1
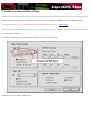
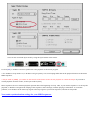
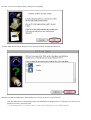
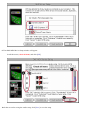
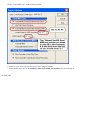
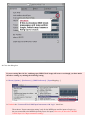
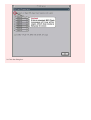
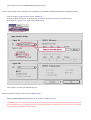
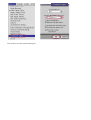
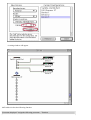
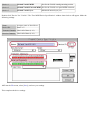
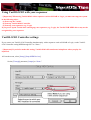
VariOS Tips
Do you want to have the VariOS play a much greater role in the music production process? Do you want to use the VariOS
with your sequencer, such as SONAR or Logic? If so, you need to read these pages, which are packed with techniques for
taking advantage of the VariOS in actual music production situations.
Since the explanations use actual screen shots, potentially complicated setting screens are made easy!
Frequently encountered problems are also described, along with the appropriate counter-measures.
And now, onward to revolutionize your music production with VariOS!
V-Producer
Here we'll discuss techniques for using the V-Producer software included with VariOS.
Synchronizing V-Producer with the five most popular sequencers NEW!!
We'll explain synchronization techniques with SONAR, Logic, ProTools, Cubase, and
Digital Performer. At all steps, we'll provide easy-to-understand screen shots.
MIDI drivers
Here we discuss MIDI driver settings for using the VariOS with your computer.
MacOS 9: Check your OMS settings NEW!!
Full explanations of using the VariOS with MIDI interfaces such as the MOTU MIDI express
or AMT8.
MacOS 9: Check your FreeMIDI settings NEW!!
A must-see for Digital Performer users! Complete discussion of settings for FreeMIDI!
Trial applications (VariOS-8/VariOS303)
This section discusses techniques for using the VariOS's trial applications; VariOS-8 and VariOS 303.
MacOS 9: Caution when switching the VariOS between VariOS-8/VariOS 303/VariPhrase modes
NEW!!
When you turn the power of the VariOS on/off to switch the VariOS program, MIDI
communication between the VariOS and your application may fail. If this occurs, the problem
usually lies with OMS.
MIDI settings when using VariOS-8/303 with your sequencer NEW!!
Settings when using VariOS-8/303 with a sequencer such as SONAR or Logic. Prevent
doubled notes!
Synchronizing VariOS303 to the tempo of your sequencer (coming soon)
A thorough discussion of synchronizing the VariOS 303 step sequencer to your sequencer
software such as SONAR or Logic!
Synchronizing VariOS-8 to the tempo of your sequencer (coming soon)
Everything you need to know about synchronizing the VariOS-8 arpeggiator to your sequencer
software!
Recording VariOS-8/303 controller knob movements in your sequencer (coming soon)
This provides a full explanation of how to record VariOS-8/303 controller knob movements in
your sequencer (e.g., SONAR or Logic).
Controlling VariOS-8/303 from your MIDI controller (coming soon)
This provides tips for controlling VariOS-8/303 from your MIDI controller (we'll use the
Edirol PCR series as an example).
Synchronizing V-Producer with the five most popular synthesizers
V-Producer can use MIDI Clock or MTC (MIDI Time Code) to synchronize with a variety of other software.
If you want to synchronize V-Producer to a MIDI sequencer (SONAR,
ProTools, Logic, Cubase, Digital, Performer, etc.) installed in the same
computer, using MIDI Clock for synchronization is the simplest, so it is the
recommended method. When synchronizing with MIDI Clock, V-Producer
will play according to the tempo of the master sequencer program.
If you want to synchronize with a MIDI sequencer that is running on the
same computer, select the MIDI device as “Roland VariOS Sync” (the
dedicated synchronization port for the VariOS).
Here we will describe settings for some typical MIDI sequencers.
●
V-Producer synchronization settings (slave)
From "Roland VariOS Sync," make settings so that MIDI Clock will be received.
●
Synchronization settings for your sequencer software (Master)
Set "Roland VariOS Sync" so that MIDI Clock will be transmitted.
❍ SONAR
❍ Logic Audio
❍ ProTools
❍ Cubase VST
❍ Digital Performer
V-Producer synchronization settings
Make the following settings so that V-Producer will operate (as a slave) according to the MIDI clock of your MIDI sequencer.
* If you are using Mac OS 9.x, you should first check the OMS settings as described in "OMS settings."
1. Choose Option - MIDI Sync.
2. In the Sync Mode dialog box, select "Roland VariOS Sync" for "IN" under Sync IN.
3. Set the Type of sync field to “MIDI Clock.”
* You can also switch the Sync mode by using the Sync buttons in the locator.
4. Click [OK]. V-Producer will now synchronize to the playback of the master program.
* If V-Producer's loop mode is on, V-Producer will give priority to its own looping rather than to the playback location of the master
MIDI sequencer.
* If Sync mode is [MIDI], you cannot use the controls of the locator section to start playback or control the tempo. If you want to
control playback from the locator, set the Sync mode to [INT].
Most sequencers do not re-transmit playback position data at the beginning of a loop. Thus, if your master sequencer is set to loop the
playback, V-Producer will ignore the looping of the sequencer, and will simply continue playing as it had been. To avoid this
problem, set V-Producer to the same loop region as the loop region in your master sequencer, and turn on loop mode.
Next, make synchronization settings for your MIDI sequencer.
OMS settings for using the VariOS with Mac OS 9.x
If you will be using the VariOS on Mac OS 9.x with a MIDI interface such as AMT8 or MIDI EXPRESS, make OMS settings as
follows.
* Most problems that occur when using the VariOS on Mac OS 9.x are due to incorrect OMS settings. Please re-create your
OMS settings once again.
The VariOS does not work correctly
Your MIDI interface (e.g., AMT8 or MIDI EXPRESS) has stopped working
Your software such as Logic or Pro Tools has stop working correctly
You can't use V-Producer simultaneously with software such as Logic or Pro Tools
1. Install OMS. (If you have already installed OMS, proceed to step 2.)
On the VariOS CD-ROM, navigate to the English - (for OS 9 )- Driver - OMS2.3.8 folder, and double-click
"Install OMS 2.3.8." to perform the installation.
* In this step you should install the OMS driver for the MIDI interface you are using (e.g., AMT8 or
MIDI EXPRESS). For details, refer to the owner's manual of your MIDI interface.
2. Install the VariOS OMS driver.
On the VariOS CD-ROM, navigate to the English - (for OS 9 )- Driver -VariOS OMS Driver-E folder, and
double-click "VariOS OMS Driver-E Installer" to perform the installation.
3. Connect all your MIDI equipment (including the VariOS) to your Mac, and turn on the power.
4. Double-click OMS Setup.
Within the location (hard disk) to which you installed OMS, go to the Opcode - OMS Applications folder, and
double-click OMS Setup.
5. Select the File menu and click “New Studio Setup.”
6. In the “Create a New Studio Setup” dialog box, click [OK].
7. In the OMS Driver Search dialog box, click [Search] without checking the check box.
8. Make sure that the OMS Driver Setup dialog box correctly indicates VariOS USB IF.
Only the MIDI devices connected directly to the Macintosh are displayed here. Verify that your device(s) are
displayed correctly, and click [OK].
* As an example here, we will show how to connect the "MIDI Express XT" MIDI interface.
9. The OMS MIDI Device Setup window will appear
Scroll the screen, check all items, and click [OK].
10. In the screen for saving the studio setup, click [Save] to save the setup.
11. Assign the following names to each port of the VariOS.
Port name displayed
Assign the following port name
Function
Port1
Roland VariOS MIDI
Port for the VariOS sound module section
Port2
Roland VariOS External MIDI
Port for the VariOS rear panel MIDI connector
DX7 II
Roland VariOS Sync
Macintosh internal synchronization (sync) port
12. [Important] Enable "Use MIDI in the background."
From the Edit menu, choose OMS MIDI Setup. In the dialog box that appears, check [Use MIDI in the
background], and click [OK].
* Unless you make these settings, you will not be able to use V-Producer simultaneously with software
such as Logic and Pro Tools.
13. From the File menu, choose Make Current.
If you are unable to select Make Current, it has already been applied, and you may continue to the next step.
14. From the File menu choose Quit to exit OMS Setup.
A dialog box will suggest that you save, so click [Save]. Basic settings for OMS are now completed.
SONAR synchronization settings
First make synchronization settings for V-Producer.
* The explanation in this document uses SONAR 2.0. Please be aware that some screens and menu names may differ in other
versions.
* Depending on the MIDI interface you are using, you may be unable to hear the sound from the VariOS if you first start
SONAR 2.0 and then start V-Producer. If this occurs, start V-Producer first, and then start SONAR 2.0.
1. Choose Options - MIDI Devices.
2. In the MIDI Device dialog box, choose “Roland VariOS Sync” in the Output Devices field.
At this time, make a note of the port number for Roland VariOS Sync.
The top MIDI device that is selected in the list of output devices is assigned to MIDI output port 1, and the
next MIDI device is assigned to MIDI output port 2, and so on.
3. Click [OK].
4. Choose Options - Project.
5. In the Project Options dialog box, click the [MIDI Out] tab.
Set the “Send MIDI Sync” fields as shown below.
* Set the “Locate Delay for SPP Recipient” in the range of 30Ð40.
* Set the MIDI output port to the Roland VariOS Sync MIDI port number you noted in step 2.
6. Click [OK].
Logic synchronization settings
First make synchronization settings for V-Producer.
* If you are using Mac OS 9.x, you should first check the OMS settings as described in "OMS settings."
* The explanation in this document is for Logic Audio 6.0. Please be aware that differences in the software version may
mean that the windows or menu items may be slightly different.
* [Important] If you are using Mac OS 9.x, check "Use OMS if available" in [Options] - [Preferences] - [MIDI Interface
Communication...].
1. Choose [Options] - [Song Settings] - [Synchronization Settings...].
* On the Mac OS X version, this will be [File] - [Song Settings] - [Synchronization Settings...].
2. Click the [MIDI]tab.
Check the “Transmit MIDI Clock” option, and choose “Roland VariOS Sync” as the output destination.
Uncheck “Allow Song Position Pointer while playing.”
3. Click the [General] tab, and uncheck “Auto enable external Sync.”
* [NOTE] MIDI Clock loop happened inside Logic may freeze the programs if you do not make this
setting.
4. Close the dialog box.
If you are using Mac OS 9.x, and hang-ups (MIDI Clock loops) still occur even though you have made
the above setting, try making the following setting.
1. Choose [Options] - [Preferences] - [OMS Preferences] - [Input Mapping...].
2. Uncheck the “Connect all Real OMS Input Instruments with Logic” check box.
Then choose "Input connection setting" only for the MIDI port used for input to Logic (e.g.,
the port connected to the MIDI keyboard you use for input). However, do not select "Roland
VariOS Sync" for "Input connection setting."
3. Close the dialog box.
ProTools synchronization settings
First make synchronization settings for V-Producer.
* If you are using Mac OS 9.x, you should first check the OMS settings as described in "OMS settings."
* The explanation in this document uses Pro Tools LE 5.0.1 for MacOS. Please be aware that some screens and menu
names may differ in other versions.
* [NOTE]If you are running ProTools and V-Producer on the same computer and synchronizing them, you must
first start up ProTools and then V-Producer. If an application that uses OMS (such as V-Producer) is already
running, ProTools may fail to start up.
1. Choose MIDI - MIDI Beat clock.
2. Check the “Enable MIDI Beat Clock” and “Roland VariOS Sync” check boxes.
3. Click [OK].
Cubase VST synchronization settings
First make synchronization settings for V-Producer.
* If you are using Mac OS 9.x, you should first check the OMS settings as described in "OMS settings."
* The explanation in this document uses Cubase VST 5.0 for MacOS. Please be aware that some screens and menu names
may differ in other versions.
* [Important] If you are using Mac OS 9.x, make settings so that Cubase will use OMS.
Go to Options - MIDI Setup - System, and change the OMS Compatibility setting from “No OMS” to “IN & OUT.” Then
re-start Cubase.
1. Choose Options - Synchronization.
2. In the Sync Out area of the Synchronization dialog box, select “Roland VariOS Sync” for the MIDI Clock field, and turn
it “On” as shown below.
3. Click [OK].
Digital Performer synchronization settings
* The explanation in this document uses Digital Performer 3.0. Please be aware that some screens and menu names may differ in
other versions.
FreeMIDI settings
1. First, make Free MIDI settings.
V-Producer synchronization settings
2. Select FreeMIDI as the MIDI driver that V-Producer will use.
From V-Producer' [Option] menu, choose “MIDI Settings...”
In the FreeMIDI MIDI Settings dialog box, set MIDI Driver to “FreeMIDI Driver.”
Click [OK] to close the FreeMIDI MIDI Settings dialog box.
3. Next, make settings so that V-Producer will synchronize to the MIDI clock data transmitted from Digital Performer.
From V-Producer' [Option] menu, choose “MIDI Sync...”
In the Sync Mode dialog box, set the Sync IN “IN” field to “Roland VariOS Sync” as shown below.
In the Sync IN “Type of sync” field, select “MIDI Clock.”
Click [OK] to close the Sync Mode dialog box.
4. From V-Producer' [Option] menu, choose “MIDI Settings...”
In the FreeMIDI MIDI Settings dialog box, uncheck the “MIDI Clock” box.
* [NOTE] Step 4 is a special setting used when you want to synchronize V-Producer and Digital Performer. If you
fail to uncheck this box, V-Producer will play at double speed when synchronized. If you want to play V-Producer
in Internal Mode, check this box once again.
Click [OK] to close the FreeMIDI MIDI Settings dialog box.
Digital Performer settings
* The explanation in this document uses Digital Performer 3.0. Please be aware that some screens and menu names may differ in
other versions.
5. From Digital Performer' [Basics] menu, choose “Transmit Sync...”
In the Transmit dialog box, set the “Transmit beat clocks via port(s)” field to “VariOS Port.”
Click [OK] to close the Transmit dialog box.
Settings for using the VariOS with FreeMIDI
You can use the VariOS with Mark of the Unicorn Corporation's FreeMIDI (*1). In order to use it, you will need to
separately obtain FreeMIDI Version 1.35 or later.
*1: FreeMIDI (Developer: Mark of the Unicorn, Inc.)
FreeMIDI is MIDI driver software that passes data between the computer and MIDI sound modules.
Installing the VariOS driver for FreeMIDI
* The VariOS driver included on the disc is provided as an additional module that allows the VariOS to be used with
FreeMIDI. In order to use it, FreeMIDI must already be installed on the startup hard disk.
1. Install the VariOS driver for FreeMIDI.
In the VariOS CD-ROM, open the folder English - (for OS 9 )- Driver - VariOS FreeMIDI Driver-E, and
double-click the "FM Driver-E Installer" icon to install the software.
FreeMIDI settings
1. Use a USB cable to connect the VariOS and your computer.
2. Turn on the power of the VariOS and all MIDI equipment connected to your Mac.
3. Open the "FreeMIDI Applications" folder, and double-click the "FreeMIDI Setup" icon.
4. Select "FreeMIDI Preferences" from the File menu.
* The first time FreeMIDI is started up, a "Welcome to FreeMIDI!" dialog box will appear. Click
[Continue].
5. In the "FreeMIDI Preferences" dialog box, check "VariOS Port" which is located below VariOS Driver in MIDI
Configuration, and click [OK]. If you have connected MIDI equipment other than the VariOS, check it as well.
* If the dialog box does not show "VariOS Driver," check whether the VariOS is connected correctly, and
start up FreeMIDI Setup once again.
6. The About Quick Setup dialog box will appear. Click [Continue].
* If the dialog will not appear, select "Quick Setup" from the "Configuration" menu.
7. In the dialog box that appears, select the MIDI devices connected to the various ports of the VariOS.
Manufacturer:
Select "Roland."
Model:
Select "Other."
Studio Location:
Select "VariOS, VariOS Port."
8. Select "1" under "Cable," and click [ >>Add>> ].
9. Select "2" under "Cable," and click [ >>Add>> ].
10. Select "3" under "Cable," and click [ >>Add>> ]. When you've completed this, click [Done].
* If, in addition to the VariOS, you have other MIDI devices connected, you should use the same
procedure to "Add" them as well.
A setting window will appear.
11. Each device has the following function.
Port name displayed Assign the following port name
Function
Device 1
Roland VariOS MIDI
Port for the VariOS sound generating section
Device 2
Roland VariOS External MIDI Port for the VariOS rear panel MIDI connector
Device 3
Roland VariOS Sync
Macintosh internal sync port
Double-click "Device" for "VariOS." The "Free MIDI Device Specification" window shown below will appear. Make the
following settings.
Name:
Assign a name as listed above.
Device ID:
Enter "17."
Transmit Channels: Check all of them (1-16).
Receive Channels: Check all of them (1-16).
12. From the File menu, select [Save], and save your settings
This completes the driver settings.
Mac OS 9: Caution when switching the VariOS between VariOS-8, VariOS
303, and VariPhrase modes
[Important] If you turn the power of the VariOS off, then on again, you must also close (and re-open) all OMS
applications.
If even one OMS application is running (such as V-Producer, VariOS-8/VariOS 303 Controller, or OMS Setup), you will
be unable to use the VariOS driver no matter how many times you have closed and restarted a given application.
Be aware that if you turn the power of the VariOS on/off while an application is running, the VariOS's MIDI port may still
be visible from the application, but it will actually be unusable.
Using VariOS-8/303 with your sequencer
* [Important] When using VariOS-8/303 with a sequencer such as SONAR or Logic, you must start up your system
in the following order:
(1) Power up the VariOS
(2) Start up VariOS-8/303 Controller
(3) Start up your sequencer (e.g., Logic)
If you power up the VariOS after starting up your sequencer (e.g., Logic), the VariOS USB MIDI driver may not be
recognized by your sequencer.
VariOS-8/303 Controller settings
If you want to use VariOS-8/303 Controller simultaneously with a sequencer such as SONAR or Logic, set the VariOS8/303 Controller setting MIDI through OUT to “None.”
* [Important] If you fail to make this setting, VariOS-8/303 will sound notes in duplicate when you play the
keyboard.
1. From the menu, select [Setup]-[Setup MIDI Devices].
Set the [Through] parameter [Output] to “None.”
If you are using VariOS-8/303 Controller by itself, set the [Through] parameter [Output] to “Roland VariOS
MIDI.”