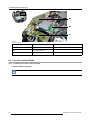
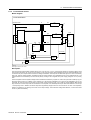
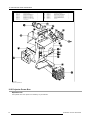
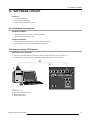
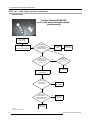
1
RLM G5
Se rv i ce Ma nua l
R9010020
IVS TECHNOLOGIES
www.ivstechnologies.com
ZI La Montjoie
1, rue des Drapiers
93210 LA PLAINE SAINT-DENIS
Tél. +33 (0)1 55 93 48 48
Fax:+33 (0)1R5976766/00
55 93 48 49
22/04/2004
Barco nv Events
Noordlaan 5, B-8520 Kuurne
Phone: +32 56.36.89.70
Fax: +32 56.36.88.24
E-mail: [email protected]
Visit us at the web: www.barco.com
Printed in Belgium
Copyright ©
All rights reserved. No part of this document may be copied, reproduced or translated. It shall not otherwise be recorded, transmitted or
stored in a retrieval system without the prior written consent of Barco.
Guarantee and Compensation
Barco provides a guarantee relating to perfect manufacturing as part of the legally stipulated terms of guarantee. On receipt, the purchaser
must immediately inspect all delivered goods for damage incurred during transport, as well as for material and manufacturing faults Barco
must be informed immediately in writing of any complaints.
The period of guarantee begins on the date of transfer of risks, in the case of special systems and software on the date of commissioning,
at latest 30 days after the transfer of risks. In the event of justified notice of compliant, Barco can repair the fault or provide a replacement
at its own discretion within an appropriate period. If this measure proves to be impossible or unsuccessful, the purchaser can demand a
reduction in the purchase price or cancellation of the contract. All other claims, in particular those relating to compensation for direct or
indirect damage, and also damage attributed to the operation of software as well as to other services provided by Barco, being a component
of the system or independent service, will be deemed invalid provided the damage is not proven to be attributed to the absence of properties
guaranteed in writing or due to the intent or gross negligence or part of Barco.
If the purchaser or a third party carries out modifications or repairs on goods delivered by Barco, or if the goods are handled incorrectly,
in particular if the systems are commissioned operated incorrectly or if, after the transfer of risks, the goods are subject to influences not
agreed upon in the contract, all guarantee claims of the purchaser will be rendered invalid. Not included in the guarantee coverage are
system failures which are attributed to programs or special electronic circuitry provided by the purchaser, e.g. interfaces. Normal wear as
well as normal maintenance are not subject to the guarantee provided by Barco either.
The environmental conditions as well as the servicing and maintenance regulations specified in the this manual must be complied with by
the customer.
Changes
Barco provides this manual ’as is’ without warranty of any kind, either expressed or implied, including but not limited to the implied warranties or merchantability and fitness for a particular purpose. Barco may make improvements and/or changes to the product(s) and/or the
program(s) described in this publication at any time without notice.
This publication could contain technical inaccuracies or typographical errors. Changes are periodically made to the information in this
publication; these changes are incorporated in new editions of this publication.
Federal Communications Commission (FCC Statement)
This equipment has been tested and found to comply with the limits for a class A digital device, pursuant to Part 15 of the FCC rules.
These limits are designed to provide reasonable protection against harmful interference when the equipment is operated in a commercial
environment. This equipment generates, uses, and can radiate radio frequency energy and, if not installed and used in accordance with
the instruction manual, may cause harmful interference to radio communications. Operation of this equipment in a residential area may
cause harmful interference, in which case the user will be responsible for correcting any interference.
Table of contents
TABLE OF CONTENTS
1. General Information. . . . . . . . . . . . . . . . . . . . . . . . . . . . . . . . . . . . . . . . . . . . . . . . . . . . . . . . . . . . . . . . . . . . . . . . . . . . . . . . . . . . . . . . . . . . . . . . . 3
1.1
RLM R5 Performer . . . . . . . . . . . . . . . . . . . . . . . . . . . . . . . . . . . . . . . . . . . . . . . . . . . . . . . . . . . . . . . . . . . . . . . . . . . . . . . . . . . . . . . . . . . . . . . . . . . . . . . . . . . . . . . . . . . . 3
2. Safety . . . . . . . . . . . . . . . . . . . . . . . . . . . . . . . . . . . . . . . . . . . . . . . . . . . . . . . . . . . . . . . . . . . . . . . . . . . . . . . . . . . . . . . . . . . . . . . . . . . . . . . . . . . . . . . . . . 5
2.1
Safety Instructions . . . . . . . . . . . . . . . . . . . . . . . . . . . . . . . . . . . . . . . . . . . . . . . . . . . . . . . . . . . . . . . . . . . . . . . . . . . . . . . . . . . . . . . . . . . . . . . . . . . . . . . . . . . . . . . . . . . . 5
3. Safety Symbols . . . . . . . . . . . . . . . . . . . . . . . . . . . . . . . . . . . . . . . . . . . . . . . . . . . . . . . . . . . . . . . . . . . . . . . . . . . . . . . . . . . . . . . . . . . . . . . . . . . . . . 9
3.1
Overview used Safety Symbols. . . . . . . . . . . . . . . . . . . . . . . . . . . . . . . . . . . . . . . . . . . . . . . . . . . . . . . . . . . . . . . . . . . . . . . . . . . . . . . . . . . . . . . . . . . . . . . . . . . . . . . 9
4. Block Diagram RLM R5 Performer . . . . . . . . . . . . . . . . . . . . . . . . . . . . . . . . . . . . . . . . . . . . . . . . . . . . . . . . . . . . . . . . . . . . . . . . . . . . . . 11
4.1
4.2
Simplified Block Diagram . . . . . . . . . . . . . . . . . . . . . . . . . . . . . . . . . . . . . . . . . . . . . . . . . . . . . . . . . . . . . . . . . . . . . . . . . . . . . . . . . . . . . . . . . . . . . . . . . . . . . . . . . . . . 11
Expanded Block Diagram . . . . . . . . . . . . . . . . . . . . . . . . . . . . . . . . . . . . . . . . . . . . . . . . . . . . . . . . . . . . . . . . . . . . . . . . . . . . . . . . . . . . . . . . . . . . . . . . . . . . . . . . . . . . 12
5. Technical Informations . . . . . . . . . . . . . . . . . . . . . . . . . . . . . . . . . . . . . . . . . . . . . . . . . . . . . . . . . . . . . . . . . . . . . . . . . . . . . . . . . . . . . . . . . . . . 13
5.1
5.2
Conventions . . . . . . . . . . . . . . . . . . . . . . . . . . . . . . . . . . . . . . . . . . . . . . . . . . . . . . . . . . . . . . . . . . . . . . . . . . . . . . . . . . . . . . . . . . . . . . . . . . . . . . . . . . . . . . . . . . . . . . . . . . 13
Connector Removal Instructions. . . . . . . . . . . . . . . . . . . . . . . . . . . . . . . . . . . . . . . . . . . . . . . . . . . . . . . . . . . . . . . . . . . . . . . . . . . . . . . . . . . . . . . . . . . . . . . . . . . . . 13
6. Spare Parts list . . . . . . . . . . . . . . . . . . . . . . . . . . . . . . . . . . . . . . . . . . . . . . . . . . . . . . . . . . . . . . . . . . . . . . . . . . . . . . . . . . . . . . . . . . . . . . . . . . . . . 15
6.1
Spare Parts list . . . . . . . . . . . . . . . . . . . . . . . . . . . . . . . . . . . . . . . . . . . . . . . . . . . . . . . . . . . . . . . . . . . . . . . . . . . . . . . . . . . . . . . . . . . . . . . . . . . . . . . . . . . . . . . . . . . . . . . 15
7. Projector Cover Removal to access Modules . . . . . . . . . . . . . . . . . . . . . . . . . . . . . . . . . . . . . . . . . . . . . . . . . . . . . . . . . . . . . . . . . 17
7.1
Top Access Modules . . . . . . . . . . . . . . . . . . . . . . . . . . . . . . . . . . . . . . . . . . . . . . . . . . . . . . . . . . . . . . . . . . . . . . . . . . . . . . . . . . . . . . . . . . . . . . . . . . . . . . . . . . . . . . . . . 17
7.1.1 Removal of the Rear cover . . . . . . . . . . . . . . . . . . . . . . . . . . . . . . . . . . . . . . . . . . . . . . . . . . . . . . . . . . . . . . . . . . . . . . . . . . . . . . . . . . . . . . . . . . . . . . . . . . . . 17
7.1.2 Removal of the Button panel cover . . . . . . . . . . . . . . . . . . . . . . . . . . . . . . . . . . . . . . . . . . . . . . . . . . . . . . . . . . . . . . . . . . . . . . . . . . . . . . . . . . . . . . . . . . . 17
7.1.3 Removal of the top cover. . . . . . . . . . . . . . . . . . . . . . . . . . . . . . . . . . . . . . . . . . . . . . . . . . . . . . . . . . . . . . . . . . . . . . . . . . . . . . . . . . . . . . . . . . . . . . . . . . . . . . 18
7.1.4 Top shield removal. . . . . . . . . . . . . . . . . . . . . . . . . . . . . . . . . . . . . . . . . . . . . . . . . . . . . . . . . . . . . . . . . . . . . . . . . . . . . . . . . . . . . . . . . . . . . . . . . . . . . . . . . . . . . 19
7.2 Side Access Modules . . . . . . . . . . . . . . . . . . . . . . . . . . . . . . . . . . . . . . . . . . . . . . . . . . . . . . . . . . . . . . . . . . . . . . . . . . . . . . . . . . . . . . . . . . . . . . . . . . . . . . . . . . . . . . . . 20
7.2.1 Side Cover left . . . . . . . . . . . . . . . . . . . . . . . . . . . . . . . . . . . . . . . . . . . . . . . . . . . . . . . . . . . . . . . . . . . . . . . . . . . . . . . . . . . . . . . . . . . . . . . . . . . . . . . . . . . . . . . . . 20
7.2.1.1 Removal of the Side cover. . . . . . . . . . . . . . . . . . . . . . . . . . . . . . . . . . . . . . . . . . . . . . . . . . . . . . . . . . . . . . . . . . . . . . . . . . . . . . . . . . . . . . . . . . . . . . 20
7.2.1.2 Side shield removal . . . . . . . . . . . . . . . . . . . . . . . . . . . . . . . . . . . . . . . . . . . . . . . . . . . . . . . . . . . . . . . . . . . . . . . . . . . . . . . . . . . . . . . . . . . . . . . . . . . . . 21
7.2.2 Side Cover Right. . . . . . . . . . . . . . . . . . . . . . . . . . . . . . . . . . . . . . . . . . . . . . . . . . . . . . . . . . . . . . . . . . . . . . . . . . . . . . . . . . . . . . . . . . . . . . . . . . . . . . . . . . . . . . . 21
7.2.2.1 Removal of the Side cover. . . . . . . . . . . . . . . . . . . . . . . . . . . . . . . . . . . . . . . . . . . . . . . . . . . . . . . . . . . . . . . . . . . . . . . . . . . . . . . . . . . . . . . . . . . . . . 21
7.2.2.2 Side Shield removal. . . . . . . . . . . . . . . . . . . . . . . . . . . . . . . . . . . . . . . . . . . . . . . . . . . . . . . . . . . . . . . . . . . . . . . . . . . . . . . . . . . . . . . . . . . . . . . . . . . . . 21
7.2.2.3 PMP Shield Removal . . . . . . . . . . . . . . . . . . . . . . . . . . . . . . . . . . . . . . . . . . . . . . . . . . . . . . . . . . . . . . . . . . . . . . . . . . . . . . . . . . . . . . . . . . . . . . . . . . . 22
8. Module/Unit Identification . . . . . . . . . . . . . . . . . . . . . . . . . . . . . . . . . . . . . . . . . . . . . . . . . . . . . . . . . . . . . . . . . . . . . . . . . . . . . . . . . . . . . . . . 23
8.1
8.2
Top View Projector . . . . . . . . . . . . . . . . . . . . . . . . . . . . . . . . . . . . . . . . . . . . . . . . . . . . . . . . . . . . . . . . . . . . . . . . . . . . . . . . . . . . . . . . . . . . . . . . . . . . . . . . . . . . . . . . . . . 23
Overview installed FANS. . . . . . . . . . . . . . . . . . . . . . . . . . . . . . . . . . . . . . . . . . . . . . . . . . . . . . . . . . . . . . . . . . . . . . . . . . . . . . . . . . . . . . . . . . . . . . . . . . . . . . . . . . . . . 24
8.2.1 Location of the Fans in the projector. . . . . . . . . . . . . . . . . . . . . . . . . . . . . . . . . . . . . . . . . . . . . . . . . . . . . . . . . . . . . . . . . . . . . . . . . . . . . . . . . . . . . . . . . . 24
8.2.2 Function of the installed Fans . . . . . . . . . . . . . . . . . . . . . . . . . . . . . . . . . . . . . . . . . . . . . . . . . . . . . . . . . . . . . . . . . . . . . . . . . . . . . . . . . . . . . . . . . . . . . . . . . 25
8.2.3 Order number for the Fans . . . . . . . . . . . . . . . . . . . . . . . . . . . . . . . . . . . . . . . . . . . . . . . . . . . . . . . . . . . . . . . . . . . . . . . . . . . . . . . . . . . . . . . . . . . . . . . . . . . . 25
8.3 Power Box Complete. . . . . . . . . . . . . . . . . . . . . . . . . . . . . . . . . . . . . . . . . . . . . . . . . . . . . . . . . . . . . . . . . . . . . . . . . . . . . . . . . . . . . . . . . . . . . . . . . . . . . . . . . . . . . . . . . 26
8.3.1 Power Box Access. . . . . . . . . . . . . . . . . . . . . . . . . . . . . . . . . . . . . . . . . . . . . . . . . . . . . . . . . . . . . . . . . . . . . . . . . . . . . . . . . . . . . . . . . . . . . . . . . . . . . . . . . . . . . 26
8.3.2 Parts of the Power Box Assembly . . . . . . . . . . . . . . . . . . . . . . . . . . . . . . . . . . . . . . . . . . . . . . . . . . . . . . . . . . . . . . . . . . . . . . . . . . . . . . . . . . . . . . . . . . . . 27
8.3.3 Power Box Swapping. . . . . . . . . . . . . . . . . . . . . . . . . . . . . . . . . . . . . . . . . . . . . . . . . . . . . . . . . . . . . . . . . . . . . . . . . . . . . . . . . . . . . . . . . . . . . . . . . . . . . . . . . . 28
8.4 Input Box Complete . . . . . . . . . . . . . . . . . . . . . . . . . . . . . . . . . . . . . . . . . . . . . . . . . . . . . . . . . . . . . . . . . . . . . . . . . . . . . . . . . . . . . . . . . . . . . . . . . . . . . . . . . . . . . . . . . . 31
8.4.1 Input Box Swapping . . . . . . . . . . . . . . . . . . . . . . . . . . . . . . . . . . . . . . . . . . . . . . . . . . . . . . . . . . . . . . . . . . . . . . . . . . . . . . . . . . . . . . . . . . . . . . . . . . . . . . . . . . . 31
8.4.2 Parts of the input Box Assembly . . . . . . . . . . . . . . . . . . . . . . . . . . . . . . . . . . . . . . . . . . . . . . . . . . . . . . . . . . . . . . . . . . . . . . . . . . . . . . . . . . . . . . . . . . . . . . 33
8.5 Lamp Box. . . . . . . . . . . . . . . . . . . . . . . . . . . . . . . . . . . . . . . . . . . . . . . . . . . . . . . . . . . . . . . . . . . . . . . . . . . . . . . . . . . . . . . . . . . . . . . . . . . . . . . . . . . . . . . . . . . . . . . . . . . . . 33
8.5.1 Lamp unit Removal . . . . . . . . . . . . . . . . . . . . . . . . . . . . . . . . . . . . . . . . . . . . . . . . . . . . . . . . . . . . . . . . . . . . . . . . . . . . . . . . . . . . . . . . . . . . . . . . . . . . . . . . . . . . 33
8.5.2 Parts of the Lamp box . . . . . . . . . . . . . . . . . . . . . . . . . . . . . . . . . . . . . . . . . . . . . . . . . . . . . . . . . . . . . . . . . . . . . . . . . . . . . . . . . . . . . . . . . . . . . . . . . . . . . . . . . 34
8.6 IR Receiver Front . . . . . . . . . . . . . . . . . . . . . . . . . . . . . . . . . . . . . . . . . . . . . . . . . . . . . . . . . . . . . . . . . . . . . . . . . . . . . . . . . . . . . . . . . . . . . . . . . . . . . . . . . . . . . . . . . . . . 35
8.6.1 IR Receiver Front swapping. . . . . . . . . . . . . . . . . . . . . . . . . . . . . . . . . . . . . . . . . . . . . . . . . . . . . . . . . . . . . . . . . . . . . . . . . . . . . . . . . . . . . . . . . . . . . . . . . . . 35
8.7 Motor/Control Board. . . . . . . . . . . . . . . . . . . . . . . . . . . . . . . . . . . . . . . . . . . . . . . . . . . . . . . . . . . . . . . . . . . . . . . . . . . . . . . . . . . . . . . . . . . . . . . . . . . . . . . . . . . . . . . . . . 35
8.7.1 Motor/Control board swapping . . . . . . . . . . . . . . . . . . . . . . . . . . . . . . . . . . . . . . . . . . . . . . . . . . . . . . . . . . . . . . . . . . . . . . . . . . . . . . . . . . . . . . . . . . . . . . . . 35
8.7.2 Motor/Control board connections . . . . . . . . . . . . . . . . . . . . . . . . . . . . . . . . . . . . . . . . . . . . . . . . . . . . . . . . . . . . . . . . . . . . . . . . . . . . . . . . . . . . . . . . . . . . . 36
8.8 Keypad & LED+IR Board . . . . . . . . . . . . . . . . . . . . . . . . . . . . . . . . . . . . . . . . . . . . . . . . . . . . . . . . . . . . . . . . . . . . . . . . . . . . . . . . . . . . . . . . . . . . . . . . . . . . . . . . . . . . 37
8.8.1 Keypad swapping. . . . . . . . . . . . . . . . . . . . . . . . . . . . . . . . . . . . . . . . . . . . . . . . . . . . . . . . . . . . . . . . . . . . . . . . . . . . . . . . . . . . . . . . . . . . . . . . . . . . . . . . . . . . . . 37
8.8.2 LED+IR Board . . . . . . . . . . . . . . . . . . . . . . . . . . . . . . . . . . . . . . . . . . . . . . . . . . . . . . . . . . . . . . . . . . . . . . . . . . . . . . . . . . . . . . . . . . . . . . . . . . . . . . . . . . . . . . . . . 37
8.9 Sealed Engine . . . . . . . . . . . . . . . . . . . . . . . . . . . . . . . . . . . . . . . . . . . . . . . . . . . . . . . . . . . . . . . . . . . . . . . . . . . . . . . . . . . . . . . . . . . . . . . . . . . . . . . . . . . . . . . . . . . . . . . . 37
8.9.1 Sealed Engine removal. . . . . . . . . . . . . . . . . . . . . . . . . . . . . . . . . . . . . . . . . . . . . . . . . . . . . . . . . . . . . . . . . . . . . . . . . . . . . . . . . . . . . . . . . . . . . . . . . . . . . . . . 38
8.9.2 Sealed Engine mounting . . . . . . . . . . . . . . . . . . . . . . . . . . . . . . . . . . . . . . . . . . . . . . . . . . . . . . . . . . . . . . . . . . . . . . . . . . . . . . . . . . . . . . . . . . . . . . . . . . . . . . 41
8.10 Lens Holder. . . . . . . . . . . . . . . . . . . . . . . . . . . . . . . . . . . . . . . . . . . . . . . . . . . . . . . . . . . . . . . . . . . . . . . . . . . . . . . . . . . . . . . . . . . . . . . . . . . . . . . . . . . . . . . . . . . . . . . . . . . 41
8.10.1 Lens Holder swapping . . . . . . . . . . . . . . . . . . . . . . . . . . . . . . . . . . . . . . . . . . . . . . . . . . . . . . . . . . . . . . . . . . . . . . . . . . . . . . . . . . . . . . . . . . . . . . . . . . . . . . . . . 41
8.11 Light Pipe . . . . . . . . . . . . . . . . . . . . . . . . . . . . . . . . . . . . . . . . . . . . . . . . . . . . . . . . . . . . . . . . . . . . . . . . . . . . . . . . . . . . . . . . . . . . . . . . . . . . . . . . . . . . . . . . . . . . . . . . . . . . . 42
8.11.1 Parts to be removed to allow Light Pipe swapping . . . . . . . . . . . . . . . . . . . . . . . . . . . . . . . . . . . . . . . . . . . . . . . . . . . . . . . . . . . . . . . . . . . . . . . . . . . 42
8.11.1.1 Light pipe Focus adjustable screw cover removal. . . . . . . . . . . . . . . . . . . . . . . . . . . . . . . . . . . . . . . . . . . . . . . . . . . . . . . . . . . . . . . . . . . . . 42
8.11.1.2 Lamp burner blower FAN 9 removal. . . . . . . . . . . . . . . . . . . . . . . . . . . . . . . . . . . . . . . . . . . . . . . . . . . . . . . . . . . . . . . . . . . . . . . . . . . . . . . . . . . . 43
8.11.1.3 Lamp House removal . . . . . . . . . . . . . . . . . . . . . . . . . . . . . . . . . . . . . . . . . . . . . . . . . . . . . . . . . . . . . . . . . . . . . . . . . . . . . . . . . . . . . . . . . . . . . . . . . . . 43
8.11.2 Replacement of the Light pipe . . . . . . . . . . . . . . . . . . . . . . . . . . . . . . . . . . . . . . . . . . . . . . . . . . . . . . . . . . . . . . . . . . . . . . . . . . . . . . . . . . . . . . . . . . . . . . . . 44
8.11.2.1 Light pipe Removal . . . . . . . . . . . . . . . . . . . . . . . . . . . . . . . . . . . . . . . . . . . . . . . . . . . . . . . . . . . . . . . . . . . . . . . . . . . . . . . . . . . . . . . . . . . . . . . . . . . . . 44
8.11.2.2 Light pipe Mounting . . . . . . . . . . . . . . . . . . . . . . . . . . . . . . . . . . . . . . . . . . . . . . . . . . . . . . . . . . . . . . . . . . . . . . . . . . . . . . . . . . . . . . . . . . . . . . . . . . . . . 44
8.12 Cold mirror. . . . . . . . . . . . . . . . . . . . . . . . . . . . . . . . . . . . . . . . . . . . . . . . . . . . . . . . . . . . . . . . . . . . . . . . . . . . . . . . . . . . . . . . . . . . . . . . . . . . . . . . . . . . . . . . . . . . . . . . . . . . 45
R5976766 RLM G5 22/04/2004
1
Table of contents
9. Technical Board Information . . . . . . . . . . . . . . . . . . . . . . . . . . . . . . . . . . . . . . . . . . . . . . . . . . . . . . . . . . . . . . . . . . . . . . . . . . . . . . . . . . . . . 47
9.1
Power Supply Circuit . . . . . . . . . . . . . . . . . . . . . . . . . . . . . . . . . . . . . . . . . . . . . . . . . . . . . . . . . . . . . . . . . . . . . . . . . . . . . . . . . . . . . . . . . . . . . . . . . . . . . . . . . . . . . . . . . 47
9.1.1 Overview Power Supply Circuit . . . . . . . . . . . . . . . . . . . . . . . . . . . . . . . . . . . . . . . . . . . . . . . . . . . . . . . . . . . . . . . . . . . . . . . . . . . . . . . . . . . . . . . . . . . . . . . 47
9.1.2 PFC (Power Factor Correction) . . . . . . . . . . . . . . . . . . . . . . . . . . . . . . . . . . . . . . . . . . . . . . . . . . . . . . . . . . . . . . . . . . . . . . . . . . . . . . . . . . . . . . . . . . . . . . . 47
9.1.3 Format Power board. . . . . . . . . . . . . . . . . . . . . . . . . . . . . . . . . . . . . . . . . . . . . . . . . . . . . . . . . . . . . . . . . . . . . . . . . . . . . . . . . . . . . . . . . . . . . . . . . . . . . . . . . . . 49
9.1.4 OEM Power Board. . . . . . . . . . . . . . . . . . . . . . . . . . . . . . . . . . . . . . . . . . . . . . . . . . . . . . . . . . . . . . . . . . . . . . . . . . . . . . . . . . . . . . . . . . . . . . . . . . . . . . . . . . . . . 51
9.1.5 StandBy Power Supply board . . . . . . . . . . . . . . . . . . . . . . . . . . . . . . . . . . . . . . . . . . . . . . . . . . . . . . . . . . . . . . . . . . . . . . . . . . . . . . . . . . . . . . . . . . . . . . . . . 52
9.1.6 MCU Board . . . . . . . . . . . . . . . . . . . . . . . . . . . . . . . . . . . . . . . . . . . . . . . . . . . . . . . . . . . . . . . . . . . . . . . . . . . . . . . . . . . . . . . . . . . . . . . . . . . . . . . . . . . . . . . . . . . . 54
9.2 Random Boards . . . . . . . . . . . . . . . . . . . . . . . . . . . . . . . . . . . . . . . . . . . . . . . . . . . . . . . . . . . . . . . . . . . . . . . . . . . . . . . . . . . . . . . . . . . . . . . . . . . . . . . . . . . . . . . . . . . . . . 55
9.2.1 Motor/Control Board . . . . . . . . . . . . . . . . . . . . . . . . . . . . . . . . . . . . . . . . . . . . . . . . . . . . . . . . . . . . . . . . . . . . . . . . . . . . . . . . . . . . . . . . . . . . . . . . . . . . . . . . . . . 55
9.2.2 Input Box Backplane. . . . . . . . . . . . . . . . . . . . . . . . . . . . . . . . . . . . . . . . . . . . . . . . . . . . . . . . . . . . . . . . . . . . . . . . . . . . . . . . . . . . . . . . . . . . . . . . . . . . . . . . . . . 56
9.2.3 Lamp Power Supply . . . . . . . . . . . . . . . . . . . . . . . . . . . . . . . . . . . . . . . . . . . . . . . . . . . . . . . . . . . . . . . . . . . . . . . . . . . . . . . . . . . . . . . . . . . . . . . . . . . . . . . . . . . 56
9.2.4 Pixel Map Processor Board . . . . . . . . . . . . . . . . . . . . . . . . . . . . . . . . . . . . . . . . . . . . . . . . . . . . . . . . . . . . . . . . . . . . . . . . . . . . . . . . . . . . . . . . . . . . . . . . . . . 57
9.2.5 Formatter Interface Board . . . . . . . . . . . . . . . . . . . . . . . . . . . . . . . . . . . . . . . . . . . . . . . . . . . . . . . . . . . . . . . . . . . . . . . . . . . . . . . . . . . . . . . . . . . . . . . . . . . . . 58
9.2.6 KeyPad. . . . . . . . . . . . . . . . . . . . . . . . . . . . . . . . . . . . . . . . . . . . . . . . . . . . . . . . . . . . . . . . . . . . . . . . . . . . . . . . . . . . . . . . . . . . . . . . . . . . . . . . . . . . . . . . . . . . . . . . . 58
9.2.7 LED + IR Board . . . . . . . . . . . . . . . . . . . . . . . . . . . . . . . . . . . . . . . . . . . . . . . . . . . . . . . . . . . . . . . . . . . . . . . . . . . . . . . . . . . . . . . . . . . . . . . . . . . . . . . . . . . . . . . . 59
10.Mechanical Parts Identification . . . . . . . . . . . . . . . . . . . . . . . . . . . . . . . . . . . . . . . . . . . . . . . . . . . . . . . . . . . . . . . . . . . . . . . . . . . . . . . . . . 61
10.1 Projector Lamp box . . . . . . . . . . . . . . . . . . . . . . . . . . . . . . . . . . . . . . . . . . . . . . . . . . . . . . . . . . . . . . . . . . . . . . . . . . . . . . . . . . . . . . . . . . . . . . . . . . . . . . . . . . . . . . . . . . 61
10.2 Projector Power Box . . . . . . . . . . . . . . . . . . . . . . . . . . . . . . . . . . . . . . . . . . . . . . . . . . . . . . . . . . . . . . . . . . . . . . . . . . . . . . . . . . . . . . . . . . . . . . . . . . . . . . . . . . . . . . . . . 62
10.3 Shutter . . . . . . . . . . . . . . . . . . . . . . . . . . . . . . . . . . . . . . . . . . . . . . . . . . . . . . . . . . . . . . . . . . . . . . . . . . . . . . . . . . . . . . . . . . . . . . . . . . . . . . . . . . . . . . . . . . . . . . . . . . . . . . . . 64
10.4 Projector Input Box . . . . . . . . . . . . . . . . . . . . . . . . . . . . . . . . . . . . . . . . . . . . . . . . . . . . . . . . . . . . . . . . . . . . . . . . . . . . . . . . . . . . . . . . . . . . . . . . . . . . . . . . . . . . . . . . . . . 64
10.5 Lens Holder. . . . . . . . . . . . . . . . . . . . . . . . . . . . . . . . . . . . . . . . . . . . . . . . . . . . . . . . . . . . . . . . . . . . . . . . . . . . . . . . . . . . . . . . . . . . . . . . . . . . . . . . . . . . . . . . . . . . . . . . . . . 66
10.6 Rigging Assembly . . . . . . . . . . . . . . . . . . . . . . . . . . . . . . . . . . . . . . . . . . . . . . . . . . . . . . . . . . . . . . . . . . . . . . . . . . . . . . . . . . . . . . . . . . . . . . . . . . . . . . . . . . . . . . . . . . . . 66
10.7 Projector Bottom Assembly . . . . . . . . . . . . . . . . . . . . . . . . . . . . . . . . . . . . . . . . . . . . . . . . . . . . . . . . . . . . . . . . . . . . . . . . . . . . . . . . . . . . . . . . . . . . . . . . . . . . . . . . . . 68
10.8 Projector Top Cover Assembly. . . . . . . . . . . . . . . . . . . . . . . . . . . . . . . . . . . . . . . . . . . . . . . . . . . . . . . . . . . . . . . . . . . . . . . . . . . . . . . . . . . . . . . . . . . . . . . . . . . . . . . 69
10.9 Projector Front Assembly . . . . . . . . . . . . . . . . . . . . . . . . . . . . . . . . . . . . . . . . . . . . . . . . . . . . . . . . . . . . . . . . . . . . . . . . . . . . . . . . . . . . . . . . . . . . . . . . . . . . . . . . . . . . 70
10.10Projector Assembly. . . . . . . . . . . . . . . . . . . . . . . . . . . . . . . . . . . . . . . . . . . . . . . . . . . . . . . . . . . . . . . . . . . . . . . . . . . . . . . . . . . . . . . . . . . . . . . . . . . . . . . . . . . . . . . . . . . 71
11.Light Pad adjustment . . . . . . . . . . . . . . . . . . . . . . . . . . . . . . . . . . . . . . . . . . . . . . . . . . . . . . . . . . . . . . . . . . . . . . . . . . . . . . . . . . . . . . . . . . . . . . 73
11.1 Lens Holder (Scheimpflug). . . . . . . . . . . . . . . . . . . . . . . . . . . . . . . . . . . . . . . . . . . . . . . . . . . . . . . . . . . . . . . . . . . . . . . . . . . . . . . . . . . . . . . . . . . . . . . . . . . . . . . . . . . 73
11.2 Illumination System . . . . . . . . . . . . . . . . . . . . . . . . . . . . . . . . . . . . . . . . . . . . . . . . . . . . . . . . . . . . . . . . . . . . . . . . . . . . . . . . . . . . . . . . . . . . . . . . . . . . . . . . . . . . . . . . . . 75
12.Projector Suspension/Stacking. . . . . . . . . . . . . . . . . . . . . . . . . . . . . . . . . . . . . . . . . . . . . . . . . . . . . . . . . . . . . . . . . . . . . . . . . . . . . . . . . . 79
12.1 Stacking Projectors. . . . . . . . . . . . . . . . . . . . . . . . . . . . . . . . . . . . . . . . . . . . . . . . . . . . . . . . . . . . . . . . . . . . . . . . . . . . . . . . . . . . . . . . . . . . . . . . . . . . . . . . . . . . . . . . . . . 79
12.2 Projector Suspension . . . . . . . . . . . . . . . . . . . . . . . . . . . . . . . . . . . . . . . . . . . . . . . . . . . . . . . . . . . . . . . . . . . . . . . . . . . . . . . . . . . . . . . . . . . . . . . . . . . . . . . . . . . . . . . . 80
13.Maintenance of the Projector . . . . . . . . . . . . . . . . . . . . . . . . . . . . . . . . . . . . . . . . . . . . . . . . . . . . . . . . . . . . . . . . . . . . . . . . . . . . . . . . . . . . 83
13.1 Air Filters . . . . . . . . . . . . . . . . . . . . . . . . . . . . . . . . . . . . . . . . . . . . . . . . . . . . . . . . . . . . . . . . . . . . . . . . . . . . . . . . . . . . . . . . . . . . . . . . . . . . . . . . . . . . . . . . . . . . . . . . . . . . . 83
13.2 Cleaning the lens . . . . . . . . . . . . . . . . . . . . . . . . . . . . . . . . . . . . . . . . . . . . . . . . . . . . . . . . . . . . . . . . . . . . . . . . . . . . . . . . . . . . . . . . . . . . . . . . . . . . . . . . . . . . . . . . . . . . . 84
14.Software Update . . . . . . . . . . . . . . . . . . . . . . . . . . . . . . . . . . . . . . . . . . . . . . . . . . . . . . . . . . . . . . . . . . . . . . . . . . . . . . . . . . . . . . . . . . . . . . . . . . . . 87
14.1 Installation requirements . . . . . . . . . . . . . . . . . . . . . . . . . . . . . . . . . . . . . . . . . . . . . . . . . . . . . . . . . . . . . . . . . . . . . . . . . . . . . . . . . . . . . . . . . . . . . . . . . . . . . . . . . . . . . 87
14.2 Interconnection PC/Projector . . . . . . . . . . . . . . . . . . . . . . . . . . . . . . . . . . . . . . . . . . . . . . . . . . . . . . . . . . . . . . . . . . . . . . . . . . . . . . . . . . . . . . . . . . . . . . . . . . . . . . . . 87
14.3 Projector Software Update Procedure. . . . . . . . . . . . . . . . . . . . . . . . . . . . . . . . . . . . . . . . . . . . . . . . . . . . . . . . . . . . . . . . . . . . . . . . . . . . . . . . . . . . . . . . . . . . . . . 88
15.Troubleshooter RLM R5 Performer. . . . . . . . . . . . . . . . . . . . . . . . . . . . . . . . . . . . . . . . . . . . . . . . . . . . . . . . . . . . . . . . . . . . . . . . . . . . . . 95
15.1 Start-up without audible relay click . . . . . . . . . . . . . . . . . . . . . . . . . . . . . . . . . . . . . . . . . . . . . . . . . . . . . . . . . . . . . . . . . . . . . . . . . . . . . . . . . . . . . . . . . . . . . . . . . . 95
15.2 Led 1, 2 and 3 light up Red continuously. . . . . . . . . . . . . . . . . . . . . . . . . . . . . . . . . . . . . . . . . . . . . . . . . . . . . . . . . . . . . . . . . . . . . . . . . . . . . . . . . . . . . . . . . . . . 96
A. Technical Specifications . . . . . . . . . . . . . . . . . . . . . . . . . . . . . . . . . . . . . . . . . . . . . . . . . . . . . . . . . . . . . . . . . . . . . . . . . . . . . . . . . . . . . . . . . . 99
A.1
RLM R5 Performer . . . . . . . . . . . . . . . . . . . . . . . . . . . . . . . . . . . . . . . . . . . . . . . . . . . . . . . . . . . . . . . . . . . . . . . . . . . . . . . . . . . . . . . . . . . . . . . . . . . . . . . . . . . . . . . . . . . 99
Index. . . . . . . . . . . . . . . . . . . . . . . . . . . . . . . . . . . . . . . . . . . . . . . . . . . . . . . . . . . . . . . . . . . . . . . . . . . . . . . . . . . . . . . . . . . . . . . . . . . . . . . . . . . . . . . . . . . . 101
2
R5976766 RLM G5 22/04/2004
1. General Information
1. GENERAL INFORMATION
1.1 RLM R5 Performer
Commercial Brochure
See next pages for contents.
Image 1-1
Front page brochure RLM G5P
R5976766 RLM G5 22/04/2004
3
1. General Information
4
R5976766 RLM G5 22/04/2004
RLM G5 Performer
With its compact design and sealed optics, the RLM G5
PERFORMER is an ideal all-round projector suitable to both the
rental as well as staging markets.
Feature-rich and ready to use, the RLM G5 PERFORMER allows
everything from seamless switching to picture-in-picture
and enables you to show up to 4 sources simultaneously
on-screen.
Add sealed optics, a dedicated lens range and compatibility
with the existing SLM Projector lenses and the RLM G5
PERFORMER becomes the ideal staging or corporate rental
projector.
www.barco.com
Ready for the Road
The RLM G5 PERFORMERs sealed optics, which makes it dust
and smoke resistant allows it to maintain optimal performance
in normal rental environments while also offering protection
in harsh staging environments where smoke machines are
frequently used.
The RLM G5 PERFORMER comes with a
dedicated rental frame which facilitates
handling, stacking and truss-mounting.
The special frame also offers protection
to the projector whilst making it easy to
handle and carry.
With the renowned SLM interlocking system, the RLM
G5 PERFORMER can be snap-locked together with another
unit, offering double brightness and redundancy, perfect for
demanding events.
The RLM G5 PERFORMER has an extensive range of mounting
points and slots to accommodate different clamps and adapt to
various truss systems and dimensions.
Advanced Image Processing
The RLM G5 PERFORMER allows seamless transitions from source to source, with special effects such as dissolve, horizontal and
vertical blind, box in and out, etc ...
Extensive PIP capabilities which offer up to 4 sources on-screen simultaneously while also allowing you to position and resize windows via an intuitive
on-screen menu.
Save and load your preferred settings at any time.
Pre-load your company logo and display it during intermission or when there
is no signal.
Optical System
Featuring a dual lamp system with auto-sensing, the RLM G5
PERFORMERÕs optical system also allows smart lamp switching in
single lamp mode to make optimum use of available lamp life.
With a full lens range accommodating any requirement, the RLM G5
PERFORMER is also compatible with the SLM high brightness lens
range by using the TLD/RLM lens adapter.
SLM lenses
¥ TLD HB (0.8)
¥ TLD HB (1.6 ¥ TLD HB (2.0 ¥ TLD HB (2.8 ¥ TLD HB (5.0 -
2.0)
2.8)
5.0)
8.O)
Throw ratio on SLM
0.8 : 1
1.6 - 2.0 : 1
2.0 - 2.8 : 1
2.8 - 5.0 : 1
5.0 - 8.0 : 1
Throw ratio on RLM
1.0 : 1
2.0 - 2.5 : 1
2.5 - 3.5 : 1
3.5 - 6.3 : 1
6.3 - 10.0 : 1
Order Information
R9842040
R9842060
R9842080
R9842100
R9842120
RLM G5 Performer specifications
¥Contrast Ratio - full field
¥Brightness Uniformity
¥Lamp
¥Lamp Lifetime (max)
¥Lamp Lifetime (typ)
¥ Noise Level (dba)
¥Max. Ambient Temp
¥Mains Voltage
¥Power Consumption
¥Weight
¥Weight Frame
FEATURES
¥Seamless Source Switching
¥ScenergiX
4000
1024 x 768 (native)
1600 x 1200 (max)
900 : 1
90%
2 x 250 W UHP
1500 Hrs
1000 Hrs
20¡ C (68¡F)
40¡ C (104¡F)
40¡ C (104¡F)
92-240 V
1000 W
25 kg (56 lbs)
5 kg (11 lbs)
¥ Dimensions
< 43
< 50
31mm (1.2Ó)
¥Digital Zoom
¥Light Shutter
¥Built-in Radio Remote Transceiver
Standard: box-in/out, etc ...
Standard horizontal and vertical
electronic edge blending
Optional
Standard
Up to 4 sources simultaneously
(2 data, 1 video and 1 SDI)
Standard
Standard
Optional
ORDER INFORMATION
¥Projector Body
¥Spare Dual Lamp (including housing)
¥TLD/RLM lens adapter
R9010020
R9841880
R9832650
¥Network Connection
¥Sealed DLP Core
¥Advanced Picture in Picture
INPUTS
¥1x Configurable 5-Wire (BNC)
¥1x Composite Video (BNC)
¥1x
¥1x
¥1x
¥1x
¥1x
¥1x
S-Video (4-pin mini-DIN)
Analog RGB (D15 connector)
SDI
DVI (Digital Visual Interface)
RS-232
XLR
251mm (9.9Ó)
¥Light Output (ANSI)**
¥Resolution
684,4mm (26.9Ó)
LENSES
RLD - Type
Order information
¥ RLD (0.8)
R9832640
¥ RLD (1.5 - 1.8)
R9832642
¥ RLD (1.8 - 2.25) R9832643
¥ RLD (2.25 - 3.0) R9832644
¥ RLD (3.0 - 4.5)
R9832645
¥ RLD (4.5 - 7.0)
R9832646
Composite Video, S-video, Component
Video, RGBHV, RGBS, RGsB
Up to 7 Composite Videos, using all
connectors on top input board
Up to 3 S-Videos when combining BNCs
With active loop-through
For 2-way communication using
rugged remote
** Optical specifications measured with RLD (4.5 - 7 : 1), on axis at 220V
Barco
Noordlaan 5, 8520 Kuurne - Belgium
Tel. +32 56 36 89 70 - Fax + 32 56 36 88 24
Ref. no. R599608 - January Ô04
Barco Projection Systems is an ISO 9001 registered company.
The information and data given are typical of the equipment described.
However any individual item is subject to change without notice.
www.events.barco.com
3240 Town Point Drive - Kennesaw, GA 30144
Tel. +1 770 218 3200
Fax +1 770 218 3250
email: [email protected]
2. Safety
2. SAFETY
2.1 Safety Instructions
WARNING:
Before Removing/Replacing any projector components, turn off the Main Power Switch and unplug the Main AC power cable.
R5976766 RLM G5 22/04/2004
5
2. Safety
Safety Instructions
1.
Before returning an instrument to the customer, always make a safety check of the entire instrument, including, but not limited
to, the following items:
a) Be sure that no built-in protective devices are defective and/or have been defeated during servicing. (1) Protective shields
are provided on this chassis to protect both the technician and the customer. Correctly replace all missing protective shields,
including any removed for servicing convenience. (2) When reinstalling the chassis and/or other assembly in the cabinet,
be sure to put back in place all protective devices, including, but not limited to, insulating materials, barriers, covers/shields,
and isolation resistor/capacitor networks. Do not operate this instrument or permit it to be operated without all protective
devices correctly installed and functioning. Servicers who defeat safety features or fail to perform safety checks may be
liable for any resulting damage.
b) Be sure that there are no cabinet openings through which an adult or child might be able to insert their fingers and contact a
hazardous voltage. Such openings include, but are not limited to, (1) excessively wide cabinet ventilation slots, and (2) an
improperly fitted and/or incorrectly secured cover panels.
c) Leakage Current Hot Check. With the instrument completely reassembled, plug the AC line cord directly into a 220 V AC
outlet (Do not use an isolation transformer during this test). Use a leakage current tester or a metering system that complies
with American National Standards Institute (ANSI) C101.0 Leakage Current for Appliances and Underwriters Laboratories
(UL) 1410, (50.7). With the instrument AC switch first in the on position and then in the off position, measure from a known
earth ground (metal waterpipe, conduit, etc.) to all exposed metal parts of the instrument (antennas, handle bracket, metal
cabinet, screwheads, metallic overlays, control shafts, etc.). especially any exposed metal parts that offer an electrical
return path to the chassis. Any current measured must not exceed 1.5 mA. Reverse the instrument power cord plug in the
outlet and repeat test. ANY MEASUREMENTS NOT WITHIN THE LIMITS SPECIFIED HEREIN INDICATE A POTENTIAL
SHOCK HAZARD THAT MUST BE ELIMINATED BEFORE RETURNING THE INSTRUMENT TO THE CUSTOMER OR
BEFORE CONNECTING ACCESSORIES.
AC Leakage Test
Leakage Current Tester
Reading should
not be above
1.5 mA
Device Under Test
+
-
Test all exposed metal surfaces
2-Wired cord
Also test with plug reversed
(Using AC Adapter plug as required)
Earth
Ground
Image 2-1
AC Leakage Test
d) Ultraviolet Radiation exposure - Warning: This lamp can cause serious skin burn and eye inflammation from shortwave
ultraviolet radiation if not operated in enclosed fixtures. DO NOT operate this lamp in a fixture with a missing or broken lens
cover.
e) Ozone: Operating lamp generates ozone gas which is harmful to the respiratory system. Therefore the lamp should be
operated in adequately ventilated equipment.
6
2.
Read and comply with all caution and safety-related notes on or inside the projector cabinet or on the projector chassis, or on
the picture tube.
3.
Design Alteration Warning - Do not alter or add to the mechanical or electrical design of this apparatus. Design alterations and
additions, including, but not limited to, circuit modifications and the addition of items such as auxiliary audio and/or video output
connections, might alter the safety characteristics of this apparatus and create a hazard to the user. Any design alterations
or additions may void the manufacturer’s warranty and may make you, the servicer responsible for personal injury or property
damage resulting therefrom.
4.
Lamp explosion Protection Warning – The lamp in this projector operates with a high internal pressure and there is a slight risk
that the lamp may explode, particularly if it is used beyond its rated life of 1000 hours. Do not remove, install, or otherwise
handle the lamp in any manner without first putting on shatterproof goggles equipped with side shields. People not so equipped
must be kept safely away while lamps are handled. Keep the lamp away from your body. For continued explosion protection,
replace the lamp only with one of the same type number. Always replace the lamp before the rated life time.
R5976766 RLM G5 22/04/2004
2. Safety
5.
Hot Chassis Warning - This projector chassis has two ground systems: the primary ground system is formed by the negative
voltage of the rectified mains (power) and is only used as a reference in primary circuits; the secondary ground system is
connected to earth ground via the earth conductor in the mains (power) lead. Separation between primary and secondary
circuits is performed by the safety isolation transformers. Components bridging this transformers are also safety components
and must never be defeated or altercated. All user-accessible conductive parts must be connected to earth ground, or are kept
at SELV (Safety Extra Low Voltage).
6.
Observe original lead dress. Always inspect in all areas for pinched, out-of-face, or frayed wiring. Do not change spacing
between components, and between components and the printed-circuit board. Check AC power cord for damage. Take extra
care to assure correct lead dress in the following areas:
a) near sharp edges
b) near thermally hot parts - be sure that leads and components do not touch thermally hot parts
c) the AC supply
d) high voltage
7.
Components, parts, and/or wiring that appear to have overheated or are otherwise damaged should be replaced with components, parts, or wiring that meet original specifications. Additionally, determine the cause of overheating and/or damage and, if
necessary, take corrective action to remove any potential safety hazard.
8.
PRODUCT SAFETY NOTICE - Many electrical and mechanical parts have special safety-related characteristics some of which
are often not evident from visual inspection, nor can the protection they give necessarily be obtained by replacing them with
components rated for higher voltage, wattage, etc. Use of a substitute replacement that does not have the same safety characteristics as the recommended replacement part in BARCO service data parts list might create shock, fire, and/or other hazards.
Product Safety is under review continuously and new instructions are issued whenever appropriate. For the latest information,
always consult the appropriate current BARCO service literature.
9.
Do not spray chemical on or near this instrument or any of its assemblies.
10. Electrostatically Sensitive (ES) Devices Some semiconductor (solid state) devices can be damaged easily by static electricity.
Such components commonly are called Electrostatically Sensitive (ES) Devices. Examples of typical ES devices are integrated
circuits and some field-effect transistors and semiconductor "chip" components. The following techniques should be used to
help reduce the incidence of component damage caused by static electricity:
a) Immediately before handling any semiconductor-equipped assembly, drain off any electrostatic charge on your body by
touching a known earth ground. Wear a commercially available high impedance discharging wrist strap device.
b) After removing an electrical assembly equipped with ES devices, place the assembly on a static dissipative surface such as
a 3M No 8210 table mat, to prevent electrostatic charge buildup or exposure of the assembly.
c) Do not use freon-propelled chemicals. These can generate electrical charges sufficient to damage ES devices.
d) Do not remove a replacement ES device from its protective package until immediately before you are ready to install it
(Most replacement ES devices are packaged with leads electrically shorted together by conductive foam, aluminium foil or
comparable conductive material).
e) Immediately before removing the protective material from the leads of a replacement ES device, touch the protective material
to the chassis or circuit assembly into which the device will be installed. CAUTION: Be sure no power is applied to the chassis
or circuit, and observe all other safety precautions.
f) Minimize bodily motions when handling unpacked replacement ES devices (Otherwise harmless motion such as the brushing together of your clothes fabric or the lifting of your foot from a carpeted floor can generate static electricity sufficient to
damage an ES device).
R5976766 RLM G5 22/04/2004
7
2. Safety
8
R5976766 RLM G5 22/04/2004
3. Safety Symbols
3. SAFETY SYMBOLS
3.1 Overview used Safety Symbols
Overview
The lightning flash and arrowhead symbol within the
equilateral triangle indicates non-insulated “dangerous
voltage” within the projector’s enclosure that may be sufficient
magnitude to constitute a risk of electric shock.
The exclamation point within the equilateral triangle
indicates related operating/maintenance instructions in the
documentation accompanying the projector.
WARNING
CAUTION
The WARNING sign denotes a hazard. It calls attention to a
procedure, practice, or the like, if not correctly performed or
adhered to, could result in personal injury. Do not proceed
beyond a WARNING sign until the indicated conditions are
fully understood and met.
The CAUTION sign denotes a hazard. It calls the attention
to an operating procedure, or the like, which, if not correctly
performed or adhered to, could result in damage to or
destruction of part or all of the product. Do not proceed
beyond a CAUTION sign until the indicated conditions are
fully understood and met.
Indicate earth (ground) terminal
or
R5976766 RLM G5 22/04/2004
9
3. Safety Symbols
10
R5976766 RLM G5 22/04/2004
SOURCE
INPUT
PIXEL MAP
PROCESSOR
FRONT-END
BOARDS
INTERFACE
FORMATTER
G
DMD
Zoom
Focus
Right/Left
Shutter
DMD
Up/Down
FORMATTER
R
OPTICAL
ENGINE
PROJECTION
LENS
DMD
FORMATTER
B
Remote
Control
IR/LED
Micro
Controller
FAN
Drivers
Lamp
Info
Formatter
Power
Standby
Power
OEM Power
LPS 1
LPS 2
Module
Control
Power Board
PFC
Mains Input
(85 - 264V AC)
EMC
Filter
Power
Switch
11
4. Block Diagram RLM R5 Performer
Module
Control
Module
Control
Dual
Lamp
Module
4. BLOCK DIAGRAM RLM R5 PERFORMER
MOTOR
DRIVER
4.1 Simplified Block Diagram
FRONT IR
RECEIVER
KEYPAD
Block diagram
Image 4-1
Block diagram RLM R5 Performer
R5976766 RLM G5 22/04/2004
Block diagram RLM G5 Performer
4. Block Diagram RLM R5 Performer
4.2 Expanded Block Diagram
Block diagram
12
R5976766 RLM G5 22/04/2004
R G B & Video Input
Pixel Map Processor
Input backplane
J401
J401
J402
J501
J402
J502
J550
1
J501
J550
1 ++5V
2 IR_Keyboard
1
3 IR_Receiver
4 Backlight 1
6
5 Backlight 2
6 GD
PIXEL MAP PROCESSOR
BOARD
J502
Keypad
Board
6
10
Sealing
To FORMAT
Power B/D
1
5
1 +5V
2 GND
3 SCL_Stdby
4 SDA_Stdby
5 RCS_IR
J600
1
J305
J505
J306
J509
CN3
J307
J901
3
GND
TxD2
TxD1
RxD2
RxD1
IRQ[4]
POWER_FAIL_I
1
3
1
1 +5V
2 GND
3 IR
J519
SDA_STDBY
SCL_STDBY
++5V
GND
GND
+15V
GND
+15V
GND
+15V
+15V
GND
GND
GND
GND
GND
+3.3V
+3.3V_SENSE-
+3.3V
+3.3V
J411
+3.3V
+3.3V
Digital Video Input
J411
LED+IR
Board
Front IR
Board
J503
+3.3V_SENSE+
J503
5
111
12
12
12
1
12
ZOOM
FOCUS
To Customer
FRONTEND
SYSTEM
To Customer
FRONTEND
SYSTEM
111 222 333
211 122
CN4
1
Formatter B/D
B_Channel
J302
1
Motor Adaptor
3~6 3~6
3~6
3~6
30
GND
GND
GND
CN100
-5V
-5V
1
+5V
+5V
+5V
+5V
GND
GND
+15V
+15V
GND
GND
1
2
2
888
777
8
3
3
7
4
4
1
OPTICAL
ENGINE
Lens Holder
GND
+15V
GND
GND
+15V
+15V
12
J2
1
1
+
+
Motor--___Focus
___Zoom
-
Lens
30
+15V
J300
1
J26
CN39
PG
/PD
1
1
2
2
GND
3
3
J505
J506
DMD
J304
Up/Down Motor
Left/Right Motor
1
+
6
-
+
-
CN4
1
30
J303
GND
GND
+5V
3
TxD2
2
TxD1
To Motor Board
J504
1
Formatter B/D
G_Channel
30
GND
CN4
12
12
12
SHUTTER
GND
J301
1
111
J1
2
9~12 9~12
9~12
9~12
DMD
2
CN33
J422
GND
+15V
GND
GND
GND
GND
+3.3V
+3.3V
+3.3V
GND
375V
RxD2
J421
1
RxD1
J421
CN34
ADAPTOR
BOARD
OEM BOARD
CN29
From PFC Board
CN59
IRQ[4]
GND
POWER_FAIL_I
GND
DMD
30
60
++5V
GND
SCL_STDBY
+3.3V
GND
SDA_STDBY
+3.3V
+3.3V_SENSE-
+3.3V
J409
SDI & IEEE11394 Input
CN35
+3.3V
+3.3V_SENSE+
J301
+3.3V
+3.3V
J412
GND
++5V
J412
To FORMAT
Power B/D
J600
1
CN3
CN32
CN36
222
111
1
NC
4
Formatter B/D
R_Channel
J422
NC
NC
NC
PG
/PD
GND
J431
J431
1
2
2
3
J26
LEFT/RIGHT
To Lens Holder
Left/Right Motor
connector
15V
Lamp_Overtemp
Sense
3
J4
1
J20
2
1
3 J25
1
5 J203
5 J213
UP/DOWN
To Customer
FRONTEND
SYSTEM
Note 1 : CN3 of Formatter Board R/G/B Channel
CN3 --- JST S12B-ZR-SM3-TF
To Lens Pressure
Sensor
2
1
CN18
From OEM Board
CN100
5V
12 11 10 9
8
7
6
J21
J10
ZOOM
To Lens Holder
Zoom connector
To R channel
NTC Sensor
5
4
3
2
1
GND
Signal board PC
J24
1
To FORMAT
Power B/D
GND
5
CN19
111 222 333 444 555
J504
GND
CN12
111 222 333 444
GND
6
12
12
12
12
2V5V-IN
5
6
GND
1
111
2V5V-IN
++5V 5
J900
1
CN3
4
UP/DOWN
To Lens Holder
Up/Down Motor
connector
GND
4
GND
J24
Motor Board
GND
3
J520
2V5V-IN
2
30
FAN DRIVERS
J10 / J11 / J12 / J13
J21 / J20 / J19 / J18
J14 / J15 / J16 / J17
MCU
BOARD
3V3VDD-IN
2
++3V3 3
GND
STANDBY
BOARD
J1
1
GND
GND
CN16
++24V 1
3V3VDD-IN
++5V
GND
5V-IN
CN15
GND
++5V
CN99
J419
++5V
LEFT/RIGHT
To Customer
FRONTEND
SYSTEM
++15V
GND
Null
PFC
Board
375V
CN55
375V
3
GND
1
12 CN23
1
12 CN24
1
PG
1
/PD
2
GND
3
CN1
1
5
1
3
1
To G channel
NTC Sensor
5
LPS 2
LPS 1
CN2
FORMAT
POWER BOARD
CN20
1
CN28
J16
1
1
2
2
CN2
CN27
GND
++5V
2
CN1
J13
1
1
To B channel
NTC Sensor
3
12 CN62
5
CN59
2
L
3
Null
4
N
5
N
to OEM Board
J58
375V
GND
To Fornmatter Board R
Channel CN3
To Fornmatter Board G
Channel CN3
To Fornmatter Board B
Channel CN3
On Off
2
Note 2 : Vender List of Motor Adj connector
FOCUS Connector :
JWT A2001-H02-2P
ZOOM Connector :
JWT A2001-H02-3P
UP/DOWN Connector :
JWT A2001-H02-4P
J1
Lamp Info
on Board
1
CN60
375V
GND
LAMP1
Solid state
temp relay
CN10
1
FOCUS
To Lens Holder
Focus connector
LEFT/RIGHT Connector : JWT A2001-H02-5P
6
CN5
1
L
J23
POWER
SWITCH
CN61
375V
GND
LAMP2
LAMP Module
RLM G5 performer
5. Technical Informations
5. TECHNICAL INFORMATIONS
5.1 Conventions
Projector Orientation
References to location (left, right, front, rear, top, bottom) on the projector are made as shown in the image below.
Image 5-1
Projector orientation convention
Spare abbreviations
Each available spare is indicated with one of the following abbreviations:
Abbreviation
Description
NR
Non repairable
CO
Consumable
FR
Factory Repairable
LR
Locally repairable
5.2 Connector Removal Instructions
When needed, remove cable straps to easily disconnect a connector, when finished always replace with new
cable straps and tie up the cables to their initial position.
WARNING:
Always respect the ES (Electrostatically Sensitive) Instructions .
Do not use any kind of tools when disconnecting a connector.
R5976766 RLM G5 22/04/2004
13
5. Technical Informations
14
R5976766 RLM G5 22/04/2004
6. Spare Parts list
6. SPARE PARTS LIST
6.1 Spare Parts list
Which spare are available for the RLM R5 Performer
The following spares can be ordered:
Art. Number
Description
Category
Page
B401045K
All dust filters at the bottom
of the projector
CO
"Air Filters", page 83
B401040K
Cold mirror (Complete
assembly)
NR
B401033K
Input module (Complete
assembly)
FR
"Input Box Swapping", page
31
B401034K
Power Box (Complete
assembly)
FR
"Power Box Swapping", page
28
B401042K
4 Fans for cooling the lamp
house
NR
"Parts of the Lamp box",
page 34
B401041K
3 Fans for cooling the Power
Bow
NR
"Parts of the Power Box
Assembly", page 27
B401043K
3 Fans for cooling the engine
(outside)
NR
"Sealed Engine", page 37
B401030K
All ’loose’ cables in one kit
NR
B400816K
IR Receiver
NR
"IR Receiver Front
swapping", page 35
B400823K
Lamp Power Supply
NR
"Lamp Power Supply", page
56
B401038K
Lens holder Asembly
NR
"Lens Holder swapping",
page 41
B401039K
Light Pipe assembly
NR
"Light pipe Removal", page
44
B401035K
Local Keypad+ IR/LED Board
NR
"Keypad & LED+IR Board",
page 37
B401044K
Mains connector+On/Off
switch
NR
B401032K
Motor Control Board
FR
"Motor/Control board
swapping", page 35
B401031K
Power boards:
FR
"Power Box Complete", page
26
PFC - MCU - Formatter OEM - Standby
B401037K
Sealed Engine
FR
"Sealed Engine", page 37
B401036K
Shutter assembly
NR
"Shutter", page 64
B400823K
lamp Power Supply
NR
"Lamp Power Supply", page
56
R9841880
lamp unit
NR
"Lamp unit Removal", page
33
R5976766 RLM G5 22/04/2004
15
6. Spare Parts list
16
R5976766 RLM G5 22/04/2004
7. Projector Cover Removal to access Modules
7. PROJECTOR COVER REMOVAL TO ACCESS
MODULES
Overview
•
Top Access Modules
•
Side Access Modules
7.1 Top Access Modules
Overview
•
7.1.1
Removal of the Rear cover
•
Removal of the Button panel cover
•
Removal of the top cover
•
Top shield removal
Removal of the Rear cover
How to remove the rear cover
1. Turn the cover lock screw (A) half a turn counterclockwise to release cover. (image 7-1)
2. While lifting up the cover bottom for removal, slightly press on the cover top side (B) to unlock .
B
A
Image 7-1
Rear cover removal
7.1.2
Removal of the Button panel cover
How to remove the button panel cover
1. Carefully release the bottom of the cover by pulling it backwards (A). (image 7-2)
2. Press the left lip (B) on top of the cover inwards (image 7-2).
3. Pull (C) the left side of the cover top upwards to release the lip (B) (image 7-2).
4. Carefully pull (D) the right side of the cover top upwards to release the matching lip (E) (image 7-2).
5. Remove the cover.
R5976766 RLM G5 22/04/2004
17
7. Projector Cover Removal to access Modules
Image 7-2
Button panel cover removal
7.1.3
Removal of the top cover
How to remove the top cover
1. Remove the screw (A) securing both plates blocking the slots for the rear cover guides. (image 7-3)
2. Pull out the respective plugs, connecting Control panel (A) and LED panel (B) to projector electronic. (image 7-4)
3. Loosen the top cover by turning the cover lock screw (A) half a turn counterclockwise. (image 7-5)
4. Lift up the top of the cover a little and move the cover backwards to slide both rear cover guides (A) out of their slot (B). (image 7-6)
5. Remove the top cover.
Image 7-3
Blocking plates removal
Image 7-4
Disconnection LED and Control panel
18
R5976766 RLM G5 22/04/2004
7. Projector Cover Removal to access Modules
Image 7-5
Unlock top cover
Image 7-6
Top cover removal
7.1.4
Top shield removal
How to remove the projector top shield
1. Remove the 11 screws (A) fastening the projector top shield. (image 7-7)
2. Carefully lift up the projector top shield a little (wire saddle clips hinder shield removal).
3. Pull out the wires out of the wire saddle clips (B) (image 7-7).
4. Remove projector top shield (image 7-7).
R5976766 RLM G5 22/04/2004
19
7. Projector Cover Removal to access Modules
A
A
B
Image 7-7
Top shield removal
7.2 Side Access Modules
7.2.1
Side Cover left
Overview
•
Removal of the Side cover
•
Side shield removal
7.2.1.1 Removal of the Side cover
How to remove the side cover
1. Remove the 4 screws (A) securing the side cover to projector base plate. (image 7-8)
2. Carefully move backwards the side cover to remove.
Image 7-8
Left side cover removal
20
R5976766 RLM G5 22/04/2004
7. Projector Cover Removal to access Modules
7.2.1.2 Side shield removal
How to remove the side shield
1. Remove the 4 screws (A) securing side shield to lamp house and Temperature/lens motor control board. (image 7-9)
2. Remove the side shield upwards (image 7-9).
Image 7-9
Side shield removal
7.2.2
Side Cover Right
Overview
•
Removal of the Side cover
•
Side Shield removal
•
PMP Shield Removal
7.2.2.1 Removal of the Side cover
How to remove the side cover
1. Remove the 4 screws (A) securing the side cover to projector base plate. (image 7-10)
2. Carefully move backwards the side cover to remove.
A
Image 7-10
Side cover removal
7.2.2.2 Side Shield removal
How to remove the side shield
1. Remove the 7 screws (A1 & A2) securing side shield (A) to Power assembly and Input assembly. (image 7-11, image 7-12)
2. Move backwards the shield (A) to remove.
R5976766 RLM G5 22/04/2004
21
7. Projector Cover Removal to access Modules
A
A1
Image 7-11
Side shield removal 1
B1
B
A
A2
Image 7-12
Side shield removal 2
7.2.2.3 PMP Shield Removal
How to remove the PMP shield
1. Remove the 6 screws (B1) securing shield (B) to base frame (image 7-12).
2. Move the shield towards the engine to remove.
22
R5976766 RLM G5 22/04/2004
8. Module/Unit Identification
8. MODULE/UNIT IDENTIFICATION
8.1 Top View Projector
Overview Modules/Units-1
After removing the projector covers and the shield on top of the projector, the following modules or units can be identified:
U1
M2
U3
U4
U2
U5
M1
U6
Image 8-1
Module/Units identification
Module (Mx) or Unit (Ux)
Description
Order Number
U1
Lens
R9832640 RLD(0.8)
R9832642 RLD(1.5-1.8)
R9832643 RLD(1.8-2.25)
R9832644 RLD(2.25-3.0)
R9832645 RLD(3.0-4.5)
R9832646 RLD(4.5-7.0)
U2
Power box complete
B401034K
U3
Lens block
B401038K
U4
Sealed Engine
B401037K
U5
Light pipe
B401039K
U6
Lamp assembly
see further
M1
SMPS control unit
(part of kit B401034K)
M2
Motor control unit
B401032K
Overview Modules/Units-2
After removing the Pixel Map Processor (PMP) cover the following modules or unit can be identified:
R5976766 RLM G5 22/04/2004
23
8. Module/Unit Identification
M3
M4
U7
Image 8-2
Modules/units identification
Module (Mx) or Unit (Ux)
Description
Order Number
M3
Pixel Map Processor
(R764284)
M4
Formatter Interface
--
U7
Input unit cpl
B401033K
8.2 Overview installed FANS
8.2.1
Location of the Fans in the projector
Location FANS in projector
The arrow on some located Fans indicates the produced air flow from the Fan.
24
R5976766 RLM G5 22/04/2004
8. Module/Unit Identification
Image 8-3
FAN location in projector
8.2.2
Function of the installed Fans
Function of the FANS
8.2.3
FAN number
Function
1–2–3
Cooling Power Modules
4
Cooling Prism
5
Cooling DMD Red
6
Cooling DMD Green
7
Cooling DMD Blue
8
Cooling Lamp
9
Cooling lamp burner up
10
Cooling lamp burner bottom
11
Exhaust fan
Order number for the Fans
How to order a Fan
The 11 installed fans are divided in 3 groups and a specific kit number is allocated to each of them.
R5976766 RLM G5 22/04/2004
25
8. Module/Unit Identification
Group
Contents
Kit number
I
Fan 1/2/3
B401041K
II
Fan 8/9/10/11
B401042K
III
Fan 5/6/7
B401043K
Fan 4 is not added to one of the above kits because the fan is mounted inside the sealed engine. In the field
there is no guarantee about the sealing after the sealed engine has been opened.
8.3 Power Box Complete
Overview
8.3.1
•
Power Box Access
•
Parts of the Power Box Assembly
•
Power Box Swapping
Power Box Access
Access to Power Boards
1. Disconnect the Fan, built-in in the power box cover, by pulling out the Fan wire plug (A) on the SMPS control board. (image 8-4)
2. Remove the 8 screws (B) securing the power box cover.
3. Lift up the cover and move backwards to remove. (image 8-5)
A
B
Image 8-4
SMPS box cover removal
26
R5976766 RLM G5 22/04/2004
8. Module/Unit Identification
Image 8-5
SMPS box cover removed (Fan not disconnected)
8.3.2
Parts of the Power Box Assembly
Which boards belong to the Power box cpl
A1
A2
A3
A4
A5
A
A6
A7
A8
Image 8-6
Parts of the power box cpl
Unit / Board
Description
Partnumber
A
Power box cpl
B401034K
A1
SMPS MCU board
Part of kit B401034K
A2
StandBy Power Supply
Part of kit B401034K
A3
OEM Power supply
Part of kit B401034K
A4
Lamp Power Supply 2
B400823K
A5
Lamp Power Supply 1
B400823K
A6
Formatter Power Supply
Part of kit B401034K
R5976766 RLM G5 22/04/2004
27
8. Module/Unit Identification
Description
Partnumber
A7
Power Factor Corrector board
Part of kit B401034K
A8
Fan
Part of kit B401041K
Unit / Board
2
1
3
Image 8-7
Overview Fans in power box
8.3.3
Unit / Board
Description
Partnumber
1-2 -3
Fan
kit B401041K (3 x FAN)
Power Box Swapping
How to swap the Power Box
1. Remove the power box cover (see "Power Box Access", page 26).
2. Loosen the formatter interface board (see "Input Box Swapping", page 31).
3. Proceed to the electrical disconnection of the power box:
-
Disconnect plug J304 on the formatter interface board. (image 8-8)
-
Disconnect plugs J301, J409 and J419 on the backplane of the input box. (image 8-9)
-
Disconnect plugs J505, J519 and J509 on the PMP board (image 8-8).
-
Disconnect the plugs J23, J24 and J62 on the formatter power board. (image 8-10)
-
Disconnect the FAN plugs on the SMPs control board. (image 8-11)
-
Disconnect the lamp power plugs as follows: (image 8-12)
o Remove the 2 screws securing bracket onto the lamp power connectors.
o Remove the bracket by tilting it fully to the right followed by pulling it upwards.
o Pull out the lamp power plugs.
4. Proceed to the mechanical disconnection of the power box:
-
Remove the 3 screws (C, D and E) securing the power box to the projector base frame. (image 8-13)
-
Loosen the 2 captive screws (A and B) securing the power box to the projector base frame (image 8-13).
5. Move the power box upwards to remove.
28
R5976766 RLM G5 22/04/2004
8. Module/Unit Identification
J304
J505
J519
J509
Image 8-8
Disconnection PMP and Formatter interface
J62
J23
J301
J409
J419
Image 8-9
Disconnection Input box
R5976766 RLM G5 22/04/2004
J24
Image 8-10
Disconnection Formatter power supply
29
8. Module/Unit Identification
J18
J19
J20
J21
J15
J16
J17
J10
J4
J900
Image 8-11
Disconnection Fans
A
A
Image 8-12
Disconnection of the lamp power supply
30
R5976766 RLM G5 22/04/2004
8. Module/Unit Identification
C
A
D
B
E
Image 8-13
Power box fixation
8.4 Input Box Complete
Overview
8.4.1
•
Input Box Swapping
•
Parts of the input Box Assembly
Input Box Swapping
Access to Input boards
1. Remove the 3 screws securing the PMP board to the input box (1) and to the formatter interface board (2&3). (image 8-14)
2. Carefully unplug, by pulling the PMP board upwards, the PMP board from the input backplane (B) and the formatter interface
board (A) (image 8-14).
3. Remove the 2 screws (3&4) securing the formatter interface board to the power box. (image 8-15)
4. Remove the 2 screws (1&2) securing the formatter interface board to the input box (image 8-15).
5. Loosen the 2 captive screw (1&2) securing the input box to projector bottom. (image 8-16)
6. Disconnect input box by pulling out the 3 respective power plugs (A,B&C).
7. Pull the input box upwards to take out the projector main frame.
R5976766 RLM G5 22/04/2004
31
8. Module/Unit Identification
B
1
A
2
B
A
3
Image 8-14
PMP removal
1
2
3
4
Image 8-15
Formatter interface
1
A
2
B
C
Image 8-16
Input box removal
32
R5976766 RLM G5 22/04/2004
8. Module/Unit Identification
8.4.2
Parts of the input Box Assembly
Which boards belong to the Input box cpl
A
A1
A2
A3
A4
A5
Image 8-17
Parts of the input box cpl
Unit / Board
Description
Partnumber
A
Input box cpl
B401033K
A1
Input backplane board
Part of kit B401033K
A2
RGBHV/Composite Video/S-Video input board
Part of kit B401033K
A3
DVI/Computer/RS232C/RC input board
Part of kit B401033K
A4
SDI In-/Output board
Part of kit B401033K
A5
2-Way hardwired Remote+Ehernet
Part of kit B401033K
8.5 Lamp Box
Overview
8.5.1
•
Lamp unit Removal
•
Parts of the Lamp box
Lamp unit Removal
CAUTION: Let cool down the projector before handling the lamp house to avoid burning.
How to remove the lamp unit from lamp house
1. Loosen the 2 spring screws (E) securing the fan door to the lamp house. (image 8-18)
2. Rotate (F) the fan door counterclockwise to open. (image 8-19)
3. Loosen the 2 spring screws (G) securing Lamp unit onto base plate. (image 8-20)
4. Disconnect the lamp plug (H) by pulling the lamp unit to the right.
5. Take the lamp unit out (I) the lamp house. (image 8-21)
R5976766 RLM G5 22/04/2004
33
8. Module/Unit Identification
Image 8-19
Open fan door
Image 8-18
Loosen fan door
Image 8-20
Loosen lamp unit
Image 8-21
Take out lamp unit
8.5.2
Parts of the Lamp box
Which parts belong to the lamp box?
A
B C
D
E
Image 8-22
Parts of the lamp box
34
R5976766 RLM G5 22/04/2004
8. Module/Unit Identification
Unit / Board
Description
Partnumber
A
Cooling lamp burner top
Part of kit B401042K
B
Cooling lamp burner bottom
Part of kit B401042K
C
Cooling lamp
Part of kit B401042K
D
Exhaust Fan
Part of kit B401042K
E
Lamp unit
kit R9841880
8.6 IR Receiver Front
8.6.1
IR Receiver Front swapping
How to swap the IR Receiver front
To access the IR Receiver front, the engine and the lens holder have to be removed.
1. Disconnect the IR Receiver board. (image 8-23)
2. Remove the 2 screws securing the board to front cover.
3. Remove the board.
A
1
2
Image 8-23
IR Receiver removal
8.7 Motor/Control Board
8.7.1
Motor/Control board swapping
How to remove the motor-control board
To access the motor control board, only the top cover of the projector has to be removed.
1. Remove the 2 screws (1&2) , securing the board on top and bottom. (image 8-24)
2. Slide the motor control board out the board slots (A&B) to remove (image 8-24).
3. Pull out all the plugs to allow board swapping (Order No kit: B401032K).
R5976766 RLM G5 22/04/2004
35
8. Module/Unit Identification
A
1
B
2
Image 8-24
Motor control board removal
8.7.2
Motor/Control board connections
Connections
Lens Zoom
Motor
J21
Lens Holder
Motor Up/Down
J24
Lens Focus
Motor
J23
Lens Holder
Motor Left/Right
J26
Shutter Motor
J28
Prism Switch
J20
From Formatter
Adapter
J520
J520
1 IRQ DMD
2 SDA
3 SCL
4 GND
J504
1 +15V
2 +5VD
3 GND
From OEM
Power Supply
J504
J24
1 D Rev
2 REV
3 FW
4 D Fw
NTC Sensor R
J10
J26
1 D Rev
2 REV
3 FW
4 D Fw
NTC Sensor G
J13
J20
J10/13/16
1 +5VD
2 GND
1 +5VD
2 GND
NTC Sensor B
J16
J28
1 D Rev
2 REV
3 FW
4 D Fwd
J21
J23
1 Mtr Fwd
2 +5VD
3 Cha A
4 Cha B
5 GND
6 Mtr Rev
1 Mtr Fwd
2 +5VD
3 Cha A
4 Cha B
5 GND
6 Mtr Rev
Image 8-25
Motor/Control board connections
36
R5976766 RLM G5 22/04/2004
8. Module/Unit Identification
8.8 Keypad & LED+IR Board
8.8.1
Keypad swapping
How to swap the Keypad
The keypad is mounted onto the inside of the top cover. To remove the top cover, keypad board has to be disconnected (see top
cover removal)
1. Remove the 5 screws (A), securing the keypad board to top cover. (image 8-26)
2. Remove the keypad board.
A
Image 8-26
Keypad removal
8.8.2
LED+IR Board
How to swap the LED+IR board
The LED+IR board is mounted onto the inside of the top cover. To remove the top cover, LED+IR board has to be disconnected
(see top cover removal)
1. Remove the 4 screws (A), securing theLED+IR board to top cover. (image 8-27)
2. Remove the LED+IR board.
A
Image 8-27
LED+IR board removal
8.9 Sealed Engine
Overview
•
Sealed Engine removal
•
Sealed Engine mounting
R5976766 RLM G5 22/04/2004
37
8. Module/Unit Identification
8.9.1
Sealed Engine removal
How to remove the Sealed Engine
1. Proceed to the disconnection of the following cables:
-
Disconnect the Prism switch (3) near the switch itself. (image 8-28)
-
Disconnect the 3 Cables on the formatter interface (2) connecting video data to the formatter boards in the Sealed engine
(image 8-28).
-
Disconnect the shutter cable (6) from the motor and temperature control board. (image 8-29)
-
Disconnect the 3 temp. sensor cables (4) from the motor and temp. control board.
-
Disconnect the 3 power cables (1) to the formatter boards in the Sealed engine from the formatter power supply (image 8-29).
-
Disconnect the 2 cables (5) to the DMD R & G cooling fan from the SMPS/Fan control board (image 8-29).
-
Disconnect the cable to the Prism cooling fan (5) from the SMPS/Fan control board (image 8-29).
2. Remove the cooling Fan of the DMD Blue, mounted on the sealed engine, by removing the 3 fixation screws (1 to 3). (image 8-30)
3. Remove the 3 screws, securing the sealed engine to the base frame. (image 8-31)
Note: To loosen the screw 3, a long crosshead screwdriver is required.
4. Carefully remove upwards the sealed engine out of the projector (image 8-28). image 8-32)
5. Remove the Shutter assembly from the sealed engine, for reuse on the new one, by loosening the 2 fixation screws. (image 8-33)
1
5
G
B
4
2
R
3
6
Image 8-28
Sealed engine cable disconnection overview
38
R5976766 RLM G5 22/04/2004
8. Module/Unit Identification
Formatter Power Supply
1
4
5
6
SMPs/Fan Control
Board
Motor Control
Board
Image 8-29
Sealed engine cable disconnection detail
2
1
3
Image 8-30
Removal cooling Fan DMD blue
R5976766 RLM G5 22/04/2004
39
8. Module/Unit Identification
1
1
3
2
2
Base plate
3
Image 8-31
Sealed engine removal from base plate
Image 8-32
Sealed engine removed
1
2
Image 8-33
Shutter removal
40
R5976766 RLM G5 22/04/2004
8. Module/Unit Identification
8.9.2
Sealed Engine mounting
How to mount the Sealed engine
1. Place the sealed engine on its mounting base, lining up the 2 center pins (1 & 2) on the engine front plate with the holes in the
mounting base. (image 8-34)
2. Secure the sealed engine onto the mounting base with 3 screws (A, B & C) (image 8-31).
3. Go back to the chapter ’Sealed engine removal’ to reinstall all cable connections and Fan mounting (see "Sealed Engine removal",
page 38).
A
1
2
C
1
2
B
Image 8-34
Sealing engine mount
8.10 Lens Holder
8.10.1 Lens Holder swapping
How to swap the lens holder
1. Disconnect the lens holder motor wires from the motor control board. (image 8-35)
2. Remove the 5 screws (1=long - 2 to 5 short) securing the lens holder to bottom frame. (image 8-36)
3. Move lens holder upwards to remove.
Lens Holder
Motor Up/Down
J24
Lens Zoom
Motor
J21
Lens Holder
Motor Left/Right
J26
Lens Focus
Motor
J23
Image 8-35
Lens holder motor disconnection
R5976766 RLM G5 22/04/2004
41
8. Module/Unit Identification
4
2
5
3
1
Image 8-36
Lens holder removal
8.11 Light Pipe
Overview
•
Parts to be removed to allow Light Pipe swapping
•
Replacement of the Light pipe
8.11.1 Parts to be removed to allow Light Pipe swapping
Overview
•
Light pipe Focus adjustable screw cover removal.
•
Lamp burner blower FAN 9 removal
•
Lamp House removal
8.11.1.1 Light pipe Focus adjustable screw cover removal.
How to remove the cover
1. Remove the 5 screws (A) securing the cover to the lamp house and the projector base plate. (image 8-37)
2. Remove the cover.
Image 8-37
Light pipe focus adjust screw cover
42
R5976766 RLM G5 22/04/2004
8. Module/Unit Identification
8.11.1.2 Lamp burner blower FAN 9 removal
How to remove the lamp burner blower FAN 9
1. Remove the 2 screws (A) securing the blower to the lamp house. (image 8-38)
2. Remove the blower out of the base plate.
Image 8-38
FAN 9 removal
8.11.1.3 Lamp House removal
How to remove the lamp house
1. Remove the 3 screws (A) securing left side of the lamp house to the base plate. (image 8-39)
2. Remove the 2 screws (A) securing rear side of the lamp house to the base plate (image 8-39).
3. Move the lamp house upwards to remove from projector frame (Access to rear fan on lamp house). (image 8-40)
Image 8-39
Lamp house removal
Image 8-40
Access to rear fan on lamp house
R5976766 RLM G5 22/04/2004
43
8. Module/Unit Identification
8.11.2 Replacement of the Light pipe
8.11.2.1 Light pipe Removal
How to remove the light pipe
1. Remove the 2 screws (A) securing the light pipe protection cover to base plate. (image 8-41)
2. Remove the protection cover.
3. Remove the 4 screws (A) securing the light pipe to base plate. (image 8-42)
4. Remove the light pipe.
A
Image 8-41
Light pipe protection cover removal
Image 8-42
Light pipe removal
8.11.2.2 Light pipe Mounting
How to mount the light pipe
1. Place the light pipe on the base plate, lining up the fixation holes with the holes in the base plate and reuse the 4 screws to secure
(image 8-42).
2. Put the protection cover back on its place and reuse the 2 screws to secure (image 8-41).
44
R5976766 RLM G5 22/04/2004
8. Module/Unit Identification
8.12 Cold mirror
How to replace the cold mirror
1. Remove the 2 screws securing the cold mirror bracket to projector base. (image 8-43)
2. Install the new cold mirror (Order No kit: B401040K) unit and reuse the 2 screws to secure on projector base.
3. Proceed to the adjustment of the cold mirror position (see "Light Pad adjustment", page 73).
Image 8-43
Replacement of the cold mirror
R5976766 RLM G5 22/04/2004
45
8. Module/Unit Identification
46
R5976766 RLM G5 22/04/2004
9. Technical Board Information
9. TECHNICAL BOARD INFORMATION
Overview
•
Power Supply Circuit
•
Random Boards
9.1 Power Supply Circuit
9.1.1
Overview Power Supply Circuit
Block diagram
Format
Power
Board
StandBy
Power
Board
PFC Board
EMI
Filter
AC Input
Rectifier
and
AC/DC
Boost up
converter
OEM
Power
Board
Lamp
Power 1&2
Board
2.5V
3.3V
5V
3.3V
5V
24V
-5V
3.3V
5V
15V
Power Supply to
PMP and
Input Backlane
Lamp 1
Lamp 2
Image 9-1
Block diagram Power Supply circuit
Overview
The power supply circuit consists of the Format, OEM, StandBy power board and a PFC board. As shown in the block diagram, the
system required voltage is converted from the Format, OEM, StandBy power board, and the output voltage DC380V of PFC board
is applied to the lamp power, and other power boards.
9.1.2
PFC (Power Factor Correction)
Block Diagram
PFC Board
AC Input
EMI
Filter
Boost
converter
Rectifier
Vdc Monitor
IC325/326
PFC Controller
IC321
Driver
IC322
Regulator
IC20
18V from Standby
380V DC Output
Driver
IC323
Image 9-2
Block diagram PFC
R5976766 RLM G5 22/04/2004
47
9. Technical Board Information
Description
PFC board is main for shaping the AC input line current waveform to correspond to that of the AC input line voltage, and boost input
rectified voltage to 380V DC for preregulator, it consist of EMI filter, rectifier, boost converter, dual driver, V DC monitor and PFC
controller.
Line voltage can directly input from 90V AC to 264V AC and boost to 380V DC for the output, there are differential choke L1, L3,
common choke FL2, and CX2, CX3 capacitors to form a EMI filter that can reduce noise and interference, then fed through retifier
CR1 to filter capacitor C810.
The PFC boost converter operated at average mode control and using new zero-current-zero-voltage switched (ZC-ZVS) active
snubber circuit that includes snubber inductor L802, clamp diode D802, clamp capacitor C803, C804, main switch Q801 and auxiliary
switch Q802. ZC-ZVS techniques can reduce the reverse-recovery-related losses of rectifier and also provides soft switching of main
switch (Q801) turns off with ZCS, whereas the auxiliary switch (Q802) turns on with ZVS, it is noticed that Q802 is turned on after
Q801 being turned on, and both of them are using IGBT. This application is shown to be significantly improved the conversion
efficiency especially at low line operation.
The output of the PFC controller IC321 is fed into dual driver IC322 and IC323, the same phase of output from IC322 and IC323
are together drive to main switch Q801. The signal after delayed is in series with IC322 and IC323 then fed to drive auxiliary switch
Q802. The power supply +15V for IC321 comes from standby and through regulator IC20.
IC321 provides all the function necessary for active power factor corrected preregulator, such as voltage error amplifier (pin 7 & 11),
multiplier (pins 5, 6, 7 & 8), current amplifier (pin 3, 4 & 5), oscillator (pin 12 & 14), power limit (pin 2) and OVP (pin 10, under 1.9V
DC is active), reference voltage (7.5V DC at pin 9) and pin 16 for the output.
When over current or short circuit occurs at 380V DC output, minus voltage drop accross R811 an R812 will be detected, and trigger
pin 2 of IC321 to stop PFC operation immediately. If over voltage happens at 380V DC output, voltage at pin 10 of IC321 will be
increase at the same time, IC327 is triggered, Q322 and Q357 turn on and operate as a SCR latched, so voltage at pin 10 of IC321
is clamped to ground to stop PFC operation.
IC325/326 act as protection to stop PFC operation while low line voltage is detected. It will force pin 10 below 1.9V DC voltage,
trigger IC321 to OVP and stop PFC operation immediately.
Pin assignment Connectors on Board
J2
J57
J61
J60
J59
J58
J55
J56
J57 (nc)
1 380V
2 nc
3 GND P*
J2 (nc)
1 ++15V StdBy
2 GND P*
J59
1 380V
2 nc
3 GND P*
J58
1 380V
2 nc
3 GND P*
4 ++15V StdBy
J61
1 380V
2 nc
3 GND P*
J60
1 380V
2 nc
3 GND P*
J55
1 380V
2 nc
3 GND P*
J56 (nc)
1 380V
2 nc
3 GND P*
J5
1/2 Mains (L)
3 nc
4/5 Mains (N)
J101
1 Power Switch
2 Power Switch
* Primary ground
Image 9-3
Pin assignment connectors on board
48
R5976766 RLM G5 22/04/2004
9. Technical Board Information
9.1.3
Format Power board
Block diagram
Format Power Board
DC 380V from PFC
1
+B
T2
D11
IC4
DC/DC Converter
2.5V
D81
IC7
D
3
COL
7
D82
GND
IC500
5
4
3
2
D13
F
IC6
Linear regulator
5V
9
S
D83
X
L(M)
C
>>Input
12
1
16
D14
AUX
GND
D84
OV/UV
Protec
D15
5
3.3V
Output
V
3
C53
4
GND
GND
4
4
ISO4
3
3
ISO3
5V from Standby
1
2
IC8
TL431CLP
1
2
Image 9-4
Block diagram Format power board
Description
The format power board repeats operation which turns on an off at pin 7 of IC7, and the pulse appears in secondary sides through
the converter transformer T2. At the time, the voltage of 3.3V at the secondary side is detected by IC8, the negative feedback to IC7
is carried out at photo coupler ISO3 and then the voltage is stabilized. Other outputs are determined by the turn ratio of secondary
side of T2, and the voltage rectified, smoothed through the series regulator (5V is stabilized at IC6, 2.5V is stabilized at IC4). The
voltage rectified ans smoothed by D14 and C53 at primary winding of T2 is supplied as a power supply voltage of IC7 on primary
side.
The format power board is a flyback voltage mode controlled and switched by a hybrid IC7, which has 6 pins that includes pi 5 (F) for
frequency setting (short to C is 66kHz, to S is 132kHz); pin 7 (D) for drain of MOSFET; pin 4 (S) fo source of MOSFET; pin 2 (L) for
line sense; pin 3 (X) for external current limit (on-off controls, current limiting) and pin 1 (C) 5.7Vdc for control feedback. Main control
loop comes from 3.3Vdc output that was connected to error amplifier IC3, isolated photo-coupler ISO3 and feedback to control pin
1 in the primary side. In addition, the others output also regulated by dropper and dc-to-dc converter for +5V and +2.5V separately.
IC500 is a protection IC for sensing OV and UV in the output voltage. Once abnormal voltage was detected , it will be shut down
the IC7 by ISO4 immediately.
R5976766 RLM G5 22/04/2004
49
9. Technical Board Information
Pin assignment Connectors on Board
J26 J28
D71 (Power Good)
J26
1 ++5V
2 GND
J27
J28
1 PG
2 /PD
3 GND
J62
J24
J23
J27
1 ++5V
2 GND
J23
1 +5Va
2 GND
3/4 3.3Va
5/6 GND
7 2.5Va
8 2.5Va
9 2.5Va
10/11/12 GND
J24
1 +5Va
2 GND
3/4 3.3Va
5/6 GND
7 2.5Va
8 2.5Va
9 2.5Va
10/11/12 GND
J62
1 +5Va
2 GND
3/4 3.3Va
5/6 GND
7 2.5Va
8 2.5Va
9 2.5Va
10/11/12 GND
J20
1 375V
2 NC
3 GND P*
* Primary ground
Image 9-5
Pin assignment connectors on board
50
R5976766 RLM G5 22/04/2004
9. Technical Board Information
9.1.4
OEM Power Board
Block diagram
OEM Power Board
DC 380V from PFC
1
+B
T3
D21
IC7
D22
D
5
4
3
2
3
COL
7
IC9
Linear regulator
15V
IC10
Linear regulator
5V
IC500
F
10
GND
S
9
X
L(M)
C
13
1
D24
D25
AUX
IC11
Linear regulator
-5V
>>Input
12
D26
5
3.3V
OV/UV
16
C85
Protec
Output
V
1
4
GND
GND
4
4
ISO6
3
3
ISO5
5V from Standby
1
2
IC13
TL431CLP
1
2
Image 9-6
Block diagram OEM power board
Description
The OEM power board repeats operation which turns on and off at pin 7 pf IC12, and the pulse appears in secondary sides through
the converter transformer T3. At the time, the voltage of 3.3V at the secondary side is detected by IC13, the negative feedback to
IC12 is carried out at photo coupler ISO5 and then the voltage is stabilized.
Other outputs are determined by the turn ratio of secondary side of T3, and the voltage rectified, smoothed through the series
regulators (-5V is stablized at IC11, 5V is stabilized at IC10, 15V is stabilized at IC9). The voltage rectified and smoothed by D25
and C85 at primary windings of T3 is supplied as a power supply voltage of IC12 on primary side.
R5976766 RLM G5 22/04/2004
51
9. Technical Board Information
Pin assignment Connectors on board
J39
D70 (Power Good)
J39
1 PG
2 /PD
3 GND
J36
J35
J100
J33
J34
J29
J32
J36
1-5 3.3V (3.5A)
6 3.3V sense+
7 3.3V sense 8-12 GND
J35
1 3.3V (1.5A)
2 3.3V (1.5A)
3 GND
4 GND
J100
1 +15V
2 +5V
3 GND
J34
1-2 GND
3 -5V (0.2A)
4-5 +5V (1.3A)
6 GND
7 + 15V (0.5A)
8 GND
J33
1 ++5V (1A)
2 GND
* Primary ground
J32
1 +15V (0.5A)
2/4/6/8 GND
3 +5V 0.7A
5 -5V 0.2A
7 ++5V (1A)
J29
1 375V
2 NC
3 GND P*
Image 9-7
Pin assignment connectors on board
9.1.5
StandBy Power Supply board
Block diagram
StandBy Power Board
DC 380V from PFC
3
COL
D1
T1
24V
IC7
D2
D
5
4
3
2
IC1
Linear regulator
1
+B
7
3.3V
IC500
F
GND
S
12
X
L(M)
C
>>Input
1
9
D5
D4
FB
8
GND
OV/UV
16
C16
Protec
Output
V
1
7
5V
GND
GND
4
4
3
ISO2
3
ISO1
1
2
IC3
TL431CLP
1
2
Image 9-8
Standby power supply
52
R5976766 RLM G5 22/04/2004
9. Technical Board Information
Description Standby power board
The standby power board repeats operation which turns on and off at pin 7 of IC2, and the pulse appears in secondary sides through
the converter transformer T1. At the time, the voltage of 5V at the secondary side is detected by IC3, the negative feedback to IC2 is
carried out at photo coupler ISO1, and the voltage is stabilized. Other outputs are determined by the turn ratio of secondary side of
T1, and the voltage rectified, smoothed through the series regulator (3.3V is stabilized at IC1). On the one hand the voltage rectified
and smoothed by D4 and C16 at primary winding of T1 is supplied as a power supply voltage of IC2 on primary side, and on the
other the voltage of 18V rectified and smoothed By D7 and C28 at primary winding of T1 and stabilized to 15V at IC20 is supplied
as a power supply voltage of IC321 on primary side.
The operation of IC2 is similar to that of IC7 described previously.
Over-Voltage Protection (OVP)
The output voltages of -5V, 3.3V, 5V and 15V are sensed by the pin 13, pin 12, pin 9, pin 10 of IC500 on DNA control board. When
these output voltages are more than 124% of their standard value, the over-voltage protection is created. For example, on the format
DC-DC converter the pin 1 of IC500 will be high and the pin 3 of IC500 will be low then the photo coupler ISO4 will turn off. So the
pin 3 of IC7 is open and IC7 stops to oscillate. The process of over-voltage protection on standby and OEM DC-DC converter is the
same with the OVP on format DC-DC converter. When the voltage of 2.5V exceeds 3.6V the four series diode D81, D82, D83 and
D84 will turn on, then the pin 12 of IC500 will sense the OVP, and IC7 stops to oscillate. When the voltage of 24V exceeds 42V the
zener diode D85 turns on, then the high voltage make the voltage of 3.3V create the over-voltage protection.
Short Circuit Protection
On -5V, 3.3V, 5V and 15V lines, the short circuit protection is carried out by detecting the voltage drop at pin 13, pin 12, pin 9 and pin
10 of IC500, then the under-voltage protection (UVP) is created when the output voltages are less than 80% of their standard value.
For example, on the OEM power board the pin 1 of IC500 will be high and the pin 3 of IC500 will be low, the photo coupler ISO6 will
turn off. The the pin 3 of IC12 is open and IC12 stops to oscillate. The process of under-voltage protection on standby and format
power boardis the same with the UVP on OEM power board. So that the process of short circuit protection is in the same way as
the over-voltage protection described previously, and the short circuit protection is carried out.
Pin assignment Connectors on Board
J19
D72 (Power Good)
J19
1 PG
2 NC
3 GND
J18
J15
J16
J18
1 ++5V
2 GND
J15
1 ++5V (9A)
2 GND
J16
1 ++24V (1A)
2/4/6 GND
3 ++3.3V (1A)
5 ++5V (1A)
J12
1 375V
2 NC
3 GND P*
* Primary ground
Image 9-9
Pin assignment connectors on board
R5976766 RLM G5 22/04/2004
53
9. Technical Board Information
9.1.6
MCU Board
Pin assignment Connectors on Board
J24
1 <StdBy PG
2 >StdBy_SW
3 GND
J26
1 <OEM PG
2 >OEM_SW
3 GND
J25
1 <Formatter PG
2 >Formatter_SW
3 GND
J24
J1
1 ++24V
2 GND
3 ++3.3V
4 GND
5 ++5V
6 GND
J25 J26
J14
1 <FAN3_PLUG1
2 ++FAN3
3 GND
J1
J15
1 <FAN3_PLUG2
2 ++FAN3
3 GND
J16
1 <FAN4_PLUG1
2 ++FAN4
3 GND
J17
1 <FAN4_PLUG2
2 ++FAN4
3 GND
J15 J16
J14
J17
J3
J18
J19
J213
J203
J20
J506
J21
J902
Not connected
J3
J903
J902
J901 J900 J505 J4
J901
J903
J5
J908
J5
J900
1 ++5V
2 GND
3 >SCL_0
4 >SDA_0
5 R_GND
J203
1 <Lamp1_Off
2 GND
3 ++5V
4 >SCI1
5 >UHP_RXD1
J213
1 <Lamp2_Off
2 GND
3 ++5V
4 >SCI2
5 >UHP_RXD2
J505
1 ++5V
2 >SDA_StdBy
3 >SCL_StdBy
4 reserved
5 <n-PWR_INT
6 >RXD1
7 >RXD2
8 <TXD1
9 <TXD2
10 GND
J506
1 ++5V
2 GND
3 >LampSync
4 >Lamp_enable
5 <Lamp_status
6 <Powergood_++3.3_1
J908 J10 J11 J12 J13
J4
1 Lamp_Overtemp_Sense
2 GND
J908
1 VDAC_TEC1
2 GND
J18
1 <FAN5_PLUG1
2 ++FAN5
3 GND
J19
1 <FAN5_PLUG2
2 ++FAN5
3 GND
J20
1 <FAN1_CTRL1
2 ++FAN1
3 GND
J21
1 <FAN1_CTRL2
2 ++FAN1
3 GND
J10
1 <FAN6_PLUG1
2 ++FAN6
3 GND
J11
1 <FAN6_PLUG2
2 ++FAN6
3 GND
J12
1 <FAN2_CTRL1
2 ++FAN2
3 GND
J13
1 <FAN2_CTRL2
2 ++FAN2
3 GND
Image 9-10
Pin assignment connectors on board
54
R5976766 RLM G5 22/04/2004
9. Technical Board Information
9.2 Random Boards
Overview
9.2.1
•
Motor/Control Board
•
Input Box Backplane
•
Lamp Power Supply
•
Pixel Map Processor Board
•
Formatter Interface Board
•
KeyPad
•
LED + IR Board
Motor/Control Board
Pin assignment Connectors on Board
Lens Zoom
Motor
J21
Lens Holder
Motor Up/Down
J24
Lens Focus
Motor
J23
Lens Holder
Motor Left/Right
J26
Shutter Motor
J28
Prism Switch
J20
From Formatter
Adapter
J520
J520
1 IRQ DMD
2 SDA
3 SCL
4 GND
From OEM
Power Supply
J504
J504
1 +15V
2 +5VD
3 GND
J24
1 D Rev
2 REV
3 FW
4 D Fw
NTC Sensor R
J10
J26
1 D Rev
2 REV
3 FW
4 D Fw
NTC Sensor G
J13
J20
J10/13/16
1 +5VD
2 GND
1 +5VD
2 GND
NTC Sensor B
J16
J28
1 D Rev
2 REV
3 FW
4 D Fwd
J21
J23
1 Mtr Fwd
2 +5VD
3 Cha A
4 Cha B
5 GND
6 Mtr Rev
1 Mtr Fwd
2 +5VD
3 Cha A
4 Cha B
5 GND
6 Mtr Rev
Image 9-11
Pin assignment connectors on board
R5976766 RLM G5 22/04/2004
55
9. Technical Board Information
9.2.2
Input Box Backplane
Pin assignment Connectors on Input Backplane
from OEM power supply
J301
1 3.3V (1.5A)
2 3.3V (1.5A)
3 GND
4 GND
from OEM power supply
J409
1-2 GND
3 -5V (0.2A)
4-5 +5V (1.3A)
6 GND
7 + 15V (0.5A)
8 GND
J301
from Standby power supply
J409
J419
J419
1 ++5V (9A)
2 GND
Image 9-12
Pin assignment connectors on input backplane
9.2.3
Lamp Power Supply
Pin assignment Connectors on Board
from PFC power supply
J_LPS1
1 380V
2 GND P*
from PFC power supply
J_LPS2
1 380V
2 GND P*
* Primary ground
Image 9-13
56
R5976766 RLM G5 22/04/2004
9. Technical Board Information
9.2.4
Pixel Map Processor Board
Pin assignment Connectors on Board
from OEM power supply
J509
1 +15V (0.5A)
2/4/6/8 GND
3 +5V 0.7A
5 -5V 0.2A
7 ++5V (1A)
J519
1-5 3.3V (3.5A)
6 3.3V sense+
7 3.3V sense 8-12 GND
from MCU Board
J505
1 ++5V
2 >SDA_StdBy
3 >SCL_StdBy
4 reserved
5 <n-PWR_INT
6 >RXD1
7 >RXD2
8 <TXD1
9 <TXD2
10 GND
J509
J519
J550
J550
J505 1 ++5V
2 IR_Keyboard
3 IR_Receiver
4 Backlight 1
5 Backlight 0
6 GND
Image 9-14
Pin assignment connectors on board
R5976766 RLM G5 22/04/2004
57
9. Technical Board Information
9.2.5
Formatter Interface Board
Pin assignment Connectors on Board
from MCU board
from Led-IR board
J307
1 +5V
2 GND
3 SCL_StdBy
5 SDA_StdBy
6 RCS_IR
DMD Blue
J302
DMD Green
J301
DMD Red
J300
J304
1 ++5V
2 GND
3 >LampSync
4 >Lamp_enable
5 <Lamp_status
6 <Powergood_++3.3_1
from Front IR board
J306
1 +5V
2 GND
3 IR
J307
J306
to PMP Board
J304
J303
from Motor/Control board
J303
1 IRQ_DMD
2 SDA
3 SCL
5 GND
Image 9-15
Pin assignment connectors on Formatter interface board
9.2.6
KeyPad
Pin assignment Connectors on Board
from PMP Board
J550
1 nc
2 nc
3 nc
4nc
5 ++5V
6 IR_Keyboard
7 IR_Receiver
8 Backlight R
9 Backlight G
10 GND
Image 9-16
Pin assignment connector on keypad
58
R5976766 RLM G5 22/04/2004
9. Technical Board Information
9.2.7
LED + IR Board
Pin assignment Connectors on Board
from Formatter interface
board
J307
1 +5V
2 GND
3 SCL_StdBy
5 SDA_StdBy
6 RCS_IR
Image 9-17
Pin assignment connector on LED+IR board
R5976766 RLM G5 22/04/2004
59
9. Technical Board Information
60
R5976766 RLM G5 22/04/2004
10. Mechanical Parts Identification
10. MECHANICAL PARTS IDENTIFICATION
Overview
•
Projector Lamp box
•
Projector Power Box
•
Shutter
•
Projector Input Box
•
Lens Holder
•
Rigging Assembly
•
Projector Bottom Assembly
•
Projector Top Cover Assembly
•
Projector Front Assembly
•
Projector Assembly
10.1 Projector Lamp box
Exploded view
The exploded view of the lamp box is added by way of illustration.
R5976766 RLM G5 22/04/2004
61
10. Mechanical Parts Identification
ITEM
REF.
DESCRIPTION
QUANTITY
ITEM
REF.
DESCRIPTION
QUANTITY
2633
2634
2636
2637
2638
2639
2640
2641
2642
2643
3105 280 800
3110 111 100
3250 204 000
3422 001 300
3455 033 001
3455 033 300
3455 033 401
3455 033 501
3455 033 601
3455 034 400
SCREW M M3*0.5*25 NON-H HEXI S
CASE NUT M3*0.5 S20C
MIRROR IR FILTER BOROFLOAT HEX
SPACER SUPPORT NY66 94V2
BRACKET SECC T=0.8 LBOX WALL
BRACKET SECC T=0.8 LBOX DOOR
BRACKET SECC T=0.8 LBOX SLOT
BRACKET SECC T=1.0 BALAST PLUG
BRACKET SECC T=0.8 LBOX CHANNEL
PLATE MIRROR AL
3
3
1
4
1
1
1
1
1
1
2644
2645
2646
2647
2649
2650
2708
2709
2756
3455 034 500
3455 035 002
3455 049 300
3455 049 400
3462 004 500
3620 005 811
3620 618 811
3620 822 511
3797 037 400
BRACKET MIRROR W TILT AL
PLATE SUPPORT RM LAMP AL
BARCKET AL5052 T0.8 FAN FIXER TO
BRACKET AL5052 T0.8 FAN FIXER BTM
SPRING SUS304 ID5.0 H12 MIRROR
DC FAN ASSY WFB1212M-R00 (450)
DC FAN ASS GB1206PHV1-AY-R00
DC FAN ASSY AFB0812MD-R00 (300)
LAMP ASSY
1
1
1
1
3
1
2
1
1
Image 10-1
Lamp box exploded view
10.2 Projector Power Box
Exploded view
The exploded view of the power box is added by way of illustration.
62
R5976766 RLM G5 22/04/2004
10. Mechanical Parts Identification
ITEM
REF.
DESCRIPTION
QUANTITY
52
86
87
88
89
90
91
92
93
94
95
96
97
98
99
100
3455 042 101
0990 072 300
3100 300 600
3100 310 600
3105 055 700
3109 021 700
3202 317 200
3240 195 000
3350 146 900
3371 007 901
3371 008 000
3371 008 100
3371 008 201
3371 008 300
3371 008 400
3371 008 501
CAP DOOR SECC T0.6
POWER SUPPLY 250W/200W(CTL)PU
SCREW M M3*0.5*6 PAN C S+P S20
SCREW M M3*0.5*6 PAN C S+P S20
SCREW M#4-40*14 HEX H BRASS NI
SCREW T M4*0.7* PAN CS S18C
LABEL CAUTION 50*60 POWER ASSY
BUSHING SIRUB OD8 ID4 H4.8 ORG
RIVET SNAP NYLON66 94V-2
BRACKET SECC T=0.8,PBOX FORMAT
BRACKET SECC T=0.8,P BOX POWER
BRACKET SECC T=0.8,P BOX BALLAST
BRACKET SECC T=0.8,P BOX TOP
BRACKET SECC T=0.8,P BOX OEM
BRACKET SECC T=0.8,P BOX STDBY
BRACKET SECC T=0.8,P BOX CAP
1
2
15
20
2
1
1
12
12
1
1
1
1
1
1
1
ITEM
REF.
DESCRIPTION
QUANTITY
101
102
103
104
105
106
107
108
109
110
111
169
218
281
536
735
1016
3279
3371 008 600
3371 008 701
3371 008 800
3421 137 500
3422 005 600
3455 032 901
3460 040 000
3468 107 000
3600 635 000
3610 635 000
3620 005 411
3620 822 411
3620 907 911
5600 200 169
5600 200 170
5600 200 171
5600 200 178
5600 200 179
BRACKET SECC T=0.8,P BOX AC
BRACKET SECC T=0.8,P BOX DOOR
BRACKET SECC T=0.8,P BOX BOTOM
RAIL NY66 UL 94V-2 PG CG-11A
STAND OFF NY66 94 V2
BRACKET SECC T=0.8,P BOX-BTM FI
CABLE CLIP SPTE+PVC TUBE L=60
CLIP SUS304 D1.8mm
SWITCH ASSY DXE-50
SOCKET ASSY DXE-50
DCFAN ASSY WFB1212L-R00(320)12
DC FAN ASSY AFB0812L-R00(220)
DC FAN ASSY AFB0912L-R00(250)9
FORMATTER BD ASSY
STANDBY BD ASSY
PFC BD ASSY
OEM BD ASSY
MCU BD ASSY
1
1
1
6
8
1
1
1
1
1
1
1
1
1
1
1
1
1
Image 10-2
Power supply box assembly
R5976766 RLM G5 22/04/2004
63
10. Mechanical Parts Identification
10.3 Shutter
Exploded view
B401036K
ITEM
REF.
DESCRIPTION
QUANTITY
ITEM
REF.
DESCRIPTION
QUANTITY
2574
2575
2576
2577
2578
2579
2580
3100 300 600
3105 147 700
3105 261 600
3109 013 900
3110 361 100
3455 027 900
3455 028 002
SCREW M M3*0.5*6 PAN C S+P S20
SCREW M M2.5*0.45*16 FF C S18C
SCREW M M2.5*0.45*6 PAN C S+P S20C NI
SCEW T M3*0.5*8 PAN C S S18C
WASHER SPCC OD6 ID2.7 T0.5 ZN
BRACKET PLATE SHUTTER SECC T=1
BRACKET SHUTTER AL T=0.5
3
2
2
1
1
1
1
2581
2582
2583
2584
2585
2586
2587
2588
2589
2590
3455 035 800
3455 041 700
3670 411 800
XXB360620
XXB4400011D
XXR817481
XXR817482
XXR819046
XXR819353
XXV367501
PIN CU L9.5
CONDUIT CU SHUTTER
WIRE WITH HOUSING GES602N201AM
NUT M2.5 STZN
MOTOR WITH GEAR 12V L100
BRACKET SHUTTER MOTOR T=1
LINKAGE SHUTTER T=1X
PLATE SHUTTER MOTOR T=1.5
GEAR SHUTTER
WASHER SPRING D5 STZN
1
1
1
2
1
1
1
1
1
2
Image 10-3
Exploded view of the Shutter assembly
10.4 Projector Input Box
Exploded view
The exploded view of the lamp box is added by way of illustration.
64
R5976766 RLM G5 22/04/2004
10. Mechanical Parts Identification
ITEM
REF.
DESCRIPTION
QUANTITY
ITEM
REF.
DESCRIPTION
QUANTITY
2820
2821
2822
2823
2824
2825
2826
2827
2828
2829
2830
3797 037 500
3100 000 600
3100 300 600
3109 012 100
3109 093 500
3240 971 900
3371 007 702
3455 023 900
3455 024 601
3455 046 400
3455 046 500
Input box assembly
SCREW M M3*0.5*6 FLAT C S20C ZN
SCREW M M3*0.5*6 PAN C S+P S20C ZN
SCREW T 3*1.27*6 PAN C S20C
SCREW T 2.6*0.9*8 PAN C S20C NI
SPONGE PORON L32C 40*12*6
BRACKET I/O AL5052 T1.5 161*14
FRAME SIDE SECC T=1.0F/C
FRAME I/O AL5052 T1.5 125*104
PLATE ADAPTER SECC 112.6*74.1
BRACKET SECC 135.2*20 T.6
1
4
18
3
1
1
1
1
1
1
2
2831
2832
2833
2834
2835
2836
2837
2838
2839
2840
2841
2842
3461 413 300
3461 414 900
5600 200 181
5600 200 182
5600 200 183
5600 200 184
5600 200 246
5600 200 250
XXB337229
XXR804658
XXV3125035
XXZ3495032
STAND OFF BRASS M3*0.5 L34+4
STAND OFF BRASS M3*5 L12+4
VIDEO BOARD ASSEMBLY
VGA BOARD ASSEMBLY
I/P BACKPLANE BOARD ASSEMBLY
PIXEL MAP PROCESSOR BOARD ASSY
SDI BOARD ASSEMBLY
XLR BOARD ASSEMBLY
CONNECTOR XLR PLUG
FRAME PCB FIX DPL
NUT#4-40 D-SUB
WIRE WITH HOUSING WLR L60
2
2
1
1
1
1
1
1
1
4
6
1
Image 10-4
Exploded view Input box
R5976766 RLM G5 22/04/2004
65
10. Mechanical Parts Identification
10.5 Lens Holder
Exploded view
ITEM
REF.
DESCRIPTION
1241
1242
1243
1244
1245
1246
1247
1248
1249
1250
3100 001 600
3100 300 800
3100 310 600
3105 049 100
3105 120 100
3109 013 900
3109 921 300
3110 113 700
3110 110 100
3450 000 601
SCREW M M3*0.5*16 FLAT C S20C
SCREW M M3*0.5*8 PAN C S+P S20
SCREW M M3*0.5*6 PAN C S+P S20
SCREW M M2*0.4*6 FLAT C S10C N
SCREW M M4*0.7*12 PAN C S+P S1
SCREW T M3*0.5*8 PAN C S S18C
SCREW M M3*0.5*3 HEXI S18C
NUT M3*0.5*3.9 SAE1008 HEXH+NY
NUT S17C ZN M3*0.5*2.4
LENS SUPPORT AZ91D BLK OXIDE A
QUANTITY
4
2
1
1
4
2
5
4
1
1
ITEM
REF.
DESCRIPTION
1251
1252
1253
1254
1255
1256
1257
1258
1259
1260
1261
1262
1263
3450 202 400
3455 023 400
XXB3587466
XXB358747
XXB361346
XXG181500
XXR366246
XXR814654
XXR815224
XXR817082
XXR829734
XXV3673806
XXZ3483136
PLATE TRIP XGA AL T=2.5
BARACKET LENS COVER SECC T=1.0
BEARING BALL R1 D013 W03
BUSH D08 D10 L08
SPRING D15 L32
SCREW SET M3X10
NUT D985 M6 STZN
FRAME BEARING LENS
BUSH AXLE ADJUST
FRAME SALVATOR LENS HOLDER
FRAME SALVATOR LENS HOLDER
WASHER SPRING D12
CABLE BRAID L140
QUANTITY
1
1
1
1
3
1
3
1
1
1
1
6
2
Image 10-5
Exploded view lens holder
10.6 Rigging Assembly
Parts of the Rigging assembly
The exploded view of the lamp box is added by way of illustration.
66
R5976766 RLM G5 22/04/2004
10. Mechanical Parts Identification
ITEM
REF.
DESCRIPTION
2871
2872
2873
2874
2875
2876
2877
2878
2879
XXA576078
XXB356331
XXB361710
XXB362626
XXG116090
XXG192900
XXR828347
XXR828351
XXR828352
CLIPS D8 SPTH
FOOT INSERT D9.5 BLACK RIGGING
SCREW D923 M3X10ST
NUT HEX SOCKET DOWEL M6X20
SCREW HEX SOCKET M5*8
SCREW SET M4X6
BOTTOM PLATE RIGGING ASSY
LOCKING CUP RIGGING
LOCKING RING
QUANTITY
4
4
16
8
2
4
1
4
4
ITEM
REF.
DESCRIPTION
2880
2881
2882
2883
2885
2886
2887
2888
2889
2890
XXR828353
XXR828354
XXR828355
XXR828356
XXR828362
XXR828363
XXR828842
XXV312007
XXV3623197
3461 412 900
INTERLOCKING FOOT AXIX RIGGING
LOCK ADJ RIGGING
LOOKING HOOK RIGGING
MOUNTING PLATE RIGING
HANDLE FRAME RIGGING ASSY
ROD TREADED M6 RIGGING
FRAME EXTRA STACKING RIGGING ASSY
SPRING D5.5 L9 RIGGING
SCREW 4X8 STZN
STAND OFF STELL M8
QUANTITY
4
4
4
4
2
8
1
16
12
3
Image 10-6
Rigging exploded view
R5976766 RLM G5 22/04/2004
67
10. Mechanical Parts Identification
10.7 Projector Bottom Assembly
Parts of the projector bottom assembly
ITEM
REF.
DESCRIPTION
5
7
9
18
27
28
32
33
35
39
53
1912
1916
3100 300 600
3105 094 100
3105 120 600
3371 007 600
3391 201 100
3391 201 300
3455 023 700
3455 023 800
3455 024 101
3455 026 501
3455 047 200
XXR 722 567
XXR 818 903
SCREW M M3*0.5*6 PAN C S+S20C ZN
SCREW M M8*1.25*15 ROUND C+S S20C
SCREW M M4*0.7*8 PAN C S+S10C ZN
BOTTOM AL 500mm T=3.0 PAINTING
COVER FILTER L PC+ABS 94V-0 PAINTING
94-0 PAINTI 94-0 PAINTI
PLATE FEET SECC T=5.0 BOTOM
PLATE EYE SECC T=5.0 BOTTOM
BRACKET STOP SECC T=0.7 BOTTOM
BRACKET FEET SECC T=1.0
BRACKET SECC T=1.0 SUPPORT REAR FOOT
FOOT PLASTIC D60
FRAME FOOT SALVATOR
QUANTITY
2
3
15
1
3
2
3
2
2
2
1
3
3
Image 10-7
Bottom assembly
68
R5976766 RLM G5 22/04/2004
10. Mechanical Parts Identification
10.8 Projector Top Cover Assembly
Parts of the projector top assembly
ITEM
REF.
DESCRIPTION
5
9
10
11
12
19
20
21
31
37
38
47
1914
3100 300 600
3105 120 600
3105 120 700
3106 164 300
3106 170 400
3390 003 900
3390 004 000
3390 105 000
3455 023 500
3455 024 400
3455 024 500
3455 028 500
XXR 724 409
SCREW M M3*0.5*6 PAN C S+S20C ZN
SCREW M M4*0.7*8 PAN C S+S10C ZN
SCREW M M4*0.7*10 PAN C S+S10C ZN YEL
SCREW TAPPING 0D=4*8 NI PLATED
SCREW T M 3*1.058*8 PAN C S18C ZN
IR WINDOW PC 94V-0 TRANSPARENT
LED WINDOW PC 94V-0 TRANSPARENT
TOP COVER PC+ABS 94V-5 PAINTING
BRACKET AXIAL SECC T=1.2
PLATE SPRING SUS301 T=0.5 T/C
BRACKET TOP SECC T=1.2 I/O
SPRING RETAINERS STEEL PANEX 4MM
RUBBER LOCAL KEYPAD
QUANTITY
4
1
9
6
17
1
1
1
2
2
1
2
1
Image 10-8
Top cover assembly
R5976766 RLM G5 22/04/2004
69
10. Mechanical Parts Identification
10.9 Projector Front Assembly
Parts of the front cover assembly
ITEM
REF.
DESCRIPTION
5
9
16
22
29
34
41
3100 300 600
3105 120 600
3240 973 100
3390 105 100
3395 005 200
3455 024 000
3455 026 700
SCREW M M3*0.5*6 PAN C S+P S20C ZN
SCREW M M4*0.7*8 PAN C S+P S10C ZN
RUBBER SPONGE 100SM 450*30 T10
FRONT COVER PC+ABS 94V-5 PAINTING
COVER PLUG PC+ABS 94V-0
BRACKET MIDDLE SECC T+1.0 F/C
FRAME LEFT SECC T+1.0
ITEM
REF.
DESCRIPTION
42
43
45
46
2986
1911
3455 026 800
3455 026 901
3455 028 300
3455 028 400
5600 200 161
XXR720 901
BRACKET FRONT SECC T+1.2
BRACKET RIGHT SECC T+1.2
STUDS PANEX STEE WING L10
RECPTACLES STEEL RIVET 4MM
IR BOARD ASSY
IR WINDOW REC 26
QUANTITY
2
8
1
1
3
1
1
QUANTITY
1
1
1
2
1
1
Image 10-9
Front cover exploded view
70
R5976766 RLM G5 22/04/2004
10. Mechanical Parts Identification
10.10Projector Assembly
Parts of the projector assembly
ITEM
REF.
DESCRIPTION
3
17
18
21
22
23
24
25
26
36
40
44
46
48
49
50
51
2627
3797 035 900
3240 973 200
3371 007 600
3390 105 000
3390 105 100
3390 105 200
3390 105 300
3390 105 501
3390 106 700
3455 024 300
3455 026 600
3455 028 200
3455 028 400
3455 032 501
3455 032 601
3455 032 701
3455 100 501
3797 037 300
POWER BOX
RUBBER SPONGE 100SM 241*48 T2
BOTTOM AL 500mm T=3.0 PAINTING
TOP COVER PC+ABS 94V-5 PAINTING
FRONT COVER PC+ABS 94V-5 PAINTING
LEFT COVER PC+ABS 94V-5 PAINTING
RIGHT COVER PC+ABS 94V-5 PAINTING
TOP COVER #1 PC+ABS 94V-5 PAINTING
COVER TOP #3 PC+ABS 94V-0
BRACKET WIND-2 SECC T=1.2 F/C
BRACKET S SECC T=1.0
STUDS PANEX STEEL SLOT L19
RECEPTACLES STEEL RIVET 4MM
SHIELD INPUT SPTE T0.3
SHIELD LEFT SPTE T0.3
SHIELD RIGHT SPTE T0.3
COVER FRONTEND SECC
LAMP MODULE ASSY
Image 10-10
Projector assembly exploded view
R5976766 RLM G5 22/04/2004
71
10. Mechanical Parts Identification
72
R5976766 RLM G5 22/04/2004
11. Light Pad adjustment
11. LIGHT PAD ADJUSTMENT
Overview
•
Lens Holder (Scheimpflug)
•
Illumination System
11.1 Lens Holder (Scheimpflug)
Adjustment controls on the Lens Holder
The following adjustment controls and locks are provided on the front of the lens holder:
•
A, B and C: 3 x M10 nuts for the adjustment of the lens position.
•
1, 2 and 3: 3 x M2.5 Allen head screw close to the M10 nuts, securing the respective adjustment screw.
•
4: Additional M2.5 Allen head screw, securing the entire lens holder to avoid vibrations in the picture.
1
A
2
B
3
4
C
Image 11-1
Adjustment controls on lens holder (lens removed)
Necessary tools
•
Nut driver of 8 mm and 10 mm
•
Allen key of 2.5 mm
How to adjust the lens holder
1. Put a TLD 0.8 lens (with optical adapter) or a RLD 0.8 lens into the lens holder of the projector, the latter placed at 2 m from the
screen (A lens with a fixed nominal focus position would be best, but in absence of this, you can use the TLD 0.8).
2. Ensure the projector axis is perpendicular onto the screen and the projector is leveled.
3. Looking at the screen, turn the focus barrel counterclockwise until you hit the mechanical stop.
The lens is at near focus.
4. Loosen the lens lock screws 1 to 4 (turning counterclockwise), using an Allen key of 2.5 mm and turn the screw lock nut a few
turn counterclockwise.
5. Search for the in focus picture by moving a white paper perpendicular on the projector axis (image 11-2)
In focus picture is found before the screen or not:
-
Before the screen (1): turn the nuts A, B and C equally clockwise until the picture is in focus on the screen center (3).
-
Not before the screen (2) (meaning in focus picture is located behind the screen) : turn the nuts A, B and C equally counterclockwise until the picture is in focus on the screen center (3).
R5976766 RLM G5 22/04/2004
73
11. Light Pad adjustment
6. Proceed to overall focus, using the adjustable nuts A, B and C. Added picture indicates the picture rotation around the vertical,
horizontal or diagonal axis when turning the respective nut. (image 11-3)
Tip:
The adjustment of the nuts A, B and C have an influence each other. Therefore, some iterations will be probably necessary.
7. Secure the position of the lens holder by tightening screw (4) as follows:
-
Drive in the screw until you feel mechanical resistance and
-
From this position, add a half turn.
8. Repeat step 6.
9. Secure the position of the adjustable nuts by tightening the matching screw 1, 2 and 3.
10.Finally, secure the lens lock screws by tightening the matching nut.
Image 11-2
In focus picture search
B
C
B
B
B
A
A
A
C
C
C
A
Image 11-3
Overall focus adjustment
74
R5976766 RLM G5 22/04/2004
11. Light Pad adjustment
11.2 Illumination System
Overview adjustment controls
A
B
C
D
E
Cold Mirror
Image 11-4
Overview adjustment controls
A
B
C
D
E
Rod rotation
Light spot size adjustment
Fixation screw light spot sharpness adjustment ring
Light spot sharpness adjustment
Cold mirror adjustment screws
Nominal setting of the controls
1. Ensure the projector is turned off.
2. Loosen the screw A and B. (image 11-5)
3. Rotate the screw A and B in the middle of its adjustment range.
4. Loosen screw C.
5. Rotate the ring (D), causing the rod to move horizontally, until the screw (C) is in the middle of the horizontal adjustment range.
6. Place the cold mirror in its nominal position, mirror support parallel to heat sink with 5.5 mm spacing, by adjusting the 3 screws
(E), accessible through the holes in the lamp house, with an Allen key of 1.5 mm. (image 11-6)
C
A
D
B
Image 11-5
Nominal setting of the controls
R5976766 RLM G5 22/04/2004
75
11. Light Pad adjustment
E
5.5m
m
E
Cold Mirror
Image 11-6
Nominal setting of the cold mirror
Alignment of the Illumination path
1. Turn on the projector and displays a white test pattern (See manual).
2. Adjust the folding mirror until the DMD is illuminated by the light spot symmetrically. (image 11-7)
3. Rotate the rod until dark borders are visible in the corners of the image. (image 11-8)
4. Adjust the horizontal position of the rod, by turning the ring (D), for sharp outline at the dark borders.
5. Rotate the rod back to its nominal position.
6. Adjust the light spot size lens (B) until the light spot on the DMD is slightly larger than the DMD size. (image 11-9)
7. Repeat the adjustment of the border sharpness, step 3 to 5 in this procedure.
8. Finally, secure the position of the controls by tightening and fixing with appropriate glue the respective screws (A), (B) and (C).
DMD
A
Light spot
B
DMD
Image 11-7
Folding mirror adjustment
76
R5976766 RLM G5 22/04/2004
11. Light Pad adjustment
Light spot
C
D
DMD
A
B
D
A
DMD
Image 11-8
Light spot sharpness adjustment
Light spot
C
A
D
DMD
1
B
B
DMD
2
B
DMD
3
Image 11-9
Light spot size adjustment
Alignment of the Cold mirror
1. Place a light meter at the center of the screen.
2. Adjust the 2 tilt screws (E1) and (E2), using an Allen key of 1.5 mm, for maximum light reading on the light meter. (image 11-10)
3. Search for different Z-positions of the cold mirror, turning the z-screw (E3) forwards and backwards, the maximum light reading
on the light meter.
Note: For each Z-position of the cold mirror, readjust the tilt screws for maximum light reading on the light meter.
4. When the cold mirror position with the global maximum in light output is found, fix the adjustment screws with appropriate glue.
R5976766 RLM G5 22/04/2004
77
11. Light Pad adjustment
E
1
1
3
2
3
E
Cold Mirror
2
Image 11-10
Cold mirror position alignment
78
R5976766 RLM G5 22/04/2004
12. Projector Suspension/Stacking
12. PROJECTOR SUSPENSION/STACKING
12.1 Stacking Projectors
How to stack projectors
Up to 2 projectors can be stacked on each other without using extra tools or accessories.
1. Put the second projector on the first one, matching the rigging points of the second projector with the rigging sockets of the first
projector. (image 12-1)
2. Secure the ringing points in the rigging socket as follows:
-
Press and keep the lock ring (1) in the rigging socket downwards.
-
Rotate the rigging foot a little counterclockwise until the lock pins (3) match the notches in the rigging socket.
-
Rotate the rigging foot in a way the lock pins move below the pin blocker (4) fully.
-
Loosen the lock ring (1). (image 12-2)
4
3
2
1
Image 12-2
Securing the rigging assembly
Image 12-1
Stacking projectors
Ceiling mounted stacked projectors
For ceiling mounted configurations, mount a security cable between the lowest projector and the upper projector.
Image 12-3
Mounting the security chain
R5976766 RLM G5 22/04/2004
79
12. Projector Suspension/Stacking
CAUTION: Be sure the safety working loud of the used security cables and appropriate connectors are sufficient to support one projector. Refer to the supplier of the security cable for safety details
12.2 Projector Suspension
What is provided?
Slots (A) are provided on the four sides of the stacking frame (bottom side) which allow the mounting of four doughty clamps in
combination with a hinge joint.
Consult a professional structural engineer prior to suspending the ceiling mount from a structure not intended
for that use. Always ensure the working load limit of the structure supporting the projector.
A
x4
Image 12-4
Rigging assembly
Necessary tools
Wrench of 17mm
How to mount the doughty clamps
1. Refer to the installed trussing to determine the place of the clamps in the slots on the rear of the stacking frame.
2. Push with the head of the cup square neck bolt the leaf spring downwards (1) to slide the bolt head in the slot (2). (image 12-5)
3. Secure the position of the bolt with a washer (3) and nut (4).
4. Turn a second nut on the bolt (later used to fix the hinge joint).
5. Turn the hinge joint (5) on the bolt to the end in a way the hinge joint faces the lens (Forward- or backwards projector pivoting).
6. Secure the position of the hinge joint by tightening the second nut (4).
7. Turn the doughty clamp on the hinge joint fully (6).
80
R5976766 RLM G5 22/04/2004
12. Projector Suspension/Stacking
(6)
(5)
(4)
(3)
(1)
(2)
Image 12-5
Mounting the doughty clamps
How to hook the clamp onto the truss beam
1. Open the clamp by loosening the clamp lock. (image 12-6)
2. Hook the clamp onto the truss beam.
The built-in clamp trigger automatically shuts the clamp around the truss beam.
3. Secure the position of the clamp by tightening the clamp lock.
A
D
B
C
Image 12-6
Projector mounting onto a truss
When the projector is mounted onto the truss, the adjustable spacers (A) in the clamp assembly allow to adapt
small level differences in the clamp height, using a wrench of 17 mm.
R5976766 RLM G5 22/04/2004
81
12. Projector Suspension/Stacking
82
R5976766 RLM G5 22/04/2004
13. Maintenance of the Projector
13. MAINTENANCE OF THE PROJECTOR
13.1 Air Filters
About maintaining the air filters
It is recommended that you replace the air filters (located at the bottom of the projector) when you replace the lamp - or sooner, in
dusty or dirty environment. In the latter case, check monthly if replacement is required.
A clogged filter reduces the air flow, and can lead to overheating and failure of the projector.
Location of the air filters
The air filters, in total 5 filters, are located into the bottom of the projector.
The 2 exterior filters (4 & 5) are obstructed by the mounted stacking frame. To be able to remove these filters,
loosen a few turn the frame screw (A) nearest the rear side of the projector.
1
2
3
4
5
A
Image 13-1
Location of air filters
Replacement of the air filters
1. Press the lip (A) of the filter lock (2 for filters 1 to 3 and 1 for filter 4 & 5) to release and next,
2. Lift up front (B) of air filter and move forwards (C) to remove. (image 13-2, image 13-3)
Tip:
For the filters 4 & 5, when the lock is released, move the filter a little to the inside of the projector until the filter center
clips are free, and next remove the filter to the outside.
R5976766 RLM G5 22/04/2004
83
13. Maintenance of the Projector
B
A
Image 13-2
C
Image 13-3
Available kit
All the 5 air filters are assembled to 1 kit, order number R401045K
13.2 Cleaning the lens
To minimize the possibility of damaging the optical coating or scratching exposed lens surface, we have developed recommendations for cleaning the lens. FIRST, we recommend you try to remove any material from
the lens by blowing it off with clean, dry deionized air. DO NOT use any liquid to clean the lenses.
84
R5976766 RLM G5 22/04/2004
13. Maintenance of the Projector
Necessary tools
Toraysee TM cloth (delivered together with the lens kit). Order number : R379058.
How to clean the lens ?
Proceed as follow :
1. Always wipe lenses with a CLEAN Toraysee TM cloth.
2. Always wipe lenses in a single direction.
Warning: Do not wipe back and forwards across the lens surface as this tends to grind dirt into the coating.
3. Do not leave cleaning cloth in either an open room or lab coat pocket, as doing so can contaminate the cloth.
4. If smears occur when cleaning lenses, replace the cloth. Smears are the first indication of a dirty cloth.
WARNING:
Do not use fabric softener when washing the cleaning cloth or softener sheets when drying the
cloth.
Do not use liquid cleaners on the cloth as doing so will contaminate the cloth.
CAUTION:
Other lenses can also be cleaned safely with this Toraysee TM cloth.
R5976766 RLM G5 22/04/2004
85
13. Maintenance of the Projector
86
R5976766 RLM G5 22/04/2004
14. Software Update
14. SOFTWARE UPDATE
Overview
•
Installation requirements
•
Interconnection PC/Projector
•
Projector Software Update Procedure
14.1 Installation requirements
Computer hardware
•
Standard PC with one free serial port (COM1 or COM2)
•
RS232 straight communication cable.
Computer Software
•
Windows 2000, Windows NT, Win 95, Win 98 , Win ME or Win XP.
•
Barco LCD/DLP Projector Code Control (Download program)
14.2 Interconnection PC/Projector
Connection PC to Projector
1. Connect one side of the RS232 communication cable to the free COM port of your PC. (image 14-1)
2. Connect the other side of the RS232 communication cable to the RS232 IN of you projector.
B
C
A
R/PR
G/Y
DVI
B/PB
Hs/Cs
Vs
ANALOG RGB
VIDEO
RS 232 C
SDI
IN
S-VIDEO
R.C.
SDI
OUT
PUSH
2
1
3
10 BASE-T
TWO WAY
HARDWIRED REMOTE
Image 14-1
Software update via RS232
A
B
C
PC + Barco download program
RS232 straight cable
RS232 input projector
R5976766 RLM G5 22/04/2004
87
14. Software Update
14.3 Projector Software Update Procedure
How to download the projector software?
1. Go to the Barco Partnerzone (htpp:/www.partnerzone.events.barco.com) and login. (image 14-2)
Note: If you don’t have a login, start the registration procedure to get a log in (Username + password).
2. Once entered the partnerzone, select the desired market “partnerzone events”. (image 14-3)
The Home page of the market partnerzone events is displayed, showing the software updates list.
3. Select “more software updates”. (image 14-4)
A tap page is displayed showing the 4 different product ranges.
4. Select tap “Projector”. (image 14-5)
A page with all the PROJECTOR products is displayed showing the software which can be downloaded.
5. In the software summary of the RLM G5, select item “RLM G5”. (image 14-6)
A pop up window is displayed asking to save the software for update to your disk.
6. Confirm “Save to disk” (image 14-7, image 14-8)
A dialog window opens asking where to save the software file. Using the browse button, browse to the desired directory on your
PC and press “Save”.
Image 14-2
PartnerZone Access to
88
R5976766 RLM G5 22/04/2004
14. Software Update
Image 14-3
PartnerZone Software updates
Image 14-4
PartnerZone Product selection
R5976766 RLM G5 22/04/2004
89
14. Software Update
Image 14-5
PartnerZone Product Software download
Image 14-6
File download
Image 14-7
Software source save
90
Image 14-8
Software source downloading
R5976766 RLM G5 22/04/2004
14. Software Update
How to UnZip the downloaded Zip file
The downloaded file is a compressed merged file. Extracting the merged files can be performed using the software program WinZip.
1. Click the downloaded file R32...... and press the right button on the mouse. (image 14-9)
The select window displays a various of possibilities to extract the zip file.
2. Click “Extract to folder D\...........”
The Zip file will be extracted, as a sub directory, in the directory where the downloaded Zip file has been saved.
3. Click the sub directory to display the extracted files.
The following files become available:
-
RlmG5.101.txt: file contains version information and installation procedure.
-
RlmG5-Performer.101.bin: source file
-
CodeControl.exe: download program
Image 14-9
UnZip the downloaded file
How to update the projector software?
1. Switch the projector into StandBy mode.
2. Double click “CodeControl.exe” to start the download program. (image 14-10)
A dialog window opens asking to fill out the following parameters:
-
Projector address (2)
-
Communication parameters, port (3) and Baudrate (1)
-
Source file (4)
3. Set the projector address. (For a switched on projector, the projector address can be displayed on the screen by pressing the
address setting button on the remote control or on the identification screen via scrolling in the menu bar “General-Identification”.)
4. Set the PC communication port number on which the RS232 cable is connected to.
5. Set the Baudrate of the PC equal to the Baudrate of the projector as follows:
-
Click “Detect”. The PC tries to communicate with the projector on differents Baudrates until the projector returns an acknowledgement. The detected Baudrate is filled out in the Baudrate drop down box.
-
Set, if a value lower than 9600 b/s is filled out, the Baudrate in the drop down menu to minimum 9600 b/s or recommended
115200 b/s. Simultaneously the Baudrate of the projector is set at the same value. (image 14-11)
Tip:
The minimum Baudrate to be used is 9600 b/s
The recommended Baudrate is 115200 b/s
6. Click the Browse button and browse to the previously downloaded source file (xxx.bin). (image 14-12)
7. Click the Download button to start the download process.
-
A successful download is indicated with a green spot in the right bottom corner of the download interface.
-
A failed download is indicated with a red spot in the right bottom corner of the download interface. (image 14-13)
R5976766 RLM G5 22/04/2004
91
14. Software Update
1
2
3
4
Image 14-10
Fill out the download parameters
Image 14-11
Baudrate set up
Image 14-12
Filling out the name of the source file
92
R5976766 RLM G5 22/04/2004
14. Software Update
Image 14-13
Download confirmation
It is recommended to close all running programs before starting the download.
R5976766 RLM G5 22/04/2004
93
14. Software Update
94
R5976766 RLM G5 22/04/2004
15. Troubleshooter RLM R5 Performer
15. TROUBLESHOOTER RLM R5 PERFORMER
15.1 Start-up without audible relay click
Troubleshooter
Trouble Shooter RLM G5P
Start-up without audible relay click
No relay click
sound when
switching on
Check the
Power Outlet
NOK
Connect to another
Power Outlet
StandBy Power
Board
OK
Check the
Projector
Power Input
Replace the
Power Cord
NOK
cn12[4]
OK
Check the
Power Input on
PFC (cn5)
Replace the
Power Input Unit
Order No: R401044K*
NOK
*Contents R401044K
- Power outlet
- Power Switch
- cable to PFC
OK
Check the
PFC In/Output Voltages
cn55[1] 375V
cn55[4] +15V
NOK
Check the
PFC output
+15V cn55[4]
NOK
Replace the
StandBy Power
Board
OK
Replace the
PFC Board
PFC Power
Board
cn5[2-4]
cn55[1]
Image 15-1
Troubleshooter start-up
R5976766 RLM G5 22/04/2004
cn55[4]
95
15. Troubleshooter RLM R5 Performer
15.2 Led 1, 2 and 3 light up Red continuously
Troubleshooter
Led3
Led2
Trouble Shooter RLM G5P
Led1-Led2 and Led3 light up Red
(continuously)
Led1
Led1-Led2 and Led3
light up Red
(continuously)
Power down the projector
and
Replace the Lamp module
NOK
Check the
Cable between
J1 lamp Info Board and
J900 MCU Board
NOK
Replace the
cable
NOK
Replace the
MCU Board
OK
OK
Check the
Cable plug J1 on
lamp Info Board
J1[1,3,4]=+5V
NOK
Check on
MCU Board
J900 [1,3,4]=+5V
NOK
OK
Replace the
MCU Board
Remove cable plug J505
on MCU Board
OK
Check on
MCU Board
J505 [2,3]=+5V
NOK
Replace the
MCU Board
OK
Check the
Cable between
J505 MCU Board and
J595 PMP Board
NOK
Replace the
Cable
OK
Replace the
PMP Board
Image 15-2
Troubleshooter Standby mode
96
R5976766 RLM G5 22/04/2004
15. Troubleshooter RLM R5 Performer
Indication of parts mentioned in troubleshooter
PMP Board
Lamp Info
A
MCU Board
B
Image 15-3
Parts mentioned in troubleshooter
R5976766 RLM G5 22/04/2004
97
15. Troubleshooter RLM R5 Performer
98
R5976766 RLM G5 22/04/2004
Trouble Shooter RLM G5P
Led1 and Led2 light up Red
Led 3 lights up Green and flashes 60s
Led1and Led2 light up Red
Led 3 lights up Green and flashes 60s
Led3
Led2
Led1
Lamp Lit
and then Off
NOK
Replace the
Lamp module
NOK
Check the cable between
Ballast and MCU Board
OK
Replace the
Cable
NOK
OK
Check on MCU Board
J203[3]=+5V
J213[3]=+5V
NOK
Replace the
MCU Board
OK
Check on MCU Board
J203[4] and J213[4]
Hi(+5V) to Low transition
when turning on
NOK
Replace the
MCU Board
Check cable between
J506 MCU Board and
J304 Adapter Board
NOK
Replace the
Cable
OK
OK
Turn on again the projector
NOK
Replace the
Lamp Power Supply
NOK
Replace the
PMP Board
Replace the
Adapter Board
NOK
Replace the respective Power Board
on which cable plug no +5V
has been measured
NO
The Led 3 lights: 2 sec
OK
Failure:
Powergood error
On the MCU Board
Pull out the cable plug on
J24/J25/J26
On the free cable plugs,
measure the voltage level
at pin 1 of the plug:
+5V?
YES
Replace the MCU Board
For the Fans not controllable
by naked eye
Check on MCU Board
Led D3
The Led 3 lights: 4 sec
OK
Failure:
Fan error
MCU Board
Check the Fans on
rotation
by naked eye
In the cool down period
of 60 sec measure voltage
at pin 1 of the Fan plug
OK
NOK
NOK
J25
J26
J24
D3
OK
The Led 3 lights always
Replace the Temperature
Sensor in the lamp module
NOK
OK
The Led 3 do not light
On the MCU Board
Insert the Fan plug of
the non rotating Fan in an
other Fan connector
Replace the MCU Board
Replace the Fan
OK
Replace the MCU Board
Troubleshooter RLM G5P
Led1, Led2, Led 3 do not light up
Be sure you have heard the click sound of the relay
when power switch has been pressed
Led1,Led2,Led 3
do not light up
Power down the
projector
Press the 'Power On' key
on the
- Remote control or
- Key panel
OK
Remove the following plugs
on the PFC Board
J58/59/60/61
Replace the
Led/IR Board
Only the Standby Board stays
connected with the PCF Board
NOK
OK
Disconnect
IR cable plug J306
on the adapter board
OK
Replace the
Front IR Board
Restart
Plug in J60 on LPS 1
NOK
OK
Led1
Power down the
projector
Replace the
LPS 1
OK
NOK
Replace the
Input Backplane
Turn on the projector
OK
Replace the
Front IR Board
First, check the interconnection cable
Plug in J419 on Input Backplane
Turn on the projector
Check Power Supply
LED/IR Board
Replace the
PFC Board
Led2
First, check the interconnection cable
NOK
Replace the
StandBy Board
NOK
Led3
J58: connector to OEM Board
J59: connector to Format Board
J60: connector to LPS 1
J61: connector to LPS 2
Power down the
projector
First, check the interconnection cable
NOK
J1 on MCU Board
J27 on Format Board
J33 On OEM Board
J519 on PMP Board
J419 Input Backplane
Turn on the projector
NOK
Disconnect the
Standby power supplies to the
other boards by removing:
OK
J307[1]=+5V?
OK
NOK
Check +5V from
MCU Board to LED/IR Board
Replace the
LED/IR Board
Power down the
projector
NOK
Plug in J61 on LPS 1
Replace the
LPS 2
First, check the interconnection cable
NOK
Plug in J519 on PMP Board
Turn on the projector
OK
Replace the
PMP Board
Turn on the projector
Check cable between
LED/IR Board and
Adapter Board
J506[1]=+5V?
OK
NOK
NOK
Replace the
Cable
Power down the
projector
OK
Plug in J58 on Formatter Board
Replace the
MCU Board
Power down the
projector
First, check the interconnection cable
NOK
Check +5V on
input MCU Board
Power down the
projector
First, check the interconnection cable
First, check the interconnection cable
NOK
Plug in J1 on MCU Board
Replace the
Formatter Board
Replace the
MCU Board
Turn on the projector
Turn on the projector
J1[5]=+5V?
OK
NOK
MCU Board
Disconnect plug J1 of
the power input cable
Pin 1 plug
J1=+5V?
Power down the
projector
Power down the
projector
OK
Replace the
MCU Board
NOK
Plug in J59 on OEM Board
Turn on the projector
First, check the interconnection cable
Remove the following plugs on the
OEM Board: J32 and J34
NOK
Replace the
OEM Board
Power down the
projector
First, check the interconnection cable
NOK
Plug in J27 on Formatter Board
Replace the
Formatter Board
Turn on the projector
Turn on the projector
J32: connector to PMP Board
J34: connector to Input Backplane
NOK
OK
Power down the
projector
Power down the
projector
Plug in J33 on OEM Board
Plug in J32 on PMP Board
Plug in J34 on Input Backplane
Turn on the projector
Turn on the projector
Turn on the projector
Power down the
projector
NOK
OK
NOK
Replace the
PMP Board
NOK
Replace the
Input Backplane
First, check the interconnection cable
Replace the
OEM Board
A. Technical Specifications
A. TECHNICAL SPECIFICATIONS
A.1 RLM R5 Performer
Summary
Light Output
4500 ANSI Lumen
Resolution
1024 x 768 (native)
1600 x 1200 (max)
Contrast Ratio
900 : 1 (full field)
Brightness uniformity
90 %
Lamp
Lifetime (max): 1500 Hrs
Lifetime (typ): 1000 Hrs
Lamp Power: 2 x 250 W
Noise level (dba) 20°C (68°F)
< 43
Noise level (dba) 40°C (104°F)
< 50
Ambient temperature
Max 40°C (104°F)
Mains Voltage
92-240 V
Power consumption
1000 W
Weight
Projector: 25 kg (56 lbs)
Frame: 5 kg (11 lbs)
Seamless Switching
Standard: box-in/out, etc ...
ScenergiX
Standard horizontal and vertical electronic edge blending
Network connection
Optional
Sealed DLP™ core
Standard
Inputs
•
1x Configurable 5-Wire (BNC) (Composite, S-Video, Component Video, RGHHV,
RGBS, RGsB)
•
1x Composite Video (BNC) (Up to 7 Composite Videos, using all connectors on
top input board)
•
1x S-Video (4-pin mini-DIN) (Up to 3 S-Videos when combining BNCs)
•
1x Analog RGB (D15 Connector)
•
1x SDI (with active loop-through)
•
1x DVI (Digital Visual Interface)
•
1x RS232
•
1x XLR (For 2-way communication using rugged-remote)
Order Information
R9010020
Picture-in-picture
Up to 4 sources simultaneously (2 data, 1 video and 1 SDI)
Digital zoom
Standard
Light shutter
Standard
Built-in radio remote receiver
Optional
R5976766 RLM G5 22/04/2004
99
A. Technical Specifications
100
R5976766 RLM G5 22/04/2004
Index
INDEX
A
L
Adjustment 73
Light pad 73
Air filters 83
Available spares
Lamp box 33–34, 61
Exploded view 61
Parts 34
Lamp house 43
Removal 43
Lamp power supply 56
Lamp unit 33
Removal 33
Led 1,2 and 3 96
Light up continuously 96
Led+IR board 59
LED+IR board 37
Lens 84
Cleaning 84
Lens holder 41, 66, 73
Exploded view 66
Lens holder swapping 41
Light pad 73
Adjustment 73
Light pipe 42, 44
Mounting 44
Parts to be removed 42
Removal 44
Replacement 44
Light pipe adj. screw 42
Removal 42
Location 24
FANS 24
15
B
Block diagram 11
Projector 11
Simplified 11
Board information 47
Bock diagram 12
Expanded 12
Bottom assembly 68
Button panel 17
Removal 17
C
Cold mirror 45
Connector removal 13
Instructions 13
Conventions 13
Cover removal 17
F
FAN 9 43
Removal 43
Fans 25
Order number 25
FANS 24–25
Function 25
Location 24
Overview 24
Format power board 49
Formatter interface board 58
Front cover assembly 70
Function 25
FANS 25
M
Maintenance 83
MCU board 54
Mechanical parts 61
Module 23
Identification 23
Module access 17, 20
Motor/Control board 35–36, 55
Connection 36
Swapping 35
Mounting 44
Light pipe 44
G
General info
3
I
Identification 23
Module 23
Illumination system 75
Alignment 75
Input box 31, 33, 56, 64
Backplane 56
Exploded view 64
Parts 33
Swapping 31
Installation requirements 87
Instructions 13
Connector removal 13
Interconnection 87
PC/Projector 87
IR Receiver front 35
IR Receiver swapping 35
K
Keypad 37, 58
Swapping 37
R5976766 RLM G5 22/04/2004
O
OEM power board 51
Order number 25
Fans 25
Overview 9, 24, 47
FANS 24
Safety symbols 9
P
PFC 47
PMP board 57
PMP shield 22
Removal 22
Power box 26–28, 62
Access 26
Exploded view 62
Parts 27
Swapping 28
Power supply circuit 47
Projector 11, 23, 79–80
Block diagram 11
Suspension 79–80
Top view 23
Projector assembly 71
Projectors 79
101
Index
Stacking
79
R
Random boards 55
Rear cover 17
Removal 17
Removal 17–22, 33, 42–44
Button panel cover 17
FAN 9 43
Lamp house 43
Lamp unit 33
Light pipe 44
Light pipe adj. screw cover
PMP shield 22
Rear cover 17
Side cover 20–21
Side shield 21
Top cover 18
Top shield 19
Replacement 44
Light pipe 44
Rigging assembly 66
RLM G5 Performer 3
RLM R5 Performer 99
Specifications 99
S
safety 5
Safety 5
Instructions 5
Safety symbols 9
Overview 9
Sealed engine 37
102
42
Sealed engine mounting 41
Sealed engine removal 38
Shutter 64
Exploded view 64
Side cover 20–21
Removal 20–21
Side cover left 20
Removal 20
Side cover right 21
Removal 21
Side shield 21
Removal 21
Software update 87–88
Procedure 88
Spare list 15
Specifications 99
RLM R5 Performer 99
Stacking 79
Projectors 79
Standby power supply board 52
Start-up 95
Suspension 79–80
Projector 79–80
T
Technical info 13
Technical specifications
Top assembly 69
Top cover 18
Removal 18
Top shield 19
Removal 19
Troubleshooter 95
99
R5976766 RLM G5 22/04/2004
Revision Sheet
To:
Barco nv Events/Documentation
Noordlaan 5, B-8520 Kuurne
Phone: +32 56.36.89.70, Fax: +32 56.36.88.24
E-mail: [email protected], Web: www.barco.com
From:
Date:
Please correct the following points in this documentation (R5976766/00):
page
R5976766
wrong
RLM G5
22/04/2004
correct