1
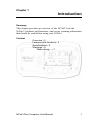
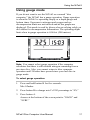
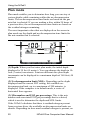
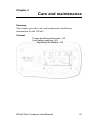
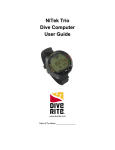
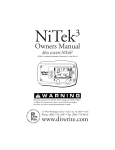
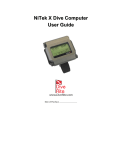
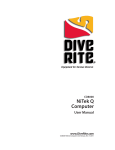
NiTek3 Dive Computer
User Guide
Date of purchase:
www.diverite.com
Content
DEVELOPED
BY
Dive Rite
175 NW Washington Street
Lake City, FL 32055
Phone: 386.752.1087
Fax: 386.755.0613
Web: www.diverite.com
COPYRIGHT
NOTICE
Copyright © 2003-2004 Lamartek, Inc. dba Dive Rite
WARRANTY
INFORMATION
Dive Rite will—at its sole discretion—repair or replace NiTek3
components proved to be damaged by faulty manufacture or
material, at no cost, for a period of up to one year (365 days)
from the date of purchase.
This manual is copyrighted by Lamartek, Inc. dba Dive Rite.
You may not reproduce, translate, transcribe, or transmit any
part of this manual without express, written permission from
Lamartek, Inc. dba Dive Rite.
This warranty applies only to the original retail purchaser. It
does not cover commercial or rental use, nor does it extend to
units purchased from other than an authorized Dive Rite
dealer.
This warranty specifically excludes battery depletion or other
conditions resulting from misuse, negligence, alteration,
accident, or unauthorized repair.
To make a claim under this warranty, the owner must have
registered his/her warranty using Dive Rite’s website
(www.diverite.com). He or she must then return the damaged
items to Dive Rite, along with a copy of the original purchase
invoice or receipt. No warranty service will be performed for
other than registered owners.
This warranty becomes void if NiTek3 components are
damaged by anything other than normal recreational diving
use, or if they have been serviced or repaired by other than
authorized Dive Rite dealers.
Repairs made under this warranty will not extend the warranty
period.
All further claims, especially for damage after diving accidents,
are excluded from coverage under this warranty.
Dive Rite has no obligation to honor any extension of this
warranty.
This warranty is in lieu of all other warranties, express or
implied. No other person or representative is authorized to
assume for Dive Rite any other liability in connection with the
sale of this product.
NiTek3 Dive Computer User Manual
i
Content
Table of contents
Chapter 1
Introduction • 1
Overview • 2
Features and functions • 3
Specifications • 5
Warnings • 6
Chapter 2
Using the NiTek3 • 9
Getting started • 10
Accessing display modes and screens • 11
Surface mode • 12
Setting the dive options • 14
Using gauge mode • 17
Understanding default mode • 18
Plan mode • 20
Dive computer mode • 22
Gauge mode • 29
Surface mode (upon surfacing from a dive) • 30
Log mode • 32
Profile mode • 34
PC transfer mode • 36
Altitude operation • 38
Chapter 3
Care and maintenance • 41
Proper handling techniques • 42
Low battery warning • 44
Index • 47
ii
NiTek3 Dive Computer User Manual
Chapter 1
Introduction
Summary
This chapter provides an overview of the NiTek3, lists the
NiTek3’s features and functions, and covers warning information
that should be read before using your NiTek3.
Content
Overview • 2
Features and functions • 3
Specifications • 5
Warnings • 6
When diving… • 7
NiTek3 Dive Computer User Manual
1
Introduction
Overview
Congratulations on your purchase of the NiTek3 dive computer.
The NiTek3 is a sophisticated and comprehensive dive computer
that was designed to offer you the latest in dive computer
technology, safety, and reliability.
The NiTek3 dive computer is a multifunctional computer for
recreational diving, providing information on depth, dive times,
no-decompression and decompression times, and nitrogen
absorption and elimination during all dive phases, including
ascent, surface interval times, and subsequent dives.
This information is displayed on an easy-to-read display,
providing simple and direct communication between the diver
and the computer. With an easy-to-read display, the diver has no
problem following and reading the displayed information.
The NiTek3 comes standard with a number of modes, including
a dive set mode, dive plan mode, log mode, profile mode, PC
transfer mode, and dive mode.
Note: It is extremely important that you carefully read and
understand this manual. Make sure you fully understand how the
NiTek3 operates before diving with it.
This manual has been divided into three chapters:
•
Introduction: Covers the features and functions,
specifications, and warnings for the NiTek3
•
Using the NiTek3: Covers the operation of each mode for
the NiTek3
•
Care and maintenance: Covers how to properly care for
and maintain the NiTek3 and change the battery
2
NiTek3 Dive Computer User Manual
Introduction
Features and functions
The NiTek3 incorporates a number of important modes and
features:
•
The NiTek3 turns on automatically upon descent
•
On the surface, the NiTek3 constantly displays a minimum
of date and time
•
The NiTek3 uses easily accessible and highly reliable push
buttons instead of exposed electrical contacts
•
The NiTek3 can be programmed to monitor exposure to
three different gas mixtures during a dive. Gas mixtures
including combinations of oxygen and nitrogen can be
programmed. Underwater, NiTek3 users can switch between
mixes at the push of a button.
•
The NiTek3 is capable of functioning up to a depth of 328
feet (100 meters) when in dive computer mode and 656 feet
(200 meters) when in gauge mode
•
The NiTek3 automatically adjusts for altitudes up to 19,685
feet (6,000 meters)
•
The NiTek3 displays a variety of data underwater including:
date, time of day, current and maximum depths, nodecompression dive time elapsed and remaining, and water
temperature
•
The NiTek3 displays data specifically related to the use of
Enriched Air Nitrox (EANx) including: fraction of oxygen
(FO2) setting, partial pressure of oxygen (PO2), and an
oxygen limit index (OLI) representing the cumulative effect
of a diver’s exposure to elevated PO2s (the theoretical “CNS
clock”) as a bar graph
•
Through a combination of audible and visible alarms, the
NiTek3 helps to alert the diver to a number of possibly
hazardous situations including: violation of ascent rate, nodecompression state, and whether mandatory decompression
stops are necessary or if the diver has ascended above a
mandatory stop ceiling. Nitrox specific warnings occur when
the diver approaches or exceeds a limiting PO2 of 1.6
NiTek3 Dive Computer User Manual
3
Introduction
atmospheres depending on what is set, and when cumulative
exposure to elevated PO2s exceeds recommended limits.
•
The NiTek3 can be programmed to display data in Imperial
or metric units
•
Dive depth can be displayed in fresh or salt water
equivalents
•
Special mode indicators makes it easy to determine what
display mode or screen you are in at any time
•
The NiTek3 glows in the dark after exposure to light
•
The NiTek3’s memory capability enables it to hold and
display log data on up to 10 dives
•
Detailed dive-profile information can be stored for each dive
through user-programmable sample intervals of 5, 10, 20, 30
or 60 seconds (longer intervals allow data for a greater
number of dives)
•
Dive data can be uploaded and stored in a dive log format on
a desktop or laptop computer using the NiTekLogic™
software and optional PC interface
4
NiTek3 Dive Computer User Manual
Introduction
Specifications
Algorithm: Modified Buhlmann
Sample tissues: 9
Tissue half-lives: from 5 to 640 minutes
Size and weight
Length: 4.25 in (10.8 cm)
Height: 1.25 in (3.2 cm)
Weight: 8 ounces (226 g)
Display face
Low battery indicator
Two user buttons
Water immersion switch
Depth sensor
Sea and fresh water calibration
Measuring range: 0 to 328 feet (0 to 100 m) measured every second
(Gauge mode 656 feet (200 m)
Accuracy: +/- 3% + 2 feet (0.5 m)
Surface interval time: from 0 to 48 hrs
Diving time: from 0 to 599 minutes
Ascent rate warning: 26 to 52 feet per minute (8 to 16 m)
Thermometer
Measuring range: 23 °F to 104 °F (-5 to 40 °C)
Accuracy: +/- 4 °F (2 °C)
Measurement interval: Every minute during dive mode
Clock
Accuracy: +/- 30 sec on average per month
24-hour display
Altitude
Altitude function monitoring: from 0 to 19,685 feet (6,000 m)
Measurement interval: Every 10 minutes
Battery
Li/MnO2 CR 123A 3V button battery
Average battery life: About 3 years (50 dives/year)
Replacement: User replaceable
Breathing gas
Mixes: 3 gas settings
O2 setting range: 21 to 99 percent
O2 setting: 1% increments
Dive log
Dive logging: Maximum of 10 dives
Profile sampling rates: 5, 10, 20, 30, or 60 seconds
NiTek3 Dive Computer User Manual
5
Introduction
Warnings
This information has been developed for your safety. Please read
and understand this manual completely before using your
NiTek3 dive computer.
Important safety information:
•
Before using your NiTek3, it is extremely important that you
read the following points—as well as similar warning and
caution notices that appear throughout this manual. Failure
to do so could result in damage to or loss of equipment,
serious personal injury, or death.
•
The NiTek3 is designed for use by certified divers who have
maintained a sufficient level of knowledge and skill
proficiency through a combination of formal training,
ongoing study, and experience. It is not intended for use by
persons who lack these qualifications and thus, may not be
able to identify, assess, and manage the risks scuba diving
entails. Use of the NiTek3 in conjunction with Enriched Air
Nitrox (EANx) requires that divers be trained and certified
for Nitrox diving.
•
The NiTek3 is not intended for use by commercial or
military divers whose activities may take them beyond the
commonly accepted depth limits for recreational or technical
diving.
•
Although the NiTek3 is capable of calculating
decompression stop requirements, users must remember that
dives requiring mandatory stage decompression carry
substantially greater risk than dives made well within nodecompression limits.
•
The NiTek3 is designed for use by one diver at a time.
Divers should not share a single NiTek3—or any other dive
computer—on the same dive. Additionally, no diver should
lend their NiTek3 to anyone else until it calculates that no
measurable residual nitrogen remains after previous dives
and no longer displays the “desaturation time” indicator
while in time mode. Further, no diver should use their
NiTek3 for repetitive dives—unless that same properly
functioning NiTek3 has accompanied them on all previous
6
NiTek3 Dive Computer User Manual
Introduction
dives in the same repetitive dive series and is thus,
accurately monitoring the diver’s total exposure to oxygen
and nitrogen.
•
Neither the NiTek3—nor any other dive computer—
physically measures the amount of nitrogen present in body
tissues or the rate at which nitrogen is being absorbed or
released. The NiTek3 monitors depth and time, and uses this
data to work a mathematical formula designed to emulate
how individuals in good general health and whose physical
characteristics do not place them among those at higher risk
of decompression illness (DCI) are assumed to absorb and
release nitrogen from body tissues. Thus, the NiTek3 cannot
compensate for factors such as age, obesity, dehydration,
cold, or exertion, which experts believe place divers at
greater risk of DCI. If these, or similar factors apply to you,
use the NiTek3—and other dive computers or dive tables—
with even greater caution.
•
Experts still know surprisingly little regarding the exact
nature and causes of decompression illness (also known as
decompression sickness, DCI, or DCS). Susceptibility to
DCI may vary substantially from person to person and from
day to day. Neither the NiTek3—nor any other dive table or
computer—can guarantee that you will not suffer
decompression illness. Even though you use these items
correctly, you may still suffer DCI. Use your NiTek3
conservatively and in conjunction with other dive planning
devices, such as dive tables. Do not rely on the NiTek3, or
any similar device, as your sole means of avoiding
decompression illness.
When diving…
•
Do not “push” the no-decompression limits (NDLs). Make
safety stops before ascending. If you exceed the nodecompression limits, check your breathing gas supply at all
stop depths.
•
The NiTek3 does not monitor breathing gas supply. You
must monitor this yourself, on every dive, using a
submersible pressure gauge or equivalent device.
NiTek3 Dive Computer User Manual
7
Introduction
•
Do not rely solely on this or any other dive computer. Take a
back-up dive computer or dive tables (along with a separate
means of monitoring depth and dive time).
•
Be aware that the NiTek3 makes assumptions regarding
residual nitrogen based on altitude settings. Avoid making
abrupt changes in altitude following a dive, as doing so may
be very dangerous.
8
NiTek3 Dive Computer User Manual
Chapter 2
Using the NiTek3
Summary
This chapter provides topics about using, setting, and
understanding each of the modes and options of the NiTek3.
Content
Getting started • 10
Accessing display modes and screens • 11
Button operation • 11
Surface mode • 12
Setting the time and date • 12
Setting the computer for metric or
Imperial • 13
Setting the dive options • 14
Setting the dive profile sampling rate • 14
Setting for fresh or salt water use • 15
Setting mix1 through mix3 gas
percetanges • 15
Using gauge mode • 17
Understanding default mode • 18
Plan mode • 20
Dive computer mode • 22
Dive mode screen • 22
Changing gas mixes underwater • 23
Warnings while in diving mode • 24
Gauge mode • 29
Surface mode (upon surfacing from a dive) • 30
Log mode • 32
Profile mode • 34
PC transfer mode • 36
Before transferring the dive log • 36
Altitude operation • 38
NiTek3 Dive Computer User Manual
9
Using the NiTek3
Getting started
The NiTek3 has many modes and screens and a number of
options that can be changed depending on your dive location and
profile. The following is a checklist of general things that you
should pay attention to before, during, and after a dive.
Before a dive
•
Check that the proper time and date are set. If you traveled,
your NiTek3 may be set to your home time zone.
•
Check that the proper mixes are set. If you are using gauge
mode, make sure it is set to “GAGE.”
•
Make sure that you review the dive plan mode for maximum
depths and times for the mixes you are using
During a dive
•
Monitor the NiTek3 throughout your dive for depth and time
•
Monitor the N2 and O2 loading bar graphs
•
Pay attention to any alarms, such as an ascent rate warning
•
Follow the no-decompression limits or complete the required
decompression displayed
After a dive
•
Monitor surface interval time if making another dive
•
Follow the no-fly requirements
•
Review your dive using the log mode and profile mode
•
Download the dive log to your PC if you have the optional
PC interface
10
NiTek3 Dive Computer User Manual
Using the NiTek3
Accessing display modes and screens
There are some display modes that the NiTek3 enters and/or
exits automatically. For example, by taking the NiTek3
underwater, the dive mode automatically turns on. Upon
surfacing, the NiTek3 automatically enters the surface mode.
To access other modes or screens requires the use of the
NiTek3’s buttons.
Button operation
The NiTek3 has two buttons (A and B), which are used to access
the different modes and screens. To use the buttons, simply press
the button once or hold the button down depending on what you
are trying to do. The correct procedure to use is clearly defined
in each topic throughout the manual.
•
A button: This button is used to select and scroll through the
different modes, such as plan mode and locks in setting
values when setting options
•
B button: This button is used to set an option’s setting, such
as setting the date
Button A
Button B
The front of the NiTek3, showing the two buttons that are used to
access and setup the different modes and options
NiTek3 Dive Computer User Manual
11
Using the NiTek3
Surface mode
Surface mode is the NiTek3’s default mode. The computer
returns to this mode automatically upon surfacing from a dive
and from other modes when two to three minutes of inactivity
have passed.
Note: The NiTek3 may display additional information
concerning exposure to nitrogen and oxygen, desaturation time,
surface interval time, and altitude. These items are covered in
“Surface mode (upon surfacing from a dive)” and “Altitude
operation.”
1
2
3
4
(1) Date: This is the month and day. The first digit is the month
and the second digit is the day. For example, 1-24 represents the
twenty-fourth day of January.
(2) Time of day: This is the time of day expressed in hours and
minutes. Time is displayed in 24-hour (military) format.
(3) Altitude: This is the current altitude you are at. See “Altitude
operation” for more information.
(4) Salt or fresh water: This is if the NiTek3 is set for salt (S)
or fresh (F) water use.
Setting the time and date
Setting the time and date is done through the surface mode. You
can enter or change the year, month, day, hours, and minutes in
this mode.
12
NiTek3 Dive Computer User Manual
Using the NiTek3
To set the time and date:
1. Press and hold button A for ten seconds.
The profile sampling rate flashes.
2. Press buttons A and B simultaneously for ten seconds.
The “minutes” field flashes.
3. Press button B to set the minutes or press button A to go to
another field, such as hours.
4. Using buttons A and B, set the year, month, day, hour, and
minutes. The time is based on a 24-hour format.
For example, 1:00 PM would be 13:00.
5. When finished, press button A to return to surface mode.
Note: When you press button A from the “day” field, the
metric/Imperial field flashes. See the topic below for more
information.
Setting the computer for metric or Imperial
operation
The NiTek3 can calculate and give you values in Imperial units
or metric units. When in Imperial, depth values are expressed in
feet and temperatures are expressed in Fahrenheit (°F). When in
metric, depth values are expressed in meters and temperatures
are expressed in Celsius (°C).
To set for metric or Imperial operation:
1. Press and hold button A for ten seconds.
The profile sampling rate flashes.
2. Press buttons A and B simultaneously for ten seconds.
The “minutes” field flashes.
3. Press button A to go to the metric/Imperial field.
The “M or FT” field flashes.
4. Press button B to change to metric (M) or feet (FT) operation.
5. Press button A to return to surface mode.
NiTek3 Dive Computer User Manual
13
Using the NiTek3
Setting the dive options
Setting the dive options includes setting up the following:
•
Dive profile sampling rate: This is how frequently depth
data is measured and stored during a dive, which is 5, 10, 20,
30, or 60 seconds.
•
Salt or fresh water use: This is the setting for salt water or
fresh water use.
•
FO2 gas percentage: This is the oxygen percentage for the
mix number selected. The O2 percentage setting range is 21
to 99 percent.
Setting the dive profile sampling rate
The NiTek3 allows you to choose how frequently it samples and
stores depth, time, temperature, etc. data. The data it samples and
stores is used in profile mode or when the data is uploaded to a
personal computer. There are five sampling rates to choose from,
5, 10, 20, 30, or 60 seconds.
The faster the sampling rate, the more detailed the dive profile,
but because it stores more information, fewer dives can be
stored. The slower the sampling rate, the less detailed the dive
profile, but it is capable of storing more information for more
dives.
Sampling rate
Approximate dive time storage capacity
5
2 hours and 30 minutes
10
5 hours
20
7 hours and 30 minutes
30
15 hours
60
30 hours
Note: When the computer’s memory storage is full, it overwrites
the oldest dive profile data stored with the new information.
To set the dive profile sampling rate:
1. Press and hold button A for ten seconds.
14
NiTek3 Dive Computer User Manual
Using the NiTek3
The profile sampling rate flashes.
2. Press button B to change the sampling rate.
3. When finished, press button A twice to return to surface
mode.
Setting for fresh or salt water use
The NiTek3 is capable of operating using fresh or salt water
calculations. This is based on:
•
•
One atmosphere of saltwater is 33 feet (10 meters)
One atmosphere of freshwater is 34 feet (10.3 meters)
Before going diving, set the computer to the type of water you
are diving in. This allows for the most accurate calculations with
respect to no-decompression limits, etc.
To set for fresh or salt water use:
1. Press and hold button A for ten seconds.
The profile sampling rate flashes.
2. Press button A to select the fresh or salt water field.
The F or S flashes.
3. Press button B to select fresh (F) or salt (S) water use.
4. When finished, press button A to return to surface mode.
Setting mix1 through mix3 gas percentages
You must set the breathing mix you plan on using on your dive.
There are up to three different mixes that can be used for any one
dive. Not all of the mixes have to bet set, only the mixes that you
plan on using. Each mix can have an oxygen (FO2) setting of 21
to 99 percent oxygen.
Note: If you only plan on using one mix on your dive, you only
need to set mix1.
To set gas mix percentages:
1. Press and hold button B for five seconds.
Mix1 flashes.
NiTek3 Dive Computer User Manual
15
Using the NiTek3
2. Press button B to change mix1.
Press and hold button B to increase the percentages rapidly
3. Press button A to select mix2.
4. Press button B to change mix2.
Press and hold button B to increase the percentages rapidly
5. Press button A to select mix3.
6. Press button B to change mix3.
Press and hold button B to increase the percentages rapidly
7. When finished, press button A to return to surface mode.
16
NiTek3 Dive Computer User Manual
Using the NiTek3
Using gauge mode
If you do not want to use the NiTek3 as a normal “dive
computer,” the NiTek3 has a gauge operation. Gauge operation
is when the NiTek3 is operating simply as a depth gauge and
bottom timer. Exposure to nitrogen and oxygen and nodecompression limits are not tracked and no bar graphs are
displayed. This mode is used by divers who are relying solely on
dive tables for decompression information. The operating depth
limit when in gauge operation is 656 feet (200 meters).
Note: You cannot select gauge operation if the computer
calculates that there is still residual nitrogen remaining from a
previous dive. Also, you cannot return to dive computer
operation until 24 hours have passed since your last dive in
gauge mode.
To select gauge operation:
1. Press and hold button B for five seconds.
Mix1 flashes.
2. Press button B to change mix1’s FO2 percentage to “0%.”
3. Press button A.
Arrows at the bottom of the screen point to “GAGE” and
“SURF.”
NiTek3 Dive Computer User Manual
17
Using the NiTek3
Understanding default mode
In your entry-level Enriched Air Nitrox training, you learned that
among the greatest risks Nitrox (EANx) use poses is CNS
oxygen toxicity. CNS oxygen toxicity can occur if Nitrox is
breathed at depths where the partial pressure of oxygen (PO2)
exceeds safe limits.
The NiTek3 is designed to help divers avoid such situations by
presenting information and warnings regarding current PO2
levels and cumulative exposure to elevated PO2s. To do so, the
NiTek3 must be set to an FO2 that accurately matches the
concentration of oxygen in the gas mixture being breathed.
Similarly, the NiTek3 is designed to help divers avoid
decompression illness by providing no-decompression limits
(NDLs) or mandatory decompression stop information. Again, to
do so, the NiTek3 must be set in a manner that accurately
matches the concentration of nitrogen being breathed.
When this information is not available, the NiTek3 attempts to
protect divers by basing its oxygen- and nitrogen-exposure
calculations on a “worst case” assumption. This is, that
calculations are based on a mixture containing up to 79 percent
nitrogen and 99 percent oxygen. This “worst case” calculation is
what is referred to as the FO2 default setting.
When and how FO2 default occurs
One factor in determining if and when your NiTek3’s FO2
setting is in default, is whether you set it for air or Nitrox.
•
If you set the mix for air (an FO2 of 21 percent), the
computer assumes that subsequent dives will be made using
air. This means that the mix set for air remains set for air,
dive after dive, without defaulting.
•
If you set the mix for Nitrox (FO2s of 22 to 99 percent), the
computer assumes that subsequent dives will be made on
Nitrox. Thus, to protect you from accidentally diving a
Nitrox mixture that cannot accurately be monitored, the
computer’s FO2 setting defaults 10 minutes after surfacing
from a dive.
18
NiTek3 Dive Computer User Manual
Using the NiTek3
•
If you set a Nitrox mixture, but do not dive with the
computer, the NiTek3 holds the programmed gas mixture
until midnight, then defaults. The computer does not default
at midnight if you are diving.
Dealing with FO2 default
The best way to deal with FO2 default is to simply avoid it.
Make sure that prior to every dive you check the FO2 setting for
gas mix you are diving. Make sure it accurately matches what
you are going to breath during the dive.
When the computer is in FO2 default mode, dashed lines appear
in place of the gas percentage and NDL. This indicates that you
need to set the gas percentages to the correct FO2.
If you go diving when the computer is in FO2 default mode, the
NiTek3’s alarm sounds and the O2 bar graph and PO2 Limit
symbols flash. The computer’s ability to accurately monitor your
exposure to oxygen no longer exists.
Note: You should not rely on the NiTek3 as the sole means of
tracking your exposure to elevated partial pressures of oxygen
(PO2s). It is recommended that you use either a second Nitroxcapable computer or another tracking method, such as Nitrox
tables.
NiTek3 Dive Computer User Manual
19
Using the NiTek3
Plan mode
Plan mode enables you to determine how long you can stay at
various depths while remaining within the no-decompression
limits. The no-decompression time limits are based on the gas
mix that is selected. If you are making a dive within 24 hours of
a previous dive, the no-decompression time limits are based on
the residual nitrogen remaining.
The most important values that are displayed on the screen in
plan mode are the depth and no-decompression time limits for
the mix number that is selected.
1
2
3
(1) Depth: When you first enter plan mode, the initial depth
displayed is 30 feet (9 meters). You can advance the depth in 10foot (3 meter) increments. Fourteen different dive plan depth
increments can be displayed to a maximum depth of 160 feet (48
meters).
(2) No-decompression limit (NDL): Depending on the depth
displayed and the current FO2 setting, the available nodecompression limit, up to a maximum of 200 minutes, is
displayed. If the computer is in default mode, a series of
horizontal lines appears.
(3) Mix number and FO2 gas percentage: This is the mix
number and associated FO2 gas percentage that is selected,
which is used to determine the depth and NDL limits.
If the NiTek3 calculates that there is residual nitrogen present
from previous dives, the available no-decompression limits are
shorter. Depending on how much residual nitrogen is present, no
20
NiTek3 Dive Computer User Manual
Using the NiTek3
NDL time may be displayed for some deeper depths. If this takes
place, a series of horizontal lines are displayed. Similarly, for
combinations of depth and FO2 that would cause a diver to
exceed a limiting PO2 of 1.6 atmospheres, a series of horizontal
lines appears in place of the no-decompression limit.
To enter plan mode:
1. Press button A.
The arrow at the bottom of the display points to PLAN.
2. Press button B or wait four to five seconds until the mixes
auto-scroll.
3. Press button A.
The mix indicator flashes.
4. Press button A to select a mix number.
5. Press button B.
The computer automatically scrolls through the available
depth and NDLs for the gas mix that is selected.
To quickly scroll the depths, press button B to advance the
depth. The no-decompression time limits change
automatically based on the depth.
6. The computer automatically returns to surface mode when it
scrolls through the last depth.
WARNING: Do not plan dives to depths deeper than those for
which the NiTek3 is capable of displaying an available nodecompression limit. Doing so could cause you to exceed the nodecompression limits or a limiting PO2 of 1.6 atmospheres. This
may increase your risk of decompression illness or CNS oxygen
toxicity and can lead to serious personal injury or death.
NiTek3 Dive Computer User Manual
21
Using the NiTek3
Dive computer mode
Dive computer mode is automatically entered when the computer
enters the water. It begins performing its dive calculations once
you descend below 5 feet (1.5 meters).
Caution: Prior to diving, always check to ensure that the FO2
settings are correct and that the computer is not in default mode.
While in diving mode, the computer calculates and displays
information about your dive and prompts you with safety stop
information and warnings if needed.
Dive mode screen
When you enter the water, the screen shows your depth,
remaining no-decompression limit, dive time, max depth, PO2
for selected mix, mix number, O2 percentages for gas selected,
and the OLI and nitrogen bar graphs.
1
5
3
7
2
4
6
8
(1) Depth: This is the current depth.
(2) Maximum depth: This is the maximum depth that has been
reached during the dive.
(3) PO2: This is the partial pressure of O2 at your current depth.
It is based on the FO2 setting for the mix selected.
(4) O2 (OLI) bar graph: This is the oxygen limit index (OLI)
that calculates the cumulative effect of your exposure to elevated
partial pressures of oxygen (PO2s). There are a maximum of
22
NiTek3 Dive Computer User Manual
Using the NiTek3
eight bars. When all bars are displayed, it means that you have
used 100 percent of your “CNS” clock. This graph increases
when you descend due to higher partial pressures and may
decrease when you ascend.
(5) Dive time: This is the time spent (in minutes) underwater,
measured from the time you descended below 5 feet (1.5 meters).
(6) Remaining no-decompression limit (NDL): This is the time
that is remaining (in minutes) before you reach the nodecompression limit. This NDL time limit increases when you
ascend and decreases when you descend.
(7) Mix number and O2 percentage: This is the mix number
the computer is currently calculating dive data for and the
oxygen percentage programmed for that mix number.
(8) Residual nitrogen bar graph: This is how much nitrogen
the computer assumes your body has absorbed. There are a
maximum of nine bars. When all bars are displayed, it means
that you are at or have exceeded the no-decompression limits.
Changing gas mixes underwater
Because the NiTek3 has the ability to use three different gas
mixes during a dive, you need the ability to switch between these
mixes while underwater. When you switch mixes, the PO2
adjusts to reflect the current mixture you are breathing.
Note: Only switch gas mixes when you have reached the safe
operating depth limit for the gas you are switching to.
To change gases underwater:
1. Press button A.
The mix number flashes.
2. Press button A to select a mix number.
3. Press button B to “lock in” the mix number.
The O2 percentages change to the programmed mix and the
PO2 indicator changes to reflect the PO2 for the selected
mix.
NiTek3 Dive Computer User Manual
23
Using the NiTek3
Note: Only the mix numbers that have been programmed
with a gas mixture are available.
Note: You cannot lock in a mix if it causes you to exceed a
PO2 of 1.6 atmospheres.
Warnings while in dive mode
While in diving mode, there are several warnings that you should
be alert to.
•
•
•
•
•
•
•
Decompression warning
Default warning
Ascent rate warning
PO2 limit warning
Oxygen limit index (OLI) warning
Decompression stop violation warning
Out-of-range warning
Decompression warning
If you exceed the no-decompression limits, the computer enters
decompression mode. An audible alarm sounds for three seconds
indicating that you have decompression stop requirements.
Caution: Decompression diving is considered to substantially
increase your risk of decompression illness.
24
NiTek3 Dive Computer User Manual
Using the NiTek3
2
3
1
5
4
Decompression warning with “DECO STOP” displayed on the
screen
(1) Deco stop symbol: The “DECO STOP” symbol displays
indicating that you have to stop at the depth displayed.
(2) Required stop depth: This is the required decompression
stop depth.
(3) Required stop time: This is the time you must remain at the
indicated stop depth.
(4) Total ascent time: This is the total amount of time (in
minutes) you must spend at the decompression stops and the
ascent time between decompression stops. Note: The total ascent
time and max depth toggle back and forth.
(5) N2 bar graph: This is how much nitrogen the computer
assumes your body has absorbed. There are a maximum of nine
bars. When all bars are displayed, it means that you are at or
have exceeded the no-decompression limits and have entered
decompression.
Default warning
If the computer is in default mode at the beginning of a dive, an
audible alarm sounds for three seconds. If you ascend and set the
NiTek3 Dive Computer User Manual
25
Using the NiTek3
mix percentages, you can restart the dive. See “Understanding
default mode” for more information.
Ascent rate warning
The NiTek3 assumes that you keep your ascent rate within the
following limits:
Depth range
Ascent rate
0 to 19 feet (0 to 5.9 meters)
26 feet (8 meters) per minute
20 to 58 feet (6 to 17.9 meters)
39 feet (12 meters) per minute
59 feet (18 meters) or deeper
52 feet (16 meters) per minute
If you exceed these ascent rates, an audible alarm sounds and the
current depth flashes. The warning displays until you slow your
ascent to an acceptable rate or you reach 5 feet (1.5 meters).
PO2 limit warning
The PO2 warning indicates that you have exceeded the 1.6
atmospheres for the gas you are breathing. When you reach 90
percent of the PO2 limit of 1.6 atmospheres, an audible alarm
sounds for three seconds and PO2 and depth flashes for three
seconds. If you continue to descend and exceed a PO2 of 1.6
atmospheres, the audible alarm sounds again for three seconds
and the PO2 and depth flash until you ascend to a safer depth.
Note: If the PO2 alarms activate at a depth of 20 feet (6 meters)
or less, you most likely have not exceeded the limiting PO2. It is
more likely that you forgot to set the FO2 percentages prior to
26
NiTek3 Dive Computer User Manual
Using the NiTek3
the dive. As a result, the computer has entered the FO2 default.
See “Understanding default mode” for more information.
Oxygen limit index (OLI) warning
The NiTek3’s oxygen limit index (OLI) reflects the cumulative
effect of your exposure to elevated partial pressures of oxygen.
The PO2 warning only accounts for the intensity of the exposure,
but the OLI accounts for both the intensity and length.
When seven of the O2’s eight bars are displayed, the computer’s
audible alarm sounds for three seconds, and the oxygen bar
graph flashes for three seconds. If you do not ascend to a
shallower depth, and all eight of the O2’s bars are displayed, the
alarm sounds again and oxygen bar graph flashes again. The
oxygen bar graph continues to flash until the bar graph drops to
seven bars. This warning will appear in log mode after the dive.
Note: Should the OLI and PO2 warnings activate at roughly the
same time—and at relatively shallows depths, early in the dive—
you most likely have not exceeded your actual oxygen limits.
What has happened, is that you forgot to set the FO2 percentages
prior to the dive and the computer has FO2 defaulted. See
“Understanding default mode” for more information.
Decompression stop violation warning
A decompression stop violation warning takes place when you
ascend to a shallower depth than the indicated stop depth or if
you do not spend sufficient time at the required depth before
ascending. When you enter this violation, the computer’s audible
alarm sounds and the stop depth, stop time, and “DECO STOP”
flashes. These items continue blinking as long as you remain
shallower than the indicated stop depth.
Note: During a deco stop violation, the computer’s ascent rate
warning does not function.
Caution: If you do not correct an indicated deco stop violation,
the warnings continue for several minutes after surfacing. At this
point, the computer is not usable for the next 24 hours.
NiTek3 Dive Computer User Manual
27
Using the NiTek3
Out-of-range warning
The following can cause the out-of-range warning:
•
Descend below the computer’s maximum operating depth of
328 feet (100 meters)
•
Exceed an actual bottom time of 599 minutes
•
Accrue decompression stops depths of greater than 90 feet
(27 meters)
The out-of-range warning consists of:
•
The audible alarm sounds for ten seconds
•
The entire screen flashes
WARNING: A NiTek3 displaying an out-of-range warning is
incapable of displaying other critical information such as depth,
time, ascent rate, PO2, OLI and deco stop violations, and
required decompression stops. For this reason, you should not,
under any circumstance, use a NiTek3 in such a way that would
cause an out-of-range warning. Under such conditions, the risk
of serious personal injury or death would be substantial.
28
NiTek3 Dive Computer User Manual
Using the NiTek3
Gauge mode
When selected, gauge mode is automatically entered when the
computer enters the water. It begins displaying depth and time
once you descend below 5 feet (1.5 meters).
Note: To enter and set up gauge mode operation, see “Using
gauge mode.”
While in gauge mode underwater, depth and time is displayed.
While in gauge mode on the surface, surface interval time is
displayed.
NiTek3 Dive Computer User Manual
29
Using the NiTek3
Surface mode (upon surfacing from a dive)
Once you surface from a dive, the NiTek3 automatically
switches to surface mode. In addition to the normal information
displayed in surface mode such as time of day, there is other
information that is displayed that pertains to the dive you just
completed. This includes:
•
•
•
•
Desaturation time
Surface interval time
Nitrogen (N2) bar graph
Oxygen limit index (OLI) bar graph
This information is displayed on both screens until the NiTek3
calculates that it is no longer needed or after 24 hours have
passed since the last dive.
Note: If you are making repetitive dives, you need to pay
attention to your surface interval and use it in conjunction with
plan mode. This ensures that you stay within no-decompression
limits.
2
3
1
4
(1) Surface interval time: This is the amount of time you have
spent on the surface since your last dive if there is residual
nitrogen present from a previous dive. It can display up to 24
hours of surface interval time.
(2) Desaturation time: This is the amount of time, expressed in
hours and minutes, that must pass before the residual nitrogen
levels drop to a point where subsequent dives are treated as a
single (non-repetitive) dives. This is not the same as “time to
fly.”
30
NiTek3 Dive Computer User Manual
Using the NiTek3
(3) O2 OLI bar graph: This indicates CNS toxicity level at the
end of the dive. This drops as your surface interval time
increases.
(4) N2 exposure bar graph: This is the amount of residual
nitrogen in your body at the end of the dive. This drops as your
surface interval time increases.
WARNING: It is recommended that you wait at least 24-hours
following any dive before flying in an aircraft or driving to
altitude. Failure to allow sufficient surface interval time before
doing so may increase your risk of decompression illness (DCI).
NiTek3 Dive Computer User Manual
31
Using the NiTek3
Log mode
For each dive, the NiTek3 stores information, such as depth, time,
temperature, etc. in a log. This stored log information can be
viewed directly from the NiTek3’s screen when in log mode. A
total of 10 dives can be stored.
Because of the amount of information the NiTek3 stores, there
are two pages that you can toggle between for each dive. Each
dive is assigned a number and has a date for the day. Each log
page displays the log number, making it easy for you to toggle
between the dive log pages.
1
2
7
8
3
4
6
5
Page one for a dive in log mode
10
9
Page two for a dive in log mode
(1) Log entry number: This is the sequence in which the log
appears. The most recent log entry has the highest number,
32
NiTek3 Dive Computer User Manual
Using the NiTek3
which began with log one. When the computer’s memory is full,
the oldest dives are overwritten with the new dives. This causes
the log entry number assigned to a particular dive to change.
(2) Date: This the month and day of the dive.
(3) Descent time: This is the time you started the dive, indicated
by a down arrow.
(4) Ascent time: This is the time you surfaced from the dive,
indicated by an up arrow.
(5) N2 exposure bar graph: This is the amount of residual
nitrogen in your body at the end of the dive.
(6) O2 OLI bar graph: This indicates CNS toxicity level at the
end of the dive.
(7) Dive time: This is the actual bottom time for the dive.
(8) Gas mixes used: These are the gas mixes that you used
during the dive.
(9) Temperature: This is the coldest temperature reached during
the dive.
(10) Max depth: This is the maximum depth reached during the
dive.
To view a dive log:
1. Press button A twice.
The arrow at the bottom the screen points to “LOG.”
2. Press button B to scroll “down” through the logged dives.
Note: The computer automatically switches between the two
log pages for each dive.
3. When finished, press button A twice to return to surface
mode.
NiTek3 Dive Computer User Manual
33
Using the NiTek3
Profile mode
Profile mode enables you to see a record of the depths you
reached at various points during a dive. You can display a
detailed profile of each dive stored in the log. When a dive is
selected, the computer automatically displays the depth and the
time in the dive when you reached that depth until it reaches the
end of the dive.
Dive profile information is stored in 5-, 10-, 20-, 30-, or 60second intervals during a dive. This must be set before a dive.
Refer to “Setting the dive profile sampling rate” for more
information.
1
2
4
3
(1) Dive log number: This is the dive number that corresponds
to the dive number when in log mode.
(2) Gas mix number and gas percentage: This is the gas mix
number that was used on the dive and the FO2 gas percentage
that was set for that mix number.
(3) Dive time: This tells you at what time during the dive you
reached the depth indicated.
(4) Depth: This is the depth that corresponds to the displayed
dive time.
To view a dive profile:
1. Press button A twice.
The arrow at the bottom the screen points to “LOG.”
34
NiTek3 Dive Computer User Manual
Using the NiTek3
2. Press button B to select the dive that you want to view
profile data.
3. Press button A.
The arrow at the bottom of the screen points to “PROF.”
Note: Once a dive profile is selected, the computer
automatically progresses through the different depths and
times of the dive.
4. When finished, press button A to return to surface mode.
NiTek3 Dive Computer User Manual
35
Using the NiTek3
PC transfer mode
If you purchased the optional personal computer interface for the
NiTek3, you can transfer the stored dive log information to
your PC.
Before transferring the dive log
You must complete the following before transferring the dive
log.
•
Install the NiTekLogic software onto your PC. Open the
program > click Options > and check the Uploader tab.
Make sure the COM port selection in the NiTekLogic
software matches the COM port you are connecting to.
•
Plug one end of the cable supplied with the interface into a
COM port on your PC. Plug the other end into the interface
module.
•
Set the NiTek3 to PC transfer mode as described below.
•
Place the NiTek3 on the interface module and secure the
strap over the computer. Click the computer icon in
NiTekLogic. A dialog box should appear indicating the
beginning of data transfer. If it is not uploading, check your
COM port settings.
Notes
•
If the dialog box says “negotiating” and cuts off before
saying “transfer,” you probably is a COM port setting issue.
Check to see that you are using the correct COM port.
•
If there is an error reported after the dialog box says
“transfer,” check for a loose or dirty connection between the
NiTek3 and the interface module.
36
NiTek3 Dive Computer User Manual
Using the NiTek3
To enter PC transfer mode:
1. Press button A twice.
The arrow at the bottom the screen points to “LOG.”
2. Press button A.
The arrow at the bottom of the screen points to “PROF.”
3. Press and hold button B for five seconds.
Arrows at the bottom of the screen point to “LOG” and
“PROF.”
4. Transfer the dive log data to your PC.
5. When finished, press button B to return to profile mode.
6. Press button A to return to surface mode.
NiTek3 Dive Computer User Manual
37
Using the NiTek3
Altitude operation
The NiTek3 adjusts automatically for diving at altitudes of up to
19,685 feet (6,000 meters). To show that the NiTek3 has made
the altitude adjustment, it displays the altitude setting using a
symbol representing a mountain and a corresponding number.
Altitude rank numbers
Number
Altitude range
0
Sea Level to 3,281 feet (1000 meters)
1
2,297 to 5,906 feet (700 to 1,800 meters)
2
4,593 to 8,530 feet (1,400 to 2,600 meters)
3
7,546 to 19,685 feet (2,300 to 6,000 meters)
ERR
Out of range above 19,685 feet (6,000 meters)
Prior to using the NiTek3 at altitudes substantially above sea
level, you should find out what the actual altitude of your dive
site is. Make certain that the altitude settings the NiTek3 displays
accurately match the altitude you are at.
Notes
•
38
Do not use the NiTek3 unless the altitude settings accurately
match the actual height above sea level you are diving in.
Doing so could cause the NiTek3 to display inaccurate
information.
NiTek3 Dive Computer User Manual
Using the NiTek3
•
Do not use the NiTek3 when the “ERR” symbol is displayed.
This means that you are above an altitude of 19,680 feet
(6,000 meters), which is beyond the NiTek3’s ability to
function accurately.
•
Do not place the NiTek3 in dive mode when making sudden,
substantial changes in altitude, such as when flying in an
airplane. This can be caused by storing the NiTek3 with wet
dive gear, which can touch its external electrical contacts and
cause it to enter dive mode. This can interfere with the
computer’s ability to function accurately.
The NiTek3 monitors and displays altitude information in all
modes, except PC transfer mode. Upon arriving at altitude, the
NiTek3’s N2 bar graph may show that there is excess nitrogen
present, even though you may not have made any dives in the
preceding 24 hours.
If you have obtained the altitude specialty diver training which
everyone should do before diving at altitudes substantially above
sea level, you already understand that this should be expected.
By ascending to a higher altitude from a lower one, your body
has more nitrogen saturated in body tissues than would be
present had you spent the preceding 24 hours at the higher
altitude. By displaying residual nitrogen and a surface interval,
your NiTek3 is merely reflecting this fact.
If the level of residual nitrogen calculated by the NiTek3 is
unusually high (seven or eight bars) when going to altitude, the
computer will be unable to enter dive mode. Avoid taking the
computer to altitude when residual nitrogen levels are this high,
and do not enter the water until nitrogen levels have dropped
substantially.
NiTek3 Dive Computer User Manual
39
Using the NiTek3
40
NiTek3 Dive Computer User Manual
Chapter 3
Care and maintenance
Summary
This chapter provides care and maintenance and battery
information for the NiTek3.
Content
Proper handling techniques • 42
Low battery warning • 44
Replacing the battery • 44
NiTek3 Dive Computer User Manual
41
Care and maintenance
Proper handling techniques
The NiTek3 is constructed to withstand the most demanding
diving conditions. It is, however, a high precision instrument,
which requires proper care.
Caution: Failure to follow these handling techniques may result
in damage to the NiTek3.
•
Do not store the computer in hot, humid, or wet
environments. The pressure transducer is sensitive to both
heat and humidity. If impaired, it may cause incorrect
altitude or depth readings.
•
When in hot and/or humid environments, dip the computer
in water for several minutes to cool it to room temperature
before using it. If it is cold, allow the computer to warm to
room temperature. Do not take it underwater immediately
after doing so.
•
Do not transport your NiTek3 on an aircraft or take it to
altitude while it is sealed in an air-tight container or in a
damp environment. Doing so may interfere with its ability to
correctly read, display, and track depth information.
•
The NiTek3’s Liquid Crystal Display (LCD) may darken if
left in a hot environment (such as on a car’s dashboard). It
will return to normal once allowed to cool, however,
extensive exposure to heat may shorten LCD life. Cold
weather can dim the LCD display.
•
Be aware that weather-related changes in air-pressure can
cause incorrect display of altitude settings. Be sure to check
indicated altitude settings against actual altitude before use.
Your NiTek3 is not to be disassembled by anyone other than
Dive Rite or its authorized dealers. Unauthorized
disassembly will violate the warranty.
•
If the NiTek3 does not appear to be functioning properly, do
not use it to dive. Return it to your authorized Dive Rite
dealer for repair.
42
NiTek3 Dive Computer User Manual
Care and maintenance
•
The NiTek3 should not come in contact with solvents or any
type of chemical substances
•
Do not use compressed air to dry the NiTek3
•
Do not use the NiTek3 in hyperbaric chambers if the device
is not fully submerged in water
•
Always rinse the computer with freshwater after use
•
Store the NiTek3 in a cool, dry location. After diving, wipe
the computer dry and store it in a location separate from
other damp items.
NiTek3 Dive Computer User Manual
43
Care and maintenance
Low battery warning
The battery that comes with the NiTek3 is designed to last for up
to three years under normal use. You may get more or less use
from the battery depending on how often it is used and how it is
cared for.
Note: The battery symbol blinks when the battery starts to run
low and is on constantly when the battery is critically low.
Cautions
•
All NiTek3 functions may cease within two to three days of
the low battery symbol first appearing. Always have low a
battery replaced promptly.
•
A depleted battery that is left in a NiTek3 for a long period
of time may leak. Replace batteries promptly.
Replacing the battery
Battery replacement is an easy operation that can be done by the
user. The battery must be replaced whenever the low battery
symbol (fixed or blinking) is displayed.
Note: When you replace the battery, all data regarding
desaturation, time, and date, etc. is lost. Never replace the battery
when desaturation is under way, since all data for desaturation
calculation would be lost.
Before replacing the battery, you should have a clean working
area free of dirt, dust, and moisture, and you need the following
items:
•
•
•
•
•
•
•
44
CR123A Lithium battery
Silicone grease
Lint-free cloth
Cotton swabs
Denatured alcohol
Pencil with a good eraser tip
Small Phillips head screwdriver
NiTek3 Dive Computer User Manual
Care and maintenance
To replace the battery:
1. Locate the battery compartment. It is the small section on the
back of the computer that does not hold the wrist strap.
2. Remove the four screws holding the panel in place using the
Phillips head screwdriver.
3. Examine the battery and battery housing for signs of
corrosion. Wipe off any sand or dirt from the cover and
o-ring using a cotton swab soaked in denatured alcohol.
4. Remove the old battery.
5. Clean the new battery’s contacts with the pencil eraser.
6. Remove the o-ring from its slot. Be careful not to damage
the o-ring.
7. Install the new battery; making sure that the polarity is
correct.
8. Clean the o-ring, and place a thin layer of silicone grease on
the o-ring.
9. Install the o-ring in its slot.
10. Screw the battery cover back into place. Do not over tighten.
11. Reset the time and date.
NiTek3 Dive Computer User Manual
45
Care and maintenance
46
NiTek3 Dive Computer User Manual
Index
A
A (mode) button · 11
accessing
modes and screens · 11
alarms · 3
algorithm · 5
altitude · 3, 5
altitude operation · 38
altitude symbols · 38
ascent rate warning · 26
ascent time · 25
log mode · 33
B
B button · 11
battery · 5
low battery warning · 44
replacing · 44
Buhlmann · 5
button operation · 11
C
care and maintenance · 41
proper handling
techniques · 42
clock · 5
computer mode · 22
D
date · 12
log mode · 33
date and time · 3
NiTek3 Dive Computer User Manual
deco stop symbol · 25
decompression stop
violation warning · 27
decompression warning · 24
default mode · 18
surface mode · 12
default warning · 25
depth · 3, 20, 22
maximum · 22
profile mode · 34
stop depth · 25
depth sensor · 5
desaturation time · 30
descent time
log mode · 33
dive log · 4, 5
dive mode · 22
dive mode screen · 22
dive option set · 14
dive profile · 4
dive time · 23
log mode · 33
profile mode · 34
diving
after a dive · 10
before a dive · 10
during a dive · 10
diving mode
gauge mode · 29
F
features and functions · 3
FO2 · 14, 20
FO2 default
dealing with · 19
how it occurs · 18
47
Index
fresh or salt water use · 15
fresh water · 14
G
gas mix number
log mode · 33
gas mixes · 15
changing underwater · 23
gas mixtures · 3
gauge mode · 29
guage mode · 17
log mode · 33
NDL · 20, 23
no-decompression limit ·
20, 23
O
OLI · 23, 31
log mode · 33
out-of-range warning · 28
oxygen limit index · 23, 31
oxygen limit index warning
· 27
I
P
Imperial · 4
L
log · 4
log mode · 32
viewing · 33
M
maximum depth
log mode · 33
metric · 4
metric or Imperial
description · 13
setting · 13
mix
changing underwater · 23
mix number · 20
mixes · 5, 15
N
N2 bar graph · 23, 25, 31
48
PC transfer mode · 4, 36
entering · 37
percentages
mixes · 15
plan mode · 20
PO2 · 22
PO2 limit warning · 26
profile · 4
profile mode · 34
viewing · 34
profile sampling rate · 14
R
residual nitrogen · 20, 23,
25, 31
S
safety information · 6
salt water · 14
setting
dive options · 14
NiTek3 Dive Computer User Manual
Index
fresh or salt water use ·
15
metric or Imperial · 13
profile sampling rate · 14
time and date · 12
size and weight · 5
specificatons · 5
surface interval time · 30
surface mode · 12, 30
T
temperature
log mode · 33
thermometer · 5
time
stop time · 25
time and date · 12
time and date
setting · 12
time mode
NiTek3 Dive Computer User Manual
setting time and date · 12
time of day · 12
W
warnings · 6
ascent rate · 26
decompression stop
violation warning · 27
decompression warning ·
24
default warning · 25
diving mode · 24
low battery warning · 44
out-of-range warning · 28
oxygen limit index · 27
PO2 limit warning · 26
water
fresh or salt · 4
salt or fresh water use ·
15
49
Index
50
NiTek3 Dive Computer User Manual