1
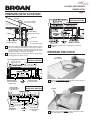
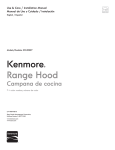
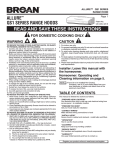
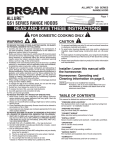
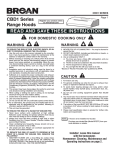
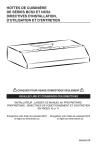
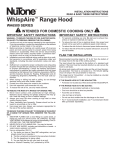
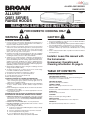
ALLURE® QSE1 SERIES
RANGE HOOD
Page 1
ALLURE®
QSE1 SERIES
RANGE HOODS
READ AND SAVE THESE INSTRUCTIONS
PatentNo.:
USD450,829S
!
FOR DOMESTIC COOKING ONLY
!
!
WARNING
CAUTION
TO REDUCE THE RISK OF FIRE, ELECTRIC SHOCK, OR INJURY
TO PERSONS, OBSERVE THE FOLLOWING:
1. Usethisunitonlyinthemannerintendedbythemanufacturer.If
you have questions, contact the manufacturer at the address or
telephonenumberlistedinthewarranty.
2. Beforeservicingorcleaningunit,switchpoweroffatservicepanel
andlocktheservicedisconnectingmeanstopreventpowerfrom
being switched on accidentally. When the service disconnecting
means cannot be locked, securely fasten a prominent warning
device,suchasatag,totheservicepanel.
3. Installationworkandelectricalwiringmustbedonebyaqualified
person(s)inaccordancewithallapplicablecodesandstandards,
includingfire-ratedconstructioncodesandstandards.
4. Sufficientairisneededforpropercombustionandexhaustingof
gases through the flue (chimney) of fuel burning equipment to
preventbackdrafting.Followtheheatingequipmentmanufacturer’s
guideline and safety standards such as those published by the
National Fire ProtectionAssociation (NFPA), and theAmerican
SocietyofHeating,RefrigerationandAirConditioningEngineers
(ASHRAE),andthelocalcodeauthorities.
5. Whencuttingordrillingintowallorceiling,donotdamageelectrical
wiringandotherhiddenutilities.
6. Toreducetheriskoffireorelectricshock,donotusethisrange
hoodwithanadditionalspeedcontroldevice.
7. Ductedfansmustalwaysbeventedtotheoutdoors.
8. Toreducetheriskoffire,useonlymetalductwork.
9. Usewithapprovedcord-connectionkitonly.
10.Thisunitmustbegrounded.
TO REDUCE THE RISK OF A RANGE TOP GREASE FIRE:
1. Neverleavesurfaceunitsunattendedathighsettings.Boilovers
cause smoking and greasy spillovers that may ignite. Heat oils
slowlyonlowormediumsettings.
2. AlwaysturnhoodONwhencookingathighheatorwhenflambeing
food (i.e.: Crêpes Suzette, Cherries Jubilee, Peppercorn Beef
Flambé).
3. Cleanventilatingfansfrequently.Greaseshouldnotbeallowedto
accumulateonfanorfilter.
4. Useproperpansize.Alwaysusecookwareappropriateforthesize
ofthesurfaceelement.
TO REDUCE THE RISK OF INJURY TO PERSONS IN THE EVENT
OF A RANGE TOP GREASE FIRE, OBSERVE THE FOLLOWING:*
1. SMOTHERFLAMESwithaclose-fittinglid,cookiesheet,ormetal
tray,thenturnofftheburner.BECAREFULTOPREVENTBURNS.
Iftheflamesdonotgooutimmediately,EVACUATEANDCALL
THE FIREDEPARTMENT.
2. NEVERPICKUPAFLAMINGPAN—Youmaybeburned.
3. DONOTUSEWATER,includingwetdishclothsortowels-violent
steamexplosionwillresult.
4. UseanextinguisherONLYif:
A. YouknowyouhaveaClassABCextinguisherandyoualready
knowhowtooperateit.
B. Thefireissmallandcontainedintheareawhereitstarted.
C. Thefiredepartmentisbeingcalled.
D. Youcanfightthefirewithyourbacktoanexit.
*Basedon“KitchenFireSafetyTips”publishedbyNFPA.
1. Forindooruseonly.
2. Forgeneralventilatinguseonly.Donotusetoexhausthazardous
orexplosivematerialsandvapors.
3. Toavoidmotorbearingdamageandnoisyand/orunbalancedimpellers,keepdrywallspray,constructiondust,etc.offpowerunit.
4. Forbestcaptureofcookingimpurities,yourrangehoodshouldbe
mountedsothatthetopofthehoodis24-30”abovethecooking
surface.
5. Pleasereadspecificationlabelonproductforfurtherinformation
andrequirements.
Installer: Leave this manual with
the homeowner.
Homeowner: Operating and
Cleaning information on page 5.
TABLE OF CONTENTS
Thismanualisdividedintosectionsasfollows:
PREPARE HOOD LOCATION
Runductworkfromrooforwallcap,andelectricalwiringfrom
servicepanel-toinstallationlocation
PREPARE THE HOOD
Getyourhoodreadyforinstallation
CONNECT WIRING
Makeelectricalwiringconnectionstohood
INSTALL HOOD
Securehoodtocabinetandductwork-installbulbsandfilters
OPERATION
Howtousethehoodcontrols
CLEANING
Keepyourhoodintopworkingcondition
SERVICE PARTS
Partnumbersandexplodedviewofhoodcomponents
WARRANTY
One-yearlimitedwarrantyandhowtocontactus
Registeryourproductonline.
IntheUSat:www.broan.com
InCanadaat:www.broan.ca
ALLURE® QSE1 SERIES
RANGE HOOD
Page 2
PREPARE HOOD LOCATION
7” ROUND
VERTICAL DUCTING
ROOF CAP
3¼" X 10" or 7” ROUND
(For vertical discharge)
SOFFIT
HOUSE WIRING
(Top or Back of hood)
CABINET
WALL CAP
HOOD
24" - 30" ABOVE
COOKING SURFACE
1
2
3¼" X 10" DUCT
(For horizontal discharge)
Determine whether hood will discharge vertically (3¼” x
10”or7”round)orhorizontally(3¼”x10”only).Forvertical
or horizontal discharge, run ductwork between the hood
locationandaroofcaporwallcap.Forbestresults,usea
minimumnumberoftransitonsandelbows.
Usediagrams,below,forproperplacementofductworkand
electricalcutoutincabinetorwall.
3
PREPARE THE HOOD
7”ROUND
DUCTPLATE
3¼” X 10”
HOOD MOUNTING SCREWS (4)
VERTICAL
DUCTING
15/
13 16" (30" hood)
1615/16" (36" hood)
1915/16" (42" hood)
CABINET FRONT
1315/16" (30" hood)
1615/16" (36" hood)
1915/16" (42" hood)
7½"
CABINET BOTTOM
5¼"
5¼"
5"
1¼"
WOOD SHIMS
(recessed-bottom
cabinets only)
10½"
2"
VERTICAL DUCT
ACCESS HOLE
WOOD SHIMS
(recessed-bottom
cabinets only)
Runhousewiringbetweenservicepanelandhood
location.
1½"
CENTER
LINE
ELECTRICAL
ACCESS HOLE
(in cabinet bottom)
1
3¼” X 10”
HORIZONTAL DUCTING
CABINET FRONT
1/8"
Remove7” Round Duct Platefromtopofhood.Setduct
plateaside-withmountingscrews.
FILTERS
¾"
DUCT
3¾" HORIZONTAL
ACCESS HOLE
CABINET
5¼"
5¼"
BOTTOM
7½"
15
13 /16" (30" hood)
1315/16" (30" hood)
1615/16" (36" hood)
1615/16" (36" hood)
1915/16" (42" hood)
1915/16" (42" hood)
HOOD
ELECTRICAL
MOUNTING
CENTER
ACCESS HOLE
SCREWS (4)
LINE
(in wall)
2
RemovetapeholdingFiltersinplace.Pulldownonfilter
tabsandliftfiltersout.Setfiltersaside.
ALLURE® QSE1 SERIES
RANGE HOOD
Page 3
PREPARE THE HOOD
PREPARE THE HOOD
TOPRECTANGULAR
DUCTKNOCKOUT
(Remove for 3¼” x 10”
Vertical Discharge)
3
RemoveDamper/Duct Connector frominsidethehood.
Setconnectoraside-withmountingscrewsandparts
bag.
REAR
RECTANGULAR
DUCTKNOCKOUT
(Remove for 3¼” x 10”
Horizontal Discharge)
6
RemoveappropriateDuct Knockout(s) fromtoporbackof
hood.
UPTO1”
SIDE-TO-SIDE
ADJUSTMENT
WIRING
COVER
RemoveWiring Cover frominsidethehood.Setcover
andmountingscrewaside.
PIVOT
7
DAMPER/DUCT
CONNECTOR
(Verticaldischarge
positionshown)
3¼” x 10” Ducted Discharge Only:Attach Damper/Duct
Connectoroverknockoutopening.MakesuredamperPivot
isnearesttoTop/Back Edgeofhood.RemoveTapefrom
damperflap.
NOTE
ELECTRICAL
CABLECLAMP
5
TOP/BACK
EDGE
Ú
4
TAPE
RemoveeithertoporbackwiringknockoutandinstallapprovedElectrical Cable Clamp.
Ù
DAMPER/DUCT
CONNECTOR
Damper/DuctConnectorcanbeinstalledupto1-inch
oneithersideofhoodcentertoaccomodateoff-center
ductwork.Inextremeoff-centerinstallations,oneend
oftheductconnectormayneedtobetrimmedtoclear
theelectricalcableclamp.
ALLURE® QSE1 SERIES
RANGE HOOD
Page 4
CONNECT WIRING
INSTALL HOOD
WARNING: To reduce the risk of electric shock,
make sure power is switched off at the service
panel. Lock or tag service panel to prevent
power from being switched on accidentally.
KEYHOLE
(4)
MOUNTING
SCREW
(4)
GREEN
GROUND
SCREW
1
1
ConnectHouse Wiring(120VAC)tohood.Connecthouse
blacktohoodblackwire,housewhitetohoodwhitewire,
andhousegroundunderGreen Ground Screw.Securely
tightencableclampontohousewiring.
2
Replacewiringcover.
Hanghoodfrom(4)Mounting Screws(frompartsbag).
Slidehoodtowardswalluntilmountingscrewsareengaged
innarrowendof(4) Keyholes.Tightenmountingscrews
securely.
CAUTION
DONOTPUSHONFANBLADE.Pushingonthe
blademaycauseittointerferewithotherhoodparts.
DUCT
TAPE
2
Connectductworktohood.UseDuct Tapetomakejoints
secureandairtight.
ALLURE® QSE1 SERIES
RANGE HOOD
Page 5
OPERATION
LAMP REPLACEMENT
LIGHT
LENS
Fan:The3-positionrockerswitch(ontheleft)controlsthefan.
The left position is low speed, center position is off, and right
positionishighspeed.Anindicatorlightshowsthatthefanison.
Light:The 3-position rocker switch (on the right) controls the
lights.Theleftpositionislowlightintensity,centerpositionisoff,
andrightpositionishighlightintensity.
CLEANING
1
PullTabonLight Lensforwardandpulldowntoremove
lens.
WARNING: To reduce the risk of electric shock,
disconnect from power supply before cleaning.
Aluminum mesh filters:Cleanfrequentlyusinghotwaterand
amilddetergent.Filtersaredishwashersafe.
To clean hood: Remove filters. Use a damp cloth and a mild
detergent to wipe all grease-laden surfaces. Use care when
cleaningfanblade-itmustnotbecomebentormisaligned.DO
NOTALLOWWATERTOENTERMOTOR.Makesureallsurfaces
arecompletelydrybeforere-installingfiltersandrestoringpower.
Motorispermanentlylubricated.Donotoilordisassemblemotor.
4W
NIGHTLIGHT
C-7BULB
42W
FLUORESCENT
LAMPGX24Q-4
!
CAUTION: Bulbs may be hot! Refer to bulb packaging for further information.
2
Grasp Lamp at base, tilt down and pull out to remove.
Replacewith42WFluorescentLampGX24Q-4.Night Light
uses4W,C-7bulb.
3
Replacelightlens.
ALLURE® QSE1 SERIES
RANGE HOOD
Page 6
SERVICE PARTS
KEY NO. PART NO.
1
2
3
4
5
6
7
8
9
10
11
12
**
13
14
15
16
17
18
19
20
21
22
R740013
R602017
R561116
R561117
R627497
R627499
R627575
R607657
R602533
R680504
*
R169016
R169002
R99080535
R531075
R99420635
99010299
R169004
99111251
99271358
99770154
99770150
97018489
98010817
98010818
98010814
R602534
R680508
DESCRIPTION
Damper/DuctConnector(includes hardware)
Screw,#8-18x¼Hex*(2inpackage,6req.)
RockerSwitch,White(2inpackage)
RockerSwitch,Black(2inpackage)
Nameplate,White
Nameplate,Stainless
Nameplate,Black
Lens
GroundScrew(2req.)
WiringCover(includeshardware)
Rivet,Pop.125dia.(3req.)
FilterSpringKit
MotorMountingScrew(3eachpart)
Motor(includesMotorMountingKit)
FanBlade(Includeshairpinclip)
HairpinClip
FilterKit(2perbag)
IndicatorLight(includes2wirenutsandlens)
LightLens
Lamp,42WFluorescent
BallastAssembly
WireHarness
ReflectorAssembly
LightPanel,White
LightPanel,Black
LightPanel,Stainless
Screw,8-18x3/8”*(2inpackage,5req.)
7”RoundDuctPlate(includeshardware)
OrderreplacementpartsbyPARTNO.-notbyKEYNO.
*Standardhardware-maybepurchasedlocally.
**Notillustrated.
WARRANTY
BROAN-NUTONE ONE YEAR LIMITED WARRANTY
Broan-NuTone warrants to the original consumer purchaser of its products that such products will be free from defects in materials or workmanship for a period of one
year from the date of original purchase. THERE ARE NO OTHER WARRANTIES, EXPRESS OR IMPLIED, INCLUDING, BUT NOT LIMITED TO, IMPLIED WARRANTIES OF
MERCHANTABILITY OR FITNESS FOR A PARTICULAR PURPOSE.
During this one-year period, Broan-NuTone will, at its option, repair or replace, without charge, any product or part which is found to be defective under normal use and
service.
THIS WARRANTY DOES NOT EXTEND TO FLUORESCENT LAMP STARTERS, TUBES, HALOGEN AND INCANDESCENT BULBS, FUSES, FILTERS, DUCTS, ROOF CAPS,
WALL CAPS AND OTHER ACCESSORIES FOR DUCTING. This warranty does not cover (a) normal maintenance and service or (b) any products or parts which have been
subject to misuse, negligence, accident, improper maintenance or repair (other than by Broan-NuTone), faulty installation or installation contrary to recommended installation instructions.
The duration of any implied warranty is limited to the one-year period as specified for the express warranty. Some states do not allow limitation on how long an implied
warranty lasts, so the above limitation may not apply to you.
BROAN-NUTONE’S OBLIGATION TO REPAIR OR REPLACE, AT BROAN-NUTONE’S OPTION, SHALL BE THE PURCHASER’S SOLE AND EXCLUSIVE REMEDY UNDER
THIS WARRANTY. BROAN-NUTONE SHALL NOT BE LIABLE FOR INCIDENTAL, CONSEQUENTIAL OR SPECIAL DAMAGES ARISING OUT OF OR IN CONNECTION WITH
PRODUCT USE OR PERFORMANCE. Some states do not allow the exclusion or limitation of incidental or consequential damages, so the above limitation or exclusion
may not apply to you.
This warranty gives you specific legal rights, and you may also have other rights, which vary from state to state. This warranty supersedes all prior warranties.
To qualify for warranty service, you must (a) notify Broan-NuTone at the address or telephone number below, (b) give the model number and part identification and (c)
describe the nature of any defect in the product or part. At the time of requesting warranty service, you must present evidence of the original purchase date.
99044696B