1
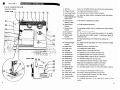
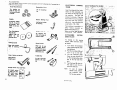
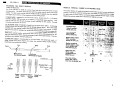
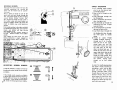
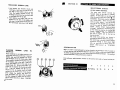
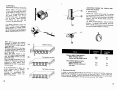
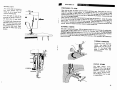
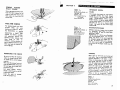
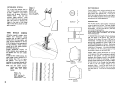
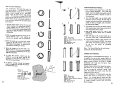
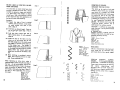
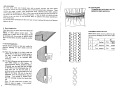
OPERATORS
INSTRUCTIONS
WHITER
SEWING
MACHINE
MODEL
734
:
C
C
You are now the owner of a new zigzag sewing
machine, the most versatile type of its kind you
can
possess.
Buttonholes, monogramming, stretch stitchin
g,
overcasting and creative embroidery are done
with ease
and speed.
C
To aid you in obtaining the greatest performance
from your new WHITE. this book on its care and
use
has been written for you.
Read the instructions
carefully, as a thorough understanding of your
machine
will reward you with many hours of trouble
free,
creative sewing.
C
WHITE_SEWING MACHINE
Record in space provided
below the Serial No.
and Model No. of this applian
ce.
The Serial No. is located Rear
of arm.
The Model No. is located Rear
of arm.
Serial
No.
Model No. 734
WHITE SEWING MACHINE COMPANY
Retain these numbers for future
reference.
Cleveland, Ohio 44111
WHITE CONSOLIDATED INDUSTRIES, LTD.
Scarborough, Ontario, Canada
9
C
6
..
G
.,
.6
..
—
I
CONTENTS
PAGE
SECTION I
PRELIMINARY INFORMATION
SECTION V
Parts Identification
Principle Parts
Accessories
Electrical Connections
Attaching Extension Plate
SECTION II
PRIME PREPARATION OF MACHINE
Choosing the Right Needle
Needle-ThreadFabric-Stitching Guide
Changing Needle
Changing Needle Plate
Selection of Presser Foot
Winding Bobbin
Adjusting Bobbin Winder
Upper Threading
Threading Bobbin Case
Placing Bobbin Case in Shuttle
SECTION III
8
9
10
10
11
12
12
13
14
14
GETTING TO KNOW YOUR MfCHINE
Selection of Stitch
Stitch Length Control
Reverse Button
Needle Position/Stitch Width/Buttonhole Control
Relating Stitch Length to Stitch Width
Stretch Stitch Control
Stitch Pattern Selector
Controls
Adjusting Thread Tensions
Adjusting Pressure on Fabric and Feed Dog Height
Sewing Light
SECTION IV
4
6
7
7
15
15
16
16
17
17
18
19
20
HOW TO SEW
Preparing to Sew
Guiding Fabric
Turning Corners
Curved Seams
Sewing Across Heavy Seams
Free-Arm Sewing
Removing the Work
21
21
21
21
22
22
22
APPLICATIONS OF STflCHES
Straight Stitch
Seams
Basting/Topstitching
Darning
Cording/Sewing in Zipper
Ouilting
Zigzag Stitch
Overcasting
Sewing Knits
Sewing on Button
With a Thread Shank
Satin Stitching
Freehand Monogramming
Applique
Gathering Over a Cord
Lace Application
Flutter Hem
Sewing Tips
Multiple Stitch Zigzag
Interlock Stitch
Twin Needle Sewing
Buttonholes
Preparation
Built-in Buttonhole
Turn-Around Buttonhole
Corded Buttonhole
Blind Hem Stitch & Stretch Blind-Hem Stitch
Stretch Stitches
Straiit Stretch Stitch
Rick-Rack
Stretch Overlock, Elastic Edging, StitchandOvercast, Ovet lock &
Feather Stitches
Applications
Elastic Application
Overtock Application
Decorative Stitches
..
23
23
23
24
24
25
25
25
26
26
27
27
28
28
28
29
29
30
30
32
33
33
34
35
35
35
36
36
3637
37
SECTION VI CARE AND MAINTENANCE OF YOUR MACHINE
Oiling Machine
Cleaning and Oiling Shuttle Area
Problems and Remedies
38
39
40
3
SECTION I
PRELIMINARY INFORMATION
PARTS IDENTIFICATION
PRINCIPLE PARTS
FRONT VIEW
1. TakeUp
2. Pressure Control
Always at its highest position when beginning or ending sewing.
For regulating the pressure on fabric.
3. Top Thread Guides
For leading thread to tension control for sewing.
For selecting needle position, setting stitch width and button
4. Needle Position/
Stitch Width/Button hole steps.
hole Control
5. Stitch Pattern
Selection Table
Fo(’reference of selected stitch pattern.
6. Stitch Pattern
Selec tot
For selecting the stitch pattern.
7. Stretch Stitch
Control
For changing ordinary stitch to triple reinforced stitch (stretch
stitch).
For winding thread on bobbin.
8. Bobbin Winder
9. Hand Wheel
-4o
t
Fi.
.k’r
1
)r’t 14
11
‘
L’
10. Stitch Length
Control
11. Reverse Button
For easy backtacking to lock thread ends by pushing the
button.
12. Feed Dog Height
Control
For regulating feed dog height for various materials and types
of sewing.
13. Needle Plate
With guide lines for sewing accuracy.
14. Presser Foot
For holding fabric when sewing.
15. Feed Dog
Diamond point to move fabric accurately.
16. Access Cover
17. Thumb Screw
For opening an access to bobbin and bobbin case.
For tightening presser foot in place on presser bar.
18. Needle Clamp
For holding needle in place in the slot of needle bar.
For automatic precise flow of upper thread.
19. Check Spring
20. Tension Dial
21. Face Plate
22. Spool Pins
23, Bobbin Winder
Tension Disc
.1I
L___
For the control of the up and down movement of the needle.
For selecting stitch length between no feeding and about 8
stitches per inch.
24, Light Switch
Presser Foot Lever
Thread Cutter
Extension Plate
Clutch-nut
25.
26.
27.
28.
For regulating the amount of tension on upper thread.
Hinge type for replacement of light bulb and oiling.
For holding spools, preventing over -spin of spools.
For providing proper tension on thread when bobbin winding.
For turning on or off the light inside face cover.
For lifting or lowering presser bar and presser foot.
For cutting both upper and lower threads after sewing.
For changing to flat sewing surface.
For stopping movement of the needle bar in order to wind
bobbin.
5
Mt..i..tUl1lLS
Your new White sewing machine comes equipped with the follow
ing set of acceories to
make your sewing easier.
Three Metal Bobbins
Buttonhole Foot
Th. bobbins are
made of m.ti end
hold about BOyvds
of thr.ad.
the for buttonhol
ing.
Needles
Button Sewing Foot
All-purpose nedl.
j
vided.
Two Felt Washers
:-
;E:.
Cording and Zipper Foot
Q
Quilting Guide
helps make parallel
rows of .tldiing.
for
Insert the plug with the inden
tations on the underside into
the socket on the right side of
the machine.
The plug will
only go in one way. Place the
foot control in such a position
that your foot rests comfort
ably on it. Insert the plug into
a wail outlet, 1lO—120V.
Your machine is grounded as a
safety feature provided on
White Sewing Machines,*
When not in use, keep the plug
disconnected from machine.
stitching very
• cord or zipper.
ATTACHING
SION PLATE
Screw Drivers
To change to flat sewing
surface, place extension plate
as follows.
do.. to the dge of
niell one for UI.
on belbln tension.
largi one for use on
thumb scrw n..di,
cI.np screw, etc.
1.
2.
3.
Cloth Guide and Screw
Tubed Oiler
alde in sewing
strdit e.n1.
for usa in oiling the
macbin.. Sos page
38.
4.
Straiit Stitch Foot and Plate
for ItNll
sawing
0
I
I
hold button in puce
for stitching.
six.. 11, 14 and 18
we induded. Twin
M(C I. elsa pro
Pi 1. f.it
ELECTRICAL CONNEC
TIONS
EXTEN
Turn down the extension
plate support legs (A) with
the left hand.
Pull the lock lever (B) and
turn it up to the left.
Tilt the extension plate
down to enter the pin (C)
in the corresponding hole
ID) at the rear side free
arm.
Turn the lever (8) down to
the right to set the pin
into front hole (El.
Note:
In case of sewing
tubular areas, detach
the extension plate
for free arm sewing.
*
only.
1
on dtsor and very
ilolit bWi)t milan.
ale wfsrl extra
support is needed.
6
U.S.A
‘5
:
“
SECtION Ii
PRIME PREPARATION OF MACHIN
E
CHOOSING THE RIGHT NEED
LE
TYPES OF NEEDLES
I he correct selection of needle to suit
the thread and fabric being sewn
gives the best
siitching results. Fine fabric should
be sewn with tine needles, heavier fabri
cs with heavier
needles For best results, sewing mach
ine needles should be replaced when
they become
even slightly dull or bent
or at the completion of every othe
r garment.
A regular needle is suggested for use
with woven fabrics. Needles style 15
x 1, (European
equivalent System 705) are used
on the majority of househol
d sewing machine. They
range in sizes from 8 to 20 with
the lower number indicating
the finer needle. The most
commonly used sizes are 1 1 and
14.
An alppose needle is designed
to handle knits as well as woven
fabrics It eliminates
skipped stitches and the slight ball
will not damage delicate fabri
cs This is the needle
provided with your sewing mach
ine and will be used for mos
t of your sewing A larger
ball point may still be necessary
for certain knits, such as bathing
suit fabric or power net.
A ball pIe is recomme
nded for use with tricots jerse
ys
linge
rie and power nets
Unlike sharp pointed needles
which pierce fibers of knit fabri
cs destroying elasticity the
ball point slips between fibers prev
enting damage to fabric and
skipped stitches These are
available in fine medium and
heavy ball points
A wedg point needle is recomme
nded for use with feather and
feather look vinyls A
wedge cutting point pierces feath
er more easily than ordinary
sewing machine needles
resulting in more satisfactory stitc
hing.
Point
Eye
N
Shaft
/
Body
//
(Flat Side of Needle)
Fabric
Extremely heavy
tarpaulin sacking
vu duck etc
I
18
‘
I
18
1
/
Long Groove
(Round Side of Needle)
‘i”
8 ?
to
44
10
4
16
to
t
12
.
.
.
.
,.
..
4
‘
.
.
.14,
.
to
Duty
p
Heavy
1uty
..
t,
4
r’
4L’”
f
:‘
50
ii,
.
Very sheer chiffon,
batiste, lace, organdy,
nylon net, marquisette, etc.
9
8 to 10
1.
4’W
.
(i
ij.
;3t
‘,,,
.
..
I
.:
.
11
.
.
W
‘
.
14
/
‘
)I,evv
•‘.
.,12
,
t.’.r.
4
10
Medium heavy drapery
fabric velveteen
suItIng felt terry etc
Synthetic
Thread
+payy Dyy
‘
,
8 i
yr.
‘
Plastic film
4 etc.
Elongated Scarf
Mercerized
Thread
6
to
‘‘
4
Heavy upholstery
fabric tIcking
denim leatherette
Medium broadcloth,
percale, glniam, linen,
chintz, taffeta sheer
wool, shantung, etc.
Machine
Stitching
Per Inch
•1
dimity. crepe,
handkerchief linen,
Long Groove
Flat
The correct selection of needle and
thread to suit the fabric will
result in more satisfactory
stitching. Fine fabrics should be
stitched with fine needles, fine
thread and short stitches.
For best results on heavier fabrics, use
coarser needles, heavier threa
ds and longer stitches.
Replace the machine needle when
it becomes even slightly dull
or bent.
Sheer voile, lawn,
f-.__
Short Groove
NEEDLE, THREAD, FABRIC
& STITCHING GUIDE
film)
.
a
44)
60
*.:‘
.•
.
.,.
..
18
to
20
63
0
-.
Short Groove —s
Eye
Regular AIlpurpose Medium
Wedge Point
Sharp Needle
Bali Point Needle
Needle
Needle
9
I
IANGING NEEDLE
SELECTION OF PRESSER FOOT
ways change the needle after every
For most ordinary sewing the original
all-purpose foot can be used. How
ever, it is recommended to use the
following
special
feet
in
your
accessory box whenever you want a
better stitching result.
Straight Stitch Foot
This has only a narrow hole to accom
rnodate only straight stitching, It may
be used on sheer or soft fabrics for
more control. When using this foot,
the Stitch Width Control should be
at “M” to avoid hitting the foot and
breaking the needle.
her garment especially when sewing on
lyester and nylon fabrics which dull
clles much faster. When needles are
Il or bent, they damage both your
‘nc arid the machine. A general rule
en placing sewing machine needles is
it the flat side of the needle is placed
the back of the machine, when the
l)binl is put in from the front. If the
edle is inserted incorrectly, the stitches
-Il not form.
change the needle:
Raise the needle bar to its highest
position by turning the hand wheel
toward you.
Loosen needle clamp to remove the
needle.
Place needle (flat side to the back and
long groove to the front) in the needle
clamp and push it upward as far as it
will go, tighten needle clamp.
After changing the needle, make one
complete turn of the hand wheel by
hand to be sure the needle is clearin
g
the needle plate.
-JANGING
NEEDLE
t.
4t091t
dI tá tha Bad
-
PLATE
though an all-purpose utility needle
ite is fixed on your machine, for
eight sewing on fine fabric or soft or
y stretchy fabric, you may want to use
straight stitch needle plate together
ih the straight stitch foot, both of
ich are included in your accessory box.
change the needle plate, remove the
o rews holding the plate in place.
t the needle plate and replace.
e needle plate is removed for cleaning
lint which may pile up between
.dle plate and feed dogs.
Buttonhole Foot
This foot has a groove underneath, to
allow the narrow satin stitch or
buttonhole to form evenly. However,
if skip stitches occur on sheer fabrics
with this foot, it may be necessary to
use thin paper underneath.
it,
.
j
Utility Neadli Plate
UflJHHo
411
.r
CHANGING
-
*
Straight Stitch Needle Plate
43H
F1
iii uuuJHH°J
o
I
Cording & ZIpper Foot, and Button
Foot
Use for sewing very close to tire edge
of a cord or zipper, and sewing on
buttons respectively.
PRESSER
FOOT
Use the large screwdriver to loosen
thumb screw. Turn the screw back
ward until the tool becomes loose.
Then, lift up on presser foot lever until
it is in its highest position in order to
remove the foot. Replace with desired
toot
and
tighten
thumb screw
securely.
11
WINDING BOBBIN
UPPER THREADING
Disengage the hand wheel (1) from the
stitching mechanism by turning the
clutch nut (2) toward you or counter
clockwise.
Place a spool of thread on one of the
spool pins and lead thread through the
rear Top Thread Guide (3) alter winding
around Bobbin Winder Tension Disc.
Run the end of thread through a hole in
the bobbin edge and place bobbin on
spindle of bobbin winder (4) fitting the
notch on bobbin over small spring on
spindle.
Push bobbin winder to the right, and hold
the thread end loosely then start machine
slowly, and bobbin will stop turning
when bobbin is full.
Cut thread and push bobbin winder to
the left. Remove bobbin from bobbin
winder.
Turn clutch nut away from you until
sewing mechanism is again engaged so
that needle moves when you turn the
hand wheel.
‘.Ir ..t’
ADJUSTING
.
-.
1. Turn the hand wheel toward
you to raise the take-up lever
to its highest position.
2. Place a spool of thread on the
spool pin.
3. Lead the thread through the
top thread guides.
4. Down and between the tension
discs, from right to left.
5. Draw the thread up through the
check.spring and with a slight
tug into the hook.
6. Up and through the eye of take
up lever from right to left.
7. Lead thread down through the
thread guide at the bottom of
the threading slot, then, through
the thread guide on needle
clamp.
needle
the
8, Thread
FROM
FRONT TO BACK, drawing it
through about 3 or 4 inches.
Hold the end of the upper
thread loosely and turn the
hand wheel toward you until
the needle goes all the way
down and comes back up. A
thread loop will form over the
upper thread which then can be
pulled out straight. Place both
thread ends under presser foot
and draw toward the back of
machine,
the
leaving
both
threads three or four inches
long.
..,,
BOBBIN
WINDER
(A)
It may be necessary to adjust of rear top
thread guide when thread winds unevenly
on bobbin.
If the thread winds unevenly on bobbin
as shown (A), loosen set screw of rear top
thread guide and move the thread guide
up slightly. If the thread winds as shown
move the thread guide down slightly.
12
‘I,
In case of twin needle sewing, place
two spools of thread, matching or
contrasting in color, one on each
spool pin, lead both threads
through top thread guides, bring
threads down and pass one thread
between the back discs and the
other between the front discs, then
treat both thread as one until
threading each thread through each
needle eye of twin needle.
SECTION lii
THREADING BOBBIN CASE
1. Hold bobbin case between thum
b and
forefinger of left hand, so that
the slot in
the edge of the bobbin case is
on top.
Take the bobbin between thum
b and
forefinger of right hand so that the
thread
on top leads from left to right.
2. Insert bobbin into bobbin
case, pull the
thread into the slot of the bobb
in case
and draw it under tension spring
and into
the fork•shaped opening of the
spring.
GETTING TO KNOW YOUR MACHINE
SELECTION OF STITCH:
Slot
fl
—
—
Slot
Tension
Spring
REVERSE BUTTON
PLACING
SHUTTLE
14
BOBBIN
CASE
IN
Raise needle bar to its highest
position, and
swing open the access cover dow
n. Hold the
bobbin case latch ID) between
the thumb
and forefinger of the left hand
, with at least
three inches of thread running
from the top
of the bobbin case to the right
, Insert and
center the bobbin case on the
stud of the
shuttle body (C). Be sure the
bobbin case
finger (E), is opposite the shut
tle race notch
(A).
Press the bobbin case
(8) into the
shuttle as far as possible until
the latch
catches on the center post of
the shuttle.
Then release the bobbin case
latch (D).
Press the bobbin case again
after the latch
has been released to make sure
the bobbin
case is locked securely in place.
Close the
access cover.
STITCH LENGTH CONTROL
The stitch length control cont
rols tht
forward feeding of the fabric in ordin
ar
sewing. At 0, the fabric is not fed
at all
With the control around the symbol
fot
buttonhole, the shortest stitch is availab
le
At 5 is the longest
about 6 stitches pet
inch on ordinary fabrics
but the control
may be set at any desired cpot betw
een 0
and 5 for a variety of length, except
when
stretch
stitching (triple back Wand- forth
stitching), the control is automatically
set
at the relative due position by turning
the
Stretch Stitch Control at ‘STR
ETCH
STITCH” position.
Turn the control to
the right to lengthen and to the left
to
shorten the stitch.
The stitch length number you choo
se is
indicated by the pointer above the cont
rol.
The stitch length in stietch stitching (trip
le
reinforced stitching) is fixed about
3/64
inch, on most kinds of fabrics with
the
stretch
stitch control at “STRETCH
STITCH”,
When you wish to sew backward to tie
the threads at the beginning or end of
a seam in
ordinary sewing, press the Reverse
Button in as far as it will go, so that your
machine sews
in reverse at approximately the same stitc
h length as forward stitch length. The
machine
will sew backward as long as the butto
n is held in.
Cross reference table between numeral
on the control and number of actual
stitches per
inch
Numeral on the control
Number of stitches per Inch (approx.)
0
1
2
3
4
No Feeding
30
25
15
8
6
15
NH DL. E
POSITION/Si I rct-t
WIDTH/
BUTTONHOLE CONTROL
this dial is used for changing
needle position.
stitch width at Left needle posi
tion, and when
making lour -step buttonhole.
Needle Position:
Three different needle position,
I
left, M
middle and B
right can be selected. At right
and middle needle positions,
only straight
sewing is available. For zigzag and
other pattern
sewings, set needle position
at L
left needle
position.
• Stitch Width at Left Needle Posi
tion:
At (L) the needle does not
swing, therefore, a
straight line of sewing results
no matter which
stitch is selected. With the
dial at 1 or narrow
zigzag mark the needle takes
a narrow swing
resulting a narrow column of
stitching. At 5,
or the widest zigzag mark, the
needle takes a
large swing resulting in a wide
column of stitches.
In case of twin needle sewing, this
control should
be set in the range of gray bar
or less than 2Y,
otherwise needle hits needle plate
.
Note: It is mechanically impo
ssible to turn
STRETCH STITCH CONTRO
L
Selection between ordinary
stitching and
triple automatic reinforced
stitching called
stretch stitch is made by the
stretch stitch
control. With the control
at “N” position,
ordinary sewing is performed
.
With the
control at “STRETCH STIT
CH” position,
the stitch length control is auto
matically set
the relative due position and
your machine
automatically performs the
stretch stitch
with the repetition of two forw
ard and one
backward stitch combination.
A reinforced
seam of stretch stitch that
will stretch
considerably more than the
fabric used is
the most wanted feature in
a sewing machine
today.
Its uses are almost unlimited
and the more
you use your machine the
more it will
become apparent to you.
-
—
—
—
STITCH PATTERN SELECTOR
In addition to straight and zigza
g stitches of both ordinary forw
ard and special automatic
back and-forth (stretch) sewing,
16 different kinds of utility
and stretch stitches as shown
on the panel of stitch pattern selec
tion table can be selected. The
numbers marked on the
stitch pattern selector knob shows
the selected stitch patterns shown
on the panel with the
corresponding numbers. For
the stitch patterns shown in the
upper row in white boxes,
set the stretch stitch control at
“N” position for forward sewi
ng. For those in the lowe
row in red boxes on the panel,
r
set it at the red dot position
marked as Stretch Stitch for
automatic back-and-forth (Stre
tch) sewing so that the stitch
length control is automat
cally set at the relative due posi
i
tion.
the
dial clockwise further than wide
st stitch
width position, therefore, for
setting the
dial for four-step buttonhol
ing from the
stitch width control range,
turn the dial
counter clockwise.
• Buttonhole Control:
The first buttonhole pictu
re (step 1) sews in
forward on the left edge of
buttonhole. With the
control at buttonhole step
(2—4), your machine
does not feed fabric for barta
cking the button
hole ends and, with it at
buttonhole step (3), it
feeds fabric in reverse to
sew the right button
hole edge.
16
RELATING STITCH LEN
GTH TO STITCH
WIDTH
When the stitch width
control is set at one
particular width (such as
5 for the widest zig
zag), the stitch length cont
rol will now control
how close those stitches
come together.
At
length 0, the fabric does
not move, resulting in
a bar of stitches formed
one on top of the other,
as is used in button sewi
ng.
or near 0, the feed pulls At the symbol fl
the fabric through
slowly, resulting in a dens
e column of stitches
called a satin stitch.
At length 5, a very long
open zigzag results.
WO
I 2¼
1111
1
2¼
2
3
2’/ 2¼
4
2¼
-
• ‘ ‘•
—
—-
,‘m
,--
5
0
ii!!,!
17
CONTHOLS:
ADJUSTING THREAD TENSIONS
Always adjust the upper thread
tension with the presser toot down,
as the tension is released when it is
raised. To increase the tension on
the .upper thread, turn tension
control to the right. To decrease,
turn to the felt. Before adjusting
the tension be sure that the
machine is threaded property.
ADJUSTING PRESSURE ON FABRIC AND
FEED DOG HEIGHT
• General Sewing
Usually for normal sewing, except for sewing
on very heavy and bulky fabrics, the center
pin
(B) of the pressure control should be at its lowest
position, with the feed dog height control at
“UP” position.
For above exceptional fabrics, reduce half the
pressure. To reduce half the pressure, press the
outer ring (A) of the pressure control, then press
the center pin (B) down again to halfway.
It is seldom required to adjust the
bobbin thread tension, however,
when necessary to change bobbin
thread tension, turn small screw on
side of the bobbin case clockwise to
tighter,, counterclockwise to loosen.
fr
When both tensions are property
balanced, a perfect stitch will
be
formed with both threads interlock
ing in fabric (A).
When the upper tension is too tight,
the bobbin thread is pulled up over
the upper thread which is lying flat
on the fabric (B).
When the upper tension is too
loose, the upper thread forms loops
over the bobbin thread lying flat
on the fabric (C).
When the upper and bobbin thread
tensions are balanced but fabric
is
puckered in sheer fabrics, both
tensions are too tight. loosen both
tensions evenly.
It is recommended to adjust
the
tension balance with a medium
stitch length.
In case of satin
stitching
for
buttonholes and
embroidery slightly loosen the
upper thread tension.
(A)
Fabric
(B)
Ordinary fabric of less elasticity:
Heavy end bulky fabrics
Medium and light weight fabrics
Top tension too tight
Very stretchy fabrics and knits:
Heavy and bulky ones
Medium and tight weight and
sheer ones
(C)
Top tension too loose
Pressure on
fabric
Half
Full
Feed dog
height
Up
Up
Half
Up
Full
Up
Mending and Darning
In order to move the fabric freely in any directi
on for darning and mendinq, release the
center pin (B) completely by pressing down on
the outer ring (A). Turn the feed dnq
height control to “DOWN” position, which drops the teed
dog well below the needle plate,
To return the feed dog height to normal, turn the
control to “UP” position.
C
18
‘9
SECTION IV
SEWING LIGHT
The sewing light is located in
lace cover directly over the
needle so as to better illumi
nate the sutching area.
HOW TO SEW
PREPARING TO SEW
Have take-up lever at highest posi
tion before starting to sew.
Pinning may be used as a
time saver instead of hand basting.
It is possible to sew over pins
when placed at right
angles to the edge of fabric with the
pin head at the raw edge, but
for best results it is
recommended that the pins be removed
as you approach the presser foot.
can result in damaged needles.
Sewing over pins
Place material and threads under press
er foot and lower the presser
foot. Lower the needle
by turning hand wheel by hand to chec
k it the needle will pierce the
stitching line you
want to sew. You are now ready to
begin sewing. Press the spee
d control. The speed of
the machine is regulated by increasingor
decreasing the amount of
pressure exerted on the
control. Never run machine without
material under presser foot.
Turn the light on and off by
pressing the button located at
the back side of face cover.
To replace bulb, disconnect the
plug and open face cover to the
left. Unscrew bulb as you do a
conventional light bulb. Plac
e
new bulb in socket and screw
in place.
GUIDING FABRIC
The scale is etched with every 1/8
inch distance measured from
the center of needle plate.
Let the edge of fabric follow the line
selected for the seam, and let
your eyes follow the
etched line you selected for the seam
, not the needle, during sewi
ng. To help you guide
the fabric, place cloth guide attachme
nt securing it by the extra thum
b screw onto machine
bedplate. Cloth guide and extra thum
b screw are included in your acce
ssory box.
Do not try to help the feeding by pulli
ng the material as this may
deflect the needle and
cause it to break.
TURNING CORNERS
To pivot at a corner, leave the
needle in the fabric in its
upward stroke. Lift the presser
foot, turn the fabric, then
lower the presser foot and
continue sewing.
CURVED SEAMS
LOOSEN
Use slightly shorter stitch
length than that of the rest of
the seams. On the part where
elasticity is required on the
seam, sew by stretch stitch.
The cloth guide may he used
on angle as shown.
21
SECTION V.
SEWING
ACROSS
HEAVY SEAMS
APPLICATIONS OF STITCHES
Pattern: 1
Length: 2—3
Needle Position/Width: M
Feed Dog: Up
Pressure: Full
Foot: Straight Stitch or
All Purpose
Stretch Control: N
When approaching heavy seam
,
hold the fabric upward on an
angle so that the heavy seam
talk under the front curve of
presser toot.
STRAIGHT STITCH:
SEAMS
The normal stitch length for mos
t fabrics
is between 2—3 but the length
chosen
should depend on the fabric and
area of
usage.
Usually, heavier fabrics require
longer stitches, and lighter weig
ht fabrics
require shorter stitches. For curved
seams
and bias cut areas use a shorter
stitch
length. Be sure to set the stitch
width
control at M.
FREE-ARM SEWING
For sewing tubular and hard
to-reach
areas,
use
your
machine as a free-arm. Stitc
h
ing buttonholes or sewi
ng
buttons on a cuff or neck band
;
topstitching a sleeve: edge
finishes on sleeves, pantlegs
and waistlines; darning and
patching knees, elbows; and
other areas of wear on
children’s clothing become
as
easy as sewing a common seam
when you have-the tree-arm
at
your fingertips.
Pattern: 1
Length: 4—5
Needle Position/Width: 0
Feed Dog: Up
Pressure: Full
Foot: Straight Stitch
Stretch Control: N
BASTINGFTOPST1TCHING
Sewing a seam with a longer stitc
h is useful
for temporary seams prior
to fitting.
Basting stitches also may be used
when
gathering in fullness.
Topstitching can be done very
effectively
with the long straight stitch. For
a bolder
stitch, two threads of the same
type can
be threaded through one needle
(size 14
or 16). A heavier thread such
as button
hole twist may be used for tops
titching,
but be sure to use a larger needle
(size 16
or 18).
REMOVING THE WORK
Be sure to stop the machine
when the thread take-up lever
or needle bar is at the highest
position.
Now raise the presser foot and
draw the fabric back and to the
left and pass the threads over
the thread cutter.
Pull down slightly, holding
thread in both hands, so as not
to bend the needle.
Leave the ends of threads
under the presser foot.
II:
-
DARNING
Worn spots or small holes can be darned
very easily. Use of an embroidery hoop
is
optional depending o-’ the fabric. A fine
threau is recommended -,b that the fabric
and thread will blend together invisibly.
Trim the ragged edges from the area to be
darned. Hold the threads to start, then
move the fabric slowly backwards and
forwards while running the machine very
fast to fill the area. Professional resul
ts
will be attained by moving the fabric in
a figure eight pattern white sewing. After
tilling in the area lengthwise. reweave
with crosswise stitches in the same manner.
Pattern: I
Length: 0
Needle PosnionlWidth
Feed Dog
M
Down
Preiture. 0
Fool: All Purpose
Stretch Control N
23
CORDING/SEWING IN ZIPPE
R
w
Insert Cording
(A) Fold bias strip of fabric
over cord.
Loosen the adjusting screw
on the
back of cording/zipper foot
and set
the foot to the left of needle.
(B) Sandwich the welting
between two
layers of fabric with tight
sides
together. Stitch a second time
with
cordinzipper loot to the
right of
needle so that the needle stitche
s close
to the cord through all thickn
esses.
Pattern: 1
Length: 1—3
Width: 5
Feed Dog: UP
Pressure: Full
Foot: All Purpose
Stretch Control: N
Pattern: I
Length: 1—3
Width: 1
Feed Dog: Up
Pressure: Full
Foot: All Purpose
Stretch Control: N
• Zippers
Swing the foot to left or right
of the needle
as needed so that the foot
sews very close
to zipper teeth.
II
QUILTING
Parallel straight lines are easy
to sew with
the quilting guide. To
attach the guide,
loosen thumb screw and slip
the U-shaped
holder of the guide betwee
n presser foot
and thumb screw.
Tighten the thumb
screw securely. Adjust the
curved bar to
the desired distance from
the needle. Sew
the first line of stitching
as desired, then,
for the succeeding
rows let the guide
follow along the previous
stitch line. A
straight stitch, zigzag, or
any other stitch
may be used.
Pattern: 1
Length: 0
Width: 2—5
Feed Dog: Down
Pressure: Full
Foot: Button Foot
Stretch Control: N
ZIGZAG STITCH:
OVERCASTING
Place the edge of the material underneath
the opening of the sewing foot and guide
raw edge along the center slot of the foot
allowing stitch to form half on and half off
the fabric.
The multiple stitch zigzag is a wiser choice
for most fabrics,
See page 29.
SEWING KNITS
The narrow zigzag can be used in seams of
firm knits for added strength.
After
sewing, open seam and press flat. Tiny
zigzag stitches can hardly be seen and the
seam will give when stretched.
Generally on knits, however, try the
straight stretch or special stretch stitche
s.
See page 35.
SEWING ON BUTTON
Place the button so its left hole comes
directly under the needle of its left zigzag
swing then gently lower the button loot.
Take a stitch into the hole.
Raise the needle from the left hole, and
mov zigzag width t.or’trol to the right
until the needle comes down exactly over
the right hole in the button.
Note: Be 9Jre the needle clears the holes
of the button by moving the wheel
by
hand befote running the machine fast.
Usually 6 to 8 stitches are adequate for
securing a button in place. Slop with
the
needle in the left hole.
To lock the
threads, set the stitch width at 0, and
take
a few stitches in the left hand hole.
24
25
• With a Thread Shank
Buttons sewn on coats or jackets should
have a thread shank to make them stand
away from the fabric. To form a thread
shank, sew over a pin or rounded tooth
pick.
After stitching the button to the fabric,
remove work from under the presser foot
leaving threads about six inches from
fabric. Remove pin or toothpick. Pull
the threads to back of button and form a
shank between button and fabric
by
winding threads tightly around the
attaching stitches. Pull threads to back
of
the fabric and tie thread ends secure
ly.
Paltern 1
Length 0
Width: 1-S
Feed Dog Down
Pressure: 0
Foot: All Purpose
Stretch Control: N
SATIN STITCHING
This is useful for decoration such
as
tapering, manual designed embroidery,
monogramming and applique.
The satin stitch, which is really just
a
very close zigzag stitch, is obtained
by
setting the stitch length as near to
“0”
as possible without stopping the feeding
action or at the symbol
The setting
will vary for different fabrics. It may
be
desirable to loosen the upper tension
slightly to cause the threads to
lock
underneath in order to make the
top
surtace look especially smooth.
For
lightweight fabrics, place a
paper
underneath the fabric for best results.
fl
Length: 1
Width: 0—2
Feed Dog: Up
Pressure: Full
Foot: All Purpose
Stretch Control: N
For giving garments and linens a personali
ed touch, first transfer the design to ti
right side of the fabric.
An embroide:
hoop is recommended especiatly for so
fabrics and toweling.
In order to monogram, you must mo
the labric slowly and run the machit
rapidly, Monogramming is like writing I
moving the paper under a stationary pe
Guide the fabric slowly so that the iiqz
falls close together like a satin stitch, but I
careful that the stitches do not pile u
When guiding froWn side to side, mo
fabric slightly faster to avoid a heavy are
Practice by forming loops.
Once this
accomplished any letter is easy.
Sometimes the use of paper or non-wovt
interlacing under the fabric may mal
guiding the fabric easier.
The paper
interfacing may be torn or cut away at t
completion of the monogram. When moni
gramming towels, plastic film placed on t
top will help cover loops and make t
monogram smooth.
Pull or cut ewe
remaining plastic film when finished.
APPLIQUE
.
Pattern: 1
Length:
Width: 1—5
Feed Dog: Up
Pressure: Full
Foot: All Purpose
Stretch Control: N
[J
26
Step 1:
P.ttern: I
FREEHAND MONOGRAMMING
Step 2:
Pettern: 1
Length:
Width: 2—F
Feed Dog: Up
Pressure: Full
Foot: All Purpose
Stretch Control: N
Applyingdecorative shapes of fabric scrap
to household articles and clothing is a ver
interesting way of trimming an otherwis
plain article.
First, trace the design oi
fabric to be appliqued, then pin or baste i
securely in place on garment. With a sm&
straight stitch or narrow zigzag, sew arount
the traced design.
At the excess fabric is trimmed away, sev
around the applique with a satin stitch. Fo
a smooth curve, stop frequently at the insidt
edge of the curve to pivot the fabric slightly
Corners look much helter when the point i
stitched by pivoting rather than just turned
As with all decorative stitches, paper may bt
used to give more body to the fabric wher
stitching and can be torn away when tht
applique is completed
GATHERING OVER A CORD
Ordinary gathering with a basting
stitch
of ten breaks thread while
pulling in full
ness. A small zigzag across
a cord such as
crochet thread or carpet thread,
gives a
much stronger cord for gatheri
ng fullness
into fabrics. Once the gathers
have been
stitched in place, the cord can
be pulled
out in order to eliminate bulk.
Pattern: 1
Length: 2
Width: 2—3
Feed Dog: Up
Pressure: Full
Foot: All Purpose
Stretch Control: N
LACE APPLICATION
Attaching laces or trims adds
a special
touch to lingerie, dresses,
or linens. Pin
or baste lace in place easing
or mitering
corners where necessary.
A straight edged lace or braid
has a
convenient line to follow when
sewing.
When using a scalloped edged
lace, follow
the design of the face for
an almost
invisible application.
Pattern: 1
Length: 34—1
Width: 1—3
Feed Dog: Up
Pressure: Full
Foot: All Purpose
Stretch Control: N
FLUTTER HEM
An unusual way of hemming
or finishing
edges of tricot or soft knits
is by a flutter
edge. Hemming in this
manner is just like
overcasting an edge, but the
!abric is
stretched in back and in
front of the
needle as you sew. For best
results, pull
the fabric equally, making
sure the needle
goes over the edge. When
you stop to
reposition your hands, keep
the needle in
the fabric.
SEWING TIPS
When a dainty hair line finish is
particularly desirable for the inside seams
of sheer collars, facings, and yokes, seam
allowance that would ordinarily show
through is eliminated by following the
seam outline with a narrow zigzag stitch,
Trim seam allowance close to line of
stitching. Turn and press.
Pattern: 1
Length: 34—1
Width: 34—2
Feed Dog: Up
Pressure: Full
Foot: All Purpose
Stretch Control: N
MULTIPLE STITCH ZIGZAG
The multiple stitch zitzag can be used for
hundreds of various kinds of sewing appli
cations, such as replacing worn blanket
bindings for both a decorative and
durable finish, overcasting an edge to
prevent fraying, applying elastic waist
bands to skirts and dresses, sewing a
zigzag stitch on soft or sheer material
preventing puckering, etc.
Just sew like ordinary zigzag stitching.
Pattern: 9
Stitch Length: 4—5
Width: 3—5
Feed Dog: Up
Pressure: Full
Foot: All Purpose
Stretch Control: N
Pattern: 1
Length: 34—34
Width: 4—5
Feed Dog: High
Pressure: Full
Foot: All Purpose
Stretch Control: N
29
INTERLOCK STITCH
For a very fine, delicate seam in
nylon tricot or jersey, the interlock
is used. Lingerie or tricot seams
should only be about 1/8 inch in
finished width.
Just sew like
ordinary zigzag stitching.
Shell
tuck on soft knits is also produced
with this stitch by swinging the
zigzag to the right of the folded
edge of the fabric placed its bulk
part to the left.
TWIN
NEEDLE
BUTTONHOLES:
Var,ous fabrics require various methods of sew
ing buttonholes. Three different methods ar
given below, with suggested uses. If you are ir
doubt as to which method is best for your fabric
test the methods in question and choose the besi
according to the finished appearance.
A
PREPARATION
SEWING
Attractive parallel straight stitch
effects
and
decorative
zigzag
patterns can be easily made by
sewing with the twinneedle, and
they are very effective for various
kinds of garment finish sewing such
as top stitching, needle position
should be at left needle position
and border sewing, etc.
Except buttonhole stitches, all
built.in special stitch patterns can
be applied with the twin needle
sewing.
In case of twin needle sewing, the
stitch width control should be at
less number than “2’/” or in gray
bar making.
The use of color.
matched or contrasted threads will
result in a more attractive finish.
Note: Use left needle position
sewing and zigzag needle
plate, when twin needle
sewing.
Pattern: Any
length: 1—5
Wdih: Less than 24
Foot: All-purpose
Needle Position: I only
30
Pattern: 8
Length: 2
Width: S
Feed Dog: Up
Pressure: Full
Foot: Alt Purpose
Stretch Control: N
nch
For the best results, a good quality mercerizec
cotton thread should be used. Polyester thread
often result in puckered or heavy unaltractivi
buttonholes. The finer your fabric is, the fine.
your cotton thread should be.
An interfacing should be used under the button
holes to give body, to strengthen, and to half
them withstand wear.
To establish the correct length of the buttonhole
add the length of the button (A). plus thi
thickness of the button (B), plus 1/32 inch to
the bartacks. The length may be marked on thi
garment with a basting stitch, tailor’s chalk, or at
invisible cellophane tape, as shown. Horizonta
buttonholes should extend 1/8 inch beyond !h
centerline of the garment. Vertical buttonhole
are placed so that the cutting space of thi
buttonhole is directly on the center line.
F,
II I
Center line of
Garment
1/8 inch
‘S
((
Center Line of
Garment
Always make a practice buttonhole on a scrap
of the gaiment fabric before making any button
holes on your garment. On your test sample
duplicate the thicknesses found in the garrrlen
and be sure to include the interfacing. The tes
sample should help determine the length needec
for the button to pass through the hole easily
as well as the stitch length needed for thi
particular fabric. As with the satin stitch, tht
stitches should be close together, hut not So cfos4
that they pile up. Be sure to use the buttonholi
foot.
BUILT-IN BUTTONHOLE
I his buttonhole eliminates the need
for
pivoting the fabric. It is used most often on
light and medium woven fabric. The stitch
length control should be at “BUTTON
HOLE” mark or near 0 not to stop feeding
action. A buttonhole of about 3/16 inch
width can be made by simply turning stitch
width control from buttonhole position 1
to 2, 3 and 4 in sequence on the stitch width
cotnrol panel.
1
Set the stitch width control for the red
square marked (1) buttonhole position.
Lower needle into the mark at the top
left end of buttonhole Lower presser foot
and sew on the left edge of buttonhole
until you reach the bottom end
of
buttonhole.
2. With the needle up and the control to
the
(2—4> Position take a few stitches to
bartack the buttom end of buttonhole.
3. With the needle up, turn the stitch
width
control to the (3) position. Sew on the
right edge of buttonhole. At this position
the machine is feeding in reverse.
4. With the needle out of the cloth,
turn
again to the (2—4) position and
complete
the buttonhole by bartacking on the
top
edge of buttonhole.
5. To lock the stitches, make sure
the
needle is out of the fabric and set
the
control at L and feed dog height down.
Then take a few stitches.
6. To prevent cutting through the
bartack
insert a straight pin through the bartack.
Cut buttonhole open.
Pattern; 1
Length: Buttonhole
1 2-4 3
Width
[]
-El -
Feed Dog: Up
Pressure: Full
Foot: Buttonhole Foot
Stretch Stitch: N
32
2-4
TURN-AROUND BUTTONHOLE
2
I
L 2 U
Ii
•.0
flH
‘U
4
,
%
5
6
Pattern: 1
Langth Buttonhole
Width: 5—2—5—2—0
Feed Dog; Down-UP-Down-UP-Down
pressure: Full
Foot: ButtonhOle Foot
Stretch Control; N
unlu’
Pattern; 1
length: Buttonhole
Width: 5—2—5—2—0
Feed Dog: Down-Up-Down-Up-Down
Pressure: Full
Foot: Buttonhole Foot
Stretch Control: N
1. Place material under presser foot to sew the
top of marked buttonhole. Turn feed dog
height control to DOWN, stitch width control
at 5 take few stitches to bartack the end of
the buttonhole.
2. Turn feed dog height to up, set stitch width
control at 2, then, sew down the left edge of
marked buttonhole and finish stitching with
needle in fabric at the right side of stitches.
Set feed dog at DOWN.
3. Lift presser foot and pivot the fabric around,
then lower presser foot and take one stitch to
left turning hand wheel by hand.
4. With stitch width control at 5, take a few
stitches, to bartack another end of marked
buttonhole.
5. With feed dog to UP and stitch width at 2,
sew down other edge of marked buttonhole.
6. Lock thread by stitching a few stitches at 0
width and feed dog height DOWN. Cut center
open space of buttonhole carefully so as not
to cut into the stitches, as illustrated
previously.
Note: Try Stretch Blind Hem for reinforcing
buttonhole, <Eyelash buttonhole).
CORDED BUTTONHOLE
Cording gives a reinforced raised buttonhole. It
is excellent for use on bulky, woven fabric, or
knits in whch the stitching jltssn gets buried and
makes cutting difficult.
On knits, a corded
buttonhole will help keep the fabric from
stretching out of shape.
Choose a heavy cotton crochet thread or button
hole twist to use for the cording. Proceed as
for the turn-around buttonhole having cord
under the presser foot in such a way that the
zigzag stitch covers the cord.
At the completion of the buttonhole snip the
excess cord close to the bartack on woven
fabrics. For knitted garments, always pull the
cords to the wrong side by using a darning needle
or needle threader, and knot the cord ends
before clipping.
33
BLIND HEM & STRETCH BLINDHEM STITCHES
The blind hem or stretch blind hem stitch
provides a durable hem finish that is almost
invisible on garments, drapes, and curtains,
It is done easily with straight or slightly
curved hems. With a little practice it will be
a very quick and easy hem application and
the hem will never need repairing.
Procedure:
(1) Prepare raw edge of hem in desired
manner, such as overcast, 6 inch stitch
ed under pinked, hem tape, or lust
plain. (Step 1)
cm
STRETCH STITCHES:
Step 1
STRAIGHT STRETCH STITCH
This stitch may be used on knits and
wovens in areas of stress as a reinforce
ment stitch. It is excellent for curved
seams such as armholes and crotch seams.
For active wear such as ski pants and
girdle fabrics which endure a lot of stress
in bending and stretching, this stitch may
be used for seaming throughout the
garment. With stretch stitch control at
“STRETCH STITCH” position, sew in
same manner as for ordinary sewing.
CAUTION
It is difficult to remove this
stitch from fabric. Pre-fit garment before
using this stitch.
• Topgtitch Effect
Because this stitch is heavier than an
ordinary straight stitch, it is ideal for lopstitching, particularly on knits.
Ill
Ill
III
III
‘U
‘I’
“I
Step 2
—
(2) Fold hem up desired length. Baste or
pin t
h inch from upper edge. Press in
place. (Step 2)
(3) Fold bern back toward right side of
fabric leaving about ¼ inch extended.
(Step 3)
(4) Guide the told of the fabric into the
center cut of the presser foot so that
the wide zigzag bite of the stitch comes
lust slightly to the left of the center cut
of the presser foot. The straight or
narrow zigzag stitches should be formed
on the single thickness of fabric, and the
zigzag width bite should catch just
barely into the fold of the fabric at the
left.
Step 3
Pattern
Feed Dint U
Pressure Full
Foot: All Purpose
Stretch Control SI HE TCll
Paltern: I
length: Automatic
Set, np
Width: 25
Feed Dog: Up
Pressure: Full
Foot: All purpose
Stretch Control
STRETCH
Step 4
(5) When stitching is completed, remove
fabric from machine and turn to right
side. Press completed hem.
When hemming an A-line skirt, place a
machine basting stitch along the raw edge of
the hem. At an ironing board, fold up the
hem, matching the seams. Ease in the excess
fabric by pulling on basting thread. Press
with steam, then apply hem tape. Baste or
pin hem ¼” from taped edge, the continue
intostep3.
Pattern: 2or3
34
Length: 2—3
Width: 3—5
Feed Dog: Up
Pressure: Full
Foot: All Purpose
Stretch Control: N
1
Length Automatic Setting
Width M
2
Step 5
A
A
3
6
)
9
Y
V
/\
/‘
RICK-RACK:
This is a most common triple backand
forth zigzag stitch for decorative uses,
with more elasticity than regular zigzag.
STRETCH
OVERLOCK,
ELASTIC
EDGING,
STITCHand-OVERCAST,
OVERLOCK,
FEATHER STITCHES
These stretch stitches are best for seaming
and
overcast,
edgestitching
and
decorative effects on both woven and
knit fabrics such as lingerie, sweater knits,
bathing suit knits, cotton knits, or gauze
type fabrics.
t’atirrr,
t eriqil
2,36,P,9
A,,tc,,,,ai,,
Sell
Wdth
/\
/\
S
rf’iJ Driq
tip
l’,r’ssiie r ,,li
r 001 All Pij’p’i’,r
SiipI.l’ (;orlrol ST lIt lUll
3!
APP L IC AT IONS:
(C) Applying Elastic
The specIal stretch stitch Qive a very fini
appearance to elastIc application.
On most knits, 3/16 inch finished seam, such as stretch overlo
ck and other special
ultrastietch stitches ae more desirable than a 5/8 inch opened seam
allowance. These
stitches can create a neater, more professional finish, elimin
ate bulky seams, prevent
curling, permit the garment to “give” under stress, and at the
same time they cut down on
the amount of work involved in making a garment. If ever in doubt
as to which of those
stitches to use, test them on the particular fabric in questio
n and choose according to
their performance.
Its uses are almost unlimited and the more you use your machin
e the more it will become
apparent to you.
• Elastic Application
Fold fabric over the elastic and stitch elastic and
fabric at one time, using stretch overlock, elastic
ing, or other special stretch stitch. The
9
ed
doóble layer of fabric next to the elastic should
be stitched with the oneside of special stretch
seam and the elastic should be caught by another
side.
DECORATIVE STITCHES
Belowshown stitches are very useful for dec
live stitching and edging on both woven and I
fabrics.
N
1
• Overiock Application
Special stretch stitches are also very usable for
overlock stitching on both woven and knit
fabrics.
5
7.
(A) Place the raw edge of the fabric under the
presser foot so that as the needle swings to
the right, it comes down at the raw edge.
This will result in an enclosed seam
allowance.
(B) The seam allowances may be trimmed to 1/4
inch either before or after sewing.
If
trimming before sewing, proceed as above.
Otherwise, sew the seam with the raw edge
of the fabric on the etched guide line 1/2”.
(Any time you use the full width of a
particular stitch, you should readiust the raw
edge of the fabric 1/8 inch to the left.)
Afterward, trim the excess fabric near the
stitching.
This method is actually easier
than the overedge method for fabrics that
curl.
Note: On soft, loose knits, the fabric may
seem to wave or ripple.
If this occurs,
reduce the pressure on fabric.
>ç
<
zo
5
x
1
.‘-••‘
SS
Scallop
<‘<‘k
Oa
Domino
‘1,,\
Crow.
Checker
‘)(‘
Cross
j
SECTION VI
F
CARE AND MAINTENANCE OF YOUR MACHINE
OILING MACHINE
CLEANING AND OILING 1
SHUTTLE AREA
The stitch forming mechanism occash
Use only a good sewing machine oil, do not use any common household oils.
Your machine should be oiled occasionally to keep it operating smoothly. How often
depends on the amount of sewing you do. Once a month oil your machine thoroughly as
indicated by the arrows on illustrations, specifically those point marked in red on your
machine.
Place a single drop to avoid over oiling.
ly becomes clogged with loose thr
and lint. This will interfere with
efficient operation of the maci
Cleaning and removal of the lint
safeguard the performance.
To remove the shuttle assembly, pro
as follows:
1. Turn hand wheel until the rn
reaches its highest position. Tilt
back on its hinges.
2. Remove bobbin case (A).
3. Turn the two shuttle race cover cli
(0 outward and remove the shi
race cover (C) and the shuttle I
(El and the lint cleaner (0).
4. Clean the shuttle race, the shuttle
shuttle race cover by removinl
threads, lint, etc.
When the cleaning has been completed, proceed as follows to replace the shuttle assert
1. Turn hand wheel until the needle reaches its highest position.
2. Place lint cleaner (0) to shuttle driver and shuttle body (El in race (F) against shi
driver and adjust into position.
3. Replace shuttle race cover (C), fitting pin at lower edge into notch, and lock
position with shuttle race cover clamps (f), making certain the clamps have
snapped securely into position.
4, Put bobbin (8) into bobbin case (A).
5. Put the bobbin case into the shuttle, fitting tongue (a) into notch (c) of race cover
6. Place a single drop of oil on shuttle body as indicated by arrow on illustration.
)“‘.
PROBLEM AND REMEDIES
Probable Cause
Trouble
II Machine
Thread or lint in raceway.
Clean and oil machin, the shuttle
area. (Sea page 39.)
Bent needle.
Replace with new needle. (See page 10j
Needle placed incorrectly
in clamp.
Place needle correctly. (See page 10.)
Minds
Skipping
Stitch..
Too fine a needie for
thread being used.
Too stretchy fabric.
Irregular
.•‘r
‘‘.
Bribing
See threading Instruction, peg. 13.
lobbin not wound
evenly.
Adjust bobbin winder. (See page 12)
Pulling or holding
material.
Avoid pulling or holding material, just
ride it.
Not enough tension
on upp.r thread.
Increase tension.
Improperly tttreeded.
Too much tendon.
.:,..
Starting with take-up
In incorrect position.
Improper setting of
needle.
.
Material
Puc.ring
Machine noisy
• material wil
not feed In
atiitch itltchlng.
Replace needle or thr.ad to conform
each other. (See page 9.)
Place a piper beneath fabric, or use
Hill Point needle.
Upper thr.ed tension
too loose.
Improper threading.
Poor quality thread.
Needle too fIn. tot
thread being used.
Upper Thread
Remedies
Tighten upper tension.
Try different thread.
Se. needle and threed chart. page 9.
Refer to threading instructions, see
page 13, and rethr.ed machine.
L.ooin upper thread tension.
Seepage 18.)
Always start sewing with takeup lever
in highest position.
Refer to needle setting instruction, see
peg.1O.
Bent or eye of needle
too diem.
Try a new needle.
Sent or blunt needle.
Discard all blunt or bent needles and
replace with new.
Tension, too tight.
Dull ne.die.
Stitch length too long.
See tension adjustment, page 18.
Change needle.
Reduce stitch length.
Stitch length control
Ia set at other than
Number 5,
Set stitch length control at Number 5
Lint In feed dog.
Remove needle plete and clean lint from
feed dog.
If your machine skips stitches only on certain fabrics,
try all of the procedures on the previous page before
calling a repair-man.
Check the needle plate area, if there are scratches and
marks around the needle hole opening, your machine is
not being cleaned properly. Always remove the needle
plate and clean the feed dogs periodically, Improper and
lack of cleaning will cause an accumulation of lint which
hampers the feeding mechanism, this in turn will cause
the operator to impatiently pull or push the cloth
causing the needle to bend and strike the plate, toot or
hook, causing a slip in the timing mechanism.
Continuous striking will cause defects making it
necessary to call a serviceman,