1
} OMPLTV37C.book
Page i Tuesday, May 24, 2005
9:50 AM
ore for your money
PLTV-37C
37" Liquid
User's Manual
Crystal
Display
Protron
PLTV-37C Liquid Crystal Display User's Manual.
@ 2005 Protron Digital Corporation.
All rights reserved.
Under copyright law, this manual may not be reproduced in any form, in whole or in part,
without the prior written consent of Protron Digital Corporation.
Disclaimer
Protron Digital Corporation has reviewed this manual and provides it only as a guide to
operation. All statements, technical information,
and recommendations
in this manual and in
any guides or related documents are believed reliable, but the accuracy and completeness
thereof are not guaranteed or warranted, and they are not intended to be, nor should they be
understood to be, representations or warranties concerning the products described.
Specifications
are subject to change without
notice.
Trademarks
Protron
is a registered trademark
is a trademark
SRSLabs, Inc.
of Prosonic Group Corporation.
of SRSLabs, Inc. WOW technology
is incorporated
under license from
_®
_'G_
is a trademark
Sound, Inc.
of BBE Sound, Inc. BBE technology
Protron Digital Corporation
2133 S. Green Privado
Ontario,
CA 91761
Printed in China
is incorporated
under license from BBE
PREVENT
POSSIBLE
DANGER,
ELECTRIC
SHOCK,
ANDOTHERINJURIES
WHEN
HANDLING
YOURDISPLAY,
PLEASE
BEAWAREOFOFALLWARNINGS
ANDSAFETY
PRECAUTIONS
LISTED
BELOW.
Neverspillanyliquidof anykindonthe display.
Neverinsertanythinginto the display,whereobjectscancomeinto contactwith
high voltagenodesor damageinternalcomponents.
Donot attempt
to service the display yourself. Opening or removing covers
exposes high voltage nodes and other hazards. Refer all servicing to qualified
service personnel.
®
Do not touch the display or antenna during thunderstorms.
during thunderstorms or if it will not be used for extended
do so may result in electric shock or fire.
Unplug the display
periods. Failure to
Before cleaning the display, unplug it from the wall. Use a damp cloth for
cleaning. Never use liquid or aerosol cleaners.
To prevent overheating and ensure reliable operation, place the display only in
a well ventilated location. Avoid cramped or inadequately ventilated locations.
Place the display at least 10 cm (4") from walls or other objects. Always keep the
vent clean. Never place the display upside down.
Note:
Read all safety and operating instructions
before operating your new display.
_cccccccccccccccccccccccccccccccccccccccc
Conformity
and Compliance
FCC Compliance
Statement
This equipment has been tested and found to comply with the limits for a Class B digital device,
pursuant to Part 15 of the FCC Rules. These limits are designed to provide reasonable protection
against harmful interference when the equipment is operated in a residential installation. This
equipment generates, uses, and can radiate radio frequency energy and, if not installed and used
in accordance with the instructions, may cause harmful interference to radio communications.
However, there is no guarantee that interference will not occur in a particular installation. If this
equipment does cause harmful interference to radio or television reception (this can be
determined by turning the device off and on), the user is encouraged to try to correct the
interference by one or more of the following measures:
•
Reorient or relocate the receiving antenna.
•
Increase the separation
between the equipment
•
Connect the equipment
is connected.
to an outlet on a circuit different
•
Consult the dealer or an experienced
and the receiver.
radio/TV technician
from that to which the receiver
for help.
Caution:
To comply with the limits for an FCC Class B computing device, the user should use the shielded
signal cable and power cord supplied with the unit. The FCCwarns that changes or modifications
of the unit not expressly approved by the party responsible for compliance could void the user's
authority to operate the equipment.
Radio
Frequency
Interference
Statement
Warning:
This is a Class B product. In a domestic environment this product may cause radio interference,
which case the user may be required to take adequate measures.
Canadian
DOC Notice
for Class B Computing
Devices
This digital apparatus does not exceed the Class B limits for radio noise emissions from a digital
apparatus as set out in the Radio Interference Regulations of the Canadian Department of
Communications.
CE Marking
and
Declaration
of Conformity
This device complies with the requirements
following:
of related European standards, which include the
Emission: EN 55022, EN 61000-3-2, EN 61000-3-3
Immunity:
EN 50082-1
Safety: EN 60950 Low-Voltage
Directive (73/23/EEC)
in
Introduction.....................................................................
Features.....................................................................
UnpackingYourNewDisplay.......................................................
SettingUpthe Display.............................................................
Connectingto aTVSignalSource................................................
Connectingto Composite
VideoOutputDevices....................................
Connectingto S-VideoOutputDevices............................................
Connectingto ComponentVideoOutputDevices...................................
Connectingto a PeripheralAudio System
..........................................
Connectingto a VideoInput System..............................................
Connectingto a PC............................................................
Operatingthe Display.............................................................
Turningthe DisplayOnandOff..................................................
Selectingthe VideoandAudio Source............................................
Adjustingthe Volume..........................................................
Selectingthe Channel..........................................................
Accessing
the On-Screen
Display.................................................
UsingYourDisplayfor the FirstTime................................................
SettingupTelevisionChannels.................................................
Usingthe RemoteControl.........................................................
Configuringthe Display..........................................................
TVParameters
...............................................................
PCParameters
...............................................................
AudioSettings...............................................................
Picture-In-Picture
.............................................................
ChannelSettings.............................................................
ParentalControls.............................................................
GeneralSettings.............................................................
Troubleshooting................................................................
SupportInformation..........................................................
Specifications
...................................................................
General....................................................................
SupportedVGATimingModes..................................................
LimitedWarranty................................................................
1
1
2
3
3
4
4
5
5
6
6
8
8
8
8
9
9
10
10
11
13
13
14
15
16
18
19
21
24
25
26
26
27
28
000o0000
C
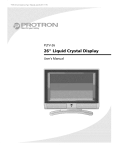
Congratulations
on purchasing your new Protron 37" Liquid Crystal Display!
You can use your new display as a television, in a home theater system, or even as a computer
monitor. With component, composite, and S-Video video inputs, you can connect numerous
devices to your display, including DVD players, VCRs, HDTV receivers, video game systems,
camcorders, and so on. And with video and audio output, you can connect your display to a
home stereo system with a subwoofer, or even record what is displayed on the screen.
The progressive scan and interlaced component video inputs on your display give you the highest
quality video available, allowing you to view crystal-clear DVDs and HDTV. With a resolution of
1366 x 768, your display gives you plenty of high-resolution
screen real estate when connected
to a computer.
Features
•
37" viewable
display area
•
Analog TV tuner with coaxial input
•
Progressive scan component
•
Interlaced
•
3 composite
•
S-Video input
•
6 audio inputs, one for each video input
•
Composite video output
•
Audio output
•
VGA and DVl computer
•
1/8" stereo audio input jack for computer
•
1366 x 768 pixel resolution
•
Wide viewing
•
Digital character smoothing
•
Versatile, functional,
•
VESA DPMS-compliant power saving--automatically
configurable period of inactivity
•
Windows
•
Conforms to VESA standards and supports the DDC1 and DDC2B specifications.
component
video input
video input
video inputs
with subwoofer
output
video inputs
audio
angle
and user-friendly
On-Screen Display (OSD)
turns off the display after a
95198/2000/XP Plug and Play compliant
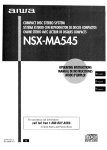
Unpacking
Your
New
Display
Before using your new display, you should unpack
the contents
of the box and check to make sure
everything
is present
and undamaged.
To unpack the display:
1.
Set the box upright
location.
near the intended
display
2.
Open the top set of flaps.
3.
Remove the styrofoam
display.
4.
Remove the accessories box from behind the
./Accessories
Box
pad from the top of the
display and set it aside.
5.
Lift the display out of the box and set it aside.
The accessories box should contain the items
indicated below. If any items are missing or
damaged, contact the seller immediately.
Power
Remote
x
Control
Cord
_
VGA
Cable
\
/
PC Audio
User's
Cable
Coax-to-RCA
Adapter
/
2 x AAA
Battery
//
Manual
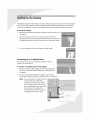
the
Display
The display requires a stable, level, and clean surface near a power outlet, 10 cm (4") away from
walls or other large objects. The rear ventilation grid should be unobstructed, and the display
should not be exposed to water or heat. Before setting up the display, prepare such a space.
To set up the display:
1.
Remove the protective
the display.
2.
Remove the power cord from the accessories box, insert the
appropriate end into the power (AC IN) connector on the bottom of
the display, and then insert the other end into a free power outlet.
3.
Turn on the power switch on the bottom
Connecting
plastic bag and plastic screen protector
to a TV Signal
of the display.
Source
A TV signal may come from a cable box, satellite
antenna,
or similar
receiver,
device.
To connect a TV signal source to the display:
1.
Remove the coax-to-RCA adapter from the Accessories Box
and insert it into the antenna (ANT) jack on the bottom of
the display.
2.
Connect a coax cable between the adapter and TV signal
source (for example, a cable box, satellite receiver or antenna).
Note:
If you would like to be able to record
the TV signal with a VCR, DVD
recorder, or similar device, connect
the TV signal source to the input of
the recording device with one cable,
then connect the output of the
recording device to the ANT jack on
the display with another
cable.
from
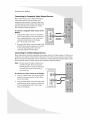
Setting
Up the Display
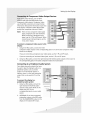
Connecting
to Composite
Many video devices, such
video game systems, and
composite video outputs.
one RCA cable to transmit
Video
Output
Devices
as VCRs, DVD players,
camcorders, have
Composite video uses
video information and
generally provides lower quality than S-Video
and component video (see below).
To connect
display:
1.
a composite
video source to the
Using an RCA cable, connect the composite
video output (yellow) on the source device to
the corresponding jack in one of the three
composite video blocks on the display
(AV 1 IN, AV 2 IN, or AV 3 IN).
Using two RCA cables, connect the right (red)
and left (white) audio outputs on the source
to the corresponding jacks in the same
composite video block used above.
Connecting
to S-Video
Output
Devices
Many video devices that have composite video outputs also have S-Video outputs. S-Video uses a
single four-wire cable to transmit video information.
Two of the wires are used to transmit video.
Because it splits the video signal into two components, S-Video generally provides higher quality
than composite video, but lower quality than component video (see below).
Note:
The pins used in S-Video connectors are
somewhat fragile. Take care to avoid
bending the pins, as a bent or broken pin
can cause loss of color information or
total signal loss.
To connect
an S-Video
i
source to the display:
1.
Using an S-Video cable, connect the S-Video
output on the source device to the S-Video
jack on the display.
2.
Using two RCA cables, connect the right (red)
and left (white) audio outputs on the source
to the corresponding jacks in the S-Video
block on the display.
S_VmDEO
OUT
Setting
Lponent
Video
Output
Up the Display
Devices
video devices, such as HDTV
high-end DVD players, have
3onent video outputs. Component video
uses three RCA connections to transmit video
information.
Because the information
is split into
three signals, component video offers higher
quality than composite video and S-Video.
Note:
There are two component video signal
types: progressive scan and interlaced.
When connecting a progressive scan
signal, use the Y, Pb, and Prinputs. When
connecting an interlaced signal, use the
Y, Cb, and Cr inputs.
To connect
display:
1.
2.
a component
video source to the
Using three RCA cables, connect the three
component video outputs to the corresponding
blocks on the display:
jacks in one of the two component
If you are connecting
a progressive scan video signal, use the Y, Pb, and Pr inputs.
If you are connecting
an interlaced
video signal, use the Y, Cb, and Cr inputs.
Using two RCA cables, connect the right (red) and left (white) audio outputs
the corresponding jacks in the same component video block used above.
Connecting
to a Peripheral
Audio
System
Your display has audio outputs that may
be used to play the display's audio on a
peripheral system, such as a stereo
system or a home theater system. In
addition, there is a line-level subwoofer
output that can be used to fill out the
bass.
To connect the display to a
peripheral
audio system:
1.
2.
video
Using two RCA cables, connect the
right (red) and left (white) audio
outputs in the output block on the
display (AV OUT) to the
corresponding inputs on your audio
system.
(OPTIONAL) If you have a powered
subwoofer, connect a third RCA cable
from the SUBWOOFER output on the
display to the subwoofer's input.
SUBWOOF
ZR
on the source to
Setting
Up the Display
Connecting
to a Video
Input
System
There is a composite video output on the display
that may be used to transmit the currently
displayed video to other video input devices,
such as video recorders or other displays.
To connect
system:
the display to a video input
1.
Using an RCA cable, connect the composite
video output (yellow) in the output block on
the display (AV OUT) to the corresponding
jack on the video input system.
2.
Using two RCA cables, connect the right (red)
and left (white) audio outputs in the AV OUT
block to the corresponding inputs on the
video input system.
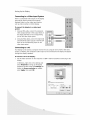
Connecting
to a PC
Your display can be used as a computer monitor for any computer with a VGA or DVl video
output. In addition, the computer's audio output can be connected to the display and played
through the display's speakers.
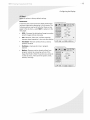
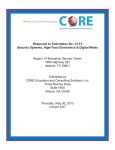
To connect
1.
a PC to the display:
Set the video resolution
display.
on the computer
In Windows, right-click on the
select Properties to bring up
Properties window. Select the
Adjust the Screen resolution
select Apply, then select OK.
to 1280 x 1024 or less before connecting
desktop and
the Display
Settings tab.
as needed,
to the
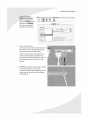
Setting
Up the Display
.<t
u
Preferences
)le menu.
Open the Displays panel
and select the Display
tab. Select the desired
resolution from the list.
800
x bOO
832
x 624
COlOt%:
Refresh
1024
× 768
IISZ
x 870
1280
× 1024
1544
X 1008
1600
X IZO0
1792
x 1344
If your computer has a
DVI output, connect a DVI cable between the
DVl output on the computer and the DVl
input on the bottom of the display.
If your computer has a VGA output only,
connect the VGA cable included in the
Accessories Box between the VGA output
the computer and the VGA input on the
display.
on
(OPTIONAL) Using the audio cable included
in the Accessories Box, connect the
computer's audio output (LINE OUT) to the
audio input on the bottom of the display
(PC AUDIO IN).
Show
Nu#_be£
Rate:
60,{) He_z
d_so+avs
of [_esent
is #'+enu
modes
bat
Operating
Turning
the
the
Display
Display
On and Off
There is a power switch on the bottom of the display and a power button on top. The power
switch is used to cut off power completely, whereas the power button turns the screen off but
allows the remote to continue working.
To turn the display on:
1.
If the power light on the front of the display is off, turn on the power switch on the bottom
of the display.
2.
Press the POWER button.
To turn the display off:
1. Press the POWER button.
2.
If the display will be unused for an extended period of time, turn off the power switch on the
bottom of the display and disconnect the power.
Selecting
the
Video
and Audio
Source
The signal source may come from any of the input blocks on the sides or bottom
The SOURCE button cycles through these.
To change the audiolvideo
1.
Press the SOURCE button
The SOURCE button
°
TV
•
VGA
°
DVi
•
S-Video
°
AV I
°
AV 2
°
AV 3
•
Component
I
•
Component
2
until the correct source is selected.
cycles through
To switch the audiolvideo
1.
source:
the following
source directly
sources:
to TV:
Press the TV button on the remote.
Adjusting
the Volume
The audio volume may be adjusted from the remote or the top of the display.
the volume:
and VOL _ buttons.
of the display.
Operating
the Display
may be selected from the remote or the top of the display.
change
the channel:
1.
Ensure the source is set to TV.
2.
Press the CH A and CH V buttons.
To change
to a particular
channel
1.
Ensure the source is set to TV.
2.
Enter the desired
3.
Press ENTER.
Accessing
the
channel
directly:
number
On-Screen
on the remote's
keypad.
Display
The On-Screen Display allows you to configure the operation of the display. You can change
video and audio settings, activate and configure picture-in-picture
(PIP) and closed captioning,
select television
channels,
control
display behavior. See "Configuring
To access
1.
the
OSD:
Press the MENU button.
access to mature
programming,
and configure
the Display" on page 13 for more information.
other
general
Using
Your
Display
for the
First Time
When you turn on your LCD for the first time, you will need to set up the display for proper
operation by scanning the television spectrum for available channels.
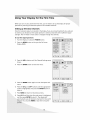
Setting
up Television
Channels
Once the television signal is connected to the display, if you are connecting directly to a wall jack
or antenna, you should scan the signal spectrum to weed out channels with insufficient signal
strength. This will make it much easier to navigate through the channels.
To scan the signal spectrum:
1.
Turn the display on using the POWER button.
2.
Press the MENU button to bring up the On-Screen
Display (OSD).
iiiill
3.
Press the VOL _ button
shows.
4.
Press the ENTER button to enter the menu.
S,
6.
Press the ENTER button
menu.
until the Channel Settings menu
again to enter the System sub-
Press the CH _ and CH Y buttons until the appropriate
system is highlighted, then press the ENTER button to
select it.
Press MENU to return to the previous menu.
Press CH V until the Auto Scan sub-menu is highlighted
and then press ENTER to select it. The display wilt
_utomatically scan all television channels for those with
You can press MENU at any time to stop the
.........................................................................
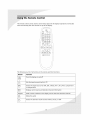
Remote
Control
The remote control can be used to control every aspect of the display's operation
more functionality
than the controls on top of the display.
The following
Button
and includes
is a list of all buttons on the remote and their functions:
Function
Turns the display on and off
Sets the signal source directly to TV
SOURCE
Selects the signal source: TV, VGA, DVl, S-Video, AV 1, AV 2, AV 3, Component
or Component
2
DISPLAY
Displays current source and television
channel information
Keypad
Used to enter
and to select
MUTE
numbers
on the display
the television
Mutes the audio
CD
NTg
Selects the television
audio channel: Mono, Stereo, or SAP
channel
1,
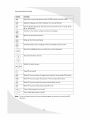
Using the Remote
Control
Button
Function
SOUND
Selects the sound enhancement
PICTURE
Adjusts the display color: Soft, Standard, Cool, or User-Defined
SLEEP
Sets the display sleep timer. The timer can be turned
90, or 120 minutes.
CC)
mode: Off, SRS(surround
sound), or
off or set to 10, 20, 30, 60,
Switches to the channel number entered via the keypad
Returns to the previous channel
O
Brings up the On-Screen Display
O
Switches between the two display formats:
E_E_
Selects the highlighted
Selects the television
_
16:9 (wide-screen)
and 4:3
item or confirms the current adjustment
channel
Adjusts the audio volume
Turns PIP on and off
s0u,cE
When PIP is active, selects the signal source used for the secondary
POSITRON
When PIP is active, adjusts the position of the secondary PIP window
s_,A_
When PIP is active, swaps the primary and secondary sources
C_
FREEZE
C_
When PIP is active, freezes the primary
wcH_P
CZ)
Turns V-Chip protection
on and off
C_
Turns closed captioning
on and off
Note;
PIP window
c°c.
PIP screen
To use a universal remote with your display, program
television.
the remote to control any NEC
ng the
Display
The On-Screen Display (OSD) allows you to configure the operation of the LCD. You can change
video and audio settings, activate and configure picture-in-picture
(PIP) and closed captioning,
select television channels, control access to mature programming, and configure other general
display behavior.
To use the OSD:
1.
Press the MENU button
on the remote or the top of the display.
2.
Once the OSD appears, use the VOL 4 and VOL _ buttons to navigate the menus represented
by icons at the top of the OSD.
3.
Press the ENTER button to select the desired menu.
4.
Use the CH A and CH V buttons to navigate the menu items.
5.
Press the ENTER button to select the desired item.
6.
If "ENTER" is displayed next to the item name, a sub-menu will appear upon pressing ENTER.
Repeat steps 4 and 5 to navigate the sub-menu.
7.
If the selected item is an adjustable parameter
parameter and then press ENTER to accept.
8.
Press MENU to return to the previous menu and, finally, exit the OSD.
use VOL 4 and VOL _ to adjust the
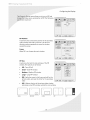
TV Parameters
The TV Parameters menu allows you to change the video
options used while watching television. You can adjust the
following parameters.
50
Brightness
Sets the brightness
of the display image.
50
I
Contrast
Sets the variation
50
SHARPNESS]
I
50
ENTER
between
light and dark colors.
Sharpness
Sets the image sharpness.
Saturation
Sets the saturation
of color in the display image.
Hue
Sets the intensity of color in the display image.
_ccccccccccccccccccccccccccccccccccccc_
OMPLTV37C.book
Page 14 Tuesday, May 24, 2005
Configuring
9:50 AM
the Display
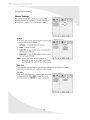
Color Temp
A sub-menu that sets the color temperature used. The
options are 6500K, 7500K, 9300K, and a user-defined
setting.
To set the user-defined color temperature,
select the
USER option and adjust the levels of red, green, and
blue to be used to produce white.
iiiiilSi T-
iiiiiiiiiiiiiiiiii i i!ii : : ii !!!
Format
Controls the picture format. The options are 4:3 and Full
(16:9--widescreen).
PC Parameters
The PC Parameters menu allows you to change the video
options used with a VGA or DVl video source. You can adjust
the following parameters.
Brightness
Sets the brightness
of the display image.
Contrast
Sets the variation
between
light and dark colors.
Auto
When turned
position.
i!i_ii_i¸iii
¸i_li_iii_!il_iiii_i_i_i_i_i:i_!i!!i!_!ii!!i_i!_!!_i_!_!i!i!i!il
on, automatically
adjusts the image
on, automatically
adjusts the color balance of the image.
Auto Color
When turned
Set Image
A sub-menu that controls PC video transmission
parameters:
°
Clock--Sets
the clock frequency
used.
°
Phase--Controls
°
H Position--Adjusts
image.
the horizontal
°
V Position--Adjusts
image.
the vertical
the phase offset used.
position of the
position of the
OMPLTV37C.book
Page 15 Tuesday, May 24, 2005
9:50 AM
Configuring
the Display
that sets the color temperature used. The
are 6500K, 7500K, 9300K, and a user-defined
setting.
[ 8R_GHTNES$
To set the user-defined color temperature,
select the
USER option and adjust the levels of red, green, and
blue to be used to produce white.
[AUTO
]
255
255
Format
255
Controls the picture format. The options are 4:3 and Full
(16:9--widescreen).
FULL
4:3
Sharpness
Sets the image sharpness.
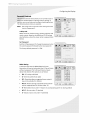
Audio
Settings
The Audio Settings menu allows you to change the way
audio is played, including volume, equalization, and other
sound
processing.
You can change
the following
settings.
Volume
Controls the audio volume.
Mute
Mutes the audio.
Bass
Adjusts the volume of bass in the audio.
Treble
Adjusts the volume of treble
in the audio.
Balance
Sets the relative volumes of the left and right speakers.
_;iiiiiii!ili!
OMPLTV37C.book
Page 16 Tuesday, May 24, 2005
Configuring
9:50 AM
the Display
MTS
A sub-menu that selects the MTS (Multichannel
Television Sound) channel played back while watching
television. The options are Mono, Stereo, and SAP
(Secondary Audio Programming).
Surround
Turns surround
sound on and off.
TREBLE
]
8ALANCE
]
NTS
BBE
BBE ]
Turns BBE, an audio enhancement
algorithm,
on and off.
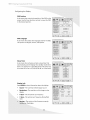
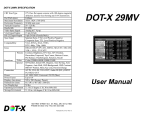
Picture-In-Picture
PIP allows you to watch video from two sources simultaneously, though
television signal. The table below gives all possible combinations.
Primary
Secondary
Video
Source
TV
TV
VGA
"
DVI
"
VGA
DVI
•
•
"
"
S-Video
•
•
AV1
"
"
AV2
"
"
AV3
"
"
Comp. 1
•
•
Comp. 2
•
•
S-Video
Video
Source
AV 1
AV 2
only one source can be the
AV 3
Comp.
1
Comp.
2
•
"
"
"
"
"
"
"
"
"
"
•
•
•
•
"
OMPLTV37C.book
Page 17 Tuesday, May 24, 2005
9:50 AM
Configuring
the Display
ire menu allows you to turn on PiP and
source, and position of PiP.The following
may be set:
PIP Position
A sub-menu that controls the position of the secondary
video window when PIP is turned on. Use the four
direction options repeatedly to move the window
around the screen.
Freeze
When PiP is on, freezes the main window.
PIP Size
A sub-menu that sets the size and type of the PIP
window. The options are as follows:
•
Off--Turns
PIP off
•
Small--Small
•
Medium--Medium
•
Large--Large
•
PBP--Splits the screen in half, uses one half for the
primary video, and uses the other for the secondary
video
ilii
ii iiiiiii_ii_i
PiP window
iiiii iiiii!iii!i!ilili_!ii!iiii!i!i!i
_?ii_!ilill i!i!:_!i!iiii!!_iiii!i!_!ii!i
PIP window
i_i_iiiiii_iiiiiii_iiiiii_!_!_!Sii_i_i_i_,_i_i_i!_ilili!i!ii_!ili!i_i!ii
iiiii!_i_iii_iii_i_i_i_i_i,i
_
_iiii_ii_i_iliiii_i:i_iiiiiiiiii!i!ili!i_i_i_
_
POP--Reduces the size of the primary video window
and places a small PIP window outside the main window
SMALL
MEDIUM
iiiil;!i!!ii!iiiiiii!!i!iiiiii
¸
i_i_iil _i!!ii
iiiiiii!iiii!_i_i,i,iiii!_!'i_i
_i_ili_i_!iii:i_i,i_i_i!ii'
PIP window
LARGE
POP
OMPLTV37C.book
Page 18 Tuesday, May 24, 2005
Configuring
Channel
9:50 AM
the Display
Settings
The Channel Settings menu allows you to select which
television channels are available for viewing, manually or
automatically.
It contains the following
menu items.
iiiiiii_i_
)ii!i
System
A sub-menu that sets the type of television
in use. The options are as follows:
•
Antenna--A
•
Cable--A
•
Cable-IRC--A
type of cable signal primarily
the east coast of the US
used on
•
Cable-HRC--Atype
of cable signal primarily
the west coast of the US
used on
Note:
standard television
signal source
antenna
cable TVsignal
Contact your cable television provider to
determine the type of cable signal used in your
area. Cable-lRC will work for most cable systems.
i!i_ii_i¸iii
¸i_li_iii_!il_iiii_i_i_i_i_i:i_!i!!i!_!ii!!i_i!_!!_i_!_!i!i!i!il
Auto Scan
When selected, automatically scans all television channels for valid signals and makes
unavailable any channels with insufficient signal strength.
Ch. Edit
A sub-menu that allows you to manually add and delete
available channels. Select ADD to make the current
channel available and DELETE to make it unavailable.
OMPLTV37C.book
Page 19 Tuesd%', May 24, 2005
9:50 AM
Configuring
the Display
Controls menu allows you to control access to
content based on industry maturity ratings. In
you can activate and configure closed captioning.
The following menu items are available.
Note:
The V-Chip will not function
is set to Component 2.
when the signal source
V-Chip Lock
When turned on, blocks access to mature television and
movie content, based on the MPAA and TV PG ratings
selected below, unless the viewer enters a password (set
below).
Set Password
Sets the V-Chip password. To change the password, enter
the current password followed by the new )assword.
The factory-default
password is '1234'.
__
_i_!!_i!
iiii!iiiii
ii:ii!i
_;iii::i!ii!
i!_!i!
iii''ii_
MPAA Rating
A sub-menu that sets the MPAA (Motion Picture
Association of America) rating level the V-Chip will block
without a password. The V-Chip will block all levels
above that selected. The options are as follows:
•
NA--AII
ratings unblocked
•
G--General
•
PG--Parental guidance suggested (some material
may not be suitable for children)
•
PG-13--Parents strongly cautioned (some material
may be inappropriate
for children under 13)
•
X--Adults
!ii!!!_!i!!ii!ii
ii_!ii!iiii!
_i!iiiii!i
audiences (all ages)
R--Restricted
NC-17--No
_
(minors under 17 require an accompanying
parent or adult guardian)
one under 17 admitted
only (no one under 17 admitted)
°cccccccccccccccccccccccccccccccc
OMPLTV37C.book
Page 20 Tuesday, May 24, 2005
Configuring
9:50 AM
the Display
TV PG Rating
A sub-menu that sets the TV PG rating level the V-Chip
will block without a password. The V-Chip will block all
levels above that selected. In addition, specific types of
mature content can be blocked for some of the ratings.
For example, programs rated TV-7 with violent content
can be blocked. The options are as follows:
•
NONE--All
•
TV-Y--AIt
•
TV-Y7--Children
7 years and older. Violent
can be blocked (see below).
•
TV-G--General
•
TV-PG--Parental guidance suggested. Violence,
sexual content, foul language, and suggestive dialog
can be blocked (see below).
•
TV-14--Parents strongly cautioned. Violence, sexual
content, foul language, and suggestive dialog can be
blocked (see below).
•
TV-MA--Mature
content,
ratings unblocked
children
content
audience
audience
and foul
language
only. Violence,
sexual
can be blocked
iiiiii_iii_
(see
iii !i!iiiiiii!
iii!i i i!
below).
Upon selection of a rating, a second menu will appear if
specific content types can be blocked (see the example
to the right).
i:ii!!N!!iN_;:iii_iiii!i!!l_iiiili;!i_il;)i!i!:!_ii!i!_iii:i:i_:!_!!
CC Control
Turns closed captioning on and off. Closed captioning
program on the screen so it may be read.
displays the dialog of the current
Mode
A sub-menu that sets the mode used for closed
captioning.
Note;
The options are as follows:
Closed captioning must be turned
menu to be active.
•
CC1--The
•
CC2--Usually
"
CC3
on for this
iiiil
¸
!!!!!!!!!!_!;!;i_ii_i:i_iii_iiiiiiiiiii_iii!ii!_!iiiiii!iill
most-used closed caption channel
used for foreign
language translations
iiiil
_
ililililililiiii!iiii_i_i_!i!;_i
_ii!i_,_ii!ii:i_iiiiiiiiii_!!i_i_!,_i,iiiiiiiiiii!_
CC4
TEXT1--Text
information
TEXT2
channels usually used for other channel
i!:!!iN!i!;:;Nii!ii_i!;!il
il_iiiil)ii_i_!i_!!:!:!_
!::_ii_:_::_
:!_!ii!_
,,i_i
!!!!!i_i_!ii
} OMPLTV37C.book
Page 21 Tuesday, May 24, 2005
9:50 AM
Configuring
the Display
;s are generally used for dialog captions and display only a few lines of text
of the screen. The TEXT1-4 modes are generally used for information
and
text across the entire screen.
Display
Controls how closed caption text is displayed on the
screen. The options are as follows:
Note:
Closed captioning must be turned on for this
menu to be active.
•
Box--Displays white text in a black box, blocking
out the video
•
Shadow--Displays
black text directly on the video
MODE:
CC1-4
MODE:
TEXT1-4
MODE:
CCl-4
MODE:
TEXTI-4
DISPLAY:
BOX
DISPLAY:
BOX
DISPLAY:
SHADOW
DISPLAY:
SHADOW
General
Settings
The General Settings menu contains general display settings,
such as OSD options and timeouts. It contains the following
menu items.
OSD Timeout
A sub-menu that sets the timeout
for the OSD. The
options are 10, 20, and 30 seconds.
_cccccccccccccccccccccccccccccccccccccc_
OMPLTV37C.book
Page 22 Tuesday, May 24, 2005
Configuring
9:50 AM
the Display
OSD Position
A sub-menu that controls the position of the OSD on the
screen. Use the four direction controls to move the OSD
to the desired position.
OSD Language
A sub-menu that selects the language used for the OSD.
The options are English, French, and Spanish.
i!i_ii_i¸iii
¸i_i_iii_!i_iiii_i_i_i_i_i:i_!i!!i!_!ii!!i_i!_!!_i_!_!i!i!i!il
Sleep Timer
A sub-menu that activates and sets a sleep timer that
automatically puts the display into standby mode when
there is no activity for a specified period. The timer may
be turned off or set to 10, 20, 30, 60, 90, or 120 minutes.
_iii_i
_pl_ _,__ ii!iiiiiiiiil);iiiii:ii_ iiiiiiii!!!iii!_iii_iii_iiiiiiiiiii
¸
Display
Info
Press ENTER to show information
•
Source--The
°
Resolution--The
display
about the display:
currently selected signal source
resolution of the image on the
H Sync--The
horizontal sync frequency
V Sync--The
rate)
vertical sync frequency
version of the firmware
the display
(frame/field
currently
OMPLTV37C.book
Page 23 Tuesday, May 24, 2005
9:50 AM
Configuring
_ll options to factory-default
the Display
settings.
Deinterlace
A sub-menu that controls how the display deinterlaces
interlaced video before displaying it on the screen. The
following options may be set (note that there are two
pages to the sub-menu--select
NEXT to advance to the
next page):
•
DCDI--Processes the deinterlaced image to produce
smooth images without staircasing
•
CCS--Removes "false color" artifacts caused by
improper signal separation in low-cost video devices
°
Film Mode--Removes
pulldown
°
artifacts from 2:2 and 3:2
material
Fleshtone--lmproves
material
Motion--Removes
skin tone in program
motion-related
artifacts from
program material by comparing sections of the
image from field to field. The section size can be set
via this sub-menu. There are three options: small,
medium, and large.
iiiii
!!_iii_i_i!!!i_i_i_iii_iiiiiiiii_!_!_i_iii_iiiiiiiiiiiiiiiiiiiiiiiiiiiiiiiiiiiiiii
_ccccccccccccccccccccccccccccccccccccccc_
OMPLTV37C.book
Page 24 Tuesday, May 24, 2005
9:50 AM
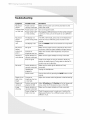
Troubleshooting
Symptom
Possible Cause
Resolution
No picture
(power
Power cord not
securely connected
Make sure the power cord is firmly inserted into the
socket and outlet.
Power switch is off
Turn on the power switch.
Power outlet
Try plugging
indicator
does
not light up)
is off
a different
device into the outlet and see if
or not working
it turns on. If not, turn on the outlet or use a different
outlet.
No picture
(power
indicator is
The display is in
power-saving mode
If in VGA or DVl mode, press a key on the keyboard
move the mouse. Otherwise, press a button on the
remote.
red)
The display is off
Press the POWER button on the remote or on top of the
or
display.
No picture
(power
No signal
Make sure the proper source is selected. If there is still
no picture, check the signal cable(s) and signal source.
is
Contrast or
brightness too low
Adjust the contrast and/or brightness
appears.
Unclear or
noisy picture
Signal cable(s) not
securely connected
Make sure the signal cable(s) are firmly connected.
Poor TV signal
Check the TV signal. If using an antenna, adjust the
position for better signal. If using cable or satellite TV,
contact your service provider.
Audio cable(s) not
securely connected
Make sure the audio signal cable(s) are firmly
connected.
Headphones
plugged in
Unplug the headphones.
Audio muted
Unmute the audio by pressing the MUTE button on the
remote.
Display is too
dark or too
bright
Contrast or
brightness too low
or too high
Adjust the contrast and/or brightness to desired setting.
Display not
centered
Position incorrectly
adjusted in OSD
Adjust H Position and V Position in the Set Image submenu under the PC Parameters menu in the OSD.
Image
vibrating
Signal cable(s) not
securely connected
Make sure the signal cable(s) are firmly connected.
Power voltage too
high or too low
Check the power source to make sure it matches the
display specification. Try a different power outlet on a
different circuit.
indicator
green)
No sound
until picture
OMPLTV37C.book
Page 25 Tuesday, May 24, 2005
9:50 AM
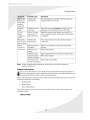
Troubleshooting
Possible
remains on
screen after
Cause
Inherent LCD
characteristics
Resolution
This is characteristic of an LCD. The after-image
disappear after a few minutes.
wilt
display is
turned off
Distorted
Display format
incorrectly
image
"Out of
set
Check that the correct Format is selected in the TV
Parameters or PC Parameters menu in the OSD.
VGA or DVl input
signal is not in a
supported mode
Adjust the resolution and refresh rate on the PC to
match a supported mode, listed under "Specifications"
on page 26.
Inherent LCD
This is characteristic
characteristics
malfunction.
Remote
control not
Batteries inserted
Make sure the batteries are inserted and oriented
improperly
properly.
functioning
Batteries low on
energy
Replace the batteries.
A button
is stuck
Jog any stuck buttons
Obstacle between
Remove the obstacle.
Range"
message on
screen
Red, green,
blue, or white
dots on screen
of an LCD and will not cause a
on the remote to unstick them.
remote and display
The remote is too
far from the display
Note:
Further troubleshooting
www.protronusa.com.
Support
Move closer to the display.
information
can be found
on the Protron website at
Information
Do not return this product to your retailer until you have performed the steps laid out in
the Easy Setup Instructions and contacted the customer service center. Merchandise may not
be returned to Protron without a return form authorization.
Before contacting Protron customer service, please record the following
be found on the back of your display:
•
Model Number
•
Serial Number
•
Date of Manufacture
The Protron customer service center may be contacted
following number:
information,
which may
24 hours a day, 7 days a week at the
1-888-257-8899
_cccccccccccccccccccccccccccccccccccccc_
} OMPLTV37C.book
Page 26 Tuesday, May 24, 2005
9:50 AM
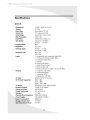
Specifications
General
Dimensions
37.4"W x 30.04" H x 9.25" D
Weight
62.171bs
Panel Type
Screen Size
Active Matrix TFT LCD
Color Range
Max. Resolution
24 bits (16.7 million colors)
1366 x 768
Pixel Pitch
Sync Range
0.60mm (H) x 0.60mm (V)
Horizontal:
30-80kHz
Vertical:
50-75Hz
Contrast
800:1
37" widescreen
Ratio
(16:9)
Brightness
500 cd/m 2
Viewing
Angle
Vertical:
Horizontal:
Response Time
Rise: 8ms
Fall: 8ms
Inputs
1 x progressive scan component
+/-88 °
+/-88 °
video (RCA)
1 x interlaced component video (RCA)
3 x composite video (RCA)
1 x S-Video
6 x stereo audio (RCA)
1 x SVGA (15-pin D-Sub)
1 x DVI-D (single link)
1 x stereo audio line in, 0 dBV nominal
1 x composite video (RCA)
1 x stereo audio (RCA)
1 x subwoofer (RCA)
Outputs
TV Tuner
TV Formats
Supported
EDTV: 480p
HDTV: 720p, 1080i
MTS (mono, stereo, SAP), SRS, BBE
TV Audio
Parental
1 x headphone (1/8" TRS)
NTSC-M, CATV, 181 channels
SDTV: 480i
Controls
Picture-In-Picture
V-Chip (TV PG, MPAA)
Speakers
PIP, PBP, POP
CC1-4, TEXT1-4
2x 10W
Plug and Play Compliance
VESA DDC1, DDC2B
Power Supply
100-240VAC, 50-60Hz
288W max.
Closed Captioning
Consumption
0 to 60°C
!perature
5 to 35°C
(1/8" TRS)
OMPLTV37C.book
Page 27 Tuesday, May 24, 2005
9:50 AM
Specifications
Timing
Modes
Vertical Frequency
(Refresh Rate)
Horizontal
60Hz
31.5kHz
72Hz
37.9kHz
75Hz
37.5kHz
85Hz
43.3kHz
720 x 400
85Hz
37.9kHz
800 x 600
56Hz
35.1kHz
60Hz
37.9kHz
640 x 480
Frequency
48.4kHz
70Hz
56.5kHz
72Hz
48.1 kHz
75Hz
46.9kHz
60.0kHz
85Hz
53.7kHz
68.7kHz
1280 x 1024
75Hz
80.0kHz
_ccccccccccccccccccccccccccccccccc_
OMPLTV37C.book
Page 28 Tuesday, May 24, 2005
More
for your
9:50 AM
money
Limited
Warranty
Protron warrants this product to be free from manufacturing
defects in material and
workmanship under normal use for the period listed at the bottom of this section.
How to obtain
service:
•
Call the Protron Customer Support line at 1-888-257-8899. If the issue cannot be resolved
over the phone, a service tag number will be issued, and the nearest authorized Protron
Service Center wilt be identified for you.
•
For televisions with screen sizes of 26" or less, you will be requested to bring your unit
into the authorized service center and pick up when repairs are complete.
•
For televisions with screen sizes 27" and above, you may request in-home service from an
authorized Protron Service Center, provided that your television is located within the
geographic territory covered by an authorized Protron Service Center. If in-home service
is not available in your area, you must take your television to the Service Center location
at your own expense, or pay for the additional cost that the Service Center may charge to
transport your television to and from your home.
•
Proof of purchase in the form of a bill of sale or receipted invoice with product name,
model and/or serial #, which provides evidence that the product is within the warranty
period, must be presented to obtain warranty service.
This warranty
does not cover:
•
Physical or cosmetic damages.
•
Damage caused by abuse and/or
neglect.
•
Ordinary adjustments
customer.
in the owners manual that can be performed
•
Damage to equipment
•
Any cost incurred in shipping
•
Signal reception
•
Incompatibility
•
Batteries.
•
Images burnt on to the screen.
•
Initial installation
•
Power surge and/or damage by lightning.
•
Force majeure or uncontrollable
as outlined
not properly connected
by the
to the product.
the product for repair.
problems caused by external antenna, cable systems or interference.
due to a change in TV/CATV broadcast systems after the product was sold.
and related adjustments.
external force damage.
Product shipped for service with inadequate
packaging
or packaging
materials.
What we will do:
Protron will reimburse an authorized
Protron Service Center the labor charges to repair
will reimburse an authorized Protron Service Center for the new, or at our
Jrbished replacement parts required to repair your television.
} OMPLTV37C.book
Page 29 Tuesday, May 24, 2005
9:50 AM
Limited
Warranty
if:
Juct is used in a commercial
Damaged through
Modified
application
misuse, negligence
or rental.
or abuse.
or repaired by anyone other than authorized
Damaged because it is improperly
connected
°
If the original
•
If the identifiable
missing.
•
The product is used outside the country
PROTRON service center.
to any other equipment.
proof of purchase cannot be supplied.
markings on the TV such as Serial # are defaced, unrecognizable,
in which it was originally
or
sold.
This warranty is not transferable and only applies to the original purchase. Any implied
warranties, including the warranty of merchantability,
are limited in duration to the period of
this expressed warranty and no warranty whether expressed or implied shall apply to the
product thereafter. Under no circumstance shall PROTRON be liable for any loss or consequential
damage arising out of the use of this product. This warranty gives specific legal right. However,
you may have other rights that may vary from state/province to state/province. Some state/
province do not allow limitations on implied warranties or exclusions of consequential damage.
Therefore these restrictions may not apply to you.
26" and below:
1 year
parts/labor
Depot
27" and above:
1 year
parts/labor
In-home
Warranty
Warranty
cccccccccccccccccccccccccccccccc_
OMPLTV37C.book
Page 30 Tuesday, May 24, 2005
9:50 AM
Protron
Digital
Corporation
htt p://www, prot ron usa.com/
PLTV-37C
OMPLTV37C