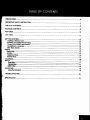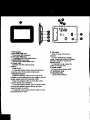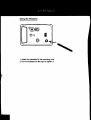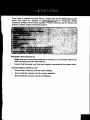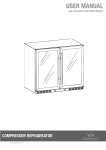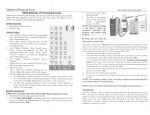
1
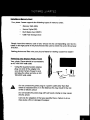
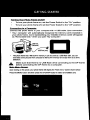
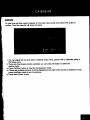
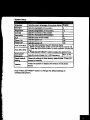
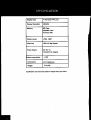
SPECIFICATION
Display Type
rFull-Color TFT LCD
Display Resolution
480x234
Memory
MS Card
SD/MMC Card
Full-size USB
Photo Format
JPEG BMP
USS Host
USS 2.0 High-Speed
Power Supply
DC 5V, 1A,
11X1-240V AC Adapter
Power consumpdon
Dimensions
Weight
<03W
217x150x24mm
310+10g
Specilkalions and manual are sublect to change without prior notice.
Nidescreen Digitcil Photo Frame
DP730
INSTRUCTION MANUAL
Please read this manual carefully before operation
4111114
TABLE OF CONTENTS
PRECAUTIONS
2
IMPORTANT SAFETY INSTRUCTION
4
TABLE OF CONTENTS
8
PACKAGE CONTENTS
..9
FEATURES
10
UNIT VIEW
11
GETTING STARTED
Installing a Memory Card
Powering your Digital Picture Frame
Turning Your Photo Frame ON/OFF
Connecting to a computer
Main Menu Screen
PHOTO
Photo View
ZOOM
Slideshow Mode
Bowser Mode
CALENDAR
SETUP
PhabSetp.—
CelendeSeLp..
SyslienSeSp.
12
12
12
13
13
13
14
14
14
14
14
18
17
...........17
17
18
KICKSTAND
Using the KIdosland
19
19
TROUBLE SHOOTING
20
SPECIFICATION.
21
PACK AGE CONTENTS
Please make sure that the items shown below are Included in the package. Should
an item be missing, please contact the local retailer from which you purchased this
product.
O
LN°
1. DP Frame x 1
2. AC Adapter x 1
3. Kickstand x 1
4. Manual x
FEATURES
7" widescreen TFT LCD color display
Displays JPEG, BMP photo files
•
Photo slideshow mode
•
Calendar and clock
•
Full-size USB port for use with flash memory drives
•
Wall-mountable design with detachable stand
•
Built-in memory
SD, MMC, MS card slot
1. TFT Display
2. Minl-size USB port
To connect with computer.
3. Full.*Lae USB port
To connect with USB flash drives.
4. Ms/SCIAIMIC card slot
Connect the Ms/SD/MMC card.
5. Power Jack
Connect with the power source.
8. Menu
Press to exit.
On the Mein Menu Screen, press this button to
move the cursor to the memory device list.
7. Direction buttons
Press the lefUright button to move the cursor
tett/right in menu setting and to turn pages in the full
screen display mode and Calendar mode.
Press the up/down button to move the cursor
up/down during menu selection.
On the Main Menu Screen, press up/down button
to select the desired memory device, and then
press Ok button to confirm
in Calendar mode, press up/down button to view
the previous/next month.
8. OK button
Press to enter during menu
selection.
In photo (full-screen) display
mode, press this button to change
between slideshow mode and
Manual mode.
In Calendar mode, press this
button to change view.
9. Power switch
To turn the photo frame on/off.
10. Ventilation slots
11. Mounting hole
Connect the kickstand.
Metalling a Memory Card
Your photo frame supports the following types of memory cards:
•
Memory Stick (MS)
•
Secure Digital (SD)
•
Multi Media Card (MMC)
•
USB Flash storage Drive
Simply insert the memory card of your choice into its corresponding card slot located on the right panel of the photo frame.Take care to orient the card in the proper
direction.
Getting photos and files onto your picture frame for viewing couldn't be easier!
Powering your Digital Photo Frame
Your photo Frame should be connected to
an AC 100-240V wall outlet.
•
Using the supplied power adapter,
plug one end of the adapter into
your photo frame's Power In jack
and plug the other end into an AC
100-240V wall outlet.
A
Do not connect the power plug to a power outlet other than that
which is indicated here or on the label as this may result in the risk
of fire or electric shock.
Do not handle the power plug with wet hands. Doing so may cause
electric shock.
Use only AC adapters of the type specified here. Failure to do so
may cause a fire or damage the player.
GETTING STARTED
Turning Your Photo Frame On/Off
To turn your photo frame on, set the Power Switch to the "On" position.
To turn your photo frame off, set the Power Switch to the "Off' position.
Connecting to a Computer
Connect the photo frame to your computer with a USB cable. Upon connection:
- Your computer will automatically recognize the memory cards installed in
your photo frame. Icons representing your Installed memory cards will appear
as "Removable Disk" when you open "My Computer".
• The photo frame has 1MS built-in memory, it can be used as a USB flash disk, you can
download some pictures from computer to the built-in memory and enjoy them as a demo
slideshow.
Make sure that there's no USB flash drive connecting to the DP frame
before connecting the DP frame to a computer.
Main Menu Screen
A
Upon turning on the power, your photo frame will display the "Main menu" screen shown below:
Press the MENU button and then press The UP/DOWN button to select an available card.
Inserted: A card icon that is In-color Indicates that a memory card has been
inserted(installed) in the corresponding slot.
No card: A card icon that is grayed-out indicates that a memory card has not been
installed in the corresponding slot and Is not available for use.
Selected: A higlighted frame indicates that the card slot is selected. Only card slots with
an installed memory card may be selected.
The demo slideshow will automatically start in approximately 8 seconds if you don't press
any button.
PitatLY.liw
To view the pictures, select the Photo icon on the main menu screen and press Enter button to enter
the Photo mode.
If your photo frame is set to thumbnail in photo setup, it will display in thumbnail mode. In this mode,
to display a photo(full screen), use the direction buttons to select a thumbnail and press enter button
to confirm.
81Idipshow Modg
If your photo frame is set to slideshow In photo setup, it will display the photo In slideshow mode.
Press Enter button to change between alideshow mode and bowser mode.
Bowser Mods
During playback, press Enter button to change between slideshow mode and bowser mode. In
bowser mode, press UP button to display the tool menu, the screen will shown as below:
000000000
•
A
The Photo List will display supported Photo files, only.
Your photo frame can display baseline JPEG /BMP files.
1. Rotation
To rotate the picture, select this icon and press Enter button.
Each sucessive press of Enter button will change the level of rotation as shown below:
Rotation 90' 4 Rotation 180 4 Rotation 270".4 Rotation OFF
2. Zoom
To zoom the picture, select this icon and press Enter button.
Each sucessive press of Enter button will change the level of magnification as shown below:
125% 4 150% 4 175% 4 200% 4 225% 4 250% 4 ZOOM OFF
3. Changing View
Select this icon and press Enter button to change between the screen ratio modes: Full Screen,
Fit to Screen and Crop to Fill.
4. Pan Up
Select this icon and press Enter button to pan up the amplified picture.
5. Pan Down
Select this icon and press Enter button to pan down The amplified picture.
6. Previous/Pan left
To view the previous photo, select this icon and press Enter button to confirm.
It also can be used to pan left the amplfied picture.
7. Next/Pan right
To view the next photo, select this Icon and press Enter button to confirm.
It also can be used to pan right the amplified picture.
8. Play/Pause
Select this icon and press Enter button to select play/pause to enter slideshow mode/keep i
bowser mode.
9. Return
Select this Icon and press Enter button to return.
Calendar
To view time and date, select Calendar on the main menu screen and press Enter button to
confirm. Then the calendar will shown as below.
I,".1
1. You can adjust the time and date in Calendar setup menu, please refer to Calendar setup in
the Setup menu.
2. There are three display modes available, you can press OK button to select the
desired mode.
3. Press Up/Down button to view the previous/next month.
4. if there are available pictures, it will be displayed on the right of the window in slideshow mode,
press LefURight button to turn the pictures.
5. Press Menu button to exit.
Photo Setup
IC. rn
1,,,I,,t:c:r
nuteult r ,t,i∎ In
Sets the photo display mode for
entering the Photo Mode from the
Main Menu.
Display Mode
Display Ratio
SlIdeshow Duration
a
Slideshow
Sets the • •to di- • Is ratio
Sets the time interval of slideshow
photos.
Fit to
Sets the slkleshow repeat
Repeat
n
5Sec•
Viftr-Ir•ri4inwi Sets the slideshow effect
MIMI.
::
1
Jill
Calendar Setup
11,11 1. I .- n
D.:f:Lilt sMIrriii
•
.:
Display Mode
Sets the Calendar display mode
Date
To set Date: Press the LEFT/RIGHT button to select th
value of the date and year, and press the UP/DOW
button to move between month, date and year
Clock Mode
Sets the Clock Mode
12-Hour
To set the Clock Time: Press the LEFT/RIGHT button
to select the the time, and press the UP/DOWN button
to move between minute and hour
System Setup
11,1•1
language
Backlight
Brightness
Conrast
Saturation
Hue
Power On
Power Off
Auto boot time
Auto Shut time
Au to-power
frequency
Reset default
setting .
Version
Inatr,e line
1
0,f11111 , thrly
Sets the menu language of the photo frame. English
Sets the backlight of the screen.
Sets the brightness of the screen.
Sets the Contrast of the screen.
Sets the Saturation of the screen.
Sets the Hue of the screen.
Sets the power on
3
12
8
8
5Q
Of
Sets the power of
Of
Sets the auto boot/shut time for the photo frame.
1.Make sure the Power switch on the DP frame is set to ON.
2. Press the UP/DOWN button 10 move between minute and
hour,
3. Press the LEFT/RIGHT button to select the desired time..
Sets the Auto-Power On / Of Frequency.
I Mon. to Fri.
Reset all settings to their factory default state. Press OK
button to execute.
Press OK button to display the version of this photo
frame.
Note: Press LEFT/RIGHT button to change the default settings of
corresponding Items.
Using the Kickstand
1. Attach the kickstand to the mounting hole.
2.Tum the kickstand to the right to tighten it.
If you have a problem with this device, please read the troubleshooting guide
below and check our website at wwx.cobyusa.com for Frequently Asked
Questions (FAQs) and firmware updates. If these resources do not resolve the
problem, please contact Technical Support.
•
The player does not turn on.
•
Make sure the unit has been powered on manually (I.e., the Power Switch has
been physically set to the ON position).
•
Ensure that the power cord has been properly connected to the power outlet.
cannot select a memory card.
•
Ensure that a memory card has been installed.
•
Ensure that the memory card is properly installed.
•
Ensure that the memory card Is not defective.