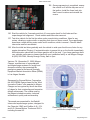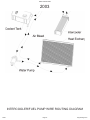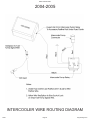
1
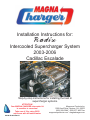
Installation Instructions for:
Radix
Intercooled Supercharger System
2003-2006
Cadillac Escalade
Step-by-step instructions for installing the best in
supercharger systems.
ATTENTION!
Your MAGNA CHARGER intercooler kit
is sensitive to corrosion!
Take care of if by using 50/50
anti-freeze with de-ionized water.
89-89-60-004 Rev H
Magnuson Products Inc
1990 Knoll Drive, Ventura, CA. 93003
(805) 289-0044 * (805) 677-4897 fax
magnusonproducts.com * magnacharger.com
INSTALLATION MANUAL
Magna Charger
Radix Intercooled Supercharger System
GM 4.8, 5.3 & 6.0 Liter Engines
We encourage you to read this manual thoroughly before you begin work, for a few reasons:
A quick parts checkt to make certain your kit is complete (see shipper parts list in this manual). If you
discover shipping damage or shortage, please call our office immediately.
Take a look at exactly what you are going to need in terms of tools, time, and experience.
Review our limited warranty with care.
Make sure to have 91 or high octane fuel in the tank.
When unpacking the supercharger kit DO NOT lift the supercharger assembly by the black plastic
bypass actuator. This is pre-set from the factory and can me altered if used as a lifting point!
Tools Required
•
Safety glasses
•
Metric wrench set
•
1/4” drill bit
•
1/4”, 3/8”, and 1/2” drive metric socket set (standard and deep)
•
8mm hex (Allen) wrench
•
3/8” and 1/2” drive foot pound and inch pound torque wrenches
•
Belt tensioner wrench or 1/2” breaker bar
•
7/32” socket
•
Drill and 5/16” drill bit
•
Phillips and flat head head screwdrivers
•
Fuel quick disconnect tools (included in kit)
•
E5 inverted Torx socket
•
Small or angled 3/8” drill motor
•
Drain pan
•
Compressed air
Radix 03-06 Escalade
IMPORTANT
Our Magna Charger kits are designed for stock engines, with stock components, in good mechanical condition only. Installation on worn or damaged engines is not recommended and may result in
engine failure, for which we naturally can’t be responsible. Magna Charger is not responsible for the
engine or consequential damages.
Aftermarket engine re-calibration devices that modify fuel and spark curve (i.e., programers) are not
recommended and may cause engine damage or failure. If you have any questions, call us!
Caution: Relieve the fuel system pressure before servicing fuel system components in order to
reduce the risk of fire and personal injury. After relieving the system pressure, a small amount of fuel
may be released when servicing the fuel lines or connections. In order to reduce the risk of personal
injury, cover the regulator and fuel line fittings with a shop towel before disconnecting. This will catch
any fuel that may leak out. Place the towel in an approved container when the job is complete, and of
course, no smoking.
Magna Charger strongly recommends the following:
•
Clean your engine compartment before starting any engine disassembly.
•
You must have a clean fuel filter - check and replace as needed before installation.
•
You must have a clean air filter - this system comes with a new air filter for your convenience.
•
OE type/Stock spark plugs and stock plug gap is recommended.
•
Start with and use only 91 octane fuel or higher.
•
Drive belt is a Gates #K061120.
After you finish your installation and road test your vehicle, please fill out and mail the limited warranty
card, so we can add you to our files (this is important for your protection).
Please remember to follow all safety rules that apply when working, including:
07/08
•
Wear eye protection at all times.
•
Do not work on a hot engine.
•
Be careful aroun fuel - use shop towels to catch any spills and dispose of
towels properly.
Page 3
magnacharger.com
Radix 03-06 Escalade
07/08
Page 4
1.
Start the supercharger installation by
installing the upgraded fuel pump.
Ensure that the fuel tank is less than 1/8”
full (preferably empty) by checking the
fuel level gauge. Even though the gauge
may read empty, some residual fuel will
be present in the tank. Exercise extreme
caution and common sense when
working around gasoline. Extinguish
all open flame or other sources of
ignition and be sure to perform the
following steps in an area with adequate
ventilation. Personal protection in the
form of eye protection and fuel resistant
gloves are strongly recommended.
2.
On the right (passenger) side of the
intake manifold, locate the fuel pressure
test port. CAUTION! The fuel in the
system is under pressure! Relieve
the pressure in the fuel system by
depressing the check valve with a
screwdriver and collecting the fuel with a
shop towel.
3.
Relieve the pressure in the fuel tank by
removing the fuel filler cap. The following
steps are for 2004 & 2005 vehicles, for
2003 skip this section and continue to
step 32.
4.
At the rear of the fuel tank, loosen the
lower clamp and disconnect the fuel
fill pipe from the tank. Disconnect the
tank vent and large white vapor canister
connectors by squeezing the sides of
the connectors and then pulling back.
To release the small vapor canister
connector, push the colored tabs on the
bottom of the connector together and up
and then pull the connector free.
magnacharger.com
Radix 03-06 Escalade
5.
At the front of the fuel tank disconnect
the fuel line by pushing the colored tabs
on the bottom of the connector together
and up and then pull the connector free.
6.
Disconnect the large electrical connector
on the top of the tank by pulling back
on the gray lock tab and squeezing
the end of the connector. Disconnect
the tank pressure sensor connector by
lifting up on its lock clip and pulling back
on the connector. Disconnect the fuel
and vapor connections on the top of
the tank module. Squeeze the colored
tabs on the bottom of the two smaller
connectors together and then push up
on the tabs to release the connectors.
Push the large vapor connector towards
the tank module; squeeze the sides of it
and then pull back to release it from the
tank module. Lower the tank free from
the vehicle. With the aid of an assistant,
remove the fuel tank to a suitable work
area.
7.
The tank module is retained in the tank
by a lock ring that locks into a retaining
collar on the tank.
8.
Notice the position of the lock ring in
relation to the collar.
Fuel Line
Lock Ring
Collar
07/08
Page 5
magnacharger.com
Radix 03-06 Escalade
07/08
Page 6
9.
CAUTION! USE A NON METALLIC
HAMMER OR DRIFT to remove the
lock ring by tapping the ring counterclockwise. Do not use a metallic hammer
and/or drift as a spark may result and
ignite a fire.
10.
After rotating the lock ring counterclockwise, remove the lock ring.
11.
Pull the module out of the tank carefully,
so the fuel level float will not catch on the
edge of the opening. On 2004 and later
vehicles inside the fuel tank, there will be
two or more fuel and vapor connectors
attached to the underside of the
module. Squeeze and pull as before to
disconnect these. Once the fuel module
is removed from the tank, the white
plastic “can” of the fuel module will still
contain about one quart (1 liter) of fuel.
Carefully tilt the module “can” so you can
pour this excess fuel back into the tank.
12.
After removing the module from the
tank, use a shop towel to cover the
tank opening to prevent any debris from
entering.
magnacharger.com
Radix 03-06 Escalade
07/08
Page 7
13.
Using a sharp knife cut the black plastic
fuel line at the filter connection and pull
the fuel line free.
14.
Release the fuel pump from the module
body by removing the pump retainer.
15.
Unclip the two clips on the sides of the
retainer to release it.
16.
Remove the pump, fuel line and retainer
from the tank module. These parts will
not be reused.
magnacharger.com
Radix 03-06 Escalade
07/08
Page 8
17.
Here are the new components for
installation in the module assembly.
Note: hose type may vary.
18.
Install the new fuel hose supplied over
the nipple of the new pump. Slide one of
the crimp clamps supplied over the hose
end.
19.
Secure the clamp by using a pair of side
cutting pliers to crimp the loop of the
clamp around the fuel line. Take care not
to cut the loop but only tighten it.
20.
Install the tie strap supplied around the
top of the fuel pump. Do not over tighten
the tie strap.
magnacharger.com
Radix 03-06 Escalade
07/08
Page 9
21.
Insert the new pump into the module
body. Rotate the pump until the pump
inlet nipple registers with the port in the
bottom of the body and press down. At
this point, the pump should no longer be
able to rotate.
22.
Mark this location on the pump and
module body, and then remove the
pump.
23.
Reinstall the new pump aligning the
marks on the pump and body, as you do
slide the brass ground terminal between
the pump and the module body trapping
it in place. Ensure that the pump inlet is
aligned with the port in the bottom of the
body.
24.
Slide the tie strap around the top of the
pump until the anchor end contacts
the side of the module body. Mark this
location with a line going down from the
top edge approximately 3/8”.
magnacharger.com
Radix 03-06 Escalade
07/08
Page 10
25.
At the bottom of this line, drill a ¼” hole.
26.
Slide the tie strap around the top of the
pump body and push the anchor end
through the new hole to secure the
pump.
27.
Install the electrical connector into
the top of the new pump. Connect the
ground connection that previously went
to the filter to the new ground jumper
lead supplied.
28.
On the new ground jumper lead, connect
the large female spade connector to the
new ground terminal at the fuel pump
and the small spade connector to the
filter terminal.
magnacharger.com
Radix 03-06 Escalade
07/08
Page 11
29.
Connect the remaining end of the fuel
line to the filter nipple and secure it with
a crimp-clamp supplied.
30.
The fuel module unit is now ready for
reinstallation in the tank.
31.
Reinstall the tank module into the tank
with the large vapor nipple pointing
towards the metal tank shield. Coat
the bottom surface of the lock ring with
some of the grease supplied, then install
the ring on the retaining collar. Apply
some more grease on the seven raised
lock bumps on the surface of the lock
ring. Using the same tools you used
to remove the lock ring, rotate the ring
clock-wise until the lock bumps are in
the same position as they were in step 8.
With the help of an assistant, reposition
the fuel tank back into the position on
your jack. Reattach the fuel vapor and
electrical connectors by pushing them
in. Raise the tank back into its original
position and reinstall the fuel tank straps
with a 17mm socket wrench, torque
these bolts to 40lb-ft. Slide the canister
vent solenoid on the side of the tank. At
the front tank, clip the metal fuel and
vapor lines into the plastic retaining clip
on the tank. Install the fuel and vapor
connectors onto the metal lines. Install
the fuel fill pipe onto the tank and tighten
the clamp securely. Refill the fuel tank
with 91 minimum octane after installation
is complete.
magnacharger.com
Radix 03-06 Escalade
07/08
Page 12
32.
With a 8mm wrench disconnect the
(-) negative battery cable. Make sure
the cable is far enough away from the
battery that it does not accidentally touch
the battery and make connection during
the installation. (Wrap negative cable
connector with electrical tape.)
33.
With a cool engine remove the radiator
cap. (Be careful not to remove the cap if
the engine is still hot.)
34.
Open radiator petcock and drain coolant
into a clean drain pan. Save coolant for
reuse later on.
35.
Remove the top plastic sight shield bolt
using a 10mm socket wrench. The top
shield and right and left side shields will
not be reused.
magnacharger.com
Radix 03-06 Escalade
07/08
Page 13
36.
Remove the two side sight shields by
first removing the two fasteners along
their lower edges with a 8mm nut driver.
37.
Using a 8mm nut driver loosen the two
large hose clamps holding the air cleaner
duct assembly.
38.
Remove the duct assembly by lifting it
out. Sight shield and duct assembly will
not be reused.
39.
Unplug the electrical connector to the
MAF sensor.
magnacharger.com
Radix 03-06 Escalade
07/08
Page 14
40.
Firmly grasp the air intake box and pull
up removing it from the vehicle.
41.
To prevent expansion foam from
escaping, insert the black plastic plug
supplied in the hole located in the upper
edge of the right (passenger) side wheel
well.
42.
Locate the can of expansion foam in your
kit. Follow the directions on the back
of the can. Insert the end of the straw
into the hole and dispense the foam into
the hole for 10 to 12 seconds. In the
existing hole that is just to the rear of the
slot that the coolant tank sits in, again
dispense the foam into the hole for 10
to 12 seconds. You will not need the
entire can. Do not attempt to over fill the
fender. (Note: do not disturb foam for
8 hours.) Noise levels will be drastically
reduced when foam has set.
43.
Using a long pair of pliers, remove the
coolant hoses from the bottom of the
throttle body.
magnacharger.com
Radix 03-06 Escalade
07/08
Page 15
44.
Remove the PCV vent hose from the
throttle body or intake manifold on
passenger side. (Depending on year.)
45.
Using a 10mm socket wrench, remove
the three bolts that fasten the cover
support bracket from the top of the intake
manifold.
46.
Open the large electrical harness
retainer clip, then using a 10mm socket
wrench remove the bolts holding the
plastic wire harness retainer to the intake
manifold.
47.
Disconnect the following electrical
and hose connections from the intake
manifold area.
magnacharger.com
Radix 03-06 Escalade
Knock Sensor
07/08
Page 16
48.
Disconnect the eight fuel injector
connections by gently pulling up on
the gray plastic release trigger on the
connector and then pulling firmly on the
connector itself.
49.
Disconnect Electrical Throttle Control
(ETC) connector from the throttle body
by removing the gray plastic locking tab
first, then squeeze and pull free the ETC
connector itself.
50.
At the rear of the of the intake manifold
disconnect the Manifold Absolute
Pressure (MAP) sensor connector by
gently raising the gray plastic retaining
clip and then pull free the connector
itself.
51.
Disconnect the engine knock sensor
connector and steel-mounting clip from
the intake manifold by prying it free with
a small screwdriver. Next gently raise the
black plastic retaining clip and then pull
free the connector from the harness.
magnacharger.com
Radix 03-06 Escalade
EVAP Connector
52.
Disconnect the evaporative purge
solenoid EVAP connector by raising the
black plastic retaining clip and then pull
free the connector itself.
53.
Lift the electrical harness from the top of
the engine and set off to the side.
54.
Remove the power brake hose from
the control valve. (Some vehicles have
hydraulic assist and do not have this
hose.)
55.
With the fuel line disconnect tool
supplied, remove the fuel line from the
fuel rail. Caution! The system may be
under pressure. Avoid open flame or
other sources of ignition.
Tool
07/08
Page 17
magnacharger.com
Radix 03-06 Escalade
07/08
Page 18
56.
Disconnect the EVAP vent tube from the
solenoid by squeezing the retainer, and
then release the tube from the solenoid.
Follow the same procedure on the other
end of the EVAP vent tube and remove
the tube from the vehicle.
57.
Remove the Positive Crankcase Vent
(PCV) vacuum hose from the intake
manifold on driver side.
58.
Using a 8mm socket wrench remove the
ten intake manifold bolts.
59.
Carefully remove the intake manifold
assembly and set aside.
magnacharger.com
Radix 03-06 Escalade
07/08
Page 19
60.
Using a vacuum cleaner, remove any dirt
or debris from the intake port area. (Be
careful not to get any dirt in the intake
ports.)
61.
Cover the intake ports with tape or
clean rags to keep dirt and objects from
entering the engine. (Remember to be
clean.)
62.
Using a 15mm wrench, remove the steel
bracket from the rear of the driver side
cylinder head. This will not be reused.
63.
Using a 10mm socket wrench remove
the two coolant vent pipe bolts.
magnacharger.com
Radix 03-06 Escalade
64.
Remove the vent pipe assembly. (Make
sure that the o-ring gaskets did not stick
to the cylinder heads, if so remove them.)
65.
Using a 15mm tensioner wrench or
breaker bar, remove the stock serpentine
belt from the vehicle. The belt will not be
reused.
07/08
Page 20
66.
Using a 15mm socket wrench remove
the three bolts holding the factory belt
tensioner to the bracket and remove the
tensioner.
67.
Using a 10mm wrench disconnect the
battery positive terminal from the back of
the alternator.
magnacharger.com
Radix 03-06 Escalade
07/08
Page 21
68.
With a 15mm socket wrench remove
the two bolts holding the alternator to
the alternator bracket. Remove the
alternator.
69.
Remove the long oil filler neck from the
valve cover by rotating it 180 degrees
counter clock-wise and pulling it out.
70.
Install the short oil filler neck supplied
by inserting it into the valve cover and
rotating it 180 degrees clock-wise.
Transfer the oil fill cap from the long neck
to the new short one.
71.
Take the new supplied coolant vent pipe
and test fit to the front of the cylinder
heads. Check for clearance between the
pipe and the alternator bracket as shown.
magnacharger.com
Radix 03-06 Escalade
07/08
Page 22
72.
Use a felt tip marker and mark the
alternator bracket were the coolant vent
pipe hits as shown.
73.
Using a file or die grinder, remove
material from the alternator mounting
bracket marked in the previous step.
Once clearance is achieved, recheck
with the new vent pipe. Ensure that the
vent pipe does not touch the alternator
bracket.
74.
Using the stock bolts removed in step
63 install the new coolant vent pipe
supplied. Ensure that the o-ring seals
are installed correctly. Torque the bolts
with a torque wrench and 10mm socket
to 106 in-lbs.
75.
Using the new supplied 16” x 3/8” PCV
vacuum hose, connect one end to the
PCV valve as shown and lay the other
end of the hose off to the driver side, out
of the way. (To be connected in a later
step.)
magnacharger.com
Radix 03-06 Escalade
07/08
Page 23
76.
Install the intake manifold gaskets
supplied onto the supercharger manifold.
Ensure that the gaskets are fully seated
into the relieves in the manifold.
77.
Remove the stock MAP sensor from the
stock intake manifold by pulling back on
the two tabs and lifting the sensor out.
Ensure that the orange MAP sensor seal
is not damaged, as it will be used.
78.
Put some lubricant on the MAP sensor
seal and press the MAP sensor into
the provided hole in the supercharger
manifold as shown.
79.
Using a 4mm Allen wrench, install the
MAP sensor retaining clip with the
provided 6mm button head screw as
shown.
magnacharger.com
Radix 03-06 Escalade
07/08
Page 24
80.
Remove the power brake hose and
clamp from the stock intake manifold.
81.
Install the power brake hose and clamp
removed in the previous step to the
large hose barb on the rear of the
supercharger inlet manifold. Remove the
cap from the remaining barb for the PCV
hose to be installed in a later step.
82.
The following steps are for 2003
vehicles only, 2004-2005 skip to step 89.
Remove the stock fuel pressure regulator
from the fuel rail by disconnecting the
vacuum hose, pulling off the spring clip
and pulling the regulator out. Be careful
not to lose any of the small O-rings on
the regulator.
83.
Make sure that the two O-rings and the
screen filter is complete as shown.
magnacharger.com
Radix 03-06 Escalade
07/08
Page 25
84.
Using a small amount of grease or oil
lubricate the two O-rings on the fuel
pressure regulator and push it into the
new supplied fuel manifold as shown.
85.
Using a pair of C-clip pliers install the
new supplied C-clip into the fuel manifold
as shown. (Make sure that the clip seats
into the machined grove in the manifold.)
86.
Apply a small amount of grease to the
new supplied fuel manifold O-ring and
set in the machined recessed area on
the new driver side fuel rail as shown.
87.
Install the assembled fuel manifold to
the driver side fuel rail using the two
new supplied 6mm bolts. Using a 10mm
socket wrench torque the bolts to 106 inlbs. (Be careful not to pinch the O-ring.)
magnacharger.com
Radix 03-06 Escalade
88.
This step is for 2003 vehicles only,
2004-2005 skip to step 89. Using the
small 5/32” hose supplied, connect one
end to the small barb on the pressure
regulator. Connect the remaining end of
the hose to the barb at the left rear of the
supercharger manifold.
89.
Using a 10mm socket wrench remove
the stock throttle body from the stock
intake manifold. Next using a #5 internal
Toro socket remove the three mounting
studs from the stock intake manifold.
90.
Install the three studs removed in the
previous step into the new supercharger
inlet manifold using a #5 internal Torx
socket and wrench.
91.
Remove the EVAP solenoid from the
stock manifold with a 8mm socket
wrench.
Manifold
Barb
Pressure
Regulator
Barb
07/08
Page 26
magnacharger.com
Radix 03-06 Escalade
07/08
Page 27
92.
Lubricate the o-ring with the supplied
grease.
93.
Mount EVAP solenoid on front of intake
manifold.
94.
Remove the one bolt directly below the
alternator and factory GM idler with a
15mm socket wrench.
95.
Here is the new tensioner support
bracket and hardware. The new bracket
will locate in the original tensioner
location. Note the different fasteners and
their locations.
magnacharger.com
Radix 03-06 Escalade
96. In the original tensioner location, install
the new tensioner support bracket.
Torque all mounting fasteners to 40 lb-ft.
07/08
Page 28
97.
Install the tensioner and it’s mounting
bolt on the new mounting bracket.
Torque the tensioner mounting bolt to 50
lb-ft.
98.
Install the 90mm idler and spacer on
the idler support bracket. Torque the
mounting bolt to 40 lb-ft.
99.
Spray silicone or some mild soap and
water solution on cylinder head surface
to lubricate. This makes the intake
manifold slide around a little to help line
up the holes. (Do not use anything that
will damage the intake gaskets such as
petroleum based products, etc.)
magnacharger.com
Radix 03-06 Escalade
100. Using an assistant, carefully lower
manifold assembly into place, being
careful not to damage gaskets.
101. Remove the spilt loom that supports the
fastener. Start all ten bolts by hand.
102. Torque all 10 bolts gradually and evenly
to a torque of 89 in-lbs.
103. Push the fuel line connector on to the
fuel manifold. Ensure that the fuel line
is pushed all the way on. Pull on the
connector to check that it is secure,
you should not be able to remove the
connector unless you use the removal
tool.
07/08
Page 29
magnacharger.com
Radix 03-06 Escalade
104. Using supplied gasket, mount throttle
body using stock nuts.
105. Remove the wiring harness from the
original bracket.
106. Route the wiring harness over the
left side fuel rail and attach it to the
supercharger manifold as shown, using
the Adel clamp and bolt supplied.
Adel Clamp
107. Plug in the electrical connectors for the
following components, the Fuel Injectors,
Electronic Throttle Control, Map Sensor,
Knock Sensor and EVAP Solenoid.
07/08
Page 30
magnacharger.com
Radix 03-06 Escalade
108. Attach one end of the ¼” coolant hose
supplied to the new steam vent pipe and
the other end to the barb on the bottom
of the throttle body with the clamps
supplied. Attach the original steam vent
hose and clamp from the radiator to the
remaining barb on the bottom of the
throttle body.
Coolant
Hose
109. Mount the nose support and torque the
fasteners 15-17 ft-lbs.
110. Reinstall the EVAP tube on the EVAP
solenoid at the front of the supercharger
manifold. Route the tube under the
supercharger nose and along the
inside of the left fuel rail to the EVAP
connection between the cylinder head
and the firewall.
111. Install the Radix information sticker on
the black plastic radiator cover below the
GM factory-warning sticker.
07/08
Page 31
magnacharger.com
Radix 03-06 Escalade
112. Install alternator on the stock bracket and
torque the fasteners to 40 ft-lb.
113. Reattach the battery cable to the
alternator terminal.
114. Using belt routing decal, install belt.
Please double check you’re routing
before moving to the next step.
115. Using a screwdriver, remove the four
screws that secure the top cover to the
base of the air box assembly.
07/08
Page 32
magnacharger.com
Radix 03-06 Escalade
116. Remove and discard the stock paper air
filter.
117. Remove the stock air box gasket and
replace it with the new gasket supplied
with the K&N air filter.
118. Install K&N air filter and reassemble
the air box assembly. Reinstall the
completed unit on the vehicle.
Bellows
119. Here is the air tube and it’s components.
Air Tube
Coupler
Clamps
07/08
Brass Barbs
Grease
Page 33
magnacharger.com
Radix 03-06 Escalade
120. Assemble the bellows and coupler to the
air tube. Notice the position of the clamp
screws. The screws must be facing up so
that you can install the assembly on the
vehicle.
121. Install the brass barb into the threaded
port in the bottom of the air tube with a
14mm wrench. Do not over tighten!
122. Using some of the O-ring grease
supplied, apply a light coating of grease
on the inside of the coupler.
123. Push the bellows end of the air tube
assembly on to the air box first, and then
install the remaining end with the coupler
on to the throttle body. Tighten all clamp
screws securely.
07/08
Page 34
magnacharger.com
Radix 03-06 Escalade
124. Attach the PCV hose from the right
(passenger) side valve cover to the
brass barb on the bottom of the air tube.
Connect the PCV hose from step 75 to
the remaining barb next to the power
brake hose connection on the back of
the inlet manifold. Connect the power
brake hose to the control valve shown in
step 54.
125. Remove the driver side fender to firewall
brace with a 13mm socket wrench, to
gain access to the fuse relay panel.
126. Firmly grasp the relay centers cover and
lift off.
127. Pull back on the two tabs holding the
relay centers main cover off.
07/08
Page 35
magnacharger.com
Radix 03-06 Escalade
128. Lift the cover off and set aside for
modification.
129. Position the intercooler reservoir bracket
on the engine side face of the main
cover. Align the cut-away of the cover
with the edge of the bracket.
Align
Edges
130. Mark the location of the three mounting
studs on the cover and then drill 1/4”
holes in these locations.
131. Place the reservoir bracket in location
on the holes. Secure the bracket on the
inside of the cover with the three nuts
supplied. Tighten the nuts with a 10mm
socket wrench.
07/08
Page 36
magnacharger.com
Radix 03-06 Escalade
Reservoir Inlet
132. Here is the intercooler reservoir/pump
assembly. Note the hose and electrical
connections.
Electrical Connection
Pump Outlet
133. Install the reservoir/pump assembly on
the two reservoir bracket studs with the
supplied nuts. Tighten the nuts securely.
134. Install the intercooler pump harness
starting at the relay center. Cover the
red and black wires that lead to the
intercooler coolant pump connector with
the split loom supplied. Tuck the relay
under the factory GM wiring so that the
relay center cover base will cover it.
Route the harness with the coolant pump
connector down and forward along the
factory GM harness.
135. In the wiring below the fuse/relay center,
locate the gray fuel pump wire that goes
from the relay center down the frame
towards the rear of the vehicle. Use a
12-volt automotive test light or voltmeter
to check that you have the correct wire.
With the battery temporarily connected,
switch the ignition on and your test light
should glow for about 3 seconds and
then go out when you have located the
correct wire. Install a T-tap connector
onto the gray fuel pump wire.
07/08
Page 37
magnacharger.com
Radix 03-06 Escalade
136. Connect the yellow wire from the relay
into the T-tap connector installed in the
last step.
137. Using a 13mm socket wrench remove
the positive terminal nut from the lug.
(Caution - make sure the battery is
disconnected.)
138. Install the positive terminal from the relay
to the positive lug as shown. (This is the
wire with the fuse holder in it.)
139. Using a 10mm socket wrench, remove
the nut from the body ground stud on the
firewall as shown.
Body Ground Stud
07/08
Page 38
magnacharger.com
Radix 03-06 Escalade
140. Locate the single black ground wire from
the relay, strip the insulation back ¼”
from the end and then firmly crimp the
ring terminal on the end. Install the black
wire with its ring terminal on the body
ground stud from the previous step and
secure it firmly with the original nut.
141. Install the intercooler electrical connector
into the bottom of the coolant pump.
Secure the wiring as necessary with the
tie straps supplied.
142. This step is for 2003 vehicles only; 20042005 vehicles skip to step 143. Install
the wiring harness for the fuel pump
in the same location as you did for the
intercooler pump wiring harness. Attach
the extra yellow wire from the intercooler
pump relay onto the male spade terminal
marked “85” on the bottom of the fuel
pump relay. Attach the ring connector
from the fused power wire in the same
location as you did for the intercooler
pump relay in step 138. Attach the black
ground wire ring connector in the same
location as you did in step 140. Route
the black and red split loom covered
wires down and along the inside of the
left frame rail to the fuel filter location.
143. Reinstall the relay center cover complete
with the reservoir and pump installed.
(Be careful not to pinch any wires.)
07/08
Page 39
magnacharger.com
Radix 03-06 Escalade
144. Reinstall the fuse/relay cover by aligning
it up and pushing down on it.
145. Reinstall fender to firewall brace.
146. Here is the intercooler and it’s mounting
components.
147. Install two of the round-headed carriage
bolts supplied into both channels on the
sides of the heat exchanger. The square
portion of the bolt shaft must be aligned
with the side of the channel.
07/08
Page 40
magnacharger.com
Radix 03-06 Escalade
148. Align the bolts with the holes in the
bracket.
149. Torque the mounting nuts to 18 ft-lbs.
150. Assemble the upper mounting clamp
with its plastic strip. Peel the backing
tape off the plastic strip and apply the
strip supplied to the inside of the jaws on
the mounting clamp.
151. Remove the seven push-lock fasteners
that secure the black plastic radiator
cover. Do this by prying up on the center
of the fastener with a small straight blade
screwdriver.
07/08
Page 41
magnacharger.com
Radix 03-06 Escalade
152. Remove the seven fasteners completely.
153. Remove the radiator cover.
154. Remove the grille assembly by first
removing the upper retaining bolt with a
10mm socket wrench.
155. Pull out on the grille assembly at the
corners to release the snap-in fasteners.
07/08
Page 42
magnacharger.com
Radix 03-06 Escalade
156. Remove the grille assembly.
157. Remove the stock cross member bolts
from the radiator brace bolt at each end
with a 13mm socket wrench.
158. Replace the cross member bolts with
the rubber mounts supplied. Tighten the
mounts securely by hand only.
159. Install the heat exchanger onto the studs
of the rubber mounts and secure it with
the nuts supplied and a 10mm socket
wrench.
07/08
Page 43
magnacharger.com
Radix 03-06 Escalade
160. Remove the transmission cooler bolt
located below and to the right of the
hood latch with a 10mm socket wrench.
For vehicles without a transmission
cooler, a bolt and nut are supplied.
Remove This Bolt
161. Install the upper mounting clamp onto
the heat exchanger core using the bolt
removed in the previous step. Tighten
the bolt securely.
162. Here is the heat exchanger mounted.
Notice the hose barbs are on the right
side.
163. Starting at the intercooler barb on the left
side of the supercharger, attach one end
of the length of the 5/8” hose with a #10
clamp. Run the hose forward and down
beside the left side of the radiator.
07/08
Page 44
magnacharger.com
Radix 03-06 Escalade
164. On vehicles equipped with HID
headlights, locate the square hole
between the HID transformer and the
headlight. Pass the two hoses for the
intercooler through this hole.
Square Hole
165. In the rubber weather shield beside
the radiator, make a slot or hole for the
hoses from the intercooler to pass.
166. Continue the hose to the upper barb on
the top of the heat exchanger. At this
point cut the hose and push it on the
barb. From the remaining length of hose,
attach one end to the lower barb of the
heat exchanger. Route the hose through
the slot in the weather shield and on to
the outlet barb of the intercooler pump.
Cut the hose and secure all connections
with #10 clamps.
167. From the remaining length of hose,
connect one end to the inlet barb of the
intercooler reservoir with a #10 clamp.
07/08
Page 45
magnacharger.com
Radix 03-06 Escalade
168. Cut the remaining end of the hose
to length and connect it to the “T”
connection on the supercharger with a
#10 clamp. Reinstall the grille assembly
by snapping the six corners back in
place and installing the upper retaining
bolt with a 10mm socket wrench. Install
the radiator cover by inserting the seven
push-lock fasteners back in their holes
and pressing the center of the push-lock
fasteners down to secure them.
169. The following steps are for 2003 vehicles
only, 2004-2005 skip to step 179. Locate
your vehicles fuel filter, usually located
on the inside of the driver side frame
rail. At this time we recommend that you
replace the fuel filter.
170. Using 5/8” and 13/16” wrenches,
disconnect fuel line from filter. Use rags
to soak up and fuel. (Be sure to dispose
of rags properly.) Do not lose small oring on fitting.
171. Using small amount of grease, lubricate
o-ring threads of OE fitting. Carefully
bend tube to run parallel to frame rail and
direct into pump discharge fitting.
07/08
Page 46
magnacharger.com
Radix 03-06 Escalade
172. Using 21/64” drill bit, carefully drill
through bottom of frame rail. Clean up
chips, de-burr the hole and fasten pump
with supplied hardware.
173. While supporting the pump using
back-up 7/8” wrench, tighten fuel line
fittings. (Make sure adapter does not get
loosened.)
174. Lubricate o-rings and threads of u-bend
adapter and install on discharge side of
fuel filter. Position as in photo.
175. Wrap inlet hose & fitting around to filter
adapter, and “click” into place.
07/08
Page 47
magnacharger.com
Radix 03-06 Escalade
176. Use tie wraps supplied in kit to fasten
hose & wires out of harms way, and to
allow smooth bends.
177. Cut the pump-wiring loom installed
earlier in step 170 so that the black and
red wires will reach the new pump.
178. The fuel pump wiring must be hooked up
correctly to work, the red Positive wire
goes to the “+” post on the pump and
the black negative wire goes to the “-”
post on the pump. (Double-check your
installation before moving on.) *Note: Do
not over-tighten the nuts and break the
studs.
179. Locate MAF cable, pull back flex loom
approximately 8 inches. Separate the
tan & black wires from this harness.
07/08
Page 48
magnacharger.com
Radix 03-06 Escalade
180. Cut the tan & black wires approximately
1” from the MAF connector.
To Computer
181. Using the new IAT harness and crimp/
shrink connectors supplied, connect
either white wire of the new harness to
the tan wire and the black wire that run
to the vehicles computer. The wires to
the MAF will no longer be used. Strip
about ¼” of insulation from the ends of
the black and tan wires to the computer
and the IAT harness, then crimp the
connectors on. Using a heat gun or blow
dryer set on HIGH; shrink the insulation
on the connectors so that it contracts
around the wires completely. You must
shrink the insulation, as crimping the
connectors alone is not enough to secure
them!
To MAF
No Longer
used
182. Plug the IAT harness into the IAT sensor
located under the supercharger nose.
183. Refill radiator and intercooler system with
a 50/50 mixture of coolant and distilled
or de-ionized water only. Bleed system
at “T” and at reservoir. Check system
periodically for fluid level.
07/08
Page 49
magnacharger.com
Radix 03-06 Escalade
WARNING! Before downloading the new software into your vehicles compute (PCM), make sure to
turn off all power consuming accessories: heater, A/C, radio, dome light, etc. Turn off the daytime
running rights by applying the emergency brake or by turning the headlamp switch counterclockwise. Follow the steps below to remove all recommended fuses and any additional power
fuses from all aftermarket add-on accessories i.e.: stereo amplifiers, DVD players, TV monitors,
MP3 players and anti-theft equipment. Keep all doors closed during programming. Never remove
the programming cable during programming and always follow the instructions on the handheld unit
display. Failure of any of the above instructions can cause a “NO RESPONSE” from the PCM or
permanent damage to the vehicle PCM.
184. Ensure vehicle is off and the keys are out
of the ignition. Locate the interior fuse
panel inside the driver door as shown.
185. Remove the 10 AMP “SEO ACCY” fuse
in the top middle section of the fuse box
as shown.
186. Remove the cover from the “Exterior
Fuse Panel” located under the hood on
the drivers (left) side. Remove the six
fuses labeled SEO B1, SEO IGN, INFO,
SEO B2, RADIO and RADIO AMP.
Download the Micro tuner following the
instructions that came with the Micro
tuner.
187. Vehicle Programming Instructions For
07/08
Page 50
magnacharger.com
Radix 03-06 Escalade
the Micro Tuner:
a. IMPORTANT! To ensure trouble-free programming of your vehicle’s computer:
b. Make sure the vehicle’s battery is sufficiently charged.
c. Turn off all accessories & close doors to prevent unnecessary drain on the battery.
d. Do not attempt to program your vehicle while a battery charger is connected.
e. Improper battery voltage will result in failure of the programming process.
f. Do not disconnect the cable or turn off the ignition during programming.
g. Reconnect battery ground (-) cable.
188. Connect the supplied cable to the 9-pin
connector at the top of the handheld
unit. Use the thumbscrews to secure the
cable to connector.
OBD11
189. Connect the other end to your OBD11
connector located under the dash near
the steering column. Make sure this
connection is seated all the way in and
that it is secure. You do not want this
cable coming out of the connector during
programming.
190. Turn the ignition key to the on or run
position but do not start the vehicle.
191. To begin programming your vehicle, you
must press the YES button.
192. You only need to press the YES button
once to start the programming cycle.
The programming process only takes
about a minute.
193. The handheld unit will inform you
that the programming process has
completed and to turn the ignition off and
disconnect the cable. Only at this time
should the ignition be turned off and the
cable removed.
194. *DO NOT DISTURB THE CABLE OR TURN THE IGNITION OFF DURING THIS TIME! IF
THE PROGRAMMING IS DISRUPTED YOUR COMPUTER WILL NOT START OR RUN
YOUR VEHICLE!
In the event that the vehicle needs to be returned to its original calibration, follow the directions as
described above. The handheld unit will prompt you that you have already modified the vehicle’s
computer. Select YES to return you vehicle’s computer back to the stock calibration. Wait for the
handheld to finish, and then disconnect cable as described above.
07/08
Page 51
magnacharger.com
Radix 03-06 Escalade
195. Once programming is completed, ensure
the vehicle is off and the keys are out of
the ignition. Install the fuses back into
their correct locations and reinstall the
covers.
89-89-60-004 Rev G
196. Start the vehicle for 5 seconds and shut off, once again check for fuel leaks and fansupercharger belt alignment. Check radiator and intercooler reservoir.
197. Test drive vehicle for the first few miles under normal driving conditions, listen for any
noises, vibrations, engine misfire or anything that does not seem normal. The supercharger
does have a slight whining noise under boost conditions, which is normal. Check & bleed
intercooler reservoir as needed.
198. After the initial test drive gradually work the vehicle to wide open throttle runs, listen for any
engine detonation (Pinging), If engine detonation is present let up on the throttle immediately.
Most detonation causes are low octane gasoline still in the tank. If you have questions about
your vehicles performance, please check with your installation facility or call Magna Charger
at (805) 289-0044, Monday through Friday, 8am to 5pm.
Ventura, CA (November 21, 2002) Magna
Charger, manufacturer of superchargers
and supercharger systems for foreign and
domestic vehicles, was presented the
prestigious award at the annual Specialty
Equipment Market Association Show (SEMA)
in Las Vegas, Nevada.
Sponsored by General Motors Corporation,
the 2002 SEMA Design Award for the “Most
Innovative Product” was awarded to Magna
Charger and recognized by the all-star team
of judges for their outstanding and innovative
design achievement. The criteria used by
the judges included innovation, technical
achievement, quality and workmanship.
The award was presented for the Radix®
Intercooled supercharger system, designed for
the Chevrolet, GMC and Cadillac, 4.8L, 5.3L
and 6.0L General Motors Trucks and SUV’s
including the new H2.
07/08
Page 52
Please enjoy your “Magna Charged”
performance responsibly.
magnacharger.com
Radix 03-06 Escalade
2003
INTERCOOLER/FUEL PUMP WIRE ROUTING DIAGRAM
07/08
Page 53
magnacharger.com
Radix 03-06 Escalade
2004-2005
INTERCOOLER WIRE ROUTING DIAGRAM
07/08
Page 54
magnacharger.com