1
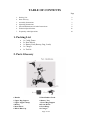
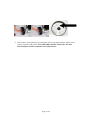
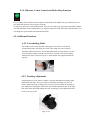
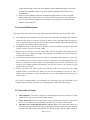
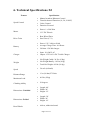
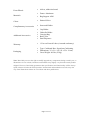
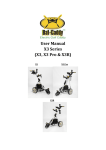
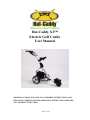
Bat-Caddy X3™ Electric Golf Caddy User Manual WARNING: PLEASE FOLLOW ALL ASSEMBLY INSTRUCTIONS AND READ AND UNDERSTAND THE OPERATING INSTRUCTIONS BEFORE YOU OPERATE THE CADDY. Page 1 of 15 TABLE OF CONTENTS Page 1. 2. 3. 4. 5. 6. 7. Packing List Parts Glossary Assembly Instructions Operating Instructions General Maintenance & Other Instructions Technical Specifications Frequently Asked Questions 1. Packing List 1 x Caddy Frame 2 x Rear Wheels 1 x Battery Pack (Battery, Bag, Leads) 1 x Charger 1 x Tool kit 2. Parts Glossary 1 Handle 2 Upper Bag Support 3 Upper Support Strap 4 Battery 5 Rear Wheel 6 Wheel Hub Cap 7 Wheel Rubber Tread 8 Battery Tray 9 Lower Bag Support 10 Front Wheel 11 Lock Hinge 12 Charger Page 2 of 15 2 2 3 5 8 12 14 3. Assembly Instructions 1. Unpack all items carefully and check inventory. 2. Place frame structure (one piece) on soft and clean ground to protect frame from being scratched. Erect Frame by unfolding and connecting the main frame tube together at the joint and locking the Y-shape lower support structure to the main frame with the frame lock mechanism. 3. Attach wheels to axles by pushing wheel locking button on the outside of the wheel and inserting the axle extension into the wheel. Make sure to keep the locking button on the outside of the wheel pushed in during this process, in order to enable the axle extensions, including the two pins, to be inserted all the way into the wheel. If not locked in, the wheel will not be connected to the Page 3 of 15 4. Place battery pack on battery tray and fasten Velcro strap around battery tightly. Insert battery plug into caddy outlet. Note: BEFORE CONNECTING make sure that Rheostat Speed Control on handle is in OFF position!!! Page 4 of 15 4. Operating Instructions 4.1. T-Handle Control Functions 4.1.1. Power Switch The ON/OFF button (see illustration) controls the caddy’s main power supply. Once you have connected the battery, make sure that the rheostat speed control is in OFF position. Now press the button for ca. 2 seconds in order to switch the caddy ON or OFF (similar to a mobile phone operation). Now the battery charge indicator LEDs will illuminate, and your caddy is ready for operation. 4.1.2. Battery Charge Indicator LEDs After the caddy has been switched on all LED lights (green, yellow, red) should be illuminated. This indicates that the battery is fully charged. During play as the battery is being discharged, first the green light should go off, then the yellow, and when only the red LED is illuminated it is time to recharge the battery. High Power : Green Color Medium Power: Yellow Color. Low Power: Red Color 4.1.3. Timed Advance Distance Function : When your press 10M, the trolley will run 10 Meters/Yards and stop by itself When your press 20M, the trolley will run 20 Meters/Yards and stop by itself When your press 30M, the trolley will run 30 Meters/Yards and stop by itself Page 5 of 15 4.1.4. Rheostat, Cruise Control and Brake/Stop Function : Easy scrolling action with the rheostat speed control knob on the handle lets you seamlessly choose your preferred speeds to suit your pace perfectly; To stop press the Cruise Control/Stop button. Once you are ready to go again press the button, and the cart will remember its last setting before you stopped, and travel at the same speed automatically. You can change the speed with the rheostat knob position. 4.2. Additional Functions 4.2.1. Freewheeling Mode The caddy can be easily operated without power. In order to activate the freewheeling mode, turn main power Off. The caddy now can be pushed manually without resistance. The freewheeling mode on some models can also be activated by pulling out both rear wheels by 1/2 inch (1cm) and relocking them back into the second axle groove. Some models are equipped with both options. 4.2.2. Tracking Adjustment: Tracking behavior of all electric caddies is strongly dependent on equal weight distribution and slope. Test your caddy’s tracking by operating it on an even surface without the bag. If changes are necessary you can adjust the tracking of your caddy by loosening the front wheel axle and the adjustment bar on the right side of the front wheel and shifting the axle accordingly. After adjustment fasten screws in reverse order. Page 6 of 15 3.2.4. Installation of Seat (Optional on some models) Attach and fasten holding bar to pre-drilled holes in frame using the locking pin. Some models have a preinstalled holding bar. Attach seat stand to seat bottom using the four small screws. Attention: Attach in such manner that the seat points parallel to the driving direction of the caddy with the opening to the outside, once you slide it into the holding bar. Slide seat stand into holding bar as shown. Due to the spring mechanism the seat should reach the ground when pushed down. NOTE: Do NOT attempt to sit on the seat while trying to move the caddy or frame damage might occur! Page 7 of 15 5. Maintenance and Additional Instructions PLEASE OBEY THESE PRECAUTIONS FOR BATTERY USE & CHARGING a) Please do not charge the battery in a sealed container or in upside down position. It is recommended to charge the battery in a well ventilated area. b) Please do not charge the battery near a heater, or where heat accumulation may occur or in direct sunshine. c) In order to prolong the service life of the battery, please avoid complete discharge and charge the battery after every use. Unplug the battery from the charger once the charge is complete. When the trolley is not in use for an extended period of time, it is recommended to charge the battery once a month. d) The battery’s poles red color stands for positive, and the black for negative. In case of battery replacement please reconnect the poles of the battery correctly. Otherwise your caddy could suffer severe damage. e) Please do not disassemble the battery or throw it into a fire. EXPLOSION!!! f) NEVER TOUCH THE ELECTRIC POLES OF THE BATTERY!! SAFETY HAZARD!! 5.1. Battery Charging & Maintenance Connect the battery cable plug with the charger and then plug the charger into an electrical outlet. During the charging cycle the LED on the charger will show a blinking green light (some charger models also have a red steady light during charging). Once the charging cycle is complete the blinking green light or the red light will turn into a steady green light. It is now okay to unplug the charger and battery for reuse. The charging cycle can last up to 12 hours depending on the level of discharge. Normally the battery will hold its charge for several months, and it does not have a “memory effect”, and therefore can be recharged at any discharge level. It is not recommended to fully discharge the batteries, as this will shorten battery life drastically. The battery has a normal lifespan of 150-200 charges, depending on charging frequency, storage conditions and time and discharge history. Before storing a battery for extended periods of time you must fully charge it. DO NOT store an empty battery or else it might become unusable. Replacement batteries are available from your authorized Bat-Caddy dealer or directly from Bat-Caddy. RECOMMENDATIONS FOR BATTERY CHARGING & MAINTENANCE a. Fully charge the battery for ca. 12 hours before the first use b. Do not leave the battery on the charger if it is not used for extended periods of time, but remove it from the charger after charge is complete. c. The battery will take approximately 2-3 rounds and charging cycles before it reaches its full operating potential. During the first couple of rounds it might still be below its optimal power. d. Always keep your battery fully charged before another game e. Never keep your battery connected to the grid during prolonged power outages. It might be Page 8 of 15 irreversibly damaged f. Do not fully discharge the battery by “overplaying” it. It is recommended to recharge the battery after every 18 holes. 5.2. Test Caddy a. Testing Environment & Conditions First, make sure that you perform your first test of the caddy in a wide and safe area possibly on even surface, free of obstructions or valuables, such as people, parked automobiles, flowing traffic, furniture or water bodies (rivers, swimming pools etc.), steep hills, cliffs or similar hazards. b. Manual Control Operation Test the manual function first: Turn the caddy on. The manual speed functions of the caddy are controlled through the rheostat speed control wheel on the right side of the handle. Pushing the wheel forward (clockwise) will control the forward movement of the caddy. In order to slow down or stop the caddy, turn the wheel backwards (counterclockwise). NOTE: we strongly recommend being in close distance of the caddy when operating it near bodies of water, creeks, bridges, public traffic or other hazards to avoid loss of control and equipment damage. The warranty will not cover accidents or damage caused by careless operation of the equipment or loss of control of the unit. 5.3. Recommendations for Efficient and Safe Operation Be alert and act responsibly at all times while operating your caddy, just as you would when operating a riding cart, motor vehicle or any other type of machinery. We absolutely do not recommend the consumption of alcohol or any other impairing substances while operating our caddies. Do not operate the caddy carelessly in narrow or dangerous spaces, places with valuables or any people gathering areas, such as parking lots, close to flowing traffic, bag drop-off areas, stores, driving ranges, putting greens and practice areas, pro shops, restaurants, starter areas and other areas where people or items could be harmed through an error or lack of skill in operation. In such situations the caddy should be best operated with power. Also, please make sure to always switch off the power and secure the caddy when you park and leave the unit for any reason, either on or off course. With its optimized balance and straight front wheel the caddy has extraordinarily narrow and responsive turning and maneuvering abilities. However, it sometimes tends to react to uneven weight distribution of its load or slope variations and will follow the weight and the slope of the golf course, which is normal for electric caddies. Therefore, please make sure that the weight in your bag is distributed evenly (move heavy balls and items to both sides equally and to the upper part of your bag, or shift the bag on the caddy). Also, when operating your caddy anticipate the slope of the course in order to avoid frequent corrections in direction. When operating the Page 9 of 15 caddy often in bumpy terrain we recommend to add an additional bungee strap to the lower and/or upper bag support to give the golf bag additional hold and prevent it from shifting. Please avoid or minimize operation on hard and rough surfaces, such as cart paths, asphalt roads, gravel roads, roots etc., as this will cause unnecessary wear and tear on tires, wheels and other components. The caddy is best operated on soft and smooth surfaces such as fairways. 5.4. General Maintenance The steps below will ensure that you get a prolonged and reliable life out of your Bat-Caddy. 1) The Caddy has been designed so that the user can concentrate on playing golf, while the caddy does the work of carrying your bag. In order to keep your Bat-Caddy looking at its best, we advise that you wipe any mud or grass from the frame, wheels and chassis after every round with a damp cloth or paper towel. 2) Do NOT use hoses or high-pressure jet washers to prevent moisture entering the electronic systems, motors or gear boxes of the caddy. 3) Remove the rear wheels every few weeks and clean out any debris that might cause the wheels to drag. You might also apply some lubricant, such WD-40 to keep moving parts smooth and corrosion free. 4) A 4-5 hour round of golf played once a week for 12 months is equivalent to ca. four years use of a lawn mower, so please inspect your cart at least once a year thoroughly, and if you notice any symptoms of wear, contact your Bat-Caddy Service Center. Alternatively, you can have your caddy inspected and tuned by our Service Center, so it’s always in great shape for the new season. 5) Always disconnect the battery when you store the caddy, and always put your caddy together before re-connecting the battery. If you are not planning to play for at least a month, store the battery in a warm and dry place (not on concrete floor) and don’t leave it on the charger. All of these recommendations and common sense will help keep your Bat-Caddy in top condition and ensure that it remains your reliable partner, both on and off the links. 5.5. Electronic Systems Microcomputer: The remote caddy has 2 microcomputer controls: The first is in main controller box. The second is in the handle controls. Safety Protection: When the temperature of the controller box reaches its upper limit in case of overload it will automatically shut down to cool off for a few minutes. Microprocessor Controlled Electronics System: When you connect the battery, the electronics system will automatically run through a start-up routine. Then you can press the main OFF/ON button on the handle. The battery charge indicator lights will show Page 10 of 15 you the charge level of the battery from green (fully charged) to red (discharged). Important: The electronics controller box contains no user serviceable parts. Therefore, it is sealed to reduce the risk of moisture entering and impacting the electronic system. Breaking this seal increases the risk of damaging the electronics and decreasing the reliability of your caddy. DO NOT attempt to open the controller case. Doing so will void the warranty! Battery Operation and Care: Follow battery charge and maintenance instructions. The battery comes with leads and connector and a 30 Ampere fuse inside the red compartment on the Plus (Red) battery lead. Page 11 of 15 6. Technical Specifications X3 Feature Specification Speed Control Motor Drive Train Battery Charger Weight Speed Distance/Range Maximum Load Climbing Ability Dimensions: Unfolded Rear Wheels Power: 1 x 200 Watt 12 V DC Electric Rear Wheel Drive Steel Gear (17:1) Power: 12V, 24Ah or 26Ah Average Charge Time: 4-8 Hours Lifetime: 150-200 charges Input: 110-240V AC Output: 12V/2A-3A DC Trickle Charger Net Weight Caddy: 26 Lbs (12kg) Net Weight Battery: 18 Lbs (8 kg) Total Net Weight: 44 Lbs (20 kg) 5.4 m/h (8.6km/h) 13 m (20 km)/27 Holes 66 Lbs (30kg) 30 degrees Length: 46" Width: 20" Height: 39" Dimensions: Folded Manual seamless Rheostat Control Timed Advanced Function (10, 20, 30 M/Y) Cruise Control Function: Forward Length: 34" Width: 20" Height: 16" Airless, rubberized tread Page 12 of 15 Front Wheels Materials Colors Complimentary Accessories Airless, rubberized tread Frame: Aluminum Bag Support: ABS Painted: Silver Scorecard Holder Cup Holder Umbrella Holder Carrying Bag Rain Cover Sand Dispenser 1 Year on Parts & Labor (6 months on battery) Type: Cardboard Box, Styrofoam Cushioning Dimensions: 35 x 21 x 14” (92 x 55 x 34 cm) Gross Weight: 48 Lbs (22 kg) Additional Accessories Warranty Packaging Note: Bat-Caddy reserves the right to modify/upgrade any components during a model year, so illustrations on our website, brochures and manuals may slightly vary from the actual product shipped. However, Bat-Caddy guarantees that specifications and functionality will be always equal or better from the advertised product. Promotional and standard accessories may also vary from illustrations shown on our website and other publications. Page 13 of 15 7. Frequently Asked Questions (FAQs) In order to provide our customers with the most accurate and in-depth information please read below some answers to the most frequently asked questions about electric golf caddies in general and the Bat-Caddy X3 in particular. GENERAL QUESTIONS Why should I use an electric golf push cart? Bat-Caddy: Electric golf caddies provide you with a series of benefits, such as improved health and fitness, weight loss, lower handicap and a better overall golf experience, as well as economic benefits due to the saved rental cart fees. On Average a Bat-Caddy pays back for itself within one season. The caddy basically gives you the experience to play like a Tour Professional, i.e. walking but not having to carry, push or pull and thus avoiding any strain or fatigue which will most definitely impact your golf game. The real question is why should I not use an electric golf caddy and continue to carry my bag or waste money on riding cart rental fees? Please also read our Product Benefits section on our website. What is the difference between a remote controlled and a manually controlled motorized golf trolley? Bat-Caddy: The remote controlled caddy can be operated via a handheld remote transmitter up to 100 yards distance. The manually controlled caddy is also power assisted but steering and speed control needs to be performed manually on the handle, so you will have to walk close to the caddy while operating it. The remote controlled caddy can also be manually operated via a seamless rheostat control on the handle. Will the golf cart follow me? Bat-Caddy: No! The type of carts that follow you are obsolete or extinct. The main disadvantage of this technology was that they tended to cut corners, i.e. run into bunkers or water hazards once the operator went around them. You also needed to switch them off before you went on the green and walk back to them after putting. Today's remote control technology is more intuitive to use. What makes your caddies better than those of your competitors? Bat-Caddy: Our caddies offer a unique and superior combination of performance features, design, quality, service and value. Please refer to our Product Information section for detailed product features and benefits and don't hesitate to compare us to any of our competitors at any level. When purchasing a caddy please also consider the after-sales service. According to many of our customers Bat-Caddy has the industry's best customer service, and response time (Testimonials). Our advice: Never buy this kind of product from amateurs on auction sites or from shady outfits without addresses or service phone numbers. Bat-Caddy is the best value in the market with the best customer service, and that's why we continue to grow at an amazing pace, despite the current economic climate. We are a global company represented in the US, Canada and Europe. Page 14 of 15 BAT-CADDY QUESTIONS Should I charge the battery once I receive the unit? Bat-Caddy: Our 12V sealed lead acid batteries come more or less fully charged, but we recommend charging them for a full 12 hours before the first usage. The charger should either have a blinking green light or a red light while it's charging and turn into a steady green light when the battery is charged. Batteries develop their full potential after a few charging cycles. How long does the battery last? Bat-Caddy: Our batteries are rated to last on average for 27 holes or 6-8 hours of play per charge. Depending on the weight and topography of your course they might last longer or shorter. However, we recommend recharging the battery after every 18 holes, as complete drainage reduces the life time of a battery significantly. What do the lights on the handle mean? Bat-Caddy: The red, yellow and green LEDs on the handle indicate the level of charge of the battery. When the battery is fully charged they all should be lit. As the battery drains itself first the green, then yellow will go off. If only the red is on it's time to recharge. My caddy has no power when I try to turn it on? Bat-Caddy: Please check if all electrical connections are tight. Also check the fuse in the red cable of the battery leads within the battery carrying case. If broken please replace with a standard 30Amp automotive fuse. My caddy tends to track to one side. What should I do? Bat-Caddy: All caddies will follow weight and slope. If the weight in your bag is unevenly distributed the caddy will always tend to track to that side. Make sure that your bag is balanced. Please test the tracking of your caddy without the bag on even terrain. The tracking can also be adjusted by adjusting the front wheel. Please open the axle screw and the tracking rod located on the right side of the front wheel. Shift wheel as needed and tighten the screws. My caddy’s motor runs, but the wheels don’t turn? Bat-Caddy: First check the position of left and right wheel. The wheels have clutches and when installed on the wrong side, they won’t be propelled. Also check axle pins on both axle ends. The trolley stops by itself sometimes? Bat-Caddy: Please check the battery charge level. Also the controller box has a shut-down function, if the battery is too low or the controller is overheating or the caddy does not receive a signal for 30-40 seconds. Whom do I contact for service, parts and technical support? Bat-Caddy: Please contact our Bat-Caddy Service Center at 1-877-815-0809 or 1-888-214-6033 or send an e-mail to [email protected] Bat-Caddy® is a registered trademark of SpaCom LLC Copyright - All Rights Reserved Bat-Caddy Page 15 of 15