1
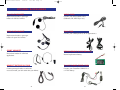
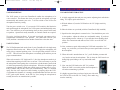
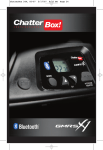
gmrsx1-owners-manual
2/24/04
1:59 PM
Page 2
16918 Edwards Rd. Cerritos, CA 90703
Tel: (888)452-2269 Fax: (562) 802-3151
www.hjc-chatterbox.com
www.chatterboxusa.com
gmrsx1-owners-manual
2/24/04
1:59 PM
Page 4
HJC Chatterbox® Limited Warranty
ChatterBox warrants that each new ChatterBox®
will be free from defective materials and workmanship for a period of one (1) year from the date of
original purchase. ChatterBox will remedy any such
defect by repair or replacement (at our option) of
the unit, provided the unit is delivered to the
address listed below, intact, for examination, with
all transportation charges prepaid and accompanied by a copy of the original retail sales receipt.
The provisions of this warranty shall not apply to
any unit which has been subject to misuse, neglect,
incorrect installation, unauthorized modification.
accident, or has been repaired or altered outside of
our factory. The express warranty contain herein
is in lieu of all other warranties, expressed or
implied or statutory, including without limitation
any warranty of merchantability or fitness for a
particular use. In no event will Chatterbox be liable
to the buyer for any damages, including special,
incidental, indirect, or consequential.
gmrsx1-owners-manual
2/24/04
1:59 PM
Page 6
CONTENTS
Introduction
4
Feature Highlights
4
Unpacking and Inspecting
5
Initial Set-Up
6
Features
7
Operation
Power On/Off
9
Vox Sensitivity
9
Channel Select
9
Volume Level Select
10
Talk Group
10
Beep On/Off Select
10
Key Lock On/Off Select
10
Scan
10
Power Save Level Select
10
Intercom
11
Monitor
11
Audio-In Jack
11
AUX-In Jack
11
Battery Indicator
11
Optional Accessories
12
Headset Installation
14
Main Unit Installation
15
How to Transmit and Receive
16
Vox Adjustment Instruction Sheet
17
Trouble Shooting
18
Technical Specification
19
3
gmrsx1-owners-manual
2/24/04
1:59 PM
Page 8
INTRODUCTION
Thank you on your recent purchase of the ChatterBox model GMRS X1. The
GMRS X1 is a micro size 15 channel portable FM transceiver constructed with
a microprocessor controlled, temperature compersated Phase Locked Loop
(PLL) frequency synthesizer. The radio features a double conversion receiver
and a direct FM transmitter modulator. A special integrated circuit provides
support to sub-audible signaling (CTCSS) and most of the receiving parts are
switched off periodically in the power saver mode to reduce battery current
drain during standby. The GMRS X1 is FM transceiver operating at 462MHz.
With the output power of 2 Watt, the radio is capable of communicating up to 5
miles. Now you can share your thoughts, as well as the road or trail, with all
your friends or even your passenger. The ChatterBox will greatly enhance your
riding experiences and can even increase your safety in certain situations.
FEATURE HIGHLIGHTS
UNPACKING AND INSPECTING
Check that all contents are in good order. If any parts of the
equipment has been damaged in transit or is missing please contact our
customer service department immediately at (562) 407-2188.
FM transceiver unit
Stereo headset and microphone (Full or Open Face)
One Rechargeable Ni-MH battery
AC home charger
PTT (Push-to-Talk-Button)
Mounting Bracket with allen wrench, protective rubber,
2 small screws, and 2 large screws
7. 2 Foam speaker covers
8. 2 Velcro discs
9. Wooden stick
1
1.
2.
3.
4.
5.
6.
• The ChatterBox GMRS X1 is the most technologically advanced state of the
art two way radio with a range of up to 5 miles.
2
• Sophisticated voice activated circuitry makes the GMRS X1 easy to use. All
you have to do is talk.
• You can operate this unit freely on each of the 15 channels and 38 talk groups
with an FCC license.
3
• Full duplex intercom for private communication between rider and passenger
is possible.
4
• Transmission between one rider/passenger to another rider/passenger is
possible.
8
6
• Power is supplied by a built in rechargeable Ni-MH battery.
• Enjoy the sound of music in true stereo sound which automatically mutes
during communication. An optional audio cord is needed.
• An optional call cord is available to allow you to answer incoming calls from
your cellular phone, (call for applications).
5
7
9
• An optional sport headset is available for unlimited applications; Camping,
Biking, Skiing, Snowboarding, Hunting, Fishing, Hiking etc.
4
5
gmrsx1-owners-manual
2/24/04
1:59 PM
Page 10
INITIAL SET-UP
FEATURES
The rechargeable Ni-MH battery comes initially charged from the factory. We
recommend that the battery be pre-conditioned by allowing it to drain completely before applying an additional 14 hr. full charge. To reduce the risk of
damage to the battery do not use any other charger except the one supplied with
the GMRS X1. Please note the battery should have a full charge before the unit
is stored for a long period of time.
If the unit is not used for a long period of time and you plan on using it, or when
you feel that the durability of the battery becomes shorter than normal, you can
restore the battery to the original state by following the steps outlined below.
1. Discharge the battery completely by leaving the unit on and setting the VOX
sensitivity to high (next to a TV or radio or in a noisy room) until the battery
is completely drained.
BUILT-IN RECHARGEABLE Ni-MH BATTERY
2. Charge the battery completely.
14. FIXED LOW PROFILE ANTENNA
1. LARGE ILLUMINATED LCD DISPLAY
3. Discharge the battery again by following Step 1.
TOUGH WATER RESISTANT CASING
4. You can try to restore the battery to the original state by repeating Steps 1 and
2 at least three times.
13. AUDIO INPUT
8. / 9. VOLUME ADJUSTMENT
portable radio, CD, MP3 etc.
12. AUXILIARY INPUT
5. If you are planning to store the unit for a long period of time, charge the battery fully and unplug your battery from the unit. NOTE: Please store at
room temperature.
cellular phone*
7. POWER ON/OFF
VOX ADJUSTMENT
11. INTERCOM INPUT
passenger
10. MIC / SPEAKER INPUT
NOTE: WHEN YOU SPEAK INTO THE MICROPHONE AND
CHIME IT IS TIME TO RECHARGE THE BATTERY.
HEAR A
6. INTERCOM / MONITOR BUTTON
4. / 5. CHANNEL SELECT BUTTON
3. MODE BUTTON
2. PUSH TO TALK BUTTON / ENTER
6
7
gmrsx1-owners-manual
2/24/04
1:59 PM
Page 12
OPERATION
1. Illuminated LCD (Liquid Crystal Display)
LCD
1
2
3
4
5
6
7
8
9
2. PTT (Push-to-Talk Button)/Enter
Hold down to transmit and release to receive.
Allows you to set different function.
3. Mode button
Press to change modes.
Allows you to program different functions.
DESCRIPTION
MODE
INTERCOM MODE
SCAN MODE
VOX
BATTERY METER
MELODY
KEY LOCK
TALK GROUP
CHANNEL
4. Up button
To select the channel and option in mode operation.
POWER ON/OFF
5. Down Button
To select the channel and option in mode operation.
Turn the VOX sensitivity dial clockwise to turn the unit on. The radio will emit
a tone to let you know the unit is on.
6. Intercom/Monitor button
Allows private (unbroadcasted) driver to passenger communication.
Allows you to listen in on a channel for weak signals.
Turn the VOX sensitivity dial counterclockwise to turn the unit off. The radio
will emit a tone to let you know the unit is off.
7. Power On/Off knob and VOX setting
To turn the unit on/off and to select the VOX sensitivity level.
VOX SENSITIVITY
The VOX dial controls the sensitivity of the microphone. As the dial is turned
clockwise, the sensitivity increases. This unit has circuitry and software that
senses when you speak through the headset and will automatically transmit.
When the surrounding noise levels increase, the mic may be activated unintentionally. To reduce the sensitivity of the mic, turn the dial counterclockwise.
When the VOX is set at a low sensitivity position, it will require your voice to
be slightly louder in order to activate the microphone transmission.
8. Volume Up button
To increase the volume level.
9. Volume Down button
To decrease the volume level.
10. Microphone and Speaker input
For the driver’s headset.
CHANNEL SELECT
11. Intercom input
For the passenger’s headset.
12. Auxiliary input
For a cell phone or external PTT (Call for applications.)
13. Audio input
For an external audio source (ie. Walkman, CD, MP3 player etc.).
Choose the desired channel by pressing Up/Down button. Then press the PTT
button to enter. Channel 10 is an Emergency Channel. Use the emergency
channel only for the purpose of soliciting or rendering assistance to a traveler,
or for communicating in an emergency pertaining to the immediate safety of life
or the immediate protection of property. This channel is used by certain organizations during emergency situations, and may not necessarily be monitored.
14. Fixed low profile Antenna.
8
9
gmrsx1-owners-manual
2/24/04
1:59 PM
Page 14
VOLUME LEVEL SELECT
INTERCOM
Choose the desired volume level with the Up/Down button. Then press the PTT
button to enter.
Press the Intercom button for 3 seconds to switch to intercom mode.
You will then hear a chime letting you know that the intercom has been
activated. Press the same button again to cancel and start regular
transmission.
TALK GROUP
Press the Mode button once, while the number is blinking choose the desired
“talk group” by pressing Up/Down button. Then press the PTT button to enter.
MONITOR
Press the Intercom button to listen in on a channel for weak signals.
Press it again to cancel.
BEEP ON/OFF SELECT
Press the Mode button twice, choose beep On/Off by pressing the Up/Down
button. Then press the PTT button to enter.
AUDIO-IN JACK
Connect your desired audio source (i.e. Walkman, CD, MP3 player etc.) with
our optional audio cord. The music will automatically mute when you transmit
or receive.
KEY LOCK ON/OFF SELECT
Press the Mode button three times, choose key lock On/Off by pressing the
Up/Down button. Then press the PTT button to enter.
SCAN
Press the Mode button four times, while the channel is blinking press the Up
button to scan up or press the Down button to scan down. The radio stops scanning after detecting a signal and remains on the same channel until the signal
drops out for 2 seconds. Then press the PTT button to stop scanning.
POWER SAVE LEVEL SELECT
Press the Mode button five times, choose the desired power save level by pressing the Up/Down button and press the PTT button to enter. “00” power save
off, “01” normal power save, “02” high power save.
AUX-IN JACK
Connect your cellular phone to the AUX-In jack with our optional call cord.
When your phone rings press the external call button, located on the call cord,
to receive. Press the external call button again to end the call. Both rider and
passenger can participate in the conversation.
BATTERY INDICATOR
3-bars indicates a full charge.
2-bars indicates half a charge.
1-bar indicates a low charge.
NOTE: WHEN YOU SPEAK INTO THE MICROPHONE AND HEAR A CHIME
IT IS TIME TO RECHARGE THE BATTERY.
10
11
gmrsx1-owners-manual
2/24/04
1:59 PM
Page 16
OPTIONAL ACCESSORIES
FULL FACE HEADSET
Replacement headset or passenger
headset for full face helmets.
AUDIO CORD
Connect your desired audio source
(Walkman, CD, MP3 Player etc.)
OPEN FACE HEADSET
CALL CORD
Connect your cellular phone (Call for applications.)
Replacement headset or passenger
headset for open face helmets.
SPORT HEADSET
Non helmet headset for unlimited
applications.
RECHARGEABLE NI-MH BATTERY
HEADSET EXTENSION CORD
12 VOLT POWER FILTER CORD
Connect passenger headset to main unit
or used to mount your unit other than your helmet.
Connect your ChatterBox GMRS X1 to
a 12 Volt battery.
Internal replacement battery.
12
13
gmrsx1-owners-manual
2/24/04
1:59 PM
Page 18
HEADSET INSTALLATION
MAIN UNIT INSTALLATION
1. For the open face headset, use the plastic tie clip to secure the windsock. For
the full face headset, microphone covers come pre-installed.
Fasten the mounting bracket snugly to the bottom left side of the helmet with
the bolts supplied. Make sure the rubber pad is placed between the outer
mounting bracket and the outer shell of the helmet. Then align the mounting
bracket with the grooves on the back side of the main unit. Slide down the main
unit on to the mounting bracket until it latches firmly into place.
2. Helmets without speaker pockets. Attach the foam covers to the speakers
respectively (Drawing 1). Attach the hard velcro disk to the back of the speakers (Drawing 2). Attach the soft velcro disks to the helmet liner. The position
of the soft velcro disks will determine the position of the speakers.
1
2
3. Attach the right speaker (the long cord) to the soft velcro disk that you
applied to the helmet liner. Attach the left speaker (the short cord) to the soft
velcro disk that you applied to the helmet liner. For helmets with speaker pockets, simply insert the speaker in the pocket. Then use the wooden stick to gently tuck the speaker wire between the headliner and the shell (Drawing 3).
Headset Connection
Insert the Mini-DIN plug of the driver headset into the microphone speaker jack
on the back of the main unit. Insert the flat side of the main plug facing you.
4
3
4. For full face headset. Attach the soft rectangular velcro piece to the chin bar.
Keep in mind the position of this velcro will determine the position of the mic.
Apply the mic to the soft rectangular velcro. Then use the wooden stick to gently tuck the mic wire between the headliner and the shell (Drawing 4).
14
15
gmrsx1-owners-manual
2/24/04
1:59 PM
Page 20
HOW TO TRANSMIT AND RECEIVE
VOX ADJUSTMENT INSTRUCTION SHEET
VOX DESCRIPTION
VOX ADJUSTMENT PRACTICE
The VOX system on your new ChatterBox® enables the microphone to be
voice activated. This means that when you speak the microphone will open
automatically and transmit your voice. It is best to think of the VOX as the
microphone sensitivity setting.
It is highly suggested that each new user practice adjusting their radio before
riding. It’s simple, quick and effective.
Turn the power switch to on. If you turn the VOX sensitivity dial clockwise
and speak through the microphone, the VOX operates and automatically transmits. You will know you are transmitting when you hear yourself in the headset speakers. Operation is totally automatic, no external controls are required.
To receive, just listen in silence. If your mic is activated, you cannot receive.
Simultaneous transmission is not possible. You cannot talk (activate your
VOX) and hear a transmission from another ChatterBox at the same time.
VOX FUNCTION
The VOX adjustment knob on the front of your ChatterBox® is the single most
important control on the unit. When set on “Hi” (high) the microphone will
easily pick up a normal speaking voice. Never begin riding with the VOX set
on “Hi”. This will cause the microphone to constantly open and thus prevent
proper communications.
When set between the “Hi” (high) and “Lo” (low) the microphone sensitivity is
reduced thus requiring a louder voice to activate. This is necessary to prevent
the microphone from opening due to wind noise or loud exhaust systems, both
of which can prematurely open the microphone. When the microphone opens
prematurely the channel is held open which causes a hissing noise in everybody’s headset and prevents users from communicating. This is a situation
many first time users experience while learning to properly adjust the VOX.
(To eliminate this situation, it is strongly recommended that first time users use
a PTT “push to talk” button.) At the full “Lo” (low) setting the microphone is
actually shut off so no transmission is possible.
16
A. With the helmet off, turn the VOX knob to the “Hi” (high) sensitivity
position.
B. Place the helmet on your head (with the ChatterBox® fully installed).
C. Speak into the microphone in a normal voice. You should hear your voice
in the speakers. Adjust the volume to a comfortable setting. If you don’t
hear anything turn the volume up. If you still don’t hear anything check
all the wire connections and make sure the VOX is set to the full “Hi”
position.
D. Next, continue to speak while turning the VOX knob towards the “Lo”
setting. As you do this you’ll notice that you must speak louder to activate
the microphone.
E. When the knob is turned almost to “Lo”, you’ll find that you must talk
very loud to activate the microphone. This is where the VOX must be set
during high speed riding or in very loud wind conditions.
F. Next, turn the VOX knob to the full ”Lo” position.
When the VOX is set at this position the microphone is
off and no transmitting is possible.
It is highly suggested that you always begin your rides with
the VOX set close to the full “Lo” setting. Once under way you can then fine
tune the sensitivity.
17
gmrsx1-owners-manual
2/24/04
1:59 PM
Page 22
TROUBLE SHOOTING
TECHNICAL SPECIFICATION
Problem 2. Not receiving.
General
1. Frequency range
2. Modulation type
3. Channel capacity
4. Channel spacing
5. Power supply
6. Current drain
Solution 2. Adjust the mic sensitivity to a lower setting
(counter clockwise).
7. Battery life
Problem 1. Cutting out during transmission.
Solution 1. Adjust the mic sensitivity to a higher setting (clockwise)
or speak louder.
Solution 1. Position the mic directly in front of your lips.
Problem 3. Short operating range.
Solution 3. Make sure you’re clear of power lines. Foliage, hills,
and buildings will also reduce your range.
8. Operating temperature
9. Dimensions
10. Weight
Problem 4. Road and wind noise while transmitting.
Transmitter
Solution 4. Add foam or cotton directly to the tip of the mic.
1. Power output
2. Frequency stability
CAUTION
3. Hum & Noise
4. Spurious & Harmonics
5. Audio distortion
ANY CHANGES OR MODIFICATIONS IN CONSTRUCTION OF
Receiver
THIS DEVICE WHICH ARE NOT EXPRESSLY APPROVED BY
1.
2.
3.
4.
5.
6.
THE PARTY RESPONSIBLE FOR COMPLIANCE COULD VOID
THE USER’S AUTHORITY TO OPERATE THE EQUIPMENT.
18
Sensitivity (12dB SINAD)
Selectivity
Inter-modulation
Spurious and image rejection
Maximum audio output
Audio distortion
462.550 MHz– 462.725 MHz
16KOF3E (FM)
15 channels
25KHz
DC 4.8V; Ni-Mh rechargeable pack
Transmitter (2W); <1100mA
(Ni-MH rechargeable pack)
Receiver (0.5 W); <300mA
8 hrs. talk time;
20 hrs. stand-by time
-20 ˚C + 60 ˚C
65(H) x 132(W) x 39(D) mm
8 oz. (with battery)
2W
Better than +/- 5ppm within
operating temperatures
-40dBc (with 300Hz to 3KHz audio filter)
-60dBc
less than 5% (1KHz tone 60% modulation)
0.25uV (-119dBm SINAD)
-60dB
-60dB
-60dB
more than 200mW
less than 5%
19
gmrsx1-owners-manual
2/24/04
1:59 PM
Page 24
FCC LICENSE INFORMATION
Your ChatterBox radio operates on communications frequencies
which are subject to FCC (Federal Communications Commission)
Rules And Regulations. FCC Rules require that all operators using
Personal Radio Service frequencies obtain a radio license must be
made on FCC form 574. Temporary operation is allowed, using form
574T which has been provided for your convenience. Please read and
follow the instructions on the provided form.
FAX: Forms can be obtained by fax from the FCC Fax-On-Demand
system. Call 1-202-418-0177 from your fax machine and request document number 000574 for the form and instructions. If you would like
an example of a completed 574 form, also request document number
005741.
MAIL: Forms can be ordered by telephone, and will be sent to you by
first class mail. Call the FCC Forms Hotline at 1-800-418-FORM (1800-418-3676).
INTERNET: Form 574 and instructions can be downloaded from the
FCC Forms web site at http://www.fcc.gov/formpage.html
Before filling out your Form 574 application Technical Data section,
you must decide which frequency (or frequencies) you will operate on.
See the frequency table on page 14.
Questions? Call the FCC for license application questions at 1-888CALL-FCC (1-888-225-5322).
20
gmrsx1-owners-manual
2/24/04
1:59 PM
21
Page 26