1
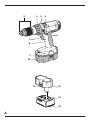
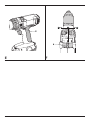
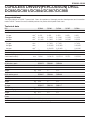
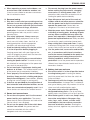
®
DC980
DC981
DC984
DC987
DC988
1
3
4
5
6
2
1
8
7
10
11
10
13
12
A
3
14
10
14
10
B
5
16
15
C
4
D
1
2
3
2
6
E
F
5
ENGLISH
CORDLESS DRIVER/(PERCUSSION) DRILL
DC980/DC981/DC984/DC987/DC988
Congratulations!
You have chosen a DEWALT power tool. Years of experience, thorough product development and innovation
make DEWALT one of the most reliable partners for professional power tool users.
Technical data
Drill
Voltage
No load speed
1st gear
2nd gear
3rd gear
Impact
1st gear
2nd gear
3rd gear
Max. torque
Chuck capacity
Maximum drilling capacity in
steel/wood/masonry
Weight (without battery pack)
DC980
12
DC981
12
DC984
14.4
DC987
18
DC988
18
min-1
min-1
min-1
0-450
0-1,400
0-1,800
0-450
0-1,400
0-1,800
0-450
0-1,400
0-1,800
0-450
0-1,450
0-2,000
0-450
0-1,450
0-2,000
min-1
min-1
min-1
Nm
mm
45
13
0-7,650
0-23,800
0-30,600
45
13
0-7,650
0-23,800
0-30,600
47
13
52
13
0-7,650
0-24,650
0-34,000
52
13
mm
kg
13/38/1.6
13/38/10
1.7
13/45/14
1.7
13/50/1.6
13/50/16
1.7
NiCd battery pack
Voltage
Capacity
Weight
V
Ah
kg
DE9075
12
2.4
0.65
DE9092
14.4
2.4
0.7
DE9096
18
2.4
0.97
NiMH battery pack
Voltage
Capacity
Weight
V
Ah
kg
DE9037
12
3.0
0.65
DE9038
14.4
3.0
0.7
DE9039
18
3.0
0.97
VAC
min
kg
DE9107
230
60
0.4
DE9116
230
60
0.4
DE9117
230
15
0.9
Charger
Mains voltage
Approx. charging time
Weight
Fuses:
Europe
U.K. & Ireland
V
230 V tools
230 V tools
10 Amperes, mains
3 Amperes, in plugs
23
ENGLISH
The following symbols are used throughout this
manual:
Director Engineering and Product Development
Horst Großmann
Denotes risk of personal injury, loss of life
or damage to the tool in case of nonobservance of the instructions in this
manual.
DEWALT, Richard-Klinger-Straße 40,
D-65510, Idstein, Germany
Denotes risk of electric shock.
General safety rules
EC-Declaration of conformity
DC980/DC981/DC984/DC987/DC988
DEWALT declares that these power tools have been
designed in compliance with: 98/37/EEC,
89/336/EEC, 73/23/EEC, EN 60745, EN 50260,
EN 60335, EN 55014-1, EN 55014-2, EN 61000-3-2
& EN 61000-3-3.
For more information, please contact DEWALT at the
address below, or refer to the back of the manual.
DC980
DC981
DC984
LpA (sound pressure)
dB(A)*
72
88
87
LWA (acoustic power)
dB(A)
85
101
100
acceleration value
m/s2
< 2.5
11
11
DC987
DC988
LpA (sound pressure)
dB(A)*
71.5
89
LWA (acoustic power)
dB(A)
84.5
102
m/s2
< 2.5
11
Weighted RMS
Weighted RMS
acceleration value
* at the operator’s ear
KpA (sound pressure uncertainty)
dB(A)
2.8
KWA (acoustic power uncertainty)
dB(A)
2.8
24
Warning! Read all instructions. Failure to follow
all instructions listed below may result in electric
shock, fire and/or serious injury. The term
«power tool» in all of the warnings listed below
refers to your mains operated (corded) power
tool or battery operated (cordless) power tool.
SAVE THESE INSTRUCTIONS.
1 Work area
a Keep work area clean and well lit. Cluttered
and dark areas invite accidents.
b Do not operate power tools in explosive
atmospheres, such as in the presence of
flammable liquids, gases or dust. Power tools
create sparks which may ignite the dust or fumes.
c Keep children and bystanders away while
operating a power tool. Distractions can cause
you to lose control.
2 Electrical safety
a Power tool plugs must match the outlet.
Never modify the plug in any way. Do not use
any adapter plugs with earthed (grounded)
power tools. Unmodified plugs and matching
outlets will reduce risk of electric shock.
b Avoid body contact with earthed or grounded
surfaces such as pipes, radiators, ranges and
refrigerators. There is an increased risk of electric
shock if your body is earthed or grounded.
c Do not expose power tools to rain or wet
conditions. Water entering a power tool will
increase the risk of electric shock.
d Do not abuse the cord. Never use the cord for
carrying, pulling or unplugging the power
tool. Keep cord away from heat, oil, sharp
edges or moving parts. Damaged or entangled
cords increase the risk of electric shock.
ENGLISH
e When operating a power tool outdoors, use
an extension cord suitable for outdoor use.
Use of a cord suitable for outdoor use reduces
the risk of electric shock.
3 Personal safety
a Stay alert, watch what you are doing and use
common sense when operating a power tool.
Do not use a power tool while you are tired or
under the influence of drugs, alcohol or
medication. A moment of inattention while
operating power tools may result in serious
personal injury.
b Use safety equipment. Always wear eye
protection. Safety equipment such as dust
mask, non-skid safety shoes, hard hat, or
hearing protection used for appropriate
conditions will reduce personal injuries.
c Avoid accidental starting. Ensure the switch
is in the off position before plugging in.
Carrying power tools with your finger on the
switch or plugging in power tools that have the
switch on invites accidents.
d Remove any adjusting key or wrench before
turning the power tool on. A wrench or a key
left attached to a rotating part of the power tool
may result in personal injury.
e Do not overreach. Keep proper footing and
balance at all times. This enables better control
of the power tool in unexpected situations.
f Dress properly. Do not wear loose clothing or
jewellery. Keep your hair, clothing and gloves
away from moving parts. Loose clothes, jewellery
or long hair can be caught in moving parts.
g If devices are provided for the connection of
dust extraction and collection facilities, ensure
these are connected and properly used. Use of
these devices can reduce dust related hazards.
4 Power tool use and care
a Do not force the power tool. Use the correct
power tool for your application. The correct
power tool will do the job better and safer at the
rate for which it was designed.
b Do not use the power tool if the switch does
not turn it on and off. Any power tool that
cannot be controlled with the switch is
dangerous and must be repaired.
c Disconnect the plug from the power source
before making any adjustments, changing
accessories, or storing power tools. Such
preventive safety measures reduce the risk of
starting the power tool accidentally.
d Store idle power tools out of the reach of
children and do not allow persons unfamiliar
with the power tool or these instructions to
operate the power tool. Power tools are
dangerous in the hands of untrained users.
e Maintain power tools. Check for misalignment
or binding of moving parts, breakage of parts
and any other condition that may affect the
power tools operation. If damaged, have the
power tool repaired before use. Many accidents
are caused by poorly maintained power tools.
f Keep cutting tools sharp and clean. Properly
maintained cutting tools with sharp cutting edges
are less likely to bind and are easier to control.
g Use the power tool, accessories and tool bits
etc., in accordance with these instructions
and in the manner intended for the particular
type of power tool, taking into account the
working conditions and the work to be
performed. Use of the power tool for operations
different from those intended could result in a
hazardous situation.
5 Battery tool use and care
a Ensure the switch is in the off position before
inserting battery pack. Inserting the battery
pack into power tools that have the switch on
invites accidents.
b Recharge only with the charger specified by
the manufacturer. A charger that is suitable for
one type of battery pack may create a risk of fire
when used with another battery pack.
c Use power tools only with specifically
designated battery packs. Use of any other
battery packs may create a risk of injury and fire.
d When battery pack is not in use, keep it away
from other metal objects like paper clips,
coins, keys, nails, screws, or other small
metal objects that can make a connection
from one terminal to another. Shorting the
battery terminals together may cause burns or
a fire.
25
ENGLISH
e Under abusive conditions, liquid may be
ejected from the battery; avoid contact.
If contact accidentally occurs, flush with
water. If liquid contacts eyes, additionally
seek medical help. Liquid ejected from the
battery may cause irritation or burns.
Do not charge damaged battery packs
Read instruction manual before use
Use only with DEWALT battery packs,
others may burst, causing personal injury
and damage
6 Service
a Have your power tool serviced by a qualified
repair person using only identical
replacement parts. This will ensure that the
safety of the power tool is maintained.
Do not expose to water
Additional safety instructions for battery packs
Fire hazard! Avoid metal short circuiting
the contacts of a detached battery pack.
Do not store or carry the battery pack
without the battery cap placed over the
contacts.
• The battery fluid, a 25-30% solution of potassium
hydroxide, can be harmful. In case of skin contact,
flush immediately with water. Neutralize with a
mild acid such as lemon juice or vinegar. In case
of eye contact, rinse abundantly with clean water
for at least 10 minutes. Consult a physician.
• Never attempt to open a battery pack for any
reason.
• Use only chargers labelled «NiMH» or «NiMH +
NiCd» to charge DEWALT NiMH battery packs.
Labels on charger and battery pack
In addition to the pictographs used in this manual,
the labels on the charger and the battery pack show
the following pictographs:
Have defective cords replaced immediately
+40 ˚c
+4 ˚c
Charge only between 4 °C and 40 °C
Discard the battery pack with due care
for the environment
Do not incinerate the battery pack
Package contents
The package contains:
1 Cordless midhandle driver/(percussion) drill
1 Charger
1 Battery pack (K models)
2 Battery packs (KA and KB models)
1 Side handle (DC987/DC988)
1 Kitbox
1 Instruction manual
1 Exploded drawing
100%
Battery charging
100%
Battery charged
Battery defective
Do not probe with conductive objects
26
• Check for damage to the tool, parts or
accessories which may have occurred during
transport.
• Take the time to thoroughly read and understand
this manual prior to operation.
Description (fig. A)
Your cordless driver/(percussion) drill has been
designed for professional drilling and screwdriving
applications.
1 Variable speed switch
ENGLISH
2 Forward/reverse slider
3 Keyless chuck/auto spindle lock
4 Mode selector/torque adjustment collar
5 Collar settings
6 Three-gear selector
7 Bit holder
8 Grip
9 Side handle (DC987/DC988)
10 Battery pack
Charger
Your DE9107 charger accepts DEWALT NiCd
battery packs ranging from 7.2 V to 14.4 V.
Your DE9117 charger accepts DEWALT NiCd
battery packs ranging from 7.2 V to 18 V.
Your DE9116 charger accepts DEWALT NiCd and
NiMH battery packs ranging from 7.2 V to 18 V.
10 Battery pack
11 Release buttons
12 Charger
13 Charging indicator (red)
Auto-spindle lock
The auto-spindle lock is engaged when the
transmission is stationary. The chuck sleeve can
easily be turned with one hand while the other
supports the unit.
Electrical safety
The electric motor has been designed for one
voltage only. Always check that the battery pack
power corresponds to the voltage on the rating
plate. Also make sure that the voltage of your
charger corresponds to that of your mains.
Your DEWALT charger is double
insulated in accordance with EN 60335.
Mains plug replacement
(U.K. & Ireland only)
• Should your mains plug need replacing and you
are competent to do this, proceed as instructed
below. If you are in doubt, contact an authorized
DEWALT repair agent or a qualified electrician.
• Disconnect the plug from the supply.
• Cut off the plug and dispose of it safely; a plug
with bared copper conductors is dangerous if
engaged in a live socket outlet.
• Only fit 13 Amperes BS1363A approved plugs
fitted with the correctly rated fuse (1).
• The cable wire colours, or a letter, will be marked
at the connection points of most good quality
plugs. Attach the wires to their respective points
in the plug (see below). Brown is for Live (L) (2)
and Blue is for Neutral (N) (4).
• Before replacing the top cover of the mains plug
ensure that the cable restraint (3) is holding the
outer sheath of the cable firmly and that the two
leads are correctly fixed at the terminal screws.
Never use a light socket.
Never connect the live (L) or neutral (N)
wires to the earth pin marked E or .
Using an extension cable
An extension cord should not be used unless
absolutely necessary. Use an approved extension
cable suitable for the power input of your charger
(see technical data). The minimum conductor size is
1 mm2; the maximum length is 30 m.
Assembly and adjustment
• Prior to assembly and adjustment,
always remove the battery pack.
• Always switch off the tool before
inserting or removing the battery pack.
• Use only DEWALT battery packs and
chargers.
Battery pack (fig. A & B)
Charging the battery pack
• To charge the battery pack (10), insert it into the
charger (12) as shown and plug in the charger.
Be sure that the battery pack is fully seated in the
charger, but do not force it.
The red charging indicator (13) will blink.
27
ENGLISH
After approx. 1 hour, it will stop blinking and remain
on. The battery pack is now fully charged and the
charger automatically switches to equalisation
mode. After approx. 4 hours, it will switch to
maintenance charge mode. The battery pack can be
removed at any time or left in the connected charger
indefinitely.
• The red charging indicator flashes rapidly to
indicate a charging problem. Reinsert the battery
pack or try a new one. If the new pack also
refuses to charge, have your charger tested by
an authorised DEWALT repair agent.
• When plugged into power sources such as
generators or sources that convert DC to AC, the
red charging indicator may blink twice, switch off
and repeat. This indicates a temporary problem
of the power source. The charger will
automatically switch back to normal operation.
Do not charge the battery pack at
ambient temperatures < 4 °C or > 40 °C.
Recommended charging temperature:
approx. 24 °C.
Inserting and removing the battery pack
• Insert the battery pack into the grip (8) until it
clicks in place.
• To remove the battery pack, press the two
release buttons (11) simultaneously and pull the
pack out of the grip (8).
Battery cap (fig. B)
A protective cap is supplied to cover the contacts of
a detached battery pack. Without the protective cap
in place, loose metal objects could short circuit the
contacts, causing a fire hazard and damaging the
battery pack.
• Take off the protective cap (14) before placing
the battery pack (10) in the charger or tool.
• Place the protective cap over the contacts
immediately after removing the battery pack from
the charger or tool.
Make sure the protective cap is in place
before storing or carrying a detached
battery pack.
28
Equalisation mode
The equalisation mode helps to maintain the
optimum capacity of the battery pack. It is therefore
recommended to use the equalisation mode weekly
or every 10 charge/discharge cycles.
• Charge the battery pack as described above.
• When the charging indicator stops blinking, leave
the battery in the charger for approx. 4 hours.
DE9116 - Hot Pack Delay
When the charger detects a battery that is hot,
it automatically starts a Hot Pack Delay, suspending
charging until the battery has cooled. After the
battery has cooled, the charger automatically
switches to the pack charging mode. This feature
ensures maximum battery life. The red indicator (13)
blinks long, then short while in the Hot Pack Delay
mode.
Inserting and removing bits (fig. A & C)
• Open the chuck by turning the sleeve (15)
counterclockwise and insert the bit shank.
• Place the bit in the chuck as far as it will go and
lift slightly before tightening.
• Tighten firmly by turning the sleeve clockwise.
• To remove the bit, proceed in reverse order.
Selecting the operating mode or adjusting the
torque (fig. D)
The collar of this tool has a wide range of positions
for the adjustment of the torque to suit the size of
the screw and the workpiece material. For torque
adjustment, refer to the section «Screwdriving».
• Select the drilling mode or torque by aligning the
symbol or number on the collar (4) with the
indicator (16) on the housing.
DC981/DC984/DC988
The percussion drills can be used in the following
operating modes:
Rotary drilling:
for steel, wood and plastics
Percussion drilling:
for masonry
ENGLISH
Forward/reverse slider (fig. E)
• To select forward or reverse rotation, use the
forward/reverse slider (2) as shown (see arrows
on tool).
Always wait until the motor has come to
a complete standstill before changing the
direction of rotation.
Three-gear selector (fig. F)
Your tool is fitted with a three-gear selector (6) to
vary the speed/torque ratio.
1 low speed/high torque
2 medium speed/medium torque
3 high speed/low torque
For speed rates, refer to the technical data.
Drilling in metal
• Use a cutting lubricant when drilling metals.
The exceptions are cast iron and brass which
should be drilled dry.
Drilling in wood
• Use the appropriate type of drill bit.
Consult your dealer for further information on the
appropriate accessories.
Maintenance
Your DEWALT Power Tool has been designed to
operate over a long period of time with a minimum
of maintenance. Continuous satisfactory operation
depends upon proper tool care and regular cleaning.
Do not change gears at full speed or
during use.
Instructions for use
• Always observe the safety instructions
and applicable regulations.
• Be aware of the location of pipework and
wiring.
• Apply only a gentle pressure to the tool.
Switching on and off (fig. A & E)
• To run the tool, press the variable speed switch
(1). The pressure exerted on the variable speed
switch determines the tool speed.
• To stop the tool, release the switch.
• To lock the tool in the off position, move the
forward/reverse slider (2) to the central position.
Screwdriving (fig. A)
• Select forward or reverse rotation using the slider (2).
• Set the collar (4) to position 1 and begin
screwdriving (low torque).
• If the clutch ratchets too soon, adjust the collar
to increase the torque as required.
Drilling (fig. A)
• Select the drilling mode using the collar (4).
• Select forward rotation.
Lubrication
Your power tool requires no additional lubrication.
Cleaning
• Unplug the charger before cleaning the housing
with a soft cloth.
• Remove the battery pack before cleaning your
power tool.
• Keep the ventilation slots clear and regularly
clean the housing with a soft cloth.
Environment
Rechargeable battery pack
This long life battery pack must be recharged when
it fails to produce sufficient power on jobs which
were easily done before. At the end of its technical
life, discard it with due care for our environment:
• Run the battery pack down completely, then
remove it from the tool.
• NiCd and NiMH cells are recyclable. Take them
to your dealer or a local recycling station.
The collected battery packs will be recycled or
disposed of properly.
29
ENGLISH
GUARANTEE
Unwanted tools
Take your tool to an authorised DEWALT repair
agent where it will be disposed of in an
environmentally safe way.
• 30 DAY NO RISK SATISFACTION GUARANTEE •
If you are not completely satisfied with the
performance of your DEWALT tool, simply return
it within 30 days, complete as purchased, to the
point of purchase, for a full refund or exchange.
Proof of purchase must be produced.
• ONE YEAR FREE SERVICE CONTRACT •
If you need maintenance or service for your
DEWALT tool, in the 12 months following
purchase, it will be undertaken free of charge at
an authorized DEWALT repair agent. Proof of
purchase must be produced. Includes labour and
spare parts for Power Tools. Excludes
accessories.
• ONE YEAR FULL WARRANTY •
If your DEWALT product becomes defective due
to faulty materials or workmanship within
12 months from the date of purchase, we
guarantee to replace all defective parts free of
charge or, at our discretion, replace the unit free
of charge provided that:
• The product has not been misused.
• Repairs have not been attempted by
unauthorized persons.
• Proof of purchase date is produced.
This guarantee is offered as an extra benefit
and is additional to consumers statutory rights.
For the location of your nearest authorized
DEWALT repair agent, please use the appropriate
telephone number on the back of this manual.
Alternatively, a list of authorized DEWALT repair
agents and full details on our after-sales service
are available on the Internet at
www.2helpU.com
30