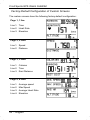
1
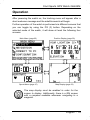
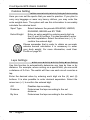
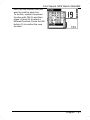
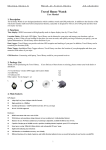
crivit_gps-uhr_lb6_0910:Layout 1 07.10.2009 13:42 Uhr Seite 1 GPS Watch with Heart Rate Monitor GB IE CY User manual and service information Crivit Sports GPS Watch GH625M Table of Contents Package Contents 5 Important Safety Instructions 6 Operating Environment ...................................................................6 Children...........................................................................................6 Intended Use...................................................................................7 Maintenance and Care....................................................................7 Conformity.......................................................................................8 Disposal of Old Devices ..................................................................8 Overview 9 The Display ...................................................................................10 Introduction 11 Getting started 11 Charging the Battery .....................................................................11 Replacing the Watchstrap.............................................................12 Powering the Watch On/Off ..........................................................14 Setting the Language ....................................................................14 Setting the Time ............................................................................15 The Breast Belt .............................................................................16 Cleaning the Breast Belt............................................................18 Replacing the Battery ................................................................18 English - 1 Crivit Sports GPS Watch GH625M Operation 19 Using the Menus ...........................................................................20 First-Time Use...............................................................................20 Capabilities of Your Watch ........................................................20 Custom Settings ........................................................................21 First-Time Recording .................................................................23 Transferring Data.......................................................................24 The Menus 25 The Main Menu .............................................................................25 Main Menu Structure .................................................................25 Activity .......................................................................................27 Activity Info.............................................................................27 Activity Setting .......................................................................28 Auto Hold............................................................................28 Alerts ..................................................................................29 Calories Setting ..................................................................30 Laps Settings......................................................................30 Set Units .............................................................................31 Delete All................................................................................31 Memory Capacity ...................................................................32 Navigation..................................................................................32 Add Map Mode.......................................................................32 Routes....................................................................................33 Starting a Saved Route ......................................................34 Saving a Waypoint .................................................................35 Finding a Waypoint ................................................................36 Return to Start / Stop Route ..................................................37 GPS Info.................................................................................37 Connect to PC ...........................................................................37 Configuration .............................................................................38 2 - English Crivit Sports GPS Watch GH625M User Setting ...........................................................................38 Setup Time .........................................................................38 Set System .........................................................................38 Set Display .........................................................................39 Set custom page ................................................................40 Factory-Default Configuration of Custom Screens ............42 User Profile.........................................................................43 Turn PC-GPS on ................................................................43 Data Recording ..................................................................43 GPS Setting ...........................................................................44 Heart Rate Setting .................................................................45 Factory Reset.........................................................................45 System Upgrade ....................................................................46 About Product ........................................................................46 The Sports Menu...........................................................................47 Examples for displaying the Sports menu.................................48 Starting a Recording..................................................................48 Stopping a Recording................................................................49 Pause.....................................................................................49 Lap .........................................................................................49 Stopping Completely..............................................................49 Location Display............................................................................50 Location display examples ........................................................50 Geographic Co-ordinates.......................................................50 UTM Co-ordinates .................................................................51 Map Display ..................................................................................52 Map display examples...............................................................52 Map mode ..............................................................................53 Course Direction mode ..........................................................53 English - 3 Crivit Sports GPS Watch GH625M Connecting to a Computer 54 System requirements: ...................................................................54 Installing the Software...................................................................54 Transferring Data ..........................................................................55 The Software 56 Creating Waypoints with the Software ..........................................61 Transferring Waypoints to the Watch ........................................63 Appendix 65 Technical Specifications................................................................65 Index..............................................................................................66 Warranty Information.....................................................................68 4 - English Crivit Sports GPS Watch GH625M Package Contents A Sports Watch GH-625 B Breast belt C USB cable D Extension E Tool F CD (not illustrated) G User manual with service information (not illustrated) English - 5 Crivit Sports GPS Watch GH625M Important Safety Instructions Before you use this device for the first time, please read the following notes in this manual and heed all warnings, even if you are familiar with handling electronic devices. Keep this manual safe for future reference. If you sell the device or pass it on, it is essential you hand over this manual also. Operating Environment The device is not for use in environments with a high temperature or humidity (e.g. bathrooms), and must be kept free of dust. Operating temperature and operating humidity: 5 ºC to 35ºC, max. 85 % RH. Always make sure that: no direct heat sources (e.g. heating) can affect the device; no direct sunlight or bright artificial light reaches the device; the device is never placed in the immediate vicinity of magnetic fields (e.g. loudspeakers); no fire sources (e.g. burning candles) are placed on or near the device; no foreign bodies are introduced into the device; Children Electrical appliances do not belong in the hands of children! Do not allow children to use electrical devices when not under supervision. Children may not comprehend the presence of potential risks. Small parts can represent choking hazards. Keep the packaging away from children too as there is danger of suffocation. Batteries can represent choking hazards. Keep batteries out of reach of children. If a battery is swallowed, seek medical help immediately. 6 - English Crivit Sports GPS Watch GH625M Intended Use This is an information technology electronics device. It may only be used for private use, not industrial or commercial purposes. Furthermore, the device may not be used in tropical climates. Only connection cables and external devices may be used that comply with safety standards and the electromagnetic compatibility and shielding quality of this device. This device fulfils all that relates to CE Conformity, relevant norms and standards. Any modifications to the equipment other than recommended changes by the manufacturer may result in these directives no longer being met. Only use the accessories recommended by the manufacturer. If you are not using the device within the Republic of Germany, you must observe the regulations and laws in the country of use. Maintenance and Care Servicing is required when this device has been damaged in any way, for example, when the device housing is damaged, when liquids or objects have entered the device or when the product has been exposed to rain or moisture. Servicing is also necessary when the product does not perform normally or if it has been dropped. If smoke, unusual noises or smells are noticed, power off the device immediately. In this case the device should not be used further and should be inspected by authorized service personnel. Please contact qualified personnel when servicing is needed. Never open the housing of the device. Only use a clean, dry cloth for cleaning. Never use any corrosive liquids. Do not attempt to open the housing of the device otherwise you will void your warranty. English - 7 Crivit Sports GPS Watch GH625M Conformity This device complies with the basic and other relevant requirements of the EMC Directive 2004/108/EC. The Declaration of Conformity can also be found at the end of this User's Manual. Disposal of Old Devices If the product is labelled with a struck-out waste bin, it is subject to the European Guideline 2002/96/EC. All electric and electronic devices must be disposed of separately from household waste at established bodies. With the proper disposal of old devices you avoid damage to the environment and your personal health. For further information about proper disposal, contact your local government, disposal bodies or the shop where you bought the device. Batteries: Old batteries do not belong in with domestic waste. They must be handed in to a collection point for old batteries. Insert the batteries with the correct polarity. Do not try to recharge the batteries and do not throw batteries into fire. When handled incorrectly there is danger of explosion. 8 - English Crivit Sports GPS Watch GH625M Overview 1 ESC/LAP 2 Power on/off 3 4 PG Up 5 OK 6 Down Press this button while a menu is displayed to move one level up. Press this button in timer mode to set an intermediate time. Press and hold this button for at least 2 seconds to power the watch on or off. While the watch is powered on, press this button briefly to toggle the display backlight on or off. To toggle between different display screens. To navigate upwards in a menu. Enlarges the map display. To confirm a selected menu item. To start or stop the timer in timer mode. To navigate downwards in a menu. Reduces the map display. English - 9 Crivit Sports GPS Watch GH625M The Display The display shows different icons that inform you about battery status, GPS signal quality and any enabled functions. Below is an example of how the displays can look with an explanation of the most important icons: (7) Battery icon indicating a fully charged internal battery or an empty internal battery. (8) Icon for enabled timer Lighting: Timer enabled Blinking: Timer paused (9) GPS reception icon Lighting: GPS signal reception Blinking: No GPS signal (10) This icon indicates that you can press the (4) or (6) button to display more pages. 10 - English Crivit Sports GPS Watch GH625M Introduction Thank you for choosing a Crivit product. This watch has been developed especially for sportspersons. Besides elementary functions like displaying the time it is able to track your position during your sporting activities thanks to a built-in GPS receiver. Any waypoints will be stored automatically so that you can display your run itinerary later on your computer. The supplied breast belt will also measure your pulse rate and save it together with the waypoints. Getting started The sports watch has a high-end rechargeable Lithium-Ion battery. This is an internal battery and can be charged with the supplied USB cable. Charge the watch battery completely before using the watch for the first time. Charging the Battery Connect the supplied USB cable to the bottom of the sports watch. You will have to open the plastic cover to do this. The connector of the cable has a notch that must fit into the corresponding hole on the watch. This guarantees that the connector can be inserted only in the correct direction and an inversion of the poles will be avoided. Next plug the USB connector of the cable into a free USB port on your computer. English - 11 Crivit Sports GPS Watch GH625M Some computers do not supply USB power while they are turned off. The message “Battery Charging in Progress” is displayed on the screen of the sports watch. The message “Battery Charging Completed” is displayed once the battery is fully charged. Replacing the Watchstrap The package contains an extended watchstrap. If necessary, you can use it to replace the shorter factory-installed watchstrap on the watch. Use the tool (E) to loosen the watchstrap from the watch housing. Place the notch of the tool between the watchstrap and the housing (see the following figure). 12 - English Crivit Sports GPS Watch GH625M The watchstrap is fixed to the watch with a spring-driven bolt. The spring-driven bolt can be pushed in. Use the tool to push the spring-driven bolt and remove the watchstrap. The following figure illustrates the uninstalled spring-driven bolt. Figure: Detailed view of the uninstalled spring-driven bolt Pull the spring-driven bolt out of the watchstrap and insert it into the other watchstrap (see the following figure). Figure: Detailed view of the inserted spring-driven bolt Insert one end of the spring-driven bolt into the corresponding notch on the watch housing. Figure: Securing the watchstrap Use the tool to push on the other end of the spring-driven bolt inside and fix the watchstrap in place. English - 13 Crivit Sports GPS Watch GH625M Powering the Watch On/Off After the built-in battery has been charged, you may power on your watch. Power the watch on by pressing and holding the button (2) for approx. 2 seconds. A sound will confirm that the watch has been powered on. When powering the watch on for the first time, it will start searching for any GPS satellites to track the present position. You can change to a different display screen by pressing the PG button (3). To find any satellites, the watch should have an unobstructed sight to the sky. If powering it on inside a building, the satellite signal will have poor reception. To power the watch off, press and hold the button (2) for approx. 2 seconds. A sound will confirm that the watch has been powered off. Setting the Language You can adjust the sports watch settings easily with the press of a few buttons. To facilitate navigating, all settings are grouped into easy-to-understand menus. Upon factory delivery, the device is set to the English user interface. To change the menu language to your local language, proceed as follows: Power the watch on by pressing and holding the button (2) for approx. 2 seconds. A sound will confirm that the watch has been powered on. Press the PG button (3) as many times as necessary to display the MAIN MENU. Select the CONFIGURATION menu option by using the (4) or (6) button. Then press the OK button (5). 14 - English Crivit Sports GPS Watch GH625M Select the USER SETTING menu option by using the (4) or (6) button. Then press the OK button (5). Select the SET SYSTEM menu option by using the (4) or (6) button. Then press the OK button (5). Select the LANGUAGE menu option by using the (4) or (6) button. Then press the OK button (5). A small window will open where you can use the (4) or (6) button to select the desired language. Then press the OK button (5). All menus will display in the selected language immediately, and you will be returned to the main menu. Setting the Time The time will synchronise automatically from the GPS signal. You only need to make sure that you have selected the proper time zone. Proceed as follows: Power the watch on by pressing and holding the (2) button for approx. 2 seconds. A sound will confirm that the watch has been powered on. Press the PG button (3) as many times as necessary to display the MAIN MENU. Select the CONFIGURATION menu option by using the (4) or (6) button. Then press the OK button (5). Select the USER SETTING menu option by using the (4) or (6) button. Then press the OK button (5). Select the SETUP TIME menu option by using the (4) or (6) button. Then press the OK button (5). In the following menu you can set your time zone, daylight saving and the time display format. Press (4) or (6) to move the highlight to the desired option and press OK (5) to confirm. English - 15 Crivit Sports GPS Watch GH625M Then select the desired option by using the (4) or (6) button. Press the OK button (5) to confirm your settings. Press the ESC/LAP button (1) three times to return to the main menu top level. The Breast Belt The breast belt lets you determine your heart rate. The belt has two sensors. The breast belt must be tied around your chest and have contact with your skin. In order to optimise the contact, you can moisten the sensors slightly. Sensor Transmitter Sensor Battery Figure: The inner side of the breast belt Loosen one end of the belt, as shown in the figure below: Figure: Opening the Breast Belt 16 - English Crivit Sports GPS Watch GH625M Put the belt around your chest so that the transmitter is centred on the front. The letters must face outwards. Adjust the length of the breast belt so that the belt remains tight while you are running. Re-insert the loosened end to close the belt. Figure: Closing the Breast Belt To guarantee a stable operation, keep the belt away from any electrical appliances and strong electromagnetic fields like high-voltage power lines, electric motors etc. English - 17 Crivit Sports GPS Watch GH625M Cleaning the Breast Belt Use only a damp cloth to clean your breast belt. Do not use any solvents or aggressive cleaners. Replacing the Battery The breast belt transmitter uses a coin-type CR2032 battery. To replace the battery, use a coin to unscrew the cover from the back of the transmitter. Replace the battery with a new battery of the same type. 18 - English Crivit Sports GPS Watch GH625M Operation After powering the watch on, the tracking menu will appear after a short welcome message and the satellite search will begin. Further operation of the watch is performed via different screens that you can toggle by using the PG (3) button. Depending on the selected mode of the watch, it will show at least the following four screens: Main Menu (page 25) Position Display (page 50) Sports Menu (page 47) Map Display (page 52) The map display must be enabled in order for the screen to display. Additionally, there is a fifth screen with a compass available whenever navigating to a waypoint. English - 19 Crivit Sports GPS Watch GH625M Using the Menus In a menu, you can use the (4) and (6) buttons to move the highlight up and down or to toggle between any available subpages. Use the OK button (5) to confirm a selection or an entry. Use the ESC/LAP button (1) to move one level backwards. First-Time Use 1. Capabilities of Your Watch Before you start using your watch you should familiarize yourself with the different functions. In the chapter "Getting Started" you already learned how to setup your watch. In the following you will learn how to change the watch preferences to obtain precise results. The available menu options will be described starting from page 25. Read this chapter to learn about the multiple applications of your watch. The key applications of the watch are: 1. Recording geographical waypoints and your heart rate during sports activities (e.g. running or biking). 2. Transferring any stored information to your computer for later review and analysis. 20 - English Crivit Sports GPS Watch GH625M 2. Custom Settings By default, the watch is programmed to use some specific settings and is ready for immediate use. However, for accurate measurements and results for analysis it is necessary to customize some settings. It is recommended that you fully read the chapter “The Menus” in order to understand the functions offered by your watch. Then perform the following settings in the order listed here: } Selecting the Units of Measure Metric or Statute. Select the desired units of measure for speed and location. This function allows you to customise the watch. For more information, see page: 31 } Entering Personal Information Name, Gender, Date of Birth, Weight and Height In User Profile you can enter personal details that will help the computer to calculate the correct values for the calories burnt. Use the (4) and (6) buttons to select a digit, then press OK (5) to confirm your setting. For more information, see page: 43 English - 21 Crivit Sports GPS Watch GH625M } Enabling Optional Features Heart Rate, Calories You can enable or disable the heart rate computing and set the heart rate range. For more information, see page: 45 } Selecting the Desired Sports Running, Biking, etc. Here you can set the sports that you want to practice. If you plan to carry any baggage or wear any heavy clothes, you may enter the extra weights here. For more information, see page: 30 } Setting the Recording Frequency e.g. once per second In this menu you can set how often an entry should be recorded during training. For more information, see page: 43 After you have entered all the required information, the watch computer will be able to perform its calculations customized for you. 22 - English Crivit Sports GPS Watch GH625M 3. First-Time Recording For first time operation, simply start recording for a few minutes in order to obtain some records. Put your breast belt on. Proceed as described on page 16. Put the watch on and use the (2) button to power it on. Make sure that the watch can establish a connection with the GPS satellites. To do this, always make sure you are outdoors. As soon as a satellite signal can be received, the reception icon (10) will light on the display. Press the PG button (3) as many times as necessary to display the Sports menu. Check if the heart rate is displaying properly in the Sports menu. If necessary, read on page 45 to find out how to enable heart rate recording. Press the OK button (5) to start recording. The message TIMER STARTED is displayed on the screen for a few seconds. Start running for a short distance to have the watch capture some records. Press the OK button (5) again to pause recording. The message TIMER STOPPED will appear for a few seconds on the display. The device will continue recording GPS coordinates. To stop recording completely, press the ESC/LAP button (1). The safety prompt "Reset Training Data and Save?" will appear. Confirm the prompt with YES to save the records and exit. English - 23 Crivit Sports GPS Watch GH625M 4. Transferring Data If necessary, you can transfer the data to your computer. This requires that you install the supplied software first. To install the software, proceed as described on page 54. Connect the watch to your PC using the supplied USB cable. Proceed as described starting from page 56. 24 - English Crivit Sports GPS Watch GH625M The Menus The Main Menu The main menu consists of four options. The main menu functions let you set your preferences in order to customise the device according to your personal requirements. Main Menu Structure Activity Info Auto Hold Alerts Activity Activity Setting Time/Distance Alert Speed Alert Heart Rate Alert Calories Setting Laps Settings Set Units Delete all Memory Capacity Navigation Add Map Mode/Remove Map Mode Create New Route Routes List all Delete all Save Waypoint List Waypoints Find Waypoint Delete all Return to Start GPS Info Connect to PC Waiting for PC English - 25 Crivit Sports GPS Watch GH625M Setup Time Set System User Setting Set Display Set custom page Configuration Time zone Daylight Saving Time Format Beeper Language Sleep Mode Backlight Contrast Page 1 Page 2 Page 3 Page 4 Lap page User Profile Turn PC-GPS on/off Data Recording GPS Normal/Off GPS Setting WAAS/Egnos on/off Heart Rate Monitor on/off Calculate Heart RT Cardio Mode Calorie by Setting Heart Rate Yes/No Set Target Zone Factory Reset Yes/No System Upgrade Yes/No About Product The menus will be described in detail in the following chapters. 26 - English Crivit Sports GPS Watch GH625M For improved navigation, each description is marked with a grey bar. In this bar, you can see the location of the menu item within the entire menu structure. Activity Activity Info ►Main menu ►Activity ►Activity Info Activity Info shows a list of all saved courses. Select a course based on the date and time to show more detailed information at the bottom of the display. Use the OK button (5) to open the overview screen for the selected course. The following information will be displayed: Date and time of the start of training Total distance Calories burned Average speed during training Maximum speed during training The overview offers the following additional features: Show Track Back Laps Delete Shows the training track in map view. Press PG (3) to return to the overview. Guides you back to the route start or destination in map view. Select “Backward” for the start or “Forward” for the destination point. Shows a list of saved laps. Select an entry to show any details in map view. Deletes any selected data. Select "Yes" to confirm the safety prompt. English - 27 Crivit Sports GPS Watch GH625M Activity Setting ►Main menu ►Activity ►Activity Setting This item contains five different settings: Auto Hold (see page 28) Alarm (see page 29) Calories Setting (see page 30) Laps Settings (see page 30) Set Units (see page 31) Auto Hold ►Main menu ►Activity ►Activity Setting ►Auto Hold If you stop for a pause during training, your watch is able to stop data recording automatically. As soon as you continue your course, recording goes on. This lets you calculate the average speed and average pulse rate accurately. The following options are available: Off When Stopped Custom Speed 28 - English Disables the feature. Data recording will be continuous. If you stop during training so that no speed is detected, recording will be paused until you resume your training. Here you can enter any speed value. If your speed falls below the set trigger value, recording will stop. It will continue once your speed has exceeded the trigger speed value. Crivit Sports GPS Watch GH625M Alerts ►Main menu ►Activity ►Activity Setting ►Alerts You can program different alert types. First of all, select if you want to enable (ON) or disable (OFF) the alerts. Furthermore, the time and distance alert can be set as ONCE or REPEAT, depending on whether you want to use it only once or repeatedly. Enter the desired values by entering each digit via the (4) and (6) buttons. It is also possible to enter decimal separators. Select the arrow icon ( ) to confirm the entered digit. Time Alert/Distance Alert Speed Alert Heart Rate Alert Time Alert Starts the alert at a preset time. Distance Alert Starts the alert after you have done a certain distance. Fast Speed Alert Starts the alert after you have exceeded a certain speed. Slow Speed Alert Starts the alert if you have fallen below a certain speed. Max HR Alert Starts the alert if you exceed a certain heart rate. Min HR Alert Starts the alert if your heart rate falls below a certain value. English - 29 Crivit Sports GPS Watch GH625M Calories Setting ►Main menu ►Activity ►Activity Setting ►Calories setting Here you can set the sports that you want to practice. If you plan to carry any baggage or wear any heavy clothes, you may enter the extra weights here. The system will use this information to accurately calculate the calories burnt. Sport Type Extra Weight Select between the presets WALKING, HIKING, RUNNING, BIKING and BY TIME. Enter an extra weight by entering each digit via the (4) and (6) buttons. It is also possible to enter decimal separators. Select the arrow icon ( ) to confirm the entered digit. Please remember that in order to obtain an accurate calories burned calculation it is necessary to enter your body weight. For more information, read User Profile on page 43. Laps Settings ►Main menu ►Activity ►Activity Setting ►Laps Settings Use this function to automatically determine any laps by time or by distance. For example, when running on a sports field, you can enter a distance of 0.4 km. The watch will then use each circuit round as a lap. Enter the desired value by entering each digit via the (4) and (6) buttons. It is also possible to enter decimal separators. Select the arrow icon ( ) to confirm the entered digit. Off Distance By time 30 - English Disables lap recording. Determines the laps according to the set distance. Determines the laps according to the set time. Crivit Sports GPS Watch GH625M Set Units ►Main menu ►Activity ►Activity Setting ►Set Units Here you can set the desired units of measure for distance, speed and co-ordinates. Units Speed Unit Coordination Select between Statute, Metric or Nautical. Select between units for slower (e.g. m/min) or faster (e.g. km/h) movement. Select a unit for the recorded co-ordinates. To be able to represent any tracks properly on Google, you should use the GOOGLE option. Delete All ►Main menu ►Activity ►Delete All All saved data can be deleted in one go. This helps you to free up some memory. Please note that this procedure will completely erase any data from your device. If you wish to perform a backup of your data, first transfer it to your computer (see the description starting from page 54). To proceed deleting, confirm the safety prompt with YES. English - 31 Crivit Sports GPS Watch GH625M Memory Capacity ►Main menu ►Activity ►Memory Capacity Here you find information on how many waypoints may be recorded. Remaining Points Remaining Times Number of waypoints still available. Time of the storage process. This setting depends on the data recording adjustments (see page 43). This value does not refer to the capacity of the built-in battery. Navigation The Navigation menu contains functions for waypoints and routes. Save your waypoints, create and edit routes, and use all the features offered by GPS navigation. The software lets you define any waypoints easily. Once created, you can download them onto the watch. Read the "The Software" section starting from page 56. Add Map Mode ►Main menu ►Navigation ►Add Map Mode Use the OK button (5) to determine whether to use the map in map mode. When selecting a waypoint for your itinerary, the map mode will be enabled automatically. 32 - English Crivit Sports GPS Watch GH625M Routes ►Main menu ►Navigation ►Routes This menu contains three options for editing waypoints along a route. A route always contains multiple waypoints. You can edit or delete any of them. To create a route you will need several recorded waypoints (see also page 35, Saving a Waypoint). If no waypoint is available, the message EMPTY appears. Create New Route List all Select any waypoint from the list and press OK (5) to add it to the new route. Repeat the above process until the desired route has been completed. From the route list you can edit individual waypoints by confirming them with OK (5). Select INSERT to add another waypoint after the current waypoint, or select REMOVE to delete the current waypoint. You can edit the name of the route from the top line of the list. Shows all entered routes with their names. You can edit individual routes by confirming them with OK (5). Proceed the same way as for creating a new route. To use the current waypoint as the start point of a route, please see “Starting a Saved Route” on the next page. Delete all To delete all programmed routes, select this menu item and confirm the safety prompt with YES. CAUTION! All routes will be completely erased. If you want to delete an individual route only, select LIST ALL and delete the selected route only by using the DELETE option. English - 33 Crivit Sports GPS Watch GH625M Starting a Saved Route ►Main menu ►Navigation ►Routes ►List all This option allows you to call-up any saved routes and select and start one of them. Select a route from the list by confirming it with OK (5). The route will be opened and the saved waypoints appear on the list. The following options are available at the bottom of the display: Delete Deletes the current route without any further prompts. Any stored waypoints will not be affected and remain in the waypoint list (see page 36, Finding a Waypoint). With this function you can start the selected route. Follow Select the FOLLOW option and press OK (5) to start the route. Select whether you want to begin at the start point or at the end point of the route. This selection allows you to follow a route in either direction. Select if you want to record data during the route. To do this, confirm the prompt with YES. Route tracking starts and the display automatically toggles to map view. For a better orientation, the next waypoint and a directional arrow are displayed on the map. Additionally, you can use the (4) and (6) buttons to zoom the overview. Please remember that the map view does not display cartographic information with a route. The map view only contains direction indicators and distances. Press PG (3) to toggle from map to course indicator view. A compass with course indicator and all necessary information to the next waypoint will appear. Press the PG button (3) multiple 34 - English Crivit Sports GPS Watch GH625M times to toggle between the different screens and navigation displays. To quit navigation, press the PG button (3) as many times as necessary to display the main menu. Then select STOP ROUTE from the NAVIGATION submenu. Saving a Waypoint ►Main menu ►Navigation ►Save Waypoint This menu allows you to save your waypoints: Waypoints are required to create a route. It is also possible to create waypoints by using the software with a map overview. To do this, read page 56 – The Software. If a satellite signal can be received, this menu displays the current position in geographical co-ordinates. This versatile feature helps you to set the present position as a waypoint at any time. For instance, while running you can set a specific route in order to being able to repeat it in the future. To do this, create a waypoint any time your path runs along a curve or changes direction. Later on, you will be able to create a route from the saved waypoints (see page 33, Routes). This allows you to save and edit a route that you have run along once. Then you can use the route in both directions. When saving the waypoints you can name them as you like and assign them an icon. If you only save them, the waypoints will be numbered in sequence. You can edit geographical co-ordinates if you have a map with co-ordinates available. English - 35 Crivit Sports GPS Watch GH625M Finding a Waypoint ►Main menu ►Navigation ►Find Waypoint To edit or delete any saved waypoints you can use this submenu. It is also possible to navigate to a specific waypoint. The following options are available: List Waypoints Opens the list of saved waypoints. Press (4) and (6) to select the desired waypoint and press (5) to confirm. Delete all Deletes all saved waypoints. To do this, confirm the prompt with YES. After you have opened a waypoint, it will be displayed with all relevant information. Use GO TO to use the current waypoint as your destination. Then proceed as described for the route function (see also on page 34, Starting a Saved Route). Select DELETE to remove the current waypoint. The waypoint will be deleted immediately and there is no safety prompt. 36 - English Crivit Sports GPS Watch GH625M Return to Start / Stop Route ►Main menu ►Navigation ►Return to Start If you have recorded your sports activity, this function will guide you back to the start point. The course direction display will show-up and you can follow the directional guidelines to go to the start of your course. If a route navigation had been started, this option will change to STOP ROUTE. This allows you to exit the current navigation. If you go to an individual waypoint, this option will read STOP GOTO and is used to exit the current navigation. GPS Info ►Main menu ►Navigation ►GPS Info This will display an overview of all available GPS satellites. The number and signal strength of the satellites will be shown in a bar diagram. Connect to PC The Connect to PC feature allows you to transfer any saved waypoints and routes to your PC. To establish a connection, plug the supplied cable to the watch and your computer. For more information, read the information on page 54 – Connecting to a Computer. English - 37 Crivit Sports GPS Watch GH625M Configuration This menu lets you set your preferences in order to customise the watch according to your personal requirements. User Setting ►Main Menu ►Configuration ►Settings The User Settings contain seven different groups: Setup Time (see page 38) Set System (see page 38) Set Display (see page 39) Set custom page (see page 40) User Profile (see page 43) Turn PC-GPS on/off (see page 43) Data Recording (see page 43) Setup Time ►Main Menu ►Configuration ►User Setting ►Setup Time The time is synchronised automatically as soon as the watch can establish a connection with the GPS satellites. You only need to set the time zone of your present position. Please read page 15 – Setting the Time. Set System ►Main Menu ►Configuration ►User Setting ►Set System Select any of the following options to set the desired values: Beeper Here you can disable the beep (OFF) button or enable it with the conditions MESSAGE ONLY or KEY AND MESSAGE. Language Select the desired display menu language (see also page 14 – Setting the Language). 38 - English Crivit Sports GPS Watch GH625M Sleep Mode When not using the watch, you can have it power off automatically after a preset time. To do this, select a time interval between 5 and 20 minutes. Select STAYS ON to disable the auto-off function. Set Display ►Main Menu ►Configuration ►User Setting ►Set Display These settings allow you to adjust the display backlight and contrast. Backlight The watch features a display with backlight illumination. Here you can set how long you want the backlight to stay on. You can select between 15, 30 or 60 seconds. Select STAYS ON to disable the backlight auto-off function. Please note that using the backlight frequently will reduce the battery runtime. You can turn the backlight on and off manually by pressing the (2) button. Contrast Press (4) and (6) to select the desired contrast value. We recommend that you use the midrange value. English - 39 Crivit Sports GPS Watch GH625M Set custom page ►Main Menu ►Configuration ►User Setting ►Set custom page With this function you can customize the display screens. This feature only applies to the sports menu and offers you the possibility of quickly viewing the desired information. You can program up to four custom screens as well as the Laps function. To restore the factory-default configuration for the custom screens, you need to perform a Factory Reset. In this case, any other settings will be lost too. As an overview, on page 42 you can check the default status of the custom screens. You can restore their configuration manually, if desired. Proceed as follows to program the custom screens: Press the (4) and (6) buttons to select the desired screen. Press the OK button (5) to confirm your selection. Use the (4) and (6) buttons to set the number of lines that you want to display on the selected screen. Press the OK button (5) to confirm your selection. You can display up to four lines. 40 - English Crivit Sports GPS Watch GH625M Next, set the function that you want to read for each line. To do this, confirm the preset function with OK (5) and then press (4) and (6) to select a different function. Press the OK button (5) to confirm the new function. English - 41 Crivit Sports GPS Watch GH625M Factory-Default Configuration of Custom Screens The custom screens have the following factory-default configuration: Page 1, 1 line Line 1: Time Line 2: Heart Rate Line 3: Elevation Page 2, 2 lines Line 1: Speed Line 2: Distance Page 3, 3 lines Line 1: Calories Line 2: Time Line 3: Rest Distance Page 4, 4 lines Line 1: Line 2: Line 3: Line 4: Average speed Max Speed Average Heart Rate Elevation 42 - English Crivit Sports GPS Watch GH625M User Profile ►Main Menu ►Configuration ►User Setting ►User Profile In User Profile you can enter personal details that will help the computer to calculate the correct values for the calories burnt. You can enter the following details: User name Gender Date of Birth Weight Height These units of measure for weight and height depend on the units of measure (see page 31, Units of Measure). Turn PC-GPS on ►Main Menu ►Configuration ►User Setting ►Turn PC-GPS on The tracked GPS co-ordinates can be transferred to a connected computer. This lets you use your watch as an external GPS receiver for your PC. To save power, you may power this function off whenever it is not needed. The internal GPS function will enable automatically when it is required for tracking waypoints. Data Recording ►Main Menu ►Configuration ►User Setting ►Data Recording In this menu you can set how often an entry shall be recorded during training. Upon factory delivery the device is set to EVERY SECOND. This setting allows recording up to approx. 15 hours of training in the internal memory. English - 43 Crivit Sports GPS Watch GH625M If required, you can establish a different recording interval. To do this, select CUSTOM TIME and then enter the desired interval in seconds. A faster recording frequency delivers better results but requires more storage in the internal memory. A lower recording frequency does the opposite. In the lower part of the display you can see the remaining number of recordings available for the current settings and how long recording would be possible. GPS Setting ►Main Menu ►Configuration ►GPS Setting There are two items available under GPS Setting: GPS To save power you can disable the GPS receiver completely (GPS OFF) or enable it when required (NORMAL) WAAS/EGNO S WAAS and EGNOS deliver additional information in order to determine the tracking accuracy. Select ON to enable WAAS and EGNOS or disable both features by selecting OFF. WAAS and EGNOS are two similar services that work in parallel. Satellite signals are supplemented from ground-based stations by reporting reliability and accuracy of the signals. This information will be sent to the satellites and to the GPS receivers. 44 - English Crivit Sports GPS Watch GH625M Heart Rate Setting ►Main Menu ►Configuration ►Heart RT Setting You can enable or disable the heart rate computing and set the heart rate range. Cardio Mode Toggle the heart rate calculation ON or OFF. Specify whether you want the calories to be computed from the heart rate. Set Target Zone Here you can enter a minimum heart rate. The maximum value will be obtained from the setting under User Profile (see page 43) and cannot be incremented. By limiting the minimum and maximum values a better accuracy can be obtained and measurement errors can be avoided. Factory Reset ►Main Menu ►Configuration ►Factory Reset With this option you can restore the factory-default settings of your watch. Any custom settings and recordings will be lost. Confirm following prompt with YES to restore the factory-default configuration: English - 45 Crivit Sports GPS Watch GH625M System Upgrade ►Main Menu ►Configuration ►System Upgrade If you have an updated operating system (firmware) for your watch, you can download it onto the watch by using this function. To be able to do this, you must connect the watch to your computer. Follow the instructions delivered with your new firmware to perform the update. About Product ►Main Menu ►Configuration ►About Product This screen shows the model designation, the current firmware version and the serial number of your watch. 46 - English Crivit Sports GPS Watch GH625M The Sports Menu This menu is split into four screens. Press the (4) and (6) buttons to switch between the screens. The details that appear on the different screens can be customised. For more information, read Set Screen on page 40. The following information can be displayed: Time Date Day of the week Chronometer Speed Elapsed distance Calories burnt Remaining distance Cumulate + (summary of ascent) Cumulate – (summary of descent) Total ascent (altitude) Heart Rate You can also have some of the information displayed as average, maximum or minimum values. English - 47 Crivit Sports GPS Watch GH625M Examples for displaying the Sports menu Starting a Recording You can start a recording at any time from the Sports menu. To do this, press OK button (5). The message TIMER STARTED is displayed on the screen for a few seconds. The timer icon (8) will light up. If the GPS signals are too inaccurate for recording, the GPS icon (9) will blink. When starting the timer, the message “No GPS Fix! Start anyway?” will appear. Select YES to start recording without tracking your position. As soon as the GPS signal is usable, the co-ordinates will be recorded. 48 - English Crivit Sports GPS Watch GH625M Stopping a Recording Pause Press the OK button (5) to pause the current recording. The message TIMER STOPPED is displayed on the screen for a few seconds and the timer icon (8) will blink. The GPS co-ordinates will continue recording, and you can resume the course at any time by pressing the OK button (5) again. The route will be saved as one continuous course. Lap It is also possible to record a course with multiple laps (intermediate stops). During recording (not during pause), press the ESC/LAP button (1). Information about the lap is displayed on the screen. The lap will be stored with the name LAP followed by a sequential number. Recording will continue running in background. Stopping Completely During recording press the OK button (5) to start pausing recording (see above). During pause, you can stop recording completely by pressing the ESC/LAP button (1). The safety prompt "Reset Training Data and Save?" will appear. Select YES on the security prompt to stop recording. Wait until the message TIMER STOPPED disappears after pressing OK or press the ESC/LAP button twice to stop recording. English - 49 Crivit Sports GPS Watch GH625M Location Display The location display shows the co-ordinates of your present position. Location display examples Geographic co-ordinates UTM co-ordinates Press the (4) and (6) buttons to switch between geographic and UTM coordinates. Geographic Co-ordinates These coordinates show your current position in degrees of latitude and longitude. The values display in Degrees, Minutes and Seconds. Longitude is expressed Eastern (E) or Western (W) from Greenwich meridian. Latitude is expressed in degrees North (N) and South (S) of the Equator. This makes it possible to uniquely identify any position on the Globe. The units of measure displayed depend on the units of measure selected on the Main Menu (see page 31 – Set Units). 50 - English Crivit Sports GPS Watch GH625M UTM Co-ordinates The UTM coordinates express your position in X-Y coordinates in decimal notation. Below, the UTM Zone is displayed. The UTM zone is a specific section of the Earth’s surface. As this section is quite small, the values can be expressed in Cartesian coordinates. The X coordinate expresses the position to the right while the Y coordinate expresses the position upwards. When using UTM coordinates, you always need to indicate the UTM zone in order to obtain a unique reference. English - 51 Crivit Sports GPS Watch GH625M Map Display The map display shows directional guidelines. Please note that the map display is not equivalent to a GPS moving map as you may be familiar with from car navigation equipment. Any displayed directional guidelines only indicate the direction to follow to go to the next waypoint. These guidelines are independent of any roads, rivers, mountains or other geographical items. Map display examples Map mode Course Direction mode Press PG (3) to toggle between the different screens. You can also press PG to open the desired mode for the map display. The map display guidelines are reliable as soon as you start moving a few meters. If you enable this display while stopped, the watch first needs to determine your direction of movement in order to be able to guide you. Simply move a few meters in any direction. 52 - English Crivit Sports GPS Watch GH625M Map mode The map mode must be enabled in order for the screen to display. Please see page 32 for how to enable this screen. The centre of the screen always represents your current position. Any waypoints will appear relative to your present position. All waypoints are displayed with their assigned name and icon. The map mode always has North to the top. Press (4) and (6) to zoom the display in or out. Course Direction mode Course Direction mode is available only when you have started a Go To. To start a Go To, start a backtrack course to your starting point, navigate to a specific waypoint or open a saved route. Please also read the "Navigation" section starting from page 32. The Course Direction mode contains a compass with a direction indicator (arrow). This arrow indicates the direction to follow to go to the next waypoint. The information for the compass indication is obtained from the GPS data. This is not a digital compass. Next to the compass, the estimated time of arrival and the remaining distance are displayed. To stop the Go To, select the main menu, go to the NAVIGATION submenu and then confirm the STOP GO TO or STOP ROUTE option. English - 53 Crivit Sports GPS Watch GH625M Connecting to a Computer To analyse and archive any recorded data, you can transfer it to your computer. You must firstly install the supplied software "GS-Sport Training Gym". System requirements: Operating system: Windows® XP or Windows Vista® Web Browser Internet Explorer 7.0 or higher Interface: USB 2.0 Disk Drive: CD or DVD drive Hard Disk: minimum 250MB of available disk space Installing the Software Insert the supplied CD-ROM into the CD or DVD drive of your computer. The AutoPlay routine should launch the setup programme automatically. If AutoPlay is disabled on your computer, double-click on the file “auto.exe”. Select the "Software" option to start the software installation. Follow the instructions on the Setup Wizard. As soon as setup has finished, you are prompted to enter a user name. Enter your name in the "User Name" field and click the "Save" button to confirm. Any special characters, accents or spaces are not allowed. It is possible to define multiple users so that several people can use the watch. 54 - English Crivit Sports GPS Watch GH625M The next window is the login dialog box. Select the desired user name and click "Login". The application starts and shows a map portion of the Earth in the larger middle window. To learn how to use the software, read the "The Software" section starting from page 56. Transferring Data First get your watch ready for copying the records. The first time you connect it to a computer, you need to install the USB driver. To do this, execute the "USB Driver" option from the CD. Connect the watch to the computer as described in the chapter "Getting Started" starting from page 11. Once the USB connection has been established, the prompt “Connect to PC?” will appear on the display. Press (4) or (6) to navigate to the YES option and press OK (5) to confirm. The message “Waiting for PC” is shown on the display for a few seconds. If the USB connection has already been established, you can also use the CONNECT TO PC item from the main menu. The watch is ready to establish a connection to the software. Read the chapter “The Software” on the following pages to find out how to transfer data. English - 55 Crivit Sports GPS Watch GH625M The Software After the software has been installed successfully, you can launch it by double-clicking on the application “Crivit Training Gym”. See page 54 to find out how to install the software. When opening the software, you are prompted to enter your user name. Select the user name that you have specified during setup and click “Login”. A GoogleMap overview will appear. GoogleMap requires an Internet connection. 56 - English Crivit Sports GPS Watch GH625M Click the “Data Transmission” button in the lower-left corner of the window. Select the data that you want to transfer. In the upper-left corner you can load track points or waypoints. Click the corresponding button (e.g. "Track Points – Download from Device”. English - 57 Crivit Sports GPS Watch GH625M The software will check if there are any track points available for download. Please wait until the process has finished. If there are any track points available on the watch, the following list will appear (this is an example only). Select the desired routes by placing a checkmark in the corresponding checkboxes. If you check the top entry, all subsequent entries will be checked too. 58 - English Crivit Sports GPS Watch GH625M The download from the watch will begin. Please wait until the process has finished. After the download has been completed, on the right part of the window a list with downloaded data will be shown. Click on an entry on the list to select it. The related GPS information will be shown as a marked path on the overview map. English - 59 Crivit Sports GPS Watch GH625M In the bottom of the window, a graphical representation of other information related to the selected course will be shown. Click on a checkbox to select the information that you want to be shown (at least one box must be checked): Altitude Speed Pulse rate 60 - English Crivit Sports GPS Watch GH625M Creating Waypoints with the Software You can use the software to create waypoints on the map and transfer them to the watch. Please note that creating waypoints does not correspond to the navigation you may be familiar with from a car navigation system. From the software main window, click the "Planning Tool" button. At the bottom of the screen, a window for entering an address will appear. It is recommended that you use the format “Street, Post Code, City”. Then click the “Search” button. The system will search the entered address and represent it on the map with a red mark. Click the "Add Waypoint" button to enable the waypoint-adding mode. English - 61 Crivit Sports GPS Watch GH625M Then click the red mark on the map. Enter a unique name for the waypoint in the window that pops up and then click “Save”. Please note that the name must not exceed six characters, as the watch display width is limited. Repeat the process until all waypoints have been entered. To stop the waypoint-adding mode, click the “Stop Adding Waypoints” button. You can also add waypoints directly from the map. To do this, simply click on the desired position on the map. The waypoint will be shown with a green mark. You can also click "Cancel" in the popup window to disregard the waypoint. 62 - English Crivit Sports GPS Watch GH625M Transferring Waypoints to the Watch After you have created all the desired waypoints you must transfer them to the watch in order to use them. First you need to connect the sports watch to your computer and put it in idle mode for reception. The message “Waiting for PC” should be shown on the display. Proceed as follows: Click the “Data Transmission” button. Click on “Waypoints“ at the top of the tab. Select the desired waypoints on the list by placing a checkmark in the corresponding checkboxes. Click the “Upload to device” button just beneath “Waypoints”. English - 63 Crivit Sports GPS Watch GH625M The marked waypoints will be transferred. As soon as the status bar disappears, the process is completed. You may then remove the watch from the computer. You'll find the waypoints on the watch in the following location: Main menu > Navigation > Find Waypoint. If a waypoint with the same name already exists on the watch, it will be overwritten and therefore lost. 64 - English Crivit Sports GPS Watch GH625M Appendix Technical Specifications Charger input jack 5V via USB 2.0 interface Display size 24.9 x 39.9 mm (H x W) Display type: B&W LCD display Water-proof standard IPX 7 Operating temperature 5 °C to 35 °C (max. 85% RH) Internal rechargeable battery Rechargeable Li-Polymer battery 660 mAh Runtime 3D fix, GPS enabled, Heart rate measurement enabled, Backlight enabled approx. 10 hours 3D fix, GPS enabled, Heart rate measurement disabled, Backlight disabled approx. 11 hours GPS disabled, Heart rate measurement disabled, Backlight disabled approx. 21 hours Charging time approx. 3 hours Weight 72.9 g Dimensions Length: Height: Diameter: 76.5 mm 17.5 mm 61.5 mm English - 65 Crivit Sports GPS Watch GH625M Index A D Activity .....................................27 Activity Info ..............................27 Activity Seting ..........................28 Alerts........................................29 Auto Hold .................................28 Data Recording ........................43 Delete ......................................31 Deleting data............................31 Display Icons ....................................10 Toggling ...............................19 Display backlight ......................39 B Backlight . see Display backlight Battery Charging ..............................11 Beeper .....................................38 Breast Belt Cleaning...............................18 Putting On............................16 Replacing the battery ...........18 C Calories....................................30 Cardio Mode ............................45 Computer Connecting...........................54 Software...............................56 Software, installing...............54 System Requirements..........54 Transferring Data.................55 Configuration ...........................38 Connect to PC .........................37 Co-ordinates ............................50 Course Direction mode ............53 Custom Screens Factory-Default Configuration .........................................42 66 - English E EGNOS....................................44 F Factory Reset...........................45 Firmware Upgrade ...............................46 Version.................................46 G Goto ...................see Navigation GPS .............................37, 43, 44 H Heart Rate ...............................45 L Language .................................14 Lap...........................................49 Laps Settings ...........................30 Location Display.......................50 Crivit Sports GPS Watch GH625M Stop..................................... 37 M Main Menu .............................. 25 Map Add/Remove ....................... 32 Map Display ............................ 52 Map mode ............................... 53 Memory capacity ..................... 32 Menus Using ................................... 20 N S Serial number .......................... 46 Set Display .............................. 39 Set Screen .............................. 40 Set System .............................. 38 Setup Time.............................. 38 Sleep Mode ............................. 38 Software .................................. 56 System Upgrade...................... 46 Navigation ............................... 32 T O The Sports Menu..................... 47 Time .................................. 15, 38 Overview Control buttons...................... 9 Display ................................ 10 Icons ................................... 10 U P Powering Off ........................... 14 Powering On ........................... 14 R Recording Starting................................ 48 Stopping .............................. 49 Reset............. see Factory Reset Route Creating............................... 33 Editing ................................. 33 Saving ................................. 34 Units ........................................ 31 User Profile ............................. 43 User Settings........................... 38 W WAAS...................................... 44 Warranty Information............... 68 Watchstrap Replacing ............................ 12 Waypoints Creating............................... 61 Deleting ............................... 31 Finding ................................ 36 Memory capacity ................. 32 Saving ................................. 35 Transferring ......................... 63 English - 67 Crivit Sports GPS Watch GH625M Warranty Information 36 Months Warranty from the date of purchase Dear Customer, Many thanks for purchasing a Crivit product. Prior to using your Crivit product, please read the included documentation and/or online help carefully. Should you encounter any problem that cannot be solved by reading the documentation, please contact our Hotline. If the problem cannot be solved over the phone, you will receive a Return Material Authorization Number (RMA) that you should attach to the device, together with a copy of the proof of purchase. After you have packed the device securely, send it with the RMA marked on the outside of the package to the address obtained from our Hotline operators for warranty repair. After receiving the device, we will repair any manufacture or hardware faults free of charge. For the latest information and frequently asked questions, please visit: www.crivit.net This warranty is valid in the United Kingdom and Eire. Your warranty rights against the reseller are valid in addition to this warranty and will not be restricted by it. Hotline phone number: 0207-3650744 (UK), 01-2421583 (IE) (Please have your Serial Number ready!) Manufacturer: 68 - English TARGA GmbH, Postfach 22 44 D-59482 Soest Germany Crivit Sports GPS Watch GH625M English - 69 Declaration of Conformity We: Targa GmbH Lange Wende 41 59494 Soest, Germany declare our responsibility that the product: model: GPS Sport watch Crivit GH625M is confirmed to comply with the requirements set out in the Council Directive on the Approximation of the Laws of the Member States relating to Electromagnetic Compatibility 2004/108/EC and the vehicle directive 2004/104/EC. The measurements were carried out in accredited laboratories. For the evaluation of above mentioned Council Directives for Electromagnetic Compatibility and for Low Voltage standards were consulted: EMC EN 55024:1998 + A1:2001 + A2:2003 EN 55022:2006 limit class B Safety EN 60950-1:2001 + A11:2005 Soest, 15th of April 2009 authorised signature _____________________________ Matthias Klauke, Managing Director 07.10.2009 13:42 Uhr Seite 2 1495947 crivit_gps-uhr_lb6_0910:Layout 1 TARGA GmbH Lange Wende 41 D-59494 Soest www.crivit.net 6