1
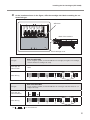
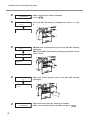
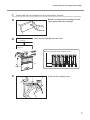
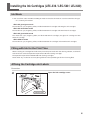
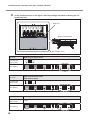
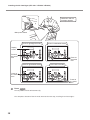
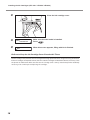
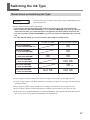
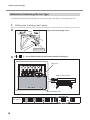
Supplemental Manual This document describes important points regarding ink. Please be sure to read this document. The content of “Installing the Ink Cartridges” has been changed. Part of ”Setup Guide” has been changed with support of the ECO-UVS ink. When you install the ink cartridges for the first time, be sure to read ”Installing the Ink Cartridges” in page 2 of this document, or ”Installing the Ink Cartridges (LEC-330/ LEC-540/ LEJ-640)” in page 9. The available operation after the [HEAD WASH] menu is executed has been changed. INK CONTROL HEAD WASH Conditional selection of the ink type becomes available upon filling with ink after the [HEAD WASH] menu is executed. In other words, you can switch the ink type even after filling with ink. For information on how to switch the ink type, please read ”Switching the Ink Type” in page 17. This machine supports the ink. R2-110607 Contents Contents.........................................................................................................1 Installing the Ink Cartridges (LEC-300A)............................................................2 Filling with Ink for the First Time.....................................................................2 Affixing the Cartridge-Slot Labels...................................................................2 Installing the Ink Cartridges............................................................................4 Installing the Ink Cartridges (LEC-330 / LEC-540 / LEJ-640)............................9 Ink Mode........................................................................................................9 Filling with Ink for the First Time.....................................................................9 Affixing the Cartridge-slot Labels...................................................................9 Selecting the Ink Mode................................................................................. 11 Installing the Ink Cartridges..........................................................................13 Switching the Ink Type.......................................................................................17 Restrictions on Switching Ink Type..............................................................17 Method for Switching the Ink Type...............................................................18 About Handling of ECO-UVS Ink.......................................................................21 Copyright © 2011 Roland DG Corporation http://www.rolanddg.com/ 1 Installing the Ink Cartridges (LEC-300A) Filling with Ink for the First Time When installing ink cartridges for the first time, clean the print heads with the cleaning solution, and then fill with ink of each color. This operation requires four SOL INK cleaning cartridges. This operation requires four UNUSED SOL INK cleaning cartridges. Never under any circumstances use anything other than the specified type of ink or cleaning fluid. Affixing the Cartridge-Slot Labels Procedure Open the ink cartridge cover. Knob Hold the knob. 2 Installing the Ink Cartridges (LEC-300A) At the locations shown in the figure, affix the cartridge-slot labels matching the selected ink type. Affix here. Back of the machine Ink cartridge cover Ink type Cartridge-slot labels to affix ECO-UV CMYKGlW (Cyan, magenta, yellow, and black ECO-UV ink cartridges, one gloss ink cartridge, and one white ink cartridge are used.) None After affixing Ink type ECO-UVS CMYKWW (Cyan, magenta, yellow, and black ECO-UVS ink cartridges and two white ink cartridges are used.) Cartridge-slot labels to affix(*1) After affixing (*1) is an included item. 3 Installing the Ink Cartridges (LEC-300A) Installing the Ink Cartridges Be sure to follow the onscreen instructions for insertion and removal. Arrow Slot number Insert and remove slowly, one at a time. Insert firmly, as far as it will go. Insert firmly until you hear a beep. During cleaning, you need to insert and remove cartridges several times. The on-screen messages tell you when or which cartridge to be inserted or removed. The SOL INK cleaning cartridges are not differentiated by color. Insert each color ink cartridge into the slot labeled with the matching color. If you insert wrong cartridges when filling ink, the condition cannot be restored easily. Contact your authorized Roland DG Corp. dealer or us., if you filled ink with wrong cartridges inserted. 1. Make the initial settings. Close the front cover. Front cover 4 Installing the Ink Cartridges (LEC-300A) Switch on the main power switch. Main power switch 2. Hold down and press the sub power switch. MENU LANGUAGE JAPANESE Use Press LENGTH UNIT mm mm Use (for length). Press . TEMP. UNIT C Use to select the unit of measurement you want (for temperature). Press . C to select the language you want. . to select the unit of measurement you want Clean the print heads using the SOL INK cleaning cartridge. Press and select the ink type. SELECT INK TYPE ECO‑UV CMYKGlW [ ECO-UV CMYKGlW ] : Cyan, magenta, yellow, and black ECO-UV ink cartridges, one gloss ink cartridge, and one white ink cartridge are used. SELECT INK TYPE ECO‑UVS CMYKWW [ ECO-UVS CMYKWW ] : Cyan, magenta, yellow, and black ECO-UVS ink cartridges and two white ink cartridges are used. Press . 5 Installing the Ink Cartridges (LEC-300A) INSTALL DRAIN BOTTLE Make sure the drain bottle is installed. Press . SET CL-LIQUID 1234 Insert the SOL INK cleaning cartridges into slots 1, 2, 3, and 4. FILLING INK... >> REMOVE CL-LIQUID 1234 SET CL-LIQUID 56 When this screen appears, pull out the SOL INK cleaning cartridges. Insert the SOL INK cleaning cartridges you pulled out into slots 5 and 6. FILLING INK... >>>> REMOVE CL-LIQUID 56 When this screen appears, pull out the SOL INK cleaning cartridges. FILLING INK... >>>>>>>> 6 CHECK DRAIN BOTTLE When this screen appears, cleaning is finished. Make sure the drain bottle is installed, and press . Installing the Ink Cartridges (LEC-300A) 3. Insert the ink cartridges for the respective colors. Before you insert the ink cartridge for each color, gently shake the cartridge. SET CARTRIDGE 123456 Insert the ink cartridge for each color. FILLING INK... >>>>>>>>>> Insert into the slot of the matching color. Close the ink cartridge cover. 7 Installing the Ink Cartridges (LEC-300A) CHECK DRAIN BOTTLE SETUP SHEET ROLL Make sure the drain bottle is installed. Press . When this screen appears, filling with ink is finished. Be Sure to Keep the Ink Cartridge Cover Closed at All Times. The ink cartridge cover prevents the ink cartridges from being exposed to direct sunlight or strong illumination. If the ink cartridges are exposed to them, the ink inside the cartridges will become hardened, and it may cause the printer to malfunction. Make sure that the ink cartridge cover is always closed except when absolutely necessary, such as when you are replacing ink cartridges. 8 Installing the Ink Cartridges (LEC-330 / LEC-540 / LEJ-640) Ink Mode In the case of LEC-330 / LEC-540 / LEJ-640, you need to select the ink mode in accordance with the ink type. P.11, "Selecting the Ink Mode" ECO-UV gloss/gloss mode This mode uses cyan, magenta, yellow, and black ECO-UV ink cartridges and two gloss ink cartridges. ECO-UV white/white mode This mode uses cyan, magenta, yellow, and black ECO-UV ink cartridges and two white ink cartridges. ECO-UV gloss/white mode This mode uses cyan, magenta, yellow, and black ECO-UV ink cartridges, one gloss ink cartridge and one white ink cartridge. ECO-UVS ink mode This mode uses cyan, magenta, yellow, and black ECO-UVS ink cartridges and two white ink cartridges. Filling with Ink for the First Time When installing ink cartridges for the first time, clean the print heads with the cleaning solution, and then fill with ink of each color. This operation requires four SOL INK cleaning cartridges. This operation requires four UNUSED SOL INK cleaning cartridges. Never under any circumstances use anything other than the specified type of ink or cleaning fluid. Affixing the Cartridge-slot Labels Procedure Open the ink cartridge cover. Knob Hold the knob. 9 Installing the Ink Cartridges (LEC-330 / LEC-540 / LEJ-640) At the locations shown in the figure, affix the cartridge-slot labels matching the selected ink mode. Affix here. Back of the machine Ink cartridge cover Ink mode ECO-UV gloss/gloss mode Cartridge-slot labels to affix After affixing Ink mode ECO-UV white/white mode ECO-UVS ink mode Cartridge-slot labels to affix After affixing Ink mode Cartridge-slot labels to affix After affixing 10 ECO-UV gloss/white mode None Installing the Ink Cartridges (LEC-330 / LEC-540 / LEJ-640) Selecting the Ink Mode Be sure to make the selection of the ink mode when switching on the power for the first time. Procedure w Close the front cover. If the main power switch is on, then switch it off. <ECO-UV gloss/gloss mode> Hold down and , switch on the main power switch. When the message shown below appears on the display screen, release the operation-panel buttons. SET INK MODE GLOSS INK <ECO-UV white/white mode> Hold down and , switch on the main power switch. When the message shown below appears on the display screen, release the operation-panel buttons. SET INK MODE WHITE INK <ECO-UV gloss/white mode> Hold down and on the operation panel and switch on the main power switch. When the message shown below appears on the display screen, release the operation-panel buttons. SET INK MODE CMYKGlW <ECO-UVS ink mode> Hold down and on the operation panel and switch on the main power switch. When the message shown below appears on the display screen, release the operation-panel buttons. SET INK MODE ECO-UVS WW Continued on the next page 11 Installing the Ink Cartridges (LEC-330 / LEC-540 / LEJ-640) Hold down until the message appears. Main power switch ECO-UV gloss/gloss mode ECO-UV white/white mode Display screen Press at the same time Press at the same time ECO-UV gloss/white mode ECO-UVS ink mode Press at the same time Press at the same time Press . The sub power switches off automatically. This completes selection of the ink mode. Go on to the next step, "Installing the Ink Cartridges." 12 Installing the Ink Cartridges (LEC-330 / LEC-540 / LEJ-640) Installing the Ink Cartridges Be sure to follow the onscreen instructions for insertion and removal. Arrow Slot number Insert and remove slowly, one at a time. Insert firmly, as far as it will go. Insert firmly until you hear a beep. During cleaning, you need to insert and remove cartridges several times. The on-screen messages tell you when or which cartridge to be inserted or removed. The SOL INK cleaning cartridges are not differentiated by color. Insert each color ink cartridge into the slot labeled with the matching color. If you insert wrong cartridges when filling ink, the condition cannot be restored easily. Contact your authorized Roland DG Corp. dealer or us., if you filled ink with wrong cartridges inserted. 1. Make the initial settings. Hold down and press the sub power switch. MENU LANGUAGE JAPANESE Use Press LENGTH UNIT mm mm Use (for length). Press . TEMP. UNIT C Use to select the unit of measurement you want (for temperature). Press . C to select the language you want. . to select the unit of measurement you want 13 Installing the Ink Cartridges (LEC-330 / LEC-540 / LEJ-640) 2. Clean the print heads using the SOL INK cleaning cartridge. SELECT INK TYPE ECO‑UV CMYKGlGl ECO-UV gloss/gloss mode SELECT INK TYPE ECO‑UV CMYKWW ECO-UV white/white mode Check the selected ink mode. <When the selected ink mode is enabled> Press . <When an incorrect ink mode is enabled> Switch off the sub power. Again carry out the procedure on page 11, "Selecting the Ink Mode." SELECT INK TYPE ECO‑UV CMYKGlW ECO-UV gloss/white mode SELECT INK TYPE ECO‑UVS CMYKWW ECO-UVS ink mode INSTALL DRAIN BOTTLE Make sure the drain bottle is installed. Press . SET CL-LIQUID 1234 Insert the SOL INK cleaning cartridges into slots 1, 2, 3, and 4. FILLING INK... >> REMOVE CL-LIQUID 1234 SET CL-LIQUID 56 FILLING INK... >>>> 14 When this screen appears, pull out the SOL INK cleaning cartridges. Insert the SOL INK cleaning cartridges you pulled out into slots 5 and 6. Installing the Ink Cartridges (LEC-330 / LEC-540 / LEJ-640) REMOVE CL-LIQUID 56 When this screen appears, pull out the SOL INK cleaning cartridges. FILLING INK... >>>>>>>> CHECK 3. Insert the ink cartridges for the respective colors. DRAIN BOTTLE When this screen appears, cleaning is finished. Make sure the drain bottle is installed, and press . Before you insert the ink cartridge for each color, gently shake the cartridge. SET CARTRIDGE 123456 Insert the ink cartridge for each color. FILLING INK... >>>>>>>>>> Insert into the slot of the matching color. 15 Installing the Ink Cartridges (LEC-330 / LEC-540 / LEJ-640) Close the ink cartridge cover. CHECK DRAIN BOTTLE SETUP SHEET ROLL Make sure the drain bottle is installed. Press . When this screen appears, filling with ink is finished. Be Sure to Keep the Ink Cartridge Cover Closed at All Times. The ink cartridge cover prevents the ink cartridges from being exposed to direct sunlight or strong illumination. If the ink cartridges are exposed to them, the ink inside the cartridges will become hardened, and it may cause the printer to malfunction. Make sure that the ink cartridge cover is always closed except when absolutely necessary, such as when you are replacing ink cartridges. 16 Switching the Ink Type Restrictions on Switching Ink Type INK CONTROL HEAD WASH On this machine, you can switch the ink type using the [HEAD WASH] menu after filling with ink. However, there are the restrictions given below: The ink types that can be used on this machine are the ECO-UV ink and ECO-UVS ink. When you select [ ECO-UV CMYKGlGl ] (*1) or [ ECO-UV CMYKGlW ] (*2) when you fill with ink for the first time, you cannot switch the ink type from the ECO-UVS ink to ECO-UV ink. You can only select [ ECO-UV CMYKWW ] (*3) when you switch the ECO-UVS ink to ECO-UV ink. On LEC-300/LEC-300A, you cannot switch the ECO-UVS ink to ECO-UV ink. LEC-300 / LEC-300A LEC-330 / LEC-540 / LEJ-640 ECO-UV CMYKGlGl ECO-UVS CMYKWW (*4) OK ECO-UV CMYKWW ECO-UVS CMYKWW OK ECO-UV CMYKGlW ECO-UVS CMYKWW OK OK ECO-UVS CMYKWW ECO-UV CMYKGlGl Not OK ECO-UVS CMYKWW ECO-UV CMYKWW OK (*5) ECO-UVS CMYKWW ECO-UV CMYKGlW Not OK Not OK (*1) Cyan, magenta, yellow, and black ECO-UV ink cartridges and two gloss ink cartridges are used. (*2) Cyan, magenta, yellow, and black ECO-UV ink cartridges, one gloss ink cartridge, and one white ink cartridge are used. (*3)Cyan, magenta, yellow, and black ECO-UV ink cartridges and two white ink cartridges are used. (*4) Cyan, magenta, yellow, and black ECO-UVS ink cartridges and two white ink cartridges are used. (*5) When you select [ ECO-UV CMYKGlGl ] or [ ECO-UV CMYKGlW ] when you fill with ink for the first time, you cannot switch the ink type from the ECO-UVS ink to ECO-UV ink. 17 Switching the Ink Type Method for Switching the Ink Type This operation requires four unused SOL INK cleaning cartridges. Have these on hand before you start. 1. Affixing the Cartridge-slot Labels. Open the ink cartridge cover. Knob Hold the knob. If is not affixed, affix it to the location shown in the figure. Affix here. Back of the machine Ink cartridge cover After affixing 18 Switching the Ink Type 2. Drain the ink and wash the interior. Insert each color ink cartridge into the slot labeled with the matching color. If you insert wrong cartridges when filling ink, the condition cannot be restored easily. Contact your authorized Roland DG Corp. dealer or us., if you filled ink with wrong cartridges inserted. Press . MENU SUB MENU Press several times until the screen shown on the left appears. Press . w SUB MENU INK CONTROL Press several times until the screen shown on the left appears. Press in this order. x INK CONTROL HEAD WASH Press y CLEANING LIQUID IS REQUIRED Make sure the cleaning fluid is ready. Press . CHECK Discard the discharged ink in the drain bottle. DRAIN BOTTLE Be sure to discard the discharged ink. Press . . Thereafter, follow the on-screen instructions to carry out the operations. After cleaning has finished, the sub power is automatically switched off. WARNING Never put discharged fluid or ink closed to fire. Doing so may cause the blaze. CAUITON To store discharged fluid temporarily, keep it in the provided drain bottle or in a durable container such as a metal can or polyethylene tank, and close the cap tightly. Any spillage or vapor leakage may cause fire, odor, physical distress. Store discharged fluid in a location not exposed to direct sunlight. When temporarily storing discharged fluid in the included drain bottle, keep the drain bottle out of direct sunlight. Otherwise the discharged fluid may harden, making the drain bottle unusable. Dispose of discharged fluid properly, in accordance with the laws in effect in your locale. Discharged fluid is flammable and contains toxic ingredients. Never attempt to incinerate discharged fluid or discard it with ordinary trash. Also, do not dispose of it in sewer systems, rivers, or streams. Doing so may have an adverse impact on the environment. 19 Switching the Ink Type 3. Fill with ink. Press the sub power button. Select the ink type. <When switching to ECO-UV ink> SELECT INK TYPE Press ECO‑UV CMYKWW Press . <When switching to ECO-UVS ink> SELECT INK TYPE Press ECO‑UVS CMYKWW Press . to display the left figure. to display the left figure. Thereafter, follow the on-screen instructions to carry out the operations. After finishing the operation, close the ink cartridge cover. When you use VersaWorks Be sure to perform the following operation after filling with ink. Otherwise, you cannot use VersaWorks. Procedure From the [Start] menu, click [All programs (or Programs) ] - [Roland VersaWorks] - [Roland VersaWorks] - [Initialize Application]. Click [ Yes ] when a confirmation message for initialization of the application appears. Click [ OK ] when a completion message for initialization of the application appears Start VersaWorks. The [ Printer Settings ] window is displayed. This is because the connection with the printer is initialized by performing Initialize Application. Make the settings of the printer. “Printer Connection and Settings” in ”Roland VersaWorks Quick Start Guide” When you initialize the application, the settings of Roland@NET are initialized as well. Please make the settings again. ”Making the Settings for Roland@NET” in ”Roland VersaWorks Quick Start Guide” 20 About Handling of ECO-UVS Ink Handling of the ECO-UVS ink is the same as that of the ECO-UV ink. Please read ”Setup Guide” and ”Users Manual”. 21 22


![2. Pulse [ENTER]](http://vs1.manualzilla.com/store/data/006276623_1-2ca95318a0b8716a20bc881dea11e8b3-150x150.png)