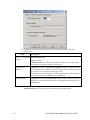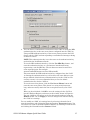
1
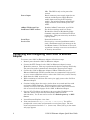
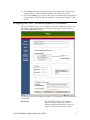
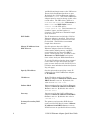
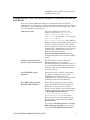
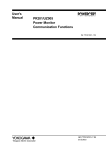
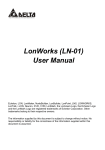
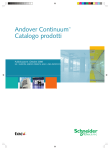
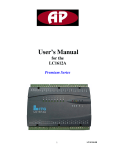
i.LON™ 10 Ethernet
Adapter Quick Start
Guide
Version 1
005-0149-01A
Echelon, LON, LONWORKS, LNS, LonTalk, LonBuilder,
LonManager, Neuron, 3120, 3150, LONMARK, NodeBuilder,
and the Echelon logo are trademarks of Echelon
Corporation registered in the United States and other
countries. LonMaker and i.LON are trademarks of Echelon
Corporation.
No part of this publication may be reproduced, stored in a
retrieval system, or transmitted, in any form or by any means,
electronic, mechanical, photocopying, recording, or
otherwise, without the prior written permission of Echelon
Corporation.
Printed in the United States of America.
Copyright ©2002 by Echelon Corporation.
Echelon Corporation
550 Meridian Ave
San Jose, CA 95126, USA
Table of Contents
Table of Contents ........................................................................................................................... 1
For More Information and Technical Support ............................................................................. 1
The i.LON 10 Ethernet Adapter ................................................................................................... 1
i.LON 10 Ethernet Adapter I/O .................................................................................................... 2
Connecting and Configuring Your i.LON 10 Ethernet Adapter ................................................. 4
Configuring the i.LON 10 Ethernet Adapter’s IP Information .............................................. 5
Configuring the i.LON 10 Ethernet Adapter to Communicate With An LNS Server........... 7
i.LON 10 Ethernet Adapter Security............................................................................................ 8
Security Access Reset ................................................................................................................ 9
i.LON 10 Ethernet Adapter Security Web Page...................................................................... 9
Installing and Configuring the xDriver Software...................................................................... 11
Using The LONWORKS Interfaces Control Panel Applet ....................................................... 11
For More Information and Technical Support
If you have technical questions that are not answered by the documentation you
can get technical support from Echelon. To receive technical support from
Echelon you must purchase one of Echelon’s incident-based support services.
Detailed information about these services may be found on the Echelon Services
home page at www.echelon.com/services. You can obtain technical support via
phone, fax, or email from your closest Echelon support center. The contact
information is listed in the following table.
The support programs and the information in the following table are subject to
change. See the Echelon Services home page at www.echelon.com/services for a
description of the current offerings and support contracts. Your i.LON
distributor may provide you with alternate contacts for support.
Language
Hours
(Mon-Fri)
Telephone
Fax
Email
London
San Jose
Tokyo
English/French/
German/Italian
0900-1700 London
Time
+44 (0) 1923 430200
English
Japanese
8:30am-4:30pm PDT
0900-1700 Tokyo Time
+1-408-938-5200
+1-800-258-4566 (US
and Canada only)
+1-408-328-3832
+81 3 3440 7781
+44 (0) 1923 430300
[email protected]
[email protected]
+81 3 3440 7782
[email protected]
The i.LON 10 Ethernet Adapter
The i.LON 10 Ethernet Adapter connects LONWORKS networks to remote LNS
Servers via a TCP/IP Ethernet connection. An LNS software component called
the xDriver which ships with LNS 3.07 or better manages communications
between multiple LONWORKS networks and i.LON 10 Ethernet Adapters (see the
LNS Programmer’s Guide, xDriver Extension for more information).
Multiple remote networks can be connected to a single LNS Server. For example,
imagine LONWORKS networks installed at 1000 separate hospital buildings in
different locations. Each network contains a LONWORKS device that monitors the
i.LON 10 Ethernet Adapter Quick Start Guide
1
hospital’s emergency power generator for various alarm conditions. Alarms
initiate connections to an LNS service center where the alarm is processed and
displayed.
The i.LON 10 Ethernet Adapter is available in two models, free topology and
power-line. The free topology model contains a TP/XF-FT-10 transceiver and can
be connected to a TP/XF-FT-10 LONWORKS channel. The power-line model
contains a PL-22 transceiver and can be connected to a PL-20 power-line
LONWORKS channel.
i.LON 10 Ethernet Adapter I/O
The two models of the i.LON 10 Ethernet Adapter (power line and free-topology),
have an identical form factor and have identical I/O with the exception of the
differing LONWORKS network connectors and the Band In Use LED on the
power-line model. The following diagram displays the i.LON 10 Ethernet Adapter
from the top and from the back, showing all hardware inputs and outputs.
i.LON 10 Ethernet Adapter, FT model
2
i.LON 10 Ethernet Adapter Quick Start Guide
i.LON 10 Ethernet Adapter, PL model
These hardware inputs and outputs have the following functions:
Power LED
Green LED that illuminates steadily while the
i.LON 10 Ethernet Adapter has power.
Ethernet Link LED
Green LED that illuminates when the i.LON
10 Ethernet Adapter has established an
Ethernet link via the 10Base-T port.
Ethernet Transmit LED
Green LED that flashes when traffic is
received on the 10Base-T network.
LONWORKS Service LED
Yellow LED that implements the Standard
Neuron Service LED behavior (see the Neuron
Chip Databook for more information).
LONWORKS Connect LED
Yellow LED that illuminates steadily if the
i.LON 10 Ethernet Adapter is connected with
the primary LNS server. This LED flashes
when the i.LON 10 Ethernet Adapter is
communicating with a non-primary (backup)
LNS server, and is dark when no LNS server
connection exists.
LONWORKS Wink LED
Yellow LED that flashes 5 times when the
i.LON 10 Ethernet Adapter receives a
LONWORKS wink command from the
LONWORKS network.
BIU LED
Yellow LED that illuminates when a carrier
frequency is detected at 131.5 kHz to 133.5
i.LON 10 Ethernet Adapter Quick Start Guide
3
kHz. This LED is only on the power-line
version.
Power Input
Barrel connector power supply input for use
with the included power supply (Echelon
model 780x0 series for the free-topology
model). The included Tamura 420A12150P
supply should be used with the power-line
model.
10Base-T Ethernet Port
Standard 10BaseT connection, type RJ-45.
LONWORKS TP/FT-10 Port
For the free-topology model, an orange
Weidmuller connector (Weidmuller model
#134686) connected to an Echelon TP/FT-10
transceiver. This port exists only on the freetopology model.
Serial Port
Reserved for future use.
Service Pin
Service pin is a recessed pushbutton used to
send a LONWORKS service pin message on the
LONWORKS channel. This button is also used
to perform a security access reset as described
in Security Access Reset.
Connecting and Configuring Your i.LON 10 Ethernet
Adapter
To connect your i.LON 10 Ethernet Adapter, follow these steps:
1. Remove power from the i.LON 10 Ethernet Adapter.
2. Connect the FTT Channel to the i.LON 10 Ethernet Adapter’s orange
Weimuller connector. This step is performed for the free-topology model only.
The power-line model communicates through the Tamura power supply.
3. Connect the i.LON 10 Ethernet Adapter’s 10Base-T Ethernet port to a
Ethernet Hub/Switch (TCP/IP network) that can communicate with your PC
or use a crossover Ethernet cable to connect the i.LON 10 to your PC directly.
4. Hold down the i.LON 10 service pin.
5. While continuing to hold down the service pin, apply power to the i.LON 10
Ethernet Adapter.
6. Continue holding down the service pin for about 10 seconds until the wink
and connect LEDs illuminate. This means that you have performed a
security access reset (see Security Access Reset, below) and you will now be
able to access all the web pages on the i.LON 10 Ethernet Adapter.
7. Set your PC’s IP address to 192.168.1.100 or any other IP address on the
192.168.1 subnet except 192.168.1.222 (Subnet Mask should be
255.255.255.0). You do not need to set the PCs Default gateway or DNS
Server.
8. Launch Internet Explorer 5.0 or later.
9. Point your browser to http://192.168.1.222/config. You will be
prompted for a user name and password to access these pages. The user
name and password are both ilon (lower case). When you log in, the status
web page appears.
4
i.LON 10 Ethernet Adapter Quick Start Guide
10. Click Setup and enter the IP parameters in the setup page as described in
Configuring the i.LON 10 Ethernet Adapter’s IP Information, below.
11. Still on the Setup page, enter the LNS Server IP information as described in
Configuring the i.LON 10 Ethernet Adapter to Communicate With An LNS
Server.
Configuring the i.LON 10 Ethernet Adapter’s IP Information
The setup web page allows you to configure the i.LON 10 Ethernet Adapter’s IP
information. The changes made on this page will propagate to the hardware
when Save and Exit is clicked.
To configure the i.LON 10 Ethernet Adapter’s IP information, enter the following
information:
Hostname
The TCP/IP host name of the i.LON 10
Ethernet Adapter. When the i.LON 10
Ethernet Adapter establishes a connection
with an LNS server it provides its fully
i.LON 10 Ethernet Adapter Quick Start Guide
5
qualified host/domain name so the LNS server
knows which LONWORKS database to open.
By default, the i.LON 10 Ethernet Adapter’s
host name is ilon10. The i.LON 10 Ethernet
Adapter must be reset for change in this value
to take effect. The URL of the i.LON 10 is
Hostname.DNS Suffix (i.e. if Hostname is
set to ilon10 and DNS Suffix is set to
echelon.com, the URL will be
ilon10.echelon.com. Valid characters are
numbers, letters, and the hyphen (‘-‘)
character. This field has a maximum length
of 63 characters.
DNS Suffix
The IP domain name in which the i.LON 10
Ethernet Adapter is installed. This value is
optional. All non-space characters are valid
for this field. This field has a maximum
length of 63 characters.
Obtain IP Address from
DHCP Server
Set this option to have the i.LON 10
Ethernet Adapter obtain its IP address,
subnet mask, default gateway, and DNS
servers from the local network’s DHCP
server. If this option is set, you must set the
Hostname and DNS Suffix and register
these values with your DNS administrator.
To see the IP address that has been assigned
to the i.LON 10, open the System Log web
page in secure mode (see the i.LON 10 User’s
Guide for more information about the System
Log web page).
6
Specify IP Address
Set this option when specifying a static IP
address for the i.LON 10 Ethernet Adapter
in IP Address.
IP Address
Static IP address used by the i.LON 10
Ethernet Adapter if Obtain IP address from
DHCP Server is not set. By default, this
value is set to 192.168.1.222.
Subnet Mask
Subnet mask used by the i.LON 10 Ethernet
Adapter if Obtain IP address from DHCP
Server is not set. By default, this value is
255.255.255.0.
Gateway
Gateway used by the i.LON 10 Ethernet
Adapter if Obtain IP address from DHCP
Server is not set. By default, this value is
192.168.1.1.
Primary/Secondary DNS
Server
The primary and secondary DNS Servers
used to resolve LNS Server names if Obtain
IP address from DHCP Server is not set.
If DNS servers are specified both here and by
i.LON 10 Ethernet Adapter Quick Start Guide
the DHCP server, the DNS server specified
by DHCP will be used.
Configuring the i.LON 10 Ethernet Adapter to Communicate With An
LNS Server
Once your i.LON 10 Ethernet Adapter is established as part of a TCP/IP
network, you can configure it to be able to communicate uplink with one or more
LNS Servers. Set the following fields in the Setup web page to allow the i.LON
10 to call uplink to an LNS Server:
LNS Server 1/2/3
Up to three LNS Server names or IP
addresses in the form <LNS Server IP
Address>:<port> or <LNS Server
Name>:<port> (for example, you can specify
123.2.34.1:1628 or
mylns.echelon.com:1628). The i.LON 10
Ethernet Adapter will attempt to send packets
to the first server on the list. If that server
does not respond, it will try the second server,
then the third. LNS Servers can be specified
by DNS name. If DNS names are used, a
DNS server must be listed in
Primary/Secondary DNS Server or be
available through the local network’s DHCP
server.
Listen for incoming LNS
Server connections on port
The TCP port on which the i.LON 10
Ethernet Adapter receives packets
(LONWORKS messages). Defaults to 1628. It
is not recommended that the port number be
set below 1025, as ports 0 through 1024 are
normally reserved.
Use CENELEC Access
Protocol
This option is only available on the powerline model. Set this option to use the
CENELEC protocol for power-line
communications. This protocol is often used
in European power-line installations.
Raw MD5 Authentication
Key/Text Shared Secret
These options appear only when you first
access the i.LON 10 Ethernet Adapter via
HTTP after a security access reset (see
Security Access Reset). You can enter either
a 16 byte, hexadecimal, colon separated key
in Raw MD5 Authentication (i.e.
11:22:33:44:55:66:77:88:99:
00:AA:BB:CC:DD:EE:FF) or a word or
phrase between 16 and 63 characters long
(all white space will be removed) in Text
Shared Secret.
If you select Text Shared Secret, the Raw
MD5 Authentication Key will be cleared.
If you select Raw MD5 Authentication
i.LON 10 Ethernet Adapter Quick Start Guide
7
Key, the Text Shared Secret will be
cleared.
The MD5 authentication key or shared secret
entered here must match the key or phrase
supplied to the xDriver and LNS Server
software with which the i.LON 10 Ethernet
Adapter communicates.
Using an MD5 authentication key or phrase
prevents unauthorized messages from being
sent to either the LNS Server or the i.LON
10 Ethernet Adapter.
Save and Exit
Click to close this page, write the
configuration changes to FLASH memory, and
reset the i.LON 10 Ethernet Adapter.
Configuration changes will take effect upon
reboot. After reboot, the Security page and
the MD5 Authentication key will no longer be
available until a security access reset is
executed.
Exit Without Save
Click to close this page without saving
changes. Any changes made will be lost. The
i.LON 10 Ethernet Adapter will not be reset
and the Security page and the MD5
Authentication Key will still be accessible if
they were before.
Display Factory Defaults
Click to set all i.LON 10 properties to factory
defaults. The changes will not propagate to
the i.LON 10 until you click Save and Exit.
This button is only available the first time this
web page is accessed after a security access
reset.
Click Save and Exit when complete. Note: As soon as you click Save and Exit
the IP address of the i.LON 10 changes to the value set on the Setup web page.
You need to reset your PCs IP address to match the i.LON 10’s subnet to access
the web page again.
i.LON 10 Ethernet Adapter Security
The i.LON 10 Ethernet Adapter institutes a number of security measures:
8
•
MD5 Authentication. The i.LON 10 Ethernet Adapter uses MD5
Authentication with all communications between it and the LNS Server,
requiring a 16 byte authentication key. See Configuring the i.LON 10
Ethernet Adapter to Communicate With An LNS Server for more information.
•
Security Web Page. The i.LON 10 Ethernet Adapter Security Web Page
allows you to password protect or disable entirely access to the i.LON 10.
•
Security Access Reset. A security access reset is required to view the MD5
authentication key, open the security web page, or reset the i.LON 10
Ethernet Adapter’s configuration. A security access reset requires physical
access to the i.LON 10 hardware.
i.LON 10 Ethernet Adapter Quick Start Guide
Security Access Reset
The following features of the i.LON 10 Ethernet Adapter are available only after
performing a security access reset:
•
Access to the MD5 Authentication Key on the setup web page (see i.LON 10
Ethernet Adapter Setup Web Page, earlier in this chapter).
•
Access to the Display Factory Defaults button on the setup web page.
•
Access to the security web page (see i.LON 10 Ethernet Adapter Security Web
Page, earlier in this chapter).
•
Access to the Perform Self-Test web page. See the i.LON 10 Ethernet
Adapter User’s Guide for more information.
•
Access to the firmware upgrade web page.
A security access reset of the i.LON Ethernet Adapter requires physical access to
the i.LON 10 hardware. To perform a security access reset, follow these steps:
1. Remove the i.LON 10 Ethernet Adapter from the TCP/IP network and attach
it to the PC using a crossover Ethernet cable or a local server hub.
2. Disconnect the power supply from the i.LON 10 Ethernet Adapter.
3. Press and hold the service pin on the i.LON 10 Ethernet Adapter using a
ballpoint pen or similar device.
4. Reconnect the power supply to the i.LON 10 Ethernet Adapter while still
pressing in the service pin.
5. Continue holding the service pin. In approximately 10 seconds the wink and
connect LEDs will illuminate. Release the service pin.
The i.LON 10 Ethernet Adapter will now be in security access mode. When the
i.LON 10 Ethernet Adapter is in security access mode, its IP address is
temporarily changed to 192.168.1.222 and the user name and password are
set to ilon/ilon; they are changed back to the values specified on the Setup and
Security web pages once the i.LON 10 exits security access mode. When in
security access mode you can access the Security web page and the other features
listed above until the i.LON 10 is reset.
i.LON 10 Ethernet Adapter Security Web Page
Access the Security web page by clicking the Security link from the Setup web
page. This page is only accessible after a security access reset. This page
appears as shown in the following figure:
i.LON 10 Ethernet Adapter Quick Start Guide
9
This page contains the following options:
10
Allow HTTP Access
Set this option to allow users to access the
i.LON 10 web pages with the exception of the
Firmware Page and the Security Page (both of
which can only be accessed after a security
access reset). If set, enter a Username and
Password that will grant access. The
Username and Password may contain up to
16 alphanumeric characters; they are case
sensitive. By default, the Username and
Password are set to ilon. If this option is
not checked, you will not be able to view any
of the i.LON 10 web pages without performing
a security access reset. Performing a security
access reset resets the Username and
Password to ilon.
Allow TFTP Access
Set this option to allow users to use TFTP to
load user web pages (see the i.LON 10
Ethernet Adapter User’s Guide). If this option
is checked, enter a Password that will grant
access. The Password may contain up to 16
alphanumeric characters; they are case
sensitive. Password is set to ilon by
i.LON 10 Ethernet Adapter Quick Start Guide
default. Performing a security access reset
resets the Password to ilon.
Allow Incoming LNS Server
Connections
Set this option to allow connections initiated
from external LNS Servers. If this option is
set, you should modify the MD5 Authentication
Key or Shared Secret to prevent access from
unauthorized LNS Servers (see Configuring
the i.LON 10 Ethernet Adapter to
Communicate With An LNS Server).
Installing and Configuring the xDriver Software
The i.LON 10 Ethernet Adapter is designed to communicate with an LNS Server,
version 3.07 or later. LNS 3.07 contains a software component called the
xDriver. If you are an LNS 3.0 user you may upgrade to version 3.07 by
installing LNS Service Pack 7, which is available on the i.LON 10 CD and also as
a free download from www.echelon.com.
NOTE: If you are using Windows 95, Windows 98, or Windows ME, the xDriver
can only be used to initiate downlink connections. Uplink connections can only
be established using Windows NT 4.0, Windows 2000, and Windows XP. See the
LNS for Windows Programmer’s Guide, xDriver Extension for more information.
Using The LONWORKS Interfaces Control Panel Applet
Use the LONWORKS Interfaces Control Panel Applet to create Windows Registry
entries that will store the information xDriver will require to connect the LNS
server to each of your i.LON 10s. A separate entry is required for each i.LON 10
you plan to connect to the LNS server with xDriver. The default xDriver will
access the appropriate entry each time it initiates a connection to an i.LON 10,
and extract the information it needs to establish the connection.
If you are managing a large application and will be using more than 50 i.LON
10s with xDriver, you should consider using an external database management
system to store this information. Please see the LNS for Windows Programmer’s
Guide, xDriver Extension for more information on this.
The following procedure describes how to use the LONWORKS Interfaces Control
Panel Applet.
1. Open the Windows Control Panel and double-click the LONWORKS Interfaces
icon (
). This opens the LONWORKS Interfaces Control Panel Applet.
NOTE: This is not the same as the LONWORKS/IP Channels control panel
applet.
i.LON 10 Ethernet Adapter Quick Start Guide
11
2. The control panel applet lists the LNS network interface name of all the
i.LON 10s that have been added to the Registry below the Default item. In
the figure above three i.LON 10s have been added to the Windows Registry.
Default represents the Default xDriver Profile. This is the set of
configuration parameters that determines how the default xDriver will
manage connections to your i.LON 10s. You can review and edit the
configuration of the Default xDriver Profile by clicking Default, and then
clicking the Profile Properties button (see the LNS Programmer’s
Guide, xDrvier Extension for more information..
Click Add to create a Registry entry for a new i.LON 10 under the
selected profile. This opens the window shown the following figure:
NOTE: You must be logged in as an Administrative user to create a
Registry entry for an i.LON 10 if you are using the Windows NT,
Windows 2000 or Windows XP platforms.
3. Enter the name for the new i.LON 10. This will be used as a lookup key to
access the proper Registry entry each time xDriver initiates a connection to
this i.LON 10. Each i.LON 10 must have a unique name.
12
i.LON 10 Ethernet Adapter Quick Start Guide
4. Click OK. This opens the tab shown in the following figure:
5. Configure the fields on the General tab. The following table describes these
fields.
Field
Hostname
Description
Maximum Length: 63 chars
Legal Chars: A-Z, a-z, “-“, 0-9
Comments: Enter the TCP/IP hostname of the i.LON 10. xDriver will use
the hostname to connect to the i.LON 10.
DNS Suffix
Maximum Length: 63 chars
Legal Chars: A-Z, a-z, “-“, 0-9,”.”
Comments: Enter the name of the IP domain on which the i.LON 10 is
installed.
Description
Comments: Optional field. Generally used to describe the site.
6. When you have configured the fields on the General tab, click the
Address/Port tab. This opens the tab shown in the following figure:
i.LON 10 Ethernet Adapter Quick Start Guide
13
7. Configure the fields on the Address/Port tab. The following table describes
these fields.
Field
Description
i.Lon is listening Default Value: 1628
on port:
Range: 1-65,535
Comments: Enter the TCP port number the i.LON 10 is using to listen
for incoming connections from the LNS server.
Use Static IP
Address
Comments: Click the Use Static IP Address button to manually enter
the IP address of the i.LON 10. You must enter an IP address in the form
x.x.x.x, where x is an integer in the range 0-255.
You should use this option if your i.LON 10’s hostname is not configured
in any name servers (e.g. DNS servers, HOSTS file).
Use Hostname
Comments: Click the Use Hostname button to have xDriver resolve the
i.LON 10’s IP address from the hostname and DNS suffix entered in the
General tab.
When you have configured the fields on the Address/Port tab, click the
Authentication tab. This opens the tab shown in the following figure :
14
i.LON 10 Ethernet Adapter Quick Start Guide
8. You can choose to authenticate connections to this i.LON 10 using the MD5
authentication key or the text secret phrase configured into the i.LON 10.
Using an MD5 authentication key or text secret phrase prevents the LNS
Server and the i.LON 10 from responding to unauthorized messages during
an xDriver session.
NOTE: This authentication key is not the same as the authentication key
used within the LONWORKS network.
To use the MD5 authentication key, click the Use MD5 Key button., and
enter the authentication key as a 32-character hexadecimal string
representing a 128-bit MD5 key. The 32 characters must be entered in
colon-separated pairs. For example:
A9:04:87:49:F4:BF:89:59:03:10:C5:47:BD:45:94:D7
This must match the MD5 authentication key configured into the i.LON
10. Setting the authentication key to all 0s here will cause xDriver to use
the pre-defined, default factory authentication key for the i.LON 10. For
security reasons, it is not recommended that you use the default
authentication key for the i.LON 10.
To use the text secret phrase, click the Use Secret Phrase button and
enter the text secret phrase. This phrase is a string 16-63 characters
long, and must exactly match the text secret phrase used by the i.LON
10.
When you have finished, click OK to save the settings for the i.LON 10
into the Windows Registry and return to the window shown in Figure 2.1.
The new i.LON 10 will appear in the list of network interfaces below the
Default Profile. Or, click Apply to save all changes and continue editing
the i.LON 10’s settings.
You can modify an i.LON 10’s settings later by selecting it from the list of
network interfaces, and clicking the Network Interface Properties button. You
can remove an i.LON 10 from the Windows Registry by selecting it from the list,
and clicking the Network Interface Remove button.
i.LON 10 Ethernet Adapter Quick Start Guide
15