1
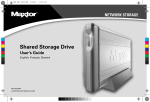
NETWORK STORAGE
Shared Storage Drive
User's Guide
P/N: 20267900
Limited Warranty Statement inside
i
Maxtor Shared Storage Drive - One Year Limited Warranty
Maxtor’s warranty obligations are limited to the terms set forth below: Please
note that Maxtor reserves the right to update from time to time the warranty
terms provided for new purchases of Maxtor products, and to establish the
effective date of those updated warranty terms. Please refer to
www.maxtor.com for the then current form of Limited Warranty Statement for
Maxtor brand products.
Please note that Maxtor products are distributed outside the United States and
Canada through local authorized distributors and resellers (“Resellers”). These
Resellers generally offer a consumer warranty, and associated warranty
services, to consumer purchasers. Maxtor recommends that consumers in
these jurisdictions first contact the Reseller from whom they purchased the
Maxtor product for all issues with regard to product defects and the applicable
product warranty. For a listing of Resellers offering warranty service in your
specific jurisdiction, please refer to www.maxtor.com. Maxtor warrants to the
original consumer purchaser (“you” or “your”) that new Maxtor disk drive
products (“Products”) will be free from defects in material and workmanship for
the Standard Warranty Period for the relevant product, which is one (1) year
unless otherwise specified on www.maxtor.com with respect to specific
products or geographies. The start of the warranty period is the documented
date of your purchase of the Product from Maxtor or Maxtor ∂s authorized
reseller. In the absence of a documented purchase date, the start of the
warranty period will be deemed to be the date that Maxtor originally shipped the
Product from its point of manufacture to Maxtor’s customer. The Standard
Warranty Period for the various Products marketed by Maxtor and the
geographies in which they are sold is detailed on www.maxtor.com.
The warranty on replacement Products is the remainder of the warranty on the
original Product or 90 days, whichever is longer.
The Products are manufactured from parts and components that are new or
equivalent to new in accordance with industry standards.
If you discover a defect in material and workmanship for the Standard Warranty
Period and Maxtor agrees that the defect exists, Maxtor will, at its option, repair
or replace the Product at no charge to you, provided it is returned during the
Standard Warranty Period, with transportation charges prepaid, to the facility
designated by Maxtor. The Product must be properly packaged in Maxtor or
Maxtor-approved packaging, with the Return Material Authorization (RMA)
number clearly displayed on the outside of the packaging, to obtain warranty
service. Products that fail within the first 30 days after purchase will be replaced
with a new Product. Maxtor may require proof of purchase documentation prior
to issuing the replacement Product.
If Maxtor elects to repair a Product, Maxtor owns all parts removed from the
repaired Product. Maxtor uses new and reconditioned parts or Products made
by itself or various manufacturers in conjunction with warranty repairs and
replacement Products. Repair parts or replacement Products may, at Maxtor∂s
option, include an equal or better model or features.
Maxtor has no responsibility whatsoever with regard to any content or data on
returned Products.
To request warranty service and before returning a Maxtor product, please
contact the Maxtor Service Center. Refer to the Maxtor Installation Guide or
www.maxtor.com for your online guide to find the appropriate telephone
number for obtaining customer assistance within your jurisdiction and the
proper address for shipping authorized returns. Once the Maxtor Service Center
determines that a repair is required, Maxtor will issue an RMA number. A copy
of your receipt or bill of sale bearing the name and location of Maxtor ∂s
authorized reseller and the Maxtor serial number and model number of the
Product in which the defect has been reported may be required as a proof of
your purchase for warranty service. Note that, as an alternative, Maxtor offers an
online warranty return option for certain Products through www.maxtor.com.
You are responsible for saving or backing up data contained in any Product
returned to Maxtor in conjunction with warranty or any other services. Maxtor
shall have no responsibility for such data whatsoever and shall have no liability
arising out of any damage to, or loss or disclosure of, such data. This limited
warranty applies only to the Maxtor products that can be identified by the
original, unaltered Maxtor trademark, trade name or logo affixed to them.
Maxtor does not warrant any product that is not manufactured by, for, or with
permission from Maxtor.
This limited warranty does not cover any of the following conditions:
•
•
•
•
Abuse, unreasonable use, mistreatment, or neglect
Unusual physical or electrical stress or power fluctuations
Damage caused during installation of the Product
Damage or capacity/performance/operational resetting caused by the
equipment or system with which the Product is used
• Damage caused by modification or repair not made or authorized by Maxtor
• Products whose Maxtor Serial Number and/or Material Number label have/
has been removed or defaced
• Damage caused by improper or improperly used packaging
• Damage caused by lack of ESD protection
• Products that are determined to be stolen
Further, this limited warranty is void if the Product cover, or any label or seal on
the Product, is removed or damaged.Maxtor owns all parts removed from the
repaired Products. Maxtor uses new and reconditioned parts in performing
warranty repairs and building replacement products.
FAILURE TO COMPLETE AND RETURN ANY MAXTOR PRODUCT
REGISTRATION FORM WILL NOT DIMINISH YOUR WARRANTY RIGHTS. THIS
WARRANTY AND REMEDIES SET FORTH ABOVE ARE EXCLUSIVE AND IN
LIEU OF ALL OTHERS, WHETHER ORAL OR WRITTEN, EXPRESSED, IMPLIED
OR STATUTORY. MAXTOR SPECIFICALLY DISCLAIMS TO THE MAXIMUM
EXTENT PERMITTED BY LAW ANY AND ALL IMPLIED WARRANTIES OR
CONDITIONS AS TO THE PRODUCTS OR ANY OTHER MATTER
WHATSOEVER. IN PARTICULAR, BUT WITHOUT LIMITATION, MAXTOR
SPECIFICALLY DISCLAIMS ANY AND ALL IMPLIED WARRANTIES OR
CONDITIONS OF SATISFACTORY QUALITY, MERCHANTABILITY, FITNESS
FOR A PARTICULAR PURPOSE AND NON-INFRINGEMENT OF THIRD PARTY
RIGHTS OR ANY OTHER WARRANTY ARISING FORM A COURSE OF
DEALING OR USAGE OF TRADE. THIS LIMITED WARRANTY DOES NOT
APPLY TO, AND MAXTOR MAKES NO WARRANTY TO YOU WITH REGARD
TO, PRODUCTS ORIGINALLY SOLD AS AN INTEGRATED COMPONENT OF A
SYSTEM NOT SUPPLIED BY MAXTOR, OR PRODUCTS PROVIDED UNDER A
THIRD PARTY LEASING OR SERVICE ARRANGEMENT. No Maxtor distributor,
reseller, dealer, agent or employee is authorized to make any modification,
extension or addition to this warranty.
MAXTOR IS NOT RESPONSIBLE OR LIABLE FOR ANY INDIRECT,
UNFORSEEABLE, SPECIAL, INCIDENTAL, OR CONSEQUENTIAL DAMAGES
HOWEVER CAUSED AND WHETHER OR NOT MAXTOR WAS ADVISED IN
ADVANCE OF THE POSSIBILITY OF SUCH DAMAGES, INCLUDING, BUT NOT
LIMITED TO, COSTS OF PROCUREMENT OF SUBSTITUTE GOODS, LOSS OF
DATA OR PROGRAMS, LOST PROFITS, DOWNTIME, GOODWILL, DAMAGE
OR REPLACEMENT OF EQUIPMENT AND PROPERTY, AND ANY COSTS OF
RECOVERING, PROGRAMMING OR REPRODUCING ANY PROGRAM OR
DATA STORED IN OR USED WITH MAXTOR PRODUCTS OR ANY OTHER
DAMAGES ARISING OUT OF THE PURCHASE, USE OR PERFORMANCE OF
THE PRODUCT. Maxtor is not, and cannot be, responsible for any losses or
damages arising out of any loss of, or any inability to access, data as a result
from the failure of a Product, and accordingly you bear this risk. The allocation of
risk under this limitation of liability is reflected in the purchase price of the
Product. This limitation of liability, however, will not apply to claims for death or
personal injury caused by the negligence of Maxtor or its associated companies,
officers, representatives or agents.
Some jurisdictions do not allow the exclusion or limitation of incidental or
consequential damages or exclusions of implied warranties, so the above
limitations or exclusions may not apply to you. This warranty gives you specific
legal rights, and you may also have other rights that vary from jurisdiction to
jurisdiction. By way of example, if a Product is purchased from Maxtor or
Maxtor∂s authorized reseller by you in a European Union Member State, you
may have additional warranty rights which are explained at www.maxtor.com.
Please note that you are expressly not permitted to use the Maxtor Products in
conjunction with the operation of nuclear facilities, aircraft navigation, aircraft
communication, aircraft flight control, aircraft air traffic control systems,
weapons devices or systems, or in any devices or systems in which a
malfunction (including, without limitation, software related delay or failure)
would result in foreseeable risk of injury or death to the operator of the device or
system, or to others.
This Statement of Limited Warranty shall be exclusively interpreted in
accordance with the English language with the meaning of its terms. Should a
translated version of this Limited Warranty deviate from the English language
version, only the English version shall apply and be binding.
Contents
1 Introduction. . . . . . . . . . . . . . . . . . . . . . . . . . . . . . . . . . . . . . . . . . . . . . . . . . . . . . . . . . 1
Maxtor Shared Storage Drive Components . . . . . . . . . . . . . . . . . . . . . . . . . . . . . . . . . . . 2
System Requirements . . . . . . . . . . . . . . . . . . . . . . . . . . . . . . . . . . . . . . . . . . . . . . . . . . . 3
Handling Precautions . . . . . . . . . . . . . . . . . . . . . . . . . . . . . . . . . . . . . . . . . . . . . . . . . . . . 3
About this Guide . . . . . . . . . . . . . . . . . . . . . . . . . . . . . . . . . . . . . . . . . . . . . . . . . . . . . . . . 3
Where to Go for Help . . . . . . . . . . . . . . . . . . . . . . . . . . . . . . . . . . . . . . . . . . . . . . . . . . . . 4
2 Installing Your Drive . . . . . . . . . . . . . . . . . . . . . . . . . . . . . . . . . . . . . . . . . . . . . . . . . 5
Connect your drive . . . . . . . . . . . . . . . . . . . . . . . . . . . . . . . . . . . . . . . . . . . . . . . . . . . . . . 5
Power up your drive . . . . . . . . . . . . . . . . . . . . . . . . . . . . . . . . . . . . . . . . . . . . . . . . . . . . . 6
Set up your drive . . . . . . . . . . . . . . . . . . . . . . . . . . . . . . . . . . . . . . . . . . . . . . . . . . . . . . . . 7
3 Using Your Drive
....................................................9
Accessing your drive . . . . . . . . . . . . . . . . . . . . . . . . . . . . . . . . . . . . . . . . . . . . . . . . . . . . . 9
Using the Drag and Sort Feature. . . . . . . . . . . . . . . . . . . . . . . . . . . . . . . . . . . . . . . . . . . 10
Using External USB drives with your drive . . . . . . . . . . . . . . . . . . . . . . . . . . . . . . . . . . . 10
Using USB printers with your drive . . . . . . . . . . . . . . . . . . . . . . . . . . . . . . . . . . . . . . . . . 11
Shutting down your drive . . . . . . . . . . . . . . . . . . . . . . . . . . . . . . . . . . . . . . . . . . . . . . . . 12
Resetting your drive . . . . . . . . . . . . . . . . . . . . . . . . . . . . . . . . . . . . . . . . . . . . . . . . . . . . 12
Advanced Settings . . . . . . . . . . . . . . . . . . . . . . . . . . . . . . . . . . . . . . . . . . . . . . . . . . . . . 13
Adding Rubber Feet to your drive . . . . . . . . . . . . . . . . . . . . . . . . . . . . . . . . . . . . . . . . . . 13
4 Troubleshooting . . . . . . . . . . . . . . . . . . . . . . . . . . . . . . . . . . . . . . . . . . . . . . . . . . . . 14
Index . . . . . . . . . . . . . . . . . . . . . . . . . . . . . . . . . . . . . . . . . . . . . . . . . . . . . . . . . . . . . . . . 19
Warranty. . . . . . . . . . . . . . . . . . . . . . . . . . . . . . . . . . . . . . . . . . . . . . . . Inside front cover
1
Introduction
Thank you for selecting this Maxtor product.
Attaching a hard disk drive to the network in a home or small office
is a simple and economical way for users to share files. Maxtor
network drives offer a winning combination of capacity, simplicity
of use and helpful software features that automate configuration,
privacy and more.
1
• Easy storage expansion with the Shared Storage Drive
or other FAT32-formatted USB drives
• USB printer sharing
• Shared folders can be either full access or limited access
• Compatible with security locking cables
• Drag and SortTM feature
The simple plug-and-play installation allows you to start using your
drive as quickly as possible. You can also change settings on your
drive at any time, and manage user access through a standard
web browser.
Whether you use your drive for additional storage, to create a copy
of your files, or both, this guide will get you up and running and
provide helpful tips for using your drive.
The Shared Storage Drive has the following features:
• Large capacity
• Multiple users on the network can access and store files
• 100BaseT/10BaseT Ethernet connectivity
• Universal Plug-and-Play using DHCP
• User-friendly web-based administrator for shared folder and
user management
• Two USB 2.0 ports
Introduction
1
1
Shared Storage Drive Components
Before installing your new drive, review the features shown
in Figure 1.
Front
Included in this Kit
The Shared Storage Drive comes complete with the
components shown in Figure 2.
NETWORK STORAGE
Back
Shared Storage Drive
User's Guide
P/N: 20267900
Limited Warranty Statement inside
Power Button
Power
Reset
Status Light
USB Ports
Connector
Button
(Flashing Green
Network ID Panel
and Amber Lights) Security
Locking Ethernet port
Slot
Figure 1.
Shared Storage Drive
Shared Storage Drive Features
Power Adapter
Cat5 Ethernet Cable
Figure 2.
2
User’s Guide
Quick Start CD
Vertical Stand
Rubber Feet
Included in this Kit
System Requirements
Handling Precautions
The following are the minimum system requirements.
Handle your drive with care! Follow the precautions listed here
or you could damage your drive and void your warranty. Review the
Maxtor Limited Warranty, included in this guide, for
more information.
• Pentium III, 500 Mhz equivalent processor or higher
• Windows® 98SE, Me, 2000 or XP
• System RAM as required by Windows
• Web browser (Microsoft Internet Explorer version 6.0 or
higher recommended)
• 10/100 TCP/IP-compliant network with available DHCP and
DNS servers
• Client for Microsoft Networks enabled over TCP/IP, and File
and Print Sharing for Microsoft Networks, on each computer
that will access the Shared Storage Drive
• Optional: appropriate printer driver for client computer
operating system that will use the USB printer connected to
the Shared Storage Drive
The following precautions can prevent loss of data:
• Do not bump, jar, drop or move the drive while in operation.
• Do not stack drives.
• Do not set the drive on its side without using the vertical
stand as it could fall over and cause damage.
• Do not remove any cables or power cords without powering
down the drive, using the front panel button.
• Do not set any liquids or drinks on the drive. Liquids will
damage the internal electronics.
• Do not attempt to open the drive’s case. This will void
your warranty.
About this Guide
The following symbols and conventions are used in this guide:
Bold
Used for menu, command, and keyboard
selections you make and screens you will see.
Helpful information about a particular topic.
Important information to prevent problems and
ensure that you are successful in using the drive.
Introduction
3
1
1
Where to Go for Help
For additional help with your drive, its installation and the
software, contact:
Maxtor Support
Maxtor provides a comprehensive support section on its website,
including the latest software, user guides and a knowledge base for
answers to common questions and problems.
Maxtor support website: http://support.maxtor.com/sharedstorage
Support phone numbers: Check the Contact Us section on the
Maxtor support website, for phone numbers in your region.
4
2
Installing Your Drive
2
In this chapter you will connect and set up your
Maxtor Shared Storage Drive.
Step 1. Connect your drive
In order to install your Shared Storage Drive, you will need
the following:
Connecting the Ethernet cable
• Web browser (Microsoft Internet Explorer 6.0 or later
is recommended).
• 10/100 compliant network with DNS and DHCP servers
(Dynamic Host Control Protocol) running.
1. Plug one end of the (supplied) Ethernet cable into
your network, switch or router.
2. Plug the other end of the Ethernet cable into the Ethernet port
on your Shared Storage Drive.
Router
• An available Ethernet port on your network, switch
or router.
• Microsoft Networks enabled over TCP/IP.
• File and Print Sharing for Microsoft Networks on each
computer that will access the Shared Storage Drive.
Follow these steps to install your drive
Step 1. Connect your drive.
Ethernet
Port
Ethernet Port
Figure 3. Connecting the Ethernet Cable
Step 2. Power up your drive.
Step 3. Set up your drive.
Installing Your Drive
5
Connecting the power
2
Step 2. Power up your drive
1. Plug the round female connector from the power adapter into
the drive’s power connector.
Press the button on the front of your drive.
2. Plug the two-pin female connector on the power cord
into the power adapter.
Your drive will now start up. This process requires up to one
minute to complete.
• The button light will turn yellow.
• When the light pulses green, your drive is ready and you can
move on to Step 3.
Your drive will be accessible on your network
approximately 10 seconds after the light turns green.
Figure 4. Connecting the Power
3. Plug the standard electrical plug from the power adapter into
your power source.
Power button.
Figure 5. Pressing the Power Button
6
Step 3. Set up your drive
When your Shared Storage Drive is found, you will see its
Network ID number and IP address appear in a drop-down
menu in the middle of the screen.
1. Insert the Maxtor Quick Start CD.
For example: MSS-000335 (192.168.0.5)
The Choose Setup Language screen will appear.
If you have multiple Shared Storage Drives connected to
your network, each will appear in the drop-down menu.
If this screen does not appear, you can access it
manually, by double-clicking the Quick Start CD icon.
6. Click Next.
2. Select your language and click OK.
The next screen will show the Network ID of your drive.
The Installshield Wizard screen will appear, followed by the
Welcome screen.
3. Click Next.
The License agreement screen will appear.
4. Click Yes.
The Choose Destination Location screen will appear.
If you wish to change the location of the installation, you
may do so by clicking the Browse button and selecting
a new location.
5. Click Next.
The Setup Status screen will appear as the software is
installed, followed by the Installshield Wizard Complete screen
when the installation is complete.
Click Finish.
7.
Click Set up Shared Storage on this computer.
The Set Up Your Shared and Private Folders screen will appear.
8. Enter a name and password, re-enter the password and
click Set Up.
The Quick Start software will now create your new user
account and both public and private folders.
The Set Up Completed screen will appear and a shortcut to
your Shared Storage Drive will appear on the desktop of
your computer.
9. You can open your private folder on your Shared Storage Drive
immediately, by clicking Open or by using the shortcut on
your desktop.
Congratulations. Your drive is now set up and ready for use!
The Quick Start software will open and the Maxtor screen will
appear, with the message: “Locating Shared Storage drives
on the Network.”
Installing Your Drive
7
2
Advanced Settings
2
For information about the advanced settings of your
Shared Storage Drive, such as modifying user accounts, access
privileges, setting the language, date, time or modifying network
settings, see “Advanced Settings” on page 13 in chapter 3.
Online Help
Your Shared Storage Drive has advanced help features. To access
these files, click on the Online Help link at the bottom of the drive
file screen.
8
3
Using Your Drive
You can use your Maxtor Shared Storage Drive as you do any hard
drive that is either built-in or directly connected to your computer.
Accessing your drive
When you install the Shared Storage Drive and create a name and a
password to access your personal folder, a set of folders is
automatically created to help you organize your files.
To access your Personal folder on the Shared Storage Drive:
Your Personal folder includes:
3
Double-click the desktop icon for your
Shared Storage Drive, that was created
when you installed the drive.
• Private folders that only you have access to.
• A shortcut to the “Public” folder where you can share files
with other users of the Shared Storage Drive.
If you cannot find your desktop icon, you can access your
Shared Storage Drive by using the Quick Start software:
The Public folder includes:
1. Open the Quick Start software.
• A set of folders in which users can share their files.
2. After your Shared Storage Drive is located on the
network, click Next.
• The “Printers and Faxes” folder, where you can install printers
as well as printer/fax machines to be available to all users of
the Shared Storage Drive. (See “Using USB Printers with your
drive” on page 11 for more information).
For more information about access privileges and other
advanced features of your Shared Storage Drive,
see “Advanced Settings” on page 13.
3. Click Set up Shared Storage
on this Computer.
4. Select the Use an Existing Account option.
5. Select your name, enter your password and click
Set Up.
6. When the Setup Completed message appears,
click Open.
Using Your Drive
9
Using the Drag and Sort Feature
3
In addition to including a set of folders to help you organize your
files, your Shared Storage Drive also includes a time-saving new
feature called Drag and Sort. With Drag and Sort, every time you
drag common files to your Shared Storage Drive, each file is
automatically sorted into the appropriate folder based on its
file type. The Drag and Sort feature supports over 100 common
file types, including .doc, .ppt, .jpg, .xls, .html and more!
Here’s an Example:
Using External USB drives with
your drive
There are two USB ports on the back of your drive which allow you
to connect USB hard drives, such as the Maxtor OneTouchTM and
Personal Storage 5000 drives.
The Maxtor Shared Storage Drive is only compatible with
USB drives that are formatted with the FAT32* file system.
*With the FAT32 file system, the size of a single file is
limited to 4 GB on this type of partition.
1. Select a Microsoft Word document, a JPEG image file, and an
MPEG video file.
Connecting a USB drive
2. Drag and drop the files onto the desktop icon of your
Shared Storage Drive.
You may connect a USB drive while your Shared Storage Drive is
on. It will automatically recognize the drive.
3. The files are automatically sorted into the appropriate folders:
You may also connect a USB drive while your Shared Storage Drive
is off. It will be recognized the next time you turn your
Shared Storage Drive on.
• The Microsoft Word document is placed into:
My Documents
• The JPEG image is placed into:
My Photos
• The MPEG video is placed into:
My Movies
By clicking and dragging files, they are copied. However, by
right-clicking and dragging, you can choose to either copy or
move the files.
The Drag and Sort feature is only supported on a PC on
which the Quick Start software has been installed.
10
Accessing the external USB drive
1. Open your Shared Storage Drive by double-clicking its
desktop icon.
2. Your external USB drive will appear as a folder on the
Shared Storage Drive.
The name of this folder will correspond to the volume
name of your external USB drive.
Disconnecting a USB drive
Using USB Printers with your drive
To disconnect a USB drive from your Maxtor Shared Storage Drive:
You may connect a USB printer to your Shared Storage Drive and
share it with anyone on your network.
1. Go to the Maxtor Shared Storage Drive home page.
See “To access the Shared Storage Drive home page:”
on page 13.
2. Click the Advanced Settings button.
3. Click Configure Your USB Devices.
4. Click Unplug USB devices from the
Shared Storage Drive.
5. Click the Safely Remove button, next to the USB drive
you want to disconnect.
A message will appear informing you that your drive can
be safely removed.
6. Click Done.
7.
Disconnect your USB drive from the your
Shared Storage Drive.
Although most USB printers should work, no compatibility
information is available at this time. With multi-function
printers, only the printing will work when connected to the
Shared Storage Drive.
Connecting a USB printer
3
• Connect the USB printer while your Shared Storage Drive
is on.
• The printer will appear in the list of shares displayed in the
Printers and Faxes folder on your Shared Storage Drive.
To use the printer from a Windows PC, install the driver
included with your printer on that specific Windows PC:
1. Under the Start menu, select Control Panel and then click
Printers and Other Hardware.
The Printers and Other Hardware window will appear.
2. Click View installed printers or fax printers.
The printers or fax printers that you have installed on your
computer should appear in this window.
3. Drag and drop the icon that corresponds to the printer you wish
to install into the Printers and Faxes folder on your
Windows PC.
You will need your original printer install disk to install the
printer driver on your Shared Storage Drive.
4. Follow the on-screen instructions to install your printer.
Using Your Drive
11
Shutting down your drive
Resetting your drive
To safely shut down your Shared Storage Drive:
If you are not able to access your drive after moving it to a different
network or turning it on after it has been off for a period of time,
you may need to reset it.
Press and hold the button on the front of your drive for 5 seconds.
To reset your drive:
• With the drive turned on, use a small pointed object, like the
tip of a pen or paperclip, press and hold the reset button on
the back of your drive until the button light turns yellow, and
then release. (See figure 2).
3
• After a few seconds, the drive will reboot.
Press the button.
Figure 6. Shutting down your drive
• When the light changes to green, the reset is complete and
your drive is ready for use.
The button light will change from green to yellow, indicating that
the drive is shutting down.
When the light goes off, your drive is completely shut down.
Press and hold the reset button.
Figure 7. Resetting your drive
To access your drive after it has been reset, follow the steps in
“Accessing your drive” on page 9.
After you reset your Shared Storage Drive, its name will be
will be reset to the original name when you installed it.
(Example: MSS-000335). In addition, the workgroup will be
reset to MSHOME.
For more detailed information about troubleshooting your drive,
see chapter 4 “Troubleshooting” on page 14.
12
Advanced Settings
Adding Rubber Feet to your drive
The Shared Storage Drive Home Page
If you plan to use your Shared Storage Drive on a desk surface,
your kit includes four rubber feet to protect your drive and the
surface of your desk.
Using the Shared Storage Drive home page, you can access many
advanced features for managing your drive, including:
• Setting the Language, Date, Time and Administrator account.
• Setting up or modifying User Accounts and access privileges.
• Creating or modifying Shared Folders and access privileges.
• Modifying Network Settings and using Disk Utilities.
• Status on Connected Users, USB Storage Devices, Printers
attached and other settings.
To access the Shared Storage Drive home page:
To apply the feet:
1. Make sure your drive is disconnected properly from
your computer.
3. Turn your drive so that the ridges are facing up. This is
the bottom of the drive.
4. Place two rubber feet on each ridge on the bottom of
your drive. One should be placed near the front and the
other toward the back of each ridge.
Bottom of Drive
1. Open the Quick Start software.
2. After your Shared Storage Drive is located on the
network, click Next.
3
2. Make sure your drive is turned off, by pressing the
button on the front of the drive.
Rubber Feet
Placement
3. Click Drive Management (Advanced).
Your web browser will open and the
Shared Storage Drive home page will appear.
If a password has been setup for the
administrator account, you will need to enter
admin as the user name, and the correct
password. If you do not know the password,
contact the administrator for your
Shared Storage Drive.
Figure 8. Adding Rubber Feet to your drive
Using Your Drive
13
4
Troubleshooting
This chapter provides troubleshooting tips and answers questions
about installing and using your Shared Storage Drive.
4
You can find more information in the Maxtor knowledge base at
http://www.maxtorkb.com or the Maxtor website at:
http://www.maxtor.com
Chapter Contents
General Troubleshooting
1. The Quick Start software does not detect my
Shared Storage Drive.
2. My Shared Storage Drive is detected but I cannot see it in
Network Neighborhood.
3. I am not able to see any folders on my Shared Storage Drive.
4. When I click the Shared Storage Drive icon in Network
Neighborhood, I am asked for a password.
5. What do the different-colored lights in the power button mean?
6. How do I find the workgroup my computer is in?
14
General Troubleshooting
4. Under Manufacturers, choose Microsoft. Under
Network Protocols, choose TCP/IP and click OK.
1. The Quick Start software does not detect my
Shared Storage Drive.
1. Check that the Shared Storage Drive is properly
installed, that the network connections are secure, and
that it is turned ON.
2. Make sure that the power button light of the Shared
Storage Drive is green.
3. Make sure that any firewalls on your computer
are disabled.
For more information about firewalls, go to the Maxtor
knowledgebase at: http://www.maxtorkb.com.
4. Make sure that the TCP/IP protocol is installed on your
computer.
TCP/IP protocol on a Windows 95/98 system:
1. Go to Start > Setting > Control Panel. Click the
Network Icon.
You may need to scroll down the list to find
TCP/IP. It should be the last item.
5. In the Network Application window, click OK.
6. If your computer asks for the original operating system
CD, insert it and click OK.
7.
Once completed, Windows will ask if it can reboot your
computer. Make sure you have closed all applications
and programs, then click Yes.
4
TCP/IP protocol on a Windows 2000/XP system:
1. Right-click My Network Places and select Properties
from the drop-down menu.
2. Right-click the Local Area Connection and select
Properties from the drop-down menu.
The Local Area Connection Properties window will
appear. If you do not see TCP/IP listed in this window,
proceed to step 3 to install it.
2. From the Configuration tab choose Add.
3. Click Protocol and then click Add.
If you do not see TCP/IP listed in this window, proceed
to step 4 to install it.
The drive may build an information database,
which may take a few minutes.
Figure 9. Local Area Connection Properties
Troubleshooting
15
3. Click the Install button.
4. In the Network Component Type window, select
Protocol and click Add.
5. From the list of available protocols, select Internet
Protocol and click OK.
6. Windows will ask you to insert the operating system
disk to install other necessary files.
7.
Follow the on-screen instructions to complete the
installation process.
2. My Shared Storage Drive is detected but I cannot
see it in Network Neighborhood.
Go to Start > Seach. Choose Computers or people, then
A computer on the network and then enter the name or network
ID of your Shared Storage drive (Example: MSS-000335).
The Network ID is located on the back of your
Shared Storage Drive.
In Windows 2000, go to Files and Folders and use the "Search for a
Computer" option.
8. Reboot if necessary.
4
If you are not using a DHCP server on your network, make
sure that your PC and the Shared Storage Drive are in the
same IP address range (Example: 192.168.1.1 to
192.168.1.254), and that they are using the same Subnet
Mask (Example: 255.255.255.0).
If that does not work, choose the Network option of the Control
Panel to check that a TCP/IP protocol is installed. If it isn’t installed,
use Add - Protocol - Microsoft - TCP/IP to install it. In Windows
2000, click Install, not Add.
Check the network bindings. First, make sure that the TCP/IP
protocol is bound to your network card (NIC). Then, in the Control
Panel, select your network card and click Properties, and select
the Bindings tab. Make sure TCP/IP is bound (checked).
If you don’t have a router on your network, make sure that your PC
and the Shared Storage Drive are in the same IP address range
(Example: 192.168.1.1 to 192.168.1.254), and that they are using
the same Subnet Mask (Example: 255.255.255.0).
If you do have a router running DHCP, check that your Gateway IP
Address is set correctly. Ask your network administrator for the
correct value.
16
3. I am not able to see any folders on my
Shared Storage Drive.
3. Make sure that“I want to be able to give others
access to my files” and “I want to be able to allow
others to print to my printer(s)” are checked.
Make sure that you have File and Print sharing enabled in your
operating system.
4. Click OK, to save your changes, and click OK once more
to close the Network window.
To Enable File and Print Sharing on a Windows 95/98 system:
5. Windows will ask you to insert your operating system
disk to install other necessary files.
1. Right-click Network Neighborhood and select
Properties.
2. From the Network window, click the File and Print
Sharing button.
6. Reboot your system for changes to take effect.
Windows 2000/XP have file and print sharing
enabled by default.
4
4. When I click the Shared Storage Drive icon in
Network Neighborhood, I’m asked for a password.
This can happen in the following situations:
• Your Windows Logon name is recognized by the Shared
Storage Drive, but your password is not. If you have a
different password for your Shared Storage Drive and you
don’t remember it, you will need to change your password. If
you are not the administrator of your Shared Storage Drive, ask
your administrator to change your password for you.
Figure 10. Windows95/98 - Network window
• Your Windows Logon name is not recognized by the
Shared Storage Drive, thus only providing you guest
access rights. If you are not the administrator of your Shared
Storage Drive, ask your administrator to create a user account
for you. To make your Shared Storage Drive logon name easy
to remember, use the same name and password as your
Windows Logon.
Troubleshooting
17
• You do not have access permissions for a share. If you are
not the administrator of your Shared Storage Drive, ask your
administrator to provide you access.
For information on accessing the Shared Storage Drive
home page, to change permission settings, see
chapter 3 “Using Your Drive” on page 9.
5. What do the different-colored lights in the
power button mean?
4
The power button light gives you a visual indication of how your
Shared Storage Drive is operating. The chart below provides you
basic information on the light colors, behaviors and their meaning:
Table 1: Shared Storage Drive Lights
6. How do I find the workgroup my computer is in?
To Find your workgroup on a Windows 95/98 system:
1. Right- click Network Neighborhood.
A pop-up menu will appear.
2. Select Properties.
3. In the next screen, select the Identification tab.
Your current workgroup will appear in the box
labeled Workgroup.
To find your workgroup/domain on a Windows 2000/XP system:
1. Right-click My Computer.
Light
Description
Pulsing Green
Drive is functioning properly
2. Select Properties.
Solid Yellow
Drive is booting up / shutting down
3. In the next screen, select the Computer Name tab.
Alternating Green / Yellow
Drive has a problem with the
Ehternet connection.
(Disconnected or no network
connection)
No light
Drive is off
A pop-up menu will appear.
If the light is solid yellow for more than five minutes,
please contact Maxtor Technical Support.
18
Your current workgroup/domain will appear next
to the field labeled workgroup/domain.
Index
A
About this Guide
Administrator account
3
13
C
Power up your drive
Public folder
6
9
Q
Quick Start CD
Connect your drive
Connecting the Ethernet cable
Connecting the power
5
5
6
D
2, 7
R
Resetting your drive
Rubber Feet
12
13
S
Date
DHCP
Drag and Sort
drive
components
handling precautions
13
3, 16
1, 10
2
U
3
USB drives
USB printers
Using your drive
F
FAT32
1, 10
I
Installing your drive
7
13
12
3
10
11
9
W
5
L
Language
Lights
Set up your drive
Shared Storage Drive home page
Shutting down your drive
System requirements
Warranty
Workgroup
inside front cover
18
13
18
M
Maxtor Support
4
N
Network ID
Network Neighborhood
2, 7
16
P
Personal folder
9
Index
19
©2004 Maxtor Corporation. All rights reserved. Changes are periodically made to the information herein which will be incorporated in revised editions of this
publication. Maxtor may make changes or improvements to the product(s) described in this publication at any time and without notice. For purposes of storage capacity,
a gigabyte (GB) equals 1,000,000,000 bytes. Total accessible capacity varies depending on operating environment. Maxtor, and the Maxtor stylized logo are registered
trademarks of Maxtor Corporation. All other brands or products are trademarks or registered trademarks of their respective holders.
Maxtor Corporation, 500 McCarthy Blvd., Milpitas, California, 95035.
FCC Declaration of Conformance
This device complies with part 15 of the FCC Rules. Operation is subject to the following two conditions: (1) this device may not cause harmful interference, and (2) this
device must accept any interference received including interference that may cause undesired operation.