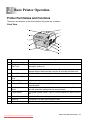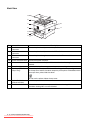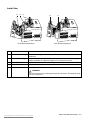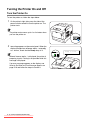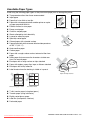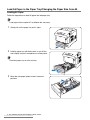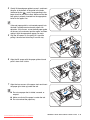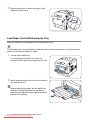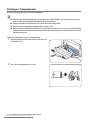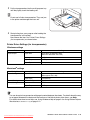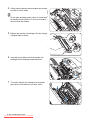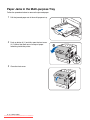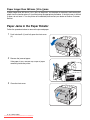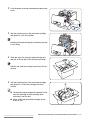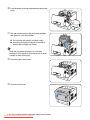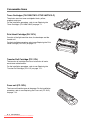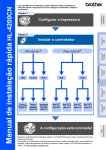
1
Brother Color Laser Printer
HL-4200CN
User's Guide
For visually-impaired users:
This User’s Guide can be read by Screen Reader ‘text-to-speech’
software.
You must set up the hardware and install the driver before you can use the printer.
Please read the Quick Setup Guide to set up the printer. You can find a printed copy in the box or view
it on the CD-ROM we have supplied.
Please read this User’s Guide thoroughly before you use the printer.
Keep the CD-ROM in a convenient place so you can use it quickly if you need to.
Please visit our web site at http://solutions.brother.com where you can get answers to Frequently
Asked Questions (FAQs), Product Support and Technical Questions, and the latest Driver Updates
and Utilities.
Version 5
Downloaded from ManualsPrinter.com Manuals
Table of Contents
Table of Contents ............................................................................................................................ -i
Trademarks ........................................................................................................................ -viii
Compilation and Publication ............................................................................................... -viii
REGULATIONS ........................................................................................................................-ix
Electronic Emission Notices .................................................................................................-ix
International ENERGY STAR® Compliance Statement ........................................................ -x
Laser Notices ....................................................................................................................... -x
Internal laser radiation ..........................................................................................................-xi
Safety Information ................................................................................................................-xi
Introduction .............................................................................................................................-xiv
How to Use This Guide ..................................................................................................................-xv
Conventions .............................................................................................................................-xv
Conventions and Symbols used in this User’s Guide ..........................................................-xv
Safety Precautions .......................................................................................................................-xvi
Installing and Relocating your Printer .....................................................................................-xvi
Operating Environment .................................................................................................... -xviii
Precautions for Power and Grounded/Earthed Connections ................................................ -xviii
Radio Interference ...............................................................................................................-xx
Operating Precautions .............................................................................................................-xx
Other Difficulties .................................................................................................................-xxi
Notes on Handling Consumables .......................................................................................... -xxii
Caution .............................................................................................................................. -xxii
1
Printer System Settings ......................................................................................................................... 1-1
Adjusting Color Registration ......................................................................................................... 1-1
Printing the Color Registration Chart ...................................................................................... 1-1
Determining values ................................................................................................................. 1-2
Entering Values ...................................................................................................................... 1-3
Configuring the Printer on a Network ........................................................................................... 1-4
Setting an IP Address ............................................................................................................. 1-4
Set the IP address acquisition method to Panel ................................................................. 1-4
Setting the IP Address ....................................................................................................... 1-5
Setting the Subnet Mask .................................................................................................... 1-6
Setting the Gateway Address ............................................................................................. 1-7
Setting Protocols .................................................................................................................... 1-8
Changing Protocol Settings ................................................................................................ 1-8
Confirming Settings ................................................................................................................ 1-9
2
Basic Printer Operation .......................................................................................................................... 2-1
Printer Part Names and Functions ............................................................................................... 2-1
Front View .......................................................................................................................... 2-1
Back View ........................................................................................................................... 2-2
Inside View ......................................................................................................................... 2-3
Turning the Printer On and Off ..................................................................................................... 2-4
Turn the Printer On ................................................................................................................. 2-4
Turn the Printer Off ................................................................................................................. 2-5
Installing the Printer Driver for Windows® ..................................................................................... 2-6
Installing the Printer Driver ..................................................................................................... 2-6
Upgrading the Printer Driver ................................................................................................... 2-6
Changing default printing functions .................................................................................... 2-8
Using Windows® Help ................................................................................................................... 2-9
Installing the Printer Driver for Macintosh® ................................................................................. 2-10
Installing the Printer Driver ................................................................................................... 2-10
Upgrading the Printer Driver ................................................................................................. 2-10
i
Downloaded from ManualsPrinter.com Manuals
Printing from Macintosh® ............................................................................................................ 2-11
Mac OS® 8.6 - 9.2 ............................................................................................................ 2-11
Mac OS® X 10.1 / 10.2 .................................................................................................... 2-11
Using Balloon Help on Macintosh® (Mac OS® 8.6-9.2 only) .................................................................. 2-12
Cancel Printing ........................................................................................................................... 2-13
Cancel Printing at the Computer .......................................................................................... 2-13
In Windows® ..................................................................................................................... 2-13
On a Macintosh® Computer .............................................................................................. 2-13
Mac OS® 8.6 - 9.2 ............................................................................................................ 2-13
Mac OS® X 10.1 / 10.2 .................................................................................................... 2-13
Cancel Printing at the printer’s Control Panel ....................................................................... 2-14
Changing the Configuration for Options ..................................................................................... 2-15
Memory expansion ........................................................................................................... 2-15
In Windows® ......................................................................................................................... 2-16
On a Macintosh® computer .................................................................................................. 2-16
For Mac OS® 8-6 - 9.2 ...................................................................................................... 2-16
For Mac OS® X 10.2 ......................................................................................................... 2-16
3
Loading Paper and Usable Paper Types .............................................................................................. 3-1
Suitable and Unsuitable Paper Types .......................................................................................... 3-1
Suitable Paper Types ............................................................................................................. 3-1
Suitable Basis Weight ........................................................................................................ 3-1
Recommended Paper ........................................................................................................ 3-1
Special paper ..................................................................................................................... 3-2
Paper Trays, Types, and Sizes .......................................................................................... 3-3
Duplex Printing Paper Types and Sizes ............................................................................. 3-4
Unsuitable Paper Types ......................................................................................................... 3-5
Storing Paper .......................................................................................................................... 3-6
Loading Paper .............................................................................................................................. 3-7
Load Paper in the Paper Tray ................................................................................................ 3-7
Load A5 Paper in the Paper Tray/Changing the Paper Size from A5 .................................. 3-10
Loading A5 Paper ............................................................................................................. 3-10
Changing the Paper Size from A5 .................................................................................... 3-13
Load Paper into the Multi-purpose Tray ............................................................................... 3-16
Printing on Envelopes, Transparencies, and Custom-size (Long) Paper ................................... 3-18
Printing on Envelopes ........................................................................................................... 3-18
Printer Driver Settings (for envelopes) ............................................................................. 3-19
Printing on Transparencies ................................................................................................... 3-20
Printer Driver Settings (for transparencies) ...................................................................... 3-21
Printing Custom-size Paper .................................................................................................. 3-22
Setting a User Defined Size ............................................................................................. 3-22
How to Print ...................................................................................................................... 3-23
Printer Driver Settings (for Custom-size (Long) Paper) .................................................... 3-23
Duplex Printing ........................................................................................................................... 3-24
Types of Duplex Printing .................................................................................................. 3-24
Duplex Printing ..................................................................................................................... 3-25
Printer Driver Settings (for duplex printing) ...................................................................... 3-25
4
Control Panel ........................................................................................................................................... 4-1
Control Panel Overview ................................................................................................................ 4-1
LED Indicators ........................................................................................................................ 4-1
Liquid Crystal Display (LCD) .................................................................................................. 4-2
Print screen ........................................................................................................................ 4-2
Menu screen ....................................................................................................................... 4-2
Buttons ................................................................................................................................... 4-3
Basic Menu Operation .................................................................................................................. 4-4
ii
Downloaded from ManualsPrinter.com Manuals
Menu Structure and Basic Operations .................................................................................... 4-4
Re-setting the printer settings ............................................................................................ 4-4
What to do if you make a mistake? ........................................................................................ 4-5
List of Menu Items ........................................................................................................................ 4-6
System Settings ...................................................................................................................... 4-6
Power Save Time ............................................................................................................... 4-6
Error Alarm ......................................................................................................................... 4-6
Job Timeout ........................................................................................................................ 4-7
Panel Language ................................................................................................................. 4-7
Auto Log Print ..................................................................................................................... 4-7
ID Print ............................................................................................................................... 4-7
Text Print ............................................................................................................................ 4-8
Auto Continue ..................................................................................................................... 4-8
PS Error Report .................................................................................................................. 4-8
PS Job Timeout .................................................................................................................. 4-8
Maintenance Mode ................................................................................................................. 4-9
Init NVM .............................................................................................................................. 4-9
Security .............................................................................................................................. 4-9
F/W (Firmware) Download ................................................................................................. 4-9
BTR CurrentAdj ................................................................................................................ 4-10
Auto PHD align ................................................................................................................. 4-10
ColorRegiCorrect .............................................................................................................. 4-10
Parallel .................................................................................................................................. 4-11
ECP .................................................................................................................................. 4-11
Adobe Protocol ................................................................................................................. 4-11
Report/List ............................................................................................................................ 4-12
Printer Settings ................................................................................................................. 4-12
Panel Settings .................................................................................................................. 4-12
PCL Font List .................................................................................................................... 4-12
Log Print ........................................................................................................................... 4-12
PS (PostScript) Font List .................................................................................................. 4-12
Demo Page ...................................................................................................................... 4-12
Network ................................................................................................................................ 4-13
Ethernet ............................................................................................................................ 4-13
TCP/IP .............................................................................................................................. 4-13
IPX Frame Type ............................................................................................................... 4-14
Protocol ............................................................................................................................ 4-14
IP Filter ............................................................................................................................. 4-15
Init NVM ............................................................................................................................ 4-15
Adobe Protocol ................................................................................................................. 4-15
USB ...................................................................................................................................... 4-16
Adobe PS Protocol ........................................................................................................... 4-16
5
Troubleshooting ...................................................................................................................................... 5-1
If it looks like you are unable to fix the problem ............................................................... 5-1
Power Problems ........................................................................................................................... 5-2
Printing Problems ......................................................................................................................... 5-3
Indicators are on, flashing, or off. ........................................................................................... 5-3
Cannot Print in Windows ........................................................................................................ 5-4
Cannot Print from a Macintosh® Computer ............................................................................ 5-5
Print Quality Problems .................................................................................................................. 5-6
Blank or Completely Black Pages are Output ........................................................................ 5-6
Faded or Dirty Printouts, White Areas (drop-outs), Creases, Blurs ........................................ 5-7
Unsatisfactory Printing .......................................................................................................... 5-11
Paper Feed Problems ................................................................................................................. 5-13
Others Problems ......................................................................................................................... 5-14
iii
Downloaded from ManualsPrinter.com Manuals
Network Problems ................................................................................................................ 5-14
Other Problems .................................................................................................................... 5-15
What to Do When an Error Message Appears ........................................................................... 5-16
The Alarm Indicator is On or Flashing ........................................................................................ 5-22
The Alarm Lamp is On .......................................................................................................... 5-22
The Alarm Lamp is Flashing ................................................................................................. 5-22
Forcing the Printer to Print Remaining Data (When Printing is Halted) ...................................... 5-23
Cleaning the Density Sensor ...................................................................................................... 5-24
6
Paper Jams .............................................................................................................................................. 6-1
Clearing Paper Jams .................................................................................................................... 6-1
Paper Jams in the Multi-purpose Tray .......................................................................................... 6-3
Paper Jams in the Paper Tray ...................................................................................................... 6-4
Paper Jams Between the Print Head Cartridge and the Fuser Unit ............................................. 6-6
Paper jams around the print head cartridge ........................................................................... 6-6
Paper jams around the fuser unit ........................................................................................... 6-8
Paper longer than 360 mm (14 in.) jams ................................................................................ 6-9
Paper Jams in the Paper Rotator ................................................................................................. 6-9
Paper Jams in the 2 Tray Module ............................................................................................... 6-10
7
Routine Maintenance and Consumable Replacement ........................................................................ 7-1
Replacing the Toner Cartridges (TN-12BK/Y/M/C) ...................................................................... 7-1
Toner Cartridge Handling Precautions ................................................................................... 7-1
Handling Precautions ......................................................................................................... 7-1
Storage Precautions ........................................................................................................... 7-1
Replacing the Toner Cartridges .............................................................................................. 7-2
Replacing the Print Head Cartridge (PH-12CL) ............................................................................ 7-5
Print Head Cartridge Handling Precautions ............................................................................ 7-5
Handling Precautions ......................................................................................................... 7-5
Storage Precautions ........................................................................................................... 7-6
Replacing the Print Head Cartridge ........................................................................................ 7-6
Replacing the Transfer Roll Cartridge (TR-11CL) ...................................................................... 7-11
Transfer Roll Cartridge Handling Precautions ...................................................................... 7-11
Handling Precautions ....................................................................................................... 7-11
Replacing the Transfer Roll Cartridge .................................................................................. 7-12
Replacing the Fuser unit (FP-12CL) ........................................................................................... 7-14
Fuser unit Handling Precautions .......................................................................................... 7-14
Replacing the Fuser unit ....................................................................................................... 7-15
Printing Reports and Lists .......................................................................................................... 7-18
Confirming Printer Configuration and Network Settings ....................................................... 7-19
Checking the Print Log ......................................................................................................... 7-20
Confirming Printer Status from Your Computer .......................................................................... 7-21
Checking Status and Remaining Amounts of Consumables using a Web Browser ............. 7-21
Cleaning the Printer .................................................................................................................... 7-22
Cleaning Precautions ........................................................................................................... 7-22
Cleaning the outside of the printer ........................................................................................ 7-22
Transporting the Printer .............................................................................................................. 7-23
Storing the Printer ....................................................................................................................... 7-28
8
Appendixes ..............................................................................................................................................A-1
Introduction to the Optional and Consumable Items ....................................................................A-1
Options ...................................................................................................................................A-1
Hard Disk (HD-41CL) .........................................................................................................A-1
Memory Expansion Card ....................................................................................................A-1
1 Tray Module (LT-41CL) ...................................................................................................A-1
2 Tray Module (LT-42CL) ...................................................................................................A-1
iv
Downloaded from ManualsPrinter.com Manuals
Consumable Items ..................................................................................................................A-2
Toner Cartridges (TN-12BK/TN12-Y/TN12-M/TN12-C) .....................................................A-2
Print Head Cartridge (PH-12CL) ........................................................................................A-2
Transfer Roll Cartridge (TR-11CL) .....................................................................................A-2
Fuser unit (FP-12CL) ..........................................................................................................A-2
Getting Product Support Information ............................................................................................A-3
General Specifications ..................................................................................................................A-4
Printer Specifications ..............................................................................................................A-4
Network Specifications ...........................................................................................................A-7
Common Specifications ......................................................................................................A-7
TCP/IP Specifications .........................................................................................................A-7
NetBIOS Specifications ......................................................................................................A-7
NetWare Specifications ......................................................................................................A-7
AppleTalk Specifications ....................................................................................................A-7
Printable Area .........................................................................................................................A-8
Important information for choosing your paper .............................................................................A-8
Life Span of Consumable Items ...................................................................................................A-9
Life span of consumables (in printable pages) .......................................................................A-9
Adding Expansion Memory .........................................................................................................A-10
9
INDEX ........................................................................................................................................................ I-1
v
Downloaded from ManualsPrinter.com Manuals
IMPORTANT: For technical and operational help, you must call the country where you bought the printer.
Calls must be made from within that country.
Register your product
By registering your product with Brother, you will be recorded as the original owner of the product.
Your registration with Brother:
■ may serve as a confirmation of the purchase date of your product should you lose your receipt;
■ may support an insurance claim by you in the event of product loss covered by insurance; and,
■ will help us notify you of enhancements to your product and special offers.
Please complete the Brother Warranty Registration or, for your convenience and most efficient way to
register your new product, register on-line at
http://www.brother.com/registration/
FAQs (Frequently asked questions)
The Brother Solutions Center is our one-stop resource for all your printer needs. You can download the latest
drivers, software and utilities and read FAQs and troubleshooting tips to learn how to get the most from your
Brother product.
http://solutions.brother.com
You can check here for the Brother driver updates.
Customer Service
In USA:
1-877-284-3238
In Canada: 1-877-BROTHER
In Europe: Visit www.brother.com for contact information on your local Brother office.
If you have comments or suggestions, please write us at:
In USA:
Printer Customer Support
Brother International Corporation
15 Musick
Irvine, CA 92618
In Canada: Brother International Corporation (Canada), Ltd.
- Marketing Dept.
1, rue Hotel de Ville
Dollard-des-Ormeaux, PQ, Canada H9B 3H6
Service center locator (USA only)
For the location of a Brother authorized service center, call 1-800-284-4357.
Service center locations (Canada only)
For the location of a Brother authorized service center, call 1-877-BROTHER
Service center locations (Europe)
For service center in Europe, contact your local Brother office. Address and telephone contact information for
European offices can be found at www.brother.com and selecting your country from the pull down list.
vi
Downloaded from ManualsPrinter.com Manuals
Brother fax back system (USA only)
Brother has installed an easy to use fax back system so you can get instant answers to common technical
questions and product information. This is available 24 hours a day, 7 days a week. You can use the system to
send the information to any fax machine.
Call the number below and follow the recorded instructions to receive a fax about how to use the system and an
index of fax back subjects.
In USA:
1-800-521-2846
Internet Addresses
Brother Global Web Site: http://www.brother.com
For Frequently Asked Questions (FAQs), Product Support and Technical Questions, and Driver Updates and
Utilities: http://solutions.brother.com
(In USA only) For Brother Accessories & Supplies: http://www.brothermall.com
vii
Downloaded from ManualsPrinter.com Manuals
Trademarks
Brother is a registered trademark of Brother Industries, Ltd.
Apple and LaserWriter are registered trademarks, and TrueType is a trademark of Apple Computer, Inc.
Centronics is a trademark of Genicom Corporation.
Hewlett-Packard, HP, PCL 5e, PCL 6 and PCL are registered trademarks of Hewlett-Packard Company.
Adobe, Adobe logo, Acrobat and PostScript are a registered trademark of Adobe Systems Incorporated.
This printer contains UFST and Micro Type from Agfa Division.
PANTONE Colors generated by the HL-4200CN are four- and /or three-color process simulations and may not
match PANTONE-identified solid color standards. Use current PANTONE Color Reference Manuals for
accurate color.
PANTONE Color simulations are only obtainable on this product when driven by qualified Pantone-licensed
software packages. Contact Pantone Inc. for a current list of qualified licensees.
Trademarks noted herein are the property of Brother Industries, Ltd. PANTONE® and other Pantone, Inc.
trademarks are the property of Pantone, Inc. ©Pantone, Inc., 2006
ENERGY S TAR® is a U.S. registered mark.
All other brand and product names mentioned in this user's guide are registered trademarks or trademarks of
respective companies.
Compilation and Publication
Under the supervision of Brother Industries Ltd., this manual has been compiled and published, covering the
latest product descriptions and specifications.
The contents of this manual and the specifications of this product are subject to change without notice.
Brother reserves the right to make changes without notice in the specifications and materials contained herein
and shall not be responsible for any damages (including consequential) caused by reliance on the materials
presented, including but not limited to typographical and other errors relating to the publication.
©2003 Brother Industries Ltd.
Shipment of the Printer
If for any reason you must ship your Printer, carefully package the Printer to avoid any damage during transit. It
is recommended that you save and use the original packaging. The Printer should also be adequately insured
with the carrier.
viii
Downloaded from ManualsPrinter.com Manuals
REGULATIONS
Electronic Emission Notices
Federal Communications Commission (FCC) Declaration of Conformity (For U.S.A. Only)
Responsible Party:
Brother International Corporation
100 Somerset Corporate Boulevard
Bridgewater, NJ 08807-0911, USA
TEL: (908) 704-1700
declares, that the products
Product Name:
Model Number:
Product Options:
Brother Laser Printer HL-4200CN
HL-4200CN
ALL
complies with Part 15 of the FCC Rules. Operation is subject to the following two conditions: (1) This device may
not cause harmful interference, and (2) this device must accept any interference received, including interference
that may cause undesired operation.
This equipment has been tested and found to comply with the limits for a Class B digital device, pursuant
to Part 15 of the FCC Rules. These limits are designed to provide reasonable protection against harmful
interference in a residential installation. This equipment generates, uses, and can radiate radio frequency
energy and, if not installed and used in accordance with the instructions, may cause harmful interference
to radio communications. However, there is no guarantee that interference will not occur in a particular
installation. If this equipment does cause harmful interference to radio or television reception, which can
be determined by turning the equipment off and on, the user is encouraged to try to correct the
interference by one or more of the following measures:
■ Adjust relocate the receiving antenna.
■ Increase the distance between the equipment and the receiver.
■ Connect the equipment to an AC power outlet/socket on a circuit different from that which the receiver is
already connected.
■ Call the dealer or an experienced radio/TV technician for help.
Important
A shielded interface cable should be used in order to ensure compliance with the limits for a Class B digital device.
Changes or modifications not expressly approved by Brother Industries, Ltd. could void the user's authority to
operate the equipment.
Industry Canada Compliance Statement (For Canada Only)
This Class B digital apparatus complies with Canadian ICES-003.
Cet appareil numérique de la classe B est conforme à la norme NMB-003 du Canada.
ix
Downloaded from ManualsPrinter.com Manuals
International ENERGY STAR® Compliance Statement
The purpose of the International ENERGY STAR® Program is to promote the development and popularization of
energy-efficient office equipment.
As an ENERGY STAR® Partner, Brother Industries, Ltd. has determined that this product meets the ENERGY STAR®
guidelines for energy efficiency.
Laser Notices
Laser Safety (120 V Model Only)
This printer is certified as a Class I laser product under the U.S. Department of Health and Human Services (DHHS)
Radiation Performance Standard according to the Radiation Control for Health and Safety Act of 1968. This means
that the printer does not produce hazardous laser radiation.
Since radiation emitted inside the printer is completely confined within protective housings and external covers, the
laser beam cannot escape from the machine during any phase of user operation.
FDA Regulations (120 V Model Only)
U.S. Food and Drug Administration (FDA) has implemented regulations for laser products manufactured on and
after August 2, 1976. Compliance is mandatory for products marketed in the United States. The label shown on
the back of the printer indicates compliance with the FDA regulations and must be attached to laser products
marketed in the United States.
MANUFACTURED:
BROTHER INDUSTRIES, LTD.
15-1 Naeshiro-cho, Mizuho-ku, Nagoya, 467-8561 Japan
This product complies with FDA radiation performance standards, 21 CFR Subchapter J.
Caution: Use of controls, adjustments or the performance of procedures other than those specified in this manual
may result in hazardous radiation exposure.
IEC 60825 Specification (220 - 240 V Model Only)
This printer is a Class 1 laser product as defined in IEC 60825 specifications. The label shown below is attached
in countries where required.
CLASS 1 LASER PRODUCT
APPAREIL À LASER DE CLASSE 1
LASER KLASSE 1 PRODUKT
This printer has a Class 3B Laser Diode that emits invisible laser radiation in the Scanner Unit. The Scanner Unit
should not be opened under any circumstances.
Caution: Use of controls, adjustments or the performance of procedures other than those specified in this manual
may result in hazardous radiation exposure.
x
Downloaded from ManualsPrinter.com Manuals
For Finland and Sweden
LUOKAN 1 LASERLAITE
KLASS 1 LASER APPARAT
Varoitus! Laitteen käyttäminen muulla kuin tässä käyttöohjeessa mainitulla tavalla saattaa altistaa käyttäjän
turvallisuusluokan 1 ylittävälle näkymättömälle lasersäteilylle.
Varning - Om apparaten används på annat sätt än i denna Bruksanvisning specificerats, kan användaren utsättas
för osynlig laserstrålning, som överskrider gränsen för laserklass 1.
Internal laser radiation
Max. Radiation Power
Wave Length
Laser Class
10 mW/ch
770 nm-808 nm
Class IIIb (Accordance with 21 CFR Part 1040.10)
Class 3B (Accordance with IEC60825)
Safety Information
IMPORTANT - For Your Safety
To ensure safe operation the three-pin plug supplied must be inserted only into a standard three-pin power
outlet/socket which is properly grounded/earthed through the normal standard wiring.
Extension cords should not be used with the equipment. If it is essential that an extension cord has to be used, it
must be a three-pin plug type and correctly wired to provide proper grounding/earthing. Incorrectly wired extension
cords may cause personal injury and equipment damage.
The fact that the equipment operates satisfactorily does not imply that the power is grounded/earthed and that the
installation is completely safe. For your safety, if in any doubt about the effective grounding/earthing of the power,
call a qualified electrician.
This product should be connected to an AC power source within the range indicated on the rating label. DO NOT
connect it to a DC power source. If you are not sure, contact a qualified electrician.
Disconnect device
This printer must be installed near an AC power outlet/socket that is easily accessible. In case of emergencies, you
must disconnect the power cord from the power outlet/socket to shut off the power completely.
Geräuschemission / Acoustic Noise Emission (For Germany Only)
Lpa < 70 dB (A) DIN 45635-19-01-KL2
IT power system (For Norway Only)
This product is also designed for IT power system with Phase to phase voltage 230V.
LAN Connection
Caution: Connect this production to a LAN connection which is not subjected to over-voltages.
xi
Downloaded from ManualsPrinter.com Manuals
Wiring Information (For U.K. only)
Important
If you need to replace the plug fuse, fit a fuse that is approved by ASTA to BS1362 with the same rating as the
original fuse.
Always replace the fuse cover. Never use a plug that does not have a cover.
Warning - This printer must be earthed.
The wires in the mains lead are coloured in line with the following code:
Green and Yellow: Earth
Blue:
Neutral
Brown:
Live
If in any doubt, call a qualified electrician.
xii
Downloaded from ManualsPrinter.com Manuals
EC Declaration of Conformity under the R & TTE Directive
Manufacturer
Brother Industries Ltd.,
15-1, Naeshiro-cho, Mizuho-ku,
Nagoya 467-8561, Japan
Herewith declare that:
Product description
Product Name
: Laser Printer
: HL-4200CN
is in conformity with provisions of the R & TTE Directive (1999/5/EEC 2002) and we declare compliance with the
following standards:
R&TTE
: EN300330-2 V1.1.1
EN301489-3 V1.3.1
CE0682 !
Safety:
EN60950:2000
EMC
: EN55022:1998 Class B
EN55024:1998
EN61000-3-2:1995 + A14:2000
EN61000-3-3:1995
Year in which CE marking was First Affixed: 2003
Issued by
: Brother Industries, Ltd.
Date
: 1 July, 2003
Place
: Nagoya, Japan
Signature
:
Takashi Maeda
Manager
Quality Management Group
Quality Management Dept.
Information & Document Company
xiii
Downloaded from ManualsPrinter.com Manuals
Introduction
Thank you for purchasing the HL-4200CN. This guide contains important information about the printer operation
and precautions to be followed. To help you use it efficiently, please read this guide before using your new printer.
Furthermore, after you read the guide, store it in a safe place. It will be useful in case you forget how to perform
operations or if a problem occurs with the printer.
This guide is written for users who are familiar with the personal computers, operating systems, and software
compatible with this printer. For operational procedures and information regarding these items, refer to the
documentation provided with the various hardware and software that you are using.
Brother Industries Ltd.
xiv
Downloaded from ManualsPrinter.com Manuals
How to Use This Guide
Conventions
The following conventions and symbols are used in this User’s Guide:
Conventions and Symbols used in this User’s Guide
Example
Meaning
Alerts you to an important operating procedure that should be performed with care.
Make sure that you read these items.
Notes provide you with useful information.
see List of Menu Items on
page 4-6
A cross reference to another section in this User’s Guide. If you are reading the
Adobe Acrobat PDF file on screen, you can click on the italicised text to jump to the
other location.
Indicates that the item referred to is in another guide (such as the Quick Setup
Guide).
Key
Indicates a key on the keyboard of your computer.
Example:
Press the Enter key
bold
Indicates a window, dialog box, or tab element or button displayed on the computer
screen.
Also indicates a menu or value displayed on the printer’s control panel.
Example:
Click OK in the Properties dialog box.
Set Enabled on the control panel.
LCD display font
Indicates a message displayed on the printer's control panel.
This may also emphasize a part name or important information to be entered.
Example:
Ready to Print appears.
Enter "0.0.0.0"
Press the Form Feed/Set
or
button once.
Indicates a control panel button.
Example:
Press the
button.
Press the Form Feed/Set button.
+
Indicates that you need to press 2 keys or control panel buttons at the same time.
Example:
Press the
+
buttons.
xv
Downloaded from ManualsPrinter.com Manuals
Safety Precautions
To ensure the safe operation of your printer, make sure that you read this section thoroughly before use.
This section describes the conventions used in the guide.
WARNING
"Warning" alerts you to situations that could result in serious injury or death.
CAUTION
"Caution" alerts you to situations that could cause injury or material damage.
This symbol alerts you to procedures that
require close attention. Make sure that you
read and follow the instructions carefully.
High
temperature
Flammable
Electrical
shock
Finger injury
This symbol alerts you to prohibited
procedures. Make sure that you read the
instructions carefully.
Prohibited
No naked/
open flame
Hint
Remove the
plug
This symbol alerts you to procedures that
need to be performed. Make sure that you
perform the procedure after reading the
instructions carefully.
Do
Do not
no
dismantle
Do not
touch
Ground/Earth
Installing and Relocating your Printer
CAUTION
Do not place the printer in a hot, humid, dusty, or poorly ventilated environment. Prolonged
exposure to such adverse conditions can cause fire or electric shocks.
Do not place the printer near heaters or volatile, flammable, or combustible materials, such
as curtains.
Place the printer on a level, sturdy surface that can withstand the printer's weight. Failure
to do so could cause the printer to fall, resulting in injuries.
To prevent injuries, this printer should be lifted by at least two people.
xvi
Downloaded from ManualsPrinter.com Manuals
To lift the printer, face the front of the printer and grip the recessed areas at the bottom left
and right with both hands. Never try to lift the printer by gripping any other areas. Lifting the
printer by gripping other areas can cause the printer to fall, resulting in injuries.
If you hold the printer by the
front cover, left or right
sides, there is a danger of
the printer falling.
Recess
When lifting the printer, get a firm footing and bend your knees to avoid possible injuries to
your back.
The printer has ventilation grills on the side and at the back of the machine. Ensure that the
printer is installed no less than 150 mm (5.9 in.) from the wall on the right, 100 mm (3.9 in.)
from the wall on the left, and 200 mm (7.8 in.) from the wall at the back. A poorly ventilated
printer can cause excessive internal heat to build up and result in fire.
The diagram below shows the minimum clearances required for normal operation,
consumables replacement, and maintenance ensuring that your printer operates at peak
performance.
600 mm (23.6 in.)
100 mm
(3.9 in.)
200 mm (7.8 in.)
350 mm (13.8 in.)
150 mm (5.9 in.)
When moving the printer, be sure to unplug the power cord from the AC power
outlet/socket. Moving the printer with the power cord connected can damage the power
cord, which could result in a fire or an electric shock.
When moving the printer, do not tilt it at more than the angles shown in the diagram below.
If tilted excessively, the printer may fall, resulting in injuries.
After installing the optional tray module, lock down the brakes of the casters at the front of
the tray module. Failure to lock down the brakes can cause the printer to move
unexpectedly, resulting in injuries.
xvii
Downloaded from ManualsPrinter.com Manuals
Operating Environment
■ Use the printer in a place that meets the following requirements:
Ambient temperature range of 10 to 32 °C (50.0 to 89.6 °F), relative humidity of 15 to 85% (no
condensation)
When using the printer at an ambient temperature of 32 °C (89.6 °F), the relative humidity should not
exceed 65%. When the relative humidity reaches 85%, the ambient temperature should not exceed
28 °C (82.4 °F).
■ Do not place the printer in a room where there are sudden fluctuations in temperature
and do not move the printer from a cold place to a warm humid place. If you do,
condensation may occur inside the printer and deteriorate print quality.
■ Do not place the printer in direct sunlight, as this may damage the printer.
■ When moving the printer, do not remove the toner cartridges, leave them locked in
place. Loose toner can spill inside the printer and deteriorate print quality.
■ Do not place the printer directly next to an air conditioner or heater, as this affects the
temperature inside the printer and can cause damage.
■ Do not use the printer when it is tilted at an angle of more than 5 degrees, as this may
result in damage.
Precautions for Power and Grounded/Earthed Connections
WARNING
Use the printer within the specified power range.
AC power:100-127 V AC ± 10% (90 V-140 V) or 220-240 V AC ± 10% (198 V-264 V)
Frequency: 50 ± 3Hz/60 ± 3Hz
Ensure that the power cord connector and AC power outlet/socket are free of dust. In a
damp environment, a contaminated connector can, over time, draw non-negligible amounts
of current that can generate heat and eventually cause fire.
Do not attempt to modify, pull, bend, chafe, or otherwise damage the power cord. Do not
place objects on the power cord. A damaged power cord can cause fire or electric shock.
Never touch a power cord with wet hands. This constitutes an electric shock hazard.
xviii
Downloaded from ManualsPrinter.com Manuals
In the following situations, stop using the printer immediately, turn it off, and disconnect the
power cord from the AC power outlet/socket. After that, call your dealer or Brother
Customer Service immediately. Continued use of the printer in such situations could result
in fire:
■ There is smoke emanating from the printer or the outside of the printer is excessively
hot.
■ Unusual noises are coming from the printer.
■ There is water inside the printer.
To prevent fire or electric shocks, connect the AC power cord to a grounded/earthed AC
power outlet/socket.For your safety, if in any doubt about the effective grounding/earthing
of the power, call a qualified electrician.
If the power cord is broken or insulated wires are exposed, stop using the printer
immediately, turn it off, and disconnect the AC power cord from the AC power outlet/socket.
After that, call your dealer or Brother Customer Service. Using a damaged cord can cause
fire or an electric shock.
CAUTION
Do not plug or unplug the printer when it is on. Unplugging a live connector can deform the
plug and cause fire.
When unplugging the printer, grasp the plug instead of the power cord. Forcibly pulling the
AC power cord can damage it and cause a fire or an electric shock.
Be sure to turn off and unplug the printer before accessing the interior of the printer for
cleaning, maintenance, or troubleshooting. Accessing the interior of a live printer can result
in electric shock.
Once a month, turn off the printer and check the power cord for the following.
■ The power cord is plugged firmly into the AC power outlet.
■ The plug is not excessively heated, rusted, or bent.
■ The plug and outlet are dust free.
■ The cord is not cracked or frayed.
If you notice any unusual conditions, call your dealer or Brother Customer Service for
assistance.
When the printer is not used over an extended period of time, it is advisable to unplug the
printer.
Switch off the printer before connecting the interface cable or options. Connecting the
interface cable or options to a live printer can cause electric shocks.
xix
Downloaded from ManualsPrinter.com Manuals
Radio Interference
This printer may interfere with radio or television reception, causing flickering or distortion. This can be
determined by turning the printer off and on. To correct interference, perform one or a combination of the
following procedures:
■ Move the printer away from a TV and/or radio.
■ Reposition the printer, TV and/or radio.
■ If the printer, TV and/or radio are plugged to the same AC power outlet/socket, unplug them, then
plug them into different outlets/sockets.
■ Reposition the TV and/or radio antennas and cables until the interference stops. For external
antennas, call your local electrician.
■ Use coaxial cables with radio and television antennas.
Operating Precautions
WARNING
Do not place any liquid containers such as vases or coffee cups on the printer. Liquids split
on the printer can cause a fire or electric shock.
Do not place any metal parts such as staples or clips on the printer. If metal or flammable
materials get into the printer, they can short circuit internal components and cause a fire or
electric shocks.
If debris (metal or liquid) gets into the printer, turn off and unplug the printer. After that, call
your dealer or Brother Customer Service immediately. Operating a debris-contaminated
printer can cause a fire or electric shocks.
Never open or remove printer covers that are secured with screws unless specifically
instructed to do so in this guide. High-voltage components can cause electric shocks.
Do not try to alter the printer's structure or modify any parts. Unauthorized modifications can
cause fire.
This printer complies with the IEC60825 (Class 1) international laser standard. This means
that the printer does not present any risk of injury to individuals from laser radiation. Various
covers confine the laser radiation to the inside of the printer; hence, users cannot incur
injury from the laser under normal operating conditions. Removing covers, unless
instructed to do so in this guide, can cause injury from laser radiation.
xx
Downloaded from ManualsPrinter.com Manuals
CAUTION
Never touch an area indicated by a high-temperature warning label (on or near the fuser
unit). Touching these areas may result in burns.
If a sheet of paper is wrapped around the fuser or rollers, do not use excessive force to
remove it so as to avoid injuries or burns. Turn off the printer immediately and call your
dealer or Brother Customer Service.
Do not place any heavy objects on the printer. An off-balance printer can fall over or the
heavy object can fall, resulting in injuries.
Do not use highly flammable sprays or solvents in or around the printer, as this can result
in fire.
When removing paper jams, make sure that no pieces of paper are left inside the printer,
as this can cause fire.
If the paper is wrapped around the fuser or roller, or you cannot see the jam that you are
trying to clear, do not attempt to remove the paper by yourself, as this may result in injuries
or burns. Turn off the printer immediately and call your dealer or Brother Customer Service.
Do not place magnetic objects near the safety switch of the printer. Magnets can activate
the printer accidentally, resulting in injuries.
Other Difficulties
Refer to this guide for procedures on clearing paper jams and how to resolve any other problems that
may occur.
xxi
Downloaded from ManualsPrinter.com Manuals
Notes on Handling Consumables
WARNING
Never put a toner cartridge into an open flame. It can explode, resulting in injuries.
Never put a transfer roll cartridge into an open flame. It can explode, resulting in injuries.
Never put a print head cartridge into an open flame. It can explode, resulting in injuries.
Caution
■ Do not open consumables until you are ready to use them. Do not store consumables in the following
conditions:
■ Hot or humid areas
■ Near a naked/open flame
■ Exposed to direct sunlight
■ Dusty areas
■ Before using consumables, read the instructions and precautions provided with the
consumables.
■ Administer emergency first aid as follows:
■ Eye Contact: Flush eyes with plenty of water for a minimum of 15 minutes, and seek medical
advice.
■ Skin contact: Wash material off skin with plenty of soap and water.
■ Inhalation: remove person to fresh air, and seek medical attention.
■ Ingestion: If toner is swallowed, get immediate medical attention or advice.
■ When you remove the transfer roll cartridge from the printer because the waste toner collection box
is full, do not attempt to empty the waste toner box and reuse the cartridge, as toner may spill inside
the printer and cause damage. Loose toner can spill inside the printer and deteriorate print quality.
■ Do not tilt or shake the print head cartridges or transfer roll cartridges when removing them
temporarily. Loose toner can spill inside the printer and deteriorate print quality.
xxii
Downloaded from ManualsPrinter.com Manuals
1
Printer System Settings
Adjusting Color Registration
When you first install the printer, or if you moved it to a new location, adjust the color registration to
ensure that colors are correctly aligned when printed.
To learn how to operate the control panel, see Basic Menu Operation on page 4-4.
Printing the Color Registration Chart
Use the control panel to print the color registration chart as follows.
Ready to Print
(The print screen. The printer is ready to print.)
1
↓
Press the Menu button. The menu screen will appear.
(The menu screen)
Menu
1:System
↓
2
Press the
3
Press the Form Feed/Set or
4
Press the
5
Press the Form Feed/Set or
6
Press the
7
Press the Form Feed/Set or
8
Press the Form Feed/Set button once.
The color registration adjustment chart starts printing.
When printing has finished, the print screen will reappear.
button once.
Menu
2:Maintenance
↓
button once.
2:Maintenance
Init NVM
↓
button 6 times.
2:Maintenance
ColorRegiCorrect
↓
button once.
ColorRegiCorrect
AUTO
↓
button once.
ColorRegiCorrect
Correction Chart
↓
button once.
Correction Chart
Ready to Print
1 - 1 PRINTER SYSTEM SETTINGS
Downloaded from ManualsPrinter.com Manuals
Determining values
From the lines to the right of the Y (yellow), M (magenta), and C (cyan) pattern, find the values of the
straightest lines.
You can also use the densest colors of the grid to find the straightest lines. The colors printed at the
highest density are those next to the straightest lines.
If 0 is the value nearest the straightest line, you do not need to adjust the color registration. If the value
is not 0', follow the steps outlined in Entering Values on page 1-3.
1. Straightest line
2. Lattice pattern
PRINTER SYSTEM SETTINGS 1 - 2
Downloaded from ManualsPrinter.com Manuals
Entering Values
Using the control panel, make adjustments by entering the values that you found in the Color
Registration Chart.
Ready to Print
↓
1
Follow Steps 1 through 5 on the previous page to display the color
registration chart settings menu.
2
Press the
3
Press the Form Feed/Set or
4
Press the
or
button until you reach the value displayed on
the chart (for example, +3).
5
Press the
6
Repeat Steps 4 and 5 to continue setting the color registration.
7
Press the Form Feed/Set button once.
8
Press the Form Feed/Set button once.
The color registration chart will be printed with the new values.
When printing has finished, the print screen will reappear.
9
Color registration adjustment is complete when the straightest
lines for Y (yellow), M (magenta), and C (Cyan) are next to the '0'
line.
ColorRegiCorrect
Correction Chart
↓
button once.
ColorRegiCorrect
Enter Number
↓
button once.
Enter Number
Y= 0 M= 0 C= 0
↓
Enter Number
Y=+3 M= 0 C= 0
↓
button once to move the cursor.
Enter Number
Y=+3 M= 0 C= 0
↓
Enter Number
Y=+3 M=+1 C=+2
↓
Correction Chart
Ready to Print
After the color registration chart has printed, do not turn off the printer until the printer motor has
stopped running.
1 - 3 PRINTER SYSTEM SETTINGS
Downloaded from ManualsPrinter.com Manuals
Configuring the Printer on a Network
Read this section if you want to configure the printer for a network connection.
Setting an IP Address
This section describes the steps for setting the IP address, subnet mask, and gateway address from the
control panel of the printer.
Follow the steps below.
IP addresses are managed throughout the system as a whole. Specifying the wrong IP address can
affect the entire network. Before you set an IP address, call your system administrator.
To learn how to operate the control panel, see Basic Menu Operation on page 4-4.
Set the IP address acquisition method to Panel.
(The print screen. The printer is ready to print.)
Ready to Print
1
↓
Press the Menu button. The menu screen will appear.
(The menu screen)
Menu:
1:System
↓
2
Press the
3
Press the Form Feed/Set or
4
Press the
5
Press the Form Feed/Set or
button once.
6
Press the Form Feed/Set or
button once.
button 4 times.
Menu:
5:Network
↓
button once.
5:Network
Ethernet
↓
button once.
5:Network
TCP/IP
↓
TCP/IP
Setup IP Address
↓
The default setting has an * next to it.
Setup IP Address
DHCP *
↓
7
Press the
8
Press the Form Feed/Set button once.
button once.
Setup IP Address
Panel *
↓
Reboot system
to take effect
↓
3 seconds later, the following screen will appear.
Continued
PRINTER SYSTEM SETTINGS 1 - 4
Downloaded from ManualsPrinter.com Manuals
Continued from the previous page.
↓
When the new value is set, an * appears next to it.
Setup IP Address
Panel *
↓
9
Press the Job Cancel/Back or
button once.
The lower line of the screen returns to Setup IP Address.
Wait to restart the printer until after you set the gateway address at the last step. Continue to the next
step without restarting the printer.
Setting the IP Address
The IP address consists of four separate values (base 10) separated by decimal points. Each of the
four values can be set to a number between 0 and 255.
Example:
Continued from the previous step
■ IP Address 192.168.1.100
↓
TCP/IP
Setup IP Address
↓
10
Press the
11
Press the Form Feed/Set or
12
Press the
or
button until the value you want appears (for
example, 192). You can hold down the buttons to change the value
in increments of 10.
13
Press the
14
Repeat steps 12 and 13 to finish setting the IP address.
15
Press the Form Feed/Set button once.
button once.
TCP/IP
IP Address
↓
button once.
IP Address
000.000.000.000*
↓
IP Address
192.000.000.000
↓
button once to move the cursor to the next value.
IP Address
192.000.000.000
↓
IP Address
192.168.001.100
↓
Continued
1 - 5 PRINTER SYSTEM SETTINGS
Downloaded from ManualsPrinter.com Manuals
Continued from the previous step.
↓
Reboot system
to take effect
↓
3 seconds later, the following screen will appear.
IP Address
192.168.001.100*
↓
16
Press the Job Cancel/Back or
button once.
The lower line of the screen returns to IP address.
Setting the Subnet Mask
Continued from the previous step
↓
TCP/IP
IP Address
↓
17
Press the
18
Press the Form Feed/Set or
19
Set the subnet mask in the same way as the IP address. To set
values with the
or
button, you can hold down the button to
change the value sequentially.
20
Press the Job Cancel/Back or
button once.
The lower line of the screen returns to Subnet Mask.
button once.
TCP/IP
Subnet Mask
↓
button once.
Subnet Mask
000.000.000.000*
↓
Subnet Mask
255.255.255.000*
↓
PRINTER SYSTEM SETTINGS 1 - 6
Downloaded from ManualsPrinter.com Manuals
Setting the Gateway Address
Continued from the previous step
↓
TCP/IP
Subnet Mask
↓
21
Press the
22
Press the Form Feed/Set or
23
Set the gateway address in the same way as the IP address. To
set values with the
or
button, you can hold down the button
to change the value sequentially.
24
At this point, restart the printer.
button once.
TCP/IP
Gateway Address
↓
button once.
Gateway Address
000.000.000.000*
↓
Gateway Address
192.168.001.254*
1 - 7 PRINTER SYSTEM SETTINGS
Downloaded from ManualsPrinter.com Manuals
Setting Protocols
When the printer is shipped from the factory, all protocols except FTP are active by default. Normally
if you are connecting a new printer to a network for the first time, you will not need to perform the
operations described in this section. If you need to change any of the default protocol settings, follow
the steps outlined in this section.
The printer settings are completed. Proceed to Confirming Settings on page 1-9.
Supported Protocols:
■
■
■
■
■
■
■
For TCP/IP(LPD)
→
→
For port 9100
→
For IPP
For NetBIOS (transport protocol: TCP/IP) →
For NetBIOS (transport protocol: NetBEUI) →
→
For NetWare
→
For AppleTalk
LPD protocol
Port9100 protocol
IPP protocol
NetBIOS TCP/IP protocol
NetBIOS NetBEUI protocol
NetWare protocol
AppleTalk protocol
To learn how to operate the control panel, see Basic Menu Operation on page 4-4.
Changing Protocol Settings
(The print screen. The printer is ready to print.)
Ready to Print
1
↓
Press the Menu button. The menu screen will appear.
(The menu screen)
Menu
1:System
↓
2
Press the
3
Press the Form Feed/Set or
4
Press the
5
Press the Form Feed/Set or
button 4 times.
Menu
5:Network
↓
button once.
5:Network
Ethernet
↓
button 3 times.
5:Network
Protocol
↓
button once.
Continued
PRINTER SYSTEM SETTINGS 1 - 8
Downloaded from ManualsPrinter.com Manuals
Continued from the previous step.
Starting protocols
↓
Protocol
LPD
↓
6
Press the
button once.
1. Press the Form Feed/Set button
once. XXX indicates the protocol
name.
Protocol
Port9100
↓
XXX
Disabled *
7
Press the
button once.
2. Press the
Protocol
IPP
↓
XXX
Enabled
8
Press the
button once.
9
Press the
button once.
Protocol
NetBIOS TCP/IP
↓
3. Press the Form Feed/Set button
once. Reboot system to take
effect appears for 3 seconds,
and then the following screen will
appear.
Protocol
NetBEUI
↓
XXX
Enabled *
10
Press the
button once.
11
Press the
button once.
Protocol
NetWare
↓
button once.
4. To start other protocols, press
the Job Cancel/Back or
button once, and then continue
to the next step.
Protocol
AppleTalk
To finish the setup, go to step 12.
↓
12
Restart the printer.
Confirming Settings
Print the printer settings list to check the content of printer settings.
The printer settings list also contains information that is required when configuring computers for printing.
Use the list to confirm that settings on the printer and the computer match.
For details about printing the Panel Settings List, see Confirming Printer Configuration and Network
Settings on page 7-19.
1 - 9 PRINTER SYSTEM SETTINGS
Downloaded from ManualsPrinter.com Manuals
2
Basic Printer Operation
Printer Part Names and Functions
The names and functions of the various parts of the printer are as follows:
Front View
6
5
7
4
8
3
9
2
10
1
11
12
No.
Name
Description
1
Paper Tray
Load paper here.
2
Multi-purpose Tray
(MP Tray)
Use this tray to manually load items such as cards, transparencies,
envelopes, and so on.
3
Front Cover
The shaded part of the illustration above. Open to clear paper jams,
replace the print head cartridge, transfer roll cartridge and fuser unit.
4
Control Panel
Use the buttons and display to control the printer.
5
Face- Down Output
Tray
Printed documents are output here, printed side facedown.
6
Paper Stopper
Lift to prevent paper from falling when it is printed.
7
Exhaust Grille
Allows internal heat to dissipate. Make sure that the exhaust grilles are
never blocked.
8
Ventilation Intake
Grille
Allows air to enter the printer to prevent it from overheating. Make sure
that the ventilation intake grilles are never blocked.
9
Power Switch
The printer's power switch. Press I to turn the printer on and O to turn it
off.
10
Button B
Use button B to open the upper part of the front cover.
11
Button A
Use button A to open the whole front cover.
12
Paper Meter
Use the meter as a guide to refill the paper tray.
BASIC PRINTER OPERATION 2 - 1
Downloaded from ManualsPrinter.com Manuals
Back View
19
18
17
20
16
21
15
14
13
No.
Name
Description
13
Parallel Interface
Connector
To use the printer locally, connect the parallel cable here.
14
USB Interface
Connector
To use the printer locally, connect the USB cable here.
15
Ethernet Interface
Connector
To use the printer through a network, connect the Ethernet cable here.
16
Power Cord Connector
Connect the power cord here.
17
Exhaust Grille
Allows internal heat to dissipate. Make sure that the exhaust grilles are never
blocked.
18
Toner Cartridges
Insert the black, yellow, magenta, and cyan toner cartridges here.
19
Top Cover (Face-Down
Output Tray)
This is the printer's top cover. Remove it to change the toner cartridges. It acts
as the top cover and the face-down output tray of the printer. Printed documents
are output here, printed side face down.
Do not use the printer without the top cover.
20
Option Slot (for the
optional hard disk)
Install the optional hard disk here.
21
Ventilation Intake Grille
Allows air to enter the printer to prevent it from overheating. Make sure that the
ventilation intake grilles are never blocked.
2 - 2 BASIC PRINTER OPERATION
Downloaded from ManualsPrinter.com Manuals
Inside View
23
24
25
26
Cover opened using button A
27
Cover opened using button B
No.
Name
Description
23
Transfer Roll Cartridge
Transfers the image created on the print head surface to the paper and collects
used toner.
24
Print Head Cartridge
Consists of a light-sensitive print head, developer, and a transfer roll. Images are
initially created as an electrical charge on the surface of this drum.
25
Paper Outlet Cover
Open to replace the print head cartridge and fuser unit.
26
Paper Rotator
With duplex printing, it turns the paper over after the front side has been printed.
27
Fuser Unit
Uses heat to fuse the toner to the paper.
WARNING
The fuser unit gets very hot during printing. Do not touch it. Touching the fuser
unit can cause burns.
BASIC PRINTER OPERATION 2 - 3
Downloaded from ManualsPrinter.com Manuals
Turning the Printer On and Off
Turn the Printer On
To turn the printer on, follow the steps below.
1
On the printer's right side, press the side of the
power switch marked I to turn the printer on. The
printer starts.
The printer motors warm up for 1 or 2 minutes when
you turn the printer on.
2
Testing appears on the control panel. When the
display changes from Please Wait… to Ready
to Print, check that the Ready lamp is lit.
Ready to Print
Ready
When Please Wait… is displayed, the printer is
preparing to print. Printing is not possible while this
message is displayed.
If an error message appears on the display, see
What to Do When an Error Message Appears on
page 5-16 and follow the steps to correct it.
2 - 4 BASIC PRINTER OPERATION
Downloaded from ManualsPrinter.com Manuals
Alarm
Turn the Printer Off
To turn the printer off, follow the steps below.
1
Confirm that Ready to Print is displayed on the
control panel.
Ready Alarm
Do not turn the printer off in the following situations:
■ Data Wait is displayed on the control panel.
■ The Ready lamp is blinking.
■ The Alarm lamp is on. See The Alarm Indicator
is On or Flashing on page 5-22.
2
Data Wait
Ready Alarm
On the printer's right side, press the side of the
power switch marked O to turn the printer off. The
printer is now off.
BASIC PRINTER OPERATION 2 - 5
Downloaded from ManualsPrinter.com Manuals
Installing the Printer Driver for Windows®
The printer driver is software that translates print and command instructions from the format used by a
computer to the format that a particular printer needs.
When using the printer locally, install the printer driver on the computer connected to it. To share a printer
through a network, install the printer driver on every computer connected to the network.
Installing the Printer Driver
To install the Windows® printer driver, see the Quick Setup Guide.
Upgrading the Printer Driver
Printer driver upgrades are available on the Brother Solutions Center. To use the software, download it.
Any connection charges incurred while downloading the software are entirely the customer's
responsibility.
Follow the steps below to install the Windows® printer driver upgrade.
The following is a description in Windows® XP. How to access dialog boxes and their contents vary
depending on the operating system and programs you are using.
1
2
3
On the Start menu, click Printers and Faxes.
(In Windows® 95/98/Me, on the File menu, point to Settings and click Printers.)
The Printers window will open.
Click the appropriate printer and on the File menu, click Printing Preferences... (or Properties).
The Properties dialog box will open.
Click the Paper/Output tab.
2 - 6 BASIC PRINTER OPERATION
Downloaded from ManualsPrinter.com Manuals
4
Click Brother Solutions Center.
The browser starts and accesses the Brother Solutions Center.
5
6
Follow the instructions on the screen to download the appropriate printer driver.
To close the Printing Preferences (or Properties) dialog box, click OK.
■ You can also use the CD-ROM that we provided to access the Brother Solutions Center and
download the printer driver.
■ The address of the Brother Solutions Center is:
http://solutions.brother.com
■ Any connection charges incurred while downloading the software are entirely the customer's
responsibility.
BASIC PRINTER OPERATION 2 - 7
Downloaded from ManualsPrinter.com Manuals
Printing from Windows®
You can send jobs to the printer from most Windows programs using their print command.
The following is a description of printing from Microsoft® Word XP in Windows ® XP.
How to access dialog boxes and their contents vary depending on the operating system and
programs you are using. For details, see the literature provided with the program you are using.
1
2
3
4
5
On the File menu, click Print.
The Print dialog box appears.
Select the HL-4200CN in the Printers box and click Preferences.
On the various tabs, choose settings for each item as required.
For details about the tabs, see Windows® Help. For details about how to use Help, see Using
Windows® Help on page 2-9.
When you finish choosing settings, click OK in the Printing Preferences dialog box.
The Printing Preferences dialog box closes.
In the Print dialog box, select the desired interval in Page range and click OK.
The data is sent to the printer.
To cancel printing, see Cancel Printing on page 2-13.
Changing default printing functions
Default printing functions are preset functions in the printer driver properties dialog box accessed from
the Print dialog box. Setting default printing functions in advance saves you time, because it reduces
the number of settings you need to make every time you print.
Follow the steps below to change the default printing functions. The following example is for Windows®
XP.
How to access dialog boxes and their contents vary depending on the operating system and
programs you are using.
1
2
On the Start menu, click Printers and Faxes.
The Printers window opens.
Choose the appropriate printer, click File on the tool bar and select Printing Preferences....
The Printing Preferences dialog box opens.
■ In Windows® 95, 98 and Me, choose the appropriate printer, click File on the tool bar and select
Properties.
■ In Windows NT® 4.0, choose the appropriate printer, click File on the tool bar and select
Document Defaults… make the settings in the dialog box that appears.
■ In Windows® 2000/XP, click Printing Preference… on the File menu and make the settings in
the dialog box that appears.
2 - 8 BASIC PRINTER OPERATION
Downloaded from ManualsPrinter.com Manuals
3
4
On the various tabs, make settings for each item as required.
For details about the various tabs, see Help.
When you finish choosing settings, click OK or Apply in the Printing Preferences dialog box.
The default printer functions in the printer driver are now changed.
Using Windows® Help
Help for the printer is provided with the printer driver. See Help when you need to know about printer
driver items and settings, or need to check different printing methods when problems occur.
To access Help, open the Properties dialog box and select the tab that contains the item in question.
The example below is for the Paper/Output tab in Windows® XP.
To display the description of an item.
1 click the
button and
2 then click the item whose description you want to
display.
To search for an item by keyword,
1 click the Index tab,
2 type the keyword(s) you are searching for,
and 3 click Display.
BASIC PRINTER OPERATION 2 - 9
Downloaded from ManualsPrinter.com Manuals
Installing the Printer Driver for Macintosh®
Printer drivers for both USB and AppleTalk network connections are provided with your Brother printer.
You can install the printer driver on Macintosh® computers that meet the following requirements:
■ The printer is connected with a USB cable and the computer runs Mac OS® 8.6 to Mac OS ® X with
a standard USB interface.
■ The printer is connected to a network and computers that are running Mac OS® 8.6 to Mac OS ® X.
■ The printer is configured as an AppleTalk client.
For details about how to set up an AppleTalk client, see the literature that came with your Macintosh®
computer.
It is not possible to use Apple QuickDraw GX on the system when using the printer.
Installing the Printer Driver
To install the Macintosh® printer driver, see the Quick Setup Guide.
Upgrading the Printer Driver
Printer driver upgrades are available on the Brother Solutions Center. To use the software, download it.
Any connection charges incurred while downloading the software are entirely the customer's
responsibility.
The address of the Brother Solutions Center is:
http://solutions.brother.com
2 - 10 BASIC PRINTER OPERATION
Downloaded from ManualsPrinter.com Manuals
Printing from Macintosh®
This section describes the steps to print from computers depending on the type of operating system
used.
When you install any new printer options (such as the lower tray module), you must reconfigure the
printer driver to use the options. To confirm or make the settings, see Changing the Configuration for
Options on page 2-15.
The following is a description of printing from Microsoft® Word 98.
How to access dialog boxes and their contents vary depending on the operating system and
programs you are using. For details, see the literature provided with the program you are using.
Mac OS® 8.6 - 9.2
1
2
3
4
5
On the File menu, click Page Setup.
The Page Setup dialog box appears
Use the
buttons next to Page Setup to select the settings that you want to choose.
Configure the items in each dialog box as necessary and click OK.
On the File menu, click Print.
The General Settings dialog box appears.
Use the
buttons next to General Settings to select the settings that you want to choose.
Configure the items in each dialog box as necessary.
■ For details about the dialog box elements, see Balloon Help. For details about how to use
Balloon Help, see Using Balloon Help on Macintosh® (Mac OS® 8.6-9.2 only) on page 2-12.
■ Use the General Settings dialog box to adjust the image and colors to suit your needs.
When you finish choosing your settings, click Print.
The data is sent to the printer.
To cancel printing, see Cancel Printing on page 2-13.
Mac OS® X 10.1 / 10.2
1
2
3
4
On the File menu, click Page Setup....
The Page Setup... dialog box appears
Use the
buttons next to Page Setup... to select the settings that you want to choose.
Configure the items in each dialog box as necessary and click OK.
On the File menu, click Print.
Use the
buttons to select the settings that you want to choose.
Configure the items in each dialog box as necessary.
When you finish choosing your settings, click Print.
The data is sent to the printer.
To cancel printing, see Cancel Printing on page 2-13.
BASIC PRINTER OPERATION 2 - 11
Downloaded from ManualsPrinter.com Manuals
Using Balloon Help on Macintosh® (Mac OS® 8.6-9.2 only)
Help for the printer is provided with the printer driver. See Help when you need to know about printer
driver items and settings, or need to check different printing methods when problems occur.
Balloon Help is provided with the Macintosh® printer driver.
Use Balloon Help to find out the functions of individual items.
To access Balloon Help, display the dialog box that contains the item in question.
The example below is for the General Settings dialog box.
For details about how to display the Properties dialog box, see Printing from Macintosh® on page 2-11.
1
2
Click Show Balloons on the Help menu of the menu bar.
Move the mouse to the item in question. A description of the item appears.
To hide Balloon Help, click Hide Balloons on the Help menu on the menu bar.
2 - 12 BASIC PRINTER OPERATION
Downloaded from ManualsPrinter.com Manuals
Cancel Printing
To cancel printing, first cancel the computer printer command.
Next, use the printer’s control panel to cancel printing from the printer.
Cancel Printing at the Computer
The steps to cancel printing vary depending on the type of operating system you are using.
In Windows®
The following example is for Windows® XP.
Follow the steps below:
1 On the Start menu, click Printers and Faxes.
The Printers window opens.
2 Double-click the appropriate printer.
The printer window appears.
3 Click the document that you want to cancel and press the Delete key on the keyboard.
Continue to Cancel Printing at the printer’s Control Panel.
On a Macintosh® Computer
Mac OS® 8.6 - 9.2
1
2
Double-click the printer from the printer list.
Select the document that you want to cancel and click
.
Mac OS® X 10.1 / 10.2
1
2
3
Open Print Center.
Double-click the printer icon on the Desktop.
Select the document that you want to cancel and delete.
Continue to Cancel Printing at the printer’s Control Panel.
BASIC PRINTER OPERATION 2 - 13
Downloaded from ManualsPrinter.com Manuals
Cancel Printing at the printer’s Control Panel
Perform this operation to cancel the print data from the printer after canceling the print command on the
computer. Note that the printer finishes printing the current page.
For details about control panel operations, see Basic Menu Operation on page 4-4.
↓
Printing
LPD
(The printer is printing)
Tray 1
↓
1
Press the Job Cancel/Back button once.
The printer begins to process the printing cancellation.
Cancelling
↓
When the cancellation finishes, the print screen reappears.
Ready to Print
(The print screen. The printer is ready to print.)
2 - 14 BASIC PRINTER OPERATION
Downloaded from ManualsPrinter.com Manuals
Changing the Configuration for Options
Once you set the initial configuration of the printer, you must reconfigure the printer driver when you
install the following options:
1. 1 Tray Module
2. 2 Tray Module
3. Hard disk
4. Memory expansion
3
1
2
4
For details about how to install options, see the instructions provided with the options. In the following
section, it is assumed that the options are already installed.
Memory expansion
In general, DIMM must have the following specifications:
Type:
144pin and 64bit output
Clock frequency:
100MHz or more
Capacity:
64Mbyte-256Mbyte
Dram Type:
SDRAM 2 Bank
The following DIMM sizes can be installed:
US
64 MB
TECHWORKS
12345-0001
128 MB
TECHWORKS
12462-0002
256 MB
TECHWORKS
12469-0001
Europe
64 MB
128 MB
256 MB
Buffalo Technology
Buffalo Technology
Buffalo Technology
VN133-64M
VN133-128M
VN133-256M
BASIC PRINTER OPERATION 2 - 15
Downloaded from ManualsPrinter.com Manuals
In Windows®
Follow the steps below. The following example is for Windows® XP.
1 On the Start menu, click Printers and Faxes.
The Printers window opens.
2 Click the appropriate printer and on the File menu, click Properties.
The Properties dialog box opens.
3 Click the Printer Configuration tab.
4 Select the options added to the printer and click OK or Apply.
On a Macintosh® computer
Follow the steps below:
For Mac OS® 8-6 - 9.2
1
2
3
Select the Printer icon on your Desktop.
Select Change Setup... on Printing menu.
Select the options added to the printer and click OK.
For Mac OS® X 10.2
This is not available in Mac OS® X 10.1.
1
2
3
4
5
6
Open Print Center.
Select the printer from printer list.
Select Show Info from Printers menu.
Select Installable Options.
Select the options added to the printer and click OK.
Close the Print Center
2 - 16 BASIC PRINTER OPERATION
Downloaded from ManualsPrinter.com Manuals
3
Loading Paper and Usable Paper Types
Suitable and Unsuitable Paper Types
Using paper that is unsuitable for printing can cause paper jams and deteriorate print quality. We
recommend that you use the types of paper listed below to get the best results from your printer.
Suitable Paper Types
Suitable Basis Weight
When using stationary supplier paper, make sure that it complies with the following specifications.
However, we recommend that you use standard domestic paper.
Feeding Method
Specifications
Multi-purpose Tray (MP Tray)
Basis weight: 64 to 216 g/m2
(17 to 57 lb)
Standard Paper Tray (tray1)
Optional Tray module (trays 2, 3)
Basis weight: 64 to 105 g/m2
(17 to 28 lb)
■ Basis weight refers to the weight of one square meter of paper.
Recommended Paper
We recommended the following paper types for this printer:
Paper Type
Europe
USA
2
Plain paper
Xerox Premier 80 g/m (21.3 lb)
Xerox Business 80 g/m2 (21.3 lb)
M-real DATACOPY 80 g/m2(21.3 lb)
Xerox 4200DP 20 lb
Hammermill Laser Paper 24 lb
Recycled paper
Xerox Recycled Supreme 80 g/m2
-
Transparency
3M CG3300
3M CG 3300
Label
Avery laser label L7163
Avery laser label #5160
■ Use long-grain paper.
■ Use paper with a moisture content of approximately 5%.
LOADING PAPER AND USABLE PAPER TYPES 3 - 1
Downloaded from ManualsPrinter.com Manuals
Special paper
You can print the following types of 'speciality paper' from the multi-purpose tray.
Paper Type
Important
Transparencies
Do not use full color transparencies (a white frame border).
Label sheets
Use label sheets that are uncut with labels covering the whole
sheet.
Envelopes
• Com-10
• Monarch
• C5
• DL
Do not use envelopes that have tape seals. Printing some
types of pre-glued envelopes may not be possible, depending
on the condition of the adhesive.
We recommend using envelopes designed for laser printers.
Cardboard
Basis weight: 100 to 216 g/m2 (26 to 57 lb)
When printing on rigid cardboard, the position of the image
may shift.
Coated paper
When printing on coated paper, feed the sheets one at a time.
Moisture can cause the sheets to stick together, causing more
than one sheet to go through at one time, which can result in
malfunction or damage to the printer.
PANTONE® Calibrated
There are many variables in the process of reproducing color generated by the HL-4200CN, any one of
which may affect the quality of the PANTONE Color simulation including type of paper used, type of toner
used, effective final resolution and dot structure/halftones. For optimal results, we recommend that you
use NEUSIEDLER Color Copy 90 g/m2 (24.0 lb), a genuine Brother toner cartridge, and the Pantone
Mode setting (only for PostScript driver.)
3 - 2 LOADING PAPER AND USABLE PAPER TYPES
Downloaded from ManualsPrinter.com Manuals
Paper Trays, Types, and Sizes
The paper types, sizes, and the maximum number of sheets that you can load in the different trays are
shown in the table below. Load all paper into the printer in the portrait orientation (lengthwise). The
names used for the paper trays in the printer driver and this User’s Guide are as follows:
Standard Paper tray
Tray 1
Multi-purpose tray
MP Tray
Optional tray module
Tray 2 / 3
Tray 1
MP tray
Tray 2 / 3
Paper size
A4, Letter, Legal, B5 (JIS),
Executive, A5
A4, Letter, Legal, B5 (JIS),
Executive, A5,
Envelopes:
Com-10, Monarch, DL, C5
User-defined size:
width: 90.0 to 215.9 mm
(3.5 to 8.5 in.),
length: 139.7 to 900.0 mm
(5.5 to 35.4 in.)
A4, Letter, Legal, B5 (JIS),
Executive, A5
Number of
sheets
500 sheets
100 sheets
500 sheets
Media type
Tray 1
Plain paper
L
MP tray
L
Tray 2 / 3
L
Duplex
printing
Select the Media type from the
printer driver
L
Plain paper
L
Thick paper1
64 g/m2 to 105 g/m2
(17 to 28 lb)
Thick paper
L
106 g/m2 to 162 g/m2
(29 to 43 lb)
L
Thick paper2
Transparency
Labels
L
L
L
Envelopes
L
Envelope
Thicker paper
163 g/m2 to 216 g/m2
(44 to 57 lb)
Transparency
Coated paper
Glossy paper
Labels
■ Using low-quality paper can cause creasing and deteriorate print quality.
■ When printing on paper longer than 355.6 mm (14 in.), put one sheet at a time in the MP tray,
and support the paper with your hands while it feeds through the printer.
■ The number of sheets that you can load varies according to the paper thickness.
■ For A5 portrait from Tray 1/2/3, you can use up to 350 sheets.
LOADING PAPER AND USABLE PAPER TYPES 3 - 3
Downloaded from ManualsPrinter.com Manuals
The illustration below shows the width and length mentioned in the table on 3-3.
1. Length
2. Portrait orientation
3. Feed direction
4. Width
Duplex Printing Paper Types and Sizes
The HL-4200CN can print on both sides of a sheet of paper.
Automatic Duplex Printing
For automatic duplex printing, select Duplex in the printer properties after executing the print command.
You can use the following paper types and sizes for duplex printing:
Paper Type
Plain Paper
(Basis weight: 64 to 105 g/m 2 (17 to 28 lb))
Thick Paper
(Basis weight: 106 to 162 g/m2 (29 to 43 lb))
Paper Sizes
A4, Letter, Legal, B5 (JIS), Executive, A5
Manual Duplex Printing with the Multi-purpose Tray
To print on both surfaces of the following types of specialty paper, print the front surface of all pages first,
then put the sheets into the multi-purpose tray to print on the back surface of the pages.
Do not print on the back surface of sheets whose front surface was printed using a printer other than the
HL-4200CN.
Paper Type
Plain Paper
(Basis weight: 64 to 105 g/m 2 (17 to 28 lb))
Thick Paper
(Basis weight: 106 to 162 g/m2 (29 to 43 lb))
Thicker Paper
(Basis weight: 163 to 216 g/m2 (44 to 57 lb))
3 - 4 LOADING PAPER AND USABLE PAPER TYPES
Downloaded from ManualsPrinter.com Manuals
Paper Sizes
A4, Letter, Legal, B5 (JIS), Executive, A5
User-defined size:
width: 149 to 210.0 mm (5.9 to 8.3 in.)
length: 215.9 to 355.6 mm (8.5 to 14 in.)
Unsuitable Paper Types
Avoid using the following paper types as they can cause paper jams or damage the printer.
■ Transparencies other than those recommended.
■ Inkjet paper
■ Paper that is too thick or too thin
■ Paper with a face preprinted with another printer or copier,
or paper preprinted with ink
■ Folded, creased, or torn paper
Full color transparencies
Inkjet paper
■ Damp or wet paper
■ Curled or warped paper
■ Sheets affected by static electricity
■ Layered or adhesive paper
■ Specially coated paper
■ Colored paper with a treated surface
■ Paper printed with ink that cannot withstand temperatures
of 155 ° C (311 ° F).
Curled paper
■ Heat-sensitive paper
■ Carbon paper
■ Paper with a rough surface such as textured or fiber form
paper
■ Acidic paper that can cause the characters to fade over
time. Use neutral paper.
■ Envelopes with a rough surface or clips attached
■ Paper with staples, paper clips, tape, or ribbons attached
■ Envelopes with sticky adhesive
■ Label sheets where the backing is visible or is precut.
Paper with tape attached
Shiny backing paper visible
■
■
■
■
■
Precut label sheets
T-shirt transfer paper (using heat press)
Transfer paper (using cold water)
Digital coated glossy paper
Label film (transparent, colorless)
Perforated paper
LOADING PAPER AND USABLE PAPER TYPES 3 - 5
Downloaded from ManualsPrinter.com Manuals
Storing Paper
Failure to properly store paper can cause paper jams, deteriorate print quality, or damage the printer.
Store paper under the following conditions:
■ Between 10 ° C and 30 ° C (50 to 86 ° F)
■ Between 30% and 65% relative humidity
■ In a dry place
■ After opening the package, wrap unused sheets in their original package and store in a cabinet or
other dry place.
■ Store paper on a flat surface. Do not lean paper against other objects or place it in an upright position.
■ Avoid storing paper in a way that may cause creasing, folding, or curling.
■ Store paper away from direct sunlight.
3 - 6 LOADING PAPER AND USABLE PAPER TYPES
Downloaded from ManualsPrinter.com Manuals
Loading Paper
See the appropriate section below to load or change paper.
For more information about suitable paper types, see Suitable and Unsuitable Paper Types on page 3-1.
Load Paper in the Paper Tray
Follow the steps below to load paper into the paper tray.
Load paper into the optional Tray Module the same way.
To load A5 paper or to change to a paper size other than A5, you need to install or remove the A5 spacer.
To install or remove the A5 spacer, see Load A5 Paper in the Paper Tray/Changing the Paper Size from
A5 on page 3-10.
1
Gently pull out the paper tray until it stops.
2
Hold the paper tray with both hands, and then lift the
front slightly and pull it completely out of the printer.
Place the tray on a flat surface.
LOADING PAPER AND USABLE PAPER TYPES 3 - 7
Downloaded from ManualsPrinter.com Manuals
3
Move the side paper guides to their outermost
positions.
4
Gently lift the end paper guide to move it, and insert
the pins at the bottom of the guide in the holes
(indicated by the
mark) corresponding to the
paper size that you want to load. Make sure that the
end guide is properly inserted into the appropriate
holes for the paper size.
If the end paper guide is not inserted properly into
the hole it could move slightly and prevent automatic
paper size detection. If this occurs, move the end
paper guide all the way to its outermost position
again, and then realign it with the appropriate paper
size mark.
5
Align the four corners of the paper stack and insert
the paper (print side up) under the tab.
■ Do not use paper that is folded, creased, or
warped.
■ Make sure that all the paper is under the tab.
■ Do not overload the paper tray.
1. Tab
2. MAX loading limit
6
Align the side guides with the edges of the paper.
Pushing the paper guides too hard against the
edges of the paper stack can cause a paper jam.
However, if the paper guides are too loose, the
paper may twist as it feeds through the printer.
3 - 8 LOADING PAPER AND USABLE PAPER TYPES
Downloaded from ManualsPrinter.com Manuals
7
Hold the paper tray with both hands as you align it
with the opening in the printer and gently place it in
the printer.
8
Push the paper tray completely back into the printer.
Do not use excessive force on the paper tray. Doing
so could damage the paper tray or the inside of the
printer.
There is an indicator next to the paper tray that tells
you how much paper remains in the tray. Use this
meter as a guide for refilling the paper tray.
9
When printing A4 or Letter size paper, lift the
stopper on the top cover.
LOADING PAPER AND USABLE PAPER TYPES 3 - 9
Downloaded from ManualsPrinter.com Manuals
Load A5 Paper in the Paper Tray/Changing the Paper Size from A5
Loading A5 Paper
Follow the steps below to load A5 paper into the paper tray.
Load paper into the optional Tray Module the same way.
1
Gently pull out the paper tray until it stops.
2
Hold the paper tray with both hands as you lift the
front slightly and pull it completely out of the printer.
Place the paper tray on a flat surface.
3
Move the side paper guides to their outermost
positions.
3 - 10 LOADING PAPER AND USABLE PAPER TYPES
Downloaded from ManualsPrinter.com Manuals
4
Gently lift the end paper guide to move it, and insert
the pins at the bottom of the guide in the holes
(indicated by the
mark) corresponding to the
paper size that you want to load. Make sure that the
end guide is properly inserted into the appropriate
holes for the paper size.
B5
A5
5
If the end paper guide is not inserted properly into
the hole it could prevent automatic paper size
detection. If this occurs, move the end paper guide
all the way to its outermost position again, and then
realign it with the appropriate paper size mark.
Grip the A5 spacer as you gently lift it up while
pulling it forward and removing it from the tray.
6
Align the A5 spacer with the paper guide slot and
push it down until it clicks.
7
Align the four corners of the paper stack and insert
the paper (print side up) under the tab.
■ Do not use paper that is folded, creased, or
warped.
■ Make sure that all the paper is under the tab.
■ Do not overload the paper tray.
LOADING PAPER AND USABLE PAPER TYPES 3 - 11
Downloaded from ManualsPrinter.com Manuals
8
Align the side guides with the edges of the paper.
Pushing the paper guides too hard against the
edges of the paper stack can cause a paper jam.
However, if the paper guides are too loose, the
paper may twist as it feeds through the printer.
9
Hold the paper tray with both hands as you align it
with the opening in the printer and gently place it in
the printer.
10
Push the paper tray completely back into the printer.
Do NOT use excessive force on the paper tray.
Doing so could damage the paper tray or the inside
of the printer.
An indicator next to the paper tray tells you how much
paper remains in the tray. Use this meter as a guide
for refilling the paper tray.
3 - 12 LOADING PAPER AND USABLE PAPER TYPES
Downloaded from ManualsPrinter.com Manuals
Changing the Paper Size from A5
Follow the steps below to remove the A5 spacer, and then load a different paper size into the paper tray.
Load paper into the optional Tray Module the same way.
1
Gently pull out the paper tray until it stops.
2
Hold the tray with both hands as you lift the front
slightly and pull it completely out of the printer.
Place the paper tray on a flat surface.
3
Move the side guides to their outermost positions
and remove the paper from the tray.
LOADING PAPER AND USABLE PAPER TYPES 3 - 13
Downloaded from ManualsPrinter.com Manuals
4
Grip the A5 spacer as you gently lift it up while
pulling it forward and removing it from its position
next to the paper guide.
5
Insert the A5 spacer into its storage slot in the paper
tray.
6
Gently lift the end paper guide to move it, and insert
the pins at the bottom of the guide in the holes
(indicated by the
mark) corresponding to the
paper size that you want to load.
Make sure that the end guide is properly inserted
into the holes for the paper size.
7
If the end paper guide is not inserted properly into
the hole it could prevent automatic paper size
detection. If this occurs, move the end paper guide
all the way to its outermost position again, and then
realign it with the appropriate paper size mark.
Align the four corners of the paper stack and insert
the paper (print side up) under the tab.
■ Do not use paper that is folded, creased, or
warped.
■ Make sure that all the paper is under the tab.
■ Do not overload the paper tray.
3 - 14 LOADING PAPER AND USABLE PAPER TYPES
Downloaded from ManualsPrinter.com Manuals
8
Align the side guides with the edges of the paper.
Pushing the paper guides too hard against the
edges of the paper stack can cause a paper jam.
However, if the paper guides are too loose, the
paper may twist as it feeds through the printer.
9
Hold the paper tray with both hands as you align it
with the opening in the printer and gently place it in
the printer.
10
Push the paper tray completely back into the printer.
Do not use excessive force on the paper tray. Doing
so could cause damage to the paper tray or the
inside of the printer.
There is an indicator next to the paper tray that tells
you how much paper remains in the tray. Use this
meter as a guide for refilling the paper tray.
LOADING PAPER AND USABLE PAPER TYPES 3 - 15
Downloaded from ManualsPrinter.com Manuals
11
When printing on A4 or Letter size paper, lift the
stopper on the top cover.
Load Paper into the Multi-purpose Tray
Follow the steps below to load paper into the multi-purpose tray.
To avoid paper jams, do not load paper of different sizes into the multi-purpose tray at the same time
and do not refill the tray before it is empty.
1
If closed, open the MP tray.
To avoid damage to the MP tray, do not use
excessive force or place heavy objects on the tray.
2
Adjust the paper guide to the mark for the size that
you are about to use.
When printing on long paper, pull out the MP tray
extension. Printing long paper with the MP tray
extension retracted can cause the paper to fall off or
prevent it from feeding.
3 - 16 LOADING PAPER AND USABLE PAPER TYPES
Downloaded from ManualsPrinter.com Manuals
3
All stacks of print media, plain paper,
transparencies, label sheets, and envelopes, need
to be fanned before loading so there is air between
the sheets.
Fanning the stack helps prevent paper jams.
■ Fan all media before loading.
■ If the paper is poorly cut and the edges are not
clean, remove the unsuitable sheets before
loading the paper stack.
4
5
Align the four corners of the paper stack and insert
it (print side down) until it lightly touches the feeding
slot.
■ Do not use paper that is folded, creased, or
warped.
■ Do not overload the paper tray.
■ When printing on sheets longer than Legal
paper (356 mm (14 in.)), load the sheets one at
a time. Moisture can cause the sheets to stick
together, causing more than one sheet to go
through at one time, which can result in
malfunction or damage to the printer. When
feeding long paper, support each sheet with
your hands to ensure proper feeding.
When loading paper, carefully align the paper
guides with the edges of the paper so that there is a
small gap between the paper stack and the guides.
Pushing the paper guides too hard against the edge
of the paper stack can curl the paper and cause
paper jams.
Load the paper so that it is straight in the paper tray.
If the paper is not loaded correctly, the printing
position may shift and cause incorrect printing.
LOADING PAPER AND USABLE PAPER TYPES 3 - 17
Downloaded from ManualsPrinter.com Manuals
Printing on Envelopes, Transparencies,
and Custom-size (Long) Paper
Take care when selecting the settings for envelopes, because choosing them incorrectly may result in
printed side or text direction errors.
When printing on transparencies or specialty paper, make sure that you select the type of paper in the
printer driver setting and image quality before sending the print command.
When frequently printing specialty paper in Windows®, we recommend that you register the
necessary settings in the User Settings tab.
Registering the settings saves you time, because you will not need to configure the driver each time
you print. For details about the User Settings tab, see Help.
Printing on Envelopes
Use the multi-purpose tray to print envelopes.
Close the envelope flaps before feeding and load as illustrated below. You can use Com-10, Monarch,
C5 and DL envelopes.
■ Do not use envelopes with tape seals. Printing on some types of pre-glued envelopes may not
be possible, depending on the condition of the adhesive. We recommend using envelopes
designed for laser printers.
■ Do not use envelopes larger than 90 mm (3.5 in.) wide and 140 mm (5.5 in.) long.
■ Using poor-quality envelopes can cause creasing and deteriorate print quality.
Most envelopes will perform acceptably on your printer. However, some envelopes will have feeding
and print quality problems because of their construction. A suitable envelope should have edges with
straight, well creased folds and should not have more than two thicknesses of paper along the
leading edge. The envelope should lie flat and not be of baggy or flimsy construction. Purchase
quality envelopes only from a supplier who understands that the envelopes will be used in a laser
printer. All envelopes should be tested prior to use to ensure desirable print results.
The following is an example of how to print the address on an envelope.
Example
printed like this.
3 - 18 LOADING PAPER AND USABLE PAPER TYPES
Downloaded from ManualsPrinter.com Manuals
1
2
3
Adjust the paper guide to the mark for the size of envelope you are about to use.
Make sure the flap is closed, load the envelope
with the side to be printed on facing down, and the
flap facing right.
Start printing from your program after putting the
envelope in the printer.
Now choose the items in Printer Driver Settings
(for envelopes) as shown below:
Printer Driver Settings (for envelopes)
Windows® settings
Tab
Paper/Output
Item
Setting
Paper Size
Com-10
Monarch
C5
DL
Same as Document Size (When the document size is
Com-10, Monarch, C5 or DL)
Reverse Print
Turn on if necessary.
Duplex Print
No Duplex
Paper Tray
MP Tray
Paper Type
Envelope
Macintosh® settings
Dialog Box
Paper Settings
Printer Settings
Item
Setting
Paper Size
Com-10
Monarch
C5
DL
Same as Document Size (When the document size is
Com-10, Monarch, C5 or DL)
Reverse Print
Turn on if necessary.
Paper Tray
MP Tray
Duplex Print
OFF
Paper Type
Envelope
For details about individual printer driver items, see Help. For details about how to use Help, see
Using Windows® Help on page 2-9 or Using Balloon Help on Macintosh® (Mac OS® 8.6-9.2 only) on page
2-12.
LOADING PAPER AND USABLE PAPER TYPES 3 - 19
Downloaded from ManualsPrinter.com Manuals
Printing on Transparencies
Use the multi-purpose tray to print transparencies.
■ Use only the recommended type of transparencies (3M CG3300). Do not use any other type,
such as color transparencies (bordered with a white frame).
■ Using unsuitable transparencies can cause damage to the printer.
■ Do not use transparencies bordered with a white frame.
■ Remove each transparency sheet from the face down output tray as soon as it is printed. When
transparencies are allowed to accumulate in the face down output tray, static electricity can build
up and cause jams.
Follow the steps below to print transparencies.
1 Adjust the paper guide to the mark for the size you
are about to use.
2
Fan a few transparencies at a time.
3 - 20 LOADING PAPER AND USABLE PAPER TYPES
Downloaded from ManualsPrinter.com Manuals
3
Put the transparencies into the multi-purpose tray
until they lightly touch the feeding slot.
Do not use full color transparencies. They can jam
in the printer and damage the fuser unit.
4
Start printing from your program after loading the
transparencies in the printer.
Now choose the items for Printer Driver Settings
(for transparencies) as shown below:
Printer Driver Settings (for transparencies)
Windows® settings
Tab
Paper/Output
Item
Setting
Paper Size
A4 or Same as Document Size
(When the document size is A4)
Duplex
No Duplex
Paper Tray
MP Tray
Paper Type
Transparency
Macintosh® settings
Dialog Box
Paper Settings
Item
Setting
Paper Size
A4 or no change
(When paper size is A4)
Paper Type
Transparency
General Settings
Document Type
Transparencies
Printer Settings
Duplex
OFF
Paper Tray
MP Tray
You can also print transparencies with paper inserted between the sheets. For details about the way
to set paper between the sheets and the functions of individual printer driver items, see Help.
For details about how to use Help, see Using Windows ® Help on page 2-9 or Using Balloon Help on
Macintosh® (Mac OS® 8.6-9.2 only) on page 2-12.
LOADING PAPER AND USABLE PAPER TYPES 3 - 21
Downloaded from ManualsPrinter.com Manuals
Printing Custom-size Paper
Using the multi-purpose tray enables you to print custom-size paper or 'long' paper, longer than legal
portrait (355.6 mm (14 in.)).
The paper sizes suitable for use with this printer are as follows:
■ Single-sided printing: Width 90.0-215.9 mm (3.5 - 8.5 in.); Length 139.7-900.0 mm (5.5 - 35.4 in.)
■ Duplex printing: Width 149-215.9 mm (5.8 - 8.5 in.); Length 210-355.6 mm (8.2 - 14 in.)
Feeding custom-size paper sideways is not possible. Always feed this type of paper lengthwise.
To print on custom-size paper, you must set the paper size as a user-defined size first.
Setting a User Defined Size
With a Macintosh® computer, you need to set the user defined size while executing a print command
from a program. Continue to How to Print.
In Windows®, you need to set the user defined size before launching the print command from a program,
using the following steps: The following example is for Windows® XP.
1
2
3
4
5
6
7
On the Start menu, click Printers and Faxes.
The Printers window opens.
Choose the appropriate printer, click File on the tool bar, and select Properties.
The Properties dialog box opens.
Click the Default Settings tab.
Click Custom Paper Size.
The Custom Paper Size dialog box appears.
Select one of the five paper sizes.
For details of the Custom Paper Size dialog box
settings, see Help. For details about how to use
Help, see Using Windows ® Help on page 2-9 or
Using Balloon Help on Macintosh® (Mac OS® 8.6-9.2
only) on page 2-12.
When you finish choosing the settings, click OK in the Custom Paper Size dialog box.
In the Properties dialog box, click OK.
The user-defined size is now set.
3 - 22 LOADING PAPER AND USABLE PAPER TYPES
Downloaded from ManualsPrinter.com Manuals
How to Print
Follow the steps below to print on custom-size (long) paper.
1 Adjust the paper guide to the width of the paper
that you are about to use.
2 With the printed side facing down, put the paper
into the multi-purpose tray so that it lightly touches
the feeding slot.
3 Start printing from your program after putting the
paper in the MP Tray.
Choose the items for Printer Driver Settings (for
Custom-size (Long) Paper) as shown.
When printing on long paper, after giving the print
command, support the paper with your hands
while it feeds into the printer.
Printer Driver Settings (for Custom-size (Long) Paper)
Windows® settings
Tab
Paper/Output
Item
Setting
Paper Size
A paper size selected from Custom Size 1
- Custom Size 5 in the Default Settings tab in the printer
driver dialog box.
Paper Tray
MP Tray
Macintosh® settings
Dialog Box
Item
Setting
Paper Settings
Paper/Output
Set the paper size in the Custom Paper Size dialog box in
'Page Sizes'.
Custom Paper Size
long, short
Set the paper size that you want to use.
Printer Settings
Paper Tray
MP Tray
For details about individual printer driver items, see Help.
For details about how to use Help, see Using Windows® Help on page 2-9 or Using Balloon Help on
Macintosh® (Mac OS® 8.6-9.2 only) on page 2-12.
LOADING PAPER AND USABLE PAPER TYPES 3 - 23
Downloaded from ManualsPrinter.com Manuals
Duplex Printing
You can perform duplex printing with the printer, using one of the following steps.
■ For plain paper or thick paper, whether fed from a paper tray or the multi-purpose tray, duplex
printing is carried out automatically if you set this in the printer driver upon executing the print
command.
■ For thicker paper or glossy paper, you can print on the back surface of the paper from the
multi-purpose tray as long as the front surface of the paper was printed using this printer.
For details about the types of paper suitable for duplex printing, see Suitable Paper Types on
page 3-1.
If you use duplex printing frequently in Windows®, we recommend that you register the necessary
settings in the User Settings tab. Registering the settings saves you time, because you will not need
to configure the driver each time you print. For details about the User Settings tab, see Help.
Types of Duplex Printing
There are two types of duplex printing: long edge binding, and short edge binding. The results of printing
with the two types are shown below:
Long Edge Binding
Short Edge Binding
R
F
R
F
F
F
F
R
F
F = Front
R = Reverse
3 - 24 LOADING PAPER AND USABLE PAPER TYPES
Downloaded from ManualsPrinter.com Manuals
F
R
F
Duplex Printing
To print on both sides of plain paper, set the paper into the paper tray or multi-purpose tray.
Follow the steps below to print on both sides of plain paper.
1 If you are using plain paper (64 - 105 g/m2 (17 - 28 lb))
→a) put the paper lengthwise into the paper tray.
If you are using thick or thicker paper (106 - 216 g/m2 (29 - 57 lb))
→b) put the paper lengthwise into multi-purpose tray.
2
Start printing from your program after putting the paper in the appropriate tray.
Now choose the items for Printer Driver Settings as shown below:
Printer Driver Settings (for duplex printing)
Windows® settings
If you are using
a) Plain Paper
Tab
Paper/Output
b)Thick Paper
Paper/Output
Thicker Paper
Item
Setting
Duplex Print
Long Edge Binding or Short Edge Binding
Paper Type
Paper (64 - 105 g/m2 (17 - 28 lb)) : Plain Paper
Paper Tray
MP Tray
Paper Type
Paper (106 - 162 g/m2 (29 - 43 lb)) : Thick Paper1
Paper (163 - 216 g/m2 (44 - 57lb)) : Thick Paper2
Macintosh® settings
If you are using
a) Plain paper
b) Thick Paper
Thicker paper
Dialog Box
Item
Setting
2
Paper Settings
Paper Type
Paper (64 - 105 g/m (17 - 28 lb)) : Plain Paper
Printer Settings
Duplex Print
Long Edge Binding or Short Edge Binding
Printer Settings
Paper Tray
MP Tray
Paper Settings
Paper Type
Paper (106 - 162 g/m 2 (29 - 43 lb)) : Thick Paper1
Paper (163 - 216 g/m 2 (44 - 57lb)) : Thick Paper2
With custom sizes, it is necessary to configure other items to suit the paper size. See the previous
section or the printer driver Help for details about these settings. For details about how to use Help,
see Using Windows® Help on page 2-9 or Using Balloon Help on Macintosh® (Mac OS® 8.6-9.2 only) on
page 2-12.
When printing on the back of speciality paper, make sure that you configure the necessary items in the
printer driver when giving the print command from the program.
LOADING PAPER AND USABLE PAPER TYPES 3 - 25
Downloaded from ManualsPrinter.com Manuals
4
Control Panel
Control Panel Overview
The control panel consists of LED indicators, a Liquid Crystal Display (LCD) and several buttons. This
section describes the names and functions of the control panel's parts.
1. Liquid Crystal Display (LCD)
2. LED indicators (Light Emitting Diode indicators)
3. Buttons
LED Indicators
The LED indicators are lights that show the printer status.
Name
Ready indicator
Alarm indicator
Status
Description
Green
Indicates printing status.
On
Indicates that the printer is not receiving data or that it is ready to print.
Flashing
The printer is receiving print data.
Off
Printing is not possible.
Red
Indicates an error.
On
Indicates a paper jam or other problem that the user can correct.
Flashing
There is a problem that the user cannot correct. Call your dealer or
Brother Customer Service.
Off
The printer is working normally.
4 - 1 CONTROL PANEL
Downloaded from ManualsPrinter.com Manuals
Liquid Crystal Display (LCD)
The LCD shows the printer status (print screen) and menus for configuring the printer (menu screen).
The items displayed differ depending on the printer settings and installed options.
Print screen
When the printer is waiting for data or printing, this screen is displayed. The contents of the print screen
are as follows.
Printer Status
Printing
Parallel
Input port
Tray1
Paper tray
Name
Description
Printer status
Shows the printer status.
Example: Please Wait…, Printing, Ready to Print
Input port
Shows the port through which the printer is receiving data.
Example: Parallel, USB, LPD, NetWare, AppleTalk
Paper tray
Shows the paper tray in use.
Example: Tray 1, Tray 2, Tray 3, MP Tray
Menu screen
Use this screen to configure the printer.
The menu screen appears when you press the Menu button. The first screen shows the following:
Menu
1:System
For details about the menu screen, consulte Basic Menu Operation en la página 4-4.
CONTROL PANEL 4 - 2
Downloaded from ManualsPrinter.com Manuals
Buttons
You can control the basic printer operations and change various printer settings with seven buttons
(Menu,
,
,
,
, Form Feed/Set, Job Cancel/Back).
The operations depend on which screen is displayed (print screen or menu screen).
Name
Menu button
Print screen
Menu screen
Switches to the menu screen.
Closes the menu screen and switches to
the print screen.
buttons
–
Allows you to scroll through menus and
menu options.
buttons
–
Switches to different menu levels and
moves the cursor between parameters.
Pressing the
button once in a menu
moves the menu one level down. Pressing
the
button moves the menu one level
up.
Form Feed/Set
button
Forces the remaining data to be printed. For
details, consulte Forcing the Printer to Print
Remaining Data (When Printing is Halted)
en la página 5-23.
Selects menus and menu options. Moves
the menu one level down when a menu is
selected. Sets a parameter when one is
displayed.
Job Cancel/Back
button
Cancels printing. For details, consulte
Cancel Printing en la página 2-13.
Moves the displayed menu one level up.
4 - 3 CONTROL PANEL
Downloaded from ManualsPrinter.com Manuals
Basic Menu Operation
Use the menu screen to set the energy save mode, job time-out, network settings and printer
configuration.
Menu Structure and Basic Operations
There are 5 main menus.
For details about individual menu screens, consulte List of Menu Items en la página 4-6.
Menu
Contents
1:System
Use this menu to program the energy save mode, job log settings, and basic printer
operation.
2:Maintenance
Use this menu to reset NV(Non Volatile)memory to its defaults, adjust paper quality to
plain paper, and set access restrictions to certain menus.
3:Parallel
Use this menu to configure the parallel interface.
4:Report/List
Use this menu to print the printer configuration list, panel settings list, PCL font list, and
print log.
5:Network
Use this menu to change network settings.
6:USB
Use this menu to change the Adobe Protocol settings.
Each menu has several levels. Program the printer by selecting the different levels and selecting the
option you want.
Re-setting the printer settings
Example: Re-set the Job time-out setting to the factory default settings.
Press the
and
buttons simultaneously.
Job Timeout
_sec.
1
↓
Press the
and
buttons simultaneously.
The following screen appears.
When processing finishes, the default settings appear.
Job Timeout
30sec.
↓
2
Press the Form Feed/Set button. The parameters are now set.
Job Timeout
30sec.*
CONTROL PANEL 4 - 4
Downloaded from ManualsPrinter.com Manuals
What to do if you make a mistake?
Perform the appropriate operation below if you accidentally press a wrong button while using the control
panel.
You accidentally pressed the Form Feed/Set button, but you want to return to the preceding
screen.
Press the Job Cancel/Back or
button.
You accidentally pressed the
Press the
button.
button, but you want to return to the preceding screen.
You made a mistake and cannot display the preceding screen.
Press the Menu button and re-enter the settings.
You accidentally pressed the Form Feed/Set button and set the wrong option.
When the parameter is set, * appears next to it.
When * appears next to an option, pressing the Job Cancel/Back or the
button does not return to
the preceding screen. Re-enter that particular setting.
4 - 5 CONTROL PANEL
Downloaded from ManualsPrinter.com Manuals
List of Menu Items
This section describes the various settings you can change in each main menu.
When printing, it is possible to set some options in the menu screens from your computer. If the computer
settings differ from those on the printer, the computer settings take precedence.
'Default' refers to the factory settings of the printer.
System Settings
Used to program the Energy Save Mode, Job Log settings, and basic printer operation.
Power Save Time
Energy Save Mode reduces the electricity used by the printer when it is idle. Mode 1 partially reduces
the power used by certain parts of the printer.
When the printer is in Energy Save Mode 1, Ready/Standby appears on the display. When in this state,
the printer takes slightly more time than usual to start printing when it receives data.
The table below describes the situations in which the printer will stop being in Energy Save Mode:
Release from Energy Save
Mode 1
• When receiving print data.
• When printing a report or list with '4 Report/List'.
■ Mode 1 time-out (default: 3 minutes)
Set a time between 1 and 60 minutes. The printer automatically goes into Energy Save Mode 1
when it is idle for the length of time you set here.
Error Alarm
This allows you control whether the printer sounds or does not sound an audible alarm when an error
occurs.
■ Yes (default)
■ No
The volume of the alarm can not be adjusted.
CONTROL PANEL 4 - 6
Downloaded from ManualsPrinter.com Manuals
Job Timeout
The Job Timeout setting causes the printer to stop processing print data if it takes more than the preset
length of time for the remaining data to be received by the printer. When a job time-out occurs, the printer
only prints the data it received up to the time-out.
■ 5 to 300 seconds (default: 30 seconds)
Set the job time-out between 5 and 300 seconds.
■ OFF
Deactivates the Job Timeout function.
Panel Language
Use this to set what language appears on the control panel.
See the Quick Setup Guide for information on how to change your language.
Auto Log Print
If you want the Print Logs to print automatically, turn this setting on.
You cannot change this setting while the printer is processing print data.
Use the '4 Report/List' menu to print logs.
■ No (default)
The printer does not print logs automatically.
■ Yes
The printer automatically prints a log after 22 print jobs.
ID Print
You can choose where you want the user ID to print on the pages.
■ OFF (default)
■ Upper Left
■ Upper Right
■ Lower Left
■ Lower Right
4 - 7 CONTROL PANEL
Downloaded from ManualsPrinter.com Manuals
Text Print
Setting Text Print to Yes, will ensure all data will be printed as it is received and any control codes
embedded within the document will be ignored. For most printing environments, we recommend that you
set this option to Yes.
■ Yes (default)
The data is printed as text.
■ No
Data is not printed as text.
Auto Continue
When there is no paper in the tray that you specified from the driver, load the nearest paper size from
another tray.
■ No
The printer does not print until the specified paper is loaded.
■ Nearest fit (default)
The printer selects the nearest paper size, resizes the print job, then prints.
■ Larger fit
The printer selects the next larger paper size, resizes the print job, then prints.
■ Select Nearest
The printer selects the nearest paper size, does not resize the print job, then prints.
■ Select Larger
The printer selects the next larger paper size, does not resize the print job, then prints.
PS Error Report
Print the PostScript Error Report when the processing of the PostScript job cannot finish within the time
specified by the PS Job Timeout setting.
■ YES (default)
Print the error report.
■ NO
Does not print the error report.
PS Job Timeout
Set the time to deal with a PostScript job. If the processing of the PS job cannot finish within the given
time, a PostSript error will occur. Although you can make this setting using either the printer driver or the
control panel, the printer driver setting takes priority over the control panel setting for when the two
settings are different.
■ 0 to 900 seconds (default: 0 seconds)
CONTROL PANEL 4 - 8
Downloaded from ManualsPrinter.com Manuals
Maintenance Mode
Use this mode to reset the non-volatile (NV) memory or to adjust paper quality settings. You can use this
mode to restrict access to certain menus.
Init NVM
Resets the printer's NV memory. This resets all of the printer’s settings back to its factory settings, or
default settings.
The NV memory stores the printer’s configuration data, even when the printer is switched off.
You cannot change this setting while the printer is processing print data.
■ YES
Resets the printer's NV memory. Resetting the NV memory resets the printer back to its factory
(default) settings.
You must restart the printer for this operation to take effect. After programming settings, be sure
to restart the printer.
■ NO
Does not reset the NV memory and returns to the menu.
Security
When necessary, you can set a password to limit access to menus. This helps prevent settings from
being changed accidentally.
■ PanelSetProtect (default: No)
Select 'ON' to set a password.
■ Change Password
Set a 4-digit password.
If you forget the password, reset the NV memory. Consulte Init NVM en la página 4-9.
F/W (Firmware) Download
■ Accept
Accept the on-demand download.
■ Reject (default)
Reject the on-demand download.
If you change this setting, call your administrator first.
4 - 9 CONTROL PANEL
Downloaded from ManualsPrinter.com Manuals
BTR CurrentAdj
When duplex printing on non-recommended paper, the print quality may be poor. To improve the quality,
change this setting according to the type of media that is being used.
■ Plain Paper
■ Plain Paper BK (BackFace)
■ Plain Paper (HighGloss)
■ Plain Paper (HighGloss and BackFace)
■ Thick Paper 1
■ Thick Paper 1 (BackFace)
■ Thick Paper 2
■ Thick Paper 2 (BackFace)
■ Glossy Paper
■ Glossy Paper (BackFace)
Media Current Adj. default setting is 0.
Media Current Adj. setting may range from -20 to +30.
If white spots appear on the printout, adjust the Media Current Adj. in the direction of -20
If the print is bluish or has toner scatter, adjust the Media Current Adj. in the direction of +30
Auto PHD align
When you set up the printer or change the print head cartridge, the printer adjusts the Color Registration
automatically.
■ ON (default)
■ OFF
Deactivates the Auto PDF align function.
ColorRegiCorrect
Use ColorRegiCorrect to print the color registration adjustment chart. After setting up or moving the
printer, print the color registration adjustment chart and adjust the color registration to ensure that colors
are correctly aligned when printed.
■ Auto (default)
Adjust the Color Registration automatically.
■ Correction chart
Print the corrected Color Registration chart.
■ Enter number
Enter values to adjust the Color Registration.
The color registration chart is printed on A4 or Letter paper. (The requested paper size depends on
your country.) Put the A4 or Letter paper in lengthwise into the paper tray.
For details about this operation, consulte Adjusting Color Registration en la página 1-1.
CONTROL PANEL 4 - 10
Downloaded from ManualsPrinter.com Manuals
Parallel
Use Parallel to configure the parallel interface.
ECP
Use ECP to configure the ECP communication mode of the parallel interface.
■ Enabled (default)
The printer receives data in ECP mode.
■ Disabled
The printer does not receive data in ECP mode.
Adobe Protocol
To set the Adobe Protocol choose one of the following:
■ Auto
■ Standard
■ BCP
■ TBCP (default)
4 - 11 CONTROL PANEL
Downloaded from ManualsPrinter.com Manuals
Report/List
Use Report/List to print reports and lists.
Reports and lists are printed on A4 or Letter paper. (The requested paper size depends on your
country.) Put A4 or Letter paper lengthwise into the paper tray.
Printer Settings
Printer Settings is a list of the installed hardware and the configuration details.
For an example of the printer configuration list, consulte Confirming Printer Configuration and Network
Settings en la página 7-19.
Panel Settings
Panel Settings is a detailed list of all the settings in the control panel menus.
PCL Font List
PCL Font List is a list of the available PCL data fonts.
Log Print
Log Print is a detailed list of the processed print jobs (maximum 22). Use this list to confirm that jobs
were printed correctly.
For an example of the Print Log, consulte Checking the Print Log en la página 7-20.
PS (PostScript) Font List
PS Font List is a list of the available PS fonts.
Demo Page
Print the demonstration page.
CONTROL PANEL 4 - 12
Downloaded from ManualsPrinter.com Manuals
Network
Use Network to make or change network settings.
■ You cannot change the Network setting while the printer is processing print data.
■ You must restart the printer for settings to take effect. After programming settings, be sure to
restart the printer.
Ethernet
Use Ethernet to set Ethernet communication speed and mode.
■ Auto (default)
10Base-T Half, 10Base-T Full, 100Base-TX Half, or 100Base-TX Full is selected automatically.
■ 10Base/Half
■ 10Base/Full
■ 100Base/Half
■ 100Base/Full
TCP/IP
Use TCP/IP to make TCP/IP settings. This menu contains the following:
■ Setup IP Address
Select how to obtain an IP address. Parameters are as follows:
DHCP (default)
The IP address is obtained from a DHCP server on the network.
Panel
Use this to set the IP address from the control panel.
■ IP Address
Use this to set the IP address.
[aaa.bbb.ccc.ddd]
Set aaa, bbb, ccc, and ddd between 0 and 255.
You cannot use the following:
224.xxx.xxx.xxx or 255.xxx.xxx.xxx
127.xxx.xxx.xxx
■ These settings are ignored when you select DHCP in Setup IP Address. To enable the settings,
select 'Panel' in 'Setup IP Address'.
■ Specifying the wrong IP address can affect the entire network. Before setting an IP address, call your
system administrator.
4 - 13 CONTROL PANEL
Downloaded from ManualsPrinter.com Manuals
■ Subnet Mask
Use this to set the subnet mask address.
[aaa.bbb.ccc.ddd]
Use 0,128, 192, 224, 240, 248, 252, 254, or 255 for aaa, bbb, ccc, and ddd.
■ Gateway Address
Use this to set the gateway address.
[aaa.bbb.ccc.ddd]
Set aaa, bbb, ccc, and ddd between 0 and 255.
You cannot use the following:
224.xxx.xxx.xxx or 255.xxx.xxx.xxx
127.xxx.xxx.xxx
IPX Frame Type
Set a frame type when you use the printer in an IPX/SPX (NetWare) environment.
■ Auto (default)
Sets the frame type automatically.
■ 802.3
Set this to use IEEE 802.3 frame type.
■ 802.2
Set this to use IEEE 802.3/802.2 frame types.
■ SNAP
Set this to use IEEE 802.3/802.2/SNAP frame types.
■ Ethernet-II
Set this to use Ethernet-II frame type.
Protocol
Choose 'Enabled' or 'Disabled' for each setting to activate or deactivate them.
■ LPD (default: Enabled)
When using TCP/IP, set LPD to 'Enabled' to print with LPD (LPR) or to 'Disabled' if you do not
want to use this feature.
■ Port 9100 (default: Enabled)
When using TCP/IP, set Port 9100 to 'Enabled' to print with port 9100 (Raw Data Socket) or to
'Disabled' if you do not want to use this feature.
■ IPP (default: Enabled)
When using TCP/IP, set IPP to 'Enabled' to print with IPP (Internet Printing Protocol) or to
'Disabled' if you do not want to use this feature. Available with Windows® 2000/XP and
Windows® Me.
■ NetBIOS TCP/IP (default: Enabled)
When using NetBIOS (Windows network) with TCP/IP as the transport protocol, set NetBIOS
TCP/IP to 'Enabled' to print using NetBIOS or to 'Disabled' if you do not want to use this feature.
■ NetBEUI (default: Enabled)
When using NetBIOS (Windows network) with NetBEUI as the transport protocol, set NetBIOS
NetBEUI to 'Enabled' to print using NetBIOS or to 'Disabled' if you do not want to use this feature.
CONTROL PANEL 4 - 14
Downloaded from ManualsPrinter.com Manuals
■ NetWare (default: Enabled)
Set NetWare to 'Enabled' to print in a NetWare system or to 'Disabled' if you do not want to use
this feature.
■ AppleTalk (default: Enabled)
Set AppleTalk to 'Enabled' to print in an AppleTalk system or to 'Disabled' if you do not want to
use this feature.
IP Filter
Use IP Filter to block the reception of data from certain locations.
To block a particular IP address, specify the IP address in 'FilterX Address' (X is a number between 1
and 5) and the subnet mask in 'FilterX Mask' as numbers between 0 and 255. For the set address, select
'OFF' (default), 'Reject', or 'Accept' from 'FilterX Mode'.
You can filter up to 5 addresses. Filter1 takes priority over the other filters. Therefore, when setting filters
for a number of addresses, assign the addresses in ascending ranges from Filter1 to Filter5.
■ You can also set IP filter settings by connecting to the printer using a web browser. For a detailed
examples of these settings, see the Network User's Guide on the CD-ROM we provided.
■ For more information about Web Based Management, consulte Confirming Printer Status from Your
Computer en la página 7-21.
Init NVM
This resets the non-volatile memory of the printer’s network card (also known as a print server).
You cannot change this setting while the printer is processing print data.
■ YES
Resets the network card's NV memory. Resetting the NV memory restores the items of the '5
Network' menu to their defaults.
You must restart the printer for this setting to take effect. After programming settings, be sure to restart
the printer.
■ NO
Does not reset the NV memory and returns to the menu.
Adobe Protocol
To set the Adobe Protocol choose one of the following:
■ Auto (default)
■ Standard
■ BCP
■ TBCP
■ RAW
4 - 15 CONTROL PANEL
Downloaded from ManualsPrinter.com Manuals
USB
Adobe PS Protocol
To set the Adobe Protocol choose one of the following:
■ TBCP (default)
■ RAW
■ Standard
■ BCP
CONTROL PANEL 4 - 16
Downloaded from ManualsPrinter.com Manuals
5
Troubleshooting
Read this chapter to learn how to correct printer problems.
If it looks like you are unable to fix the problem
Turn the printer off, disconnect the power cord from the AC outlet/socket, and contact your dealer or
Brother Customer Service for assistance.
WARNING
Do not make any changes or modifications to the equipment, as this may cause a fire or an electric
shock.
CAUTION
Turn the printer off and disconnect the power cord from the AC outlet/socket before performing
maintenance on the printer. Failure to turn the printer off and disconnect the power cord may result in an
electric shock.
5 - 1 TROUBLESHOOTING
Downloaded from ManualsPrinter.com Manuals
Power Problems
Symptom
No power
The printer frequently
turns off
Possible Cause
Action
Is the printer off?
Press the I on the power switch to turn the
printer on.
See Turning the Printer On and Off on page
2-4.
Is the power cord loose or disconnected?
Turn the printer off and connect the power
cord properly. Turn the printer on again.
Is the printer connected to a correctly rated
outlet/socket?
Connect the printer to an AC power
outlet/socket that you know works. Do not
connect any other equipment to the
outlet/socket. Do not connect the printer to
an auxiliary power outlet on the back of a
computer.
Is the power cord loose or disconnected?
Turn the printer off and connect the power
cord correctly. Turn the printer on again.
The printer is defective.
Turn the printer off immediately, disconnect
the power cord from the outlet/socket, and
contact your dealer or Brother Customer
Service.
TROUBLESHOOTING 5 - 2
Downloaded from ManualsPrinter.com Manuals
Printing Problems
Indicators are on, flashing, or off.
Symptom
Possible Cause
Action
The Alarm lamp is on Is there an error message on the control
panel display?
Check the message and rectify the error
accordingly.
See What to Do When an Error Message
Appears on page 5-16.
The Alarm lamp is
flashing
A problem that the user cannot rectify has
occurred.
Note the error code on the display, turn the
printer off immediately, disconnect the
power cord from the outlet/socket, and
contact your dealer or Brother Customer
Service.
The Ready lamp is
off
Is the control panel display on the menu
screen?
Press the Menu button on the control panel
to go back to the print screen.
See Buttons on page 4-3.
The Ready lamp is
not on or is not
flashing after
executing the print
command
Is the parallel, USB, or Ethernet interface
cable loose or disconnected?
Turn the printer off and check the interface
cable. If necessary, reconnect the cable.
Is the network card loose?
Turn the printer off and reinstall the network
card into the printer.
Does the parallel, USB, or Ethernet
interface cable meet the required printer
specifications?
Use only the recommended parallel or USB
interface cables for the printer.
10Base-T and 100Base-TX Ethernet
interface cables are compatible with the
printer. Use twisted pair cables suitable for
network connections. For best
performance, we recommend that you use
a Category 5 100Base-TX Ehternet cable.
Is the computer configured correctly?
Check the following settings on your
computer and reconfigure any that are not
correct.
• Make sure that the appropriate printer
driver for your operating system is
installed.
• Make sure that the port is set correctly in
the printer driver.
Is the printer’s IP address correct? (When
using TCP/IP.)
Call your system administrator to obtain a
valid IP address. Use the printer
configuration list to confirm the IP address.
5 - 3 TROUBLESHOOTING
Downloaded from ManualsPrinter.com Manuals
Symptom
The Ready lamp is
not on or is not
flashing after
executing the print
command
Possible Cause
Is the printer properly configured for use
through a network? (When on a network.)
Action
Print the printer configuration list to check
the network settings.
Correct any inappropriate settings.
See the Network User's Guide on the
CD-ROM.
Printouts are not
output from the
Printer even though
the Ready lamp is on
or flashing
The network has a problem. (When on a
network).
Check that the printer is on and execute the
print command from the computer one
more time.
If the problem persists, call your system
administrator.
Is the printer off?
Press the I on the power switch to turn the
printer on.
See Turning the Printer On and Off on page
2-4.
There may be data remaining in the printer. Cancel printing or force the remaining data
to be printed out.
See Cancel Printing on page 2-13.
Cannot Print in Windows
Symptom
The printer does not
print
Cannot print with
TCP/IP
Possible Cause
Example for Windows® XP
Does Pause Printing appear in the
printer window?
Action
When printing stops because of an error,
the printer sometimes switches to the
Pause Printing state. Follow the steps
below to release the printer from the Pause
Printing state.
1. On the Start menu, click Printers and
Faxes.
2. Double-click the appropriate printer.
3. In the printer window, click the Printer
menu.
4. On the Printer menu, if Pause Printing
is selected, click it to unselect it.
Is the printer off?
Press the I on the power switch to turn the
printer on.
See Turning the Printer On and Off on page
2-4.
Is the parallel, USB, or Ethernet interface
cable loose or disconnected?
Turn the printer off and check the interface
cable. If necessary, reconnect it, then turn
the printer back on.
Is the printer’s IP address set correctly?
(When using TCP/IP.)
The IP address might be different. Call your
system administrator and set the correct IP
address.
Use the printer configuration list to confirm
the current IP address.
Is there a reception filter?
Call your system administrator to find out if
there is a reception filter set.
TROUBLESHOOTING 5 - 4
Downloaded from ManualsPrinter.com Manuals
Symptom
An error message
appears on the
computer screen
Possible Cause
A printer error has occurred.
Action
Check the message and rectify the error
accordingly.
Cannot Print from a Macintosh® Computer
Symptom
The printer does not
appear in the
Chooser window
Possible Cause
Action
Is the printer off?
Press the I on the power switch to turn the
printer on.
See Turning the Printer On and Off on page
2-4.
Is the USB or Ethernet interface cable loose
or disconnected?
Turn the printer off and check the interface
cable. If necessary, reconnect it, then turn
the printer back on.
Is the network card loose or disconnected? Turn the printer off and reinstall the network
card into the printer, then turn the printer
back on.
An error message
appears on the
computer screen
Are the zone and printer names correctly
specified?
The zone or printer names might be
incorrect. Ask your system administrator for
the correct settings.
Use the printer configuration list to confirm
the current printer settings.
See Confirming Printer Configuration and
Network Settings on page 7-19.
Are you using the appropriate Mac OS®?
Print from a computer with an operating
system compatible with the printer. This
printer supports Mac OS ® 8.1 to
Mac OS ® X.
A print error has occurred.
Check the message and rectify the error
accordingly.
5 - 5 TROUBLESHOOTING
Downloaded from ManualsPrinter.com Manuals
Print Quality Problems
Blank or Completely Black Pages are Output
Symptom
Nothing is printed
Possible Cause
Two or more sheets may be feeding at
once.
Action
Remove the paper stack from the tray, fan
it, and reinsert it.
The print head cartridge is old or damaged. Replace the print head cartridge.
See Replacing the Print Head Cartridge
(PH-12CL) on page 7-5.
The power supply is defective.
Output sheets are
completely black
Contact your dealer or Brother Customer
Service.
The print head cartridge is old or damaged. Replace the print head cartridge.
See Replacing the Print Head Cartridge
(PH-12CL) on page 7-5.
The power supply is defective.
Contact your dealer or Brother Customer
Service.
TROUBLESHOOTING 5 - 6
Downloaded from ManualsPrinter.com Manuals
Faded or Dirty Printouts, White Areas (drop-outs), Creases, Blurs
Symptom
Faded printouts
Possible Cause
Action
Is the media suitable?
Replace the media with a recommend size
and type, and confirm that your printer
driver settings are correct.
See Suitable and Unsuitable Paper Types
on page 3-1
Is the paper damp?
Replace the paper.
See Loading Paper on page 3-7.
The print head cartridge is old or damaged. Replace the print head cartridge.
See Replacing the Print Head Cartridge
(PH-12CL) on page 7-5.
Dirty spots are
printed
Is the printer driver’s toner save function
active?
In the printer driver, deactivate the toner
save function on the Graphics tab
(Windows®), or the General dialog box
(Macintosh®).
See Help.
The power supply is defective.
Contact your dealer or Brother Customer
Service.
Is the media suitable? Are you using
preprinted or inkjet paper?
Replace the media with a recommend size
and type, and confirm that your printer
driver settings are correct.
See Suitable and Unsuitable Paper Types
on page 3-1.
The print head cartridge is old or damaged. Replace the print head cartridge.
See Replacing the Print Head Cartridge
(PH-12CL) on page 7-5.
Vertical black lines
The print head cartridge, transfer roll
cartridge or fuser unit is old or damaged.
Check the print head cartridge, transfer roll
cartridge and fuser unit and replace them
as necessary.
See Replacing the Print Head Cartridge
(PH-12CL) on page 7-5.
See Replacing the Transfer Roll Cartridge
(TR-11CL) on page 7-11.
See Replacing the Fuser unit (FP-12CL) on
page 7-14.
Recurring smudges
Dirt in the paper path.
Print several blank sheets.
The print head cartridge, transfer roll
cartridge or fuser unit is old or damaged.
Check the print head cartridge, transfer roll
cartridge and fuser unit and replace them
as necessary.
See Replacing the Print Head Cartridge
(PH-12CL) on page 7-5.
See Replacing the Transfer Roll Cartridge
(TR-11CL) on page 7-11.
See Replacing the Fuser unit (FP-12CL) on
page 7-14
5 - 7 TROUBLESHOOTING
Downloaded from ManualsPrinter.com Manuals
Symptom
Ink smears when
rubbed.
Possible Cause
Action
Is the paper damp?
Replace the paper.
See Loading Paper on page 3-7.
Is the media suitable?
Replace the media with a recommend size
and type, and confirm that your printer
driver settings are correct.
See Suitable and Unsuitable Paper Types
on page 3-1.
Hair-like marks
appear around black
halftone printing
The paper was left unwrapped for a long
time (especially in a dry environment).
Replace the paper.
See Loading Paper on page 3-7.
Shadows appear
around areas of
dense black printing.
Is the media suitable?
Replace the media with a recommend size
and type, and confirm that your printer
driver settings are correct.
The transfer roll cartridge is old or
damaged.
Replace the transfer roll cartridge.
See Replacing the Transfer Roll Cartridge
(TR-11CL) on page 7-11.
Did you print an Adobe Illustrator file with
the Registration Mark option selected in
the PostScript driver?
Select the AI Registration color setting in
the printer driver.
Ghost image
TROUBLESHOOTING 5 - 8
Downloaded from ManualsPrinter.com Manuals
Symptom
White spots appear
in areas of dense
black printing.
Possible Cause
Is the media suitable?
Is the media folded or creased?
Action
Replace the media with a recommend size
and type, and confirm that your printer
driver settings are correct.
See Suitable and Unsuitable Paper Types
on page 3-1
The print head cartridge is old or damaged. Replace the print head cartridge.
See Replacing the Print Head Cartridge
(PH-12CL) on page 7-5.
Color around the
edge of printing is
incorrect.
Is the color registration correctly adjusted?
Adjust the color registration.
See Adjusting Color Registration on page
1-1.
Partial blanks
Is the paper damp?
Replace the paper.
See Loading Paper on page 3-7.
Is the media suitable?
Replace the media with a recommend size
and type, and confirm that your printer
driver settings are correct.
Is the transfer roll cartridge or fuser unit
properly installed in the printer?
Make sure that the transfer roll cartridge or
fuser unit is properly installed.
See Replacing the Transfer Roll Cartridge
(TR-11CL) on page 7-11.
See Replacing the Fuser unit (FP-12CL) on
page 7-14.
Is the print head cartridge properly installed
in the printer?
Make sure that the print head cartridge is
properly installed.
See Replacing the Print Head Cartridge
(PH-12CL) on page 7-5.
The print head cartridge, transfer roll
cartridge, or fuser unit is old or damaged.
Check the print head cartridge, transfer roll
cartridge and fuser unit and replace them
as necessary.
See Replacing the Print Head Cartridge
(PH-12CL) on page 7-5.
See Replacing the Transfer Roll Cartridge
(TR-11CL) on page 7-11.
See Replacing the Fuser unit (FP-12CL) on
page 7-14.
Vertical blanks
5 - 9 TROUBLESHOOTING
Downloaded from ManualsPrinter.com Manuals
Symptom
Possible Cause
Action
When duplex printing on
non-recommended paper, white spots
appear.
Adjust the BTR CurrentAdj. setting on the
control panel according to the type of media
that is being used.See BTR CurrentAdj on
page 4-10.
When duplex printing, white spots appear.
BTR CurrentAdj. setting may not be set to 0
for all media types.
Set the BTR CurrentAdj. to 0 for all media
types, using the control panel. See BTR
CurrentAdj on page 4-10.
When duplex printing on
non-recommended paper, toner appears
scattered and the print result is blurred.
Adjust the BTR CurrentAdj. setting on the
control panel according to the type of media
that is being used. See BTR CurrentAdj on
page 4-10.
When duplex printing on recommended
paper, toner appears scattered and the
print result is blurred.
BTR CurrentAdj. setting may not be set to 0
for all media types.
Set the BTR CurrentAdj. to 0 for all media
types, using the control panel. See BTR
CurrentAdj on page 4-10.
When duplex printing on
non-recommended paper, print result
appears bluish.
Change the BTR CurrentAdj. setting on the
control panel according to the type of media
that is being used.See BTR CurrentAdj on
page 4-10.
When duplex printing on recommended
paper, print result appears bluish.
BTR CurrentAdj. setting may not be set to 0
for all media types.
Set the BTR CurrentAdj. to 0 for all media
types, using the control panel. See BTR
CurrentAdj on page 4-10.
TROUBLESHOOTING 5 - 10
Downloaded from ManualsPrinter.com Manuals
Symptom
Creased paper
Possible Cause
Action
Is the paper damp?
Replace the paper.
See Loading Paper on page 3-7.
Is the media suitable?
Are you using creased paper?
Replace the media with a recommend size
and type, and confirm that your printer
driver settings are correct.
See Suitable and Unsuitable Paper Types
on page 3-1.
Is the paper tray properly inserted into the
printer?
Push the paper tray completely back into
the printer.
Is there any paper or a foreign object
jammed in the printer?
Turn the power off and remove the jammed
paper or foreign object.
If you cannot remove the obstruction, turn
the printer off and contact your dealer or
Brother Customer Service. Do not attempt
to disassemble the printer.
Is the transfer roll cartridge or fuser unit
properly installed in the printer?
Make sure that the transfer roll cartridge
and fuser unit are properly installed.
See Replacing the Transfer Roll Cartridge
(TR-11CL) on page 7-11.
See Replacing the Fuser unit (FP-12CL) on
page 7-14.
Slanted printing,
Are the paper guides in the paper tray set
Incorrectly positioned correctly?
printing
In the paper tray, set the side and end
guides to their correct positions.
See Load Paper in the Paper Tray on page
3-7.
See Load A5 Paper in the Paper
Tray/Changing the Paper Size from A5 on
page 3-10.
Is the paper guide in the multi-purpose tray
set at the correct mark?
Set the paper guide in the multi-purpose
tray at the correct mark.
See Load Paper into the Multi-purpose Tray
on page 3-16.
Did you install the A5 spacer when loading
A5 paper into the paper tray?
Make sure that the A5 spacer is properly
installed next to the end guide in the paper
tray.
See Load A5 Paper in the Paper
Tray/Changing the Paper Size from A5 on
page 3-10.
Unsatisfactory Printing
5 - 11 TROUBLESHOOTING
Downloaded from ManualsPrinter.com Manuals
Symptom
Unsatisfactory
transparencies
Unsatisfactory
envelopes
Unsatisfactory
printing
Possible Cause
Action
Is the transparency sheet suitable?
Use transparencies suitable for use with
this printer. See Suitable and Unsuitable
Paper Types on page 3-1
Is the media properly loaded into the
multi-purpose tray?
Make sure that the transparencies are
properly loaded into the multi-purpose tray.
See Printing on Transparencies on page
3-20.
Is the printer driver configured to print
transparencies?
Set the printer driver for transparencies on
the Paper/Output tab (in Windows ®) or the
Page Setup dialog box (with Macintosh®).
See Printing on Transparencies on page
3-20.
Are the envelopes of a suitable type?
Use envelopes suitable for use with this
printer. See Suitable and Unsuitable Paper
Types on page 3-1
Is the media properly loaded into the
multi-purpose tray?
Make sure the envelopes are properly
loaded into the multi purpose tray.
See Printing on Envelopes on page 3-18.
Is the printer driver configured to print
envelopes?
Set the printer driver for envelopes in the
Paper/Output tab (in Windows®) or the
Page Setup dialog box (with Macintosh®).
See Printing on Envelopes on page 3-18.
Is the printer driver toner save or
low-resolution functions active?
Change the printer driver settings on the
Graphics tab (in Windows®) or the
General dialog box (with Macintosh ®).
See Help.
TROUBLESHOOTING 5 - 12
Downloaded from ManualsPrinter.com Manuals
Paper Feed Problems
Symptom
Possible Cause
Action
Paper does not feed,
Paper jams, Several
sheets feed at once,
Paper does not feed
straight
Is the media properly loaded?
If using special paper, is the media properly
loaded into the multi-purpose tray?
Make sure that the media is properly
loaded.
When using media such as transparencies,
label sheets, or envelopes, fan the stack
before loading so that there is air between
the sheets.
See Loading Paper on page 3-7.
Is the paper damp?
Replace the paper.
See Loading Paper on page 3-7.
Is the media suitable?
Replace the media with a size and type of
media suitable for use with this printer. See
Suitable and Unsuitable Paper Types on
page 3-1
Is the paper tray properly inserted into the
printer?
Push the paper tray completely back into
the printer.
Is there paper jammed in the printer?
Remove the jammed paper.
Also, thoroughly inspect the inside of the
printer and remove any tape or adhesive
found along the paper path.
See Clearing Paper Jams on page 6-1.
Is the printer level?
Reposition the printer on a flat, stable
surface.
See Safety Precautions on page xvi.
Is the printer driver paper feed method
correctly set?
Make sure that the printer driver paper feed
method is correctly set. Also, when an
optional tray module is present, you must
reconfigure the printer to use the module as
tray 2 or tray 3.
See Help.
Are the paper guides of the paper tray set
correctly?
In the paper tray, set the side and end
guides in the correct positions.
See Load Paper in the Paper Tray on page
3-7.
See Load A5 Paper in the Paper
Tray/Changing the Paper Size from A5 on
page 3-10.
Is the paper guide in the multi-purpose tray
set at the correct mark?
Set the paper guide in the multi-purpose
tray at the correct mark.
See Load Paper into the Multi-purpose Tray
on page 3-16.
Did you install the A5 spacer when loading
A5 paper into the paper tray?
Make sure that the A5 spacer is properly
installed next to the end guide in the paper
tray.
See Load A5 Paper in the Paper
Tray/Changing the Paper Size from A5 on
page 3-10.
5 - 13 TROUBLESHOOTING
Downloaded from ManualsPrinter.com Manuals
Others Problems
Network Problems
Symptom
Possible Cause
Action
The IP address
changes when
turning on the printer
Is the printer set to acquire an IP address
through a DHCP server?
Set the IP address acquisition method to
"Panel". See Setting an IP Address on page
1-4.
Cannot use a web
browser to manage
the printer.
Is the printer off?
Press the I on the power switch to turn the
printer on.
See Turn the Printer On on page 2-4.
Is the Ethernet cable loose or
disconnected?
Turn the printer off and check the Ethernet
cable. If necessary, reconnect the cable,
then turn the printer back on.
Is the printer's Internet address correct?
Confirm that the printer’s Internet address is
correct. If the problem persists, use an IP
address to connect to the printer instead.
Is the printer's IP address correct?
The IP address might be set incorrectly.
Ask your system administrator for the
correct settings.
Use the printer configuration list to confirm
the current IP address.
Are you using a proxy server?
Certain proxy servers block access to the
printer.
Configure your Web browser so that it does
not use the proxy server or set the address
you want to access so that it does not go
through the proxy server.
Is the port number correct?
The default port number is "80". Specify the
correct port number.
TROUBLESHOOTING 5 - 14
Downloaded from ManualsPrinter.com Manuals
Other Problems
Symptom
Possible Cause
Action
Cannot print in color
Is the printer driver set to Black/White
printing?
Change the printer driver settings in the
Paper/Output or Graphics tab
(Windows®), or the General dialog box
(Macintosh®).
See Help.
Paper does not feed
from the specified
tray
Are the application settings overriding the
printer driver settings?
Set the paper tray in the application to the
same paper tray set in the printer driver.
Printing is slow
Is the printer driver color mode set to color
printing even when you are printing in
monochrome?
Change the printer driver settings in the
Paper/Output or Graphics tab
(Windows®), or the General dialog box
(Macintosh®).
See Windows ® or Macintosh® Help.
Is the energy save mode time-out too
short?
When the printer is in energy save mode, it
takes longer than normal to begin printing
when the printer receives a print request.
On the control panel, set a longer time-out
for the energy save mode.
See List of Menu Items on page 4-6.
Is the printer level?
Reposition the printer on a flat, stable
surface.
See Safety Precautions on page xvi.
Is the paper tray properly inserted into the
printer?
Push the paper tray completely back into
the printer.
Is there any paper or a foreign object
jammed in the printer?
Turn the printer off and remove the jammed
paper or foreign object. When you cannot
remove the obstruction, turn the printer off
and contact your dealer or Brother
Customer Service. Do not attempt to
disassemble the printer.
-
On the control panel, set the energy save
mode time-out to one hour or more and
leave the printer on.
After leaving the printer for an hour to allow
condensation to dissipate, you can use the
printer normally.
See List of Menu Items on page 4-6.
Unusual noises are
coming from the
printer
There is
condensation in the
printer
5 - 15 TROUBLESHOOTING
Downloaded from ManualsPrinter.com Manuals
What to Do When an Error Message Appears
This section describes error messages and their meanings, as well as what to do when they appear.
When an error message is displayed, find the corresponding message in the table below and follow the
instructions.
When the message is too long to fit on the display, the screen changes every 3 seconds, displaying
the message in segments.
Message
Meaning and Action
xxx-xxx
The printer is not functioning correctly.
Turn OFF the Power Action:
Turn the printer off and turn it on again. When/if the same message re-appears after
taking this action, write the error code displayed, turn the printer off, and contact your
dealer or Brother Customer Service.
"xxx-xxx" indicates numeric characters.
Message
Meaning and Action
Replace Yellow
Toner (Y)
The yellow toner cartridge is empty.
Action:
Replace the yellow toner cartridge.
See Replacing the Toner Cartridges (TN-12BK/Y/M/C) on page 7-1.
Reinsert Yellow
Toner (Y)
There is no yellow toner cartridge inserted in the printer or the cartridge is improperly
set.
Action:
Grip the levers at each end of the yellow toner cartridge with your fingers, then push
down firmly to rotate the levers forward to install the cartridge.
See Replacing the Toner Cartridges (TN-12BK/Y/M/C) on page 7-1.
CTD Sensor
Need Maintenance
It is time to check the density sensor.
Action:
Remove the transfer roll cartridge and check the cleanliness of the density sensor.
See Cleaning the Density Sensor on page 5-24.
Clean Up
CTD Sensor
The density sensor is dirty.
Action:
Remove the transfer roll cartridge and clean the density sensor.
See Cleaning the Density Sensor on page 5-24.
Regi Jam
Open A-Cover
There is paper jammed in the printer.
Action:
Press button A, open the front cover and remove the jammed paper.
Make sure that there is no paper jammed in the paper trays.
See Clearing Paper Jams on page 6-1.
Fuser Jam
Open A/B-Cover
There is paper jammed in the printer.
Action:
Press button A or B, open the front cover and remove the jammed paper. Make sure
there is no paper jammed in the paper trays.
See Paper Jams Between the Print Head Cartridge and the Fuser Unit on page 6-6.
Duplex Jam
Open B-Cover
There is paper jammed in the paper rotator used for duplex printing.
Action:
Press button B, open the front cover and remove the jammed paper.
See Paper Jams in the Paper Rotator on page 6-9.
TROUBLESHOOTING 5 - 16
Downloaded from ManualsPrinter.com Manuals
Message
Meaning and Action
Feed Jam
Check Tray
There is paper jammed in the multi-purpose tray, the paper tray, or the optional tray
module (2 shelves) if installed. Action:
Pull out the tray and remove the jammed media.
See Paper Jams in the Multi-purpose Tray on page 6-3.
See Paper Jams in the Paper Tray on page 6-4.
See Paper Jams in the 2 Tray Module on page 6-10.
Print Head Cart
ID Error
The print head cartridge is defective.
Action:
Replace the print head cartridge.
See Replacing the Print Head Cartridge (PH-12CL) on page 7-5.
Replace Cyan
Toner (C)
The cyan toner cartridge is empty.
Action:
Replace the cyan toner cartridge.
See Replacing the Toner Cartridges (TN-12BK/Y/M/C) on page 7-1.
Reinsert Cyan
Toner (C)
There is no cyan toner cartridge inserted in the printer or the cartridge is improperly set.
Action:
Grip the levers at each end of the cyan toner cartridge with your fingers, then push
down firmly to rotate the levers forward to install the cartridge.
See Replacing the Toner Cartridges (TN-12BK/Y/M/C) on page 7-1.
Sys data cleared
Press Set
All system settings stored in the NV memory were deleted.
Action:
Follow the step below to reset the NV memory.
1 Press the Form Feed/Set button.
The printer settings may be deleted when you reset the NV memory. Print the printer
configuration list and the panel settings list to confirm settings.
See Confirming Printer Configuration and Network Settings on page 7-19.
See List of Menu Items on page 4-6.
No Paper in
All Tray
There is no paper in any of the paper trays.
Action:
Load paper into the trays.
See Loading Paper on page 3-7.
Disk Full
Please Press Set
The hard disk became full during electronic sorting and data writing was halted.
Action:
Press the Form Feed/Set button.
It deletes print jobs from the printer. Print with one of the following methods:
• Print fewer pages at a time.
• Deactivate the printer driver’s hard disk setting.
See Changing the Configuration for Options on page 2-15.
Check Paper
in MP Tray
Paper is not properly loaded in the multi-purpose tray or is different from that specified
on the computer.
Action:
Make sure the paper is properly loaded into the multi-purpose tray. If the computer
settings are incorrect, cancel printing.
Check the following settings on your computer, reconfigure any that are incorrect, and
reprint.
• Is the correct paper tray specified?
• Is the correct paper size specified?
See Load Paper into the Multi-purpose Tray on page 3-16.
See Cancel Printing at the printer’s Control Panel on page 2-14.
5 - 17 TROUBLESHOOTING
Downloaded from ManualsPrinter.com Manuals
Message
Meaning and Action
Replace
Transfer Roll
The transfer roll cartridge needs to be replaced.
Action:
Replace the transfer roll cartridge.
See Replacing the Transfer Roll Cartridge (TR-11CL) on page 7-11.
Reinsert
Transfer Roll
The transfer roll cartridge is not inserted in the printer or the cartridge is set improperly.
Action:
Push the transfer roll cartridge all the way into the printer.
See Replacing the Transfer Roll Cartridge (TR-11CL) on page 7-11.
Replace Print
Head Cartridge
The print head cartridge needs to be replaced.
Action:
Replace the print head cartridge.
See Replacing the Print Head Cartridge (PH-12CL) on page 7-5.
Set Print Head
Cartridge
The print head cartridge is not inserted in the printer or the cartridge is set improperly.
Action:
Push the print head cartridge all the way into the printer.
See Replacing the Print Head Cartridge (PH-12CL) on page 7-5.
Replace Fuser
cartridge
The fuser unit needs to be replaced.
Action:
Replace the fuser unit.
See Replacing the Fuser unit (FP-12CL) on page 7-14.
Reinsert Fuser
cartridge
The fuser unit is not inserted in the printer or the fuser unit is set improperly.
Action:
Push the fuser unit all the way into the printer.
See Replacing the Fuser unit (FP-12CL) on page 7-14.
No Paper in
Tray1
There is no paper in tray 1.
Action:
Load paper into paper tray 1.
See Load Paper in the Paper Tray on page 3-7.
Load xxxx
in N
Paper size xxxx is not loaded in tray N or is different from that specified on the
computer.
Action:
Load paper xxxx into tray N. If the computer settings are incorrect, cancel printing.
Check the following settings on your computer, reconfigure any that are incorrect, and
reprint.
• Is the correct paper tray specified?
• Is the correct paper size specified?
See Load Paper in the Paper Tray on page 3-7.
See Cancel Printing at the printer’s Control Panel on page 2-14.
Check Paper
in N
Paper is not properly loaded in tray N or is different from that specified on the computer.
Action:
Pull out tray N and check the paper. If the computer settings are incorrect, cancel
printing.
Check the following settings on your computer, reconfigure any that are incorrect, and
reprint.
See Load Paper in the Paper Tray on page 3-7.
See Cancel Printing at the printer’s Control Panel on page 2-14.
"N" is a paper tray.
"xxxx" represents the paper size and orientation.
TROUBLESHOOTING 5 - 18
Downloaded from ManualsPrinter.com Manuals
Message
Meaning and Action
Push in the Tray
None of the trays are properly inserted.
Action:
Push the all paper trays completely back into the printer.
Empty
Exit Tray
The face down tray is full.
Action:
Remove the paper from the face down tray.
Replace Black
Toner (K)
The black toner cartridge is empty.
Action:
Replace the black toner cartridge.
See Replacing the Toner Cartridges (TN-12BK/Y/M/C) on page 7-1.
Reinsert Black
Toner (K)
There is no black toner cartridge inserted in the printer or the cartridge is improperly
set.
Action:
Grip the levers at each end of the black toner cartridge with your fingers, then push
down firmly to rotate the levers forward to install the cartridge.
See Replacing the Toner Cartridges (TN-12BK/Y/M/C) on page 7-1.
Operation Error
Please Press Set
The request from the computer could not be printed.
Action:
Press the Form Feed/Set button and cancel printing. Check the printer driver settings
and reprint.
Operation Denied
While Printing
An illegal operation was performed on the control panel during printing.
Wait until printing finishes.
ServCallJ1
This is a warning message. Contact your dealer or Brother Customer Service.
Close
Front Cover
The front cover is open.
Action:
Make sure that the front cover is properly closed.
Replace Magenta
Toner (M)
The magenta toner cartridge is empty.
Action:
Replace the magenta toner cartridge.
See Replacing the Toner Cartridges (TN-12BK/Y/M/C) on page 7-1.
Reinsert Magenta
Toner (M)
There is no magenta toner cartridge inserted in the printer or the cartridge is improperly
set.
See Replacing the Toner Cartridges (TN-12BK/Y/M/C) on page 7-1.
Out of Memory
Please Press Set
There is not enough memory available for the printer to function normally.
Action:
Press the Form Feed/Set button and cancel printing. Install a memory expansion card
and reprint.
See Adding Expansion Memory on page A-10.
If you are unable to install a memory expansion card, try printing again after setting the
printer driver as follows:
• Turn off the Duplex Printing and Multiple Page settings.
• Change the setting in Document Types to Normal in the Graphics tab (Windows®),
or the General dialog box (Macintosh ®). Note that this lowers image quality.
See Help.
Pull out the (Y)
toner seal
A toner seal is still left in the yellow toner cartridge.
Action:
Remove the top cover, then remove the toner seals that are still left in the yellow toner
cartridge.
5 - 19 TROUBLESHOOTING
Downloaded from ManualsPrinter.com Manuals
Message
Meaning and Action
Pull out the (M)
toner seal
A toner seal is still left in the magenta toner cartridge.
Action:
Remove the top cover, then remove the toner seals that are still left in the magenta
toner cartridge.
Pull out the (C)
toner seal
A toner seal is still left in the cyan toner cartridge.
Action:
Remove the top cover, then remove the toner seals that are still left in the cyan toner
cartridge.
Pull out the (K)
toner seal
A toner seal is still left in the black toner cartridge.
Action:
Remove the top cover, then remove the toner seals that are still left in the black toner
cartridge.
ID error for (Y)
toner cart
This toner cartridge cannot be used. (ID error)
Action:
Remove the top cover, then fit the proper Brother toner cartridge.
ID error for (M)
toner cart
This toner cartridge cannot be used. (ID error)
Action:
Remove the top cover, then fit the proper Brother toner cartridge.
ID error for (C)
toner cart
This toner cartridge cannot be used. (ID error)
Action:
Remove the top cover, then fit the proper Brother toner cartridge.
ID error for (K)
toner cart
This toner cartridge cannot be used. (ID error)
Action:
Remove the top cover, then fit the proper Brother toner cartridge.
ID error for Fuser
unit
Meaning: This fuser unit cannot be used. (ID error)
Action:
Fit the proper Brother fuser unit.
ID error Please
Press Set
A F/W (firmware) error has occurred when downloading.
Action:
Press the Set button.
Address error
Please Press Set
A F/W (firmware) error has occurred when downloading.
Action:
Press the Set button.
Timeout Error
Please Press Set
A F/W (firmware) error has occurred when downloading.
Action:
Press the Set button.
Header Error
Please Press Set
A F/W (firmware) error has occurred when downloading.
Action:
Press the Set button.
Checksum Error
Please Press Set
A F/W (firmware) error has occurred when downloading.
Action:
Press the Set button.
Download N/A
Please Press Set
A F/W (firmware) error has occurred when downloading.
Action:
Press the Set button.
NO Network Please
Press Set
A F/W (firmware) error has occurred when downloading.
Action:
Press the Set button.
TROUBLESHOOTING 5 - 20
Downloaded from ManualsPrinter.com Manuals
Message
Meaning and Action
Erase Error Please
Press Set
A F/W (firmware) error has occurred when downloading.
Action:
Press the Set button.
Write Error Please
Press Set
A F/W (firmware) error has occurred when downloading.
Action:
Press the Set button.
Verify Error
Please Press Set
A F/W (firmware) error has occurred when downloading.
Action:
Press the Set button.
5 - 21 TROUBLESHOOTING
Downloaded from ManualsPrinter.com Manuals
The Alarm Indicator is On or Flashing
The red alarm indicator on the control panel indicates that there is a problem with the printer. Refer to
the sections below.
Ready
Alarm
The Alarm Lamp is On
When the alarm lamp is on, it indicates a paper jam or other problem that you can rectify yourself. Rectify
the problem according to the message displayed on the control panel.
For detailed information about the meaning of error messages, see What to Do When an Error Message
Appears on page 5-16 and correct the error as instructed.
The Alarm Lamp is Flashing
When the alarm lamp is flashing, it indicates a problem that you cannot rectify yourself. Write down the
message and error code displayed, turn the printer off and contact your dealer or Brother Customer
Service.
TROUBLESHOOTING 5 - 22
Downloaded from ManualsPrinter.com Manuals
Forcing the Printer to Print Remaining Data
(When Printing is Halted)
If the printer stops receiving data half way through a print job, the printer will wait for a pre-determined
time, during this wait, the control panel will display Data Wait. If you wish to, you can force the printer
to print the data that it has already received. Refer to the following steps for more information.
The default job time-out is 30 seconds. You can set the job time-out to between 5 and 300 seconds on
the control panel. For details about the job time-out function, see List of Menu Items on page 4-6.
Follow the steps below. Use the following control panel buttons.
For details about control panel operations, see Basic Menu Operation on page 4-4.
(The printer is processing)
1
2
Press the Form Feed/Set button once. The remaining data in the printer is printed out.
When processing is finished, the print screen re-appears.
(The print screen. The printer is ready to print.)
5 - 23 TROUBLESHOOTING
Downloaded from ManualsPrinter.com Manuals
Cleaning the Density Sensor
When the printer's density sensor is dirty, follow the steps below to clean it.
1
On the printer's right side, press the side of the
power switch marked O to turn the printer off.
2
Push up button A (1) and fully open the front cover
(2).
3
Grip the orange tabs at both ends of the transfer roll
and gently lift it out of the printer.
Lift the roll carefully to prevent waste toner from
spilling out.
TROUBLESHOOTING 5 - 24
Downloaded from ManualsPrinter.com Manuals
4
Gently wipe the density sensor window with a clean
dry cloth or cotton swab.
Do not allow anything hard to come in contact with
the density sensor window. Do not use excessive
force to clean the window.
5
Replace the transfer roll cartridge. Grip the orange
U-shaped tabs as shown.
6
Insert the pins at both ends of the transfer roll
cartridge into the bearings inside the printer.
7
To lock the transfer roll cartridge into the printer,
push down on the tabs until you hear a click.
5 - 25 TROUBLESHOOTING
Downloaded from ManualsPrinter.com Manuals
8
Close the front cover.
9
On the printer's right side, press the side of the
power switch marked I to turn the printer on.
TROUBLESHOOTING 5 - 26
Downloaded from ManualsPrinter.com Manuals
6
Paper Jams
Clearing Paper Jams
If a paper jam occurs, printing stops and an error message appears on the control panel informing you
of the location of the paper jam.
To clear the paper jam, read the error message, refer to the appropriate section below, and follow the
procedure.
Duplex Jam
Open B-cover
See Paper Jams in the
Paper Rotator on page 6-9
Feed Jam
Check Tray
See Paper Jams in the
Multi-purpose Tray on page 6-3
Regi. Jam
Open A-Cover
Fuser Jam
Open A/B Cover
Feed Jam
Check Tray
See Paper Jams Between the
Print Head Cartridge and the
Fuser Unit on page 6-6
See Paper Jams in the Paper Tray
on page 6-4
Attempting to print while there is paper jammed in the printer may damage the printer. Remove
jammed paper immediately.
■ If a paper jam occurs, the open cover lamps on the printer light according to the location of the
jam. Press button A or B, open the front cover, and remove the jammed paper.
■ The illustration above shows the printer with the optional 2 Tray Module installed.
Caution
■ When removing paper jams, make sure that no pieces of paper are left inside the printer, as this
can cause a fire. If the paper is wrapped around the fuser or roller, or you cannot see the jam
you are trying to clear, do not attempt to remove the paper by yourself, as this may cause injuries
or burns. Turn the printer off immediately and contact your dealer or Brother Customer Service.
■ Never touch an area indicated by a high-temperature warning label (on or near the fuser unit).
Touching these areas may result in burns.
6 - 1 PAPER JAMS
Downloaded from ManualsPrinter.com Manuals
■ If smoke comes out of the printer when a paper jam occurs, do not open the printer covers. Turn the
printer off, remove the power cord from the AC outlet/socket, and contact your dealer or Brother
Customer Service for assistance.
■ Remove jammed paper slowly and carefully to avoid tearing it.
Paper jams can be caused by incorrect printer installation, or using unsuitable or low-quality paper.
For details about the types of paper suitable for printing, see Suitable and Unsuitable Paper Types
on page 3-1.
PAPER JAMS 6 - 2
Downloaded from ManualsPrinter.com Manuals
Paper Jams in the Multi-purpose Tray
Follow the procedure below to remove the jammed paper.
1
Pull the jammed paper out of the multi-purpose tray.
2
Push up button A (1) and fully open the front cover
(2). Confirm that there are no scraps of paper
remaining inside the printer.
3
Close the front cover.
6 - 3 PAPER JAMS
Downloaded from ManualsPrinter.com Manuals
Paper Jams in the Paper Tray
If the Optional Tray Module is not installed, follow the procedure below to remove paper jammed in the
paper tray.
If the Optional Tray Module is installed, look for the jammed paper sequentially, starting with the lowest
tray. Follow the procedure described in Paper Jams in the 2 Tray Module on page 6-10.
1
Slowly, completely remove the paper tray from the
printer.
2
Remove all the jammed and/or creased paper from
the tray.
3
If there is jammed paper remaining inside the
printer, pull it out carefully to avoid tearing it.
PAPER JAMS 6 - 4
Downloaded from ManualsPrinter.com Manuals
4
Push up button A (1) and fully open the front cover
(2). Confirm that there are no scraps of paper
remaining inside the printer.
5
Close the front cover.
6
Hold the paper tray with both hands, align it with the
opening in the printer and gently push it back in the
printer.
7
Push the paper tray completely back into the printer.
Do not use excessive force on the paper tray. Doing
so could damage the paper tray or the inside of the
printer.
6 - 5 PAPER JAMS
Downloaded from ManualsPrinter.com Manuals
Paper Jams Between the Print Head Cartridge and the
Fuser Unit
This section describes the procedures to remove paper jammed around the print head cartridge and in
the fuser. Select the appropriate procedure according to the location of the jammed paper.
Paper jams around the print head cartridge
Follow the procedure below to remove the jammed paper.
1
Push up button A (1) and fully open the front cover
(2).
2
If there is paper jammed around the print head
cartridge (Illustration A), continue following this
procedure.
If there is paper jammed around the fuser unit
(Illustration B), follow the procedure for Paper jams
around the fuser unit on page 6-8.
Illustration A
1. Fuser Unit
2. Print Head Cartridge
3. Paper
1. Fuser Unit
2. Paper
3. Print Head Cartridge
Illustration B
PAPER JAMS 6 - 6
Downloaded from ManualsPrinter.com Manuals
3
4
5
Open the fuser unit levers and remove the jammed
paper.
If the paper is torn, remove any scraps of paper
remaining inside the printer.
Be sure to close the fuser unit levers after removing
the jammed paper.
Close the front cover.
6 - 7 PAPER JAMS
Downloaded from ManualsPrinter.com Manuals
Paper jams around the fuser unit
Follow the procedure below to remove the jammed paper.
1
Push up button B (1) and fully open the front cover
(2).
2
Open the levers at the ends of the fuser unit and
remove the jammed paper.
If the paper is torn, remove any scraps of paper
remaining inside the printer.
During operation, the fuser unit (heater) becomes
very hot. To prevent burns, do not touch it with your
bare hands.
3
4
Be sure to close the levers at the ends of the fuser
unit after removing the jammed paper.
Close the front cover.
PAPER JAMS 6 - 8
Downloaded from ManualsPrinter.com Manuals
Paper longer than 360 mm (14 in.) jams
If paper longer than 355.6 mm (14 in.) jams in the printer, cut the paper as necessary and remove the
paper from the location where it is jammed using the appropriate procedure. If the front cover is difficult
to open, do not force it. Turn the printer off immediately and contact your dealer or Brother Customer
Service.
Paper Jams in the Paper Rotator
Follow the procedure below to remove the jammed paper.
1
Push in button B (1) and fully open the front cover
(2).
2
Remove the jammed paper.
If the paper is torn, remove any scraps of paper
remaining inside the printer.
3
Close the front cover.
6 - 9 PAPER JAMS
Downloaded from ManualsPrinter.com Manuals
Paper Jams in the 2 Tray Module
Follow the procedure below to remove the jammed paper.
1
Starting with the bottom tray, pull out each tray until
you find the jammed paper.
Paper in the tray module feeds to the printer from
the front of the trays, therefore paper jammed in the
lower tray can block the upper tray of the module or
the paper tray in the printer, preventing you from
opening them. Look for the jammed paper
sequentially, starting with the lowest tray.
2
Remove all the jammed and/or creased paper from
the tray.
3
If there is jammed paper inside the printer, pull it out
carefully to avoid tearing it.
PAPER JAMS 6 - 10
Downloaded from ManualsPrinter.com Manuals
4
Push up button A (1) and fully open the front cover
(2). Confirm that there are no scraps of paper
remaining inside the printer.
5
Close the front cover.
6
Close all open paper trays.
6 - 11 PAPER JAMS
Downloaded from ManualsPrinter.com Manuals
7
Routine Maintenance and Consumable
Replacement
Replacing the Toner Cartridges (TN-12BK/Y/M/C)
The printer uses four toner cartridges: black, yellow, magenta and cyan. When the toner supply in a
cartridge begins to run out, the message Replace xxxx Toner (x) message appears on the
operation panel (xxxx is the toner cartridge color). Replace toner cartridge(s) as soon as the message
prompting you to do so appears. The printer will stop operating if you do not replace the toner cartridge
when required.
Toner cartridges are consumables. For more information about consumables, see Introduction to the
Optional and Consumable Items on page A-1.
For details about when to change consumables, see Life Span of Consumable Items on page A-9.
Toner Cartridge Handling Precautions
WARNING
Never throw a used toner cartridge into a fire. It can explode, causing injuries.
Handling Precautions
■ Never use a vacuum cleaner to clean toner. Static electricity could build up and damage
sensors.
■ Do not reuse toner cartridges once you have removed them from the printer. Loose toner could
spill inside the printer and deteriorate print quality.
■ To prevent residual toner form spilling, avoid shaking or bumping used toner cartridges.
■ After moving a toner cartridge from a cold place to a warm place, allow 1 hour for the cartridge
to adapt to room temperature before installing it. (This is not necessary if there is no
condensation.)
■ Toner should be washed off immediately if it gets on your hands or clothing.
■ Only use toner cartridges recommended by Brother. Using toner cartridges that are not
recommended may result in lower print quality and unsatisfactory printer performance.
Storage Precautions
■ Store cartridges away from direct sunlight under the following conditions:
■ Ambient temperature range, 0 to 35 ° C. Humidity range 15 to 80% RH (no condensation). Avoid
hot and humid areas.
■ Avoid storing near magnetic objects such as CRT screens, disk drives, or floppy disks.
■ Keep out of reach of children.
ROUTINE MAINTENANCE AND CONSUMABLE REPLACEMENT 7 - 1
Downloaded from ManualsPrinter.com Manuals
Replacing the Toner Cartridges
Follow the procedure below to replace toner cartridges.
1
Remove the top cover and place it on a flat surface.
2
Grip the levers at the ends of the toner cartridge that
you want to replace and pull them up.
7 - 2 ROUTINE MAINTENANCE AND CONSUMABLE REPLACEMENT
Downloaded from ManualsPrinter.com Manuals
3
Pull out the toner cartridge.
■ Put the toner cartridge onto a piece of paper to
prevent the toner from staining the floor or
furniture.
■ To prevent residual toner form spilling, avoid
shaking or bumping used toner cartridges.
4
Select the new toner cartridge that is being
replaced, and remove it from its packaging.
5
Shake the toner cartridge 7 or 8 times as illustrated
to distribute toner evenly.
6
Align the toner cartridge with the corresponding
insertion point in the printer and insert it as
illustrated.
1. Toner seal - DO NOT REMOVE YET.
ROUTINE MAINTENANCE AND CONSUMABLE REPLACEMENT 7 - 3
Downloaded from ManualsPrinter.com Manuals
7
Grip the levers at each end of the toner cartridge
with your fingers, then push down firmly to rotate the
levers forward to the ( ) position.
8
Pull the toner seal straight up to remove it.
■ Pull the toner seal straight up. Pulling the toner
seal diagonally may tear the seal.
■ If it takes more than five seconds until you
remove the toner seal after inserting the toner
cartridge in the printer, an error message may
appear. In this case, perform step 7 again, or
turn the printer off once and then on again.
9
Replace the top cover.
7 - 4 ROUTINE MAINTENANCE AND CONSUMABLE REPLACEMENT
Downloaded from ManualsPrinter.com Manuals
Replacing the Print Head Cartridge (PH-12CL)
This print head cartridge consists of the light-sensitive print head, the developer and the transfer roll.
When the print head deteriorates, Replace Print Head Cartridge message appears on the
operation panel.
Replace the print head cartridge as soon as the message prompting you to do so appears.
Replace Print
Head Cartridge
The print head cartridge is a consumable. For more information about consumables, see Introduction to
the Optional and Consumable Items on page A-1.
For details about when to change consumables, see Life Span of Consumable Items on page A-9.
Print Head Cartridge Handling Precautions
WARNING
Never throw a print head cartridge into a flame. It can explode, causing injuries.
Handling Precautions
■ Make sure that nothing touches or scratches the light-sensitive print head surface (blue colored
part) or transfer roll (black colored part). Scratches, dirt, or oil from your hands onto the print
head or transfer roll will deteriorate print quality.
■ Do not expose the print head cartridge to direct sunlight and avoid exposing the print head
cartridge to fluorescent indoor light, as this may result in dropouts or dirty printing.
■ When replacing the print head cartridge, work on a desk or other flat surface to avoid scratching
the light-sensitive print head and transfer roll.
■ Avoid removing the print head cartridge from the printer before it is time to replace it. Removing
and replacing the print head cartridge can cause dirt to stick to the cartridge and deteriorate print
quality.
■ Avoid tilting or shaking the print head cartridge when removing it, as toner may spill inside the
printer and cause damage.
■ To ensure good print quality, keep the print head cartridge level when handling it.
■ Only use print head cartridges recommended by Brother. Using a print head cartridge that is not
recommended may result in lower print quality and unsatisfactory printer performance.
ROUTINE MAINTENANCE AND CONSUMABLE REPLACEMENT 7 - 5
Downloaded from ManualsPrinter.com Manuals
Storage Precautions
■ Do not unpack new print head cartridges until you are ready to install them. If a print head
cartridge is unpacked, put it in its aluminum package for storage.
■ Store print head cartridges away from direct sunlight under the following conditions:
■ Ambient temperature range, 0 to 35 ° C. Humidity range 15 to 80% RH (no condensation). Avoid
hot and humid areas.
■ Avoid storing near magnetic objects such as CRT screens, disk drives, or floppy disks.
■ Keep out of reach of children.
■ Store in a level position.
Replacing the Print Head Cartridge
Follow the procedure below to replace the print head cartridge.
1
Push up button A (1) and fully open the front cover
(2).
7 - 6 ROUTINE MAINTENANCE AND CONSUMABLE REPLACEMENT
Downloaded from ManualsPrinter.com Manuals
2
Push the button as shown and open the paper outlet
cover.
3
Grip the handle on top of the print head cartridge
and gently lift it out of the printer.
Hold the print head cartridge by its handle to prevent
it from falling.
4
Open the top of the new print head cartridge box
and pull of the top part of the aluminum package.
Remove the sheet by working inward from the two
notches.
5
Grip the handle on top of the print head cartridge
and gently lift it. Place the cartridge onto a flat
surface.
■ Lift the print head cartridge by the handle. Do not
allow the cartridge to touch anything when
removing it from the box.
■ When setting the print head cartridge, do not
shake or tilt it.
ROUTINE MAINTENANCE AND CONSUMABLE REPLACEMENT 7 - 7
Downloaded from ManualsPrinter.com Manuals
6
Remove the polystyrene packing and open the top
of the aluminum package from the left and right.
7
Take the new print head cartridge out of its package
and pull each of the 4 seals one at a time to remove
them. Pull the seals straight out.
8
9
■ Keep the print head cartridge polystyrene
packing, aluminum package, and box in case
you need to transport the printer over long
distances in the future.
■ If there is no circle on the end of the seal, you
can not use this print head cartridge. Contact
your dealer or Brother Customer Service for
assistance.
Remove the tape from the top of the cartridge (1),
hold the protective cover on both sides and remove
it from the print head cartridge (2).
Grip the handle on top of the print head cartridge
and face the flat part towards the back of the printer.
1. Flat part facing to the back
7 - 8 ROUTINE MAINTENANCE AND CONSUMABLE REPLACEMENT
Downloaded from ManualsPrinter.com Manuals
10
With the flat part of the cartridge facing the back,
align the orange rollers on both sides of the print
head cartridge with the slots in front of the arrows on
the printer, and gently lower the cartridge into the
printer.
1. Protective sheet
2. Orange rollers
11
■ Lowering the cartridge into the printer without
correctly aligning the roll with the slots can
damage the cartridge.
■ Do not allow the surface covered with a
protective sheet to come into contact with
anything.
Pull the protective sheet on the cartridge straight up
to remove it, as illustrated.
1. Do not touch the transfer roll
Do not touch the transfer roll (black part). Make sure
that nothing touches or scratches the roll surface.
Scratches, dirt or oil from your hands onto the roll
deteriorates print quality.
12
Close the paper outlet cover.
ROUTINE MAINTENANCE AND CONSUMABLE REPLACEMENT 7 - 9
Downloaded from ManualsPrinter.com Manuals
13
Close the front cover.
7 - 10 ROUTINE MAINTENANCE AND CONSUMABLE REPLACEMENT
Downloaded from ManualsPrinter.com Manuals
Replacing the Transfer Roll Cartridge (TR-11CL)
The transfer roll cartridge consists of a transfer roll and a waste toner collection box. When the transfer
roll cartridge deteriorates, Replace Transfer Roll message appears on the operation panel.
Replace the transfer roll cartridge as soon as the message prompting you to do so appears. The printer
will stop operating if you do not replace the cartridge when required.
Replace
Transfer Roll
The transfer roll cartridge is a consumable. For more information about consumables, see Introduction
to the Optional and Consumable Items on page A-1.
For details about when to change consumables, see Life Span of Consumable Items on page A-9.
Transfer Roll Cartridge Handling Precautions
WARNING
Never throw a used transfer roll cartridge into a fire. It can cause an explosion and injuries.
Handling Precautions
■
■
■
■
Replace the transfer roll cartridge as soon as the message prompting you to do so appears.
The printer stops operating if you do not replace the cartridge when required.
Do not attempt to reuse toner from the waste toner collection box.
When you remove the transfer roll cartridge from the printer because the waste toner collection
box is full, do not attempt to empty the waste toner box and reuse the cartridge, as toner may
spill inside the printer and cause damage.
■ Avoid removing the transfer roll cartridge from the printer before it is time to replace it. Toner
may spill inside the printer, causing damage.
ROUTINE MAINTENANCE AND CONSUMABLE REPLACEMENT 7 - 11
Downloaded from ManualsPrinter.com Manuals
Replacing the Transfer Roll Cartridge
Follow the procedure below to replace the transfer roll cartridge.
1
Push up button A (1) and fully open the front cover
(2).
2
Grip the orange tabs at both ends of the transfer roll
(1) and gently lift it out of the printer (2).
Lift the transfer roll carefully to prevent waste toner
from spilling out.
Lift the transfer roll cartridge carefully to prevent
transfer roll from spilling out.
7 - 12 ROUTINE MAINTENANCE AND CONSUMABLE REPLACEMENT
Downloaded from ManualsPrinter.com Manuals
3
Unpack a new transfer roll cartridge and grip the
orange tabs as shown.
4
Insert the pins at both ends of the transfer roll
cartridge into the bearings inside the printer, and
gently push the roll into the printer.
5
To lock the transfer roll cartridge into the printer,
push down on the tabs until you hear a click.
6
Close the front cover.
ROUTINE MAINTENANCE AND CONSUMABLE REPLACEMENT 7 - 13
Downloaded from ManualsPrinter.com Manuals
Replacing the Fuser unit (FP-12CL)
When the fuser unit deteriorates, Replace Fuser Cartridge message appears on the operation
panel. Replace the fuser unit as soon as the message prompting you to do so appears. The printer will
stop operating if you do not replace the unit when required.
Replace
Fuser Cartridge
The fuser unit is a consumable. For more information about consumables, see Introduction to the
Optional and Consumable Items on page A-1.
For details about when to change consumables, see Life Span of Consumable Items on page A-9.
Fuser unit Handling Precautions
WARNING
■ To avoid burns, never touch the area marked “CAUTION! HOT” (fuser area).
■ To prevent electric shock, always turn the printer off and disconnect the power cord from the AC
outlet/socket before cleaning the printer or performing maintenance.
■ Turn the power switch off, unplug the AC power cord and allow the printer to cool for at least 30
minutes before replace the fuser unit.
7 - 14 ROUTINE MAINTENANCE AND CONSUMABLE REPLACEMENT
Downloaded from ManualsPrinter.com Manuals
Replacing the Fuser unit
WARNING
Turn the power switch off, unplug the AC power cord and allow the printer to cool for at least 30
minutes before replace the fuser unit.
Follow the procedure below to replace the fuser unit.
1
Push up button B (1) and fully open the front cover
(2).
2
Push the lever on left side of the paper outlet cover
and open the paper outlet cover
ROUTINE MAINTENANCE AND CONSUMABLE REPLACEMENT 7 - 15
Downloaded from ManualsPrinter.com Manuals
3
Push and slide forward the switches on both sides
of the fuser unit.
4
Lift the levers on both sides of the fuser unit.
5
Hold the levers on both sides as you remove the
fuser unit from the printer carfully.
6
Unpack a new fuser unit and lift the levers on both
sides (1). Grip the lever and install the fuser unit into
the printer gently placing pin into the guides.
7 - 16 ROUTINE MAINTENANCE AND CONSUMABLE REPLACEMENT
Downloaded from ManualsPrinter.com Manuals
7
Push down the levers on both sides of the fuser unit.
8
Push and slide backward the switches on both sides
of the fuser unit.
9
Close the paper outlet cover.
10
Close the front cover.
ROUTINE MAINTENANCE AND CONSUMABLE REPLACEMENT 7 - 17
Downloaded from ManualsPrinter.com Manuals
Printing Reports and Lists
Use the control panel to print the following reports and lists.
■ Printer Configuration List
Use this to confirm options installed in the printer and to check the network settings on the
printer.
See Confirming Printer Configuration and Network Settings on page 7-19.
■ Panel Settings List
Use this to check the parameters set with the control panel.
■ PCL Font List
Use this to find out which fonts are loaded into the printer.
■ Print Log
This is a report of the last 22 print jobs received by the printer. Use it to check whether the jobs
were printed normally or not.
See Checking the Print Log on page 7-20.
7 - 18 ROUTINE MAINTENANCE AND CONSUMABLE REPLACEMENT
Downloaded from ManualsPrinter.com Manuals
Confirming Printer Configuration and Network Settings
Printing the printer configuration list allows you to check what options are installed on the printer and
printer network settings.
This section describes how to print the printer configuration list.
For details about control panel operations, see Basic Menu Operation on page 4-4.
(The print screen. The printer is ready to print.)
Ready to Print
1
↓
Press the Menu button. The menu screen appears.
(The Menu screen)
Menu
1:System
↓
2
Press the
3
Press the Form Feed/Set or
4
Press the Form Feed/Set button once.
5
Press the Form Feed/Set button once.
button 3 times.
Menu
4:Report/List
↓
button once.
4:Report/List
Printer Settings
↓
Printer Settings
Ready to Print
↓
Printer Settings
Printing
↓
When printing is finished, the print screen re-appears.
ROUTINE MAINTENANCE AND CONSUMABLE REPLACEMENT 7 - 19
Downloaded from ManualsPrinter.com Manuals
Checking the Print Log
Use the control panel to print the print log. The print log is a report of the last 22 print jobs received by
the printer. Use it to check whether the jobs were printed normally or not.
When Auto Log Print in the 1:System menu is set to Yes, the print log is printed automatically every
22 print jobs (Default: No). For more details, see List of Menu Items on page 4-6.
This section describes how to print the print log.
For details about control panel operations, see Basic Menu Operation on page 4-4.
The print log is printed on A4 paper. Set the A4 paper lengthwise into the paper tray.
(The print screen. The printer is ready to print.)
Ready to Print
1
↓
Press the Menu button. The menu screen appears.
(The Menu screen)
Menu
1:System
↓
2
Press the
3
Press the Form Feed/Set or
4
Press the
5
Press the Form Feed/Set button once.
6
Press the Form Feed/Set button once.
button 3 times.
Menu
4:Report/List
↓
button once.
4:Report/List
Printer Settings
↓
button 3 times.
4:Report/List
Log Print
↓
Log Print
Ready to Print
↓
Log Print
Printing
When printing is finished, the print screen re-appears.
7 - 20 ROUTINE MAINTENANCE AND CONSUMABLE REPLACEMENT
Downloaded from ManualsPrinter.com Manuals
Confirming Printer Status from Your Computer
This printer features a variety of network tools that enable you to check the status of the printer from your
computer through the network.
Using these tools saves you from having to leave your computer to check if the printer is working properly
or not.
This section gives you a basic introduction of the network tools.
Checking Status and Remaining Amounts of Consumables using a
Web Browser
When using TCP/IP to communicate with the printer, you can check the printer status and look at and
change printer settings through the network from a Web browser.
1
2
3
4
5
6
7
8
Turn the computer on and start your Web browser.
In the address box of your Web browser, type the IP address or the Internet address of the printer
and press the enter key.
The Web Based Management screen appears.
Click Job Print Log.
The status information about jobs requested from the control panel as well as each protocol is
displayed.
Click View Job Print Log in the tree on the left to view the print log of completed jobs.
Select view format.
Click the Status tab.
Printer information appears on the screen.
Information about paper trays, the output tray, print coverage, remaining consumables and toner,
and the number of sheets output appears in this area.
Click Fault Status.
Event information appears on the screen.
Use this to check for errors. The control panel status of the printer is also displayed.
ROUTINE MAINTENANCE AND CONSUMABLE REPLACEMENT 7 - 21
Downloaded from ManualsPrinter.com Manuals
Cleaning the Printer
We recommend that you clean the printer at least once a month to keep it in good working condition and
to maintain print quality.
Caution
Turn the printer off and disconnect the power cord from the AC outlet/socket before cleaning the
printer. Failure to turn the printer off and disconnect the power cord may result in an electric shock.
Cleaning Precautions
■ Never spray anything directly onto the printer. Droplets can enter the printer and cause
malfunctions. Never use detergents other than neutral detergents.
■ Never lubricate the printer with oil. The printer does not require lubrication.
■ Never use a vacuum cleaner to clean the printer.
Cleaning the outside of the printer
1
On the printer's right side, press the side of the
power switch marked O to turn the printer off.
2
Use a soft, damp, well-squeezed cloth to clean the
outside of the printer.
If some stains prove difficult to remove, use a cloth
lightly moistened with neutral detergent.
Wipe any remaining water with a soft, dry cloth.
3
7 - 22 ROUTINE MAINTENANCE AND CONSUMABLE REPLACEMENT
Downloaded from ManualsPrinter.com Manuals
Transporting the Printer
Before transporting the printer, follow the procedure below:
Caution
■ To prevent injuries, this printer should be lifted by at least two people.
■ To lift the printer, face the front of the printer and grip the recessed areas at the bottom left and
right with both hands.
Never try to lift the printer by gripping any other areas. Lifting the printer by gripping other areas
can cause the printer to fall, resulting in injuries.
■ When lifting the printer, get a firm footing and bend your knees to avoid possible injuries to your
back.
Recess
If you hold the printer by the front cover, left or
right sides, there is a danger of the printer falling.
1. Recessed area
■ When carrying the printer, keep it level to prevent trays or consumables from falling out. Do not
tilt it more than 10 degrees in any direction.
■ When moving the printer, keep the toner cartridges in the locked position and do not remove
them from the printer. Toner may spill inside the printer and damage it.
■ When the optional 2 Tray Module is installed, remove it before transporting the printer. If the tray
module is not removed, it may fall, resulting in damage or injuries. To remove the 2 Tray Module,
refer to the literature provided with the tray module.
1
On the printer's right side, press the side of the
power switch marked O to turn the printer off.
ROUTINE MAINTENANCE AND CONSUMABLE REPLACEMENT 7 - 23
Downloaded from ManualsPrinter.com Manuals
2
Disconnect the power cord, interface cable, and any
other cables.
WARNING
Never touch a power cord with wet hands. This
constitutes an electric shock hazard.
Caution
When unplugging the printer, grasp the plug instead
of the power cord. Forcibly pulling the power cord can
damage it and cause fire or electric shocks.
3
Gently pull out the paper tray until it stops.
4
Hold the tray with both hands, lift the front slightly
and pull it completely out of the printer.
5
Remove the paper from the paper tray, and store it
in a dry, dust-free place.
7 - 24 ROUTINE MAINTENANCE AND CONSUMABLE REPLACEMENT
Downloaded from ManualsPrinter.com Manuals
6
Insert the cardboard spacers in the tray as
illustrated.
7
Hold the paper tray with both hands, align it with the
opening in the printer and gently push it in to the
printer.
8
Push the paper tray completely back into the printer.
9
Push up button A (1) and fully open the front cover
(2).
ROUTINE MAINTENANCE AND CONSUMABLE REPLACEMENT 7 - 25
Downloaded from ManualsPrinter.com Manuals
10
Push the button as shown and open the paper outlet
cover.
11
Grip the handle on top of the print head cartridge
and gently lift it out of the printer.
■ Do not touch the transfer roll (Black roller).
■ Hold the print head cartridge by its handle to
prevent the cartridge from falling.
Wrap the print head cartridge in its aluminum
package or thick paper to avoid exposing it to direct
sunlight or other strong light.
12
Close the paper outlet cover.
13
Close the front cover.
7 - 26 ROUTINE MAINTENANCE AND CONSUMABLE REPLACEMENT
Downloaded from ManualsPrinter.com Manuals
14
To protect the printer from damage, pack it in a box
before transporting it.
After moving the printer to the new location, you need
to re-adjust the color registration. For details about
this operation, see Adjusting Color Registration on
page 1-1.
ROUTINE MAINTENANCE AND CONSUMABLE REPLACEMENT 7 - 27
Downloaded from ManualsPrinter.com Manuals
Storing the Printer
Follow the procedure below when you do not need to use the printer for a long period.
1
On the printer's right side, press the side of the
power switch marked O to turn the printer off.
2
Disconnect the power cord, interface cable, and any
other cables.
WARNING
Never touch a power cord with wet hands. This
constitutes an electric shock hazard.
Caution
When unplugging the printer, grasp the plug instead
of the power cord. Forcibly pulling the power cord can
damage it and cause fire or electric shocks.
3
Remove the paper from the paper tray, and store it
in a dry, dust-free place.
If the paper proves difficult to remove, pull the tray
completely out of the printer and try removing the
paper again.
7 - 28 ROUTINE MAINTENANCE AND CONSUMABLE REPLACEMENT
Downloaded from ManualsPrinter.com Manuals
-
A
Appendixes
Introduction to the Optional and Consumable Items
The following options are available for this printer. To order any of these options, contact your dealer.
Options
Hard Disk (HD-41CL)
The optional hard disk enables high-speed sorting, when you
print multiple copies of a document.
For the installation procedure, refer to the documentation
accompanying the hard disk.
Memory Expansion Card
If you want to print color documents containing complex
graphic layouts or large amount of color image data, it may be
necessary to expand the memory of your printer.
For the installation procedure, see Adding Expansion
Memory on page A-10.
1 Tray Module (LT-41CL)
This option allows you to attach an additional 1 tray to the
printer. The tray of the module holds up to 500 sheets of
paper. When installed, the trays become the printer's tray 2.
To install the tray module, refer to the documentation
accompanying the tray module.
2 Tray Module (LT-42CL)
This option allows you to attach an additional 2 trays to the
printer. Each tray of the module holds up to 500 sheets of
paper. When installed, the trays become the printer's tray 2
and tray 3.
To install the tray module, refer to the documentation
accompanying the tray module.
APPENDIXES A - 1
Downloaded from ManualsPrinter.com Manuals
Consumable Items
Toner Cartridges (TN-12BK/TN12-Y/TN12-M/TN12-C)
The printer uses four toner cartridge0s: black, yellow,
magenta, and cyan.
For the installation procedure, refer to see Replacing the
Toner Cartridges (TN-12BK/Y/M/C) on page 7-1.
Print Head Cartridge (PH-12CL)
Consists of the light-sensitive drum, the developer and the
transfer roll.
For the installation procedure, refer to see Replacing the Print
Head Cartridge (PH-12CL) on page 7-5.
Transfer Roll Cartridge (TR-11CL)
The transfer roll cartridge consists of a transfer roll and a
waste toner collection box.
For the installation procedure, refer to see Replacing the
Transfer Roll Cartridge (TR-11CL) on page 7-11.
Fuser unit (FP-12CL)
The fuser unit fixed the toner to the paper. For the installation
procedure, refer to see Replacing the Fuser unit (FP-12CL)
on page 7-14.
A - 2 APPENDIXES
Downloaded from ManualsPrinter.com Manuals
Getting Product Support Information
Access our user support web site for the latest drivers and information about your printer.
URL: http://solutions.brother.com
APPENDIXES A - 3
Downloaded from ManualsPrinter.com Manuals
General Specifications
Printer Specifications
Type
Desktop Printer
Print Method
Electro photographic
Resolution
1,200 dots/25.4 mm (1,200 dpi), 600 dots/25.4 mm (600 dpi)
Color Graduation
256 per color (16,700,000 colors)
(*1)
Print
Speed
1,200 dpi
monochrome
/color
Plain paper
Singlesided
printing
Up to 12.0 ppm (A4)
13.0 ppm (Letter)
600 dpi
monochrome
/color
Plain paper
Singlesided
printing
Up to 24.0 ppm (A4)
Up to 26.0 ppm (Letter)
Duplex
Printing
Up to 15.0 ipm
Paper Sizes
Paper Type
Paper Tray Capacity
(Standard Domestic
Paper)
Output Capacity
A5, B5 (JIS), A4, 8.5" × 11" (Letter), 8.5" × 14" (Legal), Executive,
custom (width: 90.0-215.9 mm (3.5-8.5 in.),
length: 139.7-900.0 mm (5.5-35.4 in.))
Paper Tray
Plain paper (64-105 g/m2 (17 to 28 lb))
Multi -purpose Tray
Plain paper((64-105 g/m2 (17 to 28 lb)), Thick or Thicker paper
(106-216 g/m2 (29.0-57 lb)), transparencies, envelopes, labels
sheets, coated paper
Paper Tray
Standard: (Tray 1) 500 sheets *
Option:
1 Tray Module (tray 2) 500 sheet* × 1
2 Tray Module (trays 2, 3) 500 sheets* × 2
(*) 350 A5 sheets
Multi -purpose Tray
100 sheets
Face Down Tray
250 sheets
(All sheets suitable for use with the printer.)
Memory Capacity (*3)
A - 4 APPENDIXES
Downloaded from ManualsPrinter.com Manuals
Standard: 64 MB (expandable to 320 MB)
Option: 64, 128, or 256 MB (1 memory expansion slot available)
Fonts (*2)
European (80 fonts)
Albertus Medium/ Albertus Extra Bold
Antique Olive/ Antique Olive It/Antique Olive Bd
Arial/ Arial It/ Arial Bd/ Arial Bd It
Clarendon Condensed
Coronet
Courier/ Courier It/ Courier Bd/ Courier Bd It
Garamond Antiqua/ Garamond Kursiv/ Garamond Halbfett/
Gatamond Kurs Halb
Letter Gothic/ Letter Gothic It/ Letter Gothic Bd
Marigold
CG Omega/ CG Omega It/ CG Omega Bd/ CG Omega Bd It
CG Times/ CG Times It/ CG Times Bd/ CG Times Bd It
Times New Roman/ Times New Roman It/ Times New Roman Bd/
Times New Roman Bd It
Univers Md/ Univers Md It/ Univers Bd/ Univers Bd It
Univers Condensed Md/ Univers Condensed Md It/ Univers
Condensed Bd/ Univers Condensed Bd It
AvantGarde Bk/ AvantGarde Bk Obl/ AvantGarde Demi/
AvantGarde Demi Obl
Bookman Light/ Bookman Light It/ Bookman Demi/ Bookman
Demi It
CourierPS/ CourierPS Obl/ CourierPS Bd/ CourierPS Bd Obl
Helvetica/ Helvetica Obl/ Helvetica Bd/ Helvetica Bd Obl
Helvetica-Narrow/ Helvetica-Narrow Obl/ Helvetica-Narrow Bd/
Helvetica-Narrow Bd Obl
New Century Schlbk Rm/ New Century Schlbk It/ New Century
Schlbk Bd/ New Century Schlbk Bd It
Palatino/ Palatino It/ Palatino Bd/ Palatino Bd It
Times Rm/ Times It/ Times Bd/ Times Bd It
Zapf Chancery/ Zapf Dingbats
Symbol/ SymbolPS
Wingdings
PDL (Emulation)
Standard Driver, Adobe PostScript 3
Operating Systems Supported by the Printer Driver
Windows® 95, Windows® 98, Windows® Me, Windows®
NT 4.0, Windows® 2000/XP, Mac OS® 8.1 to Mac OS® X
(USB connection supported by Windows® 98 Second Edition*,
Windows Me*, Windows® 2000/XP*, Mac OS® 8.6 to OS ® X
Interface
Bi-directional parallel (IEEE1284 compliant)
Full-Speed USB 2.0
10/100Base TX Ethernet
Noise Level
Standby: 36.5 dB (A) or less,
Operating (single-sided printing): 55 dB (A) or less,
Operating (Duplex printing): 55 dB (A) or less.
Power Supply
100-127 V AC ± 10% (90 V-140 V), 50 ± 3 Hz/60 ± 3 Hz
220-240 V AC ± 10% (198 V-264 V), 50 ± 3 Hz/60 ± 3 Hz
Power Consumption
Operating: 900 W, Sleep: 45 W
Weight/Dimensions
Dimensions: 439 (W) ×590 (D)* × 445 (H) mm
(17.3 (W) x 23.2 (D)* × 17.5 (H) in.)
Weight: 35 kg (77.1 lb)
(*) With the paper tray installed and the multi-purpose tray folded
closed.
APPENDIXES A - 5
Downloaded from ManualsPrinter.com Manuals
(*1) y Indicates the maximum speeds for the A4 and Letter sizes fed lengthwise (portrait).
y During long print runs, printing may be cancelled in order to allow the printer to clean the interior
of the developing unit. During cleaning, Please Wait... is displayed on the operation panel.
(*2) The typefaces and Universal Font Scaling Technology™ (UFST™) are trademarks or registered
trademarks of Agfa Monotype Corporation or the respective holders.
(*3) We recommend that you expand memory up to 128 MB when you use print at 1200 dpi.
A - 6 APPENDIXES
Downloaded from ManualsPrinter.com Manuals
Network Specifications
Common Specifications
Supported Standards
Ethernet Ver.2.0 IEEE 802.3
Network Protocols
TCP/IP, NetBIOS, IPX/SPX (NetWare), AppleTalk
Interface
10/100Base TX Ethernet
TCP/IP Specifications
Supported Operating Systems
Windows® 95, Windows® 98, Windows® Me,
Windows NT® 4.0, Windows ® 2000/XP
Frame Type
Ethernet_ II (Ethernet II)
Print Protocols
LPD (LPR), Port 9100 (Available in Windows® 95, Windows® 98,
Windows® Me, and Windows ® 2000/XP), IPP *1(Available in
Windows® Me and Windows® 2000/XP)
Management Protocols
http, SNMP
*1 Not available for Linux using CUPS and Mac OS® X
NetBIOS Specifications
Supported Operating Systems
Windows® 95, Windows® 98, Windows® Me,
Windows NT® 4.0, Windows ® 2000/XP
Print Protocols
NetBIOS (TCP/IP), NetBIOS (NetBEUI)
NetWare Specifications
Network Operating Systems
NetWare 3.X/4.X/5
Frame Type
Ethernet_II (Ethernet II),
Ethernet_802.3 (IEEE 802.3),
Ethernet_802.2 (IEEE 802.2),
Ethernet SNAP (IEEE 802.1 SNAP)
Print Protocols
Print server mode
Remote server mode
Management Protocols
SNMP
AppleTalk Specifications
Supported Operating Systems
Mac OS® 8.6- Mac OS® X 10.1 / 10.2
Frame Type
Ethernet SNAP (IEEE 802.1 SNAP)
Printer Type
Adobe PostScript3
APPENDIXES A - 7
Downloaded from ManualsPrinter.com Manuals
Printable Area
When using A4, 8.5" × 14" (Legal) or smaller.
■ “Printable area" refers to the area on a page
where printing is possible.
■ "Non-printable area" refers to the area (the edges)
on the page where printing is not possible.
1. Printable area
2. Non-printable area
Important information for choosing your paper
This section provides information to help you choose paper to use with this printer.
Before you purchase a large quantity of paper
Make sure the paper is suitable for the printer.
Paper for plain paper copies
Paper is divided by usage, such as paper for printing and paper for copying. The usage is usually
specified on the paper’s package. Check the package to see whether it is suitable for laser printers. Use
paper that is suitable for laser printers.
Long grain and short grain
The pulp fiber of the paper is aligned during paper manufacture. What we call long grain paper is paper
where the fiber is parallel to the paper carriage direction of the paper.
Paper can be classified into two types, long grain and short grain. Long grain paper’s fiber direction is
parallel to the carriage direction of the paper in the printer. Short grain paper’s fiber direction is vertical
to the carriage direction of the paper in the printer. Though most plain paper for copying is long grain,
some is short grain. We recommend that you use long grain paper for this printer. Short grain paper is
too weak for the paper carriage of the printer.
Print surface
The characteristics may differ a little between the face side and reverse side of a sheet of paper.
Usually, the opening side of the ream of paper package is the print side. Follow any indication of the print
side on the paper package. Typically, the print side is indicated by an arrow.
Moisture content
Moisture content is the amount of water left in the paper after manufacture. It is one of the important
characteristics of the paper. This can change greatly depending on the storage environment, although
usually paper contains about 5% water by weight. Because paper often absorbs water, the amount of
water can sometimes be about 10% in a high humidity environment. When the amount of water
increases, the characteristic of the paper changes greatly. The fixing of the toner may become worse.
For storage of the paper and during use, we recommend that the humidity of the surrounding
environment is between 50% and 60%.
A - 8 APPENDIXES
Downloaded from ManualsPrinter.com Manuals
Life Span of Consumable Items
Life span of consumables (in printable pages)
Consumable
Number of printable pages(*)
Black toner cartridge
About 9,000 pages @5%/TN-12BK
Yellow toner cartridge
About 6,000pages @5%/TN-12Y
Magenta toner cartridge
About 6,000 pages @5%/TN-12M
Cyan toner cartridge
About 6,000 pages @5%/TN-12C
Print Head Cartridge
About 30,000 pages @5% CMYK
each/PH-12CL
Transfer roll cartridge
(includes waste toner collection box)
About 25,000 pages @5% CMYK each,
when monochrome print: full color print =
50%:50%/TR-11CL
Fuser unit
About 100,000 pages/FP-12CL
(*) The number of printable pages corresponds to the printing conditions in the table below. The actual
number of printable pages depends on the content of printed material, the paper size, and the
operating environment.
Differences in number of sheets printed may occur due to power on/off initialization and print quality
maintenance operation.
APPENDIXES A - 9
Downloaded from ManualsPrinter.com Manuals
Adding Expansion Memory
1
Turn the printer off, and then unplug the power cord from the AC power outlet/socket.
Caution
2
3
4
5
Before installing the optional accessories, turn the printer off and remove the power plug from the
outlet/socket. Installing optional accessories without turning the printer off could result in an electric
shock.
Loosen the two screws on the interface board
located at the back of the printer.
Hold the two handles on the interface board and
slowly pull the interface board towards you, then lay
it on a desk or table.
Hold the expansion memory module by the edges
and align the notches in the module with the
protrusions in the slot.
Insert the memory module diagonally (1), then tilt it
toward the interface board until it clicks into place
(2).
To remove the memory module, open the retaining clips on both sides of the module by pushing them
outward, grasp both edges of the module and pull it out straight.
A - 10 APPENDIXES
Downloaded from ManualsPrinter.com Manuals
INDEX
Numerics
1 Tray Module .............................................. A-1
2 Tray Module ..................................... 6-10, A-1
A
A5 spacer ....................................................3-13
Adobe Illustrator ............................................5-8
Alarm indicator .............................................. 4-1
Alarm lamp ..................................................5-22
Auto Continue ...............................................4-8
Auto Log Print ...............................................4-7
Auto PHD align ...........................................4-10
Automatic Duplex Printing .............................3-4
B
Button A ........................................................2-1
Button B ........................................................2-1
Buttons ..........................................................4-3
C
Cancel Printing ............................................ 2-13
Cleaning ......................................................7-22
ColorRegiCorrect ........................................ 4-10
Consumables ............................................... A-9
Control Panel ................................................4-1
Control panel ........................................2-1, 2-14
Custom-size Paper ..................................... 3-22
D
Density Sensor ............................................ 5-24
DIMM .......................................................... 2-15
Duplex Printing .....................................3-4, 3-24
Form Feed/Set button ................................... 4-3
FP-12CL ....................................................... A-2
Front Cover ...................................................2-1
Fuser Parts ........................................... 2-3 , A-2
Fuser unit ....................................................7-14
G
Gateway Address .................................1-7, 4-14
H
Hard Disk ..................................................... A-1
Help on Macintosh® ....................................2-12
I
ID Print ..........................................................4-7
Init NVM ...............................................4-9, 4-15
IP Address ...........................................1-4, 4-13
IP Filter ........................................................4-15
IPX Frame Type ..........................................4-14
J
Job Cancel/Back button ................................4-3
Job Timeout ..................................................4-7
L
Language ......................................................4-7
LED ........................................................4-1, 4-2
Lists .............................................................7-18
LT-41CL ....................................................... A-1
LT-42CL ....................................................... A-1
M
ECP mode ................................................... 4-11
Envelopes ................................................... 3-18
Error Alarm ....................................................4-6
Error Message ............................................ 5-16
Ethernet ......................................................4-13
Ethernet Interface Connector ........................ 2-2
Exhaust Grille .........................................2-1, 2-2
Macintosh ......................................................5-5
Manual Duplex Printing .................................3-4
Media type ....................................................3-3
Memory ............................................... A-4, A-10
Memory expansion ......................................2-15
Memory Expansion Card ............................. A-1
Menu button ..................................................4-3
Menu screen ................................................. 4-2
Multi-purpose Tray ....................... 2-1, 3-16, 6-3
F
N
E
F/W Download .............................................. 4-9
Face Down Tray ............................................2-1
Factory settings .............................................4-9
Faded printouts .............................................5-7
Fonts ............................................................ A-5
Network ............................................... 5-14, A-7
O
Options ................................................ 2-15, A-1
I-1
Downloaded from ManualsPrinter.com Manuals
P
Panel Language ............................................4-7
Panel Settings .............................................4-12
Paper jams ..................................................5-13
Paper Meter ..................................................2-1
Paper Outlet Cover ....................................... 2-3
Paper Rotator ................................................2-3
Paper size ..................................................... 3-3
Paper Sizes .................................................. A-4
Paper Stopper ...............................................2-1
Paper Tray ............................ 2-1 , 3-7, 3-10, 6-4
Paper Type .................................................. A-4
Parallel Interface Connector .........................2-2
PCL Font List ..............................................4-12
PH-12CL ...................................................... A-2
Power ............................................................ 5-2
Power Cord Connector .................................2-2
Power Save Time .......................................... 4-6
Power Switch ................................................2-1
Print Head Cartridge ............................. 2-3, A-2
Print Quality ..................................................5-6
Printable Area .............................................. A-8
Printer Driver for Macintosh® ...................... 2-10
Printer Driver for Windows® .........................2-6
Printer Settings ...........................................4-12
Protocol ......................................................... 1-8
PS Error Report ............................................4-8
PS Job Time-out ...........................................4-8
Toner Cartridges ............................ 2-2, 7-1 , A-2
Top Cover ..................................................... 2-2
TR-11CL ...................................................... A-2
Transfer Roll Cartridge ................. 2-3, 7-12, A-2
Transparencies ...........................................3-20
Transporting ................................................7-23
Tray Capacity ............................................... A-4
U
Unsuitable Paper Types ................................3-5
USB Interface Connector ..............................2-2
V
Ventilation Intake Grille ..........................2-1, 2-2
W
Web Based Management ...........................7-21
Web Browser ..............................................7-21
Windows .......................................................5-4
R
Ready indicator .............................................4-1
Ready lamp ............................................5-3, 5-4
Reports ....................................................... 7-18
Reset the printer ...........................................4-9
S
Security ......................................................... 4-9
Specifications ............................................... A-4
Storing .........................................................7-28
Subnet Mask ........................................1-6, 4-14
Suitable Paper Types ....................................3-1
Support ........................................................ A-3
T
TCP/IP ........................................................4-13
Text Print .......................................................4-8
TN-12BK ...................................................... A-2
TN12-C ........................................................ A-2
TN12-M ........................................................ A-2
TN12-Y ......................................................... A-2
Toner ............................................................ A-2
I-2
Downloaded from ManualsPrinter.com Manuals