1
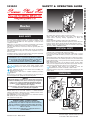
SAFETY & OPERATING GUIDE
Router
Makita 3612C
BASIC SAFETY
Before using this equipment and to avoid personal injury, carefully
read and understand these instructions. If there is anything you do
not understand, DO NOT use this equipment, contact the hire
company for advice.
Make sure you are aware of all safety requirements and that this
equipment is suitable for the task you wish to undertake.
The work area must be cordoned off from the general public and
bystanders.
This equipment must not be operated by persons who are under the
influence of alcohol or drugs. Do not use this equipment if you are
tired or unwell.
You MUST perform a risk assessment before using this equipment
to ensure your safety and the safety of others.
This equipment must only be used by persons who are
medically fit to do so. If you have any medical condition,
are recovering from any medical condition or suffer from
any mental or physical disability, you MUST seek
professional medical advice before using this equipment.
Wear the correct Personal Protective Equipment for the task ahead.
Protect your eyes, wear safety goggles. Steel
toecap boots must be worn. If appropriate, wear a
hard hat.
This equipment produces noise levels above 85 dB(A), ear
defenders must be worn.
Always wear a dust mask or suitable respiratory protective
equipment.
Do not wear loose jewellery or clothing that may get in the way or
become trapped in the equipment. Tie back long hair.
HAVS
Hand Arm vibration syndrome is a disease that can lead to
permanent disability. This can be caused by prolonged use
of any tool or powered equipment that vibrates during
operation. For information on manufacturers vibration
levels contact the hire company.
As a precaution, stop working if you experience discomfort
or numbness when operating the equipment.
Inform everyone in the work area of what you are doing.
Routers must not be used with asbestos or similar hazardous
material. The Router is designed for use on timber products and is
not suitable for use on any other material.
GET FAMILIAR! You must understand how to switch this machine
OFF quickly in case of an emergency.
This equipment weighs 6Kg.
WOOD DUST IS EXPLOSIVE
Wood dust is extremely dangerous and can ignite
spontaneously. It is liable to explode if left stored in any
type of container, including disposable plastic bin bags.
Never dispose of wood dust in a fire or incinerator, as it is
liable to explode.
The safest way of disposal is to empty the dust in to
general rubbish.
Do not lift or move the unit by its power supply cable.
1033/01d Router – Makita 3612C
Be careful when changing cutters as they are sharp.
Always switch OFF the machine and isolate it from the power
supply before cleaning, making adjustments or when left
unattended.
Ensure adequate ventilation when using this equipment.
Routers are not fitted with retractable guards to protect the user
from the cutters. Always handle the Router with extreme caution.
Carefully inspect the equipment before use, if there is any doubt
about its condition, DO NOT USE IT.
ELECTRICAL SAFETY
If you have hired a 230V model fitted with a 13A plug, it can be
powered from a standard 230V 13A power supply.
If you have hired a 230V model fitted with a 16A plug, it can be
powered from a 230V 16A mains powered socket or from a suitable
generator.
Models fitted with a 110V 16A plug will require a 110V power supply,
this should be taken from a suitable generator or from a transformer.
If the equipment fails, or if any part becomes damaged, return it. DO
NOT repair it yourself.
Fully unwind and loosely coil all extension leads. Position them
away from the equipment where they will be protected from water,
sharp objects and where they will not pose a trip hazard.
For additional safety, always use an RCD or power the
equipment from a mains circuit with a built in RCD.
Switch the machine and power socket OFF before plugging into the
power supply.
PREPARATION
Variable Speed
Control Dial
Motor
Position
Adjuster
Lock OFF
Button
ON / OFF
Trigger
Switch
Quick
Release
Button
3-Way Depth
Stop Guide
Depth
Stop
Guide Fence
Wing Nut
Vacuum
Head
Shaft Lock
Button
Exclusive Rights: Textwrite Publications Ltd
© The Author: Marc Bashford 2007
1033/01 ROUTER – MAKITA 3612C
1033/01
Use the Router only on material that is free from nails, screws, grit,
sand, bitumen and any other non timber product.
Select a work area which is well lit and offers good ventilation. If the
item being worked on is portable, always place it on a suitable work
bench and secure it in a vice or with clamps.
Make sure that the power supply is within easy reach of the work
area to ensure that cables are not placed under strain.
Ensure adequate space around the work area for the operator to
work safely.
Clear the floor area around the work at regular intervals to help
safeguard against accidents.
If working at height, work from a suitable work platform, NOT a
ladder or steps.
DUST CONTROL
You should use a dust collection system with this equipment, by
connecting a dust extraction unit to the outlet.
MAKE SURE that the collection system is securely attached to the
vacuum head.
CONTROLS
The Router is fitted with a trigger operated
ON/OFF switch that has a lock OFF thumb
button. The lock OFF button must be depressed
before the trigger can be operated.
To switch the unit, OFF simply release the
trigger.
The Router is also fitted with a variable speed
control dial which should be pre-set prior to
switching the unit ON. See the chart for dial position and RPM.
Dial No.
1
2
3
4
5
RPM
9,000
12,000
15,000
19,000
23,000
ATTACHMENTS
Guide
Lock
Lever
Template
Guide
The Router is supplied with an
adjustable side guide, which should
be used when running a cut parallel to
the materialʼs edge.
To adjust the guideʼs position, loosen
the two guide wing nuts and slide the
guide in or out as required.
A template guide is also supplied. To
fit the guide, move the guide lock lever
out, insert the guide then release the
lever to lock the guide in position.
FITTING A CUTTER
Cutter
Collet
Cutter
Chuck
Ideally, after fitting the cutter, you should set the motor head height
so that the tip of the cutter is just off the work surface when fully
raised.
To do this, turn the motor position adjuster clockwise to lower and
anticlockwise to raise. Make adjustment so that the tip of the cutter
is 2mm away from the work surface.
If you have a specific depth of cut required, you can limit the depth
the cutter can travel to. To set the depth adjust the depth stop bar
so that when lowered to the depth required, the stopʼs end makes
contact with the three way stop guide.
Turn the three-way stop guide so that the most suitable length ʻstopʼ
screw is used.
OPERATING THE UNIT
Make sure that you are wearing your PPE (personal protective
equipment).
Check the whereabouts of all cables and make sure all are clear of
the cut line. Check also that there is enough cable to allow the
Router to travel the full length of the work without being restricted.
Switch ON the dust extraction unit if being used.
Place the Routerʼs base plate on to the work without the cutter in
contact. Hold the Router firmly with both hands then depress the
lock OFF button and squeeze the ON/OFF switch to bring the motor
up to speed.
Lower the cutter to the required
Head
depth and if making a long cut,
Lock
depress the head lock lever to
Lever
lock the head in position.
RELEASE
Move the Router slowly forward
to begin cutting. DO NOT
operate this machine ʻone
handedʼ and do not swap hands
LOCK
when the unit is running.
Do not exert pressure on the
machine, let it work at its own
(Plunge Lock)
pace. Take your time, rushing the
work is both dangerous and can damage the machine, the cutter
and the material.
As you come to the end of the work piece the Router may drop
slightly and remove excess material. If this happens your work may
be ruined so practice with a piece of spare timber until you are able
to avoid the problem.
Move the Router progressively along the cut line. Always release
the head lock lever and allow the motor head to rise fully at the end
of the work piece
Release the ON/OFF trigger switch and wait for the motor to fully
stop.
EQUIPMENT MAINTENANCE & CLEANING
Spanner
Always replace the cutter once blunt.
When not being used, store the unit in a clean condition and in a
safe place, away from thieves and unauthorised users.
Shaft
Lock
Button
When you have finished, switch the unit OFF and wait for the cutter
to stop.
Disconnect the machine from the power supply then remove the
cutter from the chuck.
Next, give the unit a thorough clean ready for return.
Caution; cutters are very sharp, always wear gloves to protect your
fingers.
Switch the unit OFF and disconnect it from the power supply.
Depress and hold the shaft lock button then rotate the chuck until
the shaft lock engages. Using the spanner supplied, loosen the
collet nut by turning anticlockwise.
Remove any fitted cutter complete with reducer if used.
Insert the new cutter (complete with reducer if required) at least two
thirds into the chuck, then tighten up the collet nut.
Once tightened, release the shaft lock button and turn the chuck to
confirm that it has disengaged.
FINALLY
NOTE
Failure to clean the equipment thoroughly may make you
liable to a cleaning charge.
ADJUSTMENTS
Depending upon the task you wish to perform and the size of cutter
being used, you can set the motor unit at a particular start height
and limit itʼs depth of cut.
Premier Plant Hire, Giant Arches 12-23, 48A Burbage Road, Herne Hill, London SE24 9HE
Phone: 020 7326 0000 • Fax: 020 7274 1555 • www.premierplanthire.co.uk
1033/01d Router – Makita 3612C
02/10
Information on vibration levels, weights and sound levels in
this guide were obtained from the manufacturer and correct at
time of print. No liability will be accepted for any inaccuracies.