1
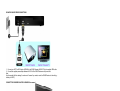
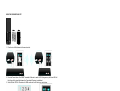
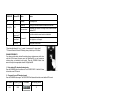
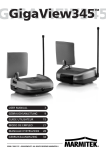
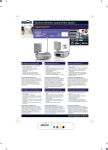
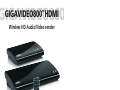
GIGAVIDEO800 HDMI
GIGAVIDEO800
TM
Wireless HD Audio/Video sender
USER MANUAL
3
GEBRAUCHSANLEITUNG
9
GUIDE UTILISATEUR
15
MODO DE EMPLEO
21
MANUALE D’ISTRUZIONE
27
GEBRUIKSAANWIJZING
33
20301/20090316 • GIGAVIDEO800 HDMITM
© ALL RIGHTS RESERVED MARMITEK
2
GIGAVIDEO800 HDMI™
ENGLISH
SAFETY WARNINGS
• To prevent short circuits, this product should only be used inside and only in dry spaces. Do not expose the
components to rain or moisture. Do not use the product close to a bath, swimming pool etc.
• Do not expose the components of your systems to extremely high temperatures or bright light sources.
• In case of improper usage or if you have altered and repaired the product yourself, all guarantees expire. Marmitek
does not accept responsibility in the case of improper usage of the product or when the product is used for purposes
other than specified. Marmitek does not accept responsibility for additional damage other than covered by the legal
product responsibility.
• This product is not a toy. Keep out of reach of children.
• Do not open the product (battery panel excepted): the device may contain live parts. The product should only be
repaired or serviced by a qualified expert.
• Keep batteries out of the reach of children. Dispose of batteries as chemical waste. Never use old and new batteries
or different types of batteries together. Remove the batteries when you are not using the system for a longer period of
time. Check the polarity (+/-) of the batteries when inserting them in the product. Wrong positioning can cause an
explosion.
• Only connect the adapter to the mains after checking whether the mains voltage is the same as the values on the
identification tags. Never connect an adapter or power cord when it is damaged. In that case, contact your supplier.
INTRODUCTION
Congratulations on purchasing the Marmitek GigaVideo800! It enables you to connect up to 4 HD devices and
transmit the HD signal wireless to your HDTV or HD-projector. Examples of HD devices are: HD-DVD player, Blu-ray
player, HD-Set top Box, PlayStation3, Xbox 360, etc. The GigaVideo800 supports HD resolutions up to 1080p. The
built-in infrared extension feature enables you to operate the HD devices with your own remote control while hidden in
a closed cabinet!
The Marmitek products are manufactured with the utmost precision and are of high quality. Please read this manual
first and follow the instructions so you can enjoy the possibilities of this product optimally.
SET CONTENTS
1x HDMI Transmitter
1x HDMI Receiver
1x HDMI Remote Control
1x Gold plated HDMI cable
1x IR Sensor Extender cable
1x IR Blaster Extender cable
2x Energy Saving Switched mode power supply
2x Anchors + Screws
1x User Guide
GIGAVIDEO 800 TRANSMITTER CONNECTIONS
1. Connect up to 2 HD devices (HDMI OUT) to your GV800 Transmitter (HDMI IN) by HDMI cable.
2. Connect up to 2 HD devices (Y/Pb/Pr OUT) to your GV800 Transmitter (Y/Pb/Pr IN) by green, blue, red-coloured
component video cable.
3. Connect the GV800 Transmitter’s “Audio L/R IN” to the HD devices by a red and white coloured audio cable.
4. Connect the supplied power adapter between the DC IN of the GV800 Transmitter and a power outlet.
© MARMITEK
3
GIGAVIDEO 800 RECEIVER CONNECTIONS
1. Connect your HDTV or HD Projector (HDMI IN) to the GV800 Receiver (HDMI OUT) by the supplied HDMI cable.
2. Connect the supplied power adapter between the DC IN of the GV800 Receiver and a power outlet.
Note:
Use the supplied drill hole drawing, 2 anchors and 2 screws if you want to mount the GV800 Receiver to the wall (e.g.
behind your HDTV).
CONNECT THE INFRARED BLASTER & SENSOR (if necessary)
1. Plug the IR sensor extender cable into the IR IN jack of the GV800 Receiver and place in the line of sight of the
remote control.
2. Plug the IR blaster extender cable into the IR OUT jack of the GV800 Transmitter. Place the IR blaster LED in
front of your HD devices and it will transmit all infrared commands received by the IR sensor extender cable.
Note:
IR blaster only supports 38kHz (NEC) and 36kHz (RC5 & RC6) infrared remote protocols. Some devices may not
be supported.
4
GIGAVIDEO800 HDMI™
USING THE GIGAVIDEO 800 SET
1. Place the two AAA batteries into the remote control.
2. Press the Power button of the GV800 Transmitter & Receiver to switch it ON. During warm-up the Power LED will
blink blue until the signal link between the Transmitter & Receiver is established.
3. Switch ON the HDTV or HD projector (to HDMI mode) and the HD device you want to view.
4. Press the Source 1 HDMI, 2 HDMI, 3 YPbPr or 4 YPbPr button, until you see the video from your device.
Note:
If all operation is normal, the Power LED will glow solid blue and Signal Strength will light in blue with max. 3
LEDs to visualise the signal strength (refer to LED details for more information).
Make sure your HD Devices are powered (ON).
Switching time between two source could be approximately 15 ~ 20 seconds.
If video from YPbPr component source device appears but dim, than press the 3 or 4 YPbPr button repeatedly on
the remote to fine-tune picture performance.
© MARMITEK
5
POWER LED
Source LED
Mode
Status
Red
OFF
Standby
In standby mode
Blinking Blue
N/A
Blinking 3x
per second **
Blinking 1x
per second
Blue
Warm-up
Setting up connection between transmitter and receiver
No connection *
Transmitter and receiver out of range or one of both has been
switched OFF
Input from selected source device is not detected.
Connected *
Solid blue
Unrecognized video format.
(Not support or out of range.)
Recognized video format.
* Signal strength indicator (0 = no, 1 = weak, 2 = average and 3 = strong signal)
** It’s normal to see the Source LED blinking when you switch your AV sources.
CHANNEL FREQUENCY
If you have some electronic devices like cordless phone, wireless access point/ router
used with 5GHz channel frequency near the GigaVideo800, you may experience
no/noise picture or diminished sound quality. Press the CHANNEL button three
seconds to adjust to an appropriate channel for GigaVideo800.
1. Enter wireless RF channel adjustment mode
Press the CHANNEL button three seconds. The all SOURCE LED 1-4 will blink 3 times
to show the current RF channel.
2. Changes to the next RF wireless channel
Press the CHANNEL button again. The SOURCE LED will automatic show the current switched RF channel.
RF Channel;
Frequency (MHz)
LED status
LED blinking number
# 32
5160
12
# 36
5180
13
# 40
5200
14
# 44
5220
23
# 48
5240
24
3. Exit the wireless RF channel adjustment mode
There is no button on the remote pressed about 10 seconds.
6
GIGAVIDEO800 HDMI™
TECHNICAL DATA
Resolutions
Supported video resolution (YPbPr)
Supported video resolution (HDMI)
Supported audio formats (analog)
Supported audio formats (digital)
480i, 480p, 576i, 576p, 720p, 1080i, 1080p@24/30fps
480p, 576p, 720p, 1080i, 1080p@24/30fps
48kHz and 24-bit per sample
up to 3.072 Mbps AC-3 and DTS
Wireless
Operating frequency
Operating range
System Latency
5.1 ~ 5.2 GHz
Up to 20 meter LOS (line of sight), up to 10 meter non LOS
No latency (<1ms)
Transmitter
HDMI input
Component input
Audo input
IR extender blaster
Dimensions
2x HDMI (19-pin female)
2x YPbPr (RCA)
2x RCA
2.5mm jack
295 x 149 x 46mm
Receiver
HDMI output
IR extender sensor
Dimensions
1x HDMI (19-pin female)
2.5mm jack
180 x 140 x 39mm
Infrared
Supported IR frequency
36kHz / 38kHz
Power supply
Switch mode Power adaptor
100-240VAC @ 50-60Hz, 5VDC 3A
Specifications may be modified without prior notice.
Environmental Information for Customers in the European Union
European Directive 2002/96/EC requires that the equipment bearing this symbol on the product and/or its packaging must not be disposed of with unsorted
municipal waste. The symbol indicates that this product should be disposed of separately from regular household waste streams. It is your responsibility to
dispose of this and other electric and electronic equipment via designated collection facilities appointed by the government or local authorities. Correct
disposal and recycling will help prevent potential negative consequences to the environment and human health. For more detailed information about the
disposal of your old equipment, please contact your local authorities, waste disposal service, or the shop where you purchased the product.
© MARMITEK
7