1
-----
---
---
---
-
-
--
-
-TM
THE OFFICIAL PUBLICATION OF THE YAMAHA USERS GROUP
MARCH 1987
------
GVAMAHA®
Editor
Tom Darter
-----
Operations
Sibyl Darter
Editorial Board
Bob Frye
Bill Hinely
Mark Koenig
Jim Smerdel
Cover Photograph
Jim Hagopian
---
--
----
--
--
--~---~i=~ErS
March 1987
Volume, 3, Number 3
Issue #18
4
ENTRANCE
5
MIXECHO
6
ANALOG STRINGS 1
A new DX9 voice created by Eldon J. Cheramie.
A new DX9 voice created by Eldon J. Cheramie.
A new DX9 voice created by Dawn Livingston.
7
STARLIGHT SPARKS
A new DX9 voice created by Peter Van der Zee.
8
QX5
Part two of a detailed, two,part guide to creating music with the
QXS digital sequence recorder. By Scott Plunkett.
10 RX5
An introduction to Yamaha's new digital rhythm programmer.
By Tom Darter.
17 Dark Voice
A new TX81Z Performance setup created by Michael A.
Huisman.
18 Brs'n'Wind
A new TX81Z Performance setup created by Michael A.
Huisman.
19 DX Music Sessions
A new educational booklet and cassette tape for use with
OX 100 and DX2 7 synthesizers.
AFfERTOUCH is published monthly. Third class
postage paid at Long
Prairie, MN and additional
points of entry.
SUBSCRIPTIONS: Free.
Address subscription correspondence to AFTERTOUCH, P.O. Box 2338,
Northridge, CA 913232338. POSTMASTER:
Send form 3579 to P.O.
Box 2338, Northridge, CA
91323,2338.
2
©1987 Yamaha International Corporation. No part ofchis publication may be reproduced, stored in a retrieval system, or transmitted in any form
electronically, mechanically, phomcopymg, recording, or otherwise, wtthout the prior written permission of Yamaha International Corporation.
AFfERTOUCH!Vol. 3 No. 3
or by any means,
From The Editor
A
FTERTOUCH MARCHES ON! In this
issue, we take a close look at yet another
new Yamaha product, the RXS digital rhythm
programmer. You will also find part 2 of our indepth look at the new QXS digital sequence
recorder. And, as promised, 4-operator patches:
From AfterTouch readers, four new patches for
the DX9, plus some special new voices for the
TX81Z FM digital tone generator (which was
the cover subject of the February 1987 issue of
AfterTouch).
Also, we want to thank the thousands of
readers who participated in the first
AfterTouch/Yamaha Reader Survey. Your
response was most gratifying. All of you who
sent in a completed questionnaire will soon be
receiving a Yamaha T-shirt. We will announce
the winner of the Grand Prize (a complete
YCAM System) in the next issue.
Finally, it is time yet again to reprint some
important information about AfterTouch
subscriptions, AfterTouch back issues, and
Yamaha product literature. Longtime
AfterTouch readers may be very familiar with
the procedures regarding all of these items, but
we still get many questions on these topics every
month from newer readers. I want to make sure
that all of you know exactly how to get the service you want as quickly as possible, so here
goes:
Warranty Cards & AfterTouch: We have
received a number of letters from Yamaha users
complaining that they expected an AfterTouch
subscription because they recently purchased a
Yamaha product and sent in a warranty card,
but still haven't received an issue. It is true that
our initial (1985) mailing was developed from a
warranty card list, but no subscriptions were
sent to those names-just a sample mailing of
the first three issues. In order to receive a free
subscription, you need to send us your request
on the attached postcard below. And remember, don't combine your subscription request
with a request for back issues: Send the two
separately.
Back Issues: If a request for back issues is
combined with a subscription request or other
material, chances are it will not be fulfilled. All
requests for AfterTouch subscriptions must go
to our Mailing List input service. After the
addresses are entered, the letters are normally
kept on file, in keeping with various postal
regulations. To be absolutely sure that you
receive any available back issues that you want,
make back issue request separately, and include
the indication "ATTN: Back Issues" on the envelope. Please do not send back issue requests
on the attached subscription postcard.
Product Literature: All requests for specific
product literature must go directly to Yamaha
[Yamaha International Corp., P. 0. Box 6600,
Buena Park, CA 90622]. We at AfterTouch are
happy to receive specific questions concerning
the use of Yamaha professional music products,
and we will answer as many of them as we can in
the Questions column; however, requests for
general product information must be sent directly to Yamaha.
We are very happy to offer AfterTouch as a
free informational service. In order to make
sure that we can serve your needs (and continue
to offer these various services free), we must ask
you to help us by sending different requests in
different envelopes. Thanks.
-TO
AFTER,
TOUCH is a
monthly
informational
publication from
Yamaha
Receive AfterTouch Free Every Month!
Y
OU CAN RECEIVE AFTERTOUCH for an entire year, absolutely free, just by
asking. If you are not already on our mailing list and would like to be, fill out the
attached postcard. Be sure to sign the card (a postal regulation); it lets us know that
you really want to receive AfterTouch.
After you have filled in the relevant information, put a stamp on the postcard
and mail it to us. When we receive the card, we'll put you on our permanent mailing list, and you will receive twelve issues of AfterTouch absolutely free! There is
absolutely no obligation, and no other strings are attached.
(By the way, if you received this issue in the mail, you are already on our permanent mailing list, so you don't need to send in another card.)
Also, don't limit yourself to just sending in your address: Let us know what you
want to read, and what you have to offer (see page 19 for details). We look forward
to your input.
To receive
AFTER,
TOUCH every
month, abso,
lutely free, just
put your name
and address on
the enclosed
card and mail it
to us.
Vol. 3 No. 3/ AFTERTOUCH
3
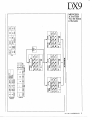
DX9
ENTRANCE.
ANewDX9
Voice By Eldon
J. Cheramie.
0
OFF
OFF
OFF
MODULATION
WHEEL
0
OFF
OFF
OFF
BREATH
CONTROL
RANGE
PITCH
ANP
EGBIAS
SINE
40
26
0
0
WAVE
SPEED
DELAY
LFO
PM)
AWO
PITCH
ANP
MODSENS
POLY
12
OFF
0
C2
ON
POLY
PITCH
BEND
RANGE
MODE
TIME
~~
~§
~
~
f2....
FREQUENCY
DETUNE
0.50
·6
ENVELOPE DATA
R2
R4
R3
R1
73
33
L2
L1
99
OPM
60
85
RS
LS
OPM
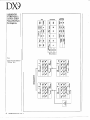
These DX9
voices can also
be loaded into
all of Yamaha's
6~operator FM
digital syn~
thesizers and
tone generators
(such as the
DX7, DXS,
TX7, TX216,
TX816, TFl,
DXl, and DX7
11 FD/0), sim~
ply by finding
an appropriate
algorithm and
using only 4 of
the 6 operators.
20
4
AITERTOUCH/Vol. 3 No. 3
99
L3
88
95
L4
5
LS
99
+
L2
99
L3
63
90
I OUTPUT
RS
99
L4
2
LS
0
L~:
ALGORITHM #3
50
L2
99
OPM
-7
10
~
osc
SYNC
FEEDBACK
LEVEL
I
·1
ENVELOPE DATA
R2
R3
R4
RS
99859999
L1
50
DETUNE
ENVELOPE DATA
R2
R3
R4
99
OPM
R1
RS
1.00
75
KEY
TRANS
DETUNE
1.00
99
1
L1
FREQUENCY
~ IOOTPUTL~
FREQUENCY
R1
PORTAMENTO
85
DETUNE
ENVELOPE DATA
R2
R4
R3
99
MONO
0
L2
L1
5
60
2.00
75
:!
I OUTPUT L~
FREQUENCY
R1
&l
75
L4
L3
28
~
7
L3
75
hil
~
90
L4
99
IQUTPUT LEVEL
95
7
LS
0
7
3
3
3
3
2
3
4
OPM
~
z9
1.1\
~
8
~
;;
~
'-"
'-"
z
"'g
gw
~
~§
W::o
if~
~Q
WAVE
OPI
99
L1
34
R1
~
99
L3
99
R3
0
95
L4
65
A4
I
OUTPUT LEVEL
I
99
L2
PMD
0
LS
0
AM)
37
BREATH
CONTROL
3
0
3
3
3
1:1
~
OPI
99
L1
25
R1
99
DET\JNE
L4
0
60
A4
IOUTPUT~
99
L3
99
R3
0
ALGORITHM #6
~
99
L2
0
82
L4
32
A4
aJTPUT LEVEL
99
L3
90
R3
+2
DETUNE
•
ENVELOPE DATA
2.00
R2
3
4
OPI
I
99
L2
60
R2
FREQUENCY
OPI
99
L1
95
R1
1
2
ENVELOPE DATA
4.00
FREQUENCY
AMP
PITCH
MOOSENS
MODULATION
WHEEL
0
RS
EGBIAS
OFF
OFF
IDEl\JNEO
+
LFO
DELAY
0
AMP
OFF
OFF
ENVELOPE DATA
99
R2
8.00
FREQUENCY
SPEED
50
PITCH
S/H
OFF
0
OFF
RANGE
0
0
0
LS
0
0
AS
LS
AS
"'~
0
5
PITCH
BEND
RANGE
12
OPI
99
L1
99
R1
41
~
95
L3
40
L4
0
32
I
OUTPUT LE;:L
I
99
L2
IDETUNE+7
ENVELOPE DATA
R3
A4
4.00
R2
TIME
0
PORTAMENTO
MOOE
OFF
FREQUENCY
~DBACK
LEVEL
I
I
MONO
POLY
POLY
LS
0
0
RS
TRANS
KEY
C2
SYNC
osc
ON
Q~·z~
-< tj \.J
tr:l >< ::to
=
0
e.('DS:::\0.
~
('D('D('Dtr:l
... o:l~ ,....
~~>~
~
\0
~
0
;;!~
~5
WB
~~
~
U)
g
~
:1!
99
25
ON
ON
NIP
OFF
OFF
EGBIAS
ON
ON
0
0
PM>
OFF
TIME
PORTAMENTO
MODE
LFO
DELAY
15
PITCH
PITCH
BEND
RANGE
4
SPEED
35
RANGE
TRI
WAVE
POLY
POLY
M:lNO
d
~0\~
C!)rn~Ocl
<~CI)CI)d
o00 ~B
,_:jz ~~ ~
....
z~z u ....
;;..
<~<~::3
MODULATION
WHEEL
BREATH
CONTROL
10
3
C2
SYNC
osc
ON
0
2
1
OPt
4
3
0
0
0
PITCH
AWP
MODSENS
KEY
AND
TRANS
~
zc
~
-3
OETUNE
OUTPUT
T
LE5~L
ENVROPE DATA
R4
R2
R3
44
81
84
L2
L3
L4
0
99 99
1.00
FREQUENCY
49
R1
99
L1
OPt
,
+4
OETUNE
OUTPUT
r
99
L2
~
LE~L
ENVROPE DATA
R2
R3
R4
48 74 47
L3
L4
97
0
1.01
FREQUENCY
56
R1
99
L1
OPt
~
-'='
..<:
~
]~
;;! "
-g:
~-SO
ill,~
~
"'""'
LtJ :'-'
85
R2
~
t
1~:_~7
99
39
L4
0
DETUNE
IOUTPUT~
RS
0
44
LS
-1
1.00
ENVELOPE DATA
RS
R2
R3
R4
55
0
55
95
L4
LS
L2
L3
0
0
99
99
1
IOUTPUT LEva
72
99
L2
~
~
L3
1.01
ENVELOPE DA IA
R3
R4
74
FREQUENCY
R1
99
R1
56
L1
FREQUENCY
OPt
68
RS
0
L1
99
0
LS
0
RS
0
LS
OPt
ALGORITHM #5
I
7
I FEEDBACK
I
LEVEL
z
"'0
"'
~
:I:
::J
()
0
b2
U-1
t;:
<
1.0
~
-..)
()
c
::c
0
~
tT1
>
~
w
?
z
w
"
~
~
g
t5
~::>
w§
~~
_,tj
MODE
12
PITCH
BEND
RANGE
POLY
MONO
POLY
OFF
SPEED
WAVE
TIME
0
PM>
19
EG BIAS
OFF
OFF
PORTAMENTO
LFO
DELAY
23
35
AilE'
OFF
OFF
SINE
ON
PITCH
99
OFF
RANGE
0
TRANS
KEY
C3
fW()
60
COOTAOL
BREATH
1
0
0
0
0
SYNC
osc
ON
PITCH
AilE'
MODSENS
MODULATION
WHEEL
1
OPM
4
3
2
~
l2
0
46
R2
OPM
99
L1
64
R1
~
l2
0
26
R2
L4
0
39
R4
DETUNE
50
32
L3
71
R3
0
VEL
L4
39
R4
0
OUTPUT LEVEL
32
L3
71
R3
ENVELOPE DATA
1.00
FREQUENCY
OPM
55
L1
59
R1
-2
DETUNE
ENVELOPE DATA
6.06
FREQUENCY
LS
~
OPM
99
L1
99
R1
47
0
L4
0
~
35
32
L3
L4
0
31
IOUTPUT LEg~L
46
l2
21
-2
DETUNE
ENVELOPE DATA
R2
R3
R4
6.00
L3
33
0
IOUTPUT LEVEL
55
46
l2
21
FREQUENCY
OPM
99
L1
51
R1
ALGORITHM #5
0
3
0
3
FIS
LS
FIS
OETUNE
ENVELOPE DATA
R2
R3
R4
19.00
FREQUENCY
LS
0
3
0
RS
LS
0
RS
()• ~ > >
....
~
(t) (t)
> ::c
....,
~~;x::;::t-4
-<
(Jj.,.....
~"'0\0• C1
C.,.(t)t:::j~~
$~Z~~
3
FEEDBACK
LEVEL
~
I
~
\0
QX5
A Detailed
Guide To Cre ..
ating Music
WithTheQX5
Digital
Sequence
Recorder, Part
2. By Scott
Plunkett.
T
HE YAMAHA QXS Digital Sequence
Recorder is a sophisticated MIDI sequencer
that offers a wide variety of composing and
arranging options. In Part 1 of this article (in
the February 1987 issue of AfterTouch), we explored some of the important features of the
unit, and discussed one possible approach to
configuring tracks and organizing your musical
work. In this month's installment (Part 2), we
will look at some alternative ways to organize
our compositions using tracks and macros, and .
will also take a close look at a few of the QXS's
most powerful features. (For a brief descriptive
overview of the QXS, see the introductory article on the QXS in the December 1986 issue of·
AfterTouch.)
Alternative Track Configurations
The approach outlined last month is only
one possible way of configuring tracks when you
are working with the QXS. Since each track is
capable of containing data from all 16 MIDI
channels, you can configure them in an almost
limitless number of ways. There are three main
approaches to track use: 1) Each track represents an instrument in a composition (the track
layout from last month's installment illustrates
this method); 2) Each track represents a part in
a song; and 3) Each track represents a complete
song.
Some musicians find it convenient to put
different parts of a song on different tracks. This
is similar to the macro recording technique used
last month to build up the drum track. But
rather than put the individual sections of the
song on different macros, as described last
month, you put them on different tracks. This
method can be useful when you have a short
musical idea that you want to arrange and work
on before you have decided on a song structure.
You may want to work on a 16 bar "groove,"
adding the bass, drum, and keyboard parts to
see if it will work better as a verse or as a chorus.
When you are finished, you can put this part on
Track 8 and begin working on another section
of the song. Using this approach, the track
arrangement will eventually look something like
this:
Track
Track
Track
Track
8
1
2
3
4
blank
blank
intro
verse 1
Track 5
Track 6
Track 7
Track 8
chorus 1 & chorus 2
verse 2
bridge
final chorus
While this method of writing can be convenient, it can also waste a tremendous amount of
memory. If you have a number of repeating
parts, consider putting them in macros. As
always, try using a combination of tracks and
macros to get the best mix of convenience and
efficiency.
If you want to use the QXS in live performance, you can put complete songs on each
track. This makes it possible to go from song to
song by turning tracks on and off. As you select
each song you must also enter the proper
tempo. You can avoid having to do too much
tempo changing, though, by using the three
Tempo Memories to set the most commonly
used tempos before each performance.
The only potential problem is that memory
use is critical when you are putting entire songs
on each track. Try to avoid including too many
songs with dense arrangements. Make extensive
use of macros, and use the Remove (Measure
Edit) and Thin Out (Track Edit) commands
whenever possible to take out unnecessary data.
If you need the QXS to play more than eight
songs ( 1 for each track) during a performance,
you will need to load the new songs into memory at some point. You can tape load from cassette, but since this can take fairly long if lots of
data is involved, there will need to be a short
break in the action while the QXS is loading. A
much faster and more reliable solution is to use
a computer or special disk drive to load the
sequences as MIDI System Exclusive bulk data.
Devices like the Yamaha MDF1 MIDI Data Filer
allow you to load new songs more efficiently.
The MDF1 uses a 2.8" Quick Disk to store
MIDI System Exclusive bulk data from any
MIDI device. With the MDF1 you can load
songs quickly into the QXS (individually or in
groups).
Auto Locate
In last month's installment, we discussed
Punch In Recording. The Auto Locate function
can help you further automate this process. As
mentioned last time, the actual punch-in and
punch-out points may be specified as any measure in the song. These measures are indicated
AITERTOUCH!Vol. 3 No. 3
~
~~---------~---~~~~~~~~~-
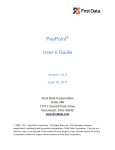
QX5 digital sequence
recorder.
by F3 and F4 in the LCD display. You can also
specify a measure before the actual punch-in
point from which playback will begin. This
"pre-roll" measure is represented by F2 in the
LCD display.
Switch the Auto Locate function on, call
the Punch Record mode, and press Start to
initiate recording. Playback will begin from the
F2 measure, and recording will begin at the F3
measure. Recording will stop at the punch-out
point (the F4 measure). Auto Locate will also
work with the Realtime Record mode!
Event Edit
One of the most powerful features of the
QXS is Event Edit. In this mode you can change
almost any part of the recorded MIDI data. Certain types of data-macro calls or relative tempo
marks-can only be inserted in Event Edit.
Once you get acquainted with the musical possibilities that Event Edit offers, you will find it
invaluable.
Make sure you have recorded something on
Track 1, and enter Event Edit by pressing the
Tempo/Event Edit button while holding down
Shift. (This puts you in the Search mode of
Event Edit.) In the Search mode, you can move
backward or forward in the track using the left
and right buttons (F3 and F4).
For each event, you will see three numbersseparated by dashes-on the top line of the
LCD. The first number indicates the current
measure, the second number tells you the beat
within the measure, and the third number is the
clock number. There are 96 clocks for each
quarter-note. Measure marks also appear at the
beginning of each measure, so that you always
know where you are. If you need to hear the
notes, you can press Start/Enter, and the QXS
will play each note as it is displayed. This allows
you to step through the track and locate any
notes you might want to change or delete.
Once you have found a note you want to
change, press the Job button (F1). A cursor will
appear over the M in the upper left corner of the
LCD, indicating that you have entered the
Change mode of Event Edit. This is where you
actually alter the data.
The first thing you are able to edit when you
enter the Change mode is the location of the
note. Use the left and right buttons (F3 and F4)
to move the event backwards or forwards to any
position in the track. This is particularly useful
when you want to change the time feel of a note
slightly within the track. If you played the note
a little too much on top of the beat, you can
move it back by about 5 clocks and give it a
more relaxed feel.
When you press the Cursor button (F2), the
cursor will move down to the event type. There
are 10 types of events that can be changed.
When the cursor is on the event type you can
select any of the 10. For example, if you want to
insert a macro call on the same clock as your
Note On command, you can use the left and
right buttons (F3 and F4) to select MACRO.
You can then move the cursor (using the
cursor/F2 button), enter the proper macro
number, and insert it into the track.
As you scroll through the 10 event types,
notice that the editing options on the bottom
right of the display are different for each type.
Continued on page 20
Vol. 3 No. 3/ AITERTOUCH
9
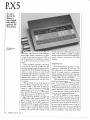
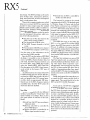
RXS
An lntro ..
duction To
Yamaha's
New Digital
Rhythm Pro ..
grammer. By
Tom Darter.
RXS digital rhythm
programmer.
W
ELCOME TO THE FUTURE! Or,
rather, welcome to the world of Yamaha's
newest digital rhythm programmer, the RXS.
As many of you may have noticed, 1987 has
seen the introduction of a significant number of
new professional musical products from
Yamaha.
Each new product represents a technological step forward. Obviously, though, some new
instruments embody a greater leap forward than
others. The DX7 II FD/D digital FM synthesizer
represents a major advance-in terms of both
sound quality and performance versatility-over
the original DX7. However, if the DX7 II FD
represents a major advance, the RXS represents
much more-something on the order of a trip to
a new planet.
This is especially obvious if the features of
the new RXS are compared to those of its predecessor, the RX11. The RX11 provided easy
access to a number of percussion sounds, but
offered nothing in the way of sound shaping.
The new RXS offers both higher-quality sampled drum sounds and the ability to reshape
(edit) those sounds on a number of levels.
More importantly, the RXS is equipped with
an impressive MIDI implementation. The
RX11 could be "played" by an external keyboard via MIDI, and this MIDI connection
allowed the RX11 to respond to MIDI velocity.
However, none of this MIDI/keyboard performance could be stored in the RX 11 's internal
memory. The new RXS both responds to and
10
AFTERTOUCH/Vol. 3 No.3
-
-------
------------
records input from a MIDI keyboard. In other
words, with the RXS it is possible to program
rhythm sequences from an external MIDI keyboard, complete with velocity (or pitch)
shadings.
Sound Overview
When dealing with a new planet, it is most
important to understand the basic layout. The
RXS offers access to 64 different percussion
sounds: 24 sounds stored in the instrument's
internal memory, 28 sounds stored in the plugin ROM Data Waveform cartridge, and 12 more
sounds available via the Copy function.
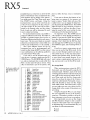
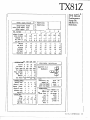
These 64 sounds can be assigned to any of
the 24 instrument buttons on the RXS's front
panel. The 24 instrument buttons (in pairs)
correspond to a total of 12 output channels,
which can be accessed via the 12 output jacks
on the back panel. If the stereo outputs are used
instead, the stereo location of each one of the
12 output channels is fixed (based on the setup
shown in the accompanying diagram).
The RXS is capable of 12-note polyphony,
which means that it can output one sound from
each of its output channels simultaneously.
And, while two voices assigned to the same output channel cannot sound at the same time, all
64 voices can be included as part of any programmed pattern. Also, since it is possible to
assign any voice to any one of the output channels, it is possible to create patterns in which
INSTRUMENT{
KEYS
INTERNAL
VOICES
CARTRIDGE
VOICES
RAM
Pos•l•on
Vo•ce
[][J[][]LJ[]LJDDLJ[]D
DLJLJ[][][]LJ[]DLJLJ[]
801
802
so 1
S02
RIM1
RIM2
E Tom 1
803
S03
FM pre 1
Cga HMT
DXmrmb
CgaHop
T1mpn
Cp1
801
Cp2
so 1
Cp3
RIM 1
E Tom2
Tom 2
E Tom3
Tom3
E Tom4
Tom4
HH clos
HH open
Edge
Cup
Chtna
Crash
Tambrn
Claps
Shaker
Cowbel
CgaLO
T1mbl L
8goHI
FMprc2
8go LO
T1mbiH
FM pre 3
Ago HI
Cstnt
Ago LO
Whstl
OX clav
GlsCsh
Gun
OX arch
Hey
Wao
Ooo
E bass H
E bass L
Cp4
Tom 1
CpS
Tom2
Cp6
Tom3
Cp7
Tom4
Cp8
HH clos
Cp9
Cup
Cp10
Cp11
Crash
Claps
Tom 1
almost any group of voices can sound at the
same time (up to the limit of twelve).
The RXS's front panel has 12 sliders, for
controlling the output levels of the 12 channels
in the stereo mix. If you connect some of the
ouput channels directly to your mixer (via the
individual output jacks), you can remove those
channels from the stereo mix by setting the
front panel sliders all the way down. The channels' outputs will still appear at full level at the
output of the individual output jacks.
The RX5 Memory Layout
When the RX5 is turned on, the various
memories (Internal, ROM, and Copy) are
called up into the internal Play/Edit memory.
There are a total of 64 memory locations in the
Play/Edit memory, which correspond to the following: the 24 internal voice memories, the 28
ROM voice memories, and the 12 Copy voice
memories.
When you first take the instrument out of
its box, the 12 Copy voice locations will contain copies of the first 12 of the 24 Internal
voices (see the accompanying diagram). These
Copy locations can be used to store edited versions of some of the original voices. Also, they
can be used to store copies of the original
voices. This function can have a number of
uses: You may want to have two copies of the
CUica
Cp12
Cowbel
same cymbal voice on different output channels, so that you can (for instance) overlap the
sounds for a more natural ride cymbal feel. Or,
you may want to copy a pitched voice to anumber of channels, so that you can create chords
played by the same instrument sound. (Remember that each voice, since it is a single, sampled
sound, is monophonic.) Using the functions
available in Key Assign mode, it is possible to
assign any of the 64 voices to any of the 12 output channels, and to any of the 24 instrument
keys.
In its Sequence memory, the RX5 can store
up to 100 patterns (numbered 00-99), which
can be combined into 20 songs (numbered 0019). Beyond this, songs can be combined into
up to 3 Chains (numbered 0-2).
Each pattern can consist of up to 99 bars.
The basic beat for any pattern can range from
half-notes ( xx/ 2) to thirty-second-notes
(xx/32), and the number of beats for each bar
of the pattern can range from 1 to 99. Each song
can consist of up to 999 segments, each one of
which can consist of a pattern, a repeat, a volume change, or a tempo change. Finally, each
chain can consist of up to 90 segments, each
one of which is a song.
This chart shows the factory
preset output channel assignments for all 64 voices available on the RX5.
Pattern Writing
This chart shows the stereo
position assigned to each of the
RX5 's 12 output channels.
Basic pattern writing on the RX5 is very
DDDDDDDDDDDD
INSTRU~fy~ {DDDDDDDDDDDD
OUTPUT
CHANNELS
STEREO
POSITIONS
1
t
8
2
t
9
4
3
t
9
II;,
12
5
'\
10
,.
6
6
7
,
4
8
...13
9
3,.
10
11
~
11
12
Jf
5
t
8
Vol. 3 No. 3/ AITERTOUCH
11
RXS
Continued
straightforward, as it has been on all of the RX
Series of instruments. Once you determine the
time signature and bar length of the pattern,
you simply enter Real Time Write mode, press
the START button, and begin. Using the
instrument keys, you can enter notes from any
of the 24 voices assigned to the keys. The precise time location of the notes will be determined by the Quantize value, and the volume
level of each note will be determined by each
voice's volume level setting.
For each instrument sound, it is possible to
assign two different accent levels. This makes it
possible to program patterns that involve at
least three different sound levels for each instrument voice. The two accent levels are accessed
whenever an instrument key is struck while one
of the Accent Level buttons ( 1 or 2) is pressed.
Also, three different layouts for the 24
instrument keys can be pre-programmed and
stored (via Key Assign Job #07), so that various
voice combinations can be called up quickly for
use in the Pattern Write mode.
If you want to use the reversed sound of a
voice as part of a pattern, simply press the REVERSE button. The REVERSE light will come
on, and any instrument key you play while the
RXS is in this mode will play in reverse. This
effect is memorized as part of the pattern, and
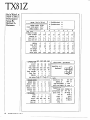
The 28 voices available on the
ROM Waveform Data Cartridge that comes with the
RX5.
12
1:
2:
3:
4:
5:
6:
7:
8:
9:
10:
11:
12:
13:
14:
15:
16:
17:
18
19:
20:
21:
22:
23:
24:
25:
26:
27:
28:
SO 3
BD 3
CgaHMT
CgaHOP
CgaLO
BgoHI
BgoLO
TimbiH
TimbiL
AgoHI
AgoLO
Cuica
Cstnt
Whstl
Timpn
GlsCsh
Gun
FMprc1
FMprc2
FMprc3
EbassH
EbassL
DXorch
DXmrmb
DXclav
Hey
Wao
Ooo
Snare Drum
Bass Drum
Conga (High Muted)
Conga (High Open)
Conga (Low)
Bongo (High)
Bongo (Low)
Timbale (High)
Timbale (Low)
Agogo (High)
Agogo (Low)
Cuica
Castanet
Whistle
Timpani
Glass Crash effect
Gunshot effect
Synth-percussion (high)
Synth-percussion (medium)
Synth-percussion (low)
Electric Bass Gtr (high)
Electric Bass Gtr (low)
Synth-orchestra
Synth-marimba
Synth-clavinet
Vocal Sound
Vocal Sound
Vocal Sound
AFTERTOUCH/Vol. 3 No. 3
---
-~-
~
~
----
does not effect the basic voices or instrument
keys.
If you want to shorten the duration of any
given note in a pattern-if, for instance, you
want to create a "choke" effect with any of the
cymbal voices-you can engage the damp function by pressing the DAMP button. The DAMP
light will come on; now, whenever you press an
instrument key, it will have the effect of stopping the sound of that voice (within the time
restrictions set by the Quantize function).
An important note: The DAMP function
only operates on notes already recorded into a
pattern-if you press the DAMP key and simply
try to play the instrument keys, you will get no
response. Don't think that the RXS has died;
just disengage the DAMP function by pressing
the DAMP key again, and everything will be as
it was.
If you do not want to write patterns in real
time, you can use the Step Write mode. In this
case, you move through a pattern one step at a
time (with the size of the steps being determined by the Quantize value), and do not have
to worry about your manual dexterity. If you
want to enter a complex pattern with exact timing, you may want to use the Step Write mode.
Key Assign Mode
When writing patterns using the RXS's
front panel, you will obviously be using the 24
instrument pads. Therefore, much of the work
of writing patterns (both in real time and in step
time) will involve interaction between the Pattern Write mode and the Key Assign mode
(since this is where the status of the 24 instrument keys is determined). Fortunately, it is possible with the RXS to move into Key Assign
mode while in Real Time Write mode, so that
you can judge your new voice choices (or Key
Assign edits) in the context of the pattern you
are writing.
Using Key Assign Job #01, you can change
the voice assignments for any of the 24 instrument keys. This makes it possible to call up different instrument voices for use in any pattern.
More importantly, you can use Key Assign
Job #02 (Parameter Assign) to alter a number
of aspects of the sound of any voice assigned to
an instrument key. For each instrument key, you
can adjust the following parameters:
• pitch
• level
• attack
• decay
Each of these sound edits is stored as part of the
pattern memory, and does not alter the basic
voice.
Whenever you move into Key Assign mode
from Real Time Write mode, the Record function is disabled, but the pattern you are working
on will continue to play, so you can determine
your next voice addition relative to the sounds
you have already entered. Once you decide on
your next move, you just have to press the Real
Time Write key again, and you are back in Real
Time Write mode. It is therefore possible to try
out various edits to a basic sound in the context
of the pattern; once you have made your
choice, re-enter the Real Time Write mode by
pressing the appropriate button, and begin
entering notes again.
Also, if you want to enter a voice part with
changing pitches, it is possible to assign one
voice to the entire top row of instrument keys,
using the Multi Voice function (Key Assign Job
#03). Once a voice is assigned to the top row of
instrument keys, you can assign a graduated set
of values for pitch, level, attack, or decay over
the total range of 12 keys. In addition, you can
make other minute alterations to the parameters of each key, using the Multi Step function
(Key Assign Job #04). Of course, a similar
effect can be achieved using a MIDI connection
to a velocity-sensitive keyboard (which will be
explained in more detail below).
Pattern Editing
In the Pattern Edit mode, it is possible to
move through a pattern note by note, and edit a
number of important musical values for each
event in the pattern. Once you enter the Edit
Pattern mode, you can step through all of the
events in a pattern; or, you can select a specific
instrument voice, and step through only the
notes that involve that voice.
For any note event in a pattern, you can edit
the following parameters:
•
•
•
•
•
pitch
level
attack
decay
reverse on/ off
Notice that, although most of these parameters
correspond to those available in the Key Assign
Parameter function (Key Assign Job #02), in
this mode they alter the specific note only, and
not the Voice that is playing the note or the
instrument key to which the voice is assigned.
They are therefore independent of the parameters set using Key Assign Job #02 or Edit Voice
Jobs #02, #03, and #04.
It is also possible to change any voice in a
pattern to another voice, using Utility Job #04
(Change Voice).
Edit Voice Mode
If you want to transform the RXS's basic
sounds beyond the edit capabilities offered by
the Key Assign parameter change functions,
you can perform much more extensive voice alterations in the Edit Voice mode. Using this
mode, you can create entirely new sounds.
Any voice that is assigned to an instrument
key can be called into the Edit Voice mode
(using Edit Voice Job #01). Once you have
picked the voice you want to edit, you can
change the following parameters of the sound:
•
•
•
•
•
pitch
envelope
pitch bend
level
loop on/ off
Let's take a closer look at each one of these edit
parameters:
Pitch (Voice Edit Job #02): This Job allows
you to adjust the pitch level of the voice over a
total range of five octaves (from minus two octaves to plus three octaves). Pitch adjustments
can be made in increments of 10 cents {equal to
1/w of a semitone).
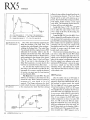
Envelope (Voice Edit Job #03): Although
the Key Assign mode allows you to adjust the
Attack and Decay values for the RXS's voices,
this Job in Edit Voice mode gives you much
more control for precise envelope shaping,
since it allows you to adjust up to six different
parameters of the voice's envelope: Attack
Rate, Decay 1 Rate, Decay 1 Level, Decay 2
Rate, Release Rate, and Gate Time (see the
accompanying diagram).
Initially, each voice will display values that
correspond to its own natural envelope. As you
change the envelope values, you will notice
that the shape of the sound can be altered quite
dramatically.
Continued
Vol. 3 No. 3/ AITERTOUCH
13
RX5
Continued
AR = Attack Rate (parameter 1)
D1 R = Decay 1 Rate (parameter 2)
D1 L = Decay 1 Level (parameter 3)
D2R = Decay 2 Rate (parameter 4)
RR = Release Rate (parameter 5)
GT = Gate Time (parameter 6)
Voice Edit parameters for the
RX5 's envelope generator.
Voice Edit parameters for the
RX5 's pitch bend.
One of the most important parameters for
editing the envelope is the Gate Time. This
determines the overall length of the envelopeexcluding the Release Rate. The initial Gate
Time setting for all of the original voices is 6500
milliseconds (6.5 seconds), which is also the
maximum value for the Gate Time. The overall
shape for the initial envelope is therefore determined completely by the settings of the Attack
Rate, Decay 1 Rate, Decay 1 Level, and Decay
2 Rate. If you want to take advantage of the
Release Rate parameter, you must shorten the
Gate Time or extend the Decay Rate values.
Also, note that the original sound can only
last as long as the information provided by the
basic sample. If you want to extend the duration
of the voice, you must turn the Loop function
on (Voice Edit Job #06).
Pitch Bend (Edit Voice Job #04): This Job
allows you to introduce a pitch bend into the
sound of the voice. Pitch is raised or lowered in
increments of 1 cent (equal to Vwo of a
semitone). The Range setting sets the final
pitch to which the note is bent (starting from
the original pitch), while the Rate setting
FINAL
PITCH
I
0
1--
a::
Bend
Rate ---,
----0.01 cent
(fixed}
ORIGINAL
PITCH
14
AFTERTOUCH!Vol. 3 No. 3
TIME
affects the time value for the pitch bend (see the
accompanying diagram). The Pitch Bend
Range can be as much as 60 semitones up or
down. The Pitch Bend Rate settings are 00-60,
with higher numbers creating a more rapid
pitch bend. The Rate setting must be above 00,
or there will be no pitch bend effect.
Level (Edit Voice Job #05): Like the Level
parameter in Key Assign mode, this Job allows
you to adjust the output volume of the voice,
·over a range of 00-31. At the 00 setting, the
voice is turned off.
Loop On/Off (Edit Voice Job #06): If you
plan to expand the overall duration of the voice,
you must turn the Loop function on in order to
give the RX5 increased sound data to deal with.
The sample sound is expanded by repeating
(looping) the tail end of the sample with
decreasing sound level. This operation is used
initially to create some of the longer voice
sounds (such as the cymbals).
Once you have created an edited Voice, you
can save it using Edit Voice Job #07 (Store
Voice). This function actually stores the new,
edited voice in the RX5's Play/Edit memory in
place of the original voice. Remember, though,
that the original voice still exists in the unit's
permanent ROM memory. To restore the original voice, simply use Voice Edit Job #08
(Initialize Voice). This will bring the original
voice back into the Play/Edit memory, in place
of the edited voice.
MIDI Functions
Like the earlier units in the RX family of
rhythm programmers, the RX5 can be set up to
respond to input from a MIDI keyboard; and, if
the keyobard is velocity-sensitive, the sounds
that you trigger will vary in volume according
to how hard to play your MIDI controller.
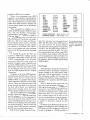
The accompanying chart shows the MIDI
note numbers that are assigned to the 64 voices
in the RX5 when it is shipped from the factory.
As you can see, all 64 of the RX5 voices can be
played simultaneously from a MIDI keyboard.
Also, if you compare the RX5's MIDI note
number assignments to those of the earlier RX
units, you will see that the RX5 note assignments are compatible. (For a chart showing the
MIDI note assignments of the earlier units, see
the RX Series article in the September 1986 issue of AfterTouch). This means that RXll patterns recorded into a MIDI sequencer can be
played by the RXS with no problems.
However, it is not necessary to use a MIDI
sequencer to record patterns when playing the
RX5 from a velocity-sensitive MIDI keyboard.
This is because the RXS can record the performance from a MIDI keyboard, complete with
velocity shadings, directly into its internal pat·
tern memory.
There are actually two different ways in
which the RX5 will respond to MIDI note numbers: The Note Number Assign mode
(described above), and the Tunable Note mode.
With the Tunable Note mode, it is possible to
use an RX5 instrument voice as a sound source
for a MIDI keyboard. The selected voice is playable over a full 5-octave range, and the keyboard performance will be stored in the RXS's
pattern memory, following the pitch changes
you perform on the keyboard. This makes it
easy to record bass lines and other instrument
parts into the RX5 using its pitched _instrument
voices.
In Tunable Note mode, the RXS also
responds to MIDI Program Changes-and the
64 program numbers of (for instance) the DX7
II FD/D correspond exactly to the 64 instru·
ment voices of the RX5. In other words, it is
possible to program a pattern completely from
an external MIDI Keyboard: Once you set the
RXS going in Real Time Pattern Write mode,
you can call up any of the voices (one at a time)
from the MIDI Keyboard using the Program
Change keys.
In addition to all of these MIDI keyboardrelated functions, the RXS offers two other new
features. Using the E.G. Velocity function
(MIDI Job #07), it is possible to affect the envelope parameters of the RXS's voices by MIDI
velocity. When the keyboard is played with
slower velocities, the attack will be slower and
the decay will be shorter. As the keyboard is
played with increasing velocity, the attack
becomes quicker and the decay becomes longer.
Also, if the DAMP button is engaged while
the RX5 is being played from a MIDI keyboard,
the RXS will respond to Note Off messages from
the keyboard as well as to Note On messages. In
other words, the Gate Time of the RXS's voices
can be controlled directly by how long a key is
held down on the keyboard. All of this informa·
tion (from both the E.G. Velocity function and
the Gate Time/DAMP function) is recorded by
the RXS into its internal pattern memory.
Both the Note number Assign and the Tun·
*802
*SD2
RIM2
E.TOM 1
E.TOM2
E.TOM3
E.TOM4
*HH OPEN
RIDE(EDGE)
CHINESE
TAMBOURINE
*SHAKER
44(G#1)
49(C#2)
46(A#1)
43 (G1)
42(F#1)
41 (F1)
40(E1)
59 (82)
63 (0#3)
61 (C#3)
58 (A#2)
56 (G#2)
*BD 1
*SO 1
*RIM 1
*TOM 1
*TOM2
*TOM3
*TOM4
*HHCLOSED
*RIDE(CUP)
*CRASH
*CLAPS
*COWBELL
45(A1)
52 (E2)
51 (0#2)
53(F2)
50(02)
48(C2)
47(81)
57 (A2)
62(03)
60(03)
54(F#2)
55(G2)
COPIED VOICES Cp01- Cp12: NOTES 24-35.
CARTRIDGE VOICES 1 - 28: NOTES 65- 92.
able Note functions are programmed using
MIDI Job #04. Before these MIDI functions
can work, however, the Channel Message
receive function must be turned on (using MIDI
Job #01), and the MIDI Receive channel(s)
must be set (using MIDI Job #02). The voices
in a programmed pattern will also ouJput MIDI
note numbers-these numbers will be the same
as those programmed in the Note Number Assign function-and these MIDI note outputs can
be assigned to their own MIDI channel (using
MIDI Job #03).
This chart shows the original
MIDI note numbers assigned
to the RXS 's voices when the
instrument is shipped from the
factory.
Data Storage
When the RX5 is turned off, all of the basic
information used by the machine is retained in
memory (thanks to the small battery inside,
which has a life of approximately 10 years).
This information includes all Voice data, all
Sequence data (Patterns, Songs, and Chains),
and all basic Key assignment and MIDI assignment data.
Even so, there are many reasons why you
may want to take advantage of the unit's many
other options for data storage: For example, you
may want to create and record more patterns or
songs than the basic memory will allow; or you
may want to experiment with a number of different Voice edits; or you may simply want to
have a backup memory just in case-you can
never be too careful when it comes to maintaining copies of you musical work. The RX5 offers
a number of alternative methods for data
storage.
In addition to the ROM Cartridge Port (for
plugging in the Waveform Data Cartridge), the
RX5 also has a RAM Cartridge Port, which can
be used for plugging in a RAM4 cartridge for
Vol. 3 No. 3/AFfERTOUCH
15
RXS
Continued
data storage. The RAM cartridge can be used to
store all Voice data, all Sequence (Pattern,
Song, and Chain) data, all Voice and Sequence
data, or single pattern data.
There is also a cassette interface port, which
allows you to connect the RXS to a cassette tape
recorder for data storage (using the standard
Yamaha cassette interface cable). In addition to
the Voice data, Sequence (Pattern, Song, and
Chain) data, and single Pattern data mentioned
above, the cassette interface can also be used to
store the instrument's Set-up data, which consists of the following elements:
• The three sets of Key data stored in the
RXS (via Key Assign Job #07)
• The Accent levels of all 64 voices
• The MIDI Transmit channels of all 64
voices
• The instrument's MIDI Receive channel
• The MIDI Notes assigned to all 64 voices
Note that none of this information can be
stored onto the RAM4 cartridge.
Since the RXS can also initiate a MIDI Bulk
data dump, it is possible to store its Sequence
memory via MIDI as System Exclusive data. In
other words, the RXS's Sequence memory can
be stored on disks, using a MIDI data recorder
such as the Yamaha MDF1 MIDI Data Filer.
(For a description of the MDF1's basic features,
see the article in the January 1987 issue of
AfterTouch.)
One unfortunate fact for owners of the DX7
II FD: Even though the DX7 II FD's disk drive
can be used as a MIDI data recorder, the size of
each file is limited by the DX7's internal memory buffer, which is approximately ZOK bytes.
Since the size of the RXSs Sequence memory
exceeds this limit, the DX7 II FD cannot be
used to store data from the RXS.
Sync Modes
The RXS is equipped with four different
methods of controlling the "Clock Rate" (the
speed of playback or recording). There are four
sync options (which are selected via the Sync
Mode):
• Internal Sync (the RXS runs according to
its Internal clock)
• MIDI Sync (the RXS is controlled by
another MIDI device)
• Tape Sync (the RXS is controlled by an
FSK sync signal recorded on tape)
16
AITERTOUCH!Vol. 3 No.3
• External Sync (the RXS is controlled by
another non-MIDI device)
The Internal Sync setting is the normal
operating mode of the RXS. The playback speed
of Patterns, Songs, and Chains, and the Real
Time Pattern writing speed are controlled by
the RXS's internal clock, the speed of which is
set by the unit's internal tempo functions. The
Internal Sync setting is also used when the RXS
is used to control other MIDI devices (the MIDI
clock signal is transmitted via the MIDI OUT
port) or non-MIDI devices (the sync signal is
transmitted via the EXT. CLOCK OUT
terminal).
The MIDI Sync setting is used when the
RXS is to be controlled by another MIDI
device, from MIDI data received via the MIDI
IN port. In addition to the tempo functions,
Start and Stop commands can be initiated from
the master MIDI unit. The RXS also responds
to MIDI Song Position Pointer when controlled
from another MIDI instrument or synchronization device.
The Tape Sync setting lets you use an FSK
Tape Sync signal to start, stop, and control the
speed of playback and Real Time Pattern writing. This signal, which incorporates a preselected tempo, can be recorded onto tape from
the RXS (or from another MIDI device that is
capable of transmmitting a Tape Sync signal,
such as the QXS). The tape Sync signal is transmitted and received via the RXS's CASSETTE
terminal.
Finally, the External Sync setting allows you
to control the RXS using a gate-type clock or
trigger signal. This control signal is fed to the
RXS via the EXT. CLOCK IN terminal.
As you can see, the RXS offers a great deal
of flexibility for the creation of new rhythm programs, at a list price of $1, 195.00. Although
the RXS does not permit user sampling, its
extensive voice editing features make it possible
to create a vast library of new sounds. In addition, the extensive MIDI capabilities of the unit
make it possible to use a velocity-sensitive MIDI
keyboard as a controller, giving you access to
realtime control of volume or pitch for the creation of subtle rhythm patterns. In future issues
of AfterTouch, we will explore some of the
RXS's features in greater detail, and will offer
hints on how to use these features to their fullest
potential.
TX81Z
I
name: Dark Voice
assign mode NORM
micro tune select OCT.
effect select OFF
inst. number
I
1: MaleVoices
2: MaleVoices
3:
4:
Dark Voice. A
NewTXSlZ
Performance
Setup By
Michael A.
Huisman.
5:
6:
7:
8:
2
3
4
5
6
7
8
number of notes
voice number
receive ch.
key limit /L
key limit /H
4
I28
1
C-2
G 8
4
I28
1
C-2
G 8
0
A29
1
C-2
G 8
0
A29
1
C-2
G 8
0
A29
1
C-2
G 8
0
A29
1
C-2
G 8
0
A29
1
C-2
G 8
0
A29
1
C-2
G 8
detune
note shift
volume
out assign
lfo select
micro tune
-4
+0
95
L
1
OFF
+4
+0
95
R
2
OFF
-1
+0
90
LR
VIB
ON
+2
+0
90
LR
1
ON
+0
+0
90
LR
1
ON
-2
+0
90
LR
1
ON
+1
+0
90
LR
1
ON
-1
+0
90
LR
1
ON
0 1
OPERATOR
on/off ON ON ON ON
out level 95
60
59
50
freq. type RTO RTO RTO RTO
fix range 255 255 255 255
freq. course
4
5
0 28
1
4
freq. fine
8
1
detune +0 -3 +3 +0
osc wave
A ..~. .no~
.no
ENVELOPES
attack rate 14
decay 1 rate
0
decay 1 level 15
decay 2 rate
1
release rate
6
eg shift
0
11
2
15
3
1
0
15
2
15
4
1
0
31
0
15
0
4
0
SCALING
rate
0
0
0
0
level
13
35
44
8
on/off OFF OFF OFF OFF
eg bias
0
0
0
0
key vel
0
0
3
0
voice name: MaleVoices
algorithm no. 4
feedback 1
LFO
waveform
speed
amp mod
pitch mod
TRI
26
depth
depth
sync ON
delay 0
1 sens
5 sens 6
FUNCTION
mode POLY middle C F2
portamento OFF rev rate 0
pb range 0
porta time 0
pitch 0
vol 99
amp 0
pitch 0
eg bias 0
amp 0
p bias +0
pitch 50
amp 0
Vol. 3 No. 3/ AITERTOUCH
17
TX81Z
Brs'n'Wind. A
NEWTX81Z
Performance
Setup By
Michael A.
Huisman.
I
~
name: Brs 'n 'Wind
assign mode NORM
micro tune select OCT.
effect select OFF
inst. number
1 : Tpt&Woodwd
2: Tpt&Woodwd
3:
5:
6:
4:
8:
7:
7
1
2
3
4
5
6
4
I29
1
C-2
4
I29
1
C-2
0
I01.
1
C-2
0
I01
1
C-2
0
I01
1
C-2
0
I01
1
C-2
I01
1
C-2
0
I01
1
C-2
G8
G8
G 8
G8
G8
G 8
G8
G 8
detune
-2
note shift
+0
volume
99
out assign
L
lfo select
1
micro tune OFF
+2
+0
99
+7
+0
90
+7
+0
90
+7
+0
90
+7
+0
90
+7
+0
90
+7
+0
90
R
LR
LR
LR
LR
LR
LR
2
OFF
1
OFF
1
OFF
1
OFF
1
OFF
1
OFF
1
OFF
number of notes
voice number
receive ch.
key limit /L
key limit /H
8
o·
001 oo2 oo3 oo4
.-OPERATOR
voice name: Tpt&Woodwd
on/off ON. ON ON ON I
out level 96 79
99 77
algorithm no. 5
freq. type RTO RTO RTO RTO
feedback 7
fix range 32K 255 255 4K
freq. course
4
4
5
5
freq. fine
8
8
1
1
detune -3 -3 +3 +3
esc wave ~A ..~.~ A ..~.
.- LFO
sync OFF
waveform TRI
.- ENVELOPES
delay
14
speed 31
attack rate 10
7 17 31
mod
depth
amp
sans
0
decay 1 rate 31 31
31 31
pitch mod depth 28 sans 3
decay 1 level 15 15 15 15
decay 2 rate
2
0
0
2 ~FUNCTION
release rate
4
7
5
5
mode POLY middle C F2
0
eg shift
portamento OFF rev rate 0
0
0
0
pb range 4
porta time 0
.-SCALING
pitch 0
vel 40
1
1
rate
0
0
amp 0
pitch 0
level 12 39
0 27
eg bias 0
amp 0
on/off OFF OFF OFF ON
p bias +0
pitch 50
eg bias
0
0
0
0
amp 0
key vel
1
1
2
3
cpc§
~
18
AFTERTOUCH/Vol. 3 No.3
I
DX Music Sessions
AL LEONARD PUBLISHING has put
together a very useful educational package
for users of Yamaha DXlOO and DX27 synthesizers. Called "DX Music Sessions," the material
consists of a 32-page booklet and a two-sided
cassette tape.
The package is intended to teach novice
musicians basic music-theory, while at the same
time helping them to learn both basic synthesizer theory and a number of contemporary
pop tunes. The cassette tape offers a combination of "learn through listening" and "play
along" techniques. All information on the tape
is backed up by material in the booklet, and
everything is presented in a straightforward,
easy-to-live-with manner.
During the course of the program, the
player is introduced to a number of basic musicianship concepts, and is also given many
H
helpful hints relative to the use of the DXlOO
and DX2 7 synthesizers. Although the program
covers a great deal of basic music theory, the
presentation is never dry-every music concept
presented is related to a practical application, so
that the learning process is both well grounded
and fun.
Users of the DX Music Sessions program are
invited to learn while playing along with
recordings of a number of popular songs (both
classic and current, including the following:
"Hound Dog," "Twist And Shout," "Like A
Virgin," "Time After Time," "Dynamite,"
"Stray Cat Strut," "If You Love Somebody Set
Them Free," and "You Know I Love You ...
Don't You?"
The DX Music Session package is available
through the Yamaha dealer network, at a list
price of$12.95.
TET US HEAR FROM YOU! We want AfterTouch to be an information network
Lfor all users of Yamaha professional musical products, so please join in. We're
looking for many different kinds of material.
Have you created an incredible patch for the DX7, the DXIOO, or any of the
other members of the Yamaha FM digital synthesizer family? How about a program
for the CX5M music computer or a great pattern for the RXll? Send in your
patches, programs, and patterns. If we use your material, we'll give you full credit
plus $25.00 for each item used.
Have you discovered a trick that increases the musical flexibility of one of the
Yamaha AfterTouch products? Send it in to our "FinalTouch" column. If we use
your hot tip, you'll receive full credit plus a check for $25.00.
Have you developed a new approach to one of the Yamaha AfterTouch instru~
ments, or have you discovered an important secret regarding their use? Put it on
paper and send it to us. Don't worry about your writing style-just get the informa~
tion down. If we decide to use your material as a full article in AfterTouch, we'll
write it up, put your name on it, and send you a check for $100.00. (An AfterTouch
article always covers at least one magazine page-which translates to at least four
double~spaced pages of typescript.)
By the way, we cannot assume liability for the safe return of unused ideas,
patches, or manuscripts. We will only be able to return unused material if you en~
close a self~addressed, stamped envelope with your submission.
If you just have a question regarding the use of Yamaha professional musical
products, send it along too, and we'll do our best to answer it in the pages of
AfterTouch. (We regret that we won't be able to answer questions through the mail,
but we will use all of your questions to guide us in our choice of future topics.)
Finally, if you just want to get something off your chest, or if you'd like to estab~
lish direct contact with other Yamaha AfterTouch product users, send in something
to our letters column, "Touch Response." We'll do our best to print names,
addresses, and phone numbers of all those who are interested in starting up regional
users groups.
AfterTouch is your publication. Let us hear from you!
ANewEduca ..
tional Booklet
And Cassette
Tape For Use
With DXlOO
And DX27
Synthesizers.
Write To:
AFTER~
TOUCH,
P. 0. Box 2338,
Northridge, CA
91323,2338.
Vol. 3 No. 3/ AFTERTOUCH
19
AFTERTOUCH
P.O. Box 2338
Northridge, CA 91323.-2338
QX5
Bulk Rate
U.S. Postage
-----------
Permit No. 33
Continued from page 9
The next time you move the cursor, you can edit
the MIDI channel assignment of the event. An
event can be assigned to any of the 16 MIDI
channels.
After setting the channel, you can alter the
note data by moving the cursor again. In the
case of Note On data you can change three
parameters: 1) Which note is played; 2) Note
On Velocity; and 3) Note Gate Time. The first
number tells you that a C4 was played. If you
want to move this note down an octave, press
the left button (F3) until you see C3 in the
LCD. Press the cursor button (F2) again, and
you will be able to change the Note On Velocity. A higher number corresponds to a faster
velocity.
The data for Note Gate Time (duration)
isn't visible in the LCD until you move the
cursor again. The duration of the note is displayed as a number of clocks. For instance, if
the gate time is 00048, the note is an eighthnote. (As mentioned above, the QXS's resolution is 96 clocks per quarter-note.)
Remember that each of the 10 event types
has a different data format. When you are
editing controller events, you won't change
note numbers, velocities, and gate times. Instead, you change the controller number
(which controller) and the current controller
value (the amount of modulation or breath control, for instance).
Depending on the kind of event you are
editing, the data ranges will also be different. If
you're editing a tempo change, the data is expressed as a percentage of the original tempo,
with a range from 25% to 398%. If you're making a macro call, the range is 1 to 32.
20
PAID
Long Prairie, MN
AFTERTOUCH!Vol. 3 No. 3
After you have finished editing an event,
you have four options:
1) You can insert the new event into the
track. This puts the new event in without changing anything else.
2) You can use Replace to put the edited
version of the event in place of the original version.
3) You can use Delete to erase the event
entirely.
4) If you change your mind, you can go
back to the Search mode (press Job
again) and leave the track as it was. This
erases the edit.
In the last two issues we've discussed a few of
the ways you can organize your work on the
QXS. The purpose of outlining these various
approaches has been to show you methods that
you may not have tried before, so that you can
see if they will be useful to you. They represent
only some of the possibilities. The best feature
of the QXS is its versatility. It doesn't force you
to work in any particular way-you can decide
which methods are best for your work, and
change and adapt them as you progress.
The best approach to learning the QXS is to
read the manual, then experiment with the features and get to know what they can do. You
don't have to know every detail of every feature-you just have to be aware of what is musically possible.
The important thing is that you worry about
creating the music first, and worry about operating the machine second.