1
-
<::
-==
_.
-.
\
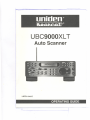
U BC9000XL T
Auto Scanner
I
\1
11
1:1
UBZZO1248AZ
OPERATING GUIDE
:Ill
T
.r-----
j
. "'-"'"
'-'"
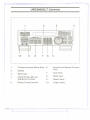
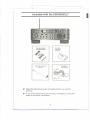
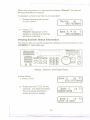
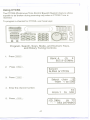
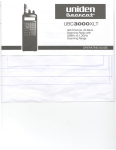
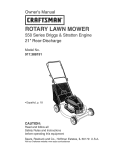
U BC9000XL T Controls
2
1
3
4
II1Iden
IfEE
:a;t-U8CeoooXLT
'
J~~~II!~!Ii!~~
~~I.IHI.jJS
I
[I
J
r
10
9
8
7
6
1.
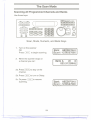
Programming and Status Keys 6.
2.
Display
3.
Bank Keys
4.
ON/OFFNOLUME and
SQUELCH Controls
5.
Rotary Tuning Controls
5
Numeric and Special Function
Keys
7.
Scan Keys
8.
Mode Keys
9.
Search Keys
10.
Output Jacks.
'
..1:
~
--
---------------------
1
Precautions
Before you use this scanner, please read and observe
.
the following:
WARNING!
Uniden does not represent this unit to be waterproof. To reduce
the risk of fire or electrical shock, do not expose this unit to
rain or moisture.
Uniden@ and Bearcat@ are registered trademarks of Uniden Corporation
@1995 Uniden Corporation.
All rights reserved.
Printed in the Philippines
[
1
-------
I
Table of Contents
Introduction
Included with the
UBC9000XLT
Feature Highlights. . . . . . . . ..
Getting Started. . . . . . . . . . . ..
Base Installation. . . . . . . . . ..
What is Scanning? . . . . . . . ..
Searching
Banks and Channels. . . . . . ..
Setting the Squelch. . . . . . . ..
Usingthe Rotary Tuner. . . ..
Programming Channels. . ..
ProgrammingBy
ManuaIEntry
Programmingwiththe
RotaryTuner
ProgrammingwithSearch..
Programmingwith
AUTOSTORE
Deletinga
Programmed Frequency. . ..
2
Birdies
3
4
6
6
7
7
8
8
10
11
Using Data Skip
Changing the
Frequency Step. . . . . . . . . ..
Setting the Signal Mode. . ..
Using Signal Attenuation. . ..
Preventing
Accidental Programming. . ..
Using COUNT to
Monitor Channel Activity. . ..
Displaying Bank
Memory Status. . . . . . . . . ..
Using Auto Recording. . . . ..
Viewing Scanner
Status Information. . . . . . . ..
DisplayLight
Using Hi-Cut
12
13
14
17
CTCSS
Operation.
. . . . . . . ..
34
35
36
37
38
38
40
41
42
44
44
45
Installingthe CTCSS Board. 45
UsingCTCSS
"...47
To Change the
CTCSS Tone Frequency. .. 48
CTCSS Tone Frequencies.. 49
Care and Maintenance. .. ... 50
Troubleshooting. .. .. . .. . .. 51
19
Transferring a
Programmed Frequency. . .. 19
Programming Channels with
Alpha Characters. . . . . . . ..
To Delete Alpha Characters.
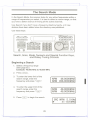
The Scan Mode
Scanning AllProgrammed
Channels and Banks. . . . . ..
Turning Banks ON or OFF..
LockingOut Channels. . . ..
Using PriorityScan. . . . . . ..
The Search Mode. . . . . . . . ..
Beginninga Search. . . . . ..
ScrollingFrequencies
Duringa Search. . . . . . . . ..
UsingTurboSearch. . . . . ..
UsingSearchDelay. . . . . ..
LockingOut Frequencies...
Unlockinga Frequency.. . ..
UnlockingAll Frequencies..
33
Additional Scanner Features 34
20
22
24
OptionalAccessories and
Replacement Parts. . . . . . . .. 52
Specifications. . . . . . . . . . . .. 53
24
25
26
28
29
29
30
31
31
32
32
33
1
-:::=:='"
"'!
~
1
..--
Introduction
The UBC9000XLT is a sophisticated information radio with automatic
scanning capabilities. You can use it at home as a base unit, or install in
your vehicle as a mobile unit.
The UBC9000XLT can store frequencies such as, police, fire/emergency,
marine, air, weather, and other broadcasts into 20 banks of 25 channels
each. The new Rotary Tuner feature enables rapid and easy selection of
channels and frequencies. And with AUTO STORE, you can
automatically program any channel.
With the UBC9000XLT, you can scan all 500 channels with Turbo Scan. In
the Search Mode, you can choose super fast Turbo Search. In addition,
the UBC9000XLT has AUTO SORT - an automatic frequency sorting
feature for faster scanning within each bank.
Types of Communication
You will be able to monitor communication such as:
.
.
Police and fire department
(including paramedics)
,
.
Motion picture and press relay
Business/industrial radio
. Utility
.
.
.
.
.
Land transportation frequencies, such as trucking firms, buses,
taxis, tow trucks, and railroads
Marine and amateur (ham radio) bands
Air band
Analogue cellular telephone frequencies
Public Service 800 MHz band
And many more in the 25-1300 MHz range.
2
L-.~
...--
.-
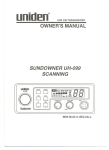
Included with the UBC9000XL T
I
!
1
,~
Australian
Warranty
Program
Telescoping Antenna
(AT124)
.
.
AC Adaptor
(AAD8500U)
Read this Operating Guide thoroughly before you use the
scanner.
If any of the above items are missing or damaged, contact the
place of purchase immediately.
3
-
1__-
r
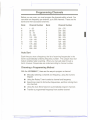
Feature Highlights
.
TwinTurboScan/Search - This lightning-fast technology
enables the UBC9000XLT to scan up to 100 channels per second
and search up to 300 steps per second (in 5kHz steps).
Because the frequency coverage is so large (see
"Specifications," page 53, for band listing), a very fast scanning
system is essential. That is why we combined our latest
- Turbo Scan and
RotaryTunerControl- Turn
technology
.
.
.
.
.
.
.
.
.
.
.
.
.
Search - into the UBC9000XL
the
large
Rotary
Tuner
T.
to select
the desired frequency or channel.
500 Channels - You can program each of these memory
channels to store one frequency.
20 Banks - Each bank contains 25 channels, useful for storing
similar frequencies in order to maintain faster scanning cycles.
-
25 1300 MHz-lndicates the range of frequencies that can be
searched within the bands of your scanner. (Note: The
frequency coverage is not totally continuous between 550-760
MHz.)
10 Priority Channels- You can assign one Priority channel for
each of the 10 banks, A-J. This allows you to keep track of
activity on your most important channel(s) while monitoring
other channels for transmissions.
.
Auto Store - Automatically stores all active frequencies within
the specified bank(s).
Auto Sorting - Programmed frequencies are automatically
sorted within each bank for faster scanning.
Auto Recording - This feature lets you record channel activity
from the scanner onto a tape recorder.
Scan/Search Delay-In the Scan or Search Mode, causes the
scanner to remain on a frequency two seconds after the last
transmission to wait for a possible reply.
Direct
Channel Access-Allows you to manually select a
specific channel without scanning.
Direct Frequency Programming-Allows you to program a
specific frequency into a channel without searching.
Frequency Transfer-Lets you transfer a frequency into an
empty channel, or replace the frequency in the current channel.
Programmable Alpha Characters-You can program
up to 250 channels with 16 alpha characters for easy reference.
4.
~.
f
...-
.
.
.
.
.
.
.
.
Variable Frequency Steps (Increments)-In
the search or
Manual Mode, lets you change the steps between frequencies.
Channel/Frequency Lockout-Lets you temporarily remove
channels or frequencies from the scanning or search cycle.
I
Signal Attenuation-Reduces
the scanner's sensitivity for
unusually strong signals often found on the WFM (wide
frequency modulation) bands.
Data Skip-Lets you set the scanner to automatically continue
searching or scanning when it encounters an unmodulated or
data signal.
Enter Lock-Temporarily disables programming keys to
prevent accidental programming.
External Speaker Jack-Allow you to connect an external
speaker or earphone for custom listening. See "Included with
your Scanner" on page 3, and "Optional Accessories &
Replacement Parts" on page 52.
Line, and AUXJacks-Allow you to connect a tape recorder.
Display Light-Lets you view the display more easily in dark or
Iow-light conditions.
5
J
.--
~
===-
=--
-d
......_-
2
r
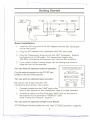
Getting Started
h
Standard
240V
AC Wall Outlet
DC 13.8V
Jack
Auxiliary
Jack
Antenna
Jack
Telescoping
Antenna
AC Adaptor!
Charger
(AAD8500U)
J-
Plug
Off-On!
Enter-Lock
Switch
FoldingLeg
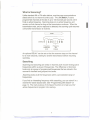
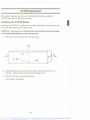
Base Installation
1. Insert the DC plug end of the AC Adaptor into the DC 13.8Vjack
on the rear panel.
2. Plug the AC Adaptor into a standard 240V AC wall outlet.
3. Plug the Telescoping Antenna into the "ANT'connector. Extend
the antenna to its full height. For frequencies higher than
406 MHz, shortening the antenna may improve the reception.
4. If you need a better viewing angle, flip the folding legs down to
raise the front of the scanner.
For use with an optional external speaker:
Plug the external speaker into the "EXTSP' jack
located on the front of the scanner.
«:: PROG
~ ~ SEND
~ ~ ALPHA:}
~HOLD~
(.SRC J (AUTO.)
For use with an optional tape recorder:
Be sure to use a tape recorder with
microphone and remote input jacks.
'--
UNE
@
UMIT
~
EXTSP
@
1. Connecta cablefromthe "LINE"jack on the
front of the scanner to the microphoneinput of a tape recorder.
2. Connect a cable from the RCA-type "AUX" jack on the back of
the scanner to the recorder's "REMOTE"jack.
(See "Using Auto Record," page 41.)
For use with an optional CTCSS Tone Board:
CTCSS Board Socket (inside the unit). See "CTCSS Operation,"page 45.
6
r
.--
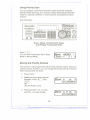
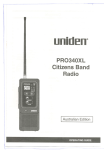
What is Scanning?
Unlike standard AM or FM radio stations, most two-way communications
(listed below) do not transmit continuously. The UBC9000XL T scans
programmed channels at the rate of up to 100 channels per second until it
finds an active frequency. Scanning stops on an active frequency, and
remains on that channel as long as the transmission continues. When the
transmission ends, and no response is detected, the scanning cycle resumes
until another transmission is received.
..
I
- - - -- -- ---- -- - - .'..
"
- - - - - ~AN
v..00::-';~~'
CHANNELS
1 2 3 4 5 6 7 a 9 10
I
~
Frequency
LockedOut
(UO)
Frequency
Not
Entered
An optional DELAY can be set so that the scanner stays on the channel
for 2 more seconds, waiting for another transmission before resuming
scanning.
Searching
Scanning and searching are similar in that they both involve finding active
frequencies within a group of frequencies. The difference is Scanning
looks only at a group of programmed frequencies that are stored in the
scanner's channels and grouped into banks.
Searching looks at all the frequencies within a pre-selected range of
frequencies.
If you find an interesting frequency while searching, you can store it in a
channel for easier access later. See "Programming with Search" on
page 14. The main purpose of the Search function is to help you find
active frequencies to program into memory.
7
-
I
::::==-
C
'eo.
I
,
'
t
,...
.
.....--
:t
--.. ------.------....---...-..--------.
~-=:-~
CTCSS Operation
This section applies only if you are installing and using an optional
CTCSS Tone Board with your scanner.
Installing the CTCSS Board
InstallingtheCTCSSToneBoardis a simpleprocedure,and requiresonly
a few minutesfollowingthe stepsbelow.
CAUTION: Be sure to turn the scanner off and disconnect the power
cord before attempting to open the scanner.
1. Remove the five screws from the top cover.
Lift
.GUJ4)
~-
:elf-- :amf)
@
~ ~
6m
~
:5<0)
~
2. Carefully lift the cover up from the back of the unit and turn it to
the left
-
being careful not break the speaker wire.
3. Stand the cover on its left side panel.
(Continued, next page)
45
..
I
-
r
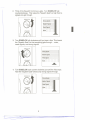
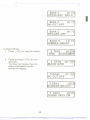
2. Think of the Squelch Control as a gate. Turn SQUELCH fully
counterclockwise. This raises the "Squelch Gate" so high that no
signals can get through.
SQUELCH
StrongSignals
@
I
3. Turn SQUELCH fully clockwise until you hear a hiss. This lowers
the "Squelch Gate" so that everything gets through... noise,
weak signals, and strong signals.
SQUELCH
..
.
Strong
Signals
..
..
MediumSignals
,.
-WeakSignals----..-----....-.........
---..--- ..---..---..---..--..
Noise---..---..---..
---..--..
---..---..
- --..---..---..--..
VOLUME
.......
4. Turn SQUELCH back counter clockwise just until the hiss stops.
Now the "Squelch Gate" allows only strong signals through.
SQUELCH
StrongSignals
@
MediumSignalsWeakSignals
..
..
..
..
.
lOo
+
Noise- - - .. - - - . . - - +
+
9
£-
--'-
--...l..-:.-===
../;
:>
r
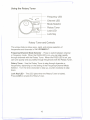
Using the Rotary Tuner
Frequency LED
Channel LED
Mode Selector
Rotary Tuner
Lock LED
Lock Key
Rotary Tuner and Controls
This unique feature allows easy, rapid, and precise selection of
frequencies and channels in the UBC9000XLT.
Frequency/Channel Mode Selector - Press to switch between channel
or frequency mode. When the CHAN LED is on, you can step rapidly
through channels with the Rotary Tuner. When the FREQ LED is on, you
can tune quickly and accurately through frequencies with the Rotary Tuner.
Rotary Tuner - Use the Rotary Tuner to step through channels or
frequencies, depending on the setting of the Frequency/Channel Mode
Selector. Turn the knob clockwise to step up, counter clockwise to step
down.
Lock Key/LED - The LED lights when the Rotary Tuner is locked.
Press LOCK to enable the Rotary Tuner.
10
- ---
'}
---
Programming Channels
Before you can scan, you must program the channels within a bank. You
can store one frequency per channel, up to 500 channels. These are the
banks and their associated channels:
Bank
Channel Number
Bank
Channel Number
A
B
C
D
E
F
G
H
I
J
1 - 25
26 -50
51 - 75
76 - 100
101 - 125
126 - 150
151 -175
176 - 200
201 - 225
226 - 250
1
2
3
4
5
6
7
8
9
0
251 -275
276 - 300
I
301- 325
326 - 350
351 - 375
376- 400
401 - 425
426 - 450
451 - 475
476 - 500
Auto Sort
Each time you store a frequency, the list of scanning frequencies in the
bank is automatically sorted by frequency number. This unique Auto Sort
feature enables faster scanning. When you manually step through.a
bank, however, frequencies are sorted according to channel number.
Choosing a Programming Method
Withthe UBC9000XL
T, therearefivewaysto programa channel:
.
.
.
.
.
Manually selecting a channel and frequency, using the numeric
keypad
Using the Rotary Tuner to select a channel and frequency
Searching a band to find active frequencies, and then storing them
into channels
Using the Auto Store feature to automatically program channels
Transfer a programmed frequency from another channel
11
~
~
===-
:Ii
~
H'
'}
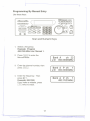
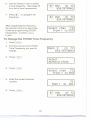
Programming By Manual Entry
Use these keys:
I81Iden"
EJEl8
C]
D
(PROGIlSENOIIAlPHA)
~~
~
.
c::s ~
uo
@ @ c::>
\
J
(DB.AY.)
p.IJI!C~T
CL][[J m:J ~ [L)
CD ID (E] [IJ CL>
-. .- @
CJ
DATA
~
c:::3>
JJ
fl)
Scan and Numeric Keys
1. Select a frequency.
Example: Program
482.7625 MHzinto Channel1.
2. Press I
MANUAL)
Manual
to enter the
Bank A
ch 22
LlO OOO.OOOOMHz
Mode.
3. Enter the channel number, then
press
Bank A P ch 1
LlO OOO.OOOOMHz
I MANUAL).
4. Enter the frequency. Then
press ~
.
Example: 482.7625
If you make a mistake, press
~ twice to erase.
Bank A P ch
1
482.7625MHz
12
~-
r
..-
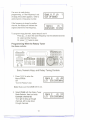
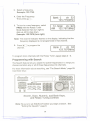
If an error is made during
programming, or if the frequency is out
of range, this screen appears. Enter a
valid channel or frequency number.
1
Bank A P ch
OUTOFBAND
If the frequency is stored in another
channel, the display will indicate the
original channel for that frequency.
Bank A
ch 1
DUPLICATECH230
To program more channels, repeat steps 3 and 4.
Press ~
to store the same frequency into the selected channel.
Or, select another channel.
Or, press ~
twice to clear.
I
Programming With the Rotary Tuner
Usethese controls:
n
8~8
"-J
( PROG11 SENO11 AlPHA)
~~
~
0
uo
@ @ c::)
II1IdI!n
a
p
use-..
T
D
[
rrr.....
c::) c:::!)
CTCSS
(DELAY.)
DATA'"
c:::3
Scan, Numeric Keys, and Rotary Tuning Controls
1. Press IMANUAL) to enter the
Bank B
ch 49
LlO OOO.OOOOMHz
Manual Mode.
OR
Turn the Rotary Tuner.
Note: Make sure the LOCK LED is out.
2. Select CHAN with the Rotary Tuner
Mode Selector, then turn knob.
Example: channel 52
Turn right to step up through
channels, left to step down
through channels.
Bank C
ch 52
LlO OOO.OOOOMHz
13
-:J
~
-
=====-
::
~
f
~
..----
3. Select a frequency.
Example: 123.7750
4. Enter the Frequency.
Then press ~
.
Bank C
ch 52
123.7750MHz
5. To turn to a new frequency, select
FREQ withthe Rotary Tuner
Mode Selector then turn rightto
step up, leftto step down.
Example: 123.7875 (turn right)
12.5KHz ch :::'?2
AM 123.7875IvrHl-
Note: The channel indicatorflashes on the display, indicatingthat the
frequency displayed is not programmed in that channel.
6. Press ~
channel.
to program the
Bank C
ch 52
123.7875MHz
To program more channels with the Rotary Tuner, repeat steps 2
- 6.
Programming with Search
The Search feature lets you search for active frequencies in a range you
choose and store any or all of those frequencies into channels.
For more information about searching, see "The Search Mode," page 29.
Use these keys:
8~~
miii!
CJ
( PROG
11SENO
11ALPHA
)
.
.~~~
@
'~-@
~
@
Search, Scan, Numeric,and Bank Keys,
and Rotary Tuning Controls
Note: Be sure to set SQUELCH before you begin a search. See
"Setting the Squelch," page 8.
14
.- '
--.-.
--
--~..
'
r
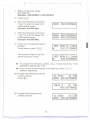
1. Select a frequency range.
See page 53.
Example: 450.000MHz to 456.000 MHz
2. Press
I
.
MANUAL)
3. Enter the frequency and press
~to
enter the lower limit
of the search range.
Example: 450.000 MHz
NFM 450o0000MHZ!
I
4. Enter the frequency and press
~to
enter the upper limit
of the search range.
Example: 456.000 MHz
5. Press~
function.
NFM 450.0000MHz
NFM 456.0000MHz
to begin the search
To exit search,
press
.
I MANUAL)
SRC NFM 12 .5 KHz
t
450.3750MHz
The scanner stops on the first
active frequency it finds.
SRC NFM 12 .5 KHz
t
.
.
I
450.3750MHz
To program the frequency, press ~
to stop searchin-g.Then,
proceed to step 6a, 6b, or 6c.
If you do not want to program the frequency, press ~
to
continue searching.
6a. Program the frequency into the
current channel.
.
Press ~
12.5KHz
ch "NFM 450.3875MHz
Bank C
ch 53
450.387SMHz
6b. Program the frequency into
another channel:
12. 5KHz
ch "5
NFM 450.3875MHz
15
:;
t
'}
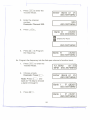
1. Press I
Ito enter the
Transfer Mode.
SEI\O
2.
Enter Bank or ch
450.3875MHz
Enter the channel
number.
Example: Channel 200.
200
450.3875MHz]
I
3. Press~.
Bank H
ch200
OOO.OOOOMHz
0
I
4. Press~
to Program
the frequency.
(Displayflip-flops)
450.3875MHz I
Bank H
ch200
450.3875MHz
6c. Programthe frequency intothe first open channelof another bank.
1. Press I SEI\O I to enter the
Transfer Mode.
12.5KHz
ch'NFM 450.3875MHz
2. Choose a bank.
Example: Press [C]
.
Enter Bank or ch
450.3875MHz
Note: Press EJ
and
bank (0-9) key to choose
a bank 0 through 9.
3. Press ~
.
Bank I P ch201
450.3875MHz
16
j
r
1
-------
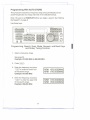
Programming With AUTO STORE
This procedure searches a frequency range and automatically stores
active'requencies into empty channels of the selected bank(s).
Note: Be sure to set SQUELCH before you begin a search. See "Setting
the Squelch" on page 8.
Use these keys:
:@
.. l7$.
LH
EXTSI'
@
@
YO
Programming, Search, Scan, Mode, Numeric, and Bank Keys
and Rotary Tuning Controls
I
1. Select a frequency range.
See page 53.
Example: 810.000 MHz to 856.000 MHz
2.
Press
I MANUAL).
3. Enter the frequency and press
~to
enter the lower limit
of the search range.
Example: 810.000 MHz
NFM 456.0000MHz
NFM 810.0000MHz
4. Enter the frequency and press
~
NFM 810.0000MHz
NFM 856.0000MHz
to enter the upper limit
of the search range.
Example: 856.000 MHz
17
,J:
--
===-
-.
.~
t
.---
l'
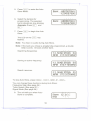
5. Press [ AUTO I to enter the Auto
Bank - ABCDEFOHU-1234567890-
Store Mode.
6. Select the bank(s) for
programming. The selected
bank indicator(s) stop blinking.
Example: Press ~
and
Bank -=ABCDEFOHU-12~4?pZ~90-
~.
7. Press[ SRC] to begin the Auto
Store.
The LED on the
flashes.
[AUTO
I key
Note: You hear no audio during Auto Store.
Note: If the bank you chose is already fully programmed, a double
beep sounds. Choose another bank.
Searching frequencies
Storing an active frequency.
"I
Search resumes.
/
12. 5K~ srbef1- 55
NFM 81-oJ,OOOMHZ
To stopAuto Store,press IMANUAL),( SCAN
I, [AUTO I ,or /HOLD\.
You can change these functions during Auto Store:
Frequency Step (See page 35.)
Turbo Search (See page 31.)
Signal Mode (See page 36.)
8. The unit tells you when Auto
Store is complete.
Store
end
18
---
~-==-,-,
,
r
t
"--"
Deleting a Programmed Frequency
Use this procedure when you want to delete a frequency from a channel
without storing a new frequency in its place.
.~
Use these keys:
EIfiI
@
1I11den """"""""UBC8000XLT
(]
CD [[J lE:] [[] [0
CD @:] [[] [D ~
SQUELCH
<ID
g)
@u <:::) c::::!) <::::!>
Programming, Search, Scan, Numeric Keys,
and-Rotary Tuning Controls
1. Enter the channel
number.
2. Press ~
.
3. Press~
.
Bank D
ch 86
854.8625MHz
Bank D
LlO
ch 86
OOO.OOOOMHz
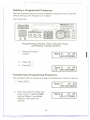
Transferring a Programmed Frequency
This procedure lets you transfer a programmed frequency to another channel.
1. Press I
IvIANUAL).
Bank C
ch 53
450.3875MHz
2. Enter the channel number and
press
I
MANUAL),
Bank D
ch 83
855.9125MHz
or select CHAN
with the Rotary Tuner Mode
Selector and locate the
channel.
19
I
f
l'
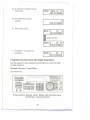
3a. To select the transfer channel,
press I SEND I ...
Enter Bank or ch
855.9125MHz
3b. Then enter the channel
number...
855.9125MH~ ]
[
3c.Thenpress~.
Bank A
ch 8
OOO.OOOOMHz
D
(Display flip-flops)
Bank D
ch 83
855.9125MHz
4. Press~
to transfer the
Bank A
ch
8
855.9125MHz
frequency.
Programming Channels with Alpha Characters
Use this feature to name programmed channels (up to 250 channels)
for easy reference.
Example: Channel 1, Local Police.
Use these keys:
181IdI!1"""""""'UBC~T
I2~,:~
@
@
90
'......
Programming, Search, Scan, Mode, and Numeric Keys,
and Rotary Tuning Controls
20
~-
""-
t
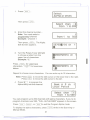
---1. Press
---
(PROG
,
'
I...
1
'--
Select
ALPHAorcrcss
Then press
I ALPHA).
Select chan
from
2. Enter the channel number...
Note: You must select a
programmed channel.
Example: Channel 1
Then press
~.
I
~\ID:
1 to 50'(1)\
from 1 to soJI
The Alpha
Edit Screen appears.
~O&
3. Turn the Rotary Tuner left/right
to choose a letter from the
upper line of characters.
Example: "L"
Press~
characters,
letters.
~
ch 1]
rNOPQRSTU
ch 11
I
for uppercase
for lowercase
~NOPQRSTU
ch 11
Repeat to choose more characters. You can enter up to 16 characters.
Note: Press[AUTO I to movetheeditcursoron the lowerlineto the right.
Press ~
to move the edit cursor to the left.
4. Press~
to program the
Alpha entry into the channel.
1
Bank A P ch
Local Police
Select chan ;. 1
from 1 to 50'0
You can program up to 250 channels with alpha characters. If you try to
program channels over 250, "FULL ALPHA MEM" appears in the screen.
Press
(SCAN
I, IMANUAL),
or
(PROG
Ito exit the Program Alpha mode.
To displaythe alphacharacters,press IALPHA) whilein theScanningor
Manual Mode.
21
-
t
--
:::=='"
..
..
.~
t
'-
1:
- '--..---
To Delete Alpha Characters
Use these keys:
1I1IIBI
P uec--.
T
CD [[J ID m:J[L)
CD ID [E] IIJ £I:)
~i!~...i...!,ij~]~
\...~...!~~~.u.~..~.
SQUElCH
@
SlJ
Program, Search, Scan, Mode, Numeric Keys,
and Rotary Tuning Controls
1. Press I
.
MANUAL)
2. Press( PROG I....
Then press
I
Select
ALPHAor CTCSS
ALPHA).
. ,~
Select
~8t
from chan
1 to :>0'(1)\
3. Enter the channel number with
the alpha characters you want
to delete, then press
~.
I
4. Turn the Rotary Tuner and
select the space between the
"9" and the "I " characters.
5. Press~
letter.
from 1 to soJI
5678
( )& ch
Police
1
56789;11 ()& ch
1
cal
to erase the first
:teal'
6. Press~
repeatedly to erase all the letters.
22
~~-
Police
1
L--------7. Press~
to storethe
changes.
[Bank A
ch 1]
Select chan
\It::1~
from 1 to sod)
8
Press (
SCAN
Mode.
I, IMANUAL),
or (
PROG
Ito exitthe ProgramAlpha
I
23
-
=-
..",
.~
~-
The Scan Mode
Scanning All Programmed Channels and Banks
Use these keys:
~. R
~~~
C]
(PROGIlSENOIIAlPHA)
D[1iiI!
ffiEO.
~\\;
. C><AN
:
SQUELCH
Scan, Mode, Numeric, and Bank Keys
1. Turn on the scanner
OR
Press( SCAN I to beginscanning.
2. When the scanner stops on
a channel you can:
2a. Press
I
MANUAL)
\ I /
ean~ ABCBEFGHIJ
f-Sca n===--123lJS67890
T~Bank A
ch 8
8SS.912SMHz
to stay on the
channel.
2b.Press( DELAY)to turn on Delay.
2c. Or press (SCAN
Ito resume
\1/
ean~ ABCSEFGHIJ
-tS5=~~n:
123ltS67890
scanning.
24
~-
t
--'~-'-
:t
. --....-.-
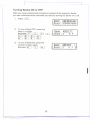
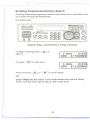
Turning Banks ON or OFF
After you have programmed channels in several of the scanner's banks
you can customize which channels you scan by turning the banks on or off.
1. Press ( SCAN I.
.
\ I/
ean~ ABCeEFGHIJ
-}:S/C~r: 123lJ567890
2. To turn a Bank OF
~
letter or numb er. F, press the
Example:
~.
~
~
~
~
' ~G
~,~
f"8""l .
d_~_.J
~
anK-
S
I,!KJ. IT] ,can~
. @::J
:
3. To turn a Bank ON, press the
number or letter again.
Example:~
,[I]
,~.
ABCD~\FI~
-1
.-",:;
'-
:;)
I
\T7
San~
I
5 7 0
AB€DEF
-t:~C ~r ==f
I\
I
25
--
"
'
r
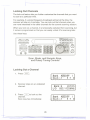
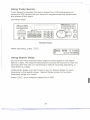
Locking Out Channels
The lock-out feature lets you further customize the channels that you want
to scan at a particular time.
For example, .if a stored frequency broadcasts almost all the time, the
scanner will stop on it and stay. You can lock out that channel when you
are more interested in the other channels for the current scanning session.
When you lock out a channel, it is temporarily excluded from scanning, but
it remains programmed so that you can easily unlock it for scanning later.
Use these keys:
unIdI!n---"+-uec-.T
~a~
(
PAOQ
11
(]
<LJ m:J [£J m:J IL>
CD @:)[]J EO [L)
SEND 11 ALPHA )
~~
~
lINE
EXTSP
@
@
:"'."".".,,""'1"""~."'."'~"'."'."'."'."~'."'~"',"','~
',.'II:::ir
'. ".1
t\-
-"\~
..t
"1~\'.
r~':'~
Iffl\
... \JJI
~
:Slt)
Scan, Mode, and Numeric Keys,
and Rotary Tuning Controls.
Locking Out a Channel
1. Press (
SCAN
I.
\T7
Sank. AB€DEF I
-t ~c ~!1==f
2. Scanner stops on an undesired
channel.
I,
5 7 0
Bank E
ch105
LlO 853.1125MHz
,
3. Press (
LlC
)to lock out the
\T7
Sank. AB€DEF I
-I: ~c,a!1==f I, 5 7 0
channel.
Scan resumes immediately.
26
[
--
1
..----------
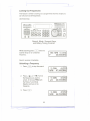
Unlocking a Channel
1. Press
IMANUAL) .
2. Enter the channel or press the
Channel Mode Selector and
use the Rotary Tuner to find the
channel you want to unlock.
3. Press (
1)0
).
Bank A P ch 1
LlO 482.7625MHz
BankA P ch
1
482.7625MHz
-'
4. Press (SCANI to resume scanning.
Unlocking All Channels in selected Scan Banks.
1. Press
I
MANUAL)
.
2. Press and hold (
Bank D
ch 53
450.3875MHz
1)0
).
You hear a double beep when all channels are unlocked,
except
OOO.OOOOMHz.
I
27
-x
;:;:
-
::::::::=--
..
....
~
'1.
'
Using Priority Scan
You can program one Priority Channel in each of the first 10 banks.
During Priority Scanning, your scanner checks these special channels
every two seconds, whether or not the scanner has located an active
channel.
Use these keys:
~.
~B~
II1Iden"-""""~UBC--T
<L] ID ~ m:J[C)
CD @:] [E] [D [L)
(]
(PAOGIlSENDIIALPHA)
---,
@
I!J
Scan, Mode, and Numeric Keys,
and Rotary Tuning Controls.
Press ( PAl).
You can turn Priority Scan ON in Scan
Mode or Manual Mode.
.1I~an~ AftC~EF
Sean-1
1\
5.7
I
0
Moving the Priority Channel
The scanner is pre-programmedwith the first channel of each bank as a
priority channel. However, you can change the priority channel to be any
other channel within the bank.
1. Press
IMANUAL).
2. Select the new priority channel.
Example: Press ~
' then
I
MANUAL)
.
~Bank A
ch 9
32S.0S00MHz
OR
Use the Rotary Tuner.
3. Press and hold ( PAl ) for two
seconds. You hear a beep.
~Bank A P ch
9
32S.0S00MHz
28
,
--
~-
:L-The Search Mode
In the Search Mode, the scanner looks for any active frequencies within a
range of frequencies you select. It is best to select a narrow range, so that
you have a better chance of finding all the active channels.
Use Search if you don't have a frequency directory handy, or if new
stations have been added since the directory was published.
Use these keys:
MEM
(
0\Mr
mlden a
SHFT
1 1 AlJX 11 STArus
>
(~II~II-J
D
[
.)(
.
..
. ..
.
.
+-UBC8OOOXL
r
,
Search, Scan, Mode, Numeric and Special Function Keys,
and Rotary Tuning Controls
Beginning a Search
1. Select a frequency range
(See page 53.)
Example: 46.000 MHz to 48.000 MHz
2.
Press
I
MANUAL)
.
3. To enter the lower limit of the
search range, enter the
frequency and press
NFM 46.0000MHz
NFM 856.0000MHz
~
4. To enter the upper limit of the
search range, enter the
frequency and press
5. Press~
NFM
NFM
~
to begin the search.
t
29
--
46.0000MHz
48.0000MHz
SRC NFM 5.0 KHz
47.1400MHz
I
.....---
t_-
"".,
'1
.
Scrolling Frequencies During a Search
Scrolling temporarily suspends a search and allows you to manually move
up or down through the frequencies.
Use these keys:
m1IdenD
(~][:~~ 8
(
PROO
11 SEND 11 ALPHA
)
.,.,.,.,.".,
(.
§lWN
SCAN
uec~T
CD IEJ [[J [[J [[:)
CD rn::JlE] IIJ Iz:)
C]
TUAIO
11
MAN.JAL
BA
.)
CIM
'
@
OFf'
CD [!::)(i:J
AM
WFM
(L)
(LJ- (i:]
.- 12.'
2......
..~.
~~=.~~D::~
@ @
~
[i:::)(!:J
oa<Hz
H.CUT
EJ @:] (L]
[D
CLR
Search Keys, and Rotary Tuning Controls
To begin scrolling, press ~to
step up
~
5 .0KHz
e~ 3
NFM 47.700 ~.
...
Or press ~to
step down.
5 .OKHz
NFM
Press and hold ~or
~to
~
eR-=!.3
47 .625
~.
scroll rapidly.
OR
Select FREQ with the Rotary Tuner mode selector and use the Rotary
Tuner. Turn the knob right to step up, left to step down.
30
1
Using Turbo Search
Turbo Search increases the search speed from 100 frequencies per
second to 300 frequencies per second in ranges where the frequencies
are spaced 5 kHz apart.
Use these keys:
ME"
( CX>I.M I
SHFT
~
I STATUS)
mIIdI!na
J)
(]
(PROOIlsec>IIALPHA)
~
ER
I - SRC J( AUTO
~I
-I
UNE
EXTSI'
@
@
(eOOAN
,
,
"'"
OFf'
CD
AM C!:J(D
-..
~ C!:JILJ
- 12.'
- ..rz:::J C!:J ILl
CUI-
+-usc-..r
<LJ [D I£J m:J[L)
CD ~ [E) [D [L)
H-CUT
EJ @:) [£)
-. .- @
illl !tJ
Mode Keys
While searching, press (TURBO).
iiSRC NFM 5.0 KHz
.t
46.0150MHz
Using Search Delay
On some two-way channels there might be short lapses in the signal
before a reply. The Search Delay feature causes the scanner to wait two
seconds after the end of a transmission before resuming searching, in
case there is a reply.
Unlike.Scan Delay, you don't have to turn on Search Delay for each
frequency in the search range. Search Delay works for the entire
frequency range you chose.
Press
( DELAY)to
turn Search Delay ON or OFF.
31
-:r=
~
:::==-
I
:t
.----
Locking Out Frequencies
This feature is similar to locking out a programmed channel, except you
can only lock out 50 frequencies.
Use these keys:
~~~
(
II1lden
"_i ~!,
PAOQ
""""."""UBC8000XLT
CD [I:J ID [Q:][I:)
CD @:][ID ITI IT:)
CJ
11SEND 11ALPHA)
Search, Mode, Numeric Keys,
and Rotary Tuning Controls
While searching press ( uo )when the
scanner stops on an undesired
frequency.
Search resumes immediately.
Unlocking a Frequency
1. Press~
to stop the search.
2. Press ~or
~to
find
the frequency you want to
unlock. Or choose FREQ with
the Rotary Tuner Mode
Selector and tune in the
frequency.
3. Press ( uo ).
32
SRC NFM
t
5.0 KHz
46.0550MHz
f
t
'I..
Unlocking All Frequencies
1. Press~
to stopthe search.
2. Findany locked-outfrequency.
5 . OKHz
C~3
LID
47.2250MHz
3. Press and hold (
uo
)for two
seconds.
You hear a double beep when all frequencies are unlocked.
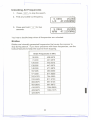
Birdies
Birdies are internally generated frequencies that cause the scanner to
stop during search. If you have problems with these frequencies, use the
lockout features to keep the scanner from stopping.
Birdie Frequencies in MHz
32.000
428.5875
74.200
431.9875
128.000
443.9375
139.995
447.9875
140.000
471.9875
167.995
483.9250
171.250
511.9250
312.4375
794.5500
312.4625
811.9750
383.9875
967.9125
407.9875
967.9875
415.9375
1084.0625
423.5875
1084.1375
I
423.9875
33
~._._.__.
'-'-
-.._--
f
~..
..----...
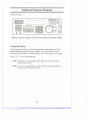
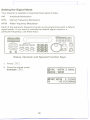
Additional Scanner Features
--
Use these keys:
II1ld1!1a."""""UBC8000X1.T
D
-CJ
UNE
EXTSP
@
@
(.
§T'MN
SCAN
TUAfIO
11
MANUAL
.)
~
<D[D~m:J[D
CDrn:J[EJIIJ [L)
L~JI
@
@
OFF
Status, Search, Mode, Numeric and Special Function Keys
Using Data Skip
Some frequencies carry un-modulated signals or data signals (such as
pager preamble signals or telefax signals). You can set the scanner to
continue scanning after a 3-second delay, when it encounter such signals.
Press
( DATA)
to turn Data Skip ON.
Note: Data Skip is not available for the AM band and is not active
during Priority scan.
'
Note: You can turn Data Skip on or off at any time during scanning,
searching and during Auto Store.
34
=.--
~-
""'-
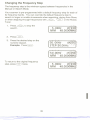
Changing
the Frequency
\
\
I
Step
The frequency step is the minimum space between frequencies in the
Manual or Search Mode.
Your scanner is pre-programmed with a default frequency step for each of
its frequency bands. You can override the default frequency step to
search in larger or smaller increments when searching, during Auto Store,
or when stepping through frequencies with ~,
~
or the Rotary
Tuner.
1. Press~
search.
\
Ii
!
I
I
I
I
I
i
!
i
to stop the
I\
I
2. Press
I SHIFT).
\
!
3. Press the desired step on the
numeric keypad.
Example: Press 150KHz I .
\
!
To return to the original frequency
step, press
~
twice.
I
I
ii
I
11
I
35
_.----..-
---
~
::::===-
~
"""'-
-='
;;::
,
,
1
c
,,- ___,m- ---,._-
""",___O'
"--'
mm,__-,
,
m
+-,
Setting the Signal Mode
Your scanner is capable of receiving three signal modes:
AM
Amplitude Modulation
NFM
Narrow Frequency Modulation
WFM Wide Frequency Modulation
Each of the scanner's frequency bands is pre-programmed with a default
signal mode. If you want to override the default signal mode for a
particular frequency, use these keys:
IIlIden .""'.""""U~T
,""}'MiiM',""'","',"""""""','""""",,,~,','i,'
ra.~
~
[
E:§]T'MN lUIBO
Ce
,eSAC
CD [[J [£] [[J [D
CD @:] [[] IIJ [L)
CJ
I=.~.~;~.!.~...~~;;;~
11 AUToe]
SCAN
11
MANUAL
PR TURBO crcss
~
e)
DATA
c;;:><;;> c:;3
UNE
EXT
SP
@
@
c::::>C3 C3
Status, Numeric and Special Function Keys
1. Press
I
SHIFT)
.
,
2. Pressthesignalmode.
Example:
I
/
~~--....
iiSRC-WFM-5.0KHz
I WFM'I.
MODE:: WFM , I /
iiSRe-WFM~
t
--
/
5.0 KHz
146~6000MHz
36
~
.=--~~-- :
~
-.
I
Using Signal Attenuation
When the ATT LED is on, the incoming signal strength is attenuated
(reduced) by about 15 dB. This prevents unusually strong signals from
over-loading the scanner.
In the Scan Mode, you must individually program each channel you want
to use the Signal Attenuation feature. You can use the Signal Attenuation
feature in the Manual, Search, or Scan Mode.
Use these keys:
~.
~~~
II1IdI!n """"""'~U~T
C]
D
~8IAlPHA)
BR
"""
CD IIJ [£:][[] [D
CD [[] lE] [[] [L)
OFF
[D~(D
[D OCJ(!:J
I>M
NfM
WFM
5KHz
12.5 KHz
25KHz
CD I:!:J (!::J
EJ @:) [D
CUI
50KHz
HI-CUT
Li}JJ
@
@
OFF
Scan, and Mode Keys
While Scanning:
1. Press
I
MANUAL)
2. Press (
ATT
While Searching,
-~
.
BankD
ch 83
855.9125MHz
). The display does not change.
press ( ATT).
II
I
I
I
i
\\
i
\
I
37
.....
~
Preventing Accidental Programming
The UBC9000XLT has a lockfeature
to prevent accidental programming
, ( PROG I,
entries. To disable the ~
I I, and [ I keys, move the rear
SEND
OFF ON
ffIEij a:==::D
AUTO
panel switch to ON.
IX
When you press ~
, ( PROG I,
or [AUTO I , a message appears.
1 SEND
I,
ENTER LOCKa:==::D
Bank C ch 69
ENTERLOCKED
Using COUNT to Monitor Channel Activity
The Count feature counts the number of times scanning stops on an
active channel. Use Count to determine the amount of activity on
channels during a scanning session.
Use these keys:
@
@
Status, Search, Scan, Numeric Keys,
and Rotary Tuning Controls
1. Press
I
MANUAL).
Bank A P ch 1
482.7625MHz
2. Press(COUNT I.
Count:O1P ch 1
482.7625MHz
38
------
"-=
-- ----=--.
~
...
ii
;:
-----
I
'---0>0.
.
---.
====
f
.
-..t-
3. Press IMANUAL),
~,
~
the count for each channel.
or use the RotaryTuner to see
I
Counter counts up to 99. To reset the counter for individualchannels
1. Press
I
MANUAL).
2. Enter the channel number or
use ~,
~,
or the
Rotary Tuner to select the
channel.
3. Press ~
Count:01P ch 1
482.7625MHz
twice.
Count:OOPch
1
482.7625MHz
Note: Turning off power resets the counter for all channels.
To turn COUNT off:
Press
(COUNT
I.
Bank A P ch 1
482.7625MHz
39
'--'--
--
.--.--.
___no
-
.
.".o.~.
=.=.-..--..
7
I
Displaying Bank MemoryStatus
This feature shows the programming status of the channels in a bank.
Use these keys:
I81IdI!n.............. uec~T
~}"~"":"tt""t'""""""?"~,,,,,::
li~;;;~;;.;
~~
~
@ @
D
.
.' '...........
'.'i"",,"""'{'
. .
.,
UO
"---J
c:::>
~
c:::>
(DElAY.)
c:::!>
DATA
~
;;;!~~I~t~~~
Status, Scan, and Numeric Keys,
and Rotary Tuning Controls
1. Press
I
MANUAL)
.
2. Enter the channel number or
Bank E
ch 110
854.9800MHz
use the Rotary Tuner to select
any channel in the bank.
3. Press and hold ( COUNT Ifor two
seconds.
Ir~~-~~:~=~I
The display shows:
The bank (A through J or 0 through 9)
An asterisk character (*) to represent each programmed
channel.
An underscore (-) character for an unprogrammed channel
A "P" to designate a Priority channel
A "L" to show a channel that is locked out.
To check bank memory status in other banks, turn the Rotary Tuner to
move from one bank to the next.
To exit from this mode, press
I
MANUAL)
or
(SCAN
I.
40
---
-----c._"~.
=.--...----
~
,
l
,-......-...........---
-
I
I
(
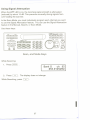
Using Auto Recording
The Auto Recording feature allows you to automatically tape record
activity from any channel of your scanner. When scanning stops on the
assigned channel, the recorder records the broadcast.
1
!
I
!
1 !
Before using the Auto Tape feature, connect the scanner to a tape
recorder. (See page 6.)
I
Use these keys:
mJllBla
,?:::{:i:'{:"'::::,\':'?"'~i'<:
~",~~~;:;~'ijj0~
R~~i;::-;~::
~~
~~"~~~~i~~
~
6
I
\I
I
I
i
(
II
:
~:~~5~~=~
<=:) <=:)
1;;'.
"""+-Uac8OOOXl
T
(-.)
DATA
i
m :~
rl!
lfIJi.
I
Status, Scan, and Numeric Keys,
Rotary Tuning Controls, Line jack
1. Press (SCAN
I.
Bank A P ch 1
482.7625MHz
2. When the scanner stops on a
channel you want to record,
press MANUAL), then press ~.
Record
ch 1
482.7625MHz
I
Note: You
can also select the channel manually.
To select other channels for recording, repeat steps 1 and 2.
To record transmissions, you need a tape recorder with Remote and
Microphone inputs.
1. Connect the REMOTE jack of your tape recorder to the AUX jack
on the rear of the UBC9000XLT. This can be used to start and
stop your recorder.
2. Put a tape in your recorder, and put it in the Record mode.
i
I
!
3. Press(SCAN I.
41
--.---------..
J
'-t~
When scanning stops on a channel that displays "Record", the channel
will automatically be recorded.
To deselect a channel so that it is not recorded:
1. Display the assigned channel
on your screen.
Record ch 1
482.7625MHz
2. Press~.
Bank A P ch 1
482.7625MHz
"Record" disappears on the
display to indicate that channel
will not be recorded.
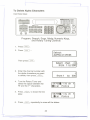
Viewing Scanner Status Information
This feature lets you quickly review the settings for several features of the
UBC9000XLT. Use these key:
I81Iden """""""'-uac-..T
CL] m:J [£:] rn::J[L)
CD @:] [JD ITJ IT::)
8Ft
"""
OfF
CD OCJ[D
I>M
@
NfM
WA.1
[D
[£) 10
.KHz 12.' KHz 2.KHz
[L)
~001<'" I!::J
ClA
HI-Cl1T
E:J ~ [L)
@
Status, Search, and Scan Keys
In Scan Mode:
1. Press IMANUAL)
Bank C
ch 72
854.2875MHz
.
2. Press and hold I
for two
seconds. You hear two beeps,
then the status information
scrolls across the display.
STATUS)
Bank C
ch 72
MODE:NFM
Bank C
ch
STEP:12 .5KHz
42
.-----.--..
_.".~==.=
.
72
1
"1'
Bank C
ch 72
CTCSS:OFF000.0
Bank C
ch 72
I
HI-CUT:OFF
Bank C
ch 72
RECORD :OFF
Bank C
ch 72
DIMMER: BRIGHT
In Search Mode:
1. Press ~to
stop the search.
2. Press and hold I STATUS)
for two
~
5 .0KHz ch~O~
MODE:NFM
'/1"
seconds.
You hear two beeps, then the
status information scrolls
across the display.
~/
5.0KHz
ch /)I~+HI-CUT:OFF
5.0KHz
C~1
DIMMER:BRIGHt/l\
5 . OKHz
ctfl
TURBO SRCH:O~ 1\
43
=---
"'11
--::;::
,co
,
"0"-
-
i
:::==:!7
Use these keys for Display Light and Hi-Cut
f""~'""""~','",'"""""",'"",'",,,"~",""f
iii~lltli
~
I . SAC 11 AUTO
.1
~LINE
EXT
SP
@
@
(]
(.
§T\\1N
D
[
T1.IWO
CD m::J@:J[[] [D
CD [D [E] [[] [L)
~::.:)
~
ilSla
SCAN 11 MANUAL
.)
PR T\JRI!O cress
DATA
c::;J c;;>
unIdI!n
"-"-""~T
( An.)
c:=> c::!> c::!>
Status and Special Function Keys
Display Light
The Display Light has three settings: BRIGHT, DIM, and OFF.
1. Press
I SHIFT).
2. Press the setting.
Example: Press 8
\17
.
Ban k:;:ASC D EFl
DIMMER 'OFF
~
Using Hi-Cut
To Turn HI-CUTONor OFF:
1. Press
2.
I SHIFT).
Press IHI-curl.
Bank ABCDEF )1}::-
HI-CUT:
ON
You can turn HI-CUT on or off while searching or scanning.
44
::::=-
,.""",,
/\
'-i-
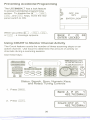
CTCSS Operation
This section applies only if you are installing and using an optional
CTCSS Tone Board with your scanner.
Installing
I
the CTCSS Board
Installing the CTCSS Tone Board is a simple procedure, and requires only
a few minutes following the steps below.
.
I
CAUTION: Be sure to turn the scanner off and disconnect the power
cord before attempting to open the scanner.
1. Remove the five screws from the top cover.
Lift
.~
~-
:.elf- -
~
@
~ ~
fim~
:5<0)
~
2. Carefully lift the cover up from the back of the unit and turn it to
the left - being careful not break the speaker wire.
3. Stand the cover on its left side panel.
(Continued, next page)
iI
45
--...
,....
~
"
---~
-
-
T
,"
..h"
--'--"-""'"
I
)
'1-
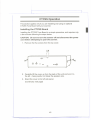
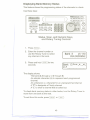
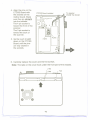
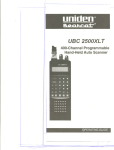
4. Align the pins on the
CTCSS Board with
the sockets on the
mother board. Make
sure they go straight
into the sockets.
The 4 pin socket is
toward the front of the
scanner.
The 3 pin socket is
toward the back of
the scanner.
CTCSS Board installed
To speaker
(Inside Top Cover)
0
D
;--
~O 0000
cO
[J:::::E
QJ
<Do'
DD
O
~
~
0(Q)(Q)
o~
GO>
3 pins
5. Gently push straight
down on the CTCSS
Board until the pins
are fully seated in
the sockets.
I
I
\
,
,
I
i
..
II
D fo
I
I
I
I
6. Carefully replace the cover and the five screws.
Note: The tabs on the cover hook under the front part of the chassis.
I
i
Nib
I
Slot
..
VI
t
~
~
V
00000
0000000
000000000
00000000000
0000
0000
0000
00000000000
000000000
0000
0000
0000
oooooooa
.,
0000 .,
i
46
--
.--.
~_."-
.-.""-"""""
J
"'1'
[
I
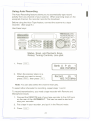
Using CTCSS
The CTCSS (Continuous Tone Control Squelch System) feature allows
squelch to be broken during scanning only when a CTCSS Tone is
received.
I
II
I
To program a channel for CTCSS, use these keys:
II1lden.""""""'Uec_XLT
<LJ I:!:I @:] ITI IT::)
CEJ @:] lE] IT] Q::)
Et.
SQUELCH
;;
5r
III
<ID
I)
!
i1
!
!lJ
Program, Search, Scan, Mode, and Numeric Keys,
and Rotary Tuning Controls
1. PressIMANUAL) .
2. Press( PROG
Bank A
ch 8
855.9125MHz
I.
Select
ALPHAor CTCSS
3. Press( CTCSS) .
Select chan j,1f
from 1 to ~O'(!)\
4. Enter the channel number.
72
from 1 to 500]
(
, "/ I
~OO .O~z
ch 72
/ I '" 'S54.2875MHz
5. Press~.
,
/
...-
!
I
47
--
=
=-
,.~...1L =,o, .
,)I
\ I /
... \' I "
6. Use the Rotary Tuner to select
a tone frequency. (See page 49
for a list of tone frequencies.)
7. Press ~
to program the
frequency.
-
67 -: OHz
"
/ I\...
ch 72
854.2875MHz
... \' I "
--
67 -: OHz -ch 72
" / I\... 854.2875I'V1F+z
-
After programing the frequency,
the scanner returns to step three.
Continue programming CTCSS
frequencies, or press IMANUAL)
to exit.
Select
chan
from 1 to
?fJ
SIde
To Change the CTCSS Tone Frequency
1. Press I
.
MANUAL)
2. Find the channel and CTCSS
Tone Frequency you want to
change.
3. Press C
PAOG
Bank C
ch 72
854.2875MHz
I.
Select
ALPHAor CTCSS
4.
Press ( CTCSS ).
Select chan
~
from 1 to SIde
5. Enter the current channel
number.
72
from 1 to 500 ]
I
6. Press~.
\
~r-7
"
I
/
67 -: OHz
/
I\...
ch
72
854.2875MHz
48
I
====-
,---"" ~=
'7
7. Use the Rotary Tuner to select
a new frequency. (See below
for a list of CTCSS tone
frequencies.)
8. Press~
'- "' I "
--
.
--
77 . OHz - -ch
-- /
After programming the frequency, the
scanner returns to step four. Continue
programming CTCSS frequencies, or
press
/
r-77 . OHzch 72
-- / I 854.2875MHz
72
I 854.287~~Jfz
Select chan ?J
from 1 to SlOo
I MANUAL) to exit.
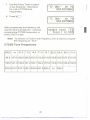
Note: To remove a CTCSS Tone Frequency, from a channel, program
the frequency as " 00.0 "
CTCSS Tone Frequencies
000.0
==>
67.0 71.9 74.4 77.0 79.7 82.5 85.4 88.5 91.5
94.8 97.4 100.0 103.5 107.2 110.9 114.8 118.8 123.0 127.3 131.8
136.5 141.3 146.2 151.4 156.7 162.2 167.9 173.8 179.9 186.2 192.8
203.5 210.7 218.1 225.7 233.6 241.8 250.3
<=
000.0
49
:=::===-
,
~"~-=,-------
I
Care and Mai ntenance
General Use
Write down the programmed channels/frequencies in case of a memory
loss.
Firmly press each scanner key so that you hear the entry tone.
Location
If strong interference or electrical noise is received, move the scanner.
Also, a higher antenna ,location usually results in better reception.
Do not use the scanner in high-moisture environments, such as a kitchen
or bathroom.
Avoid placing the scanner in direct sunlight or near heating elements or
vents.
Cleaning
Disconnect the AC adaptor while you clean the scanner.
Clean only the outside of the scanner with a mild detergent.
To prevent scratches, do not use abrasive cleaners or solvents to clean
the scanner.
Do not rub the display window.
Do not use excessive amounts of water.
Repairs
Do not attempt any repairs. The scanner contains no user-serviceable parts.
Contact the Uniden Customer Service Division or take the scanner to a
qualified repair technician.
50
---
~--
-----.-----.
c.
~
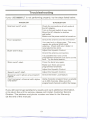
Troubleshooting
If your UBC9000XL T is not performing properly, try the steps listed below.
PROBLEM
Scanner won't work.
SUGGESTION
Check the connections at both ends of
the AC Adaptor.
Tum on the wall switch of your room.
Move the AC Adaptor to another
wall outlet.
Make sure the power switch is tumed on.
Poor reception.
Check the antenna and its connection.
You may be in a fringe area. This may
require an optional multi-band
antenna. Check with your dealer or
local electronics store.
Scan won't stop.
Adjust the Squelch Control.
Check the antenna connection.
It is possible that none of the
programmed channels are active at the
time. Try the band search.
Scan won't start.
Press the bank key again.
Make sure there are some
programmed channels.
Adjust the Squelch Control.
Search won't start.
Adjust the Squelch Control.
canner
Inputs
Check the Enter Lock feature.
won't allow any program
Can't program channel with alpha
character
Alpha character programming is available
up to 250 channels. Make sure the
programmed channel is within that range.
If you still cannot get satisfactory results and want additional information,
or to return the unit for service, please call Uniden Customer Service
Division. The address and phone number are listed in the Warranty.
(at the end of this manual)
51
--
~
...,.
I
r
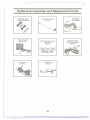
Optional Accessories and Replacement Parts
AC Adaptor
(AAD 8500U)
Telescoping Antenna
(AT124)
~
External Speaker
(ESP25, SQ)
Mobile Mounting Bracket
Assembly Kit
(MBOO1)
.0=0
o~
=
0=0
=
0=0
&?qIb ~
Hard Wire Cord
(PSOO2)
CTCSS Board
(BCOO5)
~
52
--
.
Cigarette Lighter
Power Cord Adaptor
(PSOO1)
r
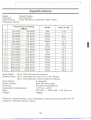
Specifications
Banks:
Total 20 banks
Channels:
500 channels
Search Band:
Total 16 Search bands(AM, NFM, WFM)
Frequency Range:
Frequency Coverage
(MHz)
25.0000 28.9950
29.0000 - 55.9950
56.0000 - 69.9500
70.0000 - 87.9950
88.0000 - 107.9500
108.0000 - 136.9875
137.0000 - 173.9950
174.0000 - 221.9500
222.0000 - 399.9875
400.0000 - 519.9875
520.0000 - 549.9500
760.0000 - 823.9875
824.0100 - 848.9700
849.0000 - 868.9875
869.0100 - 893.9700
894.0000 - 1300.0000
1
2
3
4
5
6
7
8
9
10
11
12
13
14
15
16
Mode
Step in kHz
AM
NFM
WFM
NFM
WFM
AM
NFM
WFM
AM
NFM
WFM
NFM
NFM
NFM
NFM
NFM
5.0
5.0
50.0
5.0
50.0
12.5
5.0
50.0
12.5
12.5
50.0
12.5
30.0
12.5
30.0
12.5
I
Scan Rate: Up to 100 channels per second
Search Rate: Up to 300 steps per second (Turbo Mode)
Up to 100steps per second (Normal Mode)
2 seconds
Scan Delay:
Audio Output:
Max 3W (8 Q load)
Antenna:
50 ohms (Impedance)
-10°C to + 50°C
Operating Temperature:
Size:
267 (W) x 189.5 (D) x 85 (H) mm
Weight:
1820g
Features, specifications, and availability of optional accessories are all
subject to change without notice.
53
-- --.
~
"'---
...:;;;;:=
'~oef
---
-
~.....
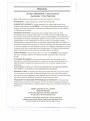
Warranty
Uniden UBC9000XLT Auto Scanner
Australian 1 Year Warranty
Note: Please
WARRANTOR:
keep your sales docket as it provides evidence of warranty.
Uniden Australia Pty. Limited ACN 001 865498
ELEMENTS OF WARRANTY: Uniden warrants to the original retail owner for the
duration of this warranty, its UBC9000XL T Auto Scanner (hereinafter referred to as the
product), to be free from defects in materials and craftsmanship with only the limitations
or exclusions set out below.
WARRANTY DURATION: This warranty to the original retail owner only, shall
terminate and be of no further effect ONE (1) Year after the date of original retail sale.
This warranty will be deemed invalid if the product is; (A) Damaged or not maintained as
reasonable and necessary, (B) Modified, altered or used as part of any conversion kits,
subassemblies, or any configurations not sold by Uniden, (C) Improperly installed,
(D) Repaired by someone other than an authorized Uniden Repair Agent for a defect or
malfunction covered by this warranty, (E) Used in conjunction with any equipment or parts
or as part of a system not manufactured by Uniden, (F) Installed, programmed or serviced
by anyone other than an authorized Uniden Repair Agent, (G) Where the Serial Number
label of the product has been removed or damaged beyond recognition.
PARTS COVERED: This warranty covers for 1 year, the UBC9000XL T Auto Scanner
Unit Only. Telescopic Antenna, AC Adaptor and other accessories are covered for
90 days.
STATEMENT OF REMEDY: In the event that the product does not conform to this
warranty at any time while this warranty is in effect, the warrantor at its discretion, will
repair the defect or replace the product and return it to you without charge for parts
and service.
THIS WARRANTY DOES NOT COVER OR PROVIDE FOR THE REIMBURSEMENT
OR PAYMENT OF INCIDENTAL OR CONSEQUENTIAL DAMAGES.
WARRANTY CARD: If a warranty card has been included with this product then please
fill it in and return it to us within 14 days of purchase. Your name and serial number of
the product will then be registered in our database and this will help up process your claim
with greater speed and efficiency should you require warranty service.
PROCEDURE FOR OBTAINING PERFORMANCE
OF WARRANTY:
In the event that
Product does not conform to this warranty, the Product should be shipped or delivered,
freight pre-paid, with evidence of original purchase, (eg/a copy of the sales docket), to the
warrantor at:
UNIDEN AUSTRALIA PTY. LIMITED
SERVICE DIVISION
345 Princes Highway, Rockdale, NSW 2216
Ph (02) 599 3100 FAX (02) 5993278
Customers In other States should ship or deliver the Product
freight pre-pald to their nearest Unlden Authorized Repair Centre.
(Contact Unlden for the nearest Warranty Agent to you)
r
/
-===
;:
..".
.
unl
I!n@
@1995 Uniden Australia Pty. Limited. All rights reserved.
UBZZO1248AZ
Printed in the Philippines
F-
f
J