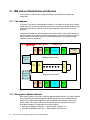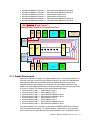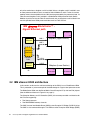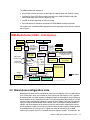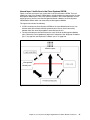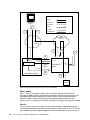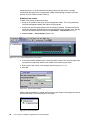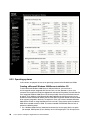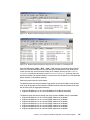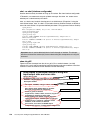
1
IBM Front cover Cisco Systems Intelligent Gigabit Ethernet Switch Module for IBM Eserver BladeCenter Copper Ethernet switching technology integrated into the BladeCenter chassis Helpful configurations and troubleshooting techniques Configuration examples using CMS and CLI Rufus Credle Yoko Fujiwara Matt Slavin Kenichi Tanaka Mark Welch ibm.com/redbooks Redpaper International Technical Support Organization Cisco Systems Intelligent Gigabit Ethernet Switch Module for IBM Eserver BladeCenter April 2005 Note: Before using this information and the product it supports, read the information in “Notices” on page vii. First Edition (April 2005) This edition applies to Cisco Systems Intelligent Gigabit Ethernet Switch Module for the IBM Eserver BladeCenter. © Copyright International Business Machines Corporation 2004, 2005. All rights reserved. Note to U.S. Government Users Restricted Rights -- Use, duplication or disclosure restricted by GSA ADP Schedule Contract with IBM Corp. Contents Notices . . . . . . . . . . . . . . . . . . . . . . . . . . . . . . . . . . . . . . . . . . . . . . . . . . . . . . . . . . . . . . . . . vii Trademarks . . . . . . . . . . . . . . . . . . . . . . . . . . . . . . . . . . . . . . . . . . . . . . . . . . . . . . . . . . . . . viii Preface . . . . . . . . . . . . . . . . . . . . . . . . . . . . . . . . . . . . . . . . . . . . . . . . . . . . . . . . . . . . . . . . . ix The team that wrote this Redpaper . . . . . . . . . . . . . . . . . . . . . . . . . . . . . . . . . . . . . . . . . . . . ix Become a published author . . . . . . . . . . . . . . . . . . . . . . . . . . . . . . . . . . . . . . . . . . . . . . . . . . xi Comments welcome. . . . . . . . . . . . . . . . . . . . . . . . . . . . . . . . . . . . . . . . . . . . . . . . . . . . . . . . xii Chapter 1. Executive summary . . . . . . . . . . . . . . . . . . . . . . . . . . . . . . . . . . . . . . . . . . . . . 1 Chapter 2. IBM eServer BladeCenter overview . . . . . . . . . . . . . . . . . . . . . . . . . . . . . . . . 2.1 IBM eServer BladeCenter architecture . . . . . . . . . . . . . . . . . . . . . . . . . . . . . . . . . . . . . . 2.1.1 The midplane . . . . . . . . . . . . . . . . . . . . . . . . . . . . . . . . . . . . . . . . . . . . . . . . . . . . . 2.1.2 Management Module Ethernet . . . . . . . . . . . . . . . . . . . . . . . . . . . . . . . . . . . . . . . . 2.1.3 Gigabit Ethernet path . . . . . . . . . . . . . . . . . . . . . . . . . . . . . . . . . . . . . . . . . . . . . . . 2.2 IBM eServer HS20 architecture . . . . . . . . . . . . . . . . . . . . . . . . . . . . . . . . . . . . . . . . . . . 2.3 Stand-alone configuration tools. . . . . . . . . . . . . . . . . . . . . . . . . . . . . . . . . . . . . . . . . . . . Chapter 3. Cisco Systems Intelligent Gigabit Ethernet Switch Module . . . . . . . . . . . . 3.1 Product description . . . . . . . . . . . . . . . . . . . . . . . . . . . . . . . . . . . . . . . . . . . . . . . . . . . . 3.2 Value proposition . . . . . . . . . . . . . . . . . . . . . . . . . . . . . . . . . . . . . . . . . . . . . . . . . . . . . 3.3 Product functionality . . . . . . . . . . . . . . . . . . . . . . . . . . . . . . . . . . . . . . . . . . . . . . . . . . . 3.3.1 Switch management . . . . . . . . . . . . . . . . . . . . . . . . . . . . . . . . . . . . . . . . . . . . . . . 3.3.2 Port features . . . . . . . . . . . . . . . . . . . . . . . . . . . . . . . . . . . . . . . . . . . . . . . . . . . . . 3.3.3 Performance features . . . . . . . . . . . . . . . . . . . . . . . . . . . . . . . . . . . . . . . . . . . . . . 3.3.4 Redundancy . . . . . . . . . . . . . . . . . . . . . . . . . . . . . . . . . . . . . . . . . . . . . . . . . . . . . 3.3.5 VLAN support . . . . . . . . . . . . . . . . . . . . . . . . . . . . . . . . . . . . . . . . . . . . . . . . . . . . 3.3.6 Security . . . . . . . . . . . . . . . . . . . . . . . . . . . . . . . . . . . . . . . . . . . . . . . . . . . . . . . . . 3.3.7 Quality of Service (QoS) and Class of Service (CoS) . . . . . . . . . . . . . . . . . . . . . . 3.3.8 Monitoring . . . . . . . . . . . . . . . . . . . . . . . . . . . . . . . . . . . . . . . . . . . . . . . . . . . . . . . 3.3.9 Network cables . . . . . . . . . . . . . . . . . . . . . . . . . . . . . . . . . . . . . . . . . . . . . . . . . . . 3.3.10 Supported IEEE network standards . . . . . . . . . . . . . . . . . . . . . . . . . . . . . . . . . . 3 6 6 6 7 8 9 11 12 12 13 13 14 14 14 15 15 16 16 17 17 Chapter 4. Cisco Systems Intelligent Gigabit Ethernet Switch Module architecture . 19 4.1 Cisco Systems Intelligent Gigabit Ethernet Switch Module block diagram . . . . . . . . . . 22 Chapter 5. Cisco Systems IGESM management and user orientation. . . . . . . . . . . . . 5.1 Cisco Systems IGESM user interface . . . . . . . . . . . . . . . . . . . . . . . . . . . . . . . . . . . . . . 5.1.1 Command-line interface . . . . . . . . . . . . . . . . . . . . . . . . . . . . . . . . . . . . . . . . . . . . 5.1.2 Cisco Systems Intelligent Gigabit Ethernet Switch Module Home . . . . . . . . . . . . 5.1.3 Cisco Systems IGESM Cluster Management Suite . . . . . . . . . . . . . . . . . . . . . . . 5.1.4 Cisco Systems Intelligent Gigabit Ethernet Switch Module Tools. . . . . . . . . . . . . 5.1.5 Cisco Systems Intelligent Gigabit Ethernet Switch Module Help Resources . . . . 5.2 Systems management considerations . . . . . . . . . . . . . . . . . . . . . . . . . . . . . . . . . . . . . 5.2.1 Out-of-band management definition . . . . . . . . . . . . . . . . . . . . . . . . . . . . . . . . . . . 5.2.2 In-band management definition . . . . . . . . . . . . . . . . . . . . . . . . . . . . . . . . . . . . . . 5.2.3 Management traffic paths to the Cisco Systems IGESM . . . . . . . . . . . . . . . . . . . 5.2.4 Cisco Cluster Management Suite . . . . . . . . . . . . . . . . . . . . . . . . . . . . . . . . . . . . . 5.2.5 CiscoWorks LAN Management Solution . . . . . . . . . . . . . . . . . . . . . . . . . . . . . . . . © Copyright IBM Corp. 2004, 2005. All rights reserved. 23 24 25 28 29 39 40 40 40 41 41 45 52 iii 5.2.6 CiscoView . . . . . . . . . . . . . . . . . . . . . . . . . . . . . . . . . . . . . . . . . . . . . . . . . . . . . . . 5.2.7 IBM Director and Remote Deployment Manager . . . . . . . . . . . . . . . . . . . . . . . . . 5.3 In-depth management path discussions . . . . . . . . . . . . . . . . . . . . . . . . . . . . . . . . . . . . 5.3.1 Introduction to this in-depth management discussion . . . . . . . . . . . . . . . . . . . . . . 5.3.2 Why was this in-depth section created? . . . . . . . . . . . . . . . . . . . . . . . . . . . . . . . . 5.3.3 General management path design considerations . . . . . . . . . . . . . . . . . . . . . . . . 5.3.4 Considerations: Using the Management Module uplink to manage the IGESM . . 5.3.5 Considerations: Using the IGESM uplinks to manage the IGESM . . . . . . . . . . . . 5.3.6 Considerations: More than a single IGESM in a given BladeCenter. . . . . . . . . . . 5.3.7 Scenario 1 (recommended). . . . . . . . . . . . . . . . . . . . . . . . . . . . . . . . . . . . . . . . . . 5.3.8 Scenario 2 (recommended). . . . . . . . . . . . . . . . . . . . . . . . . . . . . . . . . . . . . . . . . . 5.3.9 Scenario 3 (recommended). . . . . . . . . . . . . . . . . . . . . . . . . . . . . . . . . . . . . . . . . . 5.3.10 Scenario 4 (possible alternative). . . . . . . . . . . . . . . . . . . . . . . . . . . . . . . . . . . . . 5.3.11 Scenario 5 (not recommended). . . . . . . . . . . . . . . . . . . . . . . . . . . . . . . . . . . . . . 5.3.12 Scenario 6 (not recommended). . . . . . . . . . . . . . . . . . . . . . . . . . . . . . . . . . . . . . 5.3.13 Scenario 7 (possible evaluation test environment) . . . . . . . . . . . . . . . . . . . . . . . 53 54 55 55 55 57 59 61 62 64 65 67 69 70 72 74 Chapter 6. IBM eServer BladeCenter system initial setup . . . . . . . . . . . . . . . . . . . . . . 6.1 IBM eServer BladeCenter system . . . . . . . . . . . . . . . . . . . . . . . . . . . . . . . . . . . . . . . . . 6.1.1 Management Module firmware . . . . . . . . . . . . . . . . . . . . . . . . . . . . . . . . . . . . . . . 6.1.2 Management Module network interface . . . . . . . . . . . . . . . . . . . . . . . . . . . . . . . . 6.1.3 I/O module management tasks . . . . . . . . . . . . . . . . . . . . . . . . . . . . . . . . . . . . . . . 6.2 Blade server initial configuration . . . . . . . . . . . . . . . . . . . . . . . . . . . . . . . . . . . . . . . . . . 6.2.1 Firmware update . . . . . . . . . . . . . . . . . . . . . . . . . . . . . . . . . . . . . . . . . . . . . . . . . . 6.2.2 Operating systems . . . . . . . . . . . . . . . . . . . . . . . . . . . . . . . . . . . . . . . . . . . . . . . . 6.2.3 Broadcom Advanced Control Suite installation . . . . . . . . . . . . . . . . . . . . . . . . . . . 6.3 Firmware and device drivers used in this example . . . . . . . . . . . . . . . . . . . . . . . . . . . . 79 80 80 80 83 88 88 90 95 97 Chapter 7. Cisco Systems IGESM configuration and network integration . . . . . . . . . 99 7.1 Introduction to configuration and integration . . . . . . . . . . . . . . . . . . . . . . . . . . . . . . . . 100 7.1.1 For those familiar with Cisco Systems switches . . . . . . . . . . . . . . . . . . . . . . . . . 100 7.2 Management network considerations . . . . . . . . . . . . . . . . . . . . . . . . . . . . . . . . . . . . . 105 7.3 Base configurations for examples used in this chapter . . . . . . . . . . . . . . . . . . . . . . . . 106 7.3.1 Hardware and software used for the production of this document . . . . . . . . . . . 106 7.3.2 Preconfiguration preparation (base configuration information) . . . . . . . . . . . . . . 107 7.4 Guidelines for attaching the BladeCenter to a Cisco infrastructure. . . . . . . . . . . . . . . 116 7.4.1 Guidelines and comments . . . . . . . . . . . . . . . . . . . . . . . . . . . . . . . . . . . . . . . . . 117 7.4.2 Preliminary information about configuration examples . . . . . . . . . . . . . . . . . . . . 121 7.5 Example topologies and their configuration . . . . . . . . . . . . . . . . . . . . . . . . . . . . . . . . 124 7.5.1 Topology 1: Dual IGESMs, four-port aggregation to two 6500s . . . . . . . . . . . . . 124 7.5.2 Topology 2: Dual Cisco Systems IGESMs, two-port aggregation to two 6500s . 137 7.5.3 Topology 3a: Dual Cisco Systems IGESMs, two-port aggregation with RSPAN 160 7.5.4 Topology 3b: Similar to Topology 3a except using a direct cross connect . . . . . 176 7.6 Miscellaneous blade server configurations . . . . . . . . . . . . . . . . . . . . . . . . . . . . . . . . . 189 7.7 Trunk Failover feature description and configuration . . . . . . . . . . . . . . . . . . . . . . . . . 193 7.7.1 Introduction to Trunk Failover . . . . . . . . . . . . . . . . . . . . . . . . . . . . . . . . . . . . . . . 193 7.7.2 Example of Topology 1 using Trunk Failover . . . . . . . . . . . . . . . . . . . . . . . . . . . 195 7.7.3 Example of Topology 2 using Trunk Failover . . . . . . . . . . . . . . . . . . . . . . . . . . . 196 7.8 Serial over LAN feature description and configuration . . . . . . . . . . . . . . . . . . . . . . . . 198 7.8.1 Introduction to Serial over LAN . . . . . . . . . . . . . . . . . . . . . . . . . . . . . . . . . . . . . . 198 7.8.2 Configuring Serial over LAN . . . . . . . . . . . . . . . . . . . . . . . . . . . . . . . . . . . . . . . . 200 Chapter 8. Cisco Systems IGESM troubleshooting . . . . . . . . . . . . . . . . . . . . . . . . . . . 203 8.1 Basic rules and unique symptoms . . . . . . . . . . . . . . . . . . . . . . . . . . . . . . . . . . . . . . . 204 iv Cisco Systems Intelligent Gigabit Ethernet Switch Module 8.1.1 Basic rules . . . . . . . . . . . . . . . . . . . . . . . . . . . . . . . . . . . . . . . . . . . . . . . . . . . . . 8.1.2 Basic symptoms and possible solutions . . . . . . . . . . . . . . . . . . . . . . . . . . . . . . . 8.2 Introduction to troubleshooting the IGESM . . . . . . . . . . . . . . . . . . . . . . . . . . . . . . . . . 8.2.1 General comments on troubleshooting . . . . . . . . . . . . . . . . . . . . . . . . . . . . . . . . 8.2.2 Information useful to technical support . . . . . . . . . . . . . . . . . . . . . . . . . . . . . . . . 8.3 Troubleshooting suspected hardware issues . . . . . . . . . . . . . . . . . . . . . . . . . . . . . . . 8.4 Troubleshooting suspected software issues . . . . . . . . . . . . . . . . . . . . . . . . . . . . . . . . 8.5 Troubleshooting suspected configuration issues . . . . . . . . . . . . . . . . . . . . . . . . . . . . 8.6 Useful IOS CLI troubleshooting commands . . . . . . . . . . . . . . . . . . . . . . . . . . . . . . . . 8.6.1 Gathering data . . . . . . . . . . . . . . . . . . . . . . . . . . . . . . . . . . . . . . . . . . . . . . . . . . 8.6.2 Administrative . . . . . . . . . . . . . . . . . . . . . . . . . . . . . . . . . . . . . . . . . . . . . . . . . . . 8.6.3 Troubleshooting . . . . . . . . . . . . . . . . . . . . . . . . . . . . . . . . . . . . . . . . . . . . . . . . . 204 204 206 206 207 208 210 210 212 212 215 215 Chapter 9. Service and support . . . . . . . . . . . . . . . . . . . . . . . . . . . . . . . . . . . . . . . . . . . 9.1 Placing the call to IBM. . . . . . . . . . . . . . . . . . . . . . . . . . . . . . . . . . . . . . . . . . . . . . . . . 9.2 Online services . . . . . . . . . . . . . . . . . . . . . . . . . . . . . . . . . . . . . . . . . . . . . . . . . . . . . . 9.3 Ordering information . . . . . . . . . . . . . . . . . . . . . . . . . . . . . . . . . . . . . . . . . . . . . . . . . . 9.4 Other support sites . . . . . . . . . . . . . . . . . . . . . . . . . . . . . . . . . . . . . . . . . . . . . . . . . . . 223 224 224 224 225 Appendix A. Hints and tips . . . . . . . . . . . . . . . . . . . . . . . . . . . . . . . . . . . . . . . . . . . . . . Blade server NIC numbering . . . . . . . . . . . . . . . . . . . . . . . . . . . . . . . . . . . . . . . . . . . . . . . Default gateway configuration on multihomed servers . . . . . . . . . . . . . . . . . . . . . . . . . . . Duplicate IP address: part 1 . . . . . . . . . . . . . . . . . . . . . . . . . . . . . . . . . . . . . . . . . . . . . . . . Duplicate IP address: part 2 . . . . . . . . . . . . . . . . . . . . . . . . . . . . . . . . . . . . . . . . . . . . . . . . Teaming software on a blade server forces an undesired action. . . . . . . . . . . . . . . . . . . . Cisco Systems IGESM stuck at switch: prompt . . . . . . . . . . . . . . . . . . . . . . . . . . . . . . . . . Key sequence to switch between blade servers . . . . . . . . . . . . . . . . . . . . . . . . . . . . . . . . Native VLAN mismatch message. . . . . . . . . . . . . . . . . . . . . . . . . . . . . . . . . . . . . . . . . . . . Use of RSPAN on the Cisco Systems IGESM . . . . . . . . . . . . . . . . . . . . . . . . . . . . . . . . . . Detecting Management Module settings from the IGESM . . . . . . . . . . . . . . . . . . . . . . . . . Possible issues with Redhat tg3 driver . . . . . . . . . . . . . . . . . . . . . . . . . . . . . . . . . . . . . . . Possible issues with Hyperterm when using the console port . . . . . . . . . . . . . . . . . . . . . . Default Etherchannel load balancing may not be optimal . . . . . . . . . . . . . . . . . . . . . . . . . Control of the IGESM IP address information . . . . . . . . . . . . . . . . . . . . . . . . . . . . . . . . . . A.1 Using code later than 12.1(14) . . . . . . . . . . . . . . . . . . . . . . . . . . . . . . . . . . . . . . . . . . Other BladeCenter hints and tips . . . . . . . . . . . . . . . . . . . . . . . . . . . . . . . . . . . . . . . . . . . . 227 227 228 229 229 231 232 233 233 233 234 236 237 237 237 238 238 Related publications . . . . . . . . . . . . . . . . . . . . . . . . . . . . . . . . . . . . . . . . . . . . . . . . . . . . IBM Redbooks . . . . . . . . . . . . . . . . . . . . . . . . . . . . . . . . . . . . . . . . . . . . . . . . . . . . . . . . . . Other publications . . . . . . . . . . . . . . . . . . . . . . . . . . . . . . . . . . . . . . . . . . . . . . . . . . . . . . . Online resources . . . . . . . . . . . . . . . . . . . . . . . . . . . . . . . . . . . . . . . . . . . . . . . . . . . . . . . . How to get IBM Redbooks . . . . . . . . . . . . . . . . . . . . . . . . . . . . . . . . . . . . . . . . . . . . . . . . . Help from IBM . . . . . . . . . . . . . . . . . . . . . . . . . . . . . . . . . . . . . . . . . . . . . . . . . . . . . . . . . . 239 239 239 240 242 242 Abbreviations and acronyms . . . . . . . . . . . . . . . . . . . . . . . . . . . . . . . . . . . . . . . . . . . . . 243 Index . . . . . . . . . . . . . . . . . . . . . . . . . . . . . . . . . . . . . . . . . . . . . . . . . . . . . . . . . . . . . . . . . 245 Contents v vi Cisco Systems Intelligent Gigabit Ethernet Switch Module Notices This information was developed for products and services offered in the U.S.A. IBM may not offer the products, services, or features discussed in this document in other countries. Consult your local IBM representative for information on the products and services currently available in your area. Any reference to an IBM product, program, or service is not intended to state or imply that only that IBM product, program, or service may be used. Any functionally equivalent product, program, or service that does not infringe any IBM intellectual property right may be used instead. However, it is the user's responsibility to evaluate and verify the operation of any non-IBM product, program, or service. IBM may have patents or pending patent applications covering subject matter described in this document. The furnishing of this document does not give you any license to these patents. You can send license inquiries, in writing, to: IBM Director of Licensing, IBM Corporation, North Castle Drive Armonk, NY 10504-1785 U.S.A. The following paragraph does not apply to the United Kingdom or any other country where such provisions are inconsistent with local law: INTERNATIONAL BUSINESS MACHINES CORPORATION PROVIDES THIS PUBLICATION "AS IS" WITHOUT WARRANTY OF ANY KIND, EITHER EXPRESS OR IMPLIED, INCLUDING, BUT NOT LIMITED TO, THE IMPLIED WARRANTIES OF NON-INFRINGEMENT, MERCHANTABILITY OR FITNESS FOR A PARTICULAR PURPOSE. Some states do not allow disclaimer of express or implied warranties in certain transactions, therefore, this statement may not apply to you. This information could include technical inaccuracies or typographical errors. Changes are periodically made to the information herein; these changes will be incorporated in new editions of the publication. IBM may make improvements and/or changes in the product(s) and/or the program(s) described in this publication at any time without notice. Any references in this information to non-IBM Web sites are provided for convenience only and do not in any manner serve as an endorsement of those Web sites. The materials at those Web sites are not part of the materials for this IBM product and use of those Web sites is at your own risk. IBM may use or distribute any of the information you supply in any way it believes appropriate without incurring any obligation to you. Information concerning non-IBM products was obtained from the suppliers of those products, their published announcements or other publicly available sources. IBM has not tested those products and cannot confirm the accuracy of performance, compatibility or any other claims related to non-IBM products. Questions on the capabilities of non-IBM products should be addressed to the suppliers of those products. This information contains examples of data and reports used in daily business operations. To illustrate them as completely as possible, the examples include the names of individuals, companies, brands, and products. All of these names are fictitious and any similarity to the names and addresses used by an actual business enterprise is entirely coincidental. COPYRIGHT LICENSE: This information contains sample application programs in source language, which illustrates programming techniques on various operating platforms. You may copy, modify, and distribute these sample programs in any form without payment to IBM, for the purposes of developing, using, marketing or distributing application programs conforming to the application programming interface for the operating platform for which the sample programs are written. These examples have not been thoroughly tested under all conditions. IBM, therefore, cannot guarantee or imply reliability, serviceability, or function of these programs. You may copy, modify, and distribute these sample programs in any form without payment to IBM for the purposes of developing, using, marketing, or distributing application programs conforming to IBM's application programming interfaces. © Copyright IBM Corp. 2004, 2005. All rights reserved. vii Trademarks The following terms are trademarks of the International Business Machines Corporation in the United States, other countries, or both: AIX® BladeCenter™ Domino® Electronic Service Agent™ Enterprise Storage Server® Eserver® Eserver® eServer™ HelpCenter® HelpWare® ibm.com® IBM® IntelliStation® NetVista™ Redbooks (logo) Redbooks™ ServerGuide™ ThinkPad® Tivoli® TotalStorage® xSeries® ™ The following terms are trademarks of other companies: Java and all Java-based trademarks and logos are trademarks or registered trademarks of Sun Microsystems, Inc. in the United States, other countries, or both. Microsoft, Windows, Windows NT, and the Windows logo are trademarks of Microsoft Corporation in the United States, other countries, or both. Intel and Intel Inside (logos) are trademarks of Intel Corporation in the United States, other countries, or both. Linux is a trademark of Linus Torvalds in the United States, other countries, or both. All other trademarks mentioned in this document or Web site are the property of their respective owners. The use of the word partner does not imply a partnership relationship between Cisco and any other company. viii Cisco Systems Intelligent Gigabit Ethernet Switch Module Preface This IBM® Redpaper positions the Cisco Systems Intelligent Gigabit Ethernet Switch Module for the IBM Eserver® BladeCenter™ and describes how it enhances the BladeCenter value proposition by seamlessly interfacing into a customer’s existing data network. This paper helps you plan, install, and configure the Cisco Systems Intelligent Gigabit Ethernet Switch Module for several network topologies. Topology examples are provided to demonstrate several ways to perform the integration of the switch module into different networks. We also discuss the architecture of the Cisco Systems Intelligent Gigabit Ethernet Switch Module and BladeCenter and how the technology of each product jointly provides full interoperability into existing Cisco data centers. It is assumed that experienced systems and network administrators will use this paper to successfully integrate the Cisco Systems Intelligent Gigabit Ethernet Switch Module into their existing network. As we write this Redpaper, the Cisco Systems Intelligent Gigabit Ethernet Switch Module supports the 12.1(14) version of IOS. The switch also supports the 12.1(22) version. Check this support site on ibm.com® for current information pertaining to the latest supported version of IOS: http://www.ibm.com/servers/eserver/support/bladecenter/index.html The team that wrote this Redpaper This Redpaper was produced by a team of specialists from around the world working at the International Technical Support Organization, San Jose Center and Cisco San Jose. Rufus Credle is a Certified Senior I/T Specialist and certified Professional Server Specialist at the International Technical Support Organization, Raleigh Center. He conducts residencies and develops Redbooks™ about network operating systems, ERP solutions, voice technology, high availability and clustering solutions, Web application servers, pervasive computing, and IBM and OEM e-business applications, all running IBM eServer™ xSeries® and IBM eServer BladeCenter systems. Rufus’s various positions during his IBM career have included assignments in administration and asset management, systems engineering, sales and marketing, and IT services. He holds a BS degree in business management from Saint Augustine’s College. Rufus has been employed at IBM for 24 years. Yoko Fujiwara, based in Harumi, Tokyo, is an Advisory IT Specialist in IBM eServer xSeries Technical Support at IBM Japan. She has six years of experience in IA Server pre-sales technical support and has been focused on BladeCenter since the product launch in 2002. Her area of expertise includes system management. She is co-author of the IBM Redbook Implementing Systems Management Solutions Using IBM Director, SG24-6188. Her certifications include Cisco Certified System Network Associate. Matt Slavin is a Systems Engineer based in Tulsa, Oklahoma; he is employed with the Strategic Alliances group at Cisco Systems. He has been in the computer and networking industry for more than 25 years, operating in several high-level technical support capacities. His industry certifications include MCSE, MCNE, CCNA, and CCIP. Matt’s current interests include infrastructure design and support, with a special focus on wireless networking and security. © Copyright IBM Corp. 2004, 2005. All rights reserved. ix Kenichi Tanaka is an I/T Specialist in Network Systems for IBM Japan Systems Engineering in IBM Makuhari, Japan. He has three years of experience in networking. He provides technical support for network products, design, and implementation. His areas of expertise include Cisco networking products and F5 Networks load balancer. His industry certification includes Cisco Certified Network Professional. He holds a degree in electronic and information engineering from Tokyo Metropolitan University. Mark Welch is an Advisory Developer in the IBM eServer BladeCenter Development group at IBM in RTP, NC. Mark has more than 15 years of networking experience with IBM Networking Hardware Division, IBM Global Services, and IBM eServer xSeries servers. His area of specialization is in networking interoperability and test. He holds a Bachelor of Applied Science degree in Computer Programming from Florida Atlantic University. His certifications include Cisco System Network Associate, Nortel Networks Certified Design Specialist, and Nortel Networks Certified Account Specialist. Thanks to the following people for their contributions to this project: Margaret Ticknor, Jeanne Tucker, Tamikia Barrow International Technical Support Organization, Raleigh Center Deanna Polm, Sangam Racherla, Maritza Dubec International Technical Support Organization, San Jose Center Ishan Sehgal, Worldwide BladeCenter Marketing, IBM Systems and Technology Group IBM RTP Ed Bowen, Chief Technologist, Internetworking Alliance IBM RTP Mauricio Arregoces, Technical Marketing Manager, Enterprise Solution Design Cisco Systems San Jose Ted Odgers, Business Development, Cisco Systems Strategic Alliance Group Cisco Systems RTP Glenn Wilkinson, Manager, Cisco Systems Strategic Alliance Group Cisco Systems RTP Anthony Sager, Director of Business Development, CTO Cisco Alliance IBM Poughkeepsie Vinay Gundi, Software Engineer, Enterprise Solution Design Cisco Systems San Jose Chris Verne, Manager, BladeCenter Ecosystem Development, IBM Systems Group IBM RTP Norm Strole, STSM-BladeCenter Development IBM RTP Mark Allen, Enterprise Solution Design Cisco Systems San Jose Albert Mitchell, Technical Leader, EAG Desktop Switch Business Unit Cisco Systems San Jose Charles Wu, Software Engineer, EAG Desktop Switch Business Unit Cisco Systems San Jose x Cisco Systems Intelligent Gigabit Ethernet Switch Module Edward Suffern, BladeCenter Ethernet Switching IBM RTP Pritesh Patel, Manager, Software Development, EAG Desktop Switch Business Unit Cisco Systems San Jose Amit Sanyal, Product Marketing Manager, EAG Desktop Switch Business Unit Cisco Systems San Jose Damon West, IBM PC Institute IBM RTP Chris Durham, BladeCenter Development, IBM Systems Group IBM RTP Khalid Ansari, Storage Networking Support, LAN/ATM Switch Support, BISC Team IBM RTP Robert Jakes, BISC Team - (Blade Infrastructure Solutions Center) IBM RTP Kazumasa Norihashi, Manager of Network Systems, Systems Design Center IBM Japan Nobukazu Kamei, Manager, xSeries Technical Support IBM Japan Vahid Mehr, Business Development Manager, Cisco Systems Strategic Alliance Group Cisco San Jose Derek Owens, Systems Engineer, Cisco Systems Strategic Alliance Group Cisco New York Become a published author Join us for a two- to six-week residency program! Help write an IBM Redbook dealing with specific products or solutions, while getting hands-on experience with leading-edge technologies. You’ll team with IBM technical professionals, Business Partners, and/or customers. Your efforts will help increase product acceptance and customer satisfaction. As a bonus, you’ll develop a network of contacts in IBM development labs, and increase your productivity and marketability. Find out more about the residency program, browse the residency index, and apply online at: ibm.com/redbooks/residencies.html Preface xi Comments welcome Your comments are important to us! We want our papers to be as helpful as possible. Send us your comments about this Redpaper or other Redbooks in one of the following ways: Use the online Contact us review redbook form found at: ibm.com/redbooks Send your comments in an e-mail to: [email protected] Mail your comments to: IBM Corporation, International Technical Support Organization Dept. HQ7 Building 662 P.O. Box 12195 Research Triangle Park, NC 27709-2195 xii Cisco Systems Intelligent Gigabit Ethernet Switch Module 1 Chapter 1. Executive summary IBM and Cisco have committed to a strategic alliance to address customer requirements regarding the integration of server and networking technology. The Cisco Systems Intelligent Gigabit Ethernet Switch Module for IBM Eserver BladeCenter (Cisco Systems IGESM) represents an important initial step in this alliance. This BladeCenter switch module offers BladeCenter customers Cisco’s world-class copper Ethernet switching technology integrated into the BladeCenter chassis. It further enhances the BladeCenter value proposition by seamlessly interfacing to a customer’s existing data network using industry-pervasive, SNMP-based management tools such as CiscoWorks. When installed in the BladeCenter chassis, Cisco Systems IGESM provides both basic L2 switching capabilities and significant added value not found in commodity switching solutions. This value includes: BackboneFast To aid in the rapid convergence of layer 2 networks UplinkFast To aid in the rapid convergence of layer 2 networks UDLD UniDirectional Link Detection, to reduce the possibility of Spanning Tree Protocol (STP) loops CDP Cisco Discovery Protocol (to aid in management and troubleshooting) ISL VLAN Trunking (Cisco proprietary) PAgP Port Aggregation Protocol (Cisco EtherChannel) VTP VLAN Trunking Protocol (similar to GVRP) DTP Dynamic Trunking Protocol (to auto-negotiate trunk type and state) RADIUS Centralized administrative control of access to the switch TACACS+ Centralized administrative control of access to the switch VMPS VLAN Management Policy Server (only on some Cisco switches) PVST+ Per-VLAN Spanning Tree 802.1w Rapid Reconfiguration Spanning Tree (enhancement to 802.1D) 802.1s Multiple Spanning Trees (enhancement to 802.1Q) © Copyright IBM Corp. 2004, 2005. All rights reserved. 1 Each Cisco Systems IGESM provides one Gigabit/sec Ethernet (GbE) connectivity to each of the 14 blade slots and four GbE uplink interfaces external to the BladeCenter. The customer can install as few as one Cisco Systems IGESM or as many as four Cisco Systems IGESMs in one BladeCenter. With four Cisco Systems IGESMs installed, the customer can obtain 16 GbE uplink interfaces, as well as 56 GbE internal switching capability. The flexibility of the Cisco Systems IGESM allows customers to address a variety of performance and redundancy needs. Cisco and IBM are actively testing and documenting best practices for the integration of the Cisco Data Center Network Architecture and the IBM on demand operating environment. This ensures that customer needs of high availability, scalability, security, and manageability will be addressed. Combined with the integration of IBM Tivoli® and Cisco management products, these architectures are bringing about higher value solutions with lower operational expense. The Cisco Systems IGESM is an integral part of these solutions. With the Cisco Systems IGESM, the customer has the investment protection of a solution the world’s leading server and networking companies stand behind. 2 Cisco Systems Intelligent Gigabit Ethernet Switch Module 2 Chapter 2. IBM eServer BladeCenter overview The IBM Eserver BladeCenter innovative modular technology, leadership density, and availability was designed to help solve a multitude of real-world problems. For organizations seeking server consolidation, the BladeCenter centralizes servers for increased flexibility, ease of maintenance, reduced cost, and streamlined human resources. Companies that need to deploy new e-commerce and e-business applications can achieve speed while ensuring flexibility, scalability, and availability. For enterprise requirements such as file-and-print and collaboration, the BladeCenter is designed to offer reliability, flexibility for growth, and cost effectiveness. And clients with compute-intensive applications that need highly available clustering can use the BladeCenter to help achieve high degrees of scalability and performance. The IBM eServer BladeCenter family of products features a modular design that integrates multiple computing resources into a cost-effective, high-density enclosure for a platform that: Reduces installation, deployment, and redeployment time Reduces administrative costs with our helpful management tools Achieves the highest levels of availability and reliability Provides XpandonDemand scale-out capability Reduces space and cooling requirements compared to 1U solutions To understand more about how the Cisco Systems Intelligent Gigabit Ethernet Switch Module is designed to operate in the BladeCenter, we suggest that you continue to read the following sections to understand the BladeCenter architecture. If you seek to know more about the BladeCenter and its components, we suggest that you read the IBM Redpaper, The Cutting Edge: IBM Eserver BladeCenter, REDP-3581. This Redpaper can be acquired at: http://www.redbooks.ibm.com/redpapers/abstracts/redp3581.html © Copyright IBM Corp. 2004, 2005. All rights reserved. 3 Figure 2-1 shows the BladeCenter chassis, HS40, HS20, and JS20: IBM eServer BladeCenter chassis The BladeCenter is a high-density blade solution that provides maximum performance, availability, and manageability for application serving, storage flexibility, and long-life investment protection. HS40 HS40 is a four-way blade server for high-performance enterprise applications requiring four-processor SMP capability. The BladeCenter chassis supports up to seven four-way servers and is ideal for ERP and database applications. HS20 The IBM efficient two-way blade server design offers high density without sacrificing server performance. Ideal for Domino®, Web server, Microsoft® Exchange, file and print, application server, and so on. JS20 JS20 is a two-way blade server for applications requiring 64-bit computing. Ideal for compute-intensive applications and transactional Web serving. Blade development is ongoing for the BladeCenter platform. IBM eServer BladeCenter IBM eServer HS40 with SCSI Storage Expansion Unit IBM eServer HS20 Figure 2-1 IBM eServer BladeCenter and blades For more information about BladeCenter technology, visit: http://www.ibm.com/servers/eserver/bladecenter/index.html 4 Cisco Systems Intelligent Gigabit Ethernet Switch Module IBM eServer JS20 IBM eServer BladeCenter storage solutions IBM delivers a wide range of easy-to-install, high-capacity, tested storage products for the BladeCenter to meet your demanding business needs. This enables you to choose from the array of IBM TotalStorage® storage solution products, including: Fibre Channel products and Storage Area Networks Network Attached Storage Enterprise Storage Server® IBM TotalStorage provides connected, protected, and complete storage solutions designed for your specific requirements, helping to make your storage environment easier to manage, helping to lower costs, and providing business efficiency and business continuity. For more information about BladeCenter storage solutions, visit: http://www.pc.ibm.com/us/eserver/xseries/storage.html IBM eServer BladeCenter system management To get the most value out of your BladeCenter investment throughout its life cycle, you need smart, effective systems management, which will keep your availability high and costs low. Management foundation IBM Director, our acclaimed industry standards-based workgroup software, delivers comprehensive management capability for xSeries, IntelliStation®, NetVista™, and ThinkPad® hardware to help reduce costs and improve productivity. IBM Director IBM Director is hardware designed for intelligent systems management. It offers the best tools in the industry and can save you time and money by increasing availability, tracking assets, optimizing performance, and enabling remote maintenance. Advanced server management This exclusive collection of software utilities provides advanced server management and maximum availability: Server Plus Pack Application Workload Manager Scalable Systems Manager Real-Time Diagnostics Electronic Service Agent™ Tape Drive Management Assistant Deployment and update management IBM deployment tools help minimize the tedious work involved in getting your servers and clients ready to run. Such tools include: Remote Deployment Manager Software Distribution Premium Edition ServerGuide™ UpdateXpress For more information about BladeCenter system management, visit: http://www.ibm.com/servers/eserver/xseries/systems_management/xseries_sm.html Chapter 2. IBM eServer BladeCenter overview 5 2.1 IBM eServer BladeCenter architecture In this section, we look into the architectural design of the BladeCenter chassis and components. 2.1.1 The midplane In Figure 2-2, we discuss the BladeCenter midplane. The midplane has two similar sections (upper and lower) that provide redundant functionality. The processor blades (blade servers) plug into the front of the midplane. All other major components plug into the rear of the midplane. The processor blades have two connectors, one connected to the upper section and one to the lower section of the midplane. All other components plug into one section only (upper or lower). However, there will be another matching component that can plug into the other midplane section for redundancy. IBM ^ BladeCenter™ - Midplane Switch Module Switch Module Management Power Module Blower Power Module Front Panel/Media Tray Midplane Upper Section Module 1 CPU Blade 1 CPU Blade 2 Management CPU Blade 14 Midplane Lower Section Module 2 Switch Module Switch Module Power Module Blower Power Module Figure 2-2 Midplane view 2.1.2 Management Module Ethernet Discussed in Figure 2-3 on page 7 is the Management Module interface. The switch modules are configured by the active Management Module through the use of a 100 Mb Ethernet interface. Each Management Module has four 100 Mb Ethernet interfaces, one for each switch module. Each switch module has two 100 Mb Ethernet interfaces, one for each Management Module. The following list clarifies the routing: Management Module 1 Ethernet 1 → Switch Module 1 Ethernet 15 Management Module 1 Ethernet 2 → Switch Module 2 Ethernet 15 6 Cisco Systems Intelligent Gigabit Ethernet Switch Module Management Module 1 Ethernet 3 → Management Module 1 Ethernet 4 → Management Module 2 Ethernet 1 → Management Module 2 Ethernet 2 → Management Module 2 Ethernet 3 → Management Module 2 Ethernet 4 → Expansion Switch Module 3 Ethernet 15 Expansion Switch Module 4 Ethernet 15 Switch Module 1 Ethernet 16 Switch Module 2 Ethernet 16 Expansion Switch Module 3 Ethernet 16 Expansion Switch Module 4 Ethernet 16 IBM ^ BladeCenter™ Management Module Ethernet Interface Switch Module Switch Module Power Module Blower Power Module Front Panel/Media Tray Management Module 1 CPU Blade 1 CPU Blade 2 CPU Blade 14 Management Module 2 Switch Module Switch Module Power Module Blower Power Module Figure 2-3 Management Module Ethernet interface 2.1.3 Gigabit Ethernet path Discussed in Figure 2-4 on page 8 is the Gigabit Ethernet path. Each processor blade has a minimum of two and a maximum of four EtherLAN interfaces. In particular, the BladeCenter HS20 processor blade has two SERDES-based Gb Ethernet interfaces, one for each midplane connector. With a daughter card installed, two more network interfaces can be added. Each switch module (SW Module) receives one LAN input from each processor blade, for a total of 14 inputs. The following partial listing illustrates the routing: Processor blade 1 LAN 1 → Processor blade 1 LAN 2 → Processor blade 1 LAN 3 → Processor blade 1 LAN 4 → Processor blade 2 LAN 1 → Processor blade 2 LAN 2 → Processor blade 2 LAN 3 → Processor blade 2 LAN 4 → Switch Module 1 input 1 Switch Module 2 input 1 Expansion Switch Module 3 input 1 Expansion Switch Module 4 input 1 Switch Module 1 input 2 Switch Module 2 input 2 Expansion Switch Module 3 input 2 Expansion Switch Module 4 input 2 On processor blade, LAN 1 and LAN 2 are the on-board SERDES Gbit Ethernet interfaces, and are routed to Switch Module 1 and Switch Module 2, respectively, for every processor blade. LAN 3 and LAN 4 go to the Expansion Switch Modules 3 and 4, respectively, and are Chapter 2. IBM eServer BladeCenter overview 7 only to be used when a daughter card is installed. Unless a daughter card is installed in one or more processor blades, there is no need for Switch Modules 3 and 4. Further, the switch modules have to be compatible with the LAN interface generated by the processor blade. If a Fibre Channel daughter card is installed in a BladeCenter HS20 processor blade, Switch Modules 3 and 4 must also be Fibre Channel-based, and any daughter cards installed in the remaining BladeCenter HS20 processor blades must be Fibre Channel. IBM ^ BladeCenter™ Gigabit Ethernet path SERDES Ethernet SW Module 1 SW Module 3 1………..14 1………..14 Midplane (Upper Section) LAN 1 LAN 3 Network Interface Daughter Card SERDES Ethernet LAN 4 LAN 2 Processor blade #1 Midplane (Lower Section) 1………..14 1………..14 SW Module 2 SW Module 4 Figure 2-4 Gigabit Ethernet path 2.2 IBM eServer HS20 architecture In this section, we discuss the architectural design of the IBM Eserver BladeCenter HS20. This is presented as just one example of the blade design for a typical dual-processor server. The BladeCenter HS20 uses the ServerWorks Grand Champion LE (or 4.0 Low End) chipset. (See the HS20 architecture in Figure 2-5 on page 9.) The Champion Memory and I/O Controller (CMIC) is the memory controller and interface for the I/O buses supporting: Two Xeon processors Two DDR-SDRAM memory channels The CMIC has two Inter Module Buses (IMB2) to two Champion I/O Bridge (CIOB-X2) chips. The CMIC is also connected through a Thin IMB bus to the Champion South Bridge (CSB5). 8 Cisco Systems Intelligent Gigabit Ethernet Switch Module The CSB5 provides the interface to: One PCI Bus used to connect to the ATI Rage XL video controller with 8 MB of memory Two Low Pin Count (LPC) Buses used to connect to the 4 MB EEPROM (holding the POST/BIOS code) and to the SIO (SuperI/O) chip Two IDE channels supporting the internal storage Four USB Buses for redundant connections to FDD/CDROM and keyboard/video This system uses a H8S2148 IBM Integrated System Management Processor that is wired to the I2C buses. IBM BladeCenter HS20 - Architecture IDE Conn 4 MB BIOS LPC IDE Conn SIO CSB5 PC87417 LPC Thin IMB 4-bit 200 MHz simult-bidi 200 MB/sec PCI 2.2 32-bit USB for MM1 (keyb/mouse) USB for MM2 (keyb/mouse) Xeon DP Xeon DP ATI Rage XL 8 MB Graphics USB for FDD/CD - 1 USB for FDD/CD - 2 ServerWorks DDR-SDRAM GC LE 2 channels CMIC IMB2 IMB2 (16-bit 800 MHz, simult-bidi, 3.2 GB/sec) Optional SCSI Storage Expansion Unit PCI-X 64-bit 100 MHz CIOB-X2 CIOB-X2 PCI-X 64-bit 100 MHz PCI-X 64-bit 100 MHz GB Ethernet BCM5703S Ultra320 SCSI LSI 53C1020 GB Ethernet BCM5703S SCSI Backplane (2 hot-swap) Optional Expansion Card (daughter card) SMBus USB Switch H8S2148 Sys Mgmt RS-485 HDM Connector HDM Connector Midplane Figure 2-5 HS20 architecture 2.3 Stand-alone configuration tools BladeCenter hardware can be configured by using standard software such as a Web browser and a Telnet client, which are available on all the mainstream OS platforms. This is possible by exploiting Web and ANSI interfaces embedded in both the management and the Ethernet Switch Modules. A very comprehensive tool is accessible through the Web interface: This tool contains various configuration submenus, and one of them (Switch Tasks) lets the customers set up the Ethernet Switch Module. Basic settings (such as the Ethernet Switch Module IP address and the enablement of the external ports) are configured by exploiting the I2C bus. An advanced menu allows for the fine tuning of the module, by either opening another window of the Web browser or running a Java™ applet that allows for connectivity to an ANSI interface (this requires Java 2 V1.4 installed on the management system). To achieve this, the Chapter 2. IBM eServer BladeCenter overview 9 10/100 Mb internal link that connects the Management Module and the Ethernet Switch Modules through the BladeCenter backplane are exploited (notice that the internal network interface of the Management Module has a default static IP address of 192.168.70.126). These more complete tools can also be accessed by pointing your Web browser or a Telnet client to the IP of the Ethernet Switch Module itself (default for a module plugged in Rear Bay 1 is 192.168.70.127, but DHCP-based addressing can be configured). Notice that this latter capability requires the management system to connect through the external ports (on the production LAN) of the Ethernet Switch Module and therefore might potentially raise concerns about security. That is why the customer, in the Switch Tasks of the Management Module interface, has the capability to disable configuration control through the external ports. See Figure 2-6. Management LAN Internal LAN connection Higher security Production LAN BladeCenter™ Drawer Management Module MM external Ethernet port DHCP lease or 192.168.70.125 Browser Any of the four external ports Can be disabled Command Line (Telnet) Web interface Switch Module 1 Default is 192.168.70.127* Web interface Internal 10/100Mb Ethernet (Configuration path only as shown by arrow) ANSI interface *This is 192.168.70.128 If Module is plugged into Rear Bay 2 192.168.70.129 Rear Bay 3 192.168.70.130 Rear Bay 4 Figure 2-6 Stand-alone configuration tools 10 I2C bus Always static, default is 192.168.70.126 Cisco Systems Intelligent Gigabit Ethernet Switch Module 3 Chapter 3. Cisco Systems Intelligent Gigabit Ethernet Switch Module In this chapter, we discuss the features included in the Cisco Systems Intelligent Gigabit Ethernet Switch Module that offers BladeCenter customers Cisco’s world-class Ethernet switching technology integrated within the IBM Eserver BladeCenter. © Copyright IBM Corp. 2004, 2005. All rights reserved. 11 3.1 Product description The Cisco Systems Intelligent Gigabit Ethernet Switch Module (Figure 3-1) provides layer 2 switching functions for the BladeCenter server chassis. It provides up to 250 virtual LANs for assigning different users to VLANs associated with network resources, traffic patterns, and bandwidth. It also supports trunking protocols (IEEE 802.1Q) and Link Aggregation for the automatic creation of EtherChannel links. It provides security for ports so that traffic can be limited to Media Access Control (MAC) addresses allowed to access only specific ports (Internet Group Management Protocol (IGMP) snooping). Up to four Cisco Systems Intelligent Gigabit Ethernet Switch Modules can reside in the switch module bays of the BladeCenter chassis. The modules can be hot-plugged into the BladeCenter without disrupting normal operations. The switch connects to the server blades through the 14 internal GbE (Gigabit) interfaces (server ports) over the BladeCenter midplane. It supplies four external copper GbE interfaces for outside communication, which are fully compatible with all other Cisco equipment. The GbE switch is managed through two internal 100 Mbps ports for communication to the BladeCenter Management Module. A Web-based or Telnet-based interface is available for diagnostics and direct communication between the Cisco Systems Intelligent Gigabit Ethernet Switch Module and the BladeCenter Management Module. It also supports all standard Cisco management applications. Figure 3-1 Cisco Systems Intelligent Gigabit Ethernet Switch Module (product number 13N2281) 3.2 Value proposition Why the Cisco Systems Intelligent Gigabit Ethernet Switch Module for your IBM eServer BladeCenter? The message is clear because of the following points. Product strength The product strength includes: The BladeCenter integrated intelligent switch module provides full interoperability into existing Cisco data centers. 12 Cisco Systems Intelligent Gigabit Ethernet Switch Module Integrates industry-leading Cisco networking capabilities to reduce data center complexity and increases networking manageability. Leverages the leadership capabilities our BladeCenter Alliance Partners to provide customers the most technological choices. Leadership features and function The leadership features and function include: BladeCenter delivers with the Cisco Systems Intelligent Gigabit Ethernet Switch Module, the complete suite of layer 2+ features from across the Cisco Catalyst product family. The switch module will run Cisco Internetworking Operating System (IOS) so that the switch module will appear as any other Cisco networking element to the data center’s network management tools. Competitive advantage The competitive advantage includes: BladeCenter delivers full integration of Ethernet switching, reducing infrastructure complexity. No other blade vendor offers intelligent Gigabit Ethernet switching embedded into its chassis. 3.3 Product functionality In this section, we discuss the particular functions of each feature of the Cisco Systems Intelligent Gigabit Ethernet Switch Module and the supported network protocols. 3.3.1 Switch management The switch management features of the Cisco Systems Intelligent Gigabit Ethernet Switch Module include: Cisco Discovery Protocol (CDP) Versions 1 and 2 for network topology discovery and mapping between the switch and other Cisco network devices. Network Time Protocol (NTP) for providing a consistent time stamp to all switches from an external source. Directed unicast requests to a Trivial File Transfer Protocol (TFTP) server for obtaining software upgrades from a TFTP server. Default configuration storage in flash memory to ensure that the switch can be connected to a network and can forward traffic with minimal user intervention. In-band management access through a Cluster Management Suite (CMS) Web-interface session. In-band management access through up to 16 simultaneous Telnet connections for multiple command-line interface (CLI)-based sessions over the network. In-band management access through up to five simultaneous, encrypted Secure Shell (SSH) connections for multiple CLI-based sessions over the network. This option is only available in the cryptographic software image and can be obtain from: http://www.ibm.com/support/us/ In-band management access through SNMP Versions 1, 2c, and 3 get and set requests. Chapter 3. Cisco Systems Intelligent Gigabit Ethernet Switch Module 13 3.3.2 Port features These items are the ports of the Cisco Systems Intelligent Gigabit Ethernet Switch Module: Four external 1000BASE-T connectors for making 10/100/1000 Mbps connections to a backbone, end stations, and servers Fourteen internal full-duplex Gigabit ports, one connected to each of the blade servers in the BladeCenter unit Two internal full-duplex 100 Mbps ports connected to the Management Modules 3.3.3 Performance features The performance features of the Cisco Systems Intelligent Gigabit Ethernet Switch Module include: Autosensing of speed on the 10/100/1000 ports and the auto-negotiation of duplex mode on the ports for optimizing bandwidth IEEE 802.3x flow control on Gigabit Ethernet ports operating in full-duplex model Fast EtherChannel and Gigabit EtherChannel for enhanced fault-tolerance and for providing up to 4 Gbps of bandwidth between switches, routers, and servers Support for frame sizes to 1530 bytes Per-port broadcast-storm control for preventing a faulty end station from degrading overall system performance with broadcast storms Port Aggregation Protocol (PAgP) and Link Aggregation Control Protocol (LACP) for automatic creation of EtherChannel links Internet Group Management Protocol (IGMP) snooping support to limit flooding of IP multicast traffic Multicast VLAN registration (MVR) to continuously send multicast streams in a multicast VLAN while isolating the streams from subscriber VLANs for bandwidth and security IGMP filtering for controlling the set of multicast groups to which hosts on a switch port can belong Protected port (private VLAN edge port) option for restricting the forwarding of traffic to designated ports on the same switch Dynamic address learning for enhanced security 3.3.4 Redundancy This list represents the redundancy features built into the Cisco Systems Intelligent Gigabit Ethernet Switch Module: UniDirectional link detection (UDLD) on all Ethernet ports for detecting and disabling unidirectional links caused by port faults. IEEE 802.1D Spanning Tree Protocol (STP) for redundant backbone connections and loop-free networks. IEEE 802.1s Multiple STP (MSTP) for grouping VLANs into a Spanning Tree instance and provided for multiple forwarding paths for data traffic and load balancing. IEEE 802.1w Rapid STP (RSTP) for rapid convergence of the Spanning Tree by immediately transitioning root and designated ports to the forwarding state. Optional Spanning Tree features are available in the Per-VLAN Spanning Tree (PVST)+, Rapid PVST+, and MSTP modes. 14 Cisco Systems Intelligent Gigabit Ethernet Switch Module 3.3.5 VLAN support The switch supports 250 port-based VLANs for assigning users to VLANs associated with the applicable network resources, traffic patterns, and bandwidth. VLAN support highlights: The switch supports up to 4094 VLAN IDs to allow service provider networks to support the number of VLANs allowed by the IEEE 802.1Q standard. IEEE 802.1Q trunking protocol on all ports for network moves, adds, and changes; management and control of broadcast and multicast traffic; and network security by establishing VLAN groups for high-security users and network resources. VLAN Management Policy Server (VMPS) for dynamic VLAN membership. VLAN Trunking Protocol (VTP) pruning for reducing network traffic by restricting flooded traffic to links destined for stations receiving the traffic. Dynamic Trunking Protocol (DTP) for negotiating trunking on a link between two devices and for negotiating the type of trunking encapsulation (802.1Q) to be used. Voice VLAN for creating subnets for voice traffic from Cisco IP phones. VLAN 1 minimization to reduce the risk of Spanning Tree loops or storms by allowing VLAN 1 to be disabled on any individual VLAN trunk link. 3.3.6 Security Security features built into the Cisco Systems Intelligent Gigabit Ethernet Switch Module include: Bridge protocol data unit (BPDU) guard for shutting down a Port Fast-configured port when an invalid configuration occurs Protected port option for restricting the forwarding of traffic to designated ports on the same switch Password-protected access (read-only and write-only access) to management interfaces, Cluster Management Suite, and command-line interface for protection against unauthorized configuration changes Port security option for limiting and identifying MAC addresses of the station allowed to access the port Port security aging to set the aging time for secure addresses on a port Multilevel security for a choice of security level, notification, and resulting actions MAC-based, port-level security for restricting the use of a switch port to a specific group of source addresses and preventing switch access from unauthorized stations Terminal Access Controller Access Control System Plus (TACACS+), a proprietary feature for managing network security through a TACACS server IEEE 802.1X port-based authentication to prevent unauthorized devices from gaining access to the network IEEE 802.1X port-based authentication with VLAN assignment for restricting 802.1X-authenticated users to a specified VLAN IEEE 802.1X port-based authentication with port security for authenticating the port and managing network access for all MAC addresses, including that of the client IEEE 802.1X port-based authentication with voice VLAN to permit an IP phone access to the voice VLAN irrespective of the authorized or unauthorized state of the port Chapter 3. Cisco Systems Intelligent Gigabit Ethernet Switch Module 15 IEEE 802.1X port-based authentication with guest VLAN to provide limited services to non-802.1X-compliant users Standard and extended IP access control lists (ACLs) for defining security policies 3.3.7 Quality of Service (QoS) and Class of Service (CoS) This list represent the Quality of Service (QoS) and Class of Service (CoS) of the Cisco Systems Intelligent Gigabit Ethernet Switch Module: Classification – IEEE 802.1p class of service (CoS) with eight priority queues on the Gigabit ports for prioritizing mission-critical and time-sensitive traffic from data, voice, and telephony applications. – IP Differentiated Services Code Point (IP DSCP) and CoS marking priorities on a per-port basis for protecting the performance of mission-critical applications. – Flow-based packet classification (classification based on information in the MAC, IP, and TCP/UDP headers) for high-performance QoS at the network edge, allowing for differentiated service levels for different types of network traffic and for prioritizing mission-critical traffic in the network. – Support for IEEE 802.1p CoS scheduling for classification and preferential treatment of high-priority voice traffic. Egress policing and scheduling of egress queues – Four egress queues on all switch ports. Support for strict priority and weighted round-robin (WRR) CoS policies. 3.3.8 Monitoring This list represents the monitoring features of the Cisco Systems Intelligent Gigabit Ethernet Switch Module: Switch LEDs that provide visual port and switch status Switch Port Analyzer (SPAN) and Remote Switch Port Analyzer (RSPAN) support for local and remote monitoring of the network Four groups (history, statistics, alarms, and events) of embedded remote monitoring (RMON) agents for network monitoring and traffic analysis MAC address notification for tracking the MAC addresses that the switch has learned or removed Syslog facility for logging system messages about authentication or authorization errors, resource issues, and time-out events Layer 2 traceroute to identify the physical path that a packet takes from a source device to a destination device 16 Cisco Systems Intelligent Gigabit Ethernet Switch Module 3.3.9 Network cables This list represents the supported network cables for the Cisco Systems Intelligent Gigabit Ethernet Switch Module: 10BASE-T: – UTP Category 3, 4, 5 (100 meters maximum) – 100-ohm STP (100 meters maximum) 100BASE-TX: – UTP Category 5 (100 meters maximum) – EIA/TIA-568 100-ohm STP (100 meters maximum) 1000BASE-T: – UTP Category 6 (100 meters maximum) standard for 1 GB devices – UTP Category 5e (100 meters maximum) – UTP Category 5 (100 meters maximum) – EIA/TIA-568B 100-ohm STP (100 meters maximum) 3.3.10 Supported IEEE network standards The Cisco Systems Intelligent Gigabit Ethernet Switch Module supports the following IEEE standards: IEEE 802.1D Spanning Tree Protocol IEEE 802.1p Tagged Packets IEEE 802.1Q Tagged VLAN (frame tagging on all ports when VLANs are enabled) IEEE 802.2 Logical Link Control IEEE 802.3 10BASE-T Ethernet IEEE 802.3u 100BASE-TX Fast Ethernet IEEE 802.3x Full-duplex Flow Control Chapter 3. Cisco Systems Intelligent Gigabit Ethernet Switch Module 17 18 Cisco Systems Intelligent Gigabit Ethernet Switch Module 4 Chapter 4. Cisco Systems Intelligent Gigabit Ethernet Switch Module architecture In this section, we look at a system overview of the Cisco Systems Intelligent Gigabit Ethernet Switch Module (Cisco Systems IGESM) for the IBM Eserver BladeCenter. First, we focus on the Cisco Systems IGESM itself. The switch is a layer 2 switch with visibility into layers 2 through 4. Figure 4-1 shows the architecture overview of the Cisco Systems Intelligent Gigabit Ethernet Switch Module. The Cisco Systems IGESM has 14 internal 1 Gbps links to connect to blade servers and four external Gigabit ports to connect to upstream switches. The switch module has two 100 Mbps connections to the Management Modules. We can manage the Cisco Systems IGESM through the connection between the Cisco Systems IGESM and the Management Module. We can also manage the Cisco Systems IGESM like other Catalyst switches with the console port that comes sealed with a cap. The console port is a service port to which you can connect a terminal or PC in order to configure the software through the command-line interface (CLI) or to troubleshoot problems with the switch. Note: At the time of developing this Redpaper, the console port is not officially supported by IBM. However, IBM seeks to support this feature after the company completes its test. © Copyright IBM Corp. 2004, 2005. All rights reserved. 19 14 ports 1000 Mbps Internal links to BladeServers Blade1 Blade2 Blade3 Blade4 Blade5 Blade6 Blade7 Blade8 Blade9 Blade10 Blade11 Blade12 Blade13 Blade14 G0/1 G0/2 G0/3 G0/4 G0/5 G0/6 G0/7 G0/8 G0/9 G0/10 G0/11 G0/12 G0/13 G0/14 2 ports -100 Mbps MM1 Internal links to the MM2 Management Modules G0/15 G0/16 G0/17 G0/18 G0/19 G0/20 Serial CIGESM Cisco Systems ModuleModule IGESM 17 18 19 20 4 ports 10/100/1000 Mbps RJ45 links for external network connections 1 port RJ45 Service port Serial console connection on faceplate Cisco Systems Connections CIGESMIGESM Connections Figure 4-1 Cisco Systems IGESM architecture overview We also discuss details about how the Cisco Systems IGESM in the BladeCenter chassis are connected to the blade servers. Figure 4-2 shows the architecture for Ethernet connectivity. The two Cisco Systems IGESMs can be housed within the BladeCenter chassis. Each Cisco Systems IGESM provides four uplink ports, which can be grouped to support 802.3ad Link Aggregation. The blade server has two NICs with NIC 1 connecting to Cisco Systems IGESM 1 and NIC 2 connecting to Cisco Systems IGESM 2. The links connecting the blade servers to the Cisco Systems IGESMs are on the backplane of the BladeCenter chassis. The Cisco Systems IGESM has two links to the Management Modules. Each link connects to a different Management Module. uplinks 17 18 19 20 IGESM1 17 18 19 20 IGESM2 M M 2 M M 1 1 2 Blade Server1 1 2 Blade Server2 Figure 4-2 Ethernet connectivity 20 Cisco Systems Intelligent Gigabit Ethernet Switch Module 1 2 Blade Server14 Management Module Blade Servers Internal layer 2 traffic flow in the Cisco Systems IGESM Figure 4-3 shows the internal layer 2 traffic flow in the Cisco Systems IGESM. The hard coded filter in the Cisco Systems IGESM blocks all traffic between the external ports and the Management Module ports. Two Cisco Systems IGESMs in the same BladeCenter chassis exchange layer 2 frames across the Management Module. However, the Cisco Systems IGESM blocks BPDUs which are switched by the Management Module. This figure also indicates the following: If CDP is enabled, two Cisco Systems IGESMs in the same BladeCenter chassis can discover each other without connecting external ports. We can check connectivity between them with show cdp neighbors command from the CLI. The internal blade ports should not be on the same VLAN of the Management Module ports. Otherwise, we face problems of duplicate IP addresses. See “Duplicate IP address: part 1” on page 229 and “Duplicate IP address: part 2” on page 229. 4 External ports Management Module ports Figure 4-3 Layer 2 frames flow in the Cisco Systems IGESM Chapter 4. Cisco Systems Intelligent Gigabit Ethernet Switch Module architecture 21 4.1 Cisco Systems Intelligent Gigabit Ethernet Switch Module block diagram Figure 4-4 shows the block diagram of the Cisco Systems Intelligent Gigabit Ethernet Switch Module. The Cisco Systems IGESM has two ASICs for switching. It has 1 MB on chip cache for packet buffers and supports 12 Gigabit Ethernet ports. The two ASICs are interconnected with 10 Gigabit link, which is shown as the 10 Gigabit Ethernet connection in Figure 4-4. Each Switching ASIC has seven Gigabit Ethernet ports for blade servers and two ports for external ports. It also has a port to the Management Module. The connection between the ASIC and the Management Module links up at 100 Mbps. 10GbE Figure 4-4 Cisco Systems IGESM block diagram 22 Cisco Systems Intelligent Gigabit Ethernet Switch Module 5 Chapter 5. Cisco Systems IGESM management and user orientation In this chapter, we discuss tools and applications that help with management and deployment of the Cisco Systems Intelligent Gigabit Ethernet Switch Module (IGESM) in an IBM Eserver BladeCenter. We also discuss the management paths and rules for connecting to and accessing the IGESM. As noted elsewhere in this document, the information herein applies to the 4-port copper-based IGESM running a 12.1(14) version of IOS. If working with the 4-port SFP-based IGESM or a 4-port copper-based IGESM running 12.1(22) and above code, see the appropriate document for those solutions. © Copyright IBM Corp. 2004, 2005. All rights reserved. 23 5.1 Cisco Systems IGESM user interface This section discusses the management interface of the switch module and what each task represents. To configure and manage the switch module we can use the following interfaces: Command-line interface (CLI) You can configure and monitor the switch and switch cluster members from the CLI, which is accessible through Telnet or SSH from a remote management station. You can also access the CLI through terminal emulation software on a management station directly connected to the switch module console port. Using the CLI provides more details and the results of each required configuration process. The CLI also has various commands for configuration verification and troubleshooting that are not covered by the Cluster Management Suite GUI. The CLI is more flexible for configuring the switch module than the CMS. It is scriptable and requires less overhead to run. In addition, the Cisco Systems IGESM includes a console port. The console port is a service port to which you can connect a terminal or PC in order to configure the software through the CLI or to troubleshoot problems with the switch. Note: On a new IGESM, the console port is hidden by a small metal plate that must be removed to provide access to the connector. This plate is just above port g0/17 on the rear of the IGESM. The plate can be removed with a small screwdriver or other appropriate tool. This port uses the standard Cisco console cable (not supplied with the IGESM), and the default values to connect are 9600, N, 8 and 1, with no flow control. Cluster Management Suite (CMS) (only available in 12.1(14) versions of IOS for the IGESM) CMS is a graphical user interface that can be launched from anywhere in your network through a Web browser, such as Netscape Communicator or Microsoft Internet Explorer. CMS is installed on the switch, and you do not have to install additional software to the remote management station. Using CMS, you can configure and monitor a stand-alone switch, a specific cluster member, or an entire switch cluster. You can also display network topologies to gather link information and display switch images to modify switch and port level settings. CMS is useful for switch module management in small to medium-sized environments and enables easier setup with its intuitive interface and aids such as Guide mode and wizards. 24 Cisco Systems Intelligent Gigabit Ethernet Switch Module Table 5-1 summarizes each interface’s characteristics. Table 5-1 Management interfaces Command-line interface (CLI) Cluster Management Suite (CMS) Interface type Text-based Graphical Advantage Detailed and controlled Intuitive and easier to start Interface for access Telnet, SSH Web browser with Java plug-in Port used Telnet: 23 SSH: 22 HTTP 80 (default) Can be modified to 0 to 65535, but well-known ports (1-1023) should be excluded. Allowed session number 16 (with Telnet), 5 (with SSH) N/A Network topology viewer No Yes Scriptable Yes No Troubleshooting information and debug Rich Limited 5.1.1 Command-line interface The CLI is a robust interface that is widely used by many Cisco switch users. In this section, we describe some basic commands, which will help you to perform the sample configurations discussed in Chapter 7, “Cisco Systems IGESM configuration and network integration” on page 99. We also demonstrate useful commands to verify or troubleshoot your configuration. For an in-depth listing of each of the commands in the CLI and their function, refer to Cisco Systems Intelligent Gigabit Ethernet Switch Module for the IBM Eserver BladeCenter System Command Reference (which comes with your Cisco Systems Intelligent Gigabit Ethernet Switch Module). This document is also available for download and is listed in the online resources section at the end of this document. Accessing the CLI Two ways to access the CLI of the switch module are: Telnet – Directly access from a Telnet client – Launch a session from Management Module Web browser – Launch a session from IBM Director SSH (only available in the enhanced cryptographic software image) – Directly access from an SSH client Figure 5-1 is an example of directly accessing the Cisco Switch Module from a Microsoft Windows® 2000 Telnet client. User Access Verification Username: USERID Password: CIGESM#2# Figure 5-1 C:/WINNT/system32/cmd.exe - Telnet 192.168.70.128 Chapter 5. Cisco Systems IGESM management and user orientation 25 CLI command modes The Cisco IOS user interface has many different modes. Which commands are available depend on which mode you are currently in. Table 5-2 describes these modes: Main command modes Functions in this mode Display prompt according to mode How to access How to exit the mode The examples in the table use the host name Switch. Table 5-2 CLI modes Mode Functions Prompt How to start How to exit User EXEC Limited privilege Switch> Default of user with privilege level 14 or lower. Enter logout or quit. Privilege (Enable) EXEC Super user power Switch# Default of the switch module default user (USERID). Enter Enable from User mode. Ctrl+Z when returning from any configuration mode. Enter disable or exit to exit. Global configuration Make global changes or the change has system-wide impact Switch(config)# Enter config terminal from privilege mode. To exit to privileged EXEC mode, enter exit, end, or press Ctrl+Z. Interface configuration Set up interface-specific configuration Switch(config-if)# Enter interface_name from global configuration mode. To exit to global configuration mode, enter exit. To return to privileged EXEC mode, press Ctrl+Z or enter end. VLAN configuration Configure VLAN Switch(config-vlan )# Enter vlan # from global configuration mode. To exit to global configuration mode, enter exit. To return to privileged EXEC mode, press Ctrl+Z or enter end. Editing CLI Table 5-3 shows the typical editing commands through keystrokes. Table 5-3 Editing key strokes 26 Purpose Keystrokes Move one character back Ctrl+B Move one character forward Ctrl+F Delete one character Ctrl+D Move one word back ESC+B Cisco Systems Intelligent Gigabit Ethernet Switch Module Purpose Keystrokes Move one word forward ESC+F Delete one word Ctrl+W Move to the beginning of the line Ctrl+A Move to the end of the line Ctrl+E Delete from cursor to the beginning Ctrl+U Delete from cursor to the end Ctrl+K Getting help Use the commands shown in Table 5-4 to display a list of commands that are available for each command mode or a list of associated keywords and arguments for any command. Table 5-4 Help commands Command Function help Obtain a brief description of the help system in any command mode. abbreviated-command-entry? Obtain a list of commands that begin with a particular character string. abbreviated-command-entry + Tab Complete a partial command name. ? List all commands available for a particular command mode. command ? List the associated keywords for a command. command keyword ? List the associated arguments for a keyword. Reversing a command or disabling a function When you want to reverse the action of a command that you previously issued or disable a feature or a function, use the no form. For example, running no shutdown in interface configuration mode as follows reverses the shutdown of an interface: CIGESM1#configure terminal Enter configuration commands, one per line. End with CNTL/Z. CIGESM1(config)#interface g0/17 CIGESM1(config-if)#no shutdown Also, you can disable the command by recalling the command (use the up and down arrow keys) and simply adding no at the beginning of the line. Saving a configuration To save the configuration or changes that you made, enter this privileged EXEC command: Switch# copy running-config startup-config This command copies the current configuration set in the flash memory to NVRAM as the startup configuration set. If the command was not issued or if it failed, the changes you made will be lost the next time the switch reloads. Chapter 5. Cisco Systems IGESM management and user orientation 27 Useful commands In this section, we demonstrate some typical commands that are used in configuration and troubleshooting. All commands listed here can be run in privileged EXEC mode. Verifying current configuration and system status The commands shown in Table 5-5 are helpful for verifying your current settings and status. Table 5-5 Checking current configuration Command Purpose show version Check the software version, system uptime, and so forth. show platform summary Shows which bay the switch is installed in. Also shows how the Management Module is configured for management over all ports, and whether the Management Module setting for preserving the IGESMs IP address is set for Enabled or Disabled. show running-config Check the current switch module configuration. show interface status Check the port status. show cdp neighbors Check the physical connection between external switches. You can also verify your operation and switch processes using commands described in Table 5-6. Table 5-6 Verifying your operation Command Purpose show logging Check the system history. terminal monitor terminal no monitor (to disable terminal monitor) View the switch messages on the terminal window. Collecting troubleshooting information You can collect troubleshooting information by running the show tech-support command. This command collects data, including the crashinfo file, which saves information that helps technical support representatives debug problems that caused the IOS image to fail (crash), as well as other data such as show version command results and show running-config command results. Note: You can save the display within a terminal window to a file by using terminal software logging functions. Issue the following command to prevent the more line from appearing in the logged file: switch#terminal length 0 5.1.2 Cisco Systems Intelligent Gigabit Ethernet Switch Module Home After you assign an IP address to the switch module, you will be able to open its Web interface, the Cisco Systems Intelligent Gigabit Ethernet Switch Module Home. To open the interface, enter the IP address of your switch in a Web browser, then input the user ID and password of the switch. For 12.1(14) versions of IOS, a window similar to the one shown in Figure 5-2 on page 29 opens. 28 Cisco Systems Intelligent Gigabit Ethernet Switch Module The main pane displays the switch IP address, MAC address, and other information supporting switch management, such as host name, serial number, IOS version, and uptime. From the left menu, you can also launch the Cluster Management Suite, run diagnostics and monitoring tools, and access the help resources. Figure 5-2 Cisco Systems Intelligent Gigabit Ethernet Switch Module Home (12.1(14) IOS) 5.1.3 Cisco Systems IGESM Cluster Management Suite General operating instructions for the CMS are discussed in the Cisco Systems Intelligent Gigabit Ethernet Switch Module for the IBM Eserver BladeCenter Software Configuration Guide. Details are available in the online help. You can find CMS summary information at: http://www.cisco.com/warp/public/cc/techno/media/lan/ether/sgth/ The datasheet and presentation area available at: http://www.cisco.com/warp/public/cc/techno/media/lan/ether/sgth/prodlit/index.shtml To access CMS, you should first log on to the Cisco Systems Intelligent Gigabit Ethernet Switch Module Home, which we discussed in 5.1.2, “Cisco Systems Intelligent Gigabit Ethernet Switch Module Home” on page 28. Note that CMS is available only with the 12.1(14) version of IOS for the CIGESM. Click Cluster Management Suite on the switch module home page. Enter the user ID and password of the switch, and you will be directed to a window similar to the one shown in Figure 5-3 on page 30. Chapter 5. Cisco Systems IGESM management and user orientation 29 Note: The Java 1.4 Plug-in is required for this session. You will be given the option to download and install the plug-in if necessary. The system we used to access CMS was running the Java 1.4.2_03 Plug-in and a dialog box indicated that it was unsupported. We clicked Continue and were allowed to access the interface. Figure 5-3 Cisco Systems Intelligent Gigabit Ethernet Switch Module Cluster Management Suite On the CMS Front Panel View, you can use the following features: Menu bar Provides the complete list of options for managing a single switch and switch clusters. Toolbar buttons Provides buttons for commonly used switch and cluster configuration options and information windows such as legends and online help. Pop-up menu for port and device The port pop-up menu provides options specific to configuring and monitoring switch ports, and the device pop-up menu provides switch and cluster configuration and monitoring options. The following figures show the menu bar options. It is recommended that you take a moment to review them prior to using CMS. The menu bar options include: CMS (Figure 5-3) – Page Setup – Print Preview – Print – Guide – Expert – Preferences Figure 5-4 CMS menu 30 Cisco Systems Intelligent Gigabit Ethernet Switch Module Administration (Figure 5-4 on page 30) – IP Addresses – SNMP – System Time – HTTP Port – Users and Passwords – Console Baud Rate – MAC Addresses – ARP – Save Configuration – Restore Configuration – Software Upgrade – System Reload – Event Notification Figure 5-5 Administration menu Cluster (Figure 5-6) – Create Cluster Figure 5-6 Cluster menu Chapter 5. Cisco Systems IGESM management and user orientation 31 Device (Figure 5-7) – Host Name – STP – IGMP Snooping – ACL (guide mode available in read-write mode) – Security Wizard – QoS – AVVID Wizards Figure 5-7 Device menu Port (Figure 5-8) – Port Settings – Port Search – Port Security – EtherChannels – SPAN – Protected Port – Flooding Control Figure 5-8 Port menu 32 Cisco Systems Intelligent Gigabit Ethernet Switch Module VLAN (Figure 5-9) – VLAN (guide mode available in read-write mode) – Management VLAN – VMPS – Voice VLAN Figure 5-9 VLAN menu Reports (Figure 5-10) – Inventory – Port Statistics – Bandwidth Graphs – Link Graphs – Link Reports – Multicast – Resource Monitor – System Messages Figure 5-10 Reports menu Chapter 5. Cisco Systems IGESM management and user orientation 33 Tools (Figure 5-11) – Ping and Trace Figure 5-11 Tools menu View (Figure 5-12) – Refresh – Front Panel Figure 5-12 View menu Window (Figure 5-13) – Front Panel View Figure 5-13 Window menu 34 Cisco Systems Intelligent Gigabit Ethernet Switch Module Help (Figure 5-14) – Overview – What’s New? – Help For Active Window – Contents – Legend – About Figure 5-14 Help menu When you right-click a switch module, a device pop-up menu similar to the one shown in Figure 5-15 opens. The selected switch module will be surrounded by a yellow line. Figure 5-15 Device pop-up menu By selecting each of the following items from the pop-up menu, you can review and configure the switch module settings and performance data: Host Name (Figure 5-16) Bandwidth Graphs (Figure 5-17 on page 36) Properties (Figure 5-18 on page 36) Figure 5-16 Device pop-up menu: Host Name Chapter 5. Cisco Systems IGESM management and user orientation 35 Figure 5-17 Device pop-up menu: Bandwidth Graphs Figure 5-18 Device pop-up menu: Device Properties 36 Cisco Systems Intelligent Gigabit Ethernet Switch Module When you right-click a port icon similar to the one shown in Figure 5-19, a port pop-up menu opens. You can select multiple ports by using Shift or Ctrl and configure them at the same time. Selecting all ports is also possible using Select All Ports from the pop-up menu. Selected ports will be surrounded by a yellow line. Figure 5-19 Port pop-up menu From the pop-up menu, you can view and configure the following menu items: Port Settings (Figure 5-20) VLAN (Figure 5-21 on page 38) Port Security (Figure 5-22 on page 38) Link Graphs (Figure 5-23 on page 38) Figure 5-20 Port pop-up menu: Modify Port Settings Chapter 5. Cisco Systems IGESM management and user orientation 37 Figure 5-21 Port pop-up menu: VLAN Figure 5-22 Port pop-up menu: Port Security Figure 5-23 Port pop-up menu: Link Graphs 38 Cisco Systems Intelligent Gigabit Ethernet Switch Module 5.1.4 Cisco Systems Intelligent Gigabit Ethernet Switch Module Tools Click Tools on the Switch Management Home page and a window similar to the one shown in Figure 5-24 opens. This window enables you to start a Telnet session to the switch or obtain monitoring and troubleshooting information. The Tools window has the following menu: Telnet Opens a Telnet session to the switch module. Extended Ping Opens a ping dialog, in which you can issue extended ping. This tool is useful to troubleshoot a connection between the switch module and another switch. Diagnostic Log Displays the output from the system messages log and debugs privileged EXEC commands. Monitor Switch Opens a command-line interface under privilege mode with a list of commands. You will be able to issue CLI commands in a more interactive way by using this menu. You can also select different privilege levels from 0 to 15. Show Interfaces Issues the show the interfaces CLI command, which displays the status and configuration of all interfaces and is useful for troubleshooting. Figure 5-24 Cisco Systems Intelligent Gigabit Ethernet Switch Module Tools Chapter 5. Cisco Systems IGESM management and user orientation 39 5.1.5 Cisco Systems Intelligent Gigabit Ethernet Switch Module Help Resources When accessing the Help Resources menu (Figure 5-25), you are provided links to other help resources and product documentation. Figure 5-25 Cisco Systems Intelligent Gigabit Ethernet Switch Module Help Resources 5.2 Systems management considerations In this section, we look at some of the system management functions of the Cisco Systems IGESM as well as system management tools. For a more detailed discussion of management path considerations for the IGESM, see 5.3, “In-depth management path discussions” on page 55. Important: Properly managing the IGESMs in the BladeCenter actually also requires proper management of the Management Module within the BladeCenter. In other words, it is virtually impossible to successfully deploy the IGESM if you do not understand and properly configure certain settings in the Management Module, as well as the necessary IGESM configurations. 5.2.1 Out-of-band management definition It is common to provide a (physically) separate management interface for all of the devices and to carry only management traffic. This is referred to as out-of-band management and is sometimes a separate Ethernet connection or a whole different physical connection (such as the console port). See 5.3.4, “Considerations: Using the Management Module uplink to manage the IGESM” on page 59 for details about configuring the BladeCenter for Ethernet-based out-of-band management via the Management Module. In addition to managing the Ethernet switches, all of the blade servers in the BladeCenter can be managed by using the browser and logging on to the Management Module. Within the BladeCenter, the server management traffic (typically server console access) flows through a different bus, the I2C bus, which is kept separate from the BladeCenter data traffic bus. The BladeCenter comes with at least one Management Module, and it supports an external Ethernet interface, which is used by default to manage the blade servers, Ethernet switches, 40 Cisco Systems Intelligent Gigabit Ethernet Switch Module and the Management Module itself. The IGESM can be managed via this path or over its own external uplinks. (See 5.3, “In-depth management path discussions” on page 55 for a more in-depth discussion for the rules for these management paths.) By default, the Ethernet internal switch management ports are placed in VLAN 1. Typically, Cisco’s recommendation is not to use VLAN 1 for security reasons, but it is still common to use VLAN 1 for management purposes. It is also very important that you put the management interface for the IGESM in a VLAN that is not shared by any of the blade server interfaces. Important: Configuring blade servers to use the IGESM management VLAN may result in unexpected duplicate IP addresses being reported. This is the result of the Management Module attempting to proxy for devices on its internal connection. Figure 5-51 on page 73 shows a more detailed explanation. 5.2.2 In-band management definition The second mode of operation that is used by some customers is in-band management. In this case, the management traffic passes through the data traffic path (the IGESM uplinks). When BladeCenter switches are configured for in-band management, the internal port configuration on the switch that is connected to the BladeCenter Management Module’s internal interface is still automatically changed to be in the same management VLAN. This can lead to some unexpected results. (See 5.3.5, “Considerations: Using the IGESM uplinks to manage the IGESM” on page 61 for details on configuring for in-band management.) In-band management when configured has to share the limited bandwidth with the rest of the client/server traffic. If not managed properly, broadcast traffic can possibly overload the Management Module CPU, which might lead to other serious problems. 5.2.3 Management traffic paths to the Cisco Systems IGESM In this section, we discuss the various methods of attaching to and managing the Cisco Systems IGESM. For the following discussions, management traffic can include HTTP, Telnet, TFTP, and SNMP-based traffic between a Management Workstation and the Cisco Systems IGESM. See 5.3, “In-depth management path discussions” on page 55 for more details. Figure 5-26 on page 42 represents the most common paths that can be taken when connecting to the Cisco Systems IGESM. A summary of the paths Paths 1 and 2 are classified as traditional out-of-band management paths to the Cisco Systems IGESM (out-of-band because the management traffic does not utilize the same physical connections as the data traffic). Paths 3 and 4 are classified as traditional in-band management paths to the Cisco Systems IGESM. Path 5 is sometimes classified as a form of out-of-band management and may or may not be connected to either the Management Network or the Routed Production network through a terminal server. Chapter 5. Cisco Systems IGESM management and user orientation 41 Legend Ethernet Ethernet path Management Workstation I2C Interface 2 I2C path RJ45 Serial 1 3 RJ45 Serial path Routed Production Network Management Network 4 3 5 2 External Ethernet Interface Web Interface External Ports Internal Ethernet Interface G0/15 or 16 1A Cisco Systems IGESM Service Port I2C Interface Management Module 1B 4 Blade Server Figure 5-26 Management paths to the Cisco Systems IGESM Path 1 details Path 1 is from any Management Workstation, over the Management Network, to the Management Module, through the Management Module’s external Ethernet interface. (The Management Workstation would point its browser directly at the Management Module’s external IP address.) When connected to the Management Module through the Web interface, path 1 can diverge in two directions to actually manage the Cisco Systems IGESM. Path 1A This is the path used by certain tools that are available through the Web-based interface in the Management Module; these tools include launching a Telnet session or an HTTP session to the IGESM from the Management Module interface. After the tools are launched, you are 42 Cisco Systems Intelligent Gigabit Ethernet Switch Module essentially on path 2, because the Management Module is now acting simply as a pass-through from the external Management Network into the Cisco Systems IGESM, through the Ethernet connection between the Management Module and the Cisco Systems IGESM. Note that for this path to function, the management IP address on the Cisco Systems IGESM must be in the same IP subnet that is in use on both the internal and external Ethernet interfaces of the Management Modules. See 5.3.4, “Considerations: Using the Management Module uplink to manage the IGESM” on page 59 for details about configuring the BladeCenter for out-of-band management via the Management Module. Path 1B This is a very specific path (I2C interface) used by the Management Module to communicate to the Cisco Systems IGESM (and other components of the BladeCenter) for certain tasks. It is not part of the normal data path and is used only for very specific instructions from the Management Module to other components in the BladeCenter, and in the specific case of path 1B, the Cisco Systems IGESM. From a technical perspective, this path is used during certain Management Module operations toward the Cisco Systems IGESM, such as setting the Cisco Systems IGESM IP address or resetting the Cisco Systems IGESM to default values. For the most part, path 1B includes all of the Cisco Systems IGESM management tools in the Management Module Web-based interface except the ones involving HTTP, Telnet, or ping testing to the Cisco Systems IGESM. Note that path 1B is available regardless of what the management IP address is set to on the Cisco Systems IGESM. Path 2 details Path 2 is from any Management Workstation on the Management Network to the Cisco Systems IGESM, using the Management Module as a pass-through for this connection. (The Management Workstation would point its Web, Telnet, SNMP, and other applications directly at the management IP address of the Cisco Systems IGESM.) In this case, management traffic between the Cisco Systems IGESM and the Management Workstation travels over the Management Network, through the Management Module, and on to the internal Ethernet network between the Management Module and the Cisco Systems IGESM (with the same return path). As with path 1A, for this path to function, the management IP address on the Cisco Systems IGESM must be in the same IP subnet that is in use on both the internal and external Ethernet interfaces of the Management Modules. See 5.3.4, “Considerations: Using the Management Module uplink to manage the IGESM” on page 59 for details about configuring the BladeCenter for out-of-band management via the Management Module. Path 3 details Path 3 makes use of a connection between the Management Network and the Routed Production Network to carry traffic between the Cisco Systems IGESM and the Management Workstation. (The Management Workstation points its Web, Telnet, SNMP, and other applications directly at the externally available management IP address of the Cisco Systems IGESM.) In this case, the Management Module is completely bypassed for Cisco Systems IGESM management purposes, and the management traffic flows in and out of the Cisco Systems IGESMs external GigE connections. For the Cisco Systems IGESM to be accessed through path 3, the Management Module advanced management Web page must have the External ports set to Enabled, and the Management over all ports set to Enabled. If either of these are disabled, path 3 will not work. In this scenario, the IP address of the Cisco Systems IGESM must be on a different IP subnet than the IP address used by the Management Module. If they (the Management Module and Chapter 5. Cisco Systems IGESM management and user orientation 43 the Cisco Systems IGESM) are on the same IP subnet, the Management Module will still attempt to proxy for the Cisco Systems IGESMs, which could result in confusion in the network. We also recommend that you change the management VLAN on the Cisco Systems IGESM to something other than the default VLAN1, and it will have be in a VLAN that contains the IP subnet that will be used to access the Cisco Systems IGESM through its external connections. For example, if the management IP address of the Cisco Systems IGESM is 10.200.200.X (24-bit mask), the Cisco Systems IGESM management VLAN in use must be carrying the 10.200.200.X subnetwork traffic into the Routed Production Network. To change the Cisco Systems IGESM management VLAN: 1. Create the new VLAN on the Cisco Systems IGESM (vlan XX). 2. Create an interface to the new VLAN (interface vlan XX). 3. Perform a no shut on the new VLAN interface. This new management VLAN must then be added on the uplink connections (switchport trunk allowed vlan yy,zz,XX...) and into the Routed Production Network. The best way to change the actual management IP address of the management VLAN interface on the Cisco Systems IGESM is through the Web interface of the Management Module, even though it is on a different IP subnet than that being used by the Management Module. Changing the IP address directly on the Cisco Systems IGESM has certain issues, as noted in Appendix A, “Hints and tips” on page 227. See 5.3.5, “Considerations: Using the IGESM uplinks to manage the IGESM” on page 61 for details about configuring the BladeCenter for in-band management. Path 4 details Although we are showing a blade server as being the station accessing the Cisco Systems IGESM, path 4 really demonstrates that virtually any device on the Routed Production Network can access the Cisco Systems IGESM through the Routed Production Network. (The device acting as the Management Workstation would point its Web, Telnet, SNMP, and other applications directly at the externally available management IP address of the Cisco Systems IGESM.) Note that in most cases (except scenario 4 on page 69), for a blade server to connect to the Cisco Systems IGESM it must first pass though the Cisco Systems IGESM, into the Routed Production Network, and then be routed back onto the subnet containing the Cisco Systems IGESM’s IP address. This is an important note, because a blade server should rarely be placed directly on the same IP subnet/VLAN that is used for the management IP address of the Cisco Systems IGESM. (See Appendix A, “Hints and tips” on page 227 for the reasons for this isolation.) Also, as with path 3, for the Cisco Systems IGESM to be accessed through path 4, the Management Module advanced management Web page must have the External ports set to Enabled, and the Management over all ports set to Enabled. If either of these are disabled, path 4 will not work. The same IP subnet and management VLAN rules mentioned for path 3 apply for path 4. See 5.3.5, “Considerations: Using the IGESM uplinks to manage the IGESM” on page 61 for information about configuring the BladeCenter for in-band management. Path 5 details Path 5 makes use of the service port (RJ45 serial console connection) on the faceplate of the Cisco Systems IGESM. As with path 1B, this path is independent of the Cisco Systems IGESM management IP address. The use of path 5 is also totally independent of any settings on the Management Module. This connection can be used in a simple fashion by attaching a PC with a serial port directly to it (9600, N, 8, and 1, flow control to none), or in a more 44 Cisco Systems Intelligent Gigabit Ethernet Switch Module advanced way, by attaching it to a terminal server that is connected to an IP network (for the purposes of remote management through the service port on the Cisco Systems IGESM). See “Possible issues with Hyperterm when using the console port” on page 237 to ensure successfully utilizing this connection. Consequences of configuring for a particular management path Configuring for the use of a specific path as previously noted requires conscious choices that can affect the availability of the other paths. For example, configuring for in-band access (path 3 or 4 as previously described) precludes the use of paths 1A and 2. Conversely, configuring specifically for the use of path 1A or path 2 precludes the use of path 3 or 4. Path 1B and path 5 are fairly isolated from all of these choices and are not affected by the configuration choices that are necessary for selecting an out-of-band path (paths 1 and 2) or in-band path (paths 3 and 4). Section 5.3, “In-depth management path discussions” on page 55 goes into great detail about selecting and administering a desired management path for the IGESM. One final comment: It might appear that if you configure the Management Module and the Cisco Systems IGESM for in-band management and set the internal Ethernet interface of the Management Module to the IP subnet being used by the Cisco Systems IGESM, that you could actually manage the Management Module though the Cisco Systems IGESMs. This is not the case. The Cisco Systems IGESM has certain hard-coded filters that prevent any traffic that enters any of the upstream ports (g0/17 -20) from exiting out the Management Module facing ports (g0/15 - 16), and vice-versa. (This also prevents any unexpected spanning-tree loops.) The only way to manage the Management Module is through the external Ethernet interface of the Management Module. 5.2.4 Cisco Cluster Management Suite The Cisco Cluster Management Suite (CMS), which is available on 12.1(14) versions of IOS for the IGESM, is Web-based network management software embedded in the BladeCenter switch designed for small to mid-size enterprises and branch office networks. The software can reduce the time it takes to deploy and configure multiple switches by simplifying repetitive and time-consuming network management tasks and providing monitoring and troubleshooting tools. Cisco CMS Software is embedded in the BladeCenter Cisco Switch (running a 12.1(14) version of IOS) and can manage a mix of Cisco switches in a single GUI screen. Through Cisco Switch Clustering technology, users access Cisco CMS with any standard Web browser to manage up to 16 of these switches at once, regardless of their physical proximity. More information can be found at: http://www.cisco.com/en/US/products/hw/switches/ps628/products_data_sheet09186a00800913ce.h tml What Cisco CMS software is not The word Cluster in Cluster Management Suite is sometimes misconstrued to mean something other than what it is. In this case, the term represents clustering switches together on a single GUI screen solely for their management. It is not involved with clustering servers or clustering switches for high availability of data paths; it is simply a tool to manage switches. Chapter 5. Cisco Systems IGESM management and user orientation 45 Clustering servers can be achieved with clustering software on the servers, and high availability of data paths can be achieved with proper network design and the use of such features as Trunk Failover and NIC Teaming. Building a new cluster To build a new cluster, perform these steps: 1. Assign an IP address to the switch on the management subnet. This can be performed using the Management Module. See Figure 6-4 on page 83. 2. Connect this switch to other switches that run clustering software. This does not have to be a direct connection. CMS defaults to managing devices up to three hops away. The hop count can be adjusted from the menu bar under Cluster → Hop Count from 1 to 7. 3. Choose Cluster → Create Cluster (Figure 5-27). Figure 5-27 Cisco Cluster Management Suite window 4. In the Create Cluster window, enter a command switch number. This must be unique from any other command switch numbers that reside in the network (Figure 5-28). 5. Enter a new cluster name. In our example, we used RedpaperCluster. 6. Click OK. Figure 5-28 Create Cluster window After the Command Switch is created, the Front Panel View (Figure 5-29) displays the cluster and the host name of all of the switches in the cluster. Figure 5-29 Front Panel View 46 Cisco Systems Intelligent Gigabit Ethernet Switch Module Adding to a cluster To add additional devices to the cluster, perform the following steps: 1. Choose Cluster → Add To Cluster from the menu bar (Figure 5-30). Figure 5-30 Cisco Cluster Management Suite window 2. In the Current Candidates list (Figure 5-31), select the switches that you want to add to the cluster. To select all the switches in the list, click Select All. Figure 5-31 Add To Cluster window 3. Click Add to move your selections to the Add To Cluster list. To remove switches from this list, select the switches and click Remove. To remove all switches from the list, click Select All and then Remove. Note: If you requested this window from a pop-up menu, the devices that you selected will be in the Add To Cluster list when the window opens. 4. In the Password field, enter a password if the switch was configured with one. Note: If member switches will have different passwords, you must add them in groups that have the same password. 5. Click OK. If a password is required and you did not enter one, you will be prompted to enter it. Chapter 5. Cisco Systems IGESM management and user orientation 47 6. From the menu bar, choose Administration → Save Configuration to save your changes to nonvolatile memory. Allow approximately one minute for changes to be saved to nonvolatile memory before resetting or turning off the switch. When the device has been added successfully, its label turns green (Figure 5-32). Figure 5-32 Front Panel View 7. Click the box of the device you want to display on the Front Panel View (Figure 5-33). CMS queries the device and displays it. The display order can be rearranged by removing the check mark in the box and clicking the box in the order you want the devices displayed from top to bottom. Figure 5-33 Cisco Cluster Management Suite window 48 Cisco Systems Intelligent Gigabit Ethernet Switch Module 8. Any device in the cluster can now be managed either by clicking the switch graphic and then the menu bar task, or by choosing the task on the menu bar and selecting the device’s host name (Figure 5-34). In our example, we chose VLAN. Figure 5-34 VLAN Devices window Cluster topology view After a cluster is created, it can be viewed in a graphical representation. Click the Topology icon on the menu bar to display the topology (see Figure 5-35). Front Panel Topology Figure 5-35 Icon bar Note: To return to the Front Panel view, click the Front Panel icon. Chapter 5. Cisco Systems IGESM management and user orientation 49 Clicking the Topology icon opens a window similar to the one shown in Figure 5-36. CMD Topology Options icon Figure 5-36 Topology View window This shows a network map of the command switch and cluster members; the command switch is labeled CMD. The view can also include any cluster candidates, neighboring devices, neighboring clusters, and node and link information. Figure 5-36 is a snapshot of one of our setups: BladeCenter1Bay1 is the command switch (CMD). It has a direct external connection to BladeCenter2Bay1 and BladeCenter2Bay2. BladeCenter1Bay1 is connected to BladeCenter1Bay2 through the Management Module. BladeCenter2Bay1 and BladeCenter2Bay2 are connected to each other through the Management Module. A 6500 switch is connected to BladeCenter2Bay1. The 6500 is not a member of the cluster; it is a neighboring device. The contents of the Topology view depend on the options that you select in the Topology Options window. Click the Topology Options icon in the icon bar (or click clicking View → Topology Options) to enable the addition of information in the network topology. 50 Cisco Systems Intelligent Gigabit Ethernet Switch Module This opens a window similar to the one shown in Figure 5-37. Note that in this figure, all available filter options are enabled. Figure 5-37 Topology View window Chapter 5. Cisco Systems IGESM management and user orientation 51 Right-click a device, and a pop-up window with management selections opens (Figure 5-38). Figure 5-38 Topology View Right-click a link and a pop-up window with management selections opens (Figure 5-39). Figure 5-39 Topology View window 5.2.5 CiscoWorks LAN Management Solution CiscoWorks LAN Management Solution (LMS) provides a foundation of basic and advanced device management applications that help network operators manage their networks. The solution includes CiscoView, CiscoWorks Resource Manager Essentials, and CiscoWorks Campus Manager, all of which are supported for use with the IGESM. In this paper, we discuss CiscoView 5.5, which is a component of CiscoWorks LAN Management Solution. We did not perform extensive testing of this application, but we demonstrate that it is ready to monitor and manage the IGESM within your network. 52 Cisco Systems Intelligent Gigabit Ethernet Switch Module For more information about CiscoWorks LAN Management Solution (LMS), visit: http://www.cisco.com/en/US/products/sw/cscowork/ps2425/index.html 5.2.6 CiscoView CiscoView is a Web-based device management application providing dynamic status, monitoring, and configuration information for the broad range of Cisco internetworking products. CiscoView displays a physical view of a device chassis, with color-coding of modules and ports for at-a-glance status. Monitoring capabilities display performance and other statistics. Configuration capabilities allow comprehensive changes to devices, given requisite security privileges are granted. During the development and testing of the topologies and configurations documented in this Redpaper, we used CiscoView Version 5.5 and loaded the latest device package for the Cisco Systems Intelligent Gigabit Ethernet Switch Module to access and manage the switching device. The device package can be downloaded from the following Web site: http://www.cisco.com/cgi-bin/tablebuild.pl/cview50 The file name (at the time of this writing) is cigesm.cv50.v1-1.zip. Note: The Cisco Connection Online (CCO) user ID and password are necessary to access this information. A CCO ID can be obtained by going to the following page and registering: http://tools.cisco.com/RPF/register/register.do Note: CiscoWorks Resource Manager Essentials and CiscoWorks Campus Manager are also supported for the Cisco Systems Intelligent Gigabit Ethernet Switch Module, but were not tested during the creation of this document. Links to download the necessary IDUs to support the IGESM can be found at: http://www.cisco.com/kobayashi/sw-center/cw2000/lan-planner.shtml Version 10 and above IDUs support IGESM, under Application-Level Updates for each module Minimum code on IGESM to support CiscoWorks is 12.1(14)AY1. CiscoWorks Resource Manager Essentials Resource Manager Essentials is a suite of Web-based applications offering network management solutions for Cisco switches, access servers, and routers. The Resource Manager Essentials browser interface allows easy access to information critical to network uptime and simplifies time-consuming administrative tasks. Resource Manager Essentials includes: Inventory Manager Change Audit Device Configuration Manager Software Image Manager Availability Manager Syslog Analyzer Cisco Management Connection Chapter 5. Cisco Systems IGESM management and user orientation 53 CiscoWorks Campus Manager Designed for operational use, Campus Manager provides layer 2 tools for configuring, managing, and understanding complex physical and logical infrastructures. Campus Manager enables administrators to more easily change, monitor, and control network relationships, making them more effective in delivering business-critical and advanced networking services to their users and customers. 5.2.7 IBM Director and Remote Deployment Manager IBM provides two software products to help you effectively manage the day-to-day operations of your BladeCenter: IBM Director, which is provided for free to all IBM Intel®-based servers customers. Remote Deployment Manager (RDM), which is provided for a fee to clients. RDM is integrated into IBM Director, which is a prerequisite for it. IBM software management tools are designed to make the BladeCenter deployment and management easier and faster. However, you can choose not to use them. In this case, you will use the Management Module Web interface (available through a standard Web browser). Then, you can deploy the operating systems onto the blade servers by using standard installation methods (for example, booting from CD and running setup or performing unattended network installations). To fully implement the BladeCenter strategy, we recommend that you use both IBM Director and the Remote Deployment Manager (RDM) to manage and deploy blades. Among its other features, IBM Director manages the hardware; it talks directly to the BladeCenter Management Module through a special protocol, called Service Location Protocol (SLP). This makes it possible to register the BladeCenter chassis and the installed blades into the IBM Director database. After the BladeCenter is registered into IBM Director, the chassis and the blades can be managed from the Director console. Consequently, you can perform all the actions that are available through the Management Module Web interface through the Director console (except for blade Remote Console Redirection and a few others). These include actions such as blades power on/off and hardware configuration. You are also notified of events coming from the chassis (such as hardware health and alerts, and blade insertion). Conversely, RDM is responsible for deploying the operating system on brand new systems from scratch. RDM uses the Preboot Execution Environment (PXE) protocol, a standard feature of the network adapter that also needs to be supported by the machine BIOS. With the PXE protocol, the server to be installed boots from the network and the RDM server provides the basic environment to start the installation of the operating systems OS (DOS for Microsoft operating systems, Linux® for Linux). One prerequisite is a Dynamic Host Configuration Protocol (DHCP) server, not necessarily on the same server used as the RDM server. IBM Director enables you to make the most of your existing enterprise management structure by upwardly integrating with Tivoli, HP OpenView, Microsoft SMS, CA Unicenter, and BMC, NetIQ. For more information, visit the following Web sites: http://www.redbooks.ibm.com/redpapers/pdfs/redp3776.pdf http://www.ibm.com/servers/eserver/xseries/systems_management/xseries_sm.html 54 Cisco Systems Intelligent Gigabit Ethernet Switch Module 5.3 In-depth management path discussions In this section, we take a closer look at the interactions of the Cisco Systems IGESM with the Management Module and at the rules that are necessary to ensure a stable management connection to the IGESM. 5.3.1 Introduction to this in-depth management discussion This section attempts to clarify the preferred paths, in particular the management paths for the various types of traffic that will be carried to and through the Cisco Systems IGESM in the IBM BladeCenter. We show examples of seven possible scenarios and detail why some designs are recommended and why some are not. Note that the discussions in this section were valid when we wrote this section. It is possible that future revisions of code or hardware may change the operation as defined here and may invalidate portions or all of this section. For reference purposes, this section was verified against an IGESM model number 13N2286 (as reported by the Management Module, but also referred to as the 13N2281) with IOS revision 12.1(14)AY4. The Management Module in use was a model 02R1606 running release firmware BRET67D, dated 7-22-04, revision 16. 5.3.2 Why was this in-depth section created? Because of the design of the BladeCenter—there are possibly two paths to manage the IGESM (via the Management Module uplink port or via the IGESMs uplink ports) and the fact that there is always an internal link between the IGESM and the Management Module—certain designs will lead to unexpected results and possible hit-or-miss connectivity to the management VLAN interface of the IGESM. To define this further, there is an issue with certain designs based on the fact that the IGESM always tries to provide a path between itself and the Management Module, and the Management Module always tries to act as a proxy for the IGESM’s management IP address (and several other IP addresses on its internal IP subnet). The end result is that the Management Module will respond to any ARP request on its uplink port, for any IP address that it manages on its internal subnet (this includes the eth1 interface of the Management Module and the IP address for each switch bay in the BladeCenter). If both the Management Module uplink and the IGESM uplinks are placed in the same IP subnet, on the same VLAN, and External management over all ports for the IGESM is set to Enabled (a Management Module feature setting), then both the Management Module and the IGESM will attempt to respond to ARP requests for the IGESM’s IP address. Under this condition, if the Management Module’s ARP response is accepted by the upstream device, IGESM management traffic may try to flow through the Management Module, which may or may not actually pass it on to the IGESM. Also, ARPs are broadcast-based, so the IGESM sees the Management Module response and sends out a gratuitous ARP to tell the world that it owns its own IP address. The Management Module sees this and responds in kind, and an ARP war breaks out on the upstream network that owns the IP address of the IGESM. The primary purpose of the remainder of this section is to discuss how to integrate the IGESM into an infrastructure in such a fashion as to avoid these issues and ensure stable management connectivity. Note: All of these issues take place on the upstream external network from the BladeCenter. Chapter 5. Cisco Systems IGESM management and user orientation 55 There is another (internal) consequence of the Management Module proxying for its IP subnet: If a blade server is placed on the IP subnet and VLAN that is being used by the IGESM’s management interface, the blade server will almost certainly fail to bring up its IP interface, as one of the first things most OSs do when they bring up an IP interface is to send out an ARP request looking for its own IP address (to make sure someone else is not already using it). If the blade server is on the same VLAN/IP subnet that the IGESM is using for its management VLAN, the Management Module will respond back to this ARP request and the blade server OS will shut down the TCP stack, as it assumes a duplicate IP address is already on the network. Perhaps even more of a problem for this internal issue is that if the blade server is already up and running, and the Management Module and the IGESM are then placed into the same VLAN, the blade server will usually keep operating normally until it gets rebooted. When it comes back up it will re-attempt to see whether anyone has its IP address, and will fail when the Management Module responds to the initial ARP from the blade server. (The blade server sees this ARP response to its own IP address and will assume someone else already has its IP address.) One final issue with placing the blade servers on the same VLAN as the IGESMs management interface is that under certain cases (if the Management Module is also using that same IP subnet), some user data traffic can actually attempt (unsuccessfully) to flow through the Management Module, instead of strictly through the IGESM’s uplink ports. Tip: The best way to guarantee that these internal issues will not happen is to keep the blade servers off of the VLAN that is defined as the management interface VLAN on the IGESM. For the purpose of the scenarios discussed in this section we will define three types of traffic: Data Traffic This is user data carried from the production network, over the uplink ports of the IGESM, and into and out of the blade servers installed within the BladeCenter. Management Module Traffic This is management traffic that is carried to or from the Management Module, carried over the Management Module uplink port, for accessing the Management Module. IGESM Traffic This is management traffic that is carried to or from the IGESM for managing the IGESM, and may be carried via the Management Module’s uplink connection or over the IGESM’s uplink connections. While the IGESM will not permit ports g0/15 and 16 to be shut down—they are hard-coded to always be up—the other side of the connection (MM ETH1 interface) can be set to Disabled, which disables all internal Ethernet connections from the Management Module to any device in the BladeCenter. This is because it does not shut the port down; instead it stops responding to any inbound internal requests. This includes any other Ethernet Switch Modules, as well as any SAN modules and even any Serial over LAN connection (if one has been configured) from the Management Module to blade servers. Because of this complete loss of Ethernet access, disabling the ETH1 interface is useful only in very specific situations—for example, if you did not need internal Ethernet management access to any other devices in the BladeCenter, or Serial over LAN—thus usually is not recommended. 56 Cisco Systems Intelligent Gigabit Ethernet Switch Module 5.3.3 General management path design considerations Previous sections discussed the concept of in-band and out-of-band management. Here we look more closely at a subtle distinction between the Cisco Systems IGESM and traditional stand-alone Cisco switches with regard to these paths. A traditional Cisco switch has two ways to connect for management purposes: Via the console port (out-of-band) Via a network connection (in-band) The Cisco Systems IGESM in the BladeCenter has three ways to connect: Via the console port (out-of-band). Via an internal network connection to and through the Management Module, which uses a network connection but does not use the data path network connection to carry the traffic. This is the default network-based management path for the IGESM and represents paths 1 and 2 in Figure 5-40. Via an external uplink network connection (in-band), as represented by path 3 and 4 in Figure 5-40. This may seem like a minor distinction, but it is in fact quite important. Understanding how these paths vary and how to configure to use one or the other (you cannot configure to use both at the same time) is critical to successfully deploy the IGESM into production. Legend Ethernet Ethernet path Management Workstation I2C Interface 2 I2C path RJ45 Serial 1 3 RJ45 Serial path Routed Production Network Management Network 4 3 5 2 External Ethernet Interface Web Interface External Ports Internal Ethernet Interface G0/15 or 16 1A Cisco Systems IGESM Service Port I2C Interface Management Module 1B 4 Blade Server Figure 5-40 Management path flow Chapter 5. Cisco Systems IGESM management and user orientation 57 As noted, an important aspect of these two network-based management paths is that the selection of which to use is an either/or proposition. It is necessary to configure specifically to manage the IGESM via the Management Modules uplink (as shown in scenarios 1, 2, and possibly 7) or its own uplinks (as demonstrated in scenarios 3 and 4). Attempting to configure IGESM management for both paths at the same time usually creates intermittent connectivity issues when attempting to connect to the IGESM. Scenarios 5 and 6 show examples of configurations that incorrectly enable and configure for both paths simultaneously. Note: Descriptions of these scenarios begin on page 64. With that said, the first and perhaps simplest approach for managing the IGESM is to use the Management Module’s uplink port to manage the IGESM (paths 1 and 2 in Figure 5-40 on page 57). This connectivity is demonstrated in scenarios 1, 2, and 7 in this section and is also discussed in more detail below. Because it is simpler to deploy, using the Management Module’s uplink to manage the IGESM is preferred over managing the IGESM via its own uplinks, with both scenarios 1 and 2 being recommended equally based on the customer’s requirements. As already noted, the second approach is to manage the IGESM via its own external uplink connections, ports G0/17 - 20 (paths 3 and 4 in Figure 5-40 on page 57). This connectivity is demonstrated in scenarios 3 through 6, and discussed in more detail below. It is important to note that although scenarios 3 through 6 all show attempts to manage the IGESM via its own uplink ports, only scenarios 3 and 4 are recommended when using this path. Scenario 3 is the recommended choice when using IGESM uplink management, but scenario 4 is still considered a viable option. Scenarios 5 and 6 are provided in this section only to show possible problems that could arise with certain designs when using the IGESM uplinks to manage the IGESM, and thus are not recommended solutions. In summary, the selection process involves choosing the desired management path and configuring it appropriately to ensure correct operation. As already noted, using the Management Module uplink to manage the IGESM (scenarios 1 and 2) is preferred over using the IGESM uplinks to manage the IGESM (scenarios 3 and 4). However, scenarios 3 and 4 are certainly viable options for those users requiring true in-band management. The rules for configuring for management over the Management Module’s uplink are listed in 5.3.4, “Considerations: Using the Management Module uplink to manage the IGESM” on page 59. The rules for configuring for management over the IGESM’s uplinks are found in 5.3.5, “Considerations: Using the IGESM uplinks to manage the IGESM” on page 61 below. VLAN Best Practice Closely related to the various other recommendations in this section are certain best practices for VLAN usage and isolation. There are many possible approaches to VLAN utilization that may work (such as everything on a single VLAN network), but are they good designs? Do they account for robust security, predictable traffic flows, and high availability? With that in mind, several items should always be remembered when designing secure and robust networks—all designs, not just those involving the IGESM: Normally, avoid the use of VLAN 1 for carrying either management or data traffic. 58 Cisco Systems Intelligent Gigabit Ethernet Switch Module Avoid carrying management traffic and data traffic in the same VLAN. Limit the use of any VLAN used for management to only those ports that have to use that VLAN. Prune or otherwise block it from non-necessary links. Only carry VLANs on a trunk that are needed on the other side of the trunk, and prune or block all other VLANs. More about the reasoning behind these recommendations can be found in the “Virtual LAN Security Best Practices” document at: http://www.cisco.com/en/US/products/hw/switches/ps708/products_white_paper09186a008013159f.shtml 5.3.4 Considerations: Using the Management Module uplink to manage the IGESM Scenarios 1, 2, and 7 (7 is a unique case that will be discussed later) provide information about using the Management Module uplink to provide a management path to IGESMs in a BladeCenter. Note: Descriptions of these scenarios begin on page 64. Using this path for scenarios 1 and 2 requires four basic considerations: 1. Disable management over the IGESM uplinks. Make sure to set External management over all ports on the Management Module to Disabled. This causes the IGESM to not respond to ARP requests from any ports other than 15 and 16 for its management interface VLAN’s IP address. Instead, the Management Module will act as a proxy for any requests to the IGESM for its MAC address, and all management traffic will flow through the Management Module and into the IGESM over port G0/15 (or G0/16 if the redundant Management Module is active). 2. Isolate IGESM management VLAN from any blade server facing ports. Make sure that the VLAN being used between the IGESM and the Management Module is not used by any of the blade servers within the BladeCenter chassis. This is necessary because of the Management Module’s ability to proxy for devices on the internal IGESM management VLAN, which may lead to any device (such as a blade server) placed on this management VLAN getting proxied by the Management Module. The end result is that blade servers placed on the same VLAN and IP subnet as the IGESM management interface VLAN will see duplicate IP addresses (as the Management Module attempts to tell the world that it is the path to any device on that subnet). 3. Block IGESM management VLAN from IGESM upstream connections. Make sure that the VLAN being used by the IGESM on its management VLAN interface is not carried on any of the IGESM’s uplinks. Failure to block this path when attempting to manage the IGESM via the Management Module may result in intermittent connectivity to the IGESM. For scenario 1 (physically isolated management and data networks) this may not be an issue. For scenario 2 it is imperative to remove the IGESM management interface VLAN from being carried on any of the IGESM uplinks. 4. Confirm the proper IP subnet selection. Make sure that the IP subnet being used by the IGESM is the same as the subnet being utilized on the Management Module for its own IP addresses. This is absolutely necessary for scenarios that utilize the Management Module’s uplink to manage the IGESM. Adhering to the four rules above enables successful management of and access to IGESMs via the Management Module’s uplink port as if it were directly connected to the customer’s management network. This means that you do not necessarily have to connect to the Chapter 5. Cisco Systems IGESM management and user orientation 59 Management Module first, then connect to the IGESM, but that you can actually point a Telnet or browser session directly at the IP address of the IGESM and directly attach (via a path through the Management Module) into the IGESM as you would any other Cisco switch. Here is one of the more confusing aspects of using the Management Module to provide the management path to the IGESM: The VLAN that is defined on the upstream switch’s port, which is connected to the Management Module’s port, does not necessarily have to be the same as the interface VLAN on the IGESM for IGESM management traffic to flow over the Management Module and reach the IGESM. (See Figure 5-41.) This is because although a management VLAN interface is defined on the IGESM, this VLAN will always be carried over the ports headed out to the Management Module (G0/15 and g0/16) as the native VLAN on a trunk because g0/15 and g0/16 are hard-coded as 802.1Q trunks and the management VLAN interface is always assigned to the native VLAN. Thus it will be untagged and appear as such to the Management Module. To the Management Module’s interface (ETH1) facing toward the IGESM, this appears to be a simple access link and it does not matter what VLAN the IGESM calls it because it simply is looking for untagged packets that are being carried over the native VLAN, which is what it receives. It then passes these packets out the ETH0 interface toward the upstream switch. Even though the connection would still work if you use different VLANs, this can be very confusing and thus it is usually recommended that you define the same VLAN in both the IGESM (interface vlan X) and on the upstream port on the switch connected to the Management Module (switchport access vlan X). Upstream switch “switchport access VLAN X” All packets untagged When using the MM interface to manage the IGESM, these VLANs may be different and the connection still works Simple physical connection Sw Bay - external management over all ports disabled CIGESM uplinks ETH 0 Management Module IGESM ETH 1 All IGESM source and destination packets untagged MGMT “Interface VLAN Y” G0/15 Bay 1 - 4 Trunked - But IGESM management packets are always assigned to the Native VLAN (untagged) Figure 5-41 Consideration of management path to IGESM via the Management Module 60 Cisco Systems Intelligent Gigabit Ethernet Switch Module There is one possible exception to this rule: Often during an IGESM’s initial evaluation period, a simple single VLAN network is set up for test purposes. Scenario 7 in this section discusses the possibilities and ramifications of this approach. On a slightly different subject, one question that might be asked is: Why are port g0/15 and g0/16 hard-coded as trunks if all I want to do is carry untagged data to the Management Module? Why not hard-code it to a simple Access link and prevent the confusion? One reason is that the BladeCenter supports a feature known as Serial over LAN (SoL) that permits a user to Telnet to the Management Module, then connect over a special VLAN, through the IGESM, and into each individual blade server. Because the SoL VLAN must be different from the IGESM’s Management VLAN (to isolate the flows), it is necessary to carry two VLANs over the link between the Management Module and the IGESM when using SoL. The only way to carry more than a single VLAN on a single physical link and still maintain isolation of the flows is to use a trunk connection (802.1Q in this case). When using SoL, the IGESM management traffic will always be on the native VLAN (untagged) while the SoL VLAN will be some other VLAN (tagged). 5.3.5 Considerations: Using the IGESM uplinks to manage the IGESM Scenarios 3 through 6 in this section discuss how to utilize the IGESM’s uplinks to provide a management path to IGESMs in a BladeCenter. Note that only scenarios 3 and 4 are recommended in production environments that use the IGESM uplinks for IGESM management. Scenarios 5 and 6 are being provided simply to show possible issues that could be encountered when using the IGESM uplink ports to manage the IGESM. Using the IGESM uplink ports to manage an IGESM requires five basic considerations: 1. Enable management over the IGESM uplinks. Make sure that External management over all ports on the Management Module is set to Enabled. This is so the IGESM can respond to ARP requests from its uplink ports for its management interface VLAN’s IP address. 2. Isolate IGESM management VLAN from any blade server facing ports. Ensure that the VLAN that is used by the IGESM for management is not used by any of the blade servers in the BladeCenter chassis. This is necessary to prevent Management Module proxy issues for the blade servers. This is less of an issue when managing the IGESM via its own uplinks (as opposed to the Management Module uplink), but it is still good to follow this rule. (An exception to this rule is shown in scenario 4). 3. Carry the IGESM management VLAN on IGESM uplinks. Make sure that the VLAN that is used by the IGESM as its management VLAN is carried on at least one of the uplinks from the IGESM to the upstream switch (or switches). This may be carried over an Etherchannel bundle and may be carried as part of an 802.1Q trunk or as a simple access-type connection. 4. Ensure that the IGESM management VLAN is not the same as the Management Module’s upstream VLAN. Make sure that the VLAN that is used by the IGESM on its management VLAN interface is not the same as the VLAN used by the Management Module’s upstream connection to the Management Module. Because we are now attempting to manage the IGESM via its own uplinks, we want to isolate the IGESM management interface VLAN from the VLAN being used to support the Management Module. Chapter 5. Cisco Systems IGESM management and user orientation 61 5. Ensure proper IP subnet selection. Make sure that the IP subnet that is used by the IGESM is different from the subnet that is defined on the Management Module for its own IP addresses. As with step 3, it is important to isolate the IGESM management path to the Management Module because we are now going to manage the IGESM via its own uplinks. Different IP subnets between the Management Module and the IGESM will complete this isolation. Adhering to these five rules enables successful management of and access to IGESMs via the IGESM’s own uplinks (g0/17 - 20). Figure 5-42 shows an important attribute of utilizing the IGESM uplinks for IGESM management. In this case, although the VLAN that is assigned to the IGESM management VLAN is being carried over the uplinks, it can have an impact on BladeCenter operations because it is carried over to the Management Module through ports g0/15 or 16. This internal link, and the fact that the Management Module attempts to proxy for devices in the BladeCenter, is key to why only scenarios 3 and 4 are considered viable options when using the IGESM uplinks to manage the IGESM. VLAN Y Sw Bay - external management over all ports enabled ETH 0 Management Module MGMT Interface VLAN Y ETH 1 Bay 1 - 4 To blade servers BladeCenter Flow Name IGESM traffic IGESM Flow Line VLAN Y Description Shows VLAN Y also flowing to MM Figure 5-42 Discussion of management via IGESM uplinks and internal link to Management Module 5.3.6 Considerations: More than a single IGESM in a given BladeCenter When installing multiple IGESMs into a BladeCenter chassis, the most common (and recommended) approach is to place all IGESMs on the same management VLAN, in the same IP subnet, regardless of whether you will manage the IGESMs via the Management Module uplink or the IGESM’s uplink. Following this simple approach helps ensure that the recommended scenarios in this document operate as desired. A user may want to place the IGESMs into different management VLANs, such as if different groups will be managing certain IGESMs and they require VLAN isolation between each IGESM in a BladeCenter. This might seem straightforward to perform, but in reality it can lead to unexpected error messages being generated on the IGESMs. The issue with placing IGESMs in a single chassis into different management VLANs is that, because the Management Module connects each IGESM1 and each IGESM always makes 62 Cisco Systems Intelligent Gigabit Ethernet Switch Module the management VLAN on ports g0/15 and g0/16 the native VLAN, having different management VLANs results in each IGESM complaining about a native VLAN mismatch in their respective logs and on their console ports. Management Module uplink IGESM management packets untagged on Native VLAN ETH 0 Mgmt Module IGESM uplinks IGESM uplinks IGESM in Bay 1 MGMT “Interface VLAN X” G0/15 ETH 1 To switch Bays 3 and 4 IGESM in Bay 2 MGMT “Interface VLAN Y” G0/15 Flow Name Native VLAN Flow Line VLAN X and Y Description Shows internal IGESM connection via MM Figure 5-43 Discussion of different management VLANs on different IGESMs If you must place different IGESMs in the same BladeCenter into different management VLANs, you can stop the native VLAN mismatch messages by turning off CDP on the ports facing the Management Module (g0/15 and g0/16). This can be done by running the command no cdp enable on these two ports. Other reasons for native VLAN mismatch messages appearing on the IGESM include a native VLAN mismatch between the IGESM and its connecting upstream switch. The issue discussed in Figure 5-43 is specific to trying to use different management VLANs on different IGESMs in the same BladeCenter. If you place all of the IGESMs into the same VLAN, and you are seeing native VLAN mismatch messages, the problem is elsewhere and should be resolved using standard troubleshooting techniques. We now present the various scenarios. 1 The hard filter that blocks traffic from the uplink ports from traveling through g0/15 and 16 has no impact on packets originating from one IGESM traveling over the Management Module to other IGESMs in the chassis. Chapter 5. Cisco Systems IGESM management and user orientation 63 5.3.7 Scenario 1 (recommended) IGESM management using Management Module uplink Physically isolated management and data networks Management Network Data Network 802.1Q Trunk(s) or Mode Access Mode Access VLAN A, B, C... VLAN X VLAN X should be blocked Must be same IP subnet Sw Bay - external management over all ports disabled ETH 0 Management Module MGMT Interface VLAN X ETH 1 Bay 1 - 4 To blade servers BladeCenter Flow Name Data traffic MM and IGESM traffic IGESM Flow Line VLAN A, B, C... X Description Any VLAN other than X Any VLAN not used for data traffic Recommended Design - Physically Isolated Networks Management disabled for IGESM uplinks MM management via MM uplink IGESM management via MM uplink MM and IGESM share the same VLAN on MM uplink Data traffic uses other VLANs Figure 5-44 Scenario 1: Physically separate management and data networks; Management Module providing path See 5.3.4, “Considerations: Using the Management Module uplink to manage the IGESM” on page 59 for rules for this scenario. Scenarios 1 and 2 are the simplest designs to deploy and support because all management traffic utilizes the Management Module’s uplink port and isolates this traffic from the data traffic. In this design, you do not manage the IGESM via its own uplink ports, and the feature for managing the IGESM over its uplink ports must be disabled by changing to Disabled the External management over all ports setting in the Management Module advanced management section for each IGESM. For this configuration to operate correctly, the IP address used by the IGESM must be in the same IP subnet as that being used by the Management Module. 64 Cisco Systems Intelligent Gigabit Ethernet Switch Module It is not imperative in this environment of physically isolated management and data networks to block the management VLAN on the IGESM uplinks, but doing so prevents issues if the two upstream networks are ever physically merged. Note that this Scenario covers physically isolated networks (different switches and routers for each network). Logically isolated networks (shared switches and routers isolating data and management traffic with VLANs) such as shown in Scenario 2 must block the management VLAN from traversing the IGESM uplinks to ensure correct operation. Although the upstream networks are physically isolated, it is imperative that the VLANs used for blade server communication are different from the VLAN used by the Management Module and IGESM. Figure 5-51 on page 73 shows why this separation is necessary. 5.3.8 Scenario 2 (recommended) IGESM management using Management Module uplink Common management and data networks Common Management/Data Network 802.1Q trunk(s) or mode access Mode access VLAN A, B, C... VLAN X VLAN X must be blocked Must be same IP subnet Sw Bay - external management over all ports disabled ETH 0 Management Module MGMT Interface VLAN X ETH 1 Bay 1 - 4 To blade servers BladeCenter Flow Name Data traffic MM and IGESM traffic IGESM Flow Line VLAN A, B, C... X Description Any VLAN other than X Any VLAN not used for data traffic Recommended Design - Common Networks Management disabled for IGESM uplinks MM management via MM uplink IGESM management via MM uplink MM and IGESM share the same VLAN on MM uplink Data traffic uses other VLANs Figure 5-45 Scenario 2: Physically common management and data networks; Management Module providing path Chapter 5. Cisco Systems IGESM management and user orientation 65 See 5.3.4, “Considerations: Using the Management Module uplink to manage the IGESM” on page 59 for rules for this scenario. As noted in scenario 1, this is one of the simplest designs to deploy and support because all management traffic utilizes the Management Module’s uplink port and isolates this traffic from the data traffic. In this design, you do not manage the IGESM via its own uplink ports, and the feature for managing the IGESM over its uplink ports must be disabled (by changing the External management over all ports setting to Disabled in the Management Module advanced management section for each IGESM). The choice of the management interface VLAN on the IGESM is important, as it must not be set to any VLAN that will be used to carry traffic to or from any blade server. The VLAN setting on the upstream switch that is connected to the Management Module’s uplink port can also be any VLAN not used by a blade server in this chassis. However, setting it to the same VLAN as the management VLAN on the IGESM helps to avoid confusion. (See Scenario 7 for an exception to this rule.) As with scenario 1, the IP address used by the IGESM must be in the same IP subnet as that being used by the Management Module for this configuration to operate correctly. One important difference between Scenario 1 and Scenario 2: Because the upstream network is a common infrastructure in this scenario, it relies on VLAN isolation to achieve separation of traffic types. This requires that VLAN X must be blocked from traveling over the uplink between the IGESM and its upstream switch. Failure to block this may result in intermittent connectivity issues when attempting to manage the IGESM. 66 Cisco Systems Intelligent Gigabit Ethernet Switch Module 5.3.9 Scenario 3 (recommended) IGESM management using IGESM uplinks IGESM, Management Module, and data traffic in separate VLANs Common Management/Data Network 802.1Q Trunk(s) Mode Access VLAN X VLAN Y VLAN A, B, C... Must be different IP subnets Sw Bay - external management over all ports enabled ETH 0 Management Module MGMT Interface VLAN Y ETH 1 Flow Line Bay 1 - 4 To blade servers BladeCenter Flow Name Data traffic MM traffic IGESM traffic IGESM VLAN A, B, C... X Y Description Any VLAN other than X or Y Any VLAN not used for data traffic and not Y Any VLAN not used for data traffic and not X Recommended Design - Common Network Management enabled for IGESM uplinks MM management via MM uplink IGESM management via IGESM uplink MM on different VLAN than IGESM Data traffic uses other VLANs Figure 5-46 Scenario 3: Physically common management and data networks; IGESM uplinks to provide IGESM management path See 5.3.5, “Considerations: Using the IGESM uplinks to manage the IGESM” on page 61 for rules for this scenario. Scenario 3 is the recommended design when using the IGESM uplinks to manage the IGESM. In this design, you manage the IGESM via its own uplink ports, and the feature for managing the IGESM over its uplink ports must be enabled. (The External management over all ports setting must be Enabled in the Management Module advanced management section for each IGESM). Chapter 5. Cisco Systems IGESM management and user orientation 67 Of primary note is the fact that each of the management paths (for the IGESM and the Management Module) are on separate VLANs, thus separate IP subnets, and that the paths that are used for data traffic into the blade servers does not use either of these VLANs. This follows network-design best practices in keeping user and management traffic isolated, and it prevents the Management Module (via VLAN and IP subnet isolation) from trying to provide proxy support for the IGESM and is thus completely stable and fully recommended. Note that the link between the IGESM and the upstream network is shown as an 802.1Q trunk in this example. There are other ways to meet the separation of traffic requirement, such as putting VLAN Y on a single access link on IGESM port g0/17, then putting VLANs A, B, C, and so on onto an 802.1Q trunk port made up of any combination of IGESM ports g0/18, 19, or 20. This accomplishes the same end-requirement of separation of the management VLAN from blade server VLANs, so it would work. However, it is not very practical, as there is no redundancy to the management interface of the IGESM. If port g0/17 goes down, you lose management connectivity to the IGESM. A more logical approach is to produce one or two Etherchannel bundles out of the uplinks from the IGESM and configure them as 802.1Q trunks to carry all desired VLANs—both the management VLAN and the blade server VLANs. One final comment: The red line between the IGESM and the Management Module is shown here to reiterate that, technically, VLAN Y is actually carried over to the Management Module (over the native VLAN on the link). In this scenario it is not an issue, as the IP subnet on the Management Module is different from that being used on the IGESM management interface (VLAN Y), so there is no chance that the Management Module will attempt to proxy for devices on VLAN Y because the Management Module only proxies for devices on its own IP subnet. 68 Cisco Systems Intelligent Gigabit Ethernet Switch Module 5.3.10 Scenario 4 (possible alternative) IGESM management using IGESM uplinks IGESM and data traffic in a common VLAN Common Management/Data Network 802.1Q trunk(s) or mode access Mode access VLAN X Sw Bay - external management over all ports enabled VLAN Y Must be different IP subnets ETH 0 Management Module MGMT Interface VLAN Y ETH 1 IGESM Bay 1 - 4 VLAN Y. To blade servers BladeCenter Flow Name MM traffic IGESM and data traffic Flow Line VLAN X Y Description Any VLAN other than Y Any VLAN other than X Possible Design - Common Network Management enabled for IGESM uplinks MM management via MM uplink IGESM management via IGESM uplink MM on different VLAN than IGESM IGESM management and data traffic share a single VLAN Figure 5-47 Scenario 4: Physically common management and data networks; IGESM uplinks provide IGESM management path See 5.3.5, “Considerations: Using the IGESM uplinks to manage the IGESM” on page 61 for rules for this scenario. In scenario 4, the management VLAN is shared by both the blade servers and the IGESM. As long as the IP subnet on the Management Module (on both ETH0 and ETH1) is different from the IP subnets being used by the IGESM and the blade servers (and it should be if they are different VLANs), then this design will work. If for some reason, a blade server in this design were placed into the same IP subnet as the Management Module (even though it is in a different VLAN), the blade server will more than Chapter 5. Cisco Systems IGESM management and user orientation 69 likely have a difficult time connecting to devices on the network. This is because the Management Module will attempt to proxy for any IP ARP requests (coming up from the blade server and over to the Management Module via the internal connection), and the blade server may see a duplicate IP address for itself, or possibly the wrong MAC address for its default gateway, resulting in failure to complete a connection. One other possible drawback with this design is the fact that network design best practices promote separate VLANs for data and management traffic, but we have mixed data and management traffic on VLAN Y. Based on these concerns, scenario 3 is preferred if using the IGESM uplinks for management, but scenario 4 might be an alternative if desired. 5.3.11 Scenario 5 (not recommended) IGESM management using IGESM uplinks IGESM and Management Module traffic in common VLAN Common Management/Data Network 802.1Q Trunk(s) Mode Access VLAN X Sw Bay - external management over all ports enabled ETH 0 Management Module MGMT Interface VLAN X ETH 1 IGESM Bay 1 - 4 To blade servers BladeCenter Flow Name Data traffic IGESM and MM traffic VLAN A, B, C... Flow Line VLAN A, B, C... X Description Any VLAN other than X Any VLAN not used for data traffic Poor Design - Common Network Management enabled for IGESM uplinks MM management via MM uplink IGESM management via IGESM uplink MM and IGESM use the same VLAN on different uplinks Data traffic uses other VLANs Figure 5-48 Scenario 5: Physically common management and data networks; Management Module uplink and IGESM uplinks provide IGESM management path 70 Cisco Systems Intelligent Gigabit Ethernet Switch Module In scenario 5, we attempt to utilize the uplink ports on the IGESM to manage the IGESM, and use the uplink port of the Management Module to manage the Management Module, but we place them in the same VLAN and presumably the same IP subnet. In this design, at times both the Management Module and the IGESM vie for control of the IP address on the IGESM (by way of each sending out gratuitous ARPs for the IGESM’s IP address toward the upstream network), and upstream devices can become confused about the best path to the IGESM. This design may work at times and at other times fail, as upstream devices may try to send packets destined for the IGESM directly to the IGESM over its uplinks (works) or to the Management Module (during the gratuitous ARP war), at which point the Management Module may or may not pass this data on to the IGESM (fails). Figure 5-49 demonstrates these issues. Because of the unexpected and uncontrolled outcome of this design, it is not recommended. External device ARP – Who owns IP 172.16.1.10? 1 I own 172.16.1.10 My MAC is MM MAC VLAN X I own 172.16.1.10 My MAC is IGESM MAC 2 Sw Bay - external management over all ports enabled 2 ETH 0 Management Module MGMT interface VLAN X IP – 172.16.1.10 ETH 1 BladeCenter External management over all ports: enabled MM and IGESM management in same VLAN and IP subnet on upstream network Both MM and IGESM respond to inbound ARP requests for IGESM IP. Issue A: If upstream device gets MM MAC, any packets sent to it for the IGESM IP address will usually not be responded to (failed connection). If upstream device gets MAC of IGESM, packets will be sent directly to IGESM and IGESM will respond (successful connection). Issue B: To compound further, when the IGESM sees the MM’s ARP response, it sends out a gratuitous ARP saying that it owns the IP address. The MM then sends its own ARP response saying it owns it and… ARP war, as ARPs are sent back and forth for contention over ownership of the address. End result: Intermittent Telnets and pings to the IGESM with this configuration Figure 5-49 Upstream issues: Why scenario 5 is not recommended Chapter 5. Cisco Systems IGESM management and user orientation 71 5.3.12 Scenario 6 (not recommended) IGESM management using IGESM uplinks IGESM, Management Module, and Data Traffic all in common VLAN Common Management/Data Network 802.1Q trunk(s) or mode access Mode access VLAN X Sw Bay - external management over all ports enabled ETH 0 Management Module MGMT Interface VLAN X ETH 1 IGESM Bay 1 - 4 VLAN X To blade servers BladeCenter Flow Name All Traffic Flow Line VLAN X Description All traffic on a single VLAN Poor Design - Common Network Management enabled for IGESM uplinks MM management via MM uplink IGESM management via IGESM uplink MM and IGESM use the same VLAN on different uplinks MM, IGESM and data traffic all on a single VLAN Figure 5-50 Scenario 6: Physically common management and data networks; Management Module uplink and IGESM uplinks provide IGESM management path Scenario 6 is the worst possible design. The issues are as described in scenario 5 (Figure 5-49 on page 71), but we are carrying all traffic on a single VLAN/IP subnet, meaning that we are also mixing data and management traffic. Additionally, the Management Module might possibly attempt to proxy for blade servers within the BladeCenter because they share a common VLAN and presumable IP subnet with the Management Module, causing them to fail to connect properly (Figure 5-51 on page 73). Considering the possible issues as described, this design is not advised and will almost certainly lead to very unsatisfactory operation of the BladeCenter. 72 Cisco Systems Intelligent Gigabit Ethernet Switch Module Blade server sends initial ARP to world requesting info for own IP address (essentially a duplicate IP address check) ARP – “Who has 172.16.1.200?” As a broadcast, this is carried on all ports on the VLAN, including the internal facing ports toward the MM ETH 0 MGMT interface VLAN X Eth1 IP 172.16.1.2 Management ETH 1 Module 2 MM sees ARP request on same IP subnet on internal interface Sends ARP response: “I own 172.16.1.200 !” IGESM Blade server using VLAN X 1 Blade server IP – 172.16.1.200 BladeCenter Blade server on same VLAN as IGESM management VLAN interface MM in same IP subnet as blade server On boot-up or when restarting network drivers, server usually sends out a duplicate IP address check (gratuitous ARP packet asking who owns its IP address). It expects no response and would normally continue bringing up its IP address on to the network. In this case, VLAN used by server is also carried over to the MM. The MM is hardprogrammed to respond (proxy) to all internal ARP requests on its internal Ethernet interface for any request on its own IP subnet. End result in this case: BladeServer sees ARP response and assumes duplicate IP address on network. It usually shuts down the TCP stack at that point and TCP/IP is dead for this server. Figure 5-51 Internal IP ownership issue; combined with the issues in scenario 5, scenario 6 is not recommended Chapter 5. Cisco Systems IGESM management and user orientation 73 5.3.13 Scenario 7 (possible evaluation test environment) IGESM management using Management Module uplinks Management Module and data traffic all in common VLAN IGESM on internally different VLAN, but shares Management Module uplink VLAN for management Common Management/Data Network 802.1Q trunk(s) or mode access Mode access VLAN X VLAN X Must be same IP subnet Sw Bay - external management over all ports disabled ETH 0 Management Module MGMT Interface VLAN Y ETH 1 IGESM Bay 1 - 4 VLAN X If trunk - must block VLAN Y To blade servers BladeCenter Flow Name All traffic IGESM mgmt traffic Flow Line VLAN X X via Y Description All traffic on a single VLAN IGESM mgmt traffic will flow out MM on VLAN X Possible IGESM Evaluation Design - Common Network Management disabled for IGESM uplinks MM management via MM uplink IGESM management via MM uplink MM, IGESM, and data traffic all on a single VLAN Not recommended in a production environment Figure 5-52 Scenario 7: Test Environment only; Management Module uplinks to provide IGESM management path Note: This configuration has a known caveat: If the blade server facing ports (g0/1-14) are trunked, then the IGESM’s management VLAN Y must be blocked from these trunk ports. Failure to block VLAN Y on the blade server facing ports may result in failed ping requests from a blade server to the IGESM’s IP address, as well as an intermittent failure to Telnet from a blade server to the IGESM. However, if the blade server facing ports are set for Access (and for a different VLAN than Y), this caveat does not apply. 74 Cisco Systems Intelligent Gigabit Ethernet Switch Module See 5.3.4, “Considerations: Using the Management Module uplink to manage the IGESM” on page 59 for basic rules for this scenario. Keep in mind that this violates some of those rules as explained below, but is still functional for evaluation purposes. As noted earlier, this scenario might prove useful for evaluating the IGESM on a single VLAN test network. But because it shares the same VLAN for all traffic, it is not advised for use in production environments. Two important facts about this design: Management over the IGESM uplinks must be disabled to prevent the IGESM and Management Module from competing for management of the IGESM IP address (ARP war for who controls the IGESM’s IP address). Only the Management Module should provide the management path to the IGESM in this environment. The IP subnet used by the Management Module and the IGESM must be the same. The defaults for the IGESM have the management VLAN interface as VLAN 1, with ports going to the blade servers and uplinks tending to default to VLAN 2 (depending on the configurations on the other sides of the links). One approach that is encountered frequently in test environments places all traffic on VLAN 1. While placing all traffic on a single VLAN (especially VLAN 1) defies best practices, it may be suitable for limited test environments. If this sort of test environment were so desired, it would first be necessary to create the new management VLAN for the IGESM, then change the IGESM’s management interface to the newly created VLAN, and then place the blade server and uplink facing ports on VLAN 1. The following procedures are for setting up a test environment that uses VLAN 1 for all user and management traffic, and VLAN 4000 as the IGESM internal VLAN to connect over to the Management Module. VLAN 4000 was chosen only for illustration purposes. Summary of steps to configure scenario 7 1. Change the IGESM’s management interface VLAN. 2. Change the IGESM’s uplink facing ports. 3. Change the IGESM’s blade server facing ports. Changing the IGESM’s management interface VLAN To change the VLAN used by the IGESM to carry traffic over ports g0/15 and g0/16, the first step is to create the new VLAN. For this example, it should be one not assigned for any other use within this IGESM. After the VLAN is created, you must create a new management interface that uses the new VLAN. When the new interface is created, performing no shutdown on the new interface will move the IP address of the IGESM over to this new interface and automatically change the management VLAN on the links on g0/15 and 16 (the native VLAN) to this new VLAN. Syntactically, changing the IGESM’s management VLAN looks as follows: conf t Places IGESM into configuration mode. vlan 4000 Creates the new VLAN to be used for management. For this example we have used VLAN 4000. This is just an example. Whichever VLAN you choose, it must not be used for any other purpose within this IGESM (restriction of this specific scenario). Chapter 5. Cisco Systems IGESM management and user orientation 75 interface vlan 4000 Creates the new management interface based on the new VLAN. no shutdown Brings up the new management VLAN. Moves the IP address over from the old VLAN interface. Shuts down the old VLAN interface. Changes the native VLAN on ports g0/15 and 16 to 4000. Adds VLAN 4000 to the VLAN carried list on g0/15 and 16. end Exits configuration mode. write Saves configuration to NVRAM. Note that if there is more than one IGESM in the BladeCenter, all IGESMs in this chassis will begin reporting a native VLAN mismatch message until they are ready to use the same management VLAN. See 5.3.6, “Considerations: More than a single IGESM in a given BladeCenter” on page 62 for more details. Changing the IGESM’s uplink facing ports The goal of this test network is to place everything onto a single VLAN, and the easiest way to do this is to set the uplinks ports in use to access mode, then set the access VLAN to this desired VLAN. The other side of this connection must be configured accordingly. Also, this connection could just as well be a trunk-type connection, with the native VLAN set to the desired single VLAN to be used. If a trunk is used on the uplinks, you must block the IGESM management VLAN from this trunk. The following commands would be used on any uplink ports (g0/17 – g0/20) that would be carrying this VLAN: conf t Places IGESM into configuration mode. interface g0/17 Must be performed on any uplink to be used. If you are using multiple uplinks, this step must take that into consideration. switchport mode access Sets port for access. As noted above, the other side of this link must also be configured accordingly. switchport access VLAN 1 Sets uplink port (or ports) for VLAN 1. end Exits configuration mode. write Saves configuration to NVRAM. 76 Cisco Systems Intelligent Gigabit Ethernet Switch Module Changing the IGESM’s blade server facing ports Based on the stated goals of this scenario, any blade server ports (g0/1 – 14) also must be placed into VLAN 1. The following text shows an example of placing the blade server in front slot 1 into Access VLAN 1: conf t Places IGESM into configuration mode. interface g0/1 Must be performed on any blade server facing port to be used for this test. switchport mode access Sets port for access. switchport access VLAN 1 Sets blade server facing port (or ports) for VLAN 1. end Exits configuration mode. write Saves configuration to NVRAM. If you leave the port going to the blade server as a trunk, you must block the IGESM’s management VLAN from this trunk. See the caveat at the beginning of this section for details. Important: As already noted in this scenario, using a single VLAN to carry both user and management traffic is not considered a best practice and such a design is not recommended for use in a production network. Chapter 5. Cisco Systems IGESM management and user orientation 77 78 Cisco Systems Intelligent Gigabit Ethernet Switch Module 6 Chapter 6. IBM eServer BladeCenter system initial setup This chapter discusses the network topology and the hardware configured to provide you with a tested and working configuration to help implement your Cisco Systems Intelligent Gigabit Ethernet Switch Module (IGESM) for the IBM Eserver BladeCenter. As noted elsewhere in this document, the information herein applies to the 4-port copper-based IGESM running a 12.1(14) version of IOS. If working with the 4-port SFP-based IGESM or a 4-port copper-based IGESM running 12.1(22) and above code, see the appropriate document for those solutions. © Copyright IBM Corp. 2004, 2005. All rights reserved. 79 6.1 IBM eServer BladeCenter system In this section, we discuss the stages of our preparing our BladeCenter for operation. 6.1.1 Management Module firmware After the required hardware has been installed in your BladeCenter, you should update the Management Module using IBM eServer BladeCenter - Management Module Firmware Update Version 1.10 or later. Go to the following Web sites to acquire the firmware: http://www.ibm.com/pc/support/site.wss/document.do?lndocid=MIGR-54939 Or search for the latest version at: http://www.ibm.com/servers/eserver/support/xseries/index.html Follow the installation and setup instructions in the readme file. Only the files with the .pkt extension need to be installed. After the installation, you must restart the Management Module. See Figure 6-1. Figure 6-1 Management Module firmware update files 6.1.2 Management Module network interface In this section, we configure the Management Module external and internal network interfaces to exist upon the management subnet. The external network interface IP address is attached to the network outside of the BladeCenter. This is the address used to contact the Management Module from an external device. 80 Cisco Systems Intelligent Gigabit Ethernet Switch Module Establishing a physical connection to the Management Module The only way to manage the Management Module is through the external 10/100 Mbps Ethernet port on the front of the module. To establish the physical connection to the Management Module, use one of the following methods: Use a Category 3, 4, 5, or higher unshielded twisted pair (UTP) straight-through cable to connect the Ethernet port on the Management Module to a switch in a network that has an accessible management station. Use a Category 3, 4, 5, or higher cross-over cable to connect a management station (PC, laptop) directly to the external Ethernet port of the Management Module. Accessing the Management Module Web interface After you establish the physical connection to the Management Module, configure the management station with an available IP address in the same subnet as the Management Module. By default, the subnet is 192.168.70.0/24. You have two primary methods to manage the Management Module: HTTP Web interface IBM Director We use the Management Module Web interface to demonstrate the initial configuration of the Management Module and the switch module configuration. Follow these steps to establish a management session with the Management Module and to configure the initial switch module settings: 1. Open a Web browser and connect to the Management Module using the configured IP address. The default IP address for the Management Module external interface is 192.168.70.125. Note that the default IP address for the internal interface is 192.168.70.126. 2. Enter the user ID and password. The default is USERID and PASSW0RD (case-sensitive with a zero in the place of the letter O). Click OK. 3. At the initial window, click Continue to access the management session. You can also refer to the BladeCenter Management Module User’s Guide on the IBM BladeCenter Documentation CD. Configuring the Management Module network interfaces After you access the Management Module Web interface, you will be able to configure the external and internal network interfaces. From the BladeCenter Management Module Web interface, click MMControl → Network Interfaces. Chapter 6. IBM eServer BladeCenter system initial setup 81 Figure 6-2 Management Module External Network Interface window The BladeCenter Management Module defaults to the IP address 192.168.70.125. If you have more than one BladeCenter on your Management Network, you are required to change the external network interface (eth0). If you do not, you will have IP address conflicts that will result in not being able to access your Management Modules. In Figure 6-2, we configured the external interface to be on the same default management subnet with a unique IP address. After the external interface is configured, the internal interface needs to be configured with another unique IP address. The purpose of internal network interface (eth1) (Figure 6-3) is to communicate with the BladeCenter devices across an Ethernet link. Note that if you do not configure the internal interface on the same network as the External interface, you will not have IP connectivity from the Management Module to your switches modules. Figure 6-3 Management Module Internal Network Interface window Click Save at the bottom of the page. The Management Module must be restarted to implement the changes. 82 Cisco Systems Intelligent Gigabit Ethernet Switch Module 6.1.3 I/O module management tasks In this section, we set up and configure the Cisco Systems IGESM. IGESM setup and configuration The IGESM can be installed into any of the four BladeCenter switch bays in the rear of the chassis. Bay 1 is attached to one of the Ethernet Network Interfaces Controllers (NIC) on the blade HS20. Bay 2 is attached to the other Ethernet NIC. Each NIC is a Gigabit Full Duplex link to only one of the switches. As for HS40, which has a total of four NICs as standard, each two NICs link to one switch. A switch in bay 3 or bay 4 is required when a Gigabit Ethernet Expansion Card is being installed on the blade. This card provides an additional two NICs to the blades. One of the NICs has a dedicated Gigabit Full Duplex link to bay 3 and the other NIC to bay 4. To manage the Cisco Systems Intelligent Gigabit Ethernet Switch Module in bay 1: From the BladeCenter Management Module, click I/O Module Tasks → Management. A window similar to the one in Figure 6-4 opens. Figure 6-4 I/O Module Tasks: Management (Bay 1 Ethernet SM) window As with the Management Module, the switch must have a unique IP address and be on the same subnet as the Management Module for out-of-band management (5.2.1, “Out-of-band management definition” on page 40). Enter a Gateway address if attaching to other networks is required. If in-band management (5.2.2, “In-band management definition” on page 41) is desired, the IP address must be in a different subnet than the Management Module. In addition, when in-band management is configured, you must ensure that the VLAN that is configured on the switch is carried on the IGESM’s uplinks. See 5.3, “In-depth management path discussions” on page 55 for details about selecting and configuring for in-band (IGESM management via the IGESM uplinks) or out-of-band (IGESM management via the Management Module uplink). Click Save to apply these changes immediately. Rebooting or resetting is not required. Chapter 6. IBM eServer BladeCenter system initial setup 83 Enable IGESM uplink ports through the Management Module In this section, we enable the Ethernet ports of the Cisco Systems Intelligent Gigabit Ethernet Switch Module from the BladeCenter Management Module. In the I/O Module Tasks → Management (Bay 1 Ethernet SM) window shown in Figure 6-4 on page 83, click Advanced Management. If necessary, scroll down to the Advanced Setup section. You must at least set the External ports to Enabled for data to be sent out through the switch (Figure 6-5). Click Save for the changes to be applied immediately. Figure 6-5 I/O Module Tasks: Management - Advanced Setup In our example, we enabled all options except External Management over all ports under Advanced Setup. Review the list to determine what items you seek to enable: Fast POST Use this field to enable or disable fast POST on this module. When fast POST is enabled, memory diagnostics are bypassed; when disabled, memory diagnostics are executed during POST. External ports Use this field to enable or disable the external ports of this I/O module. When the external ports are disabled, no traffic can go through these ports. If this field is set to Disabled, any attempt at performing no shutdown on ports G0/17 -20 will result in an error message such as Shutdown not allowed. 84 Cisco Systems Intelligent Gigabit Ethernet Switch Module External management over all ports Use this field to enable or disable external configuration management of this module. When this field is set to Disabled, only the Management Module ports can be used to change the configuration on this module (in other words, out-of-band management). When the field is set to Enabled, all ports (including internal, external, and Management Module ports) are enabled for management and you must follow certain rules. See 5.3, “In-depth management path discussions” on page 55 for details about using this setting to define IGESM management paths. Preserve new IP configuration on all resets Use this field to specify whether you want the user-defined IP configuration to be preserved when the module’s factory defaults are restored or when a reset is initiated by a source other than the Management Module. If this field is set to Enabled, be sure a valid IP configuration is entered for this switch module in the Management Module settings for this switch. If this field is set to Disabled, the factory default IP configuration will become active when the switch factory defaults are restored or when a switch reset is initiated by a source other than the Management Module. In this case, any user-defined IP configuration for the IGESM stored on the Management Module will not be used. Note that although setting this value to Disabled allows the IGESM to use its NVRAM stored IP information on subsequent reboots of the IGESM, when the Management Module reboots it will still place its version of the IGESM IP address on to the IGESM. Therefore it is strongly recommended that you leave this setting at Enabled to prevent the different IP information from being utilized when the IGESM reloads as opposed to when the Management Module reloads. The only way to effectively utilize this setting as Disabled is to store the same information in the Management Modules IGESM settings as is stored in the NVRAM of the IGESM. This ensures that no matter which reloads (the Management Module or the IGESM), the correct IP information will be on the IGESM. IGESM firmware download In this section, we load the latest version of the switch module’s firmware. Determining the level of Cisco switch software After you install the Cisco Switch Module in your BladeCenter unit, make sure that the latest Cisco switch operating system is installed on the module. To determine the level of the Cisco switch operating system software that is installed on the switch module: 1. Log on to the IGESM Command Line Interface. 2. Run the show version command. 3. Review the version information returned for current revision. For the bulk of this project, we used the Cisco Systems IGESM firmware build 12.1 [14] AY. Obtaining the latest level of switch software To determine the latest level of the Cisco switch operating system software that is available from IBM, complete the following steps: 1. Go to http://www.ibm.com/pc/support/site.wss/ 2. Click Downloads and drivers. 3. In the Downloads and drivers window Quick path field, enter the switch machine model number (for example, 8832-21x) and click Go. A Results window opens, displaying a list of links to the latest available software. Chapter 6. IBM eServer BladeCenter system initial setup 85 4. Compare the level of software that you noted from the show version command to the latest level of available software. If the two software levels do not match, download the latest level from the Web and install it on your switch. Upgrading the switch software Switch software is upgraded through a TFTP server application. Typically, this software runs as an application under your operating system. Make sure that the software is installed on your server, then download the software images from the IBM Web site into a directory on your TFTP server. Enable the TFTP server and set its default directory to the one where the image is. To transfer the software image files from the TFTP server to the switch, you must establish a Telnet session through the Management Module. To make sure you have a connection, ping the TFTP server. The Telnet session performs optimally if all three network entities (TFTP server, Management Module, and switch IP addresses) are on the same subnet. Otherwise, you must use a router. Use the Management Module graphical interface to configure the IP addresses of the Management Module external network interface (eth0) and the Cisco Systems Intelligent Gigabit Ethernet Switch Module so that they are on the same subnet as the TFTP server. Installing a TFTP server In this section, we show how to transfer firmware to the Cisco Systems Intelligent Gigabit Ethernet Switch Module. Note that we are not recommending the use of any particular TFTP product because several good products are available on the World Wide Web. However, to demonstrate our example, we used SolarWinds TFTP. The TFTP Server from SolarWinds runs on these Microsoft operating systems: Windows 95, 98, NT, ME, 2000, and XP. We obtained SolarWinds TFTP from the following Web site: http://www.solarwinds.net/Tools/Free_tools/TFTP_Server/ Click TRY NOW and fill out the form on the page. Execute the downloaded file to install the code, and reboot the machine. The default configuration does not allow files to be transmitted from the installed machine. Configure SolarWinds by performing the following steps: 1. Click File → Configure (Figure 6-6). Figure 6-6 TFTP Server window 86 Cisco Systems Intelligent Gigabit Ethernet Switch Module 2. Change the TFTP Root Directory to the location of the Cisco switch firmware to be updated (Figure 6-7). Figure 6-7 Switch firmware location 3. Click the Security tab and change the TFTP Server to Transmit and Receive files. Click OK to save. The TFTP Server is now running. Figure 6-8 TFTP Server Configuration window Security tab Upgrading code Use the Management Module graphical interface to start a Telnet session, as described in the following steps, or if Remote Management is enabled on the external switch ports, open a Telnet session from an attached workstation’s DOS prompt: 1. Access and log on to the Management Module Web interface, as described in “Accessing the Management Module Web interface” on page 81. 2. From the I/O Module Tasks menu, click Management. The BladeCenter Management Module window opens. Chapter 6. IBM eServer BladeCenter system initial setup 87 3. Click Advanced Management in the bay in which the switch resides. 4. To start a Telnet session, click Start Telnet Session. Note: The Java 1.4 Plug-in is required to run this application. If it is not installed, it will be downloaded if an Internet connection is available. If an Internet session is not available, download it and install it separately. Complete these steps to upgrade the switch software: 1. Enter your user ID and password. If you do not have an assigned user identifier (ID) and initial password, type the default user ID (USERID) in the User ID field and the default password (PASSW0RD, where O is a zero) in the Password field and press Enter. 2. Using the CLI, type the following command and press Enter: archive download-sw tftp://xxxx/yyyy (xxxx is the IP address of the TFTP server and yyyy is the image to be downloaded; for example, cigesm-i6q4l2-tar.121-14.ay.tar) 3. A successful download produces a message similar to: New software image installed in flash:/cigesm-i6q4l2-mz.121-14.AY Configuring system to use new image...done. 4. When the download is complete, at the CLI prompt, type reload and press Enter, and type y and press Enter. 6.2 Blade server initial configuration In this section, we prepare the IBM eServer BladeCenter HS20s for operation. 6.2.1 Firmware update There are two primary methods to update the firmware of the BladeCenter HS20: Update diskettes Download the firmware diskette image. Create an update diskette and boot the HS20 with it. The updates need to be done one by one for each firmware. UpdateXpress CD IBM UpdateXpress provides an effective and simple way to update server firmware. UpdateXpress is a CD containing a self-starting program that allows you to maintain your system firmware and Windows device drivers at the most current levels defined on the CD. UpdateXpress automatically detects currently applied device driver and firmware levels and presents them to you. It then gives you the option of selecting specific upgrades or allowing UpdateXpress to update all of the items that it detected as needing upgrades. UpdateXpress For our example, we used IBM UpdateXpress Version 3.03 to perform the firmware updates to our HS20 servers. Go to the following Web site to obtain UpdateXpress V3.03: http://www.ibm.com/pc/support/site.wss/document.do?lndocid=MIGR-53046 88 Cisco Systems Intelligent Gigabit Ethernet Switch Module Note: The UpdateXpress CD might not always provide the latest level updates at the time of configuration, because updates are released as needed. This applies to both firmware and device drivers. Check the IBM Support Web site for the updates released later than the UpdateXpress CD: http://www.ibm.com/servers/eserver/support/xseries/index.html Getting started Prior to starting IBM UpdateXpress, you should back up your system unless you have a pristine system. The IBM UpdateXpress CD is a DOS-startable (bootable) CD; you can use the CD to start the system. You also can start the server from the hard disk drive and access files on the CD after the server starts. Always update your system in the following order: 1. Update the device drivers. (Start from the hard disk and access the IBM UpdateXpress CD.) 2. Update the firmware. (Start from the UpdateXpress CD.) Before the firmware update, make sure that your server can successfully restart. Note: In our example, we dealt with pristine HS20 systems. Therefore, we uploaded our firmware to the HS20 servers first. After loading the HS20s with the respective operating systems, we then launched UpdateXpress to update the operating systems with the supported device drivers. Firmware update In this section, we complete updating the firmware on the supported servers, HS20 Type 8832. We performed following steps to update the firmware: 1. Start the system from the UpdateXpress CD. Note: The Help button is not available in startable-CD mode. To view online help, go to the \help\Xpress directory on the UpdateXpress CD. All installed firmware components are displayed. If a firmware component needs to be updated or verified, it is automatically selected. If the firmware is at the same level as the firmware that is on the CD, the check box for that firmware is cleared. Note: A 60-second countdown timer is displayed in the Firmware Update window. The selected firmware components are automatically updated when the timer reaches zero. To stop the timer, press any key. 2. Select or deselect the firmware components to be updated. 3. Click Apply Update. 4. Remove the UpdateXpress CD from the CD-ROM drive. Then, restart the server. After UpdateXpress completes updating the firmware to your servers, and so forth, you should review current firmware levels by selecting Monitors → Firmware VPD on the Management Module Web interface, which opens a window similar to the one shown in Figure 6-9 on page 90. Chapter 6. IBM eServer BladeCenter system initial setup 89 Figure 6-9 BladeCenter Firmware VPD window 6.2.2 Operating systems In this section, we prepare the use of our operating systems for the BladeCenter HS20s. Creating a Microsoft Windows 2000 Server installation CD To install Microsoft Windows 2000 Server or Advanced Server, you must have a shrink-wrapped version integrated with Service Pack 3 or later. However, if you or your customer have acquired an Enterprise Agreement and receive CD updates, the latest Service Pack integrated Windows 2000 Server CD will be provided. Consult your Microsoft contacts for details. Early editions of the Microsoft Windows 2000 Server operating system are not loadable onto the BladeCenter HS20s, because the operating system did not include the USB driver support integrated in the build. To resolve this issue, we created a bootable Windows 2000 Server CD with an integrated Service Pack 3 or later. These service packs include the USB drivers needed to load an HS20. To create a bootable CD-ROM with Service Pack 3, perform the following steps: 1. On a Windows 2000 machine, download and extract the service pack with the /x option (for example, W2Ksp3.exe /x) to a directory such as d:\images\sp3\. This will unpack the 90 Cisco Systems Intelligent Gigabit Ethernet Switch Module service pack without installing it. Note that from this machine, you should be able to create a new CD-ROM image. We downloaded the image from: http://www.microsoft.com/windows2000/downloads/servicepacks/sp3/sp3lang.asp 2. Copy the i386 directory from the Windows 2000 CD to the machine with the CD writer, to the d:\images\bootcd\i386 directory. 3. Apply the service pack with the /s option to the d:\images\bootcd\ directory. We used the command: d:\images\sp3\update\update /s:d:\images\bootcd 4. Extract the boot sector from the Windows 2000 installation CD-ROM using an appropriate application. Several CD writing applications have this functionality. 5. Copy the boot sector to the machine with the CD writer, to the d:\images\bootsect\ directory. 6. Make sure that the following files are located in the d:\images\bootcd\ directory; the files not present should be copied to the d:\images\bootcd directory from the original CD-ROM. – CDROM_NT.5. – CDROM_IA.5, CDROM_IS.5, or CDROM_IP.5 depending on the version of Windows 2000: Advanced, Standard, or Professional. – CDROMSP3.TST. – Optionally, copy the following files: Autorun.inf, Read1st.me, readme.doc, and setup.exe from the original CD-ROM. 7. Use CD writer software that is capable of creating a bootable CD-ROM. 8. Use the following settings in your CD writer application. Your settings might look slightly different or not exist at all, depending on the CD writer application used. – Set the load segments to 07C0. – Set the sector count to 4. – Set the emulation-mode to no emulation. – Enable Joliet extensions. – Set the CD format to mode 1. – Set the file/directory length to ISO level 2. – Set the file system to ISO9660. – Select disc-at-once as the recording method. – Select the Bootsector file located in d:\images\bootsect\. 9. Write the CD-ROM and finalize the disc. Installing Windows 2000 device drivers using UpdateXpress The primary methods to install device drivers to BladeCenter HS20 are: Update diskettes or installer application. Download the diskette image and create an update diskette, or download the installer application, and then run installation. The installation needs to be done for each different device driver. UpdateXpress CD. UpdateXpress V3.3, which we previously used for firmware, also enables updating the device drivers on a supported server running Windows Server 2003, Windows 2000 Server, or Windows NT® 4.0. Refer to 6.2.1, “Firmware update” on page 88. Chapter 6. IBM eServer BladeCenter system initial setup 91 In this section, we update the device drivers on the supported servers, HS20 Type 8832 running Windows Advanced Server 2000, using UpdateXpress V3.3. Complete the following steps to update the device drivers: 1. Start the system. 2. Insert the UpdateXpress CD into the CD-ROM drive. Note: If the CD-ROM does not automatically start UpdateXpress, use DOS to navigate to the UpdateXpress directory on the CD; then, run launch.exe. UpdateXpress displays all of the supported device drivers that it detects. If the device driver does not have to be updated, it is displayed as unavailable; if it has to be updated, it is displayed as a checked item. If the installed device driver version detected by UpdateXpress is at the same level as the version on the CD, a cleared check box for that device driver is displayed. 3. Select or clear the check boxes for the specific device drivers. 4. Click Apply Update. The selected device drivers are updated. 5. Save all open files and close all open software. 6. Restart the system. Microsoft Windows 2000 Broadcom driver installation Windows 2000 does not ship with the drivers needed to run the Broadcom Ethernet NICs. The drivers must be updated for the NICs to be usable. To obtain the Broadcom NetXtreme Gigabit Ethernet drivers for your Microsoft Windows 2000 systems, go to: http://www.ibm.com/pc/support/site.wss/document.do?lndocid=MIGR-43815 For our example, this Web site provided us the Broadcom NetXtreme Gigabit Ethernet Software CD for the BCM570x-based servers and adapters Version 7.0.5. You should acquire Version 7.0.5 or later for setting up your operating system environment. This supports the following machines: BladeCenter HS20 Type 8678 (all) IntelliStation E Pro 6216 (all), 6226 (all) IntelliStation Z Pro 6221 (all) IntelliStation M Pro 6219 (all) xSeries 205 8480 (all) xSeries 225 8647 (all) xSeries 235 8671 (all) xSeries 255 8685 (all) xSeries 305 8673 (all) xSeries 335 8676 (all), 8830 (all) xSeries 440 8687 (all) Note: In our example, we use BladeCenter HS20 Type 8832. Although this type was not listed in the supported machines, the IBM support search engine directed us to the location of the Broadcom NetXtreme Gigabit Ethernet Software CD for the BCM570x-based servers and adapters Version 7.0.5. We loaded the drivers and they worked fine without error. 92 Cisco Systems Intelligent Gigabit Ethernet Switch Module Red Hat Linux AS 2.1 Broadcom driver installation In this section, we install Red Hat Linux AS 2.1. After loading the operating system, the network drivers worked immediately. However, we downloaded the latest Broadcom device drivers for Linux and performed the instructions in Example 6-1 to install them. The latest Broadcom device drivers were obtained from the following URL: http://www.ibm.com/pc/support/site.wss/document.do?lndocid=MIGR-54186 Example 6-1 RPM install of Broadcom device drivers for HS20 [root@localhost root]# mount /dev/sda /mnt/floppy [root@localhost root]# ls -al /mnt/floppy total 285 drwxr-xr-x 2 root root 7168 Dec 31 1969 . drwxr-xr-x 4 root root 4096 Apr 13 16:22 .. -rwxr-xr-x 1 root root 279887 Jan 6 20:06 basplnx-6.2.1-1.src.i386.rpm [root@localhost root]# [root@localhost root]# cp /mnt/floppy/basplnx-6.2.1-1.src.i386.rpm /tmp [root@localhost root]# [root@localhost root]# cd /tmp [root@localhost tmp]# rpm -ivh basplnx-6.2.1-1.src.i386.rpm 1:basplnx ########################################### [100%] [root@localhost tmp]# [root@localhost tmp]# cd /usr/src/redhat/ [root@localhost redhat]# [root@localhost redhat]# rpm -bb ./SPECS/basplnx.spec Executing(%prep): /bin/sh -e /var/tmp/rpm-tmp.4397 drwxr-xr-x root/root 0 2004-01-06 12:05:14 ./ -rw-r--r-- root/root 5648 2004-01-06 12:05:13 ./basp.4.gz -rwxr-xr-x root/root 26544 2004-01-06 12:05:13 ./baspcfg -rw-r--r-- root/root 1921 2004-01-06 12:05:13 ./baspcfg.8.gz -rw-r--r-- root/root 2240 2004-01-06 12:05:13 ./bcmtype.h -rw-r--r-- root/root 6913 2004-01-06 12:05:13 ./blf.c -rw-r--r-- root/root 1312 2004-01-06 12:05:13 ./blfcore.h -rw-r--r-- root/root 53116 2004-01-06 12:05:13 ./blfcore.o -rw-r--r-- root/root 122 2004-01-06 12:05:13 ./blfopt.h -rw-r--r-- root/root 1795 2004-01-06 12:05:13 ./blfver.h -rw-r--r-- root/root 4622 2004-01-06 12:05:14 ./Makefile drwxr-xr-x root/root 0 2004-01-06 12:05:09 ./nice-2.2.16/ -rw-r--r-- root/root 77592 2004-01-06 12:05:14 ./nice-2.2.16/3c59x.c -rw-r--r-- root/root 79140 2004-01-06 12:05:14 ./nice-2.2.16/acenic.c -rw-r--r-- root/root 73926 2004-01-06 12:05:14 ./nice-2.2.16/eepro100.c -rw-r--r-- root/root 430585 2004-01-06 12:05:14 ./nice-2.2.16/acenic_firmware.h -rw-r--r-- root/root 14528 2004-01-06 12:05:14 ./nice-2.2.16/acenic.h drwxr-xr-x root/root 0 2004-01-06 12:05:09 ./nice-2.4.16/ -rw-r--r-- root/root 101644 2004-01-06 12:05:14 ./nice-2.4.16/3c59x.c -rw-r--r-- root/root 79195 2004-01-06 12:05:14 ./nice-2.4.16/eepro100.c -rw-r--r-- root/root 6194 2004-01-06 12:05:13 ./nicext.h -rw-r--r-- root/root 60792 2004-01-06 12:05:13 ./pal.c -rw-r--r-- root/root 11513 2004-01-06 12:05:13 ./pal.h -rw-r--r-- root/root 22076 2004-01-06 12:05:13 ./readme.txt -rw-r--r-- root/root 11322 2004-01-06 12:05:13 ./release.txt drwxr-xr-x root/root 0 2004-01-06 12:05:09 ./scripts/ -rwxr-xr-x root/root 2722 2004-01-06 12:05:14 ./scripts/basp -rwxr-xr-x root/root 3332 2004-01-06 12:05:14 ./scripts/baspteam -rwxr-xr-x root/root 3924 2004-01-06 12:05:14 ./scripts/baspif -rwxr-xr-x root/root 2729 2004-01-06 12:05:14 ./scripts/team-sample -rwxr-xr-x root/root 2723 2004-01-06 12:05:14 ./scripts/team-gec -rwxr-xr-x root/root 2859 2004-01-06 12:05:14 ./scripts/team-vlan drwxr-xr-x root/root 0 2004-01-06 12:05:14 ./ -rw-r--r-- root/root 5648 2004-01-06 12:05:13 ./basp.4.gz Chapter 6. IBM eServer BladeCenter system initial setup 93 -rwxr-xr-x root/root 26544 2004-01-06 12:05:13 ./baspcfg -rw-r--r-- root/root 1921 2004-01-06 12:05:13 ./baspcfg.8.gz -rw-r--r-- root/root 2240 2004-01-06 12:05:13 ./bcmtype.h -rw-r--r-- root/root 6913 2004-01-06 12:05:13 ./blf.c -rw-r--r-- root/root 1312 2004-01-06 12:05:13 ./blfcore.h -rw-r--r-- root/root 53116 2004-01-06 12:05:13 ./blfcore.o -rw-r--r-- root/root 122 2004-01-06 12:05:13 ./blfopt.h -rw-r--r-- root/root 1795 2004-01-06 12:05:13 ./blfver.h -rw-r--r-- root/root 4622 2004-01-06 12:05:14 ./Makefile drwxr-xr-x root/root 0 2004-01-06 12:05:09 ./nice-2.2.16/ -rw-r--r-- root/root 77592 2004-01-06 12:05:14 ./nice-2.2.16/3c59x.c -rw-r--r-- root/root 79140 2004-01-06 12:05:14 ./nice-2.2.16/acenic.c -rw-r--r-- root/root 73926 2004-01-06 12:05:14 ./nice-2.2.16/eepro100.c -rw-r--r-- root/root 430585 2004-01-06 12:05:14 ./nice-2.2.16/acenic_firmware.h -rw-r--r-- root/root 14528 2004-01-06 12:05:14 ./nice-2.2.16/acenic.h drwxr-xr-x root/root 0 2004-01-06 12:05:09 ./nice-2.4.16/ -rw-r--r-- root/root 101644 2004-01-06 12:05:14 ./nice-2.4.16/3c59x.c -rw-r--r-- root/root 79195 2004-01-06 12:05:14 ./nice-2.4.16/eepro100.c -rw-r--r-- root/root 6194 2004-01-06 12:05:13 ./nicext.h -rw-r--r-- root/root 60792 2004-01-06 12:05:13 ./pal.c -rw-r--r-- root/root 11513 2004-01-06 12:05:13 ./pal.h -rw-r--r-- root/root 22076 2004-01-06 12:05:13 ./readme.txt -rw-r--r-- root/root 11322 2004-01-06 12:05:13 ./release.txt drwxr-xr-x root/root 0 2004-01-06 12:05:09 ./scripts/ -rwxr-xr-x root/root 2722 2004-01-06 12:05:14 ./scripts/basp -rwxr-xr-x root/root 3332 2004-01-06 12:05:14 ./scripts/baspteam -rwxr-xr-x root/root 3924 2004-01-06 12:05:14 ./scripts/baspif -rwxr-xr-x root/root 2729 2004-01-06 12:05:14 ./scripts/team-sample -rwxr-xr-x root/root 2723 2004-01-06 12:05:14 ./scripts/team-gec -rwxr-xr-x root/root 2859 2004-01-06 12:05:14 ./scripts/team-vlan Executing(%build): /bin/sh -e /var/tmp/rpm-tmp.4397 gcc -DLINUX -D__KERNEL__ -DMODULE -I/lib/modules/2.4.9-e.24smp/build/include -Wall -Wstrict-prototypes -O2 -c blf.c gcc -DLINUX -D__KERNEL__ -DMODULE -I/lib/modules/2.4.9-e.24smp/build/include -Wall -Wstrict-prototypes -O2 -c pal.c ld -r -o basp.o blf.o pal.o blfcore.o Executing(%install): /bin/sh -e /var/tmp/rpm-tmp.67022 mkdir -p /var/tmp/basplnx-buildroot/dev mknod /var/tmp/basplnx-buildroot/dev/basp c 0 0 mkdir -p /var/tmp/basplnx-buildroot/usr/bin cp -f baspcfg /var/tmp/basplnx-buildroot/usr/bin mkdir -p /var/tmp/basplnx-buildroot/etc/init.d cp -f scripts/basp /var/tmp/basplnx-buildroot/etc/init.d mkdir -p /var/tmp/basplnx-buildroot/etc/basp/samples cp -f scripts/baspteam /var/tmp/basplnx-buildroot/etc/basp cp -f scripts/baspif /var/tmp/basplnx-buildroot/etc/basp cp -f scripts/team-sample /var/tmp/basplnx-buildroot/etc/basp/samples cp -f scripts/team-gec /var/tmp/basplnx-buildroot/etc/basp/samples cp -f scripts/team-vlan /var/tmp/basplnx-buildroot/etc/basp/samples mkdir -p /var/tmp/basplnx-buildroot/usr/src/nice-2.2.16 cp -f nice-2.2.16/* /var/tmp/basplnx-buildroot/usr/src/nice-2.2.16 cp -f nicext.h /var/tmp/basplnx-buildroot/usr/src/nice-2.2.16 mkdir -p /var/tmp/basplnx-buildroot/usr/src/nice-2.4.16 cp -f nice-2.4.16/* /var/tmp/basplnx-buildroot/usr/src/nice-2.4.16 cp -f nicext.h /var/tmp/basplnx-buildroot/usr/src/nice-2.4.16 mkdir -p /var/tmp/basplnx-buildroot/usr/share/man/man4 cp -f basp.4.gz /var/tmp/basplnx-buildroot/usr/share/man/man4 mkdir -p /var/tmp/basplnx-buildroot/usr/share/man/man8 cp -f baspcfg.8.gz /var/tmp/basplnx-buildroot/usr/share/man/man8 mkdir -p /var/tmp/basplnx-buildroot/lib/modules/`uname -r`/kernel/net/basp 94 Cisco Systems Intelligent Gigabit Ethernet Switch Module cp -f basp.o /var/tmp/basplnx-buildroot/lib/modules/`uname -r`/kernel/net/basp mkdir -p /var/tmp/basplnx-buildroot/lib/modules/`uname -r`/build/include/linux cp -f nicext.h /var/tmp/basplnx-buildroot/lib/modules/`uname -r`/build/include/linux Processing files: basplnx-6.2.1-1 Executing(%doc): /bin/sh -e /var/tmp/rpm-tmp.67022 Finding Provides: (using /usr/lib/rpm/find-provides)... Finding Requires: (using /usr/lib/rpm/find-requires)... PreReq: /bin/sh /bin/sh /bin/sh rpmlib(PayloadFilesHavePrefix) <= 4.0-1 rpmlib(CompressedFileNames) <= 3.0.4-1 Requires(interp): /bin/sh /bin/sh /bin/sh Requires(rpmlib): rpmlib(PayloadFilesHavePrefix) <= 4.0-1 rpmlib(CompressedFileNames) <= 3.0.4-1 Requires(post): /bin/sh Requires(preun): /bin/sh Requires(postun): /bin/sh Requires: ld-linux.so.2 libc.so.6 /bin/sh libc.so.6(GLIBC_2.0) libc.so.6(GLIBC_2.1) libc.so.6(GLIBC_2.1.3) Wrote: /usr/src/redhat/RPMS/i386/basplnx-6.2.1-1.i386.rpm Executing(%clean): /bin/sh -e /var/tmp/rpm-tmp.3526 [root@localhost redhat]# rpm -ivh RPMS/i386/basplnx-6.2.1-1.i386.rpm Preparing... ########################################### [100%] 1:basplnx ########################################### [100%] [root@localhost redhat]# ________________________________________________________________________________________________ 6.2.3 Broadcom Advanced Control Suite installation Network interface card (NIC) teaming is one method for providing high availability and fault tolerance in IBM eServer servers. In this example, we use Broadcom Advanced Server Program (BASP) to implement teaming functionality along with load balancing, fault tolerance, and VLAN tagging. To enable NIC teaming, the Broadcom Advanced Control Suite application must be used on the HS20s. The program is included with the drivers, which you can download at: http://www.ibm.com/pc/support/site.wss/document.do?lndocid=MIGR-43815 To install the suite, perform the following steps: 1. Navigate to the location where the Broadcom Advanced Control Suite application files were extracted (default C:\Drivers\BcomXXX, where XXX is the code level). Execute Launch.exe. You will see a window similar to the one shown in Figure 6-10 on page 96. Chapter 6. IBM eServer BladeCenter system initial setup 95 Figure 6-10 Broadcom selection window 2. Click MANAGEMENT PROGRAMS, and a window similar to Figure 6-11 opens. Figure 6-11 Select Features window 3. Select Control Suite and BASP. Click Next to continue, then click Finish. 96 Cisco Systems Intelligent Gigabit Ethernet Switch Module 6.3 Firmware and device drivers used in this example We applied the following firmware and drivers to our environment: IBM eServer BladeCenter Management Module: – Management Module Firmware Update Version 1.10 BladeCenter HS20(8832) firmware: – BladeCenter HS20 (Type 8832) - Flash BIOS Update Version 1.04 – BladeCenter HS20 (Type 8678,8832) - blade server integrated system management processor firmware update Version 1.04 – Broadcom NetXtreme firmware level 3.21 Cisco Systems Intelligent Gigabit Ethernet Switch Module firmware: – Cisco Systems IGESM firmware build level 12.1 [14] AY BladeCenter HS20(8832) device drivers for Windows 2000 Advanced Servers: – Broadcom NetXtreme Device Driver 7.33.00 – Broadcom Advanced Server Program 7.12.01 – Broadcom Advanced Control Suite 7.0.8 (All included in Broadcom NetXtreme Gigabit Ethernet Software CD for the BCM570x-based servers and adapters Version 7.0.5.) BladeCenter HS20(8832) device drivers for Red Hat Linux AS 2.1: – Broadcom BCM5700 Linux Driver Version 7.1.22 – Broadcom Advanced Server Program (BASP) Driver for Linux Version 6.2.1 Chapter 6. IBM eServer BladeCenter system initial setup 97 98 Cisco Systems Intelligent Gigabit Ethernet Switch Module 7 Chapter 7. Cisco Systems IGESM configuration and network integration This chapter discusses the configuration of several scenarios that incorporate the IBM Eserver BladeCenter, using the embedded Cisco Systems Intelligent Gigabit Ethernet Switch Module (Cisco Systems IGESM), into a data center type environment. We provide configuration examples using both the Cisco command-line interface (CLI) and the Cluster Management Suite (where appropriate). There are two primary objectives for this chapter: To provide several topology examples and their step-by-step configurations To provide examples about how blade servers can be integrated in to these topologies In general, the blade server configurations offered are to be considered only as possible options for configuration. Examples that show such things as four different blade servers using four different techniques for attachment are not an endorsement for doing all of these configurations at once within a given BladeCenter. They are only meant to serve as configuration examples for some of the possible options. As with most designs, keeping things simple is usually the best recipe for success. As noted elsewhere in this document, the information herein applies to the 4-port copper-based IGESM running a 12.1(14) version of IOS. If working with the 4-port SFP-based IGESM or a 4-port copper-based IGESM running 12.1(22) and above code, see the appropriate document for those solutions. © Copyright IBM Corp. 2004, 2005. All rights reserved. 99 7.1 Introduction to configuration and integration The Cisco Systems IGESM module discussed in this document is a standards-based layer 2 switch, with QoS features based on layer 2 through 4 information, using Cisco Systems Internet Operating System (IOS). It contains most of the features and functionality traditionally associated with a Cisco switch, in a hot-pluggable module dedicated for use in a BladeCenter. 7.1.1 For those familiar with Cisco Systems switches This section is for users familiar with Cisco switches using IOS. Although the Cisco Systems IGESM is based on the feature set available in a Cisco 2950 switch running Enhanced Image (EI) software, there are some differences between the Cisco Systems IGESM and a stand-alone 2950. This is because of the nature of its inclusion in the BladeCenter and interactions with the Management Module, among other things. The following sections discuss some of these differences. Cisco Systems IGESM ports are designated for specific roles and cannot be re-tasked Figure 7-1 and Figure 7-2 show two different examples of the port connections to the Cisco Systems IGESM(s) within the IBM BladeCenter. We then discuss the specific roles and restrictions for the various ports. 14 ports 1000 Mbps Internal links to Blade Servers BladeServerSlot1 BladeServerSlot2 BladeServerSlot3 BladeServerSlot4 BladeServerSlot5 BladeServerSlot6 BladeServerSlot7 BladeServerSlot8 BladeServerSlot9 BladeServerSlot10 BladeServerSlot11 BladeServerSlot12 BladeServerSlot13 BladeServerSlot14 G0/1 G0/2 G0/3 G0/4 G0/5 G0/6 G0/7 G0/8 G0/9 G0/10 G0/11 G0/12 G0/13 G0/14 2 ports -100 Mbps MM1 Internal links to the MM2 Management Modules G0/15 G0/16 Serial 1 port RJ45 Service port Serial console connection on faceplate Cisco Systems IGESM Connections Figure 7-1 Connections on the Cisco Systems IGESM 100 17 18 19 20 Cisco Systems IGESM Module BladeCenter Cisco Systems Intelligent Gigabit Ethernet Switch Module 4 ports 10/100/1000 Mbps RJ45 links for external network connections G0/17 G0/18 G0/19 G0/20 Top IGESM (Bay 1) 1 2 3 4 5 17 6 7 8 9 10 11 12 13 14 15 16 18 19 20 IGESM External uplinks Eth1 1 1 1 1 1 1 1 1 1 1 1 1 1 1 B S S 1 B S S 2 B S S 3 B S S 4 B S S 5 B S S 6 B S S 7 B S S 8 B S S 9 B S S 1 0 B S S 1 1 B S S 1 2 B S S 1 3 B S S 1 4 2 2 2 2 2 MM1 Uplink Eth0 MM1 MM2 Eth0 2 2 2 2 2 2 2 2 2 MM2 Uplink Eth1 1 2 3 4 5 6 7 8 9 10 11 12 13 14 15 Bottom IGESM (Bay 2) BladeCenter Chassis 16 17 18 19 20 IGESM External uplinks (BSS = Blade Server Slot) Figure 7-2 Overall view of port connections within a BladeCenter Ports G0/1 through G0/14: Connects to blade server slots 1 through 14, respectively: Preset default values for ports going to the blade servers (includes ports g0/1 through g0/14, shown is for g0/1): description blade1 switchport access vlan 2 switchport trunk native vlan 2 switchport trunk allowed vlan 2-4094 switchport mode trunk spanning-tree portfast trunk spanning-tree bpdufilter enable Hard-coded to Auto negotiation, but only support 1000/full duplex to the blade servers. This cannot be changed at this time, but future revisions of code may support the ability to set these ports to a no negotiate condition and force the link to 1000/full. Port defaults to operate as a trunk link (switchport mode trunk) carrying VLANs 2 through 4094 (switchport trunk allowed vlan 2-4094). If no changes are made to these defaults (trunk port with native VLAN 2), when a server is attached to this port with no special software —for example, the BASP teaming software discussed later in this chapter—the server shows up as being on VLAN 2. To use a different VLAN, either use BASP software to assign VLANs at the blade server or change Chapter 7. Cisco Systems IGESM configuration and network integration 101 the port on the Cisco Systems IGESM to be an access port (switchport mode access) and then set the access VLAN to the desired VLAN (switchport access vlan x). You can also change the default VLAN by leaving it trunked and changing the native VLAN to some other value. Portfast and BPDU Filter enabled by default on blade server ports. Portfast and BPDU filters can be disabled by users. All blade server ports are given a default description to match their function. Ports G0/15 through G0/16: Connects to Management Modules 1 and 2, respectively: Preset default values for ports going to the Management Modules (includes ports g0/15 and g0/16, shown is for g0/15): description mgmt1 switchport trunk allowed vlan 1 switchport mode trunk switchport nonegotiate spanning-tree cost 100 Speed is hard-coded at 100 full and cannot be changed. Ports cannot be administratively shut down. – This is by design to ensure that the links to the BladeCenter Management Modules are not inadvertently brought down by the administrator. – Note that only one of these ports (g0/15 or g0/16) will be active at one time (only one Management Module is active at any given time). In most cases, port 15 going to Management Module 1 is the active port, while port 16 will show as: GigabitEthernet0/16 is down, line protocol is down (notconnect) This status for g0/16 will only change to up/up when the Cisco Systems IGESM receives an event notification that the second Management Module is active. Both ports hard-coded as trunks and cannot be set to access ports. The management VLAN (default is VLAN 1) is always in a Spanning Tree forwarding state on ports g0/15 and g0/16. This is to help ensure communications between the Cisco Systems IGESMs and the Management Modules. All other VLANs can be put into the blocking state through STP if a loop is detected. Note that there is a hidden filter (not visible or controllable by the administrator) that prevents any packet entering one of the uplink ports (g0/17 -20) from exiting toward the Management Module ports (g0/5-16) and vise-versa. This ensures that packets will not loop endless (prevents spanning tree loop). Spanning Tree port cost is set to 100 by default (only effects non-management VLANs as previously noted). This value can be changed by the user, but it is not recommended to do so, because unexpected STP blocks might occur. VLAN characteristics for ports g0/15 and g0/16 can only be changed by changing the management VLAN. When activating a different management VLAN (for example, create a new VLAN, create a new VLAN interface, and then do a no shut). Ports g0/15 and g0/16 will automatically make this VLAN their native VLAN and allow it to pass on their trunked links (switchport trunk allowed vlan X). This is by design and is the only way you can control the native VLAN settings for these two ports. 102 Cisco Systems Intelligent Gigabit Ethernet Switch Module Ports G0/17 through G0/20: Connects to external ports 17 through 20, respectively: Preset default values for ports going to external connections (includes ports g0/17 through g0/20, shown for port g0/17): description extern1 switchport trunk native vlan 2 These ports default to shutdown when in a new BladeCenter. You must use the Management Module Web interface, under I/O tasks, Advanced settings to set External Ports to Enabled) to bring them up the first time. If you do not Enable these ports via the Management Module, any attempt at performing no shutdown will result in the error message % Shutdown not allowed on this interface. To resolve this message you must log into the Management Module and go into advanced settings for each IGESM and set External ports to Enabled. Default native VLAN is set to 2. RJ45 Service port: This is the traditional RJ45 serial console port found on most Cisco products: – Default settings: 9600, N, 8, 1 – Supports speeds up to 115,200 bps When initially shipped, a cap plate is installed into the console port RJ45 jack that must be removed prior to inserting a cable. The cap reduces the likelihood of someone plugging an Ethernet cable into this port. See “Possible issues with Hyperterm when using the console port” on page 237 for information on a possible issue and workaround with using this port. Important: The default port settings shown above are produced after a write erase/reload on the Cisco Systems IGESM. It should be noted that using the default int command from config term mode does not produce the results as shown, but totally removes all configurations from the port being defaulted. Based on this difference, the default int command should be used with caution on the Cisco Systems IGESM. Default values are different from most other Cisco switches after a write erase As previously shown, the default interface values used by the Cisco Systems IGESM are different from most other Cisco switches. Besides the interface defaults previously shown, the following list shows some other non-traditional Cisco defaults in use by the Cisco Systems IGESM: Default SNMP values: – snmp-server community public RO – snmp-server community private RW The default for most Cisco switches is a single VLAN (VLAN1). The Cisco Systems IGESM has two default VLANs: – Management - VLAN 1 – Operational - VLAN 2 As noted elsewhere in this document, the blade server ports have VLAN 1 removed by default. This is critical to maintain isolation between the blade servers and the management VLAN of the Cisco Systems IGESMs. Chapter 7. Cisco Systems IGESM configuration and network integration 103 See 5.3, “In-depth management path discussions” on page 55 for more details on why this is important. Default Spanning Tree settings: – spanning-tree mode rapid-pvst Rapid-PVST implements 802.1w for quicker recovery from issues in a layer 2 network without having to perform a lot of extra commands that were necessary prior to 802.1w to achieve this same rapid recovery. – no spanning-tree optimize bpdu transmission – spanning-tree extend system-id A default user (the user name is USERID with a password of PASSW0RD, numeric zero for O) is created: – username USERID privilege 15 secret 5 $1$7/1C$.lbXvHc5lyBHDzAZ9WpfT0 The management VLAN IP address information is not lost during a write erase As a direct result of a feature being enabled on the Management Module (under I/O Modules Advanced Setup), after a Cisco Systems IGESM is cleared (write erase/reload or through the GUI), the BladeCenter Management Module will provide its currently saved IP information for that Cisco Systems IGESM. This is to help ensure that the Cisco Systems IGESM can always be accessed over from the Management Modules. This action (providing or not providing the Cisco Systems IGESM its default address) can be partially controlled from the Management Modules Web interface (see “Control of the IGESM IP address information” on page 237 for details on enabling or disabling the feature called Preserve new IP configuration on all resets). Also, if you change this setting to disabled, it is assumed that you plan on managing the IGESM via its own uplinks. See 5.3.5, “Considerations: Using the IGESM uplinks to manage the IGESM” on page 61 for details on why this is the case. The default Cisco Systems IGESM IP addressing provided by the Management Module for a new BladeCenter is as follows: Switch bay 1: 192.168.70.127/24 Switch bay 2: 192.168.70.128/24 Switch bay 3: 192.168.70.129/24 Switch bay 4: 192.168.70.130/24 Based on certain interactions within the BladeCenter, it is usually not recommended to change the management IP address directly on the Cisco Systems IGESM, but instead only change it through the Management Module Web-based GUI. In particular, changing the address through the CLI of the Cisco Systems IGESM to a different address on the same subnet can lead to a condition where a duplicate IP address is reported, even though there is not one. This is the result of the Management Module responding to Address Resolution Protocol (ARP) requests coming from the internal Cisco Systems IGESM ports for any address on its IP subnet. To prevent this condition, only change the IP address of the Cisco Systems IGESM through the Management Module GUI. See Appendix A, “Hints and tips” on page 227 for more information. See 6.1.2, “Management Module network interface” on page 80 for information about using the Management Module GUI. 104 Cisco Systems Intelligent Gigabit Ethernet Switch Module 7.2 Management network considerations This section discusses an extremely important topic for the BladeCenter: the selection of the management VLAN and its use within the BladeCenter. Although the BladeCenter has some very specific needs regarding its management VLAN, it might help to first generically understand the importance of selecting a suitable VLAN for management traffic, as well as the role the native VLAN can play in this selection. For an excellent discussion about selecting the management and native VLAN, see the “Switch Management Interface and Native VLAN” section in the Best Practices document (this requires a Cisco user ID and password), available at: http://www.cisco.com/en/US/partner/products/hw/switches/ps700/products_white_paper09186a008 01b49a4.shtml For a more specific source of information about management network configuration when utilizing an IGESM in the BladeCenter, see 5.3, “In-depth management path discussions” on page 55. Management VLAN with specific respect to the BladeCenter In discussions about the BladeCenter, the management VLAN refers to the only active VLAN interface on each Cisco Systems IGESM (the default is VLAN 1) that is used for connection through IP as one possible way to manage the switches. This same management VLAN is directly tied to ports g0/15 and g0/16 on the Cisco Systems IGESM, which in turn attaches the Cisco Systems IGESMs to the Management Modules. The Management Module has certain roles, one of which is to permit a connection through it into the Cisco Systems IGESMs for the purpose of managing the Cisco Systems IGESMs. A side effect of this responsibility is that the Management Module will respond to ARP requests for all addresses in its current subnet on its internal connections to the Cisco Systems IGESMs (proxying for the Cisco Systems IGESMs). If a blade server is on the same VLAN and in the same IP subnet, it usually will report a duplicate IP address as a result of the Management Module responding to a blade server ARP when it is confirming that no one has its address. For more information, see 5.3.12, “Scenario 6 (not recommended)” on page 72. Another side effect can be seen when a blade server running as a DHCP client is placed on the IGESM management VLAN. In most cases, before a DHCP server will issue an IP address to a client, it sends out a gratuitous ARP checking whether that address is already in use. If the Management Module sees this gratuitous ARP on its internal interface, it responds that it owns the address (performing as a proxy for the subnet), and the DHCP server marks it as in use and attempts to use a different IP address (with the same results). The result is that the DHCP pool is used up and no IP addresses are available for use on the subnet. Still another side effect of the design of the internal management network is that the Management Module bridges at least certain packets. (Running the show cdp neighbor command on a Cisco Systems IGESM shows that the other Cisco Systems IGESM is attached directly, even though it is actually bridged through the Management Module). With this in mind, we strongly recommend that you follow one simple rule: Keep the blade servers in the BladeCenter off of the management VLAN in use by the Cisco Systems IGESMs. To this end, the default configurations on the Cisco Systems IGESMs isolate VLAN 1 from the blade server ports. This does not, however, stop one from simply adding VLAN 1 to a blade server port. Chapter 7. Cisco Systems IGESM configuration and network integration 105 Because the default VLAN for the management VLAN is 1, under the rule above, do not place blade servers on VLAN 1. If you change the management VLAN to something other than 1 (by creating a new VLAN, creating an interface for that new VLAN, and performing a no shutdown on the new interface), do not put blade servers on this new VLAN. The previously mentioned Best Practices document for management and native VLAN selection has some other great reasons for keeping management traffic and user traffic separate, but suffice it to say that the requirements of the BladeCenter go even further in demanding that these networks (the management VLAN and VLANs used by the blade servers) be kept isolated. Paths for management of the Cisco Systems IGESM See 5.3, “In-depth management path discussions” on page 55 for a discussion about the various paths that can be used to manage the Cisco Systems IGESM in the BladeCenter. 7.3 Base configurations for examples used in this chapter Before discussing the specifics of the combinations of configurations available in this environment, it is necessary to discuss some basics of configuration and operation as used during the creation of this document. 7.3.1 Hardware and software used for the production of this document The following sections list the hardware and software used during the production of this document. It should be noted that the choice of the 6500s and their components was made based on the assumption that the BladeCenter is being deployed in a mission-critical data center environment, where high availability and high performance are of utmost importance. IBM eServer BladeCenter configuration The BladeCenter was configured as follows: Two IBM eServer BladeCenter chassis (8677-1xx) each with: – Five HS20s per BladeCenter chassis (8832-21x) • Two 2.8 Ghz CPUs (#73P5983) upgrades • One 40 GB Hard Disk Drive (#48P7063) • Two 256 MB DIMMs and two 1 GB DIMMs (#33L5039) upgrades • One Gigabit Ethernet Expansion Card (#73P9030) (not used during the creation of this chapter) – Four 1800 watt power supplies (#13N0570) upgrades per BladeCenter chassis – Two Cisco Systems Intelligent Gigabit Ethernet Switch Modules (#13N2281) – Two BladeCenter Management Modules (#48P7055) Cisco Systems Intelligent Gigabit Ethernet Switch Module Two Cisco Systems IGESMs running the following code: IOS Version: 12.1(14)AY Image name: cigesm-i6q4l2-mz.121-14.AY.bin 106 Cisco Systems Intelligent Gigabit Ethernet Switch Module Note that the current revision of code available at the time of this most recent update to this document is 12.1(14)AY4. It is strongly recommended that this or a newer revision be installed to ensure all recent bug fixes are applied and new features are available. Cisco Catalyst 6500 switch hardware and software Two Cisco Catalyst 6509s each with: IOS version: 12.2(17d)SXB Image name: s72033-jk9sv-mz.122-17d.SXB.bin Module in slot 2: 48 CEF720 48 port 10/100/1000mb Ethernet – Model number: WS-X6748-GE-TX • Hardware: 1.4 • Firmware: 12.2(14r)S5 • Software: 12.2(17d)SXB – Sub-module: Centralized Forwarding Card - WS-F6700-CFC (Hw 2.0) Module in slot 5: Supervisor Engine 720 – Model number: WS-SUP720-BASE • Hardware: 2.1 • Firmware: 7.7(1) • Software: 12.2(17d)SXB – Sub-module: Policy Feature Card 3 - WS-F6K-PFC3A (Hw 1.1) – Sub-module: MSFC3 Daughterboard - WS-SUP720 (Hw 1.2) Module in slot 6: CEF720 4 port 10-Gigabit Ethernet – Model number: WS-X6704-10GE • Hardware: 1.2 • Firmware: 12.2(14r)S5 • Software: 12.2(17d)SXB – Sub-module: Centralized Forwarding Card - WS-F6700-CFC (Hw 1.1) – Two - 10GBASE-LR XENPAK module One - DS-CAC-2500W Power supply One - WS-C6K-9SLOT-FAN2 Fan tray 7.3.2 Preconfiguration preparation (base configuration information) All configurations and testing were performed on clean systems. In the case of the Cisco Systems IGESMs and 6500s, the units were restored to the factory default through the CLI interface command write erase, deleting the vlan.dat file, and performing a reload on the switches. Important: Performing the operations above will result in all configuration data being lost on the mentioned devices, which in turn, will lead to network downtime if performed on production systems. The commands are presented here only to indicate the preparation performed prior to commencement of lab testing for this document. Important: If working in a production network, be sure to understand the consequences of any commands issued. Failure to completely understand the operation of commands can lead to network down conditions. Chapter 7. Cisco Systems IGESM configuration and network integration 107 Note: Available features and command syntax can be different with different versions of code. This document was prepared using the features and syntax from the aforementioned revisions of code, and as such, might vary from other revisions. For complete and current lists of available features and commands for these products, visit the IBM or Cisco Web sites. Base configuration options common to all examples Here, we list some configuration options established that are common to all of the examples. These are only for demonstration purposes in the examples and may or may not be duplicated in your particular environment. All example configurations will have some combination of the following VLANs configured: VLAN 2, 10, 15, 20, 25, 30, 35, 40, 45, and/or 50. The following VLANs will be placed on the following blade servers (exact number and placement will depend on such things as trunking and SLB teaming for the given example): BladeServer1: VLAN 10, 15, 20, 25 BladeServer2: VLAN 10, 20 BladeServer3: VLAN 30 BladeServer4: VLAN 35, 40, 45, 50 Note: The VLANs chosen here are only for the purposes of demonstration and may or may not be a part of your particular network. All configurations assume that VLAN 2 is the native VLAN (native VLAN is untagged) for all trunked links except g0/15 and g0/16 (this is the default for the Cisco Systems IGESM). All configurations assume that VLANs carried on trunks will be limited to only those that are necessary (this is a good security practice). All configurations presented in this section force 6500-1 to be the Spanning Tree root for all VLANs. There is a high probability that any existing network will already have a desired switch (or switches if load balancing VLANs) configured as the root. It is very important that you understand the proper selection of the root bridge, and it is not recommended that the Cisco Systems IGESM be allowed to become the root bridge. Allowing the Cisco Systems IGESM to become the root bridge can result in sub-optimal data flow within the layer 2 network. Cisco Systems IGESM base configurations Only a couple of things needed to be done to Cisco Systems IGESM1 and Cisco Systems IGESM2 to prepare them for configuration for the examples after their configurations were wiped out: Add the correct host name to each Cisco Systems IGESM, from the config term mode: – On Cisco Systems IGESM1: hostname CIGESM1 – On Cisco Systems IGESM2: hostname CIGESM2 Place each server in the IBMLAB VTP domain: – On each Cisco Systems IGESM: vtp domain IBMLAB If this were a brand new BladeCenter, you would have to connect to the Management Module and go into I/O module tasks and Advanced Settings for each IGESM and Enable External Ports (default is Disabled) at least once. 108 Cisco Systems Intelligent Gigabit Ethernet Switch Module Using the Management Module Web interface Perform the following steps to use the Management Module Web interface to enable the external ports of the Cisco Systems IGESMs for the first time: 1. Point your browser to the external IP address of the Management Module in bay 1 (defaults to 192.168.70.125) and log on using the following credentials: ID= USERID and Password = PASSW0RD (where 0 in password is a numeric zero). 2. On the left side of the window, under I/O module tasks, click Management. 3. On the right side of the window, select Bay 1 and then select Advanced Management. 4. On the right side of the window, under Advanced Setup, change External Ports to Enable and click Save. 5. Repeat for any other Cisco Systems IGESMs. Cat 6500 base configurations The Cisco Systems IGESMs in each example were wiped out and a base configuration was applied prior to the commencement of each example. In the case of the 6500s, the switch was reset to the factory default. Afterward, the following configuration was applied to simulate portions of a preexisting Cisco network (as mentioned previously, this is only an example and more than likely will vary from your production network). Several things to note about this base configuration include: VLAN 2 has been pre-added to both switches. VLANs 10, 15, 20, 25, 20, 25, 40, 45, and 50 have already been created. L3 interfaces have been created for each VLAN (10, 15, 20, and so on) for the purposes of providing a pingable point on the external switches. The blade servers usually have at least one default gateway. Although the choice of how many default gateways to use is up to the user (see more information about this subject in “Default gateway configuration on multihomed servers” on page 228), the configuration should make use of Hot Standby Router Protocol (HSRP) for the default gateway address. This will help to ensure high availability for blade servers pointing at the default gateway. In our case, the default gateways were placed on the 6500s, with HSRP configured on both 6500s to ensure that the blade servers always have a path to other networks. IP addresses used in the base configuration for 6500-1 are as follows: – 6500-1, VLAN 10 address: 10.1.10.251/24 HSRP address: 10.1.10.254/24 – 6500-1, VLAN 15 address: 10.1.15.251/24 HSRP address: 10.1.15.254/24 – 6500-1, VLAN 20 address: 10.1.20.251/24 HSRP address: 10.1.20.254/24 – 6500-1, VLAN 25 address: 10.1.25.251/24 HSRP address: 10.1.25.254/24 – 6500-1, VLAN 30 address: 10.1.30.251/24 HSRP address: 10.1.30.254/24 – 6500-1, VLAN 35 address: 10.1.35.251/24 HSRP address: 10.1.35.254/24 Chapter 7. Cisco Systems IGESM configuration and network integration 109 – 6500-1, VLAN 40 address: 10.1.40.251/24 HSRP address: 10.1.40.254/24 – 6500-1, VLAN 45 address: 10.1.45.251/24 HSRP address: 10.1.45.254/24 – 6500-1, VLAN 50 address: 10.1.50.251/24 HSRP address: 10.1.50.254/24 IP Addresses used in the base for 6500-3 are as follows: – 6500-3, VLAN 10 address: 10.1.10.253/24 HSRP address: 10.1.10.254/24 – 6500-3, VLAN 15 address: 10.1.15.253/24 HSRP address: 10.1.15.254/24 – 6500-3, VLAN 20 address: 10.1.20.253/24 HSRP address: 10.1.20.254/24 – 6500-3, VLAN 25 address: 10.1.25.253/24 HSRP address: 10.1.25.254/24 – 6500-3, VLAN 30 address: 10.1.30.253/24 HSRP address: 10.1.30.254/24 – 6500-3, VLAN 35 address: 10.1.35.253/24 HSRP address: 10.1.35.254/24 – 6500-3, VLAN 40 address: 10.1.40.253/24 HSRP address: 10.1.40.254/24 – 6500-3, VLAN 45 address: 10.1.45.253/24 HSRP address: 10.1.45.254/24 – 6500-3, VLAN 50 address: 10.1.50.253/24 HSRP address: 10.1.50.254/24 In the examples, as part of the base configuration, the switch named 6500-1 will be forced to become the primary root switch as part of its base configuration. This will be done by running the spanning-tree vlan X,Y,Z root primary command such that A, Y, and Z are VLANs in use on the switches. 6500-3 will be configured as spanning-tree vlan X,Y,Z root secondary. The VTP domain name will be set to IBMLAB as part of the base configuration. We recommend that you use the same VTP domain name throughout the data center. In addition, as part of the base configuration, both 6500s will be set to VTP transparent mode. Base configuration for 6500-1 Example 7-1 is an abbreviated list of the running configuration on the 6500-1 (showing the base configuration to be used for each of the examples). Note that a no shutdown command was issued on all of the base interfaces in use in the following example. Example 7-1 6500-1 base configuration hostname DC6500-1 ! vtp domain IBMLAB 110 Cisco Systems Intelligent Gigabit Ethernet Switch Module vtp mode transparent ! spanning-tree mode rapid-pvst spanning-tree vlan 1-2,10,15,20,25,30,35,40,45,50 priority 8192 ! enable password ese ! vlan 2 ! vlan 10 name Web ! vlan 15 name User ! vlan 20 name Application ! vlan 25 name Backup ! vlan 30,35,40,45,50 ! interface Port-channel1 switchport switchport trunk encapsulation dot1q switchport trunk allowed vlan 1,2,10,15,20,25,30,35,40,45,50 switchport mode trunk switchport nonegotiate ! interface TenGigabitEthernet6/1 no ip address switchport switchport trunk encapsulation dot1q switchport trunk allowed vlan 1,2,10,15,20,25,30,35,40,45,50 switchport mode trunk switchport nonegotiate channel-group 1 mode active no shutdown ! interface TenGigabitEthernet6/2 no ip address switchport switchport trunk encapsulation dot1q switchport trunk allowed vlan 1,2,10,15,20,25,30,35,40,45,50 switchport mode trunk switchport nonegotiate channel-group 1 mode active no shutdown ! interface Vlan1 ip address 192.168.70.1 255.255.255.0 no ip redirects no shutdown ! interface Vlan10 ip address 10.1.10.251 255.255.255.0 no ip redirects no ip proxy-arp arp timeout 200 Chapter 7. Cisco Systems IGESM configuration and network integration 111 standby 1 ip 10.1.10.254 standby 1 timers 1 3 standby 1 priority 110 standby 1 preempt delay minimum 60 standby 1 authentication cisco no shutdown ! interface Vlan15 ip address 10.1.15.251 255.255.255.0 no ip redirects no ip proxy-arp arp timeout 200 standby 1 ip 10.1.15.254 standby 1 timers 1 3 standby 1 priority 110 standby 1 preempt delay minimum 60 standby 1 authentication cisco no shutdown ! interface Vlan20 ip address 10.1.20.251 255.255.255.0 no ip redirects no ip proxy-arp arp timeout 200 standby 1 ip 10.1.20.254 standby 1 timers 1 3 standby 1 priority 110 standby 1 preempt delay minimum 60 standby 1 authentication cisco no shutdown ! interface Vlan25 ip address 10.1.25.251 255.255.255.0 no ip redirects no ip proxy-arp arp timeout 200 standby 1 ip 10.1.25.254 standby 1 timers 1 3 standby 1 priority 110 standby 1 preempt delay minimum 60 standby 1 authentication cisco no shutdown ! interface Vlan30 ip address 10.1.30.251 255.255.255.0 no ip redirects no ip proxy-arp arp timeout 200 standby 1 ip 10.1.30.254 standby 1 timers 1 3 standby 1 priority 110 standby 1 preempt delay minimum 60 standby 1 authentication cisco no shutdown ! interface Vlan35 ip address 10.1.35.251 255.255.255.0 no ip redirects no ip proxy-arp arp timeout 200 112 Cisco Systems Intelligent Gigabit Ethernet Switch Module standby 1 ip 10.1.35.254 standby 1 timers 1 3 standby 1 priority 110 standby 1 preempt delay minimum 60 standby 1 authentication cisco no shutdown ! interface Vlan40 ip address 10.1.40.251 255.255.255.0 no ip redirects no ip proxy-arp arp timeout 200 standby 1 ip 10.1.40.254 standby 1 timers 1 3 standby 1 priority 110 standby 1 preempt delay minimum 60 standby 1 authentication cisco no shutdown ! interface Vlan45 ip address 10.1.45.251 255.255.255.0 no ip redirects no ip proxy-arp arp timeout 200 standby 1 ip 10.1.45.254 standby 1 timers 1 3 standby 1 priority 110 standby 1 preempt delay minimum 60 standby 1 authentication cisco no shutdown ! interface Vlan50 ip address 10.1.50.251 255.255.255.0 no ip redirects no ip proxy-arp arp timeout 200 standby 1 ip 10.1.50.254 standby 1 timers 1 3 standby 1 priority 110 standby 1 preempt delay minimum 60 standby 1 authentication cisco no shutdown ! line vty 0 4 password ese login ! Base configuration for 6500-3 Example 7-2 shows an abbreviated list of the running configuration on the 6500-3 (showing the base configuration to be used for each of the examples). Note that a no shutdown command was issued on all of the base interfaces in use in the following example. Example 7-2 6500-3 base configuration hostname DC6500-3 ! vtp domain IBMLAB vtp mode transparent ! Chapter 7. Cisco Systems IGESM configuration and network integration 113 spanning-tree mode rapid-pvst spanning-tree vlan 1-2,10,15,20,25,30,35,40,45,50 priority 28672 ! enable password ese ! vlan 2 ! vlan 10 name Web ! vlan 15 name User ! vlan 20 name Application ! vlan 25 name Backup ! vlan 30,35,40,45,50 ! interface Port-channel1 switchport switchport trunk encapsulation dot1q switchport trunk allowed vlan 1,2,10,15,20,25,30,35,40,45,50 switchport mode trunk switchport nonegotiate ! ! interface TenGigabitEthernet6/1 no ip address switchport switchport trunk encapsulation dot1q switchport trunk allowed vlan 1,2,10,15,20,25,30,35,40,45,50 switchport mode trunk switchport nonegotiate channel-group 1 mode active no shutdown ! interface TenGigabitEthernet6/2 no ip address switchport switchport trunk encapsulation dot1q switchport trunk allowed vlan 1,2,10,15,20,25,30,35,40,45,50 switchport mode trunk switchport nonegotiate channel-group 1 mode active no shutdown ! interface Vlan1 ip address 192.168.70.3 255.255.255.0 no ip redirects no shutdown ! interface Vlan10 ip address 10.1.10.253 255.255.255.0 no ip redirects no ip proxy-arp arp timeout 200 standby 1 ip 10.1.10.254 114 Cisco Systems Intelligent Gigabit Ethernet Switch Module standby 1 timers 1 3 standby 1 priority 110 standby 1 preempt delay minimum 60 standby 1 authentication cisco no shutdown ! interface Vlan15 ip address 10.1.15.253 255.255.255.0 no ip redirects no ip proxy-arp arp timeout 200 standby 1 ip 10.1.15.254 standby 1 timers 1 3 standby 1 priority 110 standby 1 preempt delay minimum 60 standby 1 authentication cisco no shutdown ! interface Vlan20 ip address 10.1.20.253 255.255.255.0 no ip redirects no ip proxy-arp arp timeout 200 standby 1 ip 10.1.20.254 standby 1 timers 1 3 standby 1 priority 110 standby 1 preempt delay minimum 60 standby 1 authentication cisco no shutdown ! interface Vlan25 ip address 10.1.25.253 255.255.255.0 no ip redirects no ip proxy-arp arp timeout 200 standby 1 ip 10.1.25.254 standby 1 timers 1 3 standby 1 priority 110 standby 1 preempt delay minimum 60 standby 1 authentication cisco no shutdown ! interface Vlan30 ip address 10.1.30.253 255.255.255.0 no ip redirects no ip proxy-arp arp timeout 200 standby 1 ip 10.1.30.254 standby 1 timers 1 3 standby 1 priority 110 standby 1 preempt delay minimum 60 standby 1 authentication cisco no shutdown ! interface Vlan35 ip address 10.1.35.253 255.255.255.0 no ip redirects no ip proxy-arp arp timeout 200 Chapter 7. Cisco Systems IGESM configuration and network integration 115 standby 1 ip 10.1.35.254 standby 1 timers 1 3 standby 1 priority 110 standby 1 preempt delay minimum 60 standby 1 authentication cisco no shutdown ! interface Vlan40 ip address 10.1.40.253 255.255.255.0 no ip redirects no ip proxy-arp arp timeout 200 standby 1 ip 10.1.40.254 standby 1 timers 1 3 standby 1 priority 110 standby 1 preempt delay minimum 60 standby 1 authentication cisco no shutdown ! interface Vlan45 ip address 10.1.45.253 255.255.255.0 no ip redirects no ip proxy-arp arp timeout 200 standby 1 ip 10.1.45.254 standby 1 timers 1 3 standby 1 priority 110 standby 1 preempt delay minimum 60 standby 1 authentication cisco no shutdown ! interface Vlan50 ip address 10.1.50.253 255.255.255.0 no ip redirects no ip proxy-arp arp timeout 200 standby 1 ip 10.1.50.254 standby 1 timers 1 3 standby 1 priority 110 standby 1 preempt delay minimum 60 standby 1 authentication cisco no shutdown line vty 0 4 password ese login ! 7.4 Guidelines for attaching the BladeCenter to a Cisco infrastructure This section contains information about things to consider when attaching the BladeCenter to a Cisco infrastructure. We highly recommend that you review this entire section prior to any initial configuration changes. We also recommend that you review Appendix A, “Hints and tips” on page 227. as well as 5.3, “In-depth management path discussions” on page 55. 116 Cisco Systems Intelligent Gigabit Ethernet Switch Module The topologies presented in this chapter discuss attaching the BladeCenter to an external infrastructure made up of Cisco 6500s running in native mode (using IOS for all control of the 6500). The 6500 has other possible code configurations (for example, hybrid mode, where both IOS and CatOS are running). Although there are many possibilities for both platform choice and code choice, the 6500 in native mode was chosen as the best option for use in a data center environment. Important: The following link provides information about a comparison between CatOS and IOS, along with showing the different syntaxes for many of the various commands used in this document. This link might prove useful for users attempting to deploy a BladeCenter with connection to a CatOS-based switch: http://www.cisco.com/en/US/products/hw/switches/ps708/products_white_paper09186a00800c84 41.shtml There are also several excellent documents available from both IBM and Cisco about the subject of data center architectures, as well as Best Practices guides. A good place to find many documents and discussions about integrating into a Cisco data center infrastructure is: http://www.cisco.com/go/datacenter For additional assistance, view the 6500 IOS Best Practices guide at (CCO ID required): http://www.cisco.com/en/US/partner/products/hw/switches/ps700/products_white_paper09186a008 01b49a4.shtml 7.4.1 Guidelines and comments The following sections present comments and recommendations related to the various BladeCenter components used in the examples in this chapter. Cable type selection (cross-over or straight-through) Selection of the cable type (cross-over or straight-through) to use between the Cisco Systems IGESM and an external Cisco switch is important. Although both a straight-through and a cross-over have been shown to work correctly in the lab during the creation of this document, there are certain times (such as when hard-coding link speed/duplex characteristics) when only a cross-over cable will work. Based on this, we strongly recommend that you use a cross-over cable between the Cisco Systems IGESMs and upstream switches. This helps ensure that the link will always work under all possible conditions. Note: There have been reports that when using certain upstream modules to connect to the IGESM, the auto-MDIx function does not correctly configure for cross-over or not, and only a straight-through cable will work. If you encounter this scenario, it is okay to use a straight-through cable. This issue is still under investigation at this time. Contact IBM support for any updates to this issue. Speed/duplex selection The decision to allow a port to autonegotiate its speed and duplex, or to force it to a set value, is a subject of frequent debate. Testing in the lab has shown that the Cisco Systems IGESM can correctly negotiate the link when attaching to external Cisco switches. In particular, with Gigabit connections, we strongly recommend that you use auto-negotiation. Chapter 7. Cisco Systems IGESM configuration and network integration 117 Important: Although you can attach the Cisco Systems IGESMs to external switches at 100 Mb speeds, in production environments, we strongly recommend that you use 1000BaseT connections (available on all Cisco platforms suitable for data center environments) to ensure the best possible throughput. Use of the terms trunk and aggregation Some industry terms and acronyms have proven to be a source of confusion. One such term is the word trunk or trunking. This term has been used interchangeably to describe several technologies, most commonly the act of bundling links together to increase performance and reliability, and the act of carrying multiple VLANs on a single connection. Another such term of confusion is the term aggregation or link aggregation. For all discussions in this chapter we follow IEEE definitions for these terms: Trunk or trunking: The act of carrying multiple VLANs on a single connection. The connection might be a single link or a group of links aggregated to form a Link Aggregation Group. The IEEE specification for VLAN trunking is 802.1Q. Aggregation or link aggregation: The act of bundling multiple physical links into one logical link for the purposes of increasing throughput or offering increased reliability or both. Link aggregation is often referred to as EtherChannel in the Cisco world. The IEEE specification for link aggregation is 802.3ad (now part of 802.3-2002). Use of the term native VLAN The term native VLAN is used throughout this chapter to describe a single, designated, untagged VLAN in an 802.1Q trunk. The 802.1Q specification does not define this term, but the concept of untagged VLANs on a trunk is defined within the specification. Cisco has adopted this term to describe a VLAN that provides, among other things, backward compatibility with devices that might not understand 802.1Q tagging, such that at least some communications can take place across this link. In many Cisco networks, this native VLAN has often defaulted to VLAN 1 for 802.1Q trunk connections. If using a native VLAN, it is important that both sides of a trunk link agree to use the same native VLAN. Note that the Cisco Systems IGESM defaults all of its blade server and external connections to native VLAN 2, while most other Cisco switches default the native VLAN to VLAN 1. To prevent native VLAN mismatch messages, this must be taken into account. Link aggregation (EtherChannel) support Although the Cisco Systems IGESM supports Port Aggregation Protocol (PAgP), Link Aggregation Control Protocol (LACP) is the preferred method for performing link aggregation between the Cisco Systems IGESM and Cisco devices, as this is the IEEE standard. If the external Cisco switch being used does not support LACP (for 6500, LACP support began in IOS Version 12.1(13)E), you have the choice of upgrading the switch to newer code that supports LACP or using PAgP or static aggregation. (Use of PAgP and static aggregation are not covered in this chapter, but both are supported with the IGESM). It is always advisable to check the release notes of the revision of Cisco IOS being used to ensure that the feature set you require is present. The examples in this paper use a single module in each 6500 to connect each module over an LACP channel. This is only for convenience in this document; in reality, we highly recommend that you split this aggregation over multiple 6500 modules to increase high availability if a single module should fail. 118 Cisco Systems Intelligent Gigabit Ethernet Switch Module Important: The links connecting the aggregation switches, 6500-1 and 6500-3 in this document, are absolutely critical in the operation and health of the network. Based on this, and as already noted, the links between these two switches should be spread over multiple modules. This will help to ensure that a single module failure in either chassis will not take this entire link down. Ports that are part of an aggregation group must have the same characteristics (speed, duplex, trunk settings, carrying the same VLANs). Having ports with different characteristics will result in unexpected issues, including aggregations failing to form between the Cisco Systems IGESM and Cisco switches. Examples in this chapter that show use of link aggregation are only in reference to layer 2 link aggregation. Options exist to control the way traffic is load-balanced over any aggregated links. This section assumes that default load balancing is in use. See “Default Etherchannel load balancing may not be optimal” on page 237 for procedures for changing Etherchannel load balancing to something other than the default. Spanning Tree The Cisco Systems IGESM supports the current Spanning Tree IEEE standards (for example, 802.1D, 802.1s, 802.1w), as well as the original Cisco enhancements (PVST+) to Spanning Tree, which allow for rapid convergence in the event of a switch or link failure. Current support exists for up to 64 Spanning-Tree instances. As noted previously, the default for the Cisco Systems IGESM is what is referred to as Rapid-PVST, which makes use of 802.1w, instead of the original Cisco extensions, such as UplinkFast and BackboneFast, to achieve rapid recovery from a link or switchdown condition. During the production of this document, at times it was necessary to make a change to an STP port cost to ensure that the default flow of data was the preferred path rather than the default path that STP allowed. As a quick comment on STP port cost, the following applies for this document and the versions of code used: Default STP cost for single 1 Gbps link: 4 Default STP cost for dual 1 Gbps EtherChannel (2 Gbps) link: 3 Default STP cost for quad 1 Gbps EtherChannel (4 Gbps) link: 3 Default STP cost for single 10 Gbps link: 2 Default STP cost for dual 10 Gbps EtherChannel (20 Gbps) link: 1 For a more detailed discussion about Spanning Tree and its operation and configuration, review the following document: http://www.cisco.com/en/US/products/hw/switches/ps628/products_configuration_guide_chapter0 9186a00801a6baa.html BladeCenter HS20 NIC teaming considerations NIC teaming is a server-based technology that is used to provide higher performance or gain fault tolerance by eliminating single points of failure. Teaming enables the logical grouping of physical NICs in the same server into a virtual adapter (or multiple virtual adapters). Three distinct types of teaming are supported by the Broadcom Advanced Server Program (BASP). The BladeCenter HS20 NICs only support the BASP teaming called Smart Load Balancing (SLB, also known as Server Load Balancing) and SLB Auto-Fallback Disable. The HS40 should also be able to support these and may be able to support two other options Chapter 7. Cisco Systems IGESM configuration and network integration 119 involving link aggregation (because the HS40 offers two NICs to each IGESM instead of the HS20’s single NIC to each IGESM), but no testing was done with the HS40 during the creation of this document. IP addressing and MAC addressing When an SLB team is created, IP addresses are configured on the virtual adapter and not on the team member physical NICs. SLB teaming supports both Active/Active and Active/Standby configurations. In both configurations, only one Active NIC’s MAC address will be used to respond to all ARP requests as a MAC address for the virtual team. This means that one NIC is used to receive all traffic. You cannot specify which NIC MAC address will be used for the team MAC address in Active/Active configuration. This is determined by the teaming driver, and in our testing it was not fixed to one of the NICs. This means that the path used for incoming traffic can vary in Active/Active configuration. In Active/Standby, incoming traffic is always carried by the Active NIC. To transmit packets, both NICs can be used in Active/Active mode, although only the active NIC can be used in Active/Standby configuration. Fault tolerance If a loss of link occurs on any active adapter in the Active/Active team, the load distribution is re-evaluated and reassigned to the remaining team member. In case of an Active/Standby team, the standby adapter is activated when the active adapter or adapters are down. In this case, existing application sessions will be maintained. At failover, a directed ARP is sent from the other member of the SLB team to the endpoints communicating with the NIC that went down, containing the team MAC address as the source address. BASP detects link loss with link down of the NIC. Link loss beyond the BladeCenter (such as between the IGESM and its uplink switch) requires the use of the Trunk Failover feature in IOS 12.1(14)AY4 and above. (See 7.7, “Trunk Failover feature description and configuration” on page 193 for details on this feature.) If you do not implement Trunk Failover, you should configure the uplinks for physical high availability, which is demonstrated in topology 2 of this section, to ensure fault tolerance for end-to-end connectivity. Load balancing Active/Active configuration enables load balancing of outbound traffic, because only one active NIC’s MAC responds to ARP requests and incoming traffic is always directed to the MAC. Our tests in the example configurations showed that the load balancing works when the systems are in the same VLAN as the server and not in the routed network. This indicates that it load-balances based on the target MAC address. MAC address-based load balancing is beneficial when the server communicates with other systems within the same layer 2 network. However, if other systems are beyond the layer 2 network (on the other side of a router), the server must communicate with the systems through the router that is set as its default gateway. When communicating with these remote systems, the server sends all traffic to the router, which then sends the traffic to the systems. All traffic destined for these systems is transmitted using the same NIC in the load balancing team and is not load balanced when the MAC address–based algorithm is being used. We highly recommend that you review your network configuration with this view in mind if load balancing is required. IEEE 802.1q tagged VLAN The other function provided by BASP is IEEE 802.1q-tagged VLAN support (trunking). This functionality, in and of itself, is not actually a part of SLB; rather, it is used to assign multiple VLANs to a single physical NIC or teamed virtual adapter. This enables you to configure multiple layer 3 interfaces on a physical NIC and isolate traffic types from each other. Use of VLANs at the blade server level can also help to enforce appropriate security and Quality of Service (QoS) policies. When you use this function, you also must configure the Cisco 120 Cisco Systems Intelligent Gigabit Ethernet Switch Module Systems IGESM port connected to the NIC as a trunk port and configure VLANs accordingly. Also note that the server should have 64 MB of system memory per 8 VLANs configured on a BASP virtual adapter in order to maintain optimum performance. For more information about BASP NIC teaming, refer to the BACS online help and BCM570X Broadcom NetXtreme Gigabit Ethernet Teaming white paper, which is available at: http://www.broadcom.com/collateral/wp/570X-WP100-R.pdf Important: Some of the previous descriptions contain “as is” information based on a test in our specific environment with BASP 7.12.01, the latest as this paper is written, and might differ in different environments or future software releases. 7.4.2 Preliminary information about configuration examples Before we discuss specific configuration examples, it is necessary to discuss some of the basis for all the configurations in this chapter. Some comments about the examples offered in this chapter Important: The examples we provide are steps and commands to complete the desired task. It is likely that a production switch will have configuration commands already in place that conflict with these commands. It is the responsibility of the person configuring the external switches and the Cisco Systems IGESMs to fully comprehend any changes and their resultant consequences. Failure to fully understand the commands can lead to network-down conditions. The provided examples assume that a layer 2 network exists and that you are attempting to connect the BladeCenter to this layer 2 network. Where appropriate, comments about ports being blocked through STP will be included. The examples do not go into network architecture design; instead they focus on the specifics of interfacing the BladeCenter into a Cisco infrastructure with certain characteristics. It is assumed that the administrator understands the need for and ramifications of a proper network design and a layered architectural approach. The BladeCenter supports anywhere from one to four Cisco Systems IGESMs. All examples in this chapter use two IGESMs. Configuration sequence used in this chapter The basic steps that are followed in the production of the examples are: 1. Shut down or uncable the links to be configured (Table 7-1 on page 122). 2. Configure the external switch: – Configure any desired VLANs. – Configure any desired aggregation links. – Configure any desired VLAN trunking options. – Save the configuration to NVRAM. – Repeat for the next external switch. 3. Configure the Cisco Systems IGESM: – Configure any desired VLANs. – Configure any desired aggregation links. – Configure any desired VLAN trunking options. – Configure any desired access links. – Save the configuration to NVRAM. Chapter 7. Cisco Systems IGESM configuration and network integration 121 – Repeat for the next Cisco Systems IGESM. 4. Configure the blade server ports on the server blades: – Configure any desired teaming or SLB, or both. – Configure any desired VLANs/trunking. – Configure any desired access links. – Configure desired IP address. – Repeat for the next blade server. 5. Re-enable or recable the links that were disabled in step 1 (Table 7-2 on page 123). 6. Confirm the desired operation of the configuration. Summary of disconnect procedure to be performed for each example When performing initial configurations or making changes to existing configurations that might have an impact on Spanning Tree (such as changing link aggregation), we recommend that you leave connections uncabled, or shut down, before making the configuration changes. This will reduce the likelihood of any temporary Spanning Tree loops and possible network down conditions that might result in the process of adding or changing configurations. Table 7-1 shows three basic options to disable the connection. Choose the one most suited to your situation. For example, if you will not be physically at the equipment while you are performing the configuration, physically disconnecting the cables is not your best option. Table 7-1 Preconfiguration step: Disable the links being configured Descriptions and comments Via CLI Via Management Module Web interface Via CMS user interface Option 1: Disable the external Cisco Systems IGESM interfaces. Perform from the CLI interface. To disable a single port: config t interface g0/17 shutdown end To disable a range of ports from g0/17 to g0/20: config t interface range g0/17 - 20 shutdown end Repeat for any other Cisco Systems IGESMs. Perform from the Management Module Web interface: 1. On the left side of the window, under I/O module tasks, click Management. 2. On the right side, select Bay 1 then Advanced Management. 3. On the right side under Advanced Setup, change External Ports to Disable and click Save. Repeat for any other Cisco Systems IGESMs. Perform from the CMS interface: 1. In the top menu bar, click Port → Port Settings. 2. Hold down the Ctrl key and click ports Gi0/17 through Gi0/20. 3. Click Modify. 4. Next to Status, select disable. 5. Click OK. 6. Click Apply. Repeat for any other Cisco Systems IGESMs. Option 2: Disable the interface on the external switch. Perform from the enable mode. To disable a single port: config t interface g2/25 shutdown end N/A N/A To disable a range of ports from g2/25 to g2/28: config t interface range g2/25 - 28 shutdown end Repeat for any other external switch. 122 Cisco Systems Intelligent Gigabit Ethernet Switch Module Descriptions and comments Via CLI Via Management Module Web interface Via CMS user interface Option 3: Pull connecting cables from either the Cisco Systems IGESM or the external switch. N/A N/A N/A Summary of reconnect procedure to be performed for each example Table 7-2 includes the steps performed after the configuration of both sides of the connection is complete. It should be the reverse of the procedure used from Table 7-1 on page 122. Table 7-2 Post configuration step: Reconnecting the devices Description and comments Via CLI Via Management Module Web interface Via CMS user interface Option 1: Reenable the Cisco Systems IGESM interface. Perform the following from the CLI interface: To enable a single port: config t interface g0/17 no shutdown end Perform the following from the Management Module Web interface: 1. On the left side of the window, under I/O module tasks, click Management. 2. On the right side, select Bay 1 and then Advanced Management. 3. On the right side, under Advanced Setup, change External Ports to Enable and click Save. Repeat for any other Cisco Systems IGESMs. Perform the following from the CMS interface: 1. In the top toolbar, click Port → Port Settings. 2. Holding down the Ctrl key on your keyboard, click ports Gi0/17 through Gi0/20. 3. Click Modify. 4. Click the down arrow next to Status and select enable. 5. Click OK. 6. Click Apply. Repeat for any other Cisco Systems IGESMs. N/A N/A N/A N/A To enable a range of ports from g0/17 to g0/20: config t interface range g0/17 - 20 no shutdown end Repeat for any other Cisco Systems IGESMs. Option 2: Reenable the interface on the external switch. Note that on newer 6500 code, you might need to do a no shut on the port-channel rather than on the interfaces. Perform the following from the enable mode: To enable a single port: config t interface g2/25 no shutdown end Option 3: Plug cables back into their respective ports. N/A To enable a range of ports from g2/25 to g2/28: config t interface range g2/25 - 28 no shutdown end Repeat for any other external switch. Chapter 7. Cisco Systems IGESM configuration and network integration 123 7.5 Example topologies and their configuration This section provides several topologies and offers reasons for their selection, as well as step-by-step configuration options. 7.5.1 Topology 1: Dual IGESMs, four-port aggregation to two 6500s This example (in Figure 7-3) offers the maximum performance available from the BladeCenter when using two Cisco Systems IGESMs, as well as redundancy, depending on the configuration of the operating systems and features running on the blade servers and the IGESMs within the BladeCenter. It makes use of two Cisco Systems IGESMs, each with all four ports LACP aggregated into a single link, and each going to a separate Cisco switch. No ports will be in a Spanning Tree blocking state with this configuration because each Cisco Systems IGESM only has a single (albeit aggregated) connection into the layer 2 network. Important: This topology is not recommended in environments where high availability to the blade server NICs is required, based on the possibility of loss of connectivity during an all-uplink or aggregation switch failure and the inability of the blade server NICs to sense this upstream failure through the Cisco Systems IGESM (without NIC Teaming or Trunk Failover). To utilize this design for high availability, use NIC Teaming on the servers (available with the BASP software) and Trunk Failover on the IGESMs (available with 12.1(14)AY4 and above). This section shows various forms of NIC Teaming but not Trunk Failover. For an explanation on Trunk Failover and how to implement it, see 7.7, “Trunk Failover feature description and configuration” on page 193. Configurations presented for blade server attachment to this topology Important: The blade server configurations in this chapter are not part of the topology discussion; their configurations are provided to help explain some of the possibilities for attaching the servers to this topology. The examples should not be construed as the way a blade server must be configured. If your only goal is to understand a given server attachment example, review that specific example and its associated upstream connection on the Cisco Systems IGESMs and ignore the extra blade server configurations. The following list describes the blade server configuration (see Figure 7-3) for this example: BladeServer1: 802.1Q trunk links carrying multiple VLANs to a NIC. This configuration is provided to show how to permit multiple VLANs to access each individual NIC in the blade server. It demonstrates one way to isolate traffic types from each other through several VLANs per NIC. Broadcom teaming software is required, but no redundancy is used. BladeServer2: Access ports to NICs through individual connections. This configuration is provided to show how to use each NIC as a standard access link. (No VLANs, trunking, or redundancy is used from the blade server’s perspective.) This is the traditional way most servers were attached in the past, and it is simple and effective, but not very flexible. This configuration is performed using the stock network configuration tools available in Windows 2000. No teaming software is used. We do not show NIC teaming examples suitable for Trunk Failover, which require the same VLANs be carried to both NICs on the blade servers. For examples suitable for use with Trunk Failover, see blade server configs for servers 3 and 4 in the Topology 2 example. 124 Cisco Systems Intelligent Gigabit Ethernet Switch Module To Core Routers Po1 Data Center 6500-1 Aggregation Layer Data Center 6500-3 Mod 6 - 1 Mod 6 - 2 Mod 2 - 25 26 27 28 Mod 6 - 1 Mod 6 - 2 25 26 27 28 - Mod 2 Po2 Po2 Po1 Po1 17 18 19 20 17 18 19 20 CIGESM1 CIGESM2 Trunked VLAN 10 and 15 Access VLAN 10 Trunked VLAN 20 and 25 Management Netw ork Access VLAN 20 M M 1 M M 2 Trunked VLAN 10 and 15 1 Trunked VLAN 20 and 25 2 Access Access 1 2 Management Workstation Blade Server 1 Blade Server 2 BladeCenter Topology 1 between Management Modules andSystems CIGESMs not shown. Links Links between Management Module and Cisco IGESMs not shown. Figure 7-3 Topology 1 Chapter 7. Cisco Systems IGESM configuration and network integration 125 Step 1: Taking down the link or links You should disable links before making any configuration changes (Table 7-1 on page 122). Step 2: Configuring the external switches The following assumptions have been made for this example: The bulk of the configuration for the 6500s is included in the base configuration (see “Cat 6500 base configurations” on page 109), because the goal of this document is to show how to configure the BladeCenter components rather than generic Cisco devices. This section specifically focuses on configuring the 6500 ports that connect to the BladeCenter. VLAN 2 has already been created on the 6500s as part of the base configuration. VTP Domain has already been named and set to transparent as part of the base configuration. Spanning Tree root commands have already been set as part of the base configuration (to make 6500-1 the primary root and 6500-3 the secondary root). The user is already logged on to the switch, and the switch is in enable mode. Commands are being performed in the sequence shown. Cisco Switch Modules in the 6500s being used to connect to the Cisco Systems IGESMs are 1000Base-T-based, and we will be leaving the ports at 1 Gbps full duplex. The aggregation link between the 6500s has already been created as part of the base config and is carrying the desired VLANs (for example, 2, 10, 15, 20). Table 7-3 Configuring the external switches Description and comments On the 6500-1 On the 6500-3 Step 2.1: Create link aggregation. This is for the config t int range g2/25 - 28 switchport spanning-tree guard root description To-BladeCenter CIGESM1 channel-group 2 mode active config t int range g2/25 - 28 switchport spanning-tree guard root description To-BladeCenter CIGESM2 channel-group 2 mode active This creates a logical interface named g2/25 through g2/28 into it. This creates a logical interface named Port-Channel2 and places the interfaces g2/25 through g2/28 into it. int port-channel 2 description EtherChannel to CIGESM1 switchport trunk encapsulation dot1q switchport trunk native vlan 2 switchport trunk allowed vlan 2,10,15 switchport mode trunk spanning-tree guard root end Note: Configuring root guard on the port channel interface between 6500-1 and the Cisco Systems IGESM will help to ensure stability in your network. int port-channel 2 description EtherChannel to CIGESM2 switchport trunk encapsulation dot1q switchport trunk native vlan 2 switchport trunk allowed vlan 2,20,25 switchport mode trunk spanning-tree guard root end Note: Configuring root guard on the port channel interface between 6500-3 and the Cisco Systems IGESM will help to ensure stability in your network. copy running-config startup-config copy running-config startup-config port-channel between the 6500s and their respective Cisco Systems IGESMs. It is always a good practice to provide a description to an interface. Note that spanning-tree guard root is added to both the individual ports and the port-channel to ensure that it is in place. Step 2.2: Configure VLAN and trunking options on the newly created port channels. All desired VLANs were already created as part of the base configuration, and IP addresses were added at that time. This step sets up the aggregated links created in step 2.1 to be 802.1Q trunks and allows the desired VLANs to be carried. Step 2.3: Save config to NVRAM.a Port-Channel2 and places the interfaces a. Failure to save your configuration results in possible network-down conditions if the switch is restarted prior to the save. (All changes since last save will be lost.) 126 Cisco Systems Intelligent Gigabit Ethernet Switch Module Step 3: Configuring Cisco Systems IGESMs This section steps through the sequence of actions required to configure the Cisco Systems IGESMs for this example. It has two major sections: one for configuring the Cisco Systems IGESM in bay 1 and one for configuring the Cisco Systems IGESM in bay 2. The following assumptions have been made for both Cisco Systems IGESM configurations in this example: The user is already logged on to the Cisco Systems IGESM and the switch is in enable mode (or logged into CMS and using the GUI therein). Commands are being performed in the sequence shown. The Cisco Systems IGESM is starting from a base configuration per the “Cisco Systems IGESM base configurations” on page 108. The operating systems in use on the blade servers are Windows 2000. This is important, because which port is considered “first” and which port is considered “second” on a blade server has several dependences, not the least of which is the operating system in use. For an explanation of the blade servers’ connection names and how they are derived, see Appendix A, “Hints and tips” on page 227. On BladeServer1, both ports will be using trunking (but not load balancing) through the Broadcom BASP software. The first port will be configured for VLANs 10 and 15; the second port will be configured for VLANs 20 and 25. On BladeServer2, both ports will be simple access links and will be placed on VLANs 10 and 20, respectively, through port settings on the Cisco Systems IGESMs. Step 3.1: Configuring the first Cisco Systems IGESM (CIGESM1) Table 7-4 shows the steps in configuring CIGESM1, showing both CLI and CMS commands. Important: The current version of CMS supported on the Cisco Systems IGESM has a limitation in its ability to completely control VLANs being placed on a given trunk: It always includes VLAN 1 and 1001-1005, even if you do not set them as allowed. Therefore, its use might not be appropriate for production configuration when trying to control VLANs allowed on a given trunk. Table 7-4 Configuring CIGESM1 Description and comments Actions via IOS CLI for CIGEMS1 Actions via CMS for CIGEMS1 Step 3.1.1: Configure desired VLANs for CIGESM1. Create and name VLANs 10 and 15. Perform from the enable mode: config t vlan 10 name Web vlan 15 name User In the CMS interface: 1. On the top toolbar, click VLAN → VLAN. 2. Click the Configure VLANs tab. 3. Click Create. 4. Enter 10 in the VLAN ID field. 5. Enter Web in the VLAN Name field. 6. Click OK. 7. Click Create. 8. Enter 25 in the VLAN ID field. 9. Enter User in the VLAN Name field. 10. Click OK. 11. Click Apply. 12. Click Refresh to view the new VLANs. Chapter 7. Cisco Systems IGESM configuration and network integration 127 Description and comments Actions via IOS CLI for CIGEMS1 Actions via CMS for CIGEMS1 Step 3.1.2: Configure link aggregation toward 6500-1. int range g0/17 - 20 description To-6500-1 channel-group 1 mode active 1. On the top toolbar, click Port → EtherChannels. 2. Click Create. 3. Select the check boxes next to ports Gi0/17 through Gi0/20. 4. Enter 1 in the Group [1-6] field to select the port channel to use. 5. Click OK. 6. Click Apply or OK. This example uses LACP to form the aggregation. Note that there does not seem to be a way to assign a name to a port-channel through CMS. Step 3.1.3: Configure 802.1Q trunking toward 6500-1 and add allowed VLANs. Note that on the line allowing specific VLANs, there cannot be any spaces between the numbers and the commas. Also note that VLAN 2 is the native VLAN on these ports by default. Step 3.1.4: Configure 802.1Q trunking to BladeServer1 and add allowed VLANs. For this Cisco Systems IGESM, only port g0/1, connecting to the first NIC on BladeServer1, will be trunking. The first NIC on BladeServer2 will be an access link (see the next step). Step 3.1.5: Configure access links to BladeServer2 and set access VLAN. For this Cisco Systems IGESM, only port g0/2, connecting to the first NIC on BladeServer2, will be an access link. 128 This creates a logical interface named Port-Channel1 and places the interfaces g0/17 through g0/20 into it. int port-channel 1 description EtherChannel-To-6500-1 switchport trunk native vlan 2 switchport trunk allowed vlan 2,10,15 switchport mode trunk Note: The VLAN numbers should be on the same line as the command. int g0/1 switchport trunk allowed vlan 2,10,15 Note that the VLAN numbers might be wrapped in this document but they should be on the same line as the command. int g0/2 switchport mode access switchport access vlan 10 end This places the BladeServer2’s first NIC into VLAN 10. Cisco Systems Intelligent Gigabit Ethernet Switch Module 1. On the top toolbar, click VLAN → VLAN. 2. Pressing the Ctrl key, click ports Gi0/17 through Gi0/20. 3. Click Modify. 4. In the Trunk-Allowed VLAN field, enter 2,10,15. 5. Be sure the Native VLAN field is set to 2. 6. Click OK. 7. Click Apply or OK. 8. Important: Because of a limitation in the current version of CMS. it will always include VLANs 1 and 1001 through 1005. This can cause a mismatch with the setting on the 6500 side and result in the aggregation going down. The only solution for now is to go into the CLI and run switchport trunk allowed vlan with the desired settings, as shown in the CLI section for this step. On the top toolbar, click VLAN → VLAN. Click port Gi0/1. Click Modify. In the Trunk-Allowed VLAN field, enter 2,10,15. 5. Click OK. 6. Click Apply or OK. Important: As noted in step 3.1.3, due to a limitation in the current version of CMS, it will always include VLANs 1 and 1001 through 1005. This can cause a mismatch with the setting on the blade server side and result in the trunk not working as expected. The only solution for now is to go into the CLI and run switchport trunk allowed vlan with the desired settings, as shown in the CLI section for this step. 1. 2. 3. 4. In the top menu bar, click VLAN → VLAN. Click port Gi0/2. Click Modify. In the Administrative Mode field, select Static Access. 5. In the Static-Access VLAN field, enter 10. 6. Click OK. 7. Click Apply or OK. 1. 2. 3. 4. Description and comments Actions via IOS CLI for CIGEMS1 Actions via CMS for CIGEMS1 Step 3.1.6: Save Cisco Systems IGESM config to NVRAM. Failure to perform copy running-config startup-config 1. On the top toolbar, click Administration → Save Configuration. 2. Leave the Source set to Running Configuration. 3. In Destination, select Startup Configuration. 4. Click Save. this step will result in all changes to the Cisco Systems IGESM being lost if the BladeCenter is powered off or the Cisco Systems IGESM is otherwise restarted. Step 3.2: Configuring the second Cisco Systems IGESM (CIGESM2) Table 7-5 shows the step-by-step instructions used to configure CIGESM2, showing both CLI and CMS commands. Important: The current version of CMS supported on the Cisco Systems IGESM has a limitation in its ability to completely control VLANs being placed on a given trunk: It always includes VLAN 1 and 1001-1005, even if you do not set them as allowed. Therefore, its use might not be appropriate for production configuration when trying to control VLANs allowed on a given trunk. Table 7-5 Configuring CIGESM2 Description and comments Actions via IOS CLI for CIGEMS2 Actions via CMS for CIGEMS2 Step 3.2.1: Configure desired VLANs for CIGESM2. Perform the following from the enable mode: config t vlan 20 name Application vlan 25 name Backup Perform the following from the CMS interface: 1. In the top menu bar, click VLAN → VLAN. 2. Click the Configure VLANs tab. 3. Click Create. 4. Enter 20 in the VLAN ID field. 5. Enter Application in the VLAN Name field. 6. Click OK. 7. Click Create. 8. Enter 25 in the VLAN ID field. 9. Enter User in the VLAN Name field. 10. Click OK. 11. Click Apply. 12. Click Refresh to view the newly created VLANs. int range g0/17 - 20 description To-6500-3 channel-group 1 mode active 1. In the top menu bar, click Port → EtherChannels. 2. Click Create. 3. Select the check boxes next to ports Gi0/17 through Gi0/20. 4. Enter 1 in the Group [1-6] field to select the port channel to use. 5. Click OK. 6. Click Apply or OK. Create and name VLANs 20 and 25. Step 3.2.2: Configure link aggregation toward 6500-3. This example makes use of LACP to form the aggregation. This creates a logical interface named Port-Channel1 and places the interfaces g0/17 through g0/20 into it. Chapter 7. Cisco Systems IGESM configuration and network integration 129 Description and comments Actions via IOS CLI for CIGEMS2 Actions via CMS for CIGEMS2 Step 3.2.3: Configure 802.1Q trunking toward 6500-3. int port-channel 1 description EtherChannel-To-6500-3 switchport trunk native vlan 2 switchport trunk allowed vlan 2,20,25 switchport mode trunk 1. In the top menu bar, click VLAN → VLAN. 2. Hold down the Ctrl key and click ports Gi0/17 through Gi0/20. 3. Click Modify. 4. In the Trunk-Allowed VLAN field, enter 2,20,25. 5. In the Native VLAN field, make sure that it is set for 2. 6. Click OK. 7. Click Apply or OK. Important: Due to a limitation in the current version of CMS exists where it will always include VLANs 1 and 1001 through 1005. This can cause a mismatch with the setting on the 6500 side and result in the aggregation going down. The only solution for now is to go into the CLI and run the switchport trunk allowed vlan command with the desired settings, as shown in the CLI section for this step. Note that on the line allowing specific VLANs, there cannot be any spaces between the numbers and the commas. (These may appear wrapped in this example, but should be on the same line as the command). Also note that VLAN 2 is the native VLAN on these ports by default. Step 3.2.4: Configure 802.1Q trunking to BladeServer1 connecting to CIGESM2. For this Cisco Systems IGESM, only port g0/1, connecting to the second NIC on BladeServer1, will be trunking. The second NIC on BladeServer2 will be an access link (see the next step). Step 3.2.5: Configure access link to blade server’s CIGESM2. For this Cisco Systems IGESM, only port g0/2, connecting to the second NIC on BladeServer2, will be an access link. 130 (The VLAN numbers might be wrapped in this example, but they should be on the same line as the command.) int g0/1 switchport trunk allowed vlan 2,20,25 Note that the VLAN numbers might be wrapped in this document; they should be on the same line as the command. int g0/2 switchport mode access switchport access vlan 20 end This places BladeServer2’s second NIC into VLAN 20. Cisco Systems Intelligent Gigabit Ethernet Switch Module 1. In the top menu bar, click VLAN → VLAN. 2. Click port Gi0/1. 3. Click Modify. 4. In the Trunk-Allowed VLAN field, enter 2,20,25. 5. Click OK. 6. Click Apply or OK. Important: As noted in step 3.1.3, due to a limitation in the current version of CMS, it will always include VLAN 1 and 1001 through 1005. This can cause a mismatch with the setting on the blade server side and result in the trunk not working as expected. The only solution at this time is to go into the CLI and run the switchport trunk allowed vlan command with the desired settings, as shown in the CLI section for this step. 1. In the top menu bar, click VLAN → VLAN. 2. Click port Gi0/2. 3. Click Modify. 4. In the Administrative Mode field, select Static Access. 5. In the Static-Access VLAN field, enter 20. 6. Click OK. 7. Click Apply or OK. Description and comments Actions via IOS CLI for CIGEMS2 Actions via CMS for CIGEMS2 Step 3.2.6: Save Cisco Systems IGESM config to NVRAM. copy running-config startup-config 1. In the top menu bar, click Administration → Save Configuration. 2. Leave the Source set to Running Configuration. 3. In Destination, select Startup Configuration. 4. Click Save. Failure to perform this step will result in all changes to the Cisco Systems IGESM being lost if the BladeCenter is powered off or the Cisco Systems IGESM is otherwise restarted. Step 4: Configuring the interfaces on the blade servers This section lists actions required to configure the blade servers used for this example. The following assumptions have been made for this example: The operating systems in use on the blade servers is Windows 2000. This is important because which port is considered first and which port is considered second on a blade server has several dependencies, not the least of which is the operating system in use. For an explanation of the blade servers’ connection names and how they are derived, see Appendix A, “Hints and tips” on page 227. The user is already logged on to Windows 2000 as administrator or equivalent. See Appendix A, “Hints and tips” on page 227 for information about how to select a blade server for configuration using the KVM interface on the Management Module. Commands are being performed in the sequence shown. BladeServer1: Trunk connection to Cisco Systems IGESM. – The Broadcom Advanced Server Program (BASP, also know as the Broadcom Advanced Control Suite) software has been installed on BladeServer1. BladeServer1 will use the BASP software to create logical interfaces for VLANs 10, 15, 20, and 25, and all IP configuration will be performed on these logical interfaces (not on the physical interfaces). – Both ports will use trunking (but not load balancing) through the Broadcom BASP software; the first port will be configured for VLANs 10 and 15, the second port will be configured for VLANs 20 and 25. – We will be using the following IP addresses (24-bit masks): First port, VLAN 10 to CIGESM1 First port, VLAN 15 to CIGESM1 Second port, VLAN 20 to CIGESM2 Second port, VLAN 25 to CIGESM2 10.1.10.1 (default gateway = 10.1.10.254) 10.1.15.1 10.1.20.1 10.1.25.1 Note that the choice to use more than one default gateway (for example, one on each VLAN or one on several VLANs) is up to the user. See the discussion about default gateways on multihomed systems in Appendix A, “Hints and tips” on page 227. BladeServer2: Access link connection to Cisco Systems IGESM. – Neither port will use the BASP software, and all configurations will be performed directly on the interfaces. – Both ports will be simple access links and will be placed on VLANs 10 and 20, respectively, through port settings on the Cisco Systems IGESMs. – We will be using the following IP addresses (24-bit masks): First port, to CIGESM1 Second port, to CIGESM2 10.1.10.2 (default gateway = 10.1.10.254) 10.1.20.2 Chapter 7. Cisco Systems IGESM configuration and network integration 131 Note that the choice to use more than one default gateway (for example, one on each VLAN) is up to the user. See the discussion about default gateways on multihomed systems in Appendix A, “Hints and tips” on page 227. Step-by-step instructions to configure BladeServer1 Table 7-6 shows the step-by-step instructions to configure BladeServer1. Table 7-6 Configuring BladeServer1 for 802.1Q trunks with multiple VLANs Description and comments On BladeServer1 BASP using VLANs on both Ethernet ports Step 4.1.1: Launch BASP software. This step assumes the desired software is already installed. Step 4.1.2: Create and name two teams, each containing a single interface. 1. Click Tools → Create a Team on the toolbar. Note that this process might seem as though you are configuring for SLB. This is not the case, because we will only have a single NIC in each team, and we are only building the teams to assign VLANs (thus turning the interfaces into 802.1Q trunk interfaces). Click Start → Programs → Broadcom → Broadcom Advanced Control Suite. This assumes that the software used a default installation. You can also launch this software through an icon in the lower-right corner of the window near the clock (move your cursor until you find the icon labeled “Control Suite”) or by an icon available in Control Panel. 2. Enter ToCIGESM1 in the name field and click Next. Note: Leave the Team Type with the default value (Smart Load Balance and Fail Over). 3. Select the top NIC on the left side of the window, and click the top right pointing arrow to add this NIC to the Load Balance Members. 4. Click Finish. Repeat step 4.1.2 for the second NIC, naming the Team ToCIGESM2. Step 4.1.3a: Create desired VLANs on Team CIGESM1. Create and name VLANs 10 and 15 on the team going to CIGESM1. Click Tools → Configure a Team on the toolbar. Select ToCIGESM1 and click OK. Click the Add VLAN button on right side of window. In the VLAN ID field, enter 10. In the VLAN Name field, enter VLAN10-WEB. Note that the names should be descriptive but can be anything you prefer. Also note that you want to leave the box labeled Untagged VLAN cleared. 6. Click OK to create this VLAN. Repeat step 4.1.3a for the second VLAN on this team. Set the VLAN ID to 15 and name it VLAN15-USER. Step 4.1.3b: Create desired VLANs on Team CIGESM2. Create and name VLANs 20 and 25 on the team going to CIGESM2. 1. 2. 3. 4. 5. 132 1. 2. 3. 4. 5. Click Tools → Configure a Team on the toolbar. Select ToCIGESM2 and click OK. Click the Add VLAN button on right side of window. In the VLAN ID field, enter 20. In the VLAN Name field, enter VLAN20-APPS. Note that the names should be descriptive but can be anything you prefer. Also note that you want to leave the box labeled Untagged VLAN cleared. 6. Click OK to create this VLAN. Repeat step 4.1.3b for the second VLAN on this team. Set the VLAN ID to 25 and name it VLAN25-BACKUP. Cisco Systems Intelligent Gigabit Ethernet Switch Module Description and comments On BladeServer1 BASP using VLANs on both Ethernet ports Step 4.1.4: Save the changes made to BASP. This step creates four new logical interfaces in Windows 2000: ToCIGESM1/VLAN10-WEB ToCIGESM1/VLAN15-USER ToCIGESM2/VLAN20-APPS ToCIGESM2/VLAN25-BACKUP Note: Exiting the BASP program without clicking Apply or OK will result in losing your configuration changes. 1. Click Apply in the main BASP window. 2. Click the Yes button when warned about a temporary interruption to the network connections. At this time, the BASP software creates the new logical interfaces for use with Windows 2000 networking. Step 4.1.5: Configure desired IP address on each VLAN. This step assumes that the user knows how to add IP addressing information. Note that the default gateways used are part of the base HSRP config of the 6500s. Also note that on production systems, you would normally configure one or more DNS servers. This was not included as part of this environment but should be included in most production networks. For this step, attempting to apply IP addressing directly onto a physical interface is not supported. 1. From Windows, click Start → Settings → Network and Dial-up Connections. You should now see the original physical network interfaces along with the four newly created logical interfaces. 2. Select the ToCIGESM1/VLAN10-WEB interface and configure the IP address as follows: – IP Address: 10.1.10.1 – Mask: 255.255.255.0 – Default Gateway: 10.1.10.254 3. Select the ToCIGESM1/VLAN15-USER interface and configure the IP address as follows: – IP Address: 10.1.15.1 – Mask: 255.255.255.0 4. Select the ToCIGESM1/VLAN20-APPS interface and configure the IP address as follows: – IP Address: 10.1.20.1 – Mask: 255.255.255.0 5. Select the ToCIGESM1/VLAN25-BACKUP interface and configure the IP address as follows: – IP Address: 10.1.25.1 – Mask: 255.255.255.0 Step-by-step instructions to configure BladeServer2 Table 7-7 shows the step-by-step instructions used to configure BladeServer2. Table 7-7 Configuring BladeServer2 for standard interface connection Description and comments On BladeServer2 No BASP software, using physical access links on both Eth ports Step 4.2.1: Configure IP addresses directly on the desired interfaces. This step assumes that the user knows how to add IP addressing information. Note that the default gateways used are part of the base HSRP config of the 6500s. Also note that on production systems, you would normally configure one or more DNS servers. This was not included as part of this environment but should be included in most production networks. This procedure will be no different from configuring a stand-alone server with two NICs. 1. Select the Local Area Connection interface and configure the IP address as follows: – IP Address: 10.1.10.2 – Mask: 255.255.255.0 – Default Gateway: 10.1.10.254 2. Select the Local Area Connection 2 interface and configure the IP address as follows: – IP Address: 10.1.20.2 – Mask: 255.255.255.0 Chapter 7. Cisco Systems IGESM configuration and network integration 133 Step 5: Reconnecting the devices This is the final step to bring the connection into full operation. This will be the reverse of whatever procedure was used in step 1. See Table 7-2 on page 123 for details about how to reestablish the links. Step 6: Verifying the configuration This section provides options for verifying the correct and desired operation. Verifying correct operation on the blade servers Review the BASP application for the desired configuration of teaming and VLANs on BladeServer1 (see Figure 7-4). BladeServer2 should not have a BASP configuration for this example (see Figure 7-5). Figure 7-4 BladeServer1 BASP configuration Figure 7-5 BladeServer2 BASP configuration (BASP not used on BladeServer2) Using Windows 2000 networking tools, review the logical and physical network. Figure 7-6 and Figure 7-7 show BladeServer1 and BladeServer2. 134 Cisco Systems Intelligent Gigabit Ethernet Switch Module Figure 7-6 Windows 2000 networking showing physical and logical interfaces on BladeServer1 Figure 7-7 Windows 2000 networking showing only physical interfaces on BladeServer2 From the CMD prompt (Start → Run → cmd → OK), execute the ipconfig command and confirm that the desired interfaces have the desired IP configuration on each blade server (make sure they are not reversed, where the IP address you want on the Local Area Connection is not on the connection named Local Area Connection 2, assuming they have not been renamed). For teamed interfaces, make sure that the IP address is on the expected logical interface as reported by ipconfig. Perform ping tests from the various boxes. The following tests connectivity between blade servers on the same VLANs. Pings will only travel up to the appropriate Cisco Systems IGESM and back to the other blade server (they will not travel up to the aggregation switches). Ping from BladeServer1 to 10.1.10.2 (BladeServer2’s VLAN 10 connection) Ping from BladeServer1 to 10.1.20.2 (BladeServer2’s VLAN 20 connection) The following tests connectivity through the Cisco Systems IGESMs and up to the 6500s: Ping from BladeServer1 to 10.1.10.254 (HSRP address on the 6500s) Ping from BladeServer1 to 10.1.15.254 (HSRP address on the 6500s) Ping from BladeServer1 to 10.1.20.254 (HSRP address on the 6500s) Ping from BladeServer1 to 10.1.25.254 (HSRP address on the 6500s) Ping from BladeServer2 to 10.1.10.254 (HSRP address on the 6500s) Ping from BladeServer2 to 10.1.20.254 (HSRP address on the 6500s) Chapter 7. Cisco Systems IGESM configuration and network integration 135 At this time, you should be able to ping as just described. If you cannot ping to these addresses, and your above configuration checks were okay, proceed to the next section and inspect the other components in this configuration. Note: With this configuration (per this example), you will not be able to directly ping the management VLAN on the Cisco Systems IGESMs. This is because it is on a different VLAN than the blade servers. Also note that, for several reasons, we highly recommend that you do not put any blade servers on the same VLAN as the management VLAN in use by the Cisco Systems IGESMs. Verifying correct operation on the Cisco Systems IGESM Confirm your Cisco Systems IGESM configuration using the following commands. To confirm that you are on the correct switch, use the show platform summary command (shows what slot you are currently on, for example, Slot 1 = CIGESM1, Slot 2 = CIGESM2). Run the show run command and confirm that it matches the desired configuration as entered in the previous steps. Run the show logging command and look for any unexpected errors. On CIGESM1 and CIGESM2, run a show int g0/1 status command. Be sure it shows: status - connected and vlan - trunk On CIGESM1, run the show int g0/2 status command and make sure that it shows: status - connected and vlan - 10 On CIGESM2, run the show int g0/2 status command and make sure that it shows: status - connected and vlan - 20 Run the show interface trunk module 0 command and check for the desired output (it should be similar for both Cisco Systems IGESMs): Port Gi0/1 Gi0/2 . . . Gi0/17 Gi0/18 Gi0/19 Gi0/20 Mode on off Encapsulation 802.1q 802.1q Status Native vlan trunking 2 not-trunking 2 on on on on 802.1q 802.1q 802.1q 802.1q trunk-inbndl trunk-inbndl trunk-inbndl trunk-inbndl 2 2 2 2 (Po1) (Po1) (Po1) (Po1) Run the command show etherchannel summary and check for the desired output (it should be similar on both Cisco Systems IGESMs): Flags: D - down P - in port-channel I - stand-alone s - suspended H - Hot-standby (LACP only) R - Layer3 S - Layer2 u - unsuitable for bundling U - in use f - failed to allocate aggregator d - default port Number of channel-groups in use: 1 Number of aggregators: 1 Group Port-channel Protocol Ports ------+-------------+-----------+----------------------------------------------1 Po1(SU) LACP Gi0/17(P) Gi0/18(Pd) Gi0/19(P) Gi0/20(P) 136 Cisco Systems Intelligent Gigabit Ethernet Switch Module Run the command show etherchannel 1 port-channel and check for the desired output (it should be similar on both Cisco Systems IGESMs): Port-channels in the group: ---------------------Port-channel: Po1 (Primary Aggregator) -----------Age of the Port-channel = 01d:05h:15m:50s Logical slot/port = 1/0 Number of ports = 4 HotStandBy port = null Port state = Port-channel Ag-Inuse Protocol = LACP Ports in the Port-channel: Index Load Port EC state No of bits ------+------+------+------------------+----------0 00 Gi0/17 Active 0 0 00 Gi0/18 Active 0 0 00 Gi0/19 Active 0 0 00 Gi0/20 Active 0 Check the output of the show cdp neighbors command. It should show something similar to the following (different Device IDs for the CIGESM2). Note that the Cisco Systems IGESMs can see each other through the Management Module interface. Capability Codes: R - Router, T - Trans Bridge, B - Source Route Bridge S - Switch, H - Host, I - IGMP, r - Repeater, P - Phone Device ID Local Intrfce Holdtme Capability Platform PortID DC6500-1 Gig 0/20 179 R S I WS-C6506 Gig 2/28 DC6500-1 Gig 0/19 179 R S I WS-C6506 Gig 2/27 DC6500-1 Gig 0/18 179 R S I WS-C6506 Gig 2/26 DC6500-1 Gig 0/17 179 R S I WS-C6506 Gig 2/25 CIGESM2 Gig 0/15 141 S I OS-CIGESM-Gig 0/15 Verifying correct operation on the external switches (6500-1 and 6500-3) The following section includes some commands you can use to verify the desired configuration and operation of the 6500s. You can run the same set of commands as previously shown for the Cisco Systems IGESMs. Naturally, there will be some differences in the output, but you want to make sure that the proper ports are channeled and trunked and carrying the correct VLANs. Also watch out for any admin down ports. You should also be able to ping the following addresses: Ping to BladeServer1 at 10.1.10.1 Ping to BladeServer1 at 10.1.15.1 Ping to BladeServer1 at 10.1.20.1 Ping to BladeServer1 at 10.1.25.1 Ping to BladeServer2 at 10.1.10.2 Ping to BladeServer2 at 10.1.20.2 7.5.2 Topology 2: Dual Cisco Systems IGESMs, two-port aggregation to two 6500s In this example (reference Figure 7-8), uplinks from the BladeCenter are divided between two aggregation switches. This topology is a more traditional high availability configuration, in that the loss of one of the aggregation switches or channeled links will now not result in lost traffic, regardless of NIC Teaming/Trunk Failover configuration. The BladeCenter Cisco Systems IGESMs will be participating in Spanning Tree, with the EtherChannel ports 19 and 20 on both Cisco Systems IGESMs going into blocking (assuming 6500-1 is the root of the Spanning Tree). Chapter 7. Cisco Systems IGESM configuration and network integration 137 There is one case where high availability might still be an issue if NIC Teaming/Trunk Failover is not configured, and that is if both uplinks from a single Cisco Systems IGESM were to go down, but the Cisco Systems IGESM itself did not go down. In that case, the blade server would be unable to detect the upstream failure and issues would arise. Utilizing NIC Teaming and Trunk Failover would ensure that this is not an issue. This topology is recommended when NIC teaming is not in use or not practical (for example, if different VLANs are required on each NIC going to a blade server). Configurations presented for blade server attachment to this topology Important: The blade server configurations offered in this chapter are not necessarily part of the topology discussion, but instead their configurations are provided in this section as a means to help you understand some of the possibilities for attaching the servers to this topology. The examples should not be construed as the way a blade server must be configured. If your only goal is to understand a given server attachment example, it is possible to just review that specific example and its associated upstream connection on the Cisco Systems IGESMs and ignore the extra blade server configurations. The following discusses the blade server configuration (see Figure 7-8) for this example: BladeServer1: 802.1Q trunk links carrying multiple VLANs to a NIC. This configuration is provided to demonstrate how to permit multiple VLANs to access each individual NIC in the blade server. It demonstrates one way to isolate traffic types from each other through several VLANs per NIC. Broadcom teaming software is required, but no redundancy is used. BladeServer2: Access ports to NICs through individual connections. This configuration is provided to demonstrate how to use each NIC as a standard access link (no VLANs, trunking, or redundancy is used from the blade server’s perspective). This is the traditional way most servers were attached in the past and is simple and effective, but not very flexible. This configuration is performed using the stock network configuration tools available in Windows 2000 (no teaming software is used). BladeServer3: Access ports to NICs through SLB/teamed connections. This configuration is provided to show how to use multiple NICs to look like a single access NIC to the rest of the upstream network (the Cisco Systems IGESMs). It makes use of the teaming drivers to tie the NICs together, but does not use any special VLAN configuration. From the Cisco Systems IGESMs perspective, both connections are configured as simple access ports with a static VLAN assigned. – This configuration will make use of the Broadcom teaming software to bind and balance the links together; the Cisco Systems IGESMs will establish what VLAN the teamed ports will be placed into (it will need to be the same VLAN for both Cisco Systems IGESM ports that go to this server). – The example for BladeServer3 provided in this chapter uses what is known as Active/Active, or Server Load Balancing, such that both interfaces can be carrying traffic at the same time. This is opposed to Active/Standby (not shown here), also known as Hot Standby, where only one of the links is up at a time. 138 Cisco Systems Intelligent Gigabit Ethernet Switch Module BladeServer4: 802.1Q trunk links carrying multiple VLANs on a teamed/SLB connection to the server. This configuration is provided to show how to use multiple NICs to look like a single NIC, but still make use of multiple VLANs on this single logical NIC. It makes use of the teaming drivers to tie the NICs together and create the desired VLANs. From the Cisco Systems IGESMs perspective, both connections are configured as trunk ports, carrying a common set of VLANs (you need to configure the same VLANs on both of the Cisco Systems IGESM ports going to this server’s four logical NICs). – This example uses the Broadcom teaming software to bind and balance the links together and create the logical interfaces that will represent the various VLANs demonstrated in this document. – The example for BladeServer4 provided in this chapter uses what is known as Active/Active, or Server Load Balancing, such that both interfaces can be carrying traffic at the same time. This is opposed to Active/Standby (not shown here), also known as Hot Standby, where only one of the links is up at a time. Important: To ensure blade servers 3 and 4 achieve the highest availability, Trunk Failover should also be configured (not shown in this example). For details and requirements on configuring the Trunk Failover feature, see 7.7, “Trunk Failover feature description and configuration” on page 193. Chapter 7. Cisco Systems IGESM configuration and network integration 139 To Core Routers Po1 Data Center 6500-1 Aggregation Layer Mod 2 - 25 26 Mod 6 - 1 Mod 6 - 2 27 28 Po2 Data Center 6500-3 Mod 6 - 1 Mod 6 - 2 25 26 Po3 Po1 Po2 Po2 Po2 17 18 19 20 CIGESM1 Management Netw ork Po3 Po1 17 18 19 20 Trunked VLAN 10 and 15 27 28 - Mod 2 Access Access VLAN 10 VLAN 30 Trunked VLAN 35, 40, 45 and 50 Trunked VLAN 20 and 25 CIGESM2 Access VLAN 20 Access VLAN 30 Trunked VLAN 35, 40, 45 and 50 M M 1 M M 2 Trunked VLAN 10 and 15 1 2 Trunked VLAN 20 and 25 Access Access Teamed/Access Teamed/Trunked VLAN 35, 40, 45 and 50 1 2 1 2 1 2 Blade Server 3 Blade Server 4 Management Workstation Blade Server 1 Blade Server 2 BladeCenter Topology 2 Links between Management Modules and CIGESMs shownnot shown Links between Management Module and Cisco Systems not IGESMs Figure 7-8 Topology 2 140 Cisco Systems Intelligent Gigabit Ethernet Switch Module Step 1: Taking down the link or links It is always advisable to disable the link or links prior to making any configuration changes. See Table 7-1 on page 122 for the needed procedures. Step 2: Configuring the external switches The following assumptions have been made for this example: The bulk of the configuration for the 6500s is included in the base configuration (see “Cat 6500 base configurations” on page 109), because the goal of this document is to show how to configure the BladeCenter components rather than generic Cisco devices. This section specifically focuses on how to configure the 6500 ports that connect to the BladeCenter. VLAN 2 has already been created on the 6500s as part of the base configuration. The VTP Domain has already been named and set to transparent as part of the base configuration. Spanning Tree root commands have already been set as part of the base configuration (to make 6500-1 the primary root and 6500-3 as the secondary root). The user is already logged on to the switch, and the switch is in enable mode. Commands are being performed in the sequence shown. Cisco Switch Modules in the 6500s used to connect to the Cisco Systems IGESMs are 1000Base-T-based, and we will be leaving the ports at 1Gbps full duplex. The aggregation link between the 6500s has already been created as part of the base config and is carrying the desired VLANs (for example, 2, 10, 15, 20). Table 7-8 Configuring the external switches Description and comments On the 6500-1 On the 6500-3 Step 2.1: Configure Link Aggregations from the 6500s to the Cisco Systems IGESMs. config t int range g2/25 - 26 switchport spanning-tree guard root description to-BladeCenter CIGESM1 channel-group 2 mode active This creates a logical interface named Port-Channel2 and places interfaces g2/25 and g2/26 into it. config t int range g2/25 - 26 switchport spanning-tree guard root description to-BladeCenter CIGESM1 channel-group 2 mode active This creates a logical interface named Port-Channel2 and places interfaces g2/25 and g2/26 into it. int range g2/27 - 28 switchport spanning-tree guard root description to-BladeCenter CIGESM2 channel-group 3 mode active This creates a logical interface named Port-Channel3 and places interfaces g2/27 and g2/28 into it. int range g2/27 - 28 switchport spanning-tree guard root description to-BladeCenter CIGESM2 channel-group 3 mode active This creates a logical interface named Port-Channel3 and places interfaces g2/27 and g2/28 into it. This is for the port-channels between the 6500s and each of the Cisco Systems IGESMs. Note that it is always a good practice to provide a description to an interface. Also note that spanning-tree guard root is added to both the individual ports and the port-channel to ensure that it is in place. Chapter 7. Cisco Systems IGESM configuration and network integration 141 Description and comments On the 6500-1 On the 6500-3 Step 2.2: Configure VLAN and trunking options. int port-channel 2 description EtherChannel to CIGESM1 switchport trunk encapsulation dot1q switchport trunk native vlan 2 switchport trunk allowed vlan 2,10,15,30,35,40,45,50 switchport mode trunk spanning-tree guard root int port-channel 2 description EtherChannel to CIGESM1 switchport trunk encapsulation dot1q switchport trunk native vlan 2 switchport trunk allowed vlan 2,10,15,30,35,40,45,50 switchport mode trunk spanning-tree guard root Note: Configuring root guard on the port channel interface between 6500s and the Cisco Systems IGESMs will help to ensure stability in your network. Note: Configuring root guard on the port channel interface between 6500s and the Cisco Systems IGESMs will help to ensure stability in your network. int port-channel 3 description EtherChannel to CIGESM2 switchport trunk encapsulation dot1q switchport trunk native vlan 2 switchport trunk allowed vlan 2,20,25,30,35,40,45,50 switchport mode trunk spanning-tree guard root end int port-channel 3 description EtherChannel to CIGESM2 switchport trunk encapsulation dot1q switchport trunk native vlan 2 switchport trunk allowed vlan 2,20,25,30,35,40,45,50 switchport mode trunk spanning-tree guard root end copy running-config startup-config copy running-config startup-config All desired VLANs were already created as part of the base configuration, and IP addresses were added at that time. This step sets up the aggregated links created in step 2.1 to be 802.1Q trunks and allows the desired VLANs to be carried. Note the different VLANs on the different aggregations. As noted previously, controlling VLANs is considered a good security practice (although it might increase the amount of work for network administrators). Step 2.3: Save configuration to NVRAM. Note: Failure to save your configuration will result in possible network down conditions if the switch is restarted prior to the save (all changes since the last save will be lost). Step 3: Configuring Cisco Systems IGESMs This section steps through the sequence of actions required to configure the Cisco Systems IGESMs for this example. It is broken into two major sections, one for configuring the Cisco Systems IGESM in bay 1 and one for configuring the Cisco Systems IGESM in bay 2. The following assumptions have been made for both Cisco Systems IGESM configurations in this example: The user is already logged on to the Cisco Systems IGESM, and the switch is in enable mode (or logged on to CMS and using the GUI therein). Commands are being performed in the sequence shown. The Cisco Systems IGESM is starting from a base configuration per the example shown in “Cisco Systems IGESM base configurations” on page 108. The operating systems in use on the blade servers are Windows 2000. This is important, because which port is considered first and which port is considered second on a blade server has several dependences, not the least of which is the operating system in use. For an explanation of the blade servers connection names and how they are derived, see Appendix A, “Hints and tips” on page 227. 142 Cisco Systems Intelligent Gigabit Ethernet Switch Module On BladeServer1, both ports will be using trunking (but not load balancing) through the Broadcom BASP software. The first port will be configured for VLANs 10 and 15, the second port will be configured for VLANs 20 and 25. On BladeServer2, both ports will be simple access links and will be placed on VLANs 10 and 20, respectively, through port settings on the Cisco Systems IGESMs. On BladeServer3, both ports will be teamed through the Broadcom BASP software to appear as a single logical link to the OS, using access VLAN 30 as configured at the Cisco Systems IGESM’s ports to this server. On BladeServer4, both ports will be teamed through the Broadcom BASP software to appear as a single logical link to the OS and use 802.1Q trunking to support VLANs 35, 40, 45, and 50. Step 3.1: Configuring the first Cisco Systems IGESM (CIGESM1) Table 7-9 shows the step-by-step instructions used to configure CIGESM1, showing both CLI and CMS commands. Important: The current version of CMS supported on the Cisco Systems IGESM has a limitation in its ability to completely control VLANs being placed on a given trunk: It always includes VLAN 1 and 1001-1005, even if you do not set them as allowed. Because of this limitation, its use might not be appropriate for production configuration when trying to control VLANs allowed on a given trunk. Table 7-9 Configuring CIGESM1 Description and comments Actions via IOS CLI for CIGEMS1 Actions via CMS for CIGEMS1 Step 3.1.1: Configure desired VLANs for CIGESM1. Perform the following from the enable mode: config t vlan 10 name Web vlan 15 name User vlan 30,35,40,45,50 Perform the following from the CMS interface: 1. In the top menu bar, click VLAN → VLAN. 2. Click the Configure VLANs tab. 3. Click Create. 4. Enter 10 in the VLAN ID field. 5. Enter Web in the VLAN Name field. 6. Click OK. 7. Click Create. 8. Enter 15 in the VLAN ID field. 9. Enter User in the VLAN Name field. 10. Click OK. 11. Click Create. 12. Enter 30 in the VLAN ID field (leave the name field defaulted). 13. Click OK. 14. Repeat the previous three steps to create VLANs 35, 40, 45, and 50. 15. Click Apply. 16. Click Refresh to view the newly created VLANs. Create VLANs 10, 15, 30, 35, 40, 45, and 50 (only named VLAN 10 and 15 for this demonstration). Note that there are no spaces between the VLAN numbers and the commas. Chapter 7. Cisco Systems IGESM configuration and network integration 143 Description and comments Actions via IOS CLI for CIGEMS1 Actions via CMS for CIGEMS1 Step 3.1.2: Configure Link Aggregation toward the 6500s. int range g0/17 - 18 description To-6500-1 channel-group 1 mode active This creates a logical interface named Port-Channel1 and places the interfaces g0/17 and g0/18 into it. 1. In the top menu bar, click Port → EtherChannels. 2. Click Create. 3. Select the check boxes next to ports Gi0/17 and Gi0/18. 4. Enter 1 in the Group [1-6] field to select the port channel to use. 5. Click OK. 6. Click Create. 7. Select the check boxes next to ports Gi0/19 and Gi0/20. 8. Enter 2 in the Group [1-6] field to select the port channel to use. 9. Click OK. 10. Click Apply or OK. This example makes use of LACP to form the aggregation. Ports g0/17 and g0/18 will be going to 6500-1. Ports g0/19 and g0/20 will be going to 6500-3. Step 3.1.3: Configure 802.1Q trunking toward 6500s and add allowed VLANs. Note that on the line allowing specific VLANs, there cannot be any spaces between the numbers and the commas. Also note that VLAN 2 is the native VLAN on these ports by default. int range g0/19 - 20 description To-6500-3 channel-group 2 mode active This creates a logical interface named Port-Channel2 and places the interfaces g0/19 and g0/20 into it. int port-channel 1 description EtherChannel-To-6500-1 switchport trunk native vlan 2 switchport trunk allowed vlan 2,10,15,30,35,40,45,50 switchport mode trunk Note that the VLAN numbers might be wrapped in this document; they should be on the same line as the command. int port-channel 2 description EtherChannel-To-6500-3 switchport trunk native vlan 2 switchport trunk allowed vlan 2,10,15,30,35,40,45,50 switchport mode trunk Step 3.1.4: Configure 802.1Q trunking to BladeServer1 and add allowed VLANs. int g0/1 switchport trunk allowed vlan 2,10,15 Note that the VLAN numbers might be wrapped in this document; they should be on the same line as the command. This allows VLANs 2, 10, and 15 to reach BladeServer1’s first NIC. 144 Cisco Systems Intelligent Gigabit Ethernet Switch Module 1. In the top menu bar, click VLAN → VLAN. 2. Click po1. 3. Click Modify. 4. In the Trunk-Allowed VLAN field, enter 2,10,15,30,35,40,45,50. 5. Click OK. 6. Click Apply or OK. Repeat the process for po2. Important: A limitation in the current version of CMS exists where it will always include VLANs 1 and 1001 through 1005. This can cause a mismatch with the setting on the 6500 side and result in the aggregation going down. The only solution at this time is to go into the CLI and run the switchport trunk allowed vlan command with the desired settings, as shown in the CLI section for this step. 1. In the top menu bar, click VLAN → VLAN. 2. Click port Gi0/1. 3. Click Modify. 4. In the Trunk-Allowed VLAN field, enter 2,10,15. 5. Click OK. 6. Click Apply or OK. Important: As noted in step 3.1.3, a limitation in the current version of CMS exists where it will always include VLANs 1 and 1001 through 1005. This can cause a mismatch with the setting on the blade server side and result in the trunk not working as expected. The only solution at this time is to go into the CLI and run the switchport trunk allowed vlan command with the desired settings, as shown in the CLI section for this step. Description and comments Actions via IOS CLI for CIGEMS1 Actions via CMS for CIGEMS1 Step 3.1.5: Configure access links to BladeServer2 and set access VLAN. int g0/2 switchport mode access switchport access vlan 10 1. In the top menu bar, click VLAN → VLAN. 2. Click port Gi0/2. 3. Click Modify. 4. In the Administrative Mode field, select Static Access. 5. In the Static-Access VLAN field, enter 10. 6. Click OK. 7. Click Apply or OK. This places BladeServer2’s first NIC into VLAN 10. Step 3.1.6: Configure access links to BladeServer3 and set access VLAN. int g0/3 switchport mode access switchport access vlan 30 This places BladeServer3’s first NIC into VLAN 30. Step 3.1.7: Configure 802.1Q trunking to BladeServer4 and add allowed VLANs. int g0/4 switchport trunk allowed vlan 2,35,40,45,50 end Note that the VLAN numbers might be wrapped in this document; they should be on the same line as the command. Step 3.1.8: Save Cisco Systems IGESM config to NVRAM. Failure to perform this step will result in all changes to the Cisco Systems IGESM being lost if the BladeCenter is powered off or the Cisco Systems IGESM is otherwise restarted. copy running-config startup-config 1. In the top menu bar, click VLAN → VLAN. 2. Click port Gi0/3. 3. Click Modify. 4. In the Administrative Mode field, select Static Access. 5. In the Static-Access VLAN field, enter 30. 6. Click OK. 7. Click Apply or OK. 1. In the top menu bar, click VLAN → VLAN. 2. Click port Gi0/4. 3. Click Modify. 4. In the Trunk-Allowed VLAN field, enter 2,35,40,45,50. 5. Click OK. 6. Click Apply or OK. Important: As noted in step 3.1.3, a limitation in the current version of CMS exists where it will always include VLANs 1 and 1001 through 1005. This can cause a mismatch with the setting on the blade server side and result in the trunk not working as expected. The only solution at this time is to go into the CLI and run the switchport trunk allowed vlan command with the desired settings, as shown in the CLI section for this step. 1. In the top menu bar, click Administration → Save Configuration. 2. Leave the Source set to Running Configuration. 3. In Destination, select Startup Configuration. 4. Click Save. Chapter 7. Cisco Systems IGESM configuration and network integration 145 Step 3.2: Configuring the second Cisco Systems IGESM (CIGESM2) Table 7-10 shows the step-by-step instructions used to configure CIGESM2, showing both CLI and CMS commands. Important: The current version of CMS supported on the Cisco Systems IGESM has a limitation in its ability to completely control VLANs being placed on a given trunk: It always includes VLAN 1 and 1001-1005, even if you do not set them as allowed. Because of this limitation, its use might not be appropriate for production configuration when trying to control VLANs allowed on a given trunk. Table 7-10 Configuring CIGESM2 Description and comments Actions via IOS CLI for CIGEMS2 Actions via CMS for CIGEMS2 Step 3.2.1: Configure desired VLANs for CIGESM2. Perform the following from the enable mode: config t vlan 20 name Application vlan 25 name Backup vlan 30,35,40,45,50 Perform the following from the CMS interface: 1. In the top menu bar, click VLAN → VLAN. 2. Click the Configure VLANs tab. 3. Click Create. 4. Enter 20 in the VLAN ID field. 5. Enter Application in the VLAN Name field. 6. Click OK. 7. Click Create. 8. Enter 25 in the VLAN ID field. 9. Enter Backup in the VLAN Name field. 10. Click OK. 11. Click Create. 12. Enter 30 in the VLAN ID field (leave the name field defaulted). 13. Click OK. 14. Repeat the previous three steps to create VLANs 35, 40, 45, and 50. 15. Click Apply. 16. Click Refresh to view the newly created VLANs. Create VLANs 20,25, 30, 35, 40, 45, and 50 (only named VLAN 20, and 25 for this demonstration). Note no spaces between the VLAN numbers and the commas. Step 3.2.2: Configure Link Aggregation toward the 6500s. This example makes use of LACP to form the aggregation. Ports g0/17 and g0/18 will be going to 6500-1. Ports g0/19 and g0/20 will be going to 6500-3. 146 int range g0/17 - 18 description To-6500-1 channel-group 1 mode active This creates a logical interface named Port-Channel1 and places the interfaces g0/17 and g0/18 into it. int range g0/19 - 20 description To-6500-3 channel-group 2 mode active This creates a logical interface named Port-Channel2 and places the interfaces g0/19 and g0/20 into it. Cisco Systems Intelligent Gigabit Ethernet Switch Module 1. In the top menu bar, click Port → EtherChannels. 2. Click Create. 3. Select the check boxes next to ports Gi0/17 and Gi0/18. 4. Enter 1 in the Group [1-6] field to select the port channel to use. 5. Click OK. 6. Click Create. 7. Select the check boxes next to ports Gi0/19 and Gi0/20. 8. Enter 2 in the Group [1-6] field to select the port channel to use. 9. Click OK. 10. Click Apply or OK. Description and comments Actions via IOS CLI for CIGEMS2 Actions via CMS for CIGEMS2 Step 3.2.3: Configure 802.1Q trunking toward 6500s and add allowed VLANs. int port-channel 1 description EtherChannel-To-6500-1 switchport trunk native vlan 2 switchport trunk allowed vlan 2,20,25,30,35,40,45,50 switchport mode trunk 1. In the top menu bar, click VLAN → VLAN. 2. Click po1. 3. Click Modify. 4. In the Trunk-Allowed VLAN field, enter 2,20,25,30,35,40,45,50. 5. Click OK. 6. Click Apply or OK. 7. Repeat the process for po2. Important: A limitation in the current version of CMS exists where it will always include VLANs 1 and 1001 through 1005. This can cause a mismatch with the setting on the 6500 side and result in the aggregation going down. The only solution at this time is to go into the CLI and run the switchport trunk allowed vlan command with the desired settings, as shown in the CLI section for this step. Note that on the line allowing specific VLANs, there cannot be any spaces between the numbers and the commas. Also note that VLAN 2 is the native VLAN on these ports by default. Note that the VLAN numbers might be wrapped in this document; they should be on the same line as the command. int port-channel 2 description EtherChannel-To-6500-3 switchport trunk native vlan 2 switchport trunk allowed vlan 2,20,25,30,35,40,45,50 switchport mode trunk Step 3.2.4: Configure 802.1Q trunking to BladeServer1 and add allowed VLANs. int g0/1 switchport trunk allowed vlan 2,20,25 Note that the VLAN numbers might be wrapped in this document; they should be on the same line as the command. This allows VLANs 2, 20, and 25 to reach BladeServer1’s second NIC. Step 3.2.5: Configure access links to BladeServer2 and set access VLAN. int g0/2 switchport mode access switchport access vlan 20 This places BladeServer2’s second NIC into VLAN 20. 1. In the top menu bar, click VLAN → VLAN. 2. Click port Gi0/1. 3. Click Modify. 4. In the Trunk-Allowed VLAN field, enter 2,20,25. 5. Click OK. 6. Click Apply or OK. Important: As noted in step 3.1.3, a limitation in the current version of CMS exists where it will always include VLANs 1 and 1001 through 1005. This can cause a mismatch with the setting on the blade server side and result in the trunk not working as expected. The only solution at this time is to go into the CLI and run the switchport trunk allowed vlan command with the desired settings, as shown in the CLI section for this step. 1. In the top menu bar, click VLAN → VLAN. 2. Click port Gi0/2. 3. Click Modify. 4. In the Administrative Mode field, select Static Access. 5. In the Static-Access VLAN field, enter 20. 6. Click OK. 7. Click Apply or OK. Chapter 7. Cisco Systems IGESM configuration and network integration 147 Description and comments Actions via IOS CLI for CIGEMS2 Actions via CMS for CIGEMS2 Step 3.2.6: Configure access links int g0/3 switchport mode access switchport access vlan 30 1. In the top menu bar, click VLAN → VLAN. 2. Click port Gi0/3. 3. Click Modify. 4. In the Administrative Mode field, select Static Access. 5. In the Static-Access VLAN field, enter 30. 6. Click OK. 7. Click Apply or OK. to BladeServer3 and set access VLAN. This places BladeServer3’s second NIC into VLAN 30. Step 3.2.7: Configure 802.1Q trunking to BladeServer4 and add allowed VLANs. int g0/4 switchport trunk allowed vlan 2,35,40,45,50 end Note that the VLAN numbers might be wrapped in this document; they should be on the same line as the command. This allows VLANs 2, 35, 40, 45, and 50 to reach BladeServer4’s second NIC. Step 3.2.8: Save Cisco Systems IGESM config to NVRAM. copy running-config startup-config Failure to perform this step will result in all changes to the Cisco Systems IGESM being lost if the BladeCenter is powered off or the Cisco Systems IGESM is otherwise restarted. 1. In the top menu bar, click VLAN → VLAN. 2. Click port Gi0/4. 3. Click Modify. 4. In the Trunk-Allowed VLAN field, enter 2,35,40,45,50. 5. Click OK. 6. Click Apply or OK. Important: As noted in step 3.1.3, a limitation in the current version of CMS exists where it will always include VLANs 1 and 1001 through 1005. This can cause a mismatch with the setting on the blade server side and result in the trunk not working as expected. The only solution at this time is to go into the CLI and run the switchport trunk allowed vlan command with the desired settings, as shown in the CLI section for this step. 1. In the top menu bar, click Administration → Save Configuration. 2. Leave the Source set to Running Configuration. 3. In Destination, select Startup Configuration. 4. Click Save. Step 4: Configuring the interfaces on the blade servers This section steps through the sequence of actions required to configure the blade servers used for this example. The following assumptions have been made for this example: The operating systems in use on the blade servers are Windows 2000. This is important, because which port is considered “first” and which port is considered “second” on a blade server has several dependences, not the least of which is the operating system in use. For an explanation of the blade servers connection names and how they are derived, see Appendix A, “Hints and tips” on page 227. The user is already logged on to Windows 2000 as administrator or equivalent. See Appendix A, “Hints and tips” on page 227 for information about how to select a blade server for configuration using the KVM interface on the Management Module. 148 Cisco Systems Intelligent Gigabit Ethernet Switch Module Commands are being performed in the sequence shown. BladeServer1: Trunk connection to Cisco Systems IGESM. – The Broadcom Advanced Server Program (BASP, also know as the Broadcom Advanced Control Suite) software has been installed on BladeServer1. BladeServer1 will be using the BASP software to create logical interfaces for VLANs 10, 15, 20, and 25, and all IP configuration will be performed on these logical interfaces (not on the physical interfaces). – Both ports will be using trunking (but not load balancing) through the Broadcom BASP software; the first port will be configured for VLANs 10 and 15, the second port will be configured for VLANs 20 and 25. – We will be using the following IP addresses (24-bit masks): First port, VLAN 10 to CIGESM1 First port, VLAN 15 to CIGESM1 Second port, VLAN 20 to CIGESM2 Second port, VLAN 25 to CIGESM2 10.1.10.1 (default gateway = 10.1.10.254) 10.1.15.1 10.1.20.1 10.1.25.1 Note that the choice to use more than one default gateway (for example, one on each VLAN or one on several VLANs) is up to the user. See the discussion about default gateways on multihomed systems in Appendix A, “Hints and tips” on page 227. BladeServer2: Access link connection to Cisco Systems IGESM. – Neither port will be using the BASP software, and all configurations will be performed directly on the interfaces. – Both ports will be simple access links and will be placed on VLANs 10 and 20, respectively, through port settings on the Cisco Systems IGESMs. – We will be using the following IP addresses (24-bit masks): First port, to CIGESM1: 10.1.10.2 (default gateway = 10.1.10.254) Second port, to CIGESM2: 10.1.20.2 Note that the choice to use more than one default gateway (for example, one on each VLAN) is up to the user. See the discussion about default gateways on multihomed systems in Appendix A, “Hints and tips” on page 227. For BladeServer3: Server Load Balancing (SLB)- Access connection. – The Broadcom Advanced Server Program (BASP, also know as the Broadcom Advanced Control Suite) software has been installed on BladeServer3. BladeServer3 will be using the BASP software to create a single teamed logical interface for VLAN 30, and IP configuration will be performed on this single logical interface (not on the physical interfaces). – This logical port will connect to both CIGESM1 (port g0/3) and CIGESM2 (port g0/3) and will be placed in VLAN 30 through access port settings on each Cisco Systems IGESM. All IP configuration will be performed on this single logical interface (not on the physical interfaces). – We will be using the following IP address (24-bit masks): BASP logical port, to CIGESM1: 10.1.30.3 (default gateway = 10.1.30.254) For BladeServer4: Server Load Balancing (SLB)- Trunk connection. – The Broadcom Advanced Server Program (BASP, also know as the Broadcom Advanced Control Suite) software has been installed on BladeServer4. BladeServer4 will be using the BASP software to create a single teamed element that, in turn, will be used to produce four logical interfaces, one for each VLAN being used on Chapter 7. Cisco Systems IGESM configuration and network integration 149 BladeServer4 (VLANs 35, 40, 4,5 and 50), and all IP configuration will be performed on these four logical interfaces (not on the physical interfaces). – This logical port will connect to both CIGESM1 (port g0/4) and CIGESM2 (port g0/4) and will make use of LANs 35, 40, 45, and 50 through port settings on each Cisco Systems IGESM. – We will be using the following IP addresses (24-bit masks): First port, VLAN 10 to CIGESM1: 10.1.35.4 (default gateway = 10.1.35.254) First port, VLAN 15 to CIGESM1: 10.1.40.4 Second port, VLAN 20 to CIGESM2: 10.1.45.4 Second port, VLAN 25 to CIGESM2: 10.1.50.4 Note that the choice to use more than one default gateway (for example, one on each VLAN or one on several VLANs) is up to the user. See the discussion about default gateways on multihomed systems in the Appendix A, “Hints and tips” on page 227. Step-by-step instructions to configure BladeServer1 Table 7-11 shows the step-by-step instructions used to configure BladeServer1. Table 7-11 Configuring BladeServer1 for 802.1Q trunks with multiple VLANs Description and comments On BladeServer1 BASP using VLANs on both Ethernet ports Step 4.1.1: Launch BASP software. This step assumes that the desired software is already installed. Click Start → Programs → Broadcom → Broadcom Advanced Control Suite. This assumes that the software used a default installation. You can also launch this software through an icon in the lower-right corner of the window near the clock (move the cursor until you find the icon labeled “Control Suite”) or by an icon available in Control Panel. Step 4.1.2: Create and name two teams, each containing a single interface. 1. Click Tools → Create a Team on the toolbar. 2. Enter ToCIGESM1 in the name field and click Next. Note: Leave the Team Type on the default value (Smart Load Balance and Fail Over) 3. Select the top NIC on the left side of the window and click the top right pointing arrow to add this NIC to the Load Balance Members. Click Finish. Repeat Step 4.1.2 for the second NIC, naming the Team ToCIGESM2. Note that this process might seem as though you are configuring for SLB. This is not the case, because we will only have a single NIC in each team, and we are only building the teams to assign VLANs (thus turning the interfaces into 802.1Q trunk interfaces). Step 4.1.3a: Create desired VLANs on Team CIGESM1. Create and name VLANs 10 and 15 on the team going to CIGESM1. 150 Click Tools → Configure a Team on the toolbar. Select ToCIGESM1 and click OK. Click the Add VLAN button on right side of window. In the VLAN ID field, enter 10. In the VLAN Name field, enter VLAN10-WEB. Note that the names should be descriptive but can be anything you prefer. Also note that you want to leave the box labeled Untagged VLAN cleared. 6. Click OK to create this VLAN. Repeat step 4.1.3a for the second VLAN on this team. Set the VLAN ID to 15 and name it VLAN15-USER. 1. 2. 3. 4. 5. Cisco Systems Intelligent Gigabit Ethernet Switch Module Description and comments On BladeServer1 BASP using VLANs on both Ethernet ports Step 4.1.3b: Create desired VLANs on Team CIGESM2. Create and name VLANs 20 and 25 on the team going to CIGESM2. 1. 2. 3. 4. 5. Step 4.1.4: Save the changes made to BASP. This step creates four new logical interfaces in Windows 2000: ToCIGESM1/VLAN10-WEB ToCIGESM1/VLAN15-USER ToCIGESM2/VLAN20-APPS ToCIGESM2/VLAN25-BACKUP Note: Exiting the BASP program without clicking Apply or OK will result in losing your configuration changes. 1. Click Apply at the main BASP window. 2. Click the Yes button when warned about a temporary interruption to the network connections. At this time, the BASP software creates the new logical interfaces for use with Windows 2000 networking. Step 4.1.5: Configure desired IP address on each VLAN. 1. From Windows, click Start → Settings → Network and Dial-up Connections. You should now see the original physical network interfaces along with the four newly created logical interfaces. 2. Select the ToCIGESM1/VLAN10-WEB interface and configure the IP address as follows: – IP Address: 10.1.10.1 – Mask: 255.255.255.0 – Default Gateway: 10.1.10.254 3. Select the ToCIGESM1/VLAN15-USER interface and configure the IP address as follows: – IP Address: 10.1.15.1 – Mask: 255.255.255.0 4. Select the ToCIGESM1/VLAN20-APPS interface and configure the IP address as follows: – IP Address: 10.1.20.1 – Mask: 255.255.255.0 5. Select the ToCIGESM1/VLAN25-BACKUP interface and configure the IP address as follows: – IP Address: 10.1.25.1 – Mask: 255.255.255.0 This step assumes that the user knows how to add IP addressing information. Note that the default gateways used are part of the base HSRP config of the 6500s. Also note that on production systems, you would normally configure one or more DNS servers. This was not included as part of this environment but should be included in most production networks. For this step, attempting to apply IP addressing directly onto a physical interface is not supported. Click Tools → Configure a Team on the toolbar. Select ToCIGESM2 and click OK. Click Add VLAN button on right side of window. In the VLAN ID field, enter 20. In the VLAN Name field, enter VLAN20-APPS. Note that the names should be descriptive but can be anything you prefer. Also note that you want to leave the box labeled Untagged VLAN cleared. 6. Click OK to create this VLAN. Repeat step 4.1.3b for the second VLAN on this team. Set the VLAN ID to 25 and name it VLAN25-BACKUP. Chapter 7. Cisco Systems IGESM configuration and network integration 151 Step-by-step instructions to configure BladeServer2 Table 7-12 shows the step-by-step instructions used to configure BladeServer2. Table 7-12 Configuring BladeServer2 for standard interface connections Description and comments On BladeServer2 No BASP software, using physical access links on both Ethernet ports Step 4.2.1: Configure IP addresses directly on the desired interfaces. This procedure will be no different from configuring a stand-alone server with two NICs. 1. Select the Local Area Connection interface and configure the IP address as follows: – IP Address: 10.1.10.2 – Mask: 255.255.255.0 – Default Gateway: 10.1.10.254 2. Configure the Local Area Connection 2 interface and configure the IP address as follows: – IP Address: 10.1.20.2 – Mask: 255.255.255.0 This step assumes that the user knows how to add IP addressing information. Note that the default gateways used are part of the base HSRP config of the 6500s. Also note that on production systems, you would normally configure one or more DNS servers. This was not included as part of this environment but should be included in most production networks. Step-by-step instructions to configure BladeServer3 Table 7-13 shows the step-by-step instructions used to configure BladeServer3. Table 7-13 Configuring BladeServer3 for access link with single VLAN, using SLB Description and comments On BladeServer3 BASP using VLANs on both Ethernet ports for SLB Step 4.3.1: Launch BASP software. This step assumes the desired software is already installed. Click Start → Programs → Broadcom → Broadcom Advanced Control Suite. This assumes that the software used a default installation. You can also launch this software through an icon in the lower-right corner of the window near the clock (move your cursor until you find the icon labeled “Control Suite”). Step 4.3.2: Create the team using both 1. Click Tools → Create a Team on the toolbar. 2. Enter ToBoth-VLAN30 in the name field and click Next. Note: Leave the Team Type on the default value (Smart Load Balance and Fail Over). 3. Select the first NIC on the left side of the window and click the top right pointing arrow to add this NIC to the Load Balance Members. 4. Select the second NIC on the left side of the window and click the top right pointing arrow to add this NIC to the Load Balance Members. 5. Click Finish. NICs. Step 4.3.4: Save the changes made to BASP. This step creates a single new logical interface in Windows 2000: ToBoth-VLAN30 Note: Exiting the BASP program without clicking Apply or OK will result in losing your configuration changes. 152 1. Click Apply at the main BASP window. 2. Click the Yes button when warned about a temporary interruption to the network connections. At this time, the BASP software creates the new logical interface for use with Windows 2000 networking. Cisco Systems Intelligent Gigabit Ethernet Switch Module Description and comments On BladeServer3 BASP using VLANs on both Ethernet ports for SLB Step 4.3.5: Configure desired IP address on each VLAN. This step assumes that the user knows how to add IP addressing information. Note that the default gateway used is part of the base HSRP config of the 6500s. Also note that on production systems, you would normally configure one or more DNS servers. This was not included as part of this environment but should be included in most production networks. For this step, attempting to apply IP addressing directly onto a physical interface is not supported. 1. From Windows, click Start → Settings → Network and Dial-up Connections. You should now see the original physical network interfaces along with the new logical interface. 2. Select the ToCIGESM1/ToBoth-VLAN30 interface and configure the IP address as follows: – IP Address: 10.1.30.3 – Mask: 255.255.255.0 – Default Gateway: 10.1.30.254 Step-by-step instructions to configure BladeServer4 Table 7-14 shows the step-by-step instructions used to configure BladeServer4. Table 7-14 Configuring BladeServer4 for 802.1Q trunks with multiple VLANs and SLB Description and comments On BladeServer4 BASP using teaming and VLANs on both Ethernet ports Step 4.4.1: Launch BASP software. This step assumes that the desired software is already installed. Click Start → Programs → Broadcom → Broadcom Advanced Control Suite. This assumes that the software used a default installation. You can also launch this software through an icon in the lower-right corner of the window near the clock (move your cursor until you find the icon labeled “Control Suite”). Step 4.4.2: Create and name the team. 1. Click Tools → Create a Team on the toolbar. 2. Enter ToBoth-Trunked in the name field and click Next. 3. Select the first NIC on the left side of the window and click the top right pointing arrow to add this NIC to the Load Balance Members. 4. Select the second NIC on the left side of the window and click the top right pointing arrow to add this NIC to the Load Balance Members. 5. Click Finish. Step 4.4.3: Create desired VLANs on Team ToBoth-Trunked. 1. Click Tools → Configure a Team on the toolbar. Because there is only a single team, the BASP software takes you straight into the Team Configuration page. 2. Click Add VLAN button on right side of window. 3. In the VLAN ID field, enter 35. 4. In the VLAN Name field, enter VLAN35. Note that the names should be descriptive but can be anything you prefer. Also note that you want to leave the box labeled Untagged VLAN cleared. 5. Click OK to create this VLAN. Repeat step 4.4.3a for the remaining VLANs on this team. Set the values as follows: Create and name VLANs 35, 40, 45, and 50 to the team ToBoth-Trunked. – VLAN ID to 40, and name it VLAN40. – VLAN ID to 45, and name it VLAN45. – VLAN ID to 50, and name it VLAN50. Chapter 7. Cisco Systems IGESM configuration and network integration 153 Description and comments On BladeServer4 BASP using teaming and VLANs on both Ethernet ports Step 4.4.4: Save the changes made to BASP. This step creates four new logical interfaces in Windows 2000: ToBoth-Trunked/VLAN35 ToBoth-Trunked/VLAN40 ToBoth-Trunked/VLAN45 ToBoth-Trunked/VLAN50 Note: Exiting the BASP program without clicking Apply or OK will result in losing your configuration changes. 1. Click Apply at the main BASP window. 2. Click the Yes button when warned about a temporary interruption to the network connections. At this time, the BASP software creates the new logical interfaces for use with Windows 2000 networking. Step 4.5.5: Configure desired IP address on each VLAN. 1. From Windows, click Start → Settings → Network and Dial-up Connections. You should now see the original physical network interfaces along with the four newly created logical interfaces. 2. Select the ToBoth-Trunked/VLAN35 interface and configure the IP address as follows: – IP Address: 10.1.35.4 – Mask: 255.255.255.0 – Default Gateway: 10.1.35.254 3. Select the ToBoth-Trunked/VLAN40 interface and configure the IP address as follows: – IP Address: 10.1.40.4 – Mask: 255.255.255.0 4. Select the ToBoth-Trunked/VLAN45 interface and configure the IP address as follows: – IP Address: 10.1.45.4 – Mask: 255.255.255.0 5. Select the ToBoth-Trunked/VLAN50 interface and configure the IP address as follows: – IP Address: 10.1.50.4 – Mask: 255.255.255.0 This step assumes that the user knows how to add IP addressing information. Note that the default gateways used are part of the base HSRP config of the 6500s. Also note that on production systems, you would normally configure one or more DNS servers. This was not included as part of this environment but should be included in most production networks. For this step, attempting to apply IP addressing directly onto a physical interface is not supported. Step 5: Reconnecting the devices This is the final step to bring the connection into full operation. This will be the reverse of whatever procedure was used in step 1. See Table 7-2 on page 123 for details about how to reestablish the links. Step 6: Verifying the configuration This section provides options for verifying the correct and desired operation. Verifying correct operation on the blade servers Review the BASP application for the desired configuration of teaming and VLANs on BladeServer1, 3, and 4 (see Figure 7-9, Figure 7-11, and Figure 7-12). Make sure that VLANs are present and on the proper team. BladeServer2 should not have a BASP configuration (see figure Figure 7-10). 154 Cisco Systems Intelligent Gigabit Ethernet Switch Module Figure 7-9 BladeServer1 BASP configuration Figure 7-10 BladeServer2 BASP configuration (BASP not used of BladeServer2) Figure 7-11 BladeServer3 BASP configuration Chapter 7. Cisco Systems IGESM configuration and network integration 155 Figure 7-12 BladeServer4 BASP configuration Using Windows 2000 networking tools, review the logical and physical network. The following figures show BladeServers 1, 2, 3, and 4. Figure 7-13 Windows 2000 networking showing physical and logical interfaces on BladeServer1 Figure 7-14 Windows 2000 networking showing only physical interfaces on BladeServer2 156 Cisco Systems Intelligent Gigabit Ethernet Switch Module Figure 7-15 Windows 2000 networking showing only physical interfaces on BladeServer3 Figure 7-16 Windows 2000 networking showing only physical interfaces on BladeServer4 From the CMD prompt (Start → Run → cmd → OK), execute the ipconfig command and confirm that the desired interfaces have the desired IP configuration on each blade server (make sure that they are not reversed, where the IP address you want on the Local Area Connection is not on the connection named Local Area Connection 2, assuming they have not been renamed). For teamed interfaces, make sure that the IP address is on the expected logical interface as reported by ipconfig. Perform ping tests from the various boxes. The following tests connectivity between blade servers on the same VLANs. Pings will only travel up to the appropriate Cisco Systems IGESM and back to the other blade server (they will not travel up to the aggregation switches). Ping from BladeServer1 to 10.1.10.2 (BladeServer2’s VLAN 10 connection) Ping from BladeServer1 to 10.1.20.2 (BladeServer2’s VLAN 20 connection) The following tests connectivity through the Cisco Systems IGESMs and up to the 6500s: Ping from BladeServer1 to 10.1.10.254 (HSRP address on the 6500s) Ping from BladeServer1 to 10.1.15.254 (HSRP address on the 6500s) Ping from BladeServer1 to 10.1.20.254 (HSRP address on the 6500s) Ping from BladeServer1 to 10.1.25.254 (HSRP address on the 6500s) Ping from BladeServer2 to 10.1.10.254 (HSRP address on the 6500s) Ping from BladeServer2 to 10.1.20.254 (HSRP address on the 6500s) Ping from BladeServer3 to 10.1.30.254 (HSRP address on the 6500s) Chapter 7. Cisco Systems IGESM configuration and network integration 157 Ping from BladeServer4 to 10.1.35.254 (HSRP address on the 6500s) Ping from BladeServer4 to 10.1.40.254 (HSRP address on the 6500s) Ping from BladeServer4 to 10.1.45.254 (HSRP address on the 6500s) Ping from BladeServer4 to 10.1.50.254 (HSRP address on the 6500s) At this time, you should be able to ping as just described. If you cannot ping to these addresses, and your configuration checks above were okay, proceed to the next section and inspect the other components in this configuration. At this time, you can also experiment with taking down links on the servers running SLB (BladeServer3 and BladeServer4). Start up a continuous ping (-t option) from the desired blade server to the appropriate HSRP address for the subnet, and go into the Cisco Systems IGESMs and try shutting down G0/3 and G0/4 on one or the other Cisco Systems IGESMs (do not take both g0/3 or both g0/4 ports down at the same time, because that will cause the relevant blade server to lose all connectivity, which is expected behavior if you kill all ports in an SLB connection). You might lose a ping or two, but generally, the pings should continue regardless of which g0/3 or g0/4 you take down. With this configuration (per this example), you cannot ping the management VLAN on the Cisco Systems IGESMs. This is because it is on a different VLAN than the blade servers. Also note that, for several reasons, we highly recommend that you do not put any blade servers on the same VLAN as the management VLAN in use by the Cisco Systems IGESMs. Verifying correct operation on the Cisco Systems IGESM Confirm your Cisco Systems IGESM configuration using the following commands. To confirm you are on the correct switch, use the show platform summary command (this shows what slot you are currently on, for example, Slot 1 = CIGESM1, Slot 2 = CIGESM2). Do a show run command and confirm that it matches the desired configuration as entered in the previous steps. Do a show logging command and look for any unexpected errors. On CIGESM1: Do a show Do a show Do a show Do a show int int int int g0/1 g0/2 g0/3 g0/4 status. Should show status status. Should show status status. Should show status status. Should show status - connected and vlan connected and vlan connected and vlan connected and vlan - trunk. 10. 30. trunk. g0/1 g0/2 g0/3 g0/4 status. Should show status status. Should show status status. Should show status status. Should show status - connected and vlan connected and vlan connected and vlan connected and vlan - trunk. 20. 30. trunk. On CIGESM2: Do a show Do a show Do a show Do a show int int int int Run the show interface trunk module 0 command and check for the desired output (it should be similar for both Cisco Systems IGESMs): Port Gi0/1 Gi0/2 Gi0/3 Gi0/4 . . . 158 Mode on off off on Encapsulation 802.1q 802.1q 802.1q 802.1q Cisco Systems Intelligent Gigabit Ethernet Switch Module Status trunking not-trunking not-trunking trunking Native vlan 2 2 2 2 Gi0/17 Gi0/18 Gi0/19 Gi0/20 on on on on 802.1q 802.1q 802.1q 802.1q trunk-inbndl trunk-inbndl trunk-inbndl trunk-inbndl 2 2 2 2 (Po1) (Po1) (Po2) (Po2) Run the show etherchannel summary command and check for the desired output (it should be similar on both Cisco Systems IGESMs: Flags: D I H R u U d - down P - in port-channel stand-alone s - suspended Hot-standby (LACP only) Layer3 S - Layer2 unsuitable for bundling in use f - failed to allocate aggregator default port Number of channel-groups in use: 2 Number of aggregators: 2 Group Port-channel Protocol Ports ------+-------------+-----------+----------------------------------------------1 Po1(SU) LACP Gi0/17(Pd) Gi0/18(P) 2 Po2(SU) LACP Gi0/19(Pd) Gi0/20(P) Run the show etherchannel 1 port-channel command and check for the desired output (it should be similar on both Cisco Systems IGESMs). Repeat for port-channel 2. Port-channels in the group: ---------------------Port-channel: Po1 (Primary Aggregator) -----------Age of the Port-channel = 00d:03h:36m:48s Logical slot/port = 1/0 Number of ports = 2 HotStandBy port = null Port state = Port-channel Ag-Inuse Protocol = LACP Ports in the Port-channel: Index Load Port EC state No of bits ------+------+------+------------------+----------0 00 Gi0/17 Active 0 0 00 Gi0/18 Active 0 Check the output of the show cdp neighbors command. It should show something similar to the following (different Device IDs for CIGESM2). Note that the Cisco Systems IGESMs can see each other through the Management Module interface. Capability Codes: R - Router, T - Trans Bridge, B - Source Route Bridge S - Switch, H - Host, I - IGMP, r - Repeater, P - Phone Device ID DC6500-1 DC6500-1 DC6500-3 DC6500-3 CIGESM2 Local Intrfce Gig 0/18 Gig 0/17 Gig 0/20 Gig 0/19 Gig 0/15 Holdtme 127 127 177 177 159 Capability R S I R S I R S I R S I S I Platform Port ID WS-C6506 Gig 2/26 WS-C6506 Gig 2/25 WS-C6506 Gig 2/26 WS-C6506 Gig 2/25 OS-CIGESM-Gig 0/15 Chapter 7. Cisco Systems IGESM configuration and network integration 159 Verifying correct operation on the external switches (6500-1 and 6500-3) This section includes some commands you can use to verify the desired configuration and operation of the 6500s. Basically, you can run the same set of commands as previously shown for the Cisco Systems IGESMs. Naturally, there will be some differences in the output, but you want to make sure that the proper ports are channeled and trunked and carrying the correct VLANs. Also watch out for any admin down ports. You should also be able to ping the following addresses: Ping to BladeServer1 at 10.1.10.1 Ping to BladeServer1 at 10.1.15.1 Ping to BladeServer1 at 10.1.20.1 Ping to BladeServer1 at 10.1.25.1 Ping to BladeServer2 at 10.1.10.2 Ping to BladeServer2 at 10.1.20.2 Ping to BladeServer3 at 10.1.30.3 Ping to BladeServer4 at 10.1.35.4 Ping to BladeServer4 at 10.1.40.4 Ping to BladeServer4 at 10.1.45.4 Ping to BladeServer4 at 10.1.50.4 At this time, it is also possible to verify redundancy. This can be done by taking various elements of the network down (links or devices, or both) to make sure that the network operates as desired. 7.5.3 Topology 3a: Dual Cisco Systems IGESMs, two-port aggregation with RSPAN This topology (Figure 7-18) is similar to topology 2, but offers the option of a dedicated RSPAN port on each of the Cisco Systems IGESMs. The disadvantage to this design is that, assuming Spanning Tree costs places the two EtherChannel uplinks into forwarding, upon failure of one of the EtherChannel uplinks, a higher than normal oversubscription will come into play, which might impact performance. As with topology 2, there is one case where high availability might still be an issue, and that is if all uplinks from a single Cisco Systems IGESM were to go down, but the Cisco Systems IGESM itself did not go down. In that case, the blade server NICs would be unable to detect the upstream failure and issues would arise. Utilizing properly configured NIC Teaming and Trunk Failover would resolve this issue. Brief discussion about RSPAN for this topology example Important: There are very specific rules for using RSPAN. Failure to comply with these rules can result in unexpected and undesired results. Guidelines and use of RSPAN can be reviewed at the following locations: http://www.cisco.com/en/US/products/hw/switches/ps708/products_configuration_guide_chapt er09186a008007f323.html http://www.cisco.com/en/US/products/hw/switches/ps628/products_configuration_guide_chapt er09186a00801a6ba9.html 160 Cisco Systems Intelligent Gigabit Ethernet Switch Module Important: The RSPAN reflector ports discussed and tested for this topology were one of the four external ports on the Cisco Systems IGESM. It is possible to use an unused blade server port (for example, g0/14) for the role of the reflector port, but extreme caution should be used, because using an internal port that had a blade server attached could lead to unexpected and undesired behavior. All testing for this document was performed using one of the four external ports (g0/17 - g0/20) as the reflector-port. Important: As already noted, it is important to understand RSPAN before implementing it in your environment. One important point often overlooked is that the VLAN being used for RSPAN must be removed/pruned from any blade server port in the BladeCenter. Note: The Cisco Systems Intelligent Gigabit Ethernet Switch Module for the IBM Eserver BladeCenter Software Configuration Guide (which comes with your Cisco Systems Intelligent Gigabit Ethernet Switch Module) does not currently reflect the correct procedures for configuring RSPAN on the Cisco Systems IGESM (at a minimum, it neglects to mention the step to run remote-span on the VLAN being used as the destination of the RSPAN session). This is under review and should be updated soon to reflect the correct procedures. This same statement is true in regard to current Cisco documentation available for using RSPAN on 2950s. Important: Testing of RSPAN on the Cisco Systems IGESM during the production of this document showed that issues could arise (unexpected wire-rate traffic streaming) when using the version of code 12.1(14)AY. This issue is resolved at version 12.1(14)AY1 and above. We strongly advised that you not use RSPAN with 12.1(14)AY code with RSPAN. If you have already configured RSPAN and are experiencing the issue of streaming data associated with 12.1(14)AY, deleting the monitor session using RSPAN will halt this condition (from config term mode run the command no monitor session x, where x is the monitor session number configured for RSPAN use). For this example, we do a simple RSPAN that will redirect all traffic to and from the first connection to BladeServer1, on to VLAN 500, to be carried over the port-channel link to 6500-1, where it will be directed to a sniffer attached to port g2/2. Figure 7-17 shows the flow that will occur with the RSPAN configuration being demonstrated in this example. One item of note, g0/19, in its role as the reflector port, does not have a cable attached. The role of a reflector port is to function as an internal loopback so that traffic can be brought from the port or ports to be monitored and placed onto the RSPAN VLAN (VLAN 500 for this example) for subsequent transport to a remote monitoring device elsewhere in the network. Chapter 7. Cisco Systems IGESM configuration and network integration 161 g2/25 g2/26 g0/17 g0/18 g2/2 VLAN500 g0/19 - Reflector-port g0/1 CIGESM1 BladeCenter Data Center 6500-1 Sniffer 1 Blade Server 1 RSPAN source: Port g0/1 on CIGESM1 RSPAN Reflector-port: Port g0/19 on CIGESM1 RSPAN VLAN: VLAN 500 RSPAN destination: Port g2/2 on 6500-1 Figure 7-17 Desired RSPAN data flow for this example Configurations presented for blade server attachment to this topology Important: The blade server configurations offered in this chapter are not part of the topology discussion, but instead their configurations are provided in this section as a means to help you understand some of the possibilities for attaching the servers to this topology. The examples should not be construed as the way a blade server must be configured. If your only goal is to understand a given server attachment example, it is possible to just review that specific example and its associated upstream connection on the Cisco Systems IGESMs and ignore the extra blade server configurations. The following list describes the blade server configuration (see Figure 7-18) for this example: BladeServer1: 802.1Q trunk links carrying multiple VLANs to a NIC. This configuration is provided to demonstrate how to permit multiple VLANs to access each individual NIC in the blade server. It demonstrates one way to isolate traffic types from each other, through several VLANs per NIC. Broadcom teaming software is required, but no redundancy is used. BladeServer2: Access ports to NICs via individual connections. This configuration is provided to demonstrate how to use each NIC as a standard access link (no VLANs, trunking, or redundancy are used from the blade server’s perspective). This is the traditional way most servers were attached in the past and is simple and effective, but not very flexible. This configuration is performed using the stock network configuration tools available in Windows 2000 (no teaming software is used). BladeServer3: Access ports to NICs via SLB/teamed connections. This configuration is provided to show how to use multiple NICs to look like a single access NIC to the rest of the upstream network (the Cisco Systems IGESMs). It makes use of the teaming drivers to tie the NICs together but does not use any special VLAN 162 Cisco Systems Intelligent Gigabit Ethernet Switch Module configuration. From the Cisco Systems IGESM’s perspective, both connections are configured as simple access ports with a static VLAN assigned. – This configuration uses of the Broadcom teaming software to bind and balance the links together. The Cisco Systems IGESMs will establish what VLAN the teamed ports will be placed into (it will need to be the same for both Cisco Systems IGESM ports that go to this server). – The example for BladeServer3 provided in this chapter uses what is known as Active/Active, or Server Load Balancing, such that both interfaces can be carrying traffic at the same time. This is opposed to Active/Standby (not shown here), also known as Hot Standby, where only one of the links is up at a time. BladeServer4: 802.1Q trunk links carrying multiple VLANs on a teamed/SLB connection to the server. This configuration is provided to show how to use multiple NICs to look like a single NIC, but still make use of multiple VLANs on this single logical NIC. It makes use of the teaming drivers to tie the NICs together and create the desired VLANs. From the Cisco Systems IGESMs perspective, both connections are configured as trunk ports, carrying a common set of VLANs (you need to configure the same VLANs on both of the Cisco Systems IGESM ports going to this server’s four logical NICs). – This example uses the Broadcom teaming software to bind and balance the links together and create the logical interfaces that will represent the various VLANs demonstrated in this document. – The example for BladeServer4 provided in this chapter uses what is known as Active/Active, or Server Load Balancing, such that both interfaces can be carrying traffic at the same time. This is opposed to Active/Standby (not shown here), also known as Hot Standby, where only one of the links is up at a time. Important: To ensure blade servers 3 and 4 achieve the highest availability, Trunk Failover should also be configured (not shown in this example). For details and requirements on configuring the Trunk Failover feature, see 7.7, “Trunk Failover feature description and configuration” on page 193. Chapter 7. Cisco Systems IGESM configuration and network integration 163 To Core Routers Po1 Data Center 6500-1 Aggregation Layer Mod 2 - 25 26 RSPAN Port Mod 6 - 1 Mod 6 - 2 28 Po2 Po1 Po1 17 18 20 19 CIGESM1 20 Access Access VLAN 10 VLAN 30 Trunked VLAN 10 and 15 1 2 Trunked VLAN 20 and 25 Trunked VLAN 35, 40, 45 and 50 Access Access Trunked VLAN 20 Trunked and 25 VLAN 35, Access 40, 45 VLAN 20 and 50 Access VLAN 30 Teamed/Access Teamed/Trunked VLAN 35, 40, 45 and 50 1 2 Management Workstation Blade Server 1 17 18 CIGESM 19 M M 1 M M 2 25 26 - Mod 2 Po2 Trunked VLAN 10 and 15 Management Netw ork Mod 6 - 1 Mod 6 - 2 28 Data Center 6500-3 Blade Server 2 1 2 1 2 Blade Server 3 Blade Server 4 BladeCenter Topology 3a Links between Module and Ciscoand Systems IGESMs not shown LinksManagement between Management Modules CIGESMs not shown Figure 7-18 Topology 3a: Dual Cisco Systems IGESMs, two port aggregation with RSPAN 164 Cisco Systems Intelligent Gigabit Ethernet Switch Module RSPAN Port Step 1: Taking down the link or links It is always advisable to disable the link or links prior to making any configuration changes. See Table 7-1 on page 122 for the needed procedures. Step 2: Configuring the external switches The following assumptions have been made for this example: The bulk of the configuration for the 6500s is included in the base configuration (see “Cat 6500 base configurations” on page 109), because the goal of this document is to show how to configure the BladeCenter components rather than generic Cisco devices. This section specifically focuses on how to configure the 6500 ports that connect to the BladeCenter. VLAN 2 has already been created on the 6500s as part of the base configuration. The VTP Domain has already been named and set to transparent as part of the base configuration. Spanning Tree root commands have already been set as part of the base configuration (to make 6500-1 the primary root and 6500-3 as the secondary root). The user is already logged on to the switch, and the switch is in enable mode. Commands are being performed in the sequence shown. Cisco Switch Modules in the 6500s being used to connect to the Cisco Systems IGESMs are 1000Base-T-based, and we will be leaving the ports at 1Gbps full duplex. The aggregation link between the 6500s has already been created as part of the base config and is carrying the desired VLANs (for example, 2, 10, 15, 20). Table 7-15 Configuring the external switches Description and comments On the 6500-1 On the 6500-3 Step 2.1: Configure Link Aggregations and single link from the 6500s to the Cisco Systems IGESMs. config t int range g2/25 - 26 switchport spanning-tree guard root description to-BladeCenter CIGESM1 channel-group 2 mode active config t int range g2/25 - 26 switchport spanning-tree guard root description to-BladeCenter CIGESM2 channel-group 2 mode active This creates a logical interface named Port-Channel2 and places interfaces g2/25 and g2/26 into it. This creates a logical interface named Port-Channel2 and places interfaces g2/25 and g2/26 into it. int g2/28 switchport spanning-tree guard root description to-BladeCenter CIGESM2 int g2/28 switchport spanning-tree guard root description to-BladeCenter CIGESM1 This is for the port-channels between the 6500s and each of the Cisco Systems IGESMs. Note that it is always a good practice to provide a description to an interface. Also note that Spanning-Tree guard root is added to both the individual ports and the port-channel to ensure it is in place. Chapter 7. Cisco Systems IGESM configuration and network integration 165 Description and comments On the 6500-1 On the 6500-3 Step 2.2: Configure VLAN and trunking options. int port-channel 2 description EtherChannel to CIGESM1 switchport trunk encapsulation dot1q switchport trunk native vlan 2 switchport trunk allowed vlan 2,10,15,30,35,40,45,50,500 switchport mode trunk spanning-tree guard root int port-channel 2 description EtherChannel to CIGESM2 switchport trunk encapsulation dot1q switchport trunk native vlan 2 switchport trunk allowed vlan 2,20,25,30,35,40,45,50 switchport mode trunk spanning-tree guard root Note: Configuring root guard on the port channel interface between 6500s and the Cisco Systems IGESMs will help to ensure stability in your network. Note: Configuring root guard on the port channel interface between 6500s and the Cisco Systems IGESMs will help to ensure stability in your network. Also note that the addition of VLAN 500 above to the allowed VLANs was only done on the 6500-1 to support the demonstration of RSPAN. int g2/28 description Trunk to CIGESM1 switchport trunk encapsulation dot1q switchport trunk native vlan 2 switchport trunk allowed vlan 2,10,15,20,25,30,35,40,45,50 switchport mode trunk spanning-tree guard root end All desired VLANs were already created as part of the base configuration, and IP addresses were added at that time. This step sets up the aggregated links created in step 2.1 to be 802.1Q trunks and allows the desired VLANs to be carried. Note the different VLANs on the different aggregations. As noted previously, controlling VLANs is considered a good security practice (although it might increase the amount of work for network administrators). int g2/28 description Trunk to CIGESM2 switchport trunk encapsulation dot1q switchport trunk native vlan 2 switchport trunk allowed vlan 2,10,15,20,25,30,35,40,45,50 switchport mode trunk spanning-tree guard root Step 2.3: Configure to support the RSPAN VLAN as defined on CIGESM1. vlan 500 remote-span For test purposes, a sniffer will be placed on g2/2 to capture traffic to port g0/1 on CIGESM1 (as defined in step 3). monitor session 5 source remote vlan 500 monitor session 5 destination interface g2/2 int g2/2 no shutdown end The two monitor commands listed above are wrapped in this document and should be each on their own line. The use of VLAN 500 as the RSPAN VLAN is defined on CIGESM1 in an upcoming step. The VLAN selection, the selection of the session to use, and the selection of g2/2 as the destination port were all arbitrary. 166 Cisco Systems Intelligent Gigabit Ethernet Switch Module For this example, we will only be showing an RSPAN from CIGESM1 to 6500-1 Description and comments On the 6500-1 On the 6500-3 Step 2.4: Save config to copy running-config startup-config copy running-config startup-config NVRAM. Note: Failure to save your configuration will result in possible network down conditions if the switch is restarted prior to the save (all changes since last save will be lost). Step 3: Configuring Cisco Systems IGESMs This section steps through the sequence of actions required to configure the Cisco Systems IGESMs for this example. It is broken into two major sections, one for configuring the Cisco Systems IGESM in bay 1 and one for configuring the Cisco Systems IGESM in bay 2. The following assumptions have been made for both Cisco Systems IGESM configurations in this example: The user is already logged on to the Cisco Systems IGESM, and the switch is in enable mode (or logged on to CMS and using the GUI therein). Commands are being performed in the sequence shown. The Cisco Systems IGESM is starting from a base configuration per the example shown in “Cisco Systems IGESM base configurations” on page 108. The operating systems in use on the blade servers are Windows 2000. This is important, because which port is considered “first” and which port is considered “second” on a blade server has several dependences, not the least of which is the operating system in use. For an explanation of the blade servers connection names and how they are derived, see Appendix A, “Hints and tips” on page 227. On BladeServer1, both ports will be using trunking (but not load balancing) through the Broadcom BASP software. The first port will be configured for VLANs 10 and 15, the second port will be configured for VLANs 20 and 25. On BladeServer2, both ports will be simple access links and will be placed on VLANs 10 and 20, respectively, through port settings on the Cisco Systems IGESMs. On BladeServer3, both ports will be teamed through the Broadcom BASP software to appear as a single logical link to the OS, using access VLAN 30 as configured at the Cisco Systems IGESM’s ports to this server. On BladeServer4, both ports will be teamed through the Broadcom BASP software to appear as a single logical link to the OS and use 802.1Q trunking to support VLANs 35, 40, 45, and 50. Step 3.1: Configuring the first Cisco Systems IGESM (CIGESM1) Figure 7-16 shows the step-by-step instructions used to configure CIGESM1, showing both CLI and CMS commands. Important: The current version of CMS supported on the Cisco Systems IGESM has a limitation in its ability to completely control VLANs being placed on a given trunk: It always includes VLAN 1 and 1001-1005, even if you do not set them as allowed. Due to this limitation, its use might not be appropriate for production configuration when trying to control VLANs allowed on a given trunk. Chapter 7. Cisco Systems IGESM configuration and network integration 167 Table 7-16 Configuring CIGESM1 Description and comments Actions via IOS CLI for CIGEMS1 Actions via CMS for CIGEMS1 Step 3.1.1: Configure desired VLANs for CIGESM1. Perform the following from the enable mode: config t vlan 10 name Web vlan 15 name User vlan 30,35,40,45,50 Perform the following from the CMS interface: 1. In the top toolbar, click VLAN → VLAN. 2. Click the Configure VLANs tab. 3. Click Create. 4. Enter 10 in the VLAN ID field. 5. Enter Web in the VLAN Name field. 6. Click OK. 7. Click Create. 8. Enter 15 in the VLAN ID field. 9. Enter User in the VLAN Name field. 10. Click OK. 11. Click Create. 12. Enter 30 in the VLAN ID field (leave the name field defaulted). 13. Click OK. 14. Repeat the previous three steps to create VLANs 35, 40, 45, and 50. 15. Click Apply. 16. Click Refresh to view the newly created VLANs. Create VLANs 10, 15, 30, 35, 40, 45, and 50 (only named VLAN 10 and 15 for this demonstration). Note no spaces between the VLAN numbers and the commas. Step 3.1.2: Configure Link Aggregation toward 6500-1. This example makes use of LACP to form the aggregation. Ports g0/17 and g0/18 will be going to 6500-1. 168 int range g0/17 - 18 description To-6500-1 channel-group 1 mode active This creates a logical interface named Port-Channel1 and places the interfaces g0/17 and g0/18 into it. Cisco Systems Intelligent Gigabit Ethernet Switch Module 1. In the top toolbar, click Port → EtherChannels. 2. Click Create. 3. Select the check boxes next to ports Gi0/17 and Gi0/18. 4. Enter 1 in the Group [1-6] field to select the port channel to use. 5. Click OK. 6. Click Apply or OK. Description and comments Actions via IOS CLI for CIGEMS1 Actions via CMS for CIGEMS1 Step 3.1.3: Configure 802.1Q trunking toward 6500s and add allowed VLANs for both EtherChannel and single trunked link. int port-channel 1 description EtherChannel-To-6500-1 switchport trunk native vlan 2 switchport trunk allowed vlan 2,10,15,30,35,40,45,50,500 switchport mode trunk 1. In the top toolbar, click VLAN → VLAN. 2. Click po1. 3. Click Modify. 4. In the Trunk-Allowed VLAN field, enter 2,10,15,30,35,40,45,50,500. 5. Click OK. 6. Click Apply or OK. 7. In the top menu bar, click Port → Port Settings. 8. Scroll down and highlight port gi0/20. 9. Click Modify. 10. Change the description to Trunk-to-6500-3. 11. In the top toolbar, click VLAN → VLAN. 12. Click g0/20. 13. Click Modify. 14. In the Trunk-Allowed VLAN field, enter 2,10,15,30,35,40,45,50. 15. Make sure the Native VLAN field is set to 2. 16. Click OK. 17. Click Apply or OK. Important: A limitation in the current version of CMS exists where it will always include VLANs 1 and 1001 through 1005. This can cause a mismatch with the setting on the 6500 side and result in the aggregation going down. The only solution at this time is to go into the CLI and run the switchport trunk allowed vlan command with the desired settings, as shown in the CLI section for this step. Note that on the line allowing specific VLANs, there cannot be any spaces between the numbers and the commas. Also note that VLAN 2 is the native VLAN on these ports by default. Note that the VLAN numbers might be wrapped in this document; they should be on the same line as the command. The addition of VLAN 500 to the allowed VLANs above is for carrying the RSPAN traffic from the Cisco Systems IGESM to the 6500. VLAN 500 was an arbitrary selection. int g0/20 description Trunk-to-6500-3 switchport trunk native vlan 2 switchport trunk allowed vlan 2,10,15,30,35,40,45,50 switchport mode trunk Chapter 7. Cisco Systems IGESM configuration and network integration 169 Description and comments Actions via IOS CLI for CIGEMS1 Actions via CMS for CIGEMS1 Step 3.1.4: Configure RSPAN on port g0/19 on CIGESM1. Create the RSPAN VLAN and set it to support RSPAN: vlan 500 remote-span Configure the port to be monitored (g0/1 in this case), as well as the port performing the function of the reflector-port (g0/19): monitor session 1 source interface g0/1 CMS does not support configuring RSPAN at this time. Use the CLI to configure RSPAN. RSPAN can be configured several ways to capture traffic from a single port, multiple ports, or even VLANs. This step does not discuss all of the possibilities, butit gives one specific example: to capture all traffic to and from port g0/1 such that it can be captured and viewed from a sniffer attached to 6500-1, port g2/2. Port g0/19 on the Cisco Systems IGESM is used as the reflector port for this example. The necessary commands for the 6500-1 are shown in Table 7-15 on page 165. Important: We do not recommend that you use RSPAN on a Cisco Systems IGESM running Release 12.1(14)AY. This release has an issue with RSPAN that could disrupt network communications. For more information about this issue, see Appendix A, “Hints and tips” on page 227. Step 3.1.5: Configure 802.1Q trunking to BladeServer1 and add allowed VLANs. monitor session 1 destination remote vlan 500 reflector-port g0/19 The two monitor commands listed above should be each on their own, single line. Important: A remote VLAN used by RSPAN must not be used by on any other access ports on the Cisco Systems IGESM or be defined as the management VLAN on the Cisco Systems IGESM. Review the rules for setting up RSPAN mentioned at the beginning of this topology example. int g0/1 switchport trunk allowed vlan 2,10,15 Note that the VLAN numbers might be wrapped in this document; they should be on the same line as the command. This allows VLANs 2, 10, and 15 to reach BladeServer1’s first NIC. 170 Cisco Systems Intelligent Gigabit Ethernet Switch Module 1. In the top menu bar, click VLAN → VLAN. 2. Click port Gi0/1. 3. Click Modify. 4. In the Trunk-Allowed VLAN field, enter 2,10,15. 5. Click OK. 6. Click Apply or OK. Important: As noted in step 3.1.3, a limitation in the current version of CMS exists where it will always include VLANs 1 and 1001 through 1005. This can cause a mismatch with the setting on the blade server side and result in the trunk not working as expected. The only solution at this time is to go into the CLI and run the switchport trunk allowed vlan command with the desired settings, as shown in the CLI section for this step. Description and comments Actions via IOS CLI for CIGEMS1 Actions via CMS for CIGEMS1 Step 3.1.6: Configure access links to BladeServer2 and set access VLAN. int g0/2 switchport mode access switchport access vlan 10 1. In the top toolbar, click VLAN → VLAN. 2. Click port Gi0/2. 3. Click Modify. 4. In the Administrative Mode field, select Static Access. 5. In the Static-Access VLAN field, enter 10. 6. Click OK. 7. Click Apply or OK. This places BladeServer2’s first NIC into VLAN 10. Step 3.1.7: Configure access links to BladeServer3 and set access VLAN. int g0/3 switchport mode access switchport access vlan 30 This places BladeServer3’s first NIC into VLAN 30. Step 3.1.8: Configure 802.1Q trunking to BladeServer4 and add allowed VLANs. int g0/4 switchport trunk allowed vlan 2,35,40,45,50 end Note that the VLAN numbers might be wrapped in this document; they should be on the same line as the command. Step 3.1.9: Save Cisco Systems IGESM config to NVRAM. Failure to perform this step will result in all changes to the Cisco Systems IGESM being lost if the BladeCenter is powered off or the Cisco Systems IGESM is otherwise restarted. copy running-config startup-config 1. In the top toolbar, click VLAN → VLAN. 2. Click port Gi0/3. 3. Click Modify. 4. In the Administrative Mode field, select Static Access. 5. In the Static-Access VLAN field, enter 30. 6. Click OK. 7. Click Apply or OK. 1. In the top toolbar, click VLAN → VLAN. 2. Click port Gi0/4. 3. Click Modify. 4. In the Trunk-Allowed VLAN field, enter 2,35,40,45,50. 5. Click OK. 6. Click Apply or OK. Important: As noted in step 3.1.3, a limitation in the current version of CMS exists where it will always include VLANs 1 and 1001 through 1005. This can cause a mismatch with the setting on the blade server side and result in the trunk not working as expected. The only solution at this time is to go into the CLI and run the switchport trunk allowed vlan command with the desired settings, as shown in the CLI section for this step. 1. In the top toolbar, click Administration → Save Configuration. 2. Leave the Source set to Running Configuration. 3. In Destination, select Startup Configuration. 4. Click Save. Chapter 7. Cisco Systems IGESM configuration and network integration 171 Step 3.2: Configuring the second Cisco Systems IGESM (CIGESM2) Table 7-17 shows the step-by-step instructions used to configure CIGESM2, showing both CLI and CMS commands. Important: The current version of CMS supported on the Cisco Systems IGESM has a limitation in its ability to completely control VLANs being placed on a given trunk: It always includes VLAN 1 and 1001-1005, even if you do not set them as allowed. Because of this limitation, its use might not be appropriate for production configuration when trying to control VLANs allowed on a given trunk. Table 7-17 Configuring CIGESM2 Description and comments Actions via IOS CLI for CIGEMS2 Actions via CMS for CIGEMS2 Step 3.2.1: Configure desired VLANs for CIGESM2. Perform the following from the enable mode: config t vlan 20 name Application vlan 25 name Backup vlan 30,35,40,45,50 Perform the following from the CMS interface: 1. In the top toolbar, click VLAN → VLAN. 2. Click the Configure VLANs tab. 3. Click Create. 4. Enter 20 in the VLAN ID field. 5. Enter Application in the VLAN Name field. 6. Click OK. 7. Click Create. 8. Enter 25 in the VLAN ID field. 9. Enter Backup in the VLAN Name field. 10. Click OK. 11. Click Create. 12. Enter 30 in the VLAN ID field (leave the name field defaulted). 13. Click OK. 14. Repeat the previous three steps to create VLANs 35, 40, 45, and 50. 15. Click Apply. 16. Click Refresh to view the newly created VLANs. Create VLANs 20,25, 30, 35, 40, 45, and 50 (only named VLAN 20 and 25 for this demonstration). Note no spaces between the VLAN numbers and the commas. Step 3.2.2: Configure Link Aggregation toward 6500-3. This example makes use of LACP to form the aggregation. Ports g0/17 and g0/18 will be going to 6500-3. 172 int range g0/17 - 18 description To-6500-3 channel-group 1 mode active This creates a logical interface named Port-Channel1 and places the interfaces g0/17 and g0/18 into it. Cisco Systems Intelligent Gigabit Ethernet Switch Module 1. In the top toolbar, click Port → EtherChannels. 2. Click Create. 3. Select the check boxes next to ports Gi0/17 and Gi0/18. 4. Enter 1 in the Group [1-6] field to select the port channel to use. 5. Click OK. 6. Click Apply or OK. Description and comments Actions via IOS CLI for CIGEMS2 Actions via CMS for CIGEMS2 Step 3.2.3: Configure 802.1Q trunking toward 6500s and add allowed VLANs for both EtherChannel and single trunked link. int port-channel 1 description EtherChannel-To-6500-3 switchport trunk native vlan 2 switchport trunk allowed vlan 2,20,25,30,35,40,45,50 switchport mode trunk 1. In the top toolbar, click VLAN → VLAN. 2. Click po1. 3. Click Modify. 4. In the Trunk-Allowed VLAN field, enter 2,20,25,30,35,40,45,50. 5. Click OK. 6. Click Apply or OK. 7. In the top toolbar, click Port → Port Settings. 8. Scroll down and highlight port gi0/20. 9. Click Modify. 10. Change the description to Trunk-to-6500-1. 11. In the top toolbar, click VLAN → VLAN. 12. Click g0/20. 13. Click Modify. 14. In the Trunk-Allowed VLAN field, enter 2,20,25,30,35,40,45,50. 15. Make sure the native VLAN is set to 2. 16. Click OK. 17. Click Apply or OK. Important: A limitation in the current version of CMS exists where it will always include VLANs 1 and 1001 through 1005. This can cause a mismatch with the setting on the 6500 side and result in the aggregation going down. The only solution at this time is to go into the CLI and run the switchport trunk allowed vlan command with the desired settings, as shown in the CLI section for this step. Note that on the line allowing specific VLANs, there cannot be any spaces between the numbers and the commas. Also note that VLAN 2 is the native VLAN on these ports by default. Note that it is necessary to force optimal flow by changing the cost on the single link to something higher than the root cost on the EtherChannel. In this configuration, the root cost to both 6500-1 and 6500-3 is equal (4), so to ensure optimal flow (to 6500-3), we set 0/20 to 8, which forces the default flow on to the higher bandwidth link to 6500-3. Note: CMS only allows you to specify the STP port cost for a VLAN and not the entire port. Setting this per VLAN can be tedious at best. Based on this, the CLI is considered a better choice for controlling STP port costs. Step 3.2.4: Configure RSPAN for CIGESM2. Note that the VLAN numbers might be wrapped in this document; they should be on the same line as the command. int g0/20 description Trunk-to-6500-1 switchport trunk native vlan 2 switchport trunk allowed vlan 2,20,25,30,35,40,45,50 switchport mode trunk spanning-tree cost 8 Note that for this topology, although we dedicated an RSPAN reflector port on each Cisco Systems IGESM, we only demonstrate its use on CIGESM1. No RSPAN commands are performed on CIGESM2. N/A Chapter 7. Cisco Systems IGESM configuration and network integration 173 Description and comments Actions via IOS CLI for CIGEMS2 Actions via CMS for CIGEMS2 Step 3.2.5: Configure 802.1Q trunking to BladeServer1 and add allowed VLANs. int g0/1 switchport trunk allowed vlan 2,20,25 1. In the top menu bar, click VLAN → VLAN. 2. Click port Gi0/1. 3. Click Modify. 4. In the Trunk-Allowed VLAN field, enter 2,20,25. 5. Click OK. 6. Click Apply or OK. Important: As noted in step 3.1.3, a limitation in the current version of CMS exists where it will always include VLANs 1 and 1001 through 1005. This can cause a mismatch with the setting on the blade server side and result in the trunk not working as expected. The only solution at this time is to go into the CLI and run the switchport trunk allowed vlan command with the desired settings, as shown in the CLI section for this step. Note that the VLAN numbers might be wrapped in this document; they should be on the same line as the command. This allows VLANs 2, 20, and 25 to reach BladeServer1’s second NIC. Step 3.2.6: Configure access links to BladeServer2 and set access VLAN. int g0/2 switchport mode access switchport access vlan 20 This places BladeServer2’s second NIC into VLAN 20. Step 3.2.7: Configure access links to BladeServer3 and set access VLAN. int g0/3 switchport mode access switchport access vlan 30 This places BladeServer3’s second NIC into VLAN 30. 174 Cisco Systems Intelligent Gigabit Ethernet Switch Module 1. In the top menu bar, click VLAN → VLAN. 2. Click port Gi0/2. 3. Click Modify. 4. In the Administrative Mode field, select Static Access. 5. In the Static-Access VLAN field, enter 20. 6. Click OK. 7. Click Apply or OK. 1. In the top menu bar, click VLAN → VLAN. 2. Click port Gi0/3. 3. Click Modify. 4. In the Administrative Mode field, select Static Access. 5. In the Static-Access VLAN field, enter 30. 6. Click OK. 7. Click Apply or OK. Description and comments Actions via IOS CLI for CIGEMS2 Actions via CMS for CIGEMS2 Step 3.2.8: Configure 802.1Q trunking to BladeServer4 and add allowed VLANs. int g0/4 switchport trunk allowed vlan 2,35,40,45,50 end 1. In the top menu bar, click VLAN → VLAN. 2. Click port Gi0/4. 3. Click Modify. 4. In the Trunk-Allowed VLAN field, enter 2,35,40,45,50. 5. Click OK. 6. Click Apply or OK. Important: As noted in step 3.1.3, a limitation in the current version of CMS exists where it will always include VLANs 1 and 1001 through 1005. This can cause a mismatch with the setting on the blade server side and result in the trunk not working as expected. The only solution at this time is to go into the CLI and run the switchport trunk allowed vlan command with the desired settings, as shown in the CLI section for this step. Note that the VLAN numbers might be wrapped in this document; they should be on the same line as the command. This allows VLANs 2, 35, 40, 45, and 50 to reach BladeServer4’s second NIC. Step 3.2.9: Save Cisco Systems IGESM config to NVRAM. copy running-config startup-config Failure to perform this step will result in all changes to the Cisco Systems IGESM being lost if the BladeCenter is powered off or the Cisco Systems IGESM is otherwise restarted. 1. In the top menu bar, click Administration → Save Configuration. 2. Leave the Source set to Running Configuration. 3. In Destination, select Startup Configuration. 4. Click Save. Step 4: Configuring the interfaces on the blade servers The blade server configuration for this section is identical to topology 2. See “Step 4: Configuring the interfaces on the blade servers” on page 148 for information about configuring the blade servers for access to this topology. Step 5: Reconnecting the devices This is the final step to bring the connection into full operation. This will be the reverse of whatever procedure was used in step 1. See Table 7-2 on page 123 for details about how to reestablish the links. Step 6: Verifying the configuration This section is very similar to the verifications for topology 2, with the exception of fewer EtherChannels and the addition of RSPAN. See “Step 6: Verifying the configuration” on page 154 for more details. Chapter 7. Cisco Systems IGESM configuration and network integration 175 A quick rundown for verifying your RSPAN session On CIGESM1, run the command show monitor, and review the output for the desired configuration: Session 1 --------Type Source Ports Both Reflector Port Dest RSPAN VLAN: : Remote Source Session : : Gi0/1 : Gi0/19 500 On 6500-1, run the command show monitor, and review the output for the desired configuration: Session 5 --------Type : Remote Destination Session Source RSPAN VLAN : 500 Destination Ports : Gi2/2 Attach a sniffer or other network monitor to port g2/2 on 6500-1, start a continuous ping from BladeServer 1 to its default gateway for vlan 10 (ping 10.1.10.254 -t), and confirm that you can capture these pings on the sniffer. Note that for a good understanding of the rules and how to configure SPAN and RSPAN, you can review the following documents: http://www.cisco.com/en/US/products/hw/switches/ps628/products_configuration_guide_chapter0 9186a00801a6ba9.html http://www.cisco.com/en/US/products/hw/switches/ps708/products_configuration_guide_chapter0 9186a008007f323.html 7.5.4 Topology 3b: Similar to Topology 3a except using a direct cross connect This topology (Figure 7-19) is similar to topology 3a, except the redundancy is now being performed through a connection directly between the two Cisco Systems IGESMs. In this case, because we are now using each Cisco Systems IGESM as a back-up path to the aggregation switches for the other Cisco Systems IGESM, we must include all of the VLANs on each Cisco Systems IGESM, and their uplinks, to allow traffic to correctly pass if one of the primary uplinks between a Cisco Systems IGESM to a 6500 fails. The advantage of topology 3a is that when the primary root switch fails, the traffic switches over to the secondary root switch directly. The advantage of topology 3b is that it saves some cabling effort and requires fewer ports on the upstream switches. From an optimal traffic path point of view, the topology in 3a is recommended if dedicated RSPAN ports are required. Based on this recommendation, the example in this section is only offered as a possibility and is not highly recommended. Important: It is imperative to understand the rules of using RSPAN prior to implementing it in your environment. Failure to understand the proper use of RSPAN can lead to unexpected and undesired results. Review the information in 7.5.3, “Topology 3a: Dual Cisco Systems IGESMs, two-port aggregation with RSPAN” on page 160 before attempting to deploy RSPAN. 176 Cisco Systems Intelligent Gigabit Ethernet Switch Module To Core Routers Po1 Data Center 6500-1 Aggregation Layer Mod 6 - 1 Mod 6 - 2 Data Center 6500-3 Mod 6 - 1 Mod 6 - 2 Mod 2 - 25 26 RSPAN Port 25 26 - Mod 2 Po2 Po2 Po1 Po1 17 18 20 19 CIGESM1 Trunked VLAN 10 and 15 20 17 18 CIGESM 19 Access Access VLAN 10 VLAN 30 Trunked VLAN 35, 40, 45 and 50 RSPAN Port Trunked VLAN 20 Trunked and 25 VLAN 35, Access 40, 45 VLAN 20 and 50 Access VLAN 30 M M 1 Management Netw ork M M 2 Management Workstation Trunked VLAN 10 and 15 1 2 Blade Server 1 Trunked VLAN 20 and 25 Access Access Teamed/Access Teamed/Trunked VLAN 35, 40, 45 and 50 1 2 Blade Server 2 1 2 1 2 Blade Server 3 Blade Server 4 BladeCenter Topology 3b Links between Management Modules CIGESMs notIGESMs shown not shown Links between Management Module andand Cisco Systems Figure 7-19 Topology 3b: Dual Cisco Systems IGESMs, two port aggregation with cross-link and RSPAN Chapter 7. Cisco Systems IGESM configuration and network integration 177 Step 1: Taking down the link or links It is always advisable to disable the link or links prior to making any configuration changes. See Table 7-1 on page 122 for the needed procedures. Step 2: Configuring the external switches The following assumptions have been made for this example: The bulk of the configuration for the 6500s is included in the base configuration (see“Cat 6500 base configurations” on page 109), because the goal of this document is to show how to configure the BladeCenter components rather than generic Cisco devices. This section specifically focuses on how to configure the 6500 ports that connect to the BladeCenter. VLAN 2 has already been created on the 6500s as part of the base configuration. The VTP Domain has already been named and set to transparent as part of the base configuration. Spanning Tree root commands have already been set as part of the base configuration (to make 6500-1 the primary root and 6500-3 the secondary root). The user is already logged on to the switch, and the switch is in enable mode. Commands are being performed in the sequence shown. Cisco Switch Modules in the 6500s being used to connect to the Cisco Systems IGESMs are 1000Base-T-based, and we will be leaving the ports at 1Gbps full duplex. The aggregation link between the 6500s has already been created as part of the base config and is carrying the desired VLANs (for example, 2, 10, 15, 20). Table 7-18 Configuring the external switches Description and comments On the 6500-1 On the 6500-3 Step 2.1: Configure Link Aggregations and single link from the 6500s to the Cisco Systems IGESMs. config t int range g2/25 - 26 switchport spanning-tree guard root description to-BladeCenter CIGESM1 channel-group 2 mode active config t int range g2/25 - 26 switchport spanning-tree guard root description to-BladeCenter CIGESM2 channel-group 2 mode active This creates a logical interface named Port-Channel2 and places interfaces g2/25 and g2/26 into it. This creates a logical interface named Port-Channel2 and places interfaces g2/25 and g2/26 into it. This is for the port-channels between the 6500s and each of the Cisco Systems IGESMs. Note that it is always a good practice to provide a description to an interface. Also note that Spanning-Tree guard root is added to both the individual ports and the port-channel to ensure that it is in place. 178 Cisco Systems Intelligent Gigabit Ethernet Switch Module Description and comments On the 6500-1 On the 6500-3 Step 2.2: Configure VLAN and trunking options. int port-channel 2 description EtherChannel to CIGESM1 switchport trunk encapsulation dot1q switchport trunk native vlan 2 switchport trunk allowed vlan 2,10,15,20,25,30,35,40,45,50,500 switchport mode trunk spanning-tree guard root int port-channel 2 description EtherChannel to CIGESM2 switchport trunk encapsulation dot1q switchport trunk native vlan 2 switchport trunk allowed vlan 2,10,15,20,25,30,35,40,45,50 switchport mode trunk spanning-tree guard root Note: Configuring root guard on the port channel interface between 6500s and the Cisco Systems IGESMs will help to ensure stability in your network. Note: Configuring root guard on the port channel interface between 6500s and the Cisco Systems IGESMs will help to ensure stability in your network. All desired VLANs were already created as part of the base configuration, and IP addresses were added at that time. This step sets up the aggregated links created in step 2.1 to be 802.1Q trunks and allows the desired VLANs to be carried. Note that all of our VLANs (except VLAN 500) on both Cisco Systems IGESMs must be carried now to accommodate for a future failure in one of the uplinks between one of the 6500s and the Cisco Systems IGESMs. Also note that the addition of VLAN 500 above to the allowed VLANs was only done on 6500-1 to support the demonstration of RSPAN. Step 2.3: Configure to support the RSPAN VLAN as defined on CIGESM1. vlan 500 remote-span For test purposes, a sniffer will be placed on g2/2 to capture traffic to port g0/1 on CIGESM1 (as defined in step 3). monitor session 5 source remote vlan 500 For this example, we only show an RSPAN from CIGESM1 to 6500-1. monitor session 5 destination interface g2/2 int g2/2 no shutdown end The two monitor commands listed above are wrapped in this document and should be each on their own line. The use of VLAN 500 as the RSPAN VLAN is defined on CIGESM1 in an upcoming step. The VLAN selection, the selection of the session to use, and the selection of g2/2 as the destination port were all arbitrary. Step 2.4: Save config to copy running-config startup-config copy running-config startup-config NVRAM. Note: Failure to save your configuration will result in possible network down conditions if the switch is restarted prior to the save (all changes since last save will be lost). Chapter 7. Cisco Systems IGESM configuration and network integration 179 Step 3: Configuring Cisco Systems IGESMs This section steps through the sequence of actions required to configure the Cisco Systems IGESMs for this example. It is broken into two major sections, one for configuring the Cisco Systems IGESM in bay 1 and one for configuring the Cisco Systems IGESM in bay 2. The following assumptions have been made for both Cisco Systems IGESM configurations in this example: The user is already logged on to the Cisco Systems IGESM, and the switch is in enable mode (or logged on to CMS and using the GUI therein). Commands are being performed in the sequence shown. The Cisco Systems IGESM is starting from a base configuration per the example shown in “Cisco Systems IGESM base configurations” on page 108. The operating systems in use on the blade servers are Windows 2000. This is important, because which port is considered “first” and which port is considered “second” on a blade server has several dependences, not the least of which is the operating system in use. For an explanation of the blade servers connection names and how they are derived, see Appendix A, “Hints and tips” on page 227. On BladeServer1, both ports will be using trunking (but not load balancing) through the Broadcom BASP software. The first port will be configured for VLANs 10 and 15, the second port will be configured for VLANs 20 and 25. On BladeServer2, both ports will be simple access links and will be placed on VLANs 10 and 20, respectively, through port settings on the Cisco Systems IGESMs. On BladeServer3, both ports will be teamed through the Broadcom BASP software to appear as a single logical link to the OS, using access VLAN 30 as configured at the Cisco Systems IGESM’s ports to this server. On BladeServer4, both ports will be teamed through the Broadcom BASP software to appear as a single logical link to the OS and use 802.1Q trunking to support VLANs 35, 40, 45, and 50. Step 3.1: Configuring the first Cisco Systems IGESM (CIGESM1) Table 7-19 on page 181 shows the step-by-step instructions used to configure CIGESM1, showing both CLI and CMS commands. Important: The current version of CMS supported on the Cisco Systems IGESM has a limitation in its ability to completely control VLANs being placed on a given trunk: It always includes VLAN 1 and 1001-1005, even if you do not set them as allowed. Due to this limitation, its use might not be appropriate for production configuration when trying to control VLANs allowed on a given trunk. 180 Cisco Systems Intelligent Gigabit Ethernet Switch Module Table 7-19 Configuring CIGESM1 Description and comments Actions via IOS CLI for CIGEMS1 Actions via CMS for CIGEMS1 Step 3.1.1: Configure desired VLANs for CIGESM1. Perform the following from the enable mode: config t vlan 10 name Web vlan 15 name User vlan 20 name Application vlan 25 name Backup vlan 30,35,40,45,50 Perform the following from the CMS interface: 1. In the top menu bar, click VLAN → VLAN. 2. Click the Configure VLANs tab. 3. Click Create. 4. Enter 10 in the VLAN ID field. 5. Enter Web in the VLAN Name field. 6. Click OK. 7. Click Create. 8. Enter 15 in the VLAN ID field. 9. Enter User in the VLAN Name field. 10. Click OK. 11. Click Create. 12. Enter 20 in the VLAN ID field. 13. Enter Application in the VLAN Name field. 14. Click OK. 15. Click Create. 16. Enter 25 in the VLAN ID field. 17. Enter Backup in the VLAN Name field. 18. Click OK. 19. Click Create. 20. Enter 30 in the VLAN ID field (leave the name field defaulted). 21. Click OK. 22. Repeat the previous three steps to create VLANs 35, 40, 45, and 50. 23. Click Apply. 24. Click Refresh to view the newly created VLANs. Create VLANs 10, 15, 20, 25, 30, 35, 40, 45, and 50. Note that we now create all the VLANs being used on both Cisco Systems IGESMs to ensure that the traffic for a given VLAN can be switched through this Cisco Systems IGESM if one of the uplinks to the 6500s fails. Note no spaces between the VLAN numbers and the commas. Step 3.1.2: Configure Link Aggregation toward 6500-1. This example makes use of LACP to form the aggregation. Ports g0/17 and g0/18 will be going to 6500-1. int range g0/17 - 18 description To-6500-1 channel-group 1 mode active This creates a logical interface named Port-Channel1 and places the interfaces g0/17 and g0/18 into it. 1. In the top menu bar, click Port → EtherChannels. 2. Click Create. 3. Select the check boxes next to ports Gi0/17 and Gi0/18. 4. Enter 1 in the Group [1-6] field to select the port channel to use. 5. Click OK. 6. Click Apply or OK. Chapter 7. Cisco Systems IGESM configuration and network integration 181 Description and comments Actions via IOS CLI for CIGEMS1 Actions via CMS for CIGEMS1 Step 3.1.3: Configure 802.1Q trunking toward 6500s and add allowed VLANs for both EtherChannel and single trunked link. int port-channel 1 description EtherChannel-To-6500-1 switchport trunk native vlan 2 switchport trunk allowed vlan 2,10,15,20,25,30,35,40,45,50,500 switchport mode trunk 1. In the top menu bar, click VLAN → VLAN. 2. Click po1. 3. Click Modify. 4. In the Trunk-Allowed VLAN field, enter 2,10,15,30,35,40,45,50,500. 5. Click OK. 6. Click Apply or OK. 7. In the top menu bar, click Port → Port Settings. 8. Scroll down and highlight port gi0/20. 9. Click Modify. 10. Change the description to Trunk-to-6500-3. 11. In the top menu bar, click VLAN → VLAN. 12. Click g0/20. 13. Click Modify. 14. In the Trunk-Allowed VLAN field, enter 2,10,15,20,25,30,35,40,45,50. 15. Make sure the native VLAN is set to 2. 16. Click OK. 17. Click Apply or OK. Important: A limitation in the current version of CMS exists where it will always include VLANs 1 and 1001 through 1005. This can cause a mismatch with the setting on the 6500 side and result in the aggregation going down. The only solution at this time is to go into the CLI and run the switchport trunk allowed vlan command with the desired settings, as shown in the CLI section for this step. Note that on the line allowing specific VLANs, there cannot be any spaces between the numbers and the commas. Also note that VLAN 2 is the native VLAN on these ports by default. Note that the VLAN numbers might be wrapped in this document; they should be on the same line as the command. The addition of VLAN 500 to the allowed VLANs above is for carrying the RSPAN traffic from the Cisco Systems IGESM to the 6500. VLAN 500 was an arbitrary selection. int g0/20 description Trunk-to-CIGESM-2 switchport trunk native vlan 2 switchport trunk allowed vlan 2,10,15,20,25,30,35,40,45,50 switchport mode trunk Note that the VLAN numbers might be wrapped in this document; they should be on the same line as the command. 182 Cisco Systems Intelligent Gigabit Ethernet Switch Module Description and comments Actions via IOS CLI for CIGEMS1 Actions via CMS for CIGEMS1 Step 3.1.4: Configure RSPAN on port g0/19 on CIGESM1. Create the RSPAN VLAN and set it to support RSPAN: vlan 500 remote-span CMS does not support configuring RSPAN at this time. Use the CLI to configure RSPAN. RSPAN can be configured several ways to capture traffic from a single port, multiple ports, or even VLANs. This step does not discuss all the possibilities, but it gives a specific example: capturing all traffic to and from port g0/1 such that it can be captured and viewed from a sniffer attached to 6500-1, port g2/2. Port g0/19 on the Cisco Systems IGESM is used as the reflector port for this example. The necessary commands for the 6500-1 are shown in Table 7-15 on page 165. Important: We do not recommend that you use RSPAN on a Cisco Systems IGESM running Release 12.1(14)AY. This release has an issue with RSPAN that could disrupt network communications. For more information about this issue, see Appendix A, “Hints and tips” on page 227. Step 3.1.5: Configure 802.1Q trunking to BladeServer1 and add allowed VLANs. Configure the port to be monitored (g0/1 in this case), as well as the port performing the function of the reflector-port (g0/19): monitor session 1 source interface g0/1 monitor session 1 destination remote vlan 500 reflector-port g0/19 The two monitor commands listed above should each be on its own, single line. Important: A remote VLAN used by RSPAN must not be used by on any other access ports on the Cisco Systems IGESM or be defined as the management VLAN on the Cisco Systems IGESM. Review the rules for setting up RSPAN mentioned at the beginning of this topology example. int g0/1 switchport trunk allowed vlan 2,10,15 Note that the VLAN numbers might be wrapped in this document; they should be on the same line as the command. This allows VLANs 2, 10, and 15 to reach BladeServer1’s first NIC. 1. In the top toolbar, click VLAN → VLAN. 2. Click port Gi0/1. 3. Click Modify. 4. In the Trunk-Allowed VLAN field, enter 2,10,15. 5. Click OK. 6. Click Apply or OK. Important: As noted in step 3.1.3, a limitation in the current version of CMS exists where it will always include VLANs 1 and 1001 through 1005. This can cause a mismatch with the setting on the blade server side and result in the trunk not working as expected. The only solution at this time is to go into the CLI and run the switchport trunk allowed vlan command with the desired settings, as shown in the CLI section for this step. Chapter 7. Cisco Systems IGESM configuration and network integration 183 Description and comments Actions via IOS CLI for CIGEMS1 Actions via CMS for CIGEMS1 Step 3.1.6: Configure access links to BladeServer2 and set access VLAN. int g0/2 switchport mode access switchport access vlan 10 1. In the top toolbar, click VLAN → VLAN. 2. Click port Gi0/2. 3. Click Modify. 4. In the Administrative Mode field, select Static Access. 5. In the Static-Access VLAN field, enter 10. 6. Click OK. 7. Click Apply or OK. This places BladeServer2’s first NIC into VLAN 10. Step 3.1.7: Configure access links to BladeServer3 and set access VLAN. int g0/3 switchport mode access switchport access vlan 30 This places BladeServer3’s first NIC into VLAN 30. Step 3.1.8: Configure 802.1Q trunking to BladeServer4 and add allowed VLANs. int g0/4 switchport trunk allowed vlan 2,35,40,45,50 end Note that the VLAN numbers might be wrapped in this document; they should be on the same line as the command. Step 3.1.9: Save Cisco Systems IGESM config to NVRAM. copy running-config startup-config Failure to perform this step will result in all changes to the Cisco Systems IGESM being lost if the BladeCenter is powered off or the Cisco Systems IGESM is otherwise restarted. 184 Cisco Systems Intelligent Gigabit Ethernet Switch Module 1. In the top menu bar, click VLAN → VLAN. 2. Click port Gi0/3. 3. Click Modify. 4. In the Administrative Mode field, select Static Access. 5. In the Static-Access VLAN field, enter 30. 6. Click OK. 7. Click Apply or OK. 1. In the top menu bar, click VLAN → VLAN. 2. Click port Gi0/4. 3. Click Modify. 4. In the Trunk-Allowed VLAN field, enter 2,35,40,45,50. 5. Click OK. 6. Click Apply or OK. Important: As noted in step 3.1.3, a limitation in the current version of CMS exists where it will always include VLANs 1 and 1001 through 1005. This can cause a mismatch with the setting on the blade server side and result in the trunk not working as expected. The only solution at this time is to go into the CLI and run the switchport trunk allowed vlan command with the desired settings, as shown in the CLI section for this step. 1. In the top menu bar, click Administration → Save Configuration. 2. Leave the Source set to Running Configuration. 3. In Destination, select Startup Configuration. 4. Click Save. Step 3.2: Configuring the second Cisco Systems IGESM (CIGESM2) Table 7-20 shows the step-by-step instructions used to configure CIGESM2, showing both CLI and CMS commands. Important: The current version of CMS supported on the Cisco Systems IGESM has a limitation in its ability to completely control VLANs being placed on a given trunk: It always includes VLAN 1 and 1001-1005, even if you do not set them as allowed. Because of this limitation, its use might not be appropriate for production configuration when trying to control VLANs allowed on a given trunk. Table 7-20 Configuring CIGESM2 Description and comments Actions via IOS CLI for CIGEMS2 Actions via CMS for CIGEMS2 Step 3.2.1: Configure desired VLANs for CIGESM2. Perform the following from the enable mode: config t vlan 10 name Web vlan 15 name User vlan 20 name Application vlan 25 name Backup vlan 30,35,40,45,50 Perform the following from the CMS interface: 1. In the top menu bar, click VLAN → VLAN. 2. Click the Configure VLANs tab. 3. Click Create. 4. Enter 10 in the VLAN ID field. 5. Enter Web in the VLAN Name field. 6. Click OK. 7. Click Create. 8. Enter 15 in the VLAN ID field. 9. Enter User in the VLAN Name field. 10. Click OK. 11. Click Create. 12. Enter 20 in the VLAN ID field. 13. Enter Application in the VLAN Name field. 14. Click OK. 15. Click Create. 16. Enter 25 in the VLAN ID field. 17. Enter Backup in the VLAN Name field. 18. Click OK. 19. Click Create. 20. Enter 30 in the VLAN ID field (leave the name field defaulted). 21. Click OK. 22. Repeat the previous three steps to create VLANs 35, 40, 45, and 50. 23. Click Apply. 24. Click Refresh to view the newly created VLANs. Create VLANs 10, 15, 20, 25, 30, 35, 40, 45, and 50. Note that we now create all the VLANs being used on both Cisco Systems IGESMs to ensure that the traffic for a given VLAN can be switched through this Cisco Systems IGESM if one of the uplinks to the 6500s fails. Note no spaces between the VLAN numbers and the commas. Step 3.2.2: Configure Link Aggregation toward 6500-3. This example makes use of LACP to form the aggregation. Ports g0/17 and g0/18 will be going to 6500-3. int range g0/17 - 18 description To-6500-3 channel-group 1 mode active This creates a logical interface named Port-Channel1 and places the interfaces g0/17 and g0/18 into it. 1. In the top menu bar, click Port → EtherChannels. 2. Click Create. 3. Select the check boxes next to ports Gi0/17 and Gi0/18. 4. Enter 1 in the Group [1-6] field to select the port channel to use. 5. Click OK. 6. Click Apply or OK. Chapter 7. Cisco Systems IGESM configuration and network integration 185 Description and comments Actions via IOS CLI for CIGEMS2 Actions via CMS for CIGEMS2 Step 3.2.3: Configure 802.1Q trunking toward 6500s and add allowed VLANs for both EtherChannel and single trunked link. int port-channel 1 description EtherChannel-To-6500-3 switchport trunk native vlan 2 switchport trunk allowed vlan 2,10,15,20,25,30,35,40,45,50 switchport mode trunk 1. In the top menu bar, click VLAN → VLAN. 2. Click po1. 3. Click Modify. 4. In the Trunk-Allowed VLAN field, enter 2,10,15,20,25,30,35,40,45,50. 5. Click OK. 6. Click Apply or OK. 7. In the top menu bar, click Port → Port Settings. 8. Scroll down and highlight port gi0/20. 9. Click Modify. 10. Change the description to Trunk-to-6500-1. 11. In the top menu bar, click VLAN → VLAN. 12. Click g0/20. 13. Click Modify. 14. In the Trunk-Allowed VLAN field, enter 2,10,15,20,25,30,35,40,45,50. 15. Make sure the native VLAN is set to 2. 16. Click OK. 17. Click Apply or OK. Important: A limitation in the current version of CMS exists where it will always include VLANs 1 and 1001 through 1005. This can cause a mismatch with the setting on the 6500 side and result in the aggregation going down. The only solution at this time is to go into the CLI and run the switchport trunk allowed vlan command with the desired settings, as shown in the CLI section for this step. Note that on the line allowing specific VLANs, there cannot be any spaces between the numbers and the commas. Also note that VLAN 2 is the native VLAN on these ports by default. Note that it is no longer necessary to force Spanning Tree with this configuration (as it was with topology 3a), because the default path will be the desired path, toward 6500-3 (cost is 4 toward 6500-3 and 7 toward 6500-1). Step 3.2.4: Configure RSPAN for CIGESM2. 186 Note that the VLAN numbers might be wrapped in this document; they should be on the same line as the command. int g0/20 description Trunk-to-CIGESM1 switchport trunk native vlan 2 switchport trunk allowed vlan 2,10,15,20,25,30,35,40,45,50 switchport mode trunk Note that the VLAN numbers might be wrapped in this document; they should be on the same line as the command. Note that for this topology, although we dedicated an RSPAN reflector port on each Cisco Systems IGESM, we only demonstrate its use on CIGESM1. No RSPAN commands are performed on CIGESM2. Cisco Systems Intelligent Gigabit Ethernet Switch Module N/A Description and comments Actions via IOS CLI for CIGEMS2 Actions via CMS for CIGEMS2 Step 3.2.5: Configure 802.1Q trunking to BladeServer1 and add allowed VLANs. int g0/1 switchport trunk allowed vlan 2,20,25 1. In the top menu bar, click VLAN → VLAN. 2. Click port Gi0/1. 3. Click Modify. 4. In the Trunk-Allowed VLAN field, enter 2,20,25. 5. Click OK. 6. Click Apply or OK. Important: As noted in step 3.1.3, a limitation in the current version of CMS exists where it will always include VLANs 1 and 1001 through 1005. This can cause a mismatch with the setting on the blade server side and result in the trunk not working as expected. The only solution at this time is to go into the CLI and run the switchport trunk allowed vlan command with the desired settings, as shown in the CLI section for this step. Note that the VLAN numbers might be wrapped in this document; they should be on the same line as the command. This allows VLANs 2, 20, and 25 to reach BladeServer1’s second NIC. Step 3.2.6: Configure access links to BladeServer2 and set access VLAN. int g0/2 switchport mode access switchport access vlan 20 This places BladeServer2’s second NIC into VLAN 20. Step 3.2.7: Configure access links to BladeServer3 and set access VLAN. int g0/3 switchport mode access switchport access vlan 30 This places BladeServer3’s second NIC into VLAN 30. 1. In the top menu bar, click VLAN → VLAN. 2. Click port Gi0/2. 3. Click Modify. 4. In the Administrative Mode field, select Static Access. 5. In the Static-Access VLAN field, enter 20. 6. Click OK. 7. Click Apply or OK. 1. In the top menu bar, click VLAN → VLAN. 2. Click port Gi0/3. 3. Click Modify. 4. In the Administrative Mode field, select Static Access. 5. In the Static-Access VLAN field, enter 30. 6. Click OK. 7. Click Apply or OK. Chapter 7. Cisco Systems IGESM configuration and network integration 187 Description and comments Actions via IOS CLI for CIGEMS2 Actions via CMS for CIGEMS2 Step 3.2.8: Configure 802.1Q trunking to BladeServer4 and add allowed VLANs. int g0/4 switchport trunk allowed vlan 2,35,40,45,50 end 1. In the top menu bar, click VLAN → VLAN. 2. Click port Gi0/4. 3. Click Modify. 4. In the Trunk-Allowed VLAN field, enter 2,35,40,45,50. 5. Click OK. 6. Click Apply or OK. Important: As noted in step 3.1.3, a limitation in the current version of CMS exists where it will always include VLANs 1 and 1001 through 1005. This can cause a mismatch with the setting on the blade server side and result in the trunk not working as expected. The only solution at this time is to go into the CLI and run the switchport trunk allowed vlan command with the desired settings, as shown in the CLI section for this step. Note that the VLAN numbers might be wrapped in this document; they should be on the same line as the command. This allows VLANs 2, 35, 40, 45, and 50 to reach BladeServer4’s second NIC. Step 3.2.9: Save Cisco Systems IGESM config to NVRAM. copy running-config startup-config Failure to perform this step will result in all changes to the Cisco Systems IGESM being lost if the BladeCenter is powered off or the Cisco Systems IGESM is otherwise restarted. 1. In the top menu bar, click Administration → Save Configuration. 2. Leave the Source set to Running Configuration. 3. In Destination, select Startup Configuration. 4. Click Save. Step 4: Configuring the interfaces on the blade servers The blade server configuration for this section is identical to topology 2. See “Step 4: Configuring the interfaces on the blade servers” on page 148 for information about configuring the blade servers for access to this topology. Step 5: Reconnecting the devices This is the final step to bring the connection into full operation. This will be the reverse of whatever procedure was used in step 1. See Table 7-2 on page 123 for details about how to reestablish the links. Step 6: Verifying the configuration This section is very similar to the verifications for topology 3a, with the exception of the fail-over path going through the Cisco Systems IGESM. See “Step 6: Verifying the configuration” on page 175 for more details. 188 Cisco Systems Intelligent Gigabit Ethernet Switch Module 7.6 Miscellaneous blade server configurations This section includes several blade server configurations not covered elsewhere in this chapter. Note that any configurations using SLB (Active/Active or Active/Standby) are not recommend for use with topology 1 (as noted in the discussions in 7.5.1, “Topology 1: Dual IGESMs, four-port aggregation to two 6500s” on page 124) unless Trunk Failover is also configured per section 7.7, “Trunk Failover feature description and configuration” on page 193. Active/Standby SLB teaming on BladeCenter HS20 Windows 2000 In this section, we demonstrate the steps used to configure Active/Standby SLB teaming on a BladeCenter HS20 with Windows 2000. The configuration steps are very similar to the Active/Active configuration used with BladeServer3 in previous examples, with the only difference being that one of the NICs is configured as a standby member in the team. To create an Active/Standby SLB team, start from Table 7-13 on page 152, step 4.3.1. After you add a NIC to Load Balance Members in Step 4.3.2, highlight the other NIC and click the lower arrow button to add it to Standby Member. The window should be similar to the one shown in Figure 7-20. Click Finish and continue with step 4.4.3 and the remaining steps. When verifying the configuration with the BACS application, a window similar to the one shown in Figure 7-21 opens. Make sure that one NIC is assigned to each Primary Adapters and Standby Adapters group. Figure 7-20 Configuring an Active/Standby SLB team Chapter 7. Cisco Systems IGESM configuration and network integration 189 Figure 7-21 Verifying an Active/Standby SLB team SLB Active/Active teaming on BladeCenter HS20 with Red Hat Linux In this section, we demonstrate how to create an SLB team to connect to the Cisco Systems IGESMs as an access port on a BladeCenter HS20 running Red Hat AS 2.1. The following configuration, which we discuss here as an example, is basically the same configuration as BladeServer3 in previous topology examples, except for the IP address used in this example: The server uses the BASP software to create a single teamed logical interface for VLAN 30, and the IP configuration is performed on this single logical interface (not on the physical interfaces). This logical port connects to both CIGESM1 and CIGESM2 and is placed in VLAN 30, respectively, through access port settings on each Cisco Systems IGESM. All IP configuration is performed on this single logical interface (not on the physical interfaces). We use the following IP address (24-bit masks): BASP logical port, to CIGESM1: 10.1.30.11 (default gateway = 10.1.30.254) To create a team on Linux using BACS, you need to configure teaming settings with configuration scripts. To create a configuration script, you should copy a sample script from the /etc/basp/samples directory to the /etc/basp directory and use it as a template. The configuration script name must be prefixed with “team-”. After you create the configuration script, manually start the team for the first time with % /etc/init.d/basp start. For complete steps, refer to the BACS readme file. Copy the team-sample file from the /etc/basp/sample directory and name it team-toBothVLAN. Modify the file as follows. Modified or added items are in red italics. TEAM_ID=0 TEAM_TYPE=0 TEAM_NAME=toBothVLAN # 1st physical interface in the team TEAM_PA0_NAME=eth0 TEAM_PA0_ROLE=0 # 2nd physical interface in the team TEAM_PA1_NAME=eth1 TEAM_PA1_ROLE=0 # 3rd physical interface in the team 190 Cisco Systems Intelligent Gigabit Ethernet Switch Module #TEAM_PA2_NAME=eth2 #TEAM_PA2_ROLE=0 # 1st virtual interface in the team TEAM_VA0_NAME=sw0 TEAM_VA0_VLAN=0 TEAM_VA0_IP=10.1.30.3 TEAM_VA0_NETMASK=255.255.255.0 # Optional default gateway # One default gateway is usually specified for the system and it should be # reachable from one network interface TEAM_VA0_GW=10.1.30.254 802.1Q trunk links on BladeCenter HS20 with Red Hat Linux In this section, we demonstrate how to configure BACS to set a NIC to receive multiple VLANs through an 802.1Q trunk link on a BladeCenter HS20 running Red Hat AS 2.1. The following configuration, which we discuss here as an example, is basically the same configuration as BladeServer1 used in the previous topology examples in this chapter (except for the IP addresses). For this configuration, we made the following assumptions: BladeServer1 uses the BASP software to create logical interfaces for VLANs 10, 15, 20, and 25, and all IP configuration are performed on these logical interfaces (not on the physical interfaces). Both ports use trunking (but not load balancing) through the Broadcom BASP software. The first port will be configured for VLANs 10 and 15, the second port will be configured for VLANs 20 and 25. First port, VLAN 10 to CIGESM1 First port, VLAN 15 to CIGESM1 Second port, VLAN 20 to CIGESM2 Second port, VLAN 25 to CIGESM2 10.1.10.11 (default gateway = 10.1.10.254) 10.1.15.11 10.1.20.11 10.1.25.11 Note that the choice to use more than one default gateway (for example, one on each VLAN or one on several VLANs) is up to the user. See the discussion about default gateways on multihomed systems in Appendix A, “Hints and tips” on page 227. Make two copies of the team-VLAN under the /etc/basp/sample directory and name each team-toCIGESM1 and team-toCIGESM2. When you create two teams, you should make a configuration script for each team. Modify the files as follows. Modified or added items are in red italics. team-toCIGESM1 TEAM_ID=0 TEAM_TYPE=0 TEAM_NAME=toCIGESM1 # 1st physical interface in the team TEAM_PA0_NAME=eth0 TEAM_PA0_ROLE=0 # 2nd physical interface in the team #TEAM_PA1_NAME=eth1 #TEAM_PA1_ROLE=0 # 3rd physical interface in the team #TEAM_PA2_NAME=eth2 #TEAM_PA2_ROLE=0 Chapter 7. Cisco Systems IGESM configuration and network integration 191 # 1st virtual interface in the team TEAM_VA0_NAME=sw0 TEAM_VA0_VLAN=10 TEAM_VA0_IP=10.1.10.11 TEAM_VA0_NETMASK=255.255.255.0 # 2nd virtual interface in the team TEAM_VA1_NAME=sw1 TEAM_VA1_VLAN=15 TEAM_VA1_IP=10.1.15.11 TEAM_VA1_NETMASK=255.255.255.0 # Optional default gateway # One default gateway is usually specified for the system and it should be # reachable from one network interface TEAM_VA0_GW=10.1.10.254 #TEAM_VA1_GW= team-toCIGESM2 TEAM_ID=1 TEAM_TYPE=0 TEAM_NAME=toCIGESM2 # 1st physical interface in the team TEAM_PA0_NAME=eth1 TEAM_PA0_ROLE=0 # 2nd physical interface in the team #TEAM_PA1_NAME=eth1 #TEAM_PA1_ROLE=0 # 3rd physical interface in the team #TEAM_PA2_NAME=eth2 #TEAM_PA2_ROLE=0 # 1st virtual interface in the team TEAM_VA0_NAME=sw2 TEAM_VA0_VLAN=20 TEAM_VA0_IP=10.1.20.11 TEAM_VA0_NETMASK=255.255.255.0 # 2nd virtual interface in the team TEAM_VA1_NAME=sw3 TEAM_VA1_VLAN=25 TEAM_VA1_IP=10.1.25.11 TEAM_VA1_NETMASK=255.255.255.0 # Optional default gateway # One default gateway is usually specified for the system and it should be # reachable from one network interface #TEAM_VA0_GW= #TEAM_VA1_GW= 192 Cisco Systems Intelligent Gigabit Ethernet Switch Module 7.7 Trunk Failover feature description and configuration This section provides an explanation of the Trunk Failover feature (available in 12.1(14)AY4 and above IOS for the IGESM) as well as several configuration examples. For more about Trunk Failover operation and configuration, reference the IGESM Software Configuration Guide (link provided in the online resources section later in this document). 7.7.1 Introduction to Trunk Failover The Trunk Failover feature (also known as Link State Tracking and Layer 2 Trunk Failover) has been available since 12.1(14)AY4 IOS on the IGESM. The purpose of Trunk Failover is to allow a server running NIC Teaming software (combines 2 physical NICs into a single logical NIC to the OS) to know when the uplink ports out of the IGESM go down. This prevents black holing of traffic under this condition. Trunk Failover works by shutting down ports directly connected to the configured blade server when the configured upstream ports go down. It does this by putting the downstream ports in to err-disable state (down) when all upstream links in the configured group are down In most cases you should configure Trunk Failover on all CIGESMs in the BladeCenter connected to the bladeservers running NIC Teaming. Some important rules for ensuring High Availability with these features As with any network design, for high availability (HA) to be truly effective, it needs to be well thought out. The following are some important design considerations to try to ensure connectivity is maintained under various failure scenarios: For NIC teaming to work properly with Trunk Failover, you need to have external L2 connectivity between CIGESMs for proper fail-over (this is between two upstream switches on the same L2 network/VLAN). In the designs in this document, this is achieved by carrying the VLANs being used by the blade servers, on both IGESM’s uplink connections, and between 6500-1 and 6500-3. For the combination of Trunk Failover and NIC Teaming to provide effective HA, the 6500-1 and 6500-3 in these examples must be running some sort of HSRP, and the blade servers need to be using this HSRP address as their default gateway. If HSRP were not in use, and 6500-1 had sole control of an upstream default gateway address, and then 6500-1 went down, Trunk Failover would see the upstream fault and drop the downstream connections. NIC Teaming would see this and switch over to the other NIC and send the packet toward 6500-3, but 6500-3 would not be able to get to the default gateway, and thus drop the packet. Figure 7-22 shows certain attributes of NIC Teaming and Trunk Failover. Note that the failure of a NIC within the blade server, the failure of a link between the IGESM and the blade server, and the hard failure of the IGESM (resulting in link down conditions), can all be detected by NIC Teaming, without the aid of Trunk Failover. Trunk Failover comes into play when there is a failure anywhere on the link between the IGESM and the upstream switch (including a hard failure of the upstream switch that would result in a link down condition toward the IGESM). Chapter 7. Cisco Systems IGESM configuration and network integration 193 6500 -1 XX X If failure anywhere on the link toward the upstream switch, NIC on BladeServer does not know about the failure and may continue to send traffic toward the top IGESM, which will discard the traffic - Trunk Failover feature addresses this issue 1 2 3 4 6500 -3 Po1 1 2 3 4 Po2 Po2 Po1 Po1 17 18 19 20 17 18 19 20 CIGESM Top CIGESM Bot X If IGESM fails in such a way that the link toward the BladeServer goes down, or NIC fails, BladeServer can sense this and redirect traffic out the other NIC toward the bottom IGESM – NIC Teaming can take care of this without the need for trunk failover VLAN X Teamed Active/Standby X NIC 1 NIC 2 Logical NIC Interface BladeServer 1 BladeCenter Topology 1 - Trunk Failover Figure 7-22 What Trunk Failover can protect against Introduction to Trunk Failover configuration Two types of link state commands are required on the IGESM to support Trunk Failover 1. Global command (enables the link state group, up to 2 groups supported): link state track X (X = 1 or 2) 2. Interface command (assigns ports to group): link state group X {upstream | downstream} The following are the rules for placing the upstream and downstream commands: – The upstream command can only be placed on external uplinks (g0/17 –g0/20) or logical interfaces (Etherchannel) on the external uplinks. – Normally place upstream command on Etherchannel ports (int poX). – Only place the upstream command on physical ports (G0/17 - 20) if Etherchannel uplinks are not being used. – Downstream command can only be placed on g0/1 – g0/14 – Placement of downstream command will depend on specific environment, but assuming all blade servers using NIC Teaming, then all internal ports (G0/1 – 14) will receive a “downstream” command A third type of command is available to check the status of the Trunk Failover configuration: show link state group detail Shows what ports are assigned to upstream ann downstream and the status of any configured Trunk Failover groups. 194 Cisco Systems Intelligent Gigabit Ethernet Switch Module Important: The configuration of the Trunk Failover feature is only available through the IGESM CLI and not is not configure-able or monitor-able through CMS. 7.7.2 Example of Topology 1 using Trunk Failover Figure 7-23 logically depicts using Trunk Failover and NIC Teaming with Topology 1. VLAN X Must be carried between IGESMs via an external path 6500-1 1 2 3 4 6500-3 Po1 1 2 3 4 Po2 Po2 VLAN X Must be carried on uplinks from IGESM VLAN X Must be carried on uplinks from IGESM Link state group 1 Upstream Link state group 1 Upstream Po1 Po1 17 18 19 20 17 18 19 20 CIGESM Top CIGESM Bot Link state group 1 Downstream VLAN X Link state group 1 Downstream Trunk Failover Config NIC Teaming Config Teamed Active/Standby NIC 1 NIC 2 Logical NIC Interface BladeServer 3 BladeCenter Topology 1 - Elements of Trunk Failover Figure 7-23 Topology 1 - Elements of Trunk Failover This example in Figure 7-23 shows a single link state group on each IGESM (group 1) being utilized. In this design, if all four ports in Po1 go down, trunk Failover takes over and shuts Chapter 7. Cisco Systems IGESM configuration and network integration 195 down internal downstream defined port(s). This alerts NIC Teaming to an upstream failure, at which point NIC Teaming switches to the other IGESM. This example shows a single VLAN to the Teamed NIC. It is possible to also carry multiple VLANs to the Teamed NIC. If multiple VLANs are necessary, you must carry all VLANs to both NICs and on all of the external uplinks as well as on Po1 between 6500-1 and 6500-3. Steps to configure for topology 1 Trunk Failover example 1. Configure global command. 2. Configure upstream port (or ports) or Etherchannel (poX). 3. Configure downstream port (or ports). Configuring downstream before upstream will result in downstream ports going down until upstream is configured. Trunk Failover configuration example for topology 1 CIGESM1# configure terminal CIGESM1(config)# link state track 1 CIGESM1(config)# interface po1 CIGESM1(config-if)# link state group 1 upstream CIGESM1(config-if)# interface gi0/3 CIGESM1(config-if)# link state group 1 downstream CIGESM1(config-if)# end CIGESM1# write Show current Trunk Failover operation Use the show link state CIGESM1#show link state Link State Group: 1 Upstream Interfaces : Downstream Interfaces : group command to show the operational state of Trunk Failover: group detail Status: Enabled, Up Po1(Up) Gi0/3(Up) Link State Group: 2 Status: Disabled, Down Upstream Interfaces : Downstream Interfaces : (Up):Interface up (Dwn):Interface Down (Dis):Interface disabled In this example, when all four ports on Po1 go down, Gi0/3 will be set to err-disable (down) at which point NIC Teaming can then sense the failure and switch traffic out the other NIC. Note the example above only shows one IGESM being configured. In most production environments you would need to configure Trunk Failover on both IGESMs. 7.7.3 Example of Topology 2 using Trunk Failover Figure 7-23 logically depicts using Trunk Failover and NIC Teaming with Topology 2. 196 Cisco Systems Intelligent Gigabit Ethernet Switch Module VLAN X Must be carried between IGESMs via an external path 6500-1 1 Po2 2 3 4 6500-3 Po1 1 2 Po3 3 4 Po2 Po3 VLAN X Must be carried on uplinks from IGESM VLAN X Must be carried on uplinks from IGESM Link state group 1 Upstream Po1 Po2 Link state group 1 Upstream Po2 Po1 17 18 19 20 17 18 19 20 CIGESM Top CIGESM Bot Link state group 1 Downstream VLAN X Link state group 1 Downstream Trunk Failover Config NIC Teaming Config Teamed Active/Standby NIC 1 NIC 2 Logical NIC Interface BladeServer 3 BladeCenter Topology 2 - Elements of Trunk Failover Figure 7-24 Topology 2 - Elements of Trunk Failover This example in Figure 7-23 shows a single link state group on each IGESM (group 1) being utilized. In this design, if the two ports in Po1 go down, spanning tree unblocks Po2. If both Po1 and Po2 go down, Trunk Failover takes over and shuts down internal downstream defined port(s). This alerts NIC Teaming to an upstream failure at which point Teaming switches to the other IGESM. This example shows a single VLAN to the Teamed NIC. It is possible to also carry multiple VLANs to the Teamed NIC. If multiple VLANs are necessary, you must carry all VLANs to both NICs and on all of the external uplinks as well as on Po1 between 6500-1 and 6500-3. Chapter 7. Cisco Systems IGESM configuration and network integration 197 Steps to configure for topology 2 Trunk Failover example 1. Configure global command. 2. Configure upstream port (or ports) or Etherchannel (poX). 3. Configure downstream port (or ports). Configuring downstream before upstream will result in downstream ports going down until upstream is configured. Trunk Failover configuration example for topology 1 CIGESM1# configure terminal CIGESM1(config)# link state track 1 CIGESM1(config)# interface range po1 - 2 CIGESM1(config-if)# link state group 1 upstream CIGESM1(config-if)# interface gi0/3 CIGESM1(config-if)# link state group 1 downstream CIGESM1(config-if)# end CIGESM1# write Show current Trunk Failover operation Use the show link state group command to show the operational state of Trunk Failover: CIGESM1#show link state Link State Group: 1 Upstream Interfaces : Downstream Interfaces : group detail Status: Enabled, Up Po1(Up) Po2(Up) Gi0/3(Up) Link State Group: 2 Status: Disabled, Down Upstream Interfaces : Downstream Interfaces : (Up):Interface up (Dwn):Interface Down (Dis):Interface disabled In this example, if only Po1 or Po2 go down, spanning tree unblocks the other link as necessary. Only when both Po1 and Po2 go down, will Gi0/3 be set to err-disable (down), at which point NIC Teaming can then sense the failure and switch traffic out the other NIC. Note the example above only shows one IGESM being configured. In most production environments you would need to configure Trunk Failover on both IGESMs. 7.8 Serial over LAN feature description and configuration This section provides a brief introduction to the Serial over LAN feature for the BladeCenter, discusses certain rules, and provides an example of configuring the IGESM for SoL. Serial over LAN requires configuring the Management Module, the IGESM and possibly the BIOS and operating system of the blade server (depending on the model of blade server). For a more detailed explanation of Serial over LAN operation and configuration of all of the elements of SoL, reference the SoL Configuration Guide (link provided in the online resources section later in this document). 7.8.1 Introduction to Serial over LAN Serial over LAN (SoL) provides the ability to access blade servers via a special connection from the Management Module, over a special VLAN and into the blade servers, for the purpose of providing a text-only-based interface into the blade servers. 198 Cisco Systems Intelligent Gigabit Ethernet Switch Module As noted, for a more detailed description of Serial over LAN, reference the SoL Configuration Guide (link provided in the online resources section later in this document). Some general rules for Serial over LAN Not all operating systems support SoL: – W2K Server not supported – Most Linux and W2K3 supported on HS series – AIX® and Linux on JS20 is supported Requires OS and BIOS configuration steps on some blade server models (e.g. HS20 running Linux or W2K3). See IBM SoL configuration guide for details. Some blade server models may not be supported, such as the original HS 20 (model 8678). JS20 requires SoL for initial OS install: – JS20 has no KVM interface. – After is OS installed, it can use the Ethernet interface to administer JS20. HS series have built in KVM interface making SoL optional. May require firmware upgrades on some server blades. For example, JS20 requires Broadcom firmware 2.30 or higher to use SoL with IGESM. This is available at: http://www.ibm.com/pc/support/site.wss/document.do?lndocid=MIGR-56012 Upgrading all firmware (for Management Module, IGESM and blade servers) and OS drivers to latest releases is recommended: http://www.ibm.com/servers/eserver/support/bladecenter/chassis/downloadinghwonly.html Specific rules for selecting the SoL VLAN for use with the IGESM It must be a VLAN ID from 1 to 4094 (inclusive). Important: The version of the Serial over LAN configuration guide available at the time of this writing incorrectly indicates this is limited to a max of 1001. – The SoL VLAN ID cannot be 1002 through 1005 (reserved by the IGESM). – To use VLANs above 1005, must be in VTP Transparent mode (default for IGESM). VLANs 1 and 2 are both default VLANs on the IGESM, and unless otherwise changed, should not be used for the SoL VLAN. It can not be a VLAN that is being used to carry user data between the blade servers and the IGESM uplink ports. It cannot be the management VLAN between the IGESM and the Management Modules. The default VLAN for the IGESM to Management Module traffic is VLAN 1, but can be changed by the user. It must match the VLAN configured for SoL use on the Management Module. The SoL VLAN must be carried to the blade server. If the blade server will be on a single VLAN, do not set port for Access if you need SoL: – Set port to trunk and set Native VLAN to desired access VLAN. – Set SoL VLAN to be allowed on trunk to blade server. Chapter 7. Cisco Systems IGESM configuration and network integration 199 7.8.2 Configuring Serial over LAN This section provides an example of configuring SoL on an IGESM. Introduction to configuring Serial over LAN Successfully configuring Serial over LAN in the IBM BladeCenter involves several items. At a minimum you should configure both the Management Module and the IGESM. As already noted, depending on the blade servers installed, you may also need to configure both the CMOS/BIOS settings and the operating system on the server to also support Serial over LAN. This section discusses configuring only the IGESM and does not cover configuring the blade servers themselves or the Management Module. Important: In most cases, Serial over LAN is only supported on the IGESM installed in switch bay 1. At least one model of blade server offers a jumper to enable Serial over LAN through the switch in bay 2. See the Serial over LAN configuration guide for details. Configuring the IGESM Step-by-step instructions to configure the IGESM for SoL Table 7-21 shows the step-by-step instructions used to configure IGESM in the top bay. Table 7-21 Configuring IGESM for Serial over LAN Description and comments Actions via IOS CLI for the IGESM Step 1: Create the desired VLAN to be used for SoL. config t vlan 4094 name SoL (In this example we use VLAN 4094.) Switch must be in VTP Transparent mode to use this specific VLAN. Perform the commands in this table starting from a Telnet session to the IGESM, with the IGESM in the Enable mode. The SoL VLAN will only be specific to this IGESM, and can be used by other switches in the network, as the SoL VLAN on this switch will be isolated from other switches by the commands in step 2. Naming the VLAN in this step is optional, and is only for the convenience of future users reviewing the switch configuration. Whatever VLAN you define as the SoL VLAN in this section, it must match the SoL VLAN as configured on the Management Module. Step 2: Remove the SoL VLAN from the external uplinks. This must be the same VLAN defined in step 1. This isolates the SoL VLAN to this BladeCenter. Step 3: Add the SoL VLAN on the links going from the IGESM to the Management Modules and the blade servers. int range g0/17 -20 switchport trunk allowed vlan remove 4094 int range g0/1 -16 switchport trunk allowed vlan add 4094 This must be the same VLAN as defined in step 1. This enables the SoL traffic on the link between the IGESM and the Management Module as well as to the blade servers. Ports to blade servers must be in trunk mode (not access). You can simulate the blade server in Access mode by making it a trunk link and setting the native VLAN to the desired Access VLAN. Step 4: Exit config mode and save config to NVRAM. The end command exits out of config mode. Failure to perform this step results in losing all changes to the IGESM if the BladeCenter is powered off or the IGESM is otherwise restarted. 200 Cisco Systems Intelligent Gigabit Ethernet Switch Module end write After SoL is configured for the IGESM, the Management Module and, if necessary, the blade servers must be configured. When all elements of SoL are configured, it will be possible to connect to the blade servers via the SoL connection. (See the Serial over LAN configuration guide for details). Important: When configuring the SoL VLAN on the Management Module, it never asks you to reboot after saving. Testing in the lab has shown that if you change the SoL VLAN on the Management Module and do not reload the Management Module after saving the config, that the SoL VLAN may not come ready. Therefore, it is always recommended that you reload the Management Module after the SoL VLAN has been properly configured (and saved) to match the VLAN being defined as the SoL VLAN on the IGESM. Chapter 7. Cisco Systems IGESM configuration and network integration 201 202 Cisco Systems Intelligent Gigabit Ethernet Switch Module 8 Chapter 8. Cisco Systems IGESM troubleshooting In this chapter, we discuss troubleshooting techniques and commands that can be used in support of the IGESM. © Copyright IBM Corp. 2004, 2005. All rights reserved. 203 8.1 Basic rules and unique symptoms Before going into detail about troubleshooting, it is important to first discuss certain common rules and symptoms for this environment. Certain interactions within the BladeCenter between the IGESM and the Management Module require that certain important rules be followed. Failure to follow these rules can produce unexpected results when deploying the BladeCenter containing an IGESM. In this section, we summarize some of these rules and the consequences of not adhering to them. We also discuss some symptoms that might be seen and possible solutions for these. 8.1.1 Basic rules 1. Do not attach cables to the IGESM until both sides of the connection are configured. – Symptoms: No upstream connectivity, upstream network failure from spanning tree loop. – Solution: Keep cables disconnected or ports shut down until properly configured on both sides of the connection. This is an important best practice for any switch-to-switch connections in a production network, not just between the IGESM and its upstream connections. 2. Do not put BladeServers on the VLAN that the IGESM uses for its management VLAN interface. – Symptoms: Duplicate IP addresses reported on BladeServers, unstable connectivity to BladeServers, BladeServers unable to obtain a DHCP address, DHCP server unexpectedly using up all of its IP addresses. Various unexpected connectivity issues to BladeServers. – Solution: Use separate VLANs for data and management. (See 5.3, “In-depth management path discussions” on page 55 for details.) 3. Make sure the IGESM firmware (IOS) code is upgraded. – Symptoms: Any unexpected issue or missing features (Trunk Failover, Jumbo frames, Etherchannel load balancing). – Solution: Review firmware readme file for latest version of code. Upgrade to latest release of IOS. To locate the latest code for the IGESM, go to: http://www.ibm.com/support Under Support by product, click Personal computing. In the Select a product pull-down menu, select Servers. In the Family pull-down menu, select BladeCenter. Wait for the screen to refresh and then click Continue and scroll to find the desired IGESM code. 4. Decide the IGESM management path (via Management Module or IGESM uplinks) and configure for it. – Symptoms: Intermittent or no connectivity to IGESM IP address. – Solutions: See 5.3, “In-depth management path discussions” on page 55. 8.1.2 Basic symptoms and possible solutions Table 8-1 on page 205 provides a look at some of the more common symptoms and possible solutions when deploying a BladeCenter containing IGESMs. 204 Cisco Systems Intelligent Gigabit Ethernet Switch Module Table 8-1 Specific issues and recommendations Symptoms specific to BladeCenter environment and IGESM Possible cause/solution Duplicate IP address reported on IGESM Cause: IP address changed directly on IGESM rather than via Management Module. Solution: Change IP address to desired setting for IGESM on Management Module and click Save. See Appendix A, “Hints and tips” on page 227 for more about this issue. Duplicate IP address reported on BladeServer Native VLAN mismatch reported on IGESM Connection problems to BladeServers DHCP server uses up all IP addresses and BladeServer still cannot get an address Intermittent or no connectivity to IGESM Cannot configure trunk failover feature Cause: Server using same VLAN as IGESM management VLAN; Management Module proxying for all addresses on that VLAN and confusing server. Solution: Separate VLANs, use a different VLAN for the IGESM than for any of the data VLANs going to the servers. (See section 5.3, “In-depth management path discussions” on page 55.) Cause: 1) Multiple IGESMs in a BladeCenter, and at least one of the IGESMs is on a different management VLAN than other IGESMs in the same BladeCenter. 2) Upstream trunked and upstream switch using different native VLAN than IGESM. Solution: 1) Place all IGESMs in a BladeCenter into the same management VLAN or turn off CDP on ports g0/15 and g0/16. 2) Be sure that both sides of the external connection agree on a common native VLAN. (See section 5.3, “In-depth management path discussions” on page 55.) Cause: 1) VLANs not configured to be carried from servers to other devices. 2) Servers using same VLAN as IGESM management VLAN; Management Module proxying for all addresses on that VLAN and confusing server. 3) Certain drivers on BladeServers (for example, some versions of the Linux tg3 driver) failing to correctly connect to the IGESM at certain times, leaving the BladeServer facing port on IGESM as not connected. Solution: 1) Make sure desired VLAN is being carried from the blade server to destination. 2) Separate VLANs; do not use any of the data VLANs going to the servers for the IGESM VLAN. (See section 5.3, “In-depth management path discussions” on page 55.) 3) Use a different (working) version of the driver or use the interface command speed noneg if IGESM code is at 12.1(22)AY1 or higher. Cause: Servers using same VLAN as IGESM management VLAN, Management Module proxying for all addresses on that VLAN and confusing DHCP server. Solution: Separate VLANs; do not use any of the data VLANs going to the servers for the IGESM VLAN. (See section 5.3, “In-depth management path discussions” on page 55.) Cause: Management Module set to permit IGESM to manage over all ports, uplinks from Management Module and uplinks from IGESM using the same VLAN. Solution: If enabling management over all ports, Management Module must use a VLAN other than any carried on the IGESM uplinks. (See section 5.3, “In-depth management path discussions” on page 55.) Cause: Running down level IOS. Solution: Upgrade to 12.1(14)AY4 or higher. Chapter 8. Cisco Systems IGESM troubleshooting 205 Symptoms specific to BladeCenter environment and IGESM Possible cause/solution Upstream network goes down when hooking up IGESM to upstream Cause: Attempting to connect any two switches in a production network Server running Red Hat and tg3 driver not connecting to network, taking the upstream port down, or both Unable to enable external ports (g0/17-20) from IGESM. Reports Shutdown not allowed on this interface. Outbound Etherchannel traffic not load balancing, most outbound traffic using a single port in the Etherchannel bundle. Serial over LAN (SoL) not working or working intermittently when IGESM installed. with incorrect or default configurations can lead to issues in the network. This is also true of connecting an unconfigured IGESM to unconfigured ports on an upstream switch. Solution: Always configure both sides of a link before hooking up the connections or enabling the connected ports. This is a an important best practice for any switch-to-switch connections in a production network, not just between the IGESM and its upstream connections. Cause: Some versions of the tg3 driver cause port issues on the IGESM. Solution: 1) Use the Broadcom driver. 2) Get a version of the tg3 driver that works. 3) Use the speed noneg command if IGESM code is at 12.1(22)AY1 or higher. 3) Use the interface command speed noneg if IGESM code is at 12.1(22)AY1 or higher. Cause: Management Module Advanced I/O module setting for External ports set to Disabled (default). Solution: In Management Module I/O Module tasks Advanced settings, set External ports to Enabled (for all IGESMs), then go into IGESM and perform no shut to bring interfaces 17 through 20 up. Cause: Default outbound Etherchannel load balance is not necessarily effective in BladeCenter environment. Solution: Upgrade to 12.1(14)AY4 or newer and change the global load balancing from the default of source MAC to XOR the source and destination IP or MAC. (For example, to load-balance based on an XOR of the source and destination MAC addresses: port-channel load-balance src-dst-mac) Cause: 1) SoL not configured properly on Management Module, IGESM, or BladeServer. 2) Down-level firmware on Management Module, IGESM, or BladeServer. 3) Down-level driver on BladeServer. 4) Management Module not restarted after configuring SoL. Solution: 1) Use IBM SoL configuration guide to properly configure SoL when an IGESM is present. (See section 7.8, “Serial over LAN feature description and configuration” on page 198.) 2) Make sure all firmware is at recent levels. 3) Make sure driver on BladeServers at recent revision. 4) After saving SoL configs on the Management Module, even though it does not say it, it is strongly recommended that you restart Management Module to allow SoL to come ready. (It may take 2 or 3 minutes to come ready the first time.) 8.2 Introduction to troubleshooting the IGESM In this section we discuss general troubleshooting techniques and offer options for getting started. 8.2.1 General comments on troubleshooting Because of the highly integrated nature of the IGESM within the BladeCenter, it is usually necessary to engage several teams for anything beyond basic hardware troubleshooting. Experience has shown that the greater the communication between administrative groups, the more likely an issue will be resolved sooner rather than later. 206 Cisco Systems Intelligent Gigabit Ethernet Switch Module Otherwise, troubleshooting the IGESM is similar to other products in that there are typical basic types of failures that can be encountered. Some of these are: Hardware failures of IGESM – Not very common. – The only solution is RMA of defective IGESM. Software failures (bug in IGESM) – Not very common although, as with all products, software bugs do exist. – Reference the latest code readme file for a list of resolved bugs with each release of code. Misconfiguration of IGESM, other components, or both – This is the most common issue encountered. – Often requires close cooperation among different administrative groups to resolve. How does one know where to start when troubleshooting? How does one know whether it is a hardware or configuration issue and not a software bug? The only true answer is experience. Rather than attempting to list step-by-step procedures for every possible troubleshooting issue (which could fill several volumes and still not be complete), this chapter offers information about what to gather and commands that can be useful, and assumes the person doing the troubleshooting has experience in such matters. Important: Many of the following commands can affect the operation of the BladeCenter and its attached network, and should only be executed by those who understand the consequences of executing such commands. Wherever possible, warnings have been provided when commands are offered that can have such an impact on operation, but it is ultimately up to the troubleshooter to understand the consequences. The remainder of this document goes into details about troubleshooting various kinds of issues and offers hints about useful troubleshooting commands. 8.2.2 Information useful to technical support When engaging technical support, certain information can aid in timely resolution. Gather these items and have them ready when you open a call to help ensure the quickest possible resolution: Full description of issue being encountered Network diagram showing ports and VLANs in use (including the VLAN assigned to the upstream port connecting to the Management Module) Network configuration of affected blade servers Network configuration of upstream devices Output from the following IGESM CLI commands for each IGESM in the BladeCenter – – – – show show show show tech-support int status platform summary span root Chapter 8. Cisco Systems IGESM troubleshooting 207 Gathering this information usually requires the involvement of several technical support teams; for example, a network diagram usually comes from a network administration team, and blade server configuration usually comes from a systems administration team. From a support person’s perspective, answers to the following questions can also aid in this process. Some basic examples: – Is this the first time the problem has occurred? If not, how often does the issue occur? – Can the problem be reproduced, or does it appear to be random? – Has it ever worked in the past? If so, has anything changed recently in the network or systems experiencing the issue? – Has any corrective action been taken? The responses should help in isolating the issue more quickly. From here we begin to discuss some specifics of troubleshooting different kinds of issues 8.3 Troubleshooting suspected hardware issues Troubleshooting defective hardware can be one of the easier issues to isolate, especially if it is a consistent failure. The IGESM has a Fault LED on the rear (above the console port) that is used to indicate a fault detected during POST (Power On Self Test). Table 8-2 shows some details about this and other LEDs on the rear of the IGESM. Table 8-2 IGESM LEDs Indicator name Color Description OK Green On solid when Switch module is powered up and operating normally. Fault Amber Solid indicates that a fault has been detected somewhere on this switch. Off otherwise. Link OK Green Solid green when link status is up, off when link status is down. One LED of this type for each external interface. Tx/Rx/Activity Green Flashes green for traffic over the interface. One LED of this type for each external interface. Note: While the switch is executing POST, both the OK and Fault LEDs will be lit. When POST completes successfully, the Fault LED will turn off. You can also use the Management Module browser to review the Power/Restart codes under I/O Module tasks. Figure 8-1 provides information about error codes. Most critical errors require an RMA to resolve. Some rules with regard to these error codes: The first critical error code will not be overwritten by subsequent errors. A non-critical error will be overwritten by a subsequent critical error. If POST fails a critical test, the bootloader will not load IOS. Switch stays in bootloader (ROMMON) mode. – ROMMON mode is also caused by a corrupt or missing IOS. – Contact technical support for procedures for recovering from corrupt or missing IOS. 208 Cisco Systems Intelligent Gigabit Ethernet Switch Module If a critical condition is found during POST, the fault LED will be lit on back of IGESM. A POST code of FF indicates that the IGESM booted successfully. Additional messages may be found through a console port connection to the IGESM. S u b -T est N a m e C P U C ac h e m e m o ry N o n -C ac h e DRAM In te rn a l A S IC packet m em ory A S IC P C I m e m o ry d a ta p a th te st: m g m t p o rts V P D re gio n re a d te st F la sh M e m o r y in E x te n d ed P o st F la sh M e m o r y in re g u la r P O S T D a ta p a th te st: In te rn a l G E p o rts D a ta p a th te st: E x te rn a l p o rts D ia g n o stic In d ic a to r (in H ex) 0x01 0x02 0 x 0 3 -0 x 0 4 0 x 0 5 -0 x 0 6 0 x 0 7 -0 x 0 8 0x09 0x0A 0x0B 0 x 8 1 -0 x 8 E 0xA 1- 0xA 8 F a ilin g F u n c tio n a l A r ea B a se In te rn a l F u n c tio n s B a se In te rn a l F u n c tio n s B a se In te rn a l F u n c tio n s B a se In te rn a l F u n c tio n s B a se In te rn a l F u n c tio n s B a se In te rn a l F u n c tio n s B a se In te rn a l F u n c tio n s B a se In te rn a l F u n c tio n s In te rn a l In te rfa c e F a ilu re E x te rn a l In te rfa ce F a ilu re F a ilu r e C r itic a lity C ritic a l C ritic a l C ritic a l C ritic a l C ritic a l C ritic a l C ritic a l C ritic a l N o n -C ritic a l N o n -C ritic a l Figure 8-1 IGESM error codes Figure 8-2 provides an example of what might be seen in the Management Module page containing I/O Module error codes. Figure 8-2 I/O Module POST results Beyond normal bootup POST, the IGESM has certain diagnostics that can be executed from the Management Module GUI. Important: Executing these diagnostics will result in the switch rebooting and should be done only during a planned outage. Note: The setting of Fast POST Enabled/Disabled in the I/O Module tasks Advanced settings currently has no effect on the IGESM. Chapter 8. Cisco Systems IGESM troubleshooting 209 To execute different levels of diagnostics, log into the MM GUI and go to I/O Module tasks. Under Power/Restart, select one of the following options: 1. Run Standard Diagnostics Usually takes less than two minutes to test and complete boot; it runs: – Flash memory test – CPU cache memory test – DRAM test – Data path test – ASIC test 2. Run Extended Diagnostics Usually takes less than five minutes and runs the regular POST tests plus: – Extended DRAM test 3. Run Full Diagnostics Usually takes less than 12 minutes and runs the regular POST and extended POST, plus: – Extended Flash test 8.4 Troubleshooting suspected software issues The best approach to troubleshooting possible software issues is to obtain the readme file for the latest IGESM code to see whether the issue you are encountering is covered. If a documented bug is found, upgrading to the newer code should resolve the issue. You also might want to upgrade to newer code to take advantage of new features in the upgraded code. For example, version 12.1(14)AY4 and later has trunk failover and improved Etherchannel load balancing. If you believe that you have encountered a new (undocumented) bug, you should work with technical support to engage necessary resources to resolve this issue. 8.5 Troubleshooting suspected configuration issues Configuration issues are probably the most common troubleshooting event, and they usually require close cooperation among administrative groups. Some common tools that are available for this sort of troubleshooting are: IOS Command Line Interface Familiarity with the IGESM IOS CLI is imperative. Management Module GUI interface Understanding the Management Module GUI is very useful to aid in troubleshooting. OS-based commands Most operating systems support network troubleshooting commands, and some form of ping, arp dump, and traceroute commands are available in all major operating systems. External network management software CiscoWorks, IBM Director, and other management platforms can be used to gather data and help isolate problems. Other third-party tools include a network sniffer tool for capturing and examining network traffic, and a ping sweep tool for rapidly testing connectivity at many levels. The following groups of IOS CLI commands all run from Enable mode except where noted. This partial listing of available commands shows just a general grouping, as some commands 210 Cisco Systems Intelligent Gigabit Ethernet Switch Module could be part of more than one group. These commands are discussed in more detail in 8.6, “Useful IOS CLI troubleshooting commands” on page 212. Gathering data – show running – show vlan – show version – show tech-support – show platform summary – show logging Administrative – term mon – clear counters – clear log – clear arp – clear mac add – no logging console (config mode) Troubleshooting – ping – show cdp neighbor – show int status – show ip int brief – shut - no shut (interface config mode) – show int g0/X – show int trunk – show etherchannel summary – show spanning-tree blockedports – show spanning-tree root – show link state group detail – show arp – SPAN and RSPAN – debug (use with caution) Figure 8-3 lists some of the modes of operation for IOS CLI. Mode Functions Prompt How to get to User Limited privilege Switch> Telnet or service port Privilege (Enable) Super user power Switch# Enter Enable from User mode Global configuration Make global changes or the change has system-wide impact Switch(config)# Enter config terminal from privilege mode Interface configuration Set up interface specific config Switch(config-if)# Enter interface g0/Y from global config mode (where Y is the port number to be configured) VLAN configuration New way to configure VLAN This is the recommended way to create VLANs Switch(config-vlan)# Enter vlan X from global config mode (where X = VLAN ID number) VLAN database Old way to configure VLAN Recommended to use new way to create VLANs Switch(vlan)# Enter vlan database from privilege mode Bootloader (ROMMON) Set boot environment Switch: POST failure or corrupt IOS Figure 8-3 Partial list of CLI modes of operation Chapter 8. Cisco Systems IGESM troubleshooting 211 The following list provides some tips for using the CLI: Left/right arrow keys Up/down arrow keys Tab key Backspace key Spacebar Enter key ? Ctrl+B Ctrl+F Ctrl+A Ctrl+E Esc+B Esc+F Ctrl+P Ctrl+N Ctrl+D Ctrl+W Ctrl+l Ctrl+R Move left or right one character on command line Scroll through command history Complete a command Delete previous character Scroll a page at a time Scroll a line at a time Help Move one character back Move one character forward Move to the beginning Move to the end Move one word back Move one word forward Recall previous CLI Recall next CLI Delete one character Delete one word Re-paint a CLI Re-paint a CLI <show command> | [ begin | include | exclude ] <REGEXP> sh run | inc monitor Example: show lines containing the word monitor: Example: show all lines in config beginning with interface g0/17: sh run | beg 0/17 more command (with string searches): more filename | [begin | include | exclude] REGEXP 8.6 Useful IOS CLI troubleshooting commands In this section we focus on IOS commands useful for troubleshooting the IGESM. 8.6.1 Gathering data show running One of the most basic yet important commands, this shows the currently running configuration. It is used to verify that the configuration is as expected. Use the Spacebar to scroll through the entire config. switch#sh run Building configuration... Current configuration : 5907 bytes ! version 12.1 no service pad service timestamps debug uptime service timestamps log uptime no service password-encryption ... Look for expected configurations. For example, review the listing to ensure that the desired VLANs exist (if in vtp transparent mode) and that they are carried on the correct ports. Also review this listing for other important information, such as expected Etherchannels, correct IP addressing, and expected management VLAN. 212 Cisco Systems Intelligent Gigabit Ethernet Switch Module This shows the configuration running in memory, and the command show startup shows the configuration as stored in NVRAM. To synchronize the information in show running with the information in NVRAM (in other words, to save the running config into NVRAM) use write mem or copy running startup. show vlan Verifies that desired VLANs exist. If a VLAN does not exist in here, the switch will not carry data for that VLAN even if a port is configured to use it. switch#sh vlan VLAN Name ---- ---------------1 default 2 operational 30 VLAN0030 110 VLAN0110 ... Status Ports --------- ----------------------------active active Gi0/1, Gi0/2, Gi0/3, Gi0/6 Gi0/7, Gi0/8, Gi0/9, Gi0/10 Gi0/11, Gi0/12, Gi0/13, Gi0/14 active Gi0/15 active A port configured for trunk and connected (show int status) will not show up in this list. show version sh version shows: The version of code running on the IGESM How long the IGESM has been up (since last boot) The version of code and where it booted from on Flash The base (first and lowest) MAC address (as IGESM uses more than a single MAC) The config reg (normally 0xF for standard boot) switch#sh version IOS (tm) CIGESM Software (CIGESM-I6Q4L2-M), Version 12.1(14)AY4, RELEASE SOFTWARE (fc1) ... switch uptime is 6 days, 54 minutes System image file is "flash:/cigesm-i6q4l2-mz.121-14.AY4/cigesm-i6q4l2-mz.121-14.AY4.bin" ... Base ethernet MAC Address: 00:0F:90:CD:6F:C0 ... Configuration register is 0xF show tech-support show tech-support lists off a lot of information useful to support people (as well as some not as useful). The output from show tech is long enough that it usually scrolls out of the terminal emulators buffer. To prevent loss of scrolling data, set your emulator to capture data to a file, prior to running the command, and then view captured data in the log file. Items that are currently included in the output of show tech-support: show show show show show show version running-config stacks interfaces controllers file systems Chapter 8. Cisco Systems IGESM troubleshooting 213 show show show show show show show show show show show show show flash: all process memory process cpu vlan clock etherchannel summary int trunk cdp neighbors spanning-tree summary mac-address-table count log region buffers Some helpful items that are not in show tech-support: show platform summary show int status show span blocked show platform summary show platform summary is important for showing data that no other IGESM command can show, such as that certain options are configured on the Management Module. Figure 8-4 illustrates some of the important attributes from this command. Switch#sh platform summary Platform Summary: •Switch is in Bay 1 Switch Slot: 1 Current IP Addr: 172.26.147.208, 255.255.254.0, gw: 172.26.146.1 Default IP Addr: 10.10.10.91, 255.255.255.0, gw: 0.0.0.0 IP Fields read from VPD: 172.26.147.208, 255.255.254.0, gw: 172.26.146.1 Static IP Fields in VPD: 172.26.147.208 255.255.254.0 172.26.146.1 IP Acquisition Method used: static (“Disabled” will show “user-config” after CIGESM reboot) Active Mgmt Module in Mgmt Slot: 1 Native Vlan for Mgmt Module Ethernet ports: 1 External Mgmt over Extern ports Disabled •MM advanced I/O module settings Figure 8-4 Show platform summary attributes show logging Basically a local repository for events that have occurred on the switch, show logging is a FIFO buffer that keeps track of console messages and other activity. The buffer can be configured to be larger or smaller. Look here for anything unusual or unexpected (such as links going down when they should not or link state group changes) that may have occurred in the past. 214 Cisco Systems Intelligent Gigabit Ethernet Switch Module 8.6.2 Administrative term monitor (term no monitor) Redirects console output to current terminal emulation session. If Telneted in, will not see important console messages unless this command is run first (must run every time you Telnet in if you want to see con messages). clear counters Clears interface counters, more easily monitor counters from a given point in time. clear log Clears out old log messages so you can start fresh. clear arp Clears arp cache; useful when troubleshooting connectivity to IGESM management IP address and external devices. clear mac add Clears MAC address tables, forces switch to relearn all necessary MACs. no logging console (logging console) - from conf t mode Useful when connected on console port and messages are interfering with operation (scrolling too fast, interfering with entering commands). Be sure to reset to logging console when done, as console messages under normal operation are usually desired. 8.6.3 Troubleshooting ping Used to test basic network connectivity. Two modes: Simple (non-interactive): Enter the ping command and an IP address to ping: Enter the ping command followed by an address and then the Enter key switch#Ping 172.26.146.1 Type escape sequence to abort. Sending 5, 100-byte ICMP Echos to 172.26.146.1, timeout is 2 seconds: !!!!! Success rate is 100 percent (5/5), round-trip min/avg/max = 1/5/12 ms Advanced (interactive): Enter the ping command with no options. You will be prompted for options to run the ping with. This is a very flexible way to control the its characteristics. Enter the ping command followed by the Enter key to enter variables: switch#ping Protocol [ip]: Target IP address: 172.26.146.1 Repeat count [5]: 10 Datagram size [100]: 1000 Timeout in seconds [2]: 1 Extended commands [n]: Sweep range of sizes [n]: Type escape sequence to abort. Chapter 8. Cisco Systems IGESM troubleshooting 215 Sending 10, 1000-byte ICMP Echos to 172.26.146.1, timeout is 1 seconds: !!!!!!!!!! Success rate is 100 percent (10/10), round-trip min/avg/max = 4/4/4 ms show cdp neighbor show cdp neighbor is a powerful troubleshooting command. At a minimum, it tells what ports are connected on each side of a link. It can also tell the type of device on the other side of a link, the IOS version on the other side of the link, and the IP address of the devices on the other side of the link. (To see the IOS and IP address on the other side, you must add the keyword detail to the end of the show cdp neighbor command. It requires that both sides of the link be Cisco devices. (CDP is a Cisco proprietary protocol.) Figure 8-5shows the attributes of this command. • Very important tool – Based on Cisco Discovery Protocol • CDP is a Cisco protocol that runs between links and learns information about the connection • Shows connection info from CIGESM to uplinks • Shows device name/model number, ports used, etc. • cigesm_t#sh cdp nei Capability Codes: R - Router, T - Trans Bridge, B - Source Route Bridge S - Switch, H - Host, I - IGMP, r - Repeater, P - Phone Device ID c3750-24_A c3750-24_A c3750-24_A c3750-24_A cigesm_t Device name on other side of link Local Intrfce Gig 0/19 Gig 0/20 Gig 0/18 Gig 0/17 Gig 0/15 Holdtme 143 143 143 143 164 Port on this side of link Capability Platform Port ID SI WS-C3750-2Fas 1/0/19 SI WS-C3750-2Fas 1/0/20 SI WS-C3750-2Fas 1/0/18 SI WS-C3750-2Fas 1/0/17 SI OS-CIGESM-Gig 0/15 Model of device on other side Remote port number • Very handy to confirm cables are plugged into correct ports • “show cdp nei detail” gives even more information on device on the other side of the link Figure 8-5 Output of show cdp nei command 216 Cisco Systems Intelligent Gigabit Ethernet Switch Module show int status This command offers a snapshot of connection status on the IGESM (Figure 8-6 ). cigesm_t#sh int status Port Name Status Vlan Duplex Speed Type Gi0/1 blade1 notconnect 2 full 1000 1000Mbps SERDES Gi0/2 blade2 notconnect 2 full 1000 1000Mbps SERDES Gi0/3 blade3 notconnect 2 full 1000 1000Mbps SERDES Gi0/4 blade4 connected trunk full 1000 1000Mbps SERDES Gi0/5 blade5 connected trunk full 1000 1000Mbps SERDES Gi0/6 blade6 notconnect 2 full 1000 1000Mbps SERDES Gi0/7 blade7 notconnect 2 full 1000 1000Mbps SERDES Gi0/8 blade8 notconnect 2 full 1000 1000Mbps SERDES Gi0/9 blade9 notconnect 2 full 1000 1000Mbps SERDES Gi0/10 blade10 notconnect 2 full 1000 1000Mbps SERDES Gi0/11 blade11 notconnect 2 full 1000 1000Mbps SERDES Gi0/12 blade12 notconnect 2 full 1000 1000Mbps SERDES Gi0/13 blade13 notconnect 2 full 1000 1000Mbps SERDES Gi0/14 blade14 notconnect 2 full 1000 1000Mbps SERDES Gi0/15 mgmt1 connected trunk full 100 10/100/1000BaseTX Gi0/16 mgmt2 notconnect 30 full 100 10/100/1000BaseTX Gi0/17 extern1 connected trunk a-full a-100 10/100/1000BaseTX Gi0/18 extern2 connected trunk a-full a-100 10/100/1000BaseTX Gi0/19 extern3 connected trunk a-full a-100 10/100/1000BaseTX Gi0/20 extern4 connected trunk a-full a-100 10/100/1000BaseTX Po1 connected trunk a-full a-100 Po2 connected trunk a-full a-100 Port number Status of port connected = Link up notconnect= Link down Err-disable = Link down If “connected” – Shows trunk if 802.1Q trunk Shows VLAN # if access mode If “notconnected” Shows native VLAN if trunk Shows VLAN # if access mode Speed/duplex setting for port Leading “a” = Auto-negotiated Figure 8-6 Output of show interface status command show ip int brief Similar to show int status but in a different format, show ip int brief shows the management VLAN interface. Figure 8-7 gives some of the attributes of this command. • Similar to show int status but also shows mgmt VLAN status Mgmt VLAN cigesm_b#sh ip int brief Interface IP-Address Vlan1 unassigned Vlan30 172.26.147.209 GigabitEthernet0/1 unassigned GigabitEthernet0/2 unassigned GigabitEthernet0/3 unassigned GigabitEthernet0/4 unassigned GigabitEthernet0/5 unassigned GigabitEthernet0/6 unassigned ... GigabitEthernet0/14 unassigned GigabitEthernet0/15 unassigned GigabitEthernet0/16 unassigned GigabitEthernet0/17 unassigned GigabitEthernet0/18 unassigned GigabitEthernet0/19 unassigned GigabitEthernet0/20 unassigned Port-channel1 unassigned Port-channel2 unassigned Mgmt VLAN IP OK? Method Status Protocol YES NVRAM administratively down down YES unset up up YES unset down down YES unset down down YES unset down down YES unset up up YES unset up up YES unset down down YES unset YES unset YES unset YES unset YES unset YES unset YES unset YES unset YES unset Mgmt VLAN up For a link to be “up, must show both Status and Protocol as “up” down down Ports administratively up up shut down with “shut” down down command up up up up administratively down down administratively down down up up down down Figure 8-7 Output of show ip int brief Chapter 8. Cisco Systems IGESM troubleshooting 217 shut - no shut (interface config mode) Used to administratively shut down or bring up an interface. Run from interface config mode. If Telneted in, use term mon to see port up/down messages. Use show int status to see whether port is administratively shut down. shut - no shut is very handy for clearing ports in err-disable state. (Exception: If using the trunk failover feature, shut - no shut is not the tool to clear err-disabled. Instead, err-disable is normal for trunk failover if all upstream defined ports down. Fixing upstream fixes err-disable.) cigesm_t#conf t Enter configuration commands, one per line. End with CNTL/Z. cigesm_t(config)#int g0/5 cigesm_t(config-if)#shut cigesm_t(config-if)# 12:50:36: %LINK-5-CHANGED: Interface GigabitEthernet0/5, changed state to administratively down 12:50:37: %LINEPROTO-5-UPDOWN: Line protocol on Interface GigabitEthernet0/5, changed state to down cigesm_t(config-if)#no shut cigesm_t(config-if)# 12:50:46: %LINK-3-UPDOWN: Interface GigabitEthernet0/5, changed state to up 12:50:48: %LINEPROTO-5-UPDOWN: Line protocol on Interface GigabitEthernet0/5, changed state to up Important: shut is used to effectively block all traffic through an interface. This disrupts data flow and should be used only by those understanding the consequences of using this command. show int g0/X Figure 8-8 shows the output from the sh int g0/X (X is a number between 1 and 20) command. It is very handy for monitoring interface throughput and error conditions. Use clear counters to clear the numbers on the interfaces for fresh monitoring. • Show status of individual interface along with input/output stats and error stats Port link state cigesm_t#sh int g0/5 GigabitEthernet0/5 is up, line protocol is up (connected) Hardware is Gigabit Ethernet, address is 000f.90cd.6fc5 (bia 000f.90cd.6fc5) Description: blade5 Port speed/duplex ... Full-duplex, 1000Mb/s, link type is auto, media type is unknown 0 ... 5871 packets input, 633470 bytes, 0 no buffer Input stats and errors for interface Received 1210 broadcasts (0 multicast) 0 runts, 0 giants, 0 throttles 0 input errors, 0 CRC, 0 frame, 0 overrun, 0 ignored 0 watchdog, 0 multicast, 0 pause input 0 input packets with dribble condition detected output stats and errors for interface 13265 packets output, 1409452 bytes, 0 underruns 0 output errors, 0 collisions, 4 interface resets 0 babbles, 0 late collision, 0 deferred 0 lost carrier, 0 no carrier, 0 PAUSE output 0 output buffer failures, 0 output buffers swapped out Figure 8-8 Output of sh int g0/X command 218 Cisco Systems Intelligent Gigabit Ethernet Switch Module show int trunk Figure 8-9 shows some of the attributes of the show int trunk command. • Lets you know what VLANs can be carried and are being carried on trunk ports cigesm_t#sh int trunk Port Gi0/15 Po1 Po2 Native VLAN in use on trunk link Mode Encapsulation Status Native vlan on 802.1q trunking 30 on 802.1q trunking 1 on 802.1q trunking 1 VLANs that CAN be carried on trunk Port Vlans allowed on trunk Gi0/15 30,4094 Po1 1-29,31-4093 Po2 1-29,31-4093 VLANs that ARE carried on trunk Make sure any VLANs you want carried show up in this list on the proper interfaces. If they do not, make sure VLAN exists and that it’s assigned to be carried on the desired interfaces Port Gi0/15 Po1 Po2 Vlans allowed and active in management domain 30,4094 1-2,110,333,444,777-779 1-2,110,333,444,777-779 Port Gi0/15 Po1 Po2 Vlans in spanning tree forwarding state and not pruned 30,4094 1-2,110,333,444,777-779 VLANs on trunk not being blocked by spanning-tree 2,110,333,444 Figure 8-9 Output of sh int trunk command show etherchannel summary Figure 8-10 shows the output of a show eth sum command. It is important to check the health of an aggregation, and not just whether it can pass a simple ping test. • Important to monitor the health of the Etherchannel connection cigesm_t#sh eth sum This example shows a switch with two Etherchannels bundles, one Flags: D - down P - in port-channel using ports 17 and 18 and one I - stand-alone s - suspended using ports 19 and 20 H - Hot-standby (LACP only) R - Layer3 S - Layer2 u - unsuitable for bundling SU = good U - in use f - failed to allocate aggregator Anything else = problem d - default port Number of channel-groups in use: 2 Shows ports assigned to Number of aggregators: 2 bundle Group Port-channel Protocol Ports ------+-------------+-----------+---------------------1 Po1(SU) LACP Gi0/17(Pd) Gi0/18(P) 2 Po2(SU) LACP Gi0/19(P) Gi0/20(Pd) P or Pd = good Anything else = problem Figure 8-10 Output of show eth sum commands Chapter 8. Cisco Systems IGESM troubleshooting 219 show spanning-tree blockedports This command is important for showing what ports are blocked and which are forwarding before a problem starts. Should be predictable under all link up/down conditions. A switch with two Etherchannel ports (Po1 and Po2) with the root switch connected to Po1: cigesm_t#sh spanning-tree blockedports Name Blocked Interfaces List -------------------- -----------------------------------VLAN0001 Po2 VLAN0777 Po2 VLAN0778 Po2 VLAN0779 Po2 Number of blocked ports (segments) in the system : 4 show spanning-tree root Figure 8-11 shows some of the attributes of the show span root command. Like the show span blocked command, it is important to check your spanning tree when its working correctly, so if things fail you can see the changes in forwarding and blocking. • Somewhat of the inverse of the show span blocked command • Important to know what ports are closest to the root In this example, VLANs not carried switch off of this switch cigesm_t#sh spanning-tree root Vlan ---------------VLAN0001 VLAN0002 VLAN0030 VLAN0110 VLAN0777 VLAN0778 VLAN0779 VLAN4094 This switch is root for these VLANs so there is no entry in “Root port” Root Hello Max Fwd Root ID Cost Time Age Dly Root Port -------------------- ------ ----- --- --- ---------------32768 000f.f88c.6c00 31 2 20 15 32770 000f.90cd.6fc0 0 2 20 15 32798 000f.90cd.6fc0 0 2 20 15 32878 000f.90cd.6fc0 0 2 20 15 32768 000f.f88c.6f08 31 2 20 15 Po1 32768 000f.f88c.6f09 31 2 20 15 Po1 32768 000f.f88c.6f0a 31 2 20 15 Po1 36862 000f.90cd.6fc0 0 2 20 15 VLANs carried off of this switch, Po1 in this design is the closest connection to the root switch Figure 8-11 Output from the show span root command show link state group detail This show link state group detail reports on the configuration and status of the trunk failover feature. Switch#show link state group detail Link State Group: 1 Status: Enabled, Up Upstream Interfaces : Po1(Up) Po2(Up) Downstream Interfaces : Gi0/1(Up) Gi0/2(Up) Gi0/3(Up) Gi0/4(Up) Gi0/5(Up) Gi0/6(Up) Gi0/7(Up) Gi0/8(Up) Gi0/9(Up) Gi0/10(Up) Gi0/11(Up) Gi0/12(Up) Gi0/13(Up) Gi0/14(Up) Link State Group: 2 220 Status: Disabled, Down Cisco Systems Intelligent Gigabit Ethernet Switch Module Upstream Interfaces : Downstream Interfaces : (Up):Interface up (Dwn):Interface Down (Dis):Interface disabled Make sure upstream interfaces include the expected interfaces. Upstream interfaces should show all up if everything is working correctly. Make sure downstream interfaces include the expected interfaces (may be all interfaces, depending on desired config). Any configured downstream interfaces should show Up. Downstream ports will go to Dis when all configured upstream ports for the group go dow.n show arp Useful when troubleshooting connectivity issues between the IGESMs mgmt interface and upstream connections or the Management Module, show arp is also handy for troubleshooting connectivity issues to the management VLAN interface of the IGESM. ARP table shows that a device (the IGESM in this case) could resolve the MAC address for a given IP address. ARP resolution is the first thing that happens when a device attempts to talk to another IP address. (It knows the IP address, but it has to learn the MAC address to send directed packets.) cigesm_t#sh arp Protocol Address Internet 172.26.146.1 Internet 172.26.147.208 Age (min) Hardware Addr Type Interface 105 0009.6bca.eba3 ARPA Vlan30 000f.90cd.6fc0 ARPA Vlan30 SPAN and RSPAN SPAN and RSPAN are tools that can be used in conjunction with a network sniffer to capture and analyze packets to and from a device. They can also be used to send data to an IDS (Intrusion Detection System). Important: RSPAN should be used with caution, as it is possible to oversubscribe a link with redirected traffic, which could result in dropped traffic. SPAN is used to switch monitored packets from a given port on this IGESM to a specific physical port directly on this IGESM. RSPAN is used to switch monitored packets to a special VLAN, and then carried to a remote port not on this switch. With both SPAN and RSPAN, you connected the sniffer to the port that is the destination of the SPAN/RSPAN. The use of SPAN and RSPAN are covered in 7.5.3, “Topology 3a: Dual Cisco Systems IGESMs, two-port aggregation with RSPAN” on page 160the deployment Redpaper - in Chapter 7. Chapter 8. Cisco Systems IGESM troubleshooting 221 debug A vast number of debug commands are available with IOS that are used to monitor various activities within the IGESM. Warning: Use debug commands with extreme care. Debug is recommended for use only by experienced administrators. Incorrect use can lead to unexpected and undesired operation of the IGESM, and can disrupt the flow of traffic to and through the switch, which can result in a network down condition. Do not use unless you understand its consequences. Do not use debug all. Although you can have multiple debugs running at the same time, it is possible to overwhelm the CPU of the switch with too many debugs. To see current debugs use show debug. To stop debugs, use the no form of the command; for example: no debug arp. To stop all running debug commands with a single command, use u all (short for undebug all). Always run u all when you are finished troubleshooting. If Telneted in, run term monitor to see messages. Example of some common debugs: debug arp Monitors ARP request to and from management interface of the IGESM. debug ip packet Monitors IP traffic to and from the IGESM (not through the IGESM). debug cdp packets Monitors CDP packets between IGESM and other devices. debug ip icmp Monitors ping traffic to and from the IGESM (not through the IGESM). 222 Cisco Systems Intelligent Gigabit Ethernet Switch Module 9 Chapter 9. Service and support Support for the Cisco Systems Intelligent Gigabit Ethernet Switch Module is provided to our customers using the following methods. © Copyright IBM Corp. 2004, 2005. All rights reserved. 223 9.1 Placing the call to IBM For U.S., AP, CAN, and EMEA: Use one of the following numbers when calling IBM for technical support: Within the United States, call the IBM Support Center at 1-800-IBM-SERV (426-7378). Within Canada: – For support, call HelpPC at 800-426-7378. – For more information or to place an order, call 800-465-7999. Outside the United States and Canada, contact your IBM HelpWare® number, your place of purchase, or your local IBM office. For LA: For technical support, call the IBM HelpCenter®, contact your IBM HelpWare number, your place of purchase, or your local IBM office. 9.2 Online services For online services for U.S., AP, CAN, and EMEA, visit the following Web site: http://www.ibm.com/support/us/ For online services for LA, visit the following Web site: http://www.ibm.com/pc/la For online directory services, access the Directory of World Wide Contacts at the following Web site and select your country. Look for the appropriate telephone number under technical support and call IBM for assistance. http://www.ibm.com/planetwide/ 9.3 Ordering information The Cisco Systems Intelligent Gigabit Ethernet Switch Module ordering part number is 13N2281. Within the U.S.: For information about ordering through PartnerLink, call 800-426-7272, Option 8. For further details, contact the IBM Remarketer Fulfillment Center at 800-426-9735, or your local marketing support representative. Within the EMEA: Orders can be entered into the Fulfillment system now. Orders will be addressed for scheduling sequentially. Orders involving multiple units may be subject to an extended delivery schedule. No delivery commitments may be made until schedule is committed. Fulfillment of this product for Personal Computing Division Business Partners is through the SAP/Direct Ship order entry systems and processes. Online: This product is available online through the BladeCenter Switch Modules Web site: http://www.ibm.com/servers/eserver/bladecenter/switch/more_info.html 224 Cisco Systems Intelligent Gigabit Ethernet Switch Module 9.4 Other support sites Listed here are other helpful Web sites (these may require a Cisco user name and password): TAC Main Support page http://www.cisco.com/en/US/partner/support/index.html TAC Service Request Tool http://www.cisco.com/cgi-bin/front.x/case_tools/caseOpen.pl SVO Submit http://www.cisco.com/cgi-bin/front.x/agents/svo_tools/SVOToolDispatcher Cisco CCO – Online documentation http://www.cisco.com/univercd/home/home.htm Cisco TAC - Catalyst Switch Best Practices http://www.cisco.com/warp/customer/473/103.html Chapter 9. Service and support 225 226 Cisco Systems Intelligent Gigabit Ethernet Switch Module A Appendix A. Hints and tips In this section, we provide hints and tips that may prove useful during the setup, configuration, and operation of your Cisco Systems Intelligent Gigabit Ethernet Switch Module for the IBM Eserver BladeCenter. As noted elsewhere in this document, the information herein applies to the 4-port copper-based IGESM running a 12.1(14) version of IOS. If working with the 4-port SFP-based IGESM or a 4-port copper-based IGESM running 12.1(22) and above code, see the appropriate document for those solutions. Blade server NIC numbering The topic of which connection on a given blade server goes to which Cisco Systems IGESM in the BladeCenter is the subject of some discussion. The fact is that the physical first NIC on an HS20/JS20 blade server will always go to the IGESM in bay 1 (top bay) and the second physical NIC on an HS20/JS20 blade server will always go to the IGESM in bay 2 (bottom bay). This is hardwired in the BladeCenter and can not be changed. With that said, the operating system running on the blade server usually attempts to apply logical names to these physical NICs, and they may be backward from what is expected. We now discuss how this can come about and how to tell which logical connection goes to which physical NIC. In most cases, for Windows 2000, the connection named Local Area Connection goes to the Cisco Systems IGESM in switch bay 1 (referred to as CIGESM1 in Chapter 7, “Cisco Systems IGESM configuration and network integration” on page 99), and the connection named Local Area Connection 2 goes to the Cisco Systems IGESM in switch bay 2 (referred to as CIGESM2 in Chapter 7). We use the phrase most cases, because as already noted, this is not always the case. For Windows 2000, the order of the Local Area Connection logical names assigned to physical NICs is based on the order in which the drivers for each NIC are installed. The © Copyright IBM Corp. 2004, 2005. All rights reserved. 227 drivers necessary for supporting the NICs on a blade server are not part of a standard Windows 2000 install, and the NICs will be generically listed in Windows 2000 Device Manager as two or more Ethernet Controllers (with a question mark next to them) until the necessary drivers are loaded. For these NICs to become active, a third-party driver, supplied by IBM, must be installed. The normal procedure most users follow is to install the drivers on the first Ethernet Controller in the list, and then install the drivers on the second Ethernet Controller in the list (and so on). The end result of this is the most-cases scenario previously mentioned, where the Windows 2000 connection named Local Area Connection goes to CIGESM1 and the one named Local Area Connection 2 goes to CIGESM2. If, however, the drivers are installed on the second Ethernet Controller in the list first, and then the first Ethernet Controller in the list, the connection names are reversed, and the connection named Local Area Connection is now the one going to CIGESM2, and the connection named Local Area Connection 2 is now going to CIGESM1. Important: To avoid confusion, always install drivers sequentially, from the first Ethernet Controller in the list to the last Ethernet Controller in the list. For W2K3 there is a native Broadcom driver that may or may not load up in what might be perceived as a logical fashion. One might see Local Area Connection going to the top or the bottom NIC, with Local Area Connection 2 going to the other physical NIC. For Linux, the default eth0 goes to the Cisco Systems IGESM in switch bay 2 (CIGESM2 in the examples in chapter 7) and eth1 goes to the Cisco Systems IGESM in switch bay 1 (CIGESM1 in the examples in chapter 7). Note that this is reversed from a normal Windows 2000 install, as previously mentioned, and can be affected by the order drivers are installed. Important: As an aid to figuring out which logical NIC is going to which physical IGESM, you can Telnet to the top IGESM and shut down the interface on the top IGESM going to the blade server in question. Because of this shutdown on the IGESM side, one of its connections on the blade server side will be reported as down. Whichever one is reported as down will be the one physically attached to the top IGESM, regardless of the logical name the operating system has assigned it. Using the inverse of this procedure (from the OS, disabling one of the NICs, then going into each IGESM and seeing which port goes down), might be valid, as disabling the port on the blade server side may or may not result in the port on the IGESM side going down due to the nature of the physical interface on the blade server. Based on this, the first method is the recommended way to determine logical-to-physical link connectivity. Default gateway configuration on multihomed servers Most blade servers (HS20/JS20) in the BladeCenter by default have two connections to the network, each usually on separate IP subnets. Using the Broadcom teaming software enables you to increase the number of subnets configured on a blade server above and beyond that available on the physical connections. The end result is that the blade server frequently has more than a single IP subnet configured. One question that frequently comes up: Should each IP subnet configured on a multihomed system, such as the blade server, have a default gateway assigned? The answer is far from straightforward. For all examples in this chapter, only one interface receives a default gateway, and the other interfaces are left blank for the default gateway field. This is not to suggest that this is the best 228 Cisco Systems Intelligent Gigabit Ethernet Switch Module solution for your environment, which will have its own unique requirements. It is only used in these examples for simplicity. Microsoft has published Knowledge Base article 157025 that discusses the different approaches for default gateways on multihomed systems. This article can be found at: http://support.microsoft.com/default.aspx?scid=kb;en-us;157025 We recommend that the BladeCenter system administrator review this document if there are questions about how best to address this issue in your specific environment. Duplicate IP address: part 1 Several configuration choices can result in the BladeCenter reporting duplicate IP addresses, even when there are no known conflicts. The most common cause of a blade server reporting a duplicate address is the result of placing one of the interfaces of a blade server in the same VLAN as the management VLAN of the Cisco Systems IGESMs (default is VLAN 1) with an IP address in the same subnet as the Management address used internally by the Management Modules to communicate with the Cisco Systems IGESMs. In this case, the Management Module tries to act as a proxy for all addresses on this subnet (as part of allowing external access to the Cisco Systems IGESMs through its external interface) and answers to any query for any address on the entire internal Management subnet. In this case, when the blade server checks to see whether its address is available in the network (sends out an ARP request for its own address), the Management Module responds to this ARP request for the blade server address, and the blade server assumes that the address is in use and reports this through a Windows 2000 pop-up message. The simplest solution is to always keep blade servers off of the Cisco Systems IGESM management VLAN (default management VLAN for the Cisco Systems IGESMs is VLAN 1). To reduce the likelihood of blade servers being placed on this VLAN, the Cisco Systems IGESM sets the defaults to all ports going to the blade servers (g0/1 - g0/14) to: switchport access vlan 2 switchport trunk native vlan 2 switchport trunk allowed vlan 2-4094 However, this does not prevent the user from adding VLAN 1 (or whatever the management VLAN is) to ports going to the blade servers, resulting in the consequences we described. See 5.3.12, “Scenario 6 (not recommended)” on page 72 for a more detailed explanation of the cause of this issue. Important: Due to this possible interaction between the blade servers and the Management Modules, we highly recommend that you not place blade servers on the same VLAN that is used for the management VLAN on the Cisco Systems IGESMs. Duplicate IP address: part 2 As noted in “Duplicate IP address: part 1,” several configuration choices can result in the BladeCenter reporting duplicate IP addresses, even when there are no known conflicts. This section discusses an issue with the Cisco Systems IGESM reporting a duplicate IP address. Appendix A. Hints and tips 229 The most common cause is trying to change the management IP address for the Cisco Systems IGESM directly on the Cisco Systems IGESM (either through CLI or through CMS). When a user changes the management VLAN IP address on the Cisco Systems IGESM to something other than what it received from the Management Module through means other than the Management Module Web interface, all IP communications to the Cisco Systems IGESM’s management IP address via the Management Module fail, and the Cisco Systems IGESM begins to report a duplicate IP address. Note that this duplicate IP address message happens only if you change it to an address in the same subnet that it was originally on. For example, changing from 192.168.70.127 to 192.168.70.150 would result in a duplicate IP address message, while changing from 192.168.70.127 to 10.35.15.1 would not result in a duplicate IP address message (although it would more than likely result in lost IP communications to the IGESM through the Management Module). The following sequence of events demonstrates this issue. (This is for demonstration purposes only; do not perform this on production systems.) Show the current IP address of the management VLAN on the Cisco Systems IGESM to confirm the proper configuration (in this example, we use the default IP address): CIGESM1#sh run int vlan 1 INTERFACE Vlan1 ip address 192.168.70.127 255.255.255.0 no ip route-cache Test ping from the Cisco Systems IGESM to the internal IP address of the Management Module to verify that the connection is working: CIGESM1#ping 192.168.70.126 Type escape sequence to abort. Sending 5, 100-byte ICMP Echos to 192.168.70.126, timeout is 2 seconds: !!!!! Success rate is 100 percent (5/5) Change the IP address on the Cisco Systems IGESM to another address: CIGESM1#conf t Enter configuration commands, one per line. End with CNTL/Z. CIGESM1(config)#int vlan 1 CIGESM1(config-if)#ip add 192.168.70.150 255.255.255.0 CIGESM1(config-if)# Shortly after making this change, start receiving duplicate address messages on the console of the Cisco Systems IGESM: 1d19h: %IP-4-DUPADDR: Duplicate address 192.168.70.150 on Vlan1, sourced by 0009.6bca.7499 Now change back to the original address: CIGESM1(config-if)# CIGESM1(config-if)#ip add 192.168.70.127 255.255.255.0 CIGESM1(config-if)# Continue receiving duplicate address messages: 1d19h: %IP-4-DUPADDR: Duplicate address 192.168.70.127 on Vlan1, sourced by 0009.6bca.7499 Test ping from the Cisco Systems IGESM to the internal IP address of the Management Module, and it fails: CIGESM1#ping 192.168.70.126 230 Cisco Systems Intelligent Gigabit Ethernet Switch Module Type escape sequence to abort. Sending 5, 100-byte ICMP Echos to 192.168.70.126, timeout is 2 seconds: ..... Success rate is 0 percent (0/5) The cause of this issue is related to the duplicate IP address message reported in Duplicate IP address: part 1 (the Management Module responding to ARP requests for addresses on its own internal subnet). The way to prevent this situation from occurring is to change only the IP address of the management VLAN through the Management Module’s Web interface. If this issue is already occurring: Resolution 1 The safest and preferred approach is to connect to the Management Module’s Web interface, click Management under I/O Module tasks on the left side of the window, select the bay that is experiencing the issue (bay 1 in our example), ensure that the IP address shown for the Cisco Systems IGESM in bay 1 is set as desired (if not, change it to the desired address), and click Save. This puts the IP addresses back in sync between the Management Module and the Cisco Systems IGESM, and communications should be restored. (In addition, the duplicate IP addresses messages will stop.) Resolution 2 The following steps also resolve the conflict but will disrupt traffic while the Cisco Systems IGESM is rebooting. Set the IP address of the IGESM back to its original value, save the configuration, and reload the Cisco Systems IGESM. The Cisco Systems IGESM and the Management Module will be back in sync upon rebooting and coming back online. Important: To reduce the likelihood of this issue occurring, only change the address of the Cisco Systems IGESMs through the Management Modules Web-based interface, not directly on the IGESMs themselves. An exception to this rule is if you have configured the Management Module and IGESM to enable the IGESM to manage its own IP addressing information. (See “Control of the IGESM IP address information” on page 237 for details.) Teaming software on a blade server forces an undesired action The Broadcom software, known as the Broadcom Advance Control Suite (BACS), is used to control NIC teaming on the blade servers. It has been noted that there are several selections within this software that do not permit you to cancel or otherwise back out of a selection, and appear to force you to perform an action you might not want to perform. Two such examples are: Clicking Remove VLAN at a Team Configuration window Selecting Tools → Delete a team from the menu bar In these cases, a window similar to the one shown in Figure 9-1 on page 232 opens for you to specify a VLAN or a team to delete, and you will not be offered any obvious way to cancel the operation. To abort these seemingly unabortable procedures, press the Esc key on the keyboard. If there is only one item in the list to delete (for example, only one VLAN or one team), the BACS software simply deletes the item and goes back to the original window. If this deletion was undesired, the only solution is to click Cancel on the main BASC window and exit the BASC software without saving the changes. Of course, doing so will result in losing any other changes you had already made since the last time you clicked the Apply or OK button. Appendix A. Hints and tips 231 Figure 9-1 BASC example of a window without an option to cancel Cisco Systems IGESM stuck at switch: prompt Any keystrokes received through the serial console connection during the early phases of the boot-up process of the Cisco Systems IGESM may be interpreted as a break signal and may put the Cisco Systems IGESM into an incomplete boot-up state, with a prompt that simply says switch:. A display may appear if you are connected to the console port with a terminal emulator session open and characters are entered into the terminal emulator session during the boot-up process. This is an example: The system has been interrupted prior to initializing the flash filesystem. The following commands will initialize the flash filesystem, and finish loading the operating system software: flash_init load_helper boot switch: You might not see this entire message and might only see the switch: prompt. Either way, the switch has not completed the boot process and will not switch traffic or otherwise function until the boot-up process is completed. If you find the switch stuck at this prompt, you can finish the boot-up process by entering flash_init, waiting for the flash to initialize and return to the switch: prompt, and then entering boot. The switch should begin loading its flash image and complete the boot sequence and become fully operational shortly thereafter. The Cisco Systems IGESM could stop at this prompt under certain POST failure conditions. Following this procedure may or may not help under such conditions. 232 Cisco Systems Intelligent Gigabit Ethernet Switch Module Key sequence to switch between blade servers The BladeCenter has a KVM (keyboard/video/monitor) switch built into the Management Modules, allowing traditional access to the installed blade servers. To switch the keyboard, mouse, and monitor between blade servers, perform this keystroke combination from the keyboard attached to the active Management Module: NumLock NumLock <blade server number> Enter Where <blade server number> is the number of the blade server bay where the blade server is installed. For example, to select the blade server in bay 2, press the NumLock key twice, press the number 2 key, and press the Enter key: NumLock NumLock 2 Enter Note that often after selecting a blade server through this sequence, the display is blank. Moving the cursor usually brings the window up (out of screen-saver mode). Native VLAN mismatch message When changing the management VLAN on the Cisco Systems IGESM, you might receive a native VLAN mismatch message on the console of the Cisco Systems IGESM. This is because changing the management VLAN on a Cisco Systems IGESM also changes the native VLAN on ports g0/15 and g0/16. (The default native VLAN for these ports is VLAN1.) Ports g0/15 and g0/16 connect through the Management Module to all other Cisco Systems IGESMs in the BladeCenter. When you make the initial change on one Cisco Systems IGESM, the native VLAN is still different on any other Cisco Systems IGESM in the BladeCenter (on ports g0/15 and g0/16) until their management VLAN is changed as well. If you have only a single Cisco Systems IGESM in the BladeCenter, this message will not occur when changing the management VLAN. Note: For correct operation, the management VLAN on all Cisco Systems IGESMs in a BladeCenter should be the same. To resolve the native VLAN mismatch message, change the management VLAN to the same VLAN for every Cisco Systems IGESM in a given BladeCenter. See 5.3.6, “Considerations: More than a single IGESM in a given BladeCenter” on page 62 for details and a workaround if IGESM management VLANs in a single BladeCenter should be different. Use of RSPAN on the Cisco Systems IGESM Testing during the preparation of this Redpaper showed an issue with configuring RSPAN on the Cisco Systems IGESM when using IOS Release 12.1(14)AY. In certain circumstances, several interfaces, including the link to the upstream switch and the port being monitored, would begin to stream data at wire rate. The result is, at a minimum, lost communications to the device on the port being monitored and issues on the upstream switch. This RSPAN issue was traced to a bug with Release 12.1(14)AY of IOS. An update version, Revision 12.1(14)AY1, resolved this issue. The latest version of IOS that includes this fix (plus others) is available for download at the following location (this may change in the future): http://www.ibm.com/pc/support/site.wss/document.do?lndocid=MIGR-55479 If you have already configured RSPAN and are experiencing the issue of streaming data as previously described, deleting the monitor session associated with the RSPAN will halt this Appendix A. Hints and tips 233 condition (in the config term mode, run the command no monitor session x, where x is the monitor session number configured for RSPAN use). Important: We recommend extreme caution when using the RSPAN feature on the Cisco Systems IGESM if you are not using 12.1(14)AY1 or a later revision of the code. Detecting Management Module settings from the IGESM Besides the IP addressing information that the Management Module controls on the IGESM by default, there are other areas in which the Management Module has direct control over IGESM settings. In most cases it is possible to log into the Management Module and confirm these settings, but in some environments at some times, the person who administers the IGESM does not have permission to log into the Management Module. There are ways for a person logged into the IGESM to see the settings on the Management Module from the IGESM. Of the four settings in the Advanced section of I/O Module configuration for each IGESM, three can directly effect the management and flow of data to and through the IGESM. These can be seen in Figure 9-2 on page 235 and are defined as: External ports – Enabled: Ports G0/17 through 20 can be controlled on the IGESM. – Disabled (default): Ports g0/17 through 20 will be down and can be brought up on the IGESM only after this setting is changed to Enabled on the Management Module. External management over all ports – Enabled: IGESM management path is over the IGESM uplinks. – Disabled (default): IGESM management path is over the Management Module uplinks. Important: Setting this value to Enabled or Disabled implies that certain other rules are being followed to support the desired management path. See 5.3, “In-depth management path discussions” on page 55 for details. Changing this value without understanding these rules will more than likely result in intermittent or no management connectivity to the IGESM. Preserve new IP address on all resets – Enabled (default): IP address information (IP address, mask, and default gateway) are controlled by the settings in the Management Module. Every time the IGESM or Management Module reboots, the IGESM obtains the IP values stored on the Management Module, not the values stored in the IGESM’s NVRAM. – Disabled: IGESM obtains the IP address stored in NVRAM of the IGESM upon IGESM reboot. Important: Changing this value from Enabled (the default) to Disabled does not allow the IGESM to fully control its own IP addressing information. In the event the IGESM reloads (and this setting is Disabled), the IGESM will get its IP addressing information from its own NVRAM. However, if you reload the Management Module, the IGESM will be updated with the Management Module IGESM IP addressing information. Therefore, you are recommended to leave this value set to Enabled. 234 Cisco Systems Intelligent Gigabit Ethernet Switch Module The option for Fast POST in the Management Module Advanced Setup for I/O Modules only affects how thoroughly the diagnostics are run during POST, which in turn affects how fast the switch boots but does not ultimately affect any management or data paths on the IGESM. Figure 9-2 Advanced settings for each IGESM (on the Management Module) These are ways that one can detect Management Module settings from commands and actions performed on the Cisco Systems IGESM: How can I tell whether the External ports setting is set to Enabled or Disabled? If you attempt to go into one of the external interfaces and perform no shut on the IGESM, and it returns a Shutdown is not allowed on this interface message, then the setting on the Management Module is Disabled (Figure 9-3). To permit a no shut to work on ports 17 through 20, you must go into the Management Module and set this value to Enabled. • Unable to enable external ports from switch switch(config)#int g0/17 switch(config-if)#no shut % Shutdown not allowed on this interface. • Must enable External ports in advanced setup in MM • Default is Disabled Figure 9-3 Detecting the setting of external ports on the Management Module How can I tell how External management over all ports and Preserve new IP configuration on all resets are set? See Figure 9-4 on page 236. Use the sh platform summary command to see these values. To change any of these values, you must log on to the Management Module and make the appropriate change therein. Appendix A. Hints and tips 235 Switch#sh platform summary Platform Summary: •Switch is in Bay 1 Switch Slot: 1 Current IP Addr: 172.26.147.208, 255.255.254.0, gw: 172.26.146.1 Default IP Addr: 10.10.10.91, 255.255.255.0, gw: 0.0.0.0 IP Fields read from VPD: 172.26.147.208, 255.255.254.0, gw: 172.26.146.1 Static IP Fields in VPD: 172.26.147.208 255.255.254.0 172.26.146.1 IP Acquisition Method used: static (“Disabled” will show “user-config” after IGESM reboot) Active Mgmt Module in Mgmt Slot: 1 Native Vlan for Mgmt Module Ethernet ports: 1 External Mgmt over Extern ports Disabled •MM advanced I/O module settings Figure 9-4 Output of show platform summary command The sh platform summary command also shows the bay that the switch you are running the command on is installed in. This can be handy if you suspect someone has misapplied the switch name or IP address and you are not sure which switch you are logged onto. Possible issues with Redhat tg3 driver Several issues have been encountered in the field with using Redhat Linux and its native tg3 driver (tg3 driver is Redhat’s version of driver for the Broadcom NICs on the HS20). Issues noted involve links to the IGESM from the blade server not coming back up (showing notconnected with a sh int status command) after an IGESM is reloaded, and link flapping errors resulting in the port on the IGESM going to the blade server being shut down. If you encounter the port not coming up issue after an IGESM reload, the possible solutions/workarounds are: – Solution 1: Use the Broadcom driver available on ibm.com. The actual driver from Broadcom has proven to be very reliable. – Solution 2: Obtain a version of the tg3 driver that does not experience this issue. None is available as of this writing but there may be one at some later date. – Workaround 1: From the blade server, take the port down and back up (eth0 in this example) to bring the port back up: ifconfig eth0 down ifconfig eth0 up – Workaround 2: Reload the blade server experiencing this condition. If you encounter the link flapping/port down issue on an IGESM (seen as soon as the blade server attempts to bring up the link to the IGESM), possible solutions and workarounds are: – Solution 1: Use the Broadcom driver available on ibm.com. The actual driver from Broadcom has proven to be very reliable – Workaround 1: Obtain a version of the tg3 driver that does not experience this issue. • 236 One version (as seen with the command dmesg | grep tg3 executed on the Linux server) that is known to have this problem is tg3.c:v3.10RH (September 14, 2004). Cisco Systems Intelligent Gigabit Ethernet Switch Module • One version that has been known to not exhibit this issue (although it has the port down issue previously discussed) is tg3.c:v3.6RH (June 12, 2004). Note that after installing a working tg3 driver you will still have to perform a shut and no shut on the interface on the IGESM that was placed in err-disable by the faulty tg3 driver, to bring the interface back up. Possible issues with Hyperterm when using the console port When connecting to the IGESM via a serial cable and the IGESM’s console port, sometimes the user can see messages coming out from the port but is unable to enter any information. (Pressing the Enter key does not result in a command prompt for entering commands.) This issue has been seen most often when using Hyperterm with XP, but has been observed at least once with Hyperterm and W2K. Some suggestions that should ensure proper operation if you encounter this issue: Set flow control to none in hyperterm (usually works). Upgrade to the free, full version of Hyperterm (always works). Use a terminal emulator other than Hyperterm (always works). Default Etherchannel load balancing may not be optimal The default Etherchannel load balance setting (based on source MAC address) has been found to result sometimes in outbound traffic primarily using only a single uplink to carry traffic. This is hardly efficient when you have two or more outbound links that could be used in the Etherchannel bundle. New options for Etherchannel load balancing are available with 12.1(14)AY4 and later that enable you to set the load balance to any of these: Source or destination MAC Source and destination MAC (XOR) Source or destination IP (also know as SIP/DIP) Source and destination IP (XOR) An example of setting the Etherchannel load balance based on an XOR of the source and destination MAC address (more likely than the default to produce the desired load balancing): port-channel load-balance src-dst-mac This global command sets outbound load balancing for all Etherchannels on a given IGESM. Control of the IGESM IP address information Under Management Module default configurations, the IP address, mask, and default gateway of the IGESM are controlled by the Management Module. Therefore, if you attempt to change this information directly on the IGESM, the information changes only temporarily and reverts to the Management Module assigned IP information on the next IGESM reboot, the next Management Module reboot, or the next time someone saves the IP information for the IGESM on the Management Module. To give at least partial control of the this information over to the IGESM, perform these steps: 1. On Management Module, Advanced settings, set Preserve new IP configuration during all resets to Disabled and click Save. Appendix A. Hints and tips 237 2. Log on to IGESM, change IP information to desired information. 3. Save IGESM config to NVRAM (write mem). 4. Reload IGESM. After the IGESM is reloaded it will be in control of its own IP information in the event of a IGESM reload, but only if the IGESM reloads. If the Management Module reloads, it will push its IGESM IP addressing information back onto the IGESM. Important: Because there is no way to allow the IGESM to take 100% control of its own IP addressing information, it is recommended that you leave Preserve new IP configuration during all resets to Enabled. If you set this value to Disabled, you are strongly recommended to keep the proper IP addressing information of the IGESM stored in the Management Module to ensure that the IGESM will always get the same IP addressing information no matter whether the IGESM or the Management Module reloads. Important: Allowing the IGESM to manage its own IP address information assumes that you will be using the IGESM’s uplinks for in-band management. After this change, the Management Module will no longer correctly proxy for the IGESM; thus you can no longer use the Management Module uplink as a management path to the IGESM. See 5.3.5, “Considerations: Using the IGESM uplinks to manage the IGESM” on page 61. A.1 Using code later than 12.1(14) This document was written specifically for IGESMs using 12.1(14) versions of IOS. Future versions of IOS, including the next major release (12.1(22)) may have certain features and functionality that may be different from the 12.1(14) version. Some of the differences are: CMS replaced by CDM (Cisco Device Manager) – CMS offers the ability to configure most options within the IGESM. – CMS requires Java, but CDM does not. – CDM is primarily a monitoring tool that has limited configuration ability. For GUI-based configurations, users are encouraged to utilize other tools, such as CiscoWorks. 12.1(22) supports the following features: – Full 9216-byte jumbo frames – Support for Smartports – Configurable Auto-MDIx support – SSH V2 support in 12.1(22) and later crypto image – Support for the SFP-based IGESM (OS-CIGESM-18-SFP) – Support for hard-coding link speed/duplex to 1000/full on ports G0/1 - 14 Other BladeCenter hints and tips For other hints and tips for the BladeCenter, see IBM BladeCenter (Type 8677) and IBM BladeCenter HS20 (Type 8678) Product FAQ Hints and Tips version 2.00, available at: http://www.ibm.com/pc/support/site.wss/document.do?lndocid=MIGR-45277 238 Cisco Systems Intelligent Gigabit Ethernet Switch Module Related publications The publications listed in this section are considered particularly suitable for a more detailed discussion of the topics covered in this Redpaper. IBM Redbooks For information about ordering these publications, see “How to get IBM Redbooks” on page 242. Some of the documents referenced here may be available only in softcopy. Deploying Apache on IBM Eserver BladeCenter, REDP-3588 Deploying Citrix MetaFrame on IBM Eserver BladeCenter, REDP-3583 Deploying Lotus Domino on IBM Eserver BladeCenter, REDP-3584 Deploying Samba on IBM Eserver BladeCenter, REDP-3595 IBM Eserver BladeCenter Layer 2-7 Network Switching, REDP-3755 IBM Eserver BladeCenter Networking Options, REDP-3660 IBM Eserver BladeCenter Systems Management, REDP-3582 IBM Eserver BladeCenter Systems Management with IBM Director V4.1 and Remote Deployment Manager V4.1, REDP-3776 IBM Web Infrastructure Orchestration, SG24-7003 The Cutting Edge: IBM Eserver BladeCenter, REDP-3581 Other publications The following related documentation comes with your Cisco Systems Intelligent Gigabit Ethernet Switch Module: IBM Eserver BladeCenter Type 8677 Installation and User’s Guide Safety Information Rack Installation Instructions Safety Information IBM Eserver BladeCenter Management Module User’s Guide IBM Eserver BladeCenter Management Module Installation Guide IBM Eserver BladeCenter HS20 Installation and User’s Guide Hardware Maintenance Manual and Troubleshooting Guides Cisco Systems Intelligent Gigabit Ethernet Switch Module for the IBM Eserver BladeCenter Installation Guide Cisco Systems Intelligent Gigabit Ethernet Switch Module for the IBM Eserver BladeCenter Software Configuration Guide Cisco Systems Intelligent Gigabit Ethernet Switch Module Message Guide Cisco Systems Intelligent Gigabit Ethernet Switch Module Command Reference Guide © Copyright IBM Corp. 2004, 2005. All rights reserved. 239 Online resources These Web sites are also relevant as further information sources. (Some Cisco pages require your user name and password.) Whatis.com (definitions for thousands of the most current IT-related words) http://whatis.techtarget.com/ IBM Eserver BladeCenter http://www.ibm.com/servers/eserver/bladecenter/index.html IBM Eserver BladeCenter support http://www.ibm.com/servers/eserver/support/bladecenter/index.html IBM Eserver Storage http://www.pc.ibm.com/us/eserver/xseries/storage.html IBM Eserver Systems Management http://www.ibm.com/servers/eserver/xseries/systems_management/xseries_sm.html IBM Support and downloads http://www.ibm.com/support/us/ Cisco Switch Clustering Technology http://www.cisco.com/warp/public/cc/techno/media/lan/ether/sgth/ Cisco Switch Clustering Technology Product Literature http://www.cisco.com/warp/public/cc/techno/media/lan/ether/sgth/prodlit/index.shtml Cisco Cluster Management Suite software http://www.cisco.com/en/US/products/hw/switches/ps628/products_data_sheet09186a00800913c e.html CiscoWorks LAN Management Solution http://www.cisco.com/en/US/products/sw/cscowork/ps2425/index.html CiscoView device package for Cisco Systems Intelligent Gigabit Ethernet Switch Module http://www.cisco.com/cgi-bin/tablebuild.pl/cview50 Management Module Firmware Update Version 1.10 - IBM Eserver BladeCenter http://www.ibm.com/pc/support/site.wss/document.do?lndocid=MIGR-54939 IBM Eserver xSeries support http://www.ibm.com/servers/eserver/support/xseries/index.html IBM Personal computing support http://www.ibm.com/pc/support/site.wss/ SolarWinds software http://www.solarwinds.net/Tools/Free_tools/TFTP_Server/ UpdateXpress CD Version 3.03 - Servers download http://www.ibm.com/pc/support/site.wss/document.do?lndocid=MIGR-53046 Microsoft Windows 2000 Service Pack 3 download http://www.microsoft.com/windows2000/downloads/servicepacks/sp3/sp3lang.asp Broadcom NetXtreme Gigabit Ethernet Software CD V7.0.5 for BCM570x-based servers and adapters http://www.ibm.com/pc/support/site.wss/document.do?lndocid=MIGR-43815 240 Cisco Systems Intelligent Gigabit Ethernet Switch Module Broadcom Advanced Server Program (BASP) driver V6.2.1 for Linux http://www.ibm.com/pc/support/site.wss/document.do?lndocid=MIGR-54186 Switch Management Interface and Native VLAN in the Best Practices document http://www.cisco.com/en/US/partner/products/hw/switches/ps700/products_white_paper09186a 00801b49a4.shtml Cisco Business Ready Data Center http://www.cisco.com/go/datacenter 6500 IOS Best Practices guide http://www.cisco.com/en/US/partner/products/hw/switches/ps700/products_white_paper09186a 00801b49a4.shtml Elements of Spanning Tree http://www.cisco.com/en/US/customer/tech/tk389/tk621/tech_tech_notes_list.html Register for Cisco Connection Online http://tools.cisco.com/RPF/register/register.do Configuring SPAN and RSPAN http://www.cisco.com/en/US/products/hw/switches/ps628/products_configuration_guide_chapt er09186a00801a6ba9.html http://www.cisco.com/en/US/products/hw/switches/ps708/products_configuration_guide_chapt er09186a008007f323.html TAC Main Support page http://www.cisco.com/en/US/partner/support/index.html TAC Service Request Tool http://www.cisco.com/cgi-bin/front.x/case_tools/caseOpen.pl SVO Submit http://www.cisco.com/cgi-bin/front.x/agents/svo_tools/SVOToolDispatcher Cisco CCO – Online documentation http://www.cisco.com/univercd/home/home.htm Cisco TAC - Catalyst Switch Best Practices http://www.cisco.com/en/US/partner/products/hw/switches/ps700/products_white_paper09186a 00801b49a4.shtml IBM Eserver BladeCenter Switch Modules http://www.ibm.com/servers/eserver/bladecenter/switch/more_info.html IBM/Cisco Design Guide for the Cisco Systems IGESM http://www.ibm.com/services/alliances/cisco/files/cisco-igesm-design-guide.pdf IBM Serial Over LAN Setup Guide http://www.ibm.com/support/docview.wss?uid=psg1MIGR-54666 IBM/Cisco Systems IGESM Software Configuration Guide http://www.ibm.com/pc/support/site.wss/document.do?lndocid=MIGR-55261 IBM/Cisco Systems IGESM Command Reference http://www.ibm.com/pc/support/site.wss/document.do?lndocid=MIGR-55260 IBM/Cisco Systems IGESM Message Guide (all error messages) http://www.ibm.com/pc/support/site.wss/document.do?lndocid=MIGR-55259 Related publications 241 VLAN security best practices http://www.cisco.com/en/US/products/hw/switches/ps708/products_white_paper09186a00801315 9f.shtml IBM/Cisco Systems IGESM IOS Code Download http://www.ibm.com/pc/support/site.wss/document.do?lndocid=MIGR-58132 CiscoWorks IDUs to support the Cisco Systems IGESM Version 10 and above IDUs support Cisco Systems IGESM Minimum code on Cisco Systems IGESM to support CiscoWorks is 12.1(14)AY1 http://www.cisco.com/kobayashi/sw-center/cw2000/lan-planner.shtml Under "Application-Level Updates" for each module Ethereal (open source network sniffing tool) http://www.ethereal.com/ How to get IBM Redbooks You can search for, view, or download Redbooks, Redpapers, Hints and Tips, draft publications and Additional materials, as well as order hardcopy Redbooks or CD-ROMs, at this Web site: ibm.com/redbooks Help from IBM IBM Support and downloads ibm.com/support IBM Global Services ibm.com/services 242 Cisco Systems Intelligent Gigabit Ethernet Switch Module Abbreviations and acronyms 802.3 10BASE-T Ethernet 802.3ad Link Aggregation 802.1D IOS Cisco Internetworking Operating System Spanning Tree Protocol IP Internet Protocol 802.1p Class of Service (CoS) IP DSCP IP Differentiated Services Code Point 802.1Q Trunking Protocol ISL Cisco Inter-Switch Link 802.1s Multiple Spanning Tree Protocol ISO 802.1w Rapid Reconfiguration Spanning Tree International Organization of Standardization ARP Address Resolution Protocol ITSO International Technical Support Organization BACS Broadcom Advance Control Suite LACP Link Aggregation Control Protocol BASP Broadcom Advanced Server Program LPC Low Pin Count BPDU Bridge Protocol Data Unit MST Multiple Instance STP CDP Cisco Discovery Protocol MVR Multicast VLAN registration Cisco Systems IGESM Cisco Systems Intelligent Gigabit Ethernet Switch Module NAS Network Attached Storage CIOB-X2 Champion I/O Bridge NIC Ethernet Network Interfaces Controllers CLI Command-Line Interface NTP Network Time Protocol CMIC Champion Memory and I/O Controller PAgP Port Aggregation Protocol CMS Cluster Management Suite POST Power-On Self-Test CoS Class of Service PVST+ Per-VLAN Spanning Tree CSB5 Champion South Bridge PXE Preboot Execution Environment CSM Content Switching Module QoS Quality of Service DHCP Dynamic Host Configuration Protocol RDM Remote Deployment Manager DOS Disk Operating System RMON Remote Monitoring DTP Dynamic Trunking Protocol RPM RPM Package Manager EI Enhanced Image RSPAN Remote Switch Port Analyzer ESM Ethernet Switch Module RSTP Rapid STP ESS Enterprise Storage Server SAN Storage Area Networks GbE Gigabit/sec Ethernet SIO SuperI/O HA High Availability SLP Service Location Protocol HSRP Hot Standby Router Protocol SMP Symmetric Multiprocessing I²C Inter-IC: Bi-directional Two-wire Serial Bus SNMP Simple Network Management Protocol IBM International Business Machines Corporation SPAN Switch Port Analyzer IHS IBM HTTP Server SSH Secure Shell IEEE Institute of Electrical and Electronics Engineers STP Spanning Tree Protocol TACACS+ IGESM Intelligent Gigabit Ethernet Switch Module Terminal Access Controller Access Control System Plus TFTP Trivial File Transfer Protocol IGMP Internet Group Management Protocol UDLD UniDirectional Link Detection IMB2 Inter Module Buses URL Uniform Resource Locator USB Universal Serial Bus © Copyright IBM Corp. 2004, 2005. All rights reserved. 243 UTP Unshielded Twisted Pair VLAN Virtual Local Area Network VMPS VLAN Membership Policy Server VTP VLAN Trunking Protocol 244 Cisco Systems Intelligent Gigabit Ethernet Switch Module Index Numerics 1000BASE-T 14, 17 100BASE-TX 17 100-ohm STP 17 10BASE-T 17 1800 watt power supplies 106 64-bit computing 4 6500 106–109, 126 6509 107 802.1D 1, 14 802.1Q 1, 15, 118, 143 802.1Q trunk 118, 124, 138 802.1s 1, 14 802.1w 1, 14 802.1X 15 802.3x 14 8677 106 8832 85, 89, 92, 97, 106 A access control lists (ACLs) 16 ACL 32 Active-Active 139, 163 Active-Passive 138, 163 Address Resolution Protocol (ARP) 31, 104 Administration menu 31 aggregation 118 alarms 16 ANSI interface 9 application management 41 application server 4 application serving 4 Application Workload Manager 5 ATI Rage XL video controller 9 authorization errors 16 auto-negotiation 14, 117 autosensing 14 Availability Manager 53 AVVID wizards 32 B backbone 14 BackboneFast 1 bandwidth 12, 14 bandwidth graphs 33, 35 BCM570x-based servers 92, 97 blade 19 blade insertion 54 blade server 4, 6, 14, 19–20, 22, 40, 54, 88, 97, 108 configurations 99 ports 102 BladeCenter Alliance Partners 13 BladeCenter chassis 1, 4, 6, 12, 54, 106 © Copyright IBM Corp. 2004, 2005. All rights reserved. BladeCenter HS20 7–8, 88 BladeCenter Management Module 87, 106 BMC 54 bridge protocol data unit (BPDU) 15 broadcast storms 14 broadcast traffic 15 Broadcom Advance Control Suite (BACS) 231 Broadcom Advanced Server Program (BASP) 95, 97, 131, 134, 143, 149, 154 Broadcom Ethernet NIC 92 Broadcom NetXtreme Gigabit Ethernet 92 Broadcom NetXtreme Gigabit Ethernet Software CD 92 Broadcom teaming 138 Broadcom teaming software 124 C CA Unicenter 54 Campus Manager 54 Category 3, 4, 5 cabling 81 CatOS 117 CCO 53 CEF720 107 CEF720 4 port 10-Gigabit Ethernet 107 Centralized Forwarding Card (CFC) 107 Champion I/O Bridge (CIOB-X2) 8 Champion Memory and I/O Controller (CMIC) 8 Champion South Bridge (CSB5) 8 Change Audit 53 chip cache 22 Cisco Catalyst 6509 107 Cisco Connection Online (CCO) 53, 225 Cisco Data Center Network Architecture 2 Cisco Discovery Protocol (CDP) 1, 13, 243 Cisco EtherChannel 1 Cisco Internetworking Operating System (IOS) 13, 118, 243 Cisco IP phones 15 Cisco Management Connection 53 Cisco network 109 Cisco proprietary 1, 15 Cisco Switch Clustering technology 45 Cisco Systems IGESM 1, 19–21, 104, 107, 109, 121 Cisco Systems Intelligent Gigabit Ethernet Switch Module 1, 3, 12, 19, 79, 84, 99, 106 Cisco Systems Intelligent Gigabit Ethernet Switch Module Home 28 Cisco Systems Internet Operating System (IOS) 100 CiscoView 53 CiscoWorks 1 CiscoWorks Campus Manager 53 CiscoWorks LAN Management Solution (LMS) 52–53 CiscoWorks Resource Manager Essentials 53 Class of Service (CoS) 16 CLI 13, 15, 19, 24–26, 99, 107, 143 245 CLI command 25, 39 CLI command modes 26 CLI-based sessions 13 cluster 31 Cluster Management Suite See CMS Cluster Management Suite GUI 24 cluster menu 31 CMS 13, 15, 24, 29–30, 45, 99, 143 CMS Front Panel View 30, 34 CMS menu 30 collaboration 3 color-coding 53 command-line interface See CLI commands 28 console baud rate 31 cross-over cable 81, 117 cryptographic software image 13 D data center 99 database applications 4 daughter card 7–8 DDR-SDRAM memory channel 8 Device Configuration Manager 53 device menu 32 DHCP 54 diagnostic log 39 diagnostics 12, 29 Director console 54 Domino 4 DOS-startable (bootable) CD 89 duplicate IP addresses 229 dynamic address learning 14 Dynamic Host Configuration Protocol (DHCP) 54 Dynamic Trunking Protocol (DTP) 1, 15, 243 dynamic VLAN membership 15 E editing commands 26 EEPROM 9 egress policing and scheduling 16 egress queues 16 EIA/TIA-568 17 EIA/TIA-568B 17 Electronic Service Agent 5 end stations 14 enhanced cryptographic software image 25 Enhanced Image (EI) 100 enterprise applications 4 Enterprise Storage Server (ESS) 5 ERP 4 EtherChannel 32, 118, 137, 175 EtherChannel links 12, 14 EtherLAN interface 7 Ethernet interface 6–7, 40 Ethernet module 10 Ethernet Network Interfaces Controller 83 246 Ethernet port 81 Ethernet Switch Module 9 Ethernet switching technology 11 event notification 31 events 16 EXEC commands 39 Expansion Switch Module 7 expert 30 extended ping 39 external copper GbE interfaces 12 external interface 81 external management over all ports 85 External Network Interface (eth0) 82, 86 external ports 10, 22, 84 external switch port 87 F factory default 85 Fast EtherChannel 14 Fast POST 84 fault-tolerance 14 Fibre Channel 5, 8 Fibre Channel daughter card 8 file-and-print 3–4 Firmware VPD window 85 flash memory 13 flooding control 32 flow-based packet classification 16 frame sizes 14 front panel 34 G gateway 109 gateway address 83 GbE interfaces 12 Gigabit EtherChannel 14 Gigabit Ethernet Expansion Card 83 Gigabit Ethernet path 7 Gigabit Ethernet switching 13 Gigabit/sec Ethernet (GbE) 2 guest VLAN 16 guide 30 Guide mode 24 GVRP 1 H H8S2148 IBM Integrated System Management Processor 9 hardware alerts 54 hardware health 54 help commands 27 menu 35 resources 40 high availability 106, 109, 118, 124, 138, 160 history 16 host name 32, 35 hot standby 139, 163 Cisco Systems Intelligent Gigabit Ethernet Switch Module Hot Standby Router Protocol (HSRP) 109, 243 hot-pluggable module 100 HP OpenView 54 HS20 4, 83, 88–89, 106 HS20 architecture 8 HS40 4 HTTP port 31 HTTP Web interface 81 hybrid mode 117 I I/O buses 8 I/O module 84 I2C 9 I2C bus 9, 40 IBM Director 5, 25, 54, 81 IBM Integrated System Management Processor 9 IBM on demand operating environment 2 IBM TotalStorage 5 IBM UpdateXpress 89 IDE channel 9 IEEE 802.1d Spanning Tree Protocol 17 IEEE 802.1D Spanning Tree Protocol (STP) 14 IEEE 802.1p class of service (CoS) 16 IEEE 802.1p CoS scheduling 16 IEEE 802.1P Tagged Packets 17 IEEE 802.1Q 12 IEEE 802.1Q Tagged VLAN 17 IEEE 802.1Q trunking protocol 15 IEEE 802.1s Multiple STP (MSTP) 14 IEEE 802.1w Rapid STP (RSTP) 14, 243 IEEE 802.2 Logical Link Control 17 IEEE 802.3 10BASE-T Ethernet 17 IEEE 802.3u 100BASE-TX Fast Ethernet 17 IEEE 802.3x Full-duplex Flow Control 17 IGMP filtering 14 IGMP snooping 12, 32 in-band management 13, 41, 83 IntelliStation 5 Inter Module Buses (IMB2) 8 internal network interface 10, 82 Internet Group Management Protocol (IGMP) 12, 14 internetworking products 53 inventory 33 Inventory Manager 53 IOS 13, 117–118 IP Differentiated Services Code Point (IP DSCP) 16 ipconfig command 135, 157 ISL 1 J Java 1.4 Plug-in 30, 88 Java 2 V1.4 9 Java applet 9 JS20 4 L L2 switching 1 L3 interfaces 109 LACP channel 118 layer 2 1, 12–13, 19 layer 2 network 104, 108, 121, 124 layer 2 switch 100 layer 2 tools 54 layer 2 traceroute 16 legend 35 link aggregation 12, 118 Link Aggregation Control Protocol (LACP) 14, 118 Link Aggregation Group 118 link graphs 33 link reports 33 Low Pin Count (LPC) 9 M MAC address 16 MAC-based port-level security 15 management application 53 Management Module 6, 12, 21–22, 41, 80, 83, 85, 97, 102, 104 Management Module defaults 82 Management Module firmware 80 Management Module Web browser 25 Management Module Web interface 54, 81, 87, 89 management subnet 80 Management VLAN 33, 41, 83, 102–105, 136, 158 Media Access Control (MAC) 12 menu bar 30 Microsoft 54 Exchange 4 Internet Explorer 24 Windows 2000 92 Midplane 6–7, 12 modular design 3 monitor switch 39 monitoring 53 monitoring tools 29 MSFC3 Daughterboard 107 MSTP 14 multicast 33 multicast traffic 15 Multicast VLAN registration (MVR) 14 multihomed servers 228 multilevel security 15 Multiple Spanning Trees 1 Multiple STP (MSTP) 14 N native VLAN 108, 118 NetIQ 54 Netscape Communicator 24 NetVista 5 Network Attached Storage (NAS) 5 network interface card (NIC) teaming 95 network interfaces controllers (NIC) 83 network management 41 network monitoring 16 network security 15 Index 247 Network Time Protocol (NTP) 13, 243 NIC 83 NIC teaming 95, 231 NVRAM 121 O out-of-band management 40, 66, 83 P PCI Bus 9 Per-VLAN Spanning Tree (PVST) 1, 14 ping and trace 34 ping dialog 39 Policy Feature Card 3 107 Port Aggregation Protocol (PAgP) 1, 14, 118, 243 port menu 32 port pop-up menu 30 port search 32 port security 15, 32 port security aging 15 port security option 15 port settings 32 port statistics 33 port switch 16 POST 84 POST/BIOS code 9 Preboot Execution Environment (PXE) 54 preserve new IP configuration 85 print 30 private VLAN edge port 14 production network 109 protected port 32 PXE 54 Q Quality of Service (QoS) 16, 32, 100 R RADIUS 1 Rapid PVST+ 14 Rapid Reconfiguration Spanning Tree 1 Rapid STP (RSTP) 14, 243 Rapid-PVST 119 RDM 54 Real-Time Diagnostics 5 Red Hat Linux AS 2.1 93 Redbooks Web site 242 Contact us xii Remote Deployment Manager (RDM) 5, 54 remote monitoring (RMON) 16, 161 Remote Switch Port Analyzer (RSPAN) 16, 160–161 reports menu 33 resource issues 16 Resource Manager Essentials 53 resource monitor 33 root bridge 108 RSPAN 176 RSPAN reflector port 161 248 S Scalable Systems Manager 5 scale-out 3 Secure Shell (SSH) 13, 24 security wizard 32 SERDES Gbit Ethernet interface 7 SERDES-based Gb Ethernet interface 7 server consolidation 3 Server Load Balancing (SLB) 138–139, 149, 163 Server Plus Pack 5 ServerGuide 5 ServerWorks Grand Champion LE 8 Service Location Protocol (SLP) 54 show interfaces 39 Simple Network Management Protocol (SNMP) 13 single module 118 SIO (SuperI/O) 9 SLB teaming 108 SLP 54 SMP 4 SNMP 31 SNMP-based management tools 1 Software Distribution Premium Edition 5 Software Image Manager 53 software management tools 54 software upgrade 31 SolarWinds TFTP 86 SPAN 32, 176 Spanning Tree 14–15, 102, 104–105, 108, 119, 122 Spanning Tree blocking state 124 Spanning Tree loops 15 Spanning Tree Protocol (STP) 14 Spanning Tree storms 15 SSH 25 statistics 16 storage 4 Storage Area Networks (SAN) 5 storage solutions 5 STP 32, 121 STP loops 1 straight-through cable 117 subnet 83, 86 sub-optimal data flow 108 SuperI/O (SIO) 9 Supervisor Engine 720 107 Switch ASIC 22 switch factory defaults 85 switch module 6, 12 switch module console port 24 switch module firmware 85 Switch Port Analyzer (SPAN) 16 switch software 86 switch status 16 Switch Tasks 9–10 switchport 101 Syslog Analyzer 53 syslog facility 16 system messages 33 system reload 31 system time 31 Cisco Systems Intelligent Gigabit Ethernet Switch Module T W TACACS+ 1 Tape Drive Management Assistant 5 Telnet 12–13, 24–25, 39, 86–87 Telnet client 9 Telnet session 39, 87 Terminal Access Controller Access Control System Plus (TACACS+) 15 terminal emulation 24 TFTP 86 TFTP server 86 thin IMB bus 8 ThinkPad 5 time-out events 16 Tivoli 2, 54 toolbar buttons 30 tools menu 34 traceroute 16 traffic analysis 16 Trivial File Transfer Protocol (TFTP) 13 troubleshooting 28 trunk 102, 118 trunking 118 Web browser 25 Web server 4 weighted round-robin (WRR) 16 window menu 34 Windows NT 4.0 91 Windows Server 2000 91 Windows Server 2003 91 X XENPAK 107 Xeon 8 XpandonDemand 3 xSeries 5 U UniDirectional Link Detection (UDLD) 1, 14 unshielded twisted pair (UTP) 81 UpdateXpress 5, 89, 91 UpdateXpress CD 88 UplinkFast 1 upstream connection 124, 162 upstream switch 19 USB Buses 9 UTP 81 UTP Category 3 17 UTP Category 5 17 UTP Category 5e 17 UTP Category 6 17 V view menu 34 virtual local area network See VLAN VLAN 15, 102–103, 108 VLAN assignment 15 VLAN interface 102 VLAN Management Policy Server (VMPS) 1, 15 VLAN menu 33 VLAN tagging 95 VLAN Trunking 1, 118 VLAN Trunking Protocol (VTP) 1, 15 VMPS 33 voice traffic 15 voice VLAN 15, 33 VTP domain name 110 VTP transparent mode 110 Index 249 250 Cisco Systems Intelligent Gigabit Ethernet Switch Module Back cover Cisco Systems Intelligent Gigabit Ethernet Switch Module for IBM Eserver BladeCenter Copper Ethernet switching technology integrated into the BladeCenter chassis This IBM Redpaper positions the Cisco Systems Intelligent Gigabit Ethernet Switch Module for the IBM Eserver BladeCenter and describes how it enhances the BladeCenter value proposition by seamlessly interfacing into a customer’s existing data network. Helpful configurations and troubleshooting techniques This paper helps you plan, install, and configure the Cisco Systems Intelligent Gigabit Ethernet Switch Module for several network topologies. Topology examples are provided to demonstrate several ways to perform the integration of the switch module into different networks. Configuration examples using CMS and CLI We also discuss the architectures of the Cisco Systems Intelligent Gigabit Ethernet Switch Module and BladeCenter and how the technology of the two products jointly provides full interoperability into existing Cisco data centers. It is assumed that experienced systems and network administrators will use this paper to successfully integrate the Cisco Systems Intelligent Gigabit Ethernet Switch Module into their existing network. ® Redpaper INTERNATIONAL TECHNICAL SUPPORT ORGANIZATION BUILDING TECHNICAL INFORMATION BASED ON PRACTICAL EXPERIENCE IBM Redbooks are developed by the IBM International Technical Support Organization. Experts from IBM, Customers and Partners from around the world create timely technical information based on realistic scenarios. Specific recommendations are provided to help you implement IT solutions more effectively in your environment. For more information: ibm.com/redbooks