1
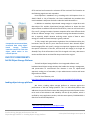
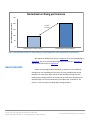
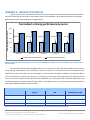
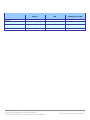
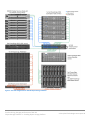
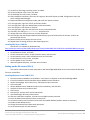
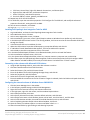
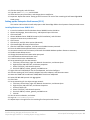
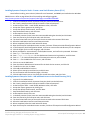
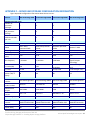
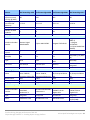
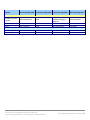
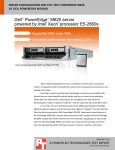
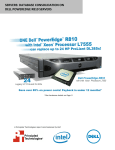
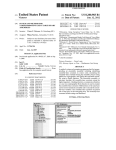
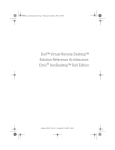
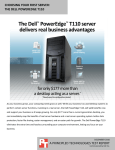
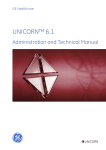
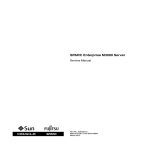
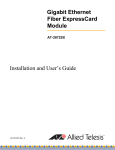
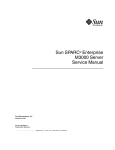
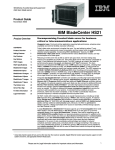
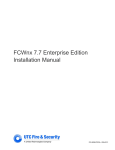
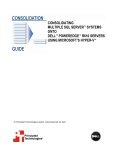
EMAIL ARCHIVING: STORAGE PERFORMANCE OF DELL DX OBJECT STORAGE PLATFORM VS. A LEADING OBJECT STORAGE PLATFORM The amount of digital information in today’s world is growing rapidly, with one estimate suggesting a 44-fold increase, to 35 trillion gigabytes, by 2020.* How best to store it all? For organizations storing employee and customer emails, effective storage includes archiving files in a secure and timely manner. This process is not just about convenience: in the face of lawsuits and stringent regulations like the Sarbanes-Oxley Act, it’s a matter of survival. Principled Technologies tested two object-based storage solutions with email archiving performance in mind. We used the Dell DX Object Storage Platform and a leading object storage platform to archive email files, testing how many objects per second each storage platform archived. We used Symantec™ Enterprise Vault™ archiving platform software on each storage solution. In our tests, the Dell DX Object Storage Platform excelled at archiving higher amounts of objects per second, archiving 112.6 percent more objects per second than a leading object storage platform. * IDC Digital Universe Study, May 2010 August 2011 A PRINCIPLED TECHNOLOGIES TEST REPORT Commissioned by Dell Inc. MEETING THE EMAIL ARCHIVING CHALLENGE To help protect consumers and employees in the digital age, US government and industry regulations now enforce strict email storage and retention policies. Here are just a few of them: U.S. Federal Rules of Civil Procedure (FRCP). Requires companies of all types and sizes to retrieve emails in a timely and accurate manner. Additionally, the U.S. District Court requires that retrieved emails be “in native format…with their metadata intact.” (Source: http://www.inboxer.com/ downloads/ Whitepaper_FRCP.pdf) Sarbanes-Oxley Act. Requires public companies to retain records for 7 years, and requires CEOs and CFOs to take individual responsibility for the accuracy of their company’s financial disclosures. Security Exchange Act. Rule 17a-4 requires financial institutions to adhere to certain guidelines for retention, accessibility, and indexing. To prove they comply with these regulations (and avoid substantial fines and legal woes), companies must archive email data in such a way that it is readily accessible and in the proper format. Given the sheer volume of electronic communication, companies require an efficient storage platform for archiving the emails, IMs, file attachments, and text messages employees generate each day. Archiving these objects properly allows for fast, accurate retrieval, which is becoming necessary to comply with an increasing number of strict private and government regulations (see sidebar). Proper archiving has numerous benefits. It helps companies comply with government and industry regulations, and makes it easier to retrieve data to respond to lawsuits, avoiding delays that can be costly and damaging. Additionally, archiving can optimize other areas of the enterprise, such as backup procedures, by taking outdated data out of the workflow. THE CASE FOR OBJECT-BASED STORAGE Effectively archiving emails requires more than just storage space. It also requires an intelligent, reliable storage method that is capable of archiving many objects per second. Emails have traditionally been backed up as datastores (such as .PST files), making individual emails difficult to restore. Such datastores lack any context or metadata that would facilitate rapid search and retrieval. Very little descriptive information is available to provide a larger context. Additionally, traditional filebased storage sees the data in an unstructured file as a series of unrelated data blocks, and is more concerned with location of data within folders and subfolders than with extensive metadata. Later technology allowed for “drilling” into datastores to pull out individual mailboxes and, later, individual messages. Even so, users could not know whether the original email message had since been changed. The consequence for organizations? A lack of confidence about the validity of their email archive content, and, even with a content management system, a cumbersome and time-consuming manual retrieval process. Such limitations make it difficult for companies to reliably locate the information they need in an urgent situation, such as when preparing for a lawsuit. To combat these limitations, companies are turning to object-based storage solutions that use metadata and protect individual content. As the name implies, object-based storage saves files as individual objects. These data objects are a combination the file itself as well as metadata about the file. Simply put, metadata is an assortment of characteristics that describe the object. Metadata provides far more contextual information about a file, which allows users to conduct context-based searches. This improves the speed Email archiving: Storage performance of Dell DX Object Storage Platform vs. a leading object storage platform A Principled Technologies test report 2 of file retrieval and increases the relevance of files retrieved. The illustration on the following page shows such metadata. How important is metadata? Very, according to the US Supreme Court. In 2010’s O’Neill vs. City of Shoreline, the Court established the precedent that email metadata is subject to disclosure under the Public Records Act. 1 In addition to metadata, object-based storage assigns a unique ID to each data object. This enables object-based storage platforms to locate the data object without a traditional hierarchical file directory. Users can still retrieve the file, even if it changes locations. Because companies often store different kinds of data in different storage “silos,” sometimes moving data between locations, this is especially helpful. Because archiving moves copies of data to other storage, the need for manual backups is greatly reduced. To fully comply with government regulations like the Sarbanes-Oxley Act, Compared to unstructured data, structured data using objectbased storage provides extensive context for each data object, which assists in the retrieval process. businesses must be able to prove that emails haven’t been altered. Objectbased storage offers such proof. It assigns a unique hash signature that reflects the specific information in that file, and that hash will change (or no longer be allowed) if any of the information in the file is changed. In this way, data owners can be confident that an archived file always matches the original. OUR TEST COMPONENTS Dell DX Object Storage Platform The Dell DX Object Storage Platform is an integrated software- and hardware-based object storage solution that handles the storage, management, and preservation of unstructured files. Because it uses an object-based approach, making use of metadata, it helps administrators archive and locate large amounts of data. For a full list of features, visit http://www.dell.com/us/enterprise/p/powervault-dx6000/pd?refid=dell-dx. Leading object storage platform We chose a leading object storage platform to compare against the performance of Dell DX storage platform. This is a disk-based platform that addresses the need for fixed content data storage that provides features similar to DX such as fault tolerance and scalability. We set up the platform, which is certified by many application vendors, with the same capacity 7.2K RPM SATA II disk drives as the Dell DX platform. 1 http://www.rcfp.org/newsitems/index.php?i=11596 Email archiving: Storage performance of Dell DX Object Storage Platform vs. a leading object storage platform A Principled Technologies test report 3 Symantec Enterprise Vault Symantec Enterprise Vault version 9.0.2.1061 is an email and file-archiving program designed specifically for storing, managing, and retrieving data. Enterprise Vault can store data on several different platforms, including Dell DX Object Storage and the chosen leading platform; it can also archive data from programs such as Microsoft Exchange and SharePoint®. To learn more about Symantec Enterprise Vault, visit http://www.symantec.com/business/enterprise-vault. ACCELERATED EMAIL ARCHIVING RESULTS We used Symantec Enterprise Vault on five Dell PowerEdge™ 2950 servers to archive email files from 15 Dell PowerEdge M600 blade servers onto a Dell DX Object Storage Platform, and performed this same task on a leading object storage platform. For our testing, we used an average email size of 8KB. In our tests, the Dell DX Object Storage Platform archived email files consistently better than the competing solution, for a 112.6 percent increase in throughput, which we calculated in objects per second (see Figure 1). We began testing on the five servers simultaneously, and recorded the total objects archived. We also captured the duration of the archive, which is how long it took to perform this task. The average duration was captured as the average of the individual server’s duration. We calculated objects/second as the total objects divided by duration. We calculated percentage win based on the aggregate objects/second results. Refer to Appendix A for the individual tests run on each server. Figure 1 presents the archiving performance, in objects per second, for the two solutions, normalized to the leading object storage platform for percentage improvement comparison. Email archiving: Storage performance of Dell DX Object Storage Platform vs. a leading object storage platform A Principled Technologies test report 4 Normalized archiving performance Normalized objects per second 250 200 112.6% increase 150 100 50 0 Leading object storage platform Dell DX Object Storage Platform Figure 1: Normalized performance of email archiving on the Dell DX platform and a leading object storage platform. We explain our detailed test results in Appendix A, our test methodology in Appendix B, our server and storage configuration information in Appendix C, and our email files corpus in Appendix D. FINAL THOUGHTS Object-based storage enables companies to effectively and confidently manage their ever-expanding email archives by using metadata and unique identifiers for each email object. While the Dell DX Object Storage and the leading object storage platform we tested both provide these capabilities, DX Object Storage can archive substantially more objects per second (over 112 percent, in our tests) than a leading object storage platform. Email archiving: Storage performance of Dell DX Object Storage Platform vs. a leading object storage platform A Principled Technologies test report 5 APPENDIX A – DETAILED TEST RESULTS Figures 2 presents our normalized test results for the entire duration of the Symantec Enterprise Vault tasks for each of the individual servers used to stream objects to the archival platform. We normalized all results to the lowest performing server for the leading object storage platform. Normalized archiving performance by server Normalized objects per second 250 200 109.1% 115.1% 112.3% 121.8% 104.3% 150 100 50 0 Server 1 Server 2 Server 3 Leading object storage platform Server 4 Server 5 Dell DX Object Storage Platform Figure 2: Normalized email archiving performance on the Dell DX Object Storage Platform and a leading object storage platform, by email server. Each test bed used five Dell PowerEdge 2950 servers as email servers with data. We simulated an email archive job by copying random groups of the email files to each of the servers to ensure that some servers would have more email files to archive than other servers would. Figures 3 and 4 provide information around the test bed input data in terms of the number of objects per ingest server, average size of the object and overall amount of data output from each of the servers. Because the two test beds were independent, the total objects differ somewhat between the two test beds. Because we compare objects/second, which is a throughput metric, the results are comparable despite the total objects differing between the two test beds. Dell DX Object Storage Platform Server 1 Server 2 Server 3 Server 4 Server 5 Objects MB Average file size (KB) 29,917 29,815 30,720 29,815 29,675 233.8 232.9 240.2 232.7 231.8 8.0 8.0 8.0 8.0 8.0 Figure 3: Data sets used to test the email archiving performance of the Dell DX Object Storage Platform. Email archiving: Storage performance of Dell DX Object Storage Platform vs. a leading object storage platform A Principled Technologies test report 6 Leading object storage platform Server 1 Server 2 Server 3 Server 4 Server 5 Objects MB 28,734 25,153 28,891 26,131 28,707 224.5 196.4 225.4 204.0 224.5 Average file size (KB) 8.0 8.0 8.0 8.0 8.0 Figure 4: Data sets used to test the email archiving performance of a leading object storage platform. Email archiving: Storage performance of Dell DX Object Storage Platform vs. a leading object storage platform A Principled Technologies test report 7 APPENDIX B – DETAILED TEST METHODOLOGY Here, we explain the detailed steps we followed to set up our test scenario. To show the differences between the Dell DX6000 Object Storage Platform and a leading object storage platform, we configured a large test bed with real-world servers and archiving solutions. We installed 15 Microsoft® Windows Server® 2008 R2 file servers and configured two shared directories: one named LV and the other named DX. We copied our email files equally across 15 file servers and then installed five Symantec Enterprise Vault servers to archive the email files. We configured a task in Symantec Enterprise Vault to archive the 15 LV file shares to the leading object storage platform, and then configured another task to archive the other 15 DX file shares to the Dell DX Object Storage Platform. We ran the tasks on the leading object storage platform, verified the archive, then ran the Dell DX tasks, verified the results, and compared the results from the Symantec Enterprise Vault task logs. Figure 5 shows our test environment for the Dell DX6000. Each of the eight Dell DX nodes was configured with four 1TB 7.2K RPM SATA II drives. We configured the Dell DX6000 with system defaults. We configured all 15 Dell PowerEdge M600 blades servers with the Microsoft Windows Server 2008 R2 SP1 operating system (OS). We used the Dell EqualLogic™ PS5000XV storage array to house the data. To archive data on the file servers, we used five Dell PowerEdge 2950 servers running the Microsoft Windows Server 2008 R2 SP1 OS, each with a copy of Symantec Enterprise Vault 9.0.2 installed. We configured a stacked pair of Dell PowerConnect™ 6248 switches to act as the core network for the data and CAS networks, and a dedicated Dell PowerConnect 5448 switch for ISCSI traffic. We connected all 15 Dell PowerEdge M600 file servers with a dedicated 1Gbps link to the Dell PowerConnect 5448 switch, and another to the Dell PowerConnect 6248 stack. Each of the five Dell PowerEdge 2950 servers has four single Gbps links to the Dell PowerConnect 6248 stack: two for the data network and two to the object storage network. We installed a Dell PowerEdge R900 with Microsoft Windows Server 2008 R2 SP1 to Host Active Directory, and connected it to the Dell PowerConnect 6248 stack with a single Gbps link. To host the Symantec Enterprise Vault SQL database, we installed a Dell PowerEdge R515 with the Microsoft Windows Server 2008 R2 SP1 OS, and connected it to the Dell PowerConnect 6248 stack with a single Gbps link. We then installed Microsoft SQL Server® 2008 SP1. We connected the Dell DX Object Storage eight-node storage cluster to the Dell PowerConnect 6248 stack. Figure 6 shows the corresponding leading object storage platform. Eight nodes were used for an even comparison and these nodes were connected to the same test configuration. Each of the eight nodes was installed with four 1TB 7.2K RPM SATA II drives just as with the Dell DX nodes. Best practice recommendations for obtaining the maximum performance were followed when setting up and configuring competitor’s platform including the use of distinct networking and switch requirements as per vendor documentation. Email archiving: Storage performance of Dell DX Object Storage Platform vs. a leading object storage platform A Principled Technologies test report 8 Figure 5: Test bed configuration for Dell DX Object Storage Platform. Email archiving: Storage performance of Dell DX Object Storage Platform vs. a leading object storage platform A Principled Technologies test report 9 Figure 6: Test bed configuration for the leading object storage platform we tested. Email archiving: Storage performance of Dell DX Object Storage Platform vs. a leading object storage platform A Principled Technologies test report 10 Setting up the storage Dell PowerEdge M600 blades, Dell PowerEdge R515, Dell PowerEdge R900, and Dell EqualLogic PS5000XV storage We installed all five Dell PowerEdge 2950 servers to use internal storage. We configured the PERC 6i RAID controller for a RAID 1 configuration on a pair of 73GB SATA Disks for the Windows Server 2008 R2 SP1. Both drives hosted the OS. We installed the Dell PowerEdge R900 server to use internal storage. We configured the PERC 6i RAID controller for a RAID 5 configuration with eight 73GB SAS Disks to host the Active Directory on the Windows Server 2008 R2 SP1 OS. We installed the Dell PowerEdge R515 server to use internal storage. We configured the PERC H700 RAID controller for a RAID1 configuration on two 73GB SAS disks to host the Windows Server 2008 R2 SP1 OS, and another four 73GB SAS disks in a RAID 10 array for Microsoft SQL Server data. We configured 15 Dell PowerEdge M600 blades to use both internal and external storage. For each Dell PowerEdge M600 blade, we configured a virtual disk on a RAID 1 array using the two internal 15K 36GB SAS drives connected to the RAID controller. We used this Virtual Disk to host the Windows Server 2008 R2 SP1 OS on each server. For data that was to be archived, we configured a dedicated 1Gb iSCSI link on each Dell PowerEdge M600 Server. We connected all 15 iSCSI links to a Dell PowerConnect 5448 switch connected to four Dell EqualLogic PS5000XV storage arrays. Figures 5 and 6 on the prior page show the layout of the test bed hardware that we used for testing both the DX Object Storage and a leading object storage platform. All recommended best practices associated with a leading object storage platform were followed. We enabled jumbo frames on all iSCSI-dedicated NICs. To do this in Windows, we adjusted the MTU to 9,000 via the NIC properties window. We enabled jumbo frames on the Dell PowerConnect 5448 switch, and on each NIC on the Dell EqualLogic PS5000XV storage. Each Dell EqualLogic PS5000XV contained 16 drives. We configured two storage groups with two Dell EqualLogic PS5000XVs as members. We configured both groups to have single storage pools in RAID 50 mode. On the storage pool on storage group 1, we created eight 250 GB LUNS for blades 1 through 8, and on the storage pool in storage group 2, we created seven 250 GB LUNS for blades 8 through 15. Setting up the internal storage on the Dell PowerEdge R900 for host operating system installation 1. 2. 3. 4. Enter the RAID controller BIOS by pressing Ctrl+R at the relevant prompt during boot. Highlight Controller 0, and press F2. Select Create New VD. Select all eight drives, select RAID level 5, tab to the OK button, and press Enter. Accept the warning regarding initialization. 5. Select the new virtual drive, press F2, and select Initialization, Start Init. 6. Wait for the initialization operation to complete. 7. Repeat steps 2 through 6 for the remaining internal volume, selecting drives three and four. 8. Press Escape, and choose to Save and Exit to return to the boot sequence Setting up the internal storage on the Dell PowerEdge 2950 for host operating system installation 1. Enter the RAID controller BIOS by pressing Ctrl+R at the relevant prompt during boot. 2. Highlight Controller 0, and press F2. 3. Select Create New VD. Email archiving: Storage performance of Dell DX Object Storage Platform vs. a leading object storage platform A Principled Technologies test report 11 4. Select both drives, select RAID level 1, tab to the OK button, and press Enter. Accept the warning regarding initialization. 5. Select the new virtual drive, press F2, and select Initialization, Start Init. 6. Wait for the initialization operation to complete. 7. Press Escape, and choose to Save and Exit to return to the boot sequence. Setting up the internal storage on the R515 for host operating system installation and SQL data 1. 2. 3. 4. Enter the RAID controller BIOS by pressing Ctrl+R at the relevant prompt during boot. Highlight Controller 0, and press F2. Select Create New VD. Select the first two drives, select RAID level 1, tab to the OK button, and press Enter. Accept the warning regarding initialization. 5. Select the new virtual drive, press F2, and select Initialization, Start Init. 6. Wait for the initialization operation to complete. 7. Press Escape. 8. Highlight Controller 0, and press F2. 9. Select drives three through six, select RAID level 10, tab to the OK button, and press Enter. Accept the warning regarding initialization. 10. Wait for the initialization operation to complete. 11. Press Escape, and choose to Save and Exit to return to the boot sequence. Setting up the internal storage on the M600 for host operating system installation 1. 2. 3. 4. Enter the RAID controller BIOS by pressing Ctrl+R at the relevant prompt during boot. Highlight Controller 0, and press F2. Select Create New VD. Select the first two drives, select RAID level 1, tab to the OK button, and press Enter. Accept the warning regarding initialization. 5. Select the new virtual drive, press F2, and select Initialization, Start Init. 6. Wait for the initialization operation to complete. 7. Repeat steps 2 through 6 for the remaining internal volume, selecting drives three and four. 8. Press Escape, and choose to Save and Exit to return to the boot sequence. Setting up the external storage 1. Using the command-line console, via serial cable, reset the first Dell EqualLogic PS5000XV by using the reset command. 2. Supply a group name, group IP address, and IP address for eth0 on the first of three arrays. 3. Reset the second array in the same manner, supply the group name to join and IP address created in Step 2. 4. Repeat Steps 1 through 3 for Array three and four to create two storage groups. 5. After group creation, using a computer connected to the same subnet as the storage, use the Dell EqualLogic Web interface to do the following: a. Assign IP addresses on the remaining NICs (eth1 and eth2) on each array. Enable the NICs. b. Verify matching firmware levels on each array and MTU size of 9,000 on each NIC on each array. c. Create a storage pool, by right-clicking Storage pools, and choosing Create storage pool. d. Click each member, and choose Yes when prompted to configure the member. e. Choose RAID 50 for the RAID Policy for both members. f. Create a 250GB volume to host the data volumes for bladeserver1. g. For the volumes created in the previous step, limit access to ISCSI initiator name, and enter iqn.199105.com.microsoft:bladeserver1.test.local for the initiator name. Email archiving: Storage performance of Dell DX Object Storage Platform vs. a leading object storage platform A Principled Technologies test report 12 h. Repeat steps e through g seven times for bladeserver2 through 8 for a total of eight LUNS. Be sure to adjust the iSCSI name in Step g to coincide with the server name. 6. Repeat Step 5, e though g, and create seven more 250GB LUNS for bladeserver 9 through 15. Setting up the Active Directory server (DC1) Installing Windows Server 2008 R2 SP1 1. 2. 3. 4. 5. 6. 7. 8. 9. 10. 11. 12. 13. 14. Insert the installation DVD for Windows Server 2008 R2 into the DVD drive. Choose the language, time and currency, and keyboard input. Click Next. Click Install Now. Choose Windows Server 2008 R2 Enterprise (Full Installation), and click Next. Accept the license terms, and click Next. Click Custom. Click the Disk, and click Drive options (advanced). Click NewApplyFormat, and click Next. After the installation completes, click OK to set the Administrator password. Enter the administrator password twice, and click OK. Connect the machine to the Internet and install all available Windows updates. Restart as necessary. Enable remote desktop access. Change the hostname and reboot when prompted. Set up networking for the data network: a. Click Start, Control Panel, right-click Network Connections, and choose Open. b. Right-click the VM traffic NIC, and choose Properties. c. Uncheck TCP/IP (v6). d. Select TCP/IP (v4), and choose Properties. e. Set the IP address, subnet, gateway, and DNS server. Installing Active Directory and DNS services on DC1 1. Click StartRun, type dcpromo and click OK. 2. At the Active Directory Domain Services Installation Wizard welcome screen, check the Use advanced mode installation option, and click Next. 3. In the Choose a Deployment Configuration dialog box, select Create a new domain in a new forest, and click Next. 4. At the FQDN page, type test.com and click Next. 5. At the NetBIOS name prompt, leave the name test and click Next. 6. At the Forest Functionality level, select Windows Server 2008 R2, and click Next. 7. At the additional Domain Controller Options, leave DNS server selected, and click Next. 8. At the System Folder Location screen, leave the default options, and click Next. 9. Assign a Directory Services Restore Mode Administrator account password, and click Next. 10. At the Summary screen, review your selections, and click Next. 11. Once Active Directory Domain Services finishes installing, click Finish, and restart the system. Setting up the Symantec Enterprise Vault SQL Server (SQL-1) Installing Windows Server 2008 R2 SP1 1. 2. 3. 4. 5. 6. Insert the installation DVD for Windows Server 2008 R2 into the DVD drive. Choose the language, time and currency, and keyboard input. Click Next. Click Install Now. Choose Windows Server 2008 R2 Enterprise (Full Installation), and click Next. Accept the license terms, and click Next. Click Custom. Email archiving: Storage performance of Dell DX Object Storage Platform vs. a leading object storage platform A Principled Technologies test report 13 7. 8. 9. 10. 11. 12. 13. 14. 15. 16. 17. 18. 19. Click the Disk, and click Drive options (advanced). Click NewApplyFormat, and click Next. After the installation completes, click OK to set the Administrator password. Enter the administrator password twice, and click OK. Connect the machine to the Internet, and install all available Windows updates. Restart as necessary. Enable remote desktop access. Change the hostname and reboot when prompted. Set up networking for the data network: a. Click Start, Control Panel, right-click Network Connections, and choose Open. b. Right-click the VM traffic NIC, and choose properties. c. Uncheck TCP/IP (v6). d. Select TCP/IP (v4), and choose Properties. e. Set the IP address, subnet, gateway, and DNS server. Open Disk manger: start, run and type diskmgmt.msc Right-click Disk 1, and click format. Assign as ‘E’ drive, label as ‘SQL-data’ and close the disk manager. Join the test.com domain, and reboot . Log in as test\administrator Installing SQL Server 2008 x64 edition on SQL-1 1. 2. 3. 4. 5. 6. 7. 8. 9. 10. 11. 12. 13. 14. 15. 16. 17. 18. 19. 20. 21. 22. 23. 24. 25. 26. Insert the DVD into the physical DVD drive. Click Run SETUP.EXE on the AutoPlay menu. When the application prompts you to install the .NET Framework, click OK. Select the Accept radio button, and click Install. When the installation finishes, click Exit. If any warnings appear about compatibility, accept them, as installing SP1 in the next section should solve them. If the application prompts you, click OK to install a hotfix for Windows (KB942288). Click Restart now to restart the server upon completion. After rebooting, log into the server. Click Start, and click Computer. Double-click the CD/DVD drive. Click Installation. Click New SQL Server stand-alone installation. On the Setup support rules screen, click OK. Specify the Enterprise Evaluation free edition, and click Next. Click the checkbox to accept the license terms, and click Next. Click Install to install the setup support files. You may see a Windows Firewall warning. For now, ignore this, and click Next. On the Feature Selection screen, select Database Engine Services, Full-Text Search, Analysis Services, Reporting Services, Client Tools Connectivity, Client Tools Backward Compatibility, Management Tools –Basic, and Management Tools – Complete. Click Next. On the Instance configuration screen, leave the default selection of default instance, and click Next. On the Disk space requirements screen, change this install directory to ‘e:\SQLdata’ and click Next. On the Server configuration screen, choose NT AUTHORITY\SYSTEM for SQL Server Agent, and choose NT AUTHORITY\SYSTEM for SQL Server Database Engine. Click Next. On the Database Engine Configuration screen, select Mixed Mode. Enter a password for the system administrator (sa) account. Click Add Current user. Note: This may take several seconds. Click Next. Email archiving: Storage performance of Dell DX Object Storage Platform vs. a leading object storage platform A Principled Technologies test report 14 27. 28. 29. 30. 31. 32. 33. 34. 35. 36. 37. 38. 39. 40. On the Error and usage-reporting screen, click Next. On the Installation rules screen, click Next. On the Ready to Install screen, click Next. After installation completes, click Start, All Programs, Microsoft SQL Server 2008, Configuration Tools, SQL Server Configuration Manager. Expand the Network Configuration node, and select the relevant instance. In the right pane, right-click TCP/IP, and choose Enable. In the right pane, right-click Named Pipes, and choose Enable. In the left pane, click SQL Server Services. In the right pane, right-click the SQL Server service, and select Restart. Click Start, Run and type Services.msc and press Enter. Change SQL server Analysis Services, and click Properties. Click the login tab and change to domain\administrator, type the Password for the account, confirm the password, and click OK. Restart the SQL server Analysis Services service. Repeat Steps 37 through 39 for the SQL Reporting Service. Installing SQL Server 2008 SP1 Service Pack 1 is available for download from http://www.microsoft.com/downloads/details.aspx?FamilyID=66ab3dbb-bf3e-4f46-9559-ccc6a4f9dc19&displaylang=en. 1. Run SQLServer2008SP1-KB968369-x64-ENU.exe. 2. On the Welcome screen, click Next. 3. On the License terms screen, accept the license terms, and click Next. 4. On the Features screen, select available features, and click Next. 5. On the Check files in use screen, click Next. 6. On the Update screen, click Next. 7. When the update completes, click Next, and click Close. Setting up the file servers (file-1) This section outlines how to install and prepare a Dell PowerEdge M600 blade server to be a Microsoft Windows file server named file-1. Installing Windows Server 2008 R2 SP1 1. 2. 3. 4. 5. 6. 7. 8. 9. 10. 11. 12. 13. 14. 15. Connect an external DVD drive to the Blade 1 in the Chassis, and power on the Dell PowerEdge M600. Insert the installation DVD for Windows Server 2008 R2 into the DVD drive. Choose the language, time and currency, and keyboard input. Click Next. Click Install Now. Choose Windows Server 2008 R2 Enterprise (Full Installation), and click Next. Accept the license terms, and click Next. Click Custom. Click the Disk, and click Drive options (advanced). Click NewApplyFormat, and click Next. After the installation completes, click OK to set the Administrator password. Enter the administrator password twice, and click OK. Connect the machine to the Internet, and install all available Windows updates. Restart as necessary. Enable remote desktop access. Change the hostname and reboot when prompted. Set up networking for the data network: Email archiving: Storage performance of Dell DX Object Storage Platform vs. a leading object storage platform A Principled Technologies test report 15 16. 17. 18. 19. a. Click Start, Control Panel, right-click Network Connections, and choose Open. b. Right-click the VM traffic NIC, and choose Properties. c. Select TCP/IP (v4), and choose Properties. d. Set the IP address, subnet, gateway, and DNS server. Repeat Step 15 for the ISCSI network. For iSCSI NICs, open the connection properties. Click Configure for The ISCSI NIC, and modify the advanced properties of each NIC, setting the MTU to 9000. Join the test.com domain, and reboot. Log in as test\administrator Installing Dell EqualLogic Host Integration Tools for MPIO 1. 2. 3. 4. 5. 6. 7. 8. 9. 10. 11. 12. 13. Log into Windows, and start the Dell EqualLogic Host Integration Tools installer. At the Welcome screen, click Next. At the License Agreement screen, click Next. At the Installation Type screen, select Typical (Requires reboot on Windows Server platforms), and click Next. In the Microsoft iSCSI Initiator service is not running window, click Yes to start the service and enable iSCSI traffic through the firewall. In the Microsoft iSCSI service window, click Yes. When the iSCSI Initiator Properties window pops up, accept the defaults, and click OK. If a Windows Firewall Detected window appears, click Yes to enable echo requests. At the Ready to install the components screen, click Install. In the Microsoft Multipath I/O feature is not detected window, click Yes to install the feature. At the Installation Complete screen, click Finish. In the System Restart Required window, select Yes, I want to restart my computer now, and click OK. After reboot, open the Dell EqualLogic Host Integration Toolkit remote setup wizard, and click configure MPIO. Under Subnets included for MPIO, ensure only the iSCSI subnet is included in the “include” section. Connecting to the volumes with Microsoft iSCSI Initiator 1. 2. 3. 4. 5. 6. 7. Using the Dell EqualLogic Web UI, ensure the data volumes are online. Click StartAdministrative ToolsiSCSI Initiator. Select the Discovery Tab, and click Discover Portal. Enter the IP address for the Dell EqualLogic Storage Group, and click OK. Select the Targets tab, and click Refresh. Select the first Inactive Target listed, and click Connect. Ensure that Add this connection to the list of Favorite Targets is selected, check the Enable multi-path check box, and click OK. Configuring the external volumes in Windows Server 2008 R2 SP1 1. 2. 3. 4. 5. 6. 7. 8. 9. 10. 11. Click the Server Manager icon in the taskbar. In the left pane, expand Storage, and click Disk Management. Right-click the first external volume, and choose Initialize Disk. In the right pane, right-click the volume, and choose New Simple Volume... At the welcome window, click Next. At the Specify Volume Size window, leave the default selection, and click Next. At the Assign Drive Letter or Path window, choose a drive letter, use drive letter E, and click Next. At the Format Partition window, choose NTFS and 64K allocation unit size, and click Next. At the Completing the New Simple Volume Wizard window, click Finish. Open the E drive in windows explorer a create a new folder called email Share the email folder by right-clicking it and selecting Properties. Email archiving: Storage performance of Dell DX Object Storage Platform vs. a leading object storage platform A Principled Technologies test report 16 12. 13. 14. 15. Click the sharing tab, and click Share. Type the name everyone, and click Add. Select the Everyone permissions, and change them to read/write. Important: Repeat the section ‘Setting up the file servers’ for each of the remaining 14 Dell PowerEdge M600 blade servers. Setting up the Enterprise Vault servers (EV-1) This section outlines how to install and prepare a Dell PowerEdge 2950 to be a Symantec Enterprise Vault server. Installing Windows Server 2008 R2 SP1 1. 2. 3. 4. 5. 6. 7. 8. 9. 10. 11. 12. 13. 14. 15. 16. 17. 18. 19. 20. 21. 22. 23. 24. 25. Insert the installation DVD for Windows Server 2008 R2 into the DVD drive. Choose the language, time and currency, and keyboard input. Click Next. Click Install Now. Choose Windows Server 2008 R2 Enterprise (Full Installation), and click Next. Accept the license terms, and click Next. Click Custom. Click the Disk, and click Drive options (advanced). Click NewApplyFormat, and click Next. After the installation completes, click OK to set the Administrator password. Enter the administrator password twice, and click OK. Connect the machine to the Internet, and install all available Windows updates. Restart as necessary. Enable remote desktop access. Change the hostname and reboot when prompted. Install Broadcom Advanced Control suite. Create a network team called data-net. Set up networking for the data network: a. Click Start, Control Panel, right-click Network Connections, and choose Open. b. Right-click the VM traffic NIC, and choose properties. c. Select TCP/IP (v4), and choose Properties. d. Set the IP address, subnet, gateway, and DNS server. Right click Intel® PRO/1000 PT Port Server adaptor#1, and select Configure. Click the teaming tab, click Team this adapter with other adaptors, and select New team. Name the TEAM CAS-net add Intel® PRO/1000 PT Port Server adaptor#2. Select IEEE 802.3ad Dynamic Link Aggregation. Click Finish. Set up networking for the object storage network: a. Click Start, Control Panel, right-click Network Connections, and choose Open. b. Right-click the VM traffic NIC, and choose Properties. c. Uncheck TCP/IP (v6). d. Select TCP/IP (v4), and choose Properties. e. Set the IP address, subnet, gateway, and DNS server. f. Click OK Join the test.com domain, and reboot . Log in as test\administrator Repeat Steps 1 through 24 for the remaining four Enterprise Vault Servers. Email archiving: Storage performance of Dell DX Object Storage Platform vs. a leading object storage platform A Principled Technologies test report 17 Installing Symantec Enterprise Vault – Create a new Vault Directory Server (EV-1) Note: Before installing, ensure that IIS, Microsoft .net framework, and MSMQ are installed on the Windows 2008 R2 server. Refer to page 38 and 39 of the Installing and configuring guide: http://www.symantec.com/business/support/index?page=content&id=DOC2845 1. 2. 3. 4. 5. 6. 7. 8. 9. 10. 11. 12. 13. 14. 15. 16. 17. 18. 19. 20. 21. 22. 23. 24. 25. 26. 27. Insert the installation DVD for Symantec Enterprise Vault into the DVD drive. Run ‘evault_setup\Symantec Enterprise Vault 9.0.2\Server\setup.exe’. At the Enterprise Vault – Install Shield, Welcome screen, click Next. Accept the license agreement by clicking Yes. Accept the default install location, and click Next. Keep the default features, and click Next. At Prerequisites check, click Next. In the Best practices screen, leave the recommended setting box checked, and click Next. Enter the license key for Enterprise vault, and click Next. The install wizard will warn you that several services need to be restarted. Click Next. Allow the installation wizard to install Enterprise Vault. When completed, allow the install wizard to reboot. Open the Enterprise Vault administrator console, Click start Enterprise VaultConfiguration Wizard. In the Enterprise Vault Configuration Wizard, click Yes to create a new vault directory on this computer. Click the English for the control language, and click Next. When prompted for account details, use test\administrator, and confirm the password. Click Next. Enter SQL-1 for the SQL server name. Enter \\SQL-1\e$\sqldata for the database and transaction log locations, and click Next. Enter EV-1 for name and description of the enterprise vault site, and click Next Enter ev-1 for the DNS alias of the server, and click Next. Click Yes to use the DNS name. Enter the domain Administrator Password for the Vault Service account, and click OK. To add EV-1 to the site, click Next. Click Add to add additional services. Select all four enterprise vault Services, and click Next. For confirmation and informational pages, click Next. Click the radio button next to ‘Just close this wizard’ when done, and click Finish. Installing Symantec Enterprise Vault – Add additional servers to the Vault Directory (EV-2) 1. 2. 3. 4. 5. 6. 7. 8. 9. 10. 11. 12. 13. 14. Log into EV-2 as administrator. Insert the installation DVD for Symantec Enterprise Vault into the DVD drive. Run ‘evault_setup\Symantec Enterprise Vault 9.0.2\Server\setup.exe’. At the Enterprise Vault – Install Shield, Welcome screen, click Next. Accept the license agreement by clicking Yes. Accept the default install location, and click Next. Keep the default features, and click Next. At Prerequisites check, Click next. In the Best practices screen, leave the recommended setting box checked, and click Next. Enter the license key for Enterprise vault, and click Next. The install wizard will warn you that several services need to be restarted. Click Next. Allow the installation wizard to install Enterprise Vault. When completed, allow the install wizard to reboot. Open the Enterprise Vault administrator console, Click Start Enterprise VaultConfiguration Wizard. Email archiving: Storage performance of Dell DX Object Storage Platform vs. a leading object storage platform A Principled Technologies test report 18 15. 16. 17. 18. 19. 20. 21. In the Enterprise Vault Configuration Wizard, join an existing Directory, and select EV-1. Click Next. Enter ev-2 for the DNS alias of the server, click Next. Enter the domain Administrator Password for the Vault Service account, and click OK. Click Add to add additional services. Select all four enterprise vault Services, and click Next. Click the radio button next to ‘Just close this wizard’ when done, and click Finish. Repeat steps 1 through 20 for each of the remaining three Enterprise Vault servers. Installing Symantec Enterprise Vault – install client agents on the target servers 1. 2. 3. 4. 5. 6. 7. 8. 9. 10. 11. 12. Log into EV-1 as administrator. Open the Enterprise vault administrator Console. Browse to Enterprise vaultDirectory onEV-1EV-1TargetsFile Servers. Right-click File Servers, and select New file server. In the new file server wizard, click Next. In the name, type file-1.test.local Select the checkbox next to Install the FSA Agent on the new file server, and click Next. Click Next to add the fileserver, and install the agents. When prompted for the Vault service account, enter the domain administrator password, and click OK. When the wizard is done installing the FSA agent, click Next. Click Next to allow data collection. Repeat steps 1 through 12 for all 15 file servers. Configuring the archive stores on the leading object storage platform 1. Log into EV-1 as test\administrator 2. Open the Enterprise vault administrator Console. 3. Browse to Enterprise vaultDirectory on EV-1EV-1Vault Store Groups, right-click and select New Vault Store Group. 4. Click Next when the new Vault store Group wizard begins. 5. For the Name and description, type ALeadingObjectStoragePlatform and click Next. 6. Create a SQL fingerprint for the Vault store group, leave the SQL Server default name SQL-1, and click Next. 7. Browse to e:\sqldata for both file group, and transaction log locations, and click Next. 8. Create the vault store group named ALeadingObjectStoragePlatform by clicking Next. 9. Begin the creation of the vault group, and click Next. 10. Select server EV-1 as the storage server, and click Next. 11. Enter the name ALeadingObjectStoragePlatform-1 for the vault store and description, and click Next. 12. Accept the default SQL server name (SQL-1), and click Next. 13. Browse to e:\sqldata for both file group, and transaction log locations, and click Next. 14. In the remove safety copies dropdown box, select Immediately after backup, and click Next. 15. Click Next to create vault store ALeadingObjectStoragePlatform1 on EV-1. 16. Begin the creation of the vault store partition, and click Next. 17. Accept the defaults for name and description, ensure the new partition is open, and click Next. 18. Select the appropriate vendor for the storage type, and click Next. 19. Add the IP address of all vendor’s nodes, and click Test. 20. Ensure the platform is responsive, and click Next. 21. Select a retention period by selecting the radio button next to never, and click Next. 22. Leave the scan period at 60 minutes, and click Next. 23. Leave remaining options at default 24. Confirm the new partition creation by clicking Finish. Email archiving: Storage performance of Dell DX Object Storage Platform vs. a leading object storage platform A Principled Technologies test report 19 25. Right-click the vault store group ALeadingObjectStoragePlatform, and click New vault store. 26. Repeat steps 9 through 16 four times to create vault stores and partitions for the leading object storage platform on all five Enterprise Vault servers. Configuring the archive stores on the Dell DX 1. Log into EV-1 as administrator. 2. Open the Enterprise vault administrator console. 3. Browse to Enterprise vaultDirectory onEV-1EV-1Vault Store Groups, right click and select New Vault Store Group. 4. Click Next when the new Vault store Group wizard begins. 5. For the name and description, type DX and click Next. 6. Create a SQL fingerprint for the Vault store group, leave the SQL Server default name SQL-1, and click Next. 7. Browse to e:\sqldata for both file group and transaction log locations, and click Next. 8. Create the vault store group named DX by clicking Next. 9. Begin the creation of the vault group, and click Next. 10. Select server EV-1 as the storage server, and click Next. 11. Enter the name DX-1 for the vault store and description, and click Next. 12. Accept the default SQL server name (SQL-1), and click Next. 13. Browse to e:\sqldata on sql-1 for both file group, and transaction log locations, and click Next. 14. In the remove safety copies dropdown box, select ‘after backup,’ and click Next. 15. Click Next to create vault store DX-1 on EV-1. 16. Begin the creation of the vault store partition, and click Next. 17. Accept the defaults for name and description, ensure the new partition is ‘open,’ and click Next. 18. Select Dell DX Object Storage Platform for the storage type, and click Next. 19. Enter the 16 IP addresses for each of the DX storage nodes, and click OK. 20. Enter the Primary DX CD publisher IP address, and click OK. 21. Test the Dell DX settings by clicking Test. 22. Click OK to accept the Dell DX Settings. 23. Leave the checkbox next to ‘store data in compliance mode’ as unchecked, and click Next. 24. Run a connectivity test, and click Next when successful. 25. Do not enable Partition rollover, and click Next. 26. Select a retention period by selecting the radio button next to ‘never,’ and click Next. 27. Leave the scan period at 60 minutes, and click Next. 28. Confirm the new partition creation by clicking Finish. 29. Right-click the vault store group Dell-DX, and click New vault store. 30. Repeat steps 9 through 16 four times to create vault stores and partitions for the Dell DX on all five Enterprise Vault servers. Configuring the archive Symantec Enterprise Vault – setup volumes 1. 2. 3. 4. 5. 6. 7. Browse to Enterprise vaultDirectory onEV-1EV-1TargetsFile Servers\\file-1. Right-click file-1, and select New volume. Click Next when the new volume wizard begins. Select the files share on file-1 by clicking the browse button. Click the radio button for regular share, and click OK. Click the share named email, and click Next. Select the appropriate vault store. See Figure 7 to select the correct store, depending on the file server and storage platform, and click Next. Email archiving: Storage performance of Dell DX Object Storage Platform vs. a leading object storage platform A Principled Technologies test report 20 File server File-1 File-2 File-3 File-4 File-5 File-6 File-7 File-8 File-9 File-10 File-11 File-12 File-13 File-14 File-15 Symantec Enterprise Vault Store configuration Vault store for the leading object storage Vault store for the Dell DX Object Storage platform Platform ALEADINGOBJECTSTORAGEPLATFORM-1 DX-1 ALEADINGOBJECTSTORAGEPLATFORM-2 DX-2 ALEADINGOBJECTSTORAGEPLATFORM-3 DX-3 ALEADINGOBJECTSTORAGEPLATFORM-4 DX-4 ALEADINGOBJECTSTORAGEPLATFORM-5 DX-5 ALEADINGOBJECTSTORAGEPLATFORM-1 DX-1 ALEADINGOBJECTSTORAGEPLATFORM-2 DX-2 ALEADINGOBJECTSTORAGEPLATFORM-3 DX-3 ALEADINGOBJECTSTORAGEPLATFORM-4 DX-4 ALEADINGOBJECTSTORAGEPLATFORM-5 DX-5 ALEADINGOBJECTSTORAGEPLATFORM-1 DX-1 ALEADINGOBJECTSTORAGEPLATFORM-2 DX-2 ALEADINGOBJECTSTORAGEPLATFORM-3 DX-3 ALEADINGOBJECTSTORAGEPLATFORM-4 DX-4 ALEADINGOBJECTSTORAGEPLATFORM-5 DX-5 Figure 7: The Symantec Enterprise Vault Store configuration we used for testing. Email archiving: Storage performance of Dell DX Object Storage Platform vs. a leading object storage platform A Principled Technologies test report 21 APPENDIX C – SERVER AND STORAGE CONFIGURATION INFORMATION Figure 8 provides configuration information about the test servers. Servers Dell PowerEdge 2950 General processor setup Number of processor 2 packages Number of cores per processor 4 package Number of hardware threads 1 per core CPU Vendor Intel Intel® Xeon® Name processor E5405 Stepping E0 Socket type LGA 771 Core frequency 2.00 (GHz) Dell PowerEdge M600 Dell PowerEdge R900 Dell PowerEdge R515 2 4 2 4 6 6 1 6 6 Intel Intel Xeon processor E5345 B LGA 771 Intel Intel Xeon processor E7450 A1 LGA 771 AMD 2.33 2.40 2.60 1,066 MHz Opteron™ 4180 HY-D1 Socket C32 (1207) 8 MB 32 KB instruction 32 KB data 3 x 3,072 KB 2,000 MHz HyperTransport Technology 64 KB + 64 KB (per core) 6 x 512 KB (per core) 80 80 90 115 Dell PowerEdge 2950 Dell PowerEdge M600 Dell PowerEdge R900 Dell PowerEdge R515 0M332H Dell 0MY736 0X947H 03X0MN Intel 5000X Intel 5000P 7300 ID5A12 Dell 2.7.0 Dell 2.4.0 Dell BIOS 1.1.10 Dell Inc. 1.2.5 Default Default Default Default Samsung M395T5750EZ4-CE66 PC2-5300 667 Samsung M395T2953EZA-CE65 PC2-5300 667 Samsung M395T5750EZ4-CE65 PC2-5300F 667 Samsung M391B5273CH0-CH9 PC3-10600E 667 Bus frequency 1,333 MHz 1,333 MHz L1 cache (KB) 128 128 L2 cache Thermal design power (TDP, in watts) Platform Vendor and model number Motherboard model number Motherboard chipset BIOS name and version BIOS settings Memory modules Vendor and model number Type Speed (MHz) 12 MB Email archiving: Storage performance of Dell DX Object Storage Platform vs. a leading object storage platform A Principled Technologies test report 22 Servers Speed in the system currently running @ (MHz) Timing/Latency (tCL-tRCD-iRPtRASmin) Size (GB) Number of RAM modules Chip organization Hard disk Dell PowerEdge 2950 Dell PowerEdge M600 Dell PowerEdge R900 Dell PowerEdge R515 667 667 667 667 5-5-5-15 5-5-5-15 5-5-5-15 9-9-9-24 2 1 2 4 8 8 32 4 Double-sided Double-sided Double-sided Double-sided Vendor and model number Western Digital WD1602ABKS Fujitsu MAY2073RC Seagate ST973451SS Seagate ST3146855SS (RAID 1) 1 x Seagate St373454SS 3 x Fujitsu Max3073RC (Raid10) Number of disks in system 2 2 8 6 Size (GB) 160 73 73 146 (RAID 1)/73 (RAID 10) Type SATA SAS SAS/Serial Attached SCSI SAS 3Gbps Controller Dell SAS 6/iR Dell SAS 6/iR PERC 6/i Controller driver Operating system LSI 1.28.3.52 LSI 1.28.3.52 LSI 4.5.0.64 LSI PERC H700 Integrated LSI 3.18.00 Microsoft Windows Server 2008 R2, Enterprise Edition SP1 Build number 7601 File system NTFS Language English Network card/subsystem NIC one Broadcom® Vendor and model BCM5708C number NetXtreme® II Type Integrated Microsoft Windows Server 2008 R2, Enterprise Edition SP1 7601 NTFS English Windows Server 2008 R2, Enterprise Edition SP1 7601 NTFS English Windows Server 2008 R2, Enterprise Edition SP1 7601 NTFS English Integrated Broadcom NetXtreme II BCM57710 10 Gigabit PCIe 4 x Discrete Driver Broadcom 6.2.9.0 Microsoft 4.8.4.1 Broadcom NetXtreme II BCM57710 10 Gigabit PCIe Integrated Microsoft 4.8.4.1 (12/23/2008) Name Broadcom 6.2.9.0 Broadcom BCM5708S NetXtreme II Email archiving: Storage performance of Dell DX Object Storage Platform vs. a leading object storage platform A Principled Technologies test report 23 Servers Dell PowerEdge 2950 Dell PowerEdge M600 Dell PowerEdge R900 Dell PowerEdge R515 NIC two Vendor and model number Type Driver USB ports Number Type Intel PRO/1000 PT N/A PCI Express Intel 9.13.41.0 N/A N/A Broadcom NetXtreme II BCM5708 Gigabit Ethernet PCI-e Microsoft 4.8.4.1 4 USB 2.0 2 USB 2.0 4 USB 2.0 Intel Pro 1000 PT PCI-e 9.14.180.0 4 USB 2.0 Figure 8: Detailed configuration information for the test servers. Email archiving: Storage performance of Dell DX Object Storage Platform vs. a leading object storage platform A Principled Technologies test report 24 APPENDIX D – ABOUT THE FILE CORPUS Here, we present information on the files that constitute our email corpus. Using the Linux DD command (http://www.redhat.com/mirrors/LDP/LDP/abs/html/extmisc.html), we created a corpus of unique urandom files that simulated an organization’s email files. The average object size for all files used in testing was 8KB. Email archiving: Storage performance of Dell DX Object Storage Platform vs. a leading object storage platform A Principled Technologies test report 25 ABOUT PRINCIPLED TECHNOLOGIES Principled Technologies, Inc. 1007 Slater Road, Suite 300 Durham, NC, 27703 www.principledtechnologies.com We provide industry-leading technology assessment and fact-based marketing services. We bring to every assignment extensive experience with and expertise in all aspects of technology testing and analysis, from researching new technologies, to developing new methodologies, to testing with existing and new tools. When the assessment is complete, we know how to present the results to a broad range of target audiences. We provide our clients with the materials they need, from market-focused data to use in their own collateral to custom sales aids, such as test reports, performance assessments, and white papers. Every document reflects the results of our trusted independent analysis. We provide customized services that focus on our clients’ individual requirements. Whether the technology involves hardware, software, Web sites, or services, we offer the experience, expertise, and tools to help our clients assess how it will fare against its competition, its performance, its market readiness, and its quality and reliability. Our founders, Mark L. Van Name and Bill Catchings, have worked together in technology assessment for over 20 years. As journalists, they published over a thousand articles on a wide array of technology subjects. They created and led the Ziff-Davis Benchmark Operation, which developed such industry-standard benchmarks as Ziff Davis Media’s Winstone and WebBench. They founded and led eTesting Labs, and after the acquisition of that company by Lionbridge Technologies were the head and CTO of VeriTest. Principled Technologies is a registered trademark of Principled Technologies, Inc. All other product names are the trademarks of their respective owners. Disclaimer of Warranties; Limitation of Liability: PRINCIPLED TECHNOLOGIES, INC. HAS MADE REASONABLE EFFORTS TO ENSURE THE ACCURACY AND VALIDITY OF ITS TESTING, HOWEVER, PRINCIPLED TECHNOLOGIES, INC. SPECIFICALLY DISCLAIMS ANY WARRANTY, EXPRESSED OR IMPLIED, RELATING TO THE TEST RESULTS AND ANALYSIS, THEIR ACCURACY, COMPLETENESS OR QUALITY, INCLUDING ANY IMPLIED WARRANTY OF FITNESS FOR ANY PARTICULAR PURPOSE. ALL PERSONS OR ENTITIES RELYING ON THE RESULTS OF ANY TESTING DO SO AT THEIR OWN RISK, AND AGREE THAT PRINCIPLED TECHNOLOGIES, INC., ITS EMPLOYEES AND ITS SUBCONTRACTORS SHALL HAVE NO LIABILITY WHATSOEVER FROM ANY CLAIM OF LOSS OR DAMAGE ON ACCOUNT OF ANY ALLEGED ERROR OR DEFECT IN ANY TESTING PROCEDURE OR RESULT. IN NO EVENT SHALL PRINCIPLED TECHNOLOGIES, INC. BE LIABLE FOR INDIRECT, SPECIAL, INCIDENTAL, OR CONSEQUENTIAL DAMAGES IN CONNECTION WITH ITS TESTING, EVEN IF ADVISED OF THE POSSIBILITY OF SUCH DAMAGES. IN NO EVENT SHALL PRINCIPLED TECHNOLOGIES, INC.’S LIABILITY, INCLUDING FOR DIRECT DAMAGES, EXCEED THE AMOUNTS PAID IN CONNECTION WITH PRINCIPLED TECHNOLOGIES, INC.’S TESTING. CUSTOMER’S SOLE AND EXCLUSIVE REMEDIES ARE AS SET FORTH HEREIN. Email archiving: Storage performance of Dell DX Object Storage Platform vs. a leading object storage platform A Principled Technologies test report 26