1
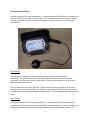
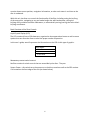
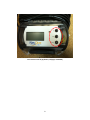
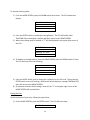
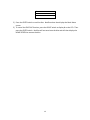
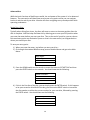
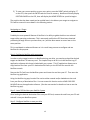
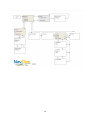
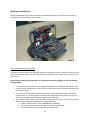
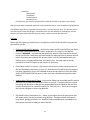
Diver Navigation System User’s Guide 1 Copyright 2014 Applied Logic Engineering, Inc. All rights reserved. Statement of Liability Our products and services are provided "as is" without warranty of any kind, either expressed or implied unless otherwise stated. In no event shall Applied Logic Engineering, Inc. be liable for any damages including, but not limited to, direct, indirect, special, incidental or consequential damages or other losses arising out of the use of or inability to use our products and services. 2 Table of Contents Introduction to NavDive……………………………………………………………………………………………………….. 3 Description of the System GPS Receiver…………………………………………………………………………………………………………….. 5 Diver Console Basic Overview……………………………………………………………………………………………… 5 Liquid Crystal Display (LCD)…………………………………………………………………………… 6 Operational controls……………………………………………………………………………………… 6 Starting Out – Using NavDive for the first time Using NavDive while conducting a dive…………………………………………………………………….. 9 Saving a position to memory…………………………………………………………………………………….. 10 Using the Tracking feature………………………………………………………………………………………… 11 Ending the Dive…………………………………………………………………………………………………………. 12 Advanced Use Saving your Entry Position………………………………………………………………………………………… 14 Navigating to a Target………………………………………………………………………………………………. 15 System flowchart………………………………………………………………………………………………………………….. 19 Working with NavDive data Accessing NavDive’s memory card……………………………………………………………………………. 20 Using the NavDive Log PC Application……………………………………………………………………….. 20 Pre Dive…………………………………………………………………………………………………………. 21 Post Dive……………………………………………………………………………………………………….. 22 Appendix A : File Formats…………………………………………………………………………………………………………………… 27 3 Introduction to NavDive Congratulations on your purchase of NavDive! You will find that NavDive is a useful tool that is fun to use, extending your ability to capture important data regarding your diving experience and use that data to map important dive locations. NavDive was designed and developed by divers for divers. We developed the product based on work we were doing with marine archeologists who needed to translate GPS coordinates they had acquired during side-scan sonar surveys into useable data that could be used to guide divers to specific positions while underwater. NavDive easily read the coordinates obtained and gave the diver the ability to select any specific target and swim directly to it, even in very poor visibility situations. Our hope is that you find NavDive to be a powerful and useful product whether you are using it for commercial or for recreational purposes. 4 Description of the System NavDive consists of two main components -- a surface deployed GPS receiver / transmitter that receives a GPS fix and transmits it to the diver. The second component is a receiver / display unit that is used by the diver to determine position and to determine a course to desired destinations. GPS Receiver The topside unit consists of a self-contained, waterproof GPS receiver and data transmitter. The GPS receiver obtains the lat/long postion information from satellites overhead. This information is then converted to a usable format and sent on to the diver's display/console every second. This unit mounts to the diver's flag float. The base of the receiver is magnetic, so there are many choices in terms of mounting. The receiver is also waterproof, but only on the surface. DO NOT take the receiver below depths of about a foot – it is not designed to be waterproof at depth. Diver Console The display/console unit is carried by the diver. It is a waterproof, self-contained unit that receives the GPS information from the topside GPS receiver/transmitter. This unit contains an integral LCD display and momentary contact switches that are operated by the diver. The 5 console shows current position, navigation information, or other unit status in real time as the dive is conducted. With this unit, the diver can control the functionality of NavDive, including saving the lat/long of the entry point, navigating to any pre-loaded target site while underwater, saving the lat/long of any notable site while underwater, or automatically storing (tracing) the entire dive's lat/long coordinates. Basic Overview of the Diver Console Liquid Crystal Display (LCD) The LCD contains 4 lines of 20 characters, organized to show operational status as well as menu options that can allow the diver to select the proper modes of operation. In this user’s guide, we will represent the information on the LCD via this type of graphic: Main Menu > 1 Pre Dive 2 Start Dive 3 Post Dive Momentary contact switch controls NavDive contains 4 switch controls that are accessible by the diver. They are: System Power – this switch turns the power on to the diver console as well as the GPS receiver. It is located on the front edge of the unit (as shown below): 6 Location of Power switch Cursor (Up/Down) -- this switch is used to move through the menuing system of NavDive Option (left/right) – this switch is used to display options available within the menu system Enter – this switch is used to select the current option being displayed on the LCD 7 User interface controls (Up/Down, Left/Right, and ENTER) 8 Starting Out – Using NavDive for the first time This section will cover the basic operation of NavDive using a few of the key features. It will detail the features most divers will use the first few dives before detailing the more advanced capabilities of the system. In this scenario, the diver will learn how to successfully get NavDive powered up, operational, and use the realtime display on the diver console to view current GPS position, to save GPS position to memory on demand, and to enable the tracing feature to track the dive as it progresses Using NavDive to conduct a dive To get setup for your first use of NavDive, follow the steps below: 1) Remove the NavDive unit from its carrying case. 2) Determine how you want to mount the GPS receiver to your flag float. There are many options / choices here, so we will not attempt to detail installation. The only important thing to keep in mind is that the receiver needs a clear line-of-sight to the sky to work properly. Once the receiver is mounted, route the cable to the diver console so that it will provide a secure tether that will withstand underwater handling by the diver. It’s recommended that some cable strain relief be implemented by attaching the cable itself to the float so that the receiver mount does not bear all of the pressure from cable handling. 3) On the diver console – be sure that a SD memory card is installed and properly configured for use with NavDive. 4) Also on the diver console, be sure that the unit is properly closed and latched. 5) Turn the power on to the NavDive diver console. Note that the console also supplies power to the GPS receiver. The red LED on the side of the GPS receiver will begin flashing as the unit attempts to sync to the satellites to determine your initial position. 6) When the red LED on the GPS receiver goes from flashing to steady ON, the receiver has locked onto satellite reception and you are ready to proceed with your dive. 7) On the diver console, you will see the following: Main Menu > 1 Pre Dive 2 Start Dive 3 Post Dive 8) As we will not use any advanced features on this first dive, we’ll skip the PRE DIVE option. Press the DOWN switch on the console to move the cursor to 2 START DIVE and then press the ENTER switch on the console. You should now see the following: Select Dive Num: 1 9 9) Since this is the first dive of the day, you can simply press the ENTER switch. If this happened to be your second or third dive of the day, you can use the RIGHT switch to increment the dive number to reflect the correct number for your next dive, followed by pressing the ENTER switch. You should then see the following: Save Entry? N 10) Since saving your entry position is considered an advanced function, we will skip it here and cover it later. For now, just press the ENTER switch. You should then something similar to the following: N 44 56.344 W092 16.987 Heading:125.3876 5 This is called the HOME SCREEN and is the primary view that you will have when using NavDIve underwater. It displays the current latitude and longitude coordinates as well as your current heading as you begin your dive. The single digit on the far right of the second line on the display represents the battery condition (5-full to 1 – discharged). This allows you to determine if your batteries have enough power to conduct a dive. It is advisable to always have at least a “3” indicated before starting a dive to insure enough power to conduct a dive. 11) You are all set to start. Pay out some cable as needed and observe the console unit. You will see the lat/long position and heading change as you swim, reflecting your current position as you move underwater. 12) As you conduct your dive, pay attention to the NavDive cable. You will want to make sure that you pay out cable as you move deeper and take up the cable on the reel as you move from deeper depths to shallower depths. This will keep the cable for getting tangled or hung up on the bottom. It will also improve your GPS position accuracy by keeping the GPS receiver on your flag float as close to directly overhead as possible. 10 Saving an underwater position to memory One of the most useful features of NavDive is the ability to save your current GPS position (latitude and longitude) whenever you find something underwater that is noteworthy. This could be a wreck, a training platform, geologic feature, or maybe just an interesting part of the reef. To save your current position with NavDive, follow the steps below: 1) Get as close as possible to the item/area you want to capture. Then make sure the cable is taut and that your flag float is directly overhead. 2) From the HOME SCREEN, press the DOWN switch once. You should then see the following: Save Position: Cancel 3) To cancel the SAVE POSITION operation, you can simply press the ENTER switch when the CANCEL option is displayed on the LCD. NavDive will then return to the HOME SCREEN without saving your position. 4) To save your position, press the RIGHT switch to scroll through the available descriptions that you can select to designate the position to be saved. NavDive is preloaded with a number of useful tags (i.e. small wreck, large wreck, platform, geologic, etc.). The last selection in the list is OTHER, which can be used if none of the other tags are appropriate. 5) Once you have selected the proper tag and it is displayed on the LCD, press the ENTER switch. The LCD will then briefly display POSITION SAVED on the LCD and the system will automatically return to the HOME SCREEN. 6) NavDive will create a record on the SD Card for this position in the file for this dive under the SAVED POSITIONS folder. The record will contain the date/time, description tag, and lat/long position. Using the Tracking feature NavDive contains a useful feature called “tracking” that, once enabled, automatically saves your GPS position to memory every 10 seconds during the dive. The captured information can then be used to create a “trace” of the path you swam during the dive – useful for documenting search patterns, courses followed, etc. 11 To activate tracking mode: 1) From the HOME SCREEN, press the DOWN switch three times. The LCD should then display: Track Position? Y 2) Press the ENTER switch to enable the tracing feature. The LCD will briefly show TRACKING ON on the display. NavDive will then return to the HOME SCREEN. 3) When the tracking mode is enabled, a “T” will be displayed in the upper right corner of the LCD: N 44 56.344 W092 16.987 Heading: 125.3876 T 5 4) To disable to tracking feature, from the HOME SCREEN, press the DOWN switch 3 times. The LCD will then show the following: Track Position? Y 5) Press the RIGHT switch once to change the Y selection on the LCD to N. Then press the ENTER switch to turn off tracking. NavDive will briefly display a message TRACKING OFF, then will return to the HOME SCREEN. 6) As a positive indicator that tracking is now off, the “T” in the upper right corner of the HOME SCREEN will now be blank. Ending the Dive At the conclusion of your dive, follow the steps below: 1) On the HOME SCREEN, press the ENTER switch. The LCD will then show: End Dive? 12 Y 2) Press the ENTER switch to end the dive. NavDive when then display the Main Menu screen. 3) To cancel the END DIVE function, press the RIGHT switch to display N on the LCD. Then press the ENTER switch. NavDive will not terminate the dive and will then display the HOME SCREEN to resume the dive. 13 Advanced Use While the basic functions of NavDive are useful, the real power of the system is in its advanced features. The next section will detail how to save your entry point so that you can navigate back to it and the end of your dive. We also will cover navigating to any stored position while operating underwater. Saving Entry Point Typically when diving from shore, the diver will want to return to the same position after the dive is complete. NavDive helps facilitate this by allowing you to save your GPS position when you enter the water before you start your dive. Then at the end of your dive, you can choose this saved entry point as a destination (more on that in the next section) to navigate back to where you started your dive. To save your entry point: 1) When you enter the water, just before you start your dive – 2) Go through the standard NavDive setup process detailed above and get to the Main Menu: Main Menu > 1 Pre Dive 2 Start Dive 3 Post Dive 3) Press the DOWN switch on the console to move the cursor to 2 START DIVE and then press the ENTER switch on the console. You should now see the following: Select Dive Num: 1 4) If this is the first dive of the day, you can simply press the ENTER switch. If this happens to be your second or third dive of the day, you can use the RIGHT switch to increment the dive number to reflect the correct number for your next dive, followed by pressing the ENTER switch. You should then see the following: Save Entry? N 14 5) To save your current position as your entry point, press the RIGHT switch to display “Y” on the LCD, then press the ENTER switch to save to memory. NavDive will briefly display POSITION SAVED on the LCD, then will display the HOME SCREEN as your dive begins. The position that has been saved can be recalled later in the dive as your target to navigate to. This will be covered in more detail in the following section. Navigating to a Target Probably the most powerful feature of NavDive is its ability to guide the diver to a selected target while operating underwater. This is extremely useful when GPS have been obtained previously (through sonar or previous dives, etc.) and the diver wants to return later to the same position. This is considered an advanced feature as it is a multi-step process to configure and use NavDive for this purpose. Step 1: Configuring NavDive with target data In order to select target locations on NavDive during your dive, you need to preload the desired targets on NavDive’s SD memory card. The simplest way to do this is via the NavDive Log PC application software which was included with your system. This PC application allows you to copy location files from your PC’s destination file library on the SD Card for use with the NavDive console. Remove the SD Card from the NavDive system and insert the card into your PC. Then start the NavDive Log application. Using the NavDive Log app, location files can be either created and/or loaded onto the card from your library of destination files. You can access this function on the LOAD CARD FOR NAVDIVE tab on the application software. (See the next section for details on how to use the NavDive Log app). Step 2 : Install SD Card into your NavDive System After loading the desired destination files onto your SD Card, remove the card from your PC and reinstall it into your NavDive system. Step 3 : Configure NavDive to start your dive 15 1. To configure NavDive at the start of the dive in which you are expecting to navigate to the target locations you loaded, select PRE DIVE from the MAIN MENU by pressing the ENTER switch after powering on the NavDive unit. Main Menu > 1 Pre Dive 2 Start Dive 3 Post Dive 2. You will then see the following menu: Pre Dive > 1 Select DestFile 2 3 Main Menu Just press the ENTER switch to select the SELECT DESTFILE option. You will then see the following screen: Select Dest File: destfilename where destfilename indicates the first destination file that you loaded onto the SD card from the NavDive Log application program. You can scroll through the list of all destination files that you loaded by using the LEFT and RIGHT switch. 3. Once the correct destination file is chosen and is displayed on the LCD, press the ENTER switch. The system will then return to the PRE DIVE menu. 4. Select MAIN MENU on the PRE DIVE menu by pressing DOWN twice, then press the ENTER switch. 5. At the MAIN MENU, select 2. START DIVE and go through the start dive process to get to the HOME SCREEN. Then go ahead and start your dive. Step 4 : Navigate to a target during your dive 16 Once the dive is underway, you can navigate to any of the specific target locations that are included in the destination file that was selected at the beginning of the dive. You can choose a target to navigate to by following the steps below: 1. On the HOME SCREEN, press the DOWN switch two times to display the NAVIGATE TO screen: Navigate To: Cancel 2. To cancel the NAVIGATE TO function, just press the ENTER switch. This will cancel this function and will cause the software to return to the HOME SCREEN. 3. Otherwise, to select a specific target for navigation, press the LEFT/RIGHT switch to scroll through the list of targets in the list. 4. Once the correct target is found and displayed on the LCD, press the ENTER switch. The software will then return to the HOME SCREEN. Step 5 : Navigating to the target Now that you have selected a target and the navigation process has started, the HOME SCREEN will look similar to the following: N 44 32.7892 W093 22.9872 Heading:178.23 Target@ 190.45 5 178ft The fourth line on the LCD displays the information necessary for navigating to the target. There are two important pieces of information on this line: The TARGET HEADING (indicated by the first set of numbers) And the DISTANCE TO TARGET (indicated by the numbers to the far right on the LCD’s 4th line) To navigate to the selected target, change your swimming direction and line up the current heading (shown on line 3 of the LCD) with the target heading (shown on line 4) and maintain that swimming course. As you move towards the target location, the DISTANCE TO TARGET (measured in feet) will continue to show the distance remaining until the target is reached. 17 Maintain your heading by matching the current heading to the target heading to reach your target. Canceling the navigation function You can cancel an active navigation session by following these steps: 1) On the HOME SCREEN, press the DOWN switch twice to display the NAVIGATE TO: screen 2) On the NAVIGATE TO: screen, just press the ENTER switch when CANCEL is displayed: Navigate To: Cancel 3) The software will then cancel the navigation session and will return to the HOME SCREEN. 18 19 Working with NavDive data All data collected during your dive is stored on a removable SD memory card so that it can be easily transferred to a PC for storage and/or analysis. Location of SD memory card Using the NavDive Log PC Application The NavDive system includes a PC software application that allows the user to load the NavDive console with useful information before the dive and download valuable dive information from the console unit after the dive. Before using the NavDive Log Application, it is important to properly configure your PC by following the steps below: 1. It is important to note that to use the Google Earth functions in the NavDIve Log software, you must first install Google Earth on your PC and you must have an active Internet connection when using NavDive Log. 2. Your PC must have the ability to work with SD Cards. If your particular PC does not have this capability built-in, you can purchase a SD Card reader that plugs into any USB port on your PC. These are available from most electronic stores (i.e. Best Buy, etc.) 3. The software utilizes a folder on your PC that is used as your file “library”. This must be created before using the NavDive Log application. Follow these steps: a. Create a folder on your C: drive called NavDive (c:\NavDive) b. Then copy all directories and files from the SD Card into this folder c. At the end of the process, you should have the following: 20 C:\NavDive \Destinations \SavedPaths \Saved Positions Descriptions.txt [You may also copy the files into these folders from the SD Card as the start to your library] With the setup above completed and the SD card inserted into the PC, start the NavDive Log application. The software application is organized into two sections – Pre Dive and Post Dive. The Pre Dive section will allow you to format and configure a new SD Card for use with NavDive by preloading it with the directory structure, destinations files that you choose, and the position description file. Pre Dive Before the dive, there are several items to configure on the SD Card that will be inserted into the NavDive console Format the SD Card for NavDive -- this function clears the SD Card of all files and places the proper folders and files on the card in preparation for using it in the NavDIve console. WARNING – any data that was previously written to the card will be erased during this process. Make sure you have copied any important files to another location before formatting the card with this process. [Note : the SD Card supplied with your NavDive unit is already preformatted and ready to use. You only need to use this procedure for new SD Cards that you acquire on your own] Create New Location in Library – this function allows you to create a new location file that will be added to the library on your PC. Note that this file will be blank as no data has been captured for it yet, but individual records can be copied to it from the VIEW SAVED POSITIONS BY DIVE tab later on after you have collected saved positions with NavDive. Load Location Files on the SD Card -- this function allows you to preload specific location files onto the SD Card from the library of files on your PC. These are files you created previously with NavDive or files that you downloaded from the NavDive web site that contain all waypoints for a specific location (i.e. lake, bay. etc.). These are the targets that you will navigate to when using NavDive. Edit Saved Position Description List -- allows you to adjust the list of descriptions that will appear when you save a location using NavDive. Examples include small wreck, large wreck, geology, platform, etc. NavDive comes preloaded with a standard set of descriptions, but you can add your own if desired. 21 Once you have properly configured the SD Card for use, you can close the NavDive Log application, remove the SD Card from your PC, and insert it into the memory card slot in your NavDive unit. You are now ready to dive. Post Dive After the dive, remove the SD Card from the NavDive console and insert it into your PC to: View / Edit Positions by Location – Using this option, you can review all waypoints contained in a particular location fie. You can view this information in table form or graphically using Google Earth. Additionally, you can also annotate the record by editing the description for the location saved (for example, "Wooden Wreck"). After making any changes to the data in the table, remember to click the SAVE FILE button to save he changes to the file on the SD card. 22 View Saved Positions by Dive – select this option to review the saved positions you created for each dive made. You can view the information in a table form or it can be viewed graphically using Google Earth. 23 Any of the items from a particular dive can also be individually selected and saved to any location file for future dives. Click on the selector column in the data grid to select a particular record. Then click on the COPY TO LOCATION button. You will then be asked to select a location file in which to save the record in. Choose the correct filename and click OK to copy the selected record from the data grid to the location file. The record will be appended to the end of the location file’s content. 24 View Position Tracking by Dive – choose this option to review your saved dive tracking file for any dive. This information can be displayed in a table format or can be viewed in Google Earth to allow you to see the exact path you swam during your dive. If viewed in the table, NavDive Log will show each position saved during the dive. Each position is recorded every 10 seconds while the tracking feature was enabled in the NavDive console. 25 26 Appendix A : File Format NavDive stores its files in a particular format on the SD memory card. This next section describes the file structure and each particular file format. This information is not necessary to operate NavDIve – it is being provided for users that want to use the data created by NavDIve for other purposes. Basic directory structure When the NavDive card is formatted using the NavDive Log application software, it creates the following file structure on the card: Destinations (folder) Saved Paths (folder) Saved Positions (folder) Descriptions.txt (file) The Destinations folder is used to hold all of the destination files for NavDive. These are files that contain all of the target locations for a particular site or area. The Saved Paths folder contains all of the files saved by NavDive when using the tracking feature. The Saved Positions folder contains all of the files saved by NavDive when specific positions are saved during the dive. The Descriptions.txt file holds all of the text descriptions used when saving a position with NavDive. This is a text file that can be edited to add or edit new descriptions as desired. When the card is initially formatted, the Destinations, Saved Paths, and Saved Positions folders are all empty. File structure for Destinations files Filename: Text denoting the location (i.e. Smiths Bay, Eagle Lake, etc.) Record format : ASCII in the following format – Description, N or S, Lat coords, E or W, Long coords <crlf> Example : Wreck1,N,4456.0452,W,09331.6795<crlf> File structure for Saved Paths files Filename : Text denoting date and dive number in this format -- DDMMYYVV Record format – DDMMYY, HHMMSS,N or S, Lat coords, E or W, Long coords <crlf> Example : 060913,002925.797,N,4507.5001,W,09326.7418<crlf> File structure for Saved Positions files Filename : Text denoting date and dive number in this format -- DDMMYYVV 27 Record format – DDMMYY, HHMMSS,Desc,N or S, Lat coords, E or W, Long coords <crlf> Example : 040913,025111.000,Plane,N,4507.5022,W,09326.7368<crlf> File structure for Descriptions.txt file Filename : MUST be Descriptions.txt and MUST be located in the root of the SD Card Record format – textdescpription <crlf> Example : Platform <crlf> 28