1
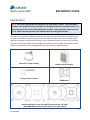
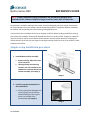
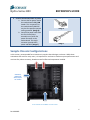
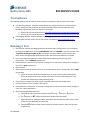
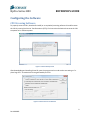
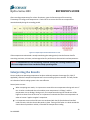
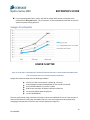
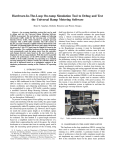
Corsair Cooling Hydro Series H50 Reviewer’s Guide PN: 49-00051 Hydro-Series H50 REVIEWER’S GUIDE Table of Contents Contents Installation ............................................................................................................................................................... 3 Sample Chassis Configurations ..................................................................................................................................... 6 Summary of Chassis Considerations ........................................................................................................................... 7 Test Software .......................................................................................................................................................... 8 Running a Test ........................................................................................................................................................ 8 Configuring the Software .................................................................................................................................... 9 CPU Stressing Software .................................................................................................................................................... 9 Data Logging Software.................................................................................................................................................... 10 Interpreting the Results ................................................................................................................................... 12 Sample Test Results ......................................................................................................................................................... 13 Corsair Contact Information ........................................................................................................................... 14 2 PN: 49-00051 Hydro-Series H50 REVIEWER’S GUIDE Installation NOTE: The Corsair Cooling H50 was designed to be used inside a chassis. The performance numbers and installation instructions below are designed to provide an example of this. It is important to test the Corsair Cooling H50 inside a chassis. Testing with the components set up ‘on a desk’ does not provide a real-world measure of cooling performance. This section covers general installation of the Corsair Cooling H50 High Performance CPU Cooler as well as chassis considerations to ensure proper airflow and maximum performance. This installation guide addresses installation and performance testing in typical enthusiast chassis, but any chassis not shown here can be utilized (provided it has the appropriate 120mm fan mount location) using these principles. The primary components of the H50 High Performance CPU cooler are identified below: CPU Cooler / Pump assembly Radiator (heat exchanger) 4 x long screws/4 x washers 120mm Fan Mounting brackets for Intel LGA 1366 (left) and Intel LGA 775 (right) (AMD AM2/AM3 brackets available from Corsair upon request) 3 PN: 49-00051 Hydro-Series H50 REVIEWER’S GUIDE NOTE: To obtain maximum cooling performance, the H50 has been designed to be installed with the 120mm cooling fan acting as a cold-air intake, NOT an exhaust fan. Our objective is to obtain maximum CPU cooling. The H50 is designed to draw in cold air from outside the chassis directly across the radiator, thereby maximizing the delta T (temperate difference between the radiator and surrounding air) and maximizing cooling performance. In most chassis the rear 120mm fan acts as an exhaust by default. When installing the H50 the existing rear exhaust fan should be removed and replaced with the fan in the box of H50, acting as an intake fan (note the arrows on the fan, which denote airflow direction and fan rotation direction). Changing the airflow direction of the rear fan may require reversing an existing intake fan to act as an exhaust in order to balance the airflow. Simple 6-step Installation procedure 1. Install Radiator and Fan assembly a. Remove existing 120mm fan from rear of enclosure b. Utilizing existing fan mounting locations, use the included screws and washers to mount the fan and radiator assembly. (see Image 1) Image 1 2. Install the appropriate backplate to the motherboard. a. Pick the appropriate backplate and mounting ring, then peel off the adhesive backing to the ring and place it on the back of the motherboard. (see Image 2) Image 2 4 PN: 49-00051 Hydro-Series H50 REVIEWER’S GUIDE 3. Set the CPU retention bracket a. Place the appropriate retention bracket on the motherboard. (Image 3) b. Tighten screws only ¼ to ½ a turn. c. DO NOT FULLY TIGHTEN SCREWS AT THIS TIME. Image 3 4. Install CPU Cooler/Pump assembly a. Remove the protective plastic shell from the bottom of the pump, but leave the Thermal Interface Material (TIM) in place. b. Press the pump down through the openings on the mounting ring, and then twist until the tabs are lined up with the brackets on the pump housing. (Image 4) Image 4 5. Tighten the screws in crosswise order a. Once tabs are lined up, tighten the screws in crosswise order until unit no longer rotates and feels secure. (Image 5) Image 5 5 PN: 49-00051 Hydro-Series H50 REVIEWER’S GUIDE 6. Connect fan and CPU Cooler to power a. Connect the fan power lead to the motherboard’s CPU_FAN header. This is important, as the motherboard’s BIOS will vary the fan speed for optimal cooling potential. (Image 6) b. Connect the power cable from the CPU Cooler/Pump assembly to any other fan power connector on the motherboard. This single connector provides both power and RPM. (Image 7) Image 6 Image 7 Sample Chassis Configurations In this section, recommended fan orientations in popular chassis designs are shown. While these orientations will work for many users, it is important for each user to evaluate system performance and re-orient fans, where necessary, based on overall airflow and components installed. Radiator mounted with fan as an Intake Corsair Obsidian Series 800D Full Tower Chassis 6 PN: 49-00051 Hydro-Series H50 REVIEWER’S GUIDE Radiator mounted with fan as an Intake Radiator mounted with fan as an Intake Exhaust Exhaust Sonata RC690 Radiator mounted with fan as an Intake Intake Radiator mounted with fan as an Intake Exhaust P180 COSMOS S Air Summary of Chassis Considerations It is important to evaluate the overall airflow of a chassis prior to testing with the Corsair H50: Ensure there is a roughly equal amount of intake and exhaust air. Orient the rear fan so that it always blows cool air over the radiator. 7 PN: 49-00051 Hydro-Series H50 REVIEWER’S GUIDE Test Software The following software may be used to stress the system components and record the test results: CPU stressing software. ‘Prime95’ stresses the CPU by running Fast Fourier Transformations (FFTs), causing the CPU to operate at its maximum power. Both versions below are multithreaded, to guarantee all cores of the CPU are stressed. a. A 64-bit version can be found here: http://files.extremeoverclocking.com/file.php?f=205 b. A 32-bit version can be found here: http://files.extremeoverclocking.com/file.php?f=103 Data logging software. Everest Ultimate is a data logging application used to record temperatures and test results. A free trial version is available at http://www.lavalys.com/ Running a Test 1. Start Everest Ultimate data logging software and ensure data is being saved. This can be done by going to the FILE menu, choosing PREFERENCES and then LOGGING in the list to the left. Click “Log Sensor Readings to HTML log file” and choose a location where you will save the files. Next, choose the appropriate temperatures and/or data from the checkmark list. Hit OK. 2. Use a stand-alone thermometer or other temperature measuring device to log room temperature. This is AMBIENT temperature. 3. Record Data for a minimum of 15 minutes, making sure to record room temperature during this time. This is IDLE temperature. 4. Start Prime95. 5. Allow system to heat up for 30 minutes or until temperatures reach a steady value. This is LOAD temperature. a. Check the Everest output file of temperature vs. time to verify steady temperatures. Once the temperatures reach a steady point over a 5 minutes operating point, they should have reached their steady operating state. 6. Close Everest, and open the HTML Log file created and document the temperatures. 7. Re-launch Everest. This will create a new Log file. 8. Record Data for a minimum of 15 minutes, making sure to record room temperature during this time. This is IDLE temperature. 9. Open the average temperature files. a. Calculate the CPU temperature increase using Taverage - Tambient = Tincrease. b. The Tincrease, or ΔT, will be the difference between IDLE and LOAD. c. Repeat process for additional coolers, document room temperature each time, as room temps can vary depending on time of day. d. Compare ΔT relative to other coolers tested in the same manner, and at similar room temperatures. 8 PN: 49-00051 Hydro-Series H50 REVIEWER’S GUIDE Configuring the Software CPU Stressing Software To properly stress the CPU, download Prime95 (or an equivalent) stressing software. Prime95 stresses the CPU by running Fast Fourier Transformations (FFTs), CPU-intensive calculations that cause the CPU to operate at its maximum power. Figure 1: Prime 95 Startup Screen After downloading and installing Prime 95, open the program and run and set the test setting to “Inplace large FFTs” to maximize the heat generated by the CPU. Figure 2: Prime 95 Torture Test Selection 9 PN: 49-00051 Hydro-Series H50 REVIEWER’S GUIDE The torture test should be run for a minimum of 30 minutes to ensure the computer has reached a steady temperature. Data Logging Software While there are other software choices for logging CPU temperatures, Corsair recommends using Everest Ultimate (free 30-day trail available at http://www.lavalys.com/) as it can be used to log temperature vs. time and compute average temperatures. Temperature Readout Figure 11: Everest Ultimate Edition Sensor Readout The Everest data logging feature will save the data to a specified file. It will provide temperatures vs. time and the average performance. The logging preferences can be found under preferences (FilePreferences - Logging). 10 PN: 49-00051 Hydro-Series H50 REVIEWER’S GUIDE Figure 12: Logging of Everest Data Choose a file name and easy to find location for the data files for future use. Figure 13: Specifying Everest Data Location and Filename 11 PN: 49-00051 Hydro-Series H50 REVIEWER’S GUIDE After recording temperatures for at least 30 minutes, open the Everest output file containing Timestamp, CPU usage, and Temperatures. Check this file to ensure the CPU core temperatures remained steady during the recording period. Figure 14: Sample Output of Performance Data vs. Time If the temperatures maintained a steady-state during the testing period, view the Everest data file containing maximum, minimum, and average values for performance characteristics and temperatures. NOTE: If temperatures are still fluctuating, continue running the stressing software until CPU core temperatures have reached a steady operating state. Interpreting the Results Once a steady-state operating temperature has been achieved, compare the average CPU, GPU (if applicable), and other component temperatures from one cooling system to another. This will provide an indication of which cooling system is the most effective. Several points to note… When comparing test results, it is important to record the room temperature during each test. If test 1 results are observed when the ambient room temperature is 25 deg C, and the temperature rises to 28 deg C during test 2, CPU temperatures during the second test will be higher than those from the first test. It is important to maintain the same room temperature in order to have an “apples to apples” comparison. It is important to ensure that CPU tests are conducted with the CPU/motherboard installed inside a chassis, with the chassis side-panels in place. Testing a CPU cooler on a desk outside the chassis does not provide a realistic, real-world CPU temperature reading. 12 PN: 49-00051 Hydro-Series H50 REVIEWER’S GUIDE If you are getting odd results, confirm that the fan power lead has been connected to the motherboard’s CPU_FAN header. This is important, as the motherboard’s BIOS will vary the fan speed for optimal cooling potential. Sample Test Results LOWER IS BETTER Figure 15: Corsair H50 vs. Thermalright Ultra 120 Extreme and Stock Intel Cooler in Corsair Obsidian Series 800D Chassis (*fan used for both coolers was Corsair fan included in H50 bundle) Sample test results achieved with the following hardware: Intel Core i7 965 overclocked to 3.46 GHz @ 1.3V vcore Asus Rampage II Extreme Motherboard (all fan controls turned off) 2x ATI Radeon 4870X2s in Crossfire X mode 6GB Corsair Dominator GT Memory without Airflow fan Corsair P256 SSD for Operating System Corsair HX1000W PSU Test was performed by using 4 iterations of Orthos to stress the individual CPU cores. Each iteration of Orthos was balanced on two hyper-threaded virtual CPU cores. All temperatures were gathered by averaging the temperature of all four cores and are displayed in Degrees C. 13 PN: 49-00051