1
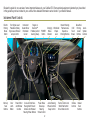
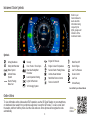
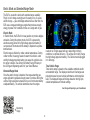
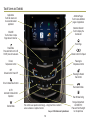
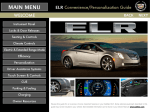
2014 C onvenience /P ersonalization G uide Review this guide for an overview of some important features in your Cadillac ELR. Some optional equipment (denoted by ♦) described in this guide may not be included in your vehicle. More detailed information can be found in your Owner Manual. Instrument Panel Controls Electric Parking Brake Switch Memory Seat Buttons Turn Signal Lever/ Pedestrian Safety Signal Lever/Exterior Lamps Control Door Latch Button Instrument Cluster/Driver Information Center Power Mirror and Window Controls Regen on Demand™ Paddles (behind steering wheel) Cruise Control/Voice Recognition/Forward Collision Alert/Heated Steering Wheel Buttons POWER Button Power Rake/ Telescope Steering Wheel Control 2 Hazard Warning Charging Windshield Flashers/Lane Status Departure Wipers Indicator Warning Buttons Lever Audio Steering Wheel Controls/ 5-way Control Traction Control and StabiliTrak Button/ Drive Mode Control CUE Touch Screen Climate Controls Glove Box/ Parking Audio Assist System Buttons Controls Heated Seat Buttons Instrument Cluster Symbols Refer to your Owner Manual to learn about the information being relayed by the lights, gauges and indicators of the instrument cluster. Symbols Airbag Readiness Safety Belt Reminder Brake System Antilock Brake System PARK Electric Parking Brake Set Engine Oil Pressure Engine Coolant Temperature Service Electric Parking Brake Vehicle Ahead Indicator StabiliTrak/Traction Control Traction Control Off Security Door, Hood or Trunk Open Rear Seat Safety Belt Reminder Lane Departure Warning Lights On Reminder 12V Charging System StabiliTrak Off Check Engine Low Tire Pressure Cruise Control Low Fuel READY Vehicle Ready See In Brief in your Owner Manual. Online Videos To view informative online videos about ELR operation, use the QR Code Reader on your smartphone, or download a free reader from your phone’s app store, to scan the QR codes. To scan a code, start the reader, and then hold the phone over the code and scan. Some phones will recognize the code automatically. 3 Online Videos Remote Keyless Entry Transmitter (Key Fob) Unlock Press to unlock the driver’s door. Press again to unlock all doors. Press and hold to open all windows from outside the vehicle. Key Release Press the button at the bottom of the transmitter to pull the door key out of the transmitter. Use the key to unlock the trunk. Remote Start Press the Lock button and then press and hold the button until the turn signal lamps flash to start the vehicle and condition the passenger cabin temperature from outside. The climate control system and rear window defogger (if needed) will turn on. Depending on conditions and vehicle settings, the engine may start. After entering the vehicle, press the brake pedal and then press the POWER button before driving. • To cancel a remote start, press and hold the button until the parking lamps turn off. • Only two remote starts are allowed between ignition cycles. • It’s RECOMMENDED to use this feature when the vehicle is plugged in to allow energy from the electrical outlet to assist in getting the cabin to a comfortable temperature and to leave more battery energy for driving. Lock Press to lock all doors. Panic Alarm Press and release to locate the vehicle. Press and hold for three seconds to sound the panic alarm. Trunk Release Press and hold to open the trunk. Keyless Access The transmitter must be within 3 ft. (1m) of the vehicle to operate the ELR. Unlock – With the transmitter within range of the door, press the touchpad at the rear edge of the door to unlock and open the door. Lock – If Passive Locking is turned on, the vehicle will lock after all doors are closed and the transmitter is removed from the vehicle. Note: To change the Remote Lock, Remote Unlock and Remote Start settings, go to Remote Lock, Unlock, Start in the Vehicle Settings menu. See Keys, Doors and Windows in your Owner Manual. 4 POWER Button Conditions for the Engine Starting When vehicle power is ON, the engine may start independent of the vehicle being plugged in or completely charged. Conditions that may cause the engine to start include: • High voltage propulsion battery charge is low • High voltage propulsion battery temperature is hot or cold • Cold ambient temperatures • Hood is open • Engine and Fuel Maintenance Modes (occur only if the engine has had very limited operation over a long period) The ELR features an electronic pushbutton start. The POWER button is located to the right of the steering wheel, near the top of the instrument panel. The Remote Keyless Entry transmitter must be in the vehicle to start the ELR. Starting the Vehicle/ON With the vehicle in Park or Neutral, press the brake pedal and then press the POWER button. A power ON audio cue will sound. The vehicle will not shift out of Park and will display a Charge Cord Connected message if the vehicle is still plugged in. When ON, the instrument cluster will display an active battery and fuel gauge. The engine will start only if needed. The READY light will display on the instrument cluster when the vehicle is ready to be driven. READY Stopping the Vehicle/OFF Shift to Park and then press the OFF audio cue will sound. POWER button. A power Note: The air conditioning compressor, pumps and fan may run at any time, even when the vehicle is OFF, to cool or warm the high voltage propulsion battery. Pressing and holding the POWER button for more than five seconds without pressing the brake pedal will place the vehicle in Service Only Mode. The instruments and audio systems will operate as they do with the vehicle ON, but the vehicle will not be able to be driven. Press the POWER button again to turn off the vehicle. See Driving and Operating in your Owner Manual. Remote Keyless Entry 5 Electric Mode and Extended-Range Mode The ELR is an electric vehicle with extended range capability. Plug it in, let it charge overnight, and it’s ready to run on a pure electric charge — gas- and tailpipe emissions-free. After that, the ELR uses a range-extending gas engine that produces enough energy to power it for hundreds of miles on a single tank of gas. Electric Mode In Electric Mode, the ELR will not use gasoline or produce tailpipe emissions. During this primary mode, the ELR is powered by electrical energy stored in its high voltage propulsion battery. It can operate in this mode until the battery is depleted to a predetermined level. Electric range is affected by colder outside temperatures. During colder months, the energy needed to warm the vehicle’s cabin and high voltage propulsion battery can cause the vehicle’s electric range to decline. See Driving for Better Energy Efficiency in the Driving and Operating section of your Owner Manual. needs to run. Engine speed will vary, depending on driving conditions, to optimize efficiency. The engine will not fully charge the high voltage propulsion battery. The vehicle must be plugged in to recharge. Total Vehicle Range Total vehicle range is based on the available combined electric and extended range. The displayed electric and fuel ranges are projections based on past vehicle performance and charge/fuel level. The displayed ranges will change based on driving style, outside temperature and climate settings. Extended-Range Mode Once the electric charge is depleted, the range-extending gas engine will start to generate enough power to continue driving the vehicle. Engine operation ensures that you will not be stranded by a depleted battery. The vehicle determines when the engine See Driving and Operating in your Owner Manual. Maximizing Range 6 Instrument Cluster Display Cluster Display Zones Press the left or right side of the 5-way control on the right side of the steering wheel to move between the different display zones. Press the 5-way control up or down to scroll through the display menus. Press SEL to select a highlighted item. The instrument cluster features an LCD screen that can be configured in four different themes. Classic – Displays basic information on speed, range and other operations. Classic Enhanced – Displays basic information plus driving efficiency and power usage information. Classic Enhanced theme shown Cluster Configurations 1. Use the 5-way control to select the Configurations page in the left display zone on the cluster. 2.Press SEL (Select) to display the Configurations menu. 3. Scroll to highlight one of the cluster configurations; press SEL. 4.Press to exit the menu. Modern – Displays basic information on speed, range and other operations along with an efficiency ring that glows green to yellow based on driving efficiency. Modern Enhanced – Displays basic information Modern Enhanced theme shown and the efficiency ring plus additional power usage information. Cluster Tutorial To view tutorials about the features of the instrument cluster, with the vehicle in Park, use the 5-way control to select Tutorials from the Settings menu. Configurable Cluster See Instruments and Controls in your Owner Manual. 7 Efficiency Driving Style Your driving style plays a large role in the efficiency of the vehicle. Avoid rapid acceleration or deceleration to help maximize energy efficiency and range. Electric range is maximized at 50 mph and below; higher speeds use more energy and significantly reduce electric range. Efficiency Gauge Use the 5-way control to select an instrument cluster theme that displays the green ring or leaf indicator. While driving, try to keep the ring green or the leaf in the center of the gauge. The ring will turn yellow or the leaf will move up or down during inefficient acceleration or aggressive braking, depending on the cluster theme. Driver-Selected Operating Modes Press the MODE button on the center console to scroll through a menu of operating modes when more performance is needed. After three seconds, the highlighted mode will become active. Tour (Default) – Use in normal driving conditions for efficient operation; is active each time the vehicle is started. Sport – Increases throttle response and adjusts steering and suspension settings for a sportier driving experience. Mountain – Use when planning to drive in mountainous terrain (long grades of 5% or higher); reserves battery power to maintain higher speeds on steep grades. Hold – Use to preserve electric range for later use. Rangeextending operation will engage. Regen on Demand™ Regen on Demand temporarily regenerates energy from the vehicle’s momentum and stores it in the high voltage propulsion battery for later use. To activate Regen on Demand, pull and hold either paddle on the back of the steering wheel without pressing the brake pedal or accelerator pedal. While pulling either paddle, the vehicle will begin to decelerate using regenerative braking. Regen on Demand is deactivated once the paddles are released, or the brake pedal or accelerator pedal is pressed. See Driving and Operating in your Owner Manual. Drive Modes 8 Efficiency Information Displays Touch the Energy icon on the center stack touch screen and then touch the Flow, Charging, or Energy Info icons at the bottom of the screen to display the desired energy information. Power Flow The Power Flow screens indicate the current system operating condition, showing the power flow between the high voltage propulsion battery, electric drive unit and engine. Each component is highlighted when it is active. Charging The Charging screens show the Charge Level and Charge Mode status. The vehicle has three programmable charge modes: • Immediately upon plug-in • Delayed based on departure time • Delayed based on electric rates and departure time Charge Complete times are estimates and most accurate at moderate temperatures. The Charge Level and Charge Mode can be changed by touching the green text. See Charging (page 16). Energy Information The Energy Info screens show the Energy Usage (Electric Mode and Extended-Range Mode) since the last time the vehicle was fully recharged and the Lifetime Fuel Economy of the vehicle. See Instruments and Controls in your Owner Manual. Information Displays 9 Touch Screen and Controls Applications: Touch the screen icon to access the desired application Additional Pages: Touch to view additional pages of applications Interaction Selector: Touch to display the favorites list. VOLUME: Touch arrows or swipe finger above chrome bar Home Page Power/Mute: Press and hold to turn CUE On/Off; press to mute audio Climate Control Fan Speed Driver’s Temperature Control Passenger’s Temperature Control OFF Climate Control Power Off Passenger’s Heated Seat Control Driver’s Heated Seat Control Recirculation Mode AUTO: Automatic Climate Control Operation Defrost Mode REAR Rear Window Defog The controls use capacitive technology – simply touch the icon/text to access a feature or adjust a function See your CUE Infotainment System Manual. 10 Storage Compartment with USB Port: Press and hold the bright bar to open/close CUE System Refer to your Owner Manual for important safety information about using the infotainment system while driving. Portable Audio Devices Two USB ports, an SD media card slot, and an auxiliary audio input jack are located in the center console storage compartment. Connect an iPod®, iPhone®, MP3 player, a USB flash drive or a USB mass storage device to the USB port or insert an SD media card into the card slot. Touch Media until the connected device is shown. CUE will read the device and build a list of voice commands. The touch screen in the center stack can be used to display and adjust Infotainment, Vehicle Personalization and Climate Control settings. Use the controls on the center stack and the touch screen to access the various menus and settings. The center stack controls only need a light touch to operate and work best with bare hands. Use the finger pad rather than the fingertip to minimize response time. The controls work with most gloves but may take longer to respond. Remove gloves if necessary. In the screen menus, a check mark next to an item indicates it is selected/on. Bluetooth® System Before using a Bluetooth-enabled device in the vehicle, it must be paired with the in-vehicle Bluetooth system. Not all devices will support all functions. The pairing process is disabled when the vehicle is moving. For more information, visit www.gmtotalconnect.com. Infotainment CUE uses a Bluetooth or USB connection to link a smartphone, cell phone, USB flash drive or portable audio player/iPod® to the touch screen infotainment display. It offers a variety of entertainment options, including streaming audio from the Internet through a smartphone, and features enhanced handsfree voice control, music information and the ability to play music files from a USB flash drive or an SD media card. For assistance, call 1-855-4-CUE-NOW (1-855-428-3669) or visit www.cadillac.com/cue. Pair a Phone 1. To use voice recognition, press the Push to Talk button on the steering wheel; after the beep, say “Pair phone,” or Use the touch screen to select the Phone icon > Phones > Pair Device. 2. Start the pairing process on the phone. Locate Cadillac CUE on the phone. 3. Enter the four-digit code that appears on the touch screen into the phone or confirm the six-digit code on the phone. 4. If your phone prompts you to accept the connection or phone book download, click “yes” and always allow. 11 See your CUE Infotainment System Manual. Climate Controls Climate Power Gauge The Climate Power gauge on the climate control screen displays the impact of the climate settings on energy consumption. A lower percentage indicates less energy is being used. Climate Modes Optimal efficiency is achieved with the heat, air conditioning and fan turned off. Touch the climate mode settings to adjust the impact the climate control system has on the vehicle’s efficiency. The most efficient operation is in the following order: • MIN – electric cabin heating/cooling is off • ECO – limits cabin heating/cooling to balance comfort with energy use • MAX – provides the most cabin heating/cooling but uses the most energy Use the heated seats and heated steering wheel to reduce the demand on the cabin heating system. Heating the seats and steering wheel uses less energy than heating the vehicle interior. Touch the Climate icon on the center stack touch screen to view and adjust the climate control settings. Press AUTO on the center stack to have the system operate automatically. Note: Under certain conditions, the engine will start to provide full heat and defrost capability. See Climate Controls in your Owner Manual. Climate Controls 12 Vehicle Personalization Seat and Steering Wheel Adjustment A B Some vehicle features can be customized using the controls on the infotainment system. The Vehicle Settings menu may include Climate and Air Quality; Collision/Detection Systems; Comfort and Convenience; Energy; Lighting; Power Door Locks; and Remote Lock, Unlock, Start. 1.Touch Settings on the Home page. 2.Touch Vehicle from the Settings menu. 3. Touch the desired menu item. 4. Touch the desired feature and setting. 5.Touch < Back to exit each menu. C D Before driving, adjust the seat and steering wheel to a comfortable position. A.Move the steering wheel adjustment control to move the steering wheel up or down and forward or rearward. B.Move the horizontal control to move the seat forward or rearward and to tilt, raise or lower the seat. C.Move the vertical control to recline or raise the seatback, or adjust the seatback bolster support. D.Move the small control to adjust lumbar support. Memory Seats With the driver’s seat, outside mirrors and steering wheel in the desired positions, press and release the SET button and then press and hold button 1 or 2 until a beep sounds to set the memory position. Press and hold button 1 or 2 to recall the stored position. See Instruments and Controls in your Owner Manual. 13 See Seats and Restraints, and Instruments and Controls, in your Owner Manual. Driver Assistance Systems The driver assistance features are based on a “control and alert” strategy that helps identify potential collision situations and intervenes when a collision threat appears more imminent, employing visual, audible and/or tactile (vibration) alerts. Luxury Package♦ IntelliBeam® – Automatically turns the high-beam headlamps on or off depending on traffic conditions. Side Blind Zone Alert – When a vehicle is detected in a side blind spot area, a warning symbol displays on the side mirror. To turn off the system, go to Collision/Detection Systems in the Vehicle Settings menu. Rear Cross Traffic Alert – Warns of traffic coming in either direction by displaying a visual alert on the Rear Vision Camera screen, and the left or right side of the driver’s seat pulses. See Safety Alert Seat. To turn the system on or off, go to Collision/Detection Systems in the Vehicle Settings menu. Adaptive Cruise Control♦ (requires Luxury Package) – If a vehicle is detected ahead, the vehicle accelerates or brakes moderately to maintain the selected following gap. If driver action is required, a visual alert flashes on the windshield and the driver’s seat pulses. See Safety Alert Seat. Press the Follow Distance Gap button on the left side of the steering wheel to set a following gap. Automatic Collision Preparation♦ (included with Adaptive Cruise Control) – Prepares the brakes or applies the brakes if an emergency collision appears immediate or the driver does not react to previous alerts. Lane Departure Warning – When crossing a detected lane marking without using a turn signal, a visual alert flashes on the instrument cluster and the left or right side of the driver’s seat pulses. See Safety Alert Seat. Press the Lane Departure Warning button on the left side of the CUE touch screen to turn the system on or off. The button illuminates when the system is on. Forward Collision Alert – When approaching a vehicle directly ahead too quickly, a visual alert flashes on the windshield and the driver’s seat pulses. See Safety Alert Seat. Press the Collision Alert button (or the Follow Distance Gap button if equipped with Adaptive Cruise Control) on the left side of the steering wheel to set the alert timing. Safety Alert Seat – Subtle seat cushion vibration pulses, left or right, or simultaneously, alert the driver of potential hazards. Audible notification may be selected instead of Safety Alert Seat vibration notification; to change the setting, go to Collision/Detection Systems in the Vehicle Settings menu. Rear Vision Camera – When the vehicle is in Reverse, a view of the area behind the vehicle appears on the CUE touch screen. See Driving and Operating in your Owner Manual. ♦ Optional equipment 14 Parking Fueling Low Ground Clearance The low ground clearance of the ELR aids its aerodynamic efficiency. As a result, the flexible air deflector under the front fascia (bumper) may contact a parking block or curb if the vehicle is parked too closely. Use care when parking to avoid damage. Filling the Fuel Tank 1. With the vehicle OFF, press the Fuel Door button, located on the driver’s door, for one second. The Wait to Refuel message will display on the instrument cluster. 2. When the Ready to Refuel message displays, the fuel door on the passenger’s side of the vehicle will unlock. It will not open automatically. 3. Press and release the rear edge of the fuel door; it will pop open slightly. Open the door to refuel the vehicle. See Vehicle Care in your Owner Manual. Electric Parking Brake To apply the parking brake, pull the Parking Brake switch on the left side of the instrument panel. To release the parking brake, with the ignition in the ON or Accessory position, press the brake pedal and press the Parking Brake switch. See Driving and Operating in your Owner Manual. Pedestrian Safety Signal The vehicle is equipped with an automatic sound generator and a manual alert. The automatic sound is generated at speeds below 20 mph to indicate the vehicle’s presence to pedestrians. To activate the additional manual alert, with the vehicle in gear, pull the turn signal lever toward you. The high-beam headlamps will flash and a soft-note alert will sound. Fuel Use premium fuel with an octane rating of 91 or higher. See Driving and Operating in your Owner Manual. See Instruments and Controls in your Owner Manual. 15 Charging Battery The ELR is powered by a lithium-ion high voltage battery pack, which holds its charge efficiently and has no memory effect (so it doesn’t have to be run down completely before recharging). Keep the vehicle plugged in, even when fully charged, to keep the battery temperature ready for the next drive. Charging Status Charging Status Indicators are located on the instrument panel near the windshield and in the side mirrors (if activated). Charging Time The ELR can be programmed for three charging modes: Immediately upon plug-in; Delayed based on departure time; and Delayed (Electric Rate and Departure Time). Using a 120-volt standard outlet will take approximately 12.5 hours to charge the ELR at the 12 amp setting, or 18 hours at the 8 amp default setting. Using a 240-volt charging station will take approximately 5 hours. Charge times will vary with outside temperature. Touch the Energy icon on the touch screen and then touch the Charging icon to view the current Charge Level and Charge Mode status. Touch the green Charge Level text to select a different charge level. Touch the green Charge Mode text to select a different charge mode. Charging Status Indicator (Instrument Panel) • Solid green with single horn chirp – Vehicle is plugged in; battery is charging • Slow (long pulse) flashing green with double horn chirp – Vehicle is plugged in; battery charging is delayed • Fast (short pulse) flashing green – Vehicle is plugged in; battery is fully charged • Solid yellow – Vehicle is plugged in; not charging • No light – Vehicle is not plugged in OR there is an issue with the charger or outlet • No light and repetitive horn chirps – Electricity was interrupted before charging was completed Charging Status Indicator (Side Mirrors) • Solid green – Battery is charging; charging is less than half complete • Fast flashing green – Charging is more than half complete • Slow flashing green – Charging is nearly complete • No light – Not charging Charging Basics See Driving and Operating in your Owner Manual. 16 Start Charging The provided 120-volt travel charge cord is located in the storage compartment under the cargo floor. 1. With the vehicle parked, select the Charging icon at the bottom of the Energy screen on the touch screen. 2. Review the selected Charge Level and Charge Mode. Touch the green text if an increased Charging Level or different Charge Mode is desired. Use the reduced charge level until a qualified electrician inspects your electrical circuit capacity, or if the electrical circuit or socket capacity is not known. Once the Charge Level and Charge Mode are selected, turn off the vehicle. Note: The Charge Level selection returns to the reduced level each time the vehicle is driven. 3. Remove the charge cord from the trunk and plug it into an electrical outlet. DO NOT PLUG INTO AN EXTENSION CORD. The charge cord indicator should be green. Where possible, secure the charge cord to the wall. 4. Press and release the rear edge of the charge port door, located just in front of the driver’s door, to open the door. Plug the charge cord into the charge port. 5. The Charging Status Indicator on the instrument panel illuminates green and the horn chirps when properly connected. The side mirror lights illuminate green and may flash (if activated). See Charging Status. Note: Immediately after plugging in, the Charging Status Indicator on the instrument panel may be yellow for a few seconds before turning green. The charging system may run fans and pumps when the vehicle is turned off. If the Charge Cord Theft Alert has been enabled, it is armed automatically when the vehicle is locked with the Remote Keyless Entry transmitter. Note: When the theft alert is armed, the alarm will sound when the plug is disconnected from the locked vehicle. To change the charge cord theft alert option, go to Energy in the Vehicle Settings menu. To temporarily override a delayed charge event, remove and reconnect the charge cord into the vehicle within five seconds. The vehicle will begin charging immediately. See Driving and Operating in your Owner Manual. 17 End Charging Home Charging Station 1. Unlock the vehicle with the RKE transmitter to disarm the charge cord theft alert. 2. Unplug the charge cord from the vehicle by pressing the plug button and close the charge port door. 3. Unplug the charge cord from the electrical outlet. 4. Properly stow the charge cord in the trunk. Charging equipment with a rating of at least 240 volt/ 20 amp will provide the fastest charging time to recharge the high voltage propulsion battery. Contact your dealer or an ELR Concierge representative, or go to www.cadillaccharging.com, for more information about an available 240V home charging station. See Driving and Operating in your Owner Manual. See Driving and Operating in your Owner Manual. 18 Auxiliary Door Releases Mobile Apps The Keyless Access System enables operation of the doors without removing the Remote Keyless Entry transmitter from your pocket or purse by pressing the door handle touch pad at the rear edge of the door (from outside the vehicle), or pressing the door latch button on the inside pull handle (from inside the vehicle). If the vehicle’s 12-volt battery is weak or disconnected, the door handle touch pads and door latch buttons may not operate. The doors can be opened manually. myCadillac The myCadillac mobile app connects owners to a variety of vehicle information and services, such as a searchable Owner Manual, vehicle maintenance tips, Roadside Assistance and more. Download the mobile app from your iPhone® or Android™ device’s app store. OnStar RemoteLink The OnStar RemoteLink mobile app takes connectivity a step further, enabling users to perform Remote Keyless Entry transmitter commands, including locking and unlocking the doors, as well as checking current battery charge level and initiating charging of your ELR. An active OnStar account is required. Download the mobile app from your iPhone® or Android™ device’s app store. To learn more about OnStar services, press the OnStar button, refer to your Owner Manual, call 1-888-466-7827 or visit OnStar.com. Open the Doors Manually from Outside 1. Remove the door key from the transmitter. 2. Insert it into the lock cylinder above the license plate and turn it to open the trunk. 3. Pull the Door release tab on the driver’s side of the trunk, below the package shelf, to unlatch the doors. Open the Doors Manually from Inside Pull the Door release handle on the floor next to each front seat. See Keys, Doors and Windows in your Owner Manual. 19 Owner Privileges™ ROADSIDE ASSISTANCE 1-800-224-1400 TTY Users: 1-888-889-2438 Roadside Assistance provides every Cadillac owner with the advantage of contacting a Cadillac advisor and, when appropriate, a Cadillac-trained dealer technician who can provide on-site services, including towing service, battery jump-starting, lockout service, fuel delivery and flat tire assistance. Services are provided for up to 6 years/70,000 miles, whichever occurs first. Roadside Assistance and OnStar®: If you have a current OnStar subscription, press the OnStar button and the vehicle will send your current GPS location to an OnStar Advisor who will speak to you, assess your problem, contact Roadside Assistance and relay your exact location so you will get the help you need. CADILLAC CONCIERGE 1-855-4-CAD-ELR (1-855-422-3357) Should you need to ask a question, make a comment, or request additional information about your Cadillac ELR, contact your Cadillac Concierge. CADILLAC ONLINE OWNER CENTER Visit my.cadillac.com for access to the Cadillac Owner Center, which features online Owner Manuals, maintenance information, service records, and more. CUE SUPPORT For information or assistance operating the CUE infotainment system, call 1-885-4-CUE-NOW (1-855-428-3669). We recommend always using ACDelco or genuine GM service parts. Certain restrictions, precautions and safety procedures apply to your vehicle. Please read your Owner Manual for complete instructions. All information contained herein is based on the latest information available at the time of printing and is subject to change without notice. Copyright 2013 by General Motors. All rights reserved. !22900401=A!