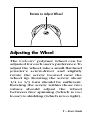
1
SCALE MASTER CLASSIC
®
V 2.0
Multi-Scale Digital Plan Measure
User’s Guide
TABLE OF CONTENTS
Preliminary Information
Introduction . . . . . . . . . . . . . . . . .3
Key Definitions/Functions . . . . . .4
Adjusting the Wheel . . . . . . . . . . .9
Using the Scale Master Classic
Imperial/Metric Modes . . . . . . . . 10
“Rolling”a Measurement. . . . . . . 11
Built-in Scales . . . . . . . . . . . . . . . 14
Changing Measurement Units . . 16
Bell On/Off . . . . . . . . . . . . . . . . . 16
Converting Between Scales . . . . 16
Locking Scale Settings. . . . . . . . . 17
Using the Counter . . . . . . . . . . . 18
Using Memory Function. . . . . . . 19
Finding Area & Volume . . . . . . . . 21
Setting Custom Scales. . . . . . . . . 25
Using Custom Scale/Ruler . . . . . 27
Appendix
Common Questions . . . . . . . . . .28
Additional Calculator
Functions . . . . . . . . . . . . . . . . 35
Specifications . . . . . . . . . . . . . . . 37
Limited Warranty. . . . . . . . . . . . . 38
2 – Scale Master C l a s s ic v 2 . 0
®
PRELIMINARY INFORMATION
Introduction
The Scale Master Classic MultiScale Digital Plan Measure has been
specifically designed to simplify
take-offs from architectural and engineering drawings.
®
◆
◆
◆
◆
◆
◆
Takes linear measurements of
any shape
Finds rectangular areas and
volumes
Converts between scales and
dimensions
Built-in push button counter
Subtract function
Six Custom Scales that let you
define and roll in any scale
3 – User’s Guide
Key Definitions/Functions
[Off/On] – Power On/Off switch
Turns power On or Off. Turning
power Off clears the display and all
values previously stored in memory. Turning the unit Off does not
clear scales or modes.
[Lock] – Lock switch
Locks the mode and scale so that they
cannot inadvertently be changed. It
is advised to operate in the locked
position unless you are specifically
setting or changing scales.
[Subtract/Count] – Subtract key
Used to perform four functions:
1) when this key is held down
while you are rolling, the unit will
subtract the rolled distance from
any previously rolled distances or
from zero;2) when in Count mode,
used to increase the count value by
one (pressing [Reset] will clear the
count); 3) when in the programming mode for height or custom
scales,used to decrement the flashing value; 4) when holding key
4 – Scale Master C l a s s ic v 2 . 0
®
down turning unit on will switch
unit between Imperial and Metric
units.
[Rcl] – Recall key
Used to recall stored values.When
you press [Rcl] [Rcl], the last value
rolled is displayed.
[Mode] – Mode key
Used to toggle between the following scale modes (in sequence):
1) Architectural (ARCH);
2) Engineering 1 (ENG 1)
3) Engineering 2 (ENG 2);
4) Custom (CUSTOM)
5) Count (COUNT).
When in programming mode, this
key moves the cursor back to the
previous field or digit.
[Scale] – Scale key
Used to toggle between the various
scales within each scale mode.
When in the programming mode
for height or custom scales,this key
moves the cursor forward to the
next field or digit to be programmed.
5 – User’s Guide
[M1+] – Memory Add key
Adds the displayed value to memory. When this key is pressed, the
value on the display is added to
memory, the display clears to “0”
and an indicator (M) lights.When in
the programming mode for height
or custom scales,this key advances
the flashing digit or units.
[M2x] – Memory Add key
Stores displayed value in memory.
When this key is pressed, the value
on the display is added to memory,
the display clears to“0”and an indicator (M) lights.
[Reset] — Reset key
Resets the display to zero .W h e n
pressed simultaneously with another key,it clears the value of that
register (for example, [Reset] [M1+]
clears the value stored in the memory register).
6 – Scale Master C l a s s ic v 2 . 0
®
[Reset] [Subtract] — Full Reset
Press keys simultaneously. Used to
clear all registers and reset the unit
to initial default values. This
keystroke does not work in the
Count Mode.
[Subtract] [Mode] — Units of Measurement
Switches between different units
of measurement and converts the
displayed value.The units of measurement switch in this order:
(Imperial Mode) feet and inches,
decimal feet, decimal inches, yards,
meters. In Metric Mode, the order
is:millimeters,meters,kilometers.
[Reset] [Rcl] — Clear All Memory
Press keys simultaneously. Clears
all memory registers (the [M1+],
[M2x], and height registers).
7 – User’s Guide
[Rcl] [M2x] — Area/Volume
Used to calculate area and
volume:
1) The first press displays the
linear value stored in the [M2x]
memory register.
2) The second press calculates
and displays the area,
multiplying the two linear
values stored in the memory
registers ([M1+], [M2x]).
3) If a height is stored, the third
press calculates and displays
the volume. If no height is
stored,displays the linear value
stored.
4) If a height is stored, the fourth
press displays the height value.
8 – Scale Master C l a s s ic v 2 . 0
®
Rotate to Adjust Wheel
Adjusting the Wheel
The Celcon polymer wheel can be
adjusted for each user’s preference.To
adjust the wheel,take a small,flat-head
jeweler’s screwdriver and slightly
rotate the screw located near the
wheel tip. Rotating the screw about
1/4 to 1/3 turn should be sufficient.
Rotating the screw within those two
values should adjust the wheel
between free spinning (which is too
loose) to skidding (which is too tight).
®
9 – User’s Guide
USING THE SCALE MASTER CLASSIC
Imperial/Metric Modes
The Scale Master Classic is set up to
use Imperial (English) dimensional
units by default. The Scale Master
Classic can be set up to use Metric
scales by using the following sequence:
1) Turn unit off via switch.
2) Press and hold [Subtract/Count] key.
3) Turn unit on via switch.
4) Release [Subtract/Count] key.
While in Metric mode, MET will remain lit in the scale box.
Repeat the pr o c e d u re above to
switch back to Imperial mode.
10 – Scale Master C l a s s ic v 2 . 0
®
“Rolling” a Measurement
To take a measurement with the Scale
Master Classic:
1) Switch the unit on. If the
display does not show zero (0),
press the [Reset] key to clear
the display.
2) Select your mode by pressing the
[Mode] key.Then press the [Scale]
key to select your scale.
3) Begin rolling.The display will register your measurements.When
you roll the unit, be sure to hold
the unit upright (see picture on
next page).
Also make sure you start and
stop at the exact points you are
measuring. Otherwise your roll
may not be accurate (see picture on next page).
11 – User’s Guide
We suggest several practice runs with
the Scale Master Classic so that you
can become comfortable with the
unit and develop your rolling technique.
12 – Scale Master Classic v2.0
®
4) To store your measurement,
press one of the memory keys
([M1+] or [M2x]).
13 – User’s Guide
Built-In Scales
Imperial (English) Units
Architect
ARCH
Engineer I
ENGI
Engineer II
ENGII
1 foot=
1 inch=
1 inch=
1/32”
1/16”
3/32”
1/8”
3/16”
1/4”
3/8”
1/2”
3/4”
1/1 (1”)
3/2 (1 1/2”)
2/1 (2”)
3/1 (3”)
4/1 (4”)
10.0’
20.0’
30.0’
40.0’
50.0’
60.0’
83.3’
100.0’
166.6’
200.0’
250.0’
300.0’
333.3’
400.0’
416.6’
500.0’
583.3’
600.0’
625.0’
666.6’
750.0’
1,000.0’
1,200.0’
2,000.0’
3,000.0’
14 – Scale Master C l a s s ic v 2 . 0
®
Metric Units
Architect
ARCH
1: 1
1: 2
1: 3
1: 4
1: 5
1: 10
1: 20
1: 25
1: 30
1: 40
1: 50
1: 75
Engineer I
ENGI
1: 100.0
1: 125.0
1: 150.0
1: 200.0
1: 250.0
1: 300.0
1: 400.0
1: 500.0
Engineer II
ENGII
1: 1,000
1: 1,250
1: 1,500
1: 1,625
1: 2,000
1: 2,500
1: 5,000
1: 6,000
1: 10k
1: 12.5k
1: 20k
1: 25k
1: 50k
15 – User’s Guide
Changing Measurement Units
Press [Subtract/Count] [Mode] simultaneously to switch to the next available units of measurement.Each key
press will switch to the next units of
measurement on this list:
Imperial Mode — Feet-Inch,Decimal
Feet,Decimal Inches,Yards,Meters;
Metric Mode — Millimeters,Meters,
Kilometers.
Bell On/Off
To toggle the bell sound on or off,
press [Reset] [Scale] simultaneously.
Converting Between Scales
The Scale Master Classic can automatically convert values between
scales. For example, 20 feet rolled in
1/16” scale will be converted to 10
feet in 1/8”scale.You may want to roll
a value in one scale and then add that
exact value (unconverted) in another
scale.
16 – Scale Master C l a s s ic v 2 . 0
®
1) Roll a value and press [M1+]. Press
[Scale] to change scales.
2) Roll another value and press
[M1+].
3) Press [Rcl] [M1+] to recall the combined total.
You can also convert values from
Imperial Units (English) to meters
within the Imperial mode. Press
[Subtract/Count] and [Mode] simultaneously to switch to other units of measurement,including meters.
Note: You cannot convert values when
changing Imperial/Metric modes.
Locking Scale Settings
Your Scale Master Classic comes
equipped with a lock switch that
prevents inadvertently changing
drawing scales. When the lock is
activated, a lock symbol will be
displayed in the LCD. While active, the
Scale and Mode cannot be revised
(other than removal of the battery).
17 – User’s Guide
Using the Counter
You can use the [Subtract/Count] key to
count items such as electrical outlets,
drains,etc.
Press [Mode] until you find the Count
mode.Then press the [Subtract /Count]
key to count the items.
You can use the [M1+] and [M2x] memory keys to store or accumulate the
counts for two different items. After
you have a count value,press [M1+] to
store it. You can then count more
items and press [M1+] to continue
accumulating the count value.You can
use the same process to store and
accumulate counts in the [M2x] memory register.
18 – Scale Master C l a s s i c v 2 . 0
®
Using the Memory Function
The memory function allows you to
add rolled or counted values. But
you cannot add dimensioned
(rolled) and undimensioned (counted) values.
To add rolled values:
1) Roll the first value*.Press [M1+].
The display resets to “0,” the
memory indicator (M) lights and
the value is added to memory.
2) Roll the next value.Press [M1+].
This value is added to your previous value stored in memory.
3) You can continue to add values
using the [M1+] key. Press [Rcl]
[M1+] to review the total in memory.
*For Count values, you must press the
[Subtract/Count] key to count your
value.Press [M1+] to add this value to
memory.
The annunciator “M” will display
when a value is stored in memory.
19 – User’s Guide
Other memory function keystrokes
[Rcl] [M1+]
or
[Rcl] [M2x]
Displays the value stored in the
memory register.
[Reset] and [M1+] simultaneously
or
[Reset] and [M2x] simultaneously
Clears the value stored in the memory register.
[Reset] and [Rcl] simultaneously
Clears values stored in memory registers (the [M1+], [M2x], and height
registers).
20 – Scale Master C l a s s i c v 2 . 0
®
Finding Area & Volume
The Scale Master Classic can calculate area and volume once you have
values set for length, width, and (for
volume calculation only) height. The
length, width and height register values are stored in semi-permanent
memory. These values will not be
cleared when you press [Reset] by
itself. These values will only clear if
you:
1) press [Reset] then the register
(clears one value at a time)
2) press [Subtract/Count] [Reset] simul taneously (clears all values)
Once you have rolled or set the height
value, it will be used for all subsequent volume calculations unless
you change it.
21 – User’s Guide
Finding Area
1) Roll the first dimension and
press [M1+]. A small “M” will
appear in the scale box display
and the main display will reset to
zero (0).
2) Roll the second dimension and
press [M2x]. The main display
will reset to zero.
3) Press [Rcl] [M2x]. The first press
displays the linear value stored in
this register. The second press
will calculate and display the
area.
Rolling or Setting Height
Note: Once you have a value stored for
height, you do not need to reprogram it unless you want to
change it.
To set or roll in a height:
1) To set a height, skip to step 2.To
roll in a height, roll the desired
dimension.
22 – Scale Master C l a s s i c v 2 . 0
®
2) Press [Subtract/Count] and [M2x]
simultaneously. If you are setting a height, go to step 3. If you
are rolling in a value, the display
will show the rolled value and an
annunciator will begin flashing
(FT-IN for Imperial Mode, MM for
Metric Mode).
3) If you do not want to change the
units of measurement, go to step
4. To change the units of measurement, press [M1+] until you
reach the desired units.
4) If you have rolled a value,press
[Scale] until the display returns to
zero. If you are setting a height,
press [Scale] to begin. The leftmost digit will begin flashing.
Press:
[M1+] to increment this digit
[Subtract/Count] to decrement
[Scale] to advance to next digit
[Mode] to move back one digit
Continue until all digits are set and the
display returns to zero.
23 – User’s Guide
Finding Volume
1) Roll the first dimension and
press [M1+].
2) Roll the second dimension and
press [M2x].
3) Roll in or set a height value.If you
already have a height value,skip
to step 4.
4) Press [Rcl] [M2x]. The first press
displays the linear value stored in
this register. The second press
will calculate and display the
area.Press the [M2x] key again to
find volume.Press a fourth time
to display the height value
stored.
24 – Scale Master C l a s s i c v 2 . 0
®
Setting Custom Scales
You can program and store six
Custom Scales: three in Imperial
(English) and three in Metric Units.
The default units of measurement are
feet-inches (FT-IN) for Imperial Mode
and millimeters (MM) for Metric Mode.
If all custom scale settings are filled,
you can overwrite an old scale with a
new scale.
You can set a Custom Scale two ways:by
rolling in a known distance or by setting the exact distance.
Rolling or Setting a Custom Scale
1) Press [Mode] until “1: CUS” appears
in the scale box display.
2) Press [Subtract/Count] and [Scale]
simultaneously. “ROLL” will appear in the main display.If you are
setting a scale,skip to step 4.
25 – User’s Guide
3) Roll desired dimension.“ROLLING“
now appears in the main display.
Note: For greater accuracy, you may
want to roll the known distance
several times, then enter the dis tance times the number of rolls (for
example, roll a distance 5 times
and if the distance is 3 feet, enter
15 feet).
4) Press [Scale]. The display will
show zeroes and the units of
measurement annunciator will
begin flashing (FT-IN for Imperial
Mode, MM for Metric Mode).
5) If you do not want to change the
units of measurement, skip to
step 6. If you want to change the
units of measurement, press
[M1+] until you reach the desired
units.
6) Press [Scale] to begin setting the
scale distance.The leftmost digit
will begin flashing.Press:
[M1+] to increment this digit
[Subtract/Count] to decrement
[Scale] to advance to next digit
26 – Scale Master C l a s s ic v 2 . 0
®
[Mode] to move back one digit
Continue until all digits are set
and the display returns to zero.
Using the Custom Scale/Ruler
The default value (after a full reset) for
Custom Scale is one-to-one (1 foot
equals 1 foot).This lets you use your
Scale Master Classic as a rolling ruler
(in Feet-Inches), which is especially
useful for measuring irregular shapes.
1) To reset your Custom Scale setting to a one-to-one ratio, press
[Reset] and [Subtract/Count] simul taneously.
2) Then press the [Mode] key until
the “Custom” mode appears.
3) Begin rolling.
27 – User’s Guide
APPENDIX
Common Questions
Q: The wheel on my Scale Master
feels a little too tight, can I
adjust it?
A: Yes! The wheel is specifically
designed to “adjust” to each user’s
feel.Simply take a small, flat-head
jeweler’s screwdriver and slightly
rotate the screw located near the
wheel tip. Rotating the wheel
about 1/4 to 1/3 turn should be
sufficient.Rotating the screw within those two values should adjust
the wheel between free spinning
(which is too loose) to skidding
(which is too tight).
Q: Once adjusted to my desired
“feel,” will the wheel stay that
way?
A: Under normal conditions, the
wheel setting should not change
much.If the device is jarred or subject to extreme environmental
28 – Scale Master C l a s s i c v 2 . 0
®
conditions, however, you may
occasionally need to make adjustments.
Q: How accurate is the Scale
Master?
A: The internal mechanics of the
Scale Master Classic are extremely
accurate: better than 99.75%.
However, where you start and stop
the device on your plans will greatly affect the accuracy of your
results.Depending on the length of
your “runs,” after getting used to
the feel of the Scale Master’s roll,
you should expect your results to
be within ±1.5%– 2%.
Q: What’s the best way to ensure
my Scale Master is lined-up
properly for my beginning and
ending points?
A: While all users differ in the way
they hold and roll the Scale
Master,holding the device straight
up, at a 90° angle to your plans, is
the best way to ensure proper
starting and stopping.And re-member, if you roll past your end point,
29 – User’s Guide
simply
hold
down
the
[Subtract/Count] button and roll
backwards.
Q: Do you have any other advice
for better rolling?
A: Again,each person has their own
technique for rolling the Scale
Master — or any other plan measure for that matter.However,many
users find that, in addition to holding it straight up and down,holding it very lightly (like an egg)
helps rolling both along straight as
well as curved lines.
Q: I often lose my previously selected scales and modes. What
am I doing wrong?
A: Pressing the [Subtract/Count] key,
simultaneously with other keys,
accesses special functions.
You may be pressing [Reset] and
[Subtract/Count] simultaneously.
This is a special Clear-All function
which resets all internal registers,
including scales and modes (do not
use this as a regular method of
clearing the display).To avoid this
30 – Scale Master C l a s s ic v 2 . 0
®
problem,make sure that you press
keys one at a time, unless you are
trying to access a special function.
Q: I read it in the User’s Guide, but
could you simplify the setting
of a Custom Scale?
A: This is one of the most commonlyasked questions.The Custom Scale
is primarily used when you have
blueprints that have been reduced
or enlarged and are no longer true
to their printed “scale.” To set a
Custom Scale:
1) Press [Mode] until you reach
Custom (indicated by a small
“Custom”legend on the left of
the display).
2) When Custom Mode is selected, press [Subtract/Count] and
[Scale] simultaneously. The
main display will prompt you to
roll a known distance on your
plans by displaying the word
“ROLL” on the main display.
31 – User’s Guide
3) Roll a known,marked distance,
being careful of your start and
stop points. The display will
now change from “ROLL” to
“ROLLING.”
4) After you’ve rolled in your distance,press the [Scale] button to
tell the device you’re finished
rolling. The main display will
now look similar to this:
FT
IN
The units of measurement annunciator will begin flashing
(FT-IN for Imperial Mode, MM for
Metric).
5) If you want to change the units
of measurement, press [M1+]
until you reach the desired
units.Then press [Scale] to begin
setting the scale distance.If you
don’t want to change the units,
simply press [Scale].
6) Now tell the Scale Master what
that rolled distance was (according to the plans),using [M1+] (to
advance the count of each
digit) and [Scale] (to enter the
32 – Scale Master C l a s s ic v 2 . 0
®
value for each digit and move to
the next digit to the right).Press
[Mode] to move back one digit.
If a digit is zero,simply press the
[Scale] key to enter it.
7) Advance through all displayed
digits.Confirm the scale entry
by pressing [Rcl] [Scale]. Remember, Custom Scales remain set
even when the unit is off.To get
rid of a Custom Scale, enter a
new scale over it or perform a
full reset.
Q: When setting a Custom Scale,
the User’s Guide says something about rolling a known
distance several times. What
does this mean?
A: Starting and stopping points are
especially critical to the accuracy
of all rolling.Nowhere is this more
true than in the setting of a Custom
Scale. If you roll a known distance
only once, you may roll it too short
or too long. By rolling a distance
several times, you can offset the
start/stop inaccuracies of each
given roll.It’s equivalent to giving
33 – User’s Guide
the Scale Master an average rolled
length for the known distance.
When setting the Custom Scale,and
the unit displays “ROLL,” you roll the
known distance several times.
Since you don’t want the Scale
Master to record all the rolls as
being your one known distance,
you enter the known distance
times (multiplied by) the number
of rolls — for example, if you roll a
10 foot distance five times, you
must enter it as 50 feet.
Q: How long will the batteries last
and where may I obtain replacements?
A: The Scale Master Classic is powered by two CR-2430 3–Volt Lithium
batteries (6 volts total).
They should last upwards of 400
hours of actual use time and are
readily available at most camera
stores as well as Radio Shack®
stores in North America. If you
have difficulty finding replacements, they may be obtained
directly from Calculated Industries
(by calling 1-800-854-8075 in the
34 – Scale Master C l a s s ic v 2 . 0
®
Continental U.S. or 775-885-4900
worldwide).
Additional Calculator Functions
Errors
If you make an incorrect entry (such
as trying to add dimensioned and nondimensioned values),the word “ERROR”
will display. Press [Reset] to clear.
Auto Range
If the calculated value is too large to
display in the selected units of measurement,the answer will be displayed
in a larger unit of measurement instead
of showing an error (for example:
“10,000,000 MM” can not be displayed,so “10,000 M”will be displayed
instead).
35 – User’s Guide
Battery & Automatic Shut-Off
The Scale Master Classic is powered
by two 3-Volt CR-2430 Lithium batteries (6 volts total).To conserve battery power,the unit will shut itself off
if it is not used for 5 minutes.Press any
key to restore power.All registers and
settings remain intact, in-cluding all
temporary registers.
Turning Bell & Clicker On/Off
The built-in clicker lets you know
when the wheel is rolling,and the bell
lets you know when you have incremented the count value.To toggle the
bell and clicker off or on, press [Reset]
and [Scale] simultaneously.
Full Reset/All Clear
To perform a complete reset of the
unit and return all registers to their initial default values, press [Reset] and
[Subtract/Count] simultaneously.
36 – Scale Master C l a s s i c v 2 . 0
®
Specifications
POWER SOURCE:
Two 3-Volt CR-2430 lithium batteries
Approximately 400 hours normal use
DISPLAY METHOD:
LCD with zero suppression, commas
and annunciators.
DISPLAY CAPACITY (MAIN DISPLAY):
9,999,999 (7 digits)
RESOLUTION/ACCURACY:
.025 Inch/99.75%
INTERNAL MATH ACCURACY:
10 Digits
DIMENSIONS:
6.7” x 1.6” x 0.6”
170mm x 41mm x 15mm
37 – User’s Guide
LIMITED WARRANTY
Calculated Industries,Inc. (“CII”) warrants
this product against defects in materials
and workmanship for a period of one (1)
year from the date of original consumer
purchase in the U.S. If a defect exists during the warranty period, CII at its option
will either repair (using new or remanufactured parts) or replace (with a new or
remanufactured unit) the product at no
charge.
The warranty will not apply to the
product if it has been damaged by
misuse, alteration, accident, improper
handling or operation, or if unauthorized repairs are attempted or made.
Some examples of damages not covered by warranty include, but are not
limited to, battery leakage, bending,
or visible cracking of the LCD which
are presumed to be damages resulting
from misuse or abuse.
To obtain warranty service in the U.S.,
ship the product postage paid to the CII
Authorized Service Provider listed on the
back page of the User’s Guide. Please provide an explanation of the service
requirement,your name,address,day phone
number and dated proof of purchase (typically a sales receipt).If the product is over
38 – Scale Master C l a s s i c v 2 . 0
®
90 days old, include payment of $6.95 for
return shipping and handling within the
contiguous 48 states. (Outside the contiguous 48 states, please call CII for return
shipping costs.)
A repaired or replacement product
assumes the remaining warranty of the
original product or 90 days,whichever is
longer.
Non-warranty Repair Service — USA
Non-warranty repair covers service
beyond the warranty period or service
requested due to damage resulting from
misuse or abuse.
Contact the CII Authorized Service
Provider listed on the back page of the
User’s Guide to obtain current product
repair information and charges.Repairs are
guaranteed for 90 days.
Repair Service — Outside the USA
Not all countries have CII Authorized
Service Providers or the same warranty
and service policies. To obtain warranty or
non-warranty repair service for goods purchased outside the U.S.,contact the dealer
through which you initially purchased the
product.
If you cannot reasonably have the prod39 – User’s Guide
uct repaired in your area,you may contact
CII to obtain current product repair information and charges,including freight and
duties.
Disclaimer
CII makes no warranty or representation, either express or implied, with
respect to the product’s quality, performance, merchantability, or fitness for
a particular purpose. As a result, this
product, including but not limited to,
keystroke procedures, mathematical
accuracy and preprogrammed material, is sold “as is,” and you the purchaser assume the entire risk as to its
quality and performance.
In no event will CII be liable for
direct, indirect, special, incidental, or
consequential damages resulting from
any defect in the product or its documentation.
The warranty, disclaimer, and remedies
set forth above are exclusive and replace
all others, oral or written, expressed or
implied. No CII dealer, agent, or employee
is authorized to make any modification,
extension, or addition to this warranty.
Some states do not allow the exclusion
or limitation of implied warranties or liability for incidental or consequential dam40 – Scale Master C l a s s i c v 2 . 0
®
ages, so the above limitation or exclusion
may not apply to you.This warranty gives
you specific rights, and you may also have
other rights which vary from state to state.
FCC Class B
This equipment has been certified to comply with the limits for a Class B computing
device,pursuant to Subpart J of Part 15 of
FCC rules.
Legal Notices
Software copyrighted and licensed to
Calculated Industries by Scale Master
Technologies, LLC, 1999.
User’s Guide copyrighted by Calculated Industries, 1999.
Scale Master® and Calculated Industries® are registered trademarks of Calculated Industries, Inc.
ALL RIGHTS RESERVED.
41 – User’s Guide
Looking for New Ideas
Calculated Industries, a leading manufacturer of special function calculators and
digital measuring instruments, is always
looking for new product ideas in these
areas.
If you have one, or if you have any suggestions for improvements to this product
or its User’s Guide,please call or write our
Product Development De-partment.
Thank you.
42 – Scale Master C l a s s i c v 2 . 0
®
How to Reach CII Headquarters
Mail
Calculated Industries, Inc.
4840 Hytech Drive
Carson City, NV 89706 USA
Phone
775-885–4975
on
ars C
ity
C
Fax
775-885–4949
MAY-6 97
.32
Email
[email protected]
VN
World Wide Web
http://www.calculated.com
File: SMC(IND)-6020-MNv1.0-98
43 – User’s Guide
Designed in the
United States of America
M anual 6020–MNv1.0