1
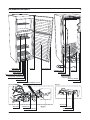
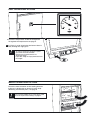
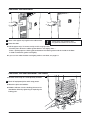
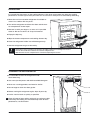
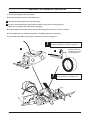
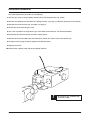
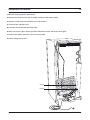
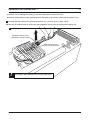
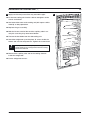
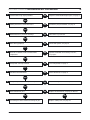
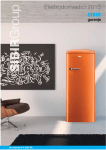
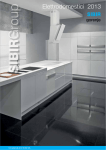
sibir refrigerator user handbook
GAS/ELECTRIC
REFRIGERATOR
www.sibir.com
Visit our website for more information
on our products, to download material
and to contact Sibir International.
!
This drawing shows the back of a gas model refrigerator. Before using this handbook make sure that
the refrigerator in your care looks like the drawing above (i.e. models V110GE or V170GE).
www.sibir.comMO-M
8251275-00
0633
copyright © sibir international
content 3 Action on receipt
3 Installation
4 Refrigerators parts
!
Please use the troubleshooting charts (at the
end of this handbook) to define your problem,
and from there find out which page to study.
5 Controls
5 LP-gas Operation
5 Electrical Operation
5 Regulating the Temperature
6 Daily operational actions
6 Weekly operational actions
7 Monthly operational actions
7 Annual operational actions
Operational Actions
Review this section to ensure that
your refrigerator is maintained in
best possible working condition.
8 Checking the door seal
8 Checking the gas equipment for leaks
9 Defrosting
9 Cleaning the refrigerator
10 Gas Operation: Checking the thermostat
11 Electrical Operation: Checking the thermostat and heater
12 Checking the thermo-element
12 Checking the flame failure device
13 Cleaning the burner and jet
14 Replacing the thermostat
15 Replacing the heater
16 Replacing the cooling unit
19 Ordering spare parts
20 Gas Operation: Refrigerator not cooling at all
21 Gas Operation: Refrigerator not cold enough
22 Electrical Operation: Refrigerator too cold
23 Electrical Operation: Refrigerator not cooling at all
24 Electrical Operation: Refrigerator not cold enough
www.sibir.com
troubleshooting charts
Review this section when you
are experiencing operational
problems with your refrigerator.
copyright © sibir international
ACTION ON RECEIPT 1 Check the packing case for damages. In case you suspect any refrigerator damages, notify your supplier
before unpacking.
2 Unpack the refrigerator carefully.
3 Check the refrigerator. If it is damaged, notify your supplier.
4 Check that the flue baffle is hanging inside the chimney, see page 4.
5 Read the operating instructions in the manual or this handbook and follow them exactly.
!
Make sure that the correct burner jet for the gas available (propane
or butane) is fitted. It may be necessary to change size of burner jet.
installation
5
1 Place the refrigerator in the coldest possible place
inside a building. The refrigerator is tested to operate
reliably in temperatures up to 43°C.
100 mm
2 The room must be ventilated and free air circulation
around the refrigerator is necessary.
3 Keep the refrigerator in the shade and away from
heat of any kind.
4 Avoid draughts, such as door and window openings.
5 Clearances to wall must be at least 25 mm and to
25 mm
roof at least 100 mm.
6 Check that the door seals properly against the
cabinet, see page 8.
7 Ask for the local gas suppliers advice as to what
material to use for gas connections.
8 If electricity is used, check that the voltage is correct.
If possible, let an authorized technician make the
gas installation.
!
A gas regulator must be fitted to the gas bottle.
www.sibir.com
copyright © sibir international
refrigerators PARTS Sight glass
Hinge
Door gasket
Cooling element
Capillary tube
Igniter button
Heater
Condensor
Flame safety device button
Cooling unit
Thermostat control knob
Gas assembly
Capillary tube
Chimney (inside)
Energy selector
Flue baffle
Temperature display sensor
Gas assembly
Burner
Burner jet
Gas valve
Thermostat
Flame safety device
www.sibir.com
Burner
Electrode
Thermo element
copyright © sibir international
CONTROLS The refrigerator can be powered by either mains
electric or LP gas. Changing between these
modes of operation is carried out by means of
control buttons positioned as shown in the figure.
The energy selector [E] can be set at either
I (mains electric), D (LP-gas) or 0 (off).
The refrigerator temperature is controlled by a
thermostat [D]. Please note that the thermostat
has no ”off” position.
The refrigerator is fitted with a safety device
which automatically shuts off the supply of gas
if the flame goes out. The safety device can be
opened manually by depressing knob [C].
A
!
B C
D
E
First time the refrigerator is used, smoke will
appear due to paint residues in the chimney.
The piezoelectric igniter discharges sparks over the burner when the button [B] is depressed. In the
flame viewer [A] you can see a blue light when the flame is alight.
lp gas operation
After initial installation, servicing, or changing gas cylinders etc, the gas pipes may contain some air
which should be allowed to escape by briefly turning on the refrigerator or other appliances. This will
ensure that the flame lights immediately.
1 Make sure that all valves between the gas container and the refrigerator are open.
2 Turn the energy selector [E] to position D.
3 Depress the safety device control [C] and hold it down while depressing the piezoelectric igniter button
[B] repeatedly.
4 Check the flame indicator [A] to see whether the flame is alight.
5 Keep the safety device control depressed for a further 10–15 seconds.
6 Release the safety device control and again check to see that the flame is alight. To terminate gas
operation, turn knob [E] to 0.
Electrical operation
Set the energy selector [E] to position I.
regulating the temperature
It will take several hours for the refrigerator to reach normal operating temperature. The temperature of
the main compartment of the refrigerator is controlled by a thermostat. The thermostat knob [D] should
be set at 3–5. If a lower (colder) temperature is desired, set the thermostat to a higher figure.
www.sibir.com
copyright © sibir international
DAILY OPERATIONAL ACTIONS 2
1 Check the temperature inside the refrigerator.
To regulate the temperature see page 5.
2 If LP-gas is used, check that the burner flame is
blue, through the sight glass.
!
·To ensure continuous operation a spare
gas bottle should be available.
·Replace the gas bottle before it is
absolutely empty.
·If possible, weigh an empty bottle and note
the weight.
WEEKLY OPERATIONAL ACTIONS
Check the frost formation on the cooling element.
If the ice is thicker than 6–10 mm (1/4–3/8 inch)
defrosting should take place, see page 9.
!
Frost forming rapidly (in just a few days) could
be result of poor door sealing, see page 8.
www.sibir.com
copyright © sibir international
MONTHLY OPERATIONAL ACTIONS 1
1 Check that the condenser and cooling unit are free
from dust.
2 Check the outer cabinet for paint damage. Repaint
if necessary.
!
When necessary:
·Clean the refrigerator in and outside with
a damp cloth. Use mild detergent only!
·Clean door gasket.
ANNUAL OPERATIONAL ACTIONS
2
1 Clean the burner jet, see page 13.
2 Check the gas line connections for leaks,
see page 8.
www.sibir.com
copyright © sibir international
CHECKING THE DOOR SEAL 1
2
1 Place a thin paper strip against the cabinet front.
!
2 Close the door.
·Check all the way around the door.
·Pay particular attention to the corners.
3 Pull the paper strip, if it moves easily or falls away by itself:
·Find the place where the rubber gasket doesn’t seal tightly, then …
·Place a pad of paper or sticking plaster between the rubber gasket and the inside of the door.
In order to make the gasket seal tightly.
4 If you can not make the door seal tightly, order a new door, see page 19.
CHECKING THE gas equipment for leaks
2
1 Dissolve some soap in a small quantity of water.
2 Brush all equipment joints with soapy water.
3 Watch the joints for bubbles.
4 Bubbles indicate a leak. A leaking joint must be
attended to either by tightening or replacing the
leaking part.
www.sibir.com
copyright © sibir international
DEFROSTING It is normal that frost forms on the cooling element. A thin layer of frost does not affect the cooling
performance. A thick layer of frost (6–10 mm or 1/4–3/8 inch or more) must be removed by defrosting.
1 Move the vaccine to another refrigerator if available or
store it in a coolbox with ice packs.
2 Turn off the refrigerator and leave the door and the freezer compartment shutter open.
3 Remove ice with your fingers, as soon as it is possible
to do so. Do not use knives or sharp instruments!
4 Empty the drip tray.
5 Wipe the freezer compartment and cooling element dry.
6 Clean the refrigerator inside. Use mild detergent only.
7 Start the refrigerator on gas or electricity.
!
·Defrosting is to be carried out as quickly as possible in order not to damage the vaccine.
·Use the time it will take to defrost to clean the refrigerator etc.
·Wait until the vaccine compartment is cold before replacing the vaccine.
cleaning the refrigerator
7
1 It is advisable to clean the refrigerator inside
when defrosting.
2 Use warm (not hot) water and mild household detergent.
3 Never use scouring powder, steel wool or similar.
4 Do not forget to clean the door gasket.
5 Before starting the refrigerator again, wipe all parts dry.
6 Put the vaccine back as quickly as possible.
7 Clean all external parts with a soft brush or a piece of cloth.
Particularly the cooling unit should be kept clean for best
performance, see illustration.
www.sibir.com
copyright © sibir international
gas OPERATION: CHECKING THE thermostat 10
1 1. Turn the thermostat control knob, to the lowest position (0). The flame should now burn with a small
flame (by-pass flame).
2 Watch the flame in the sight glass or remove the cover from the burner to watch the flame. Turn the con-
trol knob towards the highest position (MAX).
If the flame changes into a bigger one the thermostat is functioning.
If no change in flame size can be observed, the thermostat is faulty, see page 14 for replacement.
2
2
www.sibir.com
copyright © sibir international
ELECTRICAL OPERATION: checking the thermostat and heater
11
1 Pull out the plug from the wall socket.
2 Remove the plastic cover on the thermostat.
3 Remove electrical cables from the thermostat.
4 By-pass the thermostat by cennecting the cables using tape or sticking plaster.
Make sure to insulate the metal ends completely.
5 Push the plug into the wall socket and put the refrigerator on test for at least 3–4 hours.
6 If the refrigerator gets cold the thermostat should be replaced, see page 14.
7 If the cooling unit does not get warm, replace the heater, see page 15.
!
Do not attempt this procedure without the
proper knowledge of electrical components.
3
4
!
www.sibir.com
Insulate metal ends
completely. Use tape
or sticking plaster.
When finished, do not forget to put
the wires back on the thermostat.
copyright © sibir international
CHECKING THE thermo-element 12
1 Check that the joint [A] between thermo-element and flame failure device is tightened properly.
2 Check that the tip [B] of the thermo-element is located in the flame.
3 Check the flame failure device (below).
A
B
CHECKING THE flame failure device
1
1 Press the flame failure device button to its stop.
2 Light the burner and wait for 15–20 seconds.
3 Release the button and check that the flame stays lit.
If it does not, check the thermo element (above).
If you already have checked the thermo-element (above),
replace the thermo-element.
!
If the flame is blown out, the flame
failure device must shut off the gas
supply within minutes. Test as follows:
1 Blow out the flame, wait 1–2 minutes.
2 Try to light the burner without pressing the flame failure device button.
If functioning correctly, it will be impossible to light the flame without pressing
the button.
If it is still not working, also replace the flame failure device.
www.sibir.com
copyright © sibir international
CLEANING THE burner and burner jet 13
The main steps when cleaning the burner
and the burner jet are:
1 Shut the gas valve.
2 Remove possible cover plates for access
to burner and burner jet.
3 Unscrew the burner jet which is located on
the gas inlet side of the burner.
4 Clean the burner jet carefully with alcohol
or petrol and blow it dry.
Burner jet
!
·Do not use any tools for cleaning burner jets.
·Do not use other burner jet sizes than the one
recommended for the refrigerator model.
5 Clean the burner with a brush and blow it
free from dust.
6 Assemble the parts again.
www.sibir.com
copyright © sibir international
replacing thermostat 14
The main replacement procedure is the following:
1 Shut the gas valve at the gas bottle and/or pull out the plug from the wall socket.
2 Remove the capillary tube end from the cooling element, see page 4, and pull it gently out of the cabinet.
3 Remove the cover from the gas assembly, see page 4.
4 Detach the turner from the gas valve.
5 Use a flat screwdriver to separate the gas valve from the thermostat, see illustration below.
6 Disconnect the thermostat from the flame safety device.
7 Remove all electrical cables from the thermostat. Attach the cables to the new thermostat.
8 Change to new O-rings and push together the different parts.
9 Replace the cover.
10 Reattach the capillary tube end to the cooling element.
!
www.sibir.com
Be careful not to break the
capillary tube!
copyright © sibir international
replacing the heater
15
1 Remove the plug from the wall socket.
2 Remove the cover from the gas assembly and loosen the heater cables.
3 Look for a small cover on the boiler case and remove it.
4 Lift the heater and take it out.
5 Insert the new heater into the heater tube.
6 Make sure that the glass wool is put back around the heater and fit the cover again.
7 Connect the cables and fit the cover in reverse order.
8 Put the refrigerator to test.
Cover
Heater
www.sibir.com
copyright © sibir international
replacing the cooling unit [1]
16
3
!
This operation should NOT be attempted by
someone not properly trained to perform
technical service.
1 Make sure that the replacement cooling unit is correct for the refrigerator.
2 Remove the capillary tube from the cooling element
and pull it carefully out of the rear of the cabinet.
!
Be careful not to break the tube!
3 Look for screws holding cooling elements inside the
refrigerator and remove them, see illustration below.
4 Remove the door handles and carefully lay down
the refrigerator on the doors.
5 Remove the electric heater, see page 15.
6 Carefully remove the gas assembly from the
cooling unit, see page 4.
www.sibir.com
!
Before condemning a cooling unit:
·Shut the gas valve at the gas bottle and
disconnect the gas supply line, and pull out
the plug from the wall socket.
·Turn the empty refrigerator upside down a
few times and see if it works when started.
·Make sure that instructions for installation,
use, maintenance and fault finding have
been followed.
· If the refrigerator works using electricity but
not with gas, or the other way around, the
cooling unit is NOT faulty.
copyright © sibir international
replacing the cooling unit [2]
17
7 Look for screws holding the cooling unit to the cabinet back and remove them.
8 Look for sealing tape possibly applied between the cooling unit and the cabinet back. Remove if any.
9 Carefully pull the cooling unit out from the cabinet. If it is hard to get out, apply a lever.
10 Remove all residual foam on the back of the refrigeartor that may be left from the old cooling unit.
9
Wood block between lever
and topmost cooling unit pipe
Slide steel plate under
the pipe coils as protection
!
Be careful not to break ANY COOLING UNIT PIPES!
www.sibir.com
copyright © sibir international
replacing the cooling unit [3] 11 Apply new thermal paste all the way around the pipe.
18
11
12 Fit the new cooling unit into the cabinet and tighten all the
screws at the back.
13 Seal around the frame of the cooling unit (with tape or similar
material) as damp protection.
14 Replace the gas assembly.
15 Refit the heater, terminal box and the capillary tube in exactly the same way they were found before.
16 Transfer the flue baffle from the old cooling unit.
Thermal paste on pipe
17 Stand the refrigerator up and replace all screws inside the
freezer and vaccine compartment. Tighten the screws hard.
!
For proper function it is very important that good
contact between the cooling element and the cooling
unit itself is obtained.
18 Reattach the capillary tube end to the cooling element
inside the refrigerator.
19 Put the refrigerator on test.
www.sibir.com
copyright © sibir international
ordering spare parts
19
1 When ordering spare parts, always state:
· MODEL (found on the data plate)
· PRODUCT NO xxx xx xx-xx (found on the data plate)
· SERIAL NO xxx xxxxx (found on the data plate)
· VOLTAGE AND WATTAGE (if electric parts are ordered)
· SPARE PART DESCRIPTION (see spare parts list)
· SPARE PART NO (see spare parts list)
2 The data plate is located on a wall inside the cabinet.
3 To order spare parts log on to www.sibir.com, select contact, select your country, under select a topic
choose quotations for spare parts, fill out the form then click on send e-mail.
2
SIBIR
SIBIR
INTERNATIONAL AB
97
0402
TYPE: RA/RM-2D
MOD.NO.
230 ~ Volt
V170GE
PROD.NO.
1.3 Amp
921 17 40-06
300 Watt
SER.NO.
611 00001
CLIMATE CLASS
T
TOTAL CAPACITY
REFRIGERANT NH3
BRUTTOINHALT
170 L KÄLTEMITTEL
NH3
320 g
Na 2 CrO 4 =
21 g
VOLUME BRUT
AGENT FRIORIGÉNE NH3
INPUT RATE
RATING
GAS SUPPLY PRESSURE
LEISTUNGAUFN.
0.48 kW ANSCHLUSSW
37 g/h
ANSCHLUSSDRUCK
30 mbar
EFFET AMENÉ
DEBIT
PRESSION DU GAZ
TESTED TO 60 bar
GAS CATEGORY
GEPRUFT AUF 60 bar
GAS KATEGORIE
I 3 B/P
MADE IN SWEDEN
RATIFIÉ JUSQU'À 60 bar CATÉGORIE DE GAZ
Typical data plate
www.sibir.com
copyright © sibir international
GAS OPERATION: REFRIGERATOR NOT COOLING AT ALL 20
1
Flame burning?
NO
·Check gas supply and light the flame, see page 5.
·If not possible to light, clean burner, see page 13.
·If it does not stay lit, check the thermo element and failure device, see page 12.
·If igniter does not spark, change electrode.
NO
Clean the burner and burner jet, see page 13.
NO
Wait for at least 6 hours and see.
NO
Install the flue baffle properly, see page 4.
NO
Adjust the control knob to higher figure, see page 5.
NO
Arrange for ventilation, see page 3.
NO
Level refrigerator, see page 3.
NO
Move refrigerator to cooler place.
NO
Replace cooling unit, see page 16.
YES
2
Flame burning blue?
YES
3
Flame been burning for at least 6 hours?
YES
4
Flue baffle in position?
YES
5
Control knob in high figure position?
YES
6
Ventilation provided around cooling unit?
YES
7
Refrigerator levelled?
YES
8
Is the room temperature lower than 43°C?
YES
9
When checking the thermostat does it indicate
thermostat failure?
YES
10
Replace the thermostat, see page 14.
www.sibir.com
copyright © sibir international
GAS OPERATION: REFRIGERATOR NOT COLD ENOUGH 21
1
Is the flame burning blue?
NO
Clean the burner and burner jet, see page 13.
NO
Adjust the control knob to higher figure, see page 5.
NO
Shut the gas valve and defrost, see page 9.
NO
Take some ice packs out.
NO
Check door gasket, see page 8.
NO
Improve installation and rearrange vaccine,
see page 3.
NO
Level refrigerator, see page 3.
NO
Clean condenser, see page 9.
NO
Hang flu baffle in position, page 4.
NO
Place it in a colder place.
NO
Replace the cooling unit, see page 16.
YES
2
Control knob in high figure position?
YES
3
Cooling element free from thick frost?
YES
4
Normal load of ice packs for freezing?
YES
5
Door closing properly?
YES
6
Good air circulations inside and around the
refrigerator?
YES
7
Refrigerator correctly levelled?
YES
8
Condenser free from dust?
YES
9
Flue baffle in position?
YES
10
Refrigerator placed in coldest possible place?
YES
11
Does checking the thermostat indicate
thermostat failure?
YES
12
Replace the thermostat, see page 14.
www.sibir.com
copyright © sibir international
GAS OPERATION: REFRIGERATOR TOO COLD 22
1
Control knob in low figure position?
NO
Turn the knob to lower figure, see page 5.
NO
Clamp the end tightly to cooling element,
see page 4.
NO
See note below.
YES
2
Capillary tube end tightly clamped to cooling
element?
YES
3
Does checking the thermostat indicate
thermostat failure?
YES
4
Replace the thermostat, see page 14.
!
·In low room temperature (below +16°C) it might be difficult to maintain correct storage temperature.
·In such cases, add extra load as water for ice freezing in order to raise the temperature.
ELECTRICAL OPERATION: REFRIGERATOR TOO COLD
1
Control knob in low figure position?
NO
Turn the knob to lower figure, see page 5.
NO
Clamp the end tightly to cooling element,
see page 4.
YES
2
Capillary tube end tightly clamped to cooling
element?
YES
3
Replace the thermostat, see page 14.
www.sibir.com
copyright © sibir international
ELECTRICAL OPERATION: REFRIGERATOR NOT COOLING AT ALL [A] 23
1
Cooling unit at the cabinet rear warm?
NO
See chart [B] below.
NO
Arrange for ventilation, see page 3.
NO
Level the refrigerator, see page 3.
NO
Place the refrigerator in a colder place.
YES
2
Ventilation provided around the cooling unit?
YES
3
Is the refrigerator levelled?
YES
4
Is the room temperature lower than 43°C?
YES
5
Replace the cooling unit, page 16.
ELECTRICAL OPERATION: REFRIGERATOR NOT COOLING AT ALL [B]
1
Is the supply cable plugged in?
NO
Plug into the wall socket, see page 5.
NO
Set it to position I, see page 5.
NO
Check and if necessary replace the buildings
electrical fuse. If neccessary call an electrician.
NO
Turn the knob to highest figure position, see page 5.
YES
2
Is the energy selector set to position I?
YES
3
Does other equipment function in the
refrigerators wall socket?
YES
4
Control knob in high figure position?
YES
5
Check the thermostat and heater, see page 11.
www.sibir.com
copyright © sibir international
ELECTRICAL OPERATION: REFRIGERATOR NOT cold enough24
1
Control knob in high figure position?
NO
Adjust the control knob to higher figure, see page 5.
NO
Pull out the plug and defrost, see page 9.
NO
Take some ice packs out.
NO
Check door gasket, see page 8.
NO
Improve installation and rearrange vaccine,
see page 3.
NO
Level refrigerator, see page 3.
NO
Clean condenser, see page 9.
NO
Place the refrigerator in a colder place.
NO
Replace the thermostat, see page 14. Better?
YES
2
Cooling element free from thick frost?
YES
3
Normal load of ice packs for freezing?
YES
4
Door closing properly?
YES
5
Good air circulations inside and around the
refrigerator?
YES
6
Refrigerator correctly levelled?
YES
7
Condenser free from dust?
YES
8
Refrigerator placed in coldest possible place?
YES
9
Better function on gas?
YES
10
Low voltage in socket. Continue running on gas.
www.sibir.com
NO
Replace cooling unit, see page 16.
copyright © sibir international