1
Manual
Instruction
DearAlesisCuston€r:
Youhave.iust purchaseda_powedulrnusic.producliodcomprehensive
eledronicpercussionsystem.
of the ope;ationot the
ll9":9 l?k".?.Aomentto glancellroughthismanualto gaiira betterundeFtanding
HR-16,the MMT-8,andtheHR-16:8.
The operating systems of the Atesls HR-16and the HR.16|Bare tdentlcat wlth a few
exceptlons.All Instrucilons and descrlpilons ot HR-16 funcilons h thls manual wllt
apply to the operatlon of the HR-16:g except for those exceptlons whlch ars noted
throughout the manual. wh€n uslng the HR-16 and the xn.ie:a together as one untt,
please refer to the lnstructlon manual Ingen, "uslng the HR-16wltti the HR.16r8..,or
lo the Insert lnstructlon card located Inslde the lllp-up Instructlon ]ld. Both of these
Inslructlons are Included wlth yout HR-16:8.
PLEASEREADTHIS
Concerningthe backupmemoryof the HR-16and MMT-8.
Thebackupmemories
in the HR-16andthe MMT-Bare non-volatile.
They
are protectedby a lithiumcell batterywith an expectedlife of 10 years.
Thismeansyoucanturnpoweroff on bothmachines
andyourwork
willbe retained
in memory.
pleasebe awarethatanycomputer
However,
baseddevicewithmemory
backupcanbe subject
to losingitsmemory
at anytimeforthefollowing
reasons:
1) [ poweris interrupted,
evenbriefly,
duringRECORD,
ERASE,
or LENGTH
youmayloseall memory
CHANGE,
or someminuteportionof memory.
possible
Thisis
because
the MMT-8andHR-l6'sinternal
computers
are
movinginformation
aroundin memory
duringtheseoperations.
A power
surge,or powerinterruption
couldcausean unfortunate
memoryloss
duringthesevulnerable
operations.
2) Staticelectricity
canalsocausea fullor partialmemoryloss.
Therefore, it is recommendedthat you frequently backup any
rlmportantwork you are involvedin. lt ls a simple operatlon.
Pleasemake it a habitualpart of your use of the HR-16and MMT-8,
so that your enjoymentand musical progresswon't
be interrupted, See the sections on TAPE in this tnstruction
Manual,
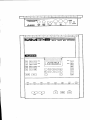
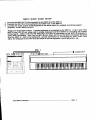
ALESIS HR.16 HIGH SAMPLERATE 1 6 B I T DIGITAL
DRUMMACHINE
TABLEOFCONTENTS
PACE
INTRODUCTION
H R . 1 6Q U I C K
PATTERNMODE
RECOFIDINIGAPATTERN
3
4
6
6
OUAITIZE...
STEPEDITMODE........
schGh/bDE
SONGEDrr.
coPY.........
8
1 0
1 2
DYNAM|CS...............................
zuTTON
F@TSWITCH.......
START/STOP
. . . , . . . . z, o
L
oulrur2
@rt
R
OUT
tN
tAE
SM/
mP
@r
Lf,tot
tN
l
_ _
ttrr4t I rtr |
w rc ff/OFF
-w
E @ @
@ @ @ :
@ E E
t,* |
_E
EEtIEtr]
TIEEEE
t M t
::_) ldY,Ll l "-,' I
l l
t
t r
t
t
I M I
|
t
t
|
t
i
l t
t
t
|
l
l l
t
|
t
|
l l
t
l
t
l
ftft.
INTRODUCTION
The AlesisHR-16(HighsampleRate/ 15 bit drum machine)iq a user{riendly,.yet
The sound.generation
exlremelypowerfulMlDl drum sequencer/ soundgoneralor.
drum"voicss"'6achof whichcan bo
ot the HR-16include16 independent
caoabiliti-es
and
canbe routedwitha 7
(47in the HR-16:B),
to anyons of 49 digitalsamples
assigned
positionpanlo one of two iets of stereb outputs' Each voics can also bs tunsd
ovoran oclave and a hal{.
independenttyin 32 incremgnts
The ssquencingof lhe drums is accomplishedby €nteringrecord,and.thonplayingon
drum buttonson ths lront panel,whichis thsn storedinlo a'pallern."
the touch-sensiiive
Therecan be up to 1OOpatlernsin the HR-16's memory(00'99). Th€sspatternscan be
anywher€lrom 1 to 682 beatslong. The patternscan be combinedinio lisls of pattsrns'
whichare called"songs.' Therecin bs up to 1oosongsin the HR'16'smemory(00-99)'
and eachcan containa listof palternsup to 255stepslong.
The 16 drumpadsat the frontof the HR-16ar€ vslocity'sensitive'Howhardlho pad.is hit
determinestlie volumeot the drumon 8 levels. 12 of the pads (all pads sxceptClosod
Hat,Mid Hat,OpenHat,andCrash)aro€achdirecflyassignedto a voice. This meansthai
playinga pad iepeatedlywill retriiger the same vo'ce,and no other pad will effectthat
voice.
Any soundsassignedto the threeHi Hatpadswill all b€ assigned10tho samevoice. This
is io tnat playingthEClosedHal willcut ott the Oponor Mkl Hal,for a mors realistichi hat
sound. The Ciash pad is assignedlo two voicEsthat alternate. This means that
repealedlyhittingthe crashpad r-sults in lwo independentcrashes(of lhs samesound)
thatcan ovorlapas lhoydscay.
Moresoundscan bs madeto overlapby assigningthe samesoundto two diffErentpads
and altsrndingwhichpad is pressedeachtimelho soundis to be playsd' Only 1s.voices
havebeenused(12 ndrmaliads, I voicelor Hi Hats,2 lor Crash).Tho 16thvoicais ussd
for the Click,whichcan alsobe assignsdto b€ anyof ihs availablesounds.
PLEASE NOTE THESE FEATURES
PROGRAMCHANGE THROUGH MIDI
This allows MlDl programsolectionof patternsto work while a part is playing.lf a new
program number is received over MlDl, lhis program number will be selectedto be
iheI.IEXT pattern number to play when the cune-ntpattern is finished.This functions
exactlyas if the new pattern irurirberhad been selecled with the keypad. ll a song is
playing, MlDl program commands will be ignored.
SONG CHANGE THROUGH MIDI
MlDl program changes will select songs it the HR-16 is in Song mode, and not
prayrng.
SPOT ERASING
This allows soot erasino while in record mode whEn Quantize is OFF. The erase
button and a drum buttoi can be held down while recordingwith quantizeoff in order
to erase all drum events (quantizedor not) that occur during the time that the buttons
are held down.
HR.16QUICK BASIC SETUP
'1. Connecl
output 1 (eitherleft , rightor both)to a suitablemonitorinq
system. I outDut2
is connscted,the desireddrumpads mustbe assignedro oup"i i rii"iltrl i,,rix;iffi".
(SeeMlX.)
ro the MtDlOUTjackof a sequencer,
an external
?: .9llg1ltt:
YlDt tNiackof rhe.HR-16
pao conlrolsr,
orum
or a keyboard.
OUTjackof rhe HR-.t6ro orherMtDtsoundsourceswhendaisey
ll^?:g*lEIlDl
cnarnrng
MtUtdevicosor lo an onernaldrumsource.TheMlDlOUTjackalsodoublesis a
l,!!PlII.EV ig{ qndborhMtDttNdaraanddarapoOuceoon rrrEHi-16 areprEsenrar the
MlDlOUTiackif desirod.
Forstandalonooperation
tho MlDl.iacks
ne6dnotbe conneclsd.
MlDlallows.rhythm
triggsring
andprogramming
of the HR-16fromexternalMlDldevices,
suchas keyboardsor drumpadsthat are equippedwilh MlDl. Also,MlDl can be usedto
sync dif{erentdevicssto tho HR-16,save and recallthe memoryusingan externaldisk
drivev-iaMlDl systemexclusivedatadump,and receiveprogramihange-commands
which
willcallup patlerns.
The programchange commandis usefulfor accessingditt€rsntsets ol soundswhen
lriggeringsoundsfrom drum pads or sequsncsrs.
lf a new program change command is receivedwhile the HR-16 is in PLAY mode,
lhe program nurnberwill select the next pattern to play alter the current pattern is
linished.
Thg HR-16 has two stereooutputs(fourindividualoutputs).The volumeslideris activeon
only ths firsl stereooutpul (output1). In addition,il only one side of an output is
connacted,the stsreo mix assignedon ihat storsooutputbecomesa mono mix on that
singleoutput. Thissaveshavinglo reconstruct
a monomixfroma stereomix,whenonlya
singleoutputis beingused.
UsingFouroutputs,assignths kickto output2 pann6dhardlottandthe snargto outout2
pannedhardright. Thisleavesall otherdrumson outputI pannedin slereo as desired
andthe kickand snareassignsdto th6k ownoutput.
on ssttingup drum machinesand sequencers,see MMT-8BASIC
fqr_Toj" inJormation
SETUP in the MMT-8Instruction
Manual.
Pags 4
PATTERN
MODE
Whenpoweris tirstturnsdon, the HR-l6 will be in SONGor PATTmode(SONGor PATT
LED lii), dependingon ths modethat was selectodbeforepowerwas turnedoff. The
songoi patternnumberwillalsob€ the sameas whsn powerwasturnedoft.
PATT (pattern) Button
Pressttib PATT'buttonlo 6nter pattsrn mode. PATT LED will light. Now, the display
Selectlng a PATTern
The 00 is underlinedto indicatethat it will be changedif a newnumberis selectedwiththe
keypadorthe +/- arrow buttons. Pressinglhs +/- arrowbuttonsimmediatelyselsctsthe
neii patternnumber,with thE numbsrsloopingpast 99 lo 00 and loopingdown lrom 00
ths displaywillchangeto:
to 99. ll a singledigiton thekeypadis pressed(3,for sxampls),
The displayis nowindicatingthat the sEconddigitot the patternshouldbe entered.Aftor
enteringthe seconddigit,ths new pattsrnis select€d. lf ths seconddigit is not entered
within2 seconds,the displaywill revortbackto the previouspatlernnumber,and no new
pattsrnwill havebeen solsctsd. This type of keypadentry is consistentwith all snlries
madewith the keypaddescribedin this manual.PressingPLAYwill startplayingthe
selectedpattsrn{rom its beginning,andths PLAYLEDwill light. The displaywill read,for
9xampre:
T 001
The displayis nowshowinglhe currentbeat numborandtho patternnumberthat is being
played.As eachbeatoccurs,the displaywilladvance
the beatcount.Whiletho patternis
plating,the keypadand+/- arrowbuttonscan be usedto selecta newpattornnumber.
Thedisplaywill read:
SElectlng new PATTerns In PLAY
At the end ol the currentpattern,the newlyselectedpattsrnnumberwill play,withthe
beatcountstartingagainat 001. The NEXTpatternto playcan be changedup untilthe
endof lhe currenlpatternis reached,afterwhichtho newpalternwillbeginplaying,and
the displaywillrevertbackto PLAYINGPATT.
S T O P / C O N T I N U EB u t t o n s
will stop playinga pattem,and the disPlaywill relurnlo the
ProssingSTOP/CONTINUE
ffom
againwill b€ginPlaying.apattern
seleclpatterndisplay. PressingSTOP/CONTINUE
the b€dinningof the beatit wason whsn it wasstopp€d.PressingPLAYwill alwaysstarta
patterntromlhe beginning.Whena pattsrnreachesits snd, it will loopbackand conlinue
playingtrom lh€ beginning.
AlesisHR-15Instruclions.........
RECORDING A PATTern
(Atso see LENGTH and QUANT|ZE)
ou.lg1teLll pressand holdrhe RECORDbutton,and rhenprsssthe pLAy
]o-reco!
button. Ihe HR-16wirrimmsdiat.ry
bsginpraying
backanyexisting
drumsin ths currontrv
s9l99lgqpattsrnfromrhe bsginning,and will iad any newdrumspiayedon rhe Uutton.o',
via MlDlto the pattern.ThepLAy and RECoRDLEDswiilb€ rit,a;d ihe dispraywirrread:
T
Th€ patternnumberis noi underlined,indicalingthat a new patterncannotbe selected
whilorecording.Whena drumbuttonis pressed,
it is recorded
alongwithitsdynamics
on
eighllevels. The drumsar€ alwaysrocordedquantizedto the nearestcurrenilyselec{ed
quantizobeat. PressingSTOPexitsrecordmod6,and boththe RECORDind pLAy
LEDswill iurn otf. lf PLAYis pressodwhile in RECORD,the RECORDLED will turn off.
andthe patlernwill immediately
beginplayingiromthe start.
LENGTH
Whenrecording
tor ths lirsttime on an emptypattern,lhe lengthwilldstaultto g beats,
unlsssit was set prsviouslywiththe LENGTHbutton.
The LENGTHbuttonis usedto set the longthof a pattarnto a speciliednumberof beats.
While hoidingihe LENGTHbutton,the displaywill showthe cuirentlengthol rhe cuilent
pattern.lf it is an emptypanern,the displaywillr6ad:
LENGTHOO8BEATS
8 beats is the default length ol an smpty pattern. ll it is desired to chang€ the length, ths
+/- arrow buttons can bs used lo move the length up or down in single b6at incrsments
(001 minimum, 682 milimum), or a lhree digit number can bo onter€d with the keypad. In
either case, tho new length is not sntored into ths pattsrn until th6 RECORD button is
presssd. Wh6n RECORD is pressed the display chang€s to:
00
ThisdisplayremainsuntilRECORDis released.lf LENGTHis releasedbeforeRECORDis
pressed,no changeto the lengthwill bo made,regardlessof what was pressedon the
keypad. lf RECORDis prssssdafler enteringa parliallength(1 or 2 digits),nothingwitl
happen. Whenenteringin digits,the lirst digitsntered(1, fof example)resultsin ths
following
display:
PATTOO
LENGTH1 BEATS
The display is now waitingtor th€ entry ot the seconddigit. lf tho seconddigit is not
enteredwiihin 2 seconds,the display$,ill revertlo its previousvalue. lf RECORDis
prsssedatler enleringan incomplets
lsngth(l or 2 digits),ths displaywill revsrtto its
oreviousvalue.
When a new lenqthis ontsred(RECORD),any drum evsntslhat were beyondlh€..new
prev'ousone' tns aoolpnal
sel lenoth
";iil will be;rased. It the new lengthis bnger thanths
6elirf"J "ittr "ir"n"e. lf it is disired to iEmoveor add lsngth1oihe beginningof
ffiih
i oitr"rn, first set the desiredlength(as describedabove),and then prossand reloase
th; PATTbutton. The displaywill changeto:
LENGTH
BEATS
PressinqthePATTbuttonagainwi||togg|ebackiotheoriginaldisp|ay.|l-RECoRD.is
p
ressed-withthoabov€disp|ayshowing,anyadditiona|beatswi||bep|acgdatlne
'beoinnino
ol lhe pattern,and any beats removedwill be removedlrom the Patlerntop'
Orim evinis ftratweresioredin the removedb€atswill be rsmovedfromlhs pattern.
The LENGTHbuttonhas no efleclin songmods,or whilea songor patternis playing'
QUANTIZE
The ouANTIZE button is used to s€leclths resoluiionat whichdrum €ventsare to bo
r'Eiora"o. wnib hotoingdown th€ ouANTzE button in patternmode,tho displaywill
read:
TO
dfF'
T h e 1 o q u a n t i z ceh o i c e sa r e 1 1 4 , 1 t 6 , 1 t 8 , 1 t 1 2 , 1 1 1 6 , 1 D 4 , 1 1 3 2 ,11//6448,,. a nO
ttre +l- irrow buttonsof ttre keypadcan be used to scroll lhroughthe choices' Tho
Keypacloulons 1-0 can also be used Io selccl the quantize value direfily' wnn
1 = 1/4 and 0= OFF.
Quantizewill only affecl newlyrecordedevgnts,and will not changsany eventsalrsady
recorded.When6vera new quantizevalugis selected,the swingamountwill b€ resotto
lo be used.whenin pattern
Sb7.. ltso, ths quantizevaltle determinEstho step_amounl
itep modeipntf+RgCOnO). ll quantizeis sst to OFF,lhe stapswill be in 3841hnotes'
ERASE
The erass button b usodto erase a singledrum, a patt6tn,or a song. When in PATT
mode,pressingand hoHingihe EMSE buttoncausssthe lollowingdisplay:
The number01 wouldactuallybs the curreilly sel€ct€dpatternnumber' To srasstho
selectsdpattern,pressRECORD-The displaywillchangeio:
The displaywill remainthis way untilthe RECORDbuttonis releas€d,aftsr whict.th€
previous6tate. To erasea singlodrum,pressand holdlhe ERA5E
;;;;-;illi"tr;"i"'its
;;{;;1 ;; a"i""t ihe d'eskeddrumbutton. ll, lor exahple,ToM 1 is press€d,ths display
willread:
'.............'.....
AlesisHR-lSlnstuctons
""""""""
Pagp 7
01
TOM 1 is now complet^ely_eJased
from pattern1. When erasinga singledrum, it is not
nec€ssaryto pressRECORD.
In SOI'IGmods,holdingthe ERASEbuttonwillcausethafollowing
display:
01
Pressingthe RECORDbuttonwill erasethe currentlyselectedsongnumber.
Whenerasinga patternor song,the erassis notexecuted
untilRECORDis oressed.
and
will be aborledif ERASEis releasedbeforepressingBECORD. Wtrenerjsinga d'r;m,
ths eraseoccursas soonas the drumbuttbnis piessed. The ERASEbutto-n
has no
eifectwhilea songor pattarnis playing.
.Er€slng lndlviduat drums In RECOFD mode (sotected beats)
While recording.ina pattsrn,individualdrumscan be erasedby hoi,Cing
ths ERASE
buttonwhileplayingthe drumon the desiredb6atto be erased. lf the drumaas hit within
a quantiz€windowin whichthat samedrum had been previouslyrscordsd,it will be
erassd..Holdingthe drum buttondownwill continueto erasean! of the samedrum
eventslhat mayo@ur.
This meansthat a drum buttoncan be helddownwith ERASEthroughouta partof a
patternwhils in recordin orderto sraseall of that drum'seventsthaioccurwithintire
currentquantizestep. lf eighth notss exisledon a snare for example,and erase and
snarewors h€lddown in recordwhile in quarternot€quantizg,only.thesnare sventson
quarternoteswouldbe srased.
Er_albg an entlre drum bulton'3 rhyfhm (all beats) or erasing and enilrg
PATTern
Whilenotplayingor recording
a pattern,
the ERASEbuttoncan be usedto eraseallof a
drum'ssvents(regardlessof quantizsmode)fromthe ontirspatternby holdingaraseand
lt
can
also
be
used
ro
erasetho enrirspaflernby tiotdingERnSE and
llttlng lhg-dlt4.
hittingRECORD.
STEP EDIT MODE
How to enter STEPEDITmode
To enterstep record/ stepedit,pressand holdPATTERN,and ihen pressRECORD,
lhen releaseboth buttons. The RECORDLED will light,bur the pLAy LED will nor,
indicalingthatyou are in stepmode. The displaywill lookas lollows:
STEP 001 + 00/96
PERC 1 VOLUME
The lirsl lineof the displayshowsthe currentbsat number, followed by the sub-beat
shownas a fractionof 96thsof a beat. The + arrow butlon is used to move lorwards in
A l e s i sH R - 1 6I n s t r u c t i o n. s. . . . . . . . . . . . . . . . . . . . . . . . . . . . .
. . . . . . . . . . . . . . . . . .P a g e I
singls steps of the current quanlize value (you cannot movg backwards). lf quantize is set
to i/16, each step will equal 24196(lf swing is set to 50%).
lf a drum existed on a slep in between the current quantize value, it will play as it is
stepped pasl, but tho display will not stop on that drum. The lower.display shows the
drum thai was triggeredlollowed by lhe volume of that drum. Since only one drum can be
displayedat a time, if more than one drum occurred on the samo beat, the + arrow button
wili advance lhrough each drum one at a time belore advancing to the nexl step. lf a
quantize slep does not have any drum recordedon it, the displaywill read EMPW in place
of the drum name. The 16 possibledrums are displayedwith 7 charactorseach as follows:
3
1
TOM4
T
KICK
OPN HAT
CLAPS
PERC
Thsse same displays appear elsewhere in this manual when lhs drum buttons are
displayed. The volume is shown as one of eight possiblevolumes. To add a new drum to
a beat, just press a dIUm button. That drum, along with its volume (how hard the pad was
hit), will be recorded onto tha displayedstep.
lf there w6re other drums already recorded on thal beat, thoy aro not etfected. lf the drum
played already sxisted on the current beat, it will be replacsdwith the new volume P|ayed.
Eraslng a drum ffom a step
To erass a drum from a step, hold ERASE, and prsss RECORD, lhe drum that was being
displayedwill be erased. To edit the volume of a drum, ths 1-8 buttons on tho keypad are
used, or the displayed drum is replayed. Step mode is exited by pressing STOP or
PATTERN. lf PLAY is presssd, step mode will be exited, and the patlern will begin
playingfrom the beginning. lf swing is on, STEP mode will step in "swinged' increments.
SONGMODE
Selecting and Playing a SONG / SONG Button
Prsss the SONG button to enler song mode. The display will fead as follows, with the last
song entered being indicatedin the number portion of the display.
STEPOl PATT27
Selecting a SONG
A SONG is a list ol patterns in a specilic order, with each entry into the list being a STEP
which contains a panern number. The O0 is underlined to indicale that it will b€ cianged if
a new number is selectsd with ths keypad . lf a single digit on the keypad is pfsssed (2,
for example),the displaywill chango to:
The display is now indicatingthat the second digit of the song should be entered. Atter
sntering tho second digit, the new song is selecled. lf tho second digit is not entered
within 2 seconds, the display will levert back to ths previous song number, and no new
song will have been selected. The +/- arrow buttons are used to scroll foruards and
backwardsthrough the steps within a song. PressingPLAY will start playing the selectsd
song from its beginning,and the PLAY LED will light. The displaywill read,for example:
AlesisHR-16Instructims
. ... .
Page I
00
STEP01
T-hEfhst lins ol.thsdisplay.
is now.showing
the.current
songnumberbeingplayed,and
lhe curent bear numberof the pattsrnbeing prayed. The iecond rineof ihe disoiauii
showingrh.e_
srep numberand ihe patrerniisigneo ro ttre iief triid ptir"riiiiiri"
momenr..wh_enrhe songadv_al:i.s.io_rhe
nextsGp, rhe dispravifli[ "no*lrtJfJn"inioi
stsp 2, src. Pressingsrop/coNTrNUE wiil stop prayingthe sons, and the ciisoravwirl
rerurn.rothe selectsongdisplay. pressingsropicolilttue
asai;witt ueqinolri,ini,ih"
song rromlhe point al which it was stopp€d. pressingpLAy iill alwaysitah the iono
'wifisiop
from.the_beginning
of.the f irst step. Wti€n a song reiches its enO,ir
anJih3
PLAY LED wiil rurn otf, untessSO'IIGLOop (se€iflDtruTtl) is on, iihich wiii;"r"; il;
songto loop backlo step one and continuepliying.
SONG
EDIT
A song is.editedby usingrhe DELETE,INSERT,and OFFSETbuttons,alongwithrhe +/arrow butons. Th€ arrow buttonsars usedto moveloruard and backwardth-roughthe list
of stepsin a song. lf a songis empty,the displaywill read:
QO
ln3erllng e Step / INSERT Button
T,oinserta step into a songat the currsntlydisplayedstep,pressand hold INSERT.The
displaywillread:
STEP01 PATT
While holdingth€.INSERTbunon,the keypador +/- buttonscan be usedto changeths
patternnumberdisplayed.To completethe insertion,the RECORDbuttonmust bo
pfessedwhilestill holdingthe INSERTbutton.Thedisplaywill read:
0t
Thisdisdaywill r€mainuntilRECORDis released,aftsrwhichthe displaywill revertto the
first INSERTdisplay. lf it is desiredto insertthe sam6patternm.anytimss,the RECORD
butloncan be pressedrepeatodlywhileholdingthe INSERTbutton. Eachtime a patiern
is ins€ned,the previouspatternat the displayedstep is movedto step +1, and ail other
stqps afterq?!e also stepped+1. It a lempo changeb desirsd,pressingTEMPOwhile
holdingINSERTcausesthe followingdisplay:
STEPO1TEM
The.keypadcan now bo usedlo changethe desiredlempoto bs insertedinto tho song.
pressingRECORq coJnplstesth€ insenion. Pressingthe TEMPObuttonagain
A,g_ain,
willchangethe disptaylo PATTagain. The programmable
temporangeot a step in a song
is lrom 46 to 2O0bsatspsr minute.
Dcletlng
a slep / DELETE Button
AlesisHR-'16Instuctios ...............--.
PagB 10
To del€te a slep lrom a song, press and hold lhe DELETE button, and the display
will read:
STEP 01 PATT 27
To completethe del€tion,the RECORDbutton must be pressedwhile still holding
the DELETE button. This shifts all patlernsafter the bisplayedstep down on6
step. After all steps have b€€n deleted, the display will show step 1 being END
(emptysong). The END step cannot be deleted (RECORDwill be ignored).
Replaclng a slep / OFFSET Button
The OFFSET button is used lo replacethe currentlydisplayedstep's pattern or
tempo with anolher patlen or tempo. lt is provided as a convenience,and
essentiallydoes lhe same thing as DELETEfollowedby INSERT. Pressingand
holdinglh€ OFFSETbulloncauseslhe followingdisplay:
STEP 01 PATT
While holdingthe OFFSETbutton,the keypadcan be used to changethe pattern
number displayed. To completethe replacement,tho RECORDbutton must b€
pressed while still holding the OFFSET butlon. The display will read:
STEP
This display will remain until RECORD is released,alter which lhe display will
revertlo lhe firsl REPLACEMENT
display. lf the step being replacedconlaineda
t€mpo, th€ displaywill read TEM insteadof PATT. Whetherreplacinga pattern
or a tempo,the TEMPObullon can be turnedon or off so as to changewhat lhe
replacementwill be. When replacinga step, all other sleps remain unchanged,
sincethe numberof stepsdoesnot change.
Erasing an entire SONG
To erase an €ntire song, press and hold the ERASEbutton. The displaywill read:
00
While holding th€ ERASE button, if RECORD is pressed, tho song will bo erased,
and the displaywill read:
SONGERASED
This display will remain until RECORD is released. In all of the above editing
examples,no changeslo lhe song will occur until RECORDis pressed.
Al€sisHR-16 lnslructims
Page 11
COPY
Copylng a PATTern to ltsetf
Tho copy button is used to-app€nd a patt€rn or song
-lfto anoth€r panern or song. lt
only functionswhile th€ coPY button is held down. the copy button is releised
(eilher befor€ or afler the copy is execut€d),th€ previous mode will show up on
the display, and copy mode is €xited. When in PATT mode, and COpy is preised
and held:
EqE I[E^tlR-1Q Pressing RECORDcompletesthe operationand the displayreads
COPY COMPLETE.
FOR THE HR-16:8 - At this point you may either enter the pattern'stwo-digitnumber
with the keypad or press the + br - key to set the copy assignment to-the same
pattern number. Pressing RECORD completesthe operation ahd the display reads
COPY COMPLETE.
This display remains until the RECORD button is released.which then relurns
the display to its previous state. Tho above example demonstrated copying a
pattern lo ilself, which will double lh€ length of that pattern.
Copylng a PATTern to another PATTern
To copy a patternto anolherpattern,press and hold COPY, then ent€r lhe two
digit patlem number with the keypad. The display will show the selected pattern
number. PressingRECORDinitiateslhe copy, and appendslhe source pattern
(lhe current pattern before COPY was pressed)to the destinationpattern (the
patternenleredwith the ksypad). lf the destinationpatt€rnwas empty, lh€n the
destinationnow containsan exact copy of the source pattern.
lf the destinationwas not empty,lh€n the destinalion'slengthis increasedby the
lengthot the sourcepattern,and the sourc€patternis app€nd€dto the €nd of the
d€stinationpatl€rn. All voice, mix, and tuning assignmentsmade on th€ source
pattern will be ovenidden by the destination palt€rn's assignments. ll the length
of the destinalion pattern would result in mor€ than 682 beats after copying, the
copy will not be ex€cul€d,and the displaywill read:
IN PATTERN
Copylng a slngle drum pad's rhythm to another drum pad
Singledrum pads can also be copiedto otherpads. lf a drum pad (CLOSEDHAT,
for sxample)is pressedwhile holdingth€ COPY button,the displaywill read:
FROMPATT
CLS HAT > ?
AlesisHR-16 lnstuctims
Both displayed pattern numbers will aclually display lhe current pafiern
n u m b e r( 0 0 - 9 9 ) .
Th€ display is now waitingfor a seconddrum pad lo b€ Press€d(pressingRECORD
at lhis point will .do nothing). lf for example,TOM 1 was pressed,lhe display
would read:
COPYFROMPATT
CLSHAT> IOM 1
The displayof th€ s€cond pad pressedremainsunderlined,indicalingthat it can
still be changed by selectinganolh€r drum pad. As in copying pallerns, once
'COPY
RECORDis pressed,the copy will be compl€te,and tho displaywill read
COMPLETE."
Th€ length of th€ rhythm of the destinationpad will not be changed,and the source
drum rhvlhm will be mergedwith the destinationdrum rhythm. The dsstination
drum will remain assignedto its previousvoice, mix, and tuning. A drum from
one patt€rn can be copied to a drum of another pattern if the destination pattern
is selecled before selectingtho sourc€ and d€stinationdrum buttons.
Copylng a SONG to ltselt
In SONG mode, pressingand holdingthe COPY buttonwill resultin the following
display:
COPYFROI\,ISONG
01 TO SONG
The 01 display will actually show the curr€ntlyselecl€dsong number. Like in
PATT mode, pressingRECORDwill appendthe currentsong to itself, making il
twic€ as long.
Copylng a SONG to another SONG
lf a n€w song number is selected,the displaywill show the newlyselectedsong
number, and pressing RECORDwill append lhe source song numb€r (the number
selecled b€for6 pressingcoPY), lo th€ deslinationsong number (the numb€r
selectedwhilo holdingCOPY).
This mode is very useful,since a verse consistingof more than one patterncould
b€ €ntered into a song, and then appendedinto anoth€rsong when n€ededwithout
having to re-enter th€ patterns for ths v€rs€. lf lhe destinationsong would
resull in more than 255 steps alter copying,th€ copy will not be ex€cuted,and
the display will r€ad:
TOOMANYSTEPS
ln all cases,the copy is nol execuleduntilRECORDis pressed,and will be aborted
if COPY is releasedbefore pressingRECORD. The COPY button has no €ffectwhile
a song or patternis playing.
AlesisHR-l6lnstructims'.......'-.........
Page 13
OFFSET
The oFFSET button is used to add or subtracta numberof crockpurses(384th
notes)to a drum or pattern. lf OFFSETis held down,th6 displaywili show:'
o0/384rh
The keypad can be used to enter a two-digltnumber (OO_99),
or the +/_ arrow
'The
buftons can be used lo incrementor decrehent the amount.
range oi the
offset,is 199. Entoring a value with th€ keypad will remain th€ curre;l dispi;y
or -). To change rhe sign, the +/- buttons must be used to ,jasi
{1.
:JSl
through"zero, Pressingthe REcoRD button€xecutesthe offsetcommandfor arl
drums in a pattern, resultingin the followingdisplay:
OFFSET
This displayremainsuntil RECORDis released. The offsetlunctionmoves drum
svents ahead (+) or behind C) the b€at in 3841hnote sleps. This is used lo
change lh€ "feel" of.the paltern. lf an event is moved past ltie end of a patt€rn, il
is put al th€ beginning. Likewiso,if an event is movedto beforethe belinning, it
is put at th6 end. Like the ERASEfunction,individualdrumscan be offse-tas iell.
lf, tor example,TOM 1 is pressed,the displaywill read:
03/384rh
TOM 1
TOM 1 is now offset ahead of its pr€viouslocationby 3 g84th notes. Unlik€
quanliz€, lhis t€ature modifies the already existing drum evenls in a pattern, and
do€s no1 eflect any n€wly recorded evonts in the pattern. B€cause of this, it is
suggestedthat a copy of a pattern be made before changingthe offset so that the
original will be easily retrievableif the results are undesirable.
The OFFSET button does not funclionwhile playinga pattern,or while in song
mod€-
SWING
The SWING butlon is used to change the ratio b€tweon two equal rhythmicvalues
(such as 1/l6th not€s)in order to achievea shuftlefeol. lf SWING is held down.
the display will show:
SWING.IN
=5O.Oo/"
The display above shows the current swing value. The +/- arrow buitons can be
used lo incremonl or decremenl the swing number, wiih the percentage of swing
A l e s iH
s R - 1I6n s l r u c t i o.n. .s. . . . . . . . . . . . . . . .
. . . . . . . . . . . . . . .p. .a g e 1 4
shown beside it. O swing = 5A% = no swing. Tho range of the swing is
determinedby tho current quantize value. The swing amount will only effect
newly recordeddrum events, like in quantize. The swing amounls are shown
below:
OUANT
1t6
1ts
1t12
1r24
1/32
1/48
1t64
OFF
SWING
PERCENTAGE
oo-24
50.0- 68.8%
50.0- 66.7%
50.0- 68.8%
50.0- 66.7%
50.0- 68.8%
50.0- 66.7%
50.0- 62.s"/"
50.0- 58.3%
50.0%
oo-12
00-08
00-06
00-04
00-02
00-01
00
The SWING button doos not functionwhile playing a pattern,or while in song
mode.
F IL L
The FILL bulton is used to allow repeated entriss ol drums inlo a palt€rn wilhout
havingto rep€aledlypress the drum buttons. While FILL is held down, pressino
and holding any drum button will caus€ that drum to repeat at the current
ouantizo rate until €ither the FILL button or th€ drum button is released. The
volume of lhe repeatswill be determinedby how hard the drum butlon is first
hit. Fill will only work while playing or recording.
A l e s i sH R - 1 6I n s t r u c t i o n. s. . . . . . . . . . . . . . . .
Pags 15
MODE/ DATA ENTRYBUTTONS
All MoDE buttons function as on/off switch€s. This means that they are pressed
once to ent€r lhe mode, and pressedagainto exit the mode. When any of th6 modes
hav€ b€en entered, the associat€dLED will b€ lit. For slmpli6ity,any lim€
PATTERNor SONG is pressed,any previouslysel€ctedmode will be urneO 6tt.
The VOICE, TUNE, and MIX settingscan bo stored with oach patternby holdingthe
RECORDbutton and pressing VOICE, TUNE, or MlX, respeitively. Any chaiges
made lo th€ss paramelers wilhout storing them are temiorary 6dits that witt-Ue
lost it a n€w pattern is selected. Copying a pattern to an €mpty pattern will also
copy lhos€ s€ttings. Copying a pattern lo a not €mply panern wili not copy these
s€ttings, but will instead r€tain th€ sottings of th€ pattern being copied io. An
empty pan€rn defaultsto a standardvoice assignmentwith no pitch shift, and
nominal mix levels.
IHPORTANT NOTE: VOICF, IUNE, AND'MIX ASSiG,NTIENTSCANNOT BE
STORED 'N AN EMPTY PATIERN UN'LESS THE LENCTH HAS BEEN
CHANGED TO A LENGTH OTHER IHAN 8 BEATS.
votcE
Seloctlng a VOICE
To changoth6 sound of any of th€ drum pads,the d€sire pad is pressed. lf KICK is
pr€ss€d, tor €xample, lh6 display will show:
KICK PAD = 01
The sfider, keypad, or +l- afiow butlons can be used to chang€ the s€lecl€d
sound, and the lou/sr display will show th€ nam6 of the curently s€lect€d sound.
Thsr€ are a tolal ol 49 sounds to choos€ from, Any changes mads to any of th€
drum pads ar€ temporary unlil storod and will bs lost as soon as a new patt€rn is
sglected, or the curr€nt pattern is r€s€l€cled (unless Manual Voice/Tune/Mix is
off, soe b6low) .
Storlng VOICE settlngs
To stor€ lh6 VOICEsetlings,pressand hold RECORD,and then pressVOICE. When
this is done, th€ voic€ settings will be permanently stor€d with lhe curr€nl
Dattern.
]MPORTANT NOTE: VOICE, TUNE, AND MtX AS96NMENTS CANNOT BE
STONED 'N AN EMPTY PATTERN U'VLESS THE LENGTH HAS EEEN
CHANGED TO A LENGTH OTHER THAN 8 BEATS.
AleslsHR-l6 lnsnuctms .................
.........,.. Page
The TUNE mode is used to sslect the desired pitch for each drum pad, and the
click. When it is pressed,ils LED will llght,and the displaywill read:
=0
This display app€ars when TUNE is first pressed, and the display was not
pr€viouslyin MIX or VOICE mode for a drum pad. lt is used to s€l€ct the pitch of
the click (melronom€). The pitch amount can be changed wilh th€ slider,or the
+l- anow buttons. The range is from -16 to +15. As with the voice mode,
pressinga drum pad will select lhat drum for pitch ediling. Also like in voice
mode, changes mad6 lo drum pads are temporaryuntil stor€d by holding RECORD
and pressingTUNE. See IMPORTANTNOTE under storlng volcc aettlngs.
The MIX button is us€d lo change th6 volume, panning, and output assignmentof
€ach drum button. When MIX is press€d ils LED lights,and the display reads:
'I
This display app€ars when MIX is first prossed, and the display was not
previouslyin VOICE or TUNE mode for a drum pad. lt is used to select the output,
lhe volume, and ths panning of lhe click (metronom€). Th€ output is selected
wilh the 1 and 2 buttons of th€ k€ypad to select stereo outpuls I or 2,
resp€clivoly. Th€ volum€ control is adjusted with th€ slider (00 to 99), and lhe
panning is adjusted with the +/- arrow bultons. The panning is seven position,
and the display will show <3, <2, <1, <>, 1>, 2>, or 3>. As with th€ voic6 mode,
pressing a drum pad will s€l€ct that drum for mix editing. Also like in voice
mode, changes mad€ lo drum pads are temporaryuntil stored by holding RECORD
and pressingMlX. 5€6 IMPORTANTNOTE under 3torlng volcs settlngs.
NOTE: The Volume slider on th€ fronl controls oulput 1 only.
TEMPO
The TEMPO button is us€d lo changeths t€mpo of a patternor song. The tempo can
be stored with a song, but nol wilh a paltern. While in patl€rn mode, th€ tempo
r€mains at its previouss€tting until changed. While in song mode, lhe tempo
changes to the programmedl€mpo €ach limo a t€mpo st€p is oncount€redwithin a
song. While in patlern mode, pressinglhe TEMPO buttoncaus€sthe TEMPO LED to
light, and results in the following display:
TEMPO= 12
PERMINUTE
AfesisHR-16Instructims...................
Paqe 17
The +/- arrows and the SELECT slider can be used to selecr a new lempo,
or a
dir€crtywilh rhre€ digirs on
lTlL.:T_T-:lrer€d
-rh keypad. Tempo "hiig;, ;r;
€TTecilv€
as soon as th€y are €ntered, and th€ REcoRD
bunon does not hav; to be
presssd.
In SONG mod€, the t€mpo is displayedas a relativeamount of change from
th€ pr€programm€dsong t€mpo. The displayreads:
The. current t€mpo (thE one most recenlly recalled within a song) will be
displayedin the lower display,.and.theupper display shows rtre peri6niale J
programmedl€mpos lo be used. The keypad can be used to €nt€r a three--dioit
numb€r, or lhe +/- arrow buttons can b6 us6d ro incremenror decrementtie
Th: range of rhe shifr is 50% (hatf r6mpo) ro 2OO%(doubte tempo)r
llgrlt:
I nrs cnange ts shown as a p€rcsntagoso thal any tempo changes that occur in the
song will keep their 1im€ratios conitant.
MIDI / UTIL
The MlDl / urlL buttonis used to accessa numberof miscellaneous
functionsthat
usually do not ne€d to b€ accessedvery often. The functions are scrolled through
with the SELECT slider, with the display showingthe curr€nt tunction,and ealh
function.b€ing numbered for easy reierence. Thi keypad and +/- anow buflons
are used to change the param€t€rs. All of these paramelersare global parameters,
e.9., they are set once for the entire machine and are not progrimmable for each
pall€rn or song. Th€ pag€s are as follows:
MIDI CHANNEL
The first MlDl UTILpage is MlDt CHANNEL.The disptaylookslike rhis:
CHANNEL:01
The keypad and +/- buttons can be ussd to change tho MlDl channelfrom 01 to .16.
This sets the MlDl channelthat the HR-16will transmitand receiveon. lf Oo is
selected,the displaywill r€ad OMNI. In OMNI mode, th€ HR-l6 will lransmiton
channel1, and will receiveon all channels. Th€ defaultis OMNI.
R E C E I V EM I D I D R U M S
The RECEIVEMlDl DRUMSfunctionis usedto detorminswh€lheror not incomino
MlDl notes from a sequencer,keyboard, or MlDl drum pad controller shouli
triggerthe drums. The displaylooks like this:
Alesi8HR-l6lnsrucdms
...................
page 19
shown beside it. O swing = 5O'/o= no swing. The range ot lh€ swing is
determinedby the current quantizevalue. The swing amount will only eff€ct
newly recordeddrum events, liko in quantize. The swing amounts are shown
below:
OUANT
SWING
PERCENTAGE
1t6
1t8
1t12
1t16
1t24
1€,2
1t4S
1t64
OFF
0 0- 2 4
00- 16
00-12
00-08
00-06
00-04
00-02
00-01
00
50.0- 68.8%
50.0- 66.7%
50.0- 68.8%
50.0- 66.7%
50.0- 68.8e/o
50.0- 66.7%
50.0- 62.5%
50.0- 58.3%
50.0%
The SWING button does not functionwhil€ playing a pattern,or while in song
moo€.
FILL
The FILL button is used to allow r€peated entries of drums into a Patternwithout
havingto repeatedlypr€ss the drum butlons. Whil€ FILL is held down, pressing
and holding any drum butlon will cause that drum to repeat at lhe currenl
ouantize rate until oither th€ FILL bulton or the drum button is released. The
volume of lhe repeatswill bo determinedby how hard ihe drum button is first
hit. Fill will only work while playing or recording.
A l e s i sH R - 1 6I n s t r u c t i o n. .s. . . . . . . . . . . . . . . . .
Pa$
15
MODE/ DATA ENTRYBUTTONS
All MoDE bunons funcrion as on/otf swilches. This means that th6y are pressed
once to enl€r the mode, and pr€ss€dagainro €xit rhe mod€. when any of th6 modes
ent€red, lhe associaredLED wiil b€ tir. For simpti6iry,an/ iir"
!ql1!g.n
PATTERNor SONG is pressed,any previoustyselectedmod€ will be tuh€d 6ft.
The VOICE, TUNE, and MIX settingscan be stored with €ach patternby holdingrhe
RECORDbutton and pressingVOICE, TUNE, or MlX, respeitively. Any cha'nges
made to th€se paramstsrs without storing them ar€ temiorary edits that will-be
lost if a n€w patt€rn is selected. Copying a pailsrn to an empty pattern will also
copy thes€ seflings. Copying.a pattern to a nol €mpty patternwili not copy these
sellings, but will inst€ad r€tain th€ seltings of th€ pati€rn being copied io. An
€mply pattorn defaults lo a standard voice assignmenl with no pil;h shift, and
nominal mix levels.
fMPORTANT NOTE: VOICE, TUNE, AND'UIX ASSTCNMENTSCANNOT BE
STORED IN AN EilPTY PATrENN U'TESS THE LENGTH HAS BEEN
CHANGED TO A LENGTH OTHER THAN S BEATS.
VOICE
Sclectlng a VOICE
To chang€th€ sound of any of th€ drum pads, the d€sire pad is pressed. tf KICK is
pressed, for example, th€ display will show:
=O1
Th€ slider, k€ypad, or +l- arow bunons can be used to change th6 s€l€ct€d
sound, and lh€ low€r display will show the name ot th€ cun€ntly s€l€cled sound.
There are a tolal of 49 sounds to chooso from. Any changes made to any of the
drum pads are temporaryuntil stor€d and will be lost as soon as a new patt€rn is
selected, or the currenl pattern is reselocted (unless Manual Voice/Tune/Mix is
off, see below) .
Storlng VOICE settlngr
To store lh€ VOICEsottings,pressand hold RECORD,and then pressVOICE. When
lhis is done, th€ voice seltings will be permanently stored with the current
pallern.
IMPORTANT NoTE: VOICE, TUNE, AND UIX ASSIGNMENTS cANNoT BE
STONED 'N AN EMPTY PATTENN U'VLESS THE LENGTH HAS BEEN
CHANCED TO A LENGTH O1HEN THAN 8 BEATS.
Alesls HR.15 Insruc{ons
Pags 16
TUNE
The TUNE mode ls used to selectlhe desiredpjtch for €ach drum pad, and th€
click. When it is pressed, its LED will light, and the display will read:
CLICK
This display app€ars wh6n TUNE is first pressed, and the display was nol
pr€viouslyin MIX or VOICE mode for a drum pad. lt is used to sel€ct the pitch of
the click (m6tronome). The pitch amounl can be changed with the slider,or th€
+l- anow buttons. Th€ range is from -16 to +15. As with the voice mode,
pressinga drum pad will select that drum for pitch editing. Also like in voice
mode, changes mads to drum pads are temporaryuntil stored by holding RECORD
and pressing TUNE. Sec IMPORTANT NOTE undar storlng volcc acttlngs.
Mlx
The MIX butlon is us€d to changs lh€ volum€, panning, and output assignmentof
each drum butlon. When MIX is pressed its LED lights,and the display reads:
CLICKOUTPUT1
:65
PAN: I '
This display appears when MIX is first pressed, and the display was not
previouslyin VOICE or TUNE mod€ for a drum pad. lt is used to s6lect tho output,
the volume, and th€ panning ot the click (m€tronom€). The output is solect€d
wilh th€ 1 and 2 buttons of the k€ypad to select sterao outputs I or 2,
resp€ctiv€ly. The volume control is adjust€d with th€ slider (00 to 99), and the
panning is adjustod with the +/- arrow bufions, The panning is seven position,
and lhe displaywill show <3, <2, <1, <>, 1>,2>, or 3>. As with th6 voice mode,
pressing a drum pad will selecl that drum for mix ediling. Also like in voice
mode, changes made to drum pads are temporaryuntil stored by holding RECORD
and pressingMlX. See IMPORTANTNOTE under storlng volcc asttlngs.
NOTE: The Volume slider on th€ front controls output 1 only.
TEMPO
The TEMPO butlon is used to change th€ tempo ot a patt€rn or song. The tempo can
b€ stored with a song, but not with a pattorn. Whil€ in paft€m mode, the tempo
remains al ils provious setting until changed, While in song mode, the t6mpo
changes to lhs programm€dtempo €ach timo a tompo step is encounteredwithin a
song. While in pattern mode, pressinglhe TEMPO buttoncaus€slhe TEMPO LED lo
lighl, and results in th€ following display:
=L2
Alesis HR-l 6 Instrucdons
P8ge
17
Th€ +/- anows and the SELECT slider can be used to selecr a new rempo,
or a
direcrtywirh rhr€€ digirs on th€ keypad. Tempo cna,ig€s-ar"
lT?:..9T_T
:lrered
enecflve
as soon
as th€y ar€ €ntered, and the REcoRD button does not hav; to be
pressed.
In SONG mod€, th€ t€mpo is disllayed as a relativ€amount of change from lh€ pre_
programm€dsong tempo. The display reads:
The. current tempo (th€ on€ most recently recalled within a song) will be
displayedin the low€r display,.and.theupp6r display shows the perjentage of
programmedtemposto be.used. The k€ypadcan be used to enter a thr€€:digit
numb€r, or th€ +/' arrow burtons can be used ro incrementor decrementtre
amount. Th€ range ot the shift is 50%
.(half i€mpo) to 2ooolo(doubl6 tempo).
This change is shown as a p€rcentag€so that
any tempo changes ihat occur in'thl
song will keep their tim€ ratiosconstant.
MIDI / UTIL
The MlDl / urll buttonis used to accessa numb€rof miscellaneous
functionslhat
usually do not ne€d to b€ accessedvery oflen. The lunctions are scrolled through
with the SELECT slider, with th€ display showing th6 current funclion, and eaih
function being numb€r€d for easy reference. Th-e keypad and +/- arrow buflons
are us€d lo change lh€ param€tor. All of lh€se parametersare global paramet€rs,
e.9., th6y are set once for lhe entire machineand are not programmablefor each
pattern or song. Th€ pag€s are as follows:
MIDI CHANNEL
The first MlDl UTIL page is MlDl CHANNEL.The disptaytookstik6rhis:
0r sET
CHANNEL:
The keypad and +/- buttonscan be used to change the MlDl channelfrom 01 to i6.
This sets lhe MlDl channelthat the HR-i6 will transmitand rEceiveon. lf OOis
s€lecl€d,lh€ displaywill read OMNI. ln OMNI mode, the HR-16 will lransmiton
channel1, and will receiveon all channels. The defaultis OMNI.
R E C E I V EM I D I D R U M S
The RECEIVEMlDl DRUMSfunctionis usedto determinewhetheror not incoming
MlDl notes from a sequencer,keyboard, or MlDl drum pad controltershould
triggerthe drums. The displaylooks lik€ this:
AlesisHR-l6lnsrucdms .....,....,,.......
pagB 18
02
DRUMNOTES:
The +/- buttonsare used to turn this functionon or off. The defaultis OFF.
TRANSMIT MIDI DRUMS
The TRANSMITMlDl DRUMStunctionis used to delerminewhetheror not the HR16 drum eventsshouldbe lransmittedout MlDl. The displaylooks like this:
0 3 T R A N S M I TM I D I
DRUMI{OTES:
Th€ +/- arrow bultons are us€d to lurn this function on or off' The delault is OFF.
MIDI NOTE ASSIGNMENT
lunctionis us€dto assigna specilicMlDl notslo each
The MlDl NOTEASSIGNMENT
drum button. The displaylooks lik€ this
04
KtcK = 061 C#4
The lower display shows th€ currenlly solected drum pad name, and tho MlDl note
numberand key assignedto it. The drum pads can be usedlo selecl anotherdrum
to assign,and the keypadand +/- arrow buttonscan b€ used to selectlh€ desired
nole.
DFII.JM MIDIT.IOTEKEYVALUE
A#0
cB4
cllo(
BO
G
KIf,(
CO8
Dl
SMFE
F#l
CLSHAT 042
G#l
MIDHAT O44
PEFICS
67
G3
TOf\,43
TOi,,l4
RDE
CRASH
041
6
61
049
Fl
D#3
D#2
c#2
AlesisHR-16Instructions
............ Page 19
MIDI ECHO
The MlDl EcHo functionis used lo echo any MrDr informationlhat
is receivedat
rh€ MlDl input to th€ MlDl output. The displiy looks lik€ this:
TOMIDIOTJT:
The +/- arrow buttons are used to turn rhis function on or off. The defaurt
is oN.
The HB-l6 will not echo system exclusiv€data.
MIDI PROGRAM CHANGE
Tho MlDl PROGRAMCHANGE function is used to allow MlDl program change
commands,to-select patt€rn numbers. MlDl programs oo throuih d9 wiil sele-ct
patterns 00-99, and MlDl
.programs lOO-127till select pall;ns OO through
27. The displaylooks like this:
05
PATTSELECT:QfP
The +/- arrow buttons ar€ used ro turn this function on or off. The default is oFF.
When ON, incoming.MlDl program change commands will select paiterns.
Programchangeswill be ignoredwhile a patGrnor song is playing.
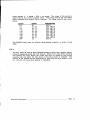
CLOCK SOURCE
The clock sourcefunctionis used to s€lect what clock will drive rhe HR-16. Th6
display will show one ol the three following choices:
& INTERNAL
ONLY
SYNCIN
By using lhe keypad or +/- arrow buttons, one of the three clocking sources can
b€ selecred. The defaull sotting is MlDl & INTERNAL(1), with the other choices
beingINTERNALoNLY (2), and TAPESYNC tN (3).
AlesisHR-16Instrucdons
Page 20
MIDI CLOCK OUT
The MlDl CLOCK OUT functionis usod to turn on or off the transmissionof MlDl
clocks. The display is as follows:
08 MtDl CLOCK
OUTENABLE:
The +/- arrow bultons are used to turn this function on or off. The default is ON.
AUTO START
Th€ AUTO START lunction is used to turn on or off th€ capability of starting a
patt€rn or song automaticallyif a MlDl slart or tape sync signal occurs. The
display is as follows:
09
The +/- arrow buttons ar€ used to turn this function on or off. Th€ default is ON.
Th6 HR-l6 does nol n€ed lo turn on or off its internalclock, since it intelligently
d€termineswhat clock to use when necessary. A functionaldescriptionof the
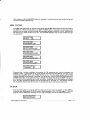
clocking possibilitiesare shown in the table below:
ctocK
AJTO
PRESS
RECEIVE
RECEIVE
M I D I& I N T E R N A L C F
2
8
1
M I D I& I N T E R N A L C N
2
8
1
I N T E R N A L O N L Y C F F 2 l . I
I N T E R N A L O N L Y C N 2 2 l
T
A
P
E
S
Y
N
C
C
F
F
S
l
4
T
A
P
E
S
Y
{
C
C
N
3
1
5
1.
2.
3.
4.
5.
6
Do nothing.
Start playing from beginningwith inlernalclock.
Enter play mode, but don't slart playingunlil tap€ sync clock occurs.
lf in play mode, starl playing,otherwiseignoresync.
Start playing from beginning with tap€ sync clock.
Start playingfrom b€ginningwith MlDl clock.
lf lape sync and auto starl are on and a pattern or song is playing,it will stop
playing automaticallyif the lape sync signal is interruplod for mor€ than I
s€cond. lf auto start is nol on, th€ HR-16 will wait in play for more sync pulses.
CLICK VALUE
The click valu€ functionis us6d to set ths metricvalue of the click (metronom€).
The displaylooks like this:
1
T h e p o s s i b l ev a l u e s a r e t h € s a m s a s i n q u a n t i z e : 1 / 4 , 1 1 6 ,1 t g , 1 t 1 2 , 1 / 1 6 ,
'1124,
1/32, 1/48, 1t64, and OFF. The keypad and +/- arrow buttons are used
to change the value. The defaultis 1/8. lf the CLICK value is set to OFF. it will
not click in eitherRECORDor PLAY.
CLICK IN PLAY
The CLICK lN PLAY function is used to turn on or of the click white playing a
patternor song. lt does not etfectthe click in record. The displaylooks like thii:
11
ENABLE:
The+/- arrowbuttonsareusedlo turnthisfunction
on or off. Thedefaultis ON.
Manual Volce/Tune/Mlx
11 !hq.'o.!" posltlon, the currentty setect€dasstgnmentswlil be appiled
''
globally
(to all Patterns and Songs). tn order to have Indlvtdual
volce/Tune/Mlxasslgnments per pattern, thls Mtdt ufillty must be turned ,'otf,'.
12 MANUAL
TUNE/MIX:
The +/- arrow buttonsar€ used to turn this functionon or off. Th€ defaultis OFF.
so that tho programmeds€ttingscan be used.
BUTTON DYNAMICS
Th€ BUTTON DYNAMICSfunction is us€d lo select tho r€sponseof the drum pads.
The display will look like this:
13 PAD
RESPONSE
The +/- arrow buttons are used to select lhe pad dynamics choices. The choices
are LOUD,MEDIUM,SOFT,and FIXED1 rhroughFIXED8. The first threechoices
are 3 differ€ntloudnesscurves. In the FIXED 1 through8 settings,the pads will
always play lhe same dynamics(1 through 8), regardlessof how hard they afe
Afesis
HR-16
lnstruclions
.......--..........-
....--...-......pffi
22
hit. Th€se curves will also €ffect MlDl input trigg€ring of lh6 drums. In addition,
MlDl input velocity ssnsitivity allows 32 st€ps of volume control per drum when
us€d wilh gxl6rnal controll€rs such as drum pads or sequencers. Nol€, howevsr,
that recordingMlDl input information on the HR-16 will only slore I steps of
velocity inside tha HR-16's internal record memory.
SONGLOOP
The SONG LOOP functionturns on or off song looping. The display is as follows:
14
EI.IABLE:
The +/- arrow buttons are used to turn this function on or olf. The default is OFF.
When ON, a song that roachesits end will loop back to lh€ b€ginningof that song.
TAPE
The TAPE button is us€d to access tho tap€ int€rfacef€atures of the HR-16. This
allows lhe us6r to save and rotrieve sequ€nce data with an ordinary casseil€
r€corder. Prossing and holding the TAPE bulton r€sults in the followingdisplay:
Pressing the RECORD button initiates th€ sav€ to tap€. Both buttons can now b€
releas€d, sinc€ thiE op€ralion may lake ov€r two minutes, during which th€
display will read:
PATT:00
Th€ display shows the currenl pattern or song being oulput. This display will
advance until all data is output. Pressing the STOP button will abort the
op€ralion. Bsforg pressing RECORD,lhe +/- arrow buttons can be used lo access
lhe other five tape pages. They are as follows:
T
LOAD ALL PATTS &
FROMTAPE:
AlesisHR-l6lnstructims...................
PagB 23
TAPE:
MIDI
ln all five ot th€se pag€s, pressing RECORD initiatos the oporation. The verify
tunction is us€d lo insure that the data just recorded to tap€ is good. Load from
tape.loads th€ enlire memorywith lh6 data on lape. Load palt and load song allow a
singlo paltern or song to be loaded from a tap€. The keypad can b€ used io select
the d€sired number. After pressir€ RECORD, th€ display will change to the
following(dependingon th€ page shown whsn it was pressed)
PATT:00
27
PATT:
SONG:00
Again, lhe RECORDand TAPE butlonscan be rel€as€d,and th€ dispfaywill continu€
until the op€ralion is compl€te, wilh the currently loading or verifying patl€rn or
song number b€ing shown in the display. When loading on€ paltern or song, the
display will continus lo show th6 selectedpattern or song number in lho upper
display. When sendingoul MlDl data, the displayshown above will remain until
th€ data has been s€nt out.. After completionof the lap€ funclions, the display will
return to its pr€vious stats (select paltern or sslect song). ll an error is
encountered while loading a lape, the display will show ERROR as soon as it
occurs, for example,
Th€ tape will attempt to conlinue to load, but it is possible that th€ data will be
corrupted and lhereiore unusable.
During any ol the tap€ operations (but not th€ send MtDl function), the
STOP/CONTINUEbutton can b€ used to abort lhe op€ration. When loading in all
palterns and songs, aborting lhe lap€ may leave unusabledata in memory. When
loading one patt€rn or song, aborling aft€r the selectedPatternor song has passod
will not cause any probloms.
...................
AfesfsHR-l6tnstructlons
Paqe 24
STORINGTO DISK USING MIDI SYSTEM EXCLUSIVEBULK DATA DUMP
The HR.16 send to MlDl function is orovided so lhat lh€ data can b€ slored on a
computer,a YamahaMDF-1 (MlDl FileQor a YamahaDX-7llFD. The data is senl
out as one block of systemexclusivedata,with the lengthbeing determinedby the
amount of memory b€ing us6d. No more than 507" of memory should be full when
saving to a DX-7llFD or its buff€r will be filled. The HR-16 will aulomatically
receive MlDl sysl€m sxclusive s€quence data from any of these devices without
having to select a specific page. lf the system exclusivedata slarls lo com€ in, the
display will read:
ROM MrDt.......
This displaywill remainuntil the data has be€n complelelyload€d,after which th€
HR-16 will relurn to song 99. Not€ that any time the HR-l6 receiv€ssequence
data from MlDl, any data previouslyin memorywill b€ lost.
SYNCING THE HR.16 TO TAPE
ll is possibleto syncthe HR-16 to a lap€ recorderwiththe helpot ths TAPEsYNC mode.
In this mode,the HR-16 readsa masterclockpulsolrom a lrackof a tape fgcorder,which
koepsall ot lho sequEncers/drum
machinespe.lecllyin timewith the recordedinformation
on the tape machins.This mothodhasthe advantageol eliminatingthe needlo printdrum
machineor synthesizsrpartson tape,sinceyou can usethe mastarclockrecordedon tape
(or "synclracK) to lriggerthe drummachineand synthesizers
via the sequsncsr.
RECORDINGTHE SYNC TONE
Belorerecordingany audioinlormalionon lhe tape machine,you mustlay a "SyncTone'
downon onetrackof the tape machine.Thisis usuallydoneon an outsidelrack (track1 or
I on an eighttrackmachine;lrack 1 or 16 on a sixteentrackmachine;stc.)io keepthe
crosstalk
to a minimum.
1) Connectthe TAPE OUT jack of ths HR-16 to tho inputol the desiredtrackol the tape
maching.
2) Press PLAY on tho HB-16,then adjust lhs level of lhe track so that il reads
approximatsly'0VU".
3l You must selort a tempo lot the songon the HR-16at this time as it cannoabe changed
later.
4) Beginrecordingon ths tape machins.
5) PressPLAYon the HR-l6. Allowthe HR-l6 to playthroughits entirosongbefors
stoppingthe recording.Whenthe song has ended,stoplhe rscordingand rewindlhe
taps machine. You are now r€adyto triggerlhe HR-16fromthe syncton6that you just
rscorded.
NOTES:
A) Thereis no TAPESYNCOUTswitdt as thisis alwaysadive,
AlesisHR-l6 Instructims...................
........ Pags 25
B) Kgep the Syncsignal at abut OVIJin oder to avoid dtopouts. fi the HR-16 does not
see the sync tone lor 1,/2seand, it will assume that the sy;c tone has enAedana iti go
into STOPmode.
p, tt m.s-shU,do tnt .useany noisereductbn , Ee, or signalprocessingon the sync tone.
u) Avotd rccgrcilngh'gh eneryy, hoh-lrequency trad<snext to the sync track.
TO CLOCK THE HR.16 FROII TAPE SYNC
ot rhetrackof the taps machinelhat hasthe synctonoto rhe TAPE
J.l .qnnegt lf -e_oytput
lN iackof rhe HR-l6.
2) Pressand holdthe CLOCKbunon.Thedisplaywill read:
&
3) Usethe keypador + and- buttonsto selsctTAPESYNClN. Thedisplaywiil read:
4) Put the tape machineinto PLAY. The HR-16will automaticallystari as soon as it
receiveslhs synctone,causingany olher ssquencersconnectedto it lo play. Be carcfut
to retum to thp bellinningol the sync tone since the HR-l6 will automatballybgin playing
any time that it receivesthe sync tone.
USING THE HR.16 AS A SOUND SOURCE
ll is possibl€to trigger the HR-l6 trom an €xternalcontrollersuch as a sequencor,
keyboard,
or drumpadcontroller
throughMlDl. TheHR-16buihin sequencer
remainsidle
whilsths sxlsrnalcontollsrtriggsrslhe voices, Be sursto activateMlDl/ UTIL#2 RECEIVE
MlDl DRUMSON. lf thisis s€tto OFF,it will notbe possibleto triggerany voiceson the HR16 lrom the controller.
MlDl programchangecommandssent lo the HR-l 6 can accesspatterns. MlDt /UTIL#6
MlDl PROGRAMPATTSELECTmustbe set to ON to ac,tivate
this lunction. This fsature
was designedto give externalMlDl controllersaccossto dittersntsoundsEl ups storedin
any ot the 100 availablepatterns.
IMPORTANT NOTE: VOICE, TUNE, AND MIX ASSICNMENTS CANNOT BE
STORED IN AN EMPTV PATTERN U'VLESS THE LENGTH HAS BEEN
CHANGED TO A LENGTH OTHER THAN 8 BEATS.
START/STOP FOOTSWITCH
The START/STOPfoolswitchjack is provided for a momentarynormally open
foolswitchlhat conn€ctsth6 jack's tip lo its sleev€ (ground). While in stop, the
footswitch will function like the play button and slart a pattern or song from the
b€ginning. While in play, tho footswitch acts like th6 stop button, and stops
playing.
PagB 26
REMAININGMEMORY
HoldingRECORD
andpressing
LENGTH
causesthefollowing
display:
1
This shows the amount of memory lhat has not b€en used. Note that some
op€rationsmay not be possibleeven though it s€ems that th€re is still a small
amounl of memory available. This is due to the tact that th€ HR-16 requires
enough memory to duplicale a pattern befor€ it can be record€d on, or length
changed, or otfset, €tc. lf a larg€ pattern is afiempt€d to be alt€red whsn th€r€ is
not €nough memoryto complol€th€ op€ralion,the displaywill.indicatelhat there
is nol €nough m€mory availableto complet€the op€ration.
CLEARING MEMORY
To clsar all of the HR-16's memory and reinitializeall of its variables, turn
power off, press and hold ERASE,DELETE,and RECORD,and turn on the power
while holdingthese buttonsdown for 3 seconds.
AlesisHR-16Instructions
Paga 27
HR-16MIDIIMPLEMENTATION
CHART
:unctlon
:HAIINEL Default
dODE
Transrnited
Recognlzed
r-l 6
t - l6
Changed
t-16
t-t 6
Default
M$sage3
Atered
M o d e3
NOTE
NUMBERTrueYoice
Notcon
YELOCITY
NotcOff
Keys
roucH
0G127
M o d eI
00-t27
o
o
I
I
I
I
PITCHBENDER
I
x
x
CONTROL
CHA},IGE
x
I
Chan's
PROGRAvI
CHAI.IGE
I
S o n oP o !
'YSTEM
:OMMON SongSel
Tunc
SYSTEM {.tocK
REALTIMEMc$ager
LocalC ontrol
AllNot6Otl
ArllveSen3€
Flesct
o
00-99
Truei
iYSTEMEXCLUSIVE
AIJX
r
o
o
o
x
x
o
o
o
o
o
x
r
I
I
I
I
I
I
Renrarks
Memodzcd
Honors
modes
1,3
3 e en 0 t e I
ProgrulrchEnge comm8ndt
3electpaltemnumber!
I
I
NOTES: Notsl:TnnlmittrdutdrccoonlzcdnotsnimbcncatlbrssigredbyDsndoDcntion.
Modc l:OM{ION,POLY
Modc 3:OMtllOfF, POLY
AlsdsHR-l6hsrudss
...............'....
Mode 2:OMlttON,hlol,lO
Modc4:OMMOFF,MONO
O:YES
I:l{O
P4s
28
HR.16 TROUBLESHOOTING
CHART
SYMPTOM
WHAT'SPROBABLYWRONG
WHATTODO
No pow€r.
Powersupplynot properlyconnected.
Powerswilchnot lurnedon.
Powersupplymalfunction.
Checkpowersupplyconnection.
Pushin oowerswitch.
Checkwithdealerto testthe
powsrsupplyon a differentunit.
No sound-
Audiocableshortsd.
Outpul s€lgction.
Volumesliderdown.
Wrong output connected,
Check cable.
Check MIX oarameter.
Baise volume slider.
Connect proper output.
One or morepadsnot
funciioning
MIXsetting
CheckMIXparameters
lor proper
oulputseleclionand volums.
Sogmsto missrecording
someb€als
Quanlizevaluo
Selectproperquantizevalue.
Nol working from
ext€rnal conlrollerc.
Bec€ivo MlDl not$ is OFF.
MlDl channels arent matchsd.
Set r6c6ive MlDl notes to ON .
Ssleci the MlDlchannel on the
HR-l6 that is being output by the
controll€r.
Nol memorizingvoice,
tune.and mix
assignments.
Tryingio store in a pattemthat is
smpry.
Selec-t
a lengthotherthan I
boals.
set up whonthe pattern
is sel€cted.
Manualvob€fiun€hh is oN.
wonl savo of bad lo
rape.
Bad @nnec-tions.
Badtaoe.
Levelof sync tone is too high or |ry.
E ros in data
TurnManuaivoicE,
tune,mix
OFF.
-----'----Checkwiring.
Usea cerlili€ddatatao€.
Try a higheror lower ieveltotape.
Rssave the data.
wonl sync lo lapg.
8ad connecliorc.
Level on tape,
_Oheckwitins.
Sellevelator near0 vu,
Turnoff noisereduction
il oossible.
lf problems aren't solved atter troubloshootingand refering to the manual, consuh
your Alosis deale'r for assistanca.
Al€sls HR-16 ln3tucdon3 ...........,..
leqe?9
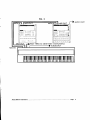
ALESIS MMT.8 MULTI TFACK MIDI RECORDER
ERASE
9
.....'..'..,....'.'.'............
-sffiffiffiY-1
A.eel3
\_/
1-)
n.\u/ O
\__/ \J I
\--,/ O?T
\__/ O
\_./ (,
M
u
ffi/
s@
@I
ffi
IN
THRU
L
OT
mJ
IN
ryrc
Q'ffi
7lr=C|El
:,
l|ur'l
1il441
r-.
lreel
-
I]!I!-J
lr{l
,=
II
l-@ r*,;-l
ll
,"'., l l
@
@
@
EETIEE
tilEEEE
t
t
E
teA,ttm'll,lfll
*n,
- l-,,;l
: @
lAill
E
==_
l @ , , l l " nI l - ' l
l'rdl
:
- -
€
-.,
l l
E
-",
l l
E
4h,
ll
ilo6 l l
"("
-
r-z_-lr;-l
Lrl
lriin_ll*'l
1|
"""
INTRODUCTION
TheAlesis MMT-gMuftiTrackMlDlRecorder
is a userfdsndlv
sequencer.
rrisabre
iore6iaany.inrormaiion
rele-ivJo;i,fi,id,il?iiFliffLr8y:jJJg,?j
pressure
andnoteoltvetmirv),
arid.sro-re
it inronon-*Lrii"'riror' d;,;;\;A"i:
fii;
notdi,conrrorrers,
prosram
;i6[ dfi;ff;uch,
chanses,
and
|$S,'$."'ji:f$?Jl"llje
The^MMT-8
canprayback8 tracks_sinnrlraneolsry
andir tuncrions
in manywaysrike
an 8lrack taperecorder.Th€MMT_8,S
,;",otca6ty
i. "pp.rir"r"ry 9,OOO
to
11'000nores.variabreMrDrconrrcrersrirJ irt'errJucn'pirctr'6eno,
""0'"n.iii-rtJ.
witlrakeup morememory. so the actualimoJni-Jt-n6i"
.,or"g"
capacity
wi'vary
depending
on hownuchihesecontoilersareused. gacnset of 8 tracksis
cailed
a 'part'.The.rec€rnbe up to 1OO
partsin the MMT€,S,e",ory tOo_ge).
'Th;,6 iii-e;ffi;
canbe comtinedintolistsof pa,is,whicharecatteO;songs,.'
ca;;6i;
100songsin the MMr€'s mdmoryi,t"d ilt;;;c;;iin
a lisrof partsup ro zss
stepslong.
Byconstructing
songsinthisfashion,
theMMT-8makesit veryeasyto arrange
songsby
rscording
onevsrseintoonepart,anda chorus_inio
anoiher:,ana
i Uriage
iito an;ti,si
andthenmakinga listol thepartsintoa songwithas,"ni i"'r""., cf,oruil,
anO-UriOqeJ
as dostred.
rne
{.ur'p has many sditing capabilities,which atow the usor ro anErany dara attor
recording
it. Notescan belraniposeC,iimingcorrecteO,
copied,anCt;;d.-MlDi
channelscan be reassigned,contr6llefsian Ue-moJitieO-,
eicl elso, ttre MMT€ has an
Autorocare fedure which wil aflow you to
irnp to any desired beat nurber within a
p.art song. See Page 29 Despirerh6 flelibitiry,
ihe MMT_8is "",y ""ry to us",
9l
sincethess l€aturesdo not qet .in the way of the moie basic operations,
likerecording
and playingback.
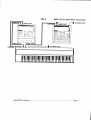
MMT.8 OUICK BASIC SETUP
1. connectthe MlDlouT of thekeyboadto the MlDllN of he MMT-8'
to theMlDlOUTof the MMT-8'
i. Conneaitre MlDllN of thekeybirard
system
to the audioinputof a suitablemonitoring
g: Cffi;a ih; audiooutputot tfrekeyboard
(amplifier,
mixer,stereosystem).
to the MMT-8' ln.fig'2.and3 the
Thesearethreebasicsetups.A singlekeyboardis connssted
master
'ririieareleiup wiitr i singiekeyloardard th€ MMT-8is prgygiqg.the
MMr_sano Hn-te
in
srre 1ift iii6 utot 6ur oi THRUis connectedto the MlDl lN properlv
iiiiiiiigiig-"ar.
willpass
iti6rf f',ti6fconnection.Arso,ium-onMlDlECHO(RedLEDlit) so thatMlDlinformation
the MlDlTHRUlrom
by.connecting
/ soundgdnerators
Urruine MMT-g.nOOmore'feyooards
/ soundgenerator'etc'
eitneiine iepoarO or fie HR-16to theMlDllN on thekeyboard
FtG. 1
AUDIOOUT
N I D II N
fllDl ouT
E
o
f:
F
N I D I N lltDtouT
MlDlOUTto otherMlDlInstruments
AUDIOOUT
Et--
AUDIOOUT
Al€sisMMT-8 Instructlons
....,.... page 4
FIG. 3
AUDIOOUT
1:':::3
EaltlEs
-!lor:-
MIDIOUT
--aLlo
larrr
L
fl
E-EOO
-J
-o
-L]
-r.r'
l D l T H R Ut 0 o t h e rl l l D l I n s t r u m e n t s
AUDIOOUT
PART MODE
Selectlng and Ptaytng a PART
Wlrglpolq"r is fifst iurnod on, the sequencerwill be in SONGor pART mode (SONGor
PART LED lit),.depending..on
the modethat was selectedbeforepowerwas ti.,rnea-ott.
I he songor partnumbsrwill alsobe the samgas whenDowerwastrjrnedolf.
PART Button
Press lhe PARTbunon to enter PART modeif lhe sequanc€r
is not currentlvin this
modo. Th€ LEDnextto lhe PARTbuttonwill lightandthe displaywill read:
" PART
Selecting a PART
The 00 is underlinedto indicatethat it will be changedif a new numberis selectedwiththo
keypador ths +/- buttons. The secondlineof the displayshowsths namoot the part. lf a
part is emply, ths display reads.EMPTYPART. pressingths +/- builons imrirediately
selscls-th6n-extpart_number,
withlhe numbersloopingpast99 to 0Oand loopingdow-n
lrom 00 to 99. lf a singledigiton the keypadis pressed(3,lor example),
the displaywill
changelo:
PART
The displayis now indicating
thatthe seconddigitof th6 partshouldbe sntered. Aftsr
snteringlh€ seconddigit,ths new part is solecled,and its name is displayed.lf the
soconddigit is not entersdwhhin2 seconds,the displaywill revertbacklo the previous
part number,.and no.new part will have been selectsd.This type of ksypad entry is
consistentwith all entriesmadewiththe keypaddescribedin ihis manual.The pageup Lnd
pagedown buttonshaveno functionwhensslectingpartsor songs.
Selectlng TRACKS for playback
While in PART mode,the eight TRACK SELECTLEDs will displaythe trac*s that are
turned on (not muted)on the seleclsdpart. Thsse buttonscan bs turned on or ofl to
changelhe selectedtracksto be played. Whenevera part is playing,the oighttrackssloct
LEDswill showwhichtracksareplaying.Whsna n6wpan is soloctsd,
all eighttracksare
turnedon. At any time,the trackselsctioncan b€ changedwiththe tracksoloctbuttons.
PressingPLAYwillstad playingthe selec,tod
partfromits beginning,and the PLAYLEDwill
lighl. Thedisplaywillread,lorexample:
T
The displayis now showingthe currentbeat numberand the part numb€rlhat is being
played. As eachbeat (quartgrnot€)occurs,the displaywill advanceths beatoount.While
the part is playing,the keypadand +/- butlonscan bs usedto s€l€cta n€w part number,
whichwill thenbe displayedin the displayas follows:
Al lhe end ol the current parl, ths n6wly selectod pan number will play, with th6 beat count
startiflg again al 001 . The NEXT part !o play can be changed up until the end of ths current
AlesislvlMT-81ns|ructions.................
................... Pags 5
partls reached,atlerwhichths newpartwillbeginplaying,andthe displaywill revedbackto
PLAYINGPART.
will stopplayinga part,andths displaywill returnto the select
PressingSTOP/CONTINUE
again
partdisplay.Any noteslhat weresustaining
willturnoff. PressingSTOP/CONTINUE
playing
part
lrom
a
the beginningol the beat it was on when il was stopped,
will begin
replayingall previouslysustainingAoles. Prosshg PLAYwill alwaysstart a partlrom lho
beginning.Whena part reachesits end,the PLAYLEDwillturn olf and lhe part will stop,
unlessLOOPis on, wh'rchwill causeths partto continueplayinglrom the boginning.
FAST FORWARD
The . and ' bunons(rewindand last {orward)can be usedto advanceor retreatthtough
lhe beatsof a parl. lf a pad is playing,pressingthe fastfoMard buttonwillcausesuslaining
noles lo slop, and ths displayto advancequicklyone bsat at a timo untillhe fast forward
button is released,alter which ths part continu€splayingfrom the beginningof the
disdaysd b€at.
FEWIND
The rewind button works similarly,but in reverss. In either direction, if the end or
boginningof a part is reached,lhe displayremainson the lasl boat, unlessloop is on,
whichresultein the beat "wrappingaround' Whena part is not playing,thss€ butlonscan
the songwill continus
be usedfor ihe samefunction,and by pressingSTOP/CONTINUE
lrom tho last displayedbeat. The fast forward and rewind button can be held down
simulaneouslylo "freez6'lhe displayon ths curr€ntbeat.
ll is also possible to Autolocate with the last-lolward and reurird buttons.
This function albws you to go directly lo any desired beat. See page 29
Recordinga PART
Seleotlng the RECORD TRACK
To recordon a part,pressthe RECOBDbunon. The RECORDLEDwill light. Ths trrck lo
be recordedalwaysdetaullslo th6 lowestnumber€dsmptytrack. For an emptypart,track
1 will be selecled. lf a part has all eightlracks used, no track will be selecled,and ths
RECORDLEDwill not light.
b€ sslsctedlhe
Everylimo a trackis recordedonto,the nextemptytrackwill aulomaticalry
nexttime RECORDis pressed. lf a trackotherthanthe selecledone is desired,pressing
anolhertrack selec'tbuttonwhile holdingdown the BECORDbutton will sEleclthe new
trackto b€ rscordedon. Likeon a tape recorder,if a trackwhhsomelhingon it is recorded
over,the old inlormationis erased.
Once th€ user has selectsda track manually,th€ automatblrack selectionof tho next
emptytrack is turnsd oft. This way, il the userwantslo r€do a lrack manyiimes, he can
s€lectit once. and that track will remains€lecteduntil hs s€loclsanothortrack. When a
nsw part is selected,lhg automaticlrack selectionis lurned back on. lf thg trackthat is
selecledis rosolected,it will slop tlashing(and rsturn1oits proviousstat6,tlashingor off),
and no lrack will b€ selectodlor record(causinglhe RECORDLED 10lurn otf when the
RECORDbuttonis released).Whilethe RECORDbuilonis helddown,lh€ displayreads:
RECORD, the lrack that is lit indicalos the currsntly sslocted llack to b.e
While holding-Any
lracks that are ,lashing ars curr€ntly emply, and any tracks that are not lit
recorded on.
currenlly havs somsthing recorded in thom. Any track (flashing, on, or off) can b€ selected
lo be rscorded onlo.
A l s s i sM M T € I n s t r u c t i o n. .s. . . . . . . . . . . . . , .
. . . . . . . . . . . . . , . . . .P. a g p 7
Enlerlng RECORD
Afler rele_asing
REcoRD, the REcoRD LED will remainlit to indicatethat it is readvto
recordif.PLAYis plesssd,unlessno track,wass€lecred(notrackLEDlit Jliai, ;h;h;;ui; -lt
cause lhe RECORD LED to turn ofl atter releaiing ihe BECORtj'button.
ispressed.white.the
RECoBD
LEDisoninenecono'lEo*iiii"li, "ri,
llgllggllrlltuE
Indrcalrng
that recordis disabled,bul lhe s€lecledrecordtrack will be remembered.To
beginrecording-,_preFl_Uy, lf alrack had been selected(RECORDLED on), then the
RECORDand PLAYLEDswill be lit, and tho selectedtrack will beginrecoraini'trom ihe
beginningol the part,aftorcountingdownfour beats(thE@untdowncan
bs changsd;soo CLICK),duringwhichtimethe disdai will rsad:
PART
COUN
HIX;3il:*t
willchanse
to 3, then2,lhen1,arterwhichlhedisplay
o*t, thedisPlav
will
The part numberis not underlined,indicatingthat a nsw part cannot be s€l€cledwhile
pg9r![9.. While recording, the eighttracks can still b€ rurnodon or off. pressingthe
RECORDbuttonstlectiv€ly"punch€sout" the r€cordtrack,lh€ RECORDLED turni off.
and the part continuesto play from where it was. Pressingthe pLAy buttonis also the
same as punchingout, excsptthat ths part will immediatelystart playingtrom the
rewind and fast lorward buttons will also punch olt.- pressing
lgSllning..__If,9_
STOP/CONTINUE
alsopunchesout,but stopslhe panfromplayin! as well.
!Vlr91rqcold]nglor the lkst tims on an Emptypart,lhe trackwill continuerecordinguntil
STOP, FAST FORWARD,REWIND,or PLAY is pressed. Whsn on€ is pressed,rhis
determinesthe lengthol the part, roundedto the nsarestbeat. When recordingon any
othertrack,the partwill automatically
stopwhonthe end of ths part (as d€terminsdby tha
lirst recordlrack) is rsached. lf LOOPis on, ihe RECORDLEDwittturnoff ("punch6ur"),
and the part will beginplayingfrom the start. lt is possibleto set thg lengthbefor'e
recordingthe ikst track,or to changethe lengthafterrEcording
the tkst track(sC LENGTH
below).
Whileholdingthe RECORDbutton,pressingand hotdingthe LENGTHbuttonwill showon
the displaythe porcentageot momorystillavailablefor recording.
LENGTH
The LENGTHbutlon is used to set lhe l€ngthof a part to a specifiednumb€rol beats.
While holdingth€ LENGTHbufion,the displaywill showthe currentlsngthof ths current
part. It it is an smptypart,th6displaywillrsad:
BEATS
This indicatesthat no lengthhasyst beonsst. ll RECORDmodeis entersdwithoutsetting
this length,lhe lsngthof ths part will be determined
by the numbsrot beatsrscordod
bsfore pressingSTOP/CONTINUE,
RECORD,or PLAY. ll it is desiredto set the tength
before recording,th€ +/- buttonscan be used to movethe lengthup or down in single
beat incremsnts(OOO
minimum,682 maximum),or a thrg€ digit numborcan be ent€r€d
AlesisMMT€ lnstruclions........
with the ksypad. In eilher case,the new leng'this not enteredinto ths part untilthe
is pressedthedisplaychangesto:
RECORD button is or€ssed. WhsnRECORD
This display romains until REC,oRD is released. lf LENGTH is releasedbstors RECORD is
pressed, no change lo the length will be made, regardless of what was Pressed on lhe
keypad. lf RECORD is pressed alter entering a partial length (1 or 2 digits), nothing will
happen. When entering in digits, the first digit entered (1,lor example) results in the
following display:
PARTOO
LENGTH1 BEATS
The display is now waiting for the enlry of the second digit. ll the second digit is nol
entered within 2 seconds, lhe display will revert lo its previous value. ll RECORD is
pressed a{ter entering an incomplete length (1 or 2 digits), tho display will revert lo its
provrous vatue.
When a new lsngth is entsred (RECORD),any informationon any track of the selected part
that was boyond the new set length will be erased. Any notes sustainingbeyond the new
end will automatically be given a new duration. lf the new length is longer than the previous
on6, the additional length will bs filled with silence. ll it is desired to removo or add length
lo the beginningof a part, lirst set the desired length (as describsd above), and then press
sither page up or page down. The displaywill change to:
LENGTHOOO
BEATS
Pressing either page up or page down again will toggle back to the original display. ll
RECORD is pfessed with the above display showing, any additionalbeats will be plac€d at
the beginningof the part, and any beats removed will be removed from the part top. Notes
that were storod in the removed beats will be removed regardless of their duration.
The LENGTH button has no effect in song mode, or while a song or part is playing.
ERASE
Erasinga PART
The erase button is used to orass a single track, part, or song. When in PART mode,
pressing and holding the ERASE button causes th€ followingdisplay:
01
The number 01 would actually be lhe currentlyselected part number. All 8 track LEDS will
be lit. To erase the selectedpart, press RECORD. The displaywill change to:
Alesis MIVIT-8lnstructions
The.displaywill remainthb way until the RECORD
button is released,after which the
displaywill returnto its previousitate.
Eraslng ! rlngle TRACK
Io erase a singletrack, prossandfiold the ERASEbu.on (all
rrack LEDswill light),and
:elqcl.tr9 d€siredrrack humber. The setea;d irack;iEb'-rniti'i"r",n rn, and rhe orher
track LED-s_wirr
rurn ofr. Addirionarrrats "in b. ";Lc'i;-dl"ni in"i, LED.
wir come on.
PressingRECORDvyill€ras€arryselsctedt?acks.
Eraslng ..lect€d Intormaflon (nota!, pltchb.nd, lndlvtdual
lllDl channel,
etc.)
when erasinga trackor part,it is-possibre
to eraseonryserecleddatatrom a partor rrack.
While holdingthe ERASEbutton,thepage up "na
dag" d;*n-bunon. b"to*th" LCD
displaycan be usedro serea soeciriciunhion;. iilf;;;rd'uutton.
"r" used,rhoy wirl
scrollthroushthe tottowingchoicesba&i;;;;r
i;;ail;;;;;,ns
on whichbutronis
pr9ssed:
01
EX.
tT 01
cH.1
thruchannel16
This fealuremakesit possibleto sfase specilicdata"such as the aftertouchon one track.
wmorir anedingths orher.daraon thartrackor part. lf eraseaftertouchwas sel€ctedand
HEL;9H.Uwas pressedwithourseleclinga rrack,all aftertouchon all eighttracks of the
selsctedpartwouldbe erased.
Eraalng e SONG
In SONGmod€,holdingthe ERASEbuttonwill causelhe followirEdisplay:
AleslsMMT€Instructions
......... pagp 10
01
song number. The eight
Pressingths RECORDbuttonwill srase lhe currentlyselec-ted
track buttonsaro inac{ivewhen erasingsongs. The page up and pags down buttonsare
alsoinactivswh€nsrasingsongs.
In all cas6s,the erase is not executsdunlil RECORDis pressed,and will be abortedif
ERASEis releasedbeforepressingRECORD. The ERASEbutlonhas no effectwhilea
songor partis playing.
COPY
The copy butlonis usedto copy or appenda track,pan,or song,to anothertrack,part,or
song. lt only functionswhilethe COPYbuttonis held down. lf the COPYbuttonis
rolsassd(eitherbefor€or aftsr the copy is sxecut6d),tho previousmodewill show up on
the display,and copy modeis exited.
Copylng a PABT to ltselt
When in PARTmode,and COPY is pressedand held,all 8 track LEDswill lighl, and the
d'rsdaywillread:
01 TO PART
Bothdisplayedparl numborswill actuallydisplayths currsntpart number(00-99).Pr€ssing
RECORDcompletosthe op€ration,andtho displayrsads:
This displayrEmainsuntil the RECORDbuton is rsleased,which then rsturnsthe
s€quencerto the previouscopy display(unlessCOPY is releasedas well). The above
oxampled€monstrated
copyinga part (all I tracks)to ilselt,whbh will doublethe lengthol
lhat oan.
Copylng a PART to another PART
To copy a partto anotherpart,pressand holdCOPY,th€n enterthe two digitpart numbsr
with ths keypad. The displaywill show the selsctedpart number. PressingRECORD
initiatss lhe copy, and appendsthe source parl (the current part belore COPY was
pr€ssed)to the deslinationpan (thepartenlsredwithths keypad).Again,all 8 trackLEDs
are lit,so all 8lracksarecopied.
lf tho dsstinationpart was empty,thsn ths destinationnowcontainsan sxact copy of the
sourcEpart. lf lhe dsstinationwas not €mpty,then the destination's
lengthis increasedby
the length of lhe sourc€ part, and lhe source part is app€ndedto the €nd of the
part.
destinalion
Any MlDlassignments
madeon ths sourcepart'strackswill be overrldden
by lhs dsstinalionpart'sMlDlassignments.
Copylng a TRACK to ltsell
To copy a singletracklo itsell(us€tulfor erasingall but one type of MlDl inlormation,see
below),pressand holdthe COPYb!fion, selecithe dssirodtrack(its LEDwill remainlit and
lh€ otherswillturnotl),thenpressRECORD.
AlesisMMT-8lnslructions.........
Pags 1l
Copylng r TRACK to another TRACK of the lemc PART
To.copya singletrad( to anothertrackof the samepartnumber,pressand holdCOpy, and
solsctthe
sercq
rne source
sourcerrafi.
track. The
I ne seroded
selocledtracl('s
track'sLELI
LEDwill
will remain
remainlit,
lit,and
dnd alllhs
alllhs other
othertrack
trackLEDS
LEDS
will lurn off . Now select the destination track, This track! LED will now llash.
tlash,indicatino
indicatinglhat
lhat
it is ths trackto be copiedto. Pressingthe RECORDbuttoninitiatesthe copy,and 6oies
lho sourcotracklo the destinationtrack. lf any informationexistedin the deaiinaliontrack,
tr;ck.
it is erassd.
Copying a TRACK to another TRACK ot a dtfferent PART
To copy a singletrackof one pan to a singletrackof another,prossand holdCOpy, select
lhe sourcotrack,selsctthe destination
part number,selsctthe destination
track.then
press RECORD. lf ths dsslinationtrack is the same numberas lhs source track. the
dostinationtrackbuttondoes not haveto bs selectedbeforepressingRECORD.
C-opylng selected lnformatlon (notes, pltchbend, Indlvlduat MlDl channsl,
elc.)
In ail
all ol
of.the
lhs above copy modes,the entire
enthe contsnls
contsntsof a track or part ars copiedlo the
destination.lt is possibleto copyselecledintormation
inJormation
fromone trac-kor partto another
anothsrbv
by
paqe
pago
usingJlte
u_s_!lq
page
the
up and
down buttonsto selectthe d€sired
d€sil daia whilo hotdingtha
!p
COPY
L;ut
Y builon.
bullon. Thess
I hess buttonscan b€
be selecled
selectedany time duringthE copy soleciionbefore
b;fore
RECORDis pressed.Theywill scrollbackwardsandforuardsihrough22 choiceswithihe
following
displays
FROM01 TO
FROM01 TO
FROM01 TO
FROM01 TO
FROM01 TO
FROM01 TO
FROM01 TO
FROM 01
I
lhruchannel
16
Alesls MMT€ Instructions
......... Pags 12
By scrolling through the list, any sslscted data can be copied lrom one track or part to
another. For example, if a track contained notes on many MlDl channsls that had been
prsviously combined together, copying only one MlDl channei to a new lrack would allow
the parts to be separated out again. Also, copying NOTES ONLY Jrom a track to itself will
etfectivoly erass all pitchbend, controller, program change, after touch, and system
exclusive data trom that track.
Copylng a SONG to ltselt
ln SONG mode, pressing and holdingthe COPY button will result in the lollowingdisplay:
01 TO SONG
The 01 displaywillactuallyshowlh6currently
selected
songnumber.Likein PARTmode,
pressingRECORDwillappendthecurrentsongto itself,makingit lwiceas long.
Copylng a SONG to anolher SONG
lf a new song numberis selected,lhe displaywill showthe newlyselecledsong number,
and pressingRECORDwill appendlhe sourcssongnumber(thenumberselectedbefore
pressingCOPY),to ths dsstinationsong number(lhe numberselectedwhile holding
COPY).Thismodeis veryuseful,sincea versoconsisting
of morethanonepartcouldbe
entersdinto a song, and then appendedinto anolhsrsong when neededwithouthaving
to re -enterlhe partslor the verss. Noneof the eighttrack buttonswill have any effect
when copyingsongs. The page up and pagedown buttonsalso have no effectwhen
copyrngsongs.
In allcases,the copyis notexecutsduntilRECORDis pressed,andwill b6 abortsdif COPY
is releassdbetor€pressingRECORD.The COPYbuttonhas no effeclwhilea songor pan
rsprayrng.
EDIT
The EDITbuttonis an on/oftswitchwithan associatedLED. All ooerationsas discussedso
far assumethat EDITis off. Whsnodit is on, individualnotseditingcan be achievedin part
mode,andthe listof partsin a songcan be editedin songmods. To exil EDITmode,prsss
EDITagain(theLEDwilllurnofl),or ssloctPARTor SONG,whichautomatically
turnsEDIT
off.
Editing a PART
WhenEDITis pressedwhilein PARTmode(PARTLEDlit),individual
MlDloventscan b6
sdited. The eighttrackbuttonsare usedlo seleclwhichtrackis beingsditod.Onlyone
lrackcan be edrtsdat a time (onlyonelrack is lit at a time). Thedisplaynowshowsthe MlDl
information
of lhe selectedtrackas follows:
lollowed
Thefirstlhreedigitsareths beatnumber,followedby ths sub-beatcounl(00"95),
by the notevalue,followedby lhe notevelocity(01-127),
followedby lhe nole'sduration
(in baatsand sub-beats),
followedby the note'sMlDlchannel(1-16).Thecursoris under
AlesisMMT-8Instructions
......... Pag€ 13
1ne991.nuq!er, indicatinglhat ir can be changedwiththe keypadof th€ +/- buttons. To
paseupand-pase
down
buttinsareussd.nCy movt
1T:1:I_"_:tlg.t11Tl!1glhg
rne
cursoras shownin lhe followingdisplays:
01
002/00
i
Ql-z
01
: a#-2
CHAN01
t
002/00 CHAN
The cursor movesto the nexl parameter,and will'loop around"pasl the last pa€meter
backlo the first. The MlDl channelis the chann€lthat the note is outputon it ihe track,s
MlDl cfiannelig assignedl,oUNCHANGED.lf the track is assQnedto a specilicchannel,the
originalchannelnumb€rwill be shownin parenthesis.Th€ noto'sMlDl channelcan still be
chalged, but no ettect will be heard unless the track's MlDl channel is assignedto
UNCHANGED.(SeeMlDl Channel,page20.)
Other MlDl informalion is displayed as follows. Thls lnformatlon wlll only be
See
dlsplayed ll lt has been entered Inlo the sequencs beforehand,
page 16r Addlng an Ev9nt. For pitch bend,the displayincludesthe beat, the
suFbeat, MlDl channel, and pitch bend amount. The Fttch bend range is from
4096 to +4095. The page up and page down dsptays scroll as tollows:
1/00:
400:
4095 CHAN01
CHANOI
001/00:
Pitch bend amountscan be entsred with the keypad,hil lhe only way lo achiev€ n€galiv€
numb€rsis to us€ the - button until nsgativenumbersare reach€d,aller which any kgypad
entrywillbe negative.
For alter touch, the display includesthe beal, sub-beat,MlDl channel,and after louch
amount. The aftef touch rangeis from 0 to 127. The page up and page down displays
scroll as tollows:
Alesls MMT€ In8tructlons
PeOs 14
127
0t
CHAN01
127 CHAN
For controllers,lhe displayshows the beat, sub-beat,controllernumber.controller
amount,and MlDlchannel.Thecontroller
rangeis lrom Oto j21. Theconlrolleramount
rangeis from0 to 127. The pageup andpagedowndisptaysscrollas follows:
121:
1/Q0:
: 1 2 7C H A N0 1
00
: 1 2 7C H A N0 l
1 2 1 : 1 2C
7 H A N0 1
1 2 1 : 1 2C7H A N
For.ry.o.gl"T
change::the displayincludesthe b6at,sub-beat,
programchange
number,
-page
and.MlDl channe.l...
The programrangeis f rom O to 127. The pade up and
down
displaysscrollas lollows:
127
CHAN01
/00:
127 CHAN
Forsyslemexclusiveinlormation,
ths numberolparameterscouldbe any value. Sinc6this
couldcontaina largeamountof intormation,
the pageup and pagedownbuttonscontinue
AlesisMMT€ Instructions
......... pa€
15
to scrollthe datathroughthe displayuntilthe 6nd is reached.The displayincludesthe
beat,sub-bsat,and any systemexclusivsdata,as follows:
126 125 1
1/00:
125 124>
126 125 124>
126 125
/00:S\
23 122 121>
<123 722 121>
elc.
Eraslng an ovent
evsnt
being
Any
displayedcan be erasodby holdingERASEand pressingRECORD.
Erasingan 6vsnt removesit tromthe track,but does not alterthe timingof tho lrack. For
example,removinga quarternote at the beginningof a lrack doss not move overything
elsefoMard a ouartornots.
Addlng an event
An ovenl can be addedby usingthe COPYbutton. Pressingand holdingCOPYcauses
the lollowingdisplay:
Pressingthe RECORDbuttonwill inserta note al the currentbsat location with a note
valus ot C3, a velocityof 64, and a durationof 1 beat. This note can then be editedas
describedabovelo any deshedvalue. lf somethingolhsrthan a not6 is desirsdto be
insertsd,the page up and pagedown buttonscan be usedto scrolllhroughthe other
choicesbelorepressingRECORD:
001/00
AlesisMMT€ Instruclions.................
Page 16
By scrollingthroughths list,any selecleddala can bs copiedlrom one trackor partto
another.For example,ff a trackcontainsdnoteson manyMlDlchannelsthat had been
previously
combinedtogethsr,copyingonlyona MlDlchannelto a newtrackwouldallow
ths pansto be soparatedout again. Also,copyingNOTESONLYfrom a trackto iisel{will
elfectivelyerase all pitchbend,controller,programchange,after louch, and system
exclusivedatafromthatlrack.
Copylng a SONG to ltselt
In SONGmode,pressing
andholdingthe COPYbuttonwillresultin ths following
display:
01 TO SONG
The01 displaywillactuallyshowthecurrently
selected
songnumber.Likein PARTmode,
pressingRECORDwill appendths currentsongto itself, makingit twiceas long.
Copying a SONG to another SONG
lf a newsongnumberis selecled,the displaywillshowth6 newlyselectedsongnumber,
and pressingRECORDwill appendthe sourcesongnumbor(th€numberselectedbefore
pressingCOPY),to the destinationsong number(the numberselectedwhile holding
COPY). This modeis very useful,sincea verseconsistingof morethan one partcouldbe
sntersdinto a song,and thsn appendedinto anothsrsongwhen nsedodwithoulhaving
1o re -enterlho partsfor ths verse. Noneof thg eighl track buttonswill have any eftect
when copyingsongs. The page up and pagedown buttonsalso haveno effectwhen
copyrngsongs.
In all cases,the copyis notexecuieduntilBECORDis pressed,andwill be abortedif COpy
is rsleasedbeforepressingRECORD.The COPYbuttonhas no slfectwhilea songor part
is playing.
EDIT
The EDITbuttonis an on/offswitchwithan associatedLED- All ooerationsas discussedso
tar assumethat EDITis otf. Whenedil is on, individualnoteediting€n be achievedin pad
mode,andths listol partsin a songcan be editedin songmode. To exitEDITmode,press
EDITagain(theLEDwillturnoll),or seleclPARTor SONG,whichautomatically
turnsEDIT
off.
Editing a PART
WhenEDITis prsssedwhilein PARTmode(PARTLEDlit),individual
MlDlevsntscan be
edited.The Eightlrackbuttonsars usedio selectwhichtrackis beingedited.Onlyone
trackcan be editedat a time(onlyonetrackis lit at a time). Thedisplaynowshowsthe MlDl
information
of the selectedtrackas lollows:
Th€ lirst thrss digits are ths boat number, followod by ths sub-beat 6unt (00-95), lollowed
by the note value, followed by the nole velocity (01-127), followed by the nols's duration
(in beats and sub-bsats),followed by the noi6's MlDl channel (1-16). Ths cursor is under
Page 13
lh€ b€al.number,indicalingthal h can be changedwith the keypador the +/- buttons. To
p.r.aTdeJl: lhe page up and page down bui6ns are u3od. Th€y move
1T::_T_"_9tlpl
rnecursora3 shownin the tollouring
displays:
I /00:
I /00: Cf -2
CHAN01
1/00: Ct
YOOCHAN01
CHAN
The cursor mov€s to the next parameter,and will "loop around' past the last parameter
backlo lhe first. The MlOl channelis the channsllhat th€ note is outputon il the track's
MlDlchann€lb a$igned to UiICHANGED.ll the trad is assbnedto a specificchannel,the
originalchann€lnumberwill be shownin parenthesis.The nots'sMlDl channelcan still b€
changed, but no etfect will be heard unless the track's MlDl channel is assigncd to
UNCHANGED.(SeeMlDl Channel,page20.)
Other MlDl information is displayed as follows. Thls hiotmatlon wlll only be
See
dlsplayed lf lt has been enterod Into lhe sequence belorehand.
page 16, Addlng an Event. For pitchbend,the displayincludesthebeat,lhe
range
pilch
is
from
sub-beat, MlDl channel, and
bend arnount. The fttch bend
-4096 to +4m5. The page up ard page dotyn disptays scroll as tollows:
4095 CHAN01
CHAN01
/00:
Pitchbend amountscan be enteredwiththe keypad,but lhe only wey to achievenegative
numbersb lo us€th6 - buttonuntiln€gativenumbersare feach€d,aflerwhichany keypad
entrywillbe negative.
For aft€r touch, lhe displayincludeslhe beat, sub-beat,MlDl channel,and after touch
amount. The atter touch rangeis from O lo 127. The page up and page down displays
scrcflas lollows:
AleslsMMT€Indrucdore.................
Pqs
14
127 CHAN01
127 CHAN0l
CHAN01
127 CHAN
For controllers,the displayshows the bsat, sub-beat,controllernumber,controller
amount,and MlDlchannel.Thecontrollsr
rangeis lrom Oto 121. The conlroller
amounl
rangeis tromo io 127. The pagoup andpagedowndisplaysscrollas iollows:
'tl00:
CHAN01
1/90:
111?',
01
1 : 1 2 7C H A N0 1
121:127CHAN01
1 2 1 : 1 2C7 H A NQ 1
For.programchangeg,the displayincludsslhe boat,sub-b€at,programchango
number,
-page
and MlDl channe.l.The programrangs is from o to 127. The page up and
down
displaysscrollas tollows:
127 CHAN01
CHAN O1
127 CHAN
Forsystemexclusiv€information,
tho numberof parameters
couldbe any valu€. Sincethis
couldconlaina largeamountof information,
the pageup and pagedownbutons continue
AlesisMMT€ lngruclions
Page 15
to scroll.
the datathroughthe displayuntilthe end is reachsd.The displayincludesthe
bgat,sub-beat,and any systsmsxclusivedata,as follows:
/00:
126 125 'l
1/00:
125 124>
126 I25
124>
u t / o u :s
126 125
122 121>
<123122
121>
elc'
EraslnE an event
event
Any
being displayed can be erased by holding ERASE and prossing RECORD.
Erasing an svsnt removss it from the track, but does not altsr ths timing of the track. For
example, removing a quarter note al lhg beginning of a lrack does not movs evorylhing
elss fomard a ouarter note.
Addlng an ev6nt
An evont can be added by using the COPY button. Pressing and holding COPY causes
the following display:
Pressingtho RECORDbutlonwill inserta note at the currentbeat localion with a not6
value of C3, a volocilyol 64, and a durationol 1 boat. This note can then be editedas
describedabov€lo any desiredvalue. lf somethingoth6r than a nole is desiredto be
inssrtsd,the page up and pagedown buttonscan be us6dlo scrollthroughthe othsr
choicesbelorepressingRECORD:
AT 001/00
T
AleslsMMT€ Instruclions
Pags '16
AT
ev€ntat the currentbeat
In th6 abovechoices,prossingRECORDwillinsertthe displayed
andwhhvaluesof 0.
Whilein part EDIT,the tast totwardand rewindbuttonsare ussd to advanceand retreat,
respoc'tiv'ely,
throughths listof MlDl evsnlson the sel€ctadlrack. Whentho end oJa track
is rLached,or if a tirck is empty,the displaywill readENDOF TRACK. Playinga partwhile
to displaythe sventsas theyhappenon the
in parteditwillplaythe partwhitecontinuing
display.
Editing and Creating a SONG
Whenin SONGmodo,the EDITbuttonis usedio sntorthe songeditmods. Thismodeis
usedfor creatingor sditinga song,whichis a listof parts. Thedisplayappearsas tollows:
00
STEPOO1PART
The steo numbercan bs movedforwardsor backwardswith ths fast iorwardand rewind
buttons. Ths part numberis underlinedindicatinglhat it can be changedwilh the keypad
or +/- buttons. lf a songis empty,the lirst steCsparl will be blank. The slep pastthe last
part of a song will also displaya blankpart. To changea part,simplytype in a new part
number.To erasea step,holdERASEand pressRECORD.The displayedstepwill be
erased,and all partstromths stspspastthe erasedstepwill shiftdownone step. To insed
a part,prsssandholdCOPY. Thodisplaywill read:
INSERTPART
The keypador +/- buttonscan be usedlo changeths partnumbsr. PressingRECORD
inseristhe part at the displayedstep, and movesthE previouslydisplayedstep and all
subssquenlstepsons stepback. Whenthebuttonsare released,tho displayrevertsback
to ths song editdisplay.
Automatlc TRACK selection and muling at each step of a SoNG
You can selectwhichkackswill playbackat sachstepof a songby turningotf thetracksyou
don'twant to hsar (LED'Sotf) and leavingon the tracksyou wish lo hear (LED'son). The
MMT-8willslorein memorywhichlracksweressloc,ted
for playbackat each step.
SONG
MODE
Selecting and Playing a SONG
SONG Button
Pressthe SONGbullonlo entersongmode. The dislplaywill readas follows,withthe last
songonteredbeingindicatedin the numberportionof th€ display.
AtesisMMT-Slnstructbns......'..".""'
Page 17
Selecling a SONG
The 00 is underlinedto indi€te that it will be changedif a newnumberis selectedwirhthe
keypador the +/- buttons. The secondlin€of ths displayshowsthe nameof tho currently
s s l e c t e d . s o n g , ( u p t o l 4 c h a r a c t lef rt h
s )e.c u n e n t s d n g ' n u m b e r i s e m p t y , t h e s e c o n d l i n 6
will read EMPW SONG. Pressingthe +/- buttonsimmediately
selbits the nsxt song
number,with the numbersloopingpast99 to OOand loopingd6wnfrom 0O.to99. lf i
singledigiton lhe keypadis pressed(2,tor oxample),tho displaywillchangeto:
The displayis now indicatingthat ths seconddigit of tho song shouldbe entered. After
enteringthe seconddigit,ths now song is selected,and its namewill appear. lf the
seconddigit is not enleredwithin2 seconds,th6 displaywill revertbackto the previous
songnumbsr,and no newsongwill havebeenselscled. The pagoup and pags down
buttonshaveno functionwhenselectingpartsor songs.
A SONGis a listof parts(sequences)
in a specific order,with eachentryintothe listbeinga
STEP which conlainsa part number. Each step also containswhichol the eighttracks
shouldbs on tor that slep.
Manual TRACK selocllon and mutlng In SONG mode
While in SONGmods,tho eightTRACKSELECTLEDswill displaythe lracksthat are
turnedon on tho first part of the s6lectedsong. ThesEbuttonscan be turnedon or otl to
changethe sslectedtracksto be played,atthoughthsso changeswill be temporaryand
not stored with the song. PressingPLAY will start playinglhe sslectedsong Jrom its
beginning,
andthe PLAYLEDwilllight.Thedisplaywillread,lorexample:
00
001
PAR'I 27 BEATOO1
Thelirstlineof thedisplayis nowshowingthecurrentsongnumberbeingplayed,and
the curr6nlbeat numberof the part beingplayed. The secondline of the displayis
showingthe step numberandthe partassign€dto the slepthat is playingat th6
moment.Whenthe songadvanceslo ths nextstep,the displaywill showlhe partlor step
2, etc. The track select LEDswill changeto show which tracks ars turned on tor lhe
currentpart. Again,the trackseleclioncan be changedby turningon or olf the track
buttons.
will stop playingthe song,and the displaywill returnto the
PressingSTOP/CONTINUE
againwill beginplayingthe songlrom the
selectsongdisplay. PressingSTOP/CONTINUE
beat at whichit was stopp€d. PressingPIAY will alwaysstartthe song{romthe bgginning
of the tirst step. when a song reachesits end, it will stopand ths PLAYLED will turn ofl,
unlessLOOP is on, whichwill causethe songlo loopbackto step one and continue
playing.
The . and " buttons(rewindand last lomard) can be ussd10advanceor retreatthrough
lhe beatsand st€psof a song. if lhs song is playing,prsssingthe tast forwardwill cause
increasing
rate(up
sustaining
notssto stop,andth6 bsaldisplayto advanceat a gradually
to the maximumpossiblotempo)untilths last forwardbuttonis rsleased,afterwhichthe
playing
end
of
the
current
the
displayed
beat.
lf
tho
continues
trom
the
beginning
ot
song
step is reached,the nextslep is starled.
The rewindbuttonworks similarly,but in reverse. In eithordirection,il ths end or
the displayremainson thatstep,unlessloopis on, which
beginning
of a songis reached,
thessbuttonscan be
around".Whena songis notPlaying,
resultsin the step"wrapping
from
the songwillcontinuo
usedfor the samefunclion,andby pressingSTOP/CONTINUE
Alesis MMT-g Instructions
Page 18
ths lasl displaygdbeat. The fast torward and rewind button can be held down
to "frseze"the displayon the currontboat.
simullaneously
LOOP
The LOOPbuttonis a simoleon/ofJswitchwithan LED indicalor.Whsn LOOPis on, a part
whenit has reachedits end and continueplaying
or songwill loopbackto its beginning
indefinitely.lf LOOPis otf, a partor songwillstopwhenit reachesits end.
MIDI ECHO
c ahteonr M
. l DEl C H o i s o n ,
T h s M l D lE C H O b u t t o n i s a n o n / o l t s w i t c h w i t h a n L E D i n d iW
is presentat th6 MlDlINPUTjackwillbe sentto lhe MlDloUTPUT
whateverinformation
jack. When not in RECOBDor RECORDREADY(RECORDLED lit),the MlDl data is
lransmittedout unchangod.
Whanin RECORDor RECORDREADY,andthe lrackselectedhas beenassigned1oa
rseivodwillbe
allMlDlintormation
below),lhen
specific
MlDl channel(seeMlDlCHANNEL
out on the setectedMlDlchannel.Thisfeatureallowsthe userto heara part
transmitted
playing on tho dssired synthssizsrwh;le it is being recorded. System exclusive
pressufearenotechoed,andMlDlclockinginformation
willbe
information
andpolyphonic
echoedonly it MlDlclockis beingusedlor clockingthe MMT-8.
NAME
Th6 NAMEbuttonis usedto changethe namoof a partor song. The nameol a partor
songis 14 characters
long. An emptypartor songwill alwayshavelhe name"EMPry
its
PARI or'EMPTY SONG",and cannotbe changed.Whena partor song is lksl used,
nameis changedfrom"EMPTYPART"or "EMPTYSONG"to "NO PARTNAME"or "NO
SONGNAME."To changethe namsof a parlor song,pressand holdthe NAMEbutton.
Thedisplaywill rsad:
PARTNAME"
The cursor is now under the {irst character of ths part or song name. Using the + and butlons, any alphanumeric character can be selected, and the keypad can be used to
snter numbsrs direclly. The pago up and page down buttons are used to move'the
cursor lsft and right on the display. When the desired name has been entersd, pressing
RECORD stores lhe name for that part or song. lf RECORD is not pressed belore
reloasingths NAME button, any changes to the name will not be saved.
MERGE
Ths MERGE mode is provided so that two tracks can be merged together (overlapped)
onto one lrack. In part mode, when MERGE is held down, the display reads:
AlesisMMT-8Instructions
......... Page 19
The sighttrackLEDswill be off. Prsssthe first desiredtrack(it will lightsolid),followedby
the deslinaliontrack(it willflash),lollowed
by BECORD.Thedisplaywill read:
This displayremainsuniilthe RECORDbuttonis reloasgd.The first trackand the second
trackare nowcombinsdin the secondtrack'slocation.Th€first trackremainsunchanged.
The MERGEbuttonhas no eflectin songmode,or whilea part is playing. NOTE: When
two lracks are merged,their MlDl channelassignmenls(see MlDl CHANNEL)are
permansntlyassignedto ths data of sach lrack, and th€ new track's MlOl channel is
assignedto UNCHANGED.This way, lracks assignedto dittersntchannelsretainlheir
channelindeo6ndenca
on lh6 sametrack.
MIDI CHANNEL
Like lhe COPY and ERASEbunons,ths MlDl CHANNELbuttonis only activewhile it is
h e l d d o w n .l t i s u s e d t o s e l o c t t h e M l Dclh a n n eol l a t r a c k o f a p a r t ( i t h a s n o f u n c t i o n i n
SONGmode).Whenhelddown,trackone'sLEDwill light,andthe displaywillshowthe
MlDlchannelselectedtor thattrack:
The keypador +/- buttonscan be usedto changslho seloctedtrack'sMlDl channel,and
othsr lrdcks can be displayedor changedby sel€clingth€ desiredtrack button(onlyone
or l lhrough
track is lit al a time). Ths selectionof tho channolcan be 0 (UNCHANGED),
16. A giventrack alwaysretainsits recordedMlDl channElinformation,so lhat if a track
played
as
record€d'
Inthis case
be
back
il
can
containinotesfrom moielhan onechannel,
whichmsansthat it willoutputon lhe same
it is desiredto assignthe tracklo UNCHANGED,
MlDl channelsas are recorded. Whenevera new track is recordedil dstaultsto
lrack'snotos
UNoHANGED.lf a specilicMlDlchannelis selecled(1-16),thenlho solected
will all be outouton the selectedchannel. Howeverthe aclualtrack inlormationremains
will causeth€ separateMlDl
unchanged,io that returninga track lo UNCHANGED
channelsto playbackas before.
NOIES: An emptytrackcan be assignedto a MlDlchannelbeforerecordingonto it, which
it MlDlECHOis on. Also,if a irackis
willcausethatchinnolto bs outputwhilorecording
copiedto an emptytrack,its MlDi channelsettingwill be copiodas well. ll a trackor part is
is letlas it was.
erased,its MlDlchannelassignmgnt
OUANTIZE
The OUANTIZEbutton is usedlo correcttho timingof noles to any desiredbsal valus.
OUANTIZEonly moves nole 6vents, and does not alter controllejs'.pilch bend, after
touch, program change, and system sxclusive inlormation. While holdingdown lhe
OUlNftZdUutton in plrt mode,ihe mostrscontlyrscordedlrackwill b€ lit, andthe display
will read:
AlesisMMT-glnstruclions
......... Page 20
The 10 quanlize choices are 112,114,116,1lg, 1112,1/16, 1n4, 1132,1148,1164. The +/buttons of ths keypad can be ussd to scroll through lho choicos. The keypad builons 0-9
can also be us6d lo select lhs quantize value dkeclly, with O=1/2 and 9=l/64. The track
sslec{ buttons can be used to solect tho desirod track(s) to be quantizod. When quantize
is tirst pIessed, all eight lrack LEDs will be lit, indicating that all lracks will bs quantizsd if
RECORD is pressed. lf a track button is pressed, all other lracks will turn ott, and only that
track will bs seloctsd. From that ooint on, each track select button will turn on or otf ils
associated LED, so that any combination of tracks can bs solsctod to bs quantized.
Prossingth6 BECORD button initiatssthe quantizing,and changes the display to:
This display remains until the RECORD button is released, which then roturns the
sequencer lo its previous quantize display. The quantization process changes the start
point of each nole to the nsarest quantize beat, but lsaves ths not6 release point where it
was, which changos the aclual note duration. Other quantizing options en be selected by
using lhe page up and pago down buttons. Pr€ssing the page up buflon scrolls through
the following choices:
NOTEEND
1/L6
lf BECORDis pressedwith QUANTIZENOTESTART& ENDbeingdisplayed,rhe release
timssof lhe nol6swill alsobe quantized
lo ths sglectedquantizeb6at. lF NOTEEND is
solecled,onlythe rslsasstimesol ths noteswill be quantized.ll KEEPDURATIONis
selected,a nots'sdurationwill remainconstanl.i.s..il the startof a noteis movedl/16
notsahead,the roleasewill alsomove1/16 ahead.
ln SONGmode,the QUANTIZEbuuonis usedto selectan amountof clockoflsetfor each
track in a song. Theseoffsetsare globalsettingsusedby all songs,and do nol atlectthe
individualpartsdkeclly. The purposefor thisleatursis to allowthe userto compensalefor
MlDl delays,and sounddeviceswith slowattacklimes. Whileholdingthe OUANTIZE
bultonin songmode,the lirsttrackLEDwilllight,all otherswillbs off,andthe displaywill
read as tollows:
NOTES
The valuecan be sst from -48 to +48 384thnotes(+ 1/2 noto)by usingthe ksypador the
+/- buttons. Positivovaluesreprssenta shift forwardin time, and negativsvalues
representa shitt backwardin time. Whsn enteringa valuewith the k6ypad,the sign
remainsunchanged(exceplwhgn entering00, which is alwayspositive). To changelhe
sign,the +/- koysmuslbe ussdto 'passthrough'zerolo the otherside. Eachtrackcan be
solectedand set independently.Of course,the first beatof ths tirst partol a songcannot
be advanced(it can'treadminds..).
Al€sis MMT-8 Inslructions
Page 21
TRANSPOSE
The TRANSPoSEfunctionalrox,-s.for_1!1ck
or part to be rransposedby a userspecified
numberof semitones.WhenTRANSPOSE
is heiddownin partrinode,
th'edisplayleads:
The keypagcan be usedto entera twodigit numb€rof semitoneslo transposeup trom
the originalpitch (00-99),or ths +/- buttonscan be usedto incremsntor decrem6ntthe
amount. Like in ERASEmode,all eighttrackselsct LEDSars lit, indicatingthat the
transposition
will sffectalltracks. tf a trackselsctbuttonis prossed,all othertrac[LEDs will
turnoff, and onlythe sglect€dlrack will be lit. Additionallrdckscan be ssl€ctedby pressing
the selecttrack buttons,whichwill togglsthe LEDson or ofl lor eachtrack. pr6ising rh6
page up or pagedownbunonwill changeths displayto:
SEMITONES
Nowlhs numberenteredfromthe keypadselectsthe numberof semitones
lo transposs
down. For eithortransposeup or down,pressingthe RECORDbuttonexecuteathe
transposecommand,resultingin the followingdisplay:
This displayremainsuntilRECORDis released. :f a trackthat is transoosedresultsin an
underflow(notesbelow 0) or an overflow(notesabove 127),the track will automatically
readjustthe pitchin oclavsincremsntsuntilil is backin legalrange.
The TRANSPOSEbuttondoesnot lunctionwhileplayinga partor song.
TEMPO
The TEMPObuttonis usedto changethe tempoot a part or song. The tempo is slored
wilh a song,and not with a part. Whilsin partmode,the temporemainsat its previous
settinguntilchanged.Whilein songmode,thelempochangesto tho programmed
tempo
eachtime a diffsrentsongis selectsd.Whilein eilhsrpartor songmodo,pressinglhe
tempobuttonresullsin lhe followingdisplay:
MINUTE
Whileholdingthe TEMPObutton,th€ +/- buttonscan be usedto selecta newtempo,or a
tempo can be €nterEddifectly with thr6o digits on lhe keypad. Tempo changes are
eflectiveas soon as thoy are sntersd, and lhs RECORDbutton does not havs to be
pressed. In part mode,ths REC,ORDbuttonhas no functionfor TEMPO. In song mode
(whilenol playing),pressingRECORDstoreslhe selsctedtampointothe currentsong.
Oth€rwise,it is a temporarytempochangethat will be torgottsnonce a ditferentsong is
selected.lf REcoRD is prsssed,the displaychangesto:
Alesis MMT-8Instruclions
. . . , . . . . . . . .P a g e 2 2
ThisremainsuntiltheRECORDbuttonis releassd.ln bothsongandpartmode,thetempo
canbe changedwhileplaying.
MID] FILTER
The MlDl FILTERbuttonis usedlo selectwhattype ol MlDl in{ormation
will bs r€cordedby
lhe MMT-8. Whiloholdingdownthe MlDl FILTERbutton,the pageup and pagedown
buttonscan be usadto scrollthroughthe possiblechoices,whilethe + and - buttonscan
be usedlo turn eachf unctionon or off. The possibledisplaysthat can b6 scrolledthrough
aro as follows:
BEND:
TOUCH:
TROLLERS:
CHANGE:
YSTEMEXCL:QFF
MIDI
CHANNEL:
Pressing the + button changes the display to ON, pressing the - button changes the
display to OFF. lf a function is off, it will not bo rocorded into the MMT-8, and will not be
echoed oul the MlDl OUT jack il MlDl ECHO is on. The lasl page selecls which MlDl
channelthe MMT-8 will record. Normally,it is sel to ALL, which means lhat it will record on
all MlDl channels. lt can also be sot to I through 16, which will cause the MMT-8 to ignore
all channels bul the selocied one while recording. Selecting00 on the keypad will display
ALL, and the individualchannels can be selected as 01 through 16. The default settings
are as shown abovo, with all lunctions on except aftor louch and systsm sxclusive.
CLOCK
The CLOCK bulton is used lo set the clock input and oulput functions ol the MMT-8.
Pressing and holding lhs CLOCK bulton allows access lo lhe CLOCK pagos. The lirst
page is used lo sel6c1lhe clockingsource, and will display one of the followingchoices:
& INTERNAL
Al€sisMMT-8Instructions
......... Page 23
ONLY
SYNC
By usingthe keypador +/- buttons,one of the three clockingsourc€scan be sslectsd.
Tttedefaultllting-is lrllDl & INTERNAL(1),wirhrheolherchoiLs beingTNTERNAL
ONLi
(2), and TAPE SYNC (g). The page up and page down buttonscai be used to scroil
thrcughthe nextlwo clock pagos:
The + and - buttonscan b€ ussdto turn eachfunctionon or otf, respeclively.The default
settingis MlDl & INTERNALctocksource,MtDtCLOCKOUT ON, a;d AUTOSTARTON.
Thereis no TAPESYNCout switch,sincothis functionis alwaysactive. The MMT-8does
not nesdto turn on or off its internalclock,sinceit intslligsntly
determines
whatclockto
uqewhen necossary.A func.tional
descriptionol the clockingp6ssibilities
are shownin the
table below:
CLOCK
AUTO
SOI.FCE
START
MIDI&INTERNAL
OFF
MIDI& INTERNAL
ON
INTERNALONLY
OFF
INTERNAL
ONLY
ON
TAPESYNC
OFF
TAPESYNC
ON
PRESS RECEIVE RECEIVE
H-AY
MIDISTART TAPE SYNC
2
6
I
2
6
1
2
1
1
'I
2
2
3
1
4
3
1
5
1 . Do nothing.
Startplayingfrombeginningwith internalclock.
Enterplay mode,but dont starfplayinguntiltaposyncclockoccurs.
4. lf in playmode,startplaying,otherwiseignoresync.
5 . Startplayingfrombeginningwithtap€syncclock.
b - Startplaying
f rombeginningwilh MlDlclock.
lf tape sync gnd auto start are on and a parl or song is playing, it will stop playing
automatically
it the lap€ syncsignalis inierrupted
for moreihan 1 second.It autostan iCno1
on,ths MMT-8willwaitin playfor moresyncpulses.
CLICK
The CLICKbuttonis us€dto set the rhythmicvaluothatthe metronomewill have. Holding
the CLICKbunonresultsin the lollowingdisplay:
AleslsMMT-8 lnslructions
Pege 24
Th6 1o cfick value choices arg 112,114,1/6,'llS, 1112,1116,1/24, 1132,1148,1/64. The
+/- bunons of the keypad can be used to scroll through lhe choices. The ksypad buttons
0-9 can also be used to select the click value directly, with 0=112and 9-t/64. Additional
clic* pages can be accesssd with the page up and page down buttons. Pressing lhs page
uo butlon once moves the cursor to ths RECORD CLICK funclion, as lollows:
1t1
RECORDCLICK
This tunction delermines whethor or not the mslronome will click while in record mode.
The defauh setting is ON, but it can be changed with the + and - buttons. The nexl page
has two mors click parameters which are accessed with the pag6 up and page down
buttons. They display as follows:
The too functiondetormineswhetheror not ths metronomewill click while in PLAY
modes. The + and - buttonscan be usedto changelhe lunctionon or otf, respectively.
The dsfaultsettingis PLAYCLICKOFF. The lasttunctiondeterminesthe numberof clicks
that will be counteddown whsn snleringrecord. lt can be set from 0 (OFF)to 99. The
dslaultis 4.
TAPE
The TAPEbutlonis usedto accessthe laos interfacsfealuresot the MMT-8. This allows
the userto savs and retrievesequencsdata with an ordinarycassetterecorder.Pressing
and holdingthe TAPEbunonrosultsin the lollowingdisplay:
SONGS TO TAPE
Pressing the RECORD button initiales ths save lo lape. Both buttons can now be
roleased, since this operation may take over two minutes, during which the display will
reao:
Thedisplayshowsthe currontpan or songbeingoutput.Thisdisplaywilladvanceunlilall
data is output. Pressingthe STOP buttonwill abortthe operation. Beforepressing
RECORD,the pageup and pagedownbultonscan be usedto accessthe otherfivetape
pages. Theyare as follows:
A
FOR ERRORS
T
FROMTAPE:
AlesisMMT-Slnstructions
"" ""
Page 25
FROMTAPE
In all five of these pages, pressing RECORD initiatesthe operation. The verity function is
used to insure thal the dala just record€dto tape is good. Load f rom taps loads the entire
sequenc€ msmory with the data on tape. Load part and load song allow a single part or
song to be loaded from a tape. The keypad can be used to seleit the desired number.
Alter pressing RECORD, the display will change to the following (dependingon th6 page
snown wnen I warspressed):
PART:00
co
00
Again,the RECORDandTAPEbuttonscan be releasod,
andthe displaywillcontinusunlil
the operation
is complete,
partor songnumberbeing
withths currently
loadingor ver'rfying
shownin the display.Whenloadingonepartor song,the displaywillcontinue
to showthe
selectedpart or song numberin ih€ uppsrdisplay. Whensondingout MlDl data,the
displayshownabovewill remainuntilthe datahasbeensentout. Aftercompletion
of the
tapotunctions,
th6 displaywillreturnto itsprevious
state(selectpad or sslectsong). lf an
error is oncountered
whileloadinga lape,ths displaywill show ERRORas soon as it
occurs,lor example,
Ths tape will attemptlo continueto load,but it is possiblethat lhe data will be conupted
and lhereforeunusable.
(butnotlhe sendMlDllunction),
Duringanyot ths tapeoperations
ths STOP/CONTINUE
buttoncan be usedto abortthe operation.Whenloadingin all partsand songs,aborling
the tape may leaveunusabledatain memory.Whenloadingone partor song,aborting
aftorthe selsctedpartor songhas passedwill notcauseany problems.
STORINGTO DISK USING MIOI SYSTEM EXCLUSIVEDATA DUMP
Tho MMT-8sendto MlDlfunctionis providedso thatthe datacan be storodon a computef,
a YamahaMDF-1(MlDlFiler)or a YamahaDX-7llFD.Thedatais sentout as oneblrckof
systemexclusivo
dala,withthe lengthbeingdelermined
by the amountof memorybeing
used. ll usinglhe MlDl Filer,no morelhan 85%ol the memoryshouldbe fullor elsethe
AlesisMMT-Slnstructions
......... Page 26
data will be 1oo largs for the MlDl f iler's buffer. No more than 257" ot memory should be lull
when saving lo a DX-7llFD or its buffsr will b€ lillsd as well. The MMT-8 will automatically
receivs MlDl system exclusivesequence data trom any of these devices without having to
select a spscif ic pags. lf the system exclusive data starts to come in, the display will read:
This display will remain until the data has bsen completely loaded, atterwhichthe MMT-8
will return to song 99. Note that any time the MMT-8 receives sequence data from MlDl,
any data previously in memory will be lost.
SYNCING THE MMT.8 TO TAPE
It is possible to sync lhe MMT-8 to a tape recorder with rhe help of the TAPE SYNG mode.
In lhis mode, the MMT-8 reads a master clock pulse lrom a track of a lape recorder,which
keeps all ol the sequoncers/drummachines perfeclly in time with the recorded inlormation
on lhe tapa machine. This method has the advantags of eliminatingthe need to print drum
machins or synlhesizerparts on tape, since you can use the masterclock recordedon tape
(or "sync track")to triggerthe drum machine and synthesizersvia the sequencer.
RECOHDING THE SYNC TONE
Belore recording any audio informationon ths tape machine, you must lay a ,,SyncTone"
down on one track ot lhe lape machine. This is usuallydone on an outsidetrack (track 1 or
8 on an oight track machine: track 1 or 16 on a sixteen track machine; etc.) to keep the
crosslalk to a minimum.
1) Connsct the TAPE OUT jack of lhe MMT-8 to tha input of rhe desired track of the tape
macntne.
2) Prsss PLAY on the MMT-8, th6n adjust thE level ol tho track so lhat it reads
approximatoly"0VU".
3l You must select a tempo for the song on the MMT-8 at this time as it cannot be changed
later.
4) Begin recordingon the tape machins.
5) Press PLAY on the MMT-8. Allow the MMT-8 to play through its entire song before
stopping the recording. When the song has ended, stop the recording and rewind the
tape machine. You are now ready to trigger lhe MMT-8 lrom the sync tone that you just
recorded.
NOTES:
A) There is no TAPE SYNC OUT switch as this is always aaive.
B) Keep the Sync signal at about jVU in order to avoid dropouts. lf the MMT-B does not
see the sync tone lor 1/2 sennd, it will assume that the sync tone has ended and will go
into STOP mode.
C) lf possible, do not use any noise reduction , EQ, or signal procxsing on the sync tone.
D) Avoid rccording high energy, high-trequency tracks next to the sync track.
TO CLOCK THE MMT.8 FROM TAPE SYNC
1) Connecl the output of the track of the tape machine that has the sync tone to the TAPE
lN iack ol the MMT-8.
AlesisMMT-8lnstructions
......... Paqe 27
2) Pressand holdth6 CLOCKbuton. Thedisplaywill read:
MIDI&
3) Use the keypad or + and - buttons to select TAPE SYNC lN. The display will read:
4) Put the tape machine into PLAY. The MMT-8 will automatically start as soon as il
receives the ryngton9, causing any olher ssquencers connected lo it to play. Be careful
to. rcturn to the b.eginning ol the sync tone since the MMT-B will aut6mhticaily begin
playing any time that it receives the sync tone.
START / STOP FOOTSWITCH
The START/STOP footswitch jack is provided tor a momentary normally open lootswitch
that connects the jack's tip to hs sleeve (ground). Whil€ in stop; the footswit;h will function
like the play bulton and start a part or song from lhe beginning. While in play, thE
lootswitch acts like the slop button, and stops playing.
REMAININGMEMORY
HoldingRECORDand pressingLENGTHcausesthe followingdisplay:
REMAINING
MEMORY
100
This shows the amount of memory that has not b€en used. Note that some
operationsmay not be possible€ven though it seems that there is still a small
amount of memory available. This is du€ to lhe fact that the MMT-8 requires
€noughmemoryto duplicatea part beforoit can be recordedon, or lengthchanged,
or offsel,etc. lf a large part is altemptedto be alteredwhen there is not enough
memory to complete lhe operation, th€ display will indicate that there is not
enoughmemoryavailableto completeth€ op€ration.
CLEARING MEMORY
To clearall ol the MMT-8'Smemoryand reinitializeall of its variables,turn powerotl, press
and hold ERASE,PAGEUP, and PAGEDOWN,and turn on the powerwhileholding
lhess bultonsdownlor 3 se@nds.
AlesisMMT-8Instructions
......... Page 28
AUTOLOCATE
The MMT€ has Aulo Lmte ability which a,bws you to go directly b a speifrc b€at of a part wihout playing through the
beatspriorto ths dssiredbeat number.
PARTMODE:
A. Whenthe MMT-8is in PLAY1. PressandholdeithertheFast-FoMafd TFl
orBewind f?l
button.
2. Enterthenumberof thedesiredbeat(3 digits)usingthekeypadbuftonsFl
through
3. Releasethe Fast-FoMardE
or Rewind l.:]
button.
4. The Part will continueplayingfrom the selectedbeat number.
B. When the MMT-8 is in STOP l. PressandholdeithertheFast-Fonvard I-;-
orRewind lTl
button.
2. Enter the number of the desiredbeat (3 digits) using th€ keypadbuttons F-l
rnrougn | 3 I
3. Releasethe Fast-ForwardElor
Rewindl--?-'l button.
4. Pressthe STOP/CONT|NUEbutton lo begin playingfrom the setected
beat.
SONG MODE:
1. Follow instructionsfor PARTmode. The MMT-8will Auto Locateto the desired beat
in the currentstep (Part)ot the song.
MMT-8MIDIIMPLEMENTATION
CHART
Function
CHAI.INEL Default
Chonge(
vIODE
Default
Messages
Atered
Transmited
Recognizad
l-t 6
l-l 6
t-l6
l-tD
x
x
00-l27
00-127
Noteon
YELOCITY
NoteOff
o
x
o
roucH
I
NOTE
NUMBERTfueVoice
i'yl
I
x
0-127
0-t 27
;YSTEMEXCLUSIVE
o
o
sonoPo!
;YsrEM
)OMMON SongSel
Tune
SYSTEM Clock
REALTIMEM c a s a g e :
o
o
I
x
I
I
o
o
o
o
AIJX
I
I
x
x
x
PITCHBENDER
CONTROL 0-63
cHAl{cEff;lii;
PROGRAIVI
CHAI.IGE
Truei
Loca.lContro
All NotesOfl
ActivcSense
Re3et
o
o
o
o
I
I
M o d el : O M N I O NP
, OLY
M o d e3 : O M N I O F FP, O L Y
Alesis MMTS lnstrucllons
Userchangeable
I
o
o
o
o
x
Lnon 3
Remafts
I
M o d c2 : O M N I O N , M O N O
MONO
Mode.l : OMNIOFF,
O: YES
I:NO
Page 30
MMT-8TROUBLESHOOTING
CHART
SYMPTOM
WHAT'SPROBABLY
WBONG
WHATTODO
No soundduring
playbackof recorded
Dans.
Didn'trecord.
MlDlchannels
notproperly
corresponding
withsoundsources.
Tracksaremuted
CheckMlDl connection.
CheckMlDl channel
assignments.
Checktrack muteselection.
Won't record after touch MlDl filtersfor aftertouch
or systemexclusivedata. and systemexclusiveare enabled.
In MlDl filtersmode,set after
touchand sys ex recordto on.
Won'tsave or loadto
tape
Bad connections.
Bad tape.
Levelof sync tone is too highor low.
Errorsin data.
Check wiring.
Use a certifieddata taoe.
Try a higheror lowerlevelto tape.
Re-savethe data.
won'tsyncto tape.
Bad connections.
Level on tape
Checkcables.
Set levelat or near0 vu.
Turn off noisereduction
if possible.
lf probl€msaren'l solved after troubl€shooling
and ref€ringto the manual,consull your Alesisdealer for
assistanco.
ALES'S LIMITED WABRANTY
ALESISCORPORATION
('ALESIS")warrantsthisproduclto be lree ot delectsin materiatand
workmanship
for a periodol 90 dayslrom the dateof originalretailpurchase.Thiswarrantyis
'"
enforceable
onlyby the originalretartpurchaser.
To be protecledby thiswarranty,the purchasermustcompleteand returnthe enclosed
warrantycard within14 daysof purchase.
Duringthe warrantyperiodALESISshall,at its soleand absoluteoption,eitherrepairor
replacefree of chargeany productthat provesto be detectiveon inspectionby ALESISor its
authorized
servicerepresentative.
To obtainwarrantyservice,the purchasermustfirstcallor writeALESISat the addressand
telephonenumberprintedbelowto obtaina ReturnAuthorization
Numberand inslructions
concerning
whereto returnthe unitlor service.All inquiriesmustbe accompanied
by a description
of
the problem.All authorizedreturnsmustbe sentto ALESISor an authorizedALESISrepairtacility
poslageprepaid,insuredand properlypackaged.Proolof purchasemustbe presentedin the formol
a billof sale,cancelledcheckor someotherlorm ol positiveproofthat the productis withinthe
watrantyperiod.ALESISreservesthe rightto updateany unit returnedfor repair.ALESISreserves
the rightto changeor improvedesignof lhe productat any lime withoutpriof notice.
This warrantydoes not coverclaimsfor damagedue to abuse,neglect,alterationor attempted
repairby unauthorized
personnel,and is limitedto lailuresarisingduringnormaluse that are due to
defectsin materialor workmanship
in the product.
ANY IMPLIEDWARRANTIES,
INCLUDINGIMPLIEDWABRANTIES
OF MEBCHANTABILITY
AND FITNESSFOR A PARTICULAR
PURPOSE,ARE LIMITEDIN DURATIONTO THE LENGTH
OF THISLIMITEDWARRANTYSomestatesdo not allowlimilations
on how tongan imptied
warrantylasts,so lhe abovelimitalionmay notapplylo you.
IN NO OTHEREVENTWILL ALESISBE LIABLEFOR INCIDENTAL.
CONSEQUENTIAL
OR
OTHERDAMAGESRESULTING
FROMTHE BRFACHOF ANY EXPRESSOR IMPLIED
WARRANTY,
INCLUDING,
AMONGOTHERTHINGS,DAMAGETO PROPERTY,
DAMAGEBASED
ON INCONVENIENCE
OR ON LOSSOF USE OF THE PRODUCT.AND.TO THE EXTENT
PERMITTEDBY LAW DAMAGESFOR PERSONALINJURYSomesralesdo not ailowrhe
exclusionor limitationof incidentalor consequentral
damages,so the abovelimitationor exclusion
may not applyto you.
This warrantygives you specificlegal rights,and you may also have other rightswhich vary
from slate to state.
This warrantyappliesonlyto productssoldand usedin the UniledStatesof America.For
warranlyinformation
in all othercountriespleaserelerto your localdistributor.
ALESIS
3630HoldregeAvenue
Los Angeles,California90016
(213)836-7924
Yourwarrantywill be in ettectandyou
will receivspfoduclupdaleintormation
ONLYIF YOUSENDIN YOUBWARRANTY
CARD
ALESIS CORPORATION. LOS ANGELES:3630HoldredgeAvenue,Los Angetes,CA 90016-9801
LONDON:6, LetchworthBusinessCenter.Avenue One. Letchworth.Hertfordshire566 2 HR
P i r i r r o r R! s . ^
r*!
A0lo
{
t