1
Installation
Instructions
Outdoor/IndoorRefrigerator
ZDOD240
DesignGuide
With Installation Instructions
Monogram_
Safety Information
BEFORE YOU BEGIN:
WARNINGS:
Read
• Use
these
instructions
completely
IMPORTANT
for local
inspector's
and
Note
to Installer
cords
with
- Be sure
the
to leave
Consun_er.
- Kee I) these
instHlctions
tot fllttlre
reference.
Manual
l)to l)erlx,,grounded
.
See
page
with
(Yet appareil
dolt
Consulter
page
receixed
_tre
pour
ti'aved
trait
betore
be
cordon
its intended
puri)ose.
electrical
service
or damaged.
cleaning
inade
or nmking
by a qualified
rei)airs.
service
-
KEY EJECTING
Kee I) the
ke)s
from
refrigerator
out
are
mis fi la terre.
• I,es
immediatel_
contact
requires
your
basic mechanical
l'usage
imm_diatement
_lectrique
tout
efliloch_
ou
ou
ou le rg_ti'ig_ratem"
toute
r_parations
a vin
avant
intervention,
doivent
_tre
taites
par
tm
qualifi_.
For Monogram
1.800.444.1845
local service
For Monogram
1.888.880.3030
service
For Monogram
1.800.626.2002.
Parts
in your area,
in Cmmda,
call
call
and Accessories,
call
www. monogrmn.com
LOCK
r-^,.,,.,
UTION:
included.)
of reach
of children
in a sate
and
secure
and
the
awa)
dora,
place.
lock
pin
does
to prevent
not
geiore
assurezwous
que
haut de la porte,
OU l'a rllloire.
potential
or closed.
2
d'&'iter
the
beyond
damage
le dispositit
afin
closing
protrude
ATTENTION
The ke) for the spring-loaded
lock is automatically
eiected. The key will not remain in the lock while
is opened
remplacer
le bar
le nettoyage
Outdoor/Indoor
should
ou
pour
construit.
d'alimentation
technicien
- Installation
kms
r_parer
que
:
endommag0.
correctement
a damaged
cet appareil
il a _t_
• Dgd)rancher
skills. Proper installation
is the responsibility
of the
installer. Product
thilm'e due to improper
installation
is not covered
under the GE Appliance
_,Vm'anty.
Two
utiliser
lequel
• I1 taut
be
5.
Refrigerator,
you
dealer
or builder.
Level
• I1 ne flint
5.
AVERTISSEMENT
the door
become
the
fi)r
or replace
AVERTISSEMENT
these
must
the
that
• Rei)airs
should
teclmician,
- Obse,,e.U_(,,e,.i._
to Consumer
Owner's
(NOTE:
only
repair
• Ui_i)lug
WARNING - This
appliance
Skill
appliance
ordinances.
instHlctions
If you
this
• hmnediately
use.
codes
w)ur
carefully,
- S.,e_heseinstructions
IMPORTANT
Note
and
to the
: Axantde
de
door,
the
make
top
cover
or cabinetry.
re,ermerla
retenue
d'endommager
ne
sure
of the
d_passe
p,,rte,
pas le
le couvercle
Important
Information
CONTENTS
ImportantInformation
Caring for Your Stainless Steel ......................3
Tools, Hardware ...............................................
3
Design Guide
The Installation Space ....................................
4
Product Clearances and Location
Requirements ...................................................
4
Preparation for Built-In Under-Counter
Installations Only .............................................
4
Installation
Instructions
Grounding the Product ................................... 5
Step 1, Remove Packaging
............................ 6
Step 2, Leveling ................................................ 6
Step 3, Connect Power ................................... 6
Step 4, Slide Product into Cutout .................. 6
Step 5, Set Temperature
Controls ................. 6
Staining Wood Drawer Fronts ....................... 7
CARING FOR YOUR STAINLESS
STEEL
TOOLS REQUIRED
• geff_re installation
or first use, we strongly advise you
polish tile stainless steel exterior
and handle with a
commercially
awfilable stainless steel cleaner such as
• A(!justable wrench
Stainless Steel Magic TM. To preserve and protect
fine finish we also strongly advise that you apply
stainless steel cleaner monthly.
All stainless
substances.
substances
• Hea\T-duty
• #9 Phillips
PARTS SUPPLIED
tile
• Two keys
steel can be damaged
by tile following
Care must be taken not to allow these
to come
in contact
with wmr Outdoor/
Indoor
Refrigerator.
If anv of these do get
on w)ur unit wash and clean tile trait immediately
(see the Care and
Manual).
• Battery
section
in the Owner's
Acid
• Pool Chemicals
• I,awn Fertilizer
• Ice Melting
• Creosole
• Iodine
• Pickling
• Urine
Cleaning
(such
as Chlorine
and
work gloves
screwdriver
(fi_r built-in
Bromine)
Salts
Juice
The following
naturally occurring
materials can
cause danlage
to tile stainless steel finish. If any of
these substances
do get on your unit wash and clean
tile trait immediately
(see tile Care and Cleaning
section in tile Owner's
Manual).
• Bird Droppings
• Tree Sap
• Sea _,Vater
3
installations
only)
Design Guide
THE INSTALLATION
SPACE
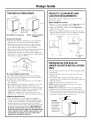
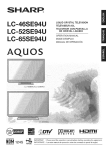
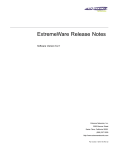
PRODUCT CLEARANCES AND
LOCATION REQUIREMENTS
23-3/4"
Tile Outdoor/Indoor
Refligerator
a l l 0 ° door swing.
When installed in a corner:
34-1/2"
• Allow 5-1/4" rain. clearance
on tile hinge side tor tile
90 ° door swing and to allow racks to slide out.
• Allow 15" n]ininmln
clearance
on tile hinge side tor
a fldl 110 ° door swing.
• Test tile door swing. Carefull) open and close tile (tooi:
Tile door should not rtlb or catch on ac!jacent cabinet U.
Ac!iust if the door makes contact with cabinet U.
NOTE:
Handleand
handlestandoff
depth is 2-3/4"
Free-Standing- Use canopytop
Choose
• This
unit;
• These
three
the
product
however,
Built-In - Removecanopytop
(if needed)
15" Minimum
to Wall
location:
has been
designed
it may
if desired,
products
may be closed
sides as long _ls tile fl'ont
air circulation
and
proper
access
as a free-standing
also
be built-in.
ill on the top
is unobstructed
to tile
and
,
fl>i"
door.
Door
Swing
110°
Swing
!;
[
i
I
\
ii
• Do not operate
these
products
where
the temllerature
will go below
45°F (7°C)
or above
190°F
(49°C).
• Unit
must be installed
on a stiucturallv
sound
and
level
surfilce
refligeratm;
set fin"
is factory
strong
enough
or approx.
250
to support
a fldly
- _
'\,,
110° ..
loaded
\\\\
,
4,-L;
23-5/8"
-
5-1/4" Minimum
to Wall
lbs.
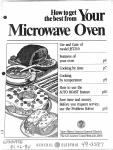
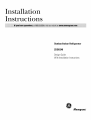
PREPARATION FOR BUILT-IN
UNDER-COUNTER
INSTALLATIONS
ONLY
24"
Tile top canopy
may be removed
when
installing
under
a COtlntertol).
The cutout depth should be 24"
Tile cutout dimensions
shown allow for a fidl door
• I/elnove
swing and access to the pull-out racks when installed
ill standard
24" deep cabinets.
• Tile Outdoor/Indoor
Refrigerator
can be installed
fl'ee-standing,
• If installing
between
frameless
cabinets,
a l/2" wide
filler strip or side panel may be required
on tile
hinge side, The filler strip will act as a spacer between
tile case and a(!jacent
cabinet door swing. Tile width
of the opening
must include
the filler panels.
NOTE: Ill a standard
24" opening,
the door will
protrude
l-I/2" fin'ward of tile surrounding
cabinets.
• Using heavy-du V work gloves, lift up on tile top
canopy back (B) and slide it torward
until it unlatches
fl'oln the unit ((:).
• iJfl tile top canopy up and ott' of tile tlnit.
NOTE: Kee I) the top canopy and screws tot future
free-standing
installations.
NOTE: When installing
the unit ill a flee-standing
configuration,
tile top canopy inust be leli ill place.
• If replacing
the top canopy inake sure the three latches
ill tile fl'ont slide into tile fl'ont lip of tile canopy betore
pushing file canopy to the rear of the unit.
tile three
screws
ti'oln tile back of tile top
canoI)y CA).
(B)
Additional
Specifications
• A 120 volt 60Hz., 15 or 20 amp power supply is
required.
All individual
properly
grounded
branch
circuit or circuit breaker
is recomn]ended.
Install a
properly
grounded
3-prong electrical
receptacle
recessed into the back wall as shown, Electrical
must
be located on rear wall as shown. THIS PRODUCT
MUST BE CONNECTED
TO A POWER SOURCE
WITH GROUND
FAULT CIRCUIT
INTERRUPTER
(GFCI) PROTECTION
WHEN INSTALLED
IN AN
OUTDOOR
LOCATION.
LOCAL CODES MAY
REQUIRE A SEPARATE
CIRCUIT.
CA)
CAUTION:
Underside edges
of the stainless
steel canopytop
maybe sharp.
Wear heavy-duty
work gloveswhen
movingthe top.
4
(C)
Installation
Instructions
GROUNDING THE OUTDOOR/
INDOOR REFRIGERATOR
GROUNDING THE OUTDOOR/
INDOOR REFRIGERATOR (CONT.)
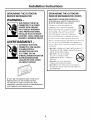
WARNING -
IMPORTANT:
READ CAREFULLY.
FOR PERSONAL
SAFETY, THIS APPLIANCE
MUST BE PROPERLY
GROUNDED.
THIS PRODUCT MUST BE
CONNECTED TO A POWER
SOURCE WITH GROUND
FAULT CIRCUIT INTERRUPT
(GFCI) PROTECTION WHEN
INSTALLED IN AN OUTDOOR
LOCATION. LOCAL CODES MAY
REQUIRE A SEPARATE CIRCUIT,
AVERTISSEMENT
PLEASE
The power cord of this appliance
is
equipped
with a 3-prong
(grounding)
plug which mates with a standard
3-prong
(grotmding)
wall receptacle
to minimize
the possibility
of electric shock hazard
from this appliance.
Have the wall outlet
and circuit checked
by a qualified
electrician
to make sm'e the outlet is properly
grotmded.
Where a standard
2-prong wall outlet is encotmtered,
it is yore" personal
responsibility
and obligation
to
have it replaced
with a properly
grounded
3-prong
wall outlet.
-
CE PRODUIT DOlT I_TRE
CONNECTE A UNE SOURCE
D'ALIMENTATION A
DISJONCTEUR DE FUITE
A LA TERRE, EN CAS
D'INSTALLATION EN PLEIN-AIR.
LES RI_GLEMENTATIONS
LOCALES PEUVENT EXIGER
UN CIRCUIT DISTINCT.
• DO NOT,
UNDER
ANY CIRCUMSTANCES,
CUT
OR P,EMOVE THE THIRD (GROUND)
PRONG
FROM THE POWER CORD.
• DO NOT USE AN ADAPTER
PI.UG TO CONNECT
THE
REFRIGERATOR
TO A 2-PRONG
OUTI,ET.
• DO NOT USE AN EXTENSION
CORD WITH THIS APPI,IANCE.
• DO NOT PI,ACE THE UNIT IN STANDING
_4;_TER OR AI,I,OW THE POWER CORD TO
BE IMMERSED.
IF YOU ARE UNCERTAIN
ABOUT
THE GFCI
PROTECTION
ON THE POWER SOURCE
TO WHICH YOU ARE CONNECTING
THIS
APPLIANCE,
PLEASE CONTACT A PROFESSIONAL
ELECTRICIAN
FOR VERIFICATION.
5
Installation
Instructions
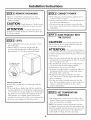
ISTEP 11 REMOVE PACKAGING
• ]_einove
corner
• Remove
all packing
plastic
blocks
and
s,,,.u
fl)r
and
children.
Remove
ATTENTION
ne sont
drawer
tape
and
(,bje(-ts
area
les enfimts.
pas
discard
:
choke
any parts
not
hazard
used.
petits.biets
pe.,e.t
11 fautjeter
toutes
les pi_ces
qui
utilis_es.
ISTEP 41 SLIDE PRODUCT
THE CUTOUT
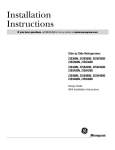
ISTEP 21 LEVEL
• Use an a(!justable
the leveling legs.
POWER
• If the refl'igerator
is used outdoing,
plug tile power
cord into a GFCI receptacle.
• Check to make sm'e power is on by opening
tile door
to see if interior
light turns on.
• The interior
tim rims at all times except when the
door is open. See the the Owner's Manual tor fl,rther
explanation.
stops.
protective
coverings.
CAUTION:
_trangler
flmm
material,
ISTEP 31 CONNECT
wrench
INTO
CAUTION: D,,t,,tti.ltsh.g.it,
sttiledoor
to tm'n
and raise or lower
with
yore"
door
• Measure floor to co/mtertop
height inside tile
opening.
Ac!j ust leveling legs until the l)ro(htct is
approximately
1/8" less than co/mtertop
height.
knees.
handle.
Do
not
Damage
push
may
or lift
ATTENTION : Ne
avec vos genoux.
le soulevezjamais
tile
trait
bv tile
occur!
i)oussezjamais
la porte
Ne poussezjamais
votre appareil
ou ne
par la poign_e
de porte. Vous pouvez
1' endotlltllager.
• Open
the door
and gently
push
the unit back into the
opening
with wmr hands against the sides. Be carefltl
not to entangle
power cord.
• In a standard
24" opening,
tile door will protrude
TurnRightto Lower
TurnLeft to Raise
l-I/2" fi)rward of tile surrounding
cabinets.
• Check again to be sure the trait is level.
• If tile trait is installed
trader a countertop,
leveling legs until the trait is resting
tile bottom of tile co/mtertop.
• If aligmnent
with a(!jacent
cabinetry
use a shim to secure
of tile co/mtertop.
• Test the door swing.
INSTALLATION
Measm'e
floor
of countertop
inside
tile
opening.
• If tile room floor is higher than tile floor inside tile
opening,
a(!just the rear leveling legs to approximately
1/8" less than the opening
height, Screw fl'ont leveling
legs all the way in to shorten
the height at the fl'ont,
This will allow you to slightly tip the refit into the
opening.
Once tile trait is in tile correct position,
fl'ont legs can be a(!justed to level tile product.
tile
against
is an issue,
the unit against
Carefidly
a@tst
the tmderside
open
and close the
door. Tile door should not mb or catch on a(!iacent
cabinett T, Noti{}' the installer if the door makes
contact with cabinetry,
TIP:
to underside
firmly
ISTEP 51 SET TEMPERATURE
CONTROLS
tile
• Tile
temperature
Owner's
hours
fl)r
NOTE:
The
You
when
first
installed,
light
preset.
to tile
Reter
inflmnation.
Allow
12-24
to stabilize.
may
not
the
immediately--this
the
are
Outdoor/Indoor
quietly.
and
controls
fi)r more
temperature
very
on
6
Manual
is working,
Refl'igerator
notice
rims
and
is normal.
the
unit
the
unit
operates
t mining,
motor
may
If the
displayis
is operating.
not
and
come
lit
Installation
Instructions
STAINING WOOD DRAWER FRONTS
The
drawer
use,
oil fl'om
• The
fronts
drawer
a(!iacent
are
unfinished
hands
may
accumulate
fl'onts
may
be
cabinetry.
stained
cherry
and
and
wood.
stain
sealed
During
the
wood.
to match
• Apply the stain and sealer according
to the
manufhcttn'er's
instructions.
To avoid unpleasant
odor;
keep the door open to ventilate
and allow the stain/
sealer to dry completely
before using the product.
NOTE:While performing installations described in this book,
safety glasses or goggles should be worn.
•
®
I_or Mo_wgmm
loc_d _rvic_J i_ )our are.,
) 5.
l. 800.444. l,_4
c_dl
NOTE:
Producl
improvem(
nt is a cominuing
( ndeavor
at General
Electlq(.
Th¢ v,:d'or¢, matt vials, app(arance
an([ specificalions
are sul)ject
Io change
withoul
llOliC(>.
Pub.No.31-51542-1 ]
PartNo. 197D5893P001
]
Monogram:
02-04JR
GE Consumor & Industrial
Louisvil]e, KY40225
Printedih Slovenia
@2004 GE Company