1
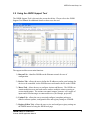
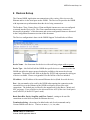
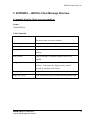
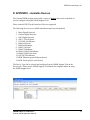
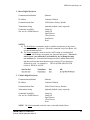
JNIOR Series 3 A Network I/O Resource Utilizing the JAVA Platform Cinema.JNIOR Application Manual Release 2.20 NOTE: For JNIOR 310 – OS 3.5.422.1046 or greater required For JNIOR 312 – OS 4.0.324.1407 or greater required INTEG Process Group, Inc. 2919 East Hardies Rd, First Floor Gibsonia, PA 15044 PH (724) 933-9350 FAX (724) 443-3553 www.integpg.com [email protected] © 2012 INTEG Process Group, Inc. All Rights Reserved Last updated on: June 15, 2012 INTEG Process Group, Inc. TABLE OF CONTENTS 1 2 3 Overview ..................................................................................................................... 3 JNIOR Hardware ........................................................................................................ 5 Installation Considerations and Tools......................................................................... 6 3.1 I/O Control via Ethernet – Macro Functionality Not Required ........................... 6 3.2 I/O Control via Serial – Macro Functionality Not Required................................ 6 3.3 Outputs and Device Control – Macro Functionality Required ............................ 7 3.4 Setting the JNIOR IP address ............................................................................... 7 3.5 Using the JNIOR Support Tool ............................................................................ 8 3.6 Using the JNIOR Web Page ................................................................................. 9 3.7 Cinema.JNIOR Configuration Overview ........................................................... 11 4 Devices Set-up .......................................................................................................... 12 5 Macros Set-up ........................................................................................................... 13 5.1 Macro Creation ................................................................................................... 13 5.2 Macro Triggers ................................................................................................... 18 6 Devices and Macro File Loading and Testing .......................................................... 19 6.1 Loading Files on the JNIOR............................................................................... 19 6.2 Macro Testing .................................................................................................... 20 7 Cinema.JNIOR Configuration Parameters................................................................ 22 7.1 Devices and Macro Files Configuration............................................................. 23 7.2 Client Configuration ........................................................................................... 24 7.3 Cinema Server Client Configuration .................................................................. 28 7.4 JNIOR Digital Input Triggers ............................................................................ 31 7.5 JNIOR Control Panel Switches .......................................................................... 32 7.6 Preshow Client Operations ................................................................................. 33 7.7 Feature Operations ............................................................................................. 36 7.8 ‘On Boot’ Macro to Execute .............................................................................. 38 7.9 ‘Scheduled Time’ to Execute a Macro ............................................................... 38 7.10 Logic Functions .............................................................................................. 39 8 Fire Alarm ................................................................................................................. 42 9 Logs........................................................................................................................... 44 10 SNMP........................................................................................................................ 47 A APPENDIX – AUX Serial Port Connection............................................................. 48 B APPENDIX – Serial Control Software Commands.................................................. 49 C APPENDIX – JNIOR to Client Message Structure .................................................. 51 D APPENDIX – Available Devices ............................................................................. 53 JNIOR A Network I/O Resource Cinema.JNIOR Application Manual 2 INTEG Process Group, Inc. 1 Overview Cinema.JNIOR is a software program that runs on the INTEG JNIOR to provide central control functionality for a theater implementing a digital cinema system. The application provides the JNIOR with the ability to communicate with a digital “Cinema Server”, an auxiliary “Client” (such as a preshow system), “Projectors” and other “Devices” via the Ethernet and/or serial ports. The program allows the JNIOR to control the JNIOR I/O based on commands received from an external system and/or via macros run on the JNIOR that when triggered can control the JNIOR outputs and send commands to the connected devices at various timing points. Flexibility is built into the system via a variety of configuration parameters and set-up files. (Please see the diagram below). The Cinema.JNIOR application can be easily added to a JNIOR and configured using the JNIOR Support Tool. Please refer to the JNIOR Support Tool Manual for additional instructions on how to install and configure the devices and macros and to manage your JNIORs. Important Functions and Concepts for Cinema.JNIOR Macros Macros are created and transferred to the JNIOR using the JNIOR Support Tool. Cinema.JNIOR will execute the macros to control the relay outputs and external devices via the serial ports and/or Ethernet port. Macros can be triggered by commands sent from the Client and Cinema Server Client via the Ethernet and/or serial port, by the digital input signals on the JNIOR and via the switches on the JNIOR Control Panel. Devices Cinema.JNIOR can communicate with a variety of external devices via the serial ports and/or Ethernet port. Cinema.JNIOR contains a variety of built-in protocols for communicating with digital projectors and sound processors. Cinema.JNIOR also contains a Raw Ethernet and Raw Serial device capability to send user-defined strings (ASCII or HEX) to unknown devices. A devices file is configured and transferred to the JNIOR using the JNIOR Support Tool. A single JNIOR can talk to multiple devices. Preshow Client A Client is typically a preshow system and the by default, Cinema.JNIOR is configured to work with the National Cinemedia (NCM) preshow system. However, Cinema.JNIOR can work with a variety of preshow systems. The Client has special commands that can be received and special responses that can be sent. The Client can be connected via a serial port or the Ethernet. Please contact INTEG to discuss how the JNIOR can work with various preshow systems. JNIOR A Network I/O Resource Cinema.JNIOR Application Manual 3 INTEG Process Group, Inc. Cinema Server Client A Cinema Server Client is typically a digital cinema server. The Cinema Server Client has the ability to trigger macros on the JNIOR by sending the ‘run’ command and can also control individual relay outputs using simple ASCII commands. The Cinema Server Client can be connected via a serial port or the Ethernet. Cinema.JNIOR works with all the digital cinema servers including those from Doremi, GDC, Dolby and Qube. JNIOR A Network I/O Resource Cinema.JNIOR Application Manual 4 INTEG Process Group, Inc. 2 JNIOR Hardware The JNIOR contains a mix of digital inputs and relay outputs. The JNIOR Model 310 has 8 inputs and 8 outputs and the JNIOR Model 312 has 4 inputs and 12 outputs. An optional expansion box providing an additional 4 Relay Outputs is available. Up to two expansion boxes can be added per JNIOR 310 and one per JNIOR 312 via the Sensor Port. All 8 digital inputs and 16 relay outputs can be used with the Cinema.JNIOR macro functionality. The JNIOR Ethernet connection uses a standard CAT5 cable with an RJ45 connector. The JNIOR contains two serial ports, one labeled RS-232 and the other labeled AUX Serial. The RS-232 port is located along the lower edge of the JNIOR and the AUX Serial port along the top edge. The RS-232 port also serves as the console port for configuration of JNIOR parameters, such as IP settings, via a program such as HyperTerminal. The JNIOR Model 310 with a catalog number ending in 003A has a 5 pole connector for the AUX Serial port and the JNIOR Model 310 with a catalog number ending in 003B has a DB9 connector for the AUX Serial port. The JNIOR Model 312 has a DB9 connector for the AUX Serial port. Please see Appendix A to this manual on how to connect a cable to the JNIOR serial ports. Details on connecting to the JNIOR I/O are available in the JNIOR Getting Started Manual, JNIOR Connection Drawing and/or 4 Relay Output Expansion Module Manual. These documents and others are available on the INTEG website at www.integpg.com JNIOR A Network I/O Resource Cinema.JNIOR Application Manual 5 INTEG Process Group, Inc. 3 Installation Considerations and Tools The user must load the Cinema.JNIOR application and configure it for their digital cinema installation. These items can be done using the JNIOR Support Tool and the JNIOR Web page. The JNIOR Support Tool is briefly described in this manual. Please refer to the JNIOR Support Tool Manual for detailed instructions on its use. At a high level, there are 2 connections made to Cinema.JNIOR: - Client (typically a Preshow system) Cinema Server Client (typically a digital cinema server) Each one of the above can connect two ways: - Preshow Client – serial Preshow Client – Ethernet - Cinema Server Client – serial Cinema Server Client – Ethernet 3.1 I/O Control via Ethernet – Macro Functionality Not Required If you are using the JNIOR with a cinema server that will communicate with the JNIOR via the Ethernet port and you will not be running any macros on the JNIOR or do not need the JNIOR to control any external devices, then Cinema.JNIOR does not need to be running and you do not need to do any further configuration. Please use the standard JNIOR interface method provided by the cinema server. 3.2 I/O Control via Serial – Macro Functionality Not Required If you are using the JNIOR with a cinema server that will communicate with the JNIOR via the AUX Serial port and you will not be running any macros on the JNIOR or do not need the JNIOR to control any external devices, then you can use the JNIOR Serial Control software (pre-installed on each JNIOR) or you can use the Cinema.JNIOR program. The Cinema.JNIOR program can receive and send the same commands as used with the Serial Control program. Please see Appendix B for a list of the serial (ASCII) commands and responses used with the Serial Control software that are also available for use with the Cinema.JNIOR application. Using the serial control commands feature is disabled by default and must be enabled by changing Registry settings described in the Configurations Parameters section of this manual. JNIOR A Network I/O Resource Cinema.JNIOR Application Manual 6 INTEG Process Group, Inc. 3.3 Outputs and Device Control – Macro Functionality Required If you are using the JNIOR in a cinema application and you want to run macros on the JNIOR to control relay outputs and external devices, then you must enable and configure the Cinema.JNIOR application. Macros can be triggered by commands from the Client, commands from the Cinema Server Client, via the digital input signals, via the switches on the front of the JNIOR Control Panel and via the JNIOR iPad App or JNIOR Android App. In addition to being configured as a Cinema Server Client, the Doremi, GDC, Dolby, and Qube digital cinema servers can control and monitor the JNIOR I/O via their standard (default) JNIOR interface method using the Ethernet or serial port. 3.4 Setting the JNIOR IP address The JNIOR default IP address from the factory is 10.0.0.201 The JNIOR Web page is a Java Applet that communicates over port 9200 The user must set the JNIOR IP configuration to work on their network. The IP configuration can be set via the JNIOR Support Tool (using the JNIOR Beacon tab and ‘right clicking’ on your JNIOR in the list to go to the Configuration pop-up) or via the RS-232 serial port located on the lower edge of the JNIOR using a program such as HyperTerminal. The advantage of using the JNIOR Support Tool/Beacon tab functionality is that the JNIOR can be immediately connected to a local Ethernet segment even if the default IP setting does not match your network addressing scheme. The JNIOR Beacon functionality can identify all the JNIORs (with JNIOR OS version 3.2 or greater), including multiple JNIORs with the same default IP address. Please refer to the JNIOR Support Tool Manual for details on using the Beacon tab to configure your IP address or the JNIOR Getting Started Manual for details on using the RS-232 port to configure your IP address. JNIOR A Network I/O Resource Cinema.JNIOR Application Manual 7 INTEG Process Group, Inc. 3.5 Using the JNIOR Support Tool The JNIOR Support Tool is shown in the screen shot below. Please refer to the JNIOR Support Tool Manual for additional details on how to use the tool. The support tool has seven main functions: 1) Beacon Tab – identifies JNIORs on the Ethernet network for ease of configuration. 2) Devices Tab – allows the user to define the IP addresses and/or serial settings for devices to be controlled via the JNIOR macros and transfer the file to the JNIOR. 3) Macro Tab – allows the user to configure Actions and Macros. The JNIOR can contain multiple macros and each macro can have multiple actions occurring at various timing points. The actions can control outputs, generate ‘soft’ toggles of inputs and/or send messages to connected devices (for example, projectors). 4) Update Tab – allows the user to run (and configure) an update package to transfer software updates, configuration files and registry settings to a JNIOR. 5) Registry Editor Tab – allows the user to view and configure registry settings on the JNIOR instead of using the JNIOR web page. JNIOR A Network I/O Resource Cinema.JNIOR Application Manual 8 INTEG Process Group, Inc. 6) Logs Tab – allows the user to aggregate, view, filter and print the various logs being created on the JNIOR. 7) Snapshot Tab – allows the user to download (back-up) any or all of the files on a JNIOR. 3.6 Using the JNIOR Web Page After a proper IP address has been set for the JNIOR, you will be able to interact with the JNIOR via the Ethernet network. You can use the main JNIOR web page and/or a Telnet connection. The main JNIOR web page is accessed by typing the IP address of the JNIOR in the address line of your web browser (Internet Explorer, Firefox, etc.). The JNIOR web page utilizes a Java applet, so a Java plug-in is required. If the Java plug-in is not already installed on your computer, you can get it at www.java.com. The JNIOR web page makes a JNIOR protocol connection from your browser back to the JNIOR via port 9200. This port must be open for the connection to work through firewalls, etc. NOTE: Please consult the JNIOR Web Based Interface Manual for a complete description of the all of the features and functionality available via the main JNIOR web page. Only the relevant items are described in this document. The user can see the status of the I/O for testing purposes during installation via the main JNIOR web page. To control the outputs, you can ‘left click’ on the Toggle button to turn the output ‘on’ or ‘off’ or you can ‘right click’ on the Toggle button and have the choices for Open, Close, Toggle or Pulse. If you select Pulse, then the pulse duration can be entered in milliseconds. The JNIOR I/O is divided into Internal and External. The main inputs and relay outputs comprise the Internal I/O and the 4 Relay Output Expansion Module is displayed on the External tab (1 or 2 modules). The external outputs have the same control features as the main relay outputs. The JNIOR will assign relay output addresses 9 – 12 and 13 – 16 to each expansion module. The output numbers are assigned on boot-up of the JNIOR. The JNIOR will continue to associate these output numbers with each module’s unique address as long as the module remains connected to the JNIOR. If a module is disconnected from the JNIOR and the JNIOR is rebooted, the JNIOR will remove its association with that module. However, if the module assigned outputs 9 – 12 is removed, but the one with outputs 13 – 16 is not, the JNIOR will continue to assign outputs 13 – 16 to the connected module. Outputs 9 – 12 will go unassigned until another module is connected. JNIOR A Network I/O Resource Cinema.JNIOR Application Manual 9 INTEG Process Group, Inc. Main JNIOR Model 310 Web Page – Internal I/O 4 Relay Output Expansion Module – External I/O JNIOR A Network I/O Resource Cinema.JNIOR Application Manual 10 INTEG Process Group, Inc. 3.7 Cinema.JNIOR Configuration Overview Cinema.JNIOR has a variety of items that must be set-up by the user. These items can be broken down into the following main categories: 1) Devices – this is a list of any device that will be utilized by the macros. This is an optional feature. The list must be set-up and transferred to the JNIOR using the JNIOR Support Tool. The user will ‘link’ to this file during the Macro configuration. 2) Macros – the user creates a list of macros to be run by the cinema application and can include sending commands to connected devices. The list must be set-up and transferred to the JNIOR using the JNIOR Support Tool. 3) Configuration Parameters (Registry Keys) – there are a variety of configuration parameters that can adjust the functionality of the Cinema.JNIOR application for a variety of situations. Many of the Configuration Parameters can be used at their default settings. However, the flexibility to change the parameters allows the user to utilize the application for a variety of situations. The configuration parameters are stored in the JNIOR Registry system. The Configuration Parameters can be set and/or edited using the JNIOR Support Tool, the Registry Editor Tab on the main JNIOR Web page, and/or the Registry Editor function in a Telnet (or HyperTerminal) session. Only the relevant Registry items are described in this document. Please consult the appropriate manual for additional details on the mechanics of using the above: JNIOR - JNIOR Support Tool Manual - Web Based Interface Manual (Registry Editor tab) - Registry Key Assignments document (Registry Editor via Telnet or HyperTerminal) A Network I/O Resource Cinema.JNIOR Application Manual 11 INTEG Process Group, Inc. 4 Devices Set-up The Cinema.JNIOR Application can communicate with a variety of devices over the Ethernet and/or via the serial ports on the JNIOR. The Devices file provides the JNIOR with important set-up information about the device being connected to. The Preshow Client, Cinema Server Client and digital cinema server are not configured or entered into the Devices file. The Client communications message structure is discussed in Appendix C of this document and various configuration items are discussed in the Configuration Parameters section of this document. The Devices configuration is done via the JNIOR Support Tool and looks as follows. Device Name – free form name for the device with each being unique with no spaces Device Type – this field will tell the JNIOR the specific device to connect to so that the JNIOR can utilize the proper protocol and make available to the macro the relevant commands. The names for this field are defined by INTEG and represent the valid types of devices available. Please see Appendix D for the full list of devices included. IP Address – the IP address of the external Ethernet device (blank for serial devices). Port – the port number to be used by the JNIOR when opening the connection to the external device over the Ethernet or the JNIOR serial port to be used for serial connections. The default port is offered by the support tool for the Barco, Christie and NEC projectors. For a serial device, the user must select AUX (if the Aux. Serial port is used) or RS232 (if the RS-232 port is used). Baud, Data Bits, Parity, Stop Bits, and Flow Control – settings to be used for connections to serial devices (blank for Ethernet devices). Termination String – the string to be added at the end of each command sent by Cinema.JNIOR to the device. Choices are none, \r, \n, \r\n, other. JNIOR A Network I/O Resource Cinema.JNIOR Application Manual 12 INTEG Process Group, Inc. 5 Macros Set-up The Cinema.JNIOR application has the ability to run macros stored on the JNIOR. The macros can control the JNIOR outputs and interact with connected devices. The following describes the functionality of the JNIOR macros and provides a brief description of how they are configured. The macros must be built using the JNIOR Support Tool. Please consult the JNIOR Support Tool manual for further details. 5.1 Macro Creation Macros for the JNIOR are configured via the JNIOR Support Tool. A file is created with a complete list of the all the macros and their associated actions and timing. Only 1 macro file can be utilized on the JNIOR at a time. If more than one macro file is transferred to the JNIOR, the JNIOR may select the first file found which may or may not be the one intended for operation. The macro editor contains three main areas (letters correspond to letters in screen shot): A) – Action View – used to display and manage actions that can be used in macros B) – Macro View – used to display and create macros consisting of actions and timing C) – Macro File Overview – display only – shows all the macros, actions and timing A B C JNIOR A Network I/O Resource Cinema.JNIOR Application Manual 13 INTEG Process Group, Inc. Action View Window The Action View window by default lists all the typical actions involving the digital inputs and the digital outputs. The Action View window contains the following information: Name – User configurable field to describe the action or output Device – A macro can utilize any of the JNIOR inputs or outputs, the JNIOR Control Panel or connect to an external device. NOTE: The external devices must be configured in the Devices Tab of the JNIOR Support Tool tab and then the Devices file must be ‘linked’ to the Macro file using the “link” feature in the dashboard at the top of the macro configuration area. The link function will add the devices from the Devices file to the pull down in the Action column. JNIOR A Network I/O Resource Cinema.JNIOR Application Manual 14 INTEG Process Group, Inc. Action – User selectable action to take when this Action is executed. There are a variety of types of actions based upon the device to be controlled: JNIOR I/O Outputs – Open, Close, Toggle and Pulse (pulse duration is 1 second by default) Inputs – “Soft Pulse” – the JNIOR creates the input ‘high’ (or ‘on’) message without any electrical signal wired to the input. The JNIOR will send out the message packet indicating the input has gone ‘high’ for external devices, such as a Cinema Server, monitoring the JNIOR to use the input signal as a trigger. JNIOR Control Panel LEDs – the 12 LEDs on the JNIOR Control Panel are controlled via the macros. The LEDs can be set to On, Off, Flash Slow, Flash Medium and Flash Fast Sounds – the speaker on the JNIOR Control Panel can play various sounds including Play Sound, Soft Alarm, Medium Alarm, Loud Alarm, Custom Alarm and Silence Alarm Clients Preshow Client – action can be added to send text to the Preshow Client Cinema Server Client – action can be added to send text to the Cinema Server Devices The currently available devices that can be utilized with Cinema.JNIOR are listed in Appendix E. The RAW Ethernet and RAW Serial devices give you the ultimate in flexibility to integrate devices regardless of whether they are built into Cinema.JNIOR or not. For the RAW Ethernet or RAW Serial devices, the only action available is a Send command. This will send the information entered in the Data column to the device. Data – Defines the pulse duration or other data to be sent to the devices listed above. JNIOR A Network I/O Resource Cinema.JNIOR Application Manual 15 INTEG Process Group, Inc. Macro View Window The Macro View window displays the macros being created and is used to adjust the timing of each action. Macro Name – User configurable name for the macro that will be used to refer to the macro by triggers, the Client and Cinema Server. NOTE: The macros are also assigned a number starting at 1 based upon their order in the macro file. The number can also be used to identify the macro to run. Timing – The number of seconds (or minutes) from the time the macro is triggered that the specific action will be executed. Two actions involving relay outputs can be executed at the same time. Action Description – Displays the action, device and any data associated with the action. JNIOR A Network I/O Resource Cinema.JNIOR Application Manual 16 INTEG Process Group, Inc. Macro File Overview Window The Macro File Overview window displays the complete list of all the actions defined in the Action View window, all the macros configured, and the timing for each action in each macro. The Macro File Overview window provides the user with an easy way to view their macro file configuration. Scroll bars are provided for viewing all the information. Fields are provided to enter a Revision identifier, Date and Comment, if desired. Action List Macro List Action Timing JNIOR A Network I/O Resource Cinema.JNIOR Application Manual 17 INTEG Process Group, Inc. 5.2 Macro Triggers The JNIOR macros can be trigged a variety of ways. 1) A predefined message (Appendix C) can be sent by the Client (i.e. preshow system) that will trigger a user configurable macro name (see the Configuration Parameters section for the default settings and how to adjust). The predefined macro name must correspond to a macro name in the macro file. 2) A specific macro name (as opposed to a predefined message) or macro number can be sent by the Client and/or Cinema Server Client using the ‘run’ command. The macro number is simply a sequential number assigned to the macro based on its order (from top to bottom) as shown in the Macro View window. NOTE: The “run macroname” command is typically sent using a RAW Ethernet or RAW serial connection on the preshow system or cinema server. When using this method, please make sure you have correctly configured the termination strings on the JNIOR and sending device to match. On occasion, the termination string may have to be added after the “run macroname” command if it is not automatically added by the sending device. 3) A device can send the complete HEX string representing the JNIOR protocol command for the ‘run macroname’ command. The HEX string is typically sent as a RAW Ethernet connection to port 9200 on the JNIOR. This allows the user to utilize this method without having to implement the actual JNIOR protocol on the sending device. The HEX string can be created using the macro execution tool described in section 6.2 of this manual. 4) The JNIOR digital inputs can be configured to trigger a specific macro when the input goes ‘high’ (transitions from ‘off’ to ‘on’). See section 7.4 of this manual. 5) The switches on the JNIOR Control Panel can be defined to trigger a specific macro. See the JNIOR Control Panel configuration instructions. 6) The INTEG JNIOR App for the iPad/iPhone or Android can send the “run macroname” command. 7) For testing purposes, a “run macroname” (or macro number) can be sent as a via a HyperTerminal connection (either via the serial port or Ethernet port). The macro will then be executed. The proper Client or Cinema Server Client ‘method’ (serial or Ethernet) must be configured via the Registry Client key described in section 6.1 of this manual. JNIOR A Network I/O Resource Cinema.JNIOR Application Manual 18 INTEG Process Group, Inc. 6 Devices and Macro File Loading and Testing After you have created your Devices file and Macro file, you will need to upload them to your JNIOR and test them. 6.1 Loading Files on the JNIOR The files must be loaded on the JNIOR using the JNIOR Support Tool so that only one copy of each file is on the JNIOR and the files are placed in the proper location. The JNIOR Support Tool will check for existing files and delete them before the new file is transferred. NEW for Cinema.JNIOR Version 2.11 When you Publish a Devices file or Macro file from the Devices Tab or Macro Tab, the JNIOR will check for an existing file and if it is the same name, it will overwrite it. If the name is different, it will prompt you to confirm that you want the new file. After the file has been successfully loaded on the JNIOR, Cinema.JNIOR will recognize the new file and automatically ingest the file if the new file has the same name as the existing file. You do NOT need to reboot the JNIOR nor restart the program. Cinema.JNIOR is now ‘hot configurable’ for the Devices file and Macro file and the Digital Input Triggers and JNIOR Control Panel Switches. If the new devices file or macro file has a new name, then the JNIOR Support Tool will prompt you asking if you want the application restarted to use the new file. Below is a screen picture showing the prompt when the JNIOR Support Tool has discovered a Macro file exists with a different name. The dialogue is similar for a Devices file. JNIOR A Network I/O Resource Cinema.JNIOR Application Manual 19 INTEG Process Group, Inc. Below is the dialogue while Cinema.JNIOR is ingesting the Macro file. The prompt will be provided when the Macro file has been completely loaded and is available for use. The dialogue is similar for a Devices file. 6.2 Macro Testing The Macros on your JNIOR can be tested using any normal triggers you plan to use, but they can also be tested using the Macro Execution function built into the JNIOR Support Tool. Right-click on your JNIOR in the list on the Beacon Tab and select Macro Execution. JNIOR A Network I/O Resource Cinema.JNIOR Application Manual 20 INTEG Process Group, Inc. The Macro Name Sender box will display. Type the macro name (or number) that you want to execute. Your JNIOR’s IP address should already be filled-in. NOTE: The HEX String displayed is the complete string that can be used with a RAW Ethernet connection over port 9200 on the JNIOR. This connection uses the JNIOR Protocol. Click on the Connect button and after the Macro Name Sender has made a connection to your JNIOR, the Send button will be bolded. Click on the Send button to cause your macro to be started. JNIOR A Network I/O Resource Cinema.JNIOR Application Manual 21 INTEG Process Group, Inc. 7 Cinema.JNIOR Configuration Parameters The Cinema.JNIOR Application has a variety of configuration parameters that make the software very flexible. The following screen picture shows the area within the JNIOR Registry where the Cinema.JNIOR keys are located. They are all under AppData and in the Cinema folder. This section lists each registry entry, the complete key name, the default value and the acceptable values. If applicable, entering a ‘-1’ indicates that the function is not used. Or depending upon the Registry Key, disabled or false may be entered. Do NOT leave a Registry Key blank. It will be deleted and when the Cinema.JNIOR program is restarted, a default value will be added. JNIOR A Network I/O Resource Cinema.JNIOR Application Manual 22 INTEG Process Group, Inc. 7.1 Devices and Macro Files Configuration The following configuration items affect the operation of the Devices and Macro functions. The Registry Keys are located in the Cinema – MACROS folder. Case Sensitivity (Key No Longer Available – Value is always TRUE) Whenever Cinema.JNIOR sends a string defined in a macro file, the default is for the JNIOR to send this string as all lower case text, regardless of how the user has entered the string. If the user wants the string to be sent exactly as it is typed with lower case and upper characters, the Case Sensitive Registry Key must be set to true. Registry Key Default Valid Values AppData/Cinema/MACROS/CaseSensitive false false, true Prevent Multiple Instances (Execute Macro Only Once at a Time) Whenever a macro is triggered, that same macro can be started again. However, it is recommended that this does not happen since it can cause unwanted operation. With Cinema.JNIOR release 2.11, a Registry Key has been added that is set to true by default that will prevent the SAME macro from starting if it is already executing. A different macro can be started, but not the SAME macro. Registry Key Default Valid Values AppData/Cinema/MACROS/PreventMultipleInstances true false, true JNIOR A Network I/O Resource Cinema.JNIOR Application Manual 23 INTEG Process Group, Inc. 7.2 Client Configuration Cinema.JNIOR can accept one connection from a Client and this connection can be over the serial port or the Ethernet port. The default is a serial connection via the AUX Serial Port. The Method key is used to enable or disable serial communications, while the serial port to be use is defined in the Serial Port Configuration keys (described next). The Ethernet connection is enabled by entering a valid port number in the TcpPort key. The Termination Strings are the characters attached at the end of each message sent by the Client to the JNIOR or the JNIOR to the Client. If the user wants the Client to use the Serial Commands (see Appendix B), the Serial Commands Enabled key must be set to true. If the user wants to receive the serial message notifying the user of input status change, the Unsolicited IO Alerts key must be set to true and if the user wants the digital input counter values attached, the Send Counts key must be set to true. When the Unsolicited IO Alerts is enabled, it is recommended to disable (set to false) the Send Ack and Send Date Stamp keys. The Send Ack message is a + or – sign included with the message indicating it was a success (+) or denied (-). The Send Date Stamp message is the date and time the command was executed. The Push Button registry keys affect the operation of a push button wired to a JNIOR input (the default input is number 7, but it can be changed by modifying the appropriate I/O Registry Key (PreshowStartPushButtonInput). Registry Key Default Valid Values FailSafeInputTrigger -1 any input number FailSafeTimerDuration -1 time in seconds IncomingTerminationString \r\n \r \n Method SERIAL Serial, disabled OutgoingTerminationString \r\n \r \n PushButtonDebounceDuration 45 time in seconds PushButtonFailSafeDuration 10 time in seconds PushButtonMacroExecute true false, true Query false false, true AppData/Cinema/Client/…. JNIOR A Network I/O Resource Cinema.JNIOR Application Manual 24 INTEG Process Group, Inc. SendAck true false, true SendCounts false false, true SendDateStamp true false, true SerialCommandsEnabled false false, true TcpPort -1 Any valid port number UnsolicitedIoAlerts false false, true Vendor 0 0 = NCM 1 = Other (no responses sent to Client) JNIOR A Network I/O Resource Cinema.JNIOR Application Manual 25 INTEG Process Group, Inc. CLIENT – Serial Port Configuration The Client connection to one of the JNIOR serial ports has the following settings: Registry Key Default Valid Values Baud 19200 300, 600, 1200, 2400, 4800, 9600, 38400, 57600, 115200 DataBits 8 7, 8 FlowControl 0 0 = None 1 = CTS/RTS(hardware) 2 = XON/XOFF (software) PacketSize 1024 1 to 1024 bytes Parity 0 Even (2), Odd (1), None (0) SerialPort AUX AUX, RS232 StopBits 1 1, 2 AppData/Cinema/Serial/…. JNIOR A Network I/O Resource Cinema.JNIOR Application Manual 26 INTEG Process Group, Inc. CLIENT – Timers Configuration When the Client connection is enabled via a serial or Ethernet (TCP/IP) connection, the following messages will be sent to the Client indicating the status of the preshow, movie and fire alarm. NOTE: If the # of times is set to 0, then the message will be sent continuously at the interval configured until that status has changed. NOTE: These messages can be disabled by changing the Registry Key for each to -1. Registry Key Default Valid Values FireAlarmClearStatusFrequency 3, 60 # of times, interval FireAlarmStatusFrequency 0, 300 # of times, interval MovieOffStatusFrequency 3, 60 # of times, interval MovieOnStatusFrequency 0, 300 # of times, interval PreshowActiveStatusFrequency 0, 120 # of times, interval PreshowActiveStatusFrequency 0, 900 # of times, interval AppData/Cinema/Timers/…. JNIOR A Network I/O Resource Cinema.JNIOR Application Manual 27 INTEG Process Group, Inc. 7.3 Cinema Server Client Configuration Cinema.JNIOR can accept one or more connections from a Cinema Server Client and this connection can be over the serial port and/or the Ethernet port. The default is to have both the serial and Ethernet connections disabled. The Serial connection is enabled via the Method key, while the serial port to be use is defined in the Serial Port Configuration keys (described next). The Ethernet connection is enabled by entering a valid port number in the TcpPort key. The Termination Strings are the characters attached at the end of each message sent by the Cinema Server Client to the JNIOR or JNIOR to Cinema Server Client. If the user wants the Cinema Server Client to use the Serial Commands (see Appendix B), the Serial Commands Enabled key must be set to true. If the user wants to receive the serial message notifying the user of input status change, the Unsolicited IO Alerts key must be set to true and if the user wants the digital input counter values attached, the Send Counts key must be set to true. When the Unsolicited IO Alerts is enabled, it is recommended to disable (set to false) the Send Ack and Send Date Stamp keys. The Send Ack message is a + or – sign included with the message indicating it was a success (+) or denied (-). The Send Date Stamp message is the date and time the command was executed. Registry Key Default Valid Values AppData/Cinema/CinemaServerClient/…. IncomingTerminationString \r\n \r \n Method disabled Serial, disabled OutgoingTerminationString \r\n \r \n PauseDelay -1 time in seconds SendAck true false, true SendCounts false false, true SendDateStamp true false, true SerialCommandsEnabled false false, true TcpPort -1 Any valid port number UnsolicitedIoAlerts false false, true JNIOR A Network I/O Resource Cinema.JNIOR Application Manual 28 INTEG Process Group, Inc. CINEMA SERVER CLIENT – Serial Port Configuration The Client connection to one of the JNIOR serial ports has the following settings: Registry Key Default Valid Values AppData/Cinema/CinemaServerClient/Serial/…. Baud 19200 300, 600, 1200, 2400, 4800, 9600, 38400, 57600, 115200 DataBits 8 7, 8 FlowControl 0 0 = None 1 = CTS/RTS(hardware) 2 = XON/XOFF (software) PacketSize 1024 1 to 1024 bytes Parity 0 Even (2), Odd (1), None (0) SerialPort RS232 AUX, RS232 StopBits 1 1, 2 JNIOR A Network I/O Resource Cinema.JNIOR Application Manual 29 INTEG Process Group, Inc. JNIOR A Network I/O Resource Cinema.JNIOR Application Manual 30 INTEG Process Group, Inc. 7.4 JNIOR Digital Input Triggers The JNIOR digital inputs can be configured to trigger a macro to execute whenever a digital input transitions from low to high. Registry Key Default Valid Values Input1Macro none Any macro name or number Input2Macro none Any macro name or number Input3Macro none Any macro name or number Input4Macro none Any macro name or number Input5Macro none Any macro name or number Input6Macro none Any macro name or number Input7Macro none Any macro name or number Input8Macro none Any macro name or number AppData/Cinema/Triggers/…. JNIOR A Network I/O Resource Cinema.JNIOR Application Manual 31 INTEG Process Group, Inc. 7.5 JNIOR Control Panel Switches The JNIOR Control Panel Switches can be configured to trigger a macro to execute whenever the switch is pressed. Registry Key Default Valid Values Trigger 1 none Any macro name or number Trigger 2 none Any macro name or number Trigger 3 none Any macro name or number Trigger 4 none Any macro name or number Trigger 5 none Any macro name or number Trigger 6 none Any macro name or number Trigger 7 none Any macro name or number Trigger 8 none Any macro name or number Trigger 9 none Any macro name or number Trigger 10 none Any macro name or number Trigger 11 none Any macro name or number Trigger 12 none Any macro name or number AppData/Cinema/Panel/…. JNIOR A Network I/O Resource Cinema.JNIOR Application Manual 32 INTEG Process Group, Inc. 7.6 Preshow Client Operations The JNIOR can implement preshow operations based on the commands (see Appendix C) received from the Preshow Client. Preshow Lamp Output This is the output that the Client will use to control the Lamp on the preshow projector, if a separate projector is used. The default configuration is to have a common Preshow and Feature projector and so this key is default to -1 (not used). Registry Key Default Valid Values AppData/Cinema/IO/PreshowLampOutput -1 -1 or Any Output Number 1 - 16 Lamp Relay Open Macro This is the name of the macro that will be executed automatically by the JNIOR when the lamp_relay_open message is received from the Client. Registry Key Default AppData/Cinema/MACROS/LampRelayOpenMacro Lamp Off Valid Values Any Macro Name Preshow Start Command This is the string that will be sent by the Client to the JNIOR to trigger the Preshow Start Macro. Registry Key Default Valid Values AppData/Cinema/MACROS/PreshowStartCommand start_preshow Any String Preshow Start Macro This is the name of the macro that will be executed when the Preshow Start Command is received by the JNIOR from the Client. Registry Key Default Valid Values AppData/Cinema/MACROS/PreshowStartMacro Preshow Start Any Macro Name JNIOR A Network I/O Resource Cinema.JNIOR Application Manual 33 INTEG Process Group, Inc. Five Minute Preshow Timer Enabled This is a failsafe timer. When the Client issues a mid_preshow message, the five minute timer will be started (if enabled). If the end_preshow message is not received from the Client before the expiration of the timer, then the Feature Start Input is soft pulsed and an exception message is sent to the Client. Registry Key Default AppData/Cinema/FiveMinutePreshowTimerEnabled false Valid Values false, true Preshow End Command This is the string that will be sent by the Client to the JNIOR to trigger the Preshow End Macro. Registry Key Default Valid Values AppData/Cinema/MACROS/PreshowStartCommand end_preshow Any String Preshow End Macro This is the name of the macro that will be executed when the Preshow End Command is received from the Client. Registry Key Default Valid Values AppData/Cinema/MACROS/PreshowEndMacro Preshow End Any Macro Name Feature Start Input This input is reserved for a software generated pulse (soft pulse) of an input signal to tell the digital cinema server that the feature is ready to begin playing. This soft pulse is the result of an end_preshow message being received from the Client or the expiration of the 5 minute preshow timer (if enabled). Registry Key Default Valid Values AppData/Cinema/IO/FeatureStartInput 8 -1 or Any Input Number 1- 8 JNIOR A Network I/O Resource Cinema.JNIOR Application Manual 34 INTEG Process Group, Inc. Movie Status Output This is the output that the Client can use to determine the status of the movie. The default is to have this feature disabled. Registry Key Default Valid Values AppData/Cinema/IO/MovieStatusOutput -1 -1 or Any Output Number 1 - 16 PreShow Lock Output This output is high when the movie is playing to lock-out the Client commands. The output is typically turned on by the digital Cinema Server. If this output is high then the JNIOR will not accept (ignore) any commands received from the Client. Registry Key Default Valid Values AppData/Cinema/IO/PreshowLockOutput 5 -1 or Any Output Number 1 - 16 Preshow Start Push Button Input The system can utilize a start/stop button to allow the theater staff to do a preshow test. The JNIOR will detect when this signal has gone from low to high and will send a message (push_button) to the Client that the button has been pushed. The Client will then determine what to do based on the current status of the system and will send a start_preshow or end_preshow macro command to the JNIOR. Registry Key Default Valid Values 7 -1 or Any Input Number 1 - 8 AppData/Cinema/IO/PreshowStartPushButtonInput JNIOR A Network I/O Resource Cinema.JNIOR Application Manual 35 INTEG Process Group, Inc. 7.7 Feature Operations After the preshow is complete as determined by the JNIOR receiving the end of preshow command from the Client, the JNIOR will soft toggle the “Feature Start Input” (if configured) so that the digital Cinema Server receives the signal to start the movie. The digital cinema server will execute its own internally stored macro that will include turning on the Preshow Lock (the Cinema Server sends a JNIOR protocol command to turn on the appropriate output). While the Preshow Lock output is high, the JNIOR will reject (ignore) all commands (Appendix C) from the Client. When the feature is over, the digital cinema server will send a command to turn the Preshow Lock output off (low). The JNIOR will send a message to the Client that the movie is completed. Movie End Macro This is the name of the macro that will be executed automatically by the JNIOR when the Preshow Lock Output returns to the off (low) state. The Preshow Lock Output is typically controlled by the Cinema Server. Registry Key Default Valid Values AppData/Cinema/MACROS/MovieEndMacro Movie End Any Macro Name JNIOR A Network I/O Resource Cinema.JNIOR Application Manual 36 INTEG Process Group, Inc. The above Registry keys are shown in the following screen pictures. IO Related Registry Keys – In addition to the above described keys, the Flat Masking Input and Output and the Scope Masking Input and Output keys, and the Preshow Lock Invert key are custom keys for a particular user of Cinema.JNIOR. Macro Related Registry Keys - In addition to the above described keys, several other keys have been added to increase the flexibility of the message structure. JNIOR A Network I/O Resource Cinema.JNIOR Application Manual 37 INTEG Process Group, Inc. 7.8 ‘On Boot’ Macro to Execute This is the name of the macro that will be executed automatically by the JNIOR when the JNIOR first boots up and the Cinema.JNIOR program starts. Registry Key Default Valid Values AppData/Cinema/MACROS/OnBoot None Any Macro Name 7.9 ‘Scheduled Time’ to Execute a Macro Cinema.JNIOR can execute a macro at a specific time of day each day of the week. Three Schedule Registry Keys are created by default. Additional schedule keys can be added by continuing the pattern (ScheduleRule4, etc.) and adding these keys to the AppData – Cinema – Schedule folder. The format for the Registry Key is daily, XX:YY, macroname Daily is currently the only choice as to which day to execute the macro. Therefore, the macro will be executed each day of the week (7 days). XX:YY is the time of day to execute the macro in military time. For example, 9:30 is 9:30 AM and 21:30 is 9:30 PM Macroname is any valid macro name in your macro file. In the example below for ScheduleRule1, the macro called ‘test’ will execute each day at 2:20PM (14:20). JNIOR A Network I/O Resource Cinema.JNIOR Application Manual 38 INTEG Process Group, Inc. 7.10 Logic Functions Cinema.JNIOR can utilize simple logic expressions to determine when to execute a specific macro. Three Logic Registry Keys are created by default. Additional logic keys can be added by continuing the pattern (LogicRule4, etc.) and adding these keys to the AppData – Cinema – Logic folder. Below is a picture of the default Registry Keys. Multiple operands and operators can be used in a logical statement producing a complex logical decision. Parenthesis can be used to order the logic. The logical operators that have been implemented include not, and, or, xor The logic is checked against digital inputs (din#) and relay outputs (rout#) where the # sign is replaced with the actual input or output number. Examples of some logical expressions using the JNIOR I/O din1 din1 and din3 not din1 and din3 din5 or din 7 (din5 or din7) and din8 (din1 and din3) or din4 JNIOR Evaluates TRUE When input 1 is ON When both input 1 and input 3 are ON When input 1 is OFF and input 3 is ON When either input 5 or input 7 is ON When input 8 is ON and either input 5 or input 7 are ON When input 4 is ON or input 1 and input 3 are both ON A Network I/O Resource Cinema.JNIOR Application Manual Evaluates FALSE When input 1 is OFF When either input 1 or input 3 are OFF When input 1 is ON or input 3 is OFF When both input 5 and input 7 are OFF When input 8 is OFF or both input 5 and input 7 are OFF When input 4 is OFF and either input 1 or input 3 are OFF 39 INTEG Process Group, Inc. There are 4 logic categories. 1. OnIOChange This logic expression will be checked whenever the JNIOR I/O changes. The I/O that can be monitored are the internal inputs and outputs on the JNIOR as well as any outputs on a 4 relay output expansion module. Example Registry Key Value OnIOChange, din1 and din2, run test For the above example, each time either input 1 or 2 changes, the logic rule (din1 AND din2) will be evaluated and the macro (test) will execute if both inputs are ON. 2. OnPreshowClient() This logic expression will be checked whenever the Preshow Client in Cinema.JNIOR receives a message. To specify the string/message that will cause the logic to be evaluated put it inside the parenthesis. Example Registry Key Value OnPreshowClient(start), din3 and din4, run preshow start For the above example, each time the device connected to the JNIOR as the Preshow Client sends the string “start” to Cinema.JNIOR, the logic rule (din3 AND din4) will be evaluated and the macro (preshow start) will execute if both inputs are ON. 3. OnCinemaServer() This logic expression will be checked whenever the Cinema Server Client in Cinema.JNIOR receives a message. To specify the string/message that will cause the logic to be evaluated put it inside the parenthesis. Example Registry Key Value OnCinemaServer(movie), din5 or din6, run movie start For the above example, each time the device connected to the JNIOR as the Cinema Server Client sends the string “movie”, the logic (din5 OR din6) will be evaluated and the macro (movie start) will be run if either digital input is ON. JNIOR A Network I/O Resource Cinema.JNIOR Application Manual 40 INTEG Process Group, Inc. 4. OnMacro() This logic expression will be evaluated whenever the named macro has been requested to run. This logic expression can be used as a ‘lock’ to make sure certain macros can only execute when a certain I/O state exists or cannot be executed when a certain I/O state exists. To specify the macro that is bound by this logic place its name inside the parenthesis. Example Registry Key Value OnMacro(flat start), din7 For the above example, if the macro “flat start” is triggered to run via any method, the logic (din7) will be checked. If (din7) is ON, the macro will be allowed to run. If (din7) is OFF, the macro will not be allowed to run. NOTE: Each part in the above Registry Keys will need to contain appropriate spaces and each of the areas of a Registry Key are to be separated by a comma. Below is a picture of how the Logic Registry Key would look for logic category 1 above. JNIOR A Network I/O Resource Cinema.JNIOR Application Manual 41 INTEG Process Group, Inc. 8 Fire Alarm The Cinema.JNIOR Application can handle a variety of fire alarm issues. The following Fire Alarm features can be configured. NOTE: The following Registry keys appear in various screen shots previously included in this document. Fire Alarm Input This is the input that is assigned to the fire alarm signal. The default JNIOR settings will work with an input that is normally low (off) and goes high (on) when the fire alarm is tripped. The JNIOR can also be configured to work with a fire alarm that has a normally high (on) signal that goes low (off) when the fire alarm is tripped. For the latter, the fire alarm input must be set for ‘inversion’. This can be done via the main JNIOR web page or a Telnet session. The registry key and value to set so that the input is configured for inversion is ‘IO/Inputs/dinX/Inversion = true’ where you replace X with the appropriate input number. Registry Key Default Valid Values AppData/Cinema/IO/FireAlarmInput 1 -1 or Any Input Number 1- 8 Fire Alarm Release Input This is the input that is assigned to the fire alarm release signal. Since the fire alarm signal may not stay high (on) or low (off) for the entire duration of the fire alarm event there needs to be a signal indicating ‘all clear’. Registry Key Default Valid Values AppData/Cinema/IO/FireAlarmReleaseInput 2 -1 or Any Input Number 1- 8 Fire Alarm Active Text This is the text that will be sent in the SNMP message on a fire alarm event. Registry Key Default AppData/Cinema/FireAlarmActiveText Fire Alarm Active Any Text JNIOR A Network I/O Resource Cinema.JNIOR Application Manual Valid Values 42 INTEG Process Group, Inc. Fire Alarm Macro This is the name of the macro that will be executed automatically by Cinema.JNIOR when there is a fire event. Registry Key Default Valid Values AppData/Cinema/MACROS/FireAlarmMacro Fire Alarm Any Macro Name Fire Alarm Preshow Clear Macro This is the name of the macro that will be executed automatically by Cinema.JNIOR when the Fire Alarm Release Input goes high and the PreShow Lock output is low (off). Registry Key Default Valid Values AppData/Cinema/MACROS/FireAlarmPreshowClearMacro Fire Alarm Preshow Clear Any Macro Name Fire Alarm Movie Clear Macro This is the name of the macro that will be executed automatically by Cinema.JNIOR when the Fire Alarm Release Input goes high and the PreShow Lock output is high (on). Registry Key Default Valid Values AppData/Cinema/MACROS/FireAlarmMovieClearMacro Fire Alarm Movie Clear Any Macro Name Fire Alarm Clear Text This is the text that will be sent in the SNMP message when the fire event is done. Registry Key Default AppData/Cinema/FireAlarmClearText Fire Alarm Clear Any Text JNIOR A Network I/O Resource Cinema.JNIOR Application Manual Valid Values 43 INTEG Process Group, Inc. 9 Logs The Cinema.JNIOR Application provides several logs for recording key instructions and system changes that have occurred. These files can be viewed, filtered, saved and printed using the JNIOR Support Tool. The following logs are provided: Cinema Log (cinema.log) – records general activities about the cinema application including events surrounding the initial program loading, specific connections, exceptions, etc. I/O Log (jniorio.log) – records the change in state of the internal and external I/O. Each status change contains a time stamp (date and time). Client Log (client.log) – records the messages going between the Client and JNIOR. Each message includes a time stamp (date and time). JNIOR A Network I/O Resource Cinema.JNIOR Application Manual 44 INTEG Process Group, Inc. Cinema Server Log (cinemaserver.log) – records the messages going between the Cinema Server Client and JNIOR. Each message includes a time stamp (date and time). Devices Log (devices.log) – records the messages being sent by the JNIOR to the digital cinema projector and/or serial devices. Each message includes a time stamp (date and time). The JNIOR has also two standard logs for generic JNIOR operations: JNIOR Boot Log (jniorboot.log) – records the status of the last JNIOR reboot JNIOR System Log (jniorsys.log) – records the general activities occurring on the JNIOR, including Registry key changes, logins, etc. The JNIOR does not have a large hard disk or unlimited memory. Making effective use of log files is essential. The maximum file size varies by log type and is predefined and not adjustable. If the file size reaches the maximum file size, a back-up copy of the file will be created (called *.bak) and a new log file will be created. This will allow the user additional time to remove the log files (.bak) before the information is overwritten. The amount time before the log creates a .bak file varies by log type and system activity. JNIOR A Network I/O Resource Cinema.JNIOR Application Manual 45 INTEG Process Group, Inc. Aggregated Logs With the JNIOR Support Tool, the user can select to retrieve all or some of the above logs and aggregate them. JNIOR A Network I/O Resource Cinema.JNIOR Application Manual 46 INTEG Process Group, Inc. 10 SNMP The JNIOR operating system 4.2 and greater contains SNMP functionality. The complete description of the SNMP functionality is defined in the JNIOR SNMP Manual. The following SNMP feature can be configured for use with the Cinema.JNIOR Application. Reboot Clear Timeout Minutes An SNMP message is sent every time the Cinema.JNIOR Application is started. Under normal operations, the program will start every time the JNIOR is rebooted. This configuration setting defines how long the application must be running before the Reboot Clear Trap SNMP message is sent. The value of key is the number of whole minutes. Registry Key Default AppData/Cinema/SNMP/RebootClearTimeoutMinutes 30 JNIOR A Network I/O Resource Cinema.JNIOR Application Manual Valid Values Any Whole Number 47 INTEG Process Group, Inc. A APPENDIX – AUX Serial Port Connection The auxiliary serial port can communicate via RS232, RS422 or RS485. The mode is configured via jumpers internal to the JNIOR. The default communication setting is RS232 and so no action should be required. However, if you are having problems, the following information is provided. To set the communication mode, you must remove the four screws on the JNIOR and remove the lid. The jumpers are located in the upper right corner. Pin number 1 is closest to the outside of the box. The internal jumper settings are as follows: Mode RS-485 2-Wire Half Duplex – Terminated RS-485 2-Wire Half Duplex – Not Terminated RS-422/RS-485 4-Wire Terminated RS-422/RS-485 4-Wire Not Terminated RS-232 (default setting since January 1, 2008) J15 1–2 1–2 2–3 2–3 2–3 J16 1–2 1–2 2–3 2–3 2–3 J17 1–2 2–3 1–2 2–3 2–3 Aux Serial with 5-Pole Connector The JNIOR Model 310 with a catalog number of JNR-100-003A has a 5 pole connector for the Auxiliary Serial port. A serial cable with an open end is required so that the cables can be connected. Only the send, receive and ground wires are needed. These are pins 2, 3 and 5 on the DB9 connector. The following information is provided to make the custom cable. The serial device is connected to the 5-pin connector as follows, where pin 1 is closest to the center of the JNIOR box: Pin 1 – Ground Pin 2 – RS232 (TX) / RS485 (TX-) Pin 3 – RS232 (RTS) / RS485 (TX+) Pin 4 – RS232 (RX) / RS485 (RX-) Pin 5 – RS232 (CTS) / RS485 (RX+) Aux Serial with DB9 Connector The JNIOR Model 310 with a catalog number of JNR-100-003B and the JNIOR Model 312 with a catalog number of JNR-200-003B both have a female DB9 connector for the Auxiliary Serial port. A straight through serial cable is required. JNIOR A Network I/O Resource Cinema.JNIOR Application Manual 48 INTEG Process Group, Inc. B APPENDIX – Serial Control Software Commands After the Cinema.JNIOR Application is properly configured to accept the serial commands, you can interact with the JNIOR via the serial port the same as with the Serial Control Program. Please see the Configuration Parameters (Registry key settings) described in Section 6 of this manual to enable the various serial commands. NOTE: When using the serial commands via Cinema.JNIOR, it is slightly different than using the commands via the Serial Control program. When using the commands with Cinema.JNIOR, all the commands MUST be prefaced with :: (a double colon). This is how Cinema.JNIOR knows it is a serial command and not a macro name. Controlling the Outputs The following commands are available to control the relay outputs: ::cX Close the output (relay is “on” closing the contact) where x = 1 through 8 for the internal relay outputs on the JNIOR 310 and x = +1 through +8 for the external relay outputs on the 4 Relay Output Expansion Modules ::oX Open the output (relay is “off” opening the contact) where x = 1 through 8 for the internal relay outputs on the JNIOR 310 and x = +1 through +8 for the external relay outputs on the 4 Relay Output Expansion Modules ::p=yyy Pulse duration (milliseconds) and is used in conjunction with the ‘close’ or ‘open’ command Examples: c2p=1000 c+2p=1000 o3p=10000 close output 2 for 1 second and then open again close output 10 for 1 second and then open again open output 3 for 10 seconds and then close again ::c* Close all outputs at the same time (includes internal and external) ::o* Open all outputs at the same time (includes internal and external) These commands can be abbreviated and used in combination, such as: ::c1 ::c+1 ::c+5 ::c1+1+5 JNIOR close relay output 1 close relay output 9 (first output on first expansion module) close relay output 13 (first output on second expansion module) combination of the above all in one command A Network I/O Resource Cinema.JNIOR Application Manual 49 INTEG Process Group, Inc. ::c1234 close relay outputs 1 through 4 ::c1368 close relay outputs 1, 3, 6, 8 ::o125 open relay outputs 1, 2, 5 ::c1+1p=1000 close relay outputs 1, 9 and pulse each for 1 second simultaneously Executing Multiple Commands at the Same Time You can also send different types of commands at the same time. If you do NOT separate them with a comma (,), the Cinema.JNIOR program will execute them all at the same time. The following are examples of commands used in combination and executed at the same time: ::c1o2 close relay output 1 and open relay output 2 ::c12o34 close relay outputs 1 and 2 and open relay outputs 3 and 4 ::c1o2p=1000 close relay output 1, open relay output 2 EACH for 1000 milliseconds If you separate them with a comma (,), the Cinema.JNIOR program will execute the commands sequentially. This gives you more flexibility in the types of commands to send. These are examples of commands used in combination, sent at the same time, but executed sequentially: ::c1,o2 close relay output 1 and open relay output 2 ::c12,o34 close relay outputs 1 and 2 and open relay outputs 3 and 4 ::o1,c2p=1000 open relay output 1, pulse relay output 2 for 1000 milliseconds Monitoring the Inputs, Outputs and Counters If enabled, whenever an input (or output) changes status (low-to-high or high-to-low), the following is sent out by the JNIOR: INx=1 OUTx=1 INx=0 OUTx=1 Input x (1 – 8) has gone high (on) Output x (1 – 16) has gone high (on) Input x (1 – 8) has gone low (off) Output x (1 – 16) has gone low (off) If enabled, with each message stating the input status, a count value will also be included. Whenever an input changes status (low-to-high or high-to-low), the following is sent out by the JNIOR: INx=1,yyy INx=0,yyy Input x (1 – 8) has gone high (on), counter value = yyy Input x (1 – 8) has gone low (off), counter value = yyy Note that these monitoring messages are sent out individually. The JNIOR does not report the status of more than one input/counter in the same message. JNIOR A Network I/O Resource Cinema.JNIOR Application Manual 50 INTEG Process Group, Inc. C APPENDIX – JNIOR to Client Message Structure Commands from the Client (non case sensitive) Format COMMAND\r\n Valid Commands run macro_name Example run start preshow The macro name is not case sensitive run macro_number Example run 1 get movie_status Used to retrieve the status of the movie start_preshow Used to run the macro associated with the start of the preshow mid_preshow Used to start the Five Minute Preshow Timer if it is enabled end_preshow Used to run the macro associated with the end of the preshow. At this time the “digital_movie_started” message is sent back to the Client. lamp_relay_close Used to Close the relay associated with the preshow lamp lamp_relay_open Used to Open the relay associated with the preshow lamp JNIOR A Network I/O Resource Cinema.JNIOR Application Manual 51 INTEG Process Group, Inc. Messages from the JNIOR (non case sensitive) Format MM/DD/YY hh:mm:ss.mmm (+/-) MESSAGE\r\n Where a + sing in the message indicates success and a – sign indicates not executed Valid Messages invalid_command Sent when the Client has sent a message that is not known movie_on Sent when the cinema server has set the Preshow Lock indicating that a feature is playing movie_off Sent when the cinema server has released the Preshow Lock indicating that a feature is done playing digital_movie_started Sent when the Preshow Client has sent the “end_preshow” message and we have soft pulsed the Feature Start Input preshow_timer_expired Sent when the 5 minute failsafe timer has expired before receiving the “end_preshow” command from the Preshow Client fire_alarm Sent when the fire alarm input was triggered push_button Sent when the push button was pressed to test the preshow client lamp_relay_undefined Sent when the Client has either requested a status update for or instructed the preshow lamp when it has not been defined preshow_lamp_on Sent when the preshow lamp closes preshow_lamp_off Sent when the preshow lamp opens JNIOR A Network I/O Resource Cinema.JNIOR Application Manual 52 INTEG Process Group, Inc. D APPENDIX – Available Devices The Cinema.JNIOR program works with a variety of devices that can be controlled via macros configured using the JNIOR Support Tool. Please contact INTEG for the latest list of devices supported. The following devices were available when this manual was last updated: 1. Barco Digital Projector 2. Christie Digital Projector 3. NEC Digital Projector 4. NEC VT700 Projector 5. USL JSD-100 Ethernet 6. Dolby 650 Serial 7. Dolby 650 Ethernet 8. Dolby 750 Serial 9. Dolby 750 Ethernet 10. Dolby 3D DFC100 Ethernet 11. Dolby 3D DFC100 Serial 12. QSC DCP300 Ethernet 13. RAW Ethernet (generic Ethernet device) 14. RAW Serial (generic serial device) The Device Type can be selected and configured via the JNIOR Support Tool on the Devices tab. Please see the JNIOR Support Tool Manual for complete details on using the JNIOR Support Tool. JNIOR A Network I/O Resource Cinema.JNIOR Application Manual 53 INTEG Process Group, Inc. 1. Barco Digital Projector Communication Method Ethernet IP Address Customer Defined Communications Port 43680 (Barco factory default) Termination String Optional (default is none required) Commands Available (For use in a JNIOR Macro) Lamp On Lamp Off Open Dowser Close Dowser Send Macro Send NOTES: A) The Send Macro command is used to send the actual name of any macro stored on the Barco projector. When this command is used, the Barco will execute the named macro. B) The Send command is used to send an ASCII string or a hexadecimal string. An ASCII string can contain any character and spaces. The text is sent as lower case unless the Case Sensitivity key is changed to true (see section 6.1). A hexadecimal string must start with the letters HEX and then each hexadecimal character must consist of 2 hex characters followed by an H. An example is: HEX 4AH 4EH 49H 4FH 52H (which is JNIOR in ASCII). 2. Christie Digital Projector Communication Method Ethernet IP Address Customer Defined Communications Port 5000 (Christie factory default) Termination String Optional (default is none required) Commands Available (For use in a JNIOR Macro) Lamp On Lamp Off Open Dowser Close Dowser Send NOTE: The Send command works the same as described under Barco. JNIOR A Network I/O Resource Cinema.JNIOR Application Manual 54 INTEG Process Group, Inc. 3. NEC Digital Projector Communication Method Ethernet IP Address Customer Defined Communications Port 7142 (NEC Series 1) 43728 (NEC Series 2) Termination String Optional (default is none required) Commands Available (For use in a JNIOR Macro) Lamp On Lamp Off Open Dowser Close Dowser Input Switch Send NOTE: The Send command works the same as described under Barco. The Input Switch is used in conjunction with a data value in the Data column 4. NEC VT700 Projector Communication Method Serial JNIOR Serial Port Auxiliary Serial Port (default) Termination String Optional (default is none required) Commands Available (For use in a JNIOR Macro) Power On Power Off Picture Mute On Picture Mute Off Send NOTE: The Send command works the same as described under Barco. JNIOR A Network I/O Resource Cinema.JNIOR Application Manual 55 INTEG Process Group, Inc. 5. USL JSD-100 Communication Method Ethernet IP Address Customer Defined Communications Port 10001 (USL factory default) Termination String Optional (default is none required) Commands Available (For use in a JNIOR Macro) Set Fader Adjust Fader Set Input Set Mute NOTE: The Set Fader, Adjust Fader and Set Input commands are used in conjunction with a data value in the Data column 6. Dolby 650 Serial Communication Method Serial JNIOR Serial Port Auxiliary Serial Port (default) Termination String Optional (default is none required) Commands Available (For use in a JNIOR Macro) Fader Level Fader Setting Format Button Set Mute Send NOTE: The Fader Level, Fader Setting and Format Button commands are used in conjunction with a data value in the Data column The Send command works the same as described under Barco. 7. Dolby 650 Ethernet JNIOR Communication Method Ethernet IP Address Customer Defined Communications Port 61412 Termination String Optional (default is none required) Commands Available (For use in a JNIOR Macro) Fader Level Fader Setting A Network I/O Resource Cinema.JNIOR Application Manual 56 INTEG Process Group, Inc. Format Button Set Mute Send NOTE: The Fader Level, Fader Setting and Format Button commands are used in conjunction with a data value in the Data column The Send command works the same as described under Barco. 8. Dolby 750 Serial Communication Method Serial JNIOR Serial Port Auxiliary Serial Port (default) Termination String Optional (default is none required) Commands Available (For use in a JNIOR Macro) Fader Level Input Mode Set Mute Send NOTE: The Fader Level, Input Mode and Set Mute commands are used in conjunction with a data value in the Data column The Send command works the same as described under Barco. 9. Dolby 750 Ethernet Communication Method Ethernet IP Address Customer Defined Communications Port 61408 Termination String Optional (default is none required) Commands Available (For use in a JNIOR Macro) Fader Level Input Mode Set Mute Send NOTE: The Fader Level, Input Mode and Set Mute commands are used in conjunction with a data value in the Data column The Send command works the same as described under Barco. JNIOR A Network I/O Resource Cinema.JNIOR Application Manual 57 INTEG Process Group, Inc. 10. Dolby 3D DFC100 Ethernet Communication Method Ethernet IP Address Customer Defined Communications Port 61412 Termination String Optional (default is none required) Commands Available (For use in a JNIOR Macro) Enable Disable Send NOTE: The Send command works the same as described under Barco. 11. Dolby 3D DFC100 Serial Communication Method Serial JNIOR Serial Port Auxiliary Serial Port (default) Communications Port 61412 Termination String Optional (default is none required) Commands Available (For use in a JNIOR Macro) Enable Disable Send NOTE: The Send command works the same as described under Barco. 12. QSC DCP300 Ethernet JNIOR Communication Method Ethernet IP Address Customer Defined Communications Port 4446 Termination String Optional (default is none required) Commands Available (For use in a JNIOR Macro) Active Audio Preset Active Control Preset Master Gain Master Mute Master Amp Power Send A Network I/O Resource Cinema.JNIOR Application Manual 58 INTEG Process Group, Inc. NOTE: Certain commands are used in conjunction with a data value in the Data column. The Send command works the same as described under Barco. 13. RAW Ethernet (generic Ethernet devices) Communication Method Ethernet IP Address Customer Defined Communications Port Customer Defined Termination String Optional (default is \r\n – carriage return, line feed) Commands Available (For use in a JNIOR Macro) Send NOTE: The Send command works the same as described under Barco. 14. RAW Serial (generic serial devices) Communication Method Serial JNIOR Serial Port Auxiliary Serial Port (default) Termination String Optional (default is \r\n – carriage return, line feed) Commands Available (For use in a JNIOR Macro) Send NOTE: The Send command works the same as described under Barco. JNIOR A Network I/O Resource Cinema.JNIOR Application Manual 59 INTEG Process Group, Inc. Summary Thank you for purchasing the JNIOR. Hopefully this manual made the getting-to-know process of your new JNIOR very quick and easy. The JNIOR has many more wonderful tools and features available, and are explained in detail in the supplied documents. Copyright Copyright 2011 INTEG Process Group, Inc. All rights reserved. Notice Every effort was made to make this manual as accurate and useful as practical at the time of the writing of this manual. However, all information is subject to change. Trademarks Trademarks are the property of their respective holders. Sun, Sun Microsystems, the Sun logo and Java are trademarks or registered trademarks of Sun Microsystems, Inc. in the United States and other countries. Microsoft, Windows, MS-DOS and Internet Explorer are registered trademarks of Microsoft Corporation. HyperTerminal is a registered trademark of Hilgraeve, Inc. Use Restrictions This User’s Manual and the software contained in the JNIOR are copyrighted by INTEG Process Group, Inc. and may not be copied or reproduced without prior consent from INTEG Process Group, Inc. INTEG Process Group, Inc. is not responsible for any errors or omissions that may be contained in this manual. Please do not hesitate to contact our JNIOR team at INTEG Process Group, Inc. We can be reached via phone, fax or e-mail as follows: INTEG Process Group, Inc. 2919 E. Hardies Road st 1 Floor Gibsonia, PA 15044 www.integpg.com [email protected] PH (724) 933-9350 FAX (724) 443-3553 JNIOR A Network I/O Resource Cinema.JNIOR Application Manual 60