1
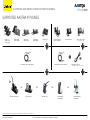
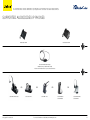
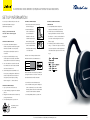
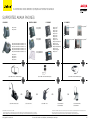
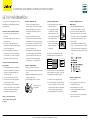
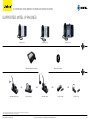
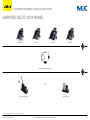
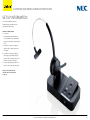
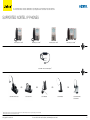
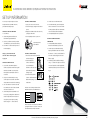
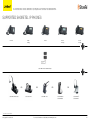
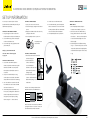
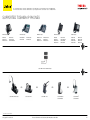
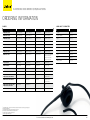
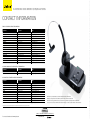
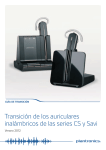
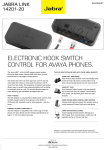
PM_BR_EHSGUIDE_1201_V09
Electronic Hook Switch (EHS) Solutions
Electronic Hook Switch (EHS) Solutions
Discover freedom with Jabra
Why Jabra headsets?
Wireless mobility
Jabra headsets are more ergonomic and
Move up to 150 meters away from your
convenient to use, enhancing flexibility and the
desk.
ability to multitask with maximum efficiency.
Once you discover the benefits of hands-
Comfort and ergonomics
free telephony, you never want to go back to
Headsets prevent aching muscles and neck
traditional handsets.
strain.
Freedom for all
Safe and secure
Jabra headsets allow you to search for
PeakStopTM technology protects users
documents, make copies or enter data on your
hearing from sudden loud noises. Tested
PC while talking to a customer. With a wireless
for safety of radiated emissions. Encrypted
headset you can enjoy freedom of movement
voice calls in wireless headsets.
Discover freedom with a wireless Jabra headset
facility and still do business on the spot! Jabra
up to 150 meters away from your desk. As a
optimized for your desk phone!
wireless headsets with EHS functionality boost
result you can provide better service and use
Sound economics
productivity as they provide the user with the
time more effectively by reducing the call-back
Improvement in employee productivity
Jabra Electronic Hook Switch (EHS) provides
ability to answer and end a call, while away
rate. Conference calls are a growing part of
significantly outweighs the headsets costs.
a solution that enable remote operation, e.g.
from their desk.
communication with colleagues and partners.
Do your own calculation on how soon your
A wireless headset with mute functionality
headset will have earned itself with the Jabra
ROI calculator: www.jabra.com/roi
answer/end functions, of compatible Jabra
wireless headsets with various phones, thus
The EHS adapter allows the user to:
allows you to stretch your legs and walk around
eliminating the need for a mechanical handset
-Hear ring tones
during a long call without background noise
lifter.
-Answer and end calls
interfering with the call.
-Adjust the volume
Why EHS?
-Mute the microphone
Hands-free efficiency
As mobility within the working environment
All from your headset
Multitask with maximum efficiency; find
continues to increase, it is vital that employees
documents or information to solve customer
have business tools that enable them to
All quite convenient, when you are up to 150
work efficiently regardless of location. With
meters away from your desk!
issues while on a call.
an EHS solution they can roam within the
Jabra EHS Adapter
2
Electronic Hook Switch (EHS) Solutions
DOWNLOAD
GUIDE (PDF)
for print
Headset
JABRA PRO™ 9400
SERIES
JABRA GO™ 6470
JABRA PRO™ 920
JABRA GN9350e/
JABRA GN9330e
Jabra GN9120 EHS/ Jabra GO™ 660
Jabra GN9125
STAY IN TOUCH AROUND
THE OFFICE
STAY IN TOUCH
WHEREVER YOU GO
WIRELESS
COMMUNICATION
STARTS HERE
SUPERIOR SOUND AND
LIGHT WEIGHT COMFORT
AWARD WINNING
SCANDINAVIAN
Extreme And Crystal
Clear Sound
Jabra headsets
with EHS capabilities
Jabra offers a range of EHS enabled headsets designed for different
Connectivity
needs and situations in offices and contact centers. Lightweight design
(Mobile phone only
available with
Jabra PRO 9470 and
Jabra PRO 9465)
Range1
Talk time
1
Touch screen
and multiple wearing styles provide exceptional comfort. Jabra has won
numerous prizes for both design and functionality.
150m
Soft+desk phone: 100m Up to 120m
Mobile phone: 25m2
120m
150m
Up to 10m
Up to 10 hrs
Up to 6 hrs
Up to 9 hrs
(Around the clock talk
time with additional
battery)
Up to 12 hrs
Up to 5.5 hrs
Up to 8 hrs
Cisco, Nortel, Polycom, Shoretel, Siemens, Snom and Toshiba.
Table of content
Aastra 4
No
No
Alcatel-Lucent 6
Yes
Auto set-up
Yes
Yes
No
No
No
No
Avaya 10
Wideband sound
Yes
Yes
Yes
Yes (Jabra GN9350e
with USB connection)
No
No
Cisco 12
MITEL 14
NEC 15
Nortel 17
Polycom 19
Shoretel 21
Siemens 23
Snom 25
Toshiba 27
Yealink 29
Jabra PRO™ 9400 and Jabra GO™ 6470 Series EHS set up
31
Ordering information 32
Contact information 33
8
Audio-codes 2 mic
Noise Blackout™
Yes, Jabra PRO 9470
Noise-canceling
microphone
Yes, Jabra PRO 9465
and Jabra PRO 9460
No
Full hearing
protection
Yes
Yes
Conference
function
No
leading phone manufacturers – including Aastra, Alcatel-Lucent, Avaya,
Yes
(Not Jabra PRO 9450)
Wearing styles
in box
No
Jabra EHS enabled headsets work with desk phones from the world’s
Yes
Headband + earhook
+ neckband3
(Neckband only
included with Jabra
PRO 9470)
Headband3
Yes
No
No
Yes
Yes
Headband5
Yes
No
No
Yes
Yes
Yes
Yes4
Headband + earhook
+ neckband3
(Neckband only
included with Jabra
GN9350e)
Headband + earhook
Yes
(Only Jabra GN9350e)
Yes
Yes
No
Yes4
Earhook in two sizes
and Ultimate-fit
Eargel™
No
Range and talk time vary according to the environment in which the headset is used
Range depends on the device with which the headset is connected
Neckband available as accessory. Jabra PRO 9460 Duo and Jabra PRO 9465 Duo, headband only
4
For Jabra GN9330e and Jabra GN9120 EHS/Jabra GN9125 built-in basic Jabra PeakStop™ protection
5
Neckband and earhook available as accessory
1
2
3
Detailed set up information can be found in the headset user manuals. Set up information on various phones
subject to change. Please see the phone manual for an updated guide.
For more information visit www.jabra.com
3
Electronic Hook Switch (EHS) Solutions for Aastra
Supported AASTRA IP phones
Aastra 6771
Aastra 6773/ip
Aastra 6775/ip
Aastra 7434ip
Aastra 7444ip
Aastra 5370
Aastra 5370ip
Aastra 5380
Aastra 5380ip
Aastra 6739i1
Aastra 6753i (53i)
Aastra 6755i (55i)
Jabra LINK™ 14201-10 EHS Adapter
OR
Jabra PRO™ 9400 Series1
1
Jabra LINK 14201-10 EHS Adapter
OR
Jabra GO™ 6470
Aastra 6757i (57i)
OR
Jabra PRO™ 920
Aastra 6757i CT (57i)
- only available in NA
Aastra DHSG cable kit
- available from your Aastra reseller
OR
Jabra GN9350e/
Jabra GN9330e
Jabra GN9120 EHS/
Jabra GN9125
Jabra PRO 9400 Series headsets, Jabra GO 660 and Jabra GO 6430 provide EHS via Bluetooth® connection with Aastra 6739i
See page 32 for order info
For more information and disclaimer, visit www.jabra.com/aastra
4
Electronic Hook Switch (EHS) Solutions for Aastra
Set up information
To connect your Aastra phone and Jabra
Setting up Jabra GN9350e
Setting up Jabra GN9330e
Setting up Jabra GN9120 EHS/
headset with the DHSG cable, just follow these
1. Open up the cover on the base unit.
1. Place the headset in the base with its
Jabra GN9125
simple steps:
2. On the LCD display, navigate to the handset
1. Plug the single end of the Y cable in the
headset socket on the phone’s headset port.
3. Plug the smaller RJ9 in the normal phone
pressing the OK button.
4. Set Compatibility selector in position “A”.
Compatibility selector
Jabra GN9350e
Termination Switch Wheel) in position “A”.
button on the Base for
3. Navigate to the DHSG mode and select it by
2. Connect the large plug in the other end to
the AUX port on the headset base.
1. Set Compatibility selector (Telephone
2. Press the Telephone
picture.
Setting up the Aastra IP phone
indicators facing you.
2. Set the base unit to the DHSG mode by
6 seconds while the
keeping the headset in the base and hold
headset is in the base until
the volume + / - buttons on the headset for
the headset’s blue LED is
6 seconds until the red light on the base
flashing rapidly.
flashes rapidly.
3. Use the volume up/down
socket on the headset base.
Setting up Jabra PRO™ 9400 and
3. Scroll through the four different settings
button to shift between
using + / - and set to the lips icon. Leave for
the different EHS settings
15 seconds until the unit has displayed the
– see table below.
confirmation flash sequence and it is ready
Jabra GO™ 6470 – follow the guide
on page 31.
to go!
The base unit’s 4 battery indicators show
which EHS mode the Jabra GN9330e is in.
Setting up Jabra PRO™ 920
GN RHL (Default)
1. Connect the Jabra LINK™ adapter as
DHSG
shown in adapter documentation supplied
AEI
with the Jabra LINK™. On some phones
MSH
25 %
100 %
the telephone cable will also need to be
connected.
2. Call your connected desk phone using
another phone to enable the Jabra LINK™
Note: If more than 15 seconds elapse without
pressing the volume + or volume – button, the
last selected interface will be activated.
adapter. Wait 10 seconds before answering.
3. Set a clear dial tone. Locate the clear dial
tone switch on the back of the Jabra PRO
920 base and rotate to “A”.
4. Set the Microphone volume. Make a call
to test your speaking volume. The listener
should not adjust their own volume. You
4. Set the base unit to the DHSG mode.
5. To set the EHS mode, press the Telephone
button on the Base for 6 seconds until the
4 battery indicators flash once. Now wait 5
seconds and the headset is initialized.
6. Set Compatibility selector in position “A”.
may adjust your microphone speaking
volume using the + / - volume buttons.
For more information and disclaimer, visit www.jabra.com/aastra
5
Electronic Hook Switch (EHS) Solutions for ALCATEL-LUCENT
Supported Alcatel-Lucent IP phones
Alcatel 8-Series (IP)
IP Touch 4028 EE
IP Touch 4038 EE
IP Touch 4068 EE
Alcatel 8-Series (IP)
IP Touch 40281
IP Touch 40381
IP Touch 4068
Jabra LINK™ 14201-20 EHS Adapter
OR
Jabra PRO™ 9400 Series
1
2
Jabra LINK™ 14201-09 EHS Adapter
OR
Jabra GO™ 6470
Alcatel 9-Series (UA)
4029
4039
OR
Jabra PRO™ 920
OR
Jabra GN9350e/
Jabra GN9330e
Jabra GN9120 EHS2/
Jabra GN91252
“Silent Mode” or “Progressive ringing” must not be selected on the telephone
MSH enabled model. Jabra GN9125 is not compatible with MSH mode
See page 32 for order info
For more information and disclaimer, visit www.jabra.com/alcatel
6
Electronic Hook Switch (EHS) Solutions for ALCATEL-LUCENT
Set up information
To connect your Alcatel-Lucent phone and
Setting up Jabra GN9120 EHS/
4. Set Compatibility selector in position “A”.
Jabra headset with the MSH 14201-09 cable,
Compatibility selector
Jabra GN9350e
just follow these simple steps:
the Headset / Handset socket on your Jabra
1. Set Compatibility selector (Telephone
LINK™ EHS Adapter to the 3.5 mm headset
Termination Switch Wheel) in position “A”.
2. Set the base unit to the MSH mode by
Jabra headset base and Alcatel 8+9 Series.
keeping the headset in the base and hold
the COM socket on your Jabra LINK™ EHS
the volume + / - buttons on the headset for
Adapter to the modular socket on your desk
1. Place the headset in the base with its
6 seconds until the red light on the base
on page 31.
Setting up Jabra PRO™ 920
shown in adapter documentation supplied
3. Set a clear dial tone. Locate the clear dial
tone switch on the back of the Jabra PRO
920 base and rotate to “A”.
6 seconds while the
15 seconds until the unit has displayed the
headset is in the base
confirmation flash sequence and it is ready
Alcatel cables
until the headset’s blue
to go!
EE4028
EE4038
EE4068
should not adjust their own volume. You
may adjust your microphone speaking
volume using the + / - volume buttons.
Setting up Jabra GN9350e
1. Open up the cover on the base unit.
2. On the LCD display, navigate to the handset
picture.
3. Navigate to the MSH mode and select it by
pressing the OK button.
1
- Cable marked: D White
- Cable marked: Red
- Cable marked: A Orange
- Telephone cord1
the different EHS settings – see table
Note: The marked end of each cable must be con-
below.
nected to the Jabra LINK™ EHS adapter.
The base unit’s 4 battery indicators show
Using Dictaphone output
which EHS mode the Jabra GN9330e is in.
GN RHL (Default)
25 %
DHSG
AEI
100 %
To install your Jabra LINK™ 14201-20
The dictaphone output can be used to record
EHS adapter with your Alcatel phone
a conversation in both directions. A 2.5 mm
Settings
jack to 3.5 mm jack cable is not included but
1. Install your headset solution to your desk
can be ordered as an accessory (Part Number
phone according to the headset manual.
MSH
4. Set the Microphone volume. Make a call
to test your speaking volume. The listener
Jabra LINK™ EHS Adapter AUX socket.
button to shift between
connected.
adapter. Wait 10 seconds before answering.
socket on your headset base unit to the
using + / - and set to the lips icon. Leave for
3. Use the volume up/down
the telephone cable will also need to be
another phone to enable the Jabra LINK™
3. Scroll through the four different settings
phone marked with a “Bell” icon.
7. With the cable marked red, connect the AUX
button on the Base for
LED is flashing rapidly.
with the Jabra LINK™. On some phones
2. Call your connected desk phone using
flashes rapidly.
2. Press the Telephone
Jabra GO™ 6470 – follow the guide
1. Connect the Jabra LINK™ adapter as
socket on the side of your desk phone.
6. With the cable marked orange A, connect
Setting up Jabra GN9330e
indicators facing you.
Setting up Jabra PRO™ 9400 and
5. With the cable marked white D, connect
Jabra GN9125
14201-21).
2. Set “Clear dial tone switch” in “A” position
Note: If more than 15 seconds elapse without
pressing the volume + or volume – button, the
last selected interface will be activated.
– see headset manual.
3. Ensure your headset base unit EHS mode is
set up to DHSG - see headset manual*.
4. Set the base unit to the MSH mode.
Connections
5. To set the EHS mode, press the Telephone
4. With the cable included with your headset
button on the Base for 6 seconds until the
system, connect the phone socket on your
4 battery indicators flash once. Now wait 5
headset base unit to the phone socket on
seconds and the headset is initialized.
your Jabra LINK™ EHS Adapter.
Cleaning the Jabra LINK™ EHS Adapter
Only use a soft – and, if necessary, slightly
damp – cloth for cleaning the Jabra LINK™ EHS
Adapter. Do not use any solvents or cleansing
agents as these can damage the finish of the
Jabra LINK™ EHS Adapter.
6. Set Compatibility selector in position “A”.
Cable included in headset pack
For more information and disclaimer, visit www.jabra.com/alcatel
7
Electronic Hook Switch (EHS) Solutions for AudioCodes
Supported AudioCodes IP phones
AudioCodes 310HD
AudioCodes 320HD
EHS with AudioCodes Adapter
Available from your AudioCodes reseller
Please contact AudioCodes for part number information
OR
Jabra PRO™ 9400 Series
See page 32 for order info
OR
Jabra GO™ 6470
OR
Jabra PRO™ 920
For more information and disclaimer, visit www.jabra.com
OR
Jabra GN9350e/
Jabra GN9330e
Jabra GN9120 EHS/
Jabra GN9125
8
Electronic Hook Switch (EHS) Solutions for AudioCodes
Set up information
To connect your AudioCodes phone and Jabra
Setting up Jabra GN9330e
Setting up Jabra GN9120 EHS/
headset with the EHS cable, just
1. Place the headset in the base with its
Jabra GN9125
follow these simple steps:
indicators facing you.
1. Set Compatibility selector (Telephone
2. Press the Telephone
Termination Switch Wheel) in position “A”
Setting up Jabra PRO™ 9400 and
button on the Base for
Jabra GO™ 6470 – follow the guide
6 seconds while the
keeping the headset in the base and hold
on page 31.
headset is in the base
the volume + / - buttons on the headset for
until the headset’s blue
6 seconds until the red light on the base
LED is flashing rapidly.
Setting up Jabra PRO™ 920
1. Connect the Jabra LINK™ adapter as
2. Set the base unit to the DHSG mode by
flashes rapidly.
3. Use the volume up/down
3. Scroll through the four different settings
shown in adapter documentation supplied
button to shift between
using + / - and set to the lips icon. Leave for
with the Jabra LINK™. On some phones
the different EHS settings
15 seconds until the unit has displayed the
the telephone cable will also need to be
– see table below.
confirmation flash sequence and it is ready
to go!
connected.
2. Call your connected desk phone using
another phone to enable the Jabra LINK™
adapter. Wait 10 seconds before answering.
3. Set a clear dial tone. Locate the clear dial
The base unit’s 4 battery indicators show
which EHS mode the Jabra GN9330e is in.
GN RHL (Default)
25 %
DHSG
tone switch on the back of the Jabra PRO
AEI
920 base and rotate to “A”.
MSH
100 %
4. Set the Microphone volume. Make a call
to test your speaking volume. The listener
Note: If more than 15 seconds elapse without
should not adjust their own volume. You
pressing the volume + or volume – button, the
may adjust your microphone speaking
last selected interface will be activated.
volume using the + / - volume buttons.
4. Set the base unit to the DHSG mode.
Setting up Jabra GN9350e
5. To set the EHS mode, press the Telephone
1. Open up the cover on the base unit.
button on the Base for 6 seconds until the
2. On the LCD display, navigate to the handset
4 battery indicators flash once. Now wait 5
seconds and the headset is initialized.
picture.
3. Navigate to the DHSG mode and select it by
6. Set Compatibility selector in position “A”.
pressing the OK button.
4. Set Compatibility selector in position “A”.
Compatibility selector
Jabra GN9350e
For more information and disclaimer, visit www.jabra.com
9
Electronic Hook Switch (EHS) Solutions for AVAYA
Supported AVAYA phones
IP phones
DIGITAL phones
Avaya 2420
Avaya 5420
IP phones
IP phones
Avaya 16081
Avaya 16161
Avaya 9404
Avaya 9408
Avaya 9504
Avaya 9508
Avaya 9608
Avaya 9610
Avaya 9611G
Avaya 9620/20C/20L
Avaya 9621G
Avaya 9630/30G
Avaya 9640/40C/40G
Avaya 9641G
Avaya 9650/50C
Avaya 96703
Avaya 1408
Avaya 1416
Avaya 2410
Avaya 5410
Avaya 4610/4610SW - Firmware> 1.8
Avaya 4620/4620SW - Firmware> 1.8
Avaya 4621/4621SW - Firmware> 1.8
Avaya 4622/4622SW - Firmware> 1.8
Avaya 4625/4625SW - Firmware> 1.8
Avaya 4630/4630SW - Firmware> 1.8
Avaya 6416D+M
Avaya 6424D+M
Avaya 1120E2
Avaya 1140E2
Avaya 1150E2
Avaya 1165E2
Avaya 5610
Avaya 5620
Avaya 5621
Avaya 5625
Jabra LINK™ 14201-19 EHS Adapter
Jabra LINK™ 14201-20 EHS Adapter
OR
Jabra PRO™ 9400 Series
1
2
OR
Jabra GO™ 6470
OR
Jabra PRO™ 920
Minimum FW for 1608/1616 phones is 1.300B
Former Nortel deskphone series Nortel 1120E, Nortel 1140E, Nortel 1150E and Nortel 1165E. UNIStim firmware release 5.2 for IP Phones is
available for download from the “Software Download” link under “Support and Training” on the Nortel website located at: http://support.nortel.com
See page 32 for order info
Jabra LINK™ 14201-32 EHS Adapter
OR
Jabra GN9350e/
Jabra GN9330e
3
Jabra GN9120 EHS/
Jabra GN9125
The firmware is available by phone model under “Phones, Clients and Accessories”. These firmware loads have not been introduced as the
default loads for the IP Phones shipped from Nortel, and must be installed by your system administrator
Jabra PRO 9400 Series headsets and Jabra GO 6470 provide EHS via Bluetooth connection with Avaya 9670G
For more information and disclaimer, visit www.jabra.com/avaya
10
Electronic Hook Switch (EHS) Solutions for AVAYA
Set up information
To connect your Avaya phone and Jabra
Setting up Jabra GN9330e
6 seconds until the red light on the base
headset with the Jabra LINK™ 14201-19 EHS
1. Place the headset in the base with its
flashes rapidly.
adapter, just follow these simple steps:
indicators facing you.
the ringer sound outlet on your desk phone.
3. Scroll through the four different settings
2. Press the Telephone button on
place the ring sensor as close as possible to
7. With the cable marked red, connect the
using + / - and set to the lips icon. Leave for
AUX socket on your headset base unit to
Setting up Jabra PRO™ 9400 and
the Base for 6 seconds while
15 seconds until the unit has displayed the
the Jabra LINK™ EHS Adapter AUX socket.
Jabra GO™ 6470 – follow the guide on page 31.
the headset is in the base
confirmation flash sequence and it is ready
until the headset’s blue LED is
to go!
Setting up Jabra PRO™ 920
1. Connect the Jabra LINK™ adapter as
Avaya cables
flashing rapidly.
3. Use the volume up/down
shown in adapter documentation supplied
button to shift between the
with the Jabra LINK™. On some phones
different EHS settings – see
the telephone cable will also need to be
table below.
1408
1416
2410
5410
- Cable marked: A White
- Cable marked: Purple (Jack 2.5 mm)
6416D+M
6424D+M
- Cable marked: B White
- Cable marked: Purple (Jack 2.5 mm)
- Cable marked: Red
- Telephone cord1
1608
1616
1608-I
1616-I
9608
9610
9611G
9620/C/L
9621G
9630/G
9640/C/G
9641G
9650/C
9670
- Cable marked: C White
- Cable marked: Purple (Jack 2.5 mm)
- Cable marked: Red
- Telephone cord1
connected.
2. Call your connected desk phone using
another phone to enable the Jabra LINK™
adapter. Wait 10 seconds before answering.
3. Set a clear dial tone. Locate the clear dial
The base unit’s 4 battery indicators show
To install your Jabra LINK™ 14201-20
which EHS mode the Jabra GN9330e is in.
EHS adapter with your Avaya phone
Settings
GN RHL (Default)
25 %
DHSG
tone switch on the back of the Jabra PRO
AEI
920 base and rotate to “A”.
MSH
100 %
1. Install your headset solution to your desk
phone according to the headset manual.
2. Set “Clear dial tone switch” in “A” position -
4. Set the Microphone volume. Make a call
see headset manual.
to test your speaking volume. The listener
Note: If more than 15 seconds elapse without
3. Ensure your headset base unit EHS mode is
should not adjust their own volume. You
pressing the volume + or volume – button, the
set up to DHSG – see headset manual .
may adjust your microphone speaking
last selected interface will be activated.
Connections
volume using the + / - volume buttons.
4. Set the base unit to the DHSG mode.
Setting up Jabra GN9350e
1
4. With the cable included with your headset
5. To set the EHS mode, press the Telephone
system, connect the phone socket in your
1. Open up the cover on the base unit.
button on the Base for 6 seconds until the
headset base unit to the phone socket on
2. On the LCD display, navigate to the handset
4 battery indicators flash once. Now wait 5
your Jabra LINK™ EHS Adapter.
picture.
seconds and the headset is initialized.
3. Navigate to the DHSG mode and select it by
6. Set Compatibility selector in position “A”.
Compatibility selector
Jabra GN9350e
1
If your base unit does not support DHSG mode, RHL mode (Jabra
default AUX mode) can be used with limited functionality between
phone and base unit – which means under installation you may need
to do hook ON and OFF a couple of times before phone and base/
headset are in sync. For RHL mode we recommend either to use your
headset or phone to answer/end calls.
connect the Headset / Handset socket
on your Jabra LINK™ EHS Adapter to the
pressing the OK button.
4. Set Compatibility selector in position “A”.
5. With the cable marked white A, B, or C,
Setting up Jabra GN9120 EHS/
headset socket on your desk phone - ensure
Jabra GN9125
you select the right cable for your Avaya
1. Set Compatibility selector (Telephone
desktop phone. See the Cable Matrix
Termination Switch Wheel) in position “A”.
2. Set the base unit to the DHSG mode by
section.
6. With the cable marked purple, connect
keeping the headset in the base and hold
the 2.5 mm jack to the ring tone detector
the volume + / - buttons on the headset for
socket in the Jabra LINK™ EHS Adapter, and
For more information and disclaimer, visit www.jabra.com/avaya
Note: The marked end of each cable must be
connected to the Jabra LINK™ EHS adapter.
Note: When using the EHS adapter with Avaya
phones, please note that the MFB button on
your headset acts as the Master button for
on- and off-hooking your telephone. This means
that both devices can work independently, but
the MFB may override the headset button on the
telephone.
Note: For setup information on Avaya 1120E,
Avaya 1140E and Avaya 1150E, follow the guide
on page 18.
11
Electronic Hook Switch (EHS) Solutions for CISCO
Supported Cisco IP phones
Cisco Unified IP Phone 7942G
Cisco Unified IP Phone 7945G
Cisco Unified IP Phone 7962G
Cisco Unified IP Phone 7965G1
Cisco Unified IP Phone 7975G1
Jabra LINK™ 14201-22 EHS Adapter2
Cisco Unified IP Phone 8961
Cisco Unified IP Phone 9951
Cisco Unified IP Phone 9971
Jabra LINK™ 14201-16 EHS Adapter2,3
Cisco Unified IP Phone 8945
Cisco Unified IP Phone 9951
Cisco Unified IP Phone 9971
Cisco CIUS
Jabra LINK™ 14201-30 EHS Adapter2,3
Bluetooth connection
OR
Jabra GN9350e/
Jabra GN9330e2
OR
Jabra PRO™ 9400
Series4
OR
Jabra PRO™ 9400
Series2
Jabra PRO™ 920
OR
OR
OR
Jabra GO™ 64704
Jabra PRO™ 920
Jabra GN9120 EHS2/
Jabra GN9125
Jabra GO 64704
Jabra GN9350e
Jabra GO 6470
Jabra GO™ 6430
Jabra GO 660
Note: Headset Hookswitch Control must be enabled on each phone.
EHS also possible via Cisco 7915IP extension panel
The Jabra PRO 9400 Series, Jabra GO 6470, Jabra LINK™ 14201-16 and Jabra LINK™ 14201-22 have tested compatible
with the listed Cisco Unified IP Phones
3
HHC requires Cisco Unified Communications Manager 4.1 (3) service release 6 or above plus the 8.3 (3) phone firmware load
4
Required software version: Minimum Value Pack 2. Value Pack 2 and Value Pack 3 can be downloaded via Jabra PC Suite
1
2
See page 32 for order info
For more information and disclaimer, visit www.jabra.com/cisco
12
Electronic Hook Switch (EHS) Solutions for CISCO
Set up information
To connect your Cisco Unified IP Phone and Jabra
Setting up Jabra PRO™ 920
Setting up Jabra GN9330e
Setting up Jabra GN9120 EHS/
headset with the Jabra EHS Adapter, just follow
1. Connect the Jabra LINK™ adapter as
1. Place the headset in the base with its
Jabra GN9125
these simple steps:
with the Jabra LINK™. On some phones
Setting up the Cisco Unified IP Phone
1. Connect the large plug to the AUX port on
the phone.
2. Connect the smaller plug to the AUX port on
the headset base.
3. Connect the normal audio cable to the
indicators facing you.
shown in adapter documentation supplied
1. Set compatibility selector (Telephone
2. Press the Telephone button
Termination Switch Wheel) in position “B”.
the telephone cable will also need to be
on the Base for 6 seconds
connected.
while the headset is in the
keeping the headset in the base and hold
base until the headset’s blue
the volume + / - buttons on the headset for
LED is flashing rapidly.
6 seconds until the red light on the base
2. Call your connected desk phone using
another phone to enable the Jabra LINK™
adapter. Wait 10 seconds before answering.
2. Set the base unit to the DHSG mode by
3. Use the volume up/down
flashes rapidly.
3. Set a clear dial tone. Locate the clear dial
button to shift between the
headset socket on the phone and the phone
tone switch on the back of the Jabra PRO
different EHS settings – see
using + / - and set to the lips icon. Leave for
socket on the headset base.
920 base and rotate to “B”.
table below.
15 seconds until the unit has displayed the
4. Ensure compatibility selector setting on
confirmation flash sequence and it is ready
4. Set the Microphone volume. Make a call
headset base is set to “B” and EHS setting
to test your speaking volume. The listener
The base unit’s 4 battery indicators show
is set to DSHG. Set to CISCO on Jabra PRO
should not adjust their own volume. You
which EHS mode the Jabra GN9330e is in.
9400 Series and Jabra GO 6470 Series.
may adjust your microphone speaking
volume using the + / - volume buttons.
Setting up the Cisco Unified IP Phone
Setting up Jabra GN9350e
1. Set Compatibility selector on headset base
1. Open up the cover on the base unit.
to CISCO on Jabra PRO 9400 Series and
Jabra GO 6470 Series.
2. Connect via USB to side port of phone
3. Connection should read: The Jabra LINK™
2. On the LCD display, navigate to the handset
the phone. You should see the Jabra LINK™
14201-30 as a Device Type: Peripheral/
Device Class: Audio/Configured: Yes
DHSG
25 %
100 %
MSH
Note: If more than 15 seconds elapse without
pressing the volume + or volume – button, the
picture.
3. Navigate to the DHSG mode and select it by
Compatibility selector
Jabra GN9350e
last selected interface will be activated.
Setting up Jabra GO™ 660
pressing the OK button.
4. Set Compatibility selector in position “B”.
14201-30 is now connected.
4. Confirm by going to Setup>Accessories in
to go!
GN RHL (Default)
AEI
9971, 9951/8961
to position “A” with DHSG on headset. Set
3. Scroll through the four different settings
4. Set the base unit to the DHSG mode.
1. Turn headset on.
5. To set the EHS mode, press the Telephone
2. Press and hold answer/end button until
button on the Base for 6 seconds until the
solid blue light comes on.
4 battery indicators flash once. Now wait 5
3. Activate Bluetooth on your phone.
seconds and the headset is initialized.
4. Search for Bluetooth devices and select
6. Set Compatibility selector in position “B”.
Jabra EXTREME.
5. Press “OK” on the phone and confirm with
Setting up Jabra PRO™ 9400 and
PIN code 0000 (4 zeros).
Jabra GO™ 6470 – follow the guide
on page 31.
For more information and disclaimer, visit www.jabra.com/cisco
13
Electronic Hook Switch (EHS) Solutions for MITEL
Supported MITEL IP phones
5340 IP phone
5330 IP phone
5360 IP phone
Bluetooth Module from Mitel1
OR
Jabra PRO™ 9400 Series
1
Bluetooth connection
OR
Jabra GO™ 6470
OR
Jabra PRO™ 9465
OR
Jabra GO™ 6430
Jabra GO™ 660
HS is only possible on these phones when connected via the Bluetooth Module. Jabra PRO 9470 & 9465
E
have to be paired with the Bluetooth Module as a mobile phone
See page 32 for order info
For more information and disclaimer, visit www.jabra.com
14
Electronic Hook Switch (EHS) Solutions for NEC
Supported NEC DT 730 IP phones
ITL-12D-1P1
ITL-24D-1P1
ITL-32D-1P1
ITL-8LD-1P1
Jabra LINK™ 14201-31 EHS Adapter
OR
Jabra PRO™ 9400 Series
1
Jabra GO™ 6470
EHS only with SIP phone firmware (NOT N-SIP firmware with SV81/83/8500 servers)
See page 32 for order info
For more information and disclaimer, visit www.jabra.com
15
Electronic Hook Switch (EHS) Solutions for NEC
Set up information
To connect your NEC phone and Jabra
headset with the Jabra LINK™ 14201-31
just follow these simple steps:
Setting up the NEC phone
1. Press “Menu”.
2. Select 4 AdminSettings > Maintenence
>Connector Mode > select Jabra Headset
Kit, press OK > press Exit > press Yes restart
phone.
3. Press “Menu” > select 3 User Settings >
Headset > select 1 Enable > press OK to
save setting.
4. Press “Menu” > select 3 User Settings >
select ringing. Choose which ringing you
require 1. Phone, 2. Headset, 3 Phone and
Headset > press OK to save setting.
5. Connect Jabra EHS Adapter 14201-31 to
the side 2. port on the back of the phone.
Setting up Jabra PRO™ 9400 and
Jabra GO™ 6470 – follow the guide
on page 31.
For more information and disclaimer, visit www.jabra.com
16
Electronic Hook Switch (EHS) Solutions for NORTEL
Supported NORTEL IP phones
Nortel IP phone 1120E1
Nortel IP phone 1140E1
Nortel IP phone 1150E1
Nortel IP phone 1165E1
Jabra LINK™ 14201-32 EHS Adapter2
OR
Jabra PRO™ 9400 Series
1
2
OR
Jabra GO™ 6470
OR
Jabra GN9350e
OR
Jabra GN9330e
Jabra GN9120 EHS/
Jabra GN9125
NIStim firmware release 5.2 for IP Phones is available for download from the “Software Download” link under “Support and Training” on the Nortel website
U
UNIStim firmware release 5.1 required for full feature set support
See page 32 for order info
For more information and disclaimer, visit www.jabra.com/nortel
17
Electronic Hook Switch (EHS) Solutions for NORTEL
Set up information
To connect your Nortel phone and Jabra head-
Setting up the Nortel IP Phone using
set, just follow these simple steps:
Jabra LINK™ 14201-32
1. In the “Preferences” menu, choose
Setting up the JABRA HEADSET
1. Set Compatibility selector on headset base
to position “A” with DHSG on headset.
2. Connect via USB port of phone.
“Headsets …”
2. Press the “Apply” button.
3. In “Active Headset Device” select the
appropriate headset type from a list of
USB headsets.
Setting up the Nortel phone
1. In the “Preferences” menu, choose
“Headsets …”.
2. Press the “Apply” button.
3. In “Active Headset Device” select the
appropriate headset type from a list of
Wired, USB, or Bluetooth headsets.
USB Connection Phone to Headset
Selection of a particular headset type fine
tunes the audio to that particular headsets
type. Selecting the right headset type is therefore recommended to achieve best performance.
UNIStim firmware release 5.2 for IP Phones is available for download from the “Software Download” link under
“Support and Training” on the Nortel website located at: http://support.nortel.com. The firmware is available
by phone model under “Phones, Clients and Accessories”. These firmware loads have not been introduced as
the default loads for the IP Phones shipped from Nortel, and must be installed by your system administrator.
For more information and disclaimer, visit www.jabra.com/nortel
18
Electronic Hook Switch (EHS) Solutions for POLYCOM
Supported POLYCOM IP phones
SoundPoint® IP 650 phone
SoundPoint® IP 560 phone
SoundPoint® IP 550 phone
SoundPoint® IP 670 phone
SoundPoint® IP 430/450 phone
SoundPoint® IP 320/3211 phone
SoundPoint® IP 330/3311 phone
Soundpoint® IP 335 phone
VVX 1500 phone
Jabra LINK™ 14201-17 EHS Adapter
OR
Jabra PRO™ 9400 Series
1
OR
Jabra GO™ 6470
OR
Jabra PRO™ 920
OR
Jabra GN9350e/
Jabra GN9330e
Jabra GN9120 EHS/
Jabra GN9125
.5mm adapter required for 320/321/330/331 models. Part No. 8800-00-75
2
You must be running SIP application version 3.0 or later and BootRom 4.1.0 or later
See page 32 for order info
For more information and disclaimer, visit www.jabra.com/polycom
19
Electronic Hook Switch (EHS) Solutions for POLYCOM
Set up information
To connect your Polycom phone and Jabra
Setting up Jabra GN9350e
4. Set the base unit to the DHSG mode.
headset with the Jabra LINK™ 14201-17,
1. Open up the cover on the base unit.
5. To set the EHS mode, press the Telephone
just follow these simple steps:
2. On the LCD display, navigate to the handset
button on the Base for 6 seconds until the
4 battery indicators flash once. Now wait 5
picture.
Setting up the Polycom phone
1. Press “Menu”.
2. Select Settings>Basic>Preferences>
seconds and the headset is initialized.
3. Navigate to the DHSG mode and select it by
6. Set Compatibility selector in position “A”.
pressing the OK button.
4. Set Compatibility selector in position “A”.
Setting up Jabra GN9120 EHS/
Head-set>Analog Headset Mode.
3. Use the up and down arrow keys to select
Jabra GN9125
Compatibility selector
Jabra GN9350e
Jabra Mode, then press the Select soft key.
1. Set Compatibility selector (Telephone
4. Press “Menu” or the exit soft key to return
Termination Switch Wheel) in position “A”.
to the idle display.
2. Set the base unit to the DHSG mode by
keeping the headset in the base and hold
Setting up Jabra PRO™ 9400 and
Setting up Jabra GN9330e
the volume + / - buttons on the headset for
Jabra GO™ 6470 – follow the guide
1. Place the headset in the base with its
6 seconds until the red light on the base
on page 31.
indicators facing you.
flashes rapidly.
2. Press the Telephone
3. Scroll through the four different settings
Setting up Jabra PRO™ 920
button on the Base for
using + / - and set to the lips icon. Leave for
1. Connect the Jabra LINK™ adapter as
6 seconds while the
15 seconds until the unit has displayed the
shown in adapter documentation supplied
headset is in the base until
confirmation flash sequence and it is ready
with the Jabra LINK™. On some phones
the headset’s blue LED is
to go!
the telephone cable will also need to be
flashing rapidly.
connected.
3. Use the volume up/down
button to shift between the
2. Call your connected desk phone using
another phone to enable the Jabra LINK™
different EHS settings – see
adapter. Wait 10 seconds before answering.
table below.
3. Set a clear dial tone. Locate the clear dial
tone switch on the back of the Jabra PRO
The base unit’s 4 battery indicators show
920 base and rotate to “A”.
which EHS mode the Jabra GN9330e is in.
4. Set the Microphone volume. Make a call
GN RHL (Default)
to test your speaking volume. The listener
DHSG
should not adjust their own volume. You
AEI
may adjust your microphone speaking
MSH
25 %
100 %
volume using the + / - volume buttons.
Note: If more than 15 seconds elapse without
pressing the volume + or volume – button, the
last selected interface will be activated.
For more information and disclaimer, visit www.jabra.com/polycom
20
Electronic Hook Switch (EHS) Solutions for SHORETEL
Supported SHORETEL IP phones
IP 212k
IP 230
IP 230g
IP 265
IP 560
IP 560g
IP 565
IP 565g
Jabra LINK™ 14201-20 EHS Adapter
OR
Jabra PRO™ 9400 Series
1
OR
Jabra GO™ 6470
OR
Jabra PRO™ 920
OR
Jabra GN9350e/
Jabra GN9330e
Jabra GN91201/
Jabra GN9125
Use non-EHS model of Jabra GN9120
See page 32 for order info
For more information and disclaimer, visit www.jabra.com
21
Electronic Hook Switch (EHS) Solutions for SHORETEL
Set up information
To install your Jabra LINK™ 14201-20 EHS
adapter with your Shoretel phone, just follow
these simple steps:
Settings
1. Install your headset solution to your desk
phone according to the headset manual.
2. Set “Clear dial tone switch” in “A” position
– see headset manual.
3. Ensure your headset base unit EHS mode is
set up to RHL – see headset manual.
Connections
Calculate your ROI
4. With the cable included with your headset
The ROI calculator is a tool built by Jabra to make it easy for you to
system, connect the phone socket in your
calculate the payback time for a headset. All you have to do is key
headset base unit to the phone socket on
in a few parameters (hours per day spent on the phone and average
your Jabra LINK™ EHS Adapter.
salary) and, based on this 7.5-minutes-per-hour average time saving,
5. With the cable marked white A, B, or C,
the tool will calculate the number of days until your customers’
connect the Headset/Handset socket
companies recoup their investment.
on your Jabra LINK™ EHS Adapter to the
www.jabra.com/roi
headset socket on your desk phone - ensure
you select the right cable for your Shoretel
desktop phone. See the Cable Matrix
section.
6. With the cable marked purple, connect
the 2.5 mm jack to the ring tone detector
socket in the Jabra LINK™ EHS Adapter, and
place the ring sensor as close as possible to
the ringer sound outlet on your desk phone.
7. With the cable marked red, connect the
AUX socket on your headset base unit to
the Jabra LINK™ EHS Adapter AUX socket.
For more information and disclaimer, visit www.jabra.com
22
Electronic Hook Switch (EHS) Solutions for SIEMENS
Supported SIEMENS IP phones
OpenStage 30/40/60/80
Plus OptiPoint 600
OptiPoint 500 Basic/Std/Adv/Eco
OptiPoint 410/420 Std/Adv
Jabra LINK™ 14201-10 EHS Adapter1
OR
Jabra PRO™ 9400 Series
1
OR
Jabra GO™ 6470
OR
Jabra PRO™ 920
OR
Jabra GN9350e/
Jabra GN9330e
Jabra GN9120 EHS/
Jabra GN9125
lso requires Acoustic Adapter from Siemens. must be version 10 or above.
A
S30817-K7110-B508 -10. This does not apply to the OpenStage 40/60/80 phones
See page 32 for order info
For more information and disclaimer, visit www.jabra.com/siemens
23
Electronic Hook Switch (EHS) Solutions for SIEMENS
Set up information
To connect your Siemens phone and Jabra
Setting up Jabra GN9350e
4. Set the base unit to the DHSG mode.
Setting up Jabra GN9120 EHS/
headset with the Jabra EHS Adapter cable, just
1. Open up the cover on the base unit.
5. To set the EHS mode, press the Telephone
Jabra GN9125
follow these simple steps:
2. On the LCD display, navigate to the handset
3. Navigate to the DHSG mode and select it by
1. Plug the single end of the Y cable in the
headset socket on the phone’s headset port.
1. Set Compatibility selector (Telephone
Termination Switch Wheel) in position “A”.
4 battery indicators flash once. Now wait 5
picture.
Setting up the Siemens IP phone
button on the Base for 6 seconds until the
seconds and the headset is initialized.
2. Set the base unit to the DHSG mode by
keeping the headset in the base and hold
6. Set Compatibility selector in position “A”.
pressing the OK button.
4. Set Compatibility selector in position “A”.
the volume + / - buttons on the headset for
2. Connect the RJ9 plug in the normal phone
6 seconds until the red light on the base
socket on the headset base.
Compatibility selector
Jabra GN9350e
3. Connect the large clear plug RJ45 into the
flashes rapidly.
3. Scroll through the four different settings
phones AUX port.
using + / - and set to the lips icon. Leave for
15 seconds until the unit has displayed the
Setting up Jabra PRO™ 9400 and
confirmation flash sequence and it is ready
Jabra GO™ 6470 – follow the guide
Setting up Jabra GN9330e
on page 31.
1. Place the headset in the base with its
Setting up Jabra PRO™ 920
2. Press the Telephone
to go!
indicators facing you.
button on the Base for
1. Connect the Jabra LINK™ adapter as
shown in adapter documentation supplied
6 seconds while the
with the Jabra LINK™. On some phones
headset is in the base until
the telephone cable will also need to be
the headset’s blue LED is
flashing rapidly.
connected.
2. Call your connected desk phone using
3. Use the volume up/down
another phone to enable the Jabra LINK™
button to shift between the
adapter. Wait 10 seconds before answering.
different EHS settings – see
table below.
3. Set a clear dial tone. Locate the clear dial
tone switch on the back of the Jabra PRO
920 base and rotate to “A”.
4. Set the Microphone volume. Make a call
The base unit’s 4 battery indicators show
which EHS mode the Jabra GN9330e is in.
to test your speaking volume. The listener
GN RHL (Default)
should not adjust their own volume. You
DHSG
may adjust your microphone speaking
AEI
volume using the + / - volume buttons.
MSH
25 %
100 %
Note: If more than 15 seconds elapse without
pressing the volume + or volume – button, the
last selected interface will be activated.
For more information and disclaimer, visit www.jabra.com/siemens
24
Electronic Hook Switch (EHS) Solutions for SNOM
Supported SNOM IP phones
Snom 300
Snom 320
Snom 360
Snom 370
Snom 820
Snom 821
Snom 870
EHS with Snom EHS Adapter.
Available from your Snom reseller
OR
Jabra PRO™ 9400 Series
See page 32 for order info
OR
Jabra GO™ 6470
OR
Jabra PRO™ 920
For more information and disclaimer, visit www.jabra.com
OR
Jabra GN9350e/
Jabra GN9330e
Jabra GN9120 EHS/
Jabra GN9125
25
Electronic Hook Switch (EHS) Solutions for SNOM
Set up information
To connect your Snom phone and Jabra head-
Setting up Jabra GN9350e
Note: If more than 15 seconds elapse without
set with the Snom-cable, just follow these
1. Open up the cover on the base unit.
pressing the volume + or volume – button, the
simple steps:
2. On the LCD display, navigate to the handset
last selected interface will be activated.
picture.
Setting up the Snom phone
3. Navigate to the DHSG mode and select it by
4. Set the base unit to the DHSG mode.
5. To set the EHS mode, press the Telephone
pressing the OK button.
4. Set Compatibility selector in position “A”.
button on the Base for 6 seconds until the
4 battery indicators flash once. Now wait 5
seconds and the headset is initialized.
Compatibility selector
Jabra GN9350e
6. Set Compatibility selector in position “A”.
Setting up Jabra GN9120/
Jabra GN9125
Setting up Jabra PRO™ 9400 and
Jabra GO™ 6470 – follow the guide on page 31.
1. Set Compatibility selector (Telephone
Setting up Jabra GN9330e
Termination Switch Wheel) in position “A”.
1. Place the headset in the base with its
Setting up Jabra PRO™ 920
1. Connect the Jabra LINK™ adapter as shown
2. Set the base unit to the DHSG mode by
indicators facing you.
keeping the headset in the base and hold
2. Press the Telephone
the volume + / - buttons on the headset for
in adapter documentation supplied with
button on the Base for
the Jabra LINK™. On some phones the
6 seconds while the
telephone cable will also need to be
headset is in the base until
connected.
the headset’s blue LED is
using + / - and set to the lips icon. Leave for
flashing rapidly.
15 seconds until the unit has displayed the
2. Call your connected desk phone using
another phone to enable the Jabra LINK™
6 seconds until the red light on the base
flashes rapidly.
3. Scroll through the four different settings
3. Use the volume up/down
adapter. Wait 10 seconds before answering.
confirmation flash sequence and it is ready
button to shift between
to go!
the different EHS settings
3. Set a clear dial tone. Locate the clear dial
tone switch on the back of the Jabra PRO
– see table below.
920 base and rotate to “A”.
4. Set the Microphone volume. Make a call
to test your speaking volume. The listener
should not adjust their own volume. You
The base unit’s 4 battery indicators show
which EHS mode the Jabra GN9330e is in.
GN RHL (Default)
may adjust your microphone speaking
DHSG
volume using the + / - volume buttons.
AEI
25 %
100 %
MSH
For more information and disclaimer, visit www.jabra.com
26
Electronic Hook Switch (EHS) Solutions for TOSHIBA
Supported TOSHIBA IP phones
DKT2000-series:
DKT2001
DKT2010-S
DKT2010-SD
IPT2000-series:
DKT2020-S
DKT2020-SD
DKT2020-FDSP
IPT2008-SDL
IPT2010-SD
DKT3000-series:
IPT2010-SDC
IPT2020-SD
DKT3007-SD
DKT3010-S
DKT3010-SD
DP5000-series:
DKT3014-SDL
DKT3020-S
DKT3020-SD
DP5008
DP5018-S
DP5022-SD
DP5032-SD
IP5000-series:
DP5122-SD
DP5130-FSDL
DP5130-SDL
DP5132-SD
IP5022-SD
IP5122-SD
IP5122-SDC
IP5131-SDL
IP5132-SD
IP5631-SDL
IP5522-SD
IP5622-SD
Jabra LINK™ 14201-20 EHS Adapter
OR
Jabra PRO™ 9400 Series
1
OR
Jabra GO™ 6470
OR
Jabra PRO™ 920
OR
Jabra GN9350e/
Jabra GN9330e
Jabra GN91201/
Jabra GN9125
Use non-EHS model of Jabra GN9120
See page 32 for order info
For more information and disclaimer, visit www.jabra.com/toshiba
27
Electronic Hook Switch (EHS) Solutions for TOSHIBA
Set up information
To install your Jabra LINK™ 14201-20 EHS
Connections
adapter with your Toshiba phone, just follow
5. With the cable included with your headset
these simple steps::
system, connect the phone socket in your
headset base unit to the phone socket on
Settings
1. Install your headset solution to your desk
phone according to the headset manual.
2. Set “Clear dial tone switch” in “A” position
– see headset manual.
3. If you are connecting to an older Toshiba
deskphone model, we recommend to
try switch setting “G”, for best possible
compatibility.
4. Ensure your headset base unit EHS mode is
set up to RHL – see headset manual.
your Jabra LINK™ EHS Adapter.
6. With the cable marked white A, B, or C,
connect the Headset/Handset socket
on your Jabra LINK™ EHS Adapter to the
headset socket on your desk phone - ensure
you select the right cable for your Toshiba
desktop phone. See the Cable Matrix
section.
7. With the cable marked purple, connect
the 2.5 mm jack to the ring tone detector
socket in the Jabra LINK™ EHS Adapter, and
place the ring sensor as close as possible to
the ringer sound outlet on your desk phone.
8. With the cable marked red, connect the
AUX socket on your headset base unit to
the Jabra LINK™ EHS Adapter AUX socket.
Plug-and-play with leading Unified Communications applications
Unified Communications integrates technologies such as voice, email and instant
messaging and facilitates enhanced productivity and collaboration by unifying and
streamlining the way we communicate. Our headsets are plug-and-play with all
leading Unified Communications applications.
www.jabra.com/uc
For more information and disclaimer, visit www.jabra.com/toshiba
28
Electronic Hook Switch (EHS) Solutions for Yealink
Supported YEALINK IP phones
T26P
T28 + EXP39
T28P
T38G SIP
Yealink EHS36 Adapter
OR
Jabra PRO™ 9400 Series
See page 32 for order info
OR
Jabra GO™ 6470
OR
Jabra PRO™ 920
For more information and disclaimer, visit www.jabra.com
OR
Jabra GN9350e/
Jabra GN9330e
Jabra GN9120 EHS/
Jabra GN9125
29
Electronic Hook Switch (EHS) Solutions for Yealink
Set up information
To connect your Yealink phone and Jabra head-
Setting up Jabra GN9350e
Note: If more than 15 seconds elapse without
set with the Yealink-cable, just follow these
1. Open up the cover on the base unit.
pressing the volume + or volume – button, the
simple steps:
2. On the LCD display, navigate to the handset
last selected interface will be activated.
picture.
Setting up the Yealink phone
3. Navigate to the DHSG mode and select it by
4. Set the base unit to the DHSG mode.
5. To set the EHS mode, press the Telephone
pressing the OK button.
4. Set Compatibility selector in position “A”.
button on the Base for 6 seconds until the
4 battery indicators flash once. Now wait 5
seconds and the headset is initialized.
Compatibility selector
Jabra GN9350e
6. Set Compatibility selector in position “A”.
Setting up Jabra GN9120/
Setting up Jabra PRO™ 9400 and
Jabra GO™ 6470 – follow the guide
on page 31.
Jabra GN9125
Setting up Jabra GN9330e
1. Set Compatibility selector (Telephone
1. Place the headset in the base with its
Setting up Jabra PRO™ 920
1. Connect the Jabra LINK™ adapter as
Termination Switch Wheel) in position “A”.
indicators facing you.
2. Set the base unit to the DHSG mode by
2. Press the Telephone
keeping the headset in the base and hold
shown in adapter documentation supplied
button on the Base for
the volume + / - buttons on the headset for
with the Jabra LINK™. On some phones
6 seconds while the
6 seconds until the red light on the base
the telephone cable will also need to be
headset is in the base until
connected.
the headset’s blue LED is
flashing rapidly.
2. Call your connected desk phone using
another phone to enable the Jabra LINK™
flashes rapidly.
3. Scroll through the four different settings
using + / - and set to the lips icon. Leave for
3. Use the volume up/down
adapter. Wait 10 seconds before answering.
3. Set a clear dial tone. Locate the clear dial
15 seconds until the unit has displayed the
button to shift between
confirmation flash sequence and it is ready
the different EHS settings
to go!
– see table below.
tone switch on the back of the Jabra PRO
920 base and rotate to “A”.
4. Set the Microphone volume. Make a call
to test your speaking volume. The listener
The base unit’s 4 battery indicators show
which EHS mode the Jabra GN9330e is in.
should not adjust their own volume. You
GN RHL (Default)
may adjust your microphone speaking
DHSG
volume using the + / - volume buttons.
AEI
MSH
25 %
100 %
For more information and disclaimer, visit www.jabra.com
30
Jabra PRO™ 9400 series and Jabra GO™ 6470 EHS set up
Jabra PRO 9400 series and Jabra GO 6470 headsets feature a
unique screen-based set up service
Manufacturor
A SmartSetup wizard on the touch screen
EHS mode
5.
guides you through the simple process of
Lift the desk phone handset and set
Aastra
AlcatelLucent
Avaya
Cisco
MITEL
NEC
DHSG
DHSG
MSH1
DHSG
DHSG
Cisco
Bluetooth
IQ
Polycom Shoretel
DHSG
RHL
SNOM
DHSG
Siemens Toshiba YEALINK
DHSG
RHL
DHSG
aside, or press the headset button on
connecting phones and setting up EHS
the desk phone.
functionality.
6.
First choose the remote solution (EHS or Jabra GN1000)
Rotate the clear dial tone switch from
“A” to “G”, as illustrated, and listen in
Once you are up and running, the screen’s
the headset for a clear dial tone. (this
colourful icons and intuitive menu system
setting “A” on most phones “B” on
make remote call-handling a breeze.
Cisco, “A” or “G” on Toshiba).
Jabra PRO 9400 and Jabra GO 6470 Series
support EHS with following phone system
manufacturers: Aastra, Alcatel-Lucent,
Press Yes to connect
to desk phone
Avaya, Cisco, Polycom, Shoretel, Siemens
Press Yes
Choose Electronic
Hook Switch adapter
Determine cable type
Choose EHS mode
Connect desk phone
Connect to base
and Toshiba.
Now connect your headset to your phone
Setting up Jabra PRO™ 9450
1.
7.
Set the microphone volume. Remove
Connect the Jabra LINK™ adapter as
the front panel of the Jabra PRO 9450
shown in adapter documentation sup-
base, as illustrated.
plied with the Jabra LINK™. On some
phones the telephone cable will also
need to be connected.
2.
Call your connected desk phone using
Unplug handset cable
another phone to enable the Jabra
Connect handset
to base
Connect to base
Connect adapter to
desk phone
LINK™ adapter. Wait 10 seconds before
answering the phone.
3.
8.
volume. The listener should not adjust
panel of the Jabra PRO 9450 base, as
their own volume. You may adjust your
illustrated. Put on the headset.
4.
1
Make a call to test your speaking
Set a clear dial tone. Remove the front
The desk phone icon will change to
The example above illustrates configuration of a Cisco-solution.
The specific configuration may vary from manufacturer to manufacturer.
microphone speaking volume on the
.
base, as illustrated. When finished, end
If the icon does not change, tap the
the call and return the front panel of
desk phone button on the base keypad.
the Jabra PRO 9450.
MSH for non-EE(Extended Edition) models, used with Jabra LINK™ 14201-09
DHSG for EE models, used with Jabra LINK™ 14201-20
For more information visit www.jabra.com
31
Electronic Hook Switch (EHS) Solutions
Ordering information
Jabra LINK™ EHS ADAPTERS
PHONES
MODEL
NA ITEM NO#
Jabra PRO™ 9470
EMEA ITEM NO#
9470-66-904-105
9470-26-904-101
UK ITEM NO#
9470-26-904-102
APAC ITEM NO#
1
Jabra PRO™ 9465
9465-69-804-105
9465-29-804-101
N/A
Jabra PRO™ 9460
9460-65-707-105
9460-25-707-101
9460-25-707-102
1
1
GLOBAL ITEM NO#
Alcatel
14201-09
1
Aastra, Siemens
14201-10
2
Cisco
14201-16
2
9460-29-707-103
Polycom
14201-17
9450-25-507-103
Avaya
14201-19
Avaya, Alcatel, Shoretel, Toshiba
14201-20
6470-15-207-503
Cisco
14201-22
6430-17-20-203 AUS/NZ
6430-17-20-205 JP
6430-17-20-206 PRC
6430-17-20-207 KR
Cisco
14201-30
NEC
14201-31
AVAYA, NORTEL
14201-32
9470-26-904-103
9465-29-804-103
Jabra PRO™ 9460 Duo
9460-69-707-105
9460-29-707-101
9460-29-707-102
Jabra PRO™ 9450
9450-65-507-105
9450-25-507-101
9450-25-507-102
Jabra PRO™ 920
920-25-508-105
920-25-508-101
920-25-508-102
3
MANUFACTURER
2
Jabra GO™ 6470
6470-15-207-505
6470-15-207-501
6470-15-207-502
Jabra GO™ 6430
6430-17-20-205
6430-17-20-201
6430-17-20-202
9460-25-707-103
920-25-508-103
1
2
Jabra GO™ 660
5078-228-209
5078-228-209
5078-228-209
5078-228-209
Jabra GN9350e
9326-607-405
9356-607-401
9356-607-402
9356-607-403
Jabra GN9330e
9327-508-405
9337-508-401
9337-508-402
9337-508-403
Jabra GN9330e USB
9337-509-405
9337-509-401
9337-509-402
9337-509-403
Jabra GN9120 FLEX MONO EHS
Jabra GN9125 FLEX MONO
9125-28-15
9120-28-11
9120-28-11
9120-28-09 AUS/NZ
9120-28-07 AP
Jabra GN9120 FLEX MONO
N/A
9120-28-01
9120-28-02
9120-28-06 JPN
9120-28-03 AP
Jabra GN9120 FLEX DUO EHS
Jabra GN9125 FLEX DUO
9129-808-215
9129-808-111
N/A
N/A
Jabra GN9120 FLEX DUO
N/A
9129-808-101
N/A
N/A
5
6
4
Jabra PRO 9400 Series + Jabra GO 6470 UK Item numbers also available for sale in Hong Kong and Singapore
Australia and New Zealand
Jabra GO 6470 NA Item numbers also available for sale in Japan
4
EHS adapter for Jabra PRO 9400 Series and Jabra GO 6470
5
Non EHS models for Shoretel & Toshiba Phones
6
UK power supply must be specified
1
2
3
For more information visit www.jabra.com
32
CONTACT information
EMEA customer contact information
Country
Telephone
Email
United Kingdom
France
Deutschland
España
Italia
Denmark
Sverige
Norge
Suomi
Russia
Poland
Czech Republic
Nederland
Belgique/Belgium
Luxemborg
Österreich
Middle East/Africa
+44 (0)1784 220 172
+33 (0) 130 589 075
+49 (0) 8031 2651 72
+34 916 398 064
+39 02 5832 8253
+45 45 75 99 99
+46 (0) 8 693 09 00
+47 32 22 74 70
+358 204 85 6040
–
+48 12 254 40 15
+420 800 522 722
+49 (0) 8031 2651 72
+49 (0) 8031 2651 72
+49 (0) 8031 2651 72
+49 (0) 8031 2651 72
–
[email protected]
[email protected]
[email protected]
–
–
[email protected]
[email protected]
[email protected]
[email protected]
[email protected]
[email protected]
[email protected]
[email protected]
[email protected]
[email protected]
[email protected]
[email protected]
USA and Canada customer contact information
Country
Telephone
Email
USA
Canada
1-800-826-4656
1-800-489-4199
[email protected]
[email protected]
ASIA PACIFIC customer contact information
Country
Telephone
Email
Australia
China
Hong Kong
Indonesia
Japan
Malaysia
New Zealand
Singapore
Taiwan
India
Philippine
1-800-636-086 (local distributor)
+86-21-5836 5067
800-968-265 (Toll free)
001-803-852-7664
+81-3-5297-7976
1800-812-160 (Toll free)
0800-447-982 (Toll free)
800-860-0019 (Toll free)
0080-186-3013 (Toll free)
000-800-852-1185 (Toll free)
+63-2-2424806
[email protected]
[email protected]
[email protected]
[email protected]
[email protected]
[email protected]
[email protected]
[email protected]
[email protected]
[email protected]
[email protected]
GN Netcom is a world leader in innovative headset solutions. GN Netcom
develops, manufactures and markets its products under the Jabra brand name
GN Netcom cannot guarantee accuracy, this Guide is a guideline only, all information is believed to
be correct and is based on GN Netcom’s extensive testing or on the soft client vendors own statements
All corporate, product and brand names used in this document are trademarks of their respective owners
Jabra® is a registered trademark of GN Netcom A/S
For more information visit www.jabra.com
www.jabra.com
The Bluetooth® word mark and logos are owned by the Bluetooth SIG, Inc. and any use of such marks by GN Netcom A/S is under license. (Design and specifications subject to change without notice)
Electronic Hook Switch (EHS) Solutions