1
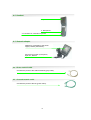
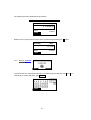
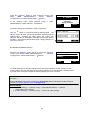
NetPhone NP210
User Guide
ENGLISH VERSION
Copyright © 2003 Voipac s.r.o.
All rights reserved.
Information found in this document may be subject to changes from time to time, without prior
notice regarding any corrections or adjustments. Changed will be incorporated into a new edition
of this Manual, or in form of additional documentation and publications. Voipac s.r.o. provides no
guaranties expressed or implied herein, especially implied guaranties regarding marketing or
suitability of the product for a special purpose.
No documentation, nor programmes contained herein shall be copied, reproduced, translated or
reduced to any medium or data-processing devise without prior written permission of Voipac.
Use the space below to copy the model number or the unit, serial number, date and place of
purchase. Production number and model number may be found on the bottom side of the unit.
IP NetPhone 210
Production number:
Date of purchase:
Place of purchase:
Voipac is a registered trademark owned by the Voipac s.r.o. company. Other products named
herein for informative purposes only may be registered trademarks of their respective owners.
2
Content
1
CONVENTIONS USED..............................................................................................................5
2
PRECAUTIONS .........................................................................................................................5
3
CONTENT OF THE PACK ........................................................................................................6
4
DESCRIPTION OF FUNCTIONAL PARTS OF PHONE...........................................................7
4.1 PHONE .................................................................................................................................7
4.1.1
Top view.......................................................................................................................7
4.1.2
Back view .....................................................................................................................7
4.1.3
Bottom View .................................................................................................................7
4.2 HEADSET .............................................................................................................................8
4.3 NETWORK ADAPTER .........................................................................................................8
4.4 DIRECT NETWORK CABLE................................................................................................8
4.5 CROSSED NETWORK CABLE ...........................................................................................8
5
CONNECTING THE PHONE .....................................................................................................9
5.1 WAYS TO CONNECT THE PHONE ....................................................................................9
5.1.1
Single phone ................................................................................................................9
5.1.2
Phone + PC..................................................................................................................9
5.1.3
Phone + network ........................................................................................................10
5.2 INSTALLATION AND HARDWARE CONNECTION .........................................................11
6
BASIC INFORMATION............................................................................................................11
6.1 PHONE BUTTONS‘ FUNCTIONS......................................................................................11
6.1.1
Display buttons...........................................................................................................11
6.1.2
Number buttons..........................................................................................................12
6.1.3
Other buttons .............................................................................................................12
6.2 DISPLAY.............................................................................................................................12
6.3 WRITE TEXT ......................................................................................................................13
6.4 REGULATION OF VOLUME..............................................................................................14
7
MENU.......................................................................................................................................14
7.1 MENU CONTROL...............................................................................................................14
7.2 STRUCTURE OF MENU ....................................................................................................15
7.2.1
Menu: Contacts ..........................................................................................................15
3
8
7.2.2
Menu 1: Messages.....................................................................................................16
7.2.3
Menu 2: Call Register ................................................................................................17
7.2.4
Menu 3: Settings ........................................................................................................18
7.2.5
Menu 4: Calculator.....................................................................................................20
7.2.6
Menu 5: Calendar ......................................................................................................21
7.2.7
Menu 6: Time .............................................................................................................22
7.2.8
Menu 7: Tones ...........................................................................................................22
7.2.9
Menu 8: Info ...............................................................................................................22
PHONE SETTINGS .................................................................................................................23
8.1 NETWORK CONFIGURATION ..........................................................................................23
8.1.1
Bridge / FwNat mode ................................................................................................23
8.1.2
Static / Dynamic IP Address .....................................................................................23
8.1.3
DNS setup..................................................................................................................26
8.1.4
NTP Server ................................................................................................................26
8.2 SERVICES ..........................................................................................................................27
8.2.1
VOIP Setup / Gatekeeper ..........................................................................................27
8.2.2
VOIP Setup / IP to IP .................................................................................................28
8.2.3
Jabber client settings .................................................................................................28
8.2.4
E-mail Settings / SMTP Server Settings ....................................................................29
8.2.5
E-mail Settings / POP3 Server Settings ....................................................................30
8.3 SAVE SETTINGS ...............................................................................................................30
9
HOW TO UPGRADE FIRMWARE ..........................................................................................31
10 CLEANING THE UNIT.............................................................................................................32
11 GLOSSARY .............................................................................................................................32
12 TROUBLESHOOTING.............................................................................................................34
13 TECHNICAL SPECIFICATIONS ............................................................................................34
4
1
Conventions used
Important will tell you how to avoid steps that might lead to the damage of your IP phone.
Comments are here to facilitate your use of the NetPhone 210 and prevent possible
complications.
2
Precautions
Before you start using the device, carefully read all the enclosed instructions. Follow
all precautions and warnings mentioned in this User Manual.
•
•
•
•
•
•
•
•
•
•
•
•
Do not use the device in the vicinity of water, e.g. tube, sink, drain, etc.!
Do not expose the devise to humid conditions!
Protect the device against sources of heat such as heaters, kitchen stoves, etc.!
It is not appropriate to place the phone in the environment with temperatures below 5°C or
above 40°C.
Do not expose the devise to magnetic fields!
Devise should not be exposed to big shocks and strokes.
Devise should not be exposed to dust and dirt.
Do not connect the power adapter to another device!
When disconnecting the network cable from the plug, do not pull the cable! Always hold the
plug!
Place the power cable off the area of frequent walking of people. Do not step on the power
cable, nor place heavy objects on it!
Total current load of connected units must not exceed the current load of the extension cable.
(if such cable is used)
Total current load of all units connected to the plug must not exceed the capacity of the fuse.
5
3
Content of the Pack
Phone
1 pc
Handset
1 pc
Handset core
1 pc
Adapter
1 pc
Streitht ethernet cable
1 pc
Cross over ethernet cable
1 pc
User guide
1 pc
6
4
Description of functional parts of phone
4.1 Phone
4.1.1 Top view
1. Display
2. Menu navigation buttons
3. Microphone
4. Indicators of the phone
status (Hold, Mute, Loud
speaker)
5. Reproductor
6. Keyboard
4.1.2 Back view
1. Power connector
3. Ethernet connector PC
(LAN)
2. MODEM/SWITCH
connector (WAN)
4. Headset connector
NO. Item
1
2
Power connector
Connector
Modem/Switch
3
PC Connector
4
Headphone connector
Description
Connector to connect he power adapter
Connector to connect external WAN
network (e.g. through DSL modem)
Connector to connect PC or internal
network
Connector to connect the headphones.
4.1.3 Bottom View
1. Connector to connect the handset.
2. Attachment slot serves to firmly
attach the handset cable
7
4.2 Headset
1. Speaker
2. Microphone
3. Connector for connection of phone
4.3 Network adapter
Adapter for connection to the power
supply network (230V/50Hz)
Connector for power up the phone,
input 12V, 600mA
4.4 Direct network cable
Connects the phone to the external network (grey colour).
4.5 Crossed network cable
Connects the phone to the PC (green colour).
8
5
Connecting the phone
Before you start connecting the devise, read carefully all the information enclosed in
the pack. While connecting follow the recommended guidelines.
5.1 Ways to connect the phone
5.1.1 Single phone
Phone is connected through Modem/Switch connector to the computer network (e.g. through DSL
router)
5.1.2 Phone + PC
This connection may be used if you have only 1 power outlet and use it to power up your
computer. In case of this connection, all data pass through the phone, which makes it easier to
manage network communication (QoS) and consequently ensure higher quality of making phone
calls.
Phone is connected through Modem/Switch connector to the external computer network.
Computer is connected to the PC connector through cross over ethernet cable (green colour)
With this connection the phone can function in either Bridge or FwNat regimes
9
CONNECTION „PHONE + PC“
Advantage of the Bridge mode:
• PC accesses the WAN (possible to use mail, web browser, ...)
• PC may be accessed from the WAN (PC may function as ftp, web server.)
Disadvantage of the Bridge mode:
• computer may become a target of attacks from the WAN
Advantage of the FwNat mode:
• PC accesses the WAN (possible to use mail, web browser...)
• Computer is protected against attacks from the WAN
Disadvantage of the FwNat mode:
• PC cannot be seen from the WAN (impossible to operate web, ftp server...)
5.1.3 Phone + network
In case, that you have more of PC interconnected through the HUB (domestic network), you may
use this connection:
Phone is connected through Modem/Switch connector to the external computer network. HUB is
connected to the PC connector through a direct cable.
In case the provider of your WAN connection has limited it to 1 MAC address, the phone must be
in the FwNat regime.
CONNECTION „PHONE + NETWORK“
Advantage of the Bridge mode:
• PCs access the WAN (possible to use mail, web browser...)
• Every computer may be accessed from the WAN (PC may function as ftp, web server.)
Disadvantage of the Bridge mode:
• computers may become a target of attacks from the WAN
• impossible to use if the connection is limited to one IP or MAC address, respectively
Advantage of the FwNat mode:
• PCs access the WAN (possible to use mail, web browser...)
• PC protected against attacks from the WAN
Disadvantage of the FwNat mode:
• PCs cannot be seen from the WAN (impossible to operate web, ftp server...)
10
5.2 Installation and hardware connection
Follow the steps below:
•
•
•
•
•
Connect the handset and the phone through the connecting cable.
Put the cable through the attachment slot on the phone.
Connect network cables, based on selected way of connection of phone to the network.
Connect the power supply to the power connector.
Connect the power supply with the outlet.
POWER
WAN
LAN
Headset
After a moment the display will show:
6
Basic information
6.1 Phone buttons‘ functions
Activate autorepeat by pressing and holding display buttons, number buttons and +, - buttons.
6.1.1 Display buttons
Button
Delete
Select
Up
Down
Description
Deleting characters in text (in front of the cursor)
Termination of active call
Executing the action written beside display button.
Right button – usually select menu, confirm, make
selection. Left button usually for exit from the menu.
Scrolling through phonebooks, menu, upward.
Switching between active calls.
Switching of devices for volume control
Scrolling through phonebooks, menu, downward.
Switching between active calls.
Switching of devices for volume control
11
6.1.2 Number buttons
•
•
•
•
entering phone numbers
entering IP addresses
entering texts
entering DTMF codes (during an active call)
6.1.3 Other buttons
Button
Settings
Hold
Rec
Alt
§
Speaker
Volume +
Volume Mic Off
Description
List of calls
Messages (sending, viewing messages)
Phone settings
Holding / releasing of call
Currently without function
Switching between capital / small letters and numbers when entering texts
Entering the phone number (in default, or during active call, respectively)
• Viewing the list of recently called numbers
• Dialing a selected number
Currently without function
Volume control
Volume control
Disconnect / connect microphone during an active call
6.2 Display
There are three basic part on display:
Basic display:
1. Information line
2. Basic display area
3. Button´s line
No. Item
1
Information line
Description
•
Actual time,
•
if Gatekeeper is connect or not
•
receive message
aktívne presmerovanie
•
•
user´s debit/credit
If menu is active, in left part is name of item in menu and on right part is number of item.
If active write text – on right part is display ABC, abc or 123 – you can change regime
when you use button „Alt“
2
Basic display
area
3
4
Button´s line
Scrollbar
Function of buttons, for example: „Select“
In case of long list of the menu, is possible to use scrollbar.
12
4. Scrollbar
6.3 Write text
For write text, use button „Alt“ which switch between small letters „abc“, capital letters „ABC“ or
number keyboard „123“. Actual condition you can see on right top part of display:
For use letters press one or several times button, until display asked mark.
After last mark on button start first again.
Marks on buttons:
1
2
,:'?!"1
ABC2
DEF3
4
5
6
GHI4
JKL5
MNO6
7
8
9
PQRS7
TUV8
WXYZ9
À
0
#
*.+-/
space @ 0
3
#
The mark before cursor you can cancel with button „Delete“. You can move cursor with buttons
„Up“ and „Down“.
13
6.4 Regulation of volume
The volume you can regulate when you press buttons „Volume +“ and „Volume – „:
By buttons „Up“ and „Down“ you can switch:
Phone speaker
Handset speaker
Phone Microphone
Handset Microphone
Ringing
Headphones
7
Menu
7.1 Menu control
After turn on of phone you can select menu by right buton Select .
After you press buton select, you can see first item in menu.
In right top part of display you can find numer of menu. By buttons Up, Down you can move
between all item up and down. Select item you confirm when you press buton Select. If you
press direkt buttons from 1 to 9 you can display directly menu with select number.
14
7.2 Structure of menu
When you press button „Contacts“ on basic display – you choose CONTACTS menu:
7.2.1
Menu: Contacts
Menu
1. Search
2. List
3. Add
Description
Search used contact
List of contacts
Add new contact
Contact/Options:
Menu
1. Add address
1.1 Phone
1.2 Mobil
1.3 Fax
1.4 E-Mail
1.5 Jabber Id
2. Remove contact
Description
Add address for contact
Write phone no. of the add person
Write mobil no. of the add person
Write fax no. of the add person
Write e-mail of the add person
Write jabber address of the add person
Delete contact
Menu of phone address:
Menu
Description
1. Dial
2. Set speed dial
Dial select number or name
Set „Speed dial“– max 2 numbers
Set select address or phone number in
contact as default.
Add address to contact
Remove contact
3. Set default
4. Add address
5. Remove address
Menu email/jabber addrress
Menu
Description
1. Send
2. Add address
3. Remove
Send messages to select address
Add address to contact
Remove contact
When you press left button “Menu” on display you can see basic MENU:
Menu
Description
1.
2.
3.
4.
5.
6.
7.
8.
Set time and date and time zone
Set ringing for calls and messages
Information about IP phone
Messages
Call register
Settings
Calculator
Calendar
Time
Tones
Info
15
7.2.2
Menu 1: Messages
Messages
Menu
Description
1.1 Write message
1.1.1 Body
Write body of message
1.1.2 Subject
1.1.4 Send
1.1.4.1 Jabber message
1.1.4.2 E-mail message
1.2 Inbox
Write head of message
Remove text from body and head of
message
Send message
Send message for „Jabber“ client
Send E-mail
Received messages
1.3 Outbox
Messages determine for sending
1.4 Sent
Sent post
1.1.3 Clear
Send message for „Jabber“ client
Send E-mail
1.4.1 Jabber message
1.4.2 E-mail message
Body
Menu of message
Menu
1.
2.
3.
4.
5.
Description
Send message for „Jabber“ client
Reply to E-mail
Forward messages
Display details of message
Add address to contacts
Remove
Reply
Forward
Details
Add to name
Message
Remove
Reply
Forward
Details
Add to name
Back
2
Select
16
7.2.3
Menu 2: Call Register
2
Call register
Menu
The list of the missed calls, after
selection of the contact, you can see
name, phone number, time of the call,
duration and price of the call.
The list of the received calls, after
selection of the contact, you can see
name, phone number, time of the call,
duration and price of the call.
The list of the dialed calls, after selection
of the contact, you can see name, phone
number, time of the call, duration and
price of the call.
Erase recent calls according following
items:
1.1 Missed calls
2.2 Received calls
2.3 Dialled calls
2.4 Erase recent calls
1.1.1.
1.1.2.
1.1.3.
1.1.4.
All
Missed
Received
Dialled
Duration of the recieved and dialled calls,
and all calls together.
Reset counters of the received or dialled
and all calls together.
2.5 Call duration
2.6 Reset counters
Menu for saved calls
Menu
1.
2.
3.
4.
5.
Description
Dial select number
Possiblity to change contact
Add address to contacts
Add like new contact
Remove select number
Dial
Use number
Add to name
Save
Erase
17
7.2.4
Menu 3: Settings
3
Settings
Menu
Description
3.1 Call settings
3.1.1 Divert
3.1.1.1 Divert all
3.1.1.1.1 Status
3.1.1.1.2 Number
3.1.1.2 Divert if not answered
3.1.1.2.1 Status
3.1.1.2.2 Number
3.1.1.2.3 Redirect after
3.1.1.3 Divert if busy
3.1.1.3.1 Status
3.1.1.3.2 Number
3.1.2 Auto answer
3.1.3 Autodial
3.1.3.1 Status
3.1.3.2 Dialing timeout
Divert calls always
Status (on/off)
Number, where will be call divert
Divert if call is not answered
Status (on/off)
Number, where will be call divert
Redirect call - you can set X sec
Divert calls if busy
Divert on/off
Number where will be call divert
On/off
Status(on/off)
Dialing timeout in ms
Set phone
3.2 Phone
3.2.1
3.2.2
3.2.3
Language on phone (EN, D,CZ, SK)
Brightness of display
On/Off
Language
Brightness
Loudspeaker
Configuration of network
3.3 Network config
3.3.1
Bridge/FwNAT
Net mode
3.3.2 WAN (modem/Switch)
3.3.2.1 Address configuration
3.3.2.2 Static address
3.3.2.2.1 IP – Address
3.3.2.2.2 Mask
3.3.2.2.3 Gateway
3.3.2.2.4 Apply changes
3.3.3 LAN (PC-FwNAT)
3.3.3.1 IP – Address
3.3.3.2 Mask
3.3.3.3 Apply changes
3.3.4 QoS
3.3.4.1 Status
3.3.4.2 Upload
3.3.4.3 Download
3.3.4.4 Voice
Static/DHCP
Phone IP address
Network mask
IP Address of gateway
Save changes
Save changes
On/Off
Max speed for upload (kbit-s)
Max speed for download (kbit-s)
Max speek for audio (kbit-s)
18
Menu
Description
DNS Server
IP address of primary DNS server
IP address of secondary DNS server
IP address of NTP server
3.3.5 DNS
3.3.5.1 Primary
3.3.5.2 Secondary
3.3.6 NTP
3.4 Services
3.4.1 VoIP
3.4.1.1 Gatekeeper
3.4.1.1.1 Login
3.4.1.1.2 Password
3.4.1.1.3 Primary gatekeeper
Set IP address or name of primary
gatekeeper
Set IP address or name of secondary
gatekeeper
Registration to the actual gatekeeper
3.4.1.1.4 Secondary gatekeeper
3.4.1.1.5 Register
3.4.1.1.6 Terminal aliases
3.4.1.2 IP to IP
3.4.1.2.1 Terminal aliases
Settings of the aliases, which will be
send during call
Activation of the IP to IP mode
3.4.1.2.2 Activate
3.4.1.3 Settings
3.4.1.3.1 General
3.4.1.3.1.1 Fast start
On/Off (fast start is the new system of
the connection in H.323v2 protocole)
On/Off (set connection in H.245
tunneling. In this mode are the
messages closed in H.225 canal (port
1720). This setting save one TCP
connection through the call. H.245
tunneling was set in H.323v2)
On/Off (Exchange and arrangement of
capabilities is in SETUP phase of
connection. Standard: after ALERTING
phase.
On/Off (medial canal will be open after
connection)
3.4.1.3.1.2 H.245 Tunneling
3.4.1.3.1.3 H.245 in SETUP
3.4.1.3.1.4 Media wait for connect
3.4.1.3.2 Audio
3.4.1.3.2.1 Sound buffers
3.4.1.3.2.2 Jitter buffer min
3.4.1.3.2.3 Jitter buffer max
3.4.1.3.2.4 Silence detection
3.4.1.3.2.5 Signal deathband
3.4.1.3.2.6 Silence deathband
3.4.1.3.3 Capabilities
Default: 3
Default: 25
Default: 75
On/Off
Default: 250
Default: 1000
Terminal Capabilities (codecs) – settings
of the codecs prioritisation,
enable/disable codecs. You can change
prioritisation of the select codec with
buttons + , - .
Function - enable codec.
Delete - disable codec.
19
Menu
Description
3.4.2 Jabber
3.4.2.1 Login
3.4.2.2 Password
3.4.2.3 Resource
3.4.2.4 Server
3.4.2.5 Port
3.4.2.6 Apply
3.4.3 Mail
3.4.3.1 Outgoing (SMTP)
3.4.3.1.1 Server
3.4.3.1.2 Port
3.4.3.1.3 E-Mail
3.4.3.2 Incomming (POP3)
3.4.1.1.1 Server
3.4.1.1.2 Port
3.4.1.1.3 Login
3.4.1.1.4 Password
3.4.1.1.5 Check interval
Write jabber registration login
Write jabber registration password
Address of the jabber´s server
Port of the jabber´s server (5222)
Registration to the jabber server
Outgoing post
Name or IP address of SMTP server
Default: 25
Sender´s E-mail
Incomming post
Name or IP address of POP3 server
Default: 110
Registration login
Registration password
Default: 10 min
3.5 Save settings
7.2.5
Menu 4: Calculator
4
Calculator
Phone has an in-built simple calculator that
immediately processes mathematical symbol you
enter into it. In case the symbol is impossible to
be processed, the outcome is shown as “Error”.
Calculator:
Deg
1569/35
Result:
Back
44.8286
Operators and functions are entered through
pressing the ALT button. After pressing ALT for
the first time, the following operators appear.
(pressing the button 1 will enter +, # adds the
value into the memory)
Back
After pressing the ALT button the second time, the
following operators appear:
Back
20
The following formula is entered through pressing
4 ALT 4 7 ALT 1 ALT ALT 1 4 ALT 8 4
Calculator:
Deg
4*7+sin(4 4)
Result:
Back
27.0297
Result may be copied anytime in place of the symbol through pressing the # button.
Calculator:
Deg
27,0297
Result:
Back
7.2.6
27.0297
Menu 5: Calendar
The phone has an in-built simple calendar. To scroll through the calendar, use + and - . To
change days, months and years, use Function.
Back
21
7.2.7
Menu 6: Time
Menu
6.1 Clock
Set actual time
6.2 Date
Set actual date
6.3 Time zone
Select actual time zone
6.4 Summer time
On/Off
6.5 Update from internet
Time actualisation through internet – is
necessery to set NTP server
7.2.8
Menu 7: Tones
Menu
7.1 Ringing tone
Select actual ringing tone
7.2 New message
Select actual tone for new message
7.3 Volume
Set volume for handset speaker
7.2.9
Menu 8: Info
Menu
Info about your loginyou’re your phone
number
Info about network settings – network
addresses
8.1 Me
8.2 Network
Info about registration to the gatekeeper
8.3 Registration
22
Menu
8
8.4 Version
Info about version of application, version
of kernel and version of file system
8.5 Jabber status
Online / offline – status of jabber
Phone Settings
8.1 Network configuration
It is impossible to make phone calls and use e-mail jabber without a proper network setting.
You will need the following information to set up the phone:
8.1.1 Bridge / FwNat mode
IP phone´s work regime (advantage and disadvantage of phone connection in single mode
is describe in chapter 5.1 )
FwNat
To make correct settings of FwNat mode you need to know following information:
IP Address of „PC“ connector on phone (LAN interface): IP address, net mask
In this mode IP phone includes LAN and WAN interface, both have MAC address and IP
address, phone works in NAT mode as router and firewall amid LAN and WAN.
Bridge
Both interfaces of IP phone are show as alone interface with one MAC address and IP
address, for other network´s devices is connection through phone´s interface
transparents.
8.1.2
Static / Dynamic IP Address
The process of the assignment of the IP address in WAN („SWITCH/MODEM“ connector)
A.) Static IP address:
IP address, net mask, gateway address
Address of primary or secondary DNS server
You may obtain this information from your external network (Internet) provider or your network
administrator.
23
Press the “Settings” button to enter “Network config” and
select
“WAN
(Modem/Switch)”
choose
“Address
Static”.
configuration” and select enable Static: “
In the Settings menu select Network config
(Modem/Switch) > Static address > “IP address” :
>
WAN
Static address
3.3.2.2.1
IP – Address
Mask
Gateway
Apply changes
Back
Select
Continue entering your IP address, mask, and gateway.
*
Use the “ ” button to jump/scroll among different fields. The
“Back” button will send you back to the Menu without saving the
entered value. Pressing the “Set” button will confirm your
selection and after a confirmation message will send you back to
the Menu. After entering all the values, push “Apply changes” to
execute your choice.
B.) Dynamic IP address (DHCP)
Pressing the “Settings” button will let you enter the “Network
config” and choose “WAN (Modem/Switch)” > “Address
configuration”, select enable DHCP: “
DHCP”.
Address configuration
Static
DHCP
Back
2
Set
For better ilustration of describe settings we can see some examples. In each of them is used
model, where is PC connected through IP phone to network. The same process is possible to use
in model, where is IP phone simple connected (settings for PC are not used).
Example 1:
Model - IP phone + PC. Public IP address is dynamically (DHCP) assigned by external network
provider, the phone operates under the Bridge mode.
Phone settings:
1. In menu „Settings“ -> „Network config“-> „WAN (Modem/Switch)“-> „Address
configuration“ select „DHCP“
2. in menu „Settings“ -> „Network config“ -> „Net mode“ select „Bridge“
24
Example 2:
Model: IP phone + PC. Public IP address is dynamically (DHCP) assigned by external network
connection provider, the phone operates under the FwNat mode.
PC connector´s address is e.g.: 192.168.1.1 (selected by user)
Net mask: 255.255.255.0
Phone settings:
1. In menu „Settings“ -> „Network config“-> „WAN (Modem/Switch)“-> „Address configuration“
select „DHCP“
2. in menu „Settings“ -> „Network config“-> „LAN (PC-FwNAT)“
•
„IP- Address“ = 192.168.1.1
• „Mask“ = 255.255.255.0
• select „Apply changes“
3. in menu „Settings“ -> „Network config“ -> „Net Mode“ select „FwNat“
Computer Settings:
Assign static IP address to the computer: 192.168.1.2, Net mask 255.255.255.0 and us phone as
the gateway – 192.168.1.1
Example 3:
Model: Phone + PC, IP address is statically assigned by external network connection provider,
phone operates under the FwNat mode.
PC phone connector address is 192.168.1.1
Net mask is 255.255.255.0
Data from external network connection provider:
• Assigned address is 62.24.64.150, net mask - 255.0.0.0, Gateway – 62.24.64.1
• Primary DNS : 62.24.64.10
• Secondary DNS: 62.24.64.11
Phone settings:
1. in menu „Settings“ -> „Network config“-> „WAN (Modem/Switch)“-> „Static address“ select:
• „IP- Address“ = 62.24.64.150
• „Mask“ = 255.0.0.0
• Gateway = 62.24.64.1
• Select „Apply changes“
2. in menu „Settings“ -> „Network config“-> „WAN (Modem/Switch)“-> „Address configuration“
select „Static“
3. in menu „Settings“ -> „Network config“-> „LAN (PC-FwNAT)“
• „IP- Address“ = 192.168.1.1
• „Mask“ = 255.255.255.0
• select „Aply changes“
4. in menu „Settings“ -> „Network config“ -> „Net mode“ select „FwNat“
5. in menu „Settings“ -> „Network config“ -> „DNS“ set
• „Primary“ = 62.24.64.10
• „Secondary“ = 62.24.64.11
25
PC Settings:
Assign static IP address 192.168.1.2 to the computer, net mask 255.255.255.0 and use the
phone 192.168.1.1 as gateway.
8.1.3
DNS setup
If you do not have a dynamically assigned address and want to
use names instead of IP addresses (e.g. gatekeeper or SMTP
Server) you must enter this value.
This information may be obtained from your Internet provider or
administrator.
Pressing the “Settings” button, select “Network config” >
“DNS”.
Enter primary and secondary DNS Server.
8.1.4
Network config
3.4
Net mode
WAN (Modem/Switch)
LAN (PC-FwNAT)
QoS
DNS
Back
Select
NTP Server
This setup will define a Server with exact time.
You will need the following information:
NTP Server name or IP address
Your time zone (shift in hours compared to GMT)
This information may be obtained from your Internet provider or administrator.
If you do not have this information, you may enter it manually through the menu “Time”.
NTP Server:
ABC
Pressing the “Settings” button, select “Network
config” > “NTP”.
Enter the Server values (IP address or name):
195.168.144.10
Back
Set
ime zone is possible to set in “Menu” > “Time” >
“Time zone”.
26
Time zone:
(+00:00) GMT
(+01:00) Vienna
(+02:00) Cairo
(+03:00) Moscow
(+03:30) Tehran
Back
15
Select
8.2 Services
8.2.1 VOIP Setup / Gatekeeper
It is impossible to make phone calls without a proper VOIP setting.
You will need the following information:
VOIP Login (name)
VOIP Password
Address of primary and secondary Gatekeeper
This information may be obtained from your Internet provider or administrator.
Pressing the “Settings” button, enter the “Services” and select “VoIP”:
3.4.1
Gatekeeper
Login
Password
Primary gatekeeper
Secondary gatekeeper
Register
Back
Selec
Enter login, password, and gatekeeper.
Password will always be displayed as „***********“.
After pressing any character this text will be deleted and your selected
character will appear. Gatekeeper may be entered as IP address or
Server name.
After entering all the data, press „Register“ to register the phone:
After a successful registering you will see:
Now, the phone is ready to use!
Example
VOIP settings under Gatekeeper mode
Data from your VOIP provider (e.g.):
• VOIP Login: viki
• VOIP Password: h4567
• Primary gatekeeper: gkp.voip.com
(This address is not real)
• Sekundárny gatekeeper: no
Phone settings:
1. in menu „Settings“ -> „Services“-> „VOIP“-> „Gatekeeper“ set
• „Name“ = viki
• „Password“ = h4567
• Primary gatekeeper: gkp.voip.com
2. in menu „Settings“ -> „Services“-> „VOIP“-> „Gatekeeper“ select „Register“
27
8.2.2 VOIP Setup / IP to IP
In case, you will use phone in IP -> IP (IP to IP) mode, you need not know any information before
setting up. You can make calls only in fayn network through IP addresses.
Example
VOIP settings under IP -> IP mode
Phone settings:
2. In menu „Settings“ -> „Services“-> „VOIP“-> „IP > IP“ -> „Terminal Aliases“ add name
(alias) that will be along with your phone call and user can see alias on LCD display. As
an example of alias you may use your name.
3. In menu „Settings“ -> „Services“-> „VOIP“-> „IP > IP“ select „Activate“
8.2.3 Jabber client settings
It is impossible to receive and send jabber messages without a proper jabber client setup.
For Jabber client you will need the following information:
Jabber server login name
Jabber password
Jabber resource
Jabber server address
Jabber server port (5222)
Jabber
Back
Login
Password
Resource
Server
Port
4.2.2
Select
Through Jabber it is possible for one user to be logged in at more sites at the same time. The
„Resource“ parameter serves to further specify your login site. Here, it is possible to enter data
like „Office“, „Home“ …
Pressing the “Settings” button, enter the phone settings and select “Services” > “Jabber”.
Enter your parameters and select „Apply“.
Example
Jabber client settings
Jabber server data:
• Server´s name: jabber.com
• Port: 5222
• Registration name: viki
• Registration password: viki85
• Resource: Home
Phone settings:
1. In menu „Settings“ -> „Services“-> „Jabber“ select:
28
„Login“: viki
„Password“: viki85
„Resource“: Home
„Server“: jabber.com
„Port“: 5222
2. in menu „Settings“ -> „Services“-> „Jabber“ select „Apply“
Skip this step if you do not need to use jabber client.
8.2.4 E-mail Settings / SMTP Server Settings
It is impossible to send and receive e-mails without a proper SMTP and POP3 setting.
SMTP server is used to send e-mails.
Skip this step if you do not need to receive electronic mail.
To set up SMTP server you will need following information:
Name of SMTP Server
Port of SMTP server (default is 25)
Sender´s Address
Outgoing (SMTP)
Server
Port
E-Mail
Back
4.3.1.2
Select
This information may be obtained from your Internet provider or administrator.
Pressing the “Settings” button, enter the phone settings and select “Services”> “Mail”>
“Outgoing (SMTP).
Enter the server (IP address or name), port, and email address. The “@” symbol can be found on
the zero 0
button.
Example
SMTP settings
Data on SMTP server:
• Name of server: smtp.mail.com
• Port: 25
• Sender´s Address: [email protected]
Phone settings:
1. in menu „Settings“ -> „Services“-> „Mail“-> „Outgoing (SMTP)“ select:
„Server“: smtp.mail.com
„Port“: 25
„E-Mail“: [email protected]
29
8.2.5
E-mail Settings / POP3 Server Settings
Skip this step if you do not need to receive electronic mail.
POP3 server is used to receive e-mails.
To be able to receive mail, you will need to know the following
information:
Name of POP3 server
Port of POP3 server (default is 110)
Login name an password
Interval of checking new mail (in minutes)
Incomming (POP3)
4.3.2.2
Server
Port
Login
Password
Check Interval
Back
Select
You may obtain this information from your Internet connection provider or your administrator.
Pressing the “Settings” button, enter the phone settings and select “Services” > “E-Mail” >
“Incomming (POP3)”.
Enter displayed parameters. The “@” symbol can be found on the zero 0
button.
Example
Setting up POP3 server
Data on POP3 server
• Name of Server: pop3.mail.com
• Port: 110
• Login name: viki45
• Login password: 45viki
• Mail checking interval: 10 min
Phone settings:
In the menu „Settings“ -> „Services“-> „Mail“-> „Incomming (POP3)“ select:
1.
„Server“: pop3.mail.com
2.
“Port“: 110
3.
„Mame“: viki45
4.
„Password“: 45viki
5.
„Check Interval“ : 10
8.3 Save settings
After changing the phone settings, save all your changes by pressing the “Settings” button,
enter the phone settings and select “Save Settings”.
Saving is confirmed by following message:
30
9
How to Upgrade Firmware
On the web page www.fayn.cz, in the section Download, you can find new firmware for Net
Phone NP210 with some patches.
How to Upgrade Firmware:
1) At boot time when on display arrives "Press
Settings to Firmware" press button Settings. You
should press it in some seconds, otherway iphone
applications will run. In case you press other key
than Settings, upgrade will not run.
Press “Settings” to Firmware
voipac
Starting DHCP
2) First menu shows you actual Kernel version and
FileSystem version.To exit press Exit (Select on
the left). If continue, press Firmware Upgrade
(Select on the right).
3) When you select „Firmware Upgrade“ set address
to firmware package according info file on the
www.fayn.cz in section Download. With ALT
select numeric or alfa keyboard ("123", "ABC",
"abc"). Move to previous page press Back (Select
on the left). To start upgrade press Download
(Select on the right).
Version
Kernel:N210-23329.1
123
FileSystem:1.2.4093.1
Exit
Firmware Upgrade
Enter URL to package
123
www.fayn.cz/data/download/
np210/fmw24093
Back
Download
4) After download, you can see on display download status with MD5 checksum. The MD5
checksum support our actual official version to avoid of download pirate software. Move
to previous page press Back (Select on the left).
Download
Package: np210fmw24093
Downloading
Signed MD5:615b37e03b67744
612f243c30e214a9b
Size: 2020494
Back
5) Make upgrade press Upgrade Now (Select on the
right). After burn process IP phone will be
restarted. After restart IP phone has new version
of firmware inside.
Upgrade Now
voipac
Upgrading …wait pls.
31
10 Cleaning the unit
Follow the steps below to clean the unit:
1. Disconnect the unit from the power supply!
2. Clean with a soft cloth, moistened with water. Do not use any liquid or aerosol cleaning
mixtures!
3. After drying up, plug in the power supply!
11 Glossary
DHCP (Dynamic Host Configuration Protocol)
Protocol for dynamic host configuration. It supplies individual network computers with
configuration information, such as IP address, implicit DNS server address, etc…
Protocol of dynamic address assignment of the IP protocol. This technology has been used with
larger Internet connection networks. Without DHCP it would be necessary to assign to each
computer (including a new one) one IP address, which currently is both impossible and not
feasible. DHCP provides for central administration and IP assignment on the need-to-need basis.
DNS (Domain Name System)
System of domain names. A database, where each host name is assigned an IP address (or vice
versa).
DTMF (Dual Tone Multi Frequency)
H.323 Gatekeeper
A switchboard of all calls within the H323 network. Although not a required part of the network, it
provides very important services including addressing, authorisation and authentication of
terminals and gates, administration of capacities and permeabilities, billing and redirecting calls.
IP address
IP address is a unique 32-bit number that identifies a computer within the Internet. Each packet
sent via the Internet contains an information about the place of its origin (source IP address) and
its destination (final IP address).
IP -> IP
Making telephone calls within the IP network without using the Gatekeeper.
Jabber
Jabber is a system for sending short text messages via the Internet. (IM - instant messaging).
Network mask
Network mask divides the IP address into two parts: higher, which marks the network, and lower,
which marks the computer within this network. Mask writes the same way as the IP address (e.g.
255.255.255.0). All computers in one IP segment must have the same sub-network mask and the
same network part of the IP address.
NAT (Network Address Translation)
Using the NAT technology (IP address translation) it is possible to connect the local network to
the Internet through a single public IP address. The whole network then looks on the outside as
32
one computer, however, computers within it have access to the Internet as if the network were
connected to it through a typical router (certain limitations apply here)
In all packets proceeding from the local network to the Internet, the source IP address is
substituted for the external IP address and an entry is made into the so-called NAT table. If the
previous packet matches any entry in the table, the destination address is substituted for the
original IP address and the packet is directed to the correct computer within the local network.
Otherwise the packet is thrown away. This way NAT protects the entire local network against
access from the outside.
Unlike typical proxy servers and application gateways, NAT is typical for its ability to let in almost
any IP-based protocol. Thus, it facilitates the Internet access the same way as a common router.
NTP (Network Time Protocol) –
Protocol for the synchronisation of clock on the Internet computers.
POP3
POP3 is a protocol used mainly by email client to access the mailbox. To communicate it uses the
TCP protocol, port 110. To prevent an authorised access into the mailbox, POP3 checks user’s
identity by his name and password.
Port
Port is a 16-bit number (1-65535) used by TCP and UDP protocols to identify application
(services) on the given computer. One computer (one IP address) may house more applications
at the same time (WWW server, WWW client – browser, FTP client, etc.). Each application,
however, is clearly labelled by the port number. Ports 1 through 1023 are reserved and used by
standard or system services (e.g. 80 = WWW). Ports 1024 may be freely used by any application
(typically by client as the source port or by non-standard application of the server type).
QoS (Quality of Service)
SMTP (Simple Mail Transfer Protocol)
a protocol used for communication between mail servers and for sending mail by client to the mail
server. To communicate, it uses the TCP protocol, port 25. The protocol itself contains only
commands for composing and sending the message, it does not provide for any securing or
identifying the user.
TCP/IP
is a common name for communication protocols used within the Internet (e.g. IP, ICMP, TCP,
UDP etc.). All of these protocols are packet-based (also called packet-oriented). TCP/IP IS NOT a
specific protocol!
VOIP
Voice Over Internet Protocol
33
12 Troubleshooting
4
4
4
4
after a correct phone connection is established, there no sound in the phone’s
handset?
5 check the handset volume setup – buttons Volume +, Volume -.
after a correct phone connection is established, when switched to the speaker mode,
there is no sound from the speaker?
5 check the speaker volume setup / buttons Volume +, Volume -.
after a correct phone connection is established the other party cannot hear you?
5 check the microphone volume setup – buttons Volume +, Volume -.
it is impossible to connect to any phone number or IP address other than IP
computer address on the intranet?
5 if not connected to the Gatekeeper, the symbol for disconnected connection is flashing
and a text reads “no gatekeeper” on the device’s display. Check the network and VOIP
settings of the device.
13 Technical Specifications
Characteristics
• H.323 compatible phone, supports co-operation with gatekeeper, H.245 Tunnelling, Fast
Start and H.245 in SETUP
• LAN a WAN network connector . support of the Bridge and FwNat regimes
• QoS
• Supported audio codecs
o G.723.1
o GSM-06.10
o MS-GSM
o LPC-10
o G.711-ALaw-64k
o G.711-uLaw-64k
• Automatic answer and incoming calls divert (always/busy/no answer after time set by the
user), autodial
• Redial, hold, mute, conferencing, call divert
• Software-generated DTMF
• Silence detection & noise reduction
• Multilanguage GUI (CZ/SK/EN)
• Viewing of credit / debit, call duration, and spent amount online
• Phonebook
• Possibility of quick dialling of often used numbers
• Registers of called, received, and missed calls (20 calls per register)
• Integral e-mail and jabber client
34