1
User Manual - MIDI Sequencer +
Showrooms at Shaw Lancashire and Mixbury Oxfordshire
Contents
1. 2. 3. 3.1. Introduction.................................................................................................................................4
Care of your MIDI Sequencer...............................................................................................4
MIDI system................................................................................................................................4
What is MIDI?..................................................................................................................................4
4. MIDI Terminology.....................................................................................................................5
5. Installation....................................................................................................................................6
5.1. Connections......................................................................................................................................6
5.2. SD Memory Card..............................................................................................................................7
6. Controls.........................................................................................................................................8
7. Display Menu System...............................................................................................................9
8. Play/Browse Screen.................................................................................................................10
8.1. Navigation in the Play/Browse screen ...........................................................................................11
8.2. Play MIDI file.................................................................................................................................11
8.3. Play Hymn MIDI file......................................................................................................................11
8.4. Play Playlist File.............................................................................................................................11
8.5. Options while playing.....................................................................................................................12
8.5.1. To stop playing...............................................................................................................................12
8.5.2. To pause the playing.......................................................................................................................12
8.5.3. To restart playing............................................................................................................................12
8.5.4. To change the Tempo......................................................................................................................12
9. Record Mode Screen...............................................................................................................12
9.1. Recording........................................................................................................................................12
9.1.1. To record:........................................................................................................................................12
10. Track Menu................................................................................................................................13
10.1. Track Play/Record..........................................................................................................................13
10.1.1. To Record a Track:..........................................................................................................................13
10.1.2. To Play a Track...............................................................................................................................13
10.1.3. To Add a track.................................................................................................................................13
10.2. Rename a track...............................................................................................................................14
10.3. Remove a track...............................................................................................................................14
11. File Management.....................................................................................................................14
11.1. Rename File/Directory....................................................................................................................14
11.2. Delete File/Directory......................................................................................................................15
11.3. Make Directory...............................................................................................................................15
12. Options.........................................................................................................................................15
12.1. Auto Playlist ..................................................................................................................................15
12.2. Hymn Mode ...................................................................................................................................15
12.3. Metronome .....................................................................................................................................15
12.4. MIDI Forward.................................................................................................................................15
12.5. Repeat ............................................................................................................................................15
12.6. Filter Menu.....................................................................................................................................16
12.7. Routing Menu.................................................................................................................................16
13. System Menu.............................................................................................................................17
14. Editing MIDI.............................................................................................................................17
14.1. Reading the SD card on a computer...............................................................................................17
14.2. Creating a Hymn MIDI file.............................................................................................................19
14.3. The Playlist.....................................................................................................................................19
Issue 2.0W 12/12/2012
Church Organ World Sequencer Plus - User Manual
Page 2 of 27
14.4. MIDI Channels...............................................................................................................................20
15. Components Relevant to MIDI...........................................................................................21
15.1. Sequencer MIDI file format............................................................................................................21
15.2. Software Editor/Synthesizer/Sequencer.........................................................................................22
15.3. MIDI Controllers............................................................................................................................23
15.3.1. Control Changes Received on Church Organ World instruments..................................................23
15.3.2. System Exclusive Messages for Church Organ World instruments����������������������������������������������24
15.3.3. Sequencer Plus System Real Time Messages (Play/Browse mode)����������������������������������������������24
15.3.4. Plus System Real Time Messages (Record mode)..........................................................................24
16. Troubleshooting .......................................................................................................................24
17. System Information.................................................................................................................26
17.1. Technical Specification...................................................................................................................26
17.2. Factory Settings..............................................................................................................................26
17.3. MIDI Implementation............................................................................................ 26
18. Information................................................................................................................................27
Issue 2.0W 12/12/2012
Church Organ World Sequencer Plus - User Manual
Page 3 of 27
1. Introduction
We hope that you enjoy the use of your MIDI sequencer plus. It is compatible with any MIDI device although
it is primarily for use with Johannus and Makin organs.
This manual describes the installation and operation of the MIDI Sequencer Plus and provides information
on how it works with other MIDI devices.
If you are an owner of a Makin organ then you will be aware that some of the information in this manual
is repeated from your Organ User Manual. This is intentional to save you having to refer back to another
manual and for other users to have access to the information
2. Care of your MIDI Sequencer
To get the best out of your MIDI Sequencer please take care by doing the following:
•
•
•
•
•
•
•
Keep it in a dry place, well away from any damp areas.
Clean it with a lint free cloth
Keep it away from liquids or any chance of accidental spillage.
When in use, place the sequencer on a flat stable surface or use the (optional) wooden stand.
Switch the MIDI Sequencer off when it is not in use.
Switch the MIDI sequencer off before removing the SD card. (To prevent corruption of open MIDI files.)
The MIDI sequencer may only be opened by a technician authorised by Johannus Organs. The MIDI
sequencer contains static-sensitive components. The warranty is invalidated if the MIDI sequencer is
opened by a non-authorised person.
• The MIDI Sequencer plus has internal connections to both the MIDI IN- and MIDI OUT-port pins 1
and 3. for future purposes. Please do not apply any kind of phantom power or signals to these pins.
Doing so may damage the Sequencer. If you plan to connect equipment, which sends signals or applies
power to pins 1 and/or 3 (and if that functionality cannot be disabled) please use MIDI cables that only
carries wires 2, 4 and 5.
3. MIDI system
3.1. What is MIDI?
MIDI is the abbreviation for Musical Instruments Digital Interface. With MIDI, musical instruments can be
coupled to each other, to a computer or to another MIDI device. The MIDI specification is produced by the
MIDI Manufacturers Association. Further information can be obtained from their web site www.midi.org.
The MIDI standard is partly based on hardware. In addition, it is a description of the way in which music
and sound are translated into a digital format which can be communicated to other devices equipped with
MIDI-functionality.
Issue 2.0W 12/12/2012
Church Organ World Sequencer Plus - User Manual
Page 4 of 27
4. MIDI Terminology
The following table lists of some of the MIDI terminology that you may encounter. For more information
consult the MIDI Manufacturers Association web site.
Term
Sequencer
Patch
Channel
Multitimbral
Polyphony
Expander
Voice
Synthesizer
Controller
Module
SysEx
Program Change
Bank Select
Issue 2.0W 12/12/2012
Description
A device for playing musical performances. The more sophisticated sequencers
also record MIDI as well as other inputs and they will also
allow editing of saved data. The most common sequencers are software computer
programs running on Personal Computer hardware. There are many of these
available ranging from the simple to very sophisticated.
A patch is the sound that a device can produce i.e. a musical instrument such as
a piano, violin or drums. Patches are also referred to as “instruments, programs,
algorithms or timbres”. Some devices contain multiple patches and the MIDI
specification pre-defines a number of
sounds allocated to patches.
Although there is only one physical MIDI connection between devices it is divided
by the MIDI signals into 16 command slots known as channels. An instrument can
generally be set to respond to one or all of the channels.
An instrument, synthesizer or sound generator is said to be multitimbral if it is capable
of producing two or more different instrument sounds simultaneously
The ability to play more than one note at a time.
A MIDI device that provides patches or other MIDI control function or a device that
replicates data coming to a MIDI IN port to multiple MIDI OUT ports.
Are the qualities of an individual note or group of notes that give a particular timbre
or sound. For example: a Trumpet or a Diapason
A device for generating sound usually to emulate an instrument. Most modern synthesizers
can create more than one instrument sound or voice and are often incorporated into
sequencers for replaying sound files.
Is any MIDI input device that implements a function but does not sound a note as a
direct result of its operation e.g. a piston, stop, expression peddle, switch, knob, etc.
MIDI allows 128 controllers per device. Many of the controller functions are predefined
by the MIDI specification.
A device that can generate musical sounds. Typically a module will incorporate one or
more patches but require external (MIDI) keyboard input to make them sound. Also
referred to as an Expander or Synthesizer.
System Exclusive MIDI messages. These are generally used by manufacturers to
generate messages that the Standard MIDI system does not provide or to send a chunk
of data in one message rather than using a lot of MIDI messages
The MIDI message used to select an instrument, patch or program. There are 128
program changes available.
The MIDI message used to select an instrument patch or program on a device that has
more than 128 patches. A device could have 128 programs with 128 banks of patches,
programs, instruments or timbres. Note that your Makin instrument does not implement
‘bank select’.
Church Organ World Sequencer Plus - User Manual
Page 5 of 27
5. Installation
5.1. Connections
The connection points for the Sequencer are situated on the side together with the On/Off switch.
Warning
If you are connecting to a MIDI device that is not a Makin or Johannus organ. You are
strongly advised to consult the manual for that device before proceeding.
To connect the sequencer to another MIDI device
1. Ensure the power is switched off on the the sequencer and on the other MIDI device to be connected
2. Connect the 9v connector to the sequencer and plug the associated mains adaptor into an electrical outlet.
3. Plug one end of the MIDI cables into the MIDI OUT socket and the other end of the cable into the the
MIDI IN socket of the other MIDI device.
4. Plug the other MIDI cable into the sequencer MIDI IN socket and its other end into the MIDI OUT
socket on the other MIDI device. Note that on Johannus and Makin organs MIDI OUT has been
changed to MIDI SEQ.
Issue 2.0W 12/12/2012
Church Organ World Sequencer Plus - User Manual
Page 6 of 27
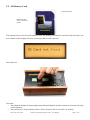
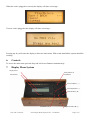
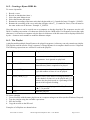
5.2. SD Memory Card
Diagonal Shoulder
Write Protect Tab
shown in the unlock
position
The sequencer has a slot for an SD memory card. The memory card must be inserted in the slot before you
use it otherwise the display will show a message that no card is present.
Insert the card
Note that:• The diagonal shoulder is bottom right nearest the push buttons and the contacts are closest to the edge
of the sequencer.
• The protect tab is in the unlock position. (You will not be able to record if it is locked.)
Issue 2.0W 12/12/2012
Church Organ World Sequencer Plus - User Manual
Page 7 of 27
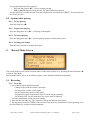
When the card is plugged in correctly the display will show a message:-
If a new card is plugged in the display will show a message:-
Pressing any key will cause the display to show the main menu. With a card installed the system should be
working.
6. Controls
To access the main menu press the Stop and Left Arrow Buttons simultaneously.
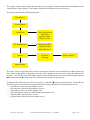
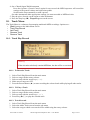
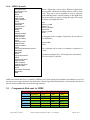
7. Display Menu System
Display Screen
Rotary Selector &
Push Button
SD Card Slot
Arrow Left Button ( < )
Arrow Right Button ( > )
Record Button ( )
Stop Button ( )
Issue 2.0W 12/12/2012
Church Organ World Sequencer Plus - User Manual
Play/Pause Button ( /|| )
Page 8 of 27
The display menu system allows the selection of the sequencer modes and provides information on the
current status of the sequencer. The display defaults to Play/Browse mode at power up.
The menu system has the following structure:Play/Browse
Record Mode
Track Menu
Track Play/Record
Add Track
Rename Track
Remove Track
File Management
Rename File/Dir
Delete File/Dir
Make Directory
Options
File Menu
Routing
Channel On/Off
System Menu
The rotary selector and push button is used to select items from the tree structured menu. Where other keys
have functions that relate to the menu a message will be displayed on the screen to show the function. For
example “exit: STOP select: RECORD” may be shown on the bottom of the screen meaning that the Stop
() and the Record ( ) buttons have the functions Exit and Select respectively.
To bring up the main menu press the Left Arrow (<) and Stop () buttons simultaneously. Use the Rotary
Selector to move the pointer to the required menu item then push Rotary Selector button to select.
• Play/Browse: shows the Play/Browse screen.
• Record mode: shows the Record Mode screen.
• Track Menu: shows the Track Menu screen.
• File Management: shows the File Management menu screen
• Options: shows Options menu screen.
• System Menu: shows the System Menu screen.
Issue 2.0W 12/12/2012
Church Organ World Sequencer Plus - User Manual
Page 9 of 27
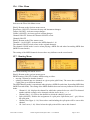
The Play/Browse screen will appear after the MIDI sequencer has been switched on.
To select screens through the key combinations:
• Play/Browse
Stop key + Play/pause key together.
• Record Mode Stop key + Record key together
• Menu Stop key + Left arrow key together
To select a screen through the main Menu
• Select the main Menu screen.
• Turn the selector to select a screen.
• Press the selector to go to the selected screen.
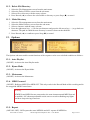
8. Play/Browse Screen
Repeat Mode Indicator
Play Mode Indicator
Busy Indicator
Metronome Indicator
Change Indicator
Elapsed Time Indicator
Status Indicator
• Song: Shows the name of the selected MIDI file.
• Tempo: Shows the set tempo (beats per minute).
• Status Indicator shows the current status (Stopped/Playing/Paused).
• Repeat Mode Indicator:
• Blank - Repeat mode not active.
• R: Repeats the selected MIDI file.
• RA: Repeats all MIDI files.
• Play Mode Indicator:
• Blank - Default play mode.
• HM: The selected MIDI file plays in the Hymn Mode.
• PL: A playlist has been detected. The MIDI files are played according to the programming of
the playlist.
• Busy indicator appears when MIDI sequencer is busy processing.
• Change indicator +/- shows behind the item that can be changed.
• Metronome Indicator: Shows the rhythm.
• Time Indicator: Shows the elapsed playing time.
Issue 2.0W 12/12/2012
Church Organ World Sequencer Plus - User Manual
Page 10 of 27
8.1. Navigation in the Play/Browse screen
• Turn the selector to the right to go forward / downward.
• Turn the selector to the left to go back / upward.
• Press the selector to select the menu, directory or song.
Directories can contain the following content:
Content
MIDI song
Subdirectory, which is marked by < and >
Back command. to leave the subdirectory
Playlist, which is marked by [ and ]
Example
RECO01
<SUBDIRO1>
[BACK]
[PLAYLIST]
8.2. Play MIDI file
• Select the Play/Browse screen from the main menu
• Turn the selector to select a MIDI file.
• Press the Play/pause key. The MIDI sequencer starts playing the selected file.
Wait until stopped appears on the screen. The MIDI file has been played.
8.3. Play Hymn MIDI file
Playing the Hymn MIDI file is only possible when the Hymn Mode is active. (Hymn Mode can be set
On or Off via the Menu system.)
1. Select the Play/Browse screen from the main menu.
2. Turn the selector to select a Hymn MIDI file. A Hymn MIDI file begins an l_ (intro) or a V (verse).
The play mode HM is displayed on the screen.
3. When selecting an intro, the associated verse will start immediately after the intro has been played.
When selecting verse, only the verse will be played.
4. Press the Play/pause key or the selector. The Hymn Mode screen appears. The MIDI sequencer
starts playing the MIDI file.
5. Press the arrow keys to change the number of times that a verse is to be played.
6. Wait until stopped appears on the screen. The MIDI file has been played.
8.4. Play Playlist File
Playing the Playlist file is only possible if the Playlist Mode has been set to active via the Menu System.
If Auto Playlist is ON, the sequencer will immediately go to the playlist, even if it is situated in a
subdirectory.
The file name of the playlist has to be playlist.txt. Other file names are not allowed, because the
sequencer will not find the playlist with another file name.
1. Insert an SD card containing a playlist into the SD card input. Browse to the playlist. The play mode
PL appears on the Play/Browse screen.
2. Press the Play/pause key. The MIDI sequencer starts playing the playlist.
3. Wait until the music stops.
Issue 2.0W 12/12/2012
Church Organ World Sequencer Plus - User Manual
Page 11 of 27
At a programmed stop in the play list:
• Press the Play/pause ( /|| ) key to resume playing.
• End of play list appears on the screen: The play list has been played.
It is also possible to exit the play list. Turn the selector to the left until it says [ EXIT ] . Press the selector
to exit the play list.
8.5. Options while playing
8.5.1. To stop playing
Press the Stop key ( ).
8.5.2. To pause the playing
Press the Play/pause key ( /|| ). Playing is interrupted.
8.5.3. To restart playing
Press the Play/pause key ( /|| )to start playing again or restart from a pause.
8.5.4. To change the Tempo
Turn the rotary selector to change the Tempo.
9. Record Mode Screen
The record mode screen can be accessed either via the menu system or by pressing the Record button (
) while in Play Mode.
Record mode allows you to record what you play on the attached instrument keyboard(s).
9.1. Recording
9.1.1. To record:
1. On a Church Organ World instrument
Change tempo with the selector (optional).
Set the general volume of the organ.
Set the expression pedal(s) of the organ.
Program the required registration in preset on the organ (optional).
Set all stops OFF (A reset with the 0 key can be used if required)
On other instruments set the required settings
2. Press the Record ( ) key. The sequencer will go into Record Pause mode
3. The Sequencer waits for a MIDI event to occur. If you want to record silence at the beginning, press
the Play/Pause key to start recording manually.
Issue 2.0W 12/12/2012
Church Organ World Sequencer Plus - User Manual
Page 12 of 27
4. On a Church Organ World instrument
Press the 0-piston (General Cancel) again for one second: the MIDI sequencer will record the
settings of the general volume and expression pedals.
Switch on the stops (manually or with a preset).
On other instruments make appropriate settings you want recorded as MIDI activities
5. Play the piece of music on the organ or other instrument.
6. Press the Stop key ( ). Stopped appears on the screen.
10. Track Menu
The Track Menu is a submenu for managing multitrack MIDI recordings. Options are:• [Back] returns to the Main Menu screen
• Track Play/Record
• Add Track
• Rename Track
• Remove Track
10.1. Track Play/Record
Warning
If the selected track already contains MIDI data, the data will be overwritten!
10.1.1. To Record a Track:
1.
2.
3.
4.
5.
Select Track Play/Record from the main menu
Select a song with the rotary selector.
Select a track with the arrow keys ( < > ).
Make sure all stops are OFF.
Press the Record button ( ) to start recording the selected track while playing all other tracks.
10.1.2. To Play a Track
1.
2.
3.
4.
Select Track Play/Record from the main menu
Select a song with the rotary selector.
Select a track with the arrow keys. ( < > )
Press Play ( /|| ) to play the selected track.
10.1.3. To Add a track
1. Select Track Play/Record from the main menu
2. Select the Add a Track screen from the sub menu
3. Select the song to which a new track will be added using the rotary selector.
Issue 2.0W 12/12/2012
Church Organ World Sequencer Plus - User Manual
Page 13 of 27
4. Press the Record button ( ) to continue {or Stop ( ) to cancel}.
5. Create name by changing selected character (underlined) with the rotary selector. Press the right
arrow key ( > ) for the next character and press the left arrow key ( < ) to go back one character.
6. When finished, press the Record button ( ) to add the track with the given name or press the Stop
Button ( ) to cancel.
10.2. Rename a track
1.
2.
3.
4.
5.
6.
Select Track Play/Record from the main menu
Select the Rename Track screen from the sub menu
Select a song with the selector.
Select a track with the arrow keys.
When finished, press Record ( ) to continue or press Stop ( ) to cancel.
Change selected character with the rotary selector. Press the right arrow key ( > ) for the next character
and press the left arrow key ( < ) to go back one character.
7. When finished, press Record ( ) to continue or press Stop ( ) to cancel.
10.3. Remove a track
1.
2.
3.
4.
5.
Select Track Play/Record from the main menu
Select the Remove Track screen from the sub menu
Select a song with the rotary selector.
Select a track with the arrow keys ( < > ).
Press Record ( ) to remove the selected track or press Stop ( ) to cancel
11. File Management
File management may be used to make a directory, delete a file or directory and rename a file or directory.
11.1. Rename File/Directory
1.
2.
3.
4.
5.
Select the File Management screen from the main menu
Select Rename File/Directory from the sub menu
Select a song with the rotary selector.
Press Record ( ) to continue {or stop ( ) to cancel}.
Change selected character with the rotary selector. Press the right arrow key ( > ) for the next character
and press the left key ( < )to go back one character.
6. When finished, press Record ( ) to continue or press Stop ( )to cancel.
Issue 2.0W 12/12/2012
Church Organ World Sequencer Plus - User Manual
Page 14 of 27
11.2. Delete File/Directory
1.
2.
3.
4.
Select the File Management screen from the main menu
Select the Delete File/Dir screen from the sub menu
Select a file or directory with the rotary selector.
Press Record ( ) to remove the selected file or directory or press Stop ( ) to cancel.
11.3. Make Directory
1.
2.
3.
4.
Select the File management screen from the main menu
Select the Make Directory screen from the sub menu
Select a character with the rotary selector.
Press the right arrow key ( > ) for the next character and press the left arrow key ( < ) to go back one
character. The path in which the new directory is stored is shown at the third line.
5. Press Record ( ) to confirm or press Stop ( ) to cancel.
12. Options
The Options sub menu enable certain functions of the sequencer to be set to a default condition as follows:-
12.1. Auto Playlist
(ON/OFF): Activates the Auto Playlist mode.
12.2. Hymn Mode
(ON/OFF): Activates the Hymn Mode.
12.3. Metronome
(ON/OFF): Activates the Metronome.
12.4. MIDI Forward
(ON/OFF): Redirects MIDI IN to MIDI OUT. This only works in the Record Mode while recording and in
the stopped & MIDI Forward state.
Warning
If MIDI In and MIDI Out are connected to the same instrument and MIDI forward
is enabled ( ON ) then unpredictable results can occur such as flashing stop lights
and draw stops moving in and out.
12.5. Repeat
(ONE/ALL/OFF): ONE repeats the same MIDI file and ALL repeats all MIDI files.
Issue 2.0W 12/12/2012
Church Organ World Sequencer Plus - User Manual
Page 15 of 27
12.6. Filter Menu
Selects to the Filter Sub-Menu screen.
[Back]: Returns to the Options menu screen.
Stops/Instr. (ON/OFF): Activates the stop and instrument changes.
Tempo (ON/OFF): Activates tempo changes.
Volume (ON/OFF): Activates general volume changes.
Channel ON/OFF: Selects the Channel ON/OFF screen.
Channel ON/OFF
[Back]: Returns to the Filter menu screen.
Channel 1-16 (ON/OFF): Activates the MIDI channels 1-16.
The channel ON/OFF mode relates to the original channels.
The channel ON/Off mode is active when playing a MIDI file and when forwarding MIDI data
(MIDI Forward mode).
The setting of the MIDI channels does not have any influence on the record mode.
12.7. Routing Menu
Selects the Routing Sub-Menu screen.
[Back]: Returns to the opt ions menu screen.
MIDI Routing (ON/OFF): Enables MIDI routing to allow:
• moving a channel to another channel.
• splitting a channel into two channels at a given point (split Point). The tones above and below
a split point go to different channels.
The MIDI Routing mode is operational when playing a MIDI file and when forwarding MIDI data
(MIDI Forward mode). The setting of the MIDI channels does not have any influence on the record
mode.
• Channel (1-16): displays the channel for which the options below are valid. This channel
number and the settings can be changed with the Arrow keys ( < > ).
• Channel Out (1-16): Selects the channel to which the channel is moved.
• Split (ON/OFF): Enables the assignment of a split point. Split Point (sscC - g6): Selects
the split point.
• Channel Out Upper (1-16): Notes above and including the split point will be sent to this
channel.
• Ch. Out Lower (1-16): Notes below the split point will be sent to this channel.
Issue 2.0W 12/12/2012
Church Organ World Sequencer Plus - User Manual
Page 16 of 27
13. System Menu
[Back]: Returns to the main Menu screen.
Sort Files (ON/OFF): Sequencer will sort files and directories alphabetically.
System Real Time Messages (ON/OFF): Activates the System Time environment
Factory Preset: Restores the original factory settings.
Recording Counter Reset: Resets the RECxxxxx.mid number
Update Firmware: Updates the current firmware if a valid FIRMWARE.BIN file is present in the root
directory of the SD-card
14. Editing MIDI
Unless it is intended to edit your Sequencer MIDI files on a personal computer you will not need to know
the information contained in this section to use the Sequencer Plus. For some of these operations a software
sequencer will be needed that allows you to edit MIDI files.
14.1. Reading the SD card on a computer
Some computers have an SD card slot so that it is only necessary to plug the card in to be able to read it. On
other machines an SD card to USB converter (Shown below) may be required.
The SD card will appear as a Disk drive in Windows® Explorer.
Issue 2.0W 12/12/2012
Church Organ World Sequencer Plus - User Manual
Page 17 of 27
In this case the removable disk (J:) is the SD card. Display the disk contents then the files may be edited,
renamed or deleted using the Windows® file or other software tools. When renaming a file ensure that the
.MID suffix is retained or the sequencer will be unable to recognise the file.
Double click on any .MID filename and this should start the Windows® Media Player (if it is the default
player) which should play the tune (as a piano piece). The file can be opened with more sophisticated software
sequencers that have a wider range of voices and the ability to edit the MIDI file.
Issue 2.0W 12/12/2012
Church Organ World Sequencer Plus - User Manual
Page 18 of 27
14.2. Creating a Hymn MIDI file
To create a hymn file
1.
2.
3.
4.
5.
6.
Record a verse.
Record an introduction (intro.).
Select the main Menu screen.
Select the Rename file mode.
Rename the recording of the intro such, that it begins with an I_ (I stands for Intro). Example: I_SONG1.
Rename the recording of the verse such, that it begins with a V_ (V stands for Verse). The text must be
the same as the text of the intro. Example: V_SONG1.
Note that steps 4 to 6 can be carried out on a computer as already described. The sequencer uses the old
DOS 8.3 naming convention of 8 characters followed by the .MID suffix. If a filename of more that eight
characters is created on a computer only the first six characters of the file name will be displayed followed
by the ~ character and a number to make the filename unique.
14.3. The Playlist
A playlist enables multiple Songs/Hymns to be played in sequence. A directory can only contain one playlist.
The playlist could be used to set up a sequence of Songs/Hymns for a complete church service if required.
The following expressions are valid to be used in the playlist:Expression:
Explanation
;comment
comment is a text description for the use of the
programmer. Its is ignored on play back.
{name}.MID
Where {name} is the name of a .MID file in the
same directory that is required to be played
{name}.MID,{x}
Where {name} is the name of a Song/Hymn file and
{x}is the number of times it is to be played.
{name}.MID,{x},{y}
Where {name} is the name of a Song/Hymn file, {x}
is the number of times it is to be played and {y} is
denotes the play back speed as a percentage of the
speed of the original recording.
STOP
The playlist stops playing until the Play/Pause key
( /|| ) is pressed.
Ends the play list.
END
To create a playlist
1. Create a text file with the name playlist.txt on a computer using a text editor (such as Windows Notepad).
2. Type the playlist using the available expressions:
3. Save the text file.
4. Copy the text file to the SD card.
Examples of a Playlists are shown below:Issue 2.0W 12/12/2012
Church Organ World Sequencer Plus - User Manual
Page 19 of 27
14.4. MIDI Channels
;Sung Eucharist
;Pre service music
BOEL.MID
STOP
;First Hymn
OEH110I.MID
OEH110V.MID,3
STOP
;Kyrie-Inwood
KINW.MID
;Gloria-Powell
GINW.MID
STOP
;Psalm
PSALM148.MID
;Gradual Hymn
OEH107I.MID
OEH107V.MID,4
STOP
;Offertory Hymn
OEH351I.MID
OEH351V.MID,5
STOP
;Sanctus & Benedictus-Inwood
SINW.MID
BIND.MID
STOP
;Agnus Dei-Inwood
STOP
;Recessional Hymn
OEH124I.MID
OEH124.MID,6
;Alleluia and Amen
AMEN124.MID
STOP
;Post ServiceVoluntary
BACH.MID
END
When a Hymn has verses where different registrations
are used then a different recording must be used for each
verse. They can be run in sequence to form a complete
hymn although some external editing of the MIDI files
may be necessary to get the timing just right. The result
for hymn 110 might look like:;Intro
OEH110_1.MID
;Verses 1,2
OEH110_2.MID,2
;Last verse
OEH110_3.MID
STOP
or alternatively the complete Hymn may be recorded in
one MIDI file:_
OEH110.MID
STOP
The comments can be used as a reminder of sequence of
events.
Filenames starting with I_ will not play the associated V_
file when used in a playlist.
MIDI can transmit data over 16 channels. MIDI devices can be usually be programmed to transmit or received
up data on one or more channels. By default the Church Organ World instruments, with a standard keyboard
layout, transmit MIDI data on the following channels:
15. Components Relevant to MIDI
Channel
1
2
3
4
5
12
Issue 2.0W 12/12/2012
1 Manual
Keyboard
2 Manual
Great
Swell
Pedal
3 Manual
Choir
Great
Swell
Pedal
Stops
Stops
Stops
Church Organ World Sequencer Plus - User Manual
4 Manual
Choir
Great
Swell
Solo
Pedal
Stops
Page 20 of 27
Stops
Keyboard &
Pedalboard
Pistons
MIDI In MIDI Thru MIDI Out
5 pin DIN sockets
Expresion Pedals
Rotary Controls
Hardware devices generate electrical signals which are converted to MIDI commands. The Diagram shows
the main MIDI hardware components available on an Organ. Control of Reverberation, Overall Volume and
memory settings are also MIDI related functions although they may not all be implemented on your MIDI
device. Example: Reverberation is not available as a MIDI setting on Makin and Johannus instruments. Note
that MIDI functions not recognized by the receiving MIDI device will be ignored if sent.
15.1. Sequencer MIDI file format
MIDI has different file formats referred to as MIDI 0, MIDI 1 and MIDI 2 used for the following purposes:• 0 - Single multichannel track
• 1 - multiple track with separated channels to play at the same time
• 2 - multiple multichannel tracks that play one by one.
The Sequencer Plus creates MIDI 1 files and can play MIDI 0 and MIDI 1.
When recording the Sequencer collects incoming data and stores it in a binary file on the SD card. Using an
program editor it is possible to edit the binary file. Part of a binary file shown below was recorded to show
the stops on a Makin 2-18D Organ.
Warning
Always back up MIDI files before editing.
Issue 2.0W 12/12/2012
Church Organ World Sequencer Plus - User Manual
Page 21 of 27
On a Church Organ World instrument the MIDI command that changes a stop is CB xx where
• C is the program change command,
• B is channel 12 and
• xx is the number of the stop
The first CB (shown in red) in the file is followed by 00 which represents the stop number. This is the Open
4D 54 68 64 00 00 00 06 00 01 00 02 00 C0 4D 54 72 6B 00 00 00 0B 00 FF 51 03 07 A0 D0 00
FF 2F 00 4D 54 72 6B 00 00 00 5F 00 FF 03 08 54 72 61 63 6B 20 30 31 00 CB 00 86 15 CB 01
84 22 CB 02 83 18 CB 03 82 58 CB 04 82 3A CB 05 84 07 CB 08 82 55 CB 09 82 54 CB 0A 82
49 CB 0B 82 58 CB 0C 82 51 CB 0D 86 4E CB 10 84 00 CB 11 83 07 CB 12 83 01 CB 13 84 69
CB 18 84 0D CB 19 82 71 CB 1A 82 6B CB 1B 00 FF 2F 00
Diapason 8 which is known from the order the stops were set. From the information in this file it would be
possible to change the registration, of any MIDI file produced, on this instrument.
It also follows that given a similar map for another instrument it is possible to convert the MIDI file to play
on the other instrument. A good understanding of MIDI commands is required for this technique but there
are plenty of web sites and books available that can help.
15.2. Software Editor/Synthesizer/Sequencer
There are easier ways to edit MIDI files. Most software MIDI Synthesizers will have a plain text editing
facility. The text rendering example of the previous file shown below is from Anvil Studio (from www.
AnvilStudio.com).
Each of the program changes represents a stop drawn. The line can be edited to make whatever changes are
necessary. Edited files can be saved on the SD card and played back using the MIDI Sequencer Plus.
Most MIDI editors will also allow the music to be edited which is useful for removing or adding
pauses,correcting timing and changing notes.
Issue 2.0W 12/12/2012
Church Organ World Sequencer Plus - User Manual
Page 22 of 27
The MIDI file shown above was recorded on a Makin Jubilee organ using the MIDI Sequencer PLUS. Using
the AnvilStudio editor, notes on the stave can be edited and MIDI control functions changed.
15.3. MIDI Controllers
MIDI controllers are set by MIDI functions. To find out which MIDI functions match control devices on
your instrument such as expression pedals and stops; simply record a file using only these functions, making
a careful note of the order of operation, then view the file in a MIDI editor.
MIDI controller codes for Church Organ World instruments are given in the back of the user handbook for
the instrument. To give a guide to their usage some of them are repeated in this manual.
Numbering in MIDI code is usually given in numbers to a base of 16 (Hexadecimal). A Hexadecimal number
uses characters 0 to 9 and A to F or a to f to represent a decimal equivalent of 0-15. A hexadecimal number
is normally denoted by the number followed by the letter h or preceded by 0x.
15.3.1. Control Changes Received on Church Organ World instruments
Information can be received by the following MIDI controllers
To change the Volume use MIDI code Bn 07 xx where xx = a value from 00 to 7F and n is the channel
number. Use channel 12 ie n=B for control functions.
To change the expression setting use MIDI code Bn 0B xx where xx = a value from 00 to 7F
Issue 2.0W 12/12/2012
Church Organ World Sequencer Plus - User Manual
Page 23 of 27
15.3.2. System Exclusive Messages for Church Organ World instruments
The SysEx messages all have the same format. The first 7 bytes and the last byte are always the
same. Only the value of the 8th byte changes. The message format is:
F0 00 4A 4F 48 41 53 xx F7 where xx is the changeable byte
For all stops off, xx has the value 7F (General Cancel)
15.3.3. Sequencer Plus System Real Time Messages (Play/Browse mode)
When the sequencer is in Play/Browse mode and no song is playing yet
1. If a Start (OxFA) or Continue (OxFB) message is received: The file shown on screen will be opened
and played from the beginning (analogous to Play/Pause button).
2. If another Start or Continue message is received after the initial start, the song will be paused (like
pressing the Play/Pause button).
3. If another Start or Continue message is received: The song will be resumed from the point it was
paused (like the Play/Pause button).
4. If a Stop (OxFC) message is received: The Sequencer will stop playing and the file will be closed
(like the Stop button).
15.3.4. Plus System Real Time Messages (Record mode)
When the sequencer is in Record mode and is not recording yet
1. If a Start (OxFA) message is received: The Sequencer will go into Record Pause (this is also
possible by pressing the REC button).
2. If another Start message is received, or a Continue message or MIDI event, recording will start
(analogous to the Play/Pause button).
3. If a Stop (OxFC) message is received: The recording will be stopped (like pressing the Stop button).
4. If after a recording a Continue message is received; the sequencer remains in Record Mode. The
recorded song will be played back so it can be heard without having to change the sequencer’s mode
Notes
The Sequencer can also be set in Record Pause manully with the REC button. When it receives a Start
or Continue, it will directly start recording. This way only one Start message is responsible for the
start of a recording.
The sequencer ignores Active Sensing (0xFE) and Clocks (0xF8) at its MIDI In port.
16. Troubleshooting
If you are having a problem with the MIDI Sequencer Plus and a message is displayed then consult the
troubleshooting chart. If this does not resolve your problem then please contact the Church Organ World
office for advice. For problems with MIDI editing the best source of advice is the internet.
Issue 2.0W 12/12/2012
Church Organ World Sequencer Plus - User Manual
Page 24 of 27
Troubleshooting Chart
Message/Problem Meaning/Cause
Explanation
SD card not found
Insert an SD card.
Card locked!
Disk full!
Read error
File not found
There is no SD card in the SD
card slot.
You are trying to make a
recording on a write-protected
SD card.
The SD card is full.
The file cannot be read.
The file does not exist or has a
faulty reference.
Maximum record The maximum number of
files
record files has been reached.
End of playlist
stop point
New SD card found
reading
The stops on the
organ do not switch
on or the stops are
flashing
You cannot find
certain MIDI files.
During playing the
stops, the tempo
changes or the
general volume are
not working.
MIDI error more
than 39 tracks [Press
any Key]
Issue 2.0W 12/12/2012
You press play while the
playlist has reached the end
You have selected a stop point
in the playlist and pressed
play.
The MIDI sequencer is busy
reading the SD card. If the
reading takes more than a
few seconds, there may be a
contact problem
The connections MIDI IN and
MIDI OUT may have been
connected to the same device
and the MIDI Forward mode
is on. The file may have been
edited incorrectly.
The MIDI sequencer may still
be in a playlist (the screen
shows PL).
The stops/Instr. , Tempo and/
or Volume modes may be OFF.
The SD card has a slide. Put the slide in the unlocked
position.
Remove some MIDI files or insert an empty SD
card.
Replace the file.
Remove the file or the faulty reference. (If the file
has been edited in Windows® then use command
mode to check that the filename complies with DOS
8.3 format, Longer filenames are allowed but only
8 characters can be displayed)
The maximum is 99999.
Rename or remove
existing recordings the names of which begin with
REC and/or reset Record Counter.
Go back to the beginning of the playlist using the
selector.
Select a song.
Wait until the MIDI sequencer is ready Switch
the MIDI sequencer off Remove the SD card and
again. Insert the SD card again. Switch the MIDI
sequencer ON
Switch off the MID Forward mode.
Check any editing
Switch off the Playlist mode
Set the mode involved to ON
The file may have been edited Check edited files.
incorrectly.
Maximum number of tracks is MIDI sequencer does not support more than 39
reached
tracks.
Church Organ World Sequencer Plus - User Manual
Page 25 of 27
17. System Information
17.1. Technical Specification
Description
Specification
Dimensions (I x w x h)
190 x 120 x 55 mm (7 3/8 x 2 1/8 x 4 5/8 inch)
Weight
710 grams (1 lb 9 oz)
Power
9 Volt 1 Amp
MIDI
In, Out/Thru
MIDI play format
MIDI 0 and MIDI 1
MIDI record format
MIDI 1
MIDI cable
2 x 5 m (2 pieces) DIN 5 pin connectors
SD card
128 MB
Maximum number of MIDI 39 tracks
tracks
Wooden stand
Optional
17.2. Factory Settings
Screen
Options
Routing
Filter
Channel ON/OFF
Mode
Factory Setting
Auto Playlist
Hymn Mode
Metronome
MIDI Forward
Repeat
MIDI Routing
Stops/Instr
Tempo
Volume
Channel 1-16
ON
ON
ON
OFF
OFF
OFF
ON
ON
ON
ON
17.3. MIDI Implementation
Function
Sub Function
Channel
Note Number
Velocity
Note On
Note Off
After touch
Key
Channel
Pitch Bend
Control Change
Issue 2.0W 12/12/2012
Transmitted
Recognized
Church Organ World Sequencer Plus - User Manual
Page 26 of 27
Program Change
System Exclusive
System Common
System Real
commands
Time Clock
Start
Stop
Continue
Aux Messages
All notes off
Active Sensing
System Reset
Notes
18. Information
If you want more information about your sequencer or on other products supplied by Church Organ World
please contact us (write, phone or e-mail).
Church Organ World has an interesting web site with topical information about Makin, Copeman Hart and
Johannus Organs and together with a diary of ongoing activities.
Church Organ World
Sovereign House
30 Manchester Road
Shaw
Lancashire OL2 7DE
01706 888 100
www.churchorganworld.co.uk
[email protected]
Showrooms at Shaw, Lancashire and Mixbury, Oxfordshire
Issue 2.0W 12/12/2012
Church Organ World Sequencer Plus - User Manual
Page 27 of 27