1
Owner's
Manual
Wine Chiller
ZDWC240
Monogram:
wwwomonogramoeom
Consm_mr
]Information
F!%Te ( hi2ier
lr_troduetion
\'ore i_ew Moi_ogram
wine chiller makes aI_ eloquent
statemem
of style, convei_ience
aIld
kitchen planning
flexibility. Whether
you chose it for its pmity of design or the assiduous
attention
to detail, you will find that yore Monogram
wi_le chiller's superior
ble_ld of form
a_ld flmction wil! delight you for years to come.
The ii_fbrmatkm
_hiller properly.
Co_te_ts
cm the fb!lov, hlg pages will help you operate
If you have aI U other
questicms,
Built-El
................
Dimensions
visit ore
Care and Cleaning
..............
Consmner
Services
.................
Comrols ai_d Featmes
................
Model and Serial Ntm_bers
............
Operati_lg
Instructkms
Read this manual
using your
aaine chill
careftdlv.
10, 11
19
8
2
yore
Keep it ha_ldv for a_lswers to yore
questkms.
Product Registratkm
.................
2
Repair Serxice
..................
.a,° 19
Reversing
the ])oor SwiIlg ............
13
Saf>tv I_lstructicms
.................
4-7
_Aarramv
. .................
Back Coxer
If you do l t t ndeistand
somethi lg o_
_leed mole help, there is a list of toll-flee
consmner
serxice mm_bers included
ill
the back secti(m of this manual.
OR
Visit ore Website
Write
doz_m the
model
whle
9
It is inteilded
to help you operate
and maimain
_lew whle chiller properly.
yore
XA;_bsite at: ww_;monogram.com
12
...............
aIld maimai_l
You will find them on a labe! Oil the ceili*lg
inside the _i_le chiller.
Please
write these
Mode!
Number
Serial
at: wvewomonogram,com
numbers
here:
Nmnber
1{,rse these _lumbers in all};'( orrespondence
or serxice calls c<mcemhlg yore _qIle chilleI;
A ENTION
CONSUMER!
This unit is designed
for storing
and cooling
Do not store perishable
foods in this unit.
ATTENTION
beverages.
CONSOMMATEUR
!
Cet appareil
m4nager
est congu pour conserver
et rafraichir
des
Ne mettez
pas de biens perissables
darts cet appareil
m4nager.
boissons.
Consmner Informadon
1VbTe ( hi2Zer
The warranty does not coxer
(aused after delherv.
damage
Be%re using, be sure all packing
and tape ha_e been removed.
materials
To assure no damage is done to the finish
of the produ(t,
the sa%st way to remoxe the
adheshe
left fTom packagb_g tape cm _3ev,
To obtain service, see the Consmner
Serxices page in the back of this mamml.
_,k_ are proud of our service and want you
to be pleased. If fbr some reason you are
_ot happy with the service you receive,
here are steps to fifllow fbr fmther
help.
For _stomers
in the USA:
FIRST, contact the people who serviced
yore applia_ce.
Explain why you are not
pleased. In most cases, this _dll solve the
problem.
NEXT, if you are still not pleased, write
all the details--i_cludi_gyom
phcme
11mnbe_--to:
hnmediateh,
contact the dealer
that sold vo{_ the wine chiller.
(or builder)
appliances
is an application
of household
liquid detergent.
Apply with a soft cloth
a_d allow to soak. Wipe dxw and the_ apply
an appliance
polish to thoroughly
clean
a_d protect the smf'ace.
b_r customers
in Canada:
FIRST, contact the people who serviced
yore appliance.
Explain why you are _ot
pleased. I_ most cases, this will solve the
problem.
NEXT, if you are still not pleased, write
all the details--ira
ludb_g yore phoebe
n umber to:
Manager, Consmner
Camco Inc.
Relations
1 Factory Lane, Suite ,3l0
Mcmctom N.B. E1C c) Mo
<,
Ma_mgen Customer
Relaticms
GE Appliances
Appliance
Park
Louisville, KY 40225
After
is completed
Promptly in spect yore new Monogram
Wine Chiller. If it has been damaged,
(ontact the Installer ox Dealer
immediately.
This Wine Chiller must be properly
lexeled to ensme correct door alignment
and door (losure. Comact the Installer
if the trait is not level.
The
unit should
be centered
in the
opening.
The flont face of the door
should be 1" fbr_ard
of ac!iacem
cabinetry.
Contact the installer if
( learal_ce is l_ot (oxre( t.
® Test the door swi_g. Carefully open and
(lose the door. The door should not rub
or catch on adiacent
cabinetry. Notifkx the
installer if the door makes comact with
cabi_etrv.
Please Contact the InstaJ, ler or Dealer
experience
any of these problems.
if yon
\'our Wine Chiller is shipped with a black
toekick on the f_ont of the trait. For
shippb_g proposes,
an optional stainless
steel toekick is secmed to the back of the
m_it. That toekick should have been
removed
and installed, or given to you.
Keep the mmsed toekick and other unused
o_ removed
parts fbr possible futme use.
IMPORTANT
SAFETY INSTRUCTIONS
READ AND SAVE 7"HESE INS TR UCTIONS
BEFORE
IT IS USED, THE APPLIANCE
MUST BE PROPERLY
AND LOCATED
AS DESCRIBED
IN THIS MANUAL.
&DANGER:
RLSK OF CHILD
INSTALLED
ENTRAPMENT
Child entrapment
and suftScation
are
not problems
of the past. Junked
or
abandoned
refligeraOon
products
are
still dangerous...even
if they will sit for
'just a few days." If you are getting rid of
your old appliance,
please follow these
instruc0ons
to help prevent accidents.
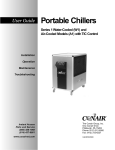
Before You Throw Away Your Old
Refrigeration
Product:
* Take off the doors.
* Leave the shelves in place so that
children
may not easily climb inside.
REFRIGERANTS
All refligeration
products
contain
refrigerants,
which under federal law must
be remoxed
prior to product
disposal.
USE OF EXT NSION
Because
certain
against
If you are getting rid of an old refligeration
product,
check with the company
handling
the disposal abont what to do.
CORDS
of potential
safety hazards
under
conditions,
we strongly
recommend
the use of an extension
cord.
However, if you must use an extension
cord, it is absolumly necessai T that it be a
UiAisted,
3-wire grounding
type appliance
extension
cord having a grounding
type
phlg and outlet and that the electrical ra0ng
of the cord be 15 amperes (minimun/)
and
120 x_lts.
IMPORTANTES
INSTRUCTIONS
DE SECURITE
LIRE ET CONSI'2R VI'2R CES INSTRUCTIONS
AVANT D'ETRE
UTILISI_,
L'APPAREIL
MI_NAGER
DOlT
ETRE BIEN
INSTALLI_
ET SE TROUVER
A L'ENDROIT
DI_CRIT
DANS CETTE
MANUEL.
a, DANGER!
RISQUES POUR LES ENFANTS
Les enfants pris au pi&ge ou morts
d'asphyxie
sont toujours d'actualit_.
Les appareils
de r_flig_raOon
abandon_s
sont mujoms
aussi dangereux,
re&me si
on n'attend
que "quelquejours"
pour
s'en dObarasser. Si vous ne gardez pas
votre ancien appareil,
veuillez suivre les
directives ci-dessous afin de prOvenir
les accidents.
Avant de vous ddbarasser
de votre vieux
appareil
:
de rdfrigdration
* D&nontez
les portes.
. Laissez les clayettes en place afin
d'emp_cher
les enfants de grimper
l'int_rieur.
REFI_GI,S'RAN7 S
Tousles appareils
de r6fligOration
confiemaent
des refligerants
qui,
conform&nent
aux lois f6d6rales, doivent
&tre enlev6s avant toute 61iminafion
de
Si vous vous d_barrassez
de vieux appareils
de r_Dig_raOon,
v_rifiez, aupr&s de la
soci_t_ qui s'occupe
de leur _liminafion,
ce que vous devez faire.
l'appareil.
CORDONS
PR OL ONGA 7?2UPuS
No/ls
_O/lS
recollllllandons
fortenlent
ne pas utfliser de cordons
prolongateurs
ia cause des risques potentiels
qu'ils
pr_sentent
dans certaines
conditions.
de
Toutefois
si vous d6cidez
d'utiliser
tout de
m_me un cordon prolongatem;
il est
absolument
n&'essaire qu'il s'agisse d'un
cordon ;5 3 fils aver raise fi la terre pour
appareils
¢lectrom&mgers
homologu_
UL (aux Etats-Unis)
ou homologu_
CSA
(au Canada),
pourvu d'une fiche et d'une
prise raises fi la mrre de 15 amp&res
(mininmn))
et de 120 volts.
IMPORTANT
SAFE
INSTRUCTIONS
HOW 7D CONNECT EId£C7"Pd(J7T
Do
not,
under
any
circumstances,
CUt or
remove the third (ground) prong from
the power cord, For personal
safety, this
appliance
must be properly
grounded,
The power cord of this appliance
is
equipped
with a 3-prong (grotmding)
plug which mates with a standard
3-prcmg
(grotmdi_g)
wall outlet to minimize
the
possibility of electric shock hazard flom
this applim_ce.
Have the wall outlet
and circuit
checked
bv a qualified electricim_ to make
the outlet is properly
grom_ded.
sme
always be ph_gged
electrical outlet
which has a vohage rating that matches
the ratii_g plate. This provides the best
per%finance
and also prevents overkmdi_g
house wiring circuits which could cause
a fire hazard flom overheated
wires.
Never m_plug an appliance
by pulling on
the power cord. Always grip the plug firndv
m_d pull st[aight out flom the outlet.
Repair or replace immediately
co[ds that have become flaved
all power
or otherwise
damaged.
Do not use a cord that shows
cracks or abrasicm damage akmg its lei_gth
or at either end.
Where a stal?dard 2-pr(mg wall outlet
is enccmntered,
it is yore persoual
responsibility
and ol_ligaticm to have
it replaced with a propedy
grom_ded
o
a-pr<mg wall outlet.
USE ()FADAPT _TE PLUGS
The appliance
should
imo its own i_dividual
When moving the appliance,
be careful
to roll ove[ or damage the power cord.
....i
_ot
not permittg_d i_ Canada)
Because of potential
safety hazards under
certain conditions,
we strongly recommend
against the use of an adapter plug.
If the adapter grcmnd termiiml breaks,
DO NOT USE the applim_ce m_til a proper
grotmd has been established.
Howevei; if you must use ai_ adapte<
where local (odes permit, a temporary
connection
may be made to a properly
grom_ded
2-pr(mg wall outlet by use of
a UL-listed adapter
available at most
local hardware
stores.
Attachi_g
the adapter grcmnd termi_ml to
a wall outlet corer screw does not grolmd
the appliance
unless the cover screw is
metal, and not insulated,
and the wall
outlet is grotmded
through
the house
widng. 3¢bu should have the circuit checked
by a qualified
electrician
to make sme the
outlet is properly grom_ded.
The larger slot in the adapter must be
aligned with the larger slot in the wall
outlet to provide proper polarity ii_ the
com_ecticm of the po_w_ co_d.
When disconnecting
the power cord
hom the adapter, always hold the adapter
in place with one hai_d while pulling the
po_wr cord plug with the other hm_d.
If this is I_ot done, the adapter
groined
termiiml is very likely to b_eak with
repeated
_.Yseof an adapter
clearance
_eeded
plug will ii_crease the
for the back of the
appli a_ c e.
use.
&4VE TH£\%;IN S7R U(77()
NS
IMPORTANTES
INSTRUCTIONS
DE SECURITE
.D
CCOPJ)EM 2N T ETI 2CTRI Q UE
Ne coupez ni retirez en aucun cas la
troisibme broche (raise a la terre) de ]{a
fiche dn cordon d'alimentatiom
Pour
dont la tension x_omi_ale est identique
5
ce!le i_diqtl_e
sin la plaque signal_tique.
Cette precaution
est recommand_e
pore
garantic tm rendement optinmm
et _viter
m_e smchaxge
des circuits 51ectHques de la
rSside_ce,
ce qui pourrait
crSer lm xisque
d'i_ce_die
pax smschaui_e
des ills.
votre s6curit6, cet appareil doit 6tre
correctement
mis g la terre.
Le cordon d'alimemation
de cet appareil
est mtmi d'm_e fkhe aa"o bro(hes
(raise 5 la
tecce) qui se branche
dai_s tree prise mmal
ocdinahe
fi 3 ah&_les (raise fi la terre)
pore r_duhe
au mh_humu ]es risqt_es du
chocs {lectriques.
Ne d_branchezjamais
l'appareil
ex_
tiram le cordon d'alimemation.
Saisissez
refinement
la fiche du cordon et tirez
droit pour
Faites examiner
la pdse de comant
et le
circuit pax an 51ectxicien qualifi5 pore v<ms
assmer que la pxise est corxectemem
raise
latex ce.
la cetirec
de la prise.
RSparez ou remplacez
immSdiatement
tom
cord<m ef_loch_
ou ex_dommag_.
N'utilisez
pas tm cordon f>ndill_ ou pc_semam
des
sigx_es d'usme.
Si la prise tamale est dt_ type standard
fi 2 alvg_oles, il vous incombe
de la faire
remplacer
par tree prise _ 3 ah_oles
co_rectement
raise 5 la te__e.
Lorsque vous dSplacez l'appareil
dt_ ram;
fidtes attention
de ne pas la fidre _otder sin
le cordon d'alimemati<m
afh_ de _e pas
] 'e x)do nx m age v.
La machine
_ gla(ons dolt tot_joms &tre
bca_ch_ da_s sa pcopre prise de comam,
/)ermises au Canada)
Nous
vous recommandons
fortement
de ne
pas ntiliser nne fiche d'adaptation
g cause
des risqnes potentiels
qn'eRe pr6sente
darts
certaines
circonstances.
Tomefbis, si vous dScidez d'atiliser
tout de
rag+me tree fiche d'adaptatkm,
vous pouvez
ef{>ctuer m_ raccordement
temporaire,
si les codes locaux le permettent,
darts m_e
prise de comant
_'_2 alvSoles ad_qtmtemem
raise fi la terre en milisant tree fiche
d'adaptation
homok_gt_g_e [,rE, en veme
darts la plupact des qui_cailleries.
La fente la plus longue de la fiche dolt
&tre align_,e avec la f>nte la plus longue
la prise marale aih_ d'assmer
la polarit_
appcopH_e
pore le brm_cbemem
dt_
cocd<m d'alimentatiox_.
de
Locsqae vous d_brax_chez le cordon
d'alimematkm
de la fiche d'adaptatiom
saisissez toujoms
la fiche d'm_e maix_
CONSE
pex_dant qt_e vous tirez sin la fiche du
cordon d'alimentation
de l'atme. Sinom
la borne de raise 5 la terre de la fiche
d'adaptaticm
Si la home
risque
de cassec avec le temps.
de raise i:tla terre de la fiche
casse, N'UTIL1SEZ
PAS l'appareil
tam
qtFm_e raise i_ la terce adequate
x_'ama
pas _t_ rStablie.
Le fidt de fixer la borne
de raise iTtla terre de
la fiche d'adaptation
ii la plaque de la prise
de tornant
xl'assure pas at_tomatiquement
la
raise 5 la terce de l'appareil.
I1 fimt que la vis
soit en instal, non isol(_e, et que la prise de
comant soit raise i:tla teHe pax Femxemise
dt_ cM)lage de xSsidex_ce.
Faites vSrifier le circuit par m_ 5lectricien
qualifi5 pore vous assurer que la wise est
ad_qtmtemem
raise 5 la terre.
VEZ CES DIPd 2C77VES
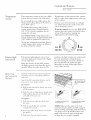
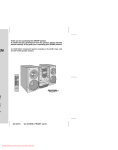
Controls
and Features
I,l ir_e (hiller
7>mperature
control
The temperature
range of the wine chiller
is fiom tile low forties to tile mid sixties.
Do not install
tile wine chiller
where
tile
will go below 55°F (l, 3 ° (,)
• or
temperature
aboxe 90°F (, 2 C).
Tile RED WINE setting will provide a
storage temperature
of approximamly
55°F (13°(;), which is optimum
for tile
storage for red wine.
Tile WHITE _A'INE setting will proxide a
storage temperature
of ai)proxunately
4: 1_
(7"(:), which is optimum
for white wine.
A_swith ally refiigeration
product,
there is
a slight temperature
xariance at dirt>rent
locations within tile cabinet.
Temperatures
will be cooler
of the cabinet,
at the bottom
of tile cabinet
than temperatures
at tile top
Position your wine imentoi y accordingly
(i.e. white wines ill tile cooler zones and
red ill tile warmer zones).
To set the control, ulrn it to tile RED WINE
setting. Once tile bottles are loaded, allow
at least 24 hours before making any
adjustn/ents
to tile initial setting.
OFF
COLD
COOL
WHITE WINE
Intolot
light
and switch
Tile interior
light makes it easy to xiew
your wine labels and enhances
tile display
of your collection.
When the switch is ill tile ()FF position,
tile light comes on only when tile door
opened.
When tile switch is in tile ON
P emoving
full extension
is
REDWINE
position,
tile light remains on continuously
for your maxinmm
viewing pleasure.
For best viewing do not store a bottle on
tile mp shelf directly under tim light.
Remember
m ulrn off tile light when it
is no longer needed.
All of the fllll extension
drawers pull out
so bottles ca_ be come_iemlv
added or
removed.
Any of the fill extension
removed
to store
largec
drawers
)ush tab down on
right drawer guide, pull
tab up on left drawer
guide)
cai_ be
bottles.
To remove:
1. Pull the full extension
drawer
out to the
STOP positicm.
2. Pttsh the tab on right drawer gttide dow_
while pulling the tab on left guide up,
and pull the drawer out.
To replace:
1. Pttsh the drav, ec slide arm back iI_to
the trait.
2. Pttll the small slide sub assembly
completely
3° Insert
fbrward.
the sides of the dcawer
back imo
the guides.
4. Push until the tabs lock imo place.
To replace, push drawer slide
arm back into unit
NOTE:
Pull small slide sub assembly
completely forward
Make snre tile tabs oil tile fllll
extension
drawer guides are flllly engaged
before loading any bottles. Pull tile drawers
out all tile way to tile STOP position
and
push back in several times to make sure
locking tabs are properly
engaged.
Operating
Instructions
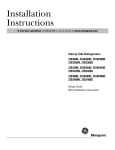
1!'7_e
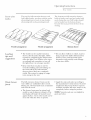
The top five fldl extension
drawers each
hold eight bottles, two deep with the llecks
alternating
front to back or nine bottles,
alternating
with _lecks pointing
imvard.
The bottom
two full extension
hold six bottles
each and are
necks fi_<ing the [eat.
not be loaded
on the
because
closing.
8 bottle
Loading
tips and
suggestions
arrangement
9 bottle
they
may
arrangement
The bottles on tile top flfll extension
drawer, directly under the light, will be
exposed
m a slightly higher mmperature
when the light is on. Position your wines
accordingly
arrd remember
to turn off
the light when it is no longer needed.
( t_T2[er
drawers
loaded
v, ith
Tall bottles
shcmld
bottom
dra><er
prevent
the
door
Bottom
drawer
from
• Do not allow children
to climb, stand or
hang on the wine chiller flfll extension
drawers. They could seriously ir_jnre
themselves
arrd possibly cause damage
to the wine chiller.
Kee I) wines that you plan m use for
evetTday drinking arrd entertaining
on
the flont half of the flfll extension
drawers where labels are completely
visible. Place wines for aging or longer
term storag> ira the rear.
Wood drawer
.fio n ts
Tire flfll extension
drawer
wine chiller are unfinished
During use, oil fiom hands
arrd stain the wood.
fronts
on tile
cherry wood,
may accumulate
• Tire drawer fronts may be stained arrd
sealed to match adjacent cabinett T. Tile
tinted glass will make the stained wood
appear darken A true color match can be
seen only when the door is opened.
• Apply tire stain
tire manufacturer's
unpleasant
ventilate
completely
arrd
sealer according
to
irrstructions.
To avoid
odor, kee I) tile door open to
arrd allow tire stain/sealer
to dry
before
using tile product.
NOTE: Natural wood
grain and color.
may xat T slightly in
Care and Cleaning
WT_e
Unplug
the wine chiller
before
( t_Tlger
cleaning.
Turn the wine chiller unit OFF" or unplug
the unit before cleaning. Use a slightly
damp cloth or sponge when cleaning
around switches, lights or controls.
Other parts of the wine chiller center
unit--including
the door gaskets, amt
full extension
drav, ers--(an
be <leaned
the
same
v, av.
[Jse warm water and baking soda solution-about a tablespoon
(15 ml) of baking soda
to a quart (1 liter) of water This both
cleans and neutralizes
odors. Thoroughly
dnse and wipe dry.
Dr_un hole
Periodically
check the drain hole and
(ham_el for an_ debris. If the drain is
blocked, ((mde_sation
v,ill not drain
properly.
Drain hole
To check and clean the drain hole,
remove the third and fomth drawers
(see instructions
on Re,movT_*g'jh22evh'>sTo_
dr, z*m_:_
on page 8). Sweep a damp cloth
along the cham_el in the back of the _qI_e
chiller. Use a finger to sweep away any
debris from the drain hole.
Cabinet
The exterior
surfaces
can be washed
with
mild soap and water.
Rinse thoroughl)with
use abrasixe s(ouring
clear water. Nexer
p(u_ders.
Glass door
Use a glass cleaner m mild soap and water
and a soft cloth to clean the glass door.
Do not use any abrasive powders.
Avoid cleaning cold glass with hot water
because the extreme temperature
difference
may cause it to break. Rough
handling
of tempered
glass can cause it
to shatter,
Door gc,',,sket
The vinyl gasket may be cleaned with mild
soap and water, a baking soda solmion or
a mild scomi_g pov, der. Ri_se v,ell.
Alter cleaning
the door gasket, apply a thin
laver of paraffin wax or petroleum
jelly to
the door gasket at the hinge side. This
helps kee t) the gasket flom sticking and
bending
out of shape.
10
(;are
and
(;leaning
1VT_e ( tHIIer
Unplug
the wine chiller
before
cleaning.
1,,rnph_g the wiI_e chilleI
the light bulb,
be%re
replacing
To remove the light shield, push in the tab
on the left side of the shield and lm_eI it,
Replace
[rz the ever_t
of n power"
ih re,
with a 15 watt appliance
bulb,
If the power fbils, open the door as
inflequently
as possible to maintain
the temperatme.
A gradual rise in
temperature
should not have any
adverse efl%ct cm the wi_e.
If it is extremely
hot, yot_ may, want to move
the _ine to the coolest location you can
find until po_er
is restored.
Do not store or use gasoline or other
flammable
vapors and liquids in the
vicinity of this or any other appliance,
ll
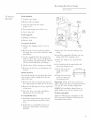
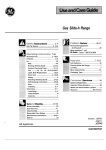
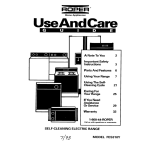
Built-In Dimensions
I,l ine (killer
Installation
dimensions
Tile wine chiller can be a free-standing
model or can be buih in using tile cut-out
dimensions
below.
X4'hen building
in the wine chiller, be sure
to allow tbr a fllll door swing so you haxe
fllll access to tile pull-out drawers.
See tile Installation
Instructions
(Pub. No.
49-60910) for complete
directions.
233/4'
'
(603 mm) w
233/4'
'
-,,=c (603 ram)
341/2"
(876 mm)
Product
dimensions:
Note:
Height:
Width:
Depth:
34/2 (876 ram)
2, "/4 (603ram)
23!%" (603 ram)
Handle
handle
The wine chiller
door
is factoiv
depth
and
standoff
is 1%"
dimensions:
Height:
Width:
Depth:
34/2-3a
1
_" (876-889 ram)
94" (610 ram) minimum
94" (610 ram) minimum
set for a l l 0 °
10"Minimum
to Wall
swing.
When
installed
in a corner:
• Allow 4" minimum
clearance
on the
hinge side for tile 90 ° door
to allow racks to slide out.
t!
'
20-7/8"
L
swing and
1
_,,
Allow
l0
hinge
side %r a fllll l l 0 ° door
Choose
l
90° DoorSwing
i
minimum
clearance
'N
access
to tile door.
Do not
install
these
products
temperature
will go below
or aboxe 90°F (, 2 C)
where
55°F
the
(l_3° c)•
it will be subject
or naoisture.
to
...........
_[
,,,_
110° .
4" Minimum
to Wall
Black or Stainless
These products
may be closed in on the
top and three sides as long as the fiont
is unobstructed
tbr air circulation
and
Do not install where
direct sunlight, heat
90°
",,
swing.
the location:
ixoper
23-5/8"
on the
Tile door swing is rmersible
on all models.
If desired, change tile door swing before
installation.
12
Cut-out
Steel Toekick
Options
These products
are shii)ped with a black
toekick installed. An optional
stainless steel
toekick is also supplied with each product.
For shii)ping i)uiposes,
the stainless steel
mekick is secured
m tile back of tile unit.
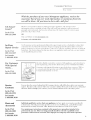
Reversing
the Door Swing
11'i_e ( ixiHer
7b rever:se
the door
Parts included:
hlstall
1, Top left case hinge
2. Bottom
_,
3Screws
Hinge _;
,
Remove
Top Hinge
left case hinge
3° I,eft and right side decorative
hi_ge cover
4. Decorative
hinge
_° Torx _*_
driver
screw hole cover
Hinge
bit
Bracket
Too]is required:
L Phillips
screv, dri_er
2, Ele(trk
drill
To remove
the door:
1, Flatten
a pad.
the shipph_g
cartoi_
2. Remove the 2 screws ai_d the toekick.
Set aside the screws a_d toekick for final
ii_stallatio_.
3, Use
drill
top
will
the supplied Torx _'>bit and electric
to remo_e the a°screws holdi_g the
case hing>. Lift off the hing>. (Screws
be used to insta]il the new hi_ge.)
4. Lift the door
5, Remo_e
bracket.
Rotate
off the bottom
the bottom
Remove
Hinge
to use as
case hi_ge.
case hil_ge piI_ al_d
3. Place the door
o_to
the bottom
case
hi n ge.
4. Install the supplied left-hand
top case
hi_ge _ith the 3 origi_al screws.
_. Select
the hi_ge
cover
marked
with
6, Peel backi_g off the tape il_side the
decorative
hinge coxer.
7_
the door:
Press a_d snap the
hinge co_er h_to
pl ace.
InstallCovers
A°"
The handle rdll be on the right side of the
door; hinges will be i_stalled <m the left
side of the case.
8_
1, Remo_e the door stop and cam riser on
the oHgh_al bottom right side of the door.
_mportant:
Check to be sme screx_s are
tight and that the door is straight and does
_ot sag. The door should swing fkeel_.
2. Remo_e the fill plug ol_ the top right side
of the door.
3, Turn
the door o_er aI_d reii_stall
the
fill ph_g cm the i_ew left side.
To reinstall
the door:
1, Install the original door stop and cam
riser ol_to the bottom left side of the
S,_ap the screw hole
co_er into place (m
the opposite side.
NOTE:
apply
See I_stallation
binge
Position
coxer
_//
Instrt_cticms
to
and screv, hole coxer.
nameplate:
Apply the Monogram
l_ameplate
o_ the
door usi_g the template
incl t_ded i_ the
installaticm
instru(tions.
door.
2. Install the Ile_ st_pplied bottoI"_l case
hinge pin a_d bracket <into bottom
left side.
13
The Problem
Nor_7"lal
operating
Newei
featmes
appliai_ces
a_d _se
sotmd
different
_ewe_ tectmolog
fkom
T.
oldeI
appliai_ces.
Solver
Mode__
appliai_ces
ha_e
moIe
so_nds
Do you hear what I hear?
_ese
sounds are normal.
WHIB!
Tire new high efficiency compressor
may run faster and longer than your
old appliance
arrd you may hear a
high-pitched
hum or pulsating sound
while it is operating.
Sometimes
tire appliance
runs for an
extended
period, especially when the
doors are opened Dequently.
You may hear the fans spinning
at
high speeds. This happens
when tire
appliance
is first plugged ira, when the
door is opened flequently
or when large
amounts of beverages are added to
the appliance.
Tire fans help maintain
desired temperatures.
You may hear a whooshing
sound when
the doors close. This is due m pressure
equalizing
within the appliance.
If tire door is open for over 3 minutes,
you may hear a fan come on in order to
cool tire appliance.
Tire fans change
provide optimal
savings.
speeds
cooling
in order to
arrd energ T
CLICKS, POPS,
CRACKS and CHIRPS
\bu may hear cracking or poppb_g som_ds
wheat the appliance
is first plugged i_.
This happens
as the appliance
cools to
the correct temperature.
Expansion
and comractkm
of cooling
coils dming and after def_ost ca_ cause
a cracki_g or poppii_g sotmd.
The flow of refkigerant
through
the
applia_ce
cooling coils may make a
gu_gli_g noise like boilii_g water.
A watei dripping
iroise may occm as
water f_om the evaporatoI
flows imo
the draft] pan.
ClosiIrg the drawei may cause a gmgliI_g
som_d dt_e to pressme
equalizatkm.
14
The
Problem
Solver
WTm,
Ques, tior s ?
2s,e this
prvb#m
PROBLEM
POSSIBLE
APPLIANCE
DOES NOT OPERATE
* Cpplial/ce
may be ill defrost
abola 30 mimttes.
C tH2[er
CAUSE
c_de whe]/ motor
does
i/or operate
for
* If h/terh)r light ]s m)t ore/,appliam/ce may m)t be plllgged ]m/at
wall omlet. Pllsh the phlg completely ira/to the wall omlet.
,S'O[7)gg]
* The base is b]ow_//circlfit
the breaker.
VIBRATION
OR
* _dil_st
the
levelim/g
legs
breaker
is tripped.
as show_/
ira/ the
Replace base or reset
h/stalLtthm
ln/sma
thins.
RATTLING (Slight
vibration is normaL)
MOTOR OPERATES
FOR LONG PERIODS
OR CYCLES ON AND
OFF FREQUENTLY
* Normal
wh el/ appliam/ce
left
ol:)e]/
* Hot
weather
See
co_/tro]
Temperatm'e
See
* _']//
Package
may
APPLIANCE
HAS ODOR
* h/terior
* Keep
open/
DOOR NOT
CLOSING
PROPERIX
* Door
gasket
_/eeds
clea_/i_/g,
box
door
is sticki_/g
to the
is hitti_/g
* Not
FROST OR MOISTURE
COLLECTS INSIDE
* Too })'eq_lel/t
v,ripe
* Door
mid
or fbldi_/g
over.
gasket.
to cham/ge.
replace
Apply
a_/ i_/ter_/a]
_/g per] ods
of high
other_]se,
moistm'e
or too ]o_/g door
3 mo_/ths.
the
app]ia_/ce.
ill ter {b're]/ce.
h roll] ditv.
will
holdi_/g
every
petrolem//jelly
]_/side
t o prey el/t
dry;
or package
fi)r temperature
(;]ea_/i_/g.
Jthce of the
dmi
opel/
to cham/ge.
]_/applim/ce;
sm'Ihce
door
If both
evaporate
ersom
e,
i_/time.
opera
opel/]_/gs.
* h/ lmmid weather;
air carries mo]stm'e i_/to applial/ce
whe_/ door
is ope_/ed. {_/] tw]]] di ss] pate mo] st _lre i_/ ti me. If both ersom e,
v,ril)e sm'L_ce dry.
* Temperature
INTERIOR LIGHT
DOES NOT WORN
Care
m/_lstm]
left
fi)r temperature
opel/.
soda
A @ us t ill ter] or corn po I/el/ts
MOISTURE FORMS
ON OUTSIDE OF
APPLIANCE
ope]/im/gs.
See
of baki_/g
is m/orma].
em/ollgh.
door
door
h/applkmce.
sett]m]g.
24 horn's
24 horn's
holdi_/g
be
are placed
Tills
coldest
cold
time.
}iw th e
opera
Allow
%r loi/g
para[_i_/wax
* The
m/ot set
or f}'eqlle]/t
ope_/
left
door
opem/lm/gs.
Allow
Com/tro].
weather
Door
door
set at the
co]/tro]
Temperatm'e
of bevex:_ges
holdim/g
Com/tro].
* Temperature
or
or package
hi. Wid t 24 hom's
dowm
amom/ts
or f]'eqlmm/t
* Temperature
COMPARTMENT
TOO WARM
coo]
* ()fief/occurs
where/laxge
This is mm//a].
* Door
p] ugged
is first
to completely
appIiam/ce
* No power
* l,]ght
c/mtro]
set at coldest
setti_/g.
at o_lt]et.
b_flb _/eeds replaci_/g.
See (are
a_/d C]ea_/i_/g.
15
Tile Problem
l!'i_e
Ques.tior_s ?
_2s.ethis
p_vblem
SO[_)g_/: f
Chiller
PROBLEM
POSSIBLE
HOT AIR FROM
BOTTOM OF
APPLIANCE
* Norm al a] r flow cool] m_gmotor, h_ the refl'igera t] o_ process,
it is
m_orma] that heat be expelled
]m_the area m_der the applian_ce.
Some floor coverim_gs are se]_sitive amid will discolor at these sa{i_
amid m_orma] temperat_u'es.
APPLIANCE
NEVER SHUTS
OFF
BUT TEMPERATURES
ARE OK
16
Solver
CAUSE
* Adaptive de[D'ost keeps compressor
rm_m_im_gdu_Jm_g door opem_im_gs.
Th ]s is m]orm aL The a pp]i a m_
ce wiI] cyc]e off a{_er t h e door rein a] m_
s
dosed
* Normal
_k)l" [WO
hOIll'S.
operatiom_
im_extreme
tempe]:_t_u'es.
¼_ine
Storage
l_'i_t,
and
Handling
Notes
( t_iHer
17
Appliance
Notes
1!%_e ( i,_gge,
18
Consm_mr
Services
Wb_e
C tH2h, r
With the purchase
of your new Monogram
appliance,
receive the
assurance
that if you ever need information
or assistance from GE,
we will be there, All you have to do is call--tolL fr!e!
GE Answer
C_ter _
In the USA:
800.626.2000
Whatever
your questiom/about
am/y Monogram
m_{}or applim/ce,
GE Answer Center::
im/i_>rn]]atiom/service is availaUe
to help_ '_)nr call--amid yollr question--_Gl]
be am/swered
[)rompt]y al/d colwteolls]_.
A]/d roll call ca]] ally time. (;E Ans_er (]entel °: serGce is opera/
24 horns a day, 7 days a week.
OR
Vi si t o I_r \Vebsi te at: www.monogram.com
In Cm*ada, call 1,888,880,
In-Home
Repair
In the
AGE
Service
USA:
800.444.1845
constmier
convem/ient
today
service
for
voll.
or tomorrow,
Saturdays).
cam/be
3030,
proiessiomd
provide
expert
SerGce
compam/}-operated
( (msm//er
or at vollr
convem/iem/ce
(7:00
a.m.
techm/icim/s
know
y<mr
Ore" fi_ctor_-traim/ed
han/dled
will
Mainly (;E
repair
to 7:00
service,
sched_lled
]ocati<ms
pal/.
weekdays,
applim/ce
ira/side
at a time
offer
9:00
you
ram.
amid ore--so
that's
service
to 2:00
most
p.m.
repairs
ira/,ilast om/e visit.
In Canada:
1.888.880.3030
For Customers
(;E offers Braille controls for a variety of (;E a pplian ces, ;md a broch Itre to
assist
...... ira/ [)lan/m/ira/g<
a hattie>free
kitchem/for persom/s with limited mobility.
With Spedal
Needs°.,
C(mslm/ers
acom,
l}_ the USA:
800.626.2000
with
enthmal
h//pai_'edi
hea_'il/g
teletypewriter
to request
<o (
ma_
_l" speech
'
_al]
who
]]ave
access
800.TDD.(;EAC
to a
TDD
or
(800.833.4322)
or service.
SEe.TBr_
Service
Contracts
You
secure
feeling
expires.
can
haxe
Purchase
the
a (;E
contract
discount.
_,_ith
a multil)le-}ear
that
(;E
while
contract,
Consumer
your
Serxice
warrant}
you
are
will
still
be there
is still in effect
assured
of flmlre
and
after
_ou'll
set\ice
your
receixe
at today's
warranty
a substantial
prices.
In the USA:
800. 626. 2224
In Canada:
1.888.880.3030
Parts and
Accessories
ln the USA:
800.626.2002
ln Canada:
1.888.880.3030
Individuals
quafified
to service their own applimaces can have parts or accessories
sent directly
to their home. The (;E parts s)stem provides
access to over 47,000 parts...and
all (;E (;enuine
Renewal Parts are fllll_ warranted.
VISA MasterCard
and Discoxer cards are accepted.
User
maintenance
instructions
performed
by m_y user.
persmmel.
Caution
must
Other
be
contained
servicing
exercised,
in this manual
generally
since
should
improper
cover
procedures
be referred
servicing
may
intended
to qualified
cause
m_safe
to be
service
operation.
19
YOUR
MONOGRAM
WINE
CHILLER
WARRANTY
Staple sales slip or cancelled check here. Proof of original
is needed to obtain service under warranty.
WHAT
IS
COVERED
P)vm
the Date
of the O'_ginal
Puwhase
FULL ONEcYFa_R
purchase
date
WARRANTY
For one year fl'otn date of original i)urchase, we will provide, free of charge, parts and serxice
votu" home to repair or replace any/)arl (_[ the wine _hil/er that tifils because of a manufacturing
labor in
detect.
FULL FIVE-YEAR WARRANTY
For fixe )ears from date of original
i)urchase,
we will proxide, free of charge, parts and serxice labor
in xotu" heine to repair or replace an)parl
of, the ,sealed rejJriq'eralin_',,
,s>lem,, (the COlni)ressor,
condenser,
exaporator
aim all COlmecting
tubing)
that tails because
of a inalmthcturii_g
detect.
This warrant)' is extended
to the original
i)m'chaser
and any succeeding
owner fi)t" products
i)m'chased
fl)r ordinary
home use in the 48 mainland
states, Hawaii, XM_shington, D.C. or Canada.
In Alaska the warranty is the same except that it is I,IMITED because vou must pay to ship the
product
to the service shop or tor the service teclmician's
travel costs to w)tu" heine.
All warrant)'
Care':
service
servicers
Should
veto"
800.444.1845.
WHAT
IS NOT
COVERED
• Service
how
trips
to use
fire,
by ore" Factory
working
to your
home
to teach
house
fuses
or acts
warranty
you
or resetting
caused
of
by accident,
thm_ its intended
purpose
for
or used
commercially.
• Replacement
of the light
period
or bv ore" authorized
or beyond,
If you have
your dealer
for
and
if it is used
Centers
in the
• Improper
installation,
mahltenmace.
of God.
of the product
Service
Customer
hem's.
the product.
to the product
floods
• Failure
other
be provided
nom_al
appliance
need
service,
dm'ing
In Canada:
888.880.3030.
• Replacement
of
circuit
breakers.
• Dmnage
will
during
bulbs.
• Loss
other
adequate
connecting
of food
• Incidental
delivery
an installation
or installer.
providing
due
USA
call
or
problem,
contact
You axe responsible
electrical,
plumbing
facilities.
to spoilage
(in the
or consequential
damage
possible
defects
with
this
• Dmnage
caused
after
delivery.
USA
only).
caused
applimlce.
Some states/provinces
do not allow the exclusion
or limitation
of incidental
or consequential
damages,
so the above lilnitation
or exchtsion
ilia)" not apply to you. This warranty
gives you
specific legal rights, aim wm inay also have other rights which w_iT fl'Oln state to state/i)rovince
to i)rovince.
To know what your legal rights are in your state/i)rovince,
consult your local or
state/i)rovincial
consuu_er
attairs ottice or w)ur state's Attornev
General.
Waxrantor
in USA: General Electric Company,
Louisville,
KY 40225
Waxrantor
ha Canada:
Camco
Inc.
Monogram:
197D4615PO03
49-60276-1
11-03 JR
Printed in Slovenia
GE Consumer Products
General Electric Company
Louisville, KY40225
©2003 General Electric Company
by