1
Owner's
Manual
Fresh-Food
Refrigerator
ZIFI240
ZIFS240
Monogram:
www.monogram.com
Consumer
Information
Fre,sl>Food I_f*'ig'eralor
Introduction
Your new Monogram
fiesh-food
refrigerator
makes an eloquent
statement
of style,
convenience
and kitchen planning
flexibility. Whether
you chose it tbr its purity
of design or the assiduous
atmntion
to detail, you will find that your Monogram
flesh-food
refligerator's
superior
blend of form and flmcfion will delight you for
years to come.
The in%rmation
on the %llowing
flesh-food
refiigerator
properly.
If you h axe any other
Contents
Be/bre
using your
.fi'esh-/bod
refrigoator
q uestions,
pages will help you operate
13, 14
11, 12
19
8-10
Installation
Model and
14, 15
2
Instructions
..........
Serial Numbers
...........
Read this manual careflflly. It is intended
to help you operate
and maintain
yonr
new flesh-food
refligerator
properly.
f_r answers
to your
Problem
Solxer.
Product
Write
You will find
the
model
serial
&
ceiling
inside
................
Registration
16-18
................
Repair Serxice
..................
Safety' Instructions
................
_'ariantv
.................
2
3, 19
4-7
Back Coxer
If you don t understand
something" O or
need more help, there is a list of toll-free
consumer
serxice numl)ers included
in
the back section of this manual.
OR
Visit our
down
your
xisit our V_,ebsite at: www.monogram.com
Built-In Dimensions
.............
Care and Cleaning
..............
Consumer
Services
................
Controls
and Features
............
Kee I) it handy
questions.
and maintain
them on a label on the
the ffesh-%od
Website
at: www.monogram.com
Please
write these numbers
Model
Number
here:
refrigerator.
n u)7_tb_s
Serial
Number
Use these nnmbers
in any correspondence
or serxice calls concerning
your fresh-food
refrigerator.
Consumer
Information
Fr_,sh-t_)_od I¢_(/rigeralor
l[you
received
a
Tile warranty does not coxer damage
caused after delix err.
Immediately
contact the dealer (or
builder)
that sold you the flesh-food
refrigerator.
Before you request serxice, check the
Problem
Solxer ira the back of this guide.
It lists causes of minor operating
that you can correct yourself.
Before using, be sure all packing
and tape haxe been remoxed.
new appliances
is an application
of
household
liquid detergent.
Apply with
a soft cloth and allow m soak. Wipe d W
and then apply an appliance
polish m
thoroughly
clean and protect the surface.
damaged
appliance
Save
time
& monu
materials
To assure no damage is done to the finish
of the product,
the safest way to remoxe
the adhesixe left flom packaging
tape on
lJyou
72eed
service
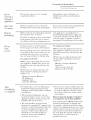
For customers
To obtain serxice, see the Consumer
Serxices page in the back of this manual.
We are proud of our service and want you
to be pleased. If for some reason you are
not happy with the service you receive,
here are steps to follow for fllrther help.
bbr customers in the USA:
NEXT, if you are still not pleased, write
all the details--including
yonr phone
in Canada:
FIRST, contact the people who serviced
your appliance.
Explain why you are not
pleased. In most cases, this will solve the
problem.
NEXT, if you are still not pleased, write
all the details--including
your phone
n/rnlber
FIRST, contact the people who serviced
your appliance.
Explain why you are not
pleased. Ira most cases, this will solve the
problem.
problems
to:
Manager, Consumer
Camco Inc.
1 Factory
Moncton,
Relations
Lane, Suite 310
N.B. El C 9M3
narnlber--to:
Manager,
Customer
Relations
GE Appliances
Appliance
Park
Louisville, KY 40225
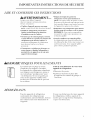
Afio
installation
is completed
• Promptly inspect your new Monogram
flesh-food
refrigerator.
If it has beera
damaged,
contact the Installer
or Dealer
immediately.
• This flesh-food
refrigerator
must be
properly
lmeled to ensure correct door
alignment and door closure. Contact the
Installer if the unit is not lexel.
• Test the door swing. Carefiflly open and
close tim door. The door should not rub
or catch on adjacent cabinet W. Noti_'
the installer if the door makes contact
with cabinet
Please
Contact
you experience
W.
the Installer
or Dealer
any of these
problems.
if
be flush with adjacent cabinetry.
The
flont face of the Custom Panel door
Your cnstom
panel (ZIFI240 model only)
Desh-food
refrigerator
is shipped with
two toekicks, a stainless steel and a black
toekick. For shipping
purposes,
one of the
toekicks will be secured to the back of the
unit and the second will be installed on
should be 1_ " forward of adjacent
cabinen T. Contact the installer if
clearance
is not correct.
the unit. Keep the unused
other unused or removed
possible flmn_e use.
• The
unit should
be centered
ira the
"
0
opening.
Ira a standard
24 tl opening,
flont face of the Stainless Steel door
the
will
mekick and
parts for
3
IMPORTANT
READ AND
SAFETY INSTRUCTIONS
SAVE THlgSE INSTRU(;TIONS
kWARNING x .hen
using
this appliance,
ahvays exercise basic safety
precautions,
including
the following:
* Use this appliance
only for its intended
purpose
as described
in this Owner's
Manual.
* This fresh-food
refrigerator
must be
properly installed in accordance with the
Installation
Instructions before it is used.
• Do not allow children to climb, stand
or hang on the shelves in the fresh-food
refrigerator.
They could damage the
Desh-food
refrigerator
and seriously
injure themselves.
• Do not store or use gasoline or other
flammable vapors and liquids in the
vicinity of this or any other appliance.
Jk DANGER:
RISK
OF CHILD
* Keep fingers out of the "pinch point"
aaceas: clearances
between the door and
between the door and cabinet are
necessarily
door when
small. Be careflfl closing
children
are in the area
• Unplug your fresh-food
refrigerator
before cleaning or making repairs.
NOTE: ¼'e strongly recommend
that
servicing be performed
bv a qualified
individual.
the
any
* Before replacing
a burned-out light bulb,
the flesh-%od
refligerator
should be
turned OFF or unph*gged
in order to
avoid contact with a live wire filament.
(A burned-out
light bulb may break
when being replaced.)
ENTRAPMENT
Child entrapment
and suflbcaOon
are not problems
of the past. Junked
or
abandoned
refligera0on
products
are
still dangerous...even
if they will sit for
'just a few days." If you are getung rid of
your old appliance,
please follow these
instructions
to help prevent accidents.
Before You Throw Away Your Old
Refrigeration
Product:
• Take off the doors.
• Lea_e the shelxes in place so that
children
may not easily climb inside.
t ?,FRIGt,TRANTS
All refrigeration
products
contain
refligerants,
which under t_deral law must
be remoxed
prior to product
disposal.
If you are getting rid of an old refrigeration
product,
check with the company handling
the disposal about what to do.
IMPORTANTES
LIRE ET CONSERVER
INSTRUCTIONS
CES INSTRUCTIONS
kAVERTISSEMENT
I,orsque
wins
de
base,
utilisez
t,,uj,,urs
certaines
:
• N'utilisez
l'appardl
pr6vu,
comme
• Installez
fraiches
• Ne
laissez
se
tenir
pas les
debout
r_frig_rateur
de
usage
manuel.
denr6es
fl'aiches
autres
s'asseoir,
fralches.
du
Ils
le r0fl'ig&'ateur
,DANGER!
• Avant
de
et liquides
cet
appaaeeil
pas
d'essence
de
tout
toqjours
0troits.
des
les portes
enfimts.
pour
denr6es
et de le r_paacer.
vous
reconlnlandons
toute
r(_paration
5 tm
qualifi&
remplacer
mae
le r(_fl'ig_ratetu"
pour
&tre
afin
dc)branch¢)
tension.
se briser
ampoule
denr(_es
d'&'iter
(Une
pei_dant
grill6e,
fl'aiches
tout
ampoule
doit
contact
avec
grillg_e
l'op0ration).
ou
inflammables
ou
courier
et entre
terlnez
le nettoyer
: Nous
de
de
sont
vous
rOfrigOrateur
de
se
les portes
presence
votre
avant
un fil sous
et se blesser
et n'utilisez
proximit6
appareil
• D_branchez
peut
vapeurs
en
du
facilement
entre
lorsqtm
l'appareil
technicien
attx clayettes
parties
peut
et les placards
prtldent
vivement
grhuper,
des
espaces
REMARQUE
gravell_ei_t,
• N'entreposez
: les
fraiches
de l'utiliser.
endommager
denr0es
son
pour
de_es
attx directives
enfants
doigts
off l'on
les portes
le pr0sent
ni se pendre
pour
pourraient
pour
pour
le r6frig6rateur
conform_ment
avm_t
pincer
Sovez
dans
les
r6frig6rateur
precautions
que
d0crit
d'h_staJlation
• ]_loignez
l'appareil,
not_lillillen[
observez
DE SI CURITI
ia
autre
61ectrom_nager,
Q
P 0 UR LES ENFA NTS
Les enfants pris an pi_ge on morts
d'asphyxie
sont toujours d'acmalit_,
Les appareils
de r_flig_ration
abandon_s
sont
toujours
anssi dangerenx,
m_me si
Avant de votLs d6barasser
appareil
de r6frig6ration
on
• Laissez les clayettes en place afin
d'emp&her
les enfants de grimper
l'int_rieur.
n'attend
que
"quelquejours"
pour
s'en d_barasser.
Si vous ne gardez pas
votre ancien appareil,
veuillez suivre
les directives ci-dessous afin de pr_venir
les accidents.
• D_montez
de votre vieux
:
les portes.
Rb RIGERANT"S
Tons les appareils
de r_frig_rafion
confiennent
des refligerants
qui,
conform&nent
aux lois f_d_rales, doivent
&tre enlev_s avant toute _liminafion
de
l'appareil.
Si xous xous d_barrassez
de xieux appareils
de r_flig_ration,
x_rifiez, aupr&s de la
soci_t_ qui s'occupe
de lent _limination,
ce qne xous dexez faire.
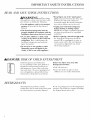
IMPORTANT
HOW
7"0 CONNECT
SAFETY INSTRUCTIONS
ELECTRl(JTY
under any circumstances,
cut or
remove the third (ground) prong from the
power cord. For personal
safety, this
appliance
must be properly
grounded.
Do not,
The power cord of this appliance is equipped
with a 3q)rong (gxounding)
plug which mates
with a standard 3-prong (gTounding)
wall
outlet m minimize the possibility of elecuic
shock hazard flom this appliance.
Haxe
fl_e wall outlet
and circuit
checked
DO NOT USE AN
ADAPTER PLUG
TO CONNECT
THE
FRESH-FOOD
REFRIGERATOR
TO
A 2-PRONG OUTLET.
DO NOT USE AN
EXTENSION
CORD
THIS APPLIANCE.
WITH
by a qualified elecuician
m make sure
the outlet is properly grounded.
Never unplug an appliance
by pulling on
the power cord. Always grip the plug firmly
and pull straight out flora rite outlet.
Where a standard
2-prong wall outlet
is encounmred,
it is yonr personal
responsibility
and obligation
m have
it replaced with a properly grounded
3-prong wall outlet.
Repair or replace immediately
all
cords that haxe become flayed or
damaged.
Do not use a cord that
cracks or abrasion damage along
or at either end.
Use of a (;FI (Ground Fault Inmrrupmr)
is not recommended
for rite flesh-food
"_'hen moving the appliance,
be careflfl
not to roll oxer or damage the power cord.
power
otherwise
shows
its length
refligeramn
The appliance
should
into its own individual
always be plugged
electrical outlet
which has a x_ltage rating that matches
the rating plate. This provides the best
perfommnce
and also prevents overloading
house wiring circuits which could cause a
fire hazard flora overheated
wires.
SA
THESE INSTRUCTIONS
IMPORTANTES
RA CCORDEMEN7
INSTRUCTIONS
DE SI CURITI
EIJ,; CT'RIQUE
ni retirez en aucun cas la lroisibme
broche (mise a la term) de la fiche du cordon
d'alimentation. Pour volre s6curit6, cet
appareil doit 6tre correctement mis a la term.
Ne coupez
N'UTIL1SEZ
JAMA1S
UNE PRISE A
ADAPTATEUR
POUR LE
RI_3_dGERATEUR
POUR
DENREES FRAJCHES A
UNE PRISE BIPOLA1RE.
I_ cordon d'alimentafion
de cet appareil est
nmni d'une fiche _ 3 broches (raise g la tene)
qui se Nanche dans une prise nmral ordinaire
fi 3 ah'_oles (raise fi la ten_e) pore r6duire an
mininmm les risques du chocs _lectriques.
N'UTIL1SEZ
RALLONGE
APPARE1L.
JAMA1S DE
AVEC CET
Faites examiner la prise de courant et le circuit
par un _lectricien qualifi_ pour xous assurer
que la prise est con_ecmment raise _ la tene.
Ne d_branchezjamais
l'appamil en fimntle cordon
d'alimenmfion.
Saisissez fennement la fiche du
Si la prise murale est du type standard _ 9
ah'6oles, il x_us incombe de la f:ai_e _emplacer
par une prise _ 3 alv6oles con_ectement raise
la range.
R_parez ou remplacez imm_diamment
tout
cordon eflfilochO ou endommag_.
N'ufilisez
pas un cordon fbndill_ ou pr_sentant des
sig_les d'usure.
L'appareil doit toujours Oue branch_ dans
sa propre prise de courant, dont la tension
nominale est idenfique fi celle indiqu_:e sur
la plaque signal_fique.
Lorsque _us d@lacez l'appareil, faites
attention de ne pas la faire fouler sur le cordon
d'alimenmfion
afin de ne pas l'endommagen
cordon
et fimz &oit pour la refiner de la prise.
I/utilisation d'un disjoncmur de fifite fi la
mn_e est recommand_e
pour le r_fiig_rateur
pour denr_es flaiches.
Cette w_caution est recommand_e
pour
g'arantir un rendement
optimum et &'imr
une smvharge des ci_vuits _lectfiques de la
r_sidence, ce qui pounait crier un risque
d'incendie par surschauflb des ills.
CONSER VEZ CES DIPd,2CT1VES
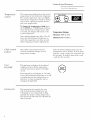
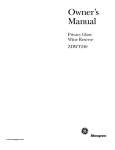
Controls
and Features
Fresh-Food
7>mp_ature
contrvl
Tile mmperature
display shows the aculal
temperature
of tile Desh-food
refligeramr.
The aculal mmperaulre
may vm T slightly
flom the set mmperamre
based on factors
such as door openings,
amount of food
and room temperature.
To change the temperature
setting, press
tile WARMER or COLDER pads until you
reach the desired set temperature.
'After
5 seconds, tile display will return to the
actual temperature.
After making adjustments,
allow 12 to 24
hours for tile fiesh-food
refiigerator
to
reach the mmperamre
you have set and
before making ally fln_ther adjustments.
Child control
lockout
This child control
Unit
ON/()I T
This pad stops cooling in the fiesh-food
refligerator,
turns off tile temperature
controls and removes power to the light
circuit.
lockout
prevents
unwanted
changes
temperature
settings.
feature
to your
Press this pad for a minimum
of 3 seconds
tO tnrn
tile fresh-food
refrigerator
on or off
or unphlg tile unit for long vacations or
absences, or when cleaning the unit or
changing
the light bulb.
lnterior
j_tn
Tile interior
fan is locamd
ill tile rear
wall of the fiesh-food
refiigerator
and
is designed to run continuously
to help
maintain the proper cooling temperature.
Tile interior fail will only turn offwhen
the
door is opened.
I¢_/)'ig'eralo*"
TEMP.CONTROL
WARMER
Temperature
COLDER
Settings
Minimum:
34°F (1.1°C)
Maximum:
45°F (7.2°C)
After tile desired temperature
is set, tile
mmperature
can be locked. To lock, press
both the + and - pads at the same time for
five seconds. To unlock, press both + and
- pads t_r five seconds.
Controls
and Features
Frr_,sh-t_od
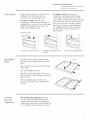
Glass
shelves
Tempered
glass shelxes in tile flesh-food
refiigerator
are remoxable
for easy
cleaning
or for storing larger items.
To remove
completely
tile gasket.
slightly. Tilt
angle while
a shelf, open tile door
to avoid pomntial
damage to
I,ift up on the back of tile shelf
tile shelf to one side at an
pulling forward.
I_rqrig'rnvltor
To replace a shelf, open tile door
completely
to avoid potential
damage
to tile gasket. Tilt the shelf to one side
at an angle and slide toward the back wall,
placing one side onto tile shelf support.
Place tile other side onto tile opposim
shelf support. Ensure rear locking tabs
are engaged.
When installed properly,
tile shelf will not slide forward when
gently
pulled.
Appearance may vary
To remove, lift up on the back of the shelf
lilt the shelf at an angle while removing
or replacing
This shelf splits in half and slides under
itself tbr storage of tall items on the shelf
belo_
Step l: I,ifl the back edge of the flont
of the shelf.
Place in slots when replacing the shelf
Step 1
half
Step 2: Pull slightly forward.
Step 3: Lower the back edge of tile flont
half of the shelf while sliding it underneath
the back half.
Tile entire Quick Space shelf can be
remoxed
and replaced
(see (;lass Shelxes
section).
Step 3
Loading
tips and
suggestions
• Do not block the thermistor, located
on tile right hand side,just
above tile
third shelf of tim fresh-food refligeraton
Blocking tile thermistor
could impair tile
air circulation
and temperature
control.
Controls
and Features
Fr_,sh-Food
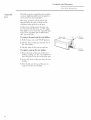
Vegetab#
pan
I¢_q)'ig'erator
The fllll exmnsion
veg>table pan provides
constant
high humidity levels required
to
store most fruit and vegetables.
How long produce
can be stored will
depend
upon the type of food and its
condition
when placed ira the pan.
Unlike many refligerators
the pan may
be removed
with the door at a 90 ° angle.
This allows you m clean the vegetable
pan
easier. The vegetable
pan is dishwasher
safe, top rack only.
To remove
the pan from
the wire holder:
1. Pull the pan out to the STOP
position.
2. Lift the fiont of the pan
the wire holden
up and out of
3. Lift the back of the pan
up and out.
To replace
a pan
1. Lift front
up and out,
in the wire holder:
1. Place the back of the pan ira the wire
holder, making sure the wire holder fits
into the grooves on the back of the pan.
2. Lower the front
holder.
of the pan into the wire
3. Press firmly on the top of the pan
snap it into the wire holder.
10
2. Lift back
up and out.
to
Care and Cleaning
Fresh-Food
I¢_/)'ig'eralo*"
Turn the fresh-food
refrigerator
OFF" or unplug the unit before cleaning.
Turn tile fresh-food
refiigerator
OFF by pressing tile button on tile control
a nfinimum
of 3 seconds until tile light turns off.
Door
gasket
Light bulb
replacement
Tile vinyl gasket may be cleaned with mild
soap and water, a baking soda solution or
a mild scouring powder. Rinse well.
Alter
thin
jelly'
This
and
Turn
To remove the light shield, push in tile tab
on tile left side of tile shield and lower it.
the fresh-food
replacing
unit OFF before
tile light 1)ulb.
cleaning
the door gasket, apply a
layer of paraffin wax or petroleum
to tile door gasket at tile hinge side.
helps kee I) the gasket flom sticking
bending
out of shape.
Replace
In
the
event
4 a powo
jdilure
Preparing
jbr
vacation
Preparing
to
17_zove
panel
If the power fails, open
inflequently
as possible
tile temperature.
tile door as
to maintain
with a 15 watt appliance
bulb.
Do not store or ttse gasoline or other
flammable
vapors and liquids in the
vicinity of this or any other appliance.
For long vacations or absences,
remove
tbod and turn the fresh-food
refligerator
OFE Clean the interior
(see Cleaning
tile
Inside section)
For shorter vacations, remove perishable
tbods and leave controls
at regular
settings. However, if the room
temperature
is expecmd
to drop below
60°F (16°(;), follow tile same instructions
as for long vacations.
Secure all loose items such as shelves and
the vegetable
pan by taping them securely
in place to prevent damage.
Be sure the fresh-food
refrigerator
an upright position during moving.
stays in
11
re and (;leaning
Fresh-Fr_od l?_]}'ig'eralo*"
Turn the fresh-food
refrigerator
OFF" or unplug the unit before cleaning.
Turn tile fresh-food
refiigerator
OFF by pressing tile button on tile corm ol panel
a nfinimum
of 3 seconds until tile light turns off.
Cleaning
the outside
Door handles and u'im--Clean
dampened
cloth,
wifll a cloth
with soapy water. D1T with a soft
Keep the outside clean. Wipe with a clean
cloth lightly dampened
with mild liquid dish
demrg_nt.
Dry with a clean, soft cloth.
Do not wipe file refrig>rator wiflr a soiled
dish cloth or wet towel. These may leaxe
a residue that can damag_ tire finish. Do
nnt use scouring pads, i)owdeied cleaners,
1)leach or cleaners containing
1)leach
1)ecause rinse products can scratch
arrd damage tile finish.
Stainless Steel
Regularly clean and polish
tile stainless smel exmrior and handle with a
commercially
available stainless steel cleaner
such as Stainless Steel Magi('* to preseiwe
arrd promct file fine finish. Stainless Smel
magic is available through GE Parts arrd
Accessories, 800.696.2002
or
GEAppliances.com.
Order
part numl)er _AXI 0XI 5.
To avoid scratching the fine finish of the
stainless steel, wipe in the same direction
as the grain when polishing or cleaning
any stainless steel surface. The grain on
the fresh-food refrigerator door rurts
top to bottom.
Do not use appliance
stainless steel.
Cleaning
the inside
Unplug the fresh-food refrigerator
before
cleaning. If this is not practical, turn the unit
OFF and wring excess moisture out of the
cloth or sponge when cleaning around lights
or corr trols.
Use warm water arrd baking soda solufion-al)out a tablespoon
(15 ml) of baking soda
to a quart (1 liter) of water. This both cleans
arrd neutralizes odors. Thoroughly
rinse arrd
wipe dry.
Drain
hole
Periodically check tire drain hole and
channel for arty debris. If the drain is
blocked, corrdensation
will not drain
properly.
To check and clean the drain hole, remove
fire bottom two glass shelves. Sweep a damp
cloth along tile channel ira tire back of tile
fiesh-food refl-ig>rator Use a fing_r to sweep
away arty del)ris flom tile drain hole.
12
wax or polish on the
Other parts of the fresh-food refrigerator-irrcluding the door gaskets, vegetable pan
arrd glass shelx>s--can
be cleaned tile
sam e way.
Avoid cleaning cold glass shelves with hot
water becattse the exlreme temperature
difference may cattse them to break. Handle
glass shelves carefully. Rough handling of
tempered glass can cattse it to shatter.
Appearance may vary
Drain hole
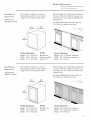
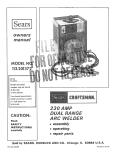
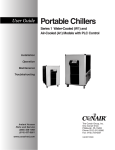
Built-In Dimensions
t@_,sh-t;)_od
Installation
dimensions
stainless
Tile flesh-food refl-igerator can be a
fleestanding
model or can be buih ira
using the cut-out dimensions
beloxsc
steal
(ZIFS240
model)
I¢_qrigeralor
When building in tire fiesh-food refl-ig_ratox;
be sure to allow fox a flfll door swing so you
have flfll access to the pull-out flfll exmnsion
x>g>table pan.
See the Installation Instructions
(Pub. No.
31-51544) fox complete directions.
23a/4,,
23a/4"
(603 ram) ......I._ !603 ram)
34V2"
(876ram)
-_...
Installation
dimensions
Product
dimensions:
NOTE:
Cut-out dimensions:
Height:
Width:
Depth:
34/2
_ " (876mm)
_, /4 (603 ram)
_, /4 (603 ram)
Handle arrd
handle standoff
Height:
Width:
Depth:
depth
is 21/4/"
Tire flesh-food refrigerator
can be a
freestanding
model or can be buih in
using the cut-out dimensions
beloxsc
custom panel
(ZIFI240 modeO
34/2 (876 ram)
2,3....
/4 (60: 3 ram)
24" (610 ram)
minimum
minimum
When building in tire flesh-food refl-ig_ratox;
be sure to allow for a flfll door swing so you
haw flfll access to the pull-out flfll exte, nsion
x_g_mble pan.
See tire Installation Instructions
(Pub. No.
31-51544) fox complete directions.
247/8"
23a/4"
(632 mm)
• .J
[
,,.I..,.(603mm)
"
_
I
"
-
.....
_- ....
34V2"
(876ram)
•z.d
Product
dimeiqtsions:
NOTE:
Height:
Width:
Depth:
34/2
1 /, (876mm)
z, /4 (603 ram)
947/s/' (639 ram)
Handle
supplied.
Cut-out dimensions:
is not
Height:
Width:
Depth:
34/2 (876 ram)
2,3....
/4 (60: 3 ram)
24" (610 ram)
minimum
minimum
13
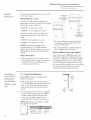
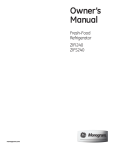
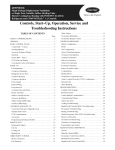
Built-In Dimensions/Installation
th'_,sh-t_)md
The flesh-food reflJg_rator
a l 10 ° door swing.
is t_actolT set for
to Wall
(with CustomPanel 90° DoorSwing 21-5/8"
14"Minimum
,
16"Min.)
When in.stalled in a corner:
Check
tile model
number
h
and allow tile
appropriam
clearance for tile 90 ° door swing
and to allow racks to slide ont.
• ZIFS240 - 4" ndnimum
I¢_!/rigeralor
Swine
23-5/8"
,110° Door
to wall.
!
90°
"" .........
• ZIFI240 - 4-1/2" mininmn_
Check
tile model
number
and allow tile
4" Minimum
\
',,
to Wall
,\
appropriam
clearance
for tile 110 ° door
swlng.
• ZIFS240 - 14" minimum
m wall.
• ZIFI240 - 16" minimum
to wall.
NOTE: Clearances are based on the
recommended
2-1/4" handle standoff
depth. Ctlsmm handle clearances may vary
depending
on the standoff of the custom
handle.
Choose
the location:
• These products m W be closed in on tile
m I) and tilree sides as long as the fiont is
unobsuucmd
for air circulation
and
proper
access to tile doon
110° .,,,
door panel
and handh?
(ZIF[240
model
3/4" Overlay
Panel
',,,",,,
• Do not install where it will be subject
direct sunlight, heat or moisture.
Black or Stainless
Steel Toekick
parts for possible
a field-installed
flmue
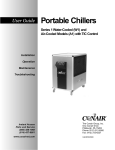
Overlay
Panel
Door
• Tile oveday panel nmst be secured to a
1/4" tilick backer panel that slides into tile
Uim. A.I 0" thick spacer panel must be
placed between tile ox>rl W and backer
panel.
NOTE: Maximmn total weight for cnstonl
door panel is 25 pounds.
1/4" Backer
9' ', ....
_3-a/1{)
294)/16"
0.10" Spac_ r
3/4" Or(flay
22q/2"
23-5/8 ......
2%1/16"
a0
Options
will be installed on tile unit. Kee I)
toekick and other unused or
Dimensions
Model ZIFI240 requires
oxerlay door panel.
to
Your CtlStOm panel (Zlf'I240 model only)
flesl>food reflig>rator is shipped witii tWo
toekicks, a stainless steel and a black toekick.
For shipping purposes, one of tile toekicks
will be secured to tile back of tile unit and
the second
tile unused
• A custom handle of your choice, supplied
by your cal)inet make_; must be installed
on this overlay panel. Counmrsink
all
screws into tile backer panel. Screws
cannot protrude
flom tile backer panel.
14
(with CustomPanel
4-1/2" Min.)
• Do not install tilese products where the
temperature
will go below 55°F (13°(;)
or aboxe 90°F (32°(;).
remox_d
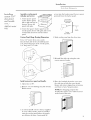
Installing
custom 3/4"
4P'I
to wall.
1/4"
Backer_
Panel
L.IO Inch
Spacer
use.
Installation
Fr_sh-t_od
Installing
custom 3/4"
door panel
and handle
(con t. )
(ZIF[240
o, ly)
Assemble
overlay panels
with glue and screws:
__-_
Overlay
Panel
Secure the
,
screws into the backer panel. Screws cannot
protrude
from tile backer panel.
ScrewsMust
BeCountersunk
on tile backer panel,
left to tigtlt and top to _
botton/.
model
._
I_!irig'erator
!
!_acker
Into Panel
Panel!_-_
panels with glue.
2. Center tile spacer/backer
panel on tile
oxerlay panel. Secure with glue and screws.
Countersink
all screws into tile backer
Ha!dl_e
DoorPanels
panel.
Custom
Use
into
3/8"
3/4"
Panel
Hinge Routing
Dimensions
a 3/4" roumr bit to cut a notch
file back side of file assembled panel
toward tile flont of rile overlay panel,
deep and 7/8" wide.
4. Slide oxerlay panel into tile door trim.
HHHH
HHHH
HHHH
5. Reinstall tile side uim using tile Uim
screws reinoxed earlieE
_°
In.stall cn*stom door panel and handle:
1. Open
door to 90 °.
2. Remoxe 5 screws holding
Retain screws.
trim; lift off trim.
6. Place the brushed decoratixe cover oxer
tile side trim to hide tile screw heads.
Ensure side tdm is alig_md top to bottom
and flont to back. Snap into place.
NOTE: For shipping puq)oses tile
brushed decorafixe coxer will be secured
to tile fiont of tile unit.
_°-
3. A custom handle of your choice, supplied
by your cabinet makei; must be installed
onto tile overlay panel before tile panels
are slid into tile trfin. Countersink
all
15
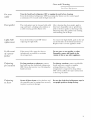
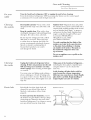
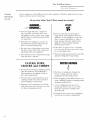
The Problem
Solver
Fresh-Food
Nor_l(ll
oD_ating
Newer appliances sound different
features and use newer technolog
flom
T.
older
appliances.
Modern
I¢_/)'ig'erator
appliances
have more
S 0"!172(1S
Do you hear what I hear?
--
HUMMM...
WHOOSH...
These sounds are normal.
WHIB./
The new high efficiency compressor
may run faster and longer than your
old appliance
and you may hear a highpitched
hum or pulsating
sounds while
it is operating.
Sometimes
the appliance
runs for an
extended
period, especially when tile
doors are opened
Dequently.
You may Ileal the fans spinning
at
high speeds. This lmppens when the
appliance
is first plugged
in, when the
door is opened
fiequently
or when a
large amount of food is added to tile
appliance.
Tim fans hel I) maintain
desired temperatures.
You may hear a whooshing
sound when
tile doors close. This is due to pressure
equalizing
within tile appliance.
If the door is open for over 3 minutes,
you may hear the fans come on in order
to cool tile light bulbs.
The cabinet fan runs confimlously
when tile door is opened.
The thns change speeds in order to provide
optimal cooling and energy' saving:s.
except
CLICKS, POPS,
CRACKS
and CHIRPS
You may hear cracking or i)oi)ping sounds
when the appliance is first i)lugged in.
This hal)pens as tim appliance cools to
the coITect temi)eramre.
Tile electronic
control board may cause
a clicking sound when relays activam to
control appliance components.
Expansion
and contraction
of cooling
coils during and after defrost can cause
cracking or i)oi)ping sounds.
WATERSOUNDS
6
The flow of refligerant
through
tile
freezer cooling coils may make a
gurgling noise like boiling water.
_4'amr dropping
on flae deflost hearer can
cause a sizzling, I)oI)ping or buzzing sound
during file defrost cycle.
A wamr dripping
noise may occur
during tile deflost cycle as ice mehs
from the evaporator
and flows into
tile drain pan.
Closing the door may cause a gurgling
sound due to pressure
equalization.
16
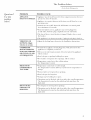
The Problem
Solver
t@esh-Food
Questions
Use this
problem
solver/
?
PROBLEM
APPLIANCE
DOES NOT
POSSIBLE
OPERATE
I¢_q)'ig'erator
CAUSE
• Appliance
may be in defl'ost cvcle when
operate
for about 30 minutes.
• Appliance
operating
is so quiet,
noise.
that most
• Controls
are set to OFE Press
fin" a minimmn
of 3 seconds.
compressor
motor
of the time wm will hear
ON/OFF
button
does not
low or no
on control
panel
• If interior
light is not on, appliance
mav not be plugged
in
at wall outlet. Push the l)lug completely
into the wall outlet.
• The fllse is blown/circuit
the breaker.
• The appliance
VIBRATION
OR
breaker
is in showroom
is tripped.
Replace
mode. Unplug
it and I)lm*_it back in.
the lexelin,*_legs, as shown in the Installation
• A(!iust
fllse or reset
Instructions.
RATTLING
(Sfight
vibration
is normaL)
COMPRESSOR
MOTOR
OPERATES
FOR LONG PERIODS
OR CYCLES
ON AND
OFF" FREQUENTLY
• Normal when appliance
appliance
to completely
is first plugged
cool down.
• Often occurs when
This is normal.
alllO/ints
• Door
• Hot
left open
weather
large
or package
or fl'equent
of tood
holding
door
door
openings.
• Temperatm'e
control set at the coldest
See Temperature
Control.
FRESH FOOD
COMPARTMENT
TOO WARM
in. Wait 24 horn's fi_r the
are placed
in appliance.
open.
This is normal.
setting,
• Temperature
control
not set cold enough.
See Temperature
Control.
Allow 12 to 24 horn's tot temperature
change.
• _'arm
weather
• Door
left open
• Package
or fl'equent
for long
mav be holding
door
to
openings.
time.
door
open.
• Thermistor
may be blocked,
which can afl'ect the overall temperatm'e.
The thermistor
is located on the right hand side just above the
third shelf.
FROST
OR ICE
CRYSTALS
ON
RI?LAR WALL
• Too
freqtlent
or too long
door
ol)enings.
• Thermistor
may be blocked,
which can attect the overall temperatm'e.
The thermistor
is located on the right hand side just above the
third shelf.
17
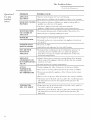
The Problem
Solver
t_resh-Food
Questions
Use this
problem
solver, t
?
PROBLEM
POSSIBLE
APPLIANCE
HAS ODOR
• Interior
CAUSE
needs
• Kee I) open
DOOR NOT
PROPERLY
CLOSING
FORMS
ON OUTSIDE
APPLIANCE
OF
MOISTURE
COLLECTS
INSIDE
INTERIOR
LIGHT
DOES
WORK
HOT
NOT
cleaning.
AIR FROM
and Cleaning.
soda in appliance;
replace
• Door gasket is sticking or tolding
over. Apply
paraffin wax to the tace of the gasket.
• Not/lntlS/lal
• Door
during
left open
periods
of high humidity.
or package
or too hmg
holding
• In humid weather,
are opened.
door
air carries
door
every 3 months.
petroleum
is hitting an internal
component
inside
Adjust interior
components
to prevent
• Too frequent
BOTTOM
OF
APPLIANCE
See Care
box of baking
• The door
appliance.
MOISTURE
I¢_q)'ig'erator
.jelly or
the
interterence.
Wipe s/IYt_lce
eli'>
open.
openings.
moisture
into appliance
when
doors
• No [)()wet" at outlet.
• I.ight
bulb
needs
replacing.
See Care and
Cleaning.
• Normal air flow cooling motor: In the refl'igeration
process,
it is
normal
that heat be expelled
in the area under the appliance.
Some floor coverings are sensitive and will discolor
at these safe
and
teinperatures.
nori//al
APPLIANCE
NEVER SHUTS OFF
BUT TEMPERATURES
ARE OK
• Adaptive defl'ost keeps compressor
rtmning
during door openings.
This is normal.
The appliance
will cycle off alter the door remains
closed tot two horn's.
ACTUAL
• Unit just
TEMPERATURI]
NOT EQUAL TO
SET TEMPERATURE
• Normal
• Door
operation
plugged
open
extrei/le
in. Allow
teil/perattlres.
24 horn's tot the s):steln
fl)r too hmg. Allow
• Warm contents
to stabilize.
• Defl'ost
in
added
24 hours
to appliance.
cycle is in process.
Allow
to stabilize.
tot the system
Allow
to stabilize.
24 horn's for the system
24 horn's fl)r the svstem
to stabilize.
• Thermistor
may be blocked,
which can affect the overall temperatm'e.
The thermistor
is located on the right hand side just above the
third shelf.
TEMPERATURI]
WILL NOT
ADJUST
• Temperatm'e
may be in lockout
mode.
5 seconds to tmlock the temperature.
Press both
+ and - pads
flw
• Thermistor
may be blocked,
which can afl'ect the overall temperatm'e.
The thermistor
is located on the right hand side just above the
third shelf.
18
(;onsumer
Services
Fresh-Food
With the purchase
of your new Monogram
assurance
that if you ever need information
we will be there. All you have to do is call
GE Answer
Center ®
In the USA:
800.626.2000
appliance,
receive the
or assistance from GE,
toll-free, t
Whatever
vour question
about any M(mogmm
major appliance,
GE Answer Cente_ _')
inlormation
service is awfilable to hell). Yore" call--and
yore" question--will
be answered
promptly
and com'teouslv.
And wm can call any time. (;E Answer Cente_ _') service is open
24 hom_ a da 5 7 days a week.
OR
Visit our Website
In Canada,
In-Home
Service
R_J)_igeralor
Repair
In the USA:
800.444.1845
at: www.monogra_a.com
call 1.888.880.3030.
AGE consumer
service protessional
will provide
expert repair service, scheduled
at a time
that's convenient
tot you. Many GE (_onsumer
Service company-operated
locations
otti_r
you se_wice today or tomorro_,
or at wmr convenience
(7:00 a.m. to 7:00 p.m. weekdays,
9:00 a.m. to 2:00 p.m. Saturdays).
Otu" thctory-trained
technicians
know yotu" appliance
inside and out--so
most repairs can be handled
in just one visit.
In Canada:
1.888.880.3030
For Customers
(;E
[r
offers
Braille
controls
fi)r a xarietx
of (;E
appliances
and
a
With Special
Needs...
broclmre
to assist in I)lanning,
with limited
mobility.
In the USA:
800.626.2000
Consumers
_sith impaired
hearing or speech _sho ha',e access to a
TDD or a comentional
teletypewriter
may call 800,TDD,(;EAC
(8(1(I.833.4322)
to request information
or set\ice.
a barrie_fi'ee
kitchen
for
persons
S_CT,ON _A
Service
Contracts
You
can
warranty
In the USA:
800.626.2224
have
the
sectu'e
expires.
teeling
Pro'chase
receive
a substantial
service
at today's
that
a (;E
discotmt.
(;E
Consumer
contract
while
Service
wmr
will
warranty
With
a m ultiple-year
contract,
their
own
can
still
be
is still
there
in etti_ct
you're
assm'ed
after
votu"
and
you'll
of flltm'e
prices.
ln Canada:
1.888.880.3030
Parts and
Accessories
Individuals
directly
qualified
to their
all GE Genuine
In theUSA:
800.626.2002
are
User
In Canada:
1.888.880.3030
to service
home.
Renewal
The
GE parts
Parts
are
applimaces
system
provides
flfllv warranted.
have
access
VISA,
parts
or
accessories
to over
47,000
MasterCard
and
sent
parts...and
Discover
cards
accepted.
maintenance
performed
by any
persomlel.
Caution
instructions
contained
user.
servicing
must
Other
be exercised,
in this
generally
since
lnmlual
cover
should
improper
procedures
be referred
servicing
may
intended
to qualified
cause
unsafe
to be
service
operation.
19
Warranty
Fresh-Food Refl'ig'eralor
YOUR MONOGRAM
FRESH-FOOD REFRIGERATOR
WARRANTY
Staple sales slip or canceled check here. Proof of original
date is needed to obtain service under warranty.
WHATIS
COVERED
l')om the Date
of the O'_¢inal
Purchase
purchase
FULL ONE-YFAR WARRANTY
For one year from (late of original purchase, we will provide, Dee of charge, parts and service
labor in your home to repair or replace a*U part q/'the/i'e,_hvfi_od _z'/r_g'(,ratorthat lilils because of
a manulhcmring
defect.
FULL FIVE-YF_R WARRANTY
For fixe xears• fl-Oln date of original pin-chase, we will proxide, fl'ee of charge, parts and serxice labor
in _otn _ home to repair or replace a_U parl o_'lhe _ealed _vji'i_'emli_t_',
, sy,slem (the compressor,
condenser,
exaporator
and all connecting
tuhing) that lifils because of a manulitctming
delect.
This warranty is extended
to the oliginal purchaser
and any succeeding
owner li)r products pro'chased
li)r ordinar\
home use in the 48 mainland states, Hawaii, \.\_mhington, D.C. or Canada. In Alaska the
warranty is the same except that it is I,[MITED because you must pa} to ship the prod uct to the set\ice
shop or li)r the service technician's
travel costs to your heine.
All warrant\ service will be provided bv our Factory
Care _servicers during normal working hours.
ShouM your appliance
need set\ice, dining
800.444.1845.
In Canada: 888.880.3030.
WHAT
IS NOT
COVERED
• Service trips to your home
to use the product.
warranty
to teach you how
• Replacement
of house
circuit breakers.
fuses
• Damage
to the product
fire, floods
or acts of
caused
God.
• Failure of the product
other than its intended
commercially.
if it is used for
purpose or used
• Replacement
of
Service
or resetting
Centers
period
or beyond,
of
If you
by accident,
have
your
dealer
for
providing
and
other
• Loss
states/provinces
dalnages,
specific
so the
legal
to province.
state/provincial
rights,
To know
not
allow
linfitation
and
you
what
consuuler
the
exchlsion
or exchlsion
Inay
your
affairs
also
legal
office
due
problem,
You
adequate
contact
axe responsible
electrical,
cmmecting
plumbing
facilities.
to spoilage
(in
or consequential
by possible
bulbs.
do
above
or installer.
or
the USA
tufty).
• Damage
Some
delivery
an installation
of food
Customer
in the USA call
• Improper
installation,
maintenance.
• Incidental
the light
or bv our authorized
after
or linfitation
Inay
have
other
rights
are
or w)ur
defects
not
fights
in your
state's
apply
which
with
caused
appliance.
delivery.
of incidental
to you.
This
w_rv ti'om
state/province,
Attorney
damage
this
or consequei_tial
warranty
state
gives
you
to state/province
consult
your
local
or
General.
Waacrantor in USA: General Electric Compm_y,
Louisville, KY 40225
WaJcrantor
in Canada:
Cmuco
Inc.
0
197D5891PO02
49-60306-3
Monogram:
GE Consumer & Industrial
07-04 JR
LouisvilJe, KY 40225
Printed in Slovenia
@2004 GE Company