1
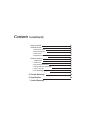
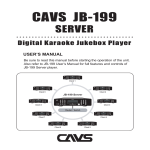
CAVS JB-199
Digital Karaoke Jukebox Player
USER’S MANUAL
Be sure to read this manual before starting the
operation of the unit.
POWER
JB/CD
POWER
BGV
TEMPO UP
Open/Close
MUTE
REC
KEY
VOL
VOCAL
MIC.1
MIC. 2
ECHO
...
...
...
...
R
...
...
...
...
...
. .
. .
MIC. 2
TEMPO DOWN
. .
MIC.1
MENU
JB/CD
MENU
AR
TIME
C
RD
LE
KEY #
LIST
TEMP
KEY b
SET UP
O
UP
VOL
LEFT
SELECT
FA N
FA R E
DOWN
1
2
4
5
6
7
8
9
0
PROG
3
BGV
RANDOM
CANCEL
JB-199
INFO
REPEAT
TITLE
STOP
RIGHT
LIST
PLAY
PAUSE
ENTER
PPgm
VOCAL
IMPORTANT SAFETY INSTRUCTIONS
All the safety and operating instructions should be read
before the product is operated.
Do not use attachments not recommended by the
product manufacturer as they may cause hazards.
The safety and operating instructions should be
retained for future reference.
Do not use this product near water - for example, near a
bath tub, wash bowl, kitchen sink or laundry tub; in a
wet basement; or near swimming pool; and the like.
All warnings on the product and in the operating
instructions should be adhered to.
All operating and using instructions should be followed.
Unplug this product from the wall outlet before
cleaning.
Do not place this product on an unstable cart, stand,
tripod, bracket, or table, The product may fall, causing
serious injury to a child or an adult and serious damage
to the product.
Do not use liquid cleaners or aerosol cleaners, Use
damp cloth for cleaning.
-
A product and cart combination should be moved with care. Quick stops, excessive forces and
uneven surfaces may cause the product and cart combination to overturn.
This symbol is to be included in the important safeguards
of applicable units adjacent to the upper side content.
CAUTION
RISK OF ELECTRIC SHOCK,
DO NOT OPEN
CAUTION : TO REDUCE THE RISK OF ELECTRIC SHOCK
DO NOT REMOVE COVER (OR BACK).
NO USER SERVICEABLE PARTS INSIDE
REFER SERVICING TO
QUALIFIED SERVICE PERSONNEL
WARNING
To prevent fire or shock hazard, do not expose
the unit to rain or moisture.
This symbol is intended to alert the user to the presence of
uninsulated "dangerous voltage" within the product's
enclosure that may be of sufficient magnitude to constitute
a risk of electric shock to persons.
This symbol is intended to alert the user to the presence of
important operating and maintenance(servicing) instructions
in the literature accompanying the appliance.
Caution : To prevent electric shock do not use this
(polarized) plug with an extension cord, receptacle
or other outlet unless the baldes can be inserted
to prevent blade exposure.
Attention : Pour prevenir les choes electriques ne pas
utiliser cetre fiche polarisee avec un prolongateur,
une prise de courant ou une autre sortie de
courant, sauf si les lames prevent etre inserees a
fond sans en laiser aucune partie a decouvert.
A product and cart combination should be moved with care. Quick stops, excessive force, and uneven surface may cause the
product and cart combination to overturn.
Slots and openings in the cabinet are provided for ventilation and to ensure reliable operation of the product and to protect it
from overheating, and these openings must not be blocked or covered. The openings should never be blocked by placing the
product on a bed, sofa, rug, or other similar surface.
The openings should not be placed in a built-in installation such as a bookcase or rack unless proper ventilation is provided or
the manufacturer's instructions have been adhered to.
This product should be operated only from the type of power source indicated on the marking label. If you are not sure of the
type of power supply to your home, consult your product dealer or local power company. For products intended to operate
from battery power, or other sources, refer to the operating instructions.
Power supply cord should be routed so that it is not likely to be walked on or pinched by items placed upon or against them,
paying particular attention to cords at plugs, convenience receptacles, and the point where they exit from the product.
Do not overload wall outlets, extension cords, or integral convenience receptacles as this can result in a risk of fire or electric
shock.
Never push any kinds of objects into this product through openings as they may touch dangerous voltage points or short-out
parts that could result in a fire or electric shock. Never spill any kind of liquid on the product.
Do not attempt to service this product yourself as opening or removing covers may expose you to dangerous voltage or other
hazards.
Refer all servicing to qualified service personnel.
Unplug this product from the wall outlet and refer servicing to qualified service personnel under the following conditions:
- When the power supply cord or plug is damaged.
- If liquid has been spilled, or objects have fallen into the product.
- If the product has been exposed to rain or water.
- If the product does not operate normally.
- If the product has been dropped or damaged in any way.
- When the product exhibits a distinct change in performance.
When replacement parts are required, be sure the service technician has used replacement part specified by the
manufacturer or have the same characteristics as the original part. Unauthorized subsitutions may result in fire, electric shock,
or other hazards.
Upon completion of any service or repair to this product, ask the service technician to perform safety checks to determine that
the product is in proper operating condition.
The product should be situated away from heat sources such as radiators, heat registers, stoves, or other products (including
amplifiers) that produce heat.
Grounding or Polarization - This product may be equipped with a polarized alternating-current line plug (a plug having one
blade wider than the other).
This plug will fit into the power outlet only one way. This is a safety feature. If you are unable to insert the plug fully into the
oulet, try reversing the plug. If the plug should still fail to fit, contact your electrician to replace your obsolete outlet. Do not
defeat the satety purpose of the polarized plug.
Alternate Warnings - This product may be equipped with a three-wire grounding-type plug, a plug having a third(grounding)
pin. This plug will only fit into a grounding-type power outlet. This is a safety feature. if you are unable to insert the plug into
the outlet, contact your electrician to replace your obsolete outlet. Do not defeat the safety purpose of the grounding-type
plug.
Lightning - For added protection for this product during a lightning storm, or when it is left unattended and unused for long
periods of time, unplug it from the wall outlet and disconnect the antenna or cable system. This will prevent damage to the
product due to lightning and power-line surges.
Federal Communications Commission Requirements
WARNING
CHANGES OR MODIFICATIONS NOT EXPRESSLY APPROVED BY THE PARTY
RESPONSIBLE FOR COMPLIANCE WITH THE FCC'S RULES(THE FCC 'GRANTEE')
COULD VOID THE USER’S AUTHORITY TO OPERATE THE EQUIPMENT.
Note
This equipment consists of parts that has been tested and found to comply with the
limits for a Class B digital devices, pursuant to part 15 of the FCC Rules. These limits
are designed to provide reasonable protection against harmful interference in a
residential installation. This equipment generates, uses and can radiate radio frequency
energy and, if not installed and used in accordance with the instructions, may cause
harmful interference to radio communications. However, there is no guarantee that
interference will not occur in a particular installation. If this equipment does cause
harmful interference to radio or television reception, which can be determined by
turning the equipment off and on, the user is encouraged to try to correct the
interference by one or more of the following measures :
Reorient or relocate the receiving antenna.
Increase the separation between the equipment and receiver
Connect the equipment into an outlet on a circuit different from that to which
the receiver is connected.
Consult the dealer or an experienced radio/TV techical for help.
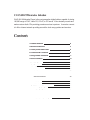
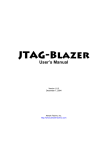
CAVS JB-199 Karaoke Jukebox
CAVS JB-199 Karaoke Player is the next generation digital jukebox capable of storing
100,000 songs of DVD, Video CD, CD+G, or CD format. It also instantly records and
makes custom Audio CDs providing premiere services to patrons. It can also connect
to LAN or Internet network providing around the clock song updates and services.
Contents
1. Product features
4
2. Safety/Precautions
5
3. Check points before use
8
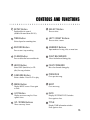
4. Controls and Functions
9
5. Using remote controller
17
6. How to connect
19
7. How to operate
26
Basic Functions
Disc Play
Advanced Functions
1. Jukebox
2. Disc Capture
3. Disc Recording
4. Download (DateCD)
5. System Control
6. Video Control
7. Audio Control
8. Download Song Files from JB-99
JB-199 Manager program
1. Preparing song files
2. Transfering song files
3. Program upgrades
4. Picture files
5. Edit, save, and print song list
26
31
32
32
33
35
36
37
38
39
40
41
42
44
46
47
49
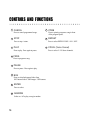
Contents (continued)
Making DataCD
Optional devices
1. External disc drive
2. External hard drive
3. VGA monitor
4. Keyboard and mouse
Windows platform
1. USB Camera
2. NTSC / PAL
3. Play DVD and Video CD
4. Change Welcome (title) page
5. Copy a song list
6. JB-199 Manager program
51
54
54
55
55
55
56
56
57
57
57
58
58
8. Trouble Shooting
59
9. Specification
60
* Limited Warranty
11
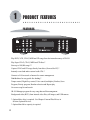
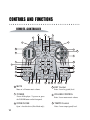
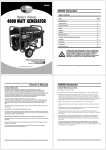
PRODUCT FEATURES
FEATURES
BGV
KEY b
LIST
KEY #
MENU
TEMPO DOWN
VOCAL
MIC.1
MIC. 2
ECHO
R
JB-199
JB-199
...
...
...
...
...
...
...
...
...
MIC. 2
TEMPO UP
. .
MIC.1
JB/CD
. .
POWER
. .
Play DVD, VCD, CD+G, MIDI and CD songs from the internal memory of JB-199
Play Super CD+G, CD+G, MIDI and CD discs.*
Store up to 100,000 songs.**
Capture CD+G and CD songs directly from discs (No need for PC).*
Instantly record and make custom Audio CDs.*
Connect to LAN network or Internet for remote management.
Dual disc drives for easy quick disc loading.*
Tempo control, Digital key control, Voice cancel (multiplex), Fanfare, Score
Program, Priority program, Random selection and Repeat play
On-screen song list and search
JB-199 Manager program for easy song data and list management
Background video (BGV) from internal video files, still images, and USB camera.
* Optional disc drive is required. See Chapter: External Disc Drives in
Section: Optional Devices.
* Optional hard drive capacity is required.
4
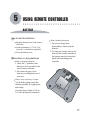
2
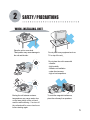
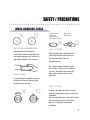
SAFETY / PRECAUTIONS
WHEN INSTALLING UNIT
Place the unit on even-level.
Tilted position may cause damage to
the unit and the disc.
Do not place heavy equipment such as
TV on top of the unit
Do not place the unit in areas with
- vibration
- high humidity
- limited or no ventilation
- under direct sunrays
- high or low temperature.
Moving the unit between extreme
temperatures may cause water dew
on the laser pickup of the unit and
result in malfunctioning. If so turn off
the unit and wait for one or two hours
before starting again.
To avoid the magnetic interference,
place the unit away from speakers.
5
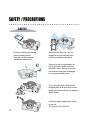
SAFETY / PRECAUTIONS
U
M SE
AN R'
UA S
L
SAFETY
Be sure to read the user manual
before operating the unit
Place the unit in an area well
ventilated an with no heat.
Never open the top cover. It is very
dangerous to touch the inside of the
unit due to possible electric shock.
When not in use for long duration, be
sure to pull out the power cord from
the electric outlet. Also do not use the
unit when the power cord is damaged
as it may cause electric shock.
The unit and its power cord should be
arranged safely at all times and never be
handled with wet hands due to a danger of
electric shock.
Check the supply voltage before turning
on the unit.
The unit uses 100 - 240V AC.
6
SAFETY / PRECAUTIONS
WHEN HANDLING DISCS
Foreign materials
Fingermarks
Heavy scratches
Paper stickers or tapes
Do not use damaged discs.
Damaged disc will not play its
audio/video content as specified and
can cause damage to the unit due to
high speed rotation when inserted.
How to keep.
Direct sunray
Electric heater
How to handle
When handling disc, take hold of the
outer edge and the center hole, not
the top and bottom sides, as
illustrated above.
Do not place paper stickers or tapes
on the disc, or write on the surface of
the disc. Be careful not to place the
disc under a direct sunray or near
high heat.
To prevent discs from bending, be sure to
pull discs out of the unit after using and
keep them in the disc case.
How to clean.
Wipe the disc with soft cloth to remove
dust and fingermarks using the motion as
illustrated.
When cleaning the disc, use only the liquid
disc cleaner and never use benzene,
thinner, or sprays for electrostatic
protection.
7
3
3
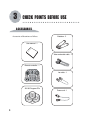
CHECK POINTS BEFORE USE
ACCESSORIES
Batteries : 2
Accessories of the unit are as follows.
Us
er
’s
m
an
ua
l
User manual : 1
Video and audio cable : 1
Remote controller : 1
POWER
Open/Close
MUTE
REC
KEY
VOL
JB/CD
MENU
AR
TEMP
TIME
C
RD
LE
SET UP
O
UP
VOL
LEFT
SELECT
FA N
FA R E
2
4
5
3
6
7
8
9
0
PROG
BGV
RANDOM
INFO
REPEAT
TITLE
STOP
PLAY
Lan cable : 1
DOWN
1
CANCEL
RIGHT
LIST
ENTER
PPgm
VOCAL
PAUSE
JB-199 Program CDs
Power cord : 1
8
4
4
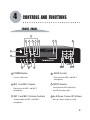
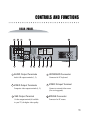
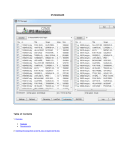
CONTROLS AND FUNCTIONS
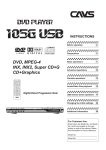
FRONT PANEL
8
5
POWER
6
JB/CD
9
7
12 13
11
14
BGV
TEMPO UP
1
KEY b
LIST
KEY #
MENU
TEMPO DOWN
VOCAL
MIC.1
MIC. 2
ECHO
10
R
JB-199
...
...
...
. .
1
3
...
...
2
...
...
...
...
. .
MIC. 2
. .
MIC.1
15 17
4
POWER Button
4
MIC 1 and MIC 2 Inputs
5
MIC 1 and MIC 2 Volume Controls
Volume controls for MIC 1 and MIC 2
microphones.
JB/CD Selector
Select between JUKE (hard drive)
and CD (disc) play mode.
Plug-in jacks for MIC 1 and MIC 2
microphones.
3
ECHO Control
Echo control for MIC 1 and MIC 2
microphones.
Turn on / off the unit.
2
18 16
6
Up & Down, Tempo UP & Down
Move up / down, Tempo up / down.
9
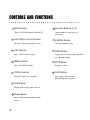
CONTROLS AND FUNCTIONS
7
BGV Selector
14
Input number of a song, track, or a
menu item.
Turn on / off the background video (BGV).
8
Left & Right, Key Up & Down
15
Move left / right, Key (pitch) up / down.
9
LIST Selector
MENU Selector
16
VOCAL Selector
Select left / right / stereo channels.
12
LCD Display
Display status of song, mode, time, etc.
13
Remote Sensor
Receive infrared signal from the remote
control.
10
PROG Button
Program up to 99 songs with pre-specified
key and tempo settings.
17
Open / close MENU display.
11
CANCEL Button
Cancel programmed songs.
Open / close on-screen song list.
10
Numeric Buttons (0 - 9)
STOP Button
Stop play or return.
18
PLAY Button
Play a song or select an item.
When playing, press to pause.
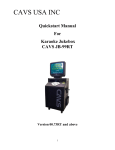
CONTROLS AND FUNCTIONS
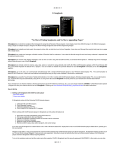
REAR PANEL
7
6
14
2
8
CAUTION
MODEL : CAVS JB-199
RISK OF ELECTRIC SHOCK
DO NOT OPEN
WARNING: TO REDUCE
POWER : AC100-240V~50/60Hz
SERIAL NO. :
This device complies with Part 15
of the FCC Rules. Operation is
subject to the following two
conditions; (1) This device may
not cause harmful interference,
and (2) This device must accept
any interference that may cause
undesired operation.
CAUTION: TO REDUCE THE RISK OF ELECTRIC
THE RISK OF FIRE OR
SHOCK, DO NOT REMOVE COVER, NO
ELECTRIC SHOCK, DO NOT
USER-SERVICEABLE PARTS INSIDE. REFER
VIDEO OUT
EXPOSE THIS APPLIANCE TO SERVICING TO QUALIFIED SERVICE PERSONNEL.
RAIN OR MOISTURE.
MOUSE
USB
1
DATE : OCT. 2004
MADE IN USA
BILL / COIN
LAN
VIDEO IN VHS
VGA
CONTROL
RESET
AUDIO OUT
KEYBOARD
4
CUPMKC-000001
MANUFACTURED :
1
5
3
9
AUDIO Output Terminals
10
11
4
Audio L/R output terminals (1, 2).
2
VIDEO Output Terminals
VHS Output Terminal
S-video output terminal (if available
in your TV) for higher video quality.
13
KEYBOARD Connector
Connector for PC keyboard.
5
VIDEO IN Input Terminal
Connect to external video source
(For use in upgrade).
Composite video output terminals (1, 2).
3
12
6
MOUSE Connector
Connector for PC mouse.
11
CONTROLS AND FUNCTIONS
7
USB 2.0 Connectors
11
Connector for external disc drive,
hard drive, camera, etc.
8
LAN (100/10 Mbps) Connector
Audio / video signal control output
terminal.
12
Connector for 100/10 Mbps LAN cable
9
VGA Connector
RESET Button
Restart JB-199.
12
BILL / COIN Connector
Connector for bill, coin, or card acceptor.
13
Connector for PC monitor.
10
CONTROL Terminal
POWER Selector
Select power input between 110V/60Hz
and 230V/50Hz.
14
POWER Cord Plug
Plug for power cord.
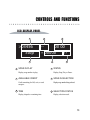
CONTROLS AND FUNCTIONS
LCD DISPLAY PANEL
1
>03456
Stop
--
:
00 00
??
* 00000
4
1
3
2
SONG IN PLAY
5
4
Display song number in play.
2
AVAILABLE CREDIT
TIME
Display elapsed or remaining time.
STATUS
Display Stop, Play or Pause.
5
SONG IN SELECTION
Display song number being selected.
Credit remaining for bill, coin, or card
acceptor.
3
6
6
SELECTION STATUS
Display selection result.
13
CONTROLS AND FUNCTIONS
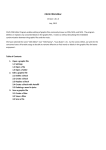
REMOTE CONTROLLER
1
2
3
11
6
9
10
7
13
POWER
Open/Close
MUTE
VOL
REC
TIME
KEY
15
MENU
16
R
VOL
UP
CL
RD
EA
TEMP
4
SET UP
O
5
JB/CD
FA N
FA R E
LEFT
SELECT
RIGHT
LIST
17
DOWN
1
2
3
8
14
4
12
20
19
6
BGV
7
8
9
CANCEL
0
PROG
STOP
PLAY
PAUSE
RANDOM
21
23
INFO
REPEAT
TITLE
24 22
1
5
25 26
27
MUTE
18 29
4
Mute on / off master music volume.
2
POWER
OPEN/CLOSE
Open / close disc drive (Disc Mode only)..
14
32 34
30
31
PPgm
33
VOCAL
35
KEY Control
Raise / lower key (pitch) level.
5
Power off the player. To power on, press
the POWER button on the front panel.
3
28
ENTER
VOLUME CONTROL
Raise / lower master music volume.
6
TEMPO Control
Raise / lower tempo (speed) level.
CONTROLS AND FUNCTIONS
7
SETUP Button
16
TIME Button
17
RECORD Button
18
Peripheral device control
(disabled for stand alone JB-199).
8
Press to select.
CLEAR Button
19
JB/CD Button
20
FANFARE Button
21
MENU Button
22
LIST Button
23
UP / DOWN Buttons
24
Move cursor up / down.
INFO
Display SYSTEM STATUS window.
Press again to close.
Display on-screen song list. Press
again to close.
15
NEXT
Go to next song.
Display MENU screen. Press again
to close.
14
PREVIOUS
Go to previous song.
Select a fanfare. Press PLAY to play.
13
FAST FORWARD
Move fast forward during play.
Select JUKE (hard drive) or CD
(disc) for song selection.
12
FAST BACKWARD
Move fast backward during play.
Press to delete the last recorded track.
11
NUMERIC Buttons
Input number of a song, title, or menu item.
Press to start / stop recording.
10
LEFT / RIGHT Buttons
Press to select / return.
Select elapsed or remaining time.
9
SELECT Button
TITLE
Display TIME information window.
Press again to close.
15
CONTROLS AND FUNCTIONS
25
CANCEL
33
STOP
34
PLAY
35
Press to cancel programmed songs.
26
Press to priority-program a song in front
of the program queue.
Press to play. Press again to pause.
28
PROG
Press to program a song.
29
PAUSE
Press to pause. Press again to play.
30
BGV
Press to select background video from
Off / Internal video / Still images / USB camera.
31
ENTER
Press to select.
32
RANDOM
Select on / off to play a song in random.
16
REPEAT
Press to select REPEAT ONE / ALL / OFF.
Press to stop / return.
27
PPGM
VOCAL (Voice Cancel)
Press to select L / R/ Stereo channels.
5
USING REMOTE CONTROLLER
BATTERY
How to load the batteries
Open the bottom cover of the remote
controller.
Load two batteries (1.5V) of "AA"
size with +/- polarities as specified.
Close the bottom cover.
Precautions in using batteries
When changing batteries
1. Check the +/- polarities of the
batteries to be as specified on the
case of remote controller.
2. Do not mix the types of two
batteries even though they are of
same size.
When using a battery charger
When handling batteries
1. Do not over charge, heat,
disassemble or short-circuit the
batteries.
2. For long term storage, take out the
batteries from remote controller as
the batteries may leak electrolytic
liquid which can damage the
controller.
+
+
Use the battery charger only after
checking carefully its charging time
and voltage.
(Use only direct voltage of 2.4V to
3.6V for both batteries combined.)
17
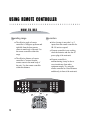
USING REMOTE CONTROLLER
HOW TO USE
Operating range
The effective angle of remote
controller is 30 degrees up/down and
right/left from the front remote
sensor in main body of the unit. Use
the remote controller within this
range.
The effective distance of remote
controller is 7 meters from the
remote sensor in the main body of
the unit. Use the remote controller
within this distance.
18
Precaution
After a bootup, it may take 1 or 2
inputs from the remote controller for
JB-199 unit to respond.
If remote controller is not working,
check the batteries and also the AC
power plug of the main unit.
If remote controller is
malfunctioning, it may be due to
cross interference from other
equipment nearby. Try using the
remote controller at a closer distance
and directly in front of the main unit.
6
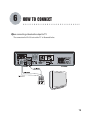
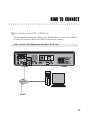
HOW TO CONNECT
When connecting video/audio output to TV
The connection for JB-199 unit with a TV is illustrated below.
19
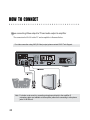
HOW TO CONNECT
When connecting Video output to TV and audio output to amplifier
The connection for JB-199 with a TV and an amplifier is illustrated below.
For video connection using VHS (S-Video) output, please contact CAVS Tech Support.
Note : For better vocal sound, try connecting microphones directly to the amplifier (if
microphone jacks are available on the amplifier) rather than connecting to microphone
jacks of JB-199 unit.
20
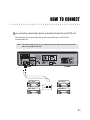
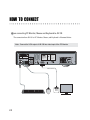
HOW TO CONNECT
When connecting external disc drives and external hard drive to JB-199 unit
The connection for an external disc drives and external hard drive to JB-199 unit
is illustrated below.
Note : Two external disc drives or one external disc drive with one external hard drive
can be connected to JB-199.
Disc Drive
Disc Drive
Disc Drive
USB USB
Hard Drive
21
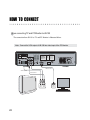
HOW TO CONNECT
When connecting TV and PC Monitor to JB-199
The connection from JB-199 to TV and PC Monitor is illustrated below.
Note : Connect the VGA output of JB-199 into video input of the PC Monitor.
CAUTION
MODEL : CAVS JB-199
RISK OF ELECTRIC SHOCK
DO NOT OPEN
POWER : AC100-240V~50/60Hz
WARNING: TO REDUCE
CAUTION: TO REDUCE THE RISK OF ELECTRIC
THE RISK OF FIRE OR
SHOCK, DO NOT REMOVE COVER, NO
ELECTRIC SHOCK, DO NOT
USER-SERVICEABLE PARTS INSIDE. REFER
EXPOSE THIS APPLIANCE TO SERVICING TO QUALIFIED SERVICE PERSONNEL.
SERIAL NO. :
This device complies with Part 15
of the FCC Rules. Operation is
subject to the following two
conditions; (1) This device may
not cause harmful interference,
and (2) This device must accept
any interference that may cause
undesired operation.
VIDEO OUT
RAIN OR MOISTURE.
MOUSE
USB
LAN
VIDEO IN VHS
VGA
CUPMKC-000001
MANUFACTURED :
DATE : OCT. 2004
MADE IN USA
CONTROL
RESET
BILL / COIN
KEYBOARD
AUDIO OUT
VIDEO OUTPUT
VIDEO OUTPUT
AUDIO OUTPUT
VIDEO
INPUT
22
AUDIO
INPUT
VIDEO
INPUT
HOW TO CONNECT
When connecting a remote PC to JB-199 unit
The connection from a remote PC to JB-199 unit is illustrated below. Use the LAN (100Mbps)
to connect JB-199 unit to a HUB or ROUTER for local network or Internet.
Note : Use the LAN 100Mbps cable included in JB-199 unit.
HUB,
ROUTER
INTERNET
23
HOW TO CONNECT
When connecting PC Monitor, Mouse and Keyboard to JB-199
The connection from JB-199 to PC Monitor, Mouse, and Keyboard is illustrated below.
Note : Connect the VGA output of JB-199 into video input of the PC Monitor.
CAUTION
MODEL : CAVS JB-199
POWER : AC100-240V~50/60Hz
RISK OF ELECTRIC SHOCK
DO NOT OPEN
SERIAL NO. :
WARNING: TO REDUCE
CAUTION: TO REDUCE THE RISK OF ELECTRIC
THE RISK OF FIRE OR
SHOCK, DO NOT REMOVE COVER, NO
ELECTRIC SHOCK, DO NOT
USER-SERVICEABLE PARTS INSIDE. REFER
EXPOSE THIS APPLIANCE TO SERVICING TO QUALIFIED SERVICE PERSONNEL.
This device complies with Part 15
of the FCC Rules. Operation is
subject to the following two
conditions; (1) This device may
not cause harmful interference,
and (2) This device must accept
any interference that may cause
undesired operation.
VIDEO OUT
RAIN OR MOISTURE.
MOUSE
USB
LAN
VIDEO IN VHS
VGA
RESET
CUPMKC-000001
MANUFACTURED :
DATE : OCT. 2004
MADE IN USA
CONTROL
BILL / COIN
KEYBOARD
AUDIO OUT
VIDEO OUTPUT
VIDEO
INPUT
24
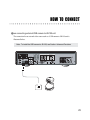
HOW TO CONNECT
When connecting external USB camera to JB-199 unit
The connection for an external video source such as a USB camera to JB-199 unit is
illustrated below.
Note : To install the USB camera to JB-199, see Section: Advanced Functions
USB
25
7
HOW TO OPERATE
BASIC FUNCTIONS
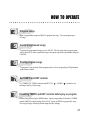
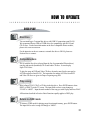
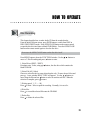
1
Power on
Be sure to set the power input of JB-199 in the back panel according to your wall outlet.
Incorrect setting will cause serious and un-repairable damage to JB-199.
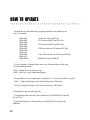
Press the POWER button on the front panel of the unit. The unit will boot up to the
initial Welcome screen. The format of songs that can be stored and played in JUKE
(internal hard drive) mode are:
TRACKS FROM
CD
CD+Graphics
Video CD (VCD)
DVD
2
3
26
FILE FORMAT
:
:
:
:
MP3
MP3 / MCG, MP3 / CDG
AVI / MP3 / MP3
AVI / MP3 / MP3
Select a song
Press LIST button to open the on-screen songlist. Search for a song using UP, DOWN,
LEFT, RIGHT buttons and press PLAY. You can also input directly a song number
using the numeric buttons and press PLAY.
Pause a song
Press PAUSE button to pause the song in play. Press again to return to normal
play.
HOW TO OPERATE
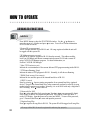
4
5
6
7
8
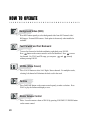
Program songs
Input a song number and press PROG to program the song. You can program up to
99 songs.
Cancel programmed songs
To cancel the programmed songs, press CANCEL. The last song in the program queue
will be deleted. To delete a particular song in the queue, input the song number and press
CANCEL.
Priority program songs
To program a song in front of the program queue, select a song and press PPgm button
in the remote control.
Set TEMPO and KEY controls
Use TEMPO UP / DOWN controls and KEY UP (
the tempo and key of the songs.
) / DOWN ( ) controls to set
Presetting TEMPO and KEY controls before play or program
With no song selected, press PROG button. Input a song number followed by TEMPO
control and KEY control settings. Press PLAY to play or PROG to program the song.
The song will play with the specified tempo and key settings.
27
HOW TO OPERATE
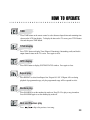
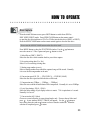
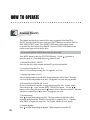
9
Background Video (BGV)
Press BGV button repeatly to select background video from Off / Internal video /
Still images / External USB camera. Each option is shown only when installed or
available.
10
Fast Forward and Fast Backward
11
VOCAL (Voice Cancel)
12
Fanfare
13
Master Volume Control
28
To move fast forward or fast backward during a playback, press PAUSE.
Press
button on the remote control to move fast backward. Press
to move
fast forward. For CD+G and CD songs, you can press
and
directly
without pressing PAUSE.
Press VOCAL button to select Left / Right / Stereo channels. For multiplex tracks,
selecting Left channel will eliminate the lead vocal in the track.
Press FANFARE button on the remote control repeatly to make a selection. Press
PLAY to play the fanfare and display a score.
Raise / lower the master volume of JB-199 by pressing VOLUME UP / DOWN button
on the remote control.
HOW TO OPERATE
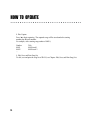
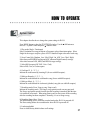
14
TIME
15
TITLE display
16
INFO display
17
Repeat play
18
Random play
19
Next and Previous play
Press TIME button on the remote control to select between elapsed time and remaining time
shown on the LCD front display. To display the time on the TV screen, press TITLE button
first and then press TIME button.
Press TITLE button to display Time (Elapsed / Remaining), Outstanding credit, and Audio
output channel status on the TV screen. Press again to close.
Press INFO button to display SYSTEM STATUS window. Press again to close.
Press REPEAT to select from Repeat One / Repeat All / Off. If Repeat All is on during
playback of programmed songs, only the programmed songs will be repeated in circle.
Press RANDOM to set the random play mode on. Press PLAY to play a song in random.
Press RANDOM again to set the random play mode off.
Press
to skip to the previous / next song.
29
HOW TO OPERATE
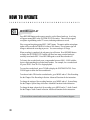
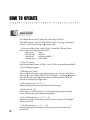
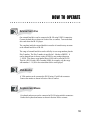
20
RECORD and PLAY
Press RECORD button on the remote control to set the Record mode on. A red ring
will appear around REC in the SYSTEM STATUS window. There will also appear
a red pause sign blinking on the TV screen, indicating readiness to record.
Play a song and sing along using MIC1 / MIC2 inputs. The music and the microphone
inputs will be recorded at 22KHz 16 bit Stereo Wav format. The red pause sign will
change to indicate the recording in process. You can record up to 99 songs.
When recording is completed, the red pause sign will return. Press RECORD button
to display the SYSTEM STATUS which will show how many recorded tracks are
currently stored under REC. Press RECORD again to set the Record mode off.
To listen to the recorded track, press a song number between 99901 - 99999 with the
last two digits matching the recorded track number. For example, for a recorded track
02, press 99902. Press PLAY to begin playback.
To erase the recorded track, press CLEAR to display the SYSTEM STATUS. Press
CLEAR again to delete the last recorded track.
To make an Audio CD from the recorded tracks, go to MENU and to 3. Disc Recording.
See the Chapter: Disc Recording in Section: Advanced Functions for the instruction.
To change the settings of the recording function, go to MENU and to 5. System Setup.
See the Chapter: System Setup in Section: Advanced Functions for the instruction.
To change the input volume level for recording, go to MENU and to 7. Audio Control.
See the Chapter: Audio Control in Section: Advanced Functions for the instruction.
To record from external audio source, please contact CAVS Technical Support.
30
HOW TO OPERATE
DISC PLAY
1
Disc Drive
You can install up to 2 external disc drives with USB 2.0 connections onto JB-199.
We recommend Plextor CDR or DVDR drives for compatibility with JB-199 and
CD+G discs. For the latest information on the list of compatible Plextor models,
please visit www.cavsusa.com.
For the instrucion on how to connect a external disc drive to JB-199, please see
Section: How to connect.
2
Compatible discs
JB-199 with the disc drive (selected from the list of recommended Plextor drives)
can play and encode (download) CD+G and Audio CD discs. It can also play
Super CD+G discs.
To play the songs in DVD and Video CD discs, the tracks must first be converted to
AVI files and stored into JB-199. The instruction for making AVI files from DVD
and Video CD discs are given in Chaper: Preparing song files.
3
Play a song
Insert a Super CD+G, CD+G or CD disc in the disc drive. Press JB/CD button to show
DISC1 (or DISC2) on the TV screen. The input field to select a song changes to
“D1-00” or “s0000”. Input the track number of the song you wish to play and Press PLAY.
All functions described in Section: Basic Functions equally applies to DISC play.
4
Return to JUKE mode
To return to JUKE mode for playing songs from internal memory, press JB/CD button.
The input field to select a song will change to “00000”.
31
HOW TO OPERATE
ADVANCED FUNCTIONS
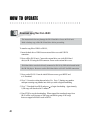
1
Jukebox
Press MENU button to show the FUNCTIONS window. Use the / buttons to
move the cursor to 1. Jukebox and press to enter. You will see various information
of JB-199 unit as follows:
* System ID (xxxxxxxxxxxx)
This is a unique machine ID for JB-199 unit. All songs registered within the unit will
be tagged with this system ID.
* IP Address (xxx.xxx.xxx.xxx)
Indicate the IP Address assigned to JB-199 from the network. This address enables
local Lan (100 Mbps) and Internet communication between JB-199 and a remote PC
using CAVS JB-199 Manager program. For detail information, see
Section: CAVS JB-199 Manager.
* Juke, FTP Version (xx.xxx)
Indicate the version numbers of the current Juke and FTP program running inside JB-199.
* FTP Status (Running / Stop)
Indicate the status of FTP program in JB-199. Normally, it will show as Running.
* DISK (Total xxxxxx, Free xxxxxx)
Indicate the size and free space of the internal hard drive of JB-199.
1. DISC 2 (xxxxx)
Enter by pressing . Input a starting song number for an external hard drive (optional
device). Songs in the external hard drive (when connected) can then be called by its song
number plus the starting song number. Normally, it is set at 99999 with only a single hard
drive in setting. Press to save and exit.
2. Password (On / Off)
Press to enter and select On by pressing . Press to input your password (4 digits).
Now re-entry to MENU will require the password. Press MENU which will show “?”
on the LCD display. Input the password to enter into MENU. To turn off the password,
go to 2. Password and Press to enter and input the password.
3. Register Song Files
Press to register all song files in JB-199. The system ID will be tagged to all song files.
All songs within JB-199 must be registered in order to play properly.
32
HOW TO OPERATE
2
Disc Capture
From the initial Welcome screen, press JB/CD button to switch from JUKE to
DISC (DISC1/DISC2) mode. Press OPEN/CLOSE button on the remote control
to open the disc drive and insert a CD+G or CD disc into the disc drive (DISC1 or DISC2).
Press the OPEN/CLOSE button on the remote control again to close the disc drive.
Do not use the OPEN/CLOSE button on the disc drive itself.
Press MENU button to show the FUNCTIONS window. Use the
move the cursor to 2. Disc Capture and press button to select.
/
buttons to
1. Select Driver (DISC1 / DISC2)
Select the disc drive which contains the disc you wish to capture.
2. Overwrite exiting data (Yes / No)
Select Yes if overwriting existing data.
3. Starting song number (xxxxx)
Select a starting number from which the captured songs will be stored. Normally
it is set as the last song number in the unit.
4. Conversion speed (1X, 2X, ..., 52X, DVD 1X, ..., DVD 20X, MAX)
Select the disc drive speed at which the disc will be read.
5. Compression rate (32Kbps, ..., 128Kbps, ..., 320Kbps)
Select the rate at which the audio data will be compressed. Normally it is set at 128Kbps.
6. Lyric Sync timing (-300 fr, +300 fr)
Select the delay timing of lyric display relative to music. 75 fr is equivalent to 1 second.
Normally it is set at 0.
7. Convert tracks (All / Select)
Choose to convert all tracks or some selected tracks only. If some, choose Select and
press . A new window SELECT TRACK will appear. Use the / buttons to
move along the tracks and use button to select or unselect each track. When the
selection is completed, press to return.
33
HOW TO OPERATE
8. Disc Capture
Press to begin capturing. The captured songs will be stored under the starting
number plus the track number.
For example, with a starting song number of 04010,
Number
04011
04012
...
Title
04010 track 1
04010 track 2
9. Edit, Save, and Print Song list
To edit, save and print the song list of JB-199, see Chapter: Edit, Save, and Print Song List.
34
HOW TO OPERATE
3
Disc Recording
This chapter describes how to make Audio CD from the recorded tracks.
From the initial Welcome screen, press JB/CD button to switch from JUKE to
DISC (DISC1/DISC2) mode. Press OPEN/CLOSE button on the remote control
to open the disc drive and insert a blank CD-ROM disc. Press the OPEN/CLOSE
button on the remote control again to close the disc drive.
Do not use the OPEN/CLOSE button on the disc drive itself.
Press MENU button to show the FUNCTIONS window. Use the
move to 3. Disc Recording and press button to enter.
1. Select Driver (DISC1 / DISC2)
Press to enter. Select, using /
blank CD-ROM.
/
buttons to
buttons, the disc drive which contains the
2. Select File (All / Select)
Choose to write all tracks or some selected tracks only. If some, choose Select and
press . A new window SELECT FILE will appear. Use the / buttons to
move along the files and use button to select or unselect each file. When the
selection is complete, press to return.
3. Writing speed ( 1 / 2 / ... / 40)
Press to enter. Select a speed for recording. Normally, it is set at 8x.
4. Write files
Press to record the selected files onto the CD-ROM.
5. Delete files
Press to delete the selected files.
35
HOW TO OPERATE
4
Download (DataCD)
This chapter describes how to transfer files (songs or upgrades) from DataCD to
JB-199. From the initial Welcome screen, press JB/CD button to switch from JUKE to
DISC (DISC1/DISC2) mode. Press OPEN/CLOSE button on the remote control
to open the disc drive and insert the DataCD. Press the OPEN/CLOSE button on the
remote control again to close the disc drive.
Do not use the OPEN/CLOSE button on the disc drive itself.
Press MENU button to show the FUNCTIONS display. Use the
move the cursor to 4. Download and press button to enter.
/
buttons to
1. Selected Disc (DISC1 / DISC2)
Select the disc drive which contains the DataCD you wish to download.
2. Overwrite exiting data (Yes / No)
Select Yes if overwriting existing data. For upgrades, set at Yes.
3. Starting song number (xxxxx)
Select a starting number from which the downloaded songs will be stored. Normally
it is set as the last song number in the unit. For upgrades, set as the last song number.
4. Download from CD-ROM (All / Select)
Choose to download all song files or some selected song files only. If some, choose
Select and press . A new window SELECT SONGS will appear. Use the /
buttons to move along the songs and use button to select or unselect each track. When the
selection is completed, press to return. For upgrades, set as All.
5. Download songs
Press to begin downloading song files. The song numbers and the titles will be
displayed during download. When the downloading is completed, Go to 1. Jukebox
in the MENU to register the songs files. See Chapter: Jukebox for more details.
6. Program upgrades
Press to begin downloading the upgrade. When completed, restart JB-199.
36
HOW TO OPERATE
5
System Control
This chapter describes how to change the system settings in JB-199.
Press MENU button to show the FUNCTIONS window. Use the
move to 5. System Control and press button to enter.
/
buttons to
1. Play mode (Single / Continuous)
Select Continuous for songs in Repeat or Program to play without interruption. Select
Single for the songs to stop for a press of PLAY button to begin at the end of each song.
2. Score Control (On_Random_Low / Med / High / On_ADC_Low / Med / High)
Select between RANDOM scoring and ADC (advanced digital control) scorings.
Also select between LOW, MED, and HIGH average scorings.
3. Select Bill Acceptor (Off / Bill / Coin / Card)
Select a Bill, Coin, or Card acceptors.
4. Credit per $1 (1 / 2 / 3 ...)
Indicate the credit earned by inserting $1 (for use with bill acceptor).
5. Debit per Karaoke (1 / 2 / 3 ...)
Indicate the credit debited for each karaoke song (for use with bill acceptor).
6. Debit per Music (1 / 2 / 3 ...)
Indicate the credit debited for each music (jukebox) song (for use with bill acceptor).
7. Recording mode (None / Song to song / Stop to end)
Indicate the recording mode. The Song to song option records one song per track.
The Stop to end option records from the time the recording is turned on until the time
it is turned off in one track. When using Start to end, be sure to turn off the recording
after the recording has been completed. Normally, it is set to Song to song.
8. Recording Status (Save / Erase)
The default setting of Save stores the recorded tracks after JB-199 is powered off.
The Erase setting deletes the recorded tracks when JB-199 is powered off.
9. Load setup default
Press to reload factory default values to all settings.
37
HOW TO OPERATE
6
Video Control
This chapter describes how to change the video settings in JB-199.
Press MENU button to show the FUNCTIONS window. Use the
move to 6. Video Control and press button to enter.
/
buttons to
1. Video source (Blue Screen / Internal Video / Internal Still / External Video)
Select a source for background video (BGV).
Blue screen
: None
Internal video
: AVI files
Internal still
: Still images (BMP)
External video : USB camera
2. Video file (xxxx.avi / ... )
Select from available internal AVI files. New AVI files can be added using DataCD
or JB-199 Manager program.
3. Still image (All / Select)
Select to display all images or some selected images only. If some, choose Select
and press . A new window SELECT FILE will appear. Use the / buttons to
move along the files and use button to select or unselect each file. When the
selection is completed, press to return.
4. Still image interval (5 / 10 / 15 / ...)
Indicate the time period (in seconds) allocated for each image.
5. Display title (on / off)
Select to turn on / off the Welcome To CAVS Sing Along message in the inital
screen. This message can be changed using DataCD.
6. Turn off backlight (Never / 1 / 2 / 3 ... / 30)
Indicate the time period (in minutes) of inactivity after which the LCD backlight
will be powered off.
38
7. Turn off power (Never / 1 / 2 / 3 ... / 30)
Indicate the time period (in minutes) of inactivity after which the unit will be
powered off.
HOW TO OPERATE
7
Audio Control
This chapter describes how to change the audio settings in JB-199.
Press MENU button to show the FUNCTIONS window. Use the
move to 7. Audio Control and press button to enter.
/
buttons to
1. Master Volume (1 / 2 / ... / 15)
Indicate the master music volume level. It is also controlled by the VOLUME UP and DOWN
buttons on the remote control. Normally, it is set at 15.
2. Master Mute (Off / On )
Select to mute on / off the master music output. It is also controlled by MUTE button on the
remote control.
3. WaveOut Volume (1 / 2 / ... / 15)
Indicate the wave output volume level. Normally, it is set at 15.
4. Synthesizer Volume (1 / 2 / ... / 15)
Indicate the MIDI output volume level. Normally, it is set at 15.
5. LineIn Volume (0% - 100%)
Indicate the music input volume level for recording. Normally it is set at 12%.
6. Microphone Volume (0% - 100%)
Indicate the microphone input volume level for recording. Normally it is set at 50%.
39
HOW TO OPERATE
8
Download song files from JB-99
The instruction below may damage the JB-99 hard drive for use in JB-99 unit.
Make a backup copy of the JB-99 hard drive before proceeding.
To transfer song files of JB-99 to JB-199,
1. Insert the hard drive of JB-99 into an external drive case with USB 2.0
connection.
2. Power off the JB-199 unit. Connect the external drive case (with JB-99 hard
drive) to JB-199 using the USB connector. Power on the external drive case.
JB-99 hard drive can also be directly connected to JB-199 by IDE cable located inside
the JB-199 player. Be sure to set the JB-99 hard drive as SLAVE for IDE connection.
3. Power on the JB-199. From the initial Welcome screen, go to MENU and
to 4. Download.
4. Go to 2. Overwrite existing data and select Yes. Go to 3. Starting song number
and input a starting song number into which you wish to begin downloading.
5. Go to 7. Download from JB-99 and press to begin downloading. Approximately,
1,000 songs will download in 15 minutes.
6. Press STOP to stop the downloading. When stopped, the transferred songs from
JB-99 will be saved in group of 100 songs, and the last group of 100 songs
that was stopped will not be saved in JB-199.
40
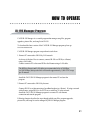
HOW TO OPERATE
JB-199 Manager Program
CAVS JB-199 Manager is a versatile program that manages song files, program
upgrades, picture files, and song list in JB-199.
To download the latest version of the CAVS JB-199 Manager program, please go
to www.cavsusa.com.
CAVS JB-199 Manager program can perform its tasks from
1. Remote PC connected to JB-199 by LAN network
- As shown in Section: How to connect, connect JB-199 to a HUB (or a Router)
using a LAN cable.
- Connect a remote PC to the same HUB or the Rounter using a LAN cable.
The HUB (or Router) and LAN cables are recommended to be of 100 Mbps
(or 100/10 Mbps) data speed which will transfer approximately 1,000 CD+G songs
per 45 minutes.
- Install the CAVS JB-199 Manager program in the remote PC and start the
program.
2. Remote PC connected to JB-199 by Internet
- Connect JB-199 to an Internet using a broadband modem (or a Router). If using a network
with a Router, assign JB-199 to be a FTP server with Port 21 in the network.
- Install the CAVS JB-199 Manager program in a remote PC with Internet
connection and start the program.
Following chapters describes the steps through which song files, program upgrades,
picture files, and song list can be managed by JB-199 Manager program.
41
HOW TO OPERATE
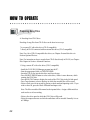
1
Preparing Song Files
A. Encoding from CD+G discs
Encoding of song files from CD+G discs can be done in two ways:
* in a remote PC with a disc drive (CD+G compatible)
* directly in JB-199 connected with an external disc drive (CD+G compatible)
Note: For a list of CD+G compatible disc drives, see Chapter: External disc drive in
Section: Optional Devices.
Note: For instruction on how to encode from CD+G discs directly in JB-199, see Chapter:
Disc Capture in Section: Advanced Functions.
1. Using a remote PC with a disc drive (CD+G compatible)
- Install the CAVS JB-199 Manager program into the PC.
- Start the program and click on CDG ENCODER.
- Insert the CD+G disc into the disc drive and close the tray.
- Press SOURCE DRIVE button to select a disc drive, if there is more than one, which
contains the CD+G disc.
- Press READ TOC button to display the tracks of the CD+G disc in the left side panel.
- Press Target button to select a directory in which the encoded files will be stored.
- Select a track you wish to encode by placing a check mark and inputting a title. If you
wish to select all, press the Check All button and input a title.
Note: The files encoded will be named as the inputted titles. Assign a different title to
each track to avoid overwriting.
- Select a disc drive speed at which the CD+G disc will be read.
- Select the compression rate at which the audio data will be encoded. Normally it is set
at 128Kbps.
42
HOW TO OPERATE
- Select the Sync timing of lyric display relative to the music. The 75 frames is equivalent
to 1 second. Normally it is set at 0.
- Check the Send Graphic Files button, indicating both audio and graphics are to be encoded.
- Press Encode button to start encoding tracks of CD+G disc into MP3/CDG files.
The right side panel will display the extracted files as follows:
Title1 MP3
Title1 CDG
Title2 MP3
Title2 CDG
B. Encoding MIDI (MID and KAR) files
- Install the CAVS JB-199 Manager program into the remote PC.
- Start the program and click on MDK ENCODER.
- Click on Folder and select the directory in which the MID or KAR files are.
- Select Code for the text language. If the text file is in English, choose 1. English.
- Press MDK ENCODER button to start encoding. When the encoding is completed, Status
will show as Finish.
- Press CLOSE button to close the MDK ENCODER window.
C. Encoding from DVD and Video CD discs
Please download the instruction Encoding from DVD and Video discs from
www.cavsusa.com/jb-199.htm.
43
HOW TO OPERATE
2
Transfering Song Files
A. Sending song files to JB-199
- Start the CAVS JB-199 Manager program in the remote PC.
- Click on JB199 Manager button.
- Click on LOG IN button.
- Input the IP address of the JB-199:
* For JB-199 connected to a local network with the remote PC, obtain the
IP address by going to MENU and 1. Jukebox.
* For JB-199 connected to Internet via a broadband modem (no network),
obtain the IP address by going to MENU and 1. Jukebox.
* For JB-199 connected to Internet via a Router (network), be sure to assign
JB-199 to be the FTP server with Port 21. The instruction can be found with
the Router. For LOG IN, obtain the IP address of the Router.
- Input the ID and Password. The default factory setting for ID is “cavsadmin” and
Password is “jb199admin”. Press the Log In button.
Note: Be sure to change the password from the factory setting.
- With JB-199 connected, the song list of JB-199 will display in the right side panel.
- Click on FOLDER button on the left side panel. Select a directory in which the new
song files are prepared. The song files in the directory will be displayed.
- Edit the song list on the left side panel inputing title and singer.
- Click on SAVE LIST button on the left side panel to save the edited song list and press
REFRESH to renew the song list.
Note: The song list can be made using a text editor and saved as juke.txt in the folder.
The JB199 Manager program will automatically pick up the juke.txt file when the
folder is opened. The format of the juke.txt file is as follows (using “|” as divider):
00001|Love me tender|Elvis Presley
00002|I just called to say I love you|Stevie Wonder
...
Each title and artist name must be less than 48 characters long.
44
HOW TO OPERATE
- Place check marks on the song files that you wish to send to JB-199 and assign song
numbers (NUM). You can also click on Auto Numbering to assign the song numbers
automatically.
Note: Song numbers (NUM) cannot be saved. They are assigned temporarily for sending
files only.
- Click on the right arrow button to begin sending song files to JB-199.
Note: Songs that are grayed out are missing some components and cannot be sent to JB-199.
B. Backing up song files from JB-199
- Check the songs you wish to backup in the right side (JB-199) panel.
- Click on the left arrow button to begin backing up song files to the remote PC.
45
HOW TO OPERATE
3
Program Upgrades
A. Upgrading JB-199 program
- Download the latest CAVS JB-199 program from www.cavsusa.com/jb-199.htm.
Note: Save the downloaded file in a directory of your PC and double click on the file
to unzip. You will see the new program, JB99NEW.exe.
- Start the CAVS JB-199 Manager program and click on Program upgrade button on
the right side panel.
- In the Program Upgrade window, click on FILE. Find the JB99NEW.exe file in your
PC and open.
- Click on Upgrade JB99NEW.exe button to send the file and upgrade the JB-199 player.
- Reboot the JB-199 player.
B. Upgrading JB-199 system files
- Download the latest system files from www.cavsusa.com/jb-199.htm.
Note: Save the downloaded file in a directory of your PC and double click on the file to
unzip. You will see a folder (for example, config, prog, or image).
- Start the CAVS JB-199 Manager program, and click on Program upgrade button on the
right side panel.
- Click on Folder button. Find the folder that was downloaded in your PC and open.
- Click on Upgrade Files button to send the folder and its contents to the JB-199 player.
- Reboot the JB-199 player.
46
HOW TO OPERATE
4
Picture Files
A. Background video files
Any AVI file can be used as background video file for JB-199. To convert your DVD
or home made movie into the background video, search the Internet for the right encoder
codec. For example, to convert a DVD movie into AVI file, search for the codec under
the title "DVD to AVI". You will find many shareware to help you in your conversion.
Also see above Chapter: Preparing Song Files:.
Normally the AVI files of 4Mbps compression or less are recommended for use in JB-199.
Higher resolution AVI files may result in degrading the core performances of JB-199.
B. background still pictures
Any BMP file can be used as background still images. Normally the BMP files of size
800 x 600 24 bit-color are recommended. For still images that are of different sizes,
JB-199 will automatically adjust the image to the TV screen. Images of larger than the
recommended size may cause blurriness in the picture.
To make BMP files, there are many shareware programs available on the Internet. You
can also use the Paint program in Windows for most standard converting and editing of
still images.
C. Transferring picture files
- From the CAVS JB-199 Manager program, click on Picture manager.
- The current video files and still pictures in JB-199 will be displayed on the right side panel.
- Press the FOLDER button on the left side panel. Open the directory which contains the
new video or still pictures.
- Check the files that you wish to send to JB-199.
- Click on the right arrow to send the files.
47
HOW TO OPERATE
- Upon completion of transfer, to see the newly added pictures, go to MENU in JB-199 and
6. Video Control.
* For video files, go to 2. Video file and select the file you wish.
* For still images, go to 3. Still image and select All to load the newly added images.
Next change the selection as you wish.
D. Screen Saver picture file
The screen saver picture file must be of 376 x 162 24 bit-color BMP file. It is transferred
to JB-199 using the method of Program Upgrades.
- Make folder \config\ in your PC.
- Insert the screen saver picture file into the \config\ folder.
- Start the CAVS JB-199 Manager program, and click on Program upgrade button on the
right side panel.
- Click on Folder button. Find the /config/ folder in your PC that has the screen saver picture
file.
- Click on Upgrade Files button to send the folder (and its contents) to the JB-199 player.
- Reboot the JB-199 player.
To make BMP files, there are many shareware programs available on the Internet. You
can also use the Paint program in Windows for most standard converting and editing of
still images.
48
HOW TO OPERATE
5
Edit, Save, and Print Song List
A. Editing song list
- Start the CAVS JB-199 Manager program and log-in to JB199 Manager. The song list
of JB-199 player will be displayed in the right side panel.
- Use your mouse to click on a title or singer of a song. Edit the field by typing in the
changes. Press Enter.
Note: You must press ENTER after typing to make the changes hold.
- To change the song number, you must back up the song file to PC, delete the song file in
JB-199 and then re-send the song file from PC to JB-199 into the new song number.
B. Saving song list
- Save the changes you made in the song list by pressing SAVE LIST button on the right
side panel. Select To JB-199 to save the song list in JB-199.
Note: This will change the song list permanently.
- You can also save a copy of the song list to your PC by pressing SAVE LIST button on
the right side panel and then selecting To My PC. The song list will be saved in a text
format.
C. Making a CD copy of the song list from JB-199 player
A copy of the song list can also be written onto a CD-ROM disc directly from JB-199
player with optional disc drive.
- From the initial Welcome screen, press JB/CD button to switch from JUKE to
DISC (DISC1/DISC2) mode.
- Press OPEN/CLOSE button on the remote control to open the disc drive and insert a
blank CD-ROM disc. Press the OPEN/CLOSE button on the remote control to close
the disc drive.
49
HOW TO OPERATE
- From the initial Welcome screen, go to MENU and 3. Disc Recording.
- Go to 2. Select file and select Song list.
- Go to 4. Write files and begin writing. When completed, the CD-ROM disc will be
ejected and the screen will return to 3. Disc Recording.
Note: The song list written in the CD-ROM disc is of text (txt) format with “|” as the
divider between song number, title, and artist. It can be edited in a PC using Word,
Excel, or other programs for printing.
D. Printing a song list
- To print the song list of JB-199 from your PC, press PRINT LIST button on the right
side panel.
- Follow the display window to select a printer in your PC and press OK to print.
Note: The song list printed directly from JB-199 will have the default page layout of
CAVS. To design you own layout, you can save the song list into your PC and then
edit the file using Excel, Word, or any other program.
50
HOW TO OPERATE
Making DataCD
DataCD can be used to download following files into JB-199:
Song files
Program upgrade
Background video and still image files
Configuration files.
The directory structure inside a DataCD containing above files must be
/
/PROG/
/IMAGE/MOVIE/
/IMAGE/STILL/
/CONFIG/
- song files with juke.txt
- program upgrade
- background video files
- still image files
- configuration files.
When a directory is empty, it can be deleted from the structure of DataCD.
A. Song files
The song file format that can be downloaded into JB-199 are
MP3
MP3 / MCG
MP3 / CDG
MP3 / MP3 / AVI
MP3 /AVI
MDK
- for Audio tracks
- CD+G tracks
- CD+G tracks
- DVD tracks
- Video CD tracks
- MIDI tracks
The CDG file noted in this list is of the graphic file format produced by JBManager
or JB-199 Manager program of CAVS. This is different from cdg (rw) files
produced by other internet programs without compression.
51
HOW TO OPERATE
1. Rename the song files numerically, assigning sequentially one number for one
song. For example,
00001.MP3
00002.MP3
00002.CDG
00003.MP3
00003.MCG
00004.MP3
00004-.MP3
00004.AVI
00005.MP3
00005.AVI
00006.MDK
...
- Audio track with one MP3 file
- CD+G track with MP3 and CDG files
- CD+G track with MP3 and MCG files
- DVD track with one AVI and two MP3 files
- Video CD track with one AVI and one MP3 files
- MIDI track with one MDK file
2. Using a Notepad or Wordpad editor, make a text file named Juke.txt of the song
list in the following format:
00001 | Unbreak My Heart | Braxton, Tony
00002 | After The Loving | Humperdink,Englebe
....
The song number, title, and singer name are separated by “|” divider (this symbol is typed by
“Shift-\”). Each title and singer name cannot be longer than 48 characters.
3. Insert the song files and Juke.txt file in the root directory of the DataCD.
B. Background video and still image files
1. For the background video files, make a subdirectory /IMAGE/MOVIE/ and insert
the AVI files.
2. For the still image files, make a subdirectory /IMAGE/STILL/ and insert the
BMP files.
52
HOW TO OPERATE
C. Program upgrade and configuraton files
Download the upgrade programs and configuration files from www.cavsusa.com/jb-199.htm.
Unzip the files and insert the upgrade programs into the directory /PROG/ and configuration
files into the subdirectory /CONFIG/.
D. Having prepared the files you wish to download into JB-199, write the files and the
directories into a CD-ROM using any standard disc writing program.
The DataCD, after having been written, should look as follows:
00001.MP3
00002.MP3
00002.CDG
00003.MP3
00003.MCG
00004.MP3
00004-.MP3
00004.AVI
00005.MP3
00005.AVI
00006.MDK
...
juke.txt
/IMAGE/MOVIE/homemade.AVI
...
/IMAGE/STILL/barclosingtime.BMP
...
/PROG/startup.EXE
...
/CONFIG/config.TXT
...
The DataCD created for JB-99 is compatible and downloadable into JB-199. Be sure
to register the song files after downloading into JB-199.
53
HOW TO OPERATE
Optional Devices
1
External disc drive
Two external disc drives can be connected to JB-199 using USB 2.0 connections.
Connect the disc drives as shown in Section: How to connect. Turn on the disc drives
and reboot the JB-199 player.
A list of recommended disc drives, compatible to JB-199 and CD+G discs, is given at
www.cavsusa.com/jb-199.htm.
When using disc drives, always OPEN/CLOSE the disc drives by using the remote
control of JB-199. From the initial Welcome screen, press JB/CD button to switch
from JUKE to DISC mode. Press the OPEN/CLOSE button on the remote control to
open or close the disc drive.
After inserting a disc, wait a few seconds for JB-199 to load the disc and return the
control.
Two disc drives may not be necessary in JB-199 as a song will be read ahead of its
play. This can be seen by a display of a rotating disc on the TV screen. The display
will close when the song has been completely read, and the disc can be replaced without
interrupting the play. The time it takes to read a 4 minute song is approximately 2
minutes after which a new disc can be inserted for a next song.
54
HOW TO OPERATE
2
External hard drive
One external hard drive can be connected to JB-199 using USB 2.0 connection.
Connect the hard drive as shown in Section: How to connect. Turn on the hard
drive and reboot the JB-199 player.
The song data inside the external hard drive must be of same directory structure
as the internal hard drive of JB-199.
The songs of external hard drive can be called by its own song numbers plus the
Disc 2 number. The Disc 2 number is specified in 1. Jukebox of MENU. It
can be changed from its factory setting of 99999 to any number inbetween
1 - 99999. Note that no song number above 99999 can be called in JB-199.
Thus for a JB-199 with a Disc 2 number 80000, for example, only the songs
with numbers 1 - 19,999 in the external hard drive can be played.
3
VGA Monitor
A VGA monitor can be connected to JB-199 using 15 pin D-sub connector.
Connect the monitor as shown in Section: How to connect.
4
Keyboard and Mouse
A keyboard and a mouse can be connected to JB-199 using mini-din connectors.
Connect the keyboard and mouse as shown in Section: How to connect.
55
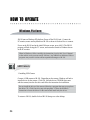
HOW TO OPERATE
Windows Platform
JB-199 runs on Windows XP platform. Power off the JB-199 unit. Connect the
PC monitor, mouse and keyboard into JB-199 as shown in Section: How to connect.
Power on the JB-199 and at the initial Welcome screen, press Alt-F4. The JB-199
program will halt closing the TV screen, and return the control to Windows shown
in the PC monitor.
When in Windows, follow carefully the instruction given by this User’s Manual
or the website www.cavsusa.com/jb-199.htm. Any addition or deletion of files or
programs may result in serious and un-repairable damages to JB-199.
1
USB Camera
1. Installing USB Camera
Connect a USB camera to JB-199. Depending on the camera, Windows will ask to
install a driver for the camera. Click OK. Inser the driver CD-ROM (that came
with the camera) into the disc drive and follow the instruction for installation.
Do not install the driver of the camera following a program that may pop up from
the driver CD. Click Cancel to stop such programs. Follow the Windows
instruction to locate the driver for the camera and install only the driver.
To return to JB-199, double click on JB-199 Startup.exe at the desktop.
56
HOW TO OPERATE
2
NTSC / PAL
Switching between NTSC and PAL
Go to Start - Settings - Control Panel. Double click on Display to open the
Display Properties window. Next go to Settings - Advanced - Displays - TV - Format.
Check the Select by format button and choose the format you wish. Click on Apply.
Click on OK repeatly to return to Windows.
To return to JB-199, double click on JB-199 Startup.exe at the desktop.
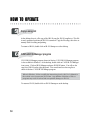
3
Play DVD and Video CD
Windows platform comes with PowerDVD player installed. To play a DVD or Video
CD, insert the disc into the disc drive. Click on AVON.exe at the desktop. This enables
sharing of audio and video signals with the TV screen and sound system. If you do not
wish to share the signals, click on AVOFF.exe on the desktop.
Double click on PowerDVD.exe to start the program. Use the program to play the DVD
or Video CD disc. To maximize the viewing screen, double click on the DVD viewing
screen. To return, double click on the viewing screen.
To return to JB-199, double click on JB-199 Startup.exe at the desktop.
4
Change Welcome (title) page
To change the initial Welcome screen, go to My Computer - C Drive - NJB99 - Config
directory. You will find config.txt file inside. Double click on the file to edit with Notepad
and search for the code line with “Welcome” at the bottom of the file. Edit the three lines
of the initial screen and save the file. Close the directory and return to the desktop.
57
HOW TO OPERATE
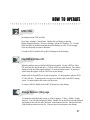
5
Copy a song list
At the desktop, there is a file copy of the JB-199 song list, JB-199 songlist.txt. This file
is newly generated each time the JB-199 is turned on. Copy the file using a disc drive or
memory-stick for editing and printing.
To return to JB-199, double click on JB-199 Startup.exe at the desktop.
6
CAVS JB-199 Manager program
CAVS JB-199 Manager program, shown in Section: CAVS JB-199 Manager program,
is also available in Windows. At the desktop, double click on CAVS JB-199 Manager
icon to start. Click on JB199 Manager and press JB199 IN button. You will see the
song list of JB-199 on the right side panel. You can edit and save the song list as
shown in Section: CAVS JB-199 Manager program.
When in Windows, follow carefully the instruction given by this User’s Manual or
the website www.cavsusa.com/jb-199.htm. Any addition or deletion of files or
programs may result in serious and un-repairable damages to JB-199.
To return to JB-199, double click on JB-199 Startup.exe at the desktop.
58
8
TROUBLE SHOOTING
There may be various reasons for abnormal operation of the JB-199 unit. Please refer to the trouble
shooting guide below. For continuing problems, contract your local dealer or CAVS Tech Support.
Also visit www.cavsusa.com for the latest update of the User’s Manual and the Trouble Shooting guide.
1. No power
Check the power cord to be firmly connected in both ends.
2. No audio
Check the connections to audio output terminals.
Check the power and volume level of amplifier.
Check the Mute function in JB-199.
3. Howling noise from
microphones
Move the microphones away from the speakers.
Turn down the volume and echo level of microphones
4. No video
Check the connections to the video output and input teminals
5. Remote control is not
working
Check the batteries inside.
After a boot up, JB-199 may ignore the first 1 or 2 inputs.
6. Video is colorless and/or
scrolling
Check the setting of NTSC/PAL mode. See Section: Advanced
Functions for changing the mode.
7. VHS (S-Video) is not
working
To use VHS (S-Video) output, contact CAVS Tech Support.
8. Recording only captures
music, not vocal
Connect the microphones to MIC 1 and MIC 2 of JB-199.
To record with external microphone inputs, contact CAVS Tech
Support.
9. Video quality of TV is not
as good as PC Monitor
Home TV monitor is equipped with far less pixel per area than
PC monitor.
10. Still image picture in TV
looks blurry.
Still image file size should be equal to or less than 800x600.
The blurriness will happen when the picture is forced to be
resized.
59
9
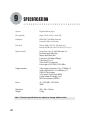
SPECIFICATION
System
Digital Jukebox player
Disc playable
Super CD+G, CD+G, Audio CD
Hard drive
EIDE/IDE 7200 RPM (Internal)
External USB 2.0 (External)
Disc drive
Plextor CDR (52/32/52, 48/24/48, etc.)
Plextor DVDR (PX-504, PX-708, PX-712, etc.)
Input terminals
Microphone input (1.2mV(600 ohm)) x 2
Output terminals
Video output (Composite, 1Vp-p (75Ohm)) x 2
Audio output (Stereo, 2.0 Vrms(max)) x 2
VHS (S-Video) output
VGA output (15 pin D-sub RGB)
Control output (Pin header 2 x 4)
Bill/Coin connector (OPDIN)
Power
AC 110V/60Hz, 230V/50Hz
200W
Dimension
Weight
420 x 100 x 350 mm
9.0 Kg
Keyboard input (Mini-din)
Mouse input (Mini-din)
LAN input (100 Mbps/10Mbps)
USB input (2.0) x 2
Video in (RCA Composite)
Power input (110V/60Hz, 220V/50Hz)
Note : Technical specifications are subject to change without notice.
60
CAVS
sptp{lkG~hyyhu{
CAVS KARAOKE JUKEBOX
CAVS USA Inc. warrants this product and all parts therof, except as set forth below ONLY TO THE ORIGINAL
PURCHASER AT RETAIL to be FREE FROM DEFECTIVE MATERIALS AND WORKMANSHIP from the data of
original retail purchase for the period as shown below. ("The Warranty Period")
PARTS
1 YR
LABOR
90 DAYS
THIS LIMITED WARRANTY IS VALID ONLY IN THE FIFTY (50) UNITED STATES, THE DISTRICT OF
COLUMBIA AND IN COMMONWEALTH OF PUERTO RICO.
WHAT WE WILL DO :
If this products is found to be defective, CAVS will repair or replace defective parts at no charge to the original
owner. Such repair and replacement services shall be rendered by CAVS during normal business hours at CAVS
authorized service centers. Parts used for replacement are warranted only for the remainder of the Warranty
Period. All products and parts there of may be brought to a CAVS authorized service center on a carry-in basis.
WHAT YOU MUST DO FOR WARRANTY SERVICE :
Return your product to a CAVS authorized service center with a copy of your bill of sale. For your nearest CAVS
authorized service center, please call : (562) 777-1846.
If service is not available locally, box the product carefully, preferably in the original carton, and ship, insured, with
a copy of your bill of sale plus a letter of explanation of the problem to the nearest CAVS Factory Service Center,
the name and location of which will be given to you by the phone.
If you have any questions concerning your CAVS Product, please contact our Technical Support Department.
WHAT IS NOT COVERED :
This limited warranty provided by CAVS does not cover :
1. Products which have been subject to abuse, accident, alteration, modification, tampering, negligence, misuse,
faulty installation, lack of reasonable care, or if repaired or serviced by anyone other than a service facility
authorized by CAVS to render such service, or if affixed any attachment not provided with the products, or if the
model number or serial number has been altered, tampered with, defaced or removed ;
2. Initial installation and removal for repair ;
3. Operational adjustments covered in the Owner's Manual, normal maintenance, video and audio head cleaning ;
4. Damage that occurs in shipment, due to act of God, and cosmetic damage ;
5. Signal reception problems and failures due to line power surge ;
6. Video Pick-up, Tubes/CCD Image Sensor, Cartridge, Stylus (Needle) are covered for 90 days from the data of
purchase ;
7. Accessories ;
8. Batteries (except that Rechargeable Batteries are covered for 90 days from the date of purchase) ;
There are no express warranties except as listed above.
THE DURATION OF ANY IMPLIED WARRANTIES, INCLUDING THE IMPLIED WARRANTY OF
MERCHANTABILITY, IS LIMITED TO THE DURATION OF THE EXPRESS WARRANTY HEREIN.
CAVS SHALL NOT BE LIABLE FOR THE LOSS OF USE OF THE PRODUCT, INCONVENIENCE, LOSS OR ANY OTHER
DAMAGES, WHETHER DIRECT, INCIDENTAL OR CONSEQUENTIAL (INCLUDING, WITHOUT LIMITATION, DAMAGE TO
TAPES, RECORDS OR DISCS) RESULTING FROM THE USE OF THIS PRODUCT, OR ARISING OUT OF ANY BREACH OF
THIS WARRANTY. ALL EXPRESS AND IMPLIED WARRANTIES, INCLUDING THE WARRANTIES OD MERCHANT-ABILITY
AND FITNESS FOR PARTICULAR PURPOSE, ARE LIMITED TO THE WARRANTY PERIOD SET FORTH ABOVE.
Some states do not allow the exclusion of incidental or consequential damages or limitations on how long an
implied warranty lasts, so these limitations or exclusions may not apply to you. This warranty gives you specific
legal rights and you may also have other rights which vary from state to state.
CAVS USA Inc.
10707 Fulton Wells Ave
Santa Fe Springs, CA 90670
REFURBISHED PRODUCTS CARRY A SEPARATE WARRANTY, THIS WARRANTY DOES NOT APPLY. FOR DETAILS OF
REFURBISHED PRODUCT WARRANTY, PLEASE REFER TO THE REFURBISHED PRODUCT WARRANTY INFORMATION
PACKAGED WITH EACH REFURBISHED PRODUCT.
For customer use :
Enter below the Model No. which is located either on the rear, bottom or side of the cabinet. Retain this
information for future reference.
CAVS USA INC.