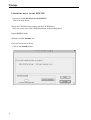
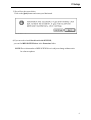
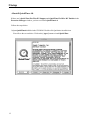
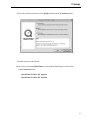
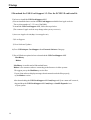
1
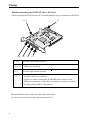
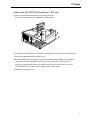
FireWire /USB PCI Board
for Macintosh
PCIFU1P
User Guide
Rev. 1.0
JAN 2000
PCIFU1P
1.Introduction............................................................................ 3
1-1.System Requirements ......................................................... 3
1-2.Restrictions ......................................................................... 3
1-3.Contents ............................................................................... 3
1-4.How to Register .................................................................. 4
1-5.Program Update and Support ........................................... 4
2.Setup........................................................................................ 5
2-1.Quick Install Guide ............................................................ 5
3.Features ................................................................................ 18
4.Trademarks........................................................................... 18
5.Cautions ................................................................................ 18
FCC Statement ........................................................................ 19
1.Introduction
1.Introduction
This User Guide describes how to install,use,and troubleshoot the RATOC PCIFU1P
FireWire/USB PCI Board.(called the PCIFU1P in this User Guide)
README file included on the CD-ROM may contain more recent information.
1-1.System Requirements
• MacOS 8.6 or MacOS 9
• PowerMac G3/DT233,G3/DT266,G3/DT300,G3/MT266,G3/MT300,G3/MT333,
7300/166,7300/180,7500/100,7600/120,7600/132,7600/200,
8500/120,8500/132,8500/150,8500/180,8600/200,8600/250,
9500/120,9500/132,9500/150,9500/200,9600/233,9600/300,9600/350
• Free one PCI slot
1-2.Restrictions
• To capture full frame rate DV movie,you need high performance HDDs and sufficient capacity.
DV data requires 3.6 MBytes disk space per second.
We strongly recommend you use more than 10MB/sec. sustained data write rate HDDs.
To capture full frame rate or non-dropped frame DV movie to FireWire HDDs
directly,you need High-Speed G3 processor more than 266 MHz.
• MacOS restricts each file size up to 2GBytes(9 minutes) DV movie.
1-3.Contents
Make sure there are the following items in the PCIFU1P package.
• PCIFU1 PCI Board
• DV 4p-FireWire 6p cable
• HDD power connector extend cable
• CD-ROM (The versions below are subject to change without notice.)
REX-PCIFW Installer
REX-PCIFW Driver1.6
FireWire Support 2.2.2
QuickTime 4.0
Digital Origin EditDV unplugged 1.6.1 (45 days trial version)
• User Guide(This document)
NOTE:
• If any of these items are missing from the PCIFU1P package,contact your supplier immediately.
3
1.Introduction
1-4.How to Register
We highly recommend to register yourself as our customer through our on-line registration.
1.On the Internet,access to our web site(http://www.ratocsystems.com).
2.Follow window menu guide to register.
3.Fill out and submit the registration form.
1-5.Program Update and Support
-Program UpdateThe latest software are always available and can be downloaded from our web site
(http://www.ratocsystems.com)
-Technical SupportYou can get a Tech support from RATOC at the following:
1)RATOC Systems,Inc. Support Center
FAX : +81-6-6633-3553
E-mail : [email protected]
Web : http://www.rexpccard.co.jp/english/
2)RATOC Systems International,Inc. Tech support
Address: 1933 O’Toole Avenue Suite A109
SanJose, CA 95131, U.S.A.
Tel
: (408)955-9400
Fax
: (408)955-9402
E-mail : [email protected]
Web : http://www.ratocsystems.com
NOTE:
Please include the information below to help us to assist you in your Tech-Support Question
• Our product name,and product description
• Host Computer Name, MacOS version
• Application software/driver version
4
2.Setup
2.Set up
2-1.Quick Install Guide
To install quickly, follow the steps below.
1.Insert the PCIFU1P PCI Board into a PCI slot.(Refer to page 7)
2.Install the driver for the PCIFU1P as follow page 8.
3.Open Extension Manager window from Control Panel.
4.Check following Drivers.
-QuickTime FireWire DV Enabler
-QuickTime FireWire DV Support
-FireWire Support 2.2.2
5.If you could not find FireWire Support 2.2.2,you have to install FireWire Support 2.2.2
as follow page 10.
6.If you could not find QuickTime FireWire DV support or Enabler,you have to install
QuickTime 4.0 as follow page 12.
7.Restart your Macintosh.
8.Download the USB Card Support 1.3.5 form Apple web site
(http://www.apple.com) and install it as follow page 14.
9.Restart your Macintosh.
10.Now you are ready to connect FireWire devices and USB devices.
To have the detailed instructions, go to the next page.
5
2.Setup
0.Before inserting the PCIFU1P into a PCI slot.
1)Before inserting the PCIFU1P into a PCI slot,understand the usage of connectors on PCIFU1P.
U12
U14 U17 U9
U7,U9
J2
U7
FireWire 6pin external connector
U17,U14
USB type A connector
U12
FireWire 6pin internal connector
J2
FireWire Cable Power connector
You have to connect between this J2 and HDD power connector with
HDD power connector extend cable to use cable-powered device such as
FireWire portable HDD,CCD camera,etc.
If internal FireWire devices come out on the market in the future,
you can use the U12(FireWire 6pin internal connector) for it.
6
2.Setup
1.Insert the PCIFU1P PCI Board into a PCI slot.
1)Turn off your Macintosh and remove the computer cover.
(Refer to the manual that accompanied your Macintosh)
2)Carefully insert the PCIFU1P by firmly pressing the PCI board into a PCI expansion slot.
3)Fasten the retaining bracket with the screw.
4)Extend the HDD power connector of your Macintosh with the HDD power connector
extend cable in this package and connect it to the J2 connector on the PCIFU1P.
You have to connect this cable to use cable-powered type FireWire devices such as
portable HDDs,CCD cameras those require cable power source.
5)Attach the computer cover.
7
2.Setup
2.Install the driver for the PCIFU1P.
You have to install the driver for the PCIFU1P.
Follow the steps below.
1)Insert the CD-ROM in this package into the CD-ROM drive.
After you see the icon of the CD-ROM mounted on the desktop,open it.
2)Open PCIFU1 folder.
3)Double-click the Installer icon.
4)You will see the screen below.
Click on the [Install] button.
8
2.Setup
5)You will see the screen below.
Click on the [Quit] button and restart your Macintosh.
6)If you succeed to install the driver for the PCIFU1P,
you can find REX-PCIFW Driver in the Extensions folder.
NOTE:The revision number of REX-PCIFW Driver is subject to change without notice
for software updates.
9
2.Setup
3.Install FireWire Support 2.2.2.
If there isn’t FireWire Support 2.2.2 in the Extension Manager in the Control Panel,
you have to install FireWire Support 2.2.2.
Follow the steps below.
1)Open FireWire Install folder in the CD-ROM.
You will see the screen below. Click on the [Installer] icon to install FireWire Support 2.2.2.
2)You will see the screen below.Click on the [Agree] button to install FireWire Support 2.2.2.
10
2.Setup
3)If you succeed to install FireWire Support 2.2.2,
you can find the following three items below in the Extensions folder.
-FireWire Support 2.2.2
-FireWire Enabler 2.2.2
-FireWire CardBus Enabler 1.0
NOTE:FireWire Enabler 2.2.2 and FireWire CardBus Enabler 1.0 are not required for
PCIFU1P. You can remove them from Extenstions folder or set them inactive.
11
2.Setup
4.Install QuickTime 4.0.
If there aren’t QuickTime FireWire DV Support and QuickTime FireWire DV Enabler in the
Extension Manager window ,you have to install QuickTime 4.0.
Follow the steps below.
1)Open QuickTime4.0 folder in the CD-ROM. Double-click Quicktime installer icon.
You will see the screen below. Click on the [Agree] button to install QuickTime.
12
2.Setup
2)You will see the screen below. Select [Full] and click on the [Continue] button.
3)Finally restart your Macintosh.
4)If you succeed to install QuickTime,you can find the following two items below
in the Extensions folder.
- QuickTime FireWire DV support
- QuickTime FireWire DV Enabler
13
2.Setup
5.Download the USB Card Support 1.3.5 for the PCIFU1P and install it.
You have to install the USB Card Support 1.3.5.
(You can install the latest version of USB Card Support available from Apple web site.
The revision number of 1.3.5 is as of Jan/2000.)
To install the USB Card Support 1.3.5, follow the steps below.
(The content of Apple web site may change when you try to access)
1)Access to Apple web site(http://www.apple.com)
2)Go to Support.
3)Go to Software Updates
4)Go to USB Adapter Card Support from Featured Software Category.
5)You will find two options below to download the USB Card Support 1.3.5
-MacBinary
- Binhex
MacBinary is smaller and will download faster.
Binhex is for customers who are connecting to the Internet via older systems.
We suggest you try the MacBinary version first.
If your client software displays messages that it cannot decode the files properly,
try the Binhex version.
After downloading the USB Card Support 1.3.5.smi(.hqx) and if you cannot self-extract it,
drag and drop the USB Card Support 1.3.5.smi(.hqx) to StuffIt Expander icon
of your system.
14
2.Setup
6) You will get USB Adapter Card Support with double clicking USB Card Support 1.3.5.smi.
Double-click USB Adapter Card Support again.
You will get Installer and see the screen below. .
7)You will see the screen below.Click on the [Install] button.
15
2.Setup
8)You will see the screen below.Restart your Macintosh.
9) If you succeed to install the USB Card Support 1.3.5,you can find the following 7 items below
in the Extensions folder.
-USB Support 1.3.5
-USB Device Extension 1.3.5
-USB Software Locator 1.3.5
-HID Library 1.3.5
-serial shimLib 1.0.1
-USB Mass Storage Support 2.0.2
-USB Mass Storage Extension 2.0.2
(The revision numbers above may change without notice.)
Now you are ready to use USB devices.
You don’t need to turn off your Macintosh when adding or removing USB devices.
16
2.Setup
6.Connecting the digital video camera
1)Connect the DVCAM to the PCIFU1P with the FireWire cable.
You can connect the DVCAM without turning off the DVCAM or the Macintosh.
You can hot plug the DVCAM.
Refer to the manual that accompanied your DVCAM for the location of the FireWire connector.
6pin
4pin
You have to use 4pin-6pin cable.
2)Check if the DVCAM is recognized.
Follow the steps below.
1.Start Apple Video Player in your system.
2.If you can preview with Apple Video Player, the DVCAM is recognized.
But note the Apple Video Player can not capture sound and recording function does not work.
Now you can do a video editing with EditDV unplugged.
If you install the EditDV unplugged,insert the CD-ROM and start installer.
NOTE:After installation of EditDV,QuickTime FireWire DV Enabler and QuickTime FireWire
DV Support are set inactive mode.EditDV installer set these QuickTime drivers inactive
mode automatically. You can not use Apple Video Player after installation of EditDV.
17
3.Features
• Compliance with 32-bit PCI Local Bus 2.1
• 32-bit PCI bus master DMA transfers up to 132MB/sec in burst mode
• USB 1.1 compliant
• FullSpeed(12 Mbps) support
• IEEE1394-1395,IEEE1394.a compatible PHY chip
• 100,200,400 Mbps automatic detect and support
• OHCI 1.0 compatible Link chip.Physical DMA support
• Two 6p-FireWire external ports,One 6p-FireWire internal port
Two USB 1.1 ports
• Class 1(15W) cable power is available through 6p-FireWire each port
Cable power source is supplied from a internal HD power connector
4.Trademarks
• Apple,QuickTime,FireWire,QuickTime Logo,FireWire Logo,MacOS and Macintosh
are registered trademarks of Apple Computer Corp.
• EditDV unplugged is a trademark of Digital Origin Co.
• Other brand and product names may be registered trademarks or trademarks of their
respective holders.
5.Cautions
• Never attempt to disassemble the PCI Board.
• Do not bend,drop or strike the PCI Board and cable,or subject it to heavy pressure.
• Information in this document is subject to change without notice.
• If you have any questions or find errors in this guide, do not hesitate to let us know.
18
FCC Statement
FCC Statement
-FCC StatementThis equipment has been tested and found to comply with the limits for a Class B digital device,
pursuant to Part 15 of the FCC Rules. These limits are designed to provide reasonable protection
against harmful interference in a residential installation. This equipment generates, uses and can
radiate radio frequency energy and, if not installed and used in accordance with the instructions,
may cause harmful interference to radio communications. However, there is no guarantee that
interference will not occur in a particular installation. If this equipment does cause harmful
interference to radio or television reception, which can be determined by turning the equipment
off and on, the user is encouraged to try to correct the interference by one or more of the
followingmeasures:
(1) Reorient or relocate the receiving antenna.
(2) Increase the separation between the equipment and receiver.
(3) Connect the equipment into an outlet on a circuit different from that to which the receiver is
connected.
(4) Consult the dealer or an experienced radio/TV technician for help.
Changes or modifications not expressly approved by the party responsible for compliance may
result in this unit not complying with FCC Rules Part 15.
19