1
MX75OOand MX85O0sen'es
Bri g htli eI dI Darkl i eI d
pJaJJ*lrurbnJ
-
rMsmpc
rr/rEULTEcHlto
\
a
ffi
{u'
F7t
t,l
\ 4t
MEIJITECHNO CO.,LTD.
JAPAN
Gidd#ffi*ffi
Tableof Contents
1.0
1.1
1.2
1.3
1.4
1.5
Introduction
Features
Microscope
GeneralSafetyGuidelines
lntendedProductUse Statement
Handlingthe microscope
WarrantyNotes
2.0
2.1
2.2
2.3
2.4
and its Components
The Microscope
lnstallation
Site
Unpacking
Microscope
Set Up
Distance
AdjustingInterpupillary
3.0
3.1
3.2
3.3
3.4
3.5
3.6
3.7
3.8
Microscope
Operation
Centeringthe Lamp- Incidentllluminator
IncidentLightOperation- Brightfield
IncidentLightOperation-Darkfield
Transmitted
LightOperation- Brightfield
/ Slide-lnAnalyzer
Usingthe Polarizer
with 35mm SLR and DigitalSLR Cameras
Photomicrography
with DigitalStillCameras
Photomicrography
a Videoor OtherCamerathat usesa "C"type mount
Connecting
4 . 0 M a i n t e n a n caen d C l e a n i n g
5.0
5.1
5.2
5.3
5.4
Troubleshooting
Replacing
the mainsfuse on the microscope
IncidentLightdoes not work
R e p l a c i ntgh e 1 2 V5 0 W H a l o g e nL a m p- I n c i d e nltl l u m i n a t o r
llluminator
Replacing
the 6V 30W HalogenLamp- Transmitted
6.0 Storage
7.0 Packingand Transport
Parts
and Replacements
8.0 Accessories
Descriotions
9.0 Technical
1 0 . 0 P h y s i c aDl i m e n s i o n s
MX75OO/ MX85OO Series
BrightfieldI Darkfield
Metallurgical Microscope
1. Introduction
Microscopes
havea moderncuiffip?ct
design.
MX7500and MXB500SeriesMetallurgical
The MeijiTechno
placement
ideal
for
is
ergonomic
controls
making
them
use
in
operation
through
of
Easy
achieved
production
and qualitycontrol.
Meiji'sMX7500and MXB500Seriesare well suitedfor a wide varietyof metallurgicalobservational
videomicroscopy.
as wellas high resolution
applications
highresolutionimagesin
delivercrisp,distortion-free,
The MX7500and MXB500SeriesMicroscopes
Brightfield
mode.
filters,micrometers
and camera
includingsimplepolarizing
MeijiTechno
suppliesa varietyof accessories
adapters.
1.1MicroscopeFeatures
ComputerAidedDesignedFrameand Optics
All Newand lmprovedPlanEpiscopicObjectives
SlimCompactFootprint
InfinityCorrectedOpticalSystem
Powerful12V 50W VerticalKoehlerllluminator
(MX8500series)
LightKoehlerllluminator
Powerful6V 30W Transmitted
Low Positioned
ErgonomicCoaxialCoarseand FineFocusControls
SmoothOperatingReverseFacingQuadrupleNosepiece
controls
CeramicCoatedFlatTopStagewith leftor right-handed
ViewingHeads
Binocularand Trinocular
Siedentopf-type
ErgonomicBinocularViewingHeadavailable
OptionalSiedentopf-type
SuperWidefieH
l di g hE y e p o i nEt y e p i e c e(sS W H 1 0 XF, . N . 2 2 )
AutomaticVoltageSensingPowerSupplywith detachablepowercord
Wide Rangeof Filtersand Accessories
1.2GeneralSafetyGuidelines
productsare designedfor safeoperationundernormaloperatingconditions.
The instrumenl
MeijiTechno
-
and accessories
describedin this manualhavebeenbuiltand testedaccordingto industrysafety
standardsfor electroniclaboratoryinstruments.
Incorrectusageor non-conformance
to operating
instructions
can causepersonalinjuryor damageto equipmentor property.Keepthis manualnearyour
instrumentfor easy reference.
1.3IntendedProductUse
ProductDisclaimer:This productis designedand intendedfor use only as a metallurgicalmicroscope
system.Modifyingthis instrumentin any way for use in any situationotherthan the originaland intended
productdesignwillautomatically
voidthe warranty.
In no eventshallMeijiTechnobe liableto any person
or entityfor any incidental,
indirector consequential
damages,arisingout of or in connectionwiththe use
performance
product.
or
of a modifiedor altered
1.4ProductSafetyInformationHandlingthe Microscope
]flwlrnr.rrrcj
D O N O TO P E R A T EU N L E S S T H EU N I TI S P R O P E R L Y
GROUNDED!
Use onlythe specifiedpowercord in a wellgroundedsocket.Do not use in an ungrounded
power
receptacle
or in caseswherethereis a breakin the groundconductoror damageto the electricalwiring.
Only fusesof the specifiedtype and ratingare to be used as replacements.
Switchoff the powerand
disconnect
the powercord beforereplacingfuses.Use of a non-compliant
fuse may resultin electrical
shockor severedamageyourequipment.
Do not replacethe bulbfor at least10 minutesafterthe unithas
beenturnedoff or injurymay result.
1.5WarrantyStatement
the instrumentin any way or unauthorized
Modifying
attemptsto disassemble
or use the instrument
for
applications
otherthan its intendeddesignwill automatically
voidthe warranty.
MeijiTechno
warrantsthis productagainstdefectsin materialand/orworkmanship
for the lifeof the
instrument
fromthe dateof the originalpurchaseto the originalpurchaser.
MeijiTechno
will repairor
replace,at its option,any instrument
whichundernormalconditionsof use and serviceprovesto be
defectivein materialor workmanship.
No chargewill be madefor laboror materialswith respectto defects
providedall repairwork is done by MeijiTechno.
coveredby thiswarranty,
Thiswarrantydoes not coverexpensesincurredin the removalor reinstallation
of any instrument
or
instruments,whetheror not provendefective.Replacementor repairsfurnishedunderthis warranlyare
This warrantysupersedesany other
subjectto the sametermsand conditionsof the originalwarranty.
warrantyand is subjectto the followingterms and conditions:
WARRANTV
productextendsto the originalpurchaserof the productand is not transferable.
Warrantyof MeijiTechno's
WARRANTYDURATION
MeijiTechnowarrantsthis productagainstdefectsin materialand/orworkmanshipfor the lifeof the
instrument
fromthe dateof originalpurchaseto the originalpurchaser.
The electricalwarrantyis one year.
CARD
OWNER'SREGISTRATION
Returnof the owner'sregistration
card by the originalpurchaserwithinten (10)daysafterthe original
purchaseis a conditionprecedentto coverageunderthis warranty.
MeijiTechno
will at its optionaccept
writtenproofof purchasefromthe originalownerin lieuof a productregistration
card.
EXCLUSIONS
AND LIMITATIONS
Specifically
excludedfromthis warrantyare failurescausedby abuse,neglect,misuse,improper
of ANY type.This warrantydoes
operation,normalwear,accident,impropermaintenance
or modifications
not coverrepairor replacement
wherenormaluse has exhaustedthe lifeof a part or instrument.
All
mechanical
devicesneedperiodicpartsreplacement
and serviceto performwell.Servicelifeof an
instrument
is dependentuponthe care it receivesand the conditionsunderwhichit has to operate.In no
be liablefor incidentalor consequential
damages.
eventshallMeijiTechno
SERVICE
To obtainserviceunderthis warranty,pleasecontactMeijiTechnodirectlyand ask for the ProductService
Department.
Statethe natureof the problem,modeland serialnumberof the instrument,
dateof purchase
and locationand nameof the distributor
the instrument
was purchasedfrom.Afterverification
of warranty
registration,
MeijiTechno
will issuea returnauthorization
number.Customermay then returnthe product
postageprepaidand insuredto the authorizedrepairfacility.
In mostinstances,
requestsfor warrantyservicewill be performedin a promptand routinemannerand
periodof time or at MeijiTechno's
will be returnedin a reasonable
merchandise
In some
convenience.
justified.
In thesecases,MeijiTechnowill
cases,requestsfor warrantyserviceare receivedwhichare not
providean explanationfor non-warrantyaction.
-
WARRANTYTERMS
The terms of this warrantymay not be variedby any person,whetheror not purportingto representor act
The limitedlifetimewarrantyprovidedis in lieuof any and all warranties,
on behalfof MeijiTechno.
Liability
or fitnessfor a particularpurposeor otherwise.
expressedor implied,whetherfor merchantability
warranties
for consequential
are excludedto the extentexclusions
are
damagesunderany,and all
permittedby law.This warrantygivesyou specificlegal rightsand you may also haveother rightswhich
vary from stateto state.This warrantysets forththe customer'sexclusiveremedy,with respectto defective
products.
of
This limitedwarrantyshallbecomenulland void in the eventof a violationof the provisions
this limitedwarranty.
2.0The Microscopeand its Components
the maincomponentsof the MXB500SeriesBrightfield/Darkfield
The imageon the nextpagedesignates
Microscope.
lf no otheraccessories
are goingto be installed,
the instrumentis now readyfor use.
MX7500/MX8500
Series
The Microscope
and its Components
z
11
'1.
16
binocularhead
Siedentopf
2 . EyepieceSWHl 0X, F.N.22
3 . Incidentllluminator
4 . Analyzerin slidermount
Ergonomicreversednosepiece
6 . Ceramiccoatedmechanical
stage
7 . Substagecondenserwith built-in
lris diaphragm(MXB500series)
B . Filtertray (MXB500series)
9 . Fieldiris (MX8500series)
(MX8500series)
1 0 . Integratedilluminator
1 1 . Dropdowncoaxialstagecontrols
18
15
1 2 . Focustensionadjustment,
turn the knurled
ringcounter-clockwise
to tightenthe tension
1 3 . Adjustable
safetyknob,turn leverclockwise
to lockthe stageheight
1 4 . Condenser
rackheight
adjustment
knob(MX8500
series)
1 5 . Standalonepowersupplyfor incidentilluminator
of MX8500series
1 6 . Powerswitch
1 7 . Low positionedergonomiccoaxialcoarse
and finefocusingcontrol
1 8 . Low positioned
variablebrightnesscontrol
1 9 . Trinocular
headwith integrated
male"C" mount
20. Beamsplitterfor cameraport
6
2.1 InstallationSite
The microscopeshouldbe operatedin a room with as littledust as practicallypossible.
Alsotry to avoidbig
Keepyour instrument
awayfrom solvents,chemicalfumesand excessivehumidity.
directsunlightand vibrationas theycan affectmeasurements
swingsin ambienttemperature,
and
performance.
instrument
OperatingAmbient Conditions
1 0 36"C (50 - 96.8"F)
Temperature:
RelativeHumidity: 0 - B0%up to 30"C (86'F)
2.2 Unpacking
Pleasecheckyour packingslipto insurethat all materialsare present.Keepa copyfor your recordsso
partsor
thatyou havethe properinformation
when orderingmoreequipment,orderingreplacement
accessories
or when callingfor technicalsupport.Pleasemakesurethat no smallpiecesor partsare left
in the packingmaterial.Keepthe packingmaterialsin a safe placefor the purposeof storageand
and its accessories.
transporting
the microscope
flAmrenrrox Avoidtouchingthe surfaceof opticalcomponentssuchas lenses,filtersand glass
or fingeroilscan corrodethe surfacesof opticsin a short
surfaces.Evenvery smalltracesof perspiration
periodof time.
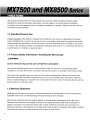
2.3 MicroscopeSet Up
e As a firststep,removeall
componentsfrom the
shippingcontainerand
removethe packing
materials.
o Placethe microscooe
frameon a stablework
surface.
MA928Verticalllluminator
F i l t e rSlots
\
\\
\
Aperturelris
selectorlever
Brightfield/Darkfield
o Loosenthe clampscrewon the microscopelimband installthe
verticalilluminator(MA92B).Once the thumbscrewis tightened,place
the binocularhead(MA815or MAB16)or the optional(MA957)
onto
the top of the illuminator
and re-tighten
the clampscrewwhilethe
headis in the correctpositionas shownrioht.
o InstalltheSiedentopfheadwiththe 2mm allenwrenchsuppliedbeing
carefultoalignthe notchin the headwiththe set screw.
Next,lnstall
the two eyepieces(MAB17)by slidingthem intothe head
and then installthe rubbereyeshields
on top of eacheyepiece.
The
eyepiecesfor MX7500and MXB500Seriesare a DIN standard
30.0mmdiameter.
MA928Verticalllluminator
amp Screw
S W H 1 0 XE y e p r e c e s
/ \
ll
Set screw
\
@@)'n*.\
o Screweachobjectiveintoa nosepieceopeningbeingcarefulnot to
touchthe optics.Installthem incrementally
or in orderof power.
o MX7500series:Connectcordfromthe incidentilluminator
to the back
of the microscope. Powersupplyis built-inthe microscope.
Plugthe
powercordset to the microscope
and the otherend intoa grounded
outlet.
O V c r 1 r c . 1l lll u m r n a l o rP l l l q o
lilX75OO series
o MXB5O0
series:Connectthe cordfromthe incidentilluminator
to the
powersupply(MA92B/05).
standalone
Plugthe powercordsetintothe
microscope
and the otherend intoa groundedoutlet.
o Boththe MX7500SeriesMicroscope
and the externalstandalone
powersupplyfor MX8500haveautovoltagesensingso theycan be
used with any voltagefrom any countryin the worldfrom 100 voltsto
260 voltsAC with the propercordset.
Vertrcal llluminator Plug
l\.4X8500series
Power cordset plug
iAcrurroru]
The mains power cord should only be plugged into a known grounded outlet.
A simpleoutlettestercan be usedto verifycorrectoutletpolarityand the presenceof a groundedcircuit
lf no otheraccessories
are goingto be installed,
the instrumentis now readyfor use.
B
-
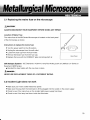
2.4 AdiustingInterpupillaryDistance
The Interpupillary
Distanceis essentially
the distancebetweenyourtwo
pupilsexpressedin millimeters.
Whenset correctly,
one will see one
uniformroundfieldof viewor FOV.The adjustmentis madeby simply
pullingapartor pushingtogetherthe eyetubesuntila uniformroundfieldis
Makenoteof the numbermarkedon the viewingheadso you
achieved.
can repeatthe settinglater.
interpupillarydistance
Whenyou placea specimenon the stage,get it intofocuswiththe right
eye whileyourlefteye is closed.Oncethe rightside is in focusby using
the finefocusknobon the microscope,
openyour lefteye and use the
diopteron the lefteyetubeto bringthe leftside in focus.
once this is done,the microscopeis adjustedto this user.other userswill
havedifferentlP's and differentfocusinqabilities.
3.0Operation
Oncethe microscope
has beensetupin its workinglocationwith all of the componentscorrecflyinstalled,
it is readyfor use.
YourMX7500/MXB500SeriesMicroscope
is a precisioninstrument
designedto lasta lifetime.
Always
handleyour microscope
with careand avoidabruptmotion,vibrationand shock.
Do not installany bulbin yourinstrument
otherthanonesdesignatedby MeijiTechno:
MA275tO5 12V 50W Halooen For VerticalilluminatorsMX75O0/MXASOO
moGls
MA326
6V 30W Halogen For integrated
transmitted
illuminators
MXBSOO
models
Alwaysdisconnect
the powercordfromthe backof the microscope
when not beingused,or when
cleaningyourinstrument
or when makingany repairs.
Aclurlon
Avoid Dismantling
Neverattemptto dismantlethe instrument.
This will voidyourwarrantyand couldpossiblyleadto the
instrument
no longerperforming
accurately.
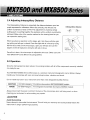
3.1Centeringthe Lamp- Incidentllluminator
Yourlightsourcemay needto be "centered"
if the fieldof viewseemsunevenlyilluminated.
The centeringcontrolsare locatedon the sideof the lightsourcehousingat the backend of the vertical
illuminator.
The drawinobelowshowsthe locationof the controls.
Centering Adjustment
1. Adjustthe brightness
to a comfortable
levelwith no specimenon the stage.
2. Loosenthe screwon the verticaladjustmentand whilelookinginto
the eyetubes,centerthe bulbverticallyin the fieldof viewand then retightenthe screwwhilethe bulbfilamentis in the correctposition.
Verticaladiustment
screw
3. Whilecontinuing
to lookintothe eyetubes,centerthe bulbfilamentin
the fieldof viewby usingthe knobto attaincenteringin the left-right
position.
Horizontaladjustmentknob
This adjustment
will also needto be donewheneverthe bulbis changed.
3.2 IncidentLight Operation- Brightfield(MX7500/MX8500
series)
1. First,set yourinterpupillary
distanceon the microscope
eyetubesby
pullingthem apartor pushingthem closertogetherto fit youreyes.
Whenset correctly,
one will see one uniformroundor "fused"fieldof
view.Makenoteof the distancesettingwhen adjustedto your likingso
you can laterrepeatthe setting.
Field of view
"' --"',, /.:;).>^
/'
t)
( , , ./'.) -_>
",
.,.:t: _/
7''t
\r1.:,/
Fused
2. Adjustingthe brightness
desiredis donewith the variablebrightness
controlknobon microscope
base (MX7500), or controlknobon the
frontof the standalonepowersupplyMXB500).
3. Makesurethe fieldirisdiaphragmon the verticalilluminator
is
openedall the way open (moveleverto the right)to start.
4. We recommend
that you initiallyuse a flat,easilyrecognizable
specimento set up your microscope.
Placethat specimenon the
stage.
Incidentlightpowersupply
MXB500Series
l0
-
5. Selecta lowerpower"scanning"
objectivelikethe 5X or the 10X to findthe areaof intereston the
specimenquickly.Be surethe objective"clicks"intoplacewhen you turn the objectivenosepiece.
6. By usingthe coarseand fine focus knobsshownabove,adjustyour specimeninto focuswith your left
eye closed(lookingonlythroughthe righteyetube).
Withthe specimenin focus,closethe righteye
you just usedand openthe left.lf the specimenis out of focusfor the lefteye,adjustthe diopteron
the eyetubeuntilthe focusin correct.The microscopeis now adjustedfor this user.Focusing
eyetubesallowsus to compensatefor usersthat wear correctiveeye lenses.lf you wear glasses,you
may want to removethe rubbereyeguards.
7. The apertureirisdiaphragmlocatedon the verticalilluminator
can be "stoppeddown"or closed
somewhatto givethe observationof your specimenmore or less contrastor resolvingpower.
Stoppingdownthe diaphragmdecreasesresolution
and brightnessbut increasesimagecontrastand
depthof focus.
3.3 lncidentLight Operation- Darkfield
1.To engagedarkfieldmode,pullthe darkfieldselectorleveruntilit comesout withthe darkfieldstopper
in position(maximumrighthandposition).
Be surethat boththe Fieldlris and the Aperturelris are
openedcompletely.
2.Lookingintothe eyepieceswithouta specimenon the stage,the fieldof viewappearsdark.
3.Whena specimenis placedon the stage,featuresof the specimensuchas scratches,
surface
particlesand depressions
will reflectbrightlyagainstthe dark background.
4.Darkfield
modeis usefulfor observingspecimenswithfeaturesthal cannolbe readilyseen under
brightfield
mode.
PossibleDarkfieldMode OperationalProblems
lf normaladjustments
are not gettingthe resultsyou expect,checkto see if theseconditionsexist:
o
o
o
o
il
lncorrectcomponentsinadvertently
installed
Componentsnot mountedflush(Verticalllluminator
to microscope
frame)
Dirtyor smudgedoptics
Aperturelris or Fieldlris are completelyclosed
3.4TransmittedLight Operation- Brightfield(MX8500series)
distanceon the microscope
1. First,set your interpupillary
eyetubesby
pullingthem apartor pushingthem closertogetherto fit youreyes.
Whenset correctly,
one will see one uniformroundor "fused"fieldof
view.Makenoteof the distancesettingwhen adjustedto your likingso
you can laterrepeatthe setting.
powerswitchwhichis locatedas shownat
2.Turnon the microscope
lightbrightnessis donewiththe
right.Adjustingthe transmitted
variablebrightness
shown
controlknobon the bodyof the microscope
at right.
Fieldof view
(
,.777-7.',
,-7),
t
)
)
+
(
.
,''l':
\.,,_-,-_,/''',t/I
Fused
=g^ IIr4;
H.-,.,,
transmitted
illuminator
on the integrated
3. Makesurethefieldirisdiaphragm
is openedallthewayopen(turnoutsideknobto the right)to start.
4. We recommendthat you initiallyuse a flat,easilyrecognizable
specimen.Placethat specimenon the stage.
s$HstE'Or*ffi
objectivelikethe 5X or the 10X to find the areaof intereston the
5. Selecta lowerpower"scanning"
specimenquickly.Be surethe objective"clicks"intoplacewhen you turn the objectivenosepiece.
6. By usingthe coarseand finefocusknobsshownabove,adjustyourspecimenintofocuswith your left
Withthe specimenin focus,closethe righteye
eye closed(lookingonlythroughthe righteyetube).
just
you
usedand openthe left.lf the specimenis out of focusfor the lefteye,adjustthe diopteron
the eyetubeuntilthe focusin correct.The microscope
is now adjustedfor this user.Focusing
eyetubesallowsus to compensatefor usersthat wear correctiveeye lenses.lf you wear glasses,you
may want to removethe rubbereyeguards.
illuminator
7.The irisdiaphragmlocatedon the transmitted
can be "stoppeddown"or closedsomewhat
to givethe observationof your specimenmore or less contrastor resolvingpower.Stoppingdown the
diaphragmdecreasesresolution
and brightnessbut increasesimagecontrastand depthof focus
PossibleBrightfieldMode OperationalProblems
lf normaladjustments
are not gettingthe resultsyou expect,checkto see if theseconditions
exist:
o
o
o
.
.
r
Incorrectcomponentsinadvertentlyinstalled
frame,etc.)
to microscope
Componentsnot mountedflush(Verticalllluminator
Dirtyor smudgedoptics
Aperturelris or Fieldlris are completely
closed
Transmitted
lightirisclosedcompletely
Darkfieldstop is inadvertently
engaged
12
-
MX7500/MX8500
SeriesPlan Epi BD Objectives
- F = 200mm
Corrected
Brightfield/DarkfieldObjectives - PlanEpi-Infinity
MA925
P l a nE p i B D S XO b j e c t i v eN, . A . :0 . 1 0 ,w . D=. i 7 . 0 m m
PlanEpi BD10XObjective,N.A.:0.25,w.D.= 7.4amm
PlanEpi BD20XObjective,N.A.:0.40,w.D.= 5.20mm
MA926
PlanEpi BD50XObjective,N.A.:0.75,w.D.= 0.3amm
MA923
MA924
Plan Epi Brightfield/ Darkfieldobjectives
@9eP
@@@@
:'
:'
V
:'
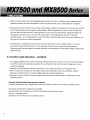
3.5 Usingthe Polarizer/ Slide-lnAnalyzer
Polarizer
viewingof difficult
the use of polarizedlightwill enhancethe contrastand facilitate
Forcertainspecimens,
features.
to see object
filteris engagedby droppingit intoone of the filterslotslocatedalongthe top of the
The polarizing
illuminator
tube as shownin the drawinqbelow.
Slide-lnAnalyzer
The analyzeris mountedin a sliderwhichis locatedrightbelowthe viewingheadas shownin the drawing
below.lt can be insertedor withdrawnfromthe opticalpathby grabbingthe chromeknoband slidingit
east-westin its slot.The leveron the side rotatesthe filterbetween0 and 90 degrees.
With the analyzerengagedand the leverset at 45 degrees,the polarizingelementsare said to be
"crossed"
and the fieldof viewwill becomedarkeror "extinguished".
the fieldof viewis dark exceptfor the opticallyactiveelementswithinthe fieldwhich
In this condition,
becomevisibleagainstthe dark background.
l?
Analyzerrotatinglever
Brightfield/Darkf
ieldselectorlever
with 35mmSLR and DigitalSLR Cameras
3.6 Photomicrography
havea trinoculartube with
ModelMX7530and MXB530microscopes
integratedmale"C" mounton top of the head for photomicroscopy.
In orderto securea 35mm SLR camerabodyto thesemicroscopes,
tube (MA150/50or MA150/60)will
an optionalcameraattachment
T2 AdapterRingthat
need to be used with the corresponding
matchesthe camerato be used.
The tablebelowshowsthe differentcamerasand adapterringsthat
can be used:
T2 CameraAdapter Rings
T2-1 Canon
T2-2 Minolta
T2-g PentaxK
T2-4 PentaxS (threaded)
T2-S Nikon
T2-6 Olympus
T2-7 Contax,Yashica
T2-8 Konica
T2-9 Canon EOS
T2-10 MinoltaAlpha/ Maxim2000
In addition,a photoeyepiecewill be neededto makean imagefor the camera.The tablebelowshowsthe
differentphotoeyepiecesthat are available:
Photoeyepieces
MA512 2.5X Photoeyepiece
MA508 5X Photoeyepiece
MA500 3.3X Photoeyepiece
14
-
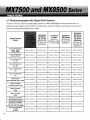
with DigitalStill Cameras
3.7 Photomicrography
an
trinocularmicroscope,
In orderto mounta consumergradedigitalcamerato a MX7530/MXB530
optionalcameraadapterwill be needed.The tablebelowshowsthe differentcamerasthat can be used
adapterpart number:
and theircorresponding
Eyetubes
"C" Moarnt
Eyetubes
TM Series
Thread
EM Eeries
ML Series
(25.4mm) (30.5mm
lD,
(23.2mm
lD, (attaches
to male 34.0mmOD
27.2mmOD c-mount
thread) Eyetubes)
Eyetubes)
Digital Camera
Model
Canon Powershot
4610. A620
A630, 4640
MA.151/30/73
MA'151/30/73
M A 1 5 ' t/ 4 0 / 7 2
M4151/45/72
MA151150/72
Canon Powershot
4700. 4700ls
M A 1 5 1/ 3 0 / 7 5
MA151/30/75
M A 1 5 1/ 4 0 / 7 4
MA151145/74
MA.151/50/74
Canon Powershot
G 1 .G 2
MA151/30/43
MA151/30/43
M A 1 5 1/ 4 0 / 4 2
M A 1 5 1/ 4 5 / 4 2
MA151140/42
Canon Powershot
G3. G5
MA151/30/41
MA.151/30/41
M4151/40/40
M A 1 5 1/ 4 5 / 4 0
MA151/50/40
Canon Powershol
G6
M A 1 5 ' t/ 3 0 / 3 1
MA151/30/31
MA151/40130
M A 1 5 1/ 4 5 / 3 0
MA151/50/30
Canon Powershot
G7
MA15't/30/21
M4151/30/21
M4151/40/20
MA.151/45/20
MA151/50/20
MA151/30/81
MA151/40180
MA151/45lBO
MA151/50/80
MA151/30/50
MA151/30/51
MA151/40150
MAl51 /45/50
MA151/55/50
Nikon Coolpix
5000
M A 1 5 1/ 3 0 / 7 0
MA.151/30/71
M4151/40/70
MA.151/45/70
Nikon Coolpix
5400
MA151/30/53
MA15.1/30/53
M4151/40/52
MA.151/45/52
MA151/30/61
M A 1 5 1/ 4 0 / 6 0
MA151/45160
MA151/30/63
M A 1 5 1/ 4 0 / 6 2
M4151/45/62
MA151/30/63
M A 1 5 1/ 4 0 / 6 4
M4151/45/64
Fuji Finepix
MA151/30/81
49002,69002,
S20Pro,
57000
5602,
Nikon Coolpix
800,900,950,990,995,4500
Olympus Camedia
c-3030,
c-3040, M A 1 5 1/ 3 0 / 6 1
c-2000,
c-2020,
c-3000,
c.3100.
c-4040.
c-4100.
c-5050
Olympus Camedia
c-750, M A . l 5 1 / 3 0 / 6 3
c-700,
c-720,
c-730,
c-740,
c.760,
c-765,
c-770,
sP500uz
c-755,
OlympusCamedia
c-5060
c-7070
l5
Eyetubes
RZ Series
MX Series
TC Series
lM Series
(30.0mm
lD,
34.0mmOD
Eyetubes)
M A 1 5 1/ 3 0 / 6 5
MA.151/50/52
MA151/50/62
w
n
VideoMicroscopy
/a--\
1,.,
Ltlt
l.t)
I
\__.r _,//
CK3100N
or CK3100P
1/3"CCDCamera
DK3000
CK3900Nor CK3900P
CCDCamera
Q "C"Mounts with Lens
M A 1 5 1 / 3 5 / 0 03 3 X
l d
M A 1 5 . l / 3 5 / 0 40 4 X
I I
MA151/35/1
5 1.0X
| |
MA.l51/35/20o.7x
t_l
M A 1 5 1 / 3 5 / 2 52 . 5 X
Slip the "C" mount with lens over the top of the photo tube
CK3100Nor CK3100P
1/3"CCD Camera
CK3900Nor CK3900P
CCD Camera
T2-1 Canon
T2-2 Minolta
T2-3 PentaxK
T2-4 PentaxS
T2-5 Nikon
T2-6 Olympus
T2-7 Contax,Yashica
T2-B Konica
T2-9 CanonEOS
T2-10Minolta( /
Maxim2000
MA150/ 60
CameraAttachment
w/findereyepieces
NIKON.OLYMPUS.
FUJI,
DIGITALCamera
DIGITAL
Camera
adapter
Connect directly to
"C" mount type CCD Cameras
TrinocularHead with
IntegratedMale "G" mount
TrinocularHead with
Photo tube
16
-
3.8 Connectinga Videoor OtherCamerathat has a "C" type mount
In orderto attacha camerathat employsa standard"C"type cameramountto the MX7530/MXB530
male"C" mountby unscrewing
and removingthe chrometube.
microscope,
one can use the integrated
WITH LENS
To changethe magnification
seen by the camera,an optional"C-Mount"cameraattachment
can be usedon top of the trinocularport of the microscope:
Microscopes
Optional "C" Mounts With Lenses - ForallMeijiTrinocular
photo
tube)
MA151/35/03 "C" Mount Adapter with 0.30X lens lstipsoverexisting
photo
tube)
MA151/35/04 "C" Mount Adapter with 0.45X lens lstipsoverexisting
photo
tube)
overexisting
M A 1 5 1 / 3 5 / 1 5 "C" Mount Adapter with 1 .0X lens (Stips
MAl51/35/20
photo
"C" Mount Adapter with 0.7X lens lstipsoverexisting
tube)
MAl51/35/25
"C" Mount Adapter with 2.5X lens lstipsoverexisting
photo
tube)
4.0 Maintenance
and Cleaning
flwnnrunc
o Disconnect
cleaning,maintenance
or repair.
the powercordon yourequipmentpriorto performing
a Keepelectrical
componentsawayfrom moistureor humidity.
o In warm humidclimates,takespecialcareto preventyourequipmentfrom exposureto fungalgrowth
by usingdesiccantin an airtightstoragecontaineror by othermeans.
o Cleanthe microscope
aftereach use.Keepingyour microscope
cleanwill insureits properoperation
overits lifetime.
Dust Protection
aftereachwork session.
Be sureto use the supplieddust coverwithyour microscope
Cleaning
Dust,fibersand otherdebriscan causeyourfieldof viewto get obstructedso keepingyour microscope
cleanwill helpthe overallqualityof yourwork.
Cleaningof PaintedSurfaces
Toughdirt can be removed
Use a softbrushor lint-freecottonclothto removeddustand looseparticles.
withwaterand a milddeteroent.
17
l-4gatrriof
NEVER
usEAcEroNEoR orHERHARSH
cHEMT.ALS.
Paintedor plasticsurfacesshouldnot be tarnishedor etchedwith cleaningagentsthat are too powerful
To cleanpaintedsurfaces,use a moistenedlint-freecottonclothwith mild soapywater.
Cleaningthe Stage
Use a soft brushor lint-freecottonclothto removedust and looseparticles.
DO NOT USE ACETONEOR OTHERHARSHCHEMICALS,use a moistenedlint-freecottonclothwith a
solutionof mildsoapywater.
Cleaningof GlassSurfaces
Use a soft brushor lint-freecottonclothto removedustand looseparticles.
Fortoughdirt,use a soft lint-freecottonclothmoistenedwith distilledwater.
lf thatfails,try usingmedicalor reagentgradeisopropylalcohol.
the Objectives
Cleaning
$ onrcen
Objectives
shouldNEVERbe disassembled
for cleaningor for any otherreason!We do not advise
cleaningthe insidesurfacesof objectivesor eyepieces.
Use a softbrush,bellowsbrushor a soft lint-freecottonclothto removeddustand looseparticles.
Fortoughdirt,use a soft lint-freecottonclothmoistenedwithdistilledwater.
lf that fails,carefullytry usingmedicalor reagentgradeisopropylalcohol.
Wipe lensesimmediately.
Overtime,waterand solventscan dissolveopticalcementsthat holdoptics
togetherso NEVERsoakobjectives
with ANY type of fluid.
t8
-
5.0Troubleshooting
productsare manufactured
in JapanunderlSO9001manufacturing
MeijiTechno
exclusively
standards.
However,if you ever haveany difficultywith any Meijiproduct,feel free to contactus at:
MEIJITECHNO
C O . ,L T D .
322-1,Chikumazawa,
Miyoshi machi,lruma-gun
Saitama 354-0043,Japan
Phone:
Fax:
E-mail:
Web:
MeijiTechnoAmerica
3010 Olcott Street
Santa Glara,CA 95054-3207
049-259-0111
13
049-259-01
[email protected]
http:i/www.meijitechno.co.jp
800.832.0060
408.970.5054
FAX
technicalsupport
@meijitechno.com
http://www.meijitechno.com
Our technicalstaffis trainedto assistyou on mechanicalor electricalissuesyou may have.
Operationallssues
Pleasereferto the previous"Operations"
modethat you are
chapterswhichcoincidewiththe observation
problemsincludethe improperpositioning
using.The mostcommonoperational
of contrastaccessories,
the improperadjustment
or the incorrectpartsinstalled.lf you are unableto obtainthe desiredimage
pleasereferto the corresponding
fromthe microscope,
chaptersof this manualunderthe proper
operationmode:brightfield,
etc.
ElectricalProblems
problemscan include:
Electrical
o The lampon the microscopeis not working.
o No voltageis present.
Checkthe followingprobablecauses:
o Checkthat all powercordsare properlyconnectedto the rightspots.
. Makesure poweris actuallypresentat the walloutlet.
o Checkto see if thereis a fuse blown.
19
5.1 Replacingthe mainsfuse on the microscope
@cauitonl
ALWAYSDISCONNECTYOUR
EQUIPMENTBEFOREDOINGANY REPAIR.
Location of Mains Fuse
is locatedon the backpanel
The mainsfuseof the MX SeriesMicroscopes
of the microscope
as shown.
Instructionsto replacethe mains fuse:
.
r
.
.
o
Turnthe powerswitchto the off position.
fromthe walloutlet.
Unplugthe microscope
Loosenthe fuse cap fromthe fuse holder.
Removethe blownfusefromthe fuse cap.
Replacethe fusewiththe CORRECTtype and ratingwhichis:
Back Panel
(suchas Littelfuse
217 Seriesor
30W HalogenSystems- IEC Standard5 X 20mm 3 amp Fast-Acting
BussmannGDB Series).
the fuse holderwiththe new fuse in place.
o Reinstall
lg olxcen
FUSESOF A DIFFERENTRATING.
NEVERUSE REPLACEMENT
5.2 IncidentLight does not work
.
o
o
o
Makesureyour mainsoutletindeedhas power.
Makesurethe plugfromthe illuminator
is firmlypluggedintothe socketon the powersupply.
Checkto see if the mainsfuse on the incidentlightpowersupplyhas blown.
Checkto see if the lamphas blowninsidethe illuminator.
20
-
the 12V50WHalogenLamp- Incidentllluminator
5.3 Replacing
(MX7500/MX8500
series)
EQUIPMENTBEFOREDOINGANY REPAIR.
ALWAYSDISCONNECTYOUR
Keepthe protective
sleeveor bag of the
Do not touchthe glassenvelopeof the lampduringinstallation.
lampduringinstallation
and removeit rightafterinstallation.
l@ nOr!
o
o
o
o
o
o
o
o
o
21
ANDLAMe
HousrNG
MAyBEHorroroucH.
mn,rp
Switchoff the microscope.
Disconnect
the powercord.
Waituntilthe housingand bulbhavecooledsufficiently.
Loosenthe clampscrewand directthe backingplateso it can be
removedfromthe housing.
Removethe defectivelamp.
Placea new lampintothe socketwhileavoidingtouchingthe
glass.Noticethe bulbis wrappedin plastic.Use the bag to avoid
touchingthe glassenvelopeduringinstallation.
Be surethe bulbis pushedin as far as possibletherebyassuring
the alignmentof the filamentin the illuminator.
Reinstallthe lampcoverdoor.
Reconnect
to align
the powercordand switchon the microscope
proper
illuminator
the filamentand to verify
operation.
Loosenthisclamoscrew
5.4 Replacingthe 6V 30W HalogenLamp - Transmitted(MX8500series)
CAUTION
L-a
ALWAYSDISCONNECTYOUR
EQUIPMENTBEFOREDOINGANY REPAIR.
Do not touchthe glassenvelopeof the lamp duringinstallation.
Keepthe protectivesleeveor bag of the
lampduringinstallation
and removeit rightafterinstallation.
l@ HOT!
unrtpANDLAMeHousrNG
MAyBEHorroroucH.
o
o
.
o
Switchoff the microscope.
Disconnect
the powercord.
Waituntilthe housingand bulbhavecooledsufficiently.
Removethe illuminator
coverscrewsand liftthe coverto
remove.
o Replacethe defectivelamp.
o Placea new lampintothe socketwhileavoiding
touchingthe glass.Noticethe bulb is wrappedin plastic.Use it
to avoidtouchingthe glassenvelopeduringinstallation.
o Be surethe bulbis pushedin as far as possibletherebyaligning
t h e f i l a m e nitn t h e i l l u m i n a t o r .
o Reinstallthe lamp coverdoor.
o Reconnect
the powercord and switchon the microscope
to
proper
illuminator
verify
operation.
6.0 Storage
Protectyour microscope
fromdust aftereach use by coveringyour instrument
withthe protective
dust
coverthat camewith your microscope.
o Storeyour microscopein a cabinetthat has a stabletemperatureand low humidity.
o lf you livein an areathat has highhumidity,
considerstoringyour microscopein a sealedcontainer
gel.
alongwith a desiccantsuchas silica
o lt is also recommended
thatthe objectiveand eyepiecesbe storedin a separateair tightcontainer
with desiccant.
22
-
7.0 Packingand Transport
and the
o Wheneverthe microscopeis goingto be moved,ship or transportthe microscope
in its originalpacking.
accessories
copyof the originalinvoice,the operations
o lt is advisableto keepa copyof all necessaryinformation:
when shipping.
manual,etc.includedwiththe microscope
8.0 Accessoriesand ReplacementsParts
Partnumbersand productdescriptions
for accessories
and partsfor MX SeriesMicroscopes
can be found
partsfor all MeijiTechnoproductsare availablethroughour
listedbelow.Accessories
and replacement
network.
dealer
Vlu*ing Hsade
Description
type binocularhead,30' inclined,30mm l.D.eyetubes
Siedentopf
(includedwith MX7520& MX8520)
typetrinocularhead,30' inclined,30mm l.D.eyetubes
Siedentopf
(includedwith MX7530& MX 8530)
SiedentopfErgonomictype binocularhead,adjustable10-50'inclination,
30mm l.D.eyetubes(optional)
Hyepieces
(accepts
25mmreticle)
SWH10X Super WidefieldHigh Eyepointeyepiece,F.N.22(standard)
(accepts
19mmreticle)
SWH15X Super WidefieldHigh Eyepointeyepiece,F.N.16(optional)
(accepts
19mmreticle)
SWH2OX Super WidefieldHigh Eyepointeyepiece,F.N.12(optional)
(optional)
(accepts
HighEyepoint
focusing
F.N.22
25mm
reticle)
SuperWidefield
eyepiece,
SWH10X-F
- F = 200mm
BrighffieldDarkfiEld Objectives - Plan Epi - tntinryCorrected
PlanEpi BD5XObjective,
P l a nE p i B D 1 0 XO b j e c t i v eN, . A . : 0 . 2 5w, . D = 7 l l m m
PlanEpi BD20XObjective,N.A.:0.40,w.D = 5.20mm
PlanEpi BD50XObjective,N.A.:0.75,w.D.= 0.38mm
23
llluminator
MA928
MA928/05
Vertical
Koehler
illuminator,
12V50Whalogen
lamp,withclearblue,cleargreen,ND50neutral
densityfilterandpolarizing
filtersin metalmount(Thispricedoesnotincludetransformer.)
Transformer
for MA928in separatecase (input100V- 24OV,12V50W)
Filters
MA.275125
Blueclearfilter,20mm diameterin metalmount (inctuded)
M4275t30
Greenclearfilterin metalmount (included)
MA275150
ND50 Neutraldensitvfilter,20mm diameterin metalmount (inctuded)
MA959
Polarizing
filter,20mmdiameterin metalmount (inctuded)
Miscellaneous
Parts& Accessoriee
MA941
M4942
MA958
'191mm '126mm
x
Ceramiccoatedflattop stage,
with right-handed
with dropdown
coaxialcontrols(100mmx 100mmx-y travel)(includedin MX7500series)
Ceramiccoatedflattop stage191mmx 126mmwith right-handed
with dropdown
coaxialcontrolsand 94.5mmdiameterclearglassstageplate(100mmx 100mmx-y
travel)(includedin MX8500series)
Photo/Videoattachmentfor MA957 ErgonomicHead,80/20beamsplitter
MA809/10
115VAC Powercord with plug(USA)
Replacement
M4809/20
ReplacemenI22OY
AC Powercord with plug (European)
MA809/30
Replacement220V
AC Powercordwith plug(UK)
MA523
Cross-LineReticle,25mm diameter
MA5O6
1 O m md i v i d e di n t o1 0 0p a r t s , 2 5 m md i a m e t e r
MA5O9
5mm dividedinto 100 parts,25mmdiameter
MA524
1Ommsquaredividedinto400 parts,0.5mmsquare,25mm diameter
MA51O
1Ommsquaredividedinto 100 parts,1.Ommsquare,25mm diameter
MA542
25mm diameter
Cross-LineReticlewith 0.1mmgraduation,
MA738
for grainsizingin steel,25mm diameter
EyepieceMicrometer
M4292
MetalStageMicrometer,
0.01mmfor reflectedlight
MA906
for MA817SWH10XEyepiece(ea)(pairinctuded)
Eyeshield
MA326
Replacement
Lamp,6V 30W halogen
MA275/05
Replacement
Lamp,12V 50W halogen
M4327
MA686/05
MA7O1
Replacement
Fuse,3A
Adapterto mountRMS threadobjectivefor MX7500and MXB500series
Dust Coverfor MX7500/MX8500
Series(standard)
24
9.0TechnicalDescriptions
Filters and Applications
Filter
I Application
ND50
| NeutralFilteror ND Filter.Greyfiltersor neutral
I densityfiltersare usedto attenuateall frequencies
of color
I of lightequallyresultingin preservation
temperature.
The
ND50
filter
would
indicate
a
I
percent
reduction
of
light
transmission
by
or a
50
I
of lightof 50 percent.
Oassage
I
I
I ClearBlueFilter.Suppressesred wavelengths.
I Usedto achievedesiredcolorbalance.Adds
alternativecontrastto images.
I
I
I ClearGreenFilter.In the past,usedfor adding
I contrastfor use with Black& Whitefilm and stillcan
I be used to achievedesiredcolor balance.Adds
contrastto images.A greenfilterusually
I alternative
I improvesresolutionby restrictingthe waveband
reachingthe objective.
I
I
Filter.Usedin conjunction
with a
I Polarizing
rotatableanalyzer,the polarizingfilterchangesthe
angleof lightseen in the fieldof view.
ClearBlueFilter
ClearGreenFilter
polarizingFilter
25
10.0PhysicalDimensions
1n
ffl l"' ll]
{,
. ri.$\
ts
26
X
MEUIrEcHNo co.,LTD.
MEIJITECHNOCO..LTD.
322-1, Chikumazawa,
Miyoshi-machi,
Iruma-gun
Saitama354-0043
Japan
Phone:
Fax:
E-mail:
Web:
049-259-0111
049-259-0113
[email protected]
http://www.meijitechno.co.jp
MEIJITECHNO
AMERICA
3010OlcottStreet,
SantaClara,CA 95054
U.S.A.
Tollfree:
Phone:
Fax:
E-mail:
Web:
(800)832-0060
(408)970-4799
(408)970-5054
[email protected]
http://www.meijitechno.com
MEIJITECHNOUK. LTD.
The Vineyard,Axbridge
Somerset,8526 2AN
U.K.
Phone:
Fax:
E-mail:
Web:
01934733 655
01934 733 660
enquiries
@meijitechno.co.uk
http://www.meijitechno.co.uk
'07.
09. 1,000V1 Printedin Japan