1
6. Timer
6.2. For wireless remote controller (option)
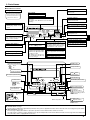
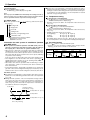
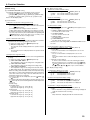
<Checking the Current Auto Off Timer Setting>
4
5
Timer Setting
TIMER
AFTER
OFF
AUTO OFF
C
D
B
A
1
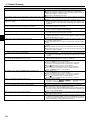
1. Be sure that the “Auto Off” is visible on the screen (at 1).
2. Hold down the Timer Menu button B for 3 seconds, so that “TIMER
MONITOR” is indicated on the screen (at 4).
• The timer remaining to shutdown appears at 5.
3. To close the monitor and return to the standard control screen, press the
Mode (Return) button 2.
TEMP
ON/OFF
FAN AUTO STOP
13
MODE VANE AUTO START
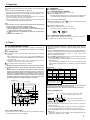
<To Turn Off the Auto Off Timer...>
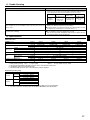
● Hold down the Timer On/Off button 9 for 3 seconds, so that “TIMER
MODE OFF” appears (at 6) and the timer value (at 7) disappears.
CHECK LOUVER
TEST RUN
7
h
2
min
SET RESET CLOCK
AAA
AAA
˚F
˚F
6
AUTO OFF
● Alternatively, turn off the air conditioner itself. The timer value (at 7) will
disappear from the screen.
7
AUTO OFF
<To Turn On the Auto Off Timer...>
● Hold down the Timer On/Off button 9 for 3 seconds. The “TIMER MODE
OFF” indication disappears (at 6), and the timer setting comes on the
display (at 7).
● Alternatively, turn on the air conditioner. The timer value will appear at 7.
7
AFTER
OFF
˚F
˚F
6
AUTO OFF
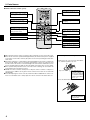
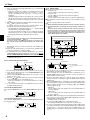
1) Set the current time
1 Press the CLOCK button using a thin stick and blink the time A.
min
2 Press the h and
button to set the current time.
3 Press the CLOCK button using a thin stick.
2) Set the time to start the unit as follows
1 Press the AUTO START button.
• Time can be set while the following symbol is blinking.
On time: B START is blinking.
• The start times is displayed at A.
min
buttons to set the desired time.
2 Use the h and
3 To cancel the ON timer, press the AUTO START button.
3) Set the time to stop the unit as follows
1 Press the AUTO STOP button.
• Time can be set while the following symbol is blinking.
Off time: C STOP is blinking.
• The stop times is displayed at D.
min
2 Use the h and
buttons to set the desired time.
3 To cancel the OFF timer, press the AUTO STOP button.
4) Changing the set times
Press the AUTO START or AUTO STOP to cancel the timer and repeat from 2) or 3).
7. Other Functions
7.1. Locking the Remote Controller Buttons (Operation
function limit controller)
■ If you wish, you can lock the remote controller buttons. You can use the
Function Selection of remote controller to select which type of lock to use.
(For information about selecting the lock type, see section 8, item [4]–2
(1)).
Specifically, you can use either of the following two lock types.
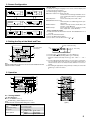
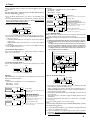
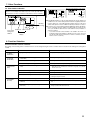
<How to Lock the Buttons>
1. While holding down the Filter button 4, press and hold down the ON/OFF
button 1 for 2 seconds. The “Locked” indication appears on the screen
(at 1), indicating that the lock is now engaged.
* If locking has been disabled in Function Selection of remote controller,
the screen will display the “Not Available” message when you press the
buttons as described above.
1
1Lock All Buttons:
Locks all of the buttons on the remote controller.
2Lock All Except ON/OFF:
Locks all buttons other than the ON/OFF button.
˚F
FUNCTION
˚F
Note:
The “Locked” indicator appears on the screen to indicate that buttons are currently locked.
1
Lock Indicator
• If you press a locked button, the “Locked” indication (at 1) will blink
on the display.
1
˚F
FUNCTION
˚F
TIME SUN
˚F
FUNCTION
˚F
TEMP.
ON/OFF
1
MENU
BACK
PAR-21MAA
10
MONITOR/SET
ON/OFF
FILTER
DAY
CLOCK
<How to Unlock the Buttons>
1. While holding down the Filter button 4, press and hold down the ON/OFF
button 1 for 2 seconds—so that the “Locked” indication disappears from
the screen (at 1).
1
4
CHECK TEST
OPERATION
CLEAR
˚F
˚F