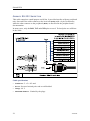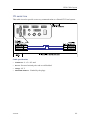
1
Installation manual
Simrad PI50
Catch monitoring system
www.simrad.com
TECHNOLOGY
FOR
SUSTAINABLE
FISHERIES
Simrad PI50
Installation manual
This manual provides you with the basic information
required to install the Simrad PI50. For more detailed
information about the practical use of the product, refer
to the Simrad PI50 Operator manual or the Simrad PI50
Reference manual.
328459/B
11.04.2011
©
Kongsberg Maritime AS
Revision status
Document: 328459 / ISBN: 978-82-8066-122-7 / Rev.B
Rev.A
28.04.2010
First release.
Rev.B
11.04.2011
Additional information added. See Record of changes in chapter About
this manual on page 7.
Copyright
©2011 Kongsberg Maritime AS
The information contained in this document remains the sole property of Kongsberg Maritime AS. No part
of this document may be copied or reproduced in any form or by any means, and the information contained
within it is not to be communicated to a third party, without the prior written consent of Kongsberg
Maritime AS. The document, or any part of it, may not be translated to any other language without the
written approval from Kongsberg Maritime AS.
Disclaimer
Kongsberg Maritime AS endeavours to ensure that all information in this document is correct and fairly
stated, but does not accept liability for any errors or omissions.
Warning
The equipment to which this manual applies must only be used for the purpose for which it was
designed. Improper use or maintenance may cause damage to the equipment and/or injury to
personnel. The user must be familiar with the contents of the appropriate manuals before attempting
to install, operate or work on the equipment.
Kongsberg Maritime AS disclaims any responsibility for damage or injury caused by improper
installation, use or maintenance of the equipment.
Support information
If you require maintenance or repair, contact your local dealer. You can also contact us using the
following address: [email protected]. If you need information about our other products, visit
http://www.simrad.com. On this website you will also find a list of our dealers and distributors.
Kongsberg Maritime AS
www.kongsberg.com
Installation manual
Table of contents
ABOUT THIS MANUAL ....................................................... 7
SIMRAD PI50 .................................................................... 9
Important ..................................................................................................................9
System description .................................................................................................10
System diagram ...................................................................................................... 11
Main units...............................................................................................................12
Colour display ............................................................................................ 12
Processor Unit ............................................................................................ 12
Sensor Receiver.......................................................................................... 13
Hydrophone ............................................................................................... 14
Catch monitoring sensors ............................................................................ 15
General supply conditions ......................................................................................15
Equipment responsibility............................................................................. 15
Receipt, unpacking and storage.................................................................... 16
General installation requirements...........................................................................16
Approval by classification society ................................................................ 16
Supply power ............................................................................................. 16
Compass deviation...................................................................................... 16
Noise sources ............................................................................................. 17
Dry docking ............................................................................................... 17
Wiring........................................................................................................ 17
Support information ...............................................................................................17
INSTALLATION PROCEDURES ......................................... 19
Basic procedure ......................................................................................................20
PI50 Marine Computer installation ........................................................................21
Colour display installation......................................................................................22
Receiver Unit installation .......................................................................................22
Hydrophone installation .........................................................................................23
Sensor installation ..................................................................................................23
Initial setup procedure ............................................................................................24
PI50 CABLE LAYOUT ....................................................... 26
Read this first! ........................................................................................................27
Cable plan...............................................................................................................28
List of cables ..........................................................................................................30
Cable drawings .......................................................................................................34
Generic RS-232 Serial line .......................................................................... 35
Generic RS-232 Serial line .......................................................................... 36
Computer/Receiver Unit serial line .............................................................. 37
328459/B
3
Simrad PI50
Vessel ground ............................................................................................. 38
AC mains (IEC 60320)................................................................................ 39
AC mains (IEC320/C7) ............................................................................... 40
Commercial DC power supply ..................................................................... 41
Receiver Unit power supply......................................................................... 42
RJ45 Ethernet, straight ................................................................................ 43
VGA/SVGA Display................................................................................... 45
Universal Serial Bus (USB) ......................................................................... 46
Parallel printer ............................................................................................ 47
DVI–I Display ............................................................................................ 48
ITI serial line.............................................................................................. 49
Hydrophone junction box ............................................................................ 50
Hydrophone ............................................................................................... 51
SOFTWARE INSTALLATION ............................................. 52
How to install the PI50 software ............................................................................53
How to obtain the PI50 license...............................................................................53
How to upgrade the PI50 software .........................................................................54
How to remove the PI50 software ..........................................................................54
INTERFACES AND INTEGRATION .................................... 55
About NMEA interfaces and telegrams .................................................................56
External interfaces ..................................................................................................56
How to set up the PI sensor data output ........................................................ 56
How to set up the Simrad ITI Trawl system interface .................................... 58
How to set up the Simrad echo sounder input................................................ 59
How to set up the navigation system interface............................................... 61
DRAWING FILE ............................................................... 63
PI50 Marine computer............................................................................................64
PI50 Receiver Unit .................................................................................................65
Power Supply for PI50 Receiver Unit ....................................................................66
TECHNICAL SPECIFICATIONS ......................................... 67
Catch monitoring system specifications .................................................................68
Interface specifications ...........................................................................................68
Colour display specifications..................................................................................69
PI50 Marine Computer specifications ....................................................................69
HYDROPHONE INSTALLATION ........................................ 72
ABOUT PI SENSORS ........................................................ 73
Sensors overview....................................................................................................74
PI Bottom Contact purpose and application .................................................. 75
PI Catch purpose and application ................................................................. 76
PI Depth purpose and application................................................................. 77
4
328459/B
Installation manual
PI Height purpose and application................................................................ 78
PI Spread purpose and application ............................................................... 79
PI Twin Spread purpose and application ....................................................... 80
PI Spread/Depth purpose and application...................................................... 81
PI Temperature purpose and application ....................................................... 82
PI Temperature/Depth purpose and application ............................................. 83
PI Geometry purpose and application ........................................................... 83
PI Height/Depth purpose and application...................................................... 85
PI SeineSounder purpose and application ..................................................... 86
PI Remote/Depth purpose and application .................................................... 87
PI Rip purpose and application .................................................................... 88
Sensor configuration...............................................................................................89
Default communication channels and update rates......................................... 89
Changing a communication channel ............................................................. 90
Changing the update rate ............................................................................. 90
PI Configurator ........................................................................................... 91
Charging procedures...............................................................................................92
Battery handling ......................................................................................... 92
How to use the Simrad PI Charger ............................................................... 92
How to use the Simrad PI MaxiCharger........................................................ 95
How to use the Simrad PI MiniCharger ........................................................ 96
How to use the Simrad PS Charger............................................................... 97
Test procedures.......................................................................................................99
Simple test for all sensors ............................................................................ 99
Checking sensors using the PI Configurator utility ...................................... 100
Checking depth sensors ............................................................................. 100
Checking bottom, catch and rip sensors ...................................................... 101
Checking the SeineSounder ....................................................................... 101
Sensor start-up identification ..................................................................... 101
TELEGRAM FORMATS .................................................... 103
About the NMEA telegram format.......................................................................104
About NMEA ........................................................................................... 104
Telegrams................................................................................................. 104
Standard NMEA 0183 communication parameters ...................................... 105
Sentence structure..................................................................................... 105
Specification of NMEA telegrams .......................................................................106
DBS Depth below surface ......................................................................... 106
GLL Geographical position latitude/longitude ............................................ 107
GGA Global positioning system fix data..................................................... 108
HDG Heading, deviation and variation....................................................... 108
HDM Heading, magnetic........................................................................... 109
HDT Heading, true ................................................................................... 109
328459/B
5
Simrad PI50
RMC Recommended minimum specific GNSS data .................................... 109
VHW Water speed and heading ..................................................................110
VTG Course over ground & ground speed ...................................................110
VLW Dual ground/water distance ...............................................................111
Proprietary telegrams and formats ....................................................................... 112
DBS Depth of trawl below surface ..............................................................112
HFB Trawl headrope to footrope and bottom ...............................................112
PSIMP-D1 PI Sensor data ..........................................................................112
A
GENERAL SAFETY RULES ............................................... 115
B
EQUIPMENT HANDLING ................................................ 116
Transportation....................................................................................................... 117
Lifting ................................................................................................................... 117
Storage prior to installation or use ....................................................................... 118
Inspection ............................................................................................................. 119
Unpacking ............................................................................................................ 119
General unpacking procedure .....................................................................119
Unpacking electronic and electromechanical units ...................................... 120
Unpacking mechanical units ...................................................................... 120
Unpacking transducers .............................................................................. 120
Storage after unpacking........................................................................................121
Storage after use ...................................................................................................121
Cleaning cabinets...................................................................................... 121
Mechanical units....................................................................................... 122
Cables...................................................................................................... 122
Internal batteries ....................................................................................... 122
Dehumidifier ............................................................................................ 123
Coatings................................................................................................... 123
Re-packaging........................................................................................................123
Temperature protection.........................................................................................123
Circuit board handling and packaging..................................................................124
Electro-Static Discharge (ESD)............................................................................125
Disposal ................................................................................................................125
C
6
BASIC CABLE REQUIREMENTS ...................................... 127
Cable trays ............................................................................................................128
Radio Frequency interference ..............................................................................128
Physical protection ...............................................................................................129
Grounding.............................................................................................................129
Cable connections.................................................................................................130
Cable terminations................................................................................................130
Cable identification...............................................................................................130
328459/B
About this manual
About this manual
Purpose
The purpose of this manual is to provide the information and basic drawings required for
installation of the Simrad PI50.
For more detailed information about the practical use of the product, refer to the Simrad
PI50 Operator manual or the Simrad PI50 Reference manual.
About the technical descriptions and the target audience
This manual describes the installation of the Simrad PI50.
The manual is intended for technical personnel; qualified maintenance engineers and
technicians. It is assumed that the personnel is conversant with the general principles of
maritime electronic equipment, in particular sonar, echo sounder and catch monitoring
systems. The personnel must also be familiar with computer hardware, signal processing,
interface technology and traditional troubleshooting on electronic and mechanical
products.
The instructions must be followed carefully to ensure optimal performance. As a guide,
installation procedures are presented in the order they are to be performed. Successful
completion of each procedure is to be confirmed by checking off the corresponding box.
Note
The installation instructions given in this document must be adhered to. Failure to do so
may render the guarantee void.
Kongsberg Maritime AS will accept no responsibility for any damage or injury to the
system, vessel or personnel caused by equipment that has been incorrectly installed or
maintained, or by drawings, instructions or procedures that have not been prepared by us.
The equipment described in this manual includes the complete system with associated
cabinets, but not system units provided locally by the customer, installation shipyard
or local dealer. The manual also defines the equipment responsibility, and provides
instructions for unpacking and storage.
After installation, this document must be stored on board the vessel for later reference
when updating or servicing the equipment.
328459/B
7
Simrad PI50
Installation drawings
Detailed vessel specific mechanical drawings for the installation must be provided by the
customer, or any shipyard contracted to perform the installation.
Kongsberg Maritime AS may, on special order, provide assistance to these drawings.
Drawings must be approved by the appropriate vessel certification authority prior to
installation of the system.
Applicable outline dimension and productions drawings are provided in the Drawing
file chapter. Drawings may also be downloaded in PDF and/or DWG formats from
http://www.simrad.com.
References
The following user manuals have been provided for the Simrad PI50.
All manuals may be downloaded from http://www.simrad.com.
• English:
– Simrad PI50 Operator Manual [328457]
– Simrad PI50 Reference Manual [328458]
– Simrad PI50 Installation Manual [328459]
• Español:
– Simrad PI50 Manual de Usuario [349277]
– Simrad PI50 Manual de Referencia [349276]
Record of changes
This list describes in more detail the various changes made to this Simrad PI50 manual.
A
28.04.2010: First version of manual
B
08.04.2011:
8
a
Added separate references to hydrophone and sensor installation to chapter
Installation procedures on page 19.
b
Added new procedure Initial setup procedure on page 24.
c
Added new section in Cable layout chapter, see Read this first! on page 27.
d
Added new cable drawing to Cable layout chapter, see Computer/Receiver
Unit serial line on page 37.
328459/B
Simrad PI50
Simrad PI50
Study this chapter to familiarize yourself with the Simrad PI50.
Topics
• Important on page 9
• System description on page 10
• System diagram on page 11
• Main units on page 12
• General supply conditions on page 15
• General installation requirements on page 16
Related topics
• General safety rules on page 115
• Equipment handling on page 116
• Basic cable requirements on page 127
Important
As with all other advanced instruments, there are a few important things that you must be
aware of.
When the PI50 is not used
When you do not use the PI50, switch off the display and the computer.
You may switch of the PI50 Sensor Receiver too. It is not equipped with an on/off switch,
but you can unplug the power supply if you are not going to use the PI50 for a while.
If something breaks down
If you believe that something has broken down, contact your local dealer. He will be
able to assist.
A list of all our dealers is provided on http://www.simrad.com. If you are unable to
contact a dealer, observe the support information in this chapter.
→ Support information on page 17
328459/B
9
Simrad PI50
When you switch off the PI50
You must NEVER switch off the PI50 by means of the on/off switch on the computer.
You must ALWAYS exit the PI50 application by clicking the Exit button on the Title Bar.
If you power down the PI50 by means of the computer switch you may damage the
software application and the interface parameters to external devices.
System description
The Simrad PI50 is designed for the professional fishery community implementing the
latest innovations. The catch monitoring system allows you to stay in full control of the
gear and its behaviour. The system is designed to be equally useful for all fishing types.
Bottom trawlers, pelagic trawlers, purse or danish seiners - whatever kind of gear you
use, all vessels can take advantage of the functionality provided by the PI50.
The Simrad PI50 comprises the following units:
• Colour display
• Processor Unit (The PI50 Marine Computer may be provided)
• Sensor Receiver
• Hydrophone
The hydrophone is mounted under the vessel’s hull.
The system further comprises a number of small and robust sensors measuring the
conditions on your fishing gear. The Simrad PI50 can receive information from six
sensors simultaneously.
One or more sensor battery chargers are also required.
The sensors are powered by built-in rechargeable batteries. They are housed in titanium
casings, and designed using advanced shock absorbing materials. The information
collected by the sensors are sent through the water to the hydrophone by means of coded
sound waves. The Sensor Receiver amplifies and decodes the information, converts it to
digital format, and sends it to the Processor Unit (computer). The computer interprets the
information, and finally presents it to you.
10
328459/B
Simrad PI50
System diagram
Figure 1
diagram
System
A basic PI50 system diagram is provided. Interface
capabilities and power cables are not shown.
A
Display Unit
B
Processor Unit
C
Sensor Receiver
D
Power Supply
E
Hydrophone
F
Catch Monitoring Sensors
Additional units include:
• Sensor Battery Charger
• Loudspeaker
A loudspeaker is optional, and it must be installed if you
wish to hear the audible alarms. Note that a loudspeaker
can not be connected directly to the computer. An
amplifier is required.
328459/B
11
Simrad PI50
Main units
The Simrad PI50 comprises the following units:
• Colour display
• Processor Unit (The PI50 Marine Computer may be provided)
• Sensor Receiver
• Hydrophone
Colour display
Any commercial colour display can be used with the Simrad PI50 system. However,
the chosen display must be fitted for maritime use, and it must meet the minimum
performance specifications.
These specifications are:
• Minimum screen resolution: 1280 x 1024
In addition to the PI50 presentation, the colour display will also display the menu
system for the interactive operation. In order to increase readability and comprehension,
dedicated colour palettes have been chosen to improve the distinction between the
various echoes and presentation elements.
Note that the colour display is not a standard part of the PI50 delivery.
Processor Unit
Note
The PI50 Marine Computer does not contain any fans.
It will be very warm, even during normal operation.
Figure 2 PI50 Marine
Computer
Minimum computer requirements
Observe the following minimum computer
requirements.
• Operating system: Microsoft® Windows® XP® (32–bit) or Microsoft® Windows®
7 (32–bit) [1]
On new installations, we recommend that Microsoft® Windows® 7 is used.
• Processor speed: 2 GHz Dual core
• Memory: 2 Gb
• Free hard disk space: 30 Gb
• Graphic adapter: DirectX9.0c compatible with Direct3d and OpenGL[2]
1.
2.
12
The PI50 software does not support Microsoft© Windows© NT or older operating systems.
A large number of commercial graphic adapters are available, and Simrad has not tested all of them.
Even adapters meeting the minimum specifications may in some cases prove to fail with the PI50
software. We welcome any feedback with comments or experiences with graphic adapters.
328459/B
Simrad PI50
• Interfaces:
– One serial (RS-232) interface to communicate with the Receiver Unit
Note that “PCI Express” serial interface boards are not supported.
– One Ethernet interface to communicate with ship’s local area network (if required)
– One or more serial line interfaces (depends on how many interfaces that are
required for the specific integration)
• Display resolution: 1280 x 1024[3]
Sensor Receiver
The Simrad PI50 uses a custom built receiver.
The PI50 Receiver Unit is housed in a small cabinet.
All necessary input and output sockets easily available.
The unit is powered by a small external power supply.
Figure 3
Unit
PI50 Receiver
The Receiver Unit provides the following interfaces:
• Serial line cable to the Processor Unit.
• One hydrophone
• External power supply
The maximum length of the serial line cable between
the Sensor Receiver and the Processor Unit is 50 meters.
3.
This is the minimum resolution. As with all other Windows applications, the PI50 software will work
with higher resolutions, provided that it is supported by the graphic adapter in the computer and the
display connected.
328459/B
13
Simrad PI50
Hydrophone
Two hull mounted hydrophones are available, one for purse seining operations, and one
for trawl operations. You can install both, and then select active hydrophone by means of
a selector box on the bulkhead.
Purse seine hydrophone
Figure 4
Purse seine hydrophone
The hull mounted hydrophone for purse seining
operations has a 90 degrees horizontal beam
and a 30 degrees vertical beam to provide the
PI50 with optimal reception from the sensors
on a purse seine.
This specific beam pattern is especially suited for
purse seining and the wide coverage area reduces
the need for careful alignment.
Trawl hydrophone
The hull mounted hydrophone for trawling operations has a 50 degrees horizontal beam
and a 30 degrees vertical beam to provide the PI50 with optimal reception from the
sensors on a bottom or pelagic trawl.
This specific beam pattern is especially suited for trawling and the wide coverage area
reduces the need for careful alignment.
Portable hydrophone
Figure 5
Portable hydrophone
A portable hydrophone is also available. It is
designed as a temporary measure until a fixed
hydrophone can be installed at the vessel’s next
planned dry docking. It has an omnidirectional
beam and a 50 meter integrated cable.
The cable is sheathed in polyurethane providing
robust external protection to compliment its 150
kg tensile strength.
The cable is supplied on a reel for convenient
retrieval and stowage, and is equipped with a
plug for easy attachment to the Receiver Unit.
14
328459/B
Simrad PI50
Catch monitoring sensors
A large selection of sensors can be used with the PI50 system.
The current software version supports the following sensors:
• Bottom Contact
• Catch
• Depth
• Spread
• Temperature
• Height
• Spread/Depth
• Twin Spread
• Height/Depth
• SeineSounder
• Geometry
Related topics
• About PI sensors on page 73
• Sensor configuration on page 89
• Charging procedures on page 92
General supply conditions
The following supply conditions are applicable to this Simrad PI50 delivery.
Equipment responsibility
The shipyard performing the installation and/or equipment dealer becomes fully
responsible for the equipment upon receipt unless otherwise stated in the contract. The
duration of responsibility includes:
• The period of time the equipment is stored locally before installation.
• During the entire installation process.
• While commissioning the equipment.
• The period of time between commissioning and the final acceptance of the equipment
by the end user (normally the owner of the vessel which the equipment has been
installed).
Unless other arrangements have been made in the contract, the Simrad PI50 guarantee
period (as specified in the contract) begins when the acceptance documents have been
signed
328459/B
15
Simrad PI50
Receipt, unpacking and storage
Upon accepting shipment of the equipment, the shipyard and/or the dealer should ensure
that the delivery is complete and inspect each shipping container for evidence of physical
damage. If this inspection reveals any indication of crushing, dropping, immersion in
water or any other form of damage, the recipient should request that a representative
from the company used to transport the equipment be present during unpacking.
All equipment should be inspected for physical damage, i.e. broken controls and
indicators, dents, scratches etc. during unpacking. If any damage to the equipment is
discovered, the recipient should notify both the transportation company and Kongsberg
Maritime so that Kongsberg Maritime can arrange for replacement or repair of the
damaged equipment.
Once unpacked, the equipment must be stored in a controlled environment with an
atmosphere free of corrosive agents, excessive humidity or temperature extremes. The
equipment must be covered to protect it from dust and other forms of contamination
when stored.
For more information, see the appendix related to equipment handling.
→ Equipment handling on page 116
General installation requirements
The following installation requirements are applicable to this Kongsberg Maritime
delivery.
Approval by classification society
The Simrad PI50 hydrophone installation must be approved by Det Norske Veritas
(DNV) or another classification society. The shipowner and shipyard performing the
installation are responsible for obtaining installation approval.
Supply power
The supply voltage to the equipment is to be kept within ±10% of the installation’s
nominal voltage. Maximum transient voltage variations on the main switchboard’s
bus-bars are not to exceed -15% to +20% of the nominal voltage (except under fault
conditions).
Compass deviation
Once the installation is complete, the vessel must be swung with the system in both
the operative and inoperative modes. The shipowner and captain are responsible for
updating the deviation table accordingly with regard to the vessel’s national registry and
corresponding maritime authority.
16
328459/B
Simrad PI50
Noise sources
The vessel’s hull, rudder(s) and propeller(s) should be thoroughly inspected in dry dock
prior to installation. Roughness below the water-line deformities in the shell plating and
protruding obstacles can create underwater noise. These sources of turbulence must be
smoothed or removed as best as possible. It is especially important that the propeller(s)
is not pitted or damaged.
Dry docking
Make sure that ample clearance under the sonar trunk and/or protection blister is
provided when dry docking the vessel. Avoid locating supporting blocks or structures in
the vicinity of this equipment.
Note
The location of the hydrophone and/or protection blister must be noted on the vessel’s
docking plan for future reference.
Power down all hydroacoustic systems, and label each system accordingly to prevent
accidental power on. Remove circuit breakers if necessary.
Wiring
All cables running between system cabinets located in different rooms and/or on different
decks must be supported and protected along their entire lengths using conduits and/or
cable trays. Note that the cables must not be installed in the vicinity of high-power
supplies and cables, antenna cables or other possible sources of interference.
Note
Whenever possible, hydrophone cables must be run in steel conduits.
For more detailed information about cables and wiring, refer to the basic cable
requirements.
→ Basic cable requirements on page 127
Support information
If you need additional technical support for your Simrad PI50 you must contact your
local dealer, or one of our support departments.
328459/B
17
Simrad PI50
Norway (Main office)
• Address: Strandpromenaden 50, 3190 Horten, Norway
• Telephone: +47 33 03 40 00
• Telefax: +47 33 04 29 87
• E-mail address: [email protected]
• Website: http://www.simrad.no
Spain
• Address: Poligono Partida Torres 38, 03570 Villajoyosa, Spain
• Telephone: +34 966 810 149
• Telefax: +34 966 852 304
• E-mail address: [email protected]
• Website: http://www.simrad.es
USA
• Address: 19210 33rd Ave W, Lynnwood, WA 98036, USA
• Telephone: +1 425 712 1136
• Telefax: +1 425 712 1193
• E-mail address: [email protected]
• Website: http://www.simrad.com
18
328459/B
Installation procedures
Installation procedures
This chapter provides the basic information required to install the physical Simrad PI50
units.
Note that physical installation of commercial units (computers, printers, displays etc.) is
not described in this manual. Refer to the applicable user manual(s) provided with the
product.
Topics
• Basic procedure on page 20
• PI50 Marine Computer installation on page 21
• Colour display installation on page 22
• Receiver Unit installation on page 22
• Hydrophone installation on page 23
• Sensor installation on page 23
• Initial setup procedure on page 24
Related topics
• General safety rules on page 115
• Equipment handling on page 116
• Basic cable requirements on page 127
328459/B
19
Simrad PI50
Basic procedure
This is the basic installation procedure.
1
Check that you have received all parts required for the installation; cables,
connectors, brackets, drawings etc.
→ Drawing file on page 63
2
Install the hydrophone and its cable according to the guidelines in the hydrophone
manual and the drawings provided with it.
3
Mount the PI50 Processor Unit (or commercial computer).
→ PI50 Marine Computer installation on page 21
4
Mount the display unit.
5
Connect the computer and display cables.
a
Power cable to display monitor.
b
Power cable to computer.
c
Video cable from computer to display monitor.
d
Connect the pointing device (mouse or trackball).
e
Connect the keyboard (if applicable).
→ PI50 Cable layout on page 26
6
Mount the Receiver Unit using the appropriate brackets.
→ Receiver Unit installation on page 22
7
Mount the power supply for the Receiver Unit.
8
Connect the cables to the Receiver Unit:
• Hydrophone cable
• Power cables
9
Prepare and install the serial line cable between the Receiver Unit and the computer:
10 Prepare and connect the required sensor interfaces.
a
Navigation system (GPS) for speed, position, distance and heading information
b
Trawl system for gear monitoring
c
Echo sounder for depth monitoring
You can connect these devices using serial lines to the rear side of the PI50
computer. If applicable, you can also retrieve the information from these peripheral
devices from the vessel’s local area network (LAN).
→ PI50 Cable layout on page 26
20
328459/B
Installation procedures
PI50 Marine Computer installation
The PI50 Marine Computer is an industrial computer. It is small, rugged, and contains no
moving parts. This means that fans, hard disks and CD drives are omitted. The computer
provides Ethernet sockets, RS-232 serial lines, and a number of USB connectors. The
hard disk is replaced with a solid state drive (SSD).
The Marine Computer is easily mounted with the
brackets supplied with the unit.
Figure 6 PI50 Marine
Computer
A small external power supply is provided, and must
be placed near the computer.
Note
The PI50 Marine Computer does not contain any fans.
It will be very warm, even during normal operation.
Two brackets and eight bolts enclosed. Mount the two brackets at the bottom of the
computer.
1
Locate the most convenient location for the computer.
In order to allow for future maintenance, we strongly advice that you mount the
computer with its rear panel available for immediate access.
Note
Make sure that you can access both the rear and front side of the computer after it
has been installed.
2
Observe the outline dimension drawing.
→ PI50 Marine computer on page 64
3
Mark the location of the six holes provided on the two brackets.
4
Mount the unit using six bolts or screws.
5
Find a suitable location for the power supply.
6
Secure the power supply with wire straps, velcro, brackets, or any other means
appropriate.
7
Connect the cables.
Note
When you connect the cables, make sure that they are all secured, and able to
withstand the vibration and movements of the vessel.
328459/B
21
Simrad PI50
Colour display installation
Different commercial colour displays are available. For installation and operation of the
chosen display unit, refer to the manual supplied with the unit.
1
Before you start installation, check that all the following requirements are met.
• The display must be located so that it is best protected from glare which reduces
readability.
• The display may be mounted in a panel, on the desktop or bulkhead, or overhead.
• Make sure that adequate ventilation is available to avoid overheating.
• The compass safe distance must be allowed for when planning the unit’s location.
• Make sure that the installation allows for the physical movements and forces
normally experienced on a vessel.
• Make sure that enough space is provided for maintenance work.
2
Install the colour display as described the applicable documentation provided with
the unit.
3
Connect the cables.
Note
When you connect the cables, make sure that they are all secured, and able to
withstand the vibration and movements of the vessel.
Receiver Unit installation
The PI50 Receiver Unit is housed in a small cabinet. All necessary input and output
sockets easily available. The unit is powered by a small external power supply.
The Receiver Unit provides the following interfaces:
• Serial line cable to the Processor Unit.
• One hydrophone
• External power supply
22
328459/B
Installation procedures
Figure 7 PI50 Receiver
Two brackets are mounted on the Receiver Unit to
Unit
facilitate installation on a bulkhead or inside a cabinet
wall. You need to find four 4 mm bolts or screws.
1 Locate the most convenient location for the
Receiver Unit.
In order to allow for future maintenance, we
strongly advice that you mount the unit with both
end panels available for immediate access.
2 Observe the outline dimension drawing.
→ PI50 Receiver Unit on page 65
→ Power Supply for PI50 Receiver Unit on page 66
3 Mark the location of the four holes provided by the two brackets.
4 Mount the unit using four bolts or screws.
5 Find a suitable location for the power supply.
6 Secure the power supply with wire straps, velcro, brackets, or any other means
appropriate.
7 Connect the cables.
Note
When you connect the cables, make sure that they are all secured, and able to
withstand the vibration and movements of the vessel.
Hydrophone installation
For hydrophone installation, refer to the documents provided with each hydrophone.
The following installation manuals apply:
• Purse seine hydrophone installation manual [164149]
• Trawl hydrophone installation manual [164472]
• Portable hydrophone installation manual [164730]
These installation manuals can also be downloaded from http://www.simrad.com.
Sensor installation
For information about sensor installation, see the documentation provided with each
sensor.
This documentation can also be downloaded from http://www.simrad.com.
Related topics
• About PI sensors on page 73
328459/B
23
Simrad PI50
Initial setup procedure
This procedure explains how to set up the communication between the Simrad PI50
computer and the Receiver Unit. This is normally done only one time.
Communication with the PI50 Receiver Unit is based on a serial line and proprietary
telegrams. You can only set up this communication with a licensed version of the PI50
software.
Important
If you purchase the PI50 Maritime computer, serial port A (1) is set up and activated
for this interface. If you use your own computer, make sure that it is equipped with an
RS-232 serial port. This is the only way you can communicate with the Receiver Unit.
→ Computer/Receiver Unit serial line on page 37
The first step (with sub-steps) in this procedure explains how to do the physical cabling.
The remaining steps describe how to set up the interface in the PI50 software.
1
Connect the PI50 computer to the Receiver Unit using a serial line.
a
Locate a free serial port that can be used for this communication.
b
On the chosen serial line socket on the PI50 computer (male connector),
connect the RS-232 cable as follows:
• Receive signal Rx on pin 2.
• Transmit signal Tx on pin 3.
• Common Ground on pin 5.
c
On the Receiver Unit, use the only serial line socket available (female
connector). Connect the RS-232 cable in a 1:1 configuration.
Note
The connection between the computer and the Receiver Unit uses a 1:1 serial
cable. A suitable cable with length 2 m is provided with the Transceiver Unit. If
you need a longer cable, you can extend this cable, or make your own.
→ Computer/Receiver Unit serial line on page 37
d
Ensure that the total length of the serial line cable does not exceed
approximately 50 meters.
If a longer cable is required, you may need to use buffer amplifiers on the
serial line.
2
24
Click the Setup icon under the Main menu to open the Setup menu.
328459/B
Installation procedures
3
Click the Installation button to open the Installation sub-menu.
On the sub-menu I/O Setup to open the I/O Setup dialog.
4
5
6
7
8
9
In the I/O Setup dialog, select which serial port to use for this communication.
Click on the chosen port to select it, then click the Input button to open the Select
Inputs dialog.
In the Select Inputs dialog, locate PI50 on the left side, and click the [►] button
to connect it.
Click OK to save the current
settings and close the dialog.
In the I/O Setup dialog, click on
the chosen port to select it, then
click the Setup button to open
the Serial Port Setup dialog.
In the Serial Port Setup dialog,
enter the relevant parameters
to set up the port.
• Baud rate: 4800
• Data bits: 8
• Parity: None
Important
If you use your own computer, you may need to verify these settings in the operating
system.
In Windows XP, right-click My Computer on the desktop. Then, click Properties
→Hardware →Device manager →Ports.
In Windows 7, open Computer from the “Start” icon. Then, click System properties
→Advanced system settings Hardware →Device manager →Ports.
Right-click on Ports to view and/or define communication properties.
10 Click OK to save the current settings and close the dialog.
11 In the I/O Setup dialog, click on the chosen port to select it, then click the Monitor
button to open the Port Monitor dialog.
12 Check the data flow on the communication line.
In order to monitor this data flow, the peripheral system must be active and
transmitting information to the PI50.
13 If the data flow is operational, close all dialogs.
328459/B
25
Simrad PI50
PI50 Cable layout
This chapter provides the cable plan and cable installation requirements for the Simrad
PI50.
Topics
• Read this first! on page 27
• Cable plan on page 28
• List of cables on page 30
• Cable drawings on page 34
26
328459/B
PI50 Cable layout
Read this first!
Detailed information about cable specifications, termination and connectors are provided.
All cables are provided by Simrad unless otherwise specified. In order to provide for
maintenance and to allow for vibration, make sure that some slack is provided for all
cables.
A detailed drawing for each cable is provided. Each drawing provides additional
specifications, and may, when applicable, include:
• Required minimum specifications
• Connections at each end (including reference to the corresponding: system unit,
terminal board identification and plug/socket to be used)
• Corresponding terminations
• Number of cores
Cables fall into two categories.
• System cables: These cables are supplied by Kongsberg Maritime.
• Shipyard cables: These cables must be provided by the shipyard performing the
installation, or the shipowner. It is very important that the cables used meet the
minimum specifications provided in this manual.
Kongsberg Maritime accepts no responsibility for damage to the system or reduced
operational performance caused by improper wiring.
For more information, see the generic cable requirements.
→ Basic cable requirements on page 127
Note
Before you perform the PI50 cabling, ensure that the mains circuit breaker for the system
is switched off.
Note
All electronic installations and corresponding wiring must be in accordance with the
vessel’s national registry and corresponding maritime authority and/or classification
society. If no such guidelines exist, we recommend that Det Norske Veritas (DNV) Report
No. 80-P008 «Guidelines for Installation and Proposal for Test of Equipment» is used as
a guide. Observe Basic cable requirements on page 127.
328459/B
27
Simrad PI50
Cable plan
Figure 8
Cable plan, topside
A
C06
C07
C05
C03
B
C01
C02
C04
C11 / C12 / C13 / C14
C15 / C16 / C17 / C18
C08
D
(CD0121 17-001)
C
C10
C09
A
Display
B
Computer
C
Ethernet cable to vessel LAN (C09, optional)
D
RS-232 serial cable to Receiver Unit (C10)
If a loudspeaker system is installed, use the appropriate output (audio or USB depending
on the speaker system) on the rear side of the computer.
Important
If you use your own computer, make sure that it is equipped with an RS–232 serial port.
This is the only way you can communicate with the Receiver Unit. Not all commercial
computers provide this interface. You must also set up the serial port on your computer
to offer the correct communication parameters. If in doubt, consult your dealer.
→ Initial setup procedure on page 24
→ Computer/Receiver Unit serial line on page 37
28
328459/B
PI50 Cable layout
Figure 9
Cable plan, Receiver Unit
B
A
C10
C22
C23
C20
C21
C
(CD0121 17-002)
A
Serial cable to Processor Unit (C10)
B
Receiver Unit
C
Power supply
D
Hydrophone
Note that the individual units are not drawn to scale.
328459/B
29
Simrad PI50
List of cables
The list below specifies each cable used on the PI50 system. References are made to the
location of connector(s), detailed cable drawings and specifications.
C1
PI50/C01 Keyboard
This is a standard keyboard cable. It is usually fixed to the keyboard. The
connection normally depends on the make and model of the computer. Most
recent computers use a USB plug, older types use PS/2. Wireless keyboards
are also available.
Note that the keyboard is an optional item. It is not a part of the PI50 delivery.
C2
PI50/C02 Mouse, trackball or other pointing device
This is a standard computer mouse, or other pointing device, cable. It is physically
attached to the mouse. The cable is normally terminated in a USB plug. Wireless
pointing devices are also available.
A commercial “trackball” pointing device is provided with the PI50 computer.
C3
PI50/C03 Display cable
This video cable is normally provided with the display, and it is often physically
attached to the rear side of the display. It is a standard commercial cable.
The most common video formats and connectors are SVGA and DVI. Some
computers also support the HDMI output format.
Make sure that the computer’s graphic adapter is fitted with a connector that
matches the video cable provided with the display.
→ VGA/SVGA Display on page 45
→ DVI–I Display on page 48
C4
PI50/C04 Printer
A printer can be connected to the PI50 computer. A cable for this is normally
provided with the printer.
The most common interface cable for printers is USB. Some older computers and
printers also support parallel connection (Centronics).
→ Universal Serial Bus (USB) on page 46
→ Parallel printer on page 47
30
328459/B
PI50 Cable layout
C5
PI50/C05 Computer to AC mains
The AC mains cable is provided with the PI50. It is a standard commercial mains
cable. The computer end is normally terminated with an IEC C13 inline socket.
The other end is terminated in an AC connector suitable for the local conditions.
If this is not the case, you must replace the AC connector. The typical cable
length is between 1,5 and 2 meters. If this is too short you must use an extension
cable (not recommended), mount a new power outlet within range, or make your
own power cable.
The PI50 Marine Computer is fitted with an external power supply, and it can also
be powered from a DC source. Observe the technical specifications.
→ PI50 Marine Computer specifications on page 69
→ AC mains (IEC 60320) on page 39
→ Commercial DC power supply on page 41
C6
PI50/C06 Colour display to AC mains
This cable is provided with the display. It is a standard commercial mains cable.
The display end is normally terminated with an IEC C13 inline socket.
The other end is terminated in an AC connector suitable for the local conditions.
If this is not the case, you must replace the AC connector. The typical cable
length is between 1,5 and 2 meters. If this is too short you must use an extension
cable (not recommended), mount a new power outlet within range, or make your
own power cable.
→ AC mains (IEC 60320) on page 39
C7
PI50/C07 Colour display to ground
This is a standard commercial grounding cable. When applicable, connect this
cable between the unit and ships’ ground.
The cable must be provided by the installation shipyard.
→ Vessel ground on page 38
C8
PI50/C08 Computer to ground
This is a standard commercial grounding cable. When applicable, connect this
cable between the unit and ships’ ground.
The cable must be provided by the installation shipyard.
→ Vessel ground on page 38
C9
PI50/C09 Ethernet to ship local area network (LAN)
If the computer is equipped with an Ethernet connector, it may also be connected
to the vessel’s local area network (LAN).
A standard “straight” Ethernet cable is required, and the cable must be provided
by the installation shipyard.
Note that screened Ethernet cables must be used (CAT5 or better).
→ RJ45 Ethernet, straight on page 43
328459/B
31
Simrad PI50
C10
PI50/C10 Serial line to Receiver Unit
This cable provides all communication between the Receiver Unit and the
computer.
A standard three-wire serial line is used.
The Receiver Unit provides a 9–pin D-connector socket. The same type of
connector is normally used on the computer too.
→ Initial setup procedure on page 24
→ Computer/Receiver Unit serial line on page 37
C11
PI50/C11 Serial interface line
The number of serial lines available depends on the chosen computer make and
model.
One serial line is required to interface the Receiver Unit.
→ Generic RS-232 Serial line on page 35
C12
PI50/C12 Serial interface line (same as C11)
C13
PI50/C13 Serial interface line (same as C11)
C14
PI50/C14 Serial interface line (same as C11)
C15
PI50/C15 Universal Serial Bus (USB) interface
Most computers support one or more USB connectors for peripheral devices. In a
typical PI50 configuration, the USB connectors are not used.
However, a USB interface may be used to accept serial line information
(providing a converter is used). You can also use the USB interfaces to connect
a mouse, keyboard, printer or memory devices. The number of USB sockets
available depends on your computer make and model.
→ Universal Serial Bus (USB) on page 46
C16
PI50/C16 Universal Serial Bus (USB) interface (same as C15)
C17
PI50/C17 Universal Serial Bus (USB) interface (same as C15)
C18
PI50/C18 FireWire interface
Most current computers supports a FireWire (IEEE 1394) interface, and provides
4–circuit or 6–circuit sockets. This interface is however not required by the PI50.
C19
32
Not used
328459/B
PI50 Cable layout
C20
PI50/C20 Power supply to AC mains
This cable is provided with the power supply.
It may be a standard mains supply cable, or it may be integrated with the power
supply.
If a loose cable is used, the power supply end is normally terminated with an IEC
C13 or IEC320/C7 inline socket. The other end is terminated in an AC connector
suitable for the local conditions. If this is not the case, you must replace the
AC connector.
→ AC mains (IEC 60320) on page 39
→ AC mains (IEC320/C7) on page 40
C21
PI50/C21 DC power cable
The PI50 Receiver Unit powered from a DC supply. The power supply – with all
cables – are provided with the PI50 delivery.
→ Receiver Unit power supply on page 42
C22
PI50/C22 Hydrophone cable
The hydrophone is connected to the dedicated socket on the Receiver Unit.
→ Hydrophone junction box on page 50
→ Hydrophone on page 51
C23
PI50/C23 Receiver Unit to ground
This is a standard commercial grounding cable. When applicable, connect this
cable between the unit and ships’ ground.
The cable must be provided by the installation shipyard.
→ Vessel ground on page 38
On the Receiver Unit, secure the cable using one of the mounting bolts for the
cabinet.
328459/B
33
Simrad PI50
Cable drawings
This chapter provides details cable drawings offering cable specifications and termination
information.
Topics
• Generic RS-232 Serial line on page 35
• Generic RS-232 Serial line on page 36
• Computer/Receiver Unit serial line on page 37
• Vessel ground on page 38
• AC mains (IEC 60320) on page 39
• AC mains (IEC320/C7) on page 40
• Commercial DC power supply on page 41
• Receiver Unit power supply on page 42
• RJ45 Ethernet, straight on page 43
• VGA/SVGA Display on page 45
• Universal Serial Bus (USB) on page 46
• Parallel printer on page 47
• DVI–I Display on page 48
• ITI serial line on page 49
• Hydrophone junction box on page 50
• Hydrophone on page 51
34
328459/B
PI50 Cable layout
Generic RS-232 Serial line
This cable holds a multi purpose serial line. It provides interface with any peripheral
unit. One end of the cable connects to the local unit (DTE) with a 9-pin D-connector,
while the other connects to the peripheral (DCE) as described in the peripheral unit’s
documentation. Note that this cable does not support all the signals in the standard
RS-232 specification.
Local
9-pin ‘D’ connector
Remote system
9-pin ‘D’ connector
2
Rx
Rx
2
3
Tx
Tx
3
5
Ground
Ground
5
5
1
Female 9-pin
D-pin connector
9
6
5
1
View
Male 9-pin
D-pin connector
6
W103
Rev.C
9
Standard RS-232 DB9 3-wire cable (DTE/DTE)
Cable specifications
• Conductors: 3 x 0.5 mm²
• Screen: Overall braided
• Voltage: 60 V
• Maximum cable diameter: Limited by the plugs
328459/B
35
Simrad PI50
Generic RS-232 Serial line
This cable comprises a multi purpose serial line. It provides interface with any peripheral
unit. One end of the cable connects to the local unit (DTE) with a 9-pin D-connector,
while the other connects to the peripheral (DCE) as described in the peripheral unit’s
documentation.
In many cases, only the RxD, TxT and GND pins are used. Twisted pairs are sufficient
in the cable.
Cable specifications
• Conductors: 5 x 2 x 0.5 mm²
• Screen: Screened twisted pairs and overall braided
• Voltage: 60 V
• Maximum diameter: Limited by the plugs
36
328459/B
PI50 Cable layout
Computer/Receiver Unit serial line
This cable holds the communication between the PI50 computer and the Receiver Unit.
Local
9-pin ‘D’ connector
Remote system
9-pin ‘D’ connector
2
Rx
Rx
2
3
Tx
Tx
3
5
Ground
Ground
5
5
1
Female 9-pin
D-pin connector
9
6
5
1
View
Male 9-pin
D-pin connector
6
W150
Rev.A
9
1:1 RS-232 DB9 3-wire cable
Cable specifications
• Conductors: 3 x 0.5 mm²
• Screen: Overall braided
• Voltage: 60 V
• Maximum cable diameter: Limited by the plugs
328459/B
37
Simrad PI50
Vessel ground
This cable is used to connect a system unit to the ship’s ground. Note that this cable must
be as short as possible.
Cable specifications
• Conductors: 1 x 6 mm²
• Screen: None
• Voltage: 60 V
• Maximum diameter: N/A
38
328459/B
PI50 Cable layout
AC mains (IEC 60320)
This is a commercial 230 Vac power cable for mains power. One end is fitted with
an IEC plug, the other with a standard European mains plug. This is a standard cable
type supplied in different lengths.
Cable specifications
• Conductors: 2 x 1.5 mm² + GND
• Screen: None
• Voltage: 750 V
• Maximum diameter: Set by the plugs
More information
• http://en.wikipedia.org/wiki/IEC_320
328459/B
39
Simrad PI50
AC mains (IEC320/C7)
This is a commercial 230 Vac power cable for 2-phase mains power. One end is fitted
with an IEC320/C7 plug, the other with a standard European mains plug. This is a
standard cable type supplied in different lengths.
Cable specifications
• Not applicable. This is a commercial cable.
40
328459/B
PI50 Cable layout
Commercial DC power supply
This is a commercial low voltage DC power supply. The input is a standard IEC320/C8
connector. The output cable is fastened to the power supply, and holds a standard circular
plug. The polarity is printed on the supply.
Cable specifications
• Not applicable. This is a commercial cable.
328459/B
41
Simrad PI50
Receiver Unit power supply
This cable is used to connect the DC power supply from the commercial power supply to
the Receiver Unit. The cable is provided fixed to the power supply, and it connects to
a three-pin socket on the Receiver Unit.
Cable specifications
• Not applicable. This is a commercial cable.
42
328459/B
PI50 Cable layout
RJ45 Ethernet, straight
This cable is used to provide standard Ethernet connections. Note that various categories
exists. Normally, CAT-5E and CAT-6 cables are used in local area networks with
bandwidth exceeding 100 Mbit. Ethernet cables are available commercially in different
lengths, colours and categories.
10Base-T Low-speed Ethernet connections
Cable specifications
• Not applicable. This is a commercial cable.
328459/B
43
Simrad PI50
1000Base-T High-speed Ethernet connections (CAT5E and faster)
Cable specifications
• Not applicable. This is a commercial cable.
More information
• http://en.wikipedia.org/wiki/TIA/EIA-568-B
• http://en.wikipedia.org/wiki/Category_5_cable
44
328459/B
PI50 Cable layout
VGA/SVGA Display
This is a standard VGA and SVGA video cable. One end is normally connected to the
display, while the other end is terminated in a standard D-connector.
Cable specifications
• Not applicable. This is a commercial cable.
328459/B
45
Simrad PI50
Universal Serial Bus (USB)
Just about any computer that you buy today comes with one or more Universal Serial
Bus (USB) connectors on the back. These connectors let you attach everything from
mouse to printers to your computer quickly and easily. Since the operating system
supports USB, installation of device drivers is also easy. In most cases, the USB cable is
commercial, and they are normally supplied with the external devices, However, USB
cables are also available commercially in different fixed lengths.
Cable specifications
• Not applicable. This is a commercial cable.
More information
• http://en.wikipedia.org/wiki/usb
46
328459/B
PI50 Cable layout
Parallel printer
This is a standard “Centronics” parallel printer cable. It is provided ready-made with
printers, and also obtainable from commercial retailers.
Termination is made with 25–pin “D-sub” connector in one end, parallel port connector
in the other end (IEEE 1284–A)
Parallel port connector
(IEEE 1284-A)
25-pin D-connector
1
Strobe
2
Data 0
3
Data 1
4
Data 2
5
Data 3
6
Data 4
7
Data 5
8
Data 6
9
Data 7
10
Acknowledge
11
Busy
15
Error
18-24
Ground
W505
Rev.E
The socket on the rear
side of the computer
is normally a 25-pin female
D-connector .
13
1
25
14
Centronics parallel printer cable
Cable specifications
• Not applicable. This is a commercial cable.
328459/B
47
Simrad PI50
DVI–I Display
This cable is a standard DVI-I cable. It is normally provided with the colour display.
For more information about the DVI signals, see http://en.wikipedia.org.
Pin-out viewed from the socket
1
2
3
4
5
6
7
8
9
10
11 12
13
14
15
16
17
18
19
21 22
23
24
20
W508
Rev.C
C1
C2
C5
C3
C4
Standard DVI-I cable
Pin
Signal
Pin
Signal
1
TMDS Data 2- (Digital red - (Link 1))
15
Ground (Return for pin 14 and analog sync)
2
TMDS Data 2+ (Digital red + (Link 1))
16
Hot plug detect
3
TMDS Data 2/4 shield
17
TMDS data 0- (Digital blue - (Link 1) and
digital sync)
4
TMDS Data 4- (Digital green - (Link 2))
18
TMDS data 0+ (Digital blue + (Link 1) and
digital sync)
5
TMDS Data 4+ (Digital green + (Link 2))
19
TMDS data 0/5 shield
6
DDC clock
20
TMDS data 5- (Digital red - (Link 2))
7
DDC data
21
TMDS data 5+ (Digital red + (Link 2))
8
Analog vertical sync
22
TMDS clock shield
9
TMDS Data 1- (Digital green - (Link 1))
23
TMDS clock+ (Digital clock + (Links 1 &
2))
10
TMDS Data 1+ (Digital green + (Link 1))
24
TMDS clock- (Digital clock - (Links 1 &
2))
11
TMDS Data 1/3 shield
C1
Analog red
12
TMDS Data 3- (Digital blue - (Link 2))
C2
Analog green
13
TMDS Data 3+ (Digital blue + (Link 2))
C3
Analog blue
14
+5 Vdc (Power for monitor when in
standby)
C4
Analog horizontal sync
TMDS = Transition Minimized Differential
Signaling
C5
Analog ground (Return for R, G and B
signals)
48
328459/B
PI50 Cable layout
ITI serial line
This cable is used to provide a two-way communication to a Simrad ITI Trawl system.
Cable specifications
• Conductors: 9 x 2 x 0.5 mm²
• Screen: Screened twisted pairs and overall braided
• Voltage: 60 V
• Maximum diameter: Limited by the plugs
328459/B
49
Simrad PI50
Hydrophone junction box
The hydrophone cable will need to be spliced. Do not splice with solder and electrical
tape, or a commercial terminal block for home lightning! The cable shielding must
however not be grounded in the junction box.
Note
You must use a metal box, and the box must be grounded.
A suitable junction box must be provided by the installation shipyard.
Junction box (metal)
0
0
Cable shield
To hydrophone
Note: The cable shield must NOT be
connected to Junction Box ground!
Hydrophone
connector
W813A
Rev.B
Hydrophone cable - Junction box
Cable specifications
• Conductors: 6 x 0.5 mm² + Ground
• Screen: Overall braided
• Voltage: 60 V
• Maximum diameter: 8 mm
50
328459/B
PI50 Cable layout
Hydrophone
The hydrophone is connected to the dedicated socket on the Receiver Unit.
A small circular marker
identifies pin 1.
View: Looking
into the socket
on the rear side
of the cabinet
(1)
(7)
(2)
(6)
(3)
(5)
(4)
HYD1 (-12 Vdc)
RED
1
Not used
2
Not used
3
HYD GND (scr)
4
Not used
5
Not used
6
HYD2 (+12 Vdc)
7
BLACK
BLUE
SCREEN
WHITE
GREEN
Male
socket
on the
Receiver
Unit
YELLOW
The colours are those used by
the cable supplied with the system.
W813B
Rev.B
Hydrophone cable
Cable specifications
• Conductors: 6 x 0.5 mm² + Ground
• Screen: Overall braided
• Voltage: 60 V
• Maximum diameter: 8 mm
328459/B
51
Simrad PI50
Software installation
The purpose of this information is to guide you through the required tasks related to
software installation and/or upgrading on the Simrad PI50.
A software upgrade is useful whenever the PI50 software is modified.
If the PI50 system is provided with a computer, it is delivered with all necessary
software installed, configured and tested. If you use your own computer, you must do
this yourself. To check which software version you have, observe the About dialog
opened from the Display menu.
Topics
• How to install the PI50 software on page 53
• How to obtain the PI50 license on page 53
• How to upgrade the PI50 software on page 54
• How to remove the PI50 software on page 54
52
328459/B
Software installation
How to install the PI50 software
Use this procedure when you wish to install the PI50 software on a computer.
Note that minimum hardware and software requirements must be met by the computer.
1
Power up the computer.
2
Insert the PI50 CD-ROM.
If your computer is not fitted with a CD or DVD drive, copy the files from the CD to
a USB memory stick.
3
Observe that the installation program opens.
If the installation program does not start automatically, use a file manager to
access the CD or USB memory stick. Double-click on the Setup.exe file to start
the installation.
4
Allow the installation program to run. Follow the instructions provided.
5
Once the installation has been completed, double-click the program icon on the
desktop to start the application.
6
If you use Windows 7 operating system:
a
Observe that Windows 7 Firewall will open a dialog requesting information
about the network.
Select Public, and click Allow access.
b
7
The operating system may also open other dialogs to verify that the PI50
software can run on the computer. You must permit this.
Observe the relevant start-up procedure.
The initial start–up procedure is provided in chapter Installation procedures.
→ Initial setup procedure on page 24
How to obtain the PI50 license
The PI50 requires a valid license to operate.
Without a license you will not be able to communicate with the PI50 Receiver.
Note
If you replace your computer, or if you replace major components inside your computer,
you will need a new license code.
We strongly advice you to record the license code for safe keeping. You may for example
write it down in the beginning of this manual.
1
Double-click the PI50 icon on the desktop to start the application.
328459/B
53
Simrad PI50
2
Click the Setup icon under the Main menu to open the Setup menu.
3
Click Installation to open the Installation sub-menu.
On the sub-menu, click Software License to open the Software License dialog.
4
Write down the Hardware ID provided by the Software License dialog.
5
Contact your dealer to order the software license.
Your dealer will need the following information from you to place the order:
• Vessel name and call sign
• Vessel type (trawler, purse seiner, etc.)
• Vessel owner’s name, address and contact information
• Hardware ID
6
When the software license is returned to you, start the PI50, open the Software
License dialog, and click Enter Licence String.
7
Write down the code, and click Ok.
8
Click OK to save the current settings and close the dialog.
How to upgrade the PI50 software
Use this procedure if you wish to reinstall the software, or receive a new CD-ROM
with a software upgrade.
1
Observe the procedure for software installation.
→ How to install the PI50 software on page 53
Unless you have made any hardware changes on your computer, the existing
software license will be used.
How to remove the PI50 software
You may wish to remove the PI50 software from your computer.
1
54
Observe the operating system’s functionality for software removal.
328459/B
Interfaces and integration
Interfaces and integration
The Simrad PI50 computer provides one or more multi purpose serial and Ethernet
ports for external interfaces.
Which interfaces to use, and how many, must be decided by considering the available
serial lines on the computer and the need for integration with other hydroacoustic and
navigation systems.
Topics
• About NMEA interfaces and telegrams on page 56
• External interfaces on page 56
328459/B
55
Simrad PI50
About NMEA interfaces and telegrams
The Simrad PI50 can send and receive information to and from several different
peripherals. All transmissions take place as telegrams with data sentences. Each
telegram has a defined format and length.
The NMEA 0183 standard is the most common protocol used to receive and transmit data
to and from peripheral sensors. A parametric sentence structure is used for all NMEA
data. The sentence start with a “$” delimiter, and represent the majority of approved
sentences defined by the standard. This sentence structure, with delimited and defined
data files, is the preferred method for conveying information.
For more information about the NMEA standard, the format and the data sentences, refer
to their official publications. Their document NMEA 1083 - Standard for interfacing
marine electronic devices explains the formats in detail. The document can be obtained
from http://www.nmea.org.
Related topics
• About NMEA on page 104
• Telegrams on page 104
• Standard NMEA 0183 communication parameters on page 105
• Sentence structure on page 105
External interfaces
This section describes how to set up the various interfaces provided by the PI50. The
interfaces are set up to transmit and/or receive information by means of Ethernet and/or
serial lines.
Topics
• How to set up the PI sensor data output on page 56
• How to set up the Simrad ITI Trawl system interface on page 58
• How to set up the Simrad echo sounder input on page 59
• How to set up the navigation system interface on page 61
How to set up the PI sensor data output
The PI50 will provide PI sensor information on an output line.
→ PSIMP-D1 PI Sensor data on page 112
The first step (with sub-steps) in this procedure explains how to do the physical cabling.
The remaining steps describe how to set up the interface in the PI50 software.
1
Connect the PI50 to the peripheral system using a serial line.
a
56
Locate a free serial port that can be used for this communication.
328459/B
Interfaces and integration
2
On the serial line socket on the PI50 computer, connect the RS-232 cable as
follows:
• Receive signal Rx on pin 2.
• Transmit signal Tx on pin 3.
• Common Ground on pin 5.
→ Generic RS-232 Serial line on page 35
→ Generic RS-232 Serial line on page 36
c On the external system, wire as described in the relevant documentation.
d Ensure that the total length of the serial line cable does not exceed
approximately 50 meters.
If a longer cable is required, you may need to use buffer amplifiers on the
serial line.
Click the Setup icon under the Main menu to open the Setup menu.
3
Click the Installation button to open the Installation sub-menu.
b
On the sub-menu I/O Setup to open the I/O Setup dialog.
4
5
6
7
In the I/O Setup dialog, select which serial line to use to export the PI information.
Click on the chosen port to select it, then click the Output button to open the Select
Outputs dialog.
In the Select Outputs dialog, locate the PI_NMEA option on the left side, and click
the [►] button to connect it.
Click once on the PI_NMEA option on the left side, then click Configure Output.
Observe that the PI Data Output dialog opens.
In the PI Data Output dialog, click to enable the Data telegrams to be exported.
Click OK to save the current settings and close the dialog.
Observe that you are back in the Select Outputs dialog.
Click OK to save the current settings and close the dialog.
In the I/O Setup dialog, click on the chosen port to select it, then click the Setup
button to open the Serial Port Setup dialog.
14 In the Serial Port Setup dialog, enter the relevant parameters to set up the port.
→ Standard NMEA 0183 communication parameters on page 105
8
9
10
11
12
13
328459/B
57
Simrad PI50
15 Click OK to save the current settings and close the dialog.
16 In the I/O Setup dialog, click on the chosen port to select it, then click the Monitor
button to open the Port Monitor dialog.
17 Observe the data flow on the output.
In order to monitor the data flow, the PI50 must be active and transmitting
information out on the serial line.
18 If the data flow is operational, close all dialogs.
How to set up the Simrad ITI Trawl system interface
This procedure explains how the PI50 can be set up to receive ITI and FS information
on a serial port.
Communication with the Simrad ITI (Integrated Trawl Instrumentation) and Simrad
FS70 is based on NMEA and proprietary telegrams.
The following telegram formats are supported:
→ DBS Depth below surface on page 106
→ DBS Depth of trawl below surface on page 112
→ HFB Trawl headrope to footrope and bottom on page 112
The first step (with sub-steps) in this procedure explains how to do the physical cabling.
The remaining steps describe how to set up the interface in the PI50 software.
1
Connect the PI50 to the ITI using a serial line.
a
Locate a free serial port that can be used for this communication.
b
On the serial line socket on the PI50 computer, connect the RS-232 cable as
follows:
• Receive signal Rx on pin 2.
• Transmit signal Tx on pin 3.
• Common Ground on pin 5.
→ Generic RS-232 Serial line on page 35
→ Generic RS-232 Serial line on page 36
c
On the ITI transceiver, use connector Serial A. Connect the cable as follows:
• Receive signal Rx on pin 2.
• Transmit signal Tx on pin 3.
• Common Ground on pin 5.
→ ITI serial line on page 49
d
Ensure that the total length of the serial line cable does not exceed
approximately 50 meters.
If a longer cable is required, you may need to use buffer amplifiers on the
serial line.
58
328459/B
Interfaces and integration
2
Click the Setup icon under the Main menu to open the Setup menu.
3
Click the Installation button to open the Installation sub-menu.
On the sub-menu I/O Setup to open the I/O Setup dialog.
4
5
6
7
8
9
10
11
12
13
In the I/O Setup dialog, select which serial line to use to accept ITI information.
Click on the chosen port to select it, then click the Input button to open the Select
Inputs dialog.
In the Select Inputs dialog, click ITI-FS on the left side, and click the [►] button
to connect it.
Click OK to save the current settings and close the dialog.
In the I/O Setup dialog, click on the chosen port to select it, then click the Setup
button to open the Serial Port Setup dialog.
In the Serial Port Setup dialog, enter the relevant parameters to set up the port.
→ Standard NMEA 0183 communication parameters on page 105
Click OK to save the current settings and close the dialog.
In the I/O Setup dialog, click on the chosen port to select it, then click the Monitor
button to open the Port Monitor dialog.
Check the data flow on the communication line.
In order to monitor this data flow, the peripheral system must be active and
transmitting information to the PI50.
If the data flow is operational, close all dialogs.
How to set up the Simrad echo sounder input
Communication with the Simrad ES Family echo sounder systems is based on NMEA
and proprietary telegrams. Depth information is also accepted from other echo sounders,
provided that one of the listed datagram formats are used.
→ DBS Depth below surface on page 106
The first step (with sub-steps) in this procedure explains how to do the physical cabling.
The remaining steps describe how to set up the interface in the PI50 software.
1 Connect the PI50 to the echo sounder using a serial line.
a Locate a free serial port that can be used for this communication.
b On the serial line socket on the PI50 computer, connect the RS-232 cable as
follows:
328459/B
59
Simrad PI50
c
• Receive signal Rx on pin 2.
• Transmit signal Tx on pin 3.
• Common Ground on pin 5.
→ Generic RS-232 Serial line on page 35
→ Generic RS-232 Serial line on page 36
On the echo sounder computer, use a similar serial line output. Connect the
RS-232 cable as follows:
• Receive signal Rx on pin 2.
• Transmit signal Tx on pin 3.
• Common Ground on pin 5.
Note
Remember that the transmit signal on the echo sounder computer is the receive
signal on the PI50 computer. See Generic RS-232 Serial line on page 35.
2
→ Generic RS-232 Serial line on page 35
d Ensure that the total length of the serial line cable does not exceed
approximately 50 meters.
If a longer cable is required, you may need to use buffer amplifiers on the
serial line.
Click the Setup icon under the Main menu to open the Setup menu.
3
Click the Installation button to open the Installation sub-menu.
On the sub-menu I/O Setup to open the I/O Setup dialog.
4
5
6
7
8
9
60
In the I/O Setup dialog, select which serial line to use to accept the depth information.
Click on the chosen port to select it, then click the Input button to open the Select
Inputs dialog.
In the Select Inputs dialog, locate EchoNMEA on the left side, and click the [►]
button to connect it.
Click OK to save the current settings and close the dialog.
In the I/O Setup dialog, click on the chosen port to select it, then click the Setup
button to open the Serial Port Setup dialog.
In the Serial Port Setup dialog, enter the relevant parameters to set up the port.
→ Standard NMEA 0183 communication parameters on page 105
328459/B
Interfaces and integration
10 Click OK to save the current settings and close the dialog.
11 In the I/O Setup dialog, click on the chosen port to select it, then click the Monitor
button to open the Port Monitor dialog.
12 Check the data flow on the communication line.
In order to monitor this data flow, the peripheral system must be active and
transmitting information to the PI50.
13 If the data flow is operational, close all dialogs.
How to set up the navigation system interface
This procedure explains how to connect a GPS system to the PI50 using serial line or
Ethernet communication.
Most Global Positioning System (GPS) receivers provide NMEA 0183 telegrams
containing speed, heading and sailed distance as well as geographical latitude and
longitude.
Supported telegram formats for heading:
→ HDG Heading, deviation and variation on page 108
→ HDT Heading, true on page 109
→ HDM Heading, magnetic on page 109
→ VHW Water speed and heading on page 110
Supported telegram formats for distance
→ RMC Recommended minimum specific GNSS data on page 109
→ VHW Water speed and heading on page 110
→ VLW Dual ground/water distance on page 111
→ VTG Course over ground & ground speed on page 110
Supported telegram formats for positioning
→ GLL Geographical position latitude/longitude on page 107
→ GGA Global positioning system fix data on page 108
→ RMC Recommended minimum specific GNSS data on page 109
Supported telegram formats for speed
→ RMC Recommended minimum specific GNSS data on page 109
→ VHW Water speed and heading on page 110
→ VTG Course over ground & ground speed on page 110
The first two steps (with sub-steps) in this procedure explain how to do the physical
cabling using a serial line or an Ethernet connection. The remaining steps describe how
to set up the interface in the PI50 software.
1 Connect the PI50 to the GPS system using a serial line.
a Locate a free serial port that can be used for this communication.
b On the serial line socket on the PI50 computer, connect the RS-232 cable as
follows:
328459/B
61
Simrad PI50
• Receive signal Rx on pin 2.
• Transmit signal Tx on pin 3.
• Common Ground on pin 5.
→ Generic RS-232 Serial line on page 35
→ Generic RS-232 Serial line on page 36
c
On the GPS system, wire as described in the relevant documentation.
d
Ensure that the total length of the serial line cable does not exceed
approximately 50 meters.
If a longer cable is required, you may need to use buffer amplifiers on the
serial line.
2
Connect the PI50 to the GPS system using an Ethernet line.
a
Locate the Ethernet port you wish to use.
If no Ethernet port is available, an Ethernet switch may be inserted between the
computer and the transceiver.
b
Connect an Ethernet cable from the PI50 computer to the peripheral system.
We strongly recommend that you use high quality Ethernet cables, minimum
CAT-5.
→ RJ45 Ethernet, straight on page 43
3
Click the Setup icon under the Main menu to open the Setup menu.
4
Click Navigation to open the Navigation dialog.
5
For each tab:
a
Select which port to use.
b
Click Setup for the selected port to define the communication parameters.
c
Select which NMEA Sentence to use.
If you choose Auto, the PI50 will automatically choose among the incoming
information according to a predefined priority list.
d
6
62
If applicable, define the Talker ID.
Click OK to save the current settings and close the dialog.
328459/B
Drawing file
Drawing file
This chapter contains relevant drawings related to the installation and maintenance
of the Simrad PI50.
Note
The mechanical drawings are for information and guidance only. They are not in scale.
All dimensions are in mm unless otherwise is noted. The original installation drawings
are available on PDF and/or AutoCad’s DWG format.
Visit www.simrad.com to download.
Topics
• PI50 Marine computer on page 64
• PI50 Receiver Unit on page 65
• Power Supply for PI50 Receiver Unit on page 66
328459/B
63
Simrad PI50
PI50 Marine computer
80
86
268
86
264
80
219 207
195
184
224
Note:
All measurements are in mm.
The drawing is not in scale.
64
CD010218A Page 1 of 1
Rev.A
328459/B
Drawing file
PI50 Receiver Unit
328459/B
65
Simrad PI50
Power Supply for PI50 Receiver Unit
67
108
36
All measurements in mm.
The drawing is not in scale
66
344703 Rev .A
CD0121 18-050 Page 1 of 1
328459/B
Technical specifications
Technical specifications
This chapter provides the technical specifications and requirements related to the Simrad
PI50.
In Kongsberg Maritime, we are continuously working to improve the quality and
performance of our products. Technical specifications may therefore be changed without
prior notice.
Topics
• Catch monitoring system specifications on page 68
• Interface specifications on page 68
• Colour display specifications on page 69
• PI50 Marine Computer specifications on page 69
328459/B
67
Simrad PI50
Catch monitoring system specifications
•
•
•
•
Communication channels: Maximum 30 channels
Communication frequencies: 43,5 to 49,5 kHz
Maximum number of communication channels in simultaneous use: 6
Single channel sensor types:
–
–
–
–
–
–
–
–
•
•
•
•
•
•
PI Catch [and PI Rip]
PI Depth
PI Temperature
PI Bottom Contact
PI Height
PI Remote/Depth
PI Geometry Differential
PI Spread
Dual channel sensor types:
– PI Temperature/Depth
– PI Height/Depth [and PI SeineSounder]
– PI Spread/Depth
– PI Twin Spread
– PI Geometry
Secondary data based on sensor information:
– Vertical geometry [using a depth sensor on each trawl door]
– Total water depth [using one height and one depth sensor]
– Trawl opening [using information added to the PI Height setup]
Sensor update rate: Individually adjusted on each sensor to Fast, Normal or Slow
Presentation modes:
– Sensor views [alphanumerical with history views]
– Trend views [historical values presented in graphs]
User settings: Unlimited (except by hard disk capacity)
Information storage: Unlimited (except by hard disk capacity) number of screen
captures
Interface specifications
Numerous external interfaces are provided for the Simrad PI50.
• Outputs:
– PI data (proprietary telegram formats)
68
328459/B
Technical specifications
• Inputs:
– Navigation data (NMEA format)
– Depth (NMEA format)
– ITI data (proprietary telegram formats)
Colour display specifications
Commercial display
The Simrad PI50 may be supplied with one of several commercial displays, and several
sizes are available. Displays may also be purchased locally.
Specifications are supplied with the displays.
Refer to the applicable documentation provided with the unit for more information.
PI50 Marine Computer specifications
Operational specifications
• Processor and memory:
– Processor: Core Duo (T2500)
– Clock frequency: 2 GHz
– Chipset: Intel® 852 GM(E)
– RAM: 4 Gb
– Hard disk: 30 Gb Solid State Drive
– Moving parts: None
• Interfaces:
– USB 2.0: 6 sockets
– Keyboard/mouse: Dual PS/2 connector (adapter is included)
– Serial lines: 4 ea RS-232/RS-422/RS-485 (adapter is included)
– Network: 2 x 10/100/1000 Mhz Ethernet LAN
– Video: VGA and DVI
• Power requirements:
– External power supply: 100 to 240 Vac input, +19 Vdc output
– DC operation: +12 to 30 Vdc
• Certification:
– CE
– FCC
328459/B
69
Simrad PI50
Physical and environmental specifications
• Mechanical construction:
– Chassis: Aluminium
– Cooling: Integrated cooling ribs
– Mounting: Brackets on each side
• Physical dimensions:
– Depth: 195 mm
– Width: 268 mm
– Height: 80 mm
• Environmental specifications:
– Operating temperatures: -10 to +50°C
– Storage temperatures: -20 to +80°C
– Relative humidity: 10 to 90% (non-condensing)
Local purchase
If you purchase a computer locally, it is important to make sure that the chosen model
meets the functional system requirements.
• It is important that the computer can facilitate the various interface requirements made
by the system, and you may need to add extra Ethernet and serial adapters.
• Make sure that the computer design and construction allows for marine use and safe
installation.
• A lap-top computer may be used as long as it meets the functional requirements.
Minimum computer requirements
Observe the following minimum computer requirements.
• Operating system: Microsoft® Windows® XP® (32–bit) or Microsoft® Windows®
7 (32–bit) [4]
On new installations, we recommend that Microsoft® Windows® 7 is used.
• Processor speed: 2 GHz Dual core
• Memory: 2 Gb
• Free hard disk space: 30 Gb
• Graphic adapter: DirectX9.0c compatible with Direct3d and OpenGL[5]
• Interfaces:
– One serial (RS-232) interface to communicate with the Receiver Unit
Note that “PCI Express” serial interface boards are not supported.
– One Ethernet interface to communicate with ship’s local area network (if required)
4.
5.
70
The PI50 software does not support Microsoft© Windows© NT or older operating systems.
A large number of commercial graphic adapters are available, and Simrad has not tested all of them.
Even adapters meeting the minimum specifications may in some cases prove to fail with the PI50
software. We welcome any feedback with comments or experiences with graphic adapters.
328459/B
Technical specifications
– One or more serial line interfaces (depends on how many interfaces that are
required for the specific integration)
• Display resolution: 1280 x 1024[6]
6.
This is the minimum resolution. As with all other Windows applications, the PI50 software will work
with higher resolutions, provided that it is supported by the graphic adapter in the computer and the
display connected.
328459/B
71
Simrad PI50
Hydrophone installation
For hydrophone installation, refer to the documents provided with each hydrophone.
The following installation manuals apply:
• Purse seine hydrophone installation manual [164149]
• Trawl hydrophone installation manual [164472]
• Portable hydrophone installation manual [164730]
These installation manuals can also be downloaded from http://www.simrad.com.
72
328459/B
About PI sensors
About PI sensors
This chapter describes the various sensors you can use with the Simrad PI50. It also
provides the basic – and important! – information related to sensor configuration, and it
explains how to use the sensor chargers.
Topics
• Sensors overview on page 74
• Sensor configuration on page 89
• Charging procedures on page 92
• Test procedures on page 99
328459/B
73
Simrad PI50
Sensors overview
A large amount of sensors may be used with the Simrad PI50 Catch monitoring
system to read important operational parameters from the trawl, purse seine or
Danish seine. A complete description of each sensor is provided on Simrad’s website
http://www.simrad.com and in the individual sensor instruction manuals.
Topics
• PI Bottom Contact purpose and application on page 75
• PI Catch purpose and application on page 76
• PI Depth purpose and application on page 77
• PI Height purpose and application on page 78
• PI Spread purpose and application on page 79
• PI Twin Spread purpose and application on page 80
• PI Spread/Depth purpose and application on page 81
• PI Temperature purpose and application on page 82
• PI Temperature/Depth purpose and application on page 83
• PI Geometry purpose and application on page 83
• PI Height/Depth purpose and application on page 85
• PI SeineSounder purpose and application on page 86
• PI Remote/Depth purpose and application on page 87
• PI Rip purpose and application on page 88
74
328459/B
About PI sensors
PI Bottom Contact purpose and application
This is an S-type PI sensor. To charge this sensor, use the Simrad PI Charger or the
Simrad PI MiniCharger.
Figure 10
A
B
PI Bottom Contact application
The trawl follows the bottom. The detection wire on the sensor is not released.
The trawl has lifted off the bottom, and the detection wire is released.
The purpose of the Simrad PI Bottom Contact sensor is to detect if a bottom trawl is
accidentally lifted up from the seabed. This will allow fish to escape under the gear.
• On a pelagic trawl, the sensor will notify you if you move the gear too close to the
bottom.
• Used on a purse seine you will be notified once the seine reaches the bottom, and this
allows you to fish even on a rough bottom.
• On a Danish seine the Simrad PI Bottom Contact sensor will let you know when the
net has a stable bottom contact, and when it is time to haul.
328459/B
75
Simrad PI50
PI Catch purpose and application
This is an S-type PI sensor. To charge this sensor, use the Simrad PI Charger or the
Simrad PI MiniCharger.
Figure 11
PI Catch application
Using the Simrad
PI Catch sensor, you
can easily monitor
the filling rate and
the amount of catch in
the trawl. The sensor
simply monitors the
expansion of the
meshes in the cod-end.
Once the volume
caught is enough to
expand the meshes,
they will pull the
detector wires and
engage the sensor. The sensitivity of the sensor can easily be adjusted by extending the
detection rubber bands to span additional meshes.
To monitor the filling rate, we recommend that you use minimum two sensors. Place the
first sensor at the far end of the cod-end, it will tell you that the trawl is actually fishing.
Place the second sensor closer to the trawl opening. Once the trawl is filled to the chosen
location, the sensor is engaged, and you know that it is time to haul.
76
328459/B
About PI sensors
PI Depth purpose and application
This is an S-type PI sensor. To charge this sensor, use the Simrad PI Charger or the
Simrad PI MiniCharger.
Figure 12
PI Depth application
The Simrad PI Depth
sensor provides
information about the
current depth and the
depth changes of your
gear.
• On a bottom trawl,
you will use the
sensor to achieve
full control when
shooting, and to
position the trawl
on the slope.
• During pelagic
trawling, you know
how important it is to position the trawl relative to the largest concentration of fish.
By using a PI Depth sensor, you can monitor the exact depth relative to the surface,
and adjust the trawl depth accordingly. Additional depth sensors on the doors will
monitor if the doors stay at the same depth.
• During seining, use the PI Depth sensor to monitor the depth of the net, and the
descending speed of the net. Then you will know when to start pursing, and which
speed to use.
• Mounted on a Danish Seine the PI Depth sensor monitors the sinking speed of the net,
and it will tell you when to start hauling once the net has stopped sinking.
Three sensor versions are available. These are set up for maximum depth 300 m, 600
m or 1000 m. The depth range is fixed by the factory, and can not be changed in the PI
Configurator utility.
328459/B
77
Simrad PI50
PI Height purpose and application
This is an L-type PI sensor. To charge this sensor, use the Simrad PI Charger or the
Simrad PI MaxiCharger.
Figure 13
PI Height application
The Simrad PI Height
sensor measures
the height over the
bottom, that is the
distance from the
bottom and up to
wherever the sensor is
located. This provides
you with a valuable
range of applications
for bottom and pelagic
trawling.
• On a bottom trawl,
place the sensor behind the headrope. From this position it will tell you the height
of the trawl opening. This allows you to adjust you equipment immediately if the
opening is reduced, and you will avoid losing catch.
• On a pelagic trawl, place the sensor behind the footrope. You will then know at once
if the trawl approaches the bottom. If you use a second sensor behind the headrope,
the difference between the two measurements will give you the height of the trawl
opening.
The sensor contains a small echo sounder to measure the height above the bottom.
78
328459/B
About PI sensors
PI Spread purpose and application
This is an L-type PI sensor. To charge this sensor, use the Simrad PI Charger or the
Simrad PI MaxiCharger.
Figure 14
PI Spread application
The purpose of the
Simrad PI Spread
sensor system is to
measure the distance
between the two trawl
doors. The PI Spread
sensor will always
require a PI Remote
sensor on the other
door to carry out this
measurement. The PI
Spread sensor system
has been developed
to be used on both
bottom and pelagic trawls.
• Use a PI Spread sensor on the port door and a PI Remote sensor on the starboard door.
• The two sensors communicate using a special transverse acoustic link.
• Using this link the PI Spread sensor measures the exact distance between the two
sensors.
Two Spread versions are available. These are set up for standard or extended (XT) spread
range. This configuration can be changed in the PI Configurator utility.
328459/B
79
Simrad PI50
PI Twin Spread purpose and application
This is an L-type PI sensor. To charge this sensor, use the Simrad PI Charger or the
Simrad PI MaxiCharger.
Note
This is a “dual” sensor. It will seize two communication channels on the PI50.
Figure 15
PI Twin Spread application
The purpose of the
Simrad PI Twin
Spread sensor system
is to measure the
distances between the
two trawl openings
on a dual bottom or
pelagic trawl. A PI
Twin Spread sensor
is mounted on the
port door, while two
PI Remote sensors are
placed on the centre
clump and on the
starboard door.
The three sensors
communicate using
special transverse
acoustic links. Using
these links the PI Twin Spread sensor measures the exact distance between the three
sensors.
80
328459/B
About PI sensors
PI Spread/Depth purpose and application
This is an L-type PI sensor. To charge this sensor, use the Simrad PI Charger or the
Simrad PI MaxiCharger.
Note
This is a “dual” sensor. It will seize two communication channels on the PI50.
Figure 16
PI Spread/Depth application
The purpose of
the Simrad PI
Spread/Depth
dual sensor is to
achieve accurate
measurements of both
the water depth and
the distance between
the two trawl doors.
The PI Spread/Depth
sensor thus contains
both a pressure sensor
to measure the water
depth, and a spread
sensor to measure the distance to the Remote sensor on the other trawl door. The PI
Spread/Depth sensor has been developed to be used on both bottom and pelagic trawls.
The sensor is normally installed on the port trawl door using an adapter.
Three sensor versions are available. These are set up for maximum depth 300 m, 600
m or 1000 m. The depth range is fixed by the factory, and can not be changed in the PI
Configurator utility.
328459/B
81
Simrad PI50
PI Temperature purpose and application
This is an S-type PI sensor. To charge this sensor, use the Simrad PI Charger or the
Simrad PI MiniCharger.
Figure 17
PI Temperature application
The Simrad PI
Temperature sensor
tells you the exact
sea water temperature
while you are fishing.
The water temperature
is an important
parameter. Fish and
bait are temperature
sensitive, and they are
normally found within
specific temperature
zones for feeding and
spawning. However,
the temperature
layers in the water are
constantly changing, and for this reason the temperature must be monitored constantly.
82
328459/B
About PI sensors
PI Temperature/Depth purpose and application
This is an L-type PI sensor. To charge this sensor, use the Simrad PI Charger or the
Simrad PI MaxiCharger.
Note
This is a “dual” sensor. It will seize two communication channels on the PI50.
Figure 18
PI Temperature/Depth application
The purpose of the Simrad
PI Temperature/Depth
dual sensor is to achieve
accurate measurements of
both the water depth and
the temperature.
The PI Temperature/Depth
sensor thus contains both a
pressure sensor to measure
the water depth, and a
temperature sensor to
measure the temperature.
The sensor has been
developed to be used on
both bottom and pelagic
trawls, as well as seines.
On a trawl, she sensor is normally installed on the headrope or footrope.
Three sensor versions are available. These are set up for maximum depth 300 m, 600
m or 1000 m. The depth range is fixed by the factory, and can not be changed in the PI
Configurator utility.
PI Geometry purpose and application
This is an L-type PI sensor. To charge this sensor, use the Simrad PI Charger or the
Simrad PI MaxiCharger.
Note
The PI Geometry Differential (DF) sensor versions are both “single” sensors. The
other PI Geometry versions are all “dual” sensors. They will seize two communication
channels on the PI50.
328459/B
83
Simrad PI50
Figure 19
PI Geometry application
The purpose of the
Simrad PI Geometry
sensor system is to
monitor the geometry
of your trawl or danish
seine.
This is achieved by
making accurate
measurements of the
distances between
the centre of the
headrope above the
trawl opening (or the
footrope at the bottom)
and each of the trawl
doors or wing ends. If these distances are not identical the trawl (or danish seine) will be
skewed and unbalanced, and this reduces the catch efficiency.
The following PI Geometry versions exist:
• Geometry Fine – High resolution icon to detect smaller changes
• Geometry Coarse – Low resolution icon to detect larger changes
• Geometry XT (Extended) Fine – Extended range, high resolution icon to detect smaller
changes
• Geometry XT (Extended) Coarse – Extended range, low resolution icon to detect larger
changes
• Geometry DF (Differential) Fine – differential measurement (single channel), high
resolution icon to detect smaller changes
• Geometry DF (Differential) Coarse – differential measurement (single channel), low
resolution icon to detect larger changes
The DF (Differential) Geometry sensor setting will only use one channel on the PI system,
but will not provided extended range.
The Coarse or Fine settings are not defined by the sensor configuration, but in the PI
menu system.
On the PI44/54 systems the phrases Sensitive and Coarse are used.
The Simrad PI Geometry sensor system has been developed to be used on both bottom
and pelagic trawls, as well as pair trawls and danish seiners. In addition to the PI
Geometry sensor, the system uses two PI Mini-R transponders. These are mounted on
the trawl doors (or trawl wings).
84
328459/B
About PI sensors
PI Height/Depth purpose and application
This is an L-type PI sensor. To charge this sensor, use the Simrad PI Charger or the
Simrad PI MaxiCharger.
Note
This is a “dual” sensor. It will seize two communication channels on the PI50.
Figure 20
PI Height/Depth application
The purpose of
the Simrad PI
Height/Depth
dual sensor is to
achieve accurate
measurements of both
the water depth and
the distance from the
sensor and down to
the bottom.
The PI Height/Depth
sensor thus contains
both a pressure sensor
to measure the water
depth, and a small
echo sounder to measure the height above the bottom. The PI Height/Depth sensor has
been developed to be used on both bottom and pelagic trawls.
The sensor is normally installed on the headrope or footrope.
Three sensor versions are available. These are set up for maximum depth 300 m, 600
m or 1000 m. The depth range is fixed by the factory, and can not be changed in the PI
Configurator utility.
328459/B
85
Simrad PI50
PI SeineSounder purpose and application
This is an L-type PI sensor. To charge this sensor, use the Simrad PI Charger or the
Simrad PI MaxiCharger.
Note
This is a “dual” sensor. It will seize two communication channels on the PI50.
Figure 21
PI SeineSounder application
The purpose of
the Simrad PI
SeineSounder
dual sensor is to
achieve accurate
measurements of both
the water depth and
the height above the
seabed with a single
sensor.
The PI SeineSounder
thus contains both
a pressure sensor to
measure the water
depth, and an echo
sounder with two
transducers to measure the height above the seabed.
The Simrad PI SeineSounder has been developed to be used on both bottom and pelagic
trawls and on purse and Danish seiners. The sensor must be installed in two different
ways depending on the application. On a trawl, it is mounted horizontally behind the
headrope. On a purse seine, it is mounted vertically below the footrope.
86
328459/B
About PI sensors
PI Remote/Depth purpose and application
This is an L-type PI sensor. To charge this sensor, use the Simrad PI Charger or the
Simrad PI MaxiCharger.
Figure 22
PI Remote/Depth application
The purpose of
the Simrad PI
Remote/Depth
dual sensor is to
achieve accurate
measurements of
the water depth,
while at the same
time communicate
with the PI Spread
or PI Spread/Depth
sensor to measure the
distance between the
two trawl doors.
In order to measure the distance, it must be installed in a pair with a PI Spread or
PI Spread/Depth sensor.
The PI Remote/Depth sensor has been developed to be used on both bottom and pelagic
trawls. The sensor is normally installed on the starboard trawl door using an adapter.
328459/B
87
Simrad PI50
PI Rip purpose and application
This is an S-type PI sensor. To charge this sensor, use the Simrad PI Charger or the
Simrad PI MiniCharger.
Figure 23
PI Rip application
The PI Rip sensor
will let you know
immediately if your
net is torn apart.
The Simrad PI Rip
sensor is identical to
the PI Catch sensor,
but uses other rubber
band sensors. It can
thus be regarded as a
second application for
the Simrad PI Catch
sensor.
Place the sensor on
the trawl belly behind
the footrope, and use it to detect if the trawl is damaged by rocks or other items on the
bottom. If this is detected, you can immediately adjust the gear to minimise the damage.
88
328459/B
About PI sensors
Sensor configuration
In order to allow the information from the various sensors to be accepted and understood
by the PI catch monitoring system, the PI receiver must be set up correctly. This
means that you must tell the receiver that the sensor exists by entering the sensor type,
communication channels and update rate.
All sensors are provided from Simrad with factory default channels and update rates.
Refer to the table in section Default communication channels and update rates on
page 89.
Topics
• Default communication channels and update rates on page 89
• Changing a communication channel on page 90
• Changing the update rate on page 90
• PI Configurator on page 91
Default communication channels and update rates
See the table below for the initial values for the communication channels and update
rates for the various sensors.
Table 1
Default communication channels and update rates
Sensor
Com.channel(s)
Update rate
PI Bottom Contact
6
Normal
PI Catch
4
Normal
PI Depth
Depth 300M: 16
Depth 600M: 12
Depth 1000M: 10
14
Fast
Fast
Fast
Normal
Depth 300M: 5
Depth 600M: 9
Depth 1000M: 1
Height: 14
Depth 300M: 3
Depth 600M: 9
Depth 1000M: 1
Height: 14
Depth 300M: 11
Depth 600M: 15
Depth 1000M: 13
2
Fast
Fast
Fast
Fast
Fast
Fast
Normal
Same as depth
Normal
Normal
Normal
Normal
Depth 300M: 16
Depth 600M: 12
Depth 1000M: 10
Spread: 2
2 and 7
Normal
Normal
Normal
Normal
Normal
PI Height
PI Height/Depth Mk.1
PI Height/Depth Mk.2
PI SeineSounder
PI Remote/Depth
PI Spread
PI Spread/Depth
PI Twin Spread
328459/B
89
Simrad PI50
Table 1
Default communication channels and update rates (cont’d.)
Sensor
Com.channel(s)
Update rate
PI Temperature
8
Normal
PI Geometry
Standard: 1 and 3
Extended range (XT): 1 and 3
Differential (DF): 1
Normal
Normal
Normal
Changing a communication channel
It may be required to change one or more communication channels, and there may be
many reasons for this.
• You have more than one of each sensor. For example, if you have three temperature
sensors, they MUST communicate on three different channels.
• Other vessels near your use the same PI catch monitoring system (or a similar), and
they have one or more of their sensors set up to the same communication channels as
you have. This will create interference, as you will "read" each others sensors.
• If your sensors are set up to use communication channels too close to each other (for
example, you have chosen channels 4, 5 and 6), this will limit the vessel speed. The
reason for this is the Doppler effect. If the speed is too high, the Doppler will cause
the transmission frequencies to change so much that they overlap, and this will create
interference. The PI system will provide a warning if this is about to happen! You
must then either change to other communication channels further apart, or reduce
the maximum shooting speed.
• If you operate at the maximum range of the sensors, you may be able to increase this
range slightly if you use lower communication channels. This is because the lower
communication channels use lower transmission frequencies.
All sensors are provided from Simrad with a default communication channel. In some
cases you may find that the chosen channel does not suit your operational needs, for
example if you have more than one sensor of any given type. This is a decision you
have to make depending on how many sensors you use, and how many of these that
are identical.
→ Default communication channels and update rates on page 89
Changing the update rate
It may be required to change the update rate on a sensor, that is how often it sends
information back to the PI catch monitoring system. A high update rate will give
frequent information updates, but the sensor will use more battery power. If you need
your batteries to last as long as possible, you must consider lowering the update rate.
• A low update rate will provide you with fewer information updates, but the battery
will last very long.
• A high update rate will give you frequent information updates, but the battery will
run out faster.
90
328459/B
About PI sensors
All sensors are provided from Simrad with a default update rate setting. In some cases
you may find that this update rate does not suit your operational needs. This is a decision
you have to make depending on the local fishing conditions.
→ Default communication channels and update rates on page 89
PI Configurator
Simrad has developed a dedicated computer utility to change the sensor configurations.
By means of an ordinary desktop computer and a special interface unit you can do this
job yourself.
You can also use the PI Configurator utility to verify that the sensor is operational.
The PI Configurator utility can be downloaded free of charge from www.simrad.com. It
will run on all computers with operating systems Microsoft® XP® and Microsoft® 7.
You can run the PI Configurator utility on the same computer as the PI50, but both
programs must not run simultaneously.
If you do not require frequent configurations, you can contact you local dealer for
assistance.
328459/B
91
Simrad PI50
Charging procedures
WARNING
Charging a sensor at sub zero temperature may develop explosive
gases representing a potential danger. Simrad assumes no liability
for improper charging, or the use of other chargers than those
approved by us.
This section explains how you shall recharge the battery in the Simrad PI Sensors. All
sensor and charger types are explained.
Topics
• Battery handling on page 92
• How to use the Simrad PI Charger on page 92
• How to use the Simrad PI MaxiCharger on page 95
• How to use the Simrad PI MiniCharger on page 96
• How to use the Simrad PS Charger on page 97
Battery handling
Operational time and service life of the sensor’s NiCd battery depends on proper use and
regular charging. Observe the following precautions, as these will have an influence on
the battery performance.
• Observe the charging temperatures.
• Charge sensors regularly. Avoid draining the sensor battery completely before
charging.
• Charge the sensor battery before storage, and at three-month intervals under long-term
storage.
• Operational life may be initially reduced after long-term storage or charging for a
long time.
• Sensors are not damaged by being left attached to a charger for several days.
However, do not store the sensor for extended periods under charge.
We recommend that a wooden box is made to keep the sensor in a secure place during
charging and storage. Make openings in the bottom to drain for sea water.
How to use the Simrad PI Charger
WARNING
Charging a sensor at sub zero temperature may develop explosive
gases representing a potential danger. Simrad assumes no liability
for improper charging, or the use of other chargers than those
approved by us.
92
328459/B
About PI sensors
The Simrad PI Charger is an
intelligent battery charger for
fast and secure charging of all PS
and PI sensors. The charger will
automatically set up the correct
charging current depending on
the sensor type and the battery
temperature. A “fuel meter” shows
the status of the battery during the
charge.
Figure 24
PI sensor
The PI Charger set up to charge a
Even though the PI Charger is
designed for fast charging of the
PI sensors, it can also charge the PS
sensors, but only at normal charge
rate.
The charger communicates with
the sensor at regular intervals. The
fast charge cycle is controlled by data
exchanged between the PI sensor
and the charger. A series of safety
mechanisms control the termination
of the fast charging current.
The PS sensors do not communicate with the charger. A constant charge current of 58
mA is then set up by the charger regardless of the battery temperature.
Figure 25
Indicators
A
+12 to 32 Vdc connected
B
Fuel meter
The number of LEDs illuminated shows the current charging
status. A complete charging cycle is indicated with all “full”
battery. Charging is indicated as follows:
A
B
Fast flashing: Fast charging in progress
Slow flashing: Normal charging in progress
On/off every four seconds: Trickle charging in progress
C
C
Battery temperature indicators
These indicators are used during fast charging of PI sensors.
Green: Battery temperature between +5 and +40°C. Fast charge is enabled.
Green and Blue: Battery temperature between 0 and +5°C. Fast charge is disabled,
normal charge is used.
328459/B
93
Simrad PI50
Green and Red: Battery temperature between +40 and +50°C. Fast charge disabled,
normal charge is used.
Blue: Battery temperature is below 0°C. No charging takes place.
Red: Battery temperature is above +50°C. No charging takes place.
Observe these steps for daily operation of the charger.
1 Ensure that mounting materials on the sensor do not short circuit the charging lugs.
This may be ropes, wires, chains or other items that obstruct or short circuit the
electrical connections between the charger and the sensor.
Note
The charging clamps on the battery charger cable must be properly secured onto the
charging lugs with metal against metal!
2
3
4
Attach the charging clamps to the sensor as follows:
a Connect the Red clamp to the positive (+) fastening lug
b Connect the Black clamp to the negative (–) fastening lug
On every sensor the polarity of the fastening lugs are engraved on the sensor body
using + and – characters.
When the charger is connected to the sensor, check the charger lamps.
Once connected, the charger will identify whether the sensor connected can be fast
charged or not. This is shown by the yellow lamps. If the top lamp flashes rapidly,
the sensor is fast charged.
If your sensor can be fast charged, the charger will also check the internal
temperature of the sensor. The temperature is shown on the “thermometer” on
the charger’s front panel. If you charge a sensor that can not be fast charged, this
“thermometer” does not work.
Observe the charge times and temperature limitations!
Fast charge: The PI Charger will first recharge the sensor battery for approximately
one hour to reach 70% battery capacity, then approximately three hours to reach
100% capacity. Once fully charged, a constant trickle charge will compensate for
self discharging.
Note
Fast charging only applies to PI sensors!
Normal charge: The PI Charger will first recharge the sensor battery for 16 hours for
full battery capacity. This mode applies for charging PI sensors outside specified
temperature range, and for all PS sensors.
Charging must only take place within the specified temperature range. For best
results, keep the ambient temperature between +10 and +25°C.
Note
Do not charge sensors in temperatures above +50°C or below 0°C!
94
328459/B
About PI sensors
How to use the Simrad PI MaxiCharger
WARNING
Charging a sensor at sub zero temperature may develop explosive
gases representing a potential danger. Simrad assumes no liability
for improper charging, or the use of other chargers than those
approved by us.
The Simrad PI MaxiCharger is a plain battery charger
to be used with the L-Type PI sensors. These following
sensors can be charged:
Figure 26 Simrad PI
MaxiCharger
• PI Spread
• PI Height
• PI SeineSounder
• PI Spread/Depth
• PI Remote/Depth
• PI Geometry
Do not use the PI MaxiCharger on any other PI or PS sensors than those listed here!
The large charging current may damage the battery!
The charger is only equipped with a single indicator lamp, this lamp will however change
colour to show the status of the charging process.
• Yellow: The charger is connected to 230 Vac, it has not been connected to the sensor,
and it is ready for use.
• Orange/Red: The charger is connected to a sensor, and fast charging is in progress.
• Green with short yellow flashes: Top charging is in progress.
• Green: Trickle charging is in progress.
The charger is provided with a small booklet from the manufacturer (Mascot). Read this
booklet before you put the charger to work!
Observe these steps for daily operation of the charger.
1
Connect the charger to 230 Vac, and check that the charger lamp is lit in yellow.
2
Ensure that mounting materials on the sensor do not short circuit the charging lugs.
This may be ropes, wires, chains or other items that obstruct or short circuit the
electrical connections between the charger and the sensor.
Note
The charging clamps on the battery charger cable must be properly secured onto the
charging lugs with metal against metal!
328459/B
95
Simrad PI50
3
Attach the charging clamps to the sensor as follows:
a
Connect the Red clamp to the positive (+) fastening lug
b
Connect the Black clamp to the negative (–) fastening lug
On every sensor the polarity of the fastening lugs are engraved on the sensor body
using + and – characters.
4
When the charger is connected to the sensor, check the charger lamps.
After a few seconds, the lamp on the charger will change from yellow to orange/red.
This means that fast charging is in progress.
When the battery in the sensor has reached 90% capacity the lamp will change
from orange/red to green with short yellow flashes. This means that top charging
is in progress.
When the battery is fully charged, the lamp turns steady green. Trickle charging is
now active. You can safely allow trickle charging for long periods of time.
How to use the Simrad PI MiniCharger
WARNING
Charging a sensor at sub zero temperature may develop explosive
gases representing a potential danger. Simrad assumes no liability
for improper charging, or the use of other chargers than those
approved by us.
The Simrad PI MiniCharger is a plain battery charger
to be used with the S-Type PI sensors. These following
sensors can be charged:
Figure 27 Simrad PI
MiniCharger
• PI Bottom Contact
• PI Catch
• PI Depth
• PI Temperature
• PI Remote (small version)
• PI Mini-R responder
You may charge the L-Type PI sensors too, but due to the small charge current, this
will not be efficient.
The charger is only equipped with a single indicator lamp, this lamp will however change
colour to show the status of the charging process.
• Yellow: The charger is connected to 230 Vac, it has not been connected to the sensor,
and it is ready for use.
• Orange/Red: The charger is connected to a sensor, and fast charging is in progress.
• Green with short yellow flashes: Top charging is in progress.
• Green: Trickle charging is in progress.
96
328459/B
About PI sensors
The charger is provided with a small booklet from the manufacturer (Mascot). Read this
booklet before you put the charger to work!
Observe these steps for daily operation of the charger.
1
Connect the charger to 230 Vac, and check that the charger lamp is lit in yellow.
2
Ensure that mounting materials on the sensor do not short circuit the charging lugs.
This may be ropes, wires, chains or other items that obstruct or short circuit the
electrical connections between the charger and the sensor.
Note
The charging clamps on the battery charger cable must be properly secured onto the
charging lugs with metal against metal!
3
Attach the charging clamps to the sensor as follows:
a
Connect the Red clamp to the positive (+) fastening lug
b
Connect the Black clamp to the negative (–) fastening lug
On every sensor the polarity of the fastening lugs are engraved on the sensor body
using + and – characters.
4
When the charger is connected to the sensor, check the charger lamps.
After a few seconds, the lamp on the charger will change from yellow to orange/red.
This means that fast charging is in progress.
When the battery in the sensor has reached 90% capacity the lamp will change
from orange/red to green with short yellow flashes. This means that top charging
is in progress.
When the battery is fully charged, the lamp turns steady green. Trickle charging is
now active. You can safely allow trickle charging for long periods of time.
How to use the Simrad PS Charger
WARNING
Charging a sensor at sub zero temperature may develop explosive
gases representing a potential danger. Simrad assumes no liability
for improper charging, or the use of other chargers than those
approved by us.
328459/B
97
Simrad PI50
The Simrad PS Charger is an battery charger for
secure charging of the PS and PI sensors. These
following sensors can be charged:
Figure 28 The PS Charger set
up to charge a sensor
• All PS Sensors
• PI Bottom Contact
• PI Catch
• PI Depth
• PI Temperature
• PI Remote (small version)
The Simrad PS Charger can only be used to charge the PI sensors listed here.
Even though the PS Charger is designed for charging the PS sensors, it can also charge
the PI sensors, but only at normal charge rate.
If the charger lamp is illuminated, but the sensor lamp does not flash every four seconds,
the battery is not being charged properly. Most likely, this is because the sensor was not
switched off when the charger was connected. To correct this, charge the sensor for ten
minutes, then disconnect the alligator clips. Use a small wire, and make contact between
the water switch sensor and one of the fastening lugs. This will cause the sensor to flash
its start-up code. If not, wash the sensor in fresh water to disengage the water switch.
Observe these steps for daily operation of the charger.
1
Connect the charger to 230 Vac or 115 Vac.
The AC voltage required by the charger is printed on the panel.
2
Ensure that mounting materials on the sensor do not short circuit the charging lugs.
This may be ropes, wires, chains or other items that obstruct or short circuit the
electrical connections between the charger and the sensor.
Note
The charging clamps on the battery charger cable must be properly secured onto the
charging lugs with metal against metal!
3
Attach the charging clamps to the sensor as follows:
a
Connect the Red clamp to the positive (+) fastening lug
b
Connect the Black clamp to the negative (–) fastening lug
On every sensor the polarity of the fastening lugs are engraved on the sensor body
using + and – characters.
4
When the charger is connected to the sensor, check the charger lamps.
It will flash once every four seconds during charging.
98
328459/B
About PI sensors
5
Observe the charge times and temperature limitations!
You must expect ~16 hours for full battery capacity.
Charging must only take place within the specified temperature range. For best
results, keep the ambient temperature between +10 and +25°C.
Note
Do not charge sensors in temperatures above +50°C or below 0°C!
Test procedures
If you wish to check the operation of a sensor before you attach it to the net, there are
a few simple procedures you can do. These are not in any way accurate, but you can
check that the battery has been fully charged, and that the sensor is switched on when the
water switch is activated.
Topics
• Simple test for all sensors on page 99
• Checking sensors using the PI Configurator utility on page 100
• Checking depth sensors on page 100
• Checking bottom, catch and rip sensors on page 101
• Checking the SeineSounder on page 101
• Sensor start-up identification on page 101
Simple test for all sensors
In order to do this test, you need the following equipment:
• A standard multimeter
• A short piece of wire
Observe the following steps:
1
Place the sensor on the deck.
2
Inspect the sensor for visual damage.
Check that there are no cracks in the sensor surface, and that the charger lugs are
not damaged.
Note
If you fail to remove ropes, wires, chains or other items that obstruct or short circuit
the electrical connections during charging, the lugs may be damages due to ...??
328459/B
99
Simrad PI50
3
Ensure that mounting materials on the sensor do not short circuit the charging lugs.
This may be ropes, wires, chains or other items that obstruct or short circuit the
electrical connections between the positive and negative charger lugs.
If the sensor surface is covered with an excessive layer of salt, this may also activate
the sensor and cause the battery to run out. To fix this, wash the sensor with fresh
water.
4
Use a multimeter, and check the voltage between the water switch and the negative
charging lug.
If the sensor battery is fully charged, you will measure approximately 12 Vdc.
5
Use a multimeter, and check the current between the water switch and the negative
charging lug.
If the sensor battery is fully charged, you will measure approximately 68 µA.
6
Use the short piece of wire, and hold it between the water switch and one of the
charging lugs.
This will activate the sensor. If the sensor is operational, you will see that the
internal lamp flashes. Single sensors will flash their identification status, while
dual sensor will only give a single flash.
Checking sensors using the PI Configurator utility
Simrad has developed a dedicated computer utility to change the sensor configurations.
By means of an ordinary desktop computer and a special interface unit you can do this
job yourself.
You can also use the PI Configurator utility to verify that the sensor is operational.
The PI Configurator utility can be downloaded free of charge from www.simrad.com. It
will run on all computers with operating systems Microsoft® XP® and Microsoft® 7.
You can run the PI Configurator utility on the same computer as the PI50, but both
programs must not run simultaneously.
If you do not require frequent configurations, you can contact you local dealer for
assistance.
Checking depth sensors
Observe this procedure to do a simple operational check of depth sensors.
1
Observe the general test procedure for all sensors.
→ Simple test for all sensors on page 99
2
Attach a solid rope to one of the charging lugs of the sensor.
3
Lower the sensor into the water from the aft deck.
You must lower them to 3 to 5 meters depth before they are activated.
4
100
Verify that the PI50 reads the depth information from the sensor.
328459/B
About PI sensors
Checking bottom, catch and rip sensors
Observe this procedure to do a simple operational check of bottom, catch and rip sensors.
1 Observe the general test procedure for all sensors.
→ Simple test for all sensors on page 99
2 Attach a solid rope to one of the charging lugs of the sensor.
3 Lower the sensor into the water from the aft deck.
You must lower them to 3 to 5 meters depth before they are activated.
4 Verify that the PI50 reads the depth information from the sensor.
5 Hoist the sensor.
6 Unscrew the wire assembly.
7 Lower the sensor back into the water.
8 Verify that the status information from the sensor has changed.
Checking the SeineSounder
Observe this procedure to do a simple operational check of the PI SeineSounder.
1 Observe the general test procedure for all sensors.
→ Simple test for all sensors on page 99
2 Check that one of the water switch screws is properly inserted.
If the sensor is lowered into the water with the water switch screw missing, the
sensor will be switched off after just a few minutes.
• Short screw: Height and depth operation
• Long screw: SeineSounder and depth operation
Sensor start-up identification
If you use a short piece of wire to short the sensor’s water switch and a charging lug the
sensor will be activated. The sensor will then flash its individual LED identification
codes.
This will not happen if the sensor is connected to a battery charger.
The identification code for single sensors is provided as follows:
1 One long flash: It has a duration of approximately 1 second.
2 One start flash: This signals that the first digit of the channel number is next.
3 None, one, two or three short flashes: The number of short flashes signifies the first
digit of the programmed channel number.
4 A second start flash: This signals that the second digit of the channel number is next.
5 None to nine short flashes: The number of short flashes signifies the second digit of
the programmed channel number.
Observe the following steps:
1 Use a short piece of wire to short the sensor’s water switch and a charging lug.
328459/B
101
Simrad PI50
2
Observe that the internal LED flashes the activation code.
Note
Single sensors will flash the identification code as described here.
Dual sensors will only give a single flash to acknowledge the activation.
Examples:
A
Show channel, example; Channel #16 at start-up
B
D
C
E
A
A one second “long flash"
B
A start "flash"
C
One “quick flash" (first digit of 16 is 1)
D
A start "flash"
E
Six "quick flashes" (second digit of 16 is 6)
E
E
E
E
E
(CD012202-004)
Figure 29
Normal operation starts.
Show channel, example; Channel #2 at start-up
A
B
C
D
A
A one second “long flash"
B
A start "flash"
C
No short flashes (first digit of 02 is 0)
D
A start "flash"
E
Two short flashes (second digit of 02 is 2)
E
E
(CD012202-003)
Figure 30
Normal operation starts.
102
328459/B
Telegram formats
Telegram formats
All telegram formats used to provide interface telegrams to and from the Simrad PI50
are described in detail.
Topics
• About the NMEA telegram format on page 104
• Specification of NMEA telegrams on page 106
• Proprietary telegrams and formats on page 112
328459/B
103
Simrad PI50
About the NMEA telegram format
The Simrad PI50 can send and receive information to and from several different
peripherals. All transmissions take place as telegrams with data sentences. Each
telegram has a defined format and length.
The NMEA 0183 standard is the most common protocol used to receive and transmit data
to and from peripheral sensors. A parametric sentence structure is used for all NMEA
data. The sentence start with a “$” delimiter, and represent the majority of approved
sentences defined by the standard. This sentence structure, with delimited and defined
data files, is the preferred method for conveying information.
For more information about the NMEA standard, the format and the data sentences, refer
to their official publications. Their document NMEA 1083 - Standard for interfacing
marine electronic devices explains the formats in detail. The document can be obtained
from http://www.nmea.org.
Topics
• About NMEA on page 104
• Telegrams on page 104
• Standard NMEA 0183 communication parameters on page 105
• Sentence structure on page 105
About NMEA
The National Marine Electronics Association (NMEA) has defined communication
standards for maritime electronic equipment, and the PI50 echo sounder conforms to
these standards. The most common standard is NMEA 0183, and the National Marine
Electronics Association describes it as follows:
The NMEA 0183 Interface Standard defines electrical signal requirements, data
transmission protocol and time, and specific sentence formats for a 4800 baud serial
data bus. Each bus may have only one talker but many listeners.
— National Marine Electronics Association
For more information about the National Marine Electronics Association and the NMEA
0183 standard, refer to the organization’s web site at http://www.nmea.org.
Telegrams
To move information between two electronic units, the data are collected in telegrams.
The content (protocol) of each telegram is defined by the NMEA standard, and several
telegram types exist to allow different type of data to be distributed.
The phrase datagram is also frequently used about this communication method.
Unless you wish to write your own software, you do not need to know how these
telegrams are designed. However, whenever you set up equipment interfaces, you need
to ensure that each system on your communication line is set up to send and receive the
same telegram. The standard allows one system to send data (a “talker") and several
104
328459/B
Telegram formats
others to receive data simultaneously ("listeners") on the same line. Therefore, you must
ensure that all products receiving data on a communication line is set up to receive the
same telegram(s) that the transmitting product provides.
Standard NMEA 0183 communication parameters
The communication parameters defined for NMEA 0183 are:
• Baudrate: 4800 bits per second
• Data bits: 8
• Parity: None
• Stop bits: One
Some instruments will also offer other parameters and/or choices.
Sentence structure
The following provides a summary explanation of the approved parametric sentence
structure.
$aaccc,c—c*hh<CR><LF>
1
“$”: Start of sentence (Hex: 24).
2
aaccc: Address field. The first two characters (aa) identifies the Talker ID, while the
last three characters are the Sentence formatter mnemonic code identifying the data
type and the string format of the successive fields.
3
“,”: Field delimiter (Hex: 2C). This character starts each field except the address
and checksum fields. If it is followed by a null field, it is all that remains to indicate
no data in the field.
4
c—c: Data sentence block. This is a series of data fields containing all the data to be
transmitted. The data field sentence is fixed and identified by the Sentence formatter
in the address field. Data fields may be of variable lengths, and they are preceded
by the Field delimiter.
5
“*”: Checksum delimiter (Hex: 2A). This delimiter follows the last field of the
sentence, and indicates that the following two alphanumerical characters contain
the checksum.
6
hh: Checksum
7
<CR><LF>: Terminates sentence
Proprietary telegrams
In some proprietary telegrams received from other Kongsberg Maritime equipment, the $
character is replaced by the @ character. The checksum field may then not be in use.
328459/B
105
Simrad PI50
Specification of NMEA telegrams
All standard NMEA telegrams supported by the PI50 are specified here. The information
is extracted from the original NMEA specifications. If additional details about the
individual telegram formats are required, see the original source file.
Topics
• DBS Depth below surface on page 106
• GLL Geographical position latitude/longitude on page 107
• GGA Global positioning system fix data on page 108
• HDG Heading, deviation and variation on page 108
• HDM Heading, magnetic on page 109
• HDT Heading, true on page 109
• RMC Recommended minimum specific GNSS data on page 109
• VHW Water speed and heading on page 110
• VTG Course over ground & ground speed on page 110
• VLW Dual ground/water distance on page 111
DBS Depth below surface
This telegram provides the current depth. The telegram is no longer recommended
for use in new designs.
It is often replaced by the DPT telegram.
Format
$--DBS,x.x,f,y.y,M,z.z,F*hh<CR><LF>
Format description
1
– – = talker identifier
2
DBS = telegram identifier
3
x.x,f = depth below surface in feet
4
y.y,M = depth below surface in meters
5
z.z,F = depth below surface in fathoms
106
328459/B
Telegram formats
GLL Geographical position latitude/longitude
This telegram is used to transfer latitude and longitude of vessel position, time of position
fix and status from a global positioning system (GPS).
Format
$--GLL,llll.ll,a,yyyyy.yy,a,
hhmmss.ss,A,a*hh<CR><LF>
Format description
1
– – = talker identifier
2
GLL = telegram identifier.
3
llll.ll,a = latitude north/south, position in degrees, minutes and hundredths.
Characters N (North) or S (South) identifies the bearing.
4
yyyyy.yy,a = longitude east/west, position in degrees, minutes and hundredths.
Characters W (West) or E (East) identifies the bearing.
5
hhmmss.ss = coordinated universal time (UTC) of position.
6
A = status, characters A (data valid) or V (data not valid) are used.
7
a = mode indicator.
328459/B
107
Simrad PI50
GGA Global positioning system fix data
This telegram contains time, position and fix related data from a global positioning
system (GPS).
Format
$--GGA,hhmmss.ss,llll.ll,a,yyyyy.yy,a,
x,zz,d.d,a.a,M,g.g,M,r.r,cccc*hh<CR><LF>
Format description
1
– – = talker identifier
2
GGA = telegram identifier
3
hhmmss.ss = coordinated universal time (UTC) of position
4
llll.ll,a = latitude north/south, position in degrees, minutes and hundredths.
Characters N (North) or S (South) identifies the bearing.
5
yyyyy.yy,a = longitude east/west, position in degrees, minutes and hundredths.
Characters W (West) or E (East) identifies the bearing.
6
x = GPS quality indicator (refer to the NMEA standard for further details)
7
zz = number of satellites in use, 00 to 12, may be different from the number in view
8
d.d = horizontal dilution of precision
9
a.a,M = altitude related to mean sea level (geoid) in meters
10 g.g,M = geoidal separation in meters
11 r.r = age of differential GPS data
12 cccc = differential reference station identification, 0000 to 1023
HDG Heading, deviation and variation
This telegram contains the heading from a magnetic sensor, which if corrected for
deviation will produce magnetic heading, which if offset by variation will provide true
heading.
Format
$--HDG,x.x,z.z,a,r.r,a*hh<CR><LF>
Heading conversions
To obtain magnetic heading: Add easterly deviation (E) to magnetic sensor reading, or
subtract westerly deviation (W) from magnetic sensor reading.
To obtain true heading: Add easterly variation (E) to magnetic heading, or subtract
westerly variation (W) from magnetic heading.
108
328459/B
Telegram formats
Format description
1
– – = talker identifier
2
HDG = telegram identifier
3
x.x = magnetic sensor heading, degrees
4
z.z,a = magnetic deviation, degrees east/west
5
r.r,a = magnetic variation, degrees east/west
HDM Heading, magnetic
This telegram contains vessel heading in degrees magnetic. The telegram is no longer
recommended for use in new designs.
It is often replaced by the HDG telegram.
Format
$--HDM,x.x,M*hh<CR><LF>
Format description
1
– – = talker identifier
2
HDM = telegram identifier
3
x.x = heading in degrees, magnetic
HDT Heading, true
This telegram is used to transfer heading information from a gyro.
Format
$--HDT,x.x,T*hh<CR><LF>
Format description
1
– – = talker identifier
2
HDT = telegram identifier
3
x.x,T = heading, degrees true
RMC Recommended minimum specific GNSS data
This telegram contains time, date, position, course and speed data provided by a global
navigation satellite system (GNSS) receiver.
Format
$--RMC,hhmmss.ss,A,llll.ll,a,yyyyy.yy,a,
x.x,z.z,ddmmyy,r.r,a,a*hh<CR><LF>
328459/B
109
Simrad PI50
Format description
1 – – = talker identifier
2 RMC = telegram identifier
3 hhmmss.ss = coordinated universal time (UTC) of position fix
4 A = status, characters A (data valid) or V (Navigation receiver warning) are used.
5 llll.ll,a = latitude nort/south. Characters N (North) or S (South) identifies the bearing.
6 yyyyy.yy.a = longitude east/west. Characters E (East) or W (West) identifies the
bearing.
7 x.x = speed over ground, knots
8 z.z = course over ground, degrees true
9 ddmmyy = date
10 r.r,a = magnetic variation, degrees east/west. Characters E (East) or W (West)
identifies the bearing.
11 a = mode indicator
VHW Water speed and heading
This telegram contains the compass heading to which the vessel points and the speed of
the vessel relative to the water.
Format
$--VHW,x.x,T,x.x,M,x.x,N,x.x,K*hh<CR><LF>
Format description
1 – – = talker identifier
2 VHW = telegram identifier
3 x.x,T = heading, degrees true
4 x.x,M = heading, degrees magnetic
5 x.x,N = speed relative to water, knots, resolution 0.1
6 x.x,K = speed relative to water, km/hr, resolution 0.1
VTG Course over ground & ground speed
This telegram contains the actual course and speed relative to the ground.
Format
$--VTG,x.x,T,y.y,M,z.z,N,g.g,K,a*hh<CR><LF>
Format description
1 – – = talker identifier
2 VTG = telegram identifier
3 x.x,T = course over ground, degrees true
110
328459/B
Telegram formats
4
y.y,M = course over ground, degrees magnetic
5
z.z,N = speed over ground, knots, resolution 0.1
6
g.g,K = speed over ground, km/hr, resolution 0.1
7
a = mode indicator
VLW Dual ground/water distance
This telegram contains the distance travelled relative to the water and over the ground.
Format
$--VLW,x.x,N,y.y,N,z.z,N,g.g,N*hh<CR><LF>
Format description
1
– – = talker identifier
2
VLW = telegram identifier
3
x.x,N = total cumulative water distance, nautical miles.
4
y.y,N = water distance since reset, nautical miles.
5
z.z,N = total cumulative ground distance, nautical miles.
6
g.g,N = ground distance since reset, nautical miles.
328459/B
111
Simrad PI50
Proprietary telegrams and formats
All proprietary telegram formats supported by the PI50 are specified here. All formats
are created by Simrad for use in own products.
Topics
• DBS Depth of trawl below surface on page 112
• HFB Trawl headrope to footrope and bottom on page 112
• PSIMP-D1 PI Sensor data on page 112
DBS Depth of trawl below surface
This proprietary Simrad telegram contains the depth of the trawl sensor.
Format
@IIDBS,,,x.x,M,,<CR><LF>
Format description
1
II = talker identifier (mandatory)
2
DBS = telegram identifier
3
x.x,M = depth in meters (0 to 2000)
HFB Trawl headrope to footrope and bottom
This proprietary Simrad telegram contains the distance from the headrope to the footrope,
and from the footrope to the bottom.
Format
@IIHFB,x.x,M,y.y,M<CR><LF>
Format description
1
II = talker identifier (mandatory)
2
HFB = telegram identifier
3
x.x,M = distance from headrope to footrope, meters
4
y.y, M = distance from footrope to bottom, meters
PSIMP-D1 PI Sensor data
This proprietary Simrad telegram contains the type and configuration of PS and PI
sensors used by the external PI catch monitoring system.
Note
This description is not complete. For further information, contact Simrad.
112
328459/B
Telegram formats
Format
$PSIMP,D1,tt,dd,M,U,SNo,MNo,C,V,CR,Q,
In,SL,NL,G,Cb,error*chksum<CR><LF>
Format description
1 PS = Talker identifier (mandatory)
2 IMP = Telegram identifier
3 D1 = Sentence specifier
4 tt = Time of day
5 dd = Current date
6 M = Measurement type:
• D = Depth
• T = Temperature
• C = Catch
• B = Bottom
• N = No sensor
• M = Marker
7 U = unit, always in SI units
• M = depth and distance measurements
• C = temperature measurements
8 SNo = Sensor number
9 MNo = Measurement number
10 C = channel; the number (1 to 30) of the communication channel for the current
data source
11 V = value; the magnitude of the current sensor measurement
12 Cr = change rate; the rate of change for the current measurement, or time counter
for bottom and catch sensors
13 Q = quality:
14 In = interference:
• 0 = No interference
• 1 = Interference detected
15 SL = signal level – the signal level of the telemetry pulse, measured in dB
16 NL = noise level – the average noise level of the current channel, measured in dB
17 G = the current gain; 0, 20 or 40 dB.
18 Cb = cable quality:
• 0 = cable is not connected
• 1 = cable is OK
• 2 = a short circuit, or the hydrophone current is too large
328459/B
113
Simrad PI50
19 error = error detected – 0 when no error is detected, a number >0 indicates an error
condition
20 chksum = The checksum field consists of a "*" and two hex digits representing the
exclusive OR of all characters between, but not including, the "$" and "*" characters
114
328459/B
Appendix A General safety rules
Appendix A
General safety rules
WARNING
The Simrad PI50 operates on 230 Vac 50/60 Hz. This voltage is
lethal!
The following safety precautions must be followed at all times during installation
and maintenance work
• Always switch off all power before installation or maintenance.
Use the main circuit breaker, and label the breaker with a warning sign that informs
others that maintenance or installation work is being carried out on the system.
• Do not open the rack or cabinet doors while in rough seas. It may swing open
suddenly and cause damage or injury.
• For safety reasons during troubleshooting on the equipment with power ON, two
persons must always be present.
• Read and understand the applicable first aid instructions for electric shock.
• Whenever maintenance is carried out, it is essential that a first aid kit is available,
and that the maintenance personnel are familiar with the first aid instructions for
electrical shock.
• The various parts of the system may be heavy. Make sure that the appropriate tools
and certified lifting equipment are available, and that the personnel are trained in
installation and maintenance work.
328459/B
115
Simrad PI50
Appendix B
Equipment handling
This section provides the basic rules for transportation, storage and handling of units. In
this context, a unit may be any large or small part of the system. It can be supplied as
part of the initial delivery, or as a spare part.
Topics
• Transportation on page 117
• Lifting on page 117
• Storage prior to installation or use on page 118
• Inspection on page 119
• Unpacking on page 119
• Storage after unpacking on page 121
• Storage after use on page 121
• Re-packaging on page 123
• Temperature protection on page 123
• Circuit board handling and packaging on page 124
• Electro-Static Discharge (ESD) on page 125
• Disposal on page 125
116
328459/B
Appendix B Equipment handling
Transportation
Unless otherwise stated in the accompanying documentation, electronic,
electro-mechanical and mechanical units supplied by Kongsberg Maritime can be
transported using all methods approved for delicate equipment; (by road, rail, air or sea).
The units are to be transported in accordance with general or specific instructions for the
appropriate unit(s), using pallets, transport cases, or carton boxes as appropriate.
Note
Special local restrictions concerning air transportation may be applied to units
containing certain types of batteries. These units must be checked properly, and the
regulations must be investigated by the packer/shipper before the unit is dispatched.
All local transportation must be carried out according to the same specifications as for
the initial delivery. In general, all units must be handled with care.
The carton or case containing the unit must be kept dry at all times, and must be sheltered
from the weather. It must not be subjected to shocks, excessive vibration or other rough
handling. The carton or case will normally be marked with text or symbols indicating
which way it is to be placed. Follow any instructions given, and ensure the case is always
placed with its “top” uppermost.
The carton or case must not be used for any purpose for which it was not intended (step,
table, etc.), and in the absence of other information, no other cartons or cases must
be stacked on top of it.
Lifting
A heavy crate will normally be marked with its weight, and the weights of other cartons
or crates will normally be entered on the packing list.
• You must always check the weight of a crate before you attempt to lift it.
• You must always use lifting apparatus that is approved and certified for the load.
Heavy units may be equipped with lifting lugs for transportation by crane within the
workshop or installation area. Before you use a crane:
• You must check the applicable weight certificate for the crane.
• You must check the security of the lifting lugs.
Ensure that all available lifting lugs are used. Ensure the unit remains under control
during the operation to avoid damage to the unit, equipment or personnel.
Heavy units may be transported using a forklift truck. Special attention must then be
paid to the position of the unit’s centre of gravity. The units must be properly secured to
the truck.
328459/B
117
Simrad PI50
Storage prior to installation or use
When a system, a unit or a spare part has been delivered to the customer, it may be
subject to long time storage prior to installation and use. During this storage period,
certain specifications must be met. The equipment must be preserved and stored in such
a way that it does not constitute any danger to health, environment or personal injury.
1
The equipment must be stored in its original transportation crate.
2
Ensure that the units are clearly separated in the shelves and that each unit is easily
identifiable.
3
The crate must not be used for any purpose for which it was not intended (eg. work
platform etc.).
4
The crates must not be placed on top of each other, unless specific markings permit
this.
5
The crates must not be placed directly on a dirt-floor.
6
Do not open the crate for inspection unless special circumstances permit so.
• “Special circumstances” may be suspected damage to the crate and its content, or
inspections by civil authorities.
• If any units are damaged, prepare an inspection report stating the condition of the
unit and actions taken. Describe the damage and collect photographic evidence if
possible. Re-preserve the equipment.
• If the units are not damaged, check the humidity absorbing material. If required,
dry or replace the bags, then re-pack the unit(s) according to the packing
instructions.
7
If the crate has been opened, make sure that is it closed and sealed after the
inspection. Use the original packing material as far as possible.
8
The storage room/area must be dry, with a non-condensing atmosphere. It must
be free from corrosive agents.
9
The storage area’s mean temperature must not be lower than -30° C, and not warmer
than +70° C. If other limitations apply, the crates will be marked accordingly.
10 The crate must not be exposed to moisture from fluid leakages.
11 The crate must not be exposed to direct sunlight or excessive warmth from heaters.
12 The crate must not be subjected to excessive shock and vibration.
13 If the unit contains normal batteries, these may have been disconnected/isolated
before the unit was packed. These must only be reconnected before the installation
starts. Units containing batteries are marked.
Caution
Units containing lithium or alkaline batteries must be handled separately
and with care. Such units are marked accordingly. Do not attempt to
recharge such batteries, open them or dispose of them by incineration.
Refer to the applicable product data sheets.
118
328459/B
Appendix B Equipment handling
Inspection
An inspection must be carried out immediately after the unit(s) have arrived at their
destination.
1 Check all wooden or cardboard boxes, plastic bags and pallets for physical damage.
Look for signs of dropping, immersion in water or other mishandling.
2 If damage is detected externally, you will have to open the packaging to check the
contents. Request a representative of the carrier to be present while the carton is
opened, so any transportation damage can be identified.
3 If any units are damaged, prepare an inspection report stating the condition of the
unit and actions taken. Describe the damage and collect photographic evidence if
possible. Send the inspection report to Kongsberg Maritime as soon as possible.
4 If the units are not damaged, check the humidity absorbing material. If required, dry
or replace the bags, then re-pack the unit(s) according to the packing instructions.
Unpacking
General unpacking procedure
Normal precautions for the handling, transportation and storage of fragile electronic
equipment must be undertaken.
Note
If the unit is not to be prepared for immediate use, you may consider storing it unopened
in its original packing material. However, it may be useful to open the case to check its
contents for damage and retrieve any accompanying documentation.
Do not use a knife to open cardboard cartons - the contents may lie close to the surface,
and may be damaged by the blade.
1
2
3
4
5
Check the carton before opening it to ensure it shows no signs of dropping,
immersion in water or other mishandling. If the carton shows signs of such damage,
refer to the paragraph covering Inspection on receipt.
Place the carton on a stable work bench or on the floor with the top of the carton
uppermost.
In the absence of other instructions, always open the top of the carton first. The
contents will normally have been lowered into the carton from above, so this will
usually be the easiest route to follow. Care must be used when opening the carton to
ensure the contents are not damaged. Do not use a knife to open cardboard cartons
If the carton has been closed using staples, remove the staples from the carton as
you open it. This will reduce the possibilities of scratch injury to yourself and
damage to the contents.
If a wooden crate has been closed using screws, always remove them using a
screwdriver. Do not attempt to prise the lid off with a crowbar or similar.
328459/B
119
Simrad PI50
6
Once the carton is open, carefully remove all loose packing and insulation material.
Check for manuals and other documents that may have been added to the carton
during packing, and put these to one side. Check also for special tools, door keys etc.
Unpacking electronic and electromechanical units
Electronic and electromechanical units will normally be wrapped in a clear plastic
bag. Lift the unit, in its bag, out of the carton and place it in a stable position on the
floor/work bench.
Inspect the unit for damage before opening the plastic bag.
Note
Beware of the dangers of Electro-Static Discharge (ESD) both to yourself and to the
equipment, when handling electronic units and components.
Cables must never be used as carrying handles or lifting points.
Do not break the seal to open a circuit board package before the board is to be used. If
the board package is returned to the manufacturer with the seal broken, the contents will
be assumed to have been used and the customer will be billed accordingly.
Assuming all is well, open the bag and remove the unit.
Open the unit and check inside. Remove any packing and desiccant material that may
be inside.
Unpacking mechanical units
Mechanical units may be heavy. Using a suitably certified lifting apparatus, lift the unit
out of the crate and place it in a stable position on the floor/work bench.
Inspect the unit for damage and remove any packing material that may be inside the unit.
Unpacking transducers
Transducers may be supplied mounted to a hull unit (if any), or packed separately. Crates
are normally identified by the order number and the serial number.
The transducer face must be protected by a rigid, padded cover (e.g. a wooden box lined
with foam rubber) all the time it is exposed to the risk of physical damage.
Caution
Once transducer is unpacked, great care must be taken to ensure that
transducer body and cabling is not exposed to any mechanical stress.
120
328459/B
Appendix B Equipment handling
Storage after unpacking
The unit must whenever possible be stored in its original transportation crate until ready
for installation. The crate must not be used for any purpose for which it was not intended
(eg. work platform etc.).
Once unpacked, the equipment must be kept in a dry, non condensing atmosphere, free
from corrosive agents and isolated from sources of vibration.
Note
Do not break the seal to open a circuit board package before the board is to be used. If
the board package is returned to the manufacturers with the seal broken, the contents
will be assumed to have been used and the customer will be billed accordingly.
The unit must be installed in its intended operating position as soon as possible
after unpacking. If the unit contains normal batteries, these may have been
disconnected/isolated before the unit was packed. These must then be reconnected
during the installation procedure. Units containing batteries are marked.
Note
Units containing lithium or alkaline batteries must be handled separately and with care.
Such units are marked accordingly. Do not attempt to recharge such batteries, open them
or dispose of them by incineration. Refer to the applicable product data sheets.
Storage after use
If a unit is removed from its operating location and placed into storage, it must be
properly cleaned and prepared before packing.
Cleaning cabinets
If a cabinet has been exposed to salt atmosphere while it was in use, it must be thoroughly
cleaned both internally and externally to prevent corrosion.
1
Wipe the cabinet externally using a damp cloth and a little detergent. Do not use
excessive amounts of water as the unit may not be water tight. On completion,
dry the unit thoroughly.
2
All surfaces must be inspected for signs of corrosion, flaking/bubbling paint, stains
etc. Damaged or suspect areas must be cleaned, prepared and preserved using the
correct preservation mediums for the unit. The mediums to be used will usually be
defined in the units’ maintenance manual.
3
Open the unit, and using a vacuum cleaner, remove all dust etc. from the unit.
Great care must be taken to ensure the circuit boards and modules are not damaged
in the process.
328459/B
121
Simrad PI50
Mechanical units
If a mechanical unit may has been exposed to a salt atmosphere while it was in use, it
must be thoroughly cleaned both internally and externally to prevent corrosion.
1
If the construction materials and type of unit permits, wash the unit using a
high-pressure hose and copious amounts of fresh water. Examples are the lower
parts of hull units (outside the hull) or subsea units
2
Ensure that all traces of mud and marine growth are removed. Use a wooden or
plastic scraper to remove persistent growth, barnacles etc. On completion, dry
the unit thoroughly.
Caution
Do not use a high pressure hose in the vicinity of cables or transducers.
Do not use sharp or metal tools on a transducer face.
3
If the materials or type of unit prevents the use of a high-pressure hose, wipe the
unit using a cloth dampened with water containing a little detergent. Examples are
the upper parts of hull units (inside the hull) and hydraulic systems
4
Do not use excessive amounts of water as some components on the unit may not be
water tight. Wipe off the detergent with a damp cloth, then dry the unit thoroughly.
5
All surfaces must be inspected for signs of corrosion, flaking/bubbling paint, stains
etc. Damaged or suspect areas must be cleaned, prepared and preserved using the
correct preservation mediums. The mediums to be used will normally be defined in
the unit’s maintenance manual.
Cables
Wipe clean all exposed cables, and check for damage. If a cable shows signs of wear or
ageing, contact Kongsberg Maritime for advice.
Internal batteries
If the unit contains batteries, these may discharge slowly during storage. If the unit is to
be stored for an extended period, disconnect or remove all internal batteries.
A suitable piece of insulating material can be placed between the battery and the
electrical contacts to prevent electrical discharge. The battery can then remain in the unit,
reducing the risk of it being misplaced during the storage period.
Caution
Units containing lithium or alkaline batteries must be handled separately and
with care. Such units are marked accordingly. Do not attempt to recharge
such batteries, open them or dispose of them by incineration. Refer to the
applicable product data sheets.
122
328459/B
Appendix B Equipment handling
Dehumidifier
Place a suitably sized bag of desiccant material (silica gel or similar) into the unit to keep
the electronic components as dry as possible.
Coatings
Spray the unit externally with a corrosion inhibitor (e.g. a light oil) before packing.
Re-packaging
Whenever possible, the unit must be stored and transported in its original packing
material and/or crate. In the event that this material is not available, proceed as follows:
• Small units must be protected from damp by being placed within a plastic bag at least
0.15 mm thick. An appropriate quantity of desiccant material should be placed inside
this bag, and the bag sealed. The sealed unit must then be placed in an appropriate
carton or crate, and supported in the container by appropriate shock-absorbing
insulation (polystyrene foam chips etc.).
• Large units must be placed in a suitable cardboard box or wooden crate. The unit
must be protected against physical damage by means of shock-absorbing insulation
mats. The box must be clearly marked with its contents, and must be stored in a
dry and dust-free area.
Temperature protection
If the unit must be protected against extremes of temperature, the carton/crate must be
lined on all walls, base and lid with 5 cm thick polyurethane or polystyrene foam. These
units will be identified as delicate in the applicable documentation.
The package must then be clearly marked:
Must not be transported or stored in temperatures below -5 degrees Celsius.
Other units can normally be stored in temperatures between -30° C and +70° C, refer to
the system’s technical specifications for details.
Note
Unless otherwise specified, transducers must not be stored in temperatures below -20° C
and above +55° C.
328459/B
123
Simrad PI50
Circuit board handling and packaging
Circuit boards are delicate items. They may work year after year in an advanced product,
but then fail due to a small spark of static electricity. For this reason, it is very important
that they are properly handled and protected during shipping.
Beware of ESD!
When you handle electronic circuit boards, you must beware of the dangers of
electrostatic discharge (ESD), both to yourself and to the equipment. In order to ensure
safe transport and storage, circuit boards and other electronic units will always be
wrapped in a clear plastic protective bag, and the bag will be sealed. See also section
Electro-Static Discharge (ESD) on page 125.
Unpacking and handling circuit boards
Observe the following steps to unpack a circuit board.
1 Wherever possible, prepare a suitable workbench. It must have an approved
conductive service mat, and it must be connected directly to a reliable earth point
via its earthing cord. You must wear a wristband in direct contact with the skin, and
the wristband must be connected to the service mat.
2 Lift the circuit board, in its protective bag, out of the carton and place it in a stable
position on the a floor/work bench.
3 Inspect the unit for damage before you open the plastic bag.
4 Do not break the seal to open a circuit board package before the board shall to be
used. If the board package is returned with the seal broken, we will assume that the
content has been used, and we will bill you accordingly.
5 Assuming all is well, open the bag and remove the unit.
6 Take out and keep the documentation. You will need it if the circuit board shall be
returned to us. Also, remove any packing and desiccant material that may be inside.
7 Keep the protective plastic bag for future use.
Unpacking on board the vessel
When you are working on board a vessel, an “approved conductive service mat” is
often far away. As you still need to unpack circuit boards, make sure that you do it
in the instrument room, or at another location where you have a steel deck. Keep far
away from the bridge or any other rooms with wall-to-wall carpets! If possible, bring a
wristband and ground yourself.
Returning a circuit board
If you wish to return a circuit board to us, observe the following rules.
Note
Failure to follow these rules may result in unserviceable circuit boards.
1
124
Place the circuit board to be returned in the same protective plastic bag as you
originally received it in - or a protective bag of similar ESD protection quality.
328459/B
Appendix B Equipment handling
2
3
4
5
DO NOT use standard plastic bags, such as commercial bubble wrap.
Fill in all the necessary information on the applicable documentation and place
it inside the bag.
Seal the bag.
Place the circuit board in a suitable carton, and secure it for shipping.
Electro-Static Discharge (ESD)
What is ESD?
Electro-Static Discharge (ESD) is the transfer of an electrostatic charge between two
bodies at different electrostatic levels, caused either by direct contact or induction by
an electrostatic field. The passing of a charge through an electronic device can cause
localised overheating, and it can also “puncture” insulating layers within the structure of
the device. This may deposit a conductive residue of the vaporised metal on the device,
and thus create a short circuit. This may result in a catastrophic failure, or degraded
performance of the device.
ESD protection
Sensitive electronic circuit boards must be transported and stored in protective packing
bags. The circuit boards must not be transported or stored close to strong electrostatic,
electro-magnetic or radioactive fields.
If it is necessary to open and touch the circuit board inside the protective bag, then
the following precautions must be taken:
1 The working area must be covered by an approved conductive service mat that has
a resistance of between 50 kΩ and 2 MΩ, and is connected directly to a reliable
earth point via its earthing cord.
2 The service personnel involved must wear a wristband in direct contact with the
skin, connected to the service mat.
3 Printed circuit boards must be placed on the conductive service mat during
installation, maintenance etc.
4 If, for any reason, it is necessary to move the circuit board from the conductive
service mat, it must be placed in an approved antistatic transportation container (e.g.
static shielding bag) before transportation.
5 During installation and servicing, all electrical equipment (soldering irons, test
equipment etc.) must be earthed.
Disposal
At the end of the product lifetime, all Kongsberg Maritime products must be disposed in
an environmental friendly way.
328459/B
125
Simrad PI50
All electrical and electronic components must be disposed of separately from the
municipal waste stream via designated collection facilities appointed by the government
or local authorities. The correct disposal and separate collection of your old appliance
will help prevent potential negative consequences for the environment and human health.
This is a precondition for reuse and recycling of used electrical and electronic equipment.
For more detailed information about disposal of your old appliance, please contact your
local authorities or waste disposal service.
All disposal of mechanical, electromechanical, electronic and chemical waste – including
all types of batteries – must thus be disposed of according to national and international
rules and regulations. Observe the relevant Waste Electronical and Electronic Equipment
(WEEE) regulations.
Kongsberg Maritime offers a product recycling service. This is described on
http://www.km.kongsberg.com →Products →Services →Product recycling.
126
328459/B
Appendix C Basic cable requirements
Appendix C
Basic cable
requirements
This chapter provides general information related to the installation of system cables.
Topics
• Cable trays on page 128
• Radio Frequency interference on page 128
• Physical protection on page 129
• Grounding on page 129
• Cable connections on page 130
• Cable terminations on page 130
• Cable identification on page 130
328459/B
127
Simrad PI50
Cable trays
All permanently installed cables associated with the system must be supported and
protected along their entire lengths using conduits and/or cable trays. The only exception
to this rule is over the final short distance (maximum. 0,5 meters) as the cables run into
the cabinets/units to which they are connected. These short service loops are to allow the
cabinets to move on their shock mounts, and to allow maintenance and repair.
• Wherever possible, cable trays must be straight, accessible and placed so as to avoid
possible contamination by condensation and dripping liquids (oil, etc.). They must be
installed away from sources of heat, and must be protected against physical damage.
Suitable shields must be provided where cables are installed in the vicinity of heat
sources.
• Unless it is absolutely unavoidable, cables should not be installed across the vessel’s
expansion joints. If the situation is unavoidable, a loop of cable having a length
proportional to the possible expansion of the joint must be provided. The minimum
internal radius of the loop must be at least twelve times the external diameter of
the cable.
• Where a service requires duplicate supply lines, the cables must follow separate paths
through the vessel whenever possible.
• Signal cables must not be installed in the same cable tray or conduit as high-power
cables.
• Cables containing insulation materials with different maximum-rated conductor
temperatures should not be bunched together (that is, in a common clip, gland, conduit
or duct). When this is impractical, the cables must be carefully arranged such that the
maximum temperature expected in any cable in the group is within the specifications
of the lowest-rated cable.
• Cables with protective coverings which may damage other cables should not be
grouped with other cables.
• Cables having a copper sheath or braiding must be installed in such a way that
galvanic corrosion by contact with other metals is prevented.
• To allow for future expansion of the system, all cables should be allocated spare
conductor pairs. Also, space within the vessel should be set aside for the installation
of extra cables.
Radio Frequency interference
All cables that are to be permanently installed within 9 m (30 ft) of any source of Radio
Frequency (RF) interference such as a transmitter aerial system or radio transmitters,
must, unless shielded by a metal deck or bulkhead, be adequately screened by sheathing,
braiding or other suitable material. In such a situation flexible cables should be screened
wherever possible.
128
328459/B
Appendix C Basic cable requirements
It is important that cables, other than those supplying services to the equipment installed
in a radio room, are not installed through a radio room, high power switch gear or other
potential sources of interference. Cables which must pass through a radio room must
be screened by a continuous metal conduit or trunking which must be bonded to the
screening of the radio room at its points of entry and exit.
Physical protection
Cables exposed to the risk of physical damage must be enclosed in a steel conduit
or protected by a metal casing unless the cable’s covering (e.g. armour or sheath) is
sufficient to protect it from the damage risk.
Cables exposed to an exceptional risk of mechanical damage (for example in holds,
storage-spaces and cargo-spaces) must be protected by a suitable casing or conduit,
even when armoured, if the cable covering does not guarantee sufficient protection
for the cables.
Metallic materials used for the physical protection of cables must be suitably protected
against corrosion.
Grounding
All metallic cable coverings (armour, metallic sheathing etc.) must be electrically
connected to the vessel’s hull at both ends except in the case of final sub-circuits where
they should be connected at the supply end only.
Grounding connections should be made using a conductor which has a cross-sectional
area appropriate for the current rating of the cable, or with a metal clamp which grips
the metallic covering of the cable and is bonded to the hull of the vessel. These cable
coverings may also be grounded by means of glands specially intended for this purpose
and designed to ensure a good ground connection. The glands used must be firmly
attached to, and in good electrical contact with, a metal structure grounded in accordance
with these recommendations.
Electrical continuity must be ensured along the entire length of all cable coverings,
particularly at joints and splices. In no case should the shielding of cables be used as the
only means of grounding cables or units.
Metallic casings, pipes and conduits must be grounded, and when fitted with joints these
must be mechanically and electrically grounded locally.
328459/B
129
Simrad PI50
Cable connections
All cable connections are shown on the applicable cable plan and interconnection
diagrams.
Where the cable plan shows cable connections outside an equipment box outline, the
connections are to be made to a plug or socket which matches the plug or socket on
that particular item of equipment.
Where two cables are connected in series via a junction box or terminal block, the
screens of both cables must be connected together but not grounded.
Cable terminations
Care must be taken to ensure that the correct terminations are used for all cable
conductors, especially those that are to be connected to terminal blocks. In this case,
crimped sleeve-terminations must be fitted to prevent the conductor core from fraying
and making a bad connection with the terminal block. It is also of the utmost importance
that where crimped terminations are used, the correct size of crimp and crimping tool are
used. In addition, each cable conductor must have a minimum of 15 cm slack (service
loop) left before its termination is fitted.
Cable identification
Cable identification codes corresponding to the cable number shown in the cable plan
must be attached to each of the external cables. These identification codes should be
positioned on the cable in such a way that they are readily visible after all panels have
been fitted. In addition, each cable conductor should be marked with the terminal board
number or socket to which it is connected.
130
328459/B
Index
Index
1000Base-T, 43
A
About
NMEA telegram
formats, 56, 104
sensors, 73
this manual, 7
AC mains cable
230 Vac, 39–40
Approval
classification society, 16
B
Basic
installation procedure, 20
Battery
handling, 92
Battery chargers, 92
Baudrate
NMEA 0183 standard, 105
Bottom Contact sensor
simple sensor test, 101
C
Cable
230 Vac, 39–40
ethernet, straight, 43
Hydrophone, 51
Hydrophone junction
box, 50
ITI serial line, 49
power supply, 41
printer
parallel, 47
Receiver Unit power
supply, 42
requirements, 127
RS-232 three-wire, 35
ship’s ground, 38
USB, 46
Cable layout, 26
Cable list, 30
Cable plan, 28
Cable requirements
connections, 130
grounding, 129
identification, 130
physical protection, 129
radio frequency
interference, 128
terminations, 130
328459/B
trays, 128
Cable trays
requirements, 128
Cables, 26
Cabling
drawings, 34
shipyard cables, 27
system cables, 27
Catch monitoring system
specifications, 68
Catch sensor
purpose, 76
simple sensor test, 101
Changing
communication
channels, 90
update rate, 90
Charging
sensors, 92
Circuit board
handling, 124
packaging, 124
returning, 124
unpacking, 124
Classification society
approval, 16
Colour display
description, 12
installation procedure, 22
minimum specifications, 12
specifications, 69
Communication
external devices, 56
external peripherals, 55
NMEA 0183
parameters, 105
Communication channel
changing, 90
Communication channels
default values, 89
Compass deviation
responsibility, 16
Computer
installation procedure, 21
interface to Receiver
Unit, procedure, 24
local purchase, 70
specifications, 69
Configuration
PI Configurator, 91, 100
sensor, 89
Connections
requirements, 130
Course data, ground
referenced
telegram, 110
Course data, water
referenced
telegram, 110
D
Data bits
NMEA 0183 standard, 105
Datagrams
about, 104
DBS
telegram, 106, 112
DC cable
Receiver Unit power
supply, 42
DC Power supply
outline dimensions
drawing, 66
DC supply, 41
Default
communication
channels, 89
update rate, 89
Depth
below surface
(telegram), 106
telegram, 106
Depth input
interface, 59
Depth sensor
purpose, 77
Depth sensor test
simple, 100
Depth/Height sensor
purpose, 85
Depth/Remote sensor
purpose, 87
Depth/Spread sensor
purpose, 81
Description
system, 10
Diagram
system, 11
Display
installation procedure, 22
specifications, 69
Disposal
equipment, 125
Distance travelled
telegram, 111
Docking plan
transducer location, 17
Drawing
131
Simrad PI50
Marine computer outline
dimensions, 64
Receiver Unit, 65
Receiver Unit power
supply, 66
system, 11
Drawing file, 63
Drawings, 63
installation, 8
Dry docking
transducer location, 17
E
Echo sounder input
interface, 59
Electro-static discharge, 125
Equipment
disposal, 125
handling, 116
inspection, 119
lifting, 117
re-packaging, 123
receipt, 16
responsibility, 15
storage after unpacking, 121
storage after use, 121
storage before use, 118
transportation, 117
unpacking, 119
ESD protection, 125
ESD, what is it?, 125
Ethernet
straight cable, 43
Export
data, 56
External interfaces
procedures, 56
F
Familiarization
sensors, 73
Simrad PI50, 9
G
General
supply conditions, 15
Geographical position
telegram, 107
Geometry sensor
purpose, 84
GGA
telegram, 108
GLL
telegram, 107
Global positioning
telegram, 108
132
Global Positioning System
interface, 61
GPS
interface, 61
Grounding
requirements, 129
H
Handling
battery, 92
circuit boards, 124
HDG
telegram, 108
HDM
telegram, 109
HDT
telegram, 109
Heading
telegram, 109
Heading deviation and
variation
telegram, 108
Heading magnetic
telegram, 109
Heading, true
telegram, 109
Height sensor
purpose, 78
Height/Depth sensor
purpose, 85
HFB
telegram, 112
How to
deal with ESD, 125
install PI50 software, 53
install the PI50 Receiver
Unit, 22
interface navigation
system, 61
observe sensor
activation codes, 101
obtain PI50 software
license, 53
pack a circuit board, 124
remove PI50 software, 54
return a circuit board, 124
set up computer
to Receiver Unit
interface, 24
set up depth input, 59
set up echo sounder
input, 59
set up interface with FS
system, 58
set up interface with ITI
system, 58
set up PI sensor output, 56
set up Receiver Unit
interface, 24
simple Bottom Contact
sensor test, 101
simple Catch sensor test, 101
simple depth sensor test, 100
simple Rip sensor test, 101
simple SeineSounder
sensor test, 101
simple sensor test, 99
unpack a circuit board, 124
unpack a circuit board
on board, 124
upgrade PI50 software, 54
use PI Charger, 93
use PI MaxiCharger, 95
use PI MiniCharger, 96
use PI PS Charger, 98
Hydrophone
cable, 51
installation, 23, 72
Hydrophone junction box
cable, 50
Hydrophones
description, 14
I
Identification
cable requirements, 130
IEC plug, 39–40
IEEE 802.3ab, 43
Import
data, 56
Important
if something breaks
down, 9
information, 9
switching off the echo
sounder, 10
when the PI50 is not
used, 9
Information
NMEA 0183, 104
support, 17
Inspection
equipment, 119
Installation, 19
drawings, 63
hydrophone, 23, 72
requirements, 16
software, 53
Installation drawings, 8
Installation procedure
basic, 20
colour display, 22
hydrophone, 23, 72
PI50 Marine Computer, 21
328459/B
Index
PI50 Receiver Unit, 22
Integration, 55
Interconnection cables, 26
Interface
connecting external
systems, 56
depth input, 59
echo sounder input, 59
external, 55
Global Positioning
System, 61
GPS, 61
ITI, 58
navigation system, 61
PI sensor output, 56
Receiver Unit,
procedure, 24
specifications, 68
Introduction
Simrad PI50, 9
ITI
interface setup, 58
serial line
communication, 49
L
License
obtain, 53
Lifting
equipment, 117
List of cables, 30
Navigation system
interface, 61
NiCd
battery handling, 92
NMEA
about formats, 56, 104
NMEA 0183
communication
parameters, 105
information, 104
NMEA telegram
GGA, 108
GLL, 107
HDG, 108
HDM, 109
HDT, 109
RMC, 109
VHW, 110
VLW, 111
VTG, 110
NMEA Telegram
formats, 103
NMEA telegrams
specifications, 106
Noise sources
inspection, 17
O
Outline dimensions
drawings, 63
P
M
Main units, 10, 12
Mains cable
230 Vac, 39–40
Maintenance
sensor charging, 92
Manual
Target audience, 7
Marine computer
outline dimensions
drawing, 64
Marine Computer
installation procedure, 21
specifications, 69
Mechanical
drawings, 63
Modifying
communication
channels, 90
update rate, 90
N
National Marine
Electronics Association, 104
328459/B
Packaging
circuit boards, 124
Parity bit
NMEA 0183 standard, 105
Peripheral
interfaces, 55
Physical cable protection
requirements, 129
PI Bottom Contact
purpose, 75
PI Catch
purpose, 76
PI Charger
use, 93
PI Configurator, 91, 100
PI Depth
purpose, 77
PI Geometry
purpose, 84
PI Height
purpose, 78
PI Height/Depth
purpose, 85
PI MaxiCharger
use, 95
PI MiniCharger
use, 96
PI Remote
purpose, 79
PI Remote/Depth
purpose, 87
PI Rip
purpose, 88
PI SeineSounder
purpose, 86
PI sensor data
telegram, 112
PI sensor output
interface, 56
PI sensors
about, 73
PI Sensors
overview, 74
PI Spread
purpose, 79
PI Spread/Depth
purpose, 81
PI Temperature
purpose, 82
PI Temperature/Depth
purpose, 83
PI Twin Spread
purpose, 80
PI50
cable layout, 26
installation procedure, 20
main units, 10, 12
PI50 Marine computer
outline dimensions
drawing, 64
PI50 Marine Computer
installation procedure, 21
PI50 Processor Unit
interface to Receiver
Unit, procedure, 24
PI50 Receiver Unit
installation procedure, 22
interfaces, 13, 22
outline dimensions
drawing, 65
PI50 Receiver Unit power
supply
outline dimensions
drawing, 66
Portable hydrophone
description, 14
Position geographical
telegram, 107
Position GNNS
telegram, 109
Position system fixed data
telegram, 108
Power supply
133
Simrad PI50
commercial, 41
outline dimensions
drawing, 66
Printer
cable
parallel, 47
Procedure
computer to Receiver
Unit interface, 24
install the PI50 Receiver
Unit, 22
installation chapter, 19
interface navigation
system, 61
observe sensor
activation codes, 101
obtain PI50 software
license, 53
PI50 software
installation, 53
Receiver Unit interface, 24
set up depth input, 59
set up echo sounder
input, 59
set up interface with FS
system, 58
set up interface with ITI
system, 58
set up PI sensor output, 56
simple Bottom Contact
sensor test, 101
simple Catch sensor test, 101
simple depth sensor test, 100
simple Rip sensor test, 101
simple SeineSounder
sensor test, 101
simple sensor test, 99
software removal, 54
software upgrade, 54
using PI Charger, 93
using PI MaxiCharger, 95
using PI MiniCharger, 96
using PS Charger, 98
Procedures
external interfaces, 56
Processor Unit
description, 12
installation procedure, 21
interface to Receiver
Unit, procedure, 24
local purchase, 70
specifications, 69
Product recycling, 125
Proprietary telegrams
specifications, 112
Protection
against ESD, 125
temperature, 123
134
PS Charger
use, 98
PSIMP-D1
telegram, 112
Purpose
this manual, 7
Purse seine hydrophone
description, 14
R
Radio Frequency
interference
requirements, 128
Re-packaging
equipment, 123
Receipt
equipment, 16
Receiver Unit
description, 13
installation procedure, 22
interface, procedure, 24
interfaces, 13, 22
outline dimensions
drawing, 65
Receiver Unit power
supply
cable, 42
outline dimensions
drawing, 66
Recycling, 125
Remote sensor
purpose, 79
Remote/Depth sensor
purpose, 87
Removal
software, 54
Requirements
cables, 127
for installation, 16
Responsibility
compass deviation, 16
equipment, 15
Returning
a circuit board, 124
Rip sensor
purpose, 88
simple sensor test, 101
RJ45
plug, 43
RMC
telegram, 109
RS-232
cable specifications, 35
S
SeineSounder
simple sensor test, 101
SeineSounder sensor
purpose, 86
Sensor
activation codes, 101
charging, 92
configuration, 89
Sensor configuration
PI Configurator, 91, 100
Sensor test
PI Configurator, 91, 100
simple, 99
Sensors
about, 73
overview, 74
Serial interface
ITI, 58
Serial line
ITI, 49
Setup
initial communication,
procedure, 24
Ship’s ground
cable, 38
Shipyard
cables, 27
Simrad ITI
interface setup, 58
Simrad PI50
familiarization, 9
introduction, 9
main units, 10, 12
Simrad PI50 sensors
about, 73
Software
installation, 53
removal, 54
upgrade, 54
Software license
obtain, 53
Specifications, 67
catch monitoring
system, 68
colour display, 69
computer, 69
interfaces, 68
NMEA telegrams, 106
proprietary telegrams, 112
Speed data, ground
referenced
telegram, 110
Speed data, water
referenced
telegram, 110
Spread sensor
purpose, 79
Spread/Depth sensor
purpose, 81
Standard
328459/B
Index
NMEA 0183 standard, 105
Stop bit
NMEA 0183 standard, 105
Storage
equipment (after
unpacking), 121
equipment (after use), 121
equipment (before use), 118
Supply
conditions, 15
Supply power
tolerance, 16
Support
information, 17
System
cables, 27
description, 10
diagram, 11
System specifications, 67
System units, 10, 12
T
T-568B, 43
Target audience, 7
Techncial
support, 17
Technical specifications, 67
catch monitoring
system, 68
colour display, 69
computer, 69
interfaces, 68
Telegram
Course over ground and
Ground speed, 110
Dual ground/water
distance, 111
Geographical position
latitude/longitude, 107
GGA, 108
GLL, 107
Global positioning
system fix data, 108
HDG, 108
HDM, 109
HDT, 109
Heading, deviation and
variation, 108
Heading, magnetic, 109
Heading, true, 109
HFB, 112
PI sensor data, 112
PSIMP-D1, 112
Recommended
minimum specific
GNSS data, 109
RMC, 109
328459/B
Trawl headrope to
footrope and bottom, 112
VHW, 110
VLW, 111
VTG, 110
Water speed and
heading, 110
Telegram code
DBS, 106, 112
Telegram formats, 103
about NMEA, 56, 104
NMEA, 106
proprietary, 112
Telegram name
Depth below surface, 106
Depth of trawl below
surface, 112
Telegrams
about, 104
Temperature
protection, 123
Temperature sensor
purpose, 82
Temperature/Depth sensor
purpose, 83
Terminations
requirements, 130
Test
sensor activation codes, 101
simple Bottom Contact
sensor test, 101
simple Catch sensor
testt, 101
simple depth sensor test, 100
simple Rip sensor test, 101
simple SeineSounder
sensor test, 101
simple sensor test, 99
using PI Configurator,
91, 100
Tolerance
supply power, 16
Transducer
docking plan, 17
Transportation
equipment, 117
Travelled distance
telegram, 111
Trawl
depth
telegram, 112
Trawl hydrophone
description, 14
Trawl, bottom
telegram, 112
Trawl, footrope
telegram, 112
Trawl, headrope
telegram, 112
Twin Spread sensor
purpose, 80
U
Unit
installation procedures, 19
Units
main, 10, 12
Universal Serial Bus
(USB)
cable, 46
Unpacking
circuit boards, 124
equipment, 119
Update rate
changing, 90
default values, 89
Upgrade
software, 54
USB
cable, 46
V
VHW
telegram, 110
VLW
telegram, 111
VTG
telegram, 110
W
Waste Electronical and
Electronic Equipment, 125
WEEE, 125
Wiring
general requirements, 17
135
ISBN: 978-82-8066-122-7
©2011
Kongsberg Maritime
Simrad PI50 Catch monitoring system
Installation manual
Simrad PI50 Catch monitoring system
Installation manual
Simrad PI50 Catch monitoring system
Installation manual