1
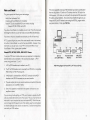
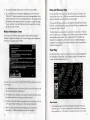
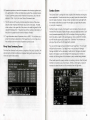
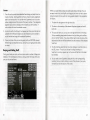
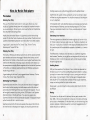
Legend Entertainment's
Technical Support
CompuServe E-Mail
72662, I 021
(NO HINTS WILL BE GIVEN ON THIS NUMBER)
From the continental U.S. call toll free
9:00 a.m. - 5:00 p.m. weekdays EST/EDT
1-800-658-8891
From Europe (Accolade Europe)
081-788-0200
From Canada and all other locations
703-222-8500
Hint Information
24-Hour Hint Line
From the continental U.S.
1-900-933-2583 ($.75 for the first minute,
$.50 for each minute thereafter)
1-900-933-CLUE
Hint books are available - call 1-800-658-889 1 or 703-222-8515 to order
($9.95 +shipping/handling)
Executive Offices
(Please do not call this number for technical assistance or hint information)
Legend Entertainment Company
P.O. Box 10810
14200 Park Meadow Drive
Chantilly, Virginia 22021
703-222-8500
Table Of Contents
Installation and Music Configuration ....... .... ... ..... . ..... ... .... ... ... .... .... ........ 3
Installation ... .. .... .......................... .. .......... ... .. ........ ..... ... .... .. .. ... ... ...... ... 3
Music and Sound ...... .... ............. ...... .. ...... ........ .... ... .. ............... .......... ... 4
Quick Start for Experienced Gamers ...... .... .......... .. ............... .. ....... ........ . 6
Overview and Introduction to Game Play .......... ..... .. .. ............................ 7
New York and New Jersey A rea Map ............... ........ .. .. ...... .. .... .... .... ..... 9
Guide to Using the Game Screens ........ ...... .......................................... . I 0
Adventure Game ..... ......... ................. .... ..... .. ........... .......... ..... ......... .. I 0
Superhero Selection .. ..... ... ........... ............ ...... ...... .... ... ..... ..... ........ ... .. 12
Storage Cabinet .... ....... ..... .. ................. ... ....... ........ .. ......... ...... ........ ... 15
Mission Information .... ........ ........................ .......... .. .. ......................... . 16
Chaos and Discovery Maps .......... ...... ... .. .. .. ........... .. ........ .. .. .. .. .. .... .... . 17
T ravel Map .......... ... ...... ........ .. .. .... .... .. .... ..... ...... .. .... .. .. ... .. ........... .. .. .. 17
Superhero lnformation .. ....... .. ..... ... .... ... ............ ..... .... ...... .. ...... ........ ... 19
Party Stats Summary ...... .. ........... ....... ................... ... ... ............ .. ....... ... 22
Combat .......................... ... .. ...... ........ ... ....... ....... ... .... .... .... ............... 23
Buying and Selling Stuff. .......... ....... ......... .......... ....... .. ... ........ ........... .... 26
Hints for Novice Role Players ........ ......... .. ...... ... ... ........... .. ....... .. ....... .... 28
Pre-combat ...... .. ...... ... .. .... .. .... .... ............. ..... ....... ......... ......... .... ... .. ..28
Combat .. ... .. ...... .... ...... ....... .. ................ ... .... .. .. ..... .......... ... ..... .... ... ... 30
Other .... ..... ......... .... ....... ..... ... .. ....... .... .. ..... ........ .. ....... ..... ....... ... .. .... 32
Installation and Music Configuration
Installation
Installation and start-up for Superhero League
of Hoboken
is a snap. Simply
follow the instructions below and you will be up and running in no time.
I. Make backup copies of your game disks. This is a precautionary step and is
not necessary to install the game properly.
2. Make sure that you have at least 8,000,000 bytes of free space on your
hard drive. If you are using disk compression software (i.e., DoubleSpace,
or Stacker) you will need 16,000,000 bytes of free space on your hard
drive. For more detailed information, please check the section entitled
Trouble Shooting and Technical Assi stance.
3. Insert Disk # I in your floppy drive and log on to that drive by t yping A: or
B:. Then type INSTALL to start the installation program . Fol low the directions on the screen.
4. Be sure you have loaded your mouse driver.
5.
Make sure that a line reading DEVICE
=C:\DOS\HIME.Jv1.SYS is in your
CON FIG.SYS file. If it is not, you shou ld add it. The line might not be
there if you use a third-party memory manager (i.e., QEMM, 386Max, etc.
Check the manual that came with your memory manager for the equivalent
command.).
Hints for Novice Adventure Gamers .... .. .. ................ .. ....... .. ....... .. .... .... .. 35
6. Make sure that a line reading DOS=H/GH is in your CON FI G.SYS fi le.
Help! Troubleshooting and Technical Assistance ...... .. ........... .. ............... 37
7. Make sure you have at least 593,920 bytes (580K) of convent ional memory
Creat ing a DOS Boot Disk ..... .......... .. ... ..... .... .. ...... ... .... ............. .. ... ... .40
Credits ..... ........... ..... ..... . .. .......... ... ..... .... ... ........ ..... .. ... .... . .. .... .. .. .... ..... ..42
avai lable. You can verify free memory by typing MEM at t he DOS prompt
on you r hard drive. If you cannot free up at least 580K then you might
w ant to try making a boot disk (see Creating a DOS Boot Disk).
About the Author ......... ....... .. ...... .. ........ .... ........ ..... ......... ........ ......... .... 43
Legal Stuff ....... ... .... ...... ....... .. ..... .. ....... .. ....... .. ..... ... ..... .. .. .......... ...... .... . 44
8. T o play the game, change directories to the hard drive directory that cont ai ns the game (e.g. t ype CD \SLH if you chose the installat ion defaults).
Then t ype SLH to start the game.
In addition to th is manual, your game package should contain the
fo llow ing elements:
4, 3 ~" High Density Floppy Disks
Warranty Card
2
After installation you can change configuration options like music card IRQ and
I/O address settings by running t he INSTALL program found within the game
directory on your hard disk.
3
Music and Sound
The second possibility is that your MIDI interface may be set to an IRQ other
than the default value of 2 and/or an I/O address other than 330 used in the
This game supports the following music technologies:
install program. In this case, you must specify the appropriate IRQ value and/or
AdLib Music Synthesizer Card
I/O address during installation. If you have already installed the game you can
Creative Labs' Sound Blaster and compatibles
Roland MT32 and compatible MIDI sound modules including
change the IRQ and 1/0 address by re-running the INSTALL program within
your game directory. Simply type INSTALL.
Roland's MT I 00, CM32L, and LAPC I
If you have a Sound Blaster or compatible you are in luck! This is the only sound
technology that will allow you to hear music and sound effects simultaneously.
If you have an AdLib or compatible sound board, you wi ll only hear music.
IBMPC
SPEAKERS
MT-32 support will give you some of the most beautiful music in the business,
but without a Sound Blaster, you will not hear sound effects. However, if you
have both, you can play music on your MT-32 and sound effects on your
Sound Blaster. Wow, a game player's paradise!
SPE.'il<ER
WIRES
PC/MIDI
INTERFACE
CABLE
AllDI
WT
Roland MT32, MTIOO, CM32L, AND LAPCI Owners
To use your MIDI sound module, make sure your equipment is configured as
described below and as illustrated on the accompanying diagram. LAPC-1
MI DI
AUDIO
"'
our
~--~
AUDIO
AUDIO
"'
CABLES
MPU-401
(OR COMPATIBLE)
ROLAND SOUND
MODULE
AMPLIFIER
OR STEREO
owners may ignore items I , 2, and 3.
I.
A PC to MIDI Interface card is installed in your PC.
MIDI Wiring Diagram for Roland MT-32, MT- I 00, and CM-32L
2. The PC to MIDI Interface card is connected to an MPU-40 I or compatible
MIDI Interface or MIDI Processing Unit
3. A MIDI cable is connected from a MIDI OUT connector on the MIDI
Interface to the MIDI IN connector on your sound module.
4. The audio output jacks on your sound module are connected to the audio
input jacks on your amplifier or stereo.
5.
One or two speakers are attached to the speaker connectors on your
amplifier or stereo.
If you are having trouble getting your MIDI sound module to operate, the difficulty can probably be traced to one of two causes. First, you may have two or
more cards in your computer that are set to the same IRQ. If this is the case,
you can change the IRQ value for one of the cards by using the card's jumpers
or switches (although some cards do not allow this). Consult the manual that
came with your MIDI interface.
4
5
Quick Start for Experienced Gamers
Overview and Introduction to Game Play
If you want to jump right in and learn as you go, feel free. We have tried to
This game is a balance between the genres commonly known as adventure
make this process easy by providing an On-line Help feature that is always
gaming and role playing. In an adventure game, you become the main charac-
accessible. When you see something you want help with, simply position the
ter of an evolving story. You advance the story by solving puzzles and interact-
mouse cursor over it and press the right mouse button. Explanatory text will
ing with characters. Most role playing games are also loosely based around an
appear on the screen.
unfolding story and character interaction, but they can include many elements
If you still cannot figure out how something works, look up the screen you are
having difficulty wrt:h in the section entitled, Guide to Using the Game Screens. You
can also find the screen you are having trouble with by quickly paging through the
subsections until you spot the picture of the screen you need help wrt:h.
If you are an adventure gamer who does not do much role playing and you
really get stuck. try reading the entire section entitled Hints for Novice Ro/e-
Pfayers. If you are a role player who does not play many adventure games, try
reading the section entitled Hints
for Novice Adventure Gamers.
traditionally not found in adventure games: a party with multiple characters, a
much bigger geographical area, multiple character statistics and attributes,
weapons and armor, and combat with bad guys.
In this game, you play the role of the central character in our story. You are a
Superhero known as The Crimson Tape. Your superpower (Create
Organizational Charts) makes you the natural leader of a band of friendly
mutants known as the Superhero League of Hoboken.
The game takes place approximately 200 years in the future in the postapocalyptic wasteland of the northeastern United States. Along with the
Superhero League of Hoboken, other Superhero Leagues have arisen to keep
order, preserve ancient knowledge from before the collapse of society, and
nurture the rebirth of a new society. Their activities are coordinated by the
Commissioner of Superhero Leagues, who also maintains ranking and status
information for all of the Leagues.
The Commissioner will assign a number of tasks to be performed by your
League. Matilda, the League's mission computer, will provide briefings on the
missions. After selecting a mission, you will assemble a party of Superheroes
and set off across the wasteland of the post-collapse northeastern United States.
You will start the game wrt:h five assigned missions. As soon as you complete
all of these missions, you will advance to a new level and be assigned another
five new missions. As you move from level to level, your League will advance
in rank and prestige. New Superheroes will join up and become available for
inclusion in your party. Each level will involve exploration, discovery, character
interaction, combat, and puzzle solving.
Five Major Game Play Activities
I.
Selecting your party and learning about missions in the Headquarters of the
League.
2. T rave ling around the northeastern United States using the Travel Map.
6
7
3.
Combat with bad guys.
4. Buying and selling stuff in marketplaces.
5.
Solving puzzles in adventure game environments.
Because this is one of the more complex games that Legend has released, we
have tried to provide as much help as possible regarding the mechanics of
game play. Help is provided through extended sections of this manual and
through On-Line Help within the game itself
The sections of this manual dedicated to understanding game play are listed below.
Guide to Using the Game Screens: Explains how to interact with the individual screen interfaces that you will run into as you play the game. This is an
excellent reference for help during the game.
Hints for Novice Role-Players: For anyone who has never played a role playing
game before or is having trouble understanding what is going on from the
very beginning. Some of the content here is the same as the previous section, but we have also included strategy tips to help you decide what to do.
Hints for Novice Adventure Gamers: For seasoned role players who have not
done much adventuring or people who have not played either role playing
or adventure games.
To access On-Line Help, simply move the cursor over what you are having
trouble with and press the right mouse button. Explanatory text will appear in
a box on the screen.
New York and New Jersey Area Map
If you are not a native New Yorker, you might find this map useful when traveling around the New York and New Jersey areas.
8
Guide to Using the Game Screens
Crimson Tape). Please note that objects associated with role playing combat, such as weapons and armor, do not appear in the adventure game
inventory - they are considered to belong to the character who owns
them. (Otherwise, our inventory tray wou ld have to accommodate several
Adventure Game Screen
You will be interacting with the adventure game environments, such as the
rooms in the Superhero League of Hoboken Headquarters building, through
the Adventure Gome Screen shown below. Many of the missions require puzzle
solving in this environment, and for these you must manipulate objects using
this interface.
hundred icons and you would spend all of your time scrol ling through
inventory.)
5. The Crimson Tape icon, (yup, that's you, the little guy with the big smile
and the white spandex uniform) allows you to interact with the members
of your party. You can talk to them and ask them to use their respective
superpowers.
6. The Lightning Bolt icon gives you access to your party members' superpowers (without the bother of talking to them).
7. You travel from location to location inside each adventure game environment using the compass rose at the lower left, or by clicking your mouse
on specially assigned regions in the picture. Valid directions light up in
bright white. To move, simply click on the direction you wish to travel.
8.
UNDO is a command that allows you to take back your last move.
9.
If you click on the icon that looks like a floppy disk, a submenu of system
options wi ll appear. These system options include HELP, SAVE, RESTORE,
RESTART, MUSIC (adjust the volume level), STATUS (check on score and
status information), and QUIT (to DOS).
Building Commands
Icons and Other Screen Elements
I.
Communicate with the game by building game commands. Game commands are made from verbs (like the ones on the left side of the screen)
and objects.
2.
Use the verbs in the list on the left hand side of the screen together with
the objects in the picture and in your inventory.
3.
Click on the object you want to interact with first and then a verb, or on a
verb and then the object. You will see your game command constructed
on the command line as you click.
4.
If you choose the object-first syntax for building commands, you will see a
default verb supplied by the system once you click on an object. You can click
again to execute the default command or move the mouse cursor to build
another command using another object or a verb from the list on the left.
I. The picture is an example of what you as the story's main character could see.
2. Game objects can exist in the picture window and in your inventory. Items
in inventory are represented by icons at the bottom of the screen.
3. The names of al l of the significant or potentially useful objects and locations
in a picture will light up as you move the mouse cursor over them. If you
position the cursor over an object and its name does not light up, then you
cannot interact with it
4. The double tray under the text window is for your party's special inventory.
As you buy stuff. TAKE items from rooms, or TAKE items from the Storage
Cabinet (more on this later), you will see objects appear as icons in your
inventory. These objects are nominally in YOUR inventory (you as the
10
11
5.
A list of specialty verbs may appear when you click on an object. Specialty
verbs are directly associated with objects (e.g. the verb Drink may be associated only with a liquid).
6.
7.
8.
When you begin the game, you have only yourself in your party. Along the bottom of your screen you will see your picture (The Crimson Tape) and empty
gray boxes for each potential party member. As you select party members, the
gray rectangles will be replaced by pictures of the new party members. As you
Some game commands, like those using the verb PUT, require two objects
to complete.
advance from Level to Level, the size limit of your party wil l expand.
You will see feedback about your actions in the text window below the
picture.
the Lunch Room waiting to be selected. The Inventory and Stats in the middle
Left click on inactive regions of the screen to clear command lines.
At the top of your screen, the window will show one of the Superheroes in
of the screen pertain to this Superhero.
Selecting and Removing Party Members
Superhero Selection Screen
I. To scroll through pictures of available Superheroes, click on the right and
A party of Superheroes will accompany you on each mission. The Superhero
left arrow buttons on either side of the Superhero pictured at the top of
Selection Screen will allow you to review the Superheroes' qualifications and add
the screen.
or delete party members as needed for each mission.
2. As you scroll through the available choices of Superheroes, the Inventory
This screen is located in the Lunch Room in the Superhero League of
Hoboken Headquarters building where available Superheroes hang out while
awaiting assignment.
and Stats information wi ll change to correspond to the pictured Superhero.
3. To add a Superhero to your fighting party, simply click on the ADD button.
The selected Superhero wil l then be pictured in one of the gray boxes
Go NORTH from the room where you started out the game (Headquarters)
and you will find yourself in the Lunch Room, looking at the Superhero Selection
Screen.
along the bottom of the screen.
4.
To remove a party member, click on the picture of the Superhero in your
party that you want to get rid of and then click on the REMOVE button.
Additional Information About Superheroes
I . For a description and other information about any Superhero pictured on
the screen, first click on the picture to highlight it then click on INFO. This
wi ll show you a screen that contains a background description of the
Superhero and his or her Class.
All About Inventory
I . The inventory column lists objects that are being carried by the currently
selected Superhero.
2. A plus sign next to the item indicates that the Superhero is currently
equipped with that item and it wil l have an impact on combat. If the item is
armor, a plus sign indicates that it is being worn and as a resu lt increases
the party member's toughness. If the item is a weapon, then a plus sign
indicates that it is one of the selected weapons for combat and is being
held in such a way that it is ready to use in a fight. No plus sign indicates
that the item is simply being carried and wil l not have any effect on combat.
12
13
3. You do not have to worry about trying every combination of weapon and
armor to find what works best. The computer will decide how to optimally
7.
8.
equip a party member given what is in his or her inventory. For further help
refer to Distributing Weapons in the Hints for Novice Game Players section.
4.
Each Superhero can wear up to ten pieces of arm or that frt: on different
parts of the body (top of head, eyes, neck, shoulders, arms, hands, chest,
waist, legs, and feet). Armor modifies the toughness statistic and makes a
party member more resistant to damage in combat
5.
Items that are not used in combat, such as adventure game objects, are
grayed out (Note: The Crimson Tape is the only Superhero who can carry
these objects.)
6.
superpowers vary in effectiveness from I % to I 00%.
9.
Brawn, Brains, Toughness, and Health stats can all be increased during game
play. Toughness is increased by wearing armor. The other stats can be
increased by EATing; veggies increase Health, beef increases Brawn, and fish
increases Brains.
I O. Experience points are a kind of score that increases as the character
explores territory, participates in combat, and helps solve puzzles that complete missions. As each Superhero passes certain thresholds of experience,
he or she will advance in Class. A jump to a new Class will increase all
light it and then click on the LOOK button.
stats.
I. The statistics (stats) area contains information about the selected
Superhero.
Condition: Depending on the number of health points, this ranges from
just Peachy to Run Down to Pretty Zonked and finally, when health is at
zero, Zonked. Characters can also be Itchy, Paranoid, Glowing (irradiated),
and Hiccuping. Health points can be restored by RESTing. The party may
need to visit a Shaman (medicine man) to cure Itchy, Paranoid, Glowing, or
Hiccuping characters.
3. Brawn: An indication of the character's brute strength (and therefore how
hard the character hits during combat).
4.
Secondary Superpower: Additional superpowers are acquired as characters discover radioactive isotopes during their travels. These additional
For information about the items in inventory, first click on the item to high-
Statistics
2.
Primary Superpower: Each Superhero starts out excelling at one superpower.
I I . The little pictures of the party members along the bottom of the screen
actually contain important information about some of the stats. The little
white number in the upper left of this picture is the total toughness for that
character including armor. The green bar and the number at the bottom of
this picture is a graphical and numerical indicator of health.
Storage Cabinet
A nifty, infinitely expandable storage cabinet is located in the Superhero League
Headquarters. It can hold inventory items, weapons and armor. Remember to
check the storage cabinet when you first start out and whenever your League
advances to a new level because it will often contain useful goodies.
Brains: An indication of the relative intelligence of the character. Brains
affect the character's shooting ability and how effectively the character uses
his or her superpower. It also has a slight effect on hitting ability. Brains is
equivalent to "manna" or other kinds of "magic quotients" in other games.
5. Toughness: An indication of how resistant the character is to damage.
6.
Health: Shows the condition of the character, equivalent to Hit Points. At
zero health points the character is useless and cannot participate in combat
although he or she still remains with the party. If the health stat for all of
the characters in your party goes to zero, the party is out of commission
and the game is lost. Health points are restored by RESTing.
14
15
I. To access the storage cabinet, click on it and then click on OPEN.
Chaos and Discovery Maps
2. You can select an item to transfer by highlighting it. Then click on the
TAKE or PUT button to transfer the item from the storage cabinet to the
selected Superhero or from the selected Superhero to the storage cabinet.
Remember that the selected Superhero is indicated by a yellow rectangle.
You can also click on an item, hold down the left mouse button and drag
the item to a party member.
On the wall of the Mission Room you wi ll find two maps. By clicking on the
maps and then on the verb LOOK, you can access a fu ll screen interface that
Mission Information Screen
The computer in the Mission Room (upstairs in the Superhero League of
Hoboken Headquarters bui lding) is the source of League mission assignments.
The mission computer's name is Matilda.
gives you information about the terrain you will encounter.
The Discovery Map shows terrain you have exp lored. Because there are bonus
points for completely exploring a sector, this map wil l help you remember what
you have and have not explored.
The Chaos Map shows the level of monster activity in each sector. The chaos
value for a given sector is an indication of how likely you are to get into combat
when wandering in that sector. You can eliminate all of the monsters and
reduce the chaos value for a given sector to zero by repeated ly engaging in
combat until you wipe out all the monsters within the sector. You get bonus
points for clearing sectors.
Travel Map
Use the Travel Map to move from location to location across the geography of
the northeastern United States. Each map tile is a sector. Each sector has a
number and letter designation (e.g. 2C).
To access your current missions, TURN ON MAT ILDA by clicking on the mission computer.
I.
For detailed descriptions of the missions, click on the colored button to the
left of each of the five brief descriptions.
2. The detailed mission descriptions will contain important information about
the mission objectives and the map coordinates/locations.
3.
The Mission Information Screen is accessable from the Travel Map, so do not
worry about writing everything down before leaving Headquarters.
4. When you have satisfied the mission objectives, you must return to
Headquarters. Matilda will register the mission as completed.
16
Map Features
I . The pulsating orange and red cursor indicates t he position of t he party
within the sector. The party's current position can be seen by looking at
the coordinates (i.e., I, I 0) located in the upper left corner of your screen.
17
2.
Terrain types include highway, hi ll, city. flooded city, forest, radioactive
Forest: Cannot be traversed until the party is properly equipped to move
within the fo rest. The secret to this is a puzzle, so we wil l not reveal how
wasteland, suburb, deep water, etc.
you get equipped here.
Each sector is divided up into square tiles, which represent a terrain type.
3. As you travel around on the map, you will discover hot spots that represent
4.
5. Radioactive Terrain: Can have an abnormal effect on your party unless
interesting places in the sector. A pop-up window describing your discovery
your party members have been immunized against radiation poisoning.
wil l appear on top of the screen. In some cases t he hot spot wi ll represent
an adventure game environment or an entrance to another sector.
Traversing radioactive terrain may cause party members to become irradi-
4. The LOOK verb at the upper left allows you to examine the terrain directly
underfoot.
ated (condition GLOWING) if they have not been immunized. An irradiated party member does not always get restored to full health during a REST
period. The attention of a Shaman is required to treat radiation poisoning
although this condition w ill also disappear after a sufficent number of RESTs.
5. The REST verb al lows your party to rest, bringing health stats up to maximum.
6. The DANGER indicator wi ll appear if you are carrying the dangerometer
Superhero Information Screen
(obtained from the storage cabinet in Headquarters). This instrument indi-
This screen details the inventory and stats for the highlighted Superhero and
cates the potential nastiness of combat you will encounter in the sector
can be acccessed by pressing the HERO button from any point in the game.
your party is currently occupying. Note: The dangerometer does not pre-
On t his screen, the party is lined up along the bottom and the inventory and
dict combat frequency, just nastiness.
stats for the selected Superhero are displayed in the gray windows.
7. T he buttons underneath the compass rose access the system function s
such as SAVE and RESTORE, the Superhero Information Screen, the Party
Stats Summary Screen and the Mission Information Screen.
Movement
I . Move by cl icking on the compass rose at the lower left of the map (white
arrows indicate valid directions), by using the cursor control keys on your
keyboard, or by clicking on a region of the screen with your mouse. Hint
Before you leave Headquarters, use the this screen to equip your party for
combat. Equipping can mean changing the order of the party, and/or transferring armor and weapons between party members to maxim ize effectiveness
during combat
The yel low box around the picture of the Superhero indicates this Superhero is
currently selected. The inventory items and statistics you see in the gray w indows pertain to this Superhero.
Once you become comfortable navigating the map, you may find that using
the keyboard is the most efficient method of moving around.
Movement Restrictions Based on Terrain
I . Flooded City: Cannot be traversed unless the party is in possession of an
inflatable raft or rubber dinghy, or two of the party members have the
Really Good at Treading Water Superpower at 25% or better.
2. Deep W ater: Cannot be traversed unless the party is in possession of an
inflatable raft or rubber dinghy, or at least three of t he party members have
the Really Good at T reading Water Superpower at 50% or better.
3.
Hilly or Mountainous Terrain: Cannot be traversed until the party has
consumed a dose of power pil ls. Once consumed, the charge from a dose
of power pi lls lasts until the next REST period.
18
19
Order of Party Members
I. The order of yo ur party is important because the party fights in the order
the party members are displayed. The Superhero at the bottom left of the
screen is the leading Superhero as the party fights and travels. Organize
your party with Superheros that have the greatest combat skills at the left
and the Superheros wit.h the greatest combat superpowers at the right.
2. To change the order of your party, position the cursor over the party
member you want to move and while holding down the left mouse button,
move the mouse cursor to the slot yo u want the party member to occupy.
Now release the mouse button and the selected Superhero will be in the
new position.
Transferring Inventory Items
I. To transfer inventory items from one party member to another, select the
party member who has the item you want to move. Click on the item
while holding the left mouse button down, move the mouse cursor to the
picture of the party member you want to have the item, then release the
mouse button. This is called "clicking and dragging."
All About Inventory
I. The inventory column lists objects that are being carried by the selected
party member.
2. A plus sign next to the item indicates the Superhero is currently equipped
wfth that item and it will have an impact on combat. If the item is armor, a
plus sign indicates that it is being worn and increases the party member's
toughness. If the item is a weapon, then a plus sign indicates that ft is one
of the selected weapons for combat and is being held in such a way that it
is ready to use in a fight. No plus sign indicates that the ft:em is simply being
carried and will not have any effect on combat.
3. You do not have to worry about trying every combination of weapon and
armor to find out what works best. The computer will decide how to optimally equip a party member given what is in his or her inventory.
4. Each Superhero can wear up to ten pieces of armor that fit on different
parts of the body (top of head, eyes, neck, shoulders, arms, hands, chest,
waist, legs, and feet) . Armor modifies the toughness statistic and makes a
party member more resistant to damage in combat.
20
5. Items that are not used in combat, such as adventure game objects, are
grayed out. (Note: The Crimson Tape is the only one who can carry these
objects.)
6. To get information about items in inventory click on the item to highlight it
and then click on the LOOK button.
Superhero Statistics
I. The statistics (stats) area contains information about the Superhero pictured at the top of the screen.
2. Condition: Depending on the number of health points, this ranges from
Just Peachy to Run Down to Pretty Zonked and finally, when health is at
zero, Zonked. Characters can also be Itchy, Paranoid, Glowing (irradiated),
and Hiccuping. Health points can be restored by RESTing. The party may
need to visit a Shaman medicine man to cure Itchy, Paranoid, Glowing, or
Hiccuping characters.
3. Brawn: An indication of the character's brute strength (and therefore how
hard the character hits during combat).
4. Brains: An indication of the relative intelligence of the character. Brains
affect the character's shooting ability and his or her abilft:y to use his superpower. Brains also has a slight effect on hft:ting ability. It is equivalent to
"manna" or other kinds of "magic quotients" in other games.
5. Toughness: An indication of how resistant the character is to damage.
6. Health: Shows the condition of the character, equivalent to hit points. At
zero health points the character is useless and cannot participate in combat
although he or she remains wft:h the party. If the health stat for all of the
characters in your party goes to zero, the party is out of commission and
the game is lost. Health points are restored by RESTing.
7. Primary Superpower: Each Superhero starts out excelling at one superpower.
8. Secondary Superpower: Addft:ional superpowers are acquired as characters come across radioactive isotopes during their travels. These additional
superpowers vary in effectiveness from I% to I00%.
9.
Brawn, Brains, Toughness, and Health stats can all be increased during game
play. Toughness is increased by wearing armor. The other stats can be
increased by EATing; veggies increase Health, beef increases Brawn, and fish
increases Brains.
21
I0. Experience points are a score that increases as the character explores territory, participates in combat, and helps solve puzzles that complete missions.
As each Superhero passes certain thresholds of experience, he or she wi ll
advance in Class. A jump to a new Class wil l increase all stats.
I I. The little pictures of the party members along the bottom of the screen
actually contain important information about some of the stats. The little
white number in the upper left of the picture is the total toughness for that
character including armor. The green bar and the number at the bottom of
the picture is a graphical and numerical indicator of health.
12. To get information about a Superhero, click on INFO. This wi ll show you a
screen that contains a description of the Superhero, his or her Class, his or
her condition, and the number of experience points accrued.
Party Stats Summary Screen
The Party Stats Summary Screen provides a snapshot of the party's condition. All
stats and party member conditions are displayed, along with a summary of provisions and party funds available.
Combat Screen
The Combat Screen is perhaps the most complex of the interfaces and requires
some explanation. Combat occurs when your party comes into contact w ith a
band of nasties (monsters). During combat members of your party tight with
the monsters until either your party wins the tight, your party flees the scene,
or your party is wiped out.
Combat is fought in rounds. During each round, members of your party and
monsters from the band of nasties wi ll get a chance to attack each other. Each
round proceeds sequentially, with all of the members of one group getting a
chance to attack a target in the opposing group. If you surprise the monsters,
you wi ll have the opportun ity to attack first. Otherwise, if the monsters surprise you, they wi ll have the first opportunity to attack.
You can pick the target and type of attack for each Superhero. The computer
wi ll tight for the monsters. Each attack may or may not result in damage.
Damage manifests itself as a decrease in health points. Damage is calculated
based on the weapon used, the strength of the attacking party member or
monster, and the toughness of the monster or party member being attacked.
When health points for a party member or monster go to zero, then that party
member or monster is out of commission. When an entire party or band of
monsters has been knocked out of commission, then the tight ends.
22
23
Screen Elements
cower if a Superhero is out of hand-to-hand range, is missing a good combat superpower, AND has a lousy shooting weapon.
I. The monsters are lined up along the top of the screen. The colored graphs
underneath the little pictures of the monsters are an indication of each
6. Single Curved Arrow (One Round of Auto-combat): This icon represents
monster's condition (health points) .
one round of auto-combat. Selecting it will cause the computer to fight
one round for you. The computer does not necessarily make the best
2. Double click on the monster pictures at the top of the screen to get stats,
choices when it comes to weapons, targets, superpower options, and com-
descriptions, and other information.
bat tactics.
3. The window containing the animation shows you all the monsters within
7.
hand-to-hand range. Depending on the terrain, you will see one, two, or
three monsters. This allows you to see the nasties in all of their mutated,
horrifying, hilarious, and ridiculous glory.
8.
4. The text window to the right of the animation window describes all the
action during combat.
Combat Icons
I . Combat icons are located under the text window.
9.
2. Knife icon (Attack): The knife icon is for a close-in attack using the weapon
mercy.
Because only the first one to three monsters (depending on terrain) are
within hand-to-hand range, the attack option is limited to the corresponding
Superheroes in the first, second, and third positions in the party line-up.
I 0. Money Sack Icon (Bribe): Click on this to offer a bribe to your opponents.
If the greed stat of your selected opponent is high (check the stats by double clicking on its small picture), then it might leave your party alone if you
3. Gun Icon (Shoot): This is for a shooting attack with a ranged weapon (i.e.
pay it.
pistol, slingshot, laser, sling, hip mounted catapult, bowel disrupter, gizzard
exploder, etc.). Party members farther back in the pack can use shooting
I I. Fleeing Man Icon (Run Away): The fleeing man icon is for running away
(leaving the scene, getting lost, or taking off). If it looks like your party is
weapons to attack opponents.
5.
24
Shield Icon (Cower): The shield icon is for a defensive crouch that temporarily improves toughness for one round of combat. You might want to
Clasped Hands (Beg for Mercy): The clasped hands are a last resort. If
clicking on its small picture), it might leave your party alone if you beg for
shard, rusty nail, modified joy buzzer, nuclear tipped brass knuckles, etc.).
Lightning Bolt Icon (Use a Superpower): The lightning bolt icon is for a
superpower attack (i.e. Increase Foe's Cholesterol Level, Put Animals to
Sleep, Induce Rust, Cause Root Rot, etc.). Not all superpowers are effective in combat (you cannot use Clean Almost Any Mess during a fight).
Not all combat superpowers are effective against all opponents. Useable
superpowers will be displayed in bold. If you try using Induce Rust on a
Junk Bond Amoeba, it wil l not be as effective as using it on a Mutated
Welding Robot. When used properly, however, superpowers are your
most effective weapons.
Speech Bubble Icon (Kibbitz): This is a kind of cheerleader option. Clicking
on this icon will cause the selected Superhero to give advice to another of
the party members, temporarily increasing that party member's offensive
weapon capabilities. You might want to use this option instead of Cower if
you have a particularly tough Superhero who is not in hand-to-hand range,
has no effective combat superpower, and has a lousy shooting weapon.
your opponent has a high mercy rating (check the monster stats by double
selected for hand-to-hand combat (i.e. knife, pointy stick, two-by-four, glass
4.
Double Arrow (Icon Toggle): The double arrow toggles the combat icons.
Use this to see the rest of the possible combat actions.
going to lose, then the best thing to do is run away. You might lose some
money or a weapon or two during the flight, but at least your party will live
to fight another day.
t
l
12. Double Curved Arrows Icon (Auto-combat for All Rounds): The double
curved arrows icon is for auto-combat through the end of the combat
encounter. Selecting this will cause the computer to make the decisions for
your party until the fight is resolved. The same warning offered for one
round of auto-combat applies here: use this only when the outcome of the
combat is assured. The computer does not make the best tactical decisions. This is a good option to pick only when you have a party of six to
nine super tough guys and you stumble on a bunch of wimpy monsters.
25
Combat
I. You wil l use the combat icons described here during your party's tum in a
round of combat. Each Superhero wi ll have a chance to pick a target and
take his or her best shot. You can tell which Superhero's tum it is by the
yellow rectangle around the picture of that party member. You designate a
target for your action by clicking on the monster you wish to se lect. A
white outline wi ll show the selected monster.
2.
A red circle with a line through it w ill appear over those icons that are not
avai lable (the knife close-in attack icon will be blocked out if a monster is
out of hand-t o-hand range of the selected Superhero).
3. If your party loses, then you lose the game (unti l you RESTORE, anyway).
When things look desperate and you are sure you are going to lose a fight,
run away!
Buying and Selling Stuff
During your travels your party wi ll come across quite a number of vi llage marketplaces. The marketplaces wil l have a varying number of shops where your
party can buy and sell items.
26
When your party enters a shop, look at the wares that are for sale. You can
use party funds to buy or sell spiffy new weapons and armor, as well as adventure game objects that are useful for solving puzzles related to the completion
of missions.
I . The items for sale appear on the right hand side.
2. The items in the inventory of t he selected Superhero appear on the left
hand side.
4. T he prices for items you can buy are to the right of the items in the shop.
T o buy something, simply select the item to buy by clicking on it and then
click on t he BUY button. If you have sufficient party funds, the price wil l be
deducted and the item w ill be transferred into the inventory of the selected
Superhero.
5. To sell something, select the item to sel l by clicking on it and then click on
the SELL button. T he price you w ill get for selling something in a
Superhero's inventory appears next to the name of that it em in the inventory window.
6.
You can select a new Superhero (along with his or her corresponding
inventory) to buy or sell by cl icking on one of the pictures of your party
members that line the bottom of the screen.
27
Hints for Novice Role-players
Pre-Combat
Selecting Your Party
shooting weapons, such as the pitching machine and the spitball shooter.
Superheroes with a good combat superpower, such as "put animals to sleep,"
wi ll often be using that superpower. You should not waste your best weapons
on such a Superhero.
First, you (The Crimson Tape) must be in every party. Second, you must
In the example Level I party described above, you should give your best hand-
include any Superhero whose power wi ll be needed to complete the mission
to-hand weapon to Robomop, your best shooting weapon to The Crimson
you are embarking on. Remaining party slots should be filled with Superheroes
Tape, your second-best of each to Iron Tummy, and table scraps to Tropical
who w ill perform best during combat.
Oil Man.
Health points are the best indicator of a Superhero's survival chances during
Distributing Your Hardware
combat. On the other hand, a Superhero with a low number of health points but
a potent combat-related superpower can be very useful.Try to strike a balance.
The various garments and devices that increase toughness can be worn in any
of I 0 body locations: head, eyes, waist, knees, etc. Therefore, a Superhero can
A good Level I party would be The Crimson Tape, The Iron Tummy,
have up to I 0 such pieces of armor. As with weapons, the best piece of armor
Robomop, and Tropical Oil Man.
for a particular spot wi ll be automatically equipped, as indicated by a+ next to
its name.
Ordering Your Party
From both an offensive and defensive point of view, the first, second and third
party members are the ones who engage in hand-to-hand combat, and wil l
bear the brunt of combat, so these should be your toughest Superheroes. Also,
note that the effectiveness of shooting weapons decreases with distance, but
the superpowers are equally effective regardless of how far back the Superhero
is. Therefore, your relatively weak Superheroes with offensive superpowers
should bring up the rear.
The effectiveness of additional armor decreases as a Superhero's toughness
level increases. Therefore, you can get the most toughness for the buck by distributing your armor in order to keep every party member at approximately
the same toughness level.
Avoiding Sectors
With just a few exceptions, the nastiness of your combats are dependent on
the sector you are in. If you find yourself getting constantly beaten in combat,
A good ordering for the Level I party suggested above: Robomop, The Iron
you may be in a sector that is too tough for you; try coming back when your
Tummy, The Crimson Tape, Tropical Oil Man.
party is larger, or at least tougher. Note: Combat against manageable opponents shou ld NOT be avoided; these combats wi ll help you gain experience,
Distributing Your Weapons
Superheroes toward the front of your party are most likely to be engaged in
hand-to-hand combat, requiring hand-held weapons such as billy clubs and
pointy sticks. Give these Superheroes your best hand-held weapons. You can
tell how good a weapon is by clicking on the LOOK button in the Superhero
Information Screen or the Buy-Sell Screen. If you give two weapons to a
Superhero, the best one will be automatically equipped. The equipped weapon
will be the one with the + next to its name.
money, and various goodies from post-combat caches.
During Level I, you do not need to visit any sectors other than 2C, 20, 30,
and Newark.
Resting
On one hand, you do not want to rest every time any party member is less
than I 00%, or else you wi ll constantly be running out of provisions and having
Superheroes beyond the first slot, and especially those beyond the third slot,
to hurry back to Headquarters. On the other hand, you do not want to go into
combat in battered condition, because then a normally manageable bunch of
are most li kely to be shooting at their targets, and should be given the best
nasties wil l punch your lights out.
28
29
You will have to decide to rest based on how daring you want to be. A good
front of the pack will usually cause more damage than shooting at an opponent
rule of thumb is to rest any time that one or more of your party members is
toward the back of the pack.
completely zonked.
If you are going to use a superpower, try to match the power with the target.
Health
Consult the
It is usually better to concentrate on getting rid of one opponent, especially a
Party Stats Summary Screen to check out the condition of each
really tough one, than it is to sprinkle your targets around, partially injuring
party member. In addition to combat injuries, which will be healed by resting,
many opponents. One counter example is the Marketoon, who cannot be
other sub-optimal conditions will be shown. These conditions will have a vari-
killed; just injure him and wait for him to flee.
ety of bad side effects, including inability to heal and poor performance during
combat.
These conditions will eventually wear off while resting. If you want to make them
go away sooner, you will have to visit a Shaman and pay for special healing.
You have a choice of seven actions during combat: Attack, Shoot, Use a
Superpower, Cower, Beg, Bribe, and Kibbitz.
Not every Superhero has a superpower that is useful during combat For those
The Chaos Map and the Dangerometer
The
Deciding on an Action
that do, Use a Superpower is usually the right choice, provided that there are
Chaos Map is located in the Mission Room back in Hoboken. It tells you
how likely you are to get into combats in any given area, but not how nasty
those combats will be.
opponents for which the superpower is effective. More on this in the next section.
A TIACK can only be used by those Superheroes engaged in hand-to-hand
combat, which are in positions one, two, or three depending on the terrain. In
The dangerometer is found in the Headquarters Storage Cabinet, and can be
addition, these Superheroes can only attack opponents who are also engaged
carried around with you. It does not tell you the probability of a combat occur-
in hand-to-hand combat. This is usually your most effective combat technique.
ring, but it does tell you how nasty a combat will be if it does occur. Its information is displayed in the upper left comer of the
Travel Map. The redder the
display, the more dangerous the combats in this sector.
Combat
Selecting Your Target
SHOOT can be used by any Superhero against any opponent. However, note
that if a Superhero is engaged in hand-to-hand combat, he is much less likely to
be able to aim properly. Also note that the effectiveness of shooting weapons
decreases with distance, so it is usually best to Shoot at opponents toward the
front of their party.
COWER has no offensive purpose, but it does temporarily increase a
Your combat-related actions are directed against one opponent at a time. The
Superhero's toughness by 50%, so it's a good thing to try if a Superhero has
current target is the opponent whose small picture has a white rectangle sur-
nothing useful to do during a particular round of combat.
rounding it. You can change the target simply by clicking on the picture of
another opponent.
Depending on the terrain, the first, second or third members of each party may
be engaged in hand-to-hand combat. This is indicated by the number of opponents who appear in the large picture. If you want to attack an opponent with a
hand-to-hand weapon, your target must be one of those first three opponents.
If you are going to be using a shooting weapon, keep in mind that the effectiveness wi ll drop off with distance, so that shooting at an opponent toward the
30
BEG is best used as a last resort, and is most effective against an opponent with
a high mercy rating. This rating can be gleaned by double clicking on an opponents small picture.
BRIBE is best used as a last resort against an opponent with a high greed rating.
KIBBITZ is another useful option for a Superhero with nothing particularly useful to do during the current round of combat. It increases the offensive ability of
another party member.
31
How to Choose a Superpower
Eating beef, fish, and vegetable dishes will increase vital statistics. These are usu-
Not all superpowers work against every opponent. For example, "put animals
ally a good investment, especially early in the game, since the effect of increas-
to sleep" is very effective against animals, less effective against humans, and not
ing Brains, Brawn, or Health will be multiplied each time a Superhero advances
to the next class.
at all effective against machines. "induce rust" works only on opponents wft:h
metal parts.
Buying isotopes is sometimes a good investment, and sometimes a waste of
When to Run Away
money. You will have to make this evaluation based on your current situation.
If all appears lost, then you have no choice but to Run Away. This will save you
If you think you do not need an adventure ftem, sell it to a pawnbroker. In the
from losing the game, although you may lose money, a weapon, hardware, or a
worst case, you could be wrong and have to buy ft back at a very reasonable
markup.
combination of the three. The best time to run away is when you get to your
last party member. Remember that once your last party member does something, the opponents will attack. The question you need to ask yourself is, "Can
I survive another round of pounding?" If the answer is no, then Run Away!
Buying resistance to radioactivity is money well spent. Radioactive areas are
usually loaded wft:h valuable caches.
Exploration Bonuses
Speeding Up Combat
Visft:ing every location in a sector will give every party member a special exploYou can use One Round of Auto-Combat, or the even faster Auto-Combat
ration bonus, increasing experience and leading to more rapid class advance-
for All Rounds, to speed through the combat sequences. You should generally
ment. (Note: each time you completely explore a sector, the bonus increases.)
use these features when you are up against a party that you know you could
defeat. Alternately, if you realize you are going to lose, you may just want to
get it over with.
The Discovery Map in the Mission Room is useful for showing which sectors
have yet to be completely ex plored.
Bonuses for Cleaning Up a Sector
Other
Budgeting Your Money
Once you have defeated every group of opponents in a sector, every party
member will receive a special bonus, increasing experience and leading to more
Money comes from post-combat caches, completing all the missions in a level,
rapid class advancement. (Note: each time you clean up a sector, the bonus
increases.)
and selling items to the various shops.
Money is used to buy weapons, hardware, miscellaneous items from pawn
shops, miscellaneous items from various individuals who roam the countryside,
bribing opponents during combat, and buying immunity to radioactivity.
There is usually not enough money to buy everything you could possibly want.
Once you have bought one or two really good hand-held weapons for your
first or second party members, it's not worth spending a lot more on hand-held
weapons. The same goes for buying shooting weapons for those party member
who do the most shooting during combat.
Since every Superhero can wear up to I 0 pieces of hardware, such armor .
makes a very good investment.
32
The Chaos Map in the Mission Room is useful for showing which sectors have
not been cleaned of bad guys.
On occasion, a special combat will occur in a sector even after you have
cleaned it up.
Class Advancement
Superheroes gain experience from completing missions, winning combats, performing special tasks, buying the services of a Brothel, exploring every location
in a sector, and cleaning a sector of all nasties.
Once a certain amount of experience is accrued, a Superhero advances to the
next class, such as advancing from Fifth Class to Fourth Class. This increases all
of his or her statistics: Health, Brains, Brawn, and Toughness.
33
Once a Superhero reaches First Class, continued experience accrual leads to
Hints for Novice Adventure Gamers
decorations, which can make a Superhero impervious to attack during initial
rounds of combat.
As you travel from place to place in the game you will encounter situations in
Level Advancement
adventure game environments which require action on your part in order to
When all the missions on a level have been completed, and the party returns
to Headquarters, the entire Superhero League advances to a new level. As a
puzzles. The game designer has provided you with clues along the way that
lead to the solution, but you must figure out how to get there using available
result, all members of the Superhero League gain experience, there is a mone-
objects or information.
advance the story or complete the mission. These situations are, in essence,
tary bonus, the maximum party size increases, and a new set of missions
becomes available. Also, the Superhero League's newly-raised status often
Many of the missions require puzzle solving in one form or another. When we
induces new Superheroes to join up.
talk about puzzle solving we are not necessarily refenring to traditional logic
puzzles or word games.
Consider the following example situation. The protagonist is being chased
through a dark cave by a honrible monster. He gets to the edge of deep chasm
over a river of lava. There is no apparent way across. The monster is getting
closer. Our Superhero is carrying a rope and there is a rock projection from
the roof of the cave just within reach of a good toss.
In a movie or book. the protagonist takes action and resolves the situation by
creating a lasso, throwing it over the rock projection, and then swinging across.
In an adventure game, this situation would be a puzzle. You, as the game's
main character, are faced with the dilemma. You have collected the rope at a
previous point in the story. You must make the intuitive leap to use the rope
to swing across. You must make the lasso and throw it over the rock, and then
you must swing across.
Clever use of objects is the key to adventure game puzzle solving. Even when
the clues come from information gleaned from non-player characters, the
mechanics of solving puzzles comes down to the manipulation of objects.
We have tried to simplify life in the adventure game portions of this game by
maintaining only tho.se objects needed to solve adventure game puzzles in
inventory when you are in the adventure game interface. You do not have to
worry about weapons and armor when you are trying to figure out how to
solve a puzzle.
Five Pieces of Advice for Novice Adventure Gamers
I. Crime pays. TAKE everything that is not nailed down, even if it seems
utterly ridiculous and useless at the time.
34
35
2.
Keep your eyes open. Examine every object that you come across; you
Help! Troubleshooting And
Technical Assistance
'
will get extra tidbits of infomiation that may yield clues as to the solutions
to puzzles.
3.
4.
5.
SAVE early and SAVE often. Adventuring can be as dangerous as fighting
Some common problems and their solutions are described in this section. If
monsters. SAVE before doing something new that might be dangerous.
your problem is not addressed, first make a boot disk by exactly following the
Try crazy stuff. If you cannot seem to solve a puzzle but think you are on
instructions in the next section. If this does not solve your problem, please call
the right track because of clues given in the game text, then try crazy stuff
our Technical Support Department at one of the numbers listed in the front of
PUT objects on different objects. Look at the specialty verbs that come up
this manual for specific help.
when you click on objects in the picture and in your inventory. Sometimes
When calling Technical Support please have infomiation available about your
the right combination is just a couple of clicks away.
system configuration, DOS version, type of graphics adapter card, and sound
card. It is most helpful if you are at your computer when you call so that we
Keep Looking. If you think you are missing something or you just cannot
figure out how to use the objects you have to solve a particular puzzle,
then keep looking. The key object you need may be in a location you have
not explored yet. It also might be sitting overlooked in a room or market-
can walk you through the problem.
If you would like game hints, callers within the continental U.S. may call our 24hour automated hint line at 1-900-933-CLUE ( 1-900-933-2583). You can
place that you have already been in. As a last resort, try backtracking to
order a hint book ($9.95 plus shipping and handling) by calling 1-800-658-8891,
some of your recent stops.
or 703-222-8515 (NO HINTS WILL BE GIVEN ON THESE NUMBERS). You
If you get really stuck on an adventure game puzzle, here are some suggestions
for breaking the logjam:
might also try dialing with a modem into one of the on-line services where you
can talk to real live gamers who have probably been stuck in the same place
you are.
I. Talk it over with a friend, relative, spouse, lover, or even your pet cat.
Sometimes just articulating the problem wil l steer you towards a solution.
2.
Look for hints from fellow gamers using one of the major on-line services.
If you are a member of CompuServe, type the command GO GAMCPUB at
any ! prompt to get to Legend Entertainment's support area (Section 7), or
contact our Customer Support Department at ID #72662, I 021.
Compuserve, Prodigy, and GEnie all have active gamer areas and forums.
I've got an MT-32 and do not hear any music
3.
4.
Look for hints in game magazines. Many computer game magazines will run
walk-throughs or articles on strategy for specific games. These features will
often contain specific hints (if not the answers) to most if not all of the puzzles.
If you have a Roland MT-32 (or compatible) sound module and you are not
hearing any music, start the game with the command SLH MT32. If you are still
Call our 24-hour automated hint line at 1-900-933-CLUE ( 1-900-933-
not hearing any music, the difficulty can probably be traced to one of two
sources:
2583) for hints and answers. The cost is a reasonable $.75 for the first
minute and $.50 for each minute thereafter.
5.
You may have two cards in your computer that are set to the same IRQ. If
Order a hint book by calling the appropriate number as listed in the front
this is the case, change the IRQ value for one of the cards by using the
card's jumpers or switches. Some cards may not allow this. Consult the
of this manual.
manual for the card for more details.
Remember that there may come a point where a hard puzzle stops being fun
and becomes merely a frustration. This is understandable. Get some help.
We do not want you to be frustrated - we want you to finish the game.
36
I.
2.
Your MIDI interface may be set t o an IRQ or an I/O address other than the
default values of 2 and 330, respectively. In this case, you should change
the IRQ and I/O addresses by re-running INSTALL.
37
The game crashes near the beginning
I've never had a problem like this before...
If you get a crash when you start up the game, make sure you have taken all of
your TSR (Terminate and Stay Resident) programs out of RAM. You need at
least 580,000 bytes of free memory to avoid the low memory warning. To
solve this problem, follow the instructions in the next section entitled, Creating
Do not panic, chances are you are getting interference from a forgotten TSR.
Tum to the next section and create a boot disk by following the instructions
exactly. If yo u are still having problems, please call our Technical Support
Department at one of the numbers listed at the front of this manual.
a DOS Boot Disk.
The mouse cursor isn't anywhere to be seen.
If the mouse does not seem to be working, make sure you install the mouse
driver before you start up the game. You can usually accomplish this by typing
MOUSE <ENTER> from the MS-DOS prompt. If you get a Bad command or
file name error, find out where the mouse driver lives on the disk or consult the
documentation that came with your mouse and its driver software.
I'm having trouble completing commands
On a slow machine the mouse cursor may flicker and create control problems
when there is animation on the screen. You can eliminate this problem by
pressing <F7> to disable animation.
I start the game, play for a few turns and then the program «goes to
lunch,,
If the game hangs ,in the first few rooms and you have a Sound Blaster or compatible card, you most likely have the wrong IRQ or an IRQ conflict. You
should check the IRQ and address information for your card and change the
configuration using the INSTALL program.
If you are using DOS 6.0 or higher, QEMM, or 386MAX, you should be able
to optimize your configuration. All of these products come with tools which
should enable you, under normal circumstances to create at least 600k of free
memory.
I have a Diamond Stealth graphics card and my screen is filling with
green and yellow garbage during some of the animations
Exit from the room with the animation that is causing the trouble. Disable animation with the <F7> key. When you return to the room picture with the
problem, the garbage should be gone. You can re-enable animation with <F7>
once you have gotten past the room with the problem.
38
39
Creating A DOS Boot Disk
If you are suffering from problems that you cannot explain, the procedures outlined here may help.
If you have DOS 6.0 or higher you may bypass your AUTO EXEC.BAT and
CON FIG.SYS by pressing <FS> or single step through these files by pressing
<FS>. Read your DOS manual for further help.
For other versions, the steps below will allow you to boot your machine from a
clean system boot disk, uncluttered by autoloading TSR's, device drivers, and
complicated CONFIG.SYS files. To create a boot disk, it is easiest to use the
automatic feature in the install program. Simply return to the DOS prompt in
the directory where you have installed this game. Then type INSTALL
<ENTER>. From the installations options menu, choose "create a bootable
disk" by using the arrow keys and pressing <ENTER>. The program will direct
you to insert a blank disk at the appropriate time and will let you know when
the boot disk has been created.
Now reboot your computer with this disk still in your A: drive. When the
boot process is complete you will see this DOS prompt: A:>
4.
If you see any files listed, you need to go back to step I because the disk is
not blank and if you continue from here you will wipe out everything on
the disk.
5.
Type FORMAT A:/S <ENTER>.
6.
Type N when DOS asks if you want to format another diskette
7. Type DIR A: <ENTER>.
8. You should see COMMAND.COM listed in the newly formatted disk's
directory. If you do not, type COPY C:\COMMAND.COM A: <ENTER>.
9. Type A: <ENTER>.
I 0. Type COPY CON CON FIG.SYS <ENTER>; the DOS prompt is now
gone, but the cursor is still there.
I I . Type FILES=20 <ENTER>.
12. Type BUFFERS=20 <ENTER>.
14. Type DEVICE=C:\DOS\HIMEM.SYS <ENTER>.
15. Type DOS=HIGH
Then:
16. Hold down the <CRTL> key and hit Z once, then <ENTER>.
I . Type C: <ENTER>.
DOS tells you it copied one file and the DOS prompt is back on the screen.
Congratulations! You just made your own DOS system configuration file on
your own DOS system boot disk. Now reboot your computer with this
diskette still in your A: drive. When the boot process is complete you will see
this DOS prompt: A:>
2. Type MOUSE <ENTER>. (If you get a Bad command or file name error, find
out where the mouse driver lives on the disk or consult the documentation
that came with you r mouse and its driver software.)
3. Type CD\ and then the name of the directory where you have installed the
game, or CD\SLH if you have used the default directory. Then, <ENTER>.
17. Then type C: <ENTER>.
This same process may be duplicated manually by following these steps:
18. Then type MOUSE <ENTER>. (If you get a Bad command or file name
error, find out where the mouse driver lives on the disk or consult the documentation that came with your mouse and its driver software.)
I . Find a blank diskette for your A: drive.
19. Type CD\SLH <ENTER>.
4. Type the appropriate command as listed in Configuration Options.
2.
Insert the blank diskette in the A: drive and close the drive door.
3. Type DIR A: <ENTER>.
40
20. Type the appropriate command as listed in Configuration Options.
If you have any further trouble, please call Technical Support at one of the
numbers listed at the front of this manual.
41
About The Author
Credits
STEVE MERETZKY has been writing computer games since dinosaurs roamed
Game Design ....... ..... .. ............ .... ....... ..... .................... .. ....... Steve Meretzky
Art ................................. .. ............ Kinetic Arts (Cindy Koval ck, Peter Calabria,
Tanya Isaacson), Paul Mock,
Anne-Marie Cox, Mark Poesch
Music .... .. .. .. .............. ..... .... ........ ...... .. Arfing Dog, Eric Heberling, Mike Verdu
System Architecture .... ........ .. .... .... ...... . Duane Beck, Mark Poesch, Mike Verdu
Planetfall, Leather Goddesses
of Phobos, Zari< Zero, Spellcosting I0 I: Sorcerers Get All the Girls, and The
Hitchhiker's Guide to the Galaxy (in collaboration with Douglas Adams) . He lives
the earth. Some of his less derided efforts include
in Massachusetts with his spouse (Betty), two children (Danny and Sasha) , a
goldfish (Brownie), an imaginary toaster oven repairman (Clyde), and approx imately 900 spiders (names unknown). Steve has never been indicted by a
grand jury.
System Programming ............ .... ...... ...... ..... ......... .Duane Beck, Chip Kerchner
Mark Poesch
Additional Programming .. ... .. .. ...... ..... ........ .. .... .... .. .. .............. ... Leo DaCosta
Sound Effects ............. ..... ......... ......... ...... .. ... .............. .. ............. Duane Beck
Role Playing Interfaces ............... .. ........... .. .... .. ...... James Synoski. Duane Beck,
Chip Kerchner, Mark Poesch
Package Design .............. .... .. .... ....... ... ..... ..... .... .... .. ... ..... .. ......... Peggy Oriani
Production Coordination ... .. .. ...... .... ...... ........ .... .. .. ................. Rosie Freeman
Cover Illustration .. ...................... .. .... .. ... ... ..................... Francesco Santalucia
Testing ... ................. ...... ..... ........... ......... .. ........... . Alyssa Verdu, Jeremy Lam,
joven Malazo, Ron Gibson
Producers .... .... ... ..... .... .. ....... .... .. ... ......... ... ...... .. Mike Verdu, Steve Meretzky
Steve Meretzky gratefully acknowledges the help and support
of the following people and organizations
Yale University Information Office
Princeton University Information Office
Hoboken Chamber of Commerce
Lincoln Public Library
U.S. Geological Survey
National Park Service, Morristown National Historic Park
National Park Service, Edison National Historic Site
THAT Agency
Bob Bates
Jim Sullivan
New York Yankees Baseball Club
42
43
Legal Stuff
We appreciate your purchasing a license to use our product, and w e want you
to feel good about that purchase. Unfortunately, our lawyers have forced us to
put some rather obnoxious verbiage here. Fortunately, all of our competrtion
puts the same stuff in their manuals. Some of the things written below may
appear to be outrageous and unconscionable. But then, so are our lawyers.
(Did you hear the one about the lawyer who stepped in a pile of manure and
thought he was melting?)
I . Limited Warranty. This manual and the re.lated software product are sold
"AS IS," without warranty as to their performa.nce. Wart a minute! You
mean that if the program does not have a happy ending, I do not get my
money back? . ..Yes. We have probably already spent your money to keep our
programmers in pizza anyway. Here comes some more legalese to try to nail
down that concept.
The entire risk as to the quality and performance of the computer software
program is assumed by the user. However, Legend Entertainment Company
warrants for a period of 90 days to the original purchaser that the medium
on which the software is recorded is free from defects in material and workmanship. If during that period ending 90 days from purchase a defect should
become apparent, return the disk to Legend or your dealer and Legend will
replace the disk without charge to you. Your sole and exclusive remedy in
the event of a defect is expressly limited to replacement of the disk as provided above. This warranty gives you specific legal rights and you may also
have other rights which vary from state to state. (NOTE: After the warranty
period, a defective disk may be returned to us wrth a check or money order for
$7.50 U.S. and we will replace rt.)
WARE OR ANY BREACH OF THE WARRANTY SET FORTH ABOVE.
SOME STATES DO NOT ALLOW THE EXCLUSION OR LIMITATION OF
INCIDENTAL OR CONSEQUENTIAL DAMAGES, SO THE ABOVE LIMITATION MAY NOT APPLY TO YOU. For example, you may be playing our
game when a friend passing by is distracted by some of the graphics. He walks
into a floor lamp. The lamp fal ls over, scaring your cat. The cat streaks from
the room, upsetting a heater wh ich sets some curtains afire. Unfortunately, it is
a windy day and the fire is soon out of control. Three days later Chicago is still
ablaze. If we took out an insurance policy against such remote contingencies,
we'd have to charge $ 1599.99 for the game, and you would not be reading this
lame copy. Anyway, we do not assume liabilrty for things li ke this, even ifthe
city is a small one like Muleshoe, Texas.
2. Copyright. This manual and the related software product are copyright
© , 1994, by Legend Entertainment Company. All rights are reserved. This
document may not, in whole or part, be copied, reproduced, plagiarized, or
otherwise ripped off without our express consent (which we are not going to
give). The money you spent on this product purchased a license to use it
(check your other software; almost no software is sold these days). The scope
of the license is to make such copies as are reasonably necessary for your personal use. You do not have the right to give copies to your friends (or enemies). Unreasonable copying and/or distributing of this product is a violation of
law. The U. S. Copyright Act provides for statutory damages of up to $50,000
for w illful infringement of a copyright. Giving copies of our software to your
friends is an infringement. GOTCHA! Now that you know that unauthorized
copying is an infringement, if you do so it w ill be wi llfu l, and you can be nailed
for some big bucks if we catch you_.
3. Other Copyright and Trademark Notices.
" Legend Entertainment" is a registered trademark of Legend Entertainment
THE WARRANTIES SET FORTH ABOVE ARE IN LIEU OF ALL WARRANTIES, EXPRESS OR IMPLIED, INCLUDING ANY IMPLIED WARRANTIES OF MERCHANTABILITY OR FITNESS FOR ANY PARTICULAR
PURPOSE. SOME STATES DO NOT ALLOW LIMITATIONS ON HOW
LONG AN IMPLIED WARRANTY LASTS, SO THE ABOVE LIMITATION
MAY NOT APPLY TO YOU. IN NO EVENT SHALL LEGEND ENTERTAINMENT COMPANY OR ANYONE ELSE WHO HAS BEEN INVOLVED
IN THE CREATION OR PRODUCTION OF THIS COMPUTER SOFTWARE PROGRAM BE LIABLE FOR DIRECT, INDIRECT, SPECIAL, OR
CONSEQUENTIAL DAMAGES ARISING OUT OF USE OF THIS SOFT-
Company.
"Adlib Music Synthesizer Card" is a trademark of AdLib Inc.
" Sound Blaster" is a trademark of Creative Labs, Inc.
MIDI Interface Toolkit Copyright©, 1987 and 1989, by MusicQuest, Inc. All
rights reserved by MusicQuest.
" MT-32," "MT- I 00," "CM-32L," and " LAPC-1" are trademarks of Roland
Corporation.
" CompuServe" is a trademark of CompuServe Incorporated.
"IBM" is a trademark of IBM Corporation.
44
45
"Microsoft" is a trademark of Microsoft Corporation.
Portions of the game code are Copyright (©, 1988-1990 by Genus
Microprogramming, Incorporated.
© 1994 Legend Entertainment Company
All Rights Reserved
46
First Printing