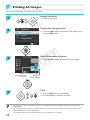
1
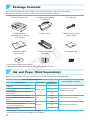
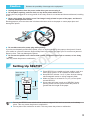
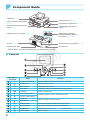
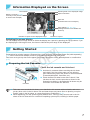
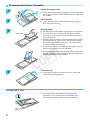
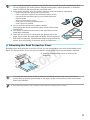
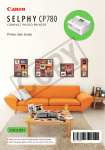
Printer User Guide C Y P O ENGLISH OO Make sure you read this guide including the “Safety Precautions” section before using the printer. OO Read this guide carefully for the correct use of the printer. OO Keep this guide handy for future reference. Package Contents Check if the following items are included in your printer package, using the If anything is missing, contact the retailer where you purchased the printer. □ SELPHY Printer Unit □ Paper Cassette (Postcard Size (4 x 6 in.)) PCP-CP400 □ SELPHY CP810 Solution Disk □ check boxes. □ Compact Power Adapter □ Power Cord □ Cleaner Unit* □ Dust Protection Cover CA-CP200 B 1 DPC-CP100*2 □ Printer User Guide Y P O (This Guide) C □ Warranty Card *1 May not be included in some regions. *2 May not be included in some regions. Purchase separately if required. Ink and Paper (Sold Separately) Before using the printer, be sure to purchase a Color Ink Cassette/Paper Set separately. Color Ink Cassette/Paper Set Product Name Color Ink Cassette/Paper Set KP-36IP (Postcard) Color Ink Cassette/Paper Set KP-72IN (Photo Paper) Color Ink Cassette/Paper Set KP-108IN (Photo Paper) Color Ink Cassette/Paper Set KL-36IP Color Ink Cassette/Paper Set KL-36IP 3 Pack Paper Size Postcard Size 72 Paper Cassette PCP-CP400 (Included with SELPHY) 108 L Size 36 108 Paper Cassette PCPL-CP400* 36 Card Size * Purchase separately with Color Ink Cassette/Paper Set. Some accessories may not be available in some regions. 2 Necessary Paper Cassette 36 Color Ink Cassette/Paper Set KC-36IP Color Ink Cassette/Label Set KC-18IF (Full Page Sticker) Color Ink Cassette/Label Set KC-18IL (8 Stickers Per Page) Number of Possible Prints 18 18 Paper Cassette PCC-CP400* Read This First OO The images printed with this product should be intended for personal use. Do not print images that infringe upon copyright laws without the prior permission of the copyright holder. OO This product’s warranty is only effective in the country of sale. If there is a problem with the printer while abroad, please return it to the country of sale before proceeding with a warranty claim to a Canon Customer Support Help Desk. OO The LCD monitor is produced with extremely high-precision manufacturing techniques. More than 99.99% of the pixels operate to specification. However, some pixels may occasionally misfire or appear as red or black dots. This has no effect on the printed image and does not constitute a malfunction. OO The LCD monitor may be covered with a thin plastic film for protection against scratches during shipment. If so, remove the film before using the printer. Conventions Used in this Guide OO OO OO OO OO OO OO OO This printer will be referred to as “SELPHY” or “printer”. Icons are used in the text to represent SELPHY’s buttons. For details, refer to “Controls” (p. 6). Language that displays on the screen appears inside [ ] (square brackets). : Indicates important notes. : Indicates tips and additional information. (p. xx): Indicates page reference. xx indicates the number of pages. This guide assumes all functions are at their default settings. The various types of memory cards that can be used in this printer are collectively referred to as “memory cards”. Table of Contents C Y P O Package Contents_________________________ 2 Maintaining the Printer_____________________ 17 Ink and Paper (Sold Separately)______________ 2 Cropping and Printing Images_______________ 18 Read This First___________________________ 3 Printing ID Photos________________________ 19 Conventions Used in this Guide______________ 3 Printing a Variety of Images_________________ 21 Safety Precautions________________________ 4 Printing From Your Computer_______________ 26 Setting Up SELPHY________________________ 5 Installing and Starting the Software___________ 28 Component Guide_________________________ 6 Printing Images with the Software____________ 30 Information Displayed on the Screen__________ 7 Printing From Your Digital Camera___________ 32 Getting Started___________________________ 7 Printing Images Using Digital Camera Specified Setting the Display Language_______________ 11 Settings (DPOF Print)_____________________ 33 Compatible Memory Cards and Printing When a Power Outlet is not Available__ 34 Memory Card Slots_______________________ 12 Troubleshooting _________________________ 35 Images That Can Be Printed________________ 12 Specifications___________________________ 37 Selecting and Printing Images_______________ 13 Handling SELPHY________________________ 39 Printing All Images________________________ 16 Storing the Printed Photos__________________ 17 Cleaning Up After Printing__________________ 17 3 Safety Precautions OO Before using the product, please ensure that you read the safety precautions described below. Always ensure that the product is used correctly. OO The safety precautions noted on the following pages are intended to prevent injuries to yourself and other persons, or damage to the equipment. OO Be sure to also check the guides included with any separately sold accessories you use. Warning Denotes the possibility of serious injury or death. OO Store this equipment out of the reach of children and infants. Mistakenly putting the power cord around a child’s neck could result in asphyxiation. OO OO OO OO Use only recommended power sources. Do not attempt to disassemble, alter or apply heat to the product. Avoid dropping or subjecting the product to severe impacts. To avoid the risk of injury, do not touch the interior of the printer if it has been dropped or otherwise damaged. OO Stop using the product immediately if it emits smoke, a strange smell, or otherwise behaves abnormally. OO Do not use organic solvents such as alcohol, benzine, or thinner to clean the equipment. OO Do not let the product come into contact with water (e.g. sea water) or other liquids. OO Do not allow liquids or foreign objects to enter the printer. This could result in electrical shock or fire. If liquid comes into contact with the product, unplug it from the outlet and consult your retailer or a Canon Customer Support Help Desk. Y P O OO Do not touch this printer or the power plug during thunderstorms. This could result in electrical shock or fire. Immediately stop using the equipment and distance yourself from it. C OO Unplug the power cord periodically and wipe away any dust and dirt that has collected on the plug, the exterior of the power outlet, and the surrounding area with a dry cloth. OO Do not handle the power cord with wet hands. OO Do not use the equipment in a manner that exceeds the rated capacity of the electrical outlet or wiring accessories. Do not use if the power cord or plug are damaged, or not fully plugged into the outlet. OO Do not allow dirt or metal objects (such as pins or keys) to contact the terminals or plug. OO Do not cut, damage, alter or place heavy items on the power cord. This could result in electrical shock or fire. OO Do not play the supplied CD-ROM(s) in any CD player that does not support data CD-ROMs. Playing the CD-ROM(s) in an audio CD player (music player) could damage the speakers. It is also possible to suffer hearing loss from listening with headphones to the loud sounds of a CD-ROM played on a music CD player. Caution Denotes the possibility of injury. OO Do not stick any part of your hand into the printer interior. OO Be sure to place SELPHY safely so as to avoid tripping over the power cord. This could lead to injury or damage the printer. OO Avoid using, placing or storing the printer in the following places. Places subject to strong sunlight. Places subject to temperatures above 40 °C (104 °F). Humid or dusty areas. Places subject to strong vibrations. This may heat up and damage the printer or adapter and could result in electric shock, burn, injury, or a fire. High temperature may cause deformation of the adapter or printer casing. ● ● 4 ● ● Caution Denotes the possibility of damage to the equipment. OO Unplug the product from the power outlet when you are not using it. OO Do not place anything, such as cloth, on top of the printer while in use. Leaving the unit plugged in for a long period of time may cause it to overheat and become distorted, resulting in fire. OO Never reuse paper for printing, even if an image is only printed on part of the paper, and there is leftover blank space as shown. Reusing paper to print can cause the ink sheet to become stuck to the paper or cause paper jams and damage the printer. OO Do not disconnect the power plug while printing. If you have accidentally turned off the power, turn it on again and wait for the paper to be ejected. Consult your retailer or a Canon Customer Support Help Desk in the event of a paper jam. Do not remove jammed paper by force. This may damage the printer. OO Do not use the printer near a device that creates a magnetic field such as a motor, or in a dusty place. This may cause the printer to malfunction. C Y P O Setting Up SELPHY More than the length of the paper 10 cm (4 in.) or more OO Place SELPHY on a stable and even surface, such as a table. Never place it on an unstable or tilted surface. OO Keep SELPHY at least 1 m (3 ft.) from devices emitting electromagnetic waves or strong magnetic fields. OO Make sure there is at least 10 cm (4 in.) of free space around SELPHY. OO Since paper will pass in and out of SELPHY during printing, make sure the space behind the printer is greater than the length of the paper. 10 cm (4 in.) or more OO Do not use SELPHY near a device that creates a magnetic field such as a motor, or in a dusty place. This may cause the printer to malfunction. OO Do not place near a television or radio. This may cause the printer to malfunction. 5 Component Guide Card Slots (p. 12) Paper Cassette Compartment (p. 10) Ink Cassette Lock (p. 14) Paper Cassette Compartment Cover (p. 10) Ink Cassette Compartment Cover (p. 10) USB Terminal for Computer (p. 29) USB Terminal for Digital Camera/USB Flash Memory Connection (pp. 15, 32) Ink Cassette Compartment (p. 10) Air Vent (p. 39) DC IN (Power Input) Terminal (p. 10) Paper Ejection Slot Security Slot* * Security cables, such as a Kensington lock, can be attached to this slot. Controls C Icons Used in This Guide Name Function — Screen (LCD Monitor) q Power Button Turns SELPHY on or off (p. 11). k MENU Button Displays the menu screen (p. 11). — EDIT Button Displays the edit menu and rotates the cropping frame. OK Button Sets the selected item. o 6 Y P O u Up/+ COPIES Button d Down/– COPIES Button Displays images, settings screens, or error messages (p. 36). Specifies number of copies, selects items to set. l Left Button r Right Button - Enlarge Button Switches the display, enlarges the cropping frame. 0 Reduce Button Switches the display, reduces the cropping frame. v BACK Button Restores the previous screen (p. 21), cancels printing (p. 14). p PRINT Button Starts printing (p. 14). Switches images, changes settings. Information Displayed on the Screen File Number Shooting date of the displayed image Paper orientation Memory card slot (p. 12) currently in use (An SD card is used in this example) Print size (Postcard size in this example) Print settings (pp. 22 – 25) (Settings that are not available are dimmed) Number of copies for the displayed image Number of copies Switching the screen display You can display the full image screen or divide the display into 4 panes by pressing the -0 buttons. If you are displaying the full image screen, the frame to indicate the print range is also displayed. Getting Started Y P O Preparations for printing images. A Postcard size (4 x 6 in.) Color Ink Cassette/Paper Set (sold separately) (p. 2) will be used as an example; however, preparation is the same for other sizes. Take care not to get any dust on the paper since it may cause lines on the printed photos or a malfunction (p. 5). C Preparing the Ink Cassette Check the ink cassette and ink sheet Ink sheet OO Hold the ink cassette without touching the ink sheet and check if the size of the paper you are going to print matches the paper size shown on the ink cassette (Postcard(4x6in)Size, Card Size, etc.). OO Check that the ink sheet is taut with no slack. If the ink sheet is slack, turn the sprocket as shown in the illustration to tighten it, otherwise the ink sheet may be torn when it is inserted into SELPHY. OO Take care not to touch the ink sheet, not to handle the ink cassette with wet hands, and not to get any dust or dirt in the ink sheet. Dirt and water drops may cause lines on photos, poor print quality, a tear in the ink sheet, or cause the printer to malfunction (p. 5). OO When tightening, turn the sprocket gently without force. Forcing it may cause a tear in the ink sheet or the ink sheet will run out before completing a photo print, resulting in leftover paper. 7 Preparing the Paper Cassette 1 Check the paper size. 2 Open the lid. 3 Set the paper. OO Check that the prepared ink cassette and the size shown on the paper cassette (POSTCARD (4x6in), CARD SIZE, etc.) match. OO There are two layers of lids. Open the outer lid then open the inner lid . Glossy side first, OO Set the paper into the paper cassette that you prepared. OO You can place up to 18 sheets in the paper cassette. Inserting 19 or more sheets may damage the printer or cause malfunction. OO Hold the paper as shown in the illustration and load with the glossy side up. (Do not touch the print side (glossy side) of the paper with your fingers. This may prevent you from making clean prints.) OO If a protective sheet is included with the paper, remove it and set only the paper into the cassette. Y P O OO When making Postcard size prints that have an area for pasting a stamp, insert the cards so that the stamp area is faced as shown in the illustration. 4 C Close the lid. OO Close the inner lid until it clicks into place. Leave the outer lid open during printing. Printing with L Size OO You can print in L size using PCPL-CP400 (sold separately). You can also print in Postcard size by removing the adapter as shown in the illustration. 8 OO Use only dedicated paper included in the genuine Canon brand Color Ink Cassette/Paper Sets for use in SELPHY CP series printers. Regular printing paper, regular postcards, or dedicated paper for SELPHY ES series printers cannot be used. OO Never do the following, as it may result in failure or cause the printer to malfunction: -- reverse the paper (the glossy side is the print side) -- bend or separate the paper at the perforations before printing -- use label sheets that have begun to peel or label sheets with portions peeled -- write on a sheet before printing -- reuse paper for printing on the blank part (p. 5) -- reuse a spent ink cassette OO Do not touch the springs on the paper cassette. If the springs are bent or deformed, paper will not feed correctly into SELPHY. OO One spring is attached at the center of the top surface on card sized paper cassettes. OO Take case not to touch or rub the print (the glossy) side of the paper, not to handle the paper with wet hands, and not to get any dust or dirt on the paper. Dirt and water drops may cause lines on photos, poor print quality, or cause the printer to malfunction (p. 5). Spring Attaching the Dust Protection Cover By attaching the dust protection cover DPC-CP100, you can prevent dust or dirt from accumulating on the paper. The dust protection cover may not be included in some regions. Purchase separately if required. Y P O OO Insert the dust protection cover as shown in the illustration. C OO In a place with a lot of dust or dirt, or outdoors, the dust protection cover may not be able to prevent dust or dirt from accumulating on the paper, so take care to select a clean environment when using SELPHY. OO Store the dust protection cover in a bag to prevent dust from collecting when not using. 9 Inserting the Ink and Paper Cassettes 1 Open the covers. 2 Insert the ink cassette. 3 Insert the paper cassette. Connecting the Power 1 2 10 OO Open the covers for the ink cassette and paper cassette compartments. OO Insert the ink cassette into the printer in the direction indicated by the arrow on the cassette until it clicks and locks into place. OO Close the ink cassette compartment cover. OO Make sure that the outer lid is open (p. 8) and insert the paper cassette all the way into the compartment. C Y P O Plug the adapter cord into SELPHY. OO Fully insert the adapter plug into SELPHY. Connect the power cord. OO Connect the power cord to the compact power adapter, then plug the other end into a power outlet. Setting the Display Language You can change the language displayed in the LCD monitor menus and messages. The default setting is English. 1 Turn on SELPHY. 2 Raise the screen (LCD monitor). OO Press and hold the q button until the screen shown at left displays. OO To turn the power off, press and hold the q button and release when the screen display changes. OO Do not raise the LCD monitor more than 45° as this may result in damage or malfunction. Approx. 45° 3 Display the settings screen. OO PPress the k button. OO PPress the ud buttons to select [Change Settings], and then press the o button. C Y P O 4 Display the language settings screen. 5 Select a language. OO Press the ud buttons to select a [ then press the o button. Language], and OO Press the udlr buttons to select a language, then press the o button. OO You can go back to Step 2 if you press the v button twice. 11 Compatible Memory Cards and Memory Card Slots Card Slots Memory Cards That Can be Used Without an Adapter OO SD Memory Card OO SDHC Memory Card OO SDXC Memory Card SD/MMC + OO MultiMediaCard OO MMCplus Card OO HC MMCplus Card Memory Cards That Require an Adapter (commercially available) OO miniSD Memory Card OO miniSDHC Memory Card OO microSD Memory Card OO microSDHC Memory Card OO microSDXC Memory Card OO RS-MMC Card *1 OO MMCmobile Card OO MMCmicro Card OO xD-Picture Card *2 OO CF Card OO Microdrive CF/microdrive Y P O *1 “RS-MMC” is an abbreviation of “Reduced-Size Multi Media Card”. *2 Operations were confirmed with the adapter DPC-CF manufactured by Fujifilm Corporation. OO For memory cards that require an adapter, be sure to first insert the memory card into the adapter before inserting into the appropriate card slot. If you insert the memory card into a card slot without using an adapter, you may not be able to remove the memory card from the printer. OO Use a memory card formatted in the device used for taking the images. A memory card formatted on a computer may not be recognized. C OO Refer to the user guide included with your memory card and adapter for handling instructions. About USB Flash Memory You can print images on a commercially available USB flash memory by connecting it to SELPHY (p. 15). Images That Can Be Printed JPEG images conforming to the Exif standard can be printed with SELPHY. OO Irregularly sized images, or images that have been edited on a computer may not display or print properly. 12 Selecting and Printing Images You can select an image and specify the number of copies for printing. In this section, an SD memory card will be used as an example, but you can print from other memory cards using the same steps. 1 Turn on SELPHY. 2 Raise the screen (LCD monitor). OO Press and hold the q button until the screen shown at left displays. OO To turn the power off, press and hold the q button and release when the screen display changes. OO Do not raise the LCD monitor more than 45° as this may result in damage or malfunction. Approx. 45° Insert a single memory card into the slot. 3 Label side 4 Y P O OO Insert the card faced as shown in the illustration until it clicks. OO To remove the card, push it in until it clicks and release your finger slowly. OO If you are using a CF/microdrive card, insert it fully into the appropriate slot. XX The screen in Step 4 below (image display screen) (p. 7) will display. C Select an image. OO Press the lr buttons to select an image to print. OO Every 5th image will be displayed if you press and hold the lr buttons. Select the number of copies. 5 Number of copies for the displayed image Number of copies OO Press the ud buttons to select the number of copies. OO If you press and hold one of the ud buttons, the number increases or decreases by 5 copies. OO To print another image at the same time, repeat Steps 4 and 5. 13 6 Print. 7 Insert the paper. 8 Change the ink cassette. OO Press the p button to start printing. OO During printing, the paper will pass in and out from the back of SELPHY several times. Do not touch the paper until printing has finished and the printed sheets collect on the print output tray (on the outer lid of the paper cassette). OO Do not let 19 or more printed sheets collect on the print output tray. OO During printing, always press the v button to cancel printing. OO If the paper out message is displayed on the screen, pull the paper cassette out from SELPHY without turning off the power. OO Refill the paper cassette with new paper (p. 8), and reinsert the cassette into SELPHY (p. 10). OO If the ink out message is displayed on the screen, open the ink cover without turning off the power. OO The ink cassette will come out if you move the lock in the direction shown in the illustration. Insert a new ink cassette (pp. 7, 10). C Y P O OO Never pull out the paper cassette, open the ink cassette compartment cover, or remove the memory card while you can hear the printer’s operation sounds immediately after turning on the printer, or during printing. This may cause the printer to malfunction. OO Press the v button to cancel printing. You cannot cancel printing by pressing the power button and the printer could be damaged if you unplug it to disconnect power. OO It may take some time before images are displayed on the screen in Step 4 if the memory card contains a large number of images. OO If the [Start DPOF printing] screen displays, refer to “Printing Images Using Digital Camera Specified Settings (DPOF Print)” (p. 33). OO You can print up to 99 images at once and specify up to 99 copies per image in Steps 4 and 5. However, you cannot specify more than 999 images (p. 35). Avoiding Incomplete Photos Note the following to avoid wasted remaining paper due to the ink sheet running out before completing a photo print. OO Do not turn the sprocket too much when tightening the ink sheet (p. 7). OO Always press the v button when you want to cancel printing and never turn off the power before pressing the v button (Step 6). OO If the paper out message is displayed on the screen, refill the paper without turning off the power (Step 7) or press the v button to cancel printing (Step 6). Depending on print conditions, you may not be able to avoid incomplete photo prints due to the ink sheet running out in some cases even if you follow the above instructions. 14 Printing From USB Flash Memory Just like images on memory cards, images on commercially available USB flash memory can also be printed. Insert a USB flash memory. OO Insert a USB flash memory as shown. OO All further steps are the same as those used for printing images from memory cards (pp. 13 – 14). OO Depending on the brand of USB flash memory used, it may be difficult to insert or remove, and it may not operate properly. OO Refer to the user guide included with your USB flash memory for operating instructions. Printing 1 Copy of the Selected Image You can print 1 copy of the selected image with simple operation. Selecting and Printing an Image. Y P O OO Select the image as described in Steps 1 to 4 on p. 13. OO Press the p button to print 1 copy of the selected image. C OO If you have specified the image and the number of copies in Steps 4 to 5 on p. 13, SELPHY will print as specified even if you carry out the above operations. Therefore, make sure that the number of copies is “0” in Step 4 on p. 13 before trying this operation. 15 Printing All Images You can print all images on a memory card at once. 1 Display the menu. 2 Display the settings screen. 3 Select the number of copies. OO Press the k button. OO Press the ud buttons to select [Print All Images], then press the o button. Y P O OO Press the ud buttons to set the number of copies. C Number of Number of copies images contained Number of in the card sheets required 4 Print. OO Press the p button to start printing. OO To cancel printing, press the v button. OO If there are more than 1000 images on the card, only 999 copies will be printed in order of the most recent by shooting date. OO You can specify up to 99 copies in Step 3. However, you cannot specify a value if the number of images in the card multiplied by the value exceeds 999. (For example, if the card contains 100 images, you can specify up to 9 copies.) 16 Storing the Printed Photos OO When both edges of a print have perforations, you can remove the edges by bending them. OO Use an oil-based pen to write on prints. OO To prevent discoloration, do not store prints in places subject to temperatures of over 40 °C (104 °F), humid or dusty places, or in direct sunlight. OO Avoid the following actions as they may result in color change, color fading or color bleeding: Sticking any type of adhesive tape on a print surface, allowing print surfaces to come into contact with vinyl or plastic, applying alcohol or other volatile solvents to a print surface, or leaving the print surface tightly pressed against other surfaces or objects for prolonged periods. OO If you wish to mount prints in an album, select an album with photo covers made of nylon, polypropylene or cellophane. OO Color may change over time or depending on storage conditions. Canon assumes no liability for color changes. Cleaning Up After Printing Turn off SELPHY (p. 11), then remove the memory card or USB flash memory. Lower the screen (LCD monitor) flat for storage. Unplug the power cord from the power outlet and disconnect the adapter plug from SELPHY. OO If the compact power adapter is hot, wait until it has cooled down before you store it. Remove the paper cassette and close the paper cassette compartment cover. Keep the remaining paper inside the cassette and store the cassette in a dark, cool, and dry place free from dust. OO Keep the ink cassette inside SELPHY. OO Store SELPHY horizontally, in a dark place free from dust. Dust and dirt may cause white lines on photos or cause the printer to malfunction. C Y P O OO When you have more than one ink cassette, keep one inside SELPHY, and keep the other inside the original packaging or a bag to protect it from dust, and store it in a dark place. OO When storing new paper and ink cassettes, leave them in unopened packages, and keep them in a dark place. Maintaining the Printer To prevent dust and dirt from causing lines on photos and to ensure the print quality, clean SELPHY regularly using the supplied cleaner unit (p. 2) before printing and when changing the ink cassette. Note that the cleaning unit may not be included in some regions. Cleaning SELPHY. OO Remove the ink cassette if it is inserted. OO Insert the cleaner unit with the arrow side up as shown fully and then pull out. Repeat this several times. OO Store the cleaner unit in a bag to prevent dust after cleaning. OO Do not touch the white part of the cleaner unit as it will not clean as effectively. OO Do not use any cleaning kits other than the supplied cleaner unit. Doing so may cause the printer to malfunction. OO If lines still appear on photos after cleaning, contact a Canon Customer Support Help Desk. 17 Cropping and Printing Images You can crop and print part of an image. 1 Display the cropping screen. OO Select an image as described in Step 4 on p. 13, press the EDIT button, and then press the o button. XX A cropping frame to indicate the range will be displayed. 2 Determine the range. 3 Make the setting. 4 OO The cropping frame switches between portrait and landscape each time you press the EDIT button. OO You can move the cropping frame by pressing the udlr buttons. OO You can enlarge the cropping frame by pressing the button and shrink it by pressing the 0 button. Y P O OO Press the o button to set the cropping range and return to the image display screen. XX is displayed at the bottom left of the screen. OO The cropping range setting is not cleared by setting the number of copies to 0. OO To crop another image and print at the same time, repeat Steps 1 to 3. C Print the images. OO Print as described in Step 6 on p. 14. OO If you want to change the cropping range after setting it, press the EDIT button in the image display screen, press the ud buttons to select [Adjust Cropping], and press the o button to repeat Steps 2 to 3. OO If you want to cancel the cropping range after setting it, press the EDIT button in the image display screen, press the ud buttons to select [Reset Cropping], press the o button to display the reset cropping screen, and then press the o button again. OO The cropping ranges are all cleared if you turn SELPHY off or remove the memory card before printing them. OO You can set up to 99 images with cropping ranges. OO You cannot crop images in [DPOF Print] and [Print All Images]. Index] or [ Shuffle] in [Page Layout] (p. 23). OO You cannot crop images when you have selected [ OO You cannot change the vertical and horizontal ratio of the cropping frame on the screen. OO You can change the number of copies by pressing the ud buttons in the image display screen in Step 3. OO The cropping range is cleared when printing is finished. 18 Printing ID Photos You can print your image as an ID photo. You can select the size from [Multi-size], [Standard]*, and [Custom]. Also, you can select 2 types of images to be printed on one sheet. * The Standard size conforms to the ICAO international standards. 1 Set to print ID photos. 2 Specify the ID photo size. 3 Select and print the images. OO Press the k button. OO Press the ud buttons to select [ID Photo], and then press the o button. OO Press the lr buttons to select the size, and then press the o button. OO If you have selected [Custom], press the ud buttons to select [Long Side], press the lr buttons to specify the length, then specify the length for [Short Side], and then press o again. The values which can be specified in [Short Side] change automatically according to the value you have specified in [Long Side]. OO If you have selected [Multi-size], the size of the image to be printed is displayed. C Y P O OO Select the image by pressing the lr buttons, and press the u button. is displayed at the bottom right of the screen (up to 2 images). OO Press the EDIT button to set the cropping range (p. 18). OO Print as described in Step 6 on p. 14. OO The ID photo may not be accepted officially, depending on the institution the ID photo is required for. Please contact the appropriate institution for regulation details. OO You cannot use card size paper. OO [Borders] settings will be ignored. OO Settings are cleared when printing is finished. OO The date and file number will not be printed. OO If you have selected 2 types of images, these 2 types are printed in equal numbers for the number of columns in the layout. OO If you have selected 2 types of images and the number of columns is an odd number, nothing will be printed in the center column. 19 Crop the image for the passport. OO If you display the cropping range (p. 18) while the [Standard] size is selected for [ID Photo], 2 lines are displayed. OO Adjust so that one line is at the top of the head and the other line is under the chin to print a passport photo conforming to the passport standards. OO Please contact the appropriate institution for regulation details other than regarding position and size of the face. C 20 Y P O Printing a Variety of Images You can use various printing features, such as imprinting the shooting date or adjusting the color of an image. You do not need to make settings for each image because once the settings are made, they are applied for all images. Making Settings 1 Display the settings screen. 2 Select the item and change the settings. OO Press the k button. OO Press the ud buttons to select [Change Settings], and then press the o button. C 3 Y P O OO Press the ud buttons to select an item. OO Press the lr buttons to change the settings, then press the v button to complete the setting. OO Pressing the v button again will restore the image display screen. OO Refer to pp. 22 – 25 for information about each setting. Print. OO Select an image for printing (p. 13) and the number of copies (p. 13), then press the p button to print. 21 Printing With the Date (Date) OO You can print the shooting date recorded by the digital camera. OO Off (Default setting) / On 02/02/2012 OO Turning off SELPHY will return the setting to [ Off]. OO Since the date printed will be the date the image was recorded by the digital camera, it cannot be changed on SELPHY. OO You can change the style of the printed date in [Date Format] (p. 25). Index], or [ Shuffle] is selected in [Page Layout] (p. 23). OO The date will not print if [ Off] for images that already have the date imprinted by the camera to prevent two dates being OO Specify [ printed in the image. Correcting Red Eyes and Printing (Correct Red-Eye) OO Correct images with red-eye. OO Off (Default setting) / On OO Portions other than the eyes may be mistakenly corrected. Set [Correct Red-Eye] to [ only when printing images with red-eye. Y P O On] OO If SELPHY is turned off or the memory card is removed, the setting will return to [ Off]. OO Red-eye may not be automatically detected or optimally corrected when faces appear extremely small, large, dark or bright in relation to the overall image, with faces turned to the side or diagonally, or faces with a portion hidden. 2-up], [ 4-up], [ 8-up], or [ Index] in [Page OO You cannot correct red-eye when you have selected [ Layout] (p. 23). Sepia] or [ B/W] in [My Colors] (p. 24). OO Red-eye correction is not applied when you have selected [ OO The level of correction may change depending on the cropping range setting, page layout, and paper size. C Printing With or Without a Border (Borders) OO You can set images to print with or without a border. OO Borderless (Default setting) / Bordered OO Turning off SELPHY will return the setting to [ Borderless]. Index], or [ Shuffle] in [Page Layout] (p. 23). OO Images are printed without borders if you select [ 8-up] in [Page Layout] (p. 23) when printing on card sized paper (p. 2), images will be printed OO If you select [ Bordered] is selected. without borders, even if [ 22 Selecting a Layout and Printing (Page Layout) OO You can set the number of images that you want to print on one sheet. The number of images that you specified (p. 13) will be printed in the selected layout. 1-up (Default setting) Prints one image using a full sheet 8-up* Prints eight images on one sheet 2-up Prints two images on one sheet Index Prints as an index 4-up Prints four images on one sheet Shuffle Automatically arranges images in a variety of sizes for printing on a single sheet * Set the layout to [ 8-up] when using Color Ink Cassette/Label Set KC-18IL (8-label sheet) (p. 2). OO If SELPHY is turned off, the setting will return to [ 1-up]. OO You can retain a layout even after SELPHY is turned off. To have SELPHY retain layouts, first make sure SELPHY is turned off, press and hold the k button, u button, and p button, and then press and hold the q button until “SELPHY” is displayed on the screen. If you want SELPHY to no longer retain layouts, turn off SELPHY and then turn it on in the same way as you did before for retaining layouts. OO The image position cannot be specified. OO Depending on the selected layout, the settings made in [Date] (p. 22), [Image Optimize] (p. 24), [Correct RedEye] (p. 22), [Borders] (p. 22), [Smooth Skin] (p. 24), or [Brightness] (p. 25) may not be applied. Index], you can print all images on a memory card as an index OO If you select [Print All Images] (p. 16) in [ print. Y P O Arranging Images of Different Sizes (Shuffle) C OO Shuffle automatically arranges images in a variety of sizes for printing. OO A group of up to 8 images, or a group of up to 20 images can be printed on a single sheet. OO Prints can be made on L size or Postcard size paper (p. 2). OO In “Making Settings” (p. 21), press the ud buttons to select [Page Layout] in the screen in Step 2. Press the lr buttons to select [ Shuffle], then press the o button. OO When the screen shown on the left appears, press the ud buttons to select an option. OO Press the lr buttons to change the settings, then press the v button to complete the setting. OO Pressing the v button twice will restore the image display screen. OO You cannot specify the position of the images. OO It may take some time before printing starts. 23 Making Skin Look Smooth in Prints (Smooth Skin) OO Makes skin look smooth and beautiful in prints. OO Off (Default setting) / On OO This setting is reset to [ Off] when printing finishes, SELPHY is turned off, or the memory card is removed. OO Correction may be applied to areas other than skin, producing unexpected results. Index], [Smooth Skin] will not be applied. OO When [Page Layout] (p. 23) is set to [ Changing the Color Tone and Printing (My Colors) OO You can adjust the colors in your images, or make your images sepia-toned or black and white. Off (Default setting) — PositiveFilm Intense, natural colors like those obtained with positive film Vivid Emphasizes the contrast and color saturation for a vivid impression Sepia Changes the image to sepia tone Neutral Tones down the contrast and color saturation for neutral hues B/W Black and white OO Turning off SELPHY will return the setting to [ Off]. OO Depending on the settings made in My colors, [Correct Red-Eye] (p. 22) settings may not be applied. Y P O Getting the Best Results With Auto Correction (Image Optimize) OO SELPHY will automatically correct the image to achieve optimum image quality. Off / On (Default setting) OO C OO Some images may not be adjusted correctly. OO Turning off SELPHY will return the setting to [ On]. Index], [Image Optimize] will not be applied. OO When [Page Layout] (p. 23) is set to [ OO The level of correction will change depending on the page layout and paper size. 24 Adjusting the Brightness (Brightness) OO You can adjust the brightness of an image within a range of ±3. OO The larger the + value, the brighter the image gets. The larger the - value, the darker the image gets. OO Turning off SELPHY will return the setting to [±0]. Index] is selected in [Page Layout] (p. 23). OO [Brightness] will not be applied if [ Changing the Date Style (Date Format) OO You can change the order of the printed date (p. 22). OO mm/dd/yyyy (Default Setting), dd/mm/yyyy, yyyy/mm/dd 02/02/2012 2012/02/02 Y P O OO The setting will be retained even if SELPHY is turned off or the memory card is removed from the slot. Saving Energy (Auto Power Down) C OO SELPHY turns itself off automatically if it is not operated for approximately 5 minutes. OO On (Default setting) / Off OO If you print multiple images that include images SELPHY cannot print (p. 12), a message [Could not print some images! Cancel printing?] is displayed and printing stops. If [Auto Power Down] is [On] and SELPHY is not operated for approximately 5 minutes, SELPHY cancels printing and turns itself off. If you turn SELPHY back on after the above sequence, a blank sheet may be output. Never reuse ejected paper (p. 5). Note that the battery is still consumed after printing stops until the Auto Power Down function takes effect if you are using the battery (p. 34). OO SELPHY is not turned off automatically when it is connected to a camera or a computer, or an error message is displayed on the screen. 25 Printing From Your Computer If you connect your computer to SELPHY and use the supplied software, you can view all images at once and take advantage of various printing functions that cannot be done with just SELPHY alone. Select favorite images from an index and print OO You can select images you wish to print from an index, and print them all at once. You can also add text to your images and print. Print with decorations OO You can add frames or stamps to your images and print. You can also add text to your images and print. Print calendars OO You can add calendars to your prints. You can also add text to your images and print. Y P O Arrangement printing C OO You can arrange multiple images on the same sheet. ID photo printing OO You can print in the size required for ID photos. OO The ID photo may not be accepted officially, depending on the institution the ID photo is required for. Please contact the appropriate institution for regulation details. 26 System Requirements Windows Macintosh OS Windows 7 Service Pack 1 Windows Vista Service Pack 2 Windows XP Service Pack 3 Configuration The above OSs should be pre-installed on computers with built-in USB ports. CPU Pentium 1.3 GHz or higher Mac OS X v10.7: Intel Core 2 Duo or higher Mac OS X v10.6: Intel Processor RAM Windows 7 (64-bit): 2 GB or more Windows 7 (32-bit), Vista: 1 GB or more Windows XP: 512 MB or more 1 GB or more Interface USB Free Hard Disk Space 120 MB or more* 140 MB or more Display 1,024 x 768 pixels or more 1,024 x 768 pixels or more Mac OS X v10.6 – v10.7 * For Windows, Microsoft .NET Framework 2.0 (max. 280 MB) or higher must be installed. Installation may take some time depending on your computer’s capabilities. C Y P O 27 Installing and Starting the Software Windows 7 and Mac OS X 10.7 are used for these explanations. Items to Prepare OO Computer OO Supplied CD-ROM (SELPHY CP810 Solution Disk) (p. 2) OO A commercially available USB cable shorter than 2.5 m (8.2 ft.) (SELPHY terminal requires a Mini-B connector) 1 Install the software. Windows OO Place the CD-ROM in the computer’s CD-ROM drive and click [Easy Installation] when the screen on the left appears. OO Follow the on-screen instructions to proceed. OO If the User Account Control window appears, follow the on-screen instructions to proceed. XX Proceed with the installation to display the screen on the left. C Y P O Macintosh OO Insert the CD-ROM in the computer’s CD-ROM drive. Click [Finder] in the Dock (the bar at the bottom of the desktop) and double click [ ] in the CD-ROM. OO If is displayed on the desktop, you can also doubleclick to display files in the CD-ROM. OO When the screen on the left appears, click [Install] and follow the on-screen instructions to proceed. OO When the installation finishes, click [Finish] to restart the computer and complete the installation. 2 28 Prepare SELPHY. OO Turn off SELPHY and remove the memory card or USB flash memory. OO Insert an ink cassette and a paper cassette that contains paper you want to use into SELPHY (pp. 7 – 10). Connect SELPHY to the computer. 3 OO Use the USB cable to connect SELPHY to the computer. OO Refer to the user guides included with the cable and computer for handling instructions. Commercially available USB cable 4 Turn on SELPHY. OO Press the q button to turn on SELPHY. Windows OO When the installation finishes, click [Restart] to restart the computer and complete the installation. Confirm that the software has been started properly. 5 XX The software will start and the screen on the left will appear when communication between SELPHY and the computer is established. OO Perform Steps 2 to 4 to automatically start the software the next time. Windows Y P O OO If the screen in Step 5 does not appear, open it from the [Start] menu r [All Programs] r [Canon Utilities] r [SELPHY Photo Print] r [SELPHY Photo Print]. Macintosh C OO If the screen in Step 5 does not appear, follow the procedure below to register your printer. Select [ ] from the menu, and click [System Preferences] r [Print & Fax] to open the Print & Fax screen. Click [+] to select [CP810] from the pop-up window, then click [Add]. After you have finished registering your printer, click the [SELPHY Photo Print] icon from the Dock (the bar at the bottom of the desktop) to display the screen for Step 5. OO SELPHY may not operate correctly if it is connected to a computer via a USB hub. OO SELPHY may not function properly if other USB devices (with the exception of a USB mouse or USB keyboard) are used at the same time. Disconnect any other USB devices from your computer and then reconnect SELPHY. OO Do not put your computer into standby mode (or sleep mode) while SELPHY is connected to the computer’s USB port. If you accidentally do so, awaken the computer from standby mode without disconnecting the USB cable. When you cannot awaken the computer properly, restart the computer. OO For details on handling the computer, refer to the user guide included with your computer. 29 Printing Images with the Software You can print images saved on the computer using the installed software (SELPHY Photo Print). The [Simple print] feature will be explained in this section. Using this feature, you can view all your images at once and select which ones you want to print. 1 Display the print menu. 2 Select a print method. 3 Select one or more images. OO Click [Print menu]. OO If printing preparations are not complete (paper cassette and ink cassette inserted), you cannot click [Print menu]. Follow the on-screen instructions to perform the necessary operations. OO Click [Simple print]. OO You can make prints with frames, stamps, and speech bubbles by clicking [Decoration print]. OO You can make prints with calendars added by clicking [Calendar print]. OO You can print multiple images on the same sheet by clicking [Layout Print]. OO You can print in the size required for ID photos by clicking [ID Photo Print]. You can select the criteria for images to display. Y P O XX Images will display in an index within the [Pictures] folder. OO Click an image to select for printing. XX The background color changes and the image is set for printing. OO Use the same procedure to click all images you want to print. OO If you click an image again, the background color switches back to the original color and the settings are canceled. OO Once images are selected, click [Next]. C You can display images saved in another folder by pressing this button and selecting a folder from the screen that appears. 30 Select the number of prints. 4 OO Select the number of copies for each image. OO For Windows, click [Print] to start printing. OO For Macintosh, click [Print menu], then click [Print] in the screen that appears. Press the - or + button to set the number of copies. 5 End the program. Windows OO When all printing is finished, click corner of the screen. at the top right Macintosh Y P O OO When all printing is finished, click of the screen. at the top left corner OO The layout image shown in the right side of the screen that is displayed when you click [ID Photo Print] in Step 2 on p. 30 differs from the actual layout. You can check the actual layout by clicking [Preview] in the [4.Print] screen. OO If you select an index layout in the screen that is displayed when you click [Layout Print] in Step 2 on p. 30, then you cannot adjust the image, such as changing the size or orientation of the image in the [4.Print] screen. C 31 Printing From Your Digital Camera You can select and print images from a digital camera that supports the PictBridge standard. A Canon brand compact digital camera will be used as an example to explain the print method. If operations are different for the digital camera you use, refer to the user guide included with your digital camera. 1 Make sure that a memory card is not inserted in SELPHY, and it is not connected to a computer. 2 Connect SELPHY to the digital camera using the interface cable (USB cable) included with the digital camera. 3 First turn on SELPHY, then turn on the digital camera and play back the images on the digital camera. Y P O XX Depending on the digital camera you use, on the digital camera’s screen. 4 may appear Perform the necessary operations on your digital camera to select an image for printing. OO Use the digital camera to start printing. XX Printing starts. OO After printing has completed, turn off SELPHY and the digital camera, then unplug the cable. C OO You cannot stop printing with the v button. Use the digital camera to stop printing. OO PictBridge is an industry standard established by the Camera & Imaging Products Association (CIPA). It allows you to print images taken with any digital camera or video camera, regardless of the manufacturer or model, by connecting to a printer without using a computer. 32 Printing Images Using Digital Camera Specified Settings (DPOF Print) You can make print settings and select images to print on your digital camera and then print the images all at once. For details, refer to the user guide included with your digital camera. Insert a memory card containing DPOF settings into the appropriate memory card slot. 1 XX [DPOF images remain Print images?] appears on the screen. Label side 2 3 Y P O Press the o button. C Check the settings. Settings with the digital camera : Date : File number : Index (Print Type) : Standard (Print Type) Number of sheets required 4 Print the images. OO Press the p button to start printing. OO The date and file number are the DPOF settings made with the digital camera (these settings cannot be changed with SELPHY). OO If, on a Canon brand digital camera, the [Print Type] is set to [Standard], the settings made in “Printing a Variety of Images” (pp. 21 – 25) will be applied. OO The screen in Step 3 can also be displayed when you press the k button and select [DPOF Print], then press the o button. [DPOF Print] only displays when a memory card is inserted that contains DPOF information set with the digital camera. 33 Printing When a Power Outlet is not Available You can use the battery pack NB-CP2L (sold separately) and charger adapter CG-CP200 (sold separately) to print images where there is no power outlet. You can print approximately 36 sheets* of postcard size paper with a fully charged battery. * The number of sheets is determined under Canon testing standards and may change depending on the printing conditions. Installing the Battery 1 Remove the battery terminal cover. 2 Attach the battery to the charger adapter. 3 Connect the charger adapter to SELPHY. OO First insert in the direction indicated by , and then in the direction indicated by until it clicks and locks into place. Charging the Battery C Y P O Connect the power cord to the charger adapter with the attached battery. XX The battery charge starts and the orange lamp will be lit. XX The battery charge will complete after approximately 4 hours and the green lamp will be lit. OO The charge will continue even if you turn SELPHY on while the charger adapter is connected to it. However, the charge stops while printing. OO For cautions concerning the battery, refer to the user guide included with the battery. OO Keep SELPHY on a stable surface such as a desk while it is connected to the charger adapter and take care not to unplug the charger adapter cable. 34 Troubleshooting If you think there is a problem with SELPHY, first, check the following. If the items below do not solve your problem, contact a Canon Customer Support Help Desk as listed on the included customer support list. Power OO Power will not turn on • Make sure the plug is correctly connected (p. 10). • Hold the q button pressed until the start-up image appears on the screen (p. 11). • If you are using the battery pack NB-CP2L (sold separately) and charger adapter CG-CP200 (sold separately), check if the battery is charged, attached correctly, and the cable is connected properly. Printing Problems OO Cannot print • Make sure SELPHY is turned on (p. 11). • Make sure that the ink and paper cassettes are correctly inserted (p. 10). • Make sure there is no slack in the ink sheet (p. 7). • Make sure that you are using dedicated paper (p. 9). • When the ink is spent, replace the ink cassette with a new one. When the paper is spent, refill the paper cassette with new paper (p. 14). • Make sure you are using the correct combination of paper, paper cassette and ink cassette (p. 7). • Connect SELPHY to only one device at a time. If SELPHY is connected simultaneously to a digital camera, computer and has a memory card inserted, you may not be able to print properly. • Depending on the room temperature, SELPHY may overheat and temporarily stop operating. This is not a malfunction. Wait until the temperature drops and printing resumes. Y P O Cannot display/print images from memory card or USB flash memory • Make sure the memory card is inserted all the way into the correct slot with the label facing upward (pp. 12, 13). • Make sure the USB flash memory is inserted all the way in the correct slot faced correctly (p. 15). • Make sure you are using a supported image type (p. 12). • Make sure that any memory card requiring an adapter is inserted into the adapter before being inserted into the slot (p. 12). C Cannot print from a digital camera • Make sure your digital camera supports PictBridge (p. 32). • Make sure SELPHY and the digital camera are connected correctly (p. 32). • Make sure the rechargeable battery/disposable batteries in your digital camera are not depleted. If there is insufficient charge, replace the battery with a fully charged one, or new batteries. Cannot print from a computer • Make sure you installed the software according to the correct procedure (p. 28). • Make sure SELPHY is connected directly to a port on the computer with the USB cable (p. 29). • Problems Exclusive to Windows: Make sure the printer is not set to offline. If it is, right-click the printer icon and cancel the offline setting. • Problems Exclusive to Macintosh: Make sure SELPHY is registered on the Printer List (p. 29). 35 OO Cannot print the date Cannot print from memory cards or USB flash memory • Make sure the date imprint option is set (p. 33). If you are using DPOF printing, the date imprint settings are configured on the digital camera used for the DPOF settings. Cannot print from digital cameras • Make sure the date setting in your digital camera is set to [On]. However, if the setting is [Default], the date imprint settings on SELPHY will be used. OO Cannot make clean prints • Make sure the ink sheet and paper are not dusty. • Make sure there is no dust on the inside surfaces of SELPHY (p. 39). • Make sure no condensation has formed on the inside surfaces of SELPHY (p. 39). • Make sure SELPHY is not placed near a device emitting electromagnetic waves or a strong magnetic field (p. 5). OO Colors on the computer display and the print are different • Color generation methods are different with computer screens and printers. Moreover, variance may be attributable to the environment in which the screen is viewed (color and strength of the light), or to the screen’s color adjustment settings. OO After using the computer to cancel a print in progress, an image that had already been printed was printed again when printing resumed • When you restart printing on a Macintosh computer after canceling, an already printed image may print again when printing resumes. Paper Problems Y P O OO Paper will not fit into cassette • Make sure the paper size matches the size of the paper cassette (p. 2). OO Paper is not feeding properly/frequent paper jams • Make sure the paper and paper cassette are correctly inserted (pp. 8, 10). • Make sure there are less than 19 sheets in the cassette. • Make sure 19 or more sheets have not collected on the outer lid of the paper cassette. • Make sure that you are using dedicated paper (p. 9). C OO Cannot print the specified number of prints/paper left over • Paper may be left over if the ink runs out first (p. 14). OO Paper is jammed • If the paper is sticking out from the front or back (paper ejection slot) (p. 6) of SELPHY, gently tug on the paper to remove it. However, if a gentle tug is not sufficient to remove the paper, do not attempt to forcibly pull it out. Turn the printer off and on repeatedly until the paper is ejected. If you have accidentally turned off the power while printing, turn it on again and wait for the paper to be ejected. Consult your retailer or a Canon Customer Support Help Desk in the event of a paper jam. Do not remove jammed paper by force. The printer could be damaged. Error Messages If a problem occurs with SELPHY, a message appears on the screen. If a possible solution displays with the error message, follow the on-screen instructions. If no solution displays, refer to “Troubleshooting” (p. 35). If these items do not solve your problem, contact a Canon Customer Support Help Desk as listed on the customer support list. OO If a problem occurs while SELPHY is connected to a digital camera, an error message may appear for you to check on the screen of the digital camera. 36 Specifications SELPHY CP810 Printing Method Dye-sublimation thermal transfer (with overcoating) Resolution/Color Representation Gradation Ink 300 x 300 dpi 256 shades per color (Resolution based on the “area intensity method” is equivalent to a 4800 x 4800 dpi color representation)*1 Dedicated color ink cassette (Y/M/C/overcoating) Paper Postcard Size, L Size, Card Size (including full page label sheets, 8-label sheets) Print Size Postcard Size L Size Card Size (Each label on an 8-label sheet) Postcard Size L Size Card Size Feeding System Borderless Bordered 100.0 x 148.0 mm (3.94 x 5.83 in.) 91.3 x 121.7 mm (3.59 x 4.79 in.) 89.0 x 119.0 mm (3.50 x 4.69 in.) 79.1 x 105.1 mm (3.11 x 4.14 in.) 54.0 x 86.0 mm (2.13 x 3.39 in.) 49.9 x 66.6 mm (1.96 x 2.62 in.) 22.0 x 17.3 mm (0.87 x 0.68 in.) – Printing from memory cards/USB flash memory/Connected to cameras (PictBridge) Approx. 47 sec. Approx. 39 sec. Approx. 27 sec. Automatic paper feed from paper cassette Ejection System Automatic paper ejection on top of paper cassette Screen Tilt-up, 2.7 type, TFT LCD Color Monitor Printing Speed*2 Interface Hi-Speed USB Y P O USB Flash Memory Connecting to a PictBridge compliant device: USB compliant Type A connector Connecting to a computer: USB compliant Mini-B connector CF Card, Microdrive, xD-Picture Card*3, SD Memory Card, SDHC Memory Card, SDXC Memory Card, MMC Card, MMCplus Card, HC MMCplus Card, miniSD Memory Card*3, miniSDHC Memory Card*3, microSD Memory Card*3, microSDHC Memory Card*3, microSDXC Memory Card*3, RS-MMC Card*3, MMCmobile Card*3, MMCmicro Card FAT/exFAT only supported Operating Temperatures 5 – 40 °C (41 – 104 °F) Operating Humidity Power Power Consumption 20 – 80% Compact Power Adapter CA-CP200 B Battery Pack NB-CP2L (Sold Separately) Charger adapter CG-CP200 (sold separately) 60 W or less (4 W or less on standby) Dimensions 178.0 x 127.0 x 60.5 mm (7.01 x 5.00 x 2.38 in.) (excluding protrusions) Weight (printer only) Approx. 810 g (approx. 28.6 oz.) Memory Cards C *1 The “concentration gradation method” used by SELPHY allows 256 shades (max) of color to be represented per dot. In * 2 *3 comparison, printers using the area intensity method represent shades by the number of dots printed in a unit of area, i.e. 256 dots (16 dots vertical x 16 dots horizontal) are needed to represent the same 256 shades of color. SELPHY’s color representation is therefore equivalent to a 4800 x 4800 dpi resolution based on an area intensity method. • Gradation refers to the number of shades that can be represented on a print. For example, black and white has two gradations, while 256 gradations include the shades of gray going from white to black that can be represented. • “dpi” refers to the number of dots that can be printed in 1 inch (“dots per inch”). Measured from the start of the yellow printing pass to final output. Special adapter (commercially available) is required. 37 Compact Power Adapter CA-CP200 B Rated Input 100 – 240 V AC (50/60 Hz) 1.5 A (100 V) – 0.75 A (240 V) Rated Output 24 V DC, 1.8 A Operating Temperatures 0 – 45 °C (32 – 113 °F) Dimensions 122.0 x 60.0 x 30.5 mm (4.80 x 2.36 x 1.20 in.) (excluding power cord) Weight Approx. 310 g (10.9 oz.) Dust Protection Cover DPC-CP100 This may not be included in some regions. Purchase separately as necessary. Dimensions 137.5 x 117.0 x 27.2 mm (5.41 x 4.61 x 1.07 in.) Weight Approx. 88 g (3.1 oz.) Charger Adapter CG-CP200 (Sold Separately) Rated Input 24 V DC Rated Output 24 V DC Operating Temperatures 5 – 40 °C (41 – 104 °F) Dimensions 156.2 x 49.0 x 35.5 mm (6.15 x 1.93 x 1.40 in.) (excluding protrusions) Weight Approx. 134 g (4.73 oz.) Battery Pack NB-CP2L (Sold Separately) Y P O Type Rechargeable lithium-ion battery Nominal Voltage 22.2 V DC Nominal Capacity 1200 mAh Battery Life (Charge Cycles) Approx. 300 times Operating Temperatures 5 – 40 °C (41 – 104 °F) Dimensions 110.0 x 40.7 x 37.5 mm (4.33 x 1.60 x 1.48 in.) Weight Approx. 230 g (8.11 oz.) C OO All data is based on tests by Canon. OO Printer specifications or appearance are subject to change without notice. CAUTION RISK OF EXPLOSION IF BATTERY IS REPLACED BY AN INCORRECT TYPE. DISPOSE OF USED BATTERIES ACCORDING TO LOCAL REGULATION. Use of genuine Canon accessories is recommended. This product is designed to achieve excellent performance when used with genuine Canon accessories. Canon shall not be liable for any damage to this product and/or accidents such as fire, etc., caused by the malfunction of non-genuine Canon accessories (e.g., a leakage and/or explosion of a battery pack). Please note that this warranty does not apply to repairs arising out of the malfunction of non-genuine Canon accessories, although you may request such repairs on a chargeable basis. 38 Handling SELPHY OO Do not apply strong impact or vibration. This may cause paper jams or the printer to malfunction. OO Do not expose SELPHY to insect sprays and volatile liquids. Do not allow SELPHY to be in contact with rubber or plastic products over a long time. This may deteriorate the external casing. OO Depending on the room temperature, SELPHY may overheat and temporarily stop operating. This is not a malfunction. Wait for a while till SELPHY cools down and restarts operating. Printing may take longer when continuously printing, the room temperature is high, or SELPHY’s rear air vent is blocked because SELPHY will temporarily stop printing due to overheating. OO When moving SELPHY from a cold place to a warm place, insert SELPHY in an airtight plastic bag in advance and remove after SELPHY has reached room temperature to avoid condensation. If condensation forms, leave SELPHY in room temperature until the condensation evaporates naturally. OO Clean SELPHY with a soft dry cloth. OO If dust accumulates on the air vent (p. 6), remove the ink cassette (p. 14) and clean away the dust. The printing results may not be clean if dust gets in from the air vent. OO Never clean SELPHY with solvents such as benzine or thinner, or mild detergent. This may deteriorate or deform the external casing, or the coating may peel off. USA and Canada only: The Lithium ion/polymer battery is recyclable. Please call 1-800-8-BATTERY for information on how to recycle this battery. FCC Notice (Printer, Model CD1101 Systems) Y P O This device complies with part 15 of the FCC Rules. Operation is subject to the following two conditions: (1) This device may not cause harmful interference, and (2) this device must accept any interference received, including interference that may cause undesired operation. C NOTE: This equipment has been tested and found to comply with the limits for a Class B digital device, pursuant to part 15 of the FCC Rules. These limits are designed to provide reasonable protection against harmful interference in a residential installation. This equipment generates, uses and can radiate radio frequency energy and, if not installed and used in accordance with the instructions, may cause harmful interference to radio communications. However, there is no guarantee that interference will not occur in a particular installation. If this equipment does cause harmful interference to radio or television reception, which can be determined by turning the equipment off and on, the user is encouraged to try to correct the interference by one or more of the following measures: • Reorient or relocate the receiving antenna. • Increase the separation between the equipment and receiver. • Connect the equipment into an outlet on a circuit different from that to which the receiver is connected. • Consult the dealer or an experienced radio/TV technician for help. The cable with the ferrite core provided with the printer must be used with this equipment in order to comply with Class B limits in Subpart B of Part 15 of the FCC rules. Do not make any changes or modifications to the equipment unless otherwise specified in the manual. If such changes or modifications should be made, you could be required to stop operation of the equipment. Canon U.S.A., Inc. One Canon Plaza, Lake Success, NY 11042, U.S.A. Tel No. (516) 328-5600 Canadian Radio Interference Regulations This Class B digital apparatus complies with Canadian ICES-003. 39 Trademark Acknowledgments OOSDXC Logo is a trademark of SD-3C, LLC. OOThis device incorporates exFAT technology licensed from Microsoft. OOCF5 logo is a trademark of CompactFlash Association. About This Guide OOReprinting, transmitting, or storing in a retrieval system any part of this guide without the permission of Canon is prohibited. OOCanon reserves the right to change the contents of this guide at any time without prior notice. OOIllustrations and screenshots in this guide may differ slightly from the actual equipment. OOThe above items notwithstanding, Canon accepts no liability for damages due to mistaken operation of the products. C Y P O -European Union (and EEA) only- This symbol attached on the product is according to the WEEE Directive (2002/96/EC). -India only- This product is not to be disposed of with your household waste, according to the e-waste (Management and Handling) Rules, 2011. This product should be handed over to a designated collection point, e.g., to an authorized collection site for recycling waste electrical and electronic equipment (EEE). Improper handling of this type of waste could have a possible negative impact on the environment and human health due to potentially hazardous substances that are generally associated with EEE. At the same time, your cooperation in the correct disposal of this product will contribute to the effective usage of natural resources. For more information regarding return and recycling of WEEE products, please visit http://www.canon.co.in/environment Also, this product complies with the “India E-waste Rule 2011” and prohibits use of lead, mercury, hexavalent chromium, polybrominated biphenyls or polybrominated diphenyl ethers in concentrations exceeding 0.1 % by weight and 0.01 % by weight for Cadmium, except for the exemptions set in Schedule II of the Rule. CDP-E483-020 © CANON INC. 2012