1
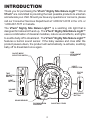
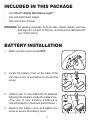
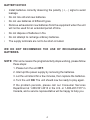
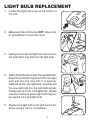
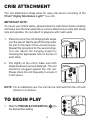
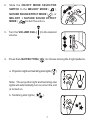
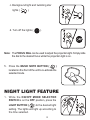
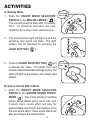
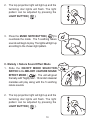
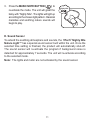
®
Smart Start ®
Nighty Nite Nature Light™
USER'S MANUAL
© VTECH
91-01491-005
Dear Parent:
At VTECH® we know that a child has the ability to do great things. That’s
why all of our electronic learning products are uniquely designed to
develop a child’s mind and allow them to learn to the best of their ability.
Whether it’s introducing numbers and letters, identifying colors and
shapes, or stimulating senses with lights and music, all VTECH® infant
and toddler learning products encourage your child’s natural growth and
discovery skills. When it comes to providing electronic learning products
that enlighten, entertain and develop minds, at VTECH® we see the
potential in every child.
1
INTRODUCTION
Thank you for purchasing the VTech® Nighty Nite Nature Light™! We at
VTech® are committed to providing the best possible products to entertain
and educate your child. Should you have any questions or concerns, please
call our Consumer Services Department at 1-800-521-2010 in the U.S. or
1-800-267-7377 in Canada.
The VTech® Nighty Nite Nature Light™ is a soothing crib light that is
designed for babies birth and up. The VTech® Nighty Nite Nature Light™
uses a combination of classical melodies, nature sound effects, and lights
to soothe baby off to dreamland. The VTech® Nighty Nite Nature Light™
features a built-in sound sensor. If the baby awakes and cries after the
product powers-down, the product will automatically re-activate, soothing
baby off to dreamland once again.
CRIB
ATTACHMENT
STRAPS
ON/OFF MODE
SELECTOR SWITCH
LIGHT
PROJECTION
™
FOCUS
DIAL
TIME
SELECTOR
SWITCH
LIGHT
BUTTON
VOLUME
DIAL
MUSIC NOTE
BUTTON
SOUND SENSOR
ROCKING MOON
AND BEAR
SHOOTING STARS
2
INCLUDED IN THIS PACKAGE
-
One VTech® Nighty Nite Nature Light™
-
Two crib attachment straps
-
One instruction manual
WARNING: All packing materials, such as tape, plastic sheets, wire ties
and tags are not part of this toy, and should be discarded for
your child’s safety.
BATTERY INSTALLATION
1. Make sure the unit is turned OFF.
2. Locate the battery cover on the back of the
unit. Use a coin or screwdriver to loosen the
screw.
3. Install 4 new “C” size (UM-2/LR14) batteries
following the diagram inside the battery box.
(The use of new alkaline batteries is
recommended for maximum performance.)
4. Replace the battery cover and tighten the
screw to secure the battery cover.
3
BATTERY NOTICE
•
Install batteries correctly observing the polarity ( +, - ) signs to avoid
leakage.
•
Do not mix old and new batteries.
•
Do not use batteries of different types.
•
Remove exhausted or new batteries from the equipment when the unit
will not be used for an extended period of time.
•
Do not dispose of batteries in fire.
•
Do not attempt to recharge ordinary batteries.
•
The supply terminals are not to be short-circuited.
WE DO NOT RECOMMEND THE USE OF RECHARGEABLE
BATTERIES.
NOTE: If for some reason the program/activity stops working, please follow
these steps:
1. Please turn the unit OFF.
2. Interrupt the power supply by removing the batteries.
3. Let the unit stand for a few minutes, then replace the batteries.
4. Turn the unit ON. The unit should now be ready to play again.
If the problem persists, please call our Consumer Services
Department at 1-800-521-2010 in the U.S. or 1-800-267-7377 in
Canada, and a service representative will be happy to help you.
4
LIGHT BULB REPLACEMENT
1. Locate the light bulb cover at the bottom of
the unit.
L.
VO
2. Make sure the unit is turned OFF. Use a coin
or screwdriver to open the cover.
3. Gently pull out the old light bulb and remove
the protection ring from the old light bulb.
4. Attach the protection ring to the new light bulb.
Place the protection ring around the new light
bulb and turn the ring until it is securely
fastened to the new light bulb. Carefully put
the new light bulb into the light bulb socket.
Please use a 4.8 volt, 0.3 A light bulb. Please
note the maximum power light bulb that can
be used is a 2.4 watt light bulb.
5. Replace the light bulb cover and secure the
screw using a coin or screwdriver.
5
VO
L.
CRIB ATTACHMENT
The crib attachment straps allow for easy and secure mounting of the
VTech® Nighty Nite Nature Light™ to a crib.
IMPORTANT NOTE:
To ensure your child’s safety, please follow the instructions below carefully
and make sure the final assembly is correct. Attach only to cribs with sturdy
rails and spindles. Do not attach to playpens with mesh walls.
1. Place the unit in the crib bringing both straps
over the top rail. Slip the top of the strap under
the slot on the back of the unit and secure.
Repeat this procedure for the second strap.
You can adjust the hanging height by
choosing the appropriate hole on the top of
each strap.
2. Pull slightly on the unit to make sure both
straps have been securely fastened. The unit
should be snugged against the crib rail.
Please check the unit frequently to ensure it
is still secure.
NOTE: For an additional use, the unit can be removed from the crib and
placed on a dresser.
TO BEGIN PLAY
1. Slide the TIME SELECTOR SWITCH (
the desired time setting.
6
) to
2.
Slide the ON/OFF MODE SELECTOR
SWITCH to the MELODY MODE (
),
NATURE SOUND EFFECT MODE (
), or
MELODY + NATURE SOUND EFFECT
) to turn the unit on.
MODE (
3. Turn the VOLUME DIAL (
volume.
4. Press the LIGHT BUTTON (
) to the desired
) to choose among the 4 light patterns.
a. Projection light and twinkling star lights (
)
.
Note: The projection light and twinkling star
lights will automatically turn on when the unit
is turned on.
b. Twinkling star lights (
).
7
c. Background light and twinkling star
lights (
).
d. Turn off the lights (
).
Note: The FOCUS DIAL can be used to adjust the projection light. Simply slide
the dial to the desired focus while the projection light is on.
5. Press the MUSIC NOTE BUTTON (
)
located on the front of the unit to re-activate the
selected mode.
NIGHT LIGHT FEATURE
1. While the ON/OFF MODE SELECTOR
SWITCH is on the OFF position, press the
LIGHT BUTTON (
) to the desired light
setting. The lights will light up according to
the time selected.
8
ACTIVITIES
A. Melody Mode
1. Slide the ON/OFF MODE SELECTOR
“It’s lullaby
time”+
SWITCH to the MELODY MODE (
).
The unit will greet the baby with “It’s lullaby
time”. 10 classical melodies will play
randomly according to the selected time.
2. The top projection light will light up and the
twinkling star lights will flash. The light
pattern can be adjusted by pressing the
LIGHT BUTTON (
).
3. Press the MUSIC NOTE BUTTON (
) to
re-activate the mode. “It’s lullaby time” and
random classical melodies will begin to play. The
lights will light up according to the chosen light
pattern.
B. Nature Sound Effect Mode
1. Slide the ON/OFF MODE SELECTOR
SWITCH to the NATURE SOUND EFFECT
MODE (
). This mode will play 5 soothing
nature sound effects (wind, wave, rain, bird,
cricket). Each sound effect will play for
approximately one minute and continue on to
the next sound effect. These sound effects will
play according to the selected time.
9
“It’s lullaby
time”+
2. The top projection light will light up and the
twinkling star lights will flash. The light
pattern can be adjusted by pressing the
LIGHT BUTTON (
).
) to
3. Press the MUSIC NOTE BUTTON (
re-activate the mode. The 5 soothing nature
sounds will begin to play. The lights will light up
according to the chosen light pattern.
C. Melody + Nature Sound Effect Mode
1. Slide the ON/OFF MODE SELECTOR
SWITCH to the MELODY + NATURE SOUND
EFFECT MODE (
). The unit will greet
the baby with “Nighty Nite”. 10 random classical
melodies will play along with the 5 soothing
nature sounds.
2. The top projection light will light up and the
twinkling star lights will flash. The light
pattern can be adjusted by pressing the
LIGHT BUTTON (
).
10
“Nighty Nite”
+
3. Press the MUSIC NOTE BUTTON (
) to
re-activate the mode. The unit will greet the
baby with “Nighty Nite”. The lights will light up
according to the chosen light pattern. Classical
melodies and soothing nature sounds will
begin to play.
“Nighty Nite”
+
D. Sound Sensor
To extend the soothing atmosphere and sounds, the VTech® Nighty Nite
Nature Light™ has a special sound sensor built within the unit. Once the
selected time setting is finished, the product will automatically shut-off.
The sound sensor will re-activate the program if background noise is
detected for approximately 7 seconds. The unit will re-activate according
to the selected mode.
Note: The lights and motor are not activated by the sound sensor.
11
SOOTHING CLASSICAL MELODIES:
1. Twinkle, Twinkle, Little Star
2. Brahms Lullaby
3. Musetta’s Waltz
4. Pachelbel Cannon
5. Air for the G String
6. Largo
7. Swan Lake
8. Moonlight Sonata
9. Artist’s Life
10. Clair de Lune
IMPORTANT SAFETY NOTICE:
This criblight is not intended for use as a toy. Please make sure the straps
are out of reach from children. When placed in the crib, please make sure
the criblight is positioned upright with the projection light facing directly
upwards.
CARE AND MAINTENANCE
1. Keep the unit clean by wiping it with a slightly damp cloth.
2. Keep the unit out of direct sunlight and away from any direct heat source.
3. Remove the batteries when the unit is not in use for an extended period
of time.
4. Do not drop the unit on hard surfaces and do not expose the unit to
moisture or water.
12
IMPORTANT NOTE
Creating and developing baby products is accompanied by a
responsibility that we at VTech® take very seriously. We make every
effort to ensure the accuracy of the information, which forms the value
of our products. However, errors sometimes can occur. It is important
for you to know that we stand behind our products and encourage you
to call our Consumer Services Department at 1-800-521-2010 in the
U.S., or 1-800-267-7377 in Canada with any problems and/or
suggestions that you might have. A service representative will be happy
to help you.
Note:
This equipment generates and uses radio frequency energy and if not
installed and used properly, that is, in strict accordance with the
manufacturer’s instructions, it may cause interference to radio and television
reception. It has been type tested and found to comply within the limits for
a Class B computing device in accordance with the specifications in Subpart J of Part 15 FCC Rules, which are designed to provide reasonable
protection against such interference in a residential installation. However,
there is no guarantee that interference will not occur in a particular
installation. If this equipment does cause interference with radio or television
reception, which can be determined by turning the equipment off and on,
the user is encouraged to try to correct the interference by one or more of
the following measures:
• reorient the receiving antenna
• relocate this product with respect to the receiver
• move this product away from the receiver
13