1
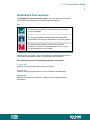
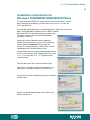
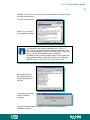
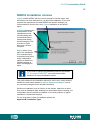
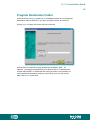
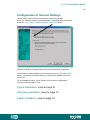
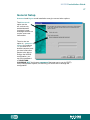
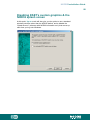
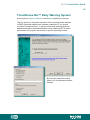
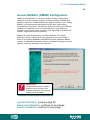
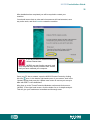
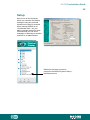
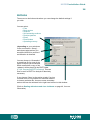
NOD32
Installation
Guide
Version 2.7
Includes Windows Vista
and 64-bit protection
Proactive protection
against Viruses, Spyware,
Worms, Trojans, Rootkits,
Adware and Phishing
Best Detection
Fastest Performance
Minimal Resource
Utilization
NOD32 Installation Guide
Copyright © 1997 – 2007 ESET LLC. All rights reserved.
No part of this document may be reproduced or transmitted in any form
or by any means electronic or mechanical, for any purpose without the
express written permission of ESET LLC. Information in this document is
subject to change without prior notice.
Certain names of program products and company names used in this
document might be registered trademarks or trademarks owned by other
entities.
ESET, NOD32 and AMON are trademarks of ESET.
Microsoft and Windows are registered trademarks of Microsoft Corporation.
ESET, LLC
610 West Ash Street
San Diego
California
92101
U.S.A.
http://www.eset.com
For Sales and Technical Support (US and Canada):
Tel: (619) 876-5400
Fax: +1 (619) 876-5845
Online purchase: http://www.eset.com/purchase/index.php
Sales email:
[email protected]
Technical Support Worldwide:
http://www.eset.com/support/index.php
Then by clicking on your country’s name, you can locate the support details
closest to you.
This guide is frequently updated to reflect changes in the product. The
latest version can always be found at
http://www.eset.com/download/manual.htm
This guide was prepared for NOD32 for Windows Version 2.7 (January 2007)
NOD32 Installation Guide
Contents
Introduction
Guidebook Conventions
Minimum System Requirements
Section 1: Installation
Installation instructions
Section 2: Configuration
Profiles
Scanning
On-Demand Scanning
On-Access Scanning
Updating
Heuristics
Section 3: Dealing with alerts & virus incidents
Dealing with an alert
Sending a sample to ESET
Section 4: Troubleshooting & Information
Appendix A: Troubleshooting
Appendix B: Installation types
Appendix C: Uninstalling
Section 5: Glossary
Page
3
4
5
6
7
8 to 31
32
33 to 38
39
40
41
42 & 43
44
45
46
47
48
49
50
51
52 & 53
NOD32 Installation Guide
Introduction
Congratulations, you have just purchased NOD32, the most advanced
antivirus solution available.
NOD32 is very simple to use and you will probably not even need to
read through this guide... however, the following information will help you
to get a better understanding of the many features of NOD32, so that you
get the best protection possible.
NOD32 is more than just a virus scanner – being able to scan for known
viruses is the bare minimum that should be expected from an anti-virus
product, so it should be reassuring to know that NOD32 not only does
this faster, and more reliably than other products, but that it also has an
excellent track record in discovering new threats. In addition, version 2.7
includes detection for adware, spyware and riskware aswell as rootkit
detection with its Anti-Stealth technology. With NOD32 you can be sure you
have the most advanced and comprehensive virus protection possible.
NOD32 Installation Guide
Guidebook Conventions
To highlight the most important points – we have used a set of simple
icons which draw attention to key information and settings.
Key:
The Check Icon indicates a setting that we recommend
you use or enable
The Info Icon higlights important facts and information
about NOD32, to help you make better use of the program
The Hazard Icon highlights areas where potential
problems can arise, or misconfigurations occur, to help
you avoid damage or loss of data.
Use the icons as a guide – they will highlight the most important areas of
configuration and usage so that you get the best out of NOD32.
This document uses the following typographic conventions:
C:\type.exe
Used for text that must be typed exactly as shown
ndntenst.exe
Used for file and program names, screen messages and dialogues
username
Used for items like menu options, or objects such as passwords and
usernames
NOD32 Installation Guide
Minimum System Requirements
Please make sure that the computer on which you plan to install NOD32
meets the minimum system requirements for the program to run:
Operating system
CPU
RAM
133 MHz/150 MHz
32 MB
Windows NT4/2000
133 MHz
32 MB/64 MB
Windows XP/2003/XP 64 or 32-bit
300 MHz
128 MB
Windows Vista
800 MHz
512 MB
Windows 98/ME
Disk Space: 30MB free disk space
Graphics:
VGA video card. (SVGA 800x600 recommended)
You must only install ONE anti-virus On-Access
scanner at one time (a scanner that is always running
while your PC is switched on); otherwise you could
cause serious system instability.
If you are installing NOD32 with another anti-virus
program, please make sure you do not enable both
On-Access scanners at once.
If another anti-virus program has previously been installed on your
computer, its scanner may interfere with NOD32. Usually resident
scanners will display an icon in the system tray (the area of the taskbar
near the clock). We recommend removing any other antivirus software,
including older versions of NOD32, before installing NOD32 Version 2.7, to
avoid the possibility of serious problems
Version 2.7 may be installed over your existing NOD32 if it is version 2 or
higher, however, if any problems were encountered, a clean installation is
recommended.
Details on uninstalling NOD32 can be found in Appendix C on page 51.
NOD32 Installation Guide
Installation
NOD32 Installation Guide
Installation Instructions for
Windows 95/98/ME/NT/2000/2003/XP/Vista
To install from the NOD32 CD, simply insert the CD into the drive. If setup
does not begin automatically, you will need to run NOD32.exe from the
CD’s root directory.
To install the download version (recommended, as it will be the most up-todate), first download the installer from the ESET website:
http://www.ESET.com/download/registered_software.php
For either method, you must have administrator
privileges on your PC.
Locate the correct Standard version (not LAN
Update Server version) to suit your PC’s operating
system and click Download. The installer for
version 2.7 is approximately 11 MB in size. You will
immediately see a window similar to this:
Copy & Paste the username and password sent
to you in your license email. (Highlight the text, press
‘Ctrl + C’ to copy and ‘Ctrl + V’ to paste into the
required fields)
Click OK and you’ll see a window similar to this:
Click ‘Save’. Choose to save the download to your
desktop (or an Installers folder if you have one)
You will then see the download progress in a window
similar to this:
Once it has downloaded, locate and run the file by
double clicking on it.
NOD32 Installation Guide
Whether from a CD or from a download, the installation instructions from
this point are the same.
You will see this screen:
Click Extract to begin
the installation process.
The extraction path can be changed in the "Extract to"
box. This will not affect the final installation directory, only
where the installation files are put during setup. These files
can be removed after NOD32 setup completes.
If installing onto a 64-bit operating system, the installer will
automatically install a compatible version, but the Extract
path will read: C:\Program Files (x86)\ESET\Install
After clicking Extract
you will see the files
being expanded onto
the disk:
...and then you should
see the following
message:
Once the Setup Wizard has started, you will be presented with the
Installation choices....
NOD32 Installation Guide
10
NOD32 Installation choices
Typical installs NOD32 with the correct settings for normal usage, and
will make most of the decisions for you about the installation. If you have
no particular requirement to install NOD32 with specific settings, it is
recommended to choose this route. Typical installation is the default
option.
Advanced allows some
customisation of the
installation process,
including being able
to password protect
settings and enable
silent messaging. This
is useful for users
who have a shared
computer.
Expert allows every
part of the installation
to be controlled and
customised, and offers
many configuration
options at install time,
including setting up
SMTP messaging for
alerts.
If you need to change the installation path from the default
“C:\Program Files\ESET” you must choose either
Advanced or Expert Installation modes.
This guide shows all the installation options for each route, clearly marked,
whether the information applies to Typical, Advanced or Expert, so that
you can easily navigate to the relevant information.
Whichever installation route is chosen, all the options, apart from a select
few, such as installation path, desktop icon and context menu scanning, are
configurable after the product is installed, so for most purposes, a typical
installation is fastest and simplest.
For an “At-a-glance” chart of installation options see
Appendix B: Installation Types
NOD32 Installation Guide
11
End User Licence Agreement
In all installation modes, the next screen will be the End User License
Agreement, on which you must choose I accept and click Next> to
continue installation. You may also Print the license agreement for future
reference.
You are advised to
read the terms of the
license carefully before
proceeding with the
installation. If you
decline the license
terms, the installation
cannot proceed.
Typical installation: jump to page 13
Advanced installation: continue to next page
Expert installation: continue to next page
NOD32 Installation Guide
12
Program Destination Folder
At this point the Advanced and Expert Installations allow you to change the
destination folder of NOD32, if you have a specific reason for doing so.
During Typical install, this screen will not be shown.
Unless there is a specific need to change the installation path – for
instance, you want to install NOD32 on a different drive, or already have
a folder called ESET on a different drive that you want to use instead, we
recommend that the default setting is used. Once you have the correct
path, click Next> to proceed.
NOD32 Installation Guide
13
Configuring Automatic Updates
At this point the Typical, Advanced and Expert installations converge.
You will now be presented with a screen asking you to choose your update
server.
We strongly recommend that you use the setting
<Choose Automatically>
This ensures that updates will be delivered most
efficiently.
If you do not enter a username and password at
this point, the product will not receive automatic updates
until you enter them.
You will be prompted to provide a username and password for
updates. You should copy and paste these from your license email to
ensure that no typing errors are made. (Highlight the text, ‘Ctrl + C’ to copy
and ‘Ctrl + V’ to paste into the required fields)
If you do not have this information to hand, you can choose to set update
parameters later, otherwise you will not be able to proceed with the
installation without either entering a username and password.
NOD32 Installation Guide
14
Configuration of Internet Settings
You will now be asked about your Internet Connection settings.
If you use a dial-up modem (not broadband or networked) then you need to
check the I use dial-up (modem) Internet connection option.
This will set NOD32 to update when an internet connection is detected.
You will also be asked whether you use a proxy server, if you don’t or are
unsure, just accept the default setting, as shown, and NOD32 will work it
out for you.
For all installation routes, if you choose a Proxy Server configuration,
continue to the next page. If not:
Typical installation: jump to page 21
Advanced installation: jump to page 16
Expert installation: jump to page 16
NOD32 Installation Guide
15
Proxy Servers
If you know that you use a proxy server, and chose the I use a proxy
server option, you will be presented with a screen in which you can fill out
your proxy details....
Your network
administrator or ISP
(Internet Service
Provider) should
supply you with the username
and password for the proxy,
if required. Do NOT put your
NOD32 username and
password into these fields.
When you have finished, click Next> to continue the installation.
NOD32 Installation Guide
16
Configuring Updates
The Advanced and Expert installation routes allow you to configure
updating options at this point.
Clicking on the Change button will give control over program and signature
options, all of which can be configured after installation. It’s recommended
that you leave these options as they are.
ESET release regular updates to keep NOD32’s protection
current, we strongly advise that automatic updating is
left enabled, to ensure that your computer has the best
protection possible.
NOD32 Installation Guide
17
General Setup
Advanced and Expert mode installation now give several other options.
The Silent mode
option can be
set, so that only
an administrator
(set later) is sent
messages that do not
require some user
intervention.
There is also an
option to ‘password
protect’ the settings
– if you work on a
shared computer, and
you don’t want other
people to be able to
change the NOD32
configuration, you
can set a password
of your own
choosing (NOT the license password that was sent to you by ESET)
on the configuration options, so that only you will be able to change the
configuration.
NOD32 Installation Guide
18
Disabling ESET’s custom graphics & the
NOD32 splash screen
At this point, Expert mode will also give you the option to use a standard
windows interface rather than the NOD32 default, and to disable the
“Splash Screen” (a banner with NOD32 information on it) that comes up
each time you log onto Windows.
NOD32 Installation Guide
19
Warning distribution
If you wish to send a notification message to an administrator for example,
this window gives you 2 options: to send a warning message by email
and/or by Windows Messenger system. If you are a single-user, there is no
need to check these boxes.
In the next window, you will be able to enter the details of the recipients....
NOD32 Installation Guide
20
SMTP / Messaging Options
If your SMTP server requires authentication you may
configure that once the NOD32 installation has completed.
At this point, you will only be able to enter the addressing
information.
Expert mode now allows you to configure alerting and messaging options.
NOD32 has several configurable messaging options, which are particularly
useful for networked computers, where an administrator looks after several
machines. To configure the options at this point, you will require the
following details:
Note: The example information in this screenshot has been added to
illustrate the options - the options will be blank when the screen is
presented to you.
SMTP Server
address
Default sender
address and
recipient email
address(es)
Windows Messenger
recipients
You will need to ascertain the computer names, domain names or IP
addresses from the systems administrator in your network.
If you did not check one or other of the boxes on the previous screen, then
the unchecked option will be greyed out in this screen. If you chose neither
option on the previous dialogue, this screen will not be shown.
NOD32 Installation Guide
21
ThreatSense.Net™ Early Warning System
At this point the Typical, Advanced and Expert installations converge.
This is a system for automatic evaluation of files requiring further analysis
in ESET’s labs and enables their automatic submission. If you choose
to enable ThreatSense.Net™, it will also collect and submit anonymous,
statistical data about detected infiltrations, which enables ESET to watch
and evaluate the progress and severity of specific spreading threats.
By clicking the Advanced setup
button, you can amend the default
settings.
NOD32 Installation Guide
22
Detection of potentially unwanted
applications
Some advertising and activity tracking companies complain about
detection that terms their software as Adware or explicitly calls it Spyware.
NOD32 2.7 includes the detection of “potentially unwanted applications”.
This setting includes some Adware and other not necessarily malicious
applications. Though not always malicious, some Adware will often fill
a computer with a larger amount of file and memory baggage. This
overhead, though not necessarily a security risk, is extremely irritating and
troublesome to many users.
NOD32 Installation Guide
23
Access MONitor (AMON) Configuration
AMON (Access MONitor) is a memory-resident (always running when
computer is on) file scanning program. Automatic starting of AMON after
computer restart is a fundamental defense against malicious code. Quitting
AMON is not recommended and should only be done under special
circumstances. Execution of two different antivirus monitors (from different
products or companies) is not recommended since it may make your
computer slower and/or cause a system crash, especially on Windows NT
systems, might lead to serious problems.
AMON is the most important line of antivirus defense. It is critically
important to keep it running at all times using the most current version
of the virus signature databases and NOD32 program upgrades. AMON
monitors all potentially threatening actions on protected computers such as
opening, executing, creating or renaming files.
IMPORTANT:
Do not enable another resident
scanner from a 2nd anti-virus
program, otherwise your system
could become unstable.
Typical installation: jump to page 30
Advanced installation: continue to next page
Expert installation: continue to next page
NOD32 Installation Guide
24
Options for On-Demand Scanner
Configuration of On-demand scanning integration is available in the Expert
and Advanced routes at this point.
To allow easy access to the NOD32 On-Demand scanner, an icon can be
placed on the desktop during installation, if this is not desirable, this action
can be prevented here.
Context menu scanning (Enable on-demand scanner using mouse) allows
the user to right click on a file or folder in Windows, and choose to scan it
with NOD32. This integration into the context menu can be disabled here.
Neither of these options can be enabled after installation. If
they have been disabled here, the program will require
re-installation to enable these options.
We recommend these options are left checked.
NOD32 Installation Guide
25
Document MONitor (DMON) Configuration
Microsoft Office documents (Word, Excel, etc.) can sometimes contain
viruses which infect other files when the document is opened. Document
MONitor (DMON) provides protection against this sort of threat. Later
versions of Internet Explorer allow Microsoft Office documents to be
opened within the browser, directly from the internet. DMON will monitor
these documents and prevent infiltration of a virus should an infected
document be opened.
DMON is enabled by default in all installation modes, but can be disabled if
desired in Advanced and Expert modes.
NOD32 Installation Guide
26
Internet MONitor (IMON) Configuration
While the role of AMON is to provide real-time, resident, anti-virus
monitoring of a system and user actions, the IMON module protects your
computer from email and internet threats. To allow scanning of POP3 email
and while also using the internet, we recommend having IMON enabled.
IMON is enabled by default in all installation modes, but can be disabled if
desired in Advanced and Expert modes.
IMON’s primary role is to monitor incoming email. The key advantage of
IMON is its ease of use. There is virtually no setup necessary since this
module works with all email programs. IMON works on the winsock level
(operating system level).
If IMON is not enabled, the AMON module will still prevent
the opening of infected attachments saved from email and
the internet. However, it is strongly recommended that
IMON be enabled while using email or the internet.
NOD32 Installation Guide
27
IMON Configuration (email)
IMON will work correctly with most POP3 email clients, however there may
be cases where some incompatibility occurs, in which case, you can reduce
the efficiency of IMON, to ensure that it works correctly.
Notifications of
checking can be
added to email,
and this option can
be configured here
(in Advanced and
Expert routes)
Reducing the efficiency of IMON
may mean that some features are
disabled, or that the performance
may be affected.
Generally, it is not recommended
to enable IMON when installing
NOD32 onto a server, as some
system instability may occur.
NOD32 Installation Guide
28
IMON Configuration (HTTP)
IMON can also check for infiltrations coming through the internet browser.
The default option is to offer a choice of actions to the user when
an undesirable object is detected. IMON can also be configured to
automatically deny the download of the infected file.
HTTP checking is enabled by default, but can be disabled during Advanced
and Expert installations.
NOD32 Installation Guide
29
Email MONitor (EMON) Configuration
EMON (Email MONitor), a complementary resident module, scans emails
incoming via MAPI interface. The MAPI interface hooks into the different
interfaces of Microsoft Outlook. MAPI interface is used also when receiving
emails from the Microsoft Exchange Mail Server via the Exchange protocol.
Even if the MAPI Interface is not used on the computer, EMON will still
be installed. E-mails incoming via the POP3 protocol will be checked
by IMON.
NOD32 Installation Guide
30
Completion of Setup Configuration
At this point all installation tracks reconverge, and the configuration
phase is complete. This is the last point at which changes can be made
to the selected installation options, before the files are copied and the
configuration completed.
If you wish to change any
configuration parameters, use the
Back button now.
If you have enabled the AMON
module, you should particularly ensure that
you have no other resident (on-access)
anti-virus scanner active before proceeding.
To complete the installation with the selected configuration, click Next>
During the setup, you will see this message:
NOD32 Installation Guide
31
After installation has completed you will be required to restart your
machine.
You should ensure that no other anti-virus scanner will load at restart, save
any active work, and click Finish to restart the machine.
If you do not wish to restart immediately,
choose Restart later.
NOD32 may not function correctly, and
your computer may not be protected from viruses
until you have restarted your computer.
Once your PC has re-started, open the NOD32 Control Center by clicking
this icon
once, in the bottom right hand corner of your screen, look in the
‘Update’ section and press the ‘Update now’ button to ensure you are up to
date with ESET’s virus definitions.
After that, go to the Threat Protection Modules section and click once on
‘NOD32’. In the right hand screen, click the button for an ‘In-depth analysis’.
This will give your machine an immediate and thorough scan.
NOD32 Installation Guide
32
Configuration
...after installation
NOD32 Installation Guide
33
Configuring Profiles for manual
or ‘On-Demand’ scanning
The first thing you might want to do is review the default
profiles so that NOD32 is scanning exactly what you
want, when you want. Open the Control Centre by
clicking this icon
in the bottom right hand corner of
your screen (in the system tray near the clock).
Then under the section ‘Threat Protection Modules’
click ‘NOD32’
and in the resulting right hand window, click ‘Run
NOD32’.
NOD32 Installation Guide
34
Scanning Targets
After a few seconds, you will be
presented with the Scanning
Targets window where you can
choose which drives are scanned
(the ones selected will have a red
check mark through their icon).
NOD32 Installation Guide
35
Setup
Next, move to the Setup tab
where you can alter the default
settings to suit your personal
preferences of what is scanned
when running NOD32 for an
‘On-demand scan’. You can
add or exclude certain file types
if desired and you can send
messages of warnings to another
machine or an administrator.
Details for the latter need to be
entered in the NOD32 System Setup >
Notifications area.
NOD32 Installation Guide
36
Actions
Then move to the Actions tab where you can change the default settings if
you wish.
You can select:
• Files
• Boot sectors
• Archives
• Self-extracting archives
• Runtime packers
• Email
• Email folders
• Operating memory
(depending on your selections
in the next section: ‘Setup’)……
and choose what actions you
would like NOD32 to perform if
an infiltration is detected.
You can choose to ‘Quarantine’
a suspicious file for most of the
types of objects just mentioned,
which means that a copy of the
‘malware’ will be placed in the ESET folder
(C:\All Programs\ESET\infected). This can
then be sent to ESET for analysis if absolutely
necessary.
If you choose ‘Clean’ as the action to take ‘If a virus
is found’ and it is not possible for technical reasons
to clean a particular file, there are some secondary
actions that can be activated in the right hand column in this window.
(Refer to Dealing with alerts and virus incidents on page 46, for more
information)
NOD32 Installation Guide
37
Profile saving
The last tab in this section is for Profiles. By default, the program will use
the Control Center Profile. If you’ve made some changes on the previous
tabs, you can now save them to Control Center Profile, or to My Profile if
you wish.
There are also some pre-set Profile headings for Floppy Disk, In-Depth
Analysis and Local Disk scanning, so there are numerable variations for
On-Demand Scanning options.
The Context Menu Profile refers to scanning an individual file or folder by
right-clicking on it. When you do so, a drop down panel will give you various
system options; one of them is
to get NOD32 to scan the file
or folder for infections. This is a
very useful quick check before
opening any file.
Some users might want to set up
another profile for some specific
scanning of certain media. You
can create a new name for it here
by clicking the Profiles button
in the lower part of the window.
Then you can setup some new
parameters and save them under
this profile.
It’s also possible to use Password Protection to stop other
users changing profile settings.
First, you must setup Password Protection. You may
have already selected this during installation. In the main
Control Center window, enter the NOD32 System Tools
section and then look in the NOD32 System Setup area.
Then click ‘Setup’ and you will see the area for setting
your password. The password is totally of your invention
and should NOT be confused with the username and
password that ESET send you with your license email.
Make sure the password is easy for you to remember,
but if you did forget it, you can “unlock” NOD32 again by
getting this unlocking utility from our website:
http://www.eset.com/files/unlock.exe
NOD32 Installation Guide
38
Finally, the Scanning Log tab shows exactly what’s going on when a scan is
invoked.
Scan button
This will invoke a scan of your
selected drives (as you’ve
specified in Scanning Targets)
and you will see all the files being
scanned in the window. If the
On-demand scanner finds an
infiltration or potential infiltration,
it will be displayed in red in this
window. You can then either
choose to click the ‘Scan & Clean’
button as described below, or right
click on the log entry and from the
drop down context menu, choose
‘Clean’. The latter is the far quicker
method if any infections are
detected.
Once the scan has been started, the ‘Scan’ button changes to a ‘Pause’
button. This might be useful in case you wanted your PC to perform a task
in another application while the scan is running, with as little performance
slow-down as possible.
Once the scan has been started, the ‘Scan & Clean’ button changes to a
‘Stop’ button in case you wanted to terminate the scan before it finishes.
Scan & Clean button
This will also invoke scanning of your selected drives and directories, but
will automatically perform the relevant action (Clean, Prompt for an action,
No action, Rename, Delete, Replace, Copy to Quarantine) that you have
chosen in the ‘Actions’ tab.
NOD32 Installation Guide
39
Scanning
The Scanning Log window does not need to be watched in real time….you
can wait until it’s finished to review the complete log entries. The scan can
take a few seconds or several minutes, depending on what you have asked
to be scanned and in how much depth. When finished, you can review the
scanning log. Any suspicious files will be shown in red and the path will be
shown of where they are residing on your machine. You can right-click on
these red notes and choose ‘Clean’ at this point.
In the screenshot above you will notice
the items C:\pagefile.sys - error opening
(Access denied) [4], C:\hiberfil.sys error opening (Access denied) [4], etc.
This is perfectly normal and is nothing to worry
about. The files are being exclusively used by your
operating system and nobody, not even NOD32,
has permission to look inside them. At the end of the
scan, you will see a brief comment of explanation
(see inset screenshot above).
At any time you can review previous
system scans in the Logs section in the
Control Centre. Look in NOD32 Scanner
Logs.
Equally, you can review details in the Threat Log
if any infections have been found and the Event
Log will give details of updates, connection errors,
warnings, etc.
NOD32 Installation Guide
40
On-demand scanning
So, you’ve setup the scanning profiles to your liking, or maybe you’ve
chosen to stick with the default settings, and run a scan of your PC. Now
you can instigate a scan of a specific drive on your computer, or specific
files, or a Floppy disk or CD, etc. using your pre-defined setups saved
under the Profiles tab. This is
called an On-demand scan.
In the Control Centre, under
‘Threat Protection Modules’,
click ‘NOD32’ and in the right
hand window click one of
the 4 buttons that suits your
requirements:
• ‘Local’ to instantly start a scan
of all local drives
• ‘Run NOD32’ to open the setup
tabs as previously mentioned
in Profiles on page 32
• ‘Diskettes’ to instantly start a
scan of any floppy diskettes
• ‘In-depth analysis’ to instantly scan everything on your machine with
more depth than a standard scan. This scan has it‘s own prESET, indepth parameters, with everything set to maximum, so is not governed
by the Profile(s) you have previously setup. This scan could therefore
take much longer than a normal scan.
NOD32 Installation Guide
41
On-access scanning (AMON)
This is when you attempt to open a file and NOD32
will automatically check it for you first via AMON (the
Access MONitor). By default, AMON will be the resident
scanner on your machine, always vigilant, always in the
background, always ready to warn you of an infiltration.
On-access scanning (DMON)
DMON is a plug-in for NOD32 that serves for scanning
Microsoft Office documents and files downloaded
automatically by Internet Explorer (e.g. Microsoft
ActiveX elements). DMON provides an additional level
of protection to AMON.
Email scanning (EMON)
EMON (Email MONitor), a complementary resident
module, scans emails incoming via MAPI interface.
The MAPI interface exploits the different interfaces of
Microsoft Outlook. MAPI interface is used also when
receiving emails from the Microsoft Exchange Mail
Server via the Exchange protocol.
Internet traffic scanning (IMON)
IMON will also continually work in the background on
your machine, checking your incoming email and also
any websites that you visit and download from.
For more information on AMON, DMON, EMON & IMON or
the NOD32 scanner, please check the Help button in the
NOD32 Control Centre (there is a 2nd button in the righthand window too for specific module help) and/or have a
look through the Frequently Asked Questions (FAQ’s) on
the ESET website: http://www.ESET.com/support/faq.php
On access scanners load into system memory, and intercept all the calls
made by the operating system to the file system. In this way they ensure
that a file has been scanned before it is passed to the system for opening,
thus preventing a virus from infecting the sytem.
NOD32 Installation Guide
42
Updating
By default, NOD32 will check for Virus
Signature Database updates automatically.
These are the descriptions that our
analysers have created, of the many
viruses, worms and trojans. You can also
manually check for updates, if you wish, by
clicking the ‘Update now’ button
in the Update section.
The upper right hand window
will give you information on the last time
you received an update and the version
number of the VSD (Virus Signature
Database). If you were in any doubt as to
whether your VSD was current or not,
you can go the Support page
on the ESET website
(http://www.eset.com/support/index.php)
where the latest version number
is shown. To make any changes to
the updating procedure, click the ‘Setup’
button.
NOD32 version
To find out which version of NOD32 you
have installed, you can look in the NOD32
System Tools under Information. In the right
hand window, about half way down, you will
see the details of the components you have
installed.
At the top of the window is information
about which VSD you currently have: the
version number and the date you received
it.
New updates are released every day, on average,
although there is no guaranteed rule. In addition,
Program Component Upgrades are also sometimes
sent out. This occurs when a major change has
been implemented in the NOD32 application. When only minor
changes are made, a newer version is made available on the
website for free download to all registered users.
NOD32 Installation Guide
43
Updating with a dial-up connection
If you have a dial-up connection to the internet, NOD32 will check for
updates as soon as you connect and will keep checking every hour,
assuming you stay online for a long while of course. You will see this in the
Scheduler/Planner section, also under NOD32 System Tools…
The 1st item will be checked if you have an ‘always online’ connection (eg:
DSL, T1) and both the 1st and 2nd items will be checked if you have a Dialup connection and have entered the correct details when installing.
NOD32 Installation Guide
44
ThreatSense Heuristics
This is something that NOD32 is particularly good at: scanning for possible
malware, enabling detection of new malicious software without having to
wait for updates. The heuristic capability contains sophisticated algorithms
which allow proactive detections, meaning that protection against new
malware is available immediately. Although we try our utmost to keep up
with the perpetual torrent of new malware, it’s not possible to produce virus
signatures in the blink of an eye, so this is where the use of Heuristics is a
distinct advantage.
Advanced Heuristics
This extends the standard heuristic
capabilities of NOD32 and allows
detection of a high number of
new threats, etc. However, we
recommend that you use Advanced
Heuristics carefully when setting
up these preferences for an Ondemand scan as it can slow the
scanning time quite dramatically and
can occasionally produce a ‘False
Positive’, hence it is not enabled by
default. (A False Positive is when
NOD32 suspects a file or folder is
containing something malicious but
which turns out to be harmless).
Anti-Stealth Technology
Rootkits are now frequently used to hide malicious processes and files.
Enabling the use of Anti-Stealth technology will allow Rootkits to be
detected, even if they are installed and active, and they are hiding files from
the operating system. NOD32 can then use signatures and heuristics to
detect and remove these threats.
We recommend periodically running an ‘In-depth analysis’ scan of your
machine, for example, which has Advanced Heuristics enabled. In fact, this
type of scan has everything set to maximum, hence it’s a sensible habit to
run it now and again. You may wish to setup a Scheduled Task to run an
‘In-depth analysis’ scan once a week, or once a month. In NOD32 Control
Center, look in NOD32 System Tools section and click on ‘Scheduler/
Planner’. Then click on the [+] Add button and follow the setup instructions.
We strongly recommend leaving Advanced Heuristics
enabled in the AMON, DMON, EMON & IMON modules.
For more information please check the Help button in the
NOD32 Control Centre and/or have a look through the
Frequently Asked Questions (FAQ’s) on the ESET website:
http://www.ESET.com/support/nodfaq.htm
NOD32 Installation Guide
45
Dealing with alerts
& virus incidents
NOD32 Installation Guide
46
Dealing with alerts and virus incidents
Basic rules to follow if a virus is detected:
• Trojans can only be deleted as they do not infect other files and
contain only their own code
• Worms in email attachments should be deleted as they contain
only the viral code
• If the IMON’s HTTP scanner detects a virus, choose to terminate
the connection to prevent it from saving to the disk.
If you are unsure whether it is safe to delete the particular file without any
side effect on your system’s functionality, we suggest you tick the ‘Copy to
quarantine’ checkbox before you choose to delete it. Please bear in mind
that many viruses copy themselves to system folders such as WINDOWS
or WINDOWS\system32 to confuse the user. Should you have any
concerns about deleting the file and were unable to find any description of
it, either on our website or on the web, please send the suspicious file to
[email protected] for analysis.
Note:
Occasionally, you may get a virus alert where the name of the infection is
“unknown” or “probable...”. This is because one of the NOD32 modules
has detected virus-like characteristics in a file but doesn’t have a matching
signature to verify the virus name. This is most common with very new
infections which have not yet been identified.
NOD32 has an impressive record of catching still-unknown, new viruses
and worms because of the sensitivity and power of these “characteristic”
scanning techniques, also known as heuristics. Since these are very often
as-yet-unknown malware (bad software), we are very interested in receiving
samples of these files for analysis.
NOD32 Installation Guide
47
Submitting a sample file to ESET
NOD32 uses ThreatSense.Net™ Early Warning System. This system
enables the evaluation of files which may have been flagged as suspicious
by NOD32. It assists the user to submit such files to ESET’s analysts, if
this is desirable. ThreatSense.Net™ is enabled by default, but will prompt
the user before submitting any files. The process can also be completely
automated, or disabled if not required.
The system also includes collection and submission of anonymous
statistical data about detected infiltrations which enables ESET, the vendor,
to watch and evaluate the progress and severity of the spreading of
particular threats.
For disabling, enabling and further
control over the ThreatSense.Net™
Early Warning System, you can go to the
NOD32 Control Center > NOD32 System
Tools > NOD32 System Setup and click
on Setup in the right hand window. In the
next window, go to the ThreatSense.Net™
tab and click ‘Advanced settings...’ and
you’ll see another window like this
for further configuration.
The Exclusion Filter has a few common
file extension names included (ie: Word
Document, Excel Spreadsheet, etc.) to
prevent accidental disclosure of private
information to ESET. You can add or
remove specific file names if you desire.
There may still be occasions when you wish to submit a sample file
manually. First check the ‘Quarantine’ box before cleaning, renaming, or
deleting the suspect file. The quarantine process saves a copy of the file
in an encrypted and non-executable form, so no-one will be accidentally
infected while moving the file, or sending it via email. The quarantined files
are (by default) saved to “C:\Program Files\ESET\infected\ ”. Files
should not be submitted manually once NOD32 has evaluated them as
suitable for analysis and submitted them automatically.
To submit a quarantined file, simply go to NOD32 Control Center and then
to the ‘NOD32 System Tools’ section. In this section is the ‘Quarantine’ subsection and in the right hand window you’ll see a list of the files you have
quarantined. Simply highlight the entry, or entries, you wish and then click
the ‘Submit for analysis’ button below the window.
For more information on how to manually submit suspicious files follow the
instructions here: http://www.ESET.com/support/faq1.php?id=1110
NOD32 Installation Guide
48
Troubleshooting
NOD32 Installation Guide
49
Appendix A: Troubleshooting
Q: My username or password doesn’t work
A: If a dialog box pops up asking for your username and password, it’s
most likely because they were entered incorrectly during setup, or that your
NOD32 license has expired. If you are sure your license is still valid, click
Setup on the popup screen to re-enter the username and password as sent
to you in the email from your vendor.
Your username and password are case sensitive
(the username is always “AV-” in upper-case, followed
by numerals and the password only uses lower-case
letters plus numbers), and must be entered exactly,
including the dash “-“ character in the username. We
strongly recommend that you “copy” and “paste” these
values to avoid mistakes. (Highlight the text, Ctrl + C to
copy and Ctrl + V to paste into the required fields)
If you have tried these suggestions without success please contact your
reseller’s Technical Support. (Further information can be found on ESET’s
website: http://www.eset.com/support/nodfaq.htm)
Q: Can I use NOD32’s IMON with email client XYZ?
A: If your email client uses the POP3 protocol, it should work with IMON
without any further configuration. Note that if you use IMAP or another
protocol not currently supported by IMON, you will still be prevented from
opening unsafe attachments by the AMON module.
Q: My problem is not listed, what should I do?
A: If you have any other questions, start with the list of Frequently Asked
Questions (FAQ) - http://www.eset.com/support/faq.php
If you don’t find the solution there, please contact ESET Technical Support
by http://www.eset.com/support/index.php
NOD32 Installation Guide
50
Appendix B: Installation Types
Typ. = Typical Installation (Recommended for most users)
Adv. = Advanced Installation (Partially customised installation)
Exp. = Expert (Fully customised installation)
Post = Option can be configured post install
Option
NOD32 Destination folder
Silent Mode / Password protect settings
GUI type / NOD32 Splash screen
Send warnings by email or Win.Messenger
Update-server, Username & Password
Internet connection & proxy settings
Auto-update configuration
Launch resident protection (AMON) on startup
Place On-demand scanner icon on desktop
Enable on-demand scanning with mouse
Install DMON, IMON services
Enable email scanning/cleaning
Enable HTTP scanning
Install EMON services
ThreatSense.Net™ Early Warning System
Default
Typ. Adv.
C:\All Programs\ESET
l
Off / Off
l
Full Graphic / Yes
Off / Off
Auto / -none- / -nonel l
Use IE/no proxy
l l
Hourly or on-connect
l
Win9x - Yes, XP/2000/2003/NT - No l l
Yes
l
Yes
l
Yes
l
Yes
l
Yes
l
If Outlook installed
l
Yes
l l
Exp.
l
l
l
l
l
l
l
l
l
l
l
l
l
l
l
Post
l
l
l
l
l
l
l
l
l
l
l
l
NOD32 Installation Guide
51
Appendix C: Uninstalling NOD32
To uninstall NOD32, go to ‘Start’ in the lower left hand corner of your
computer screen and select ‘Programs’ or ‘All Programs’ and then the
‘ESET’ folder. Inside that folder is a file named ‘Uninstall’. Click on this
file to invoke the uninstallation process. This takes a few seconds. When
finished, reboot your machine as prompted and after the PC re-starts,
check that the ESET folder has been removed from C:\Program Files. If it
hasn’t, you can now delete this ESET folder manually by right-clicking your
mouse on the folder and selecting ‘Delete’.
You can now install the full commercial version of NOD32, or re-install it
if the original installation was not successful, and reboot your machine as
prompted once more.
NOD32 Installation Guide
52
Glossary
AMON
On-Access Scanning Monitor - scans all files on your computer as soon as you
try to run or access them.
Archives
Compressed or stuffed files: can be used to save a lot of disk space and transfer
larger files via the internet more quickly. For instance .zip and .rar are archive
files.
Boot Sectors
The boot sector is the first sector on a floppy disk. On a hard disk it is the first
sector of a partition. It contains information about the disk or partition, such as the
number of sectors, plus a small amount of program code.
Broadband
A high-speed, high-capacity transmission channel. Broadband channels are
carried on coaxial or fiber-optic cables that have a wider bandwidth than
conventional telephone lines, giving them the ability to carry video, voice, and
data simultaneously.
C:
Standard code letter for main hard drive on your computer.
Cache
The Cache is a file on your reader’s computer where their system stores a copy
of objects accessed recently. Then, if the same object is required again, instead
of issuing another request, the computer can simply use the copy from the
Cache, which can save a considerable amount of time.
CPU
Central processing unit. Also known as a microprocessor or processor. The 386,
486, and Pentium are examples of CPUs built by Intel, but there are many types
of CPU.
Dial-up connection
The computer is connected to the internet via a modem through a normal
telephone line. Download speeds will be slower than Broadband.
DMON
On-Access Scanning Monitor specifically for Microsoft Office Documents (Word,
Excel, etc.)
Download
Copy a file from the internet to your machine - for example downloading an
update from ESET’s website.
False Positive
Often referred to as an FP. A False Positive is when a anti-virus scanner reports
a file or folder as containing something malicious but which turns out to be
harmless.
HTTP
HyperText Transfer Protocol - The Web’s communication standard, referenced in
the http:// that appears at the beginning of every web page address (an extra ‘s’
on the end, as in https:// denotes the secure, encrypt form). HTTP is what allows
web browsing to work.
IMAP
Internet Message Access Protocol. One of the protocols allowing a user to access
their email. It permits manipulation of remote message folders (mailboxes), in a
way that is functionally equivalent to local mailboxes. IMAP and POP3 are the
most common methods for email retrieval.
IMON
Internet traffic Scanning Monitor - scanning incoming email and website
downloads for malicious software
Installer
Executable file that will install a program, for instance to install NOD32 onto your
machine.
IP address
Every computer on the internet has an IP address assigned to it. It’s like a phone
number for your computer. An IP address is formatted like this: ##.##.###.###.
(12.34.567.890 for example). Web browsers “dial” this number to find another
computer on the internet. IP addresses are matched to friendly names like www.
ESET.com via a system called DNS (Domain Name Service)
ISP
Internet Service Provider - the organisation that provides your connection to the
internet.
MAPI
Messaging Application Programming Interface - A system built into Microsoft
Windows that enables e-mail applications to work together to distribute mail. As
long as both applications are MAPI-enabled, they can share mail messages with
each other.
NOD32 Installation Guide
53
Operating Memory
The area of memory used by the system to run itself and any loaded programs.
Some Operating memory (also called System Memory) on the disk in a “swapfile”,
which is a type of Cache, and the rest in the RAM chips on the computer. Viruses
try to load themselves into Operating Memory so that they remain active while the
computer is switched on.
Password
Your password, secret word or code used to access information. For instance,
your personal password assigned by ESET to access the ESET servers for
updates, upgrades and downloads. (You may also set your own password to
protect your settings from other users on your computer. This is set by you and
should not be confused with ESET’s password).
POP3
Version 3 of the Post Office Protocol. POP3 allows a client computer to retrieve
electronic mail from a POP3 server via a (temporary) TCP/IP or other connection.
It does not provide for sending mail, which is assumed to be done via SMTP or
some other method. IMAP and POP3 are the most common methods for email
retrieval.
Proxy Server
A computer specifically designed to reduce the amount of bandwidth used, or
to control access to the internet. A proxy will be either a “caching” – meaning it
stores a copy of the content downloaded through it for faster future access – or
“pass through” – meaning it will simply provide a gateway to other services, for
instance websites. Usually home users will not be using a proxy.
RAM
Random Access Memory – Used for the operating memory which can be used
by programs to perform necessary tasks while the computer is on; an integrated
circuit memory chip which allows information to be stored and accessed far faster
than from the hard disk.
ROM
Read Only Memory - memory whose contents can be accessed and read but
cannot be changed – used mainly for the system BIOS and CMOS chips. (These
tell the machine how to start up and find the disks)
Runtime Packers
Packers do simply as their name suggests, they ‘pack’ or ‘compress’ a program
much the same way a compressor like Pkzip does, packers then attach their own
decryption / loading stub which ‘unpacks’ the program before running it. Packers
are often used by virus writers to try to confuse anti-virus scanners.
SMTP
Simple Mail Transfer Protocol. Allows electronic mail to be sent from an email
account. The SMTP dialog usually happens in the background under the control
of the message transfer agent, e.g. sendmail or outlook express.
Spyware
Software that secretly collects personal information and delivers it to an
unauthorised 3rd party. Some Spyware can significantly slow the machine, or
cause system crashes.
ThreatSense.Net™
The ThreatSense.Net™ Early Warning System assists in submitting new malware
threats to ESET’s lab and therefore provides valuable information to help protect
the user’s PC.
Trojan Horse
A Trojan Horse is a program intended to perform some covert and usually
malicious act which the victim did not expect or want. It differs from a virus in that
it doesn’t replicate, although some viruses can contain Trojans.
URL
Uniform Resource Locator - The structure of a web address. ie: the HTTP part
(HyperText Transfer Protocol), the domain name or IP address and the final
section (top level domain): [.com] [.uk] [.org] [.net] [.gov]...etc.
For example: http://www.ESET.com
Username
Your personal username assigned by ESET to access the ESET servers to
download updates and upgrades.
Virus
A computer virus is a self-replicating program that copies itself and that can
“infect” other programs by modifying them or their environment such that a call to
an infected program implies a call to a possibly evolved copy of the virus.
VSD
Virus Signature Database - The collective, known “signatures” of viruses,
released by ESET, on average, every day, to keep your computer up to date with
protection.
Worm
A subset of viruses which replicate as above but without requiring a host file (The
worm file contains everything necessary for the virus to replicate itself). Worms
require a networked system to reproduce. Email is one method a worm can use
to spread.