1
Cinema Rhapsody
Mach IV
Home Theater Controller
Installation Manual
HDMI 1.4 - April 2011
602-610 Mamaroneck Avenue, White Plains, NY, 10605, www.ada-usa.com, 1-800-HD-AUDIO, Fax (914) 946-9620
Contents
Safety Instructions & Electrical Warning.........................................................................................3
AC Connections..................................................................................................................................4
Power Amplifier (& Powered Subwoofer) Connections..................................................................5
Introduction - Front Panel Controls & Displays..............................................................................6
Power On, Mute, Off, & Master Volume Control..............................................................................7
Input Selector......................................................................................................................................8
Mode Selector & Mode Descriptions................................................................................................9
Rear Panel Connections..................................................................................................................11
Out of the Box Input Configuration................................................................................................11
Custom Input Configuration............................................................................................................12
Setup - Entering & Navigation.........................................................................................................13
Customizing Virtual Inputs..............................................................................................................14
Inputs Labels....................................................................................................................................15
Audio Input Jack Assignment.........................................................................................................16
Video Input Jack Assignment.........................................................................................................17
Input Presets.....................................................................................................................................18
Default Modes...................................................................................................................................19
DC Triggers & Loading Custom Input Configurations..................................................................20
Final Input.........................................................................................................................................21
Setup 1 - Speaker Size & Crossover Frequency...........................................................................22
Subwoofer Crossover Point Setup.................................................................................................22
Setup 2 - Speaker Level...................................................................................................................24
Setup 3 - Delay Settings..................................................................................................................26
Delay Level Setup 3..........................................................................................................................26
Setup 4 - Bass Limiter......................................................................................................................28
Setup 5 - THX....................................................................................................................................29
Modes, DTS Enhancements & THX Options..................................................................................30
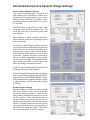
Simulated Surround & Dynamic Range Settings..........................................................................31
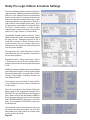
Dolby Pro Logic II Music & Custom Settings.................................................................................32
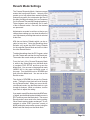
Reverb Mode Settings......................................................................................................................33
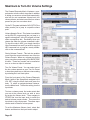
Maximum & Turn-On Volume Settings...........................................................................................34
Dolby Volume....................................................................................................................................35
Tone Settings & Loudness On/Off..................................................................................................36
Parametric EQ (PEQ) Setup.............................................................................................................37
HDMI Down Mix.................................................................................................................................38
Solo Test............................................................................................................................................39
Saving (& Loading) Input Configuration & PROM Files................................................................40
Recalling Factory & Storing/Recalling Installer Defaults.............................................................41
ADA Bus Address, IR Receiver & Display Blanking......................................................................42
TEQ Tracking....................................................................................................................................43
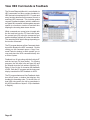
View HEX Commands & Feedback.................................................................................................44
HEX Codes for System Integration.................................................................................................45
Dolby and the double-D symbol are trademarks of Dolby Laboratories Licensing Corporation. Confidential Unpublished Works. © Copyright 1992-2002,
Dolby Laboratories, Inc. All Rights Reserved. Lucasfilm and THX are trademarks or registered trademarks of Lucasfilm, Ltd. ©Lucasfilm Ltd. & TM.
Surround EX is a jointly developed technology of THX and Dolby Laboratories, Inc. and is a trademark of Dolby Laboratories, Inc. All rights reserved.
used under authorization. Manufactured under license from DTS Technology, LLC. DTS Digital Surround is a trademark of DTS Technology LLC.
©2010, Audio Design Associates, Inc. All rights reserved. Technical data and information contained in this manual is subject to change without notice.
Page 2
Safety Instructions & Electrical Warning
READ INSTRUCTIONS - All the safety and operating instructions should be read before the appliance
is operated.
RETAIN INSTRUCTIONS - The operating instructions should be retained for future reference.
HEED WARNING - All warnings on the appliance and in the operating instructions should be adhered to.
FOLLOW INSTRUCTIONS - All operating and use instructions should be followed.
WATER AND MOISTURE - The appliance should not be used near water - for example, near a bathtub,
washbowl, kitchen sink, laundry tub, in a wet basement, or near a swimming pool, etc.
LOCATION - The appliance should be installed in a stable location.
WALL OR CEILING MOUNT - The appliance should not be mounted to a wall or ceiling.
VENTILATION - The appliance should be situated so that its location or position does not interfere with its
proper ventilation. For example, the appliance should not be situated on a bed, sofa, rug or similar
surface that may block the ventilation openings.
HEAT - The appliance should be situated away from heat sources such as radiators, heat registers, stoves,
or other appliances that produce heat.
POWER SOURCES - The appliance should be connected to a power supply only of the type described in
the operating instructions or as marked on the appliance.
GROUNDING - Make sure that this unit is always connected to a standard three-prong grounded outlet
(the circular pin is ground). When operating this unit at a higher voltage with a different power cord
configuration, consult your dealer for the proper power cord/outlet combination to use before operating this unit.
The lightning flash with the arrowhead, within an equilateral
triangle, is intended to alert the
user of the presence of uninsulated “dangerous voltage” within
the product’s enclosure that may
be of sufficient magnitude to constitute a risk of electrical shock to
persons.
IMPORTANT
CAUTION
POWER CORD PROTECTION - Power supply cords should be routed so that they are not likely to be
walked on or pinched by items placed upon or against them, paying particular attention to cords at
plugs, convenience receptacles, and the point where they exit from the appliance.
RISK OF ELECTRIC SHOCK
DO NOT OPEN
CLEANING - The appliance should be cleaned only with a polishing cloth or a soft dry cloth. Never clean with
furniture wax, benzine, insecticides or other volatile liquids since they may corrode the face plate.
CAUTION: TO PREVENT RISK
OF ELECTRICAL SHOCK, DO
NOT REMOVE COVER (OR
BACK). NO USER-SERVICEABLE PARTS INSIDE. REFER
SERVICING TO QUALIFIED
SERVICE PERSONNEL.
POWER LINES - An outdoor antenna should be located away from power lines.
NONUSE PERIODS - The power cord of the appliance should be unplugged from the outlet when left
unused for a long period of time.
OBJECT AND LIQUID ENTRY - Care should be taken so that objects do not fall and liquids are not spilled
into the enclosure through openings.
DAMAGE REQUIRING SERVICE - The appliance should be serviced by an authorized service center or
qualified service personnel when:
•
•
•
•
•
The power supply cord or plug has been damaged; or
Objects have fallen, or liquid has been spilled into the appliance; or
The appliance has been exposed to rain; or
The appliance does not appear to operate normally or exhibits a marked change in performance; or
The appliance has been dropped; or the enclosure has been damaged.
SERVICING - The user should not attempt to service the appliance beyond that described in the operating instructions. For all other service requirements, the user should contact an Authorized Dealer or
Service Center.
WARNING:
TO REDUCE THE RISK OF FIRE OR ELECTRICAL SHOCK, DO NOT EXPOSE THIS APPLIANCE TO
RAIN OR MOISTURE. REPLACE FUSE ONLY AS MARKED.
CAUTION:
TO PREVENT ELECTRIC SHOCK, DO NOT PLUG THIS UNIT INTO ANY OUTLET OR EXTENSION
CORD WITHOUT THE STANDARD THREE-PRONG CONFIGURATION, WHERE THE CIRCULAR HOLE
IS USED FOR THE GROUND PLUG. ANY UNITS NOT SOLD IN THE UNITED STATES OR CANADA
ARE NOT SUPPLIED WITH A POWER CORD. THEREFORE, AN AUDIO DESIGN ASSOCIATES DEALER
SHOULD BE CONSULTED BEFORE CONNECTING THIS UNIT TO ANY POWER SOURCE.
The exclamation point within the
equilateral triangle is intended to
alert the user of the presence of
important operating and maintenance (servicing) instruction in
the literature accompanying the
appliance.
LINE VOLTAGE SELECTOR SWITCH AND REMOVABLE POWER CORD:
THIS UNIT IS EQUIPPED WITH A VOLTAGE SELECTOR SWITCH. IN MOST CASES, THIS SWITCH
WILL REMAIN IN THE 115V POSITION (SEE PICTURE BELOW), WHICH IS HOW THE UNIT LEAVES
THE FACTORY. HOWEVER, IF YOU WANT TO OPERATE THE UNIT IN AN AREA THAT USES THE 230V
SETTING, CONSULT YOUR DEALER BEFORE PLUGGING THE UNIT IN. IN A CASE WHERE THE
230V SETTING WOULD BE NEEDED, AUDIO DESIGN ASSOCIATES WILL NOT PROVIDE A POWER
CORD FOR THE UNIT. THEREFORE, THE USER MUST CONSULT AN AUTHORIZED DEALER OR ADA
TO OBTAIN THE PROPER POWER CORD, AS WELL. MAKE SURE THAT THE VOLTAGE SELECTOR SWITCH IS IN THE PROPER POSITION AND THAT YOU HAVE THE CORRECT POWER CORD
BEFORE THIS UNIT IS PLUGGED IN AND OPERATED!
115 V
Page 3
AC Connections
AC Connection
The Cinema Rhapsody
Mach 4 features a dualprimary type of power
supply that operates on
115V~/60Hz as well as
230V~/50Hz.
When using the Cinema
Rhapsody Mach 4
with non-US Standard
AC power cords, the
user must supply the
appropriate EIC Female to
Male AC power cord.
Before You Begin
As you remove the Cinema Rhapsody Mach 4 from its packaging,
inspect the condition of the component prior to proceeding with the
following steps for AC connection. In the event that the Cinema
Rhapsody Mach 4 appears to have suffered cosmetic damage due
to shipping, please contact your Authorized ADA Dealer immediately
and do not proceed to plug the unit into an AC outlet.
AC Connection
For customers who are using the U.S. standard AC receptacle, you
will use the EIC AC Power Cord provided with the Cinema Rhapsody
Mach 4. Simply plug this AC cord into an operative AC outlet. For
customers who are using a non-U.S. standard AC receptacle, you
will need to acquire an EIC AC Power Cord with the appropriate
receptacle connector. ADA only provides AC Power Cords with the
U.S. standard AC prongs.
B
Plug into Cinema Rhapsody
Plug into an AC Outlet
Page 4
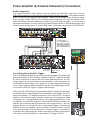
Power Amplifier (& Powered Subwoofer) Connections
Audio Connections
The Cinema Rhapsody’s Audio Outputs are clearly marked in a white field on the back of the unit.
ADA strongly suggests not using directional interconnects that lift the grounds. This diagram includes
ADA’s PTM-8150 Eight Channel Power Amplifier. While you may decide to vary the input arrangement if you are using a PTM-8150, the following input arrangement will cause the amplifier’s front
panel LED display to spread outward from Channel 4, the center channel speaker. If you are using a
self-powered subwoofer, you will connect the Cinema Rhapsody Mach 4’s SUB Output directly to the
subwoofer and you may opt to “Y” split the SUB output to illuminate channel eight of the PTM-8150.
B
L R
L R
LS RS BS BS
C S
Low Volatge Trigger
Pin 1 (-) to Gnd on 9-Pin D
Pin 2 (+) to Zn 1 on 9 Pin D
(Set PTM-8150 PAC Module
so all channels trigger with
Zone 1 and Normal Turn On)
L
BS
R
L
LS
RS
B
C
S
S
BR
L R
Sub Output To
Power Amplifier
For Passive Subs
L R
LS RS BS BS
Or Sub Output To
Powered Subwoofer
C S
Low Voltage Power Amplifier Trigger
The Cinema Rhapsody Mach 4 features two low voltage triggers that can be used
among other things, to turn ADA power amplifiers on and off. Unlike the switched
AC outlet, which turns on and off with the Cinema Rhapsody Mach 4, the lowvoltage triggers are set to track inputs on the preamplifier. In the setup mode, you
can determine if either trigger one or trigger two (or both) engage with that input
or not. When triggering a power amplifier using the low voltage triggers, ADA’s
out of the box setup has Trigger 1 engaging with all inputs.
ADA power with a PAC Module (Programmable Amplifier Controller) permit amplifier channel pairs to be assigned to track independent zone triggers (for use in
multi-room systems). The amplifiers can also be set to “Fast Turn On” so that the
amplifier can be used for paging (amplifier remains on and charged even when
the trigger is off). In a home theater system, zone triggering and fast turn on are
not required. If an ADA PAC amplifier is ordered with an ADA home theater preamplifier, the unit will ship with all channel pairs set to trigger with Zn 1. Also, the
L
LS On” so that when the
amplifier will be set to “Normal Turn
L trigger is removed,Cthe
BS
amplifier will turn off completely. Here, the Mach III will also ship with a 9-pin D
to two-wire cable that can be terminated to Low Voltage Trigger 1 on the Mach III
as shown in the adjacent diagram. Make certainS that Low Voltage Trigger Button
S
RS
R back of the PAC amplifier
on the
is in the outward
BR “LV Trigger” position.
Low Volatge
Pin 1 (-) to G
Pin 2 (+) to
(Set PTM-81
so all chann
Zone 1 and
Page 5
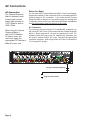
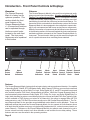
Introduction - Front Panel Controls & Displays
Overview
The Cinema Rhapsody
Mach 4 is factory set for
optimum operation. This
section details the front
panel features of the
Cinema Rhapsody Mach
4. All component functions
can be operated through
the three control knobs
located on the units front
panel. The front panel
displays are also explained
in this section.
L C R
SUB
SL SR
BSL
BSR
Cinema Rhapsody Mach IV
Master
Power
Switch
Features
Input
Channel
Indicators
Welcome
The Cinema Rhapsody Mach 4 is the world’s most advanced audio
video surround sound preamplifier. It is also configured “Out Of
The Box” for optimum operation. While it is designed to be easy
to setup and operate, ADA strongly recommends spending some time
familiarizing yourself with the units many functions and features. For
those who wish to customize their home theater system, the Cinema
Rhapsody Mach 4 is also equipped to be configured to operate ideally in any environment and with many varying source components.
While the connection of components and accessories are discussed
in the following sections, this area will explain the front panel features
and basic operation commands of the Cinema Rhapsody Mach 4’s
front panel. The text found in italic type in this manual’s margins will
act as a quick reference when reviewing these materials.
Blu-ray DVD
Volume -3.0
Dolby TrueHD
L C R
SUB
SL SR
BSL
BSR
MODE
ENGAGE
INPUT
VOLUME
CHANNEL
RECORD
SELECTOR
CONTROL
MADE IN U.S.A.
Input
Volume Record Channel
Output
Mode
Channel Selector Selector Control Selector Selector
Knob & On/Off Knob
Knob
Indicators
Knob
The Cinema Rhapsody Mach 4 acts as both an input selector and surround sound decoder. It is capable
of decoding Dolby TrueHD, DTS HD Master Audio, Multi-Channel PCM from sources that connected
using an HDMI cable as well as Dolby Pro Logic, Dolby Digital (AC-3), and DTS encoded formats and
also provide Lucasfilm THX Ultra 2 enhancements and filters. While the Cinema Rhapsody Mach 4
can automatically detect between Dolby Digital, DTS, Dolby Pro Logic, and Dolby Digital/Dolby Pro
Logic (both decoding formats are used when playing two-channel encoded DVD discs {typically older
movies available on DVD that are not mixed in six channels}), the option to engage either full THX
enhancements or only THX Re-EQ must be manually set on the Cinema Rhapsody Mach 4. The Cinema Rhapsody Mach 4 also provides several additional modes ideal for music playback. There are
additional settings that permit the Cinema Rhapsody Mach 4 to also operate in home theaters where
a full eight channel speaker array may only be partially implemented (i.e. no back surround and/or no
center channel). Furthermore, the Cinema Rhapsody Mach 4 also permits each channel to be set to
its own volume level with respect to all other channels as well as have its own delay setting. These
features and more are discussed in the upcoming sections.
Page 6
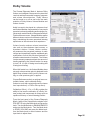
Power On, Mute, Off, & Master Volume Control
When the Cinema Rhapsody Mach 4 is off, turning any knob or
pushing any knob other than the Volume knob will cause the Cinema
Rhapsody Mach 4’s center LCD display to indicate that you need to
push the knob to turn it on.
Power On
Press the Cinema
Rhapsody Mach 4’s
Volume knob to engage
power on.
Front Plate
To turn on the Cinema Rhapsody Mach 4, providing the unit
is not in Mute, press the Volume knob once.
Press Knob
To Turn On
Press Knob
Once To Mute
Press Knob
Twice For Off
Side View
Pressing of the Volume knob performs only three functions.
If the unit is off, pressing it will turn it on.
If the unit is on, pressing it will engage Mute.
If the unit is on, pressing and holding it will turn it off.
L
VOLUME
CONTROL
Front View
e
Raise Vo
r&
lum
e
ow
(To regain the audio (exit
Mute), turn or press the Volume knob).
Once the Cinema Rhapsody
Mach 4 is on, turning the
Volume knob will only raise
or lower the system’s volume
level. This is considered the
Master Volume Control as it
will adjust all eight channels of
volume, maintaining the balance of levels that are preset
between channels.
Chassis Side
Mute
While the Cinema
Rhapsody Mach 4 is
on, pressing it’s Volume
knob once will mute all
channels.
Power Off
Pressing and holding the
Volume knob will turn the
Cinema Rhapsody off.
Un-Mute
While the Cinema
Rhapsody is in Mute,
turning or pressing the
volume knob, will regain
audio.
Power On/Off Via AC
Control
If the Cinema Rhapsody
is on when it is unplugged
or when power is removed
through the use of an
AC Controller, it will also
automatically turn back on
when power is restored.
Page 7
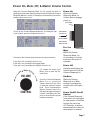
Input Selector
T
INPUT
r
elect
To S pon Anoth
n
ent e
m
ur Co
SELECTOR
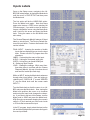
The Cinema Rhapsody Mach 4 permits you to scroll to the next
input without having all of the components you are passing actively
process through the Cinema Rhapsody Mach 4. This prevents the
clicking that is commonly associated with changing TV channels up
and down. To best access another component from the front of the
Cinema Rhapsody Mach 4, turn the Input Selector knob. As you
turn this knob, you will notice that the top row of the LCD display
will advance through the input names until the desired component is
displayed while the current component in use (in this example, BLUE
RAY DVD) remains unchanged in the “Current Input” section.
Front View
INPUT
1 Dial In New Input
Turn the Input Selector
knob until the top line of
the LCD display reads
the component you wish
to select. As you turn
the knob, you will notice
that the “Current Input”
section of the display
still indicates the current
source in play. Also, this
component is still being
routed and processed by
the Cinema Rhapsody
Mach 4.
B L U - R AY
INPUT
S AT E L L I T E 2
INPUT
CABLE/TV 3
INPUT
HD DVR/PVR 4
2 Engage New Input
Once the top line of the
display indicates the next
component you wish to
access, press the Input
Front Plate
Selector knob to engage
this input. This method
permits you to select an
input without switching
all of the inputs you are
Press Knob
scrolling through.
INPUT
VIDEO LIB
The New
Component
Selection
Side View
5
Once the desired component is
displayed on the LCD’s top row,
press the Input Selector knob to
engage that component. The
display will then return to read
the new selection (i.e. Video
Game).
To Activate
Page 8
1
Chassis Side
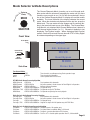
Mode Selector & Mode Descriptions
Tu
MODE
r
Select An
To Mode oth
n
e
r
SELECTOR
Front View
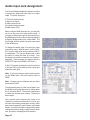
The Cinema Rhapsody Mach 4 permits you to scroll through available modes without necessarily engaging the mode until you have
found the one you wish to use. As you turn the mode knob, the top
line of the Cinema Rhapsody Mach 4’s display will read the modes
available. The lower left-hand of the display indicates the current
mode. When the desired mode displayed on the top line, press the
Mode knob. The new mode will now engage and its name will display in the lower left-hand corner of the display. The Cinema Rhapsody Mach 4 only displays Multi-Channel Modes when it detects a
multi-channel signal present (i.e. 5.1). Otherwise it defaults to just
displaying Two-Channel modes. When displaying Multi-Channel
modes, note that Direct and Discrete decode DTS or Dolby Digital
bit streams depending on the signal type.
Front Plate
MODE
AGL Enhanced
Press Knob
To Activate
MODE
The New
Mode
Selection
Side View
Two-Channel Modes
Direct 2.0 LF/RF Stereo
LF/RF/Sw
Mono
C
Quad Bypass
MODE
Chassis Side
Stereo Enh
Two-channel & no audio processing, Fronts speakers Large
Two-channel with Subwoofer
Center speaker down-mix to mono
DTS NEO Audio Stream Processing Algorithm
NEO6 3Channel LF/RF/C/Sw
Front speakers with subwoofer
NEO6 Phantom LF/RF/LS/RS/Sw
No Center speaker & Center channel to Front Right & Left speakers
NEO6 5Channel LF/RF/C/LS/RS/Sw No Back Surround Speakers
NEO6 Movie
LF/RF/C/LS/RS/LB/RB/Sw Full Speaker array
NEO6 Mve +THX LF/RF/C/LS/RS/LB/RB/Sw Full Speaker array with THX filters
NEO6 Music
LF/RF/C/LS/RS/LB/RB/Sw Full Speaker array design for music playback
Dolby Pro Logic Audio Stream Processing Algorithm
Pro Logic 3Ch
LF/RF/C/Sw
Front speakers with subwoofer
Pro Logic Phan LF/RF/LS/RS/Sw
No Center speaker & Center channel to Front Right & Left speakers
Pro Logic
LF/RF/C/LS/RS/LB/RB/Sw Full Speaker array
Pro Logic +THX LF/RF/C/LS/RS/LB/RB/Sw Original Pro Logic with full Speaker array with THX filters
Dolby Pro Logic IIx Audio Stream Processing Algorithm
PL2 Matrix
LF/RF/C/LS/RS/LB/RB/Sw For Mono signals, fills speaker array
PL2 Game
LF/RF/C/LS/RS/LB/RB/Sw For Video Games encoded by Dolby in 2-Channel
PL2 Music
LF/RF/C/LS/RS/LB/RB/Sw For Music - permits adjustment of PLII features
PL2 Movie
LF/RF/C/LS/RS/LB/RB/Sw For Film & TV - Greater spatial separation than PL, full bandwidth
Page 9
Dolby Pro Logic IIx Audio Stream Processing Algorithm (Continued)
PL2 Mve +THX LF/RF/C/LS/RS/LB/RB/Sw Adds THX filters to Pro Logic 2 Movie
PL2 Custom
LF/RF/C/LS/RS/LB/RB/Sw Custom settings for Pro Logic 2 Movie - permits adjustment of PL II
PL2 Cstm1 +THX LF/RF/C/LS/RS/LB/RB/Sw Adds THX filters to PL Custom mode (above)
PL2 Custom 2
LF/RF/C/LS/RS/LB/RB/Sw Custom 2 settings for Pro Logic 2 Movie - permits adjustment of PL IIPL2
Cstm2 +THX
LF/RF/C/LS/RS/LB/RB/Sw Adds THX filters to PL Custom mode (above)
PL2 Custom 3
LF/RF/C/LS/RS/LB/RB/Sw Custom 3 settings for Pro Logic 2 Movie - permits adjustment of PL IIPL2
Cstm3 +THX
LF/RF/C/LS/RS/LB/RB/Sw Adds THX filters to PL Custom mode (above)
ADA Proprietary Modes (ADA’s Favorites)
AGL Enhanced
LF/RF/C/LS/RS/LB/RB/Sw Based on Pro Logic, AGL is an auto-sensing 2-channel mode
Quad Bypass
LF/RF/C/LS/RS/LB/RB/Sw For Music - Creates excellent music image using full speaker array
Stereo Enh
LF/RF/C/LS/RS/LB/RB/Sw For Stereo Signals - Simulated surround w/control of room size
Mono Enh
LF/RF/C/LS/RS/LB/RB/Sw For Mono Signals - Simulated surround w/control of room size
Stereo 5
LF/RF/C/LS/RS/LB/RB/Sw Distributes stereo to entire speaker array
Mono 5LF/RF/C/LS/RS/LB/RB/Sw
Distributes mono to entire speaker array
Room Simulation Modes with Reverb Customization
Cinema
LF/RF/C/LS/RS/LB/RB/Sw For Film - Uses the entire speaker array
Club
LF/RF/C/LS/RS/LB/RB/Sw For Music - Uses the entire speaker array
Hall
LF/RF/C/LS/RS/LB/RB/Sw For Music - Uses the entire speaker array
Arena
LF/RF/C/LS/RS/LB/RB/Sw For Music - Uses the entire speaker array
Cathedral
LF/RF/C/LS/RS/LB/RB/Sw For Music - Uses the entire speaker array
Quad Reverb
LF/RF/C/LS/RS/LB/RB/Sw For Music - Uses the entire speaker array
Multi-Channel Modes
Direct 7.1
LF/RF/C/LS/RS/LB/RB/Sw
Dnmix Stereo
LF/RF/Sw
Dnmix Mono C
Dnmix 3Channel LF/RF/C/Sw
Dnmix Phantom LF/RF/Sw
7.1 direct from source, LFE but no bass management
2 Channel downmix with subwoofer
2 Channel downmix to mono with Center speaker & Subwoofer
2 Channel downmix to Front speakers & Subwoofer
2 Channel downmix to Front right & left speakers and Subwoofer
Ideal Modes for DTS or Dolby Digital Signals
Discrete LF/RF/C/LS/RS/LB/RB/Sw DTS or Dolby Digital 7.1 direct from source with bass management
Discrete +THX
LF/RF/C/LS/RS/LB/RB/Sw Above Mode with THX Enhancements
Discrete EX/ES LF/RF/C/LS/RS/LB/RB/Sw Same as Discrete but uses DTS ES or DD EX flags
THX Surr EX/ES LF/RF/C/LS/RS/LB/RB/Sw Above Mode with THX Enhancements
DTS NEO Audio Stream Processing Algorithm
NEO6 Movie
LF/RF/C/LS/RS/Sw Downmix to 2-Channel & then processed via NEO6 Matrix
NEO6 Mve +THX LF/RF/C/LS/RS/Sw Above Mode with THX Enhancements
NEO6 Music LF/RF/C/LS/RS/Sw Downmix to 2-Channel & then processed via NEO6 Music Matrix
Dolby Pro Logic Audio Stream Processing Algorithm
PL2x Movie
LF/RF/C/LS/RS/LB/RB/Sw Downmix to 2-Channel & then processed via PL II Movie Matrix
PL2x Mve +THX LF/RF/C/LS/RS/LB/RB/Sw Above Mode with THX Enhancements
PL2x Music LF/RF/C/LS/RS/LB/RB/Sw Downmix to 2-Channel & then processed via PL II Music Matrix
THX Modes
THX Ultra2 Mve LF/RF/C/LS/RS/LB/RB/Sw For Film - 7.1 direct from source with THX Ultra 2 Enhancements
THX Ultra2 Gme LF/RF/C/LS/RS/LB/RB/Sw For Games - 7.1 direct from source w/THX Ultra 2 Enhancements
THX Ultra2 Msc LF/RF/C/LS/RS/LB/RB/Sw For Music - 7.1 direct from source w/THX Ultra 2 Enhancements
Room Simulation Modes
Dmx Cinema
LF/RF/C/LS/RS/LB/RB/Sw
DmxClub
LF/RF/C/LS/RS/LB/RB/Sw
DmxHall
LF/RF/C/LS/RS/LB/RB/Sw
DmxArena
LF/RF/C/LS/RS/LB/RB/Sw
DmxCathedral
LF/RF/C/LS/RS/LB/RB/Sw
DmxQuadReverb LF/RF/C/LS/RS/LB/RB/Sw
Page 10
Downmix to 2-Channel then Cinema mode with Reverb
Downmix to 2-Channel then Club Mode with Reverb
Downmix to 2-Channel then Hall Mode with Reverb
Downmix to 2-Channel then Arena Mode with Reverb
Downmix to 2-Channel then Cathedral Mode with Reverb
Downmix to 2-Channel then Quad Mode with Reverb
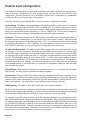
Rear Panel Connections
Composite
HDMI
S-Video Ethernet
HDMI
ADA Bus
Low
Component
Video Input (8) Audio/Video Input (8) & 10/100T Audio/Video
Data
Voltage
Video Input (8)
& Output (4)
Input (8)
Output (2)
Jack
Input (8)
Port
Triggers (2) & Output (2)
Cinema
Rhapsody
Mach 4
Analog Audio
Stereo
Input (8)
Analog
Record
Output
Balanced
Eight Channel
Audio Output (7.1)
Digital Audio
Analog 8-Ch Main Eight
Bypass
Channel Audio TOS-Link (3) &
Coax (5) Input
Input
Output (7.1)
HDMI
Audio/Video
Input (8)
Digital Audio
Record
Output
HDMI
Ethernet
Audio/Video 10/100T
Input (8)
Jack
EIC AC
Power
Input
ADA Bus
Low
Data
Voltage
Port
Triggers (2)
B
Analog Audio
Stereo
Input (8)
Analog
Record
Output
Digital Audio
Analog 8-Ch Main Eight
Bypass
Channel Audio TOS-Link (3) &
Coax (5) Input
Input
Output (7.1)
Cinema
Rhapsody
Mach 4-B
Digital Audio
Record
Output
EIC AC
Power
Input
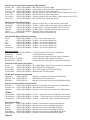
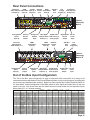
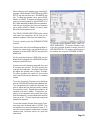
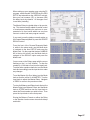
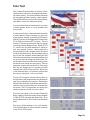
Out of the Box Input Configuration
The “Out of the Box” input configuration is easy to follow and offers connection of as many as 20
components without adjustment of the Cinema Rhapsody Mach 4’s input configurations (providing that
the sources have the appropriate outputs). Below is a chart showing the Cinema Rhapsody Mach 4’s
20 “input labels” and the assignment of the HDMI (audio & video signal) and audio jacks on the rear
panel of the unit. Also shown here are the default surround sound modes for the respective inputs
when playing 5.1 or 2 channel material.
INPUT #
INPUT LABEL
VIDEO INPUT
AUDIO INPUT
1
2
3
4
5
6
7
8
9
10
11
12
13
14
15
16
17
18
19
20
BLU-RAY DVD
SATELLITE
CABLE/TV
HD DVR/PVR
VIDEO SERVER
VIDEO GAME
HD VCR
HD CAMERA
IPOD DOCK
RADIO TUNER
MULTI-ROOM
PHONOGRAPH
CD PLAYER
COMPUTER
MUSIC SERVER
DVD AUDIO
SACD PLAYER
DAT PLAYER
LASER AC-3
LASER DTS
HDMI 1
HDMI 2
HDMI 3
HDMI 4
HDMI 5
HDMI 6
HDIM 7
HDMI 8
OFF
OFF
OFF
OFF
OFF
OFF
OFF
OFF
OFF
OFF
OFF
OFF
HDIMI
HDMI
HDMI
HDMI
HDMI
HDMI
HDMI
HDMI
ANALOG 1
ANALOG 2
ANALOG 3
ANALOG 4
OPTICAL 1
OPTICAL 2
DIGITAL 1
DIGITAL 2
DIGITAL 3
DIGITAL 4
DIGITAL 5
DIGITAL 6
COMPOSITE
VIDEO INPUT
1
2
3
4
5
6
7
8
Off
Off
Off
Off
Off
Off
Off
Off
Off
Off
1
1
S-VIDEO
INPUT
1
2
3
4
5
6
7
8
Off
Off
Off
Off
Off
Off
Off
Off
Off
Off
1
1
COMPONENT
VIDEO INPUT
1
2
3
4
5
6
7
8
Off
Off
Off
Off
Off
Off
Off
Off
Off
Off
Off
Off
DC LOW
VOLTAGE 1
ON
ON
ON
ON
ON
ON
ON
ON
ON
ON
ON
ON
ON
ON
ON
ON
ON
ON
ON
ON
DC LOW
VOLTAGE 2
ON
ON
ON
ON
ON
ON
ON
ON
OFF
OFF
OFF
OFF
OFF
OFF
OFF
OFF
OFF
OFF
ON
ON
DEFAULT 5.1
DEFAULT 2.0
DISCRETE+EX/ES
DISCRETE+EX/ES
DISCRETE+EX/ES
DISCRETE+EX/ES
DISCRETE+EX/ES
THX GAMES
DISCRETE+EX/ES
DISCRETE+EX/ES
THX MUSIC
THX MUSIC
THX MUSIC
THX MUSIC
THX MUSIC
THX MUSIC
THX MUSIC
THX MUSIC
THX MUSIC
THX MUSIC
DISCRETE+EX/ES
DISCRETE+EX/ES
PLII MOVIE
PLII MOVIE
PLII MOVIE
PLII MOVIE
PLII MOVIE
PLII GAME
PLII MOVIE
PLII MOVIE
QUAD BYPASS
QUAD BYPASS
QUAD BYPASS
QUAD BYPASS
QUAD BYPASS
QUAD BYPASS
QUAD BYPASS
QUAD BYPASS
QUAD BYPASS
QUAD BYPASS
PLII MOVIE
PLII MOVIE
Page 11
Custom Input Configuration
The Cinema Rhapsody Mach 4 is an incredibly flexible home theater controller that can accommodate a wide array of components. For easy and quick setup, one can use the “Out of the Box” input
configuration. One can also elect to do a completely “Custom Input” configuration or a combination
of “Out of the Box” and “Custom Input” configurations.
There are several Cinema Rhapsody Mach 4 features specific to each input including:
Input Labeling - The ability to rename input labels to match more closely a specific setup. For example,
you can relabel the input labeled SATELLITE to read DSS SAT. You need to limit the input label to
12 characters including spaces, symbols and numbers. ADA strongly suggests that as you rename
inputs, you maintain their numeric reference (i.e. the 3 in CABLE/TV 3). From a control standpoint,
this will make it easier to maintain a link between the input and the input command.
Final Input - The ability to reduce from 20, the number of input labels seen turning the input knob. If
you have say only six components, you can limit the Final Input number to read 6. Please note that
this eliminates the display from showing input labels 7-20. If you had an input label that you wanted
to use above input label 6 (i.e. MULTI-ROOM), you would relabel one for the first six inputs to read
MULTI-ROOM. Obviously, you may also need to re-assign input jacks (see below).
AV Input Jack Assignment - The ability to have HDMI & audio input jacks track input labels as they
are selected. If you are assigning an AV source using an HDMI input, you can opt to route the audio
via the HDMI input or alternately, via an analog or digital audio input. Typically you will select HDMI
for the audio input as this permits the Suite 7.1 to process the high-resolution audio formats (Dolby
TrueHD, DTS-HD Master Audio, or multi-channel PCM). For audio only sources (analog or digital),
you can turn the HDMI input OFF or alternately, you can select a specific video input. For example, if
while listening to the music playing in the multi-room system you wish to also watch the video image
of the satellite receiver (a sporting event), you could have the Satelllite’s HDMI jack track the audio
from the Multi-Room input.
Default Modes - When an input is selected, pre-assigned modes for 5.1 or 2 channel audio automatically engage. This way, the best possible mode always engages.
Input Presets - There are a total of six features that can be engaged when an input is selected. These
include a starting volume preset, balance preset (includes levels and delays), tone preset, parametric
equalizer (PEQ) preset, and speaker preset which includes active speakers, whether they roll-off and
their roll-off frequency. The last feature involves setting an audio delay for that input.
HDMI Downmix - The ability to have the TV play audio via its internal speakers.
While you can limit the number of inputs to just the number of sources that are connected (using Final
Input) and then rename (Input Labeling), re-link the sources (AV Input Jack Assignment), and assign
surround modes (Default Modes), the ability to custom label inputs has other benefits.
For example, if the DVD player is used for both film and music playback, you could create an input
label called DVD FILM and a second input label called DVD MUSIC. While both labels would access
the same AV Input Jack, you could then set a set of Default Modes for DVD FILM that were film like
(i.e. DISCRETE+EX/ES & PLII MOVIE) while the Default Modes for DVD MUSIC were set to THX
MUSIC and QUAD BYPASS. This way, the user simply selects the appropriate input and does not
think about then selecting modes. Note that if you are going to use multiple input labels for one or
more sources, your Final Input number will need to be increased.
Page 12
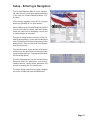
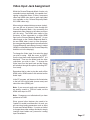
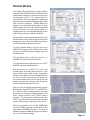
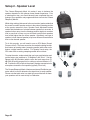
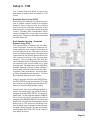
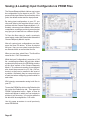
Setup - Entering & Navigation
The Cinema Rhapsody Mach 4 can be setup using either the unit’s front panel display and knobs
or by using the Cinema Rhapsody Mach 4 PC
Program.
ADA strongly suggests using the PC program
when ever possible as it is more intuitive.
When setting up the Cinema Rhapsody Mach 4
from its front panel, the Mode, Input and Volume
knobs are used to move the display’s cursor and
to make changes or selections.
To enter the Setup mode on the front of the Cinema Rhapsody Mach 4, press and hold the Mode
knob. The display will change to the primary Setup
Mode Screen. Here you can recall Tone, Balance
and Volume presets.
Turn the Mode knob to the desired recall feature
and then turn the Input knob until the appropriate
preset number appears. Pressing the Input knob
will Recall that preset.
From the Setup page you can also set the Cinema
Rhapsody Mach 4’s pararmetric tone control,
speaker balance, volume setup, parametric EQ
as well as entering the Pro Setup mode.
To exit the Setup mode from any page, navigate
the cursor to Main and press the Mode knob.
Page 13
Customizing Virtual Inputs
The Cinema Rhapsody Mach 4 features 20 virtual
inputs that can be limited in number, renamed, reassigned to different AV jacks, carry default modes
along with recalling presets for volume, balance
(with delay), tone, parametric EQ, speaker configuration, and even audio delay.
While each input label is unique, several input
labels can be set to access the same source. For
example, an input labeled DVD FILM and another
labeled DVD MUSIC would access the same DVD
player but simply engage different sound fields
ideally suited for viewing the movies or listening
to music. As an input is selected, the following
Cinema Rhapsody features can be accessed.
Default Modes - Set an ideal mode for both 2
channel audio detection and multi-channel audio
detection.
Volume Preset - Recall one of four volume presets
or simply remain on the last used volume.
Balance Preset - Recall one of four balance presets that also store delay levels or simply remain
on the last used setting.
Tone Presets - Recall one of four balance presets
or simply remain on the last used setting.
PEQ Presets - Recall one of four parametric EQ
presets or remain on the last used setting.
Speaker Presets - Recall one of four speaker
configuration presets or simply use the current
speaker configuration (last used).
Dolby Volume Presets - Recall one of four Dolby
Volume presets or last used.
Delay - Measured in mili-seconds (up to 200) this
feature permits you to time align sources. This is
in addition to the global Lip Sync Delay.
From a hardware standpoint, while all other settings occur in real-time in the Cinema Rhapsody
Mach 4, these features are loaded into the motherboard of the unit. Even the front panel control
head acts only like an external interface (like the
PC program). Once you have made adjustments
on it, you will still need to “load” these settings into
the Cinema Rhapsody Mach 4’s motherboard.
Page 14
Before proceeding with the custom setup of your
Cinema Rhapsody Mach 4, it is worth taking some
time to consider just how you intend to use your
system. Some considerations include:
Is your system going to be used solely for film
playback or are you going to also use it to play
music?
If you are going to use it for music, do you want
to use the same speaker configuration as for
theater or do you prefer operating the system in
just two-channel mode?
If you are using the system to view TV, are there
times when you wish to defeat surround sound
such as when viewing the news?
Are you using your DVD player for both DVD
movies and music CDs?
Obviously there are many other possible considerations. These are here to simply illustrate just
how flexible the Cinema Rhapsody Mach 4 is. In
the end, the goal of the optimum setup is to make
operating the Cinema Rhapsody Mach 4 as easy
as selecting an input.
Example 1: Using the DVD player for both
flim and music.
Here you could opt to create an input labeled
DVD FILM and another labeled DVD MUSIC.
Both inputs would access the same jacks. The
difference between these two virtual inputs could
include default modes, starting volume level,
balance levels, tone settings, and parametric EQ
settings. As such, when inserting a DVD into your
player, all you do is select the DVD FILM input.
When you insert a CD, select DVD MUSIC. All
other settings then engage automatically.
Example 2: Using your speaker system for
both 7.1 (or 5.1) surround sound and strict
2-channel stereo.
When going to a source you want to play in just
stereo (CD STEREO), you could recall a speaker
preset that includes just the right and left front
speakers without any roll-off. You could also
bypass modes and change the starting volume
level, balance level and perhaps flatten tones and
parametric EQ levels.
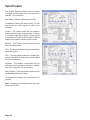
Inputs Labels
Once on the Setup screen, navigate to the LABELS/AV setup feature, by turning the Mode knob
until the cursor is PRO SETUP and then press
the Mode knob.
The first option will be the LABELS/AV option.
Press the Mode knob again. Note that these
pages also feature a PREV arrow pointing left
(Previous page). If you wish to return to the prior
screen, navigate the cursor using the Mode knob
until it rests on this arrow and press the Mode
knob. Doing the same on the left MAIN arrow
exits setup.
The Cinema Rhapsody Mach 4 features 20 input
labels or virtual inputs. The Factory Default features 20 input labels. Features discussed in this
section include:
FINAL INPUT - Lowering the number of visible
inputs that are displayed as you turn the input
knob. Please note the PC program does this
elsewhere.
LABEL - Customizing the name of the input.
AUDIO - Linking the rear panel audio jack.
VIDEO - Linking the rear panel HDMI jack.
N - Setting up Input Presets
LOAD - Loading the settings. While most functions take place in real time with the Cinema
Rhapsody Mach 4, this set of functions do not
and must be loaded (the final step).
While on INPUT, turning the Mode knob advances
through other Input Labels. If we are looking to
relabel Input 5 “VIDEO LIB 5” to read “SERVER
5”, turn the Mode knob until the screen reads
INPUT 5.
Turn the Mode knob so that the cursor is on LABEL and press the Mode knob. Now, turning the
Mode knob positions the cursor on a character
and turning the Input knob changes the character. If you want to exit out of this feature, turn the
Mode knob to SAVE and press the Mode knob.
ADA Strongly recommends keeping the numeric
suffix (i.e. 5) as it reminds you of the control code
or IR code that accesses this input.
In the PC program, simply select the input on the
left and then highlight the input name and type in
the new input name.
Page 15
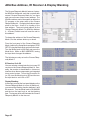
Audio Input Jack Assignment
The Cinema Rhapsody Mach 4 makes it possible
to assign any audio and video jack to an Input
Label. For audio, there are:
3 TOS-Link Optical inputs,
5 digital coax inputs
8 analog audio inputs
An 8-channel bypass input
8 HDMI inputs (A/V)
When using an HDMI interconnect, you may still
opt to use any one of the other audio inputs. If
you want to extract the audio for that source from
the HDMI input used for video, instead of selecting
a digital or analog audio input, select HDMI. The
Input Label will then select the audio associated
to the HDMI input.
To change the Audio Input, first select the input
you wish to setup. With the cursor on the I in INPUT, turn the input knob until the desired INPUT
# is displayed. The turn the Mode knob so that
the cursor is under the letter A in Audio. Turn
the Input knob until the connection you require is
displayed. In this example, we want to alter the
SATELLITE input from HDMI to OPTICAL 1.
In the PC program, pull down on the first window
to the left of the Input Label (source name) and
select the audio jack.
Note - If you are looking to extract audio present
on the HDMI cable, the audio option must be
HDMI.
Note - Changes are not effected until you have
performed a LOAD.
To assign audio jacks for other Input Labels, turn
the Mode knob so that the cursor is sitting under
the I in the word INPUT. Then turn the Input Knob
to select the desired input number. Repeat the
above steps.
Since several other features also need to be
“loaded” it is useful to set these first. As such, you
will save time loading parameters such as Video
Input Jack Assignment, Input Presets, and Default
Modes. If you do not intend to change these other
settings and wish to simply Load the Input Labels
now, proceed to Loading Input Parameters.
Page 16
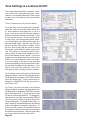
Video Input Jack Assignment
While the Cinema Rhapsody Mach 4 tracks only
one audio input per input label, it is capable of assigning a composite video, S-Video, component
video and HDMI video input to each input label
(not available on the Cinema Rhapsody Mach
4-B, HDMI video only).
When using an external video processor (scaler),
you can still run all sources’ video through the
Cinema Rhapsody Mach 4 by connecting the
appropriate video outputs to the video processor
you are using. The HDMI video output of the
processor is then connected to a single HDMI
input on the Cinema Rhapsody Mach 4. As you
select inputs on the Cinema Rhapsody Mach 4,
the non-HDMI video is sent to video processor,
the corresponding audio signal is processed in the
Cinema Rhapsody, and video processor’s output
(HDMI) is routed back into the Cinema Rhapsody
and then out to the display(s).
To change the Video Input, first select the input
you wish to setup. With the cursor on INPUT,
turn the input knob until the desired INPUT # is
displayed. Then turn the Mode knob the video
connection you wish to alter. To change the
Video Input, turn the Input knob and the screen
will advance through the options (including OFF
if not used).
Remember that in order to play the audio off the
HDMI cable, HDMI needs to be selected as the
Audio Input.
In the PC program, pull down on the first window
to the left of the Input Label (source name) and
select the video (HDMI) jack.
Note - If your source is audio only connected via
an analog, coaxial or TOS-Link cable, set the
HDMI video input to OFF.
Note - Changes are not effected until you have
performed a LOAD.
Since several other features also need to be
“loaded” it is useful to set these first. As such, you
will save time loading parameters such as Input
Presets and Default Modes. If you do not intend
to change these other settings and wish to simply
Load the Input Labels now, proceed to Loading
Input Parameters.
Page 17
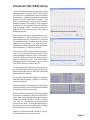
Input Presets
The Cinema Rhapsody Mach 4 has the ability
to engage certain feature sets when an input is
selected. One of these is:
Auto Delay - Rated in milliseconds (0-200).
In addition to setting the Audio Delay, you can
also assign one of four inputs for each of the
following.
Volume - The volume preset lets you assign a
starting volume level for a specific input. If the unit
is off and an input with a specific volume preset
is selected, the Turn On volume preset is ignored
and this input specific volume preset is used.
Balance - The balance preset stores channel
levels and delay levels.
Tone - The tone preset stores the parametric bass
and treble control.
PEQ - The multi-band parametric equalizer features a 12 band EQ for all channels and an 8 band
EQ for the subwoofer.
Speakers - The speaker configuration lets you
determine which speakers are active, whether
they roll-off, and their roll-off frequency.
Dolby Volume - The Dolby Volume preset can be
recalled automatically per input.
To change these settings you must use the PC
program.
Note - Changes are not effected until you have
performed a LOAD.
Page 18
Default Modes
The Cinema Rhapsody Mach 4 features ADA’s
unique Double Default Mode Auto-Detection that
automatically engages a surround sound mode
for each input - one for 7.1/5.1 and another for 2
channel audio. This way, regardless of what mode
was last used, the right decoding takes place each
time an input is selected. Default Modes are
loaded to the Cinema Rhapsody Mach 4 along
with the Input Labels, AV Input Jack Assignments
and Input Presets. As such, before loading it is
suggested that you set the Default Modes for the
Input Labels you have created or modified.
While the PC program permits assignment of the
Default Modes on the same page as other input
assignments, this feature is located elsewhere in
the Cinema Rhapsody Mach 4’s menu.
To set the Default Modes, if you are still on the
LABELS/AV screen, turn the Mode knob so that
the cursor is on PREV (previous page) and press
the Mode knob.
Turn the Mode knob so that the cursor is on
POWER UP and press the Mode knob.
Turn the Mode knob so that the cursor is on DFLT
MODES and press the Mode knob.
With the cursor is on INPUT, you can scroll
through inputs by turning the Input knob. If you
have altered Input Label names (regardless
whether you loaded the Cinema Rhapsody Mach
4), the new Input Label names will appear on
the screen because the control head on the unit
already contains the changes even though the
Cinema Rhapsody Mach 4 does not.
When you are on the desired input label, turn the
Mode knob to select DEFAULT 5.1 and DEFAULT
2.0. While on either of these features, the Input
Knob lets you change the Default Mode for that
input. Please note that “LAST USED” mode is
an option. For other inputs, navigate back to the
INPUT using the Mode Knob and then selecting
another input using the Input knob and repeat.
When you are done, return to the LABELS/AV
screen by PREV (previous screen) both on this
page and the POWER UP screen. You will then
be able to select the LABELS/AV page from where
you can LOAD these settings.
Page 19
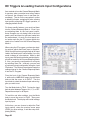
DC Triggers & Loading Custom Input Configurations
As a reminder to how the Cinema Rhapsody Mach
4 operates, when you adjust most every feature
on the unit, the changes occur in real time (immediately). That is not the case when it comes
to labeling of inputs, assigning AV jacks, altering
input presets, assigning DC trigger operation, or
changing default modes.
For these specific features, you must load them
into the Cinema Rhapsody Mach 4. Even if you
are adjusting them on the front panel control,
these changes are only being held in the front
panel control and have not yet been loaded into
the motherboard. As such, the front panel control works much like the PC program which also
needs to be “loaded” into the Cinema Rhapsody
Mach 4.
When using the PC program, you have two loading options which read Send Input or Send All.
Since Send All involves going through all 20 Input
Labels, the Send Input is a nice feature if you only
made a change to a few devices. While on that
Input, press the Send Input button and just that input will be loaded to the Cinema Rhapsody Mach
4. Also, you save the configuration for all inputs
by selecting Save File. Inversely, you can load
a previously stored configuration using the Load
File feature. The Retrieve Input feature loads the
settings internal to the Cinema Rhapsody Mach
4 into the PC Program.
From the front of the Cinema Rhapsody Mach
4, while on the LABELS/AV page, turn the Mode
knob so that the cursor is on INPUT. Turn the
Input knob to select the desired input whose triggers you wish to set.
Turn the Mode knob to TRIG. Turning the Input
knob to select between Triggers 1 & 2, 1, 2, or OFF.
Repeat these steps for all inputs.
To load this and other settings, turn the Mode
knob to move the cursor to LOAD. Then press
the Mode knob. The display will load all settings
input by input.
At this time, you can choose to adjust the Final
Input number, return the previous menu page
(PREV) for other settings, or exit the setup completely (MAIN).
Page 20
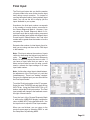
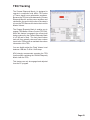
Final Input
The Final Input feature lets you limit the number
of inputs visible to the user as they turn the Input
knob during normal operation. So instead of
scrolling through all twenty (factory default) input
labels, you can set the unit to display just the
inputs available in your system.
Sometimes, the final input number corresponds
to the number of source devices connected to
the Cinema Rhapsody Mach 4. However, if you
are using the Cinema Rhapsody Mach 4’s virtual inputs such that a single source component
takes up multiple Input Labels with different Input
Presets and/or Default Modes, the Final Input
number will be greater than the number of source
components.
Determine the number of virtual inputs (Input Labels) you are using and then set the Final Input
to that number.
Note: Final Input reduces the number of inputs
visible by eliminating the highest input labels in
order. You cannot set the Cinema Rhapsody
Mach 4 to skip over inputs that are not used. If
you have an Input Label that you want to use
above an Input Label you are not using, you will
need to recreate the input settings on a lower
Input Label number.
Note: Unlike other virtual input related features,
the adjustment of the Final Input is in real time
(instantaneous). There is no “loading” required.
Once set, the highest input you can select will be
the Final Input number.
To set the Final Input number in the PC program,
Select the side THEATER tab and then the top
INPUTS tab. Using the FINAL INPUT DN or UP
buttons, adjust the Final Input number. The Final
Input number will change in the feedback area to
the right of these buttons.
From the front of the Cinema Rhapsody Mach
4, while on the LABELS/AV display, navigate the
cursor to MAX INPUT using the Mode knob. Use
the Input knob to adjust the Final Input number.
When you are finished, you can return to the
previous menu page by selecting PREV or exit
the Setup Menu by selecting MAIN.
Page 21
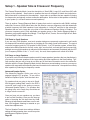
Setup 1 - Speaker Size & Crossover Frequency
The Cinema Rhapsody Mach 4 uses the description of Small (SM), Large (LG), and None (NO) with
respect to the speakers. Small refers to speakers that are not designed to handle low frequencies.
Bass information is redirected to the subwoofer. Large refers to speakers that are capable of playing
low frequencies and typically, no bass redirection takes place. None refers to that speaker not existing
in your system (i.e. no back-center surround speakers)
There is another Cinema Rhapsody Mach 4 feature that works in conjunction with SMALL settings
called Sub Crossover (SUB) which refers the Sub Woofer crossover frequency point that determines
at which frequency the Small speakers’ bass information is “rolled off” and sent to the subwoofer.
Speakers that are set to Large are only rolled off if the Advanced Speaker Option is Enabled. The
crossover frequency point is fully adjustable per speaker group on the Cinema Rhapsody Mach 4.
Speakers are grouped together accordingly: Front Right & Left, Center, Surround Right & Left, Back
Surround Right & Left, and Subwoofer.
THX Rated or Small Speakers
If you are using THX speakers, most such speaker designs are purposely engineered to not handle
low frequencies because the subwoofer is providing all of the bass sound reinforcement. The typical
crossover frequency point for THX speaker is 80Hz (Hertz). In a THX speaker system, all bass information below 80Hz intended for the left, center, right, surround left, surround right, back surround left,
and back surround right speakers is redirected to the subwoofer and summed (combined) with the LFE
(Low Frequency Effects or the “.1” in a 5.1 mix). As such, these speakers are rolled off at 80Hz.
Full Range or Large Speakers
If you have a mix of home theater speakers and full-range speakers (speakers that can handle bass),
you can opt to set some speakers to the Large setting and other speakers to the Small setting. Typically speakers that are set to Large do not have any of their bass information sent to the subwoofer.
However with the Cinema Rhapsody Mach 4 which features a second analog crossover, you can run
speakers full range while still extracting the bass information to the subwoofer - the speaker most likely
best capable of producing low frequency sounds.
Advanced Speaker Option
The Advanced Speaker Option can only be
engaged using the PC program. To turn on the
Advanced Speaker Option, click the check box.
For speakers that are going to be set to Small,
ADA suggests setting them small in the DSP’s
crossover and Large in the analog crossover
(Advanced Speaker Option). For speakers that
are going to be set to Large, they should be set
to Large in both crossovers.
Once you have set your speakers up, you have
to turn on Sub Summing. Here you also have an
option of boosting the sub input level by 10dB.
Because all adjustments made here occur in realtime, ADA suggests listening to material as you
make these adjustments.
The four Speaker Presets store settings all these
settings including speaker sizes, crossover points
and Advanced Speaker Options.
Page 22
When setting up your speaker array using the PC
program, select the side THEATER tab, the PRO
SETUP top tab and then the 1-SPEAKERS sub
tab. To select the speaker’s size, press NONE,
SMALL or LARGE. To adjust the frequency roll-off
point for just that speaker(s), adjust FREQ UP or
DN. When adjusting the Back Surround speakers,
note that you must have the Surround speakers
set to either LARGE or SMALL in order to have
Back Surround speakers at all.
The TRACK CROSSOVER FREQ option raises
and lowers the frequency roll-off point for all
speakers together (other than the subwoofer).
To store a preset, press the SPEAKER STORE
# button.
From the front of the Cinema Rhapsody Mach 4,
while in the setup mode, use the Mode knob to
navigate to the word PRO SETUP and press the
Mode knob.
To view the current Speaker setup, select UPDATE SPEAKERS. To view the settings of any
of the four possible Speaker Presets, press the
SPEAKER RECALL 1-4 buttons at the bottom of
the window (do not press SPEAKER STORE).
On the page that features LABELS/AV, use the
Mode knob to navigate to the SPEAKERS option
and press the Mode knob.
You are now on the Speakers page with the L and
R channels are inverted. The front speaker are
now able to be adjusted. Turning the Input knob
will adjust the speaker size (L=large, S=small).
For other speakers the option for none exists
and is represented by the absence of a speaker
symbol.
To set the Crossover Frequency, turn the Mode
knob to CROSSOVER and press the Mode Knob.
Turn the Mode knob to select the channels you
wish to adjust and use the Input knob to change
the frequency levels. Repeat these steps for all
speakers you wish to adjust. To adjust the frequency for all speakers at the same time (other
than the subwoofer), turn the Mode knob until the
cursor is on ALL. Turn the Input knob to adjust all
frequencies together.
To store the Speaker Presets, while on the Crossover page, turn the Mode knob to STORE. Turn
the Input knob to select the desired Preset #. To
store the current speaker configuration including
speaker sizes, crossover values, etc, press the
Input Knob.
Page 23
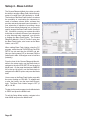
Setup 2 - Speaker Level
The Cinema Rhapsody Mach 4’s makes it easy to balance the
speaker channels for the optimum home theater experience. Prior
to entering this step, you should already have completed the positioning of your speakers and programmed their size into the Cinema
Rhapsody Mach 4.
While delay settings (discussed in the next section) make certain that
the sound from each speaker arrives to the primary listening position
at the precise moment in time, Speaker Level adjustment makes
certain that the balance of volume between speakers is accurate. A
speaker further away from the listening position might not sound as
loud as one that is closer so you will need to adjust that speakers
level a little higher than the closer speaker. Alternately, one type of
speaker (a front channel speaker) may have different characteristics
from a rear channel speaker.
To do this properly, you will need to use an SPL Meter (Sound
Pressure Level). There are several on the market including models
that feature an analog meter (sweeping needle) while other units
feature a digital numeric readout. For Speaker Level setup, the
SPL meter with an analog sweeping needle will work best.
To setup the meter, make certain that you have good batteries and
set the meters two switches to “C Weighted” and “Slow”. Set the
Range to 80 dB (Decibels) which covers the level range from 70
dB to 86 dB as the range point for setting up a home theater is 75
dB. Position the SPL meter at the primary seating area and aim its
microphone toward the first speaker (typically Front Left).
The Cinema Rhapsody Mach 4 features an internal Pink Noise generator which is used to determine the signal level to each speaker.
Please note that pink noise is a static type sound that will not harm
your speakers and is used strictly for calibration.
Page 24
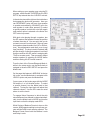
When setting up your speaker array using the PC
program, select the side THEATER tab, the PRO
SETUP top tab and then the 2-LEVELS sub tab.
In the window toward the right are the text buttons
that engage the pink noise generator. Here you
can SEQUENCE (noise will move from speaker
to speaker automatically), ADVANCE (go to the
next speaker in order when pressed), or select
a specific speaker in which the noise will remain
until another option is selected or the Noise Test
OFF button is pressed.
With pink noise playing through a speaker, aim
the SPL meter at the speaker but note the position
of where the meter is. You can spin it but you do
not want to move it from that spot. Raise or lower
that speaker channels audio level (UP or DN buttons). Any adjustments made here occur in real
time (instantly). The level noted in Decibels (dB)
will also change. Adjust that speaker’s level such
that the needle on the SPL meter is swinging with
75 dB as a center point. Then proceed to adjust
another speaker by selecting its NOISE button
and then aiming the SPL meter toward it.
From the front of the Cinema Rhapsody Mach 4,
while in the setup mode, use the Mode knob to
navigate to the word PRO SETUP and press the
Mode knob.
On the page that features LABELS/AV in the top
left corner, use the Mode knob to navigate to the
LEVELS option and press the Mode knob.
You are now on the Levels page with the NOISE
ON and the L or Left channel active. To select
a specific channel, turn the Mode knob to that
channel. Turning the Input knob will adjust that
channels volume. Use the SPL meter as noted
above to set the levels.
To engage Noise Sequence in which the pink
noise advances from channel to channel automatically, turn the Mode knob to NOISE and turn the
Input knob so that the display reads SEQ.
While Storing of Balance Presets is done on this
screen, ADA suggests waiting to store these presets until the Delay Levels are also adjusted. The
Balance Preset stores both the Balance Levels
and Delay Levels.
Page 25
Setup 3 - Delay Settings
The adjustment of the Delay setting can be configured independently for each of the Cinema Rhapsody
Mach 4’s eight channels (including the subwoofer channel). The goal of setting channel delays is to
have the sound from each speaker reach the primary seating position at the same time or perhaps better put, the correct time. Since the Cinema Rhapsody Mach 4 can delay the signal of a channel from
reaching that channel’s output (and as such, the amplifier, then the speaker, and then your ears), the
delay is applied to all speakers that are closer to the listener than the furthest speaker. This speaker,
the one at the greatest distance from the primary listening/viewing position, for the sake of this section, will be called the “Reference Speaker”, because all of the other speakers closer to the listening
position will use this speaker’s distance as a reference point.
The process of setting the delays will require the use of a tape measure or some other distance measuring instrument. ADA suggests using the U.S./British standard to measure these distances in feet
as sound travels at approximately 1 foot per millisecond (1/1000th of a second). If you are using the
metric standard to measure your distances, ADA suggests converting all measurements to feet as it
will be easier to calibrate the delay time settings (1 foot is approximately equal to 30.5 cm). Note that
the Cinema Rhapsody Mach 4 can be set in increments of 1/10th of a foot (0.1’ or 3.5 cm).
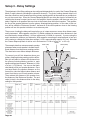
The example details an extreme sample speaker
placement where each speaker is located at a different distance from the primary seating position.
The chart below uses these example distances.
To proceed, you will first determine where your
primary listening/viewing seating position will be.
Next you will want to measure the distance from
the primary listening/viewing position to each
speaker using a tape measure. Measure to 1/10th
of a foot (~1.25 inches). You can use the blank
chart below to fill in your speaker distances. Once
you have filled in the speaker distances on the
second line, take the highest value distance and
insert it into the top row of each speaker column.
Then subtract the distance of the speaker from
the distance of the Reference Speaker. The end
value (in feet) is the distance value for the delay
setting for that speaker.
Page 26
CENTER
FRONT (LEFT)
FRONT (RIGHT)
12 Ft
17 Ft
SUBWOOFER
15 Ft
7 Ft
8 Ft
9 Ft
SUR. (LEFT)
10 Ft
9 Ft
BACK SUR.
SUR. (RIGHT)
When setting up your speaker array using the PC
program, select the side THEATER tab, the PRO
SETUP top tab and then the 3-DELAYS sub tab.
Here you can increase (UP) or decrease (DN)
the delay levels by channel. All changes occur
in real-time (instantly).
The Master Delay is a global delay or lip sync delay. This feature can be added to remote control
or touchscreen permitting the end user to compensate for lip sync issues which can vary from
source to source and even program content.
If you want to see the delays currently active on
the Cinema Rhapsody Mach 4, press the UPDATE
DELAYS button.
From the front of the Cinema Rhapsody Mach
4, while in the setup mode, use the Mode knob
to navigate to the word SETUP and press the
Mode knob. On the page that features LABELS/
AV in the top left corner, use the Mode knob to
navigate to the DELAYS option and press the
Mode knob.
You are now on the Delays page with the cursor
flashing on the L or Left channel. To alter the
number (in 1/10th feet or 3cm) turn the Input knob.
To adjust other speaker channels, turn the Mode
knob and accordingly use the Input knob to make
any changes.
To set the Master (Lip Syn) delay, turn the Mode
knob so that the cursor is on MASTER. Turn the
Input knob to adjust the Master Delay. Navigate
to PREV to return to the previous screen.
To store the Balance and Delay levels (but not the
Master Delay) on a Balance Preset, turn the Mode
knob to STORE and then turn the Input knob to
select the Preset number you wish to store. Then
press the Input knob to store that preset.
Storing the Balance Presets on either the Delay
or the Speaker Level screens stores both delays
and levels.
Page 27
Setup 4 - Bass Limiter
The Cinema Rhapsody Mach 4 provides you with
the ability to engage a Bass Peak Limiter that operates in a range from 0 dB (decibels) to -24 dB.
The function of the Bass Peak Limiter is to reduce
the possibility of overloading the subwoofer in
cases of extreme volume and/or software that
provides extremely dynamic bass information. If
your subwoofer is capable of providing a large
level of bass without bottoming out, you may not
need to engage the Bass Peak Limiter (leaving it
Off). If however, you play your system at volume
levels that on occasion will cause your subwoofer
to play distorted audio segments, you will wish
to engage the Bass Peak Limiter. The Cinema
Rhapsody Mach 4’s “Out Of The Box” setup has
the Bass Peak Limiter, also known as the Bass
Limiter, set to OFF.
When setting Bass Peak Limiter using the PC
program, select the side THEATER tab, the PRO
SETUP top tab and then the 4-BASS sub tab.
Here you can increase (UP) or decrease (DN) the
limiter level in dBs. All changes occur in real-time
(instantly).
From the front of the Cinema Rhapsody Mach 4,
while in the setup mode, use the Mode knob to
navigate to the word PRO SETUP and press the
Mode knob. On the page that features LABELS/
AV in the top left corner, use the Mode knob to
navigate to the BASS option and press the Mode
knob.
You are now on the Bass Peak Limiter page with
the cursor flashing on CEILING. To engage and/
or alter the Limiter, turn the Input knob accordingly. The Bass Peak Limiter range is OFF (0
dB) to -24 dB.
To return to the previous page, turn the Mode knob
to PREV and press the Mode knob.
To exit the Setup Mode entirely, navigate to the
letter MAIN and press the Mode knob.
Page 28
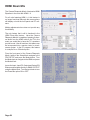
Setup 5 - THX
The Cinema Rhapsody Mach 4 permits the
adjustment of features that are specific to THX
Ultra 2.
Boundary Gain Control (BGC)
When the chosen listening room layout (for practical or esthetic reasons) results in the listener
being too close to the rear wall, the resulting
bass level can be sufficiently reinforced by the
boundary that the overall sound quality becomes
“boomy”. Boundary Gain Compensation (BCG)
can be switched ON to restore the correct bass
performance. Please note, that ADA recommends
this filter remain off.
Back Speaker Spacing - Advanced
Speaker Array (ASA)
The optimum blend of ambient and rear directional information provides an enhanced surround experience over a wider listening area for
all multi-channel formats. With stereo surround
tracks and multi-channel music,, the signal is fed
unprocessed to the left and right surrounds and
after further processing, to the surround back
speakers. This processing uses THX ASA (Advanced Speaker Array) Technology and provides
an enveloping rear surround field over a wide
listening area. The adjustment to the ASA (Back
Speaker Spacing) is based on three settings; if
the two back surround speakers are less than 1
foot apart, if they are between 1 and 4 feet apart,
or if they are greater than 4 feet apart. To set the
Back Speaker Spacing for your system.
In the PC program, select the side THEATER tab,
the PRO SETUP top tab and then the 5-THX sub
tab. Here you can turn Boundary Gain ON or OFF
as well as select the ASA speaker settiing.
From the front of the Cinema Rhapsody Mach 4,
while in the setup mode, use the Mode knob to
navigate to the word PRO SETUP and press the
Mode knob. On the page that features LABELS/
AV in the top left corner, use the Mode knob to
navigate to the ENHANCEMENTS and press the
Mode knob. On the Enhancement page, turn the
Mode knob to THX and press the Mode knob.
Use the Mode knob to navigate to either Boundary Gain or Back Spacing. Use the Input knob to
turn Boundary Gain ON or OFF and to select the
ASA setting of choice.
Page 29
Modes, DTS Enhancements & THX Options
Modes have become so numerous that it may
become difficult to manage them. Here, the Cinema Rhapsody Mach 4 is specifically designed
to minimize mode clutter. In addition to Default
Modes per input, ADA begins by placing modes in
one of two camps, Two-Channel Modes or MultiChannel Modes. Both groups are never available
at the exact same time. So when the Cinema
Rhapsody Mach 4 senses a two-channel source
playing, it makes Two-Channel modes available.
The PC program even grays out the Multi-Channel
modes while the front panel does not preset them
at all. Alternately, when a multi-channel signal is
detected (i.e. 5.1), then the Two-Channel modes
grey out or are not visible while the Multi-Channel
modes are.
DTS Enhancements & THX Enhancements
The Cinema Rhapsody Mach 4 PC program has
a unique tab that permits you to engage DTS LFE
Attenuation as well as adjustment of THX Enhancements. Please note, THX Enhancements
are only available through the PC program and
cannot be accessed via the front panel.
By selecting the Theater side tab and then Mode
top tab, you can then select the DTS & THX Extras
tab to access control of these features.
For THX, the Cinema Rhapsody Mach 4 is unique
in that it permits you to engage Re-Equalization,
Deorralation, and Timbre Match at will providing
you are not on a THX mode in which case, all
three THX filters will automatically be engaged.
This is ideal for those that recognize the benefit
of Re-EQ but prefer to leave Decorrelation and
Timbre Match off.
DTS LFE Attenuation is incorporated in the Cinema Rhapsody Mach 4 to compensate for what
some may perceive as excessive bass when playing DTS encoded software. To minimize this, the
Cinema Rhapsody Mach 4 is uniquely capable of
lowering the LFE when a DTS bit stream is detected. Here you can also set the level the LFE
is lowered (in dB) from 0 to -20 dB. Generally,
-10 dB should do the trick. If you choose to use
this feature, you must first select LFE ATTEN
ENABLE (FOR DTS). Then you can adjust the
level you wish to attenuate the LFE signal. DTS
LFE can be adjusted from the front of the Cinema
Rhapsody Mach 4 under DTS LFE.
Page 30
Simulated Surround & Dynamic Range Settings
Stereo & Mono Enhance Settings
The Cinema Rhapsody Mach 4 features two
ADA modes that are designed to enhance your
experience when viewing stereo or mono source
material such as older films, TV shows, or other
programming that is neither Dolby Pro Logic or
5.1 encoded.
Stereo Enhance is designed to provide spatial
separation using the entire speaker array. This
mode will work well for both strong and weak
stereo signals.
Mono Enhance is similar but works with mono
source material creating an enveloping surround
sound experience.
Uniquely, the Cinema Rhapsody Mach 4 permits
you to customize these simulated surround sound
modes to the room environment by setting an attenuation level (level of audio to the surrounds)
and delay level independently for each of these
two modes. Changes are made in real time so
that as you make adjustments to these setting,
you can hear the changes. To setup these modes,
play the appropriate type of source material and
adjust according to personal preference.
In the PC program these changes are made under
the Modes tab under Enhancements.
From the Cinema Rhapsody Mach 4’s front panel,
while in setup mode, navigate to the PRO SETUP
page and then to the ENHANCEMENTS page.
Use the Mode knob to select the feature you wish
to adjust and then use the Input knob to adjust
its setting.
Dynamic Range Settings
Dynamic Range is normally set to Max in typical
ADA home theater systems as this setting will
provide the vibrant experience. There are two
other settings available that can only be set via
the PC program. These minimize the range of
the audio experience such that there is less of a
volume difference between loud sounds and softer
sounds. In theaters where the whispers are too
soft or the explosions too loud, you can elect to try
either Dynamic Range Min or Mid. This feature
can only be adjusted from the PC program.
Page 31
Dolby Pro Logic II Music & Custom Settings
The Cinema Rhapsody Mach 4 features Dolby Pro
Logic decoding. While the parameters behind the
Dolby Pro Logic II Movie mode are not adjustable
(the top image of the PC program shows that all
features are greyed-out when in this mode), some
of these parameters are adjustable for Dolby Pro
Logic II Music mode (middle screen shot). All of
the parameters are available for the three Dolby
Pro Logic II Custom modes. In order to make
changes (which occur in real-time), you must first
select a Pro Logic II Music or Custom Mode.
Center Width - Using a scale from 0 (off) to 7, Center
Width spreads the center channel image toward
the right and left. Remember that this is still a
mode that is based on Dolby Prologic decoding and as such, mono (i.e. vocals in music) are
extracted from the right & left tracks and passed
onto the center channel.
Panorama On or Off - When Panorama is ON, the
sound field from the front speakers is pulled into
the surround speakers.
Dimension Control - Using a scale from 0 (off) to
7, Dimension Control is the level of audio that is
pulled to the surround channels when Panorama
is ON.
Additional features available when first selecting
one of the three Prologic II Custom modes include
Surround Shelfing filter, Surround Delay On/Off,
Polarity Control, Matrix Coefficient Control and
Auto Balance On/Off.
Once features are set for either Prologic II Music
or any of the three Custom modes, it remains set
for that mode.
From the front panel of the Cinema Rhapsody
Mach 4 while in the Setup Mode navigate to the
PRO SETUP using the Mode knob and press the
knob. While on the screen that displays LABELS/
AV in the upper left-hand corner, turn the Mode
knob ENHANCEMENTS and press the Mode
knob. Then navigate to PRO LOGIC II and press
the Mode knob.
Use the Mode knob to select features wile using
the Input knob to alter the settings. You must first
select either a Pro Logic II Music or Custom mode
in order to alter the mode.
Page 32
Reverb Mode Settings
The Cinema Rhapsody Mach 4 features several
modes that incorporate Reverb. Uniquely, ADA
permits you to fully adjust these modes including
features that permit you to determine the Size of
the affect, the Mix percentage, the Low Frequency
Cut, the Reverb Time and the Damping frequency.
These features can be individually set for each
of the six Reverb modes. Once set, the features
are preserved.
Adjustments are made in real time so that as you
change these settings you can hear the affects of
your adjustments providing that mode is selected
at the time.
ADA has set factory Defaults which can be recalled at any time. Note that Recalling these
Defaults only recalls the ADA Factory Defaults
for the selected Reverb Mode and will not affect
the other Reverb Modes.
To adjust the settings from the PC Program, select
the side Theater tab and then the top Reverb tab.
Then select the reverb mode you wish to adjust.
From the front of the Cinema Rhapsody Mach
4, while in the Setup Mode, turn the Mode knob
to navigate PRO SETUP and then press the
Mode knob. You are now on the page that reads
LABELS A/V in the upper left-hand corner of
the page. Turn the Mode knob to REVERB and
then press the Mode knob. You are now on the
Reverb screen.
The display’s REVERB line shows the Reverb
mode. Turning the Input knob will scroll through
the six Reverb modes. When you are on the desired Reverb mode, turn the Mode knob to cycle
through its features. While on a feature, turn the
Input knob to adjust the setting.
If you want to reset a Reverb mode to the ADA Factory default, turn the Mode knob such that the cursor is
DFLT and then press the Mode knob. The current
Reverb mode is now reset to the factory setting.
Other Reverb modes remain unchanged. To exit,
navigate to either PREV (previous screen) or
MAIN (exiting the setup modes screens) using the
Mode knob and then press the Mode knob.
Page 33
Maximum & Turn-On Volume Settings
The Cinema Rhapsody Mach 4 features a comprehensive volume control stage that in addition
to letting you access a volume point numerically,
also lets you set a maximum volume level, four
volume presets, and select one of the four volume
presets as your turn-on volume level.
On the PC Program tab labeled VOL SETUP, the
slider permits you to jump to a specific volume
point.
Volume Numeric Direct - This feature is available
on the ADA PC program and lets you jump to a
specific volume point. In the PC program, a virtual
slider accomplishes this. Essentially, when you
release the slider the volume command is sent.
To view this code in HEX, you simply check the
View Commands box and if you wish to copy the
HEX command into a program, merely doubleclick on the command itself.
Storing Volume Presets - This tab also enables
you to store the current volume as one of the four
Volume Presets. When on a volume you wish to
store, press the corresponding VOLUME STORE
# button. These four presets can be recalled at
turn on or when an input is selected.
Turn On Volume Preset - You can select one of
the four volume presets as your Turn On Preset
or have the system turn on the last volume setting
by selecting the Last Used option.
From the front panel of the Cinema Rhapsody
Mach 4 while in the Setup Mode navigate to the
VOL SET using the Mode knob and press the
knob. To select a navigate between features,
turn the Mode knob. To alter the setting, turn the
Input knob.
To store a volume preset, first make certain that
you are at the volume level you wish to store
by turning the Volume knob. Then navigate to
STORE and turn the Input knob to select the
desired volume preset number. Then press the
Input knob to store that preset. The same steps
can be used to Recall a volume preset.
To set the Maximum Volume Level, select that
feature and then turn the Input knob to adjust.
Page 34
Dolby Volume
The Cinema Rhapsody Mach 4 features Dolby
Volume, an intelligent volume control system that
resolves and improves audio frequency response
and volume inconsistencies. Dolby Volume
can be turned on or off as can be the two main
modules of Dolby Volume: Volume Modeler and
Volume Leveler.
Audio is meant to be played at a reference level
and Volume Modeler compensates for how people
perceive loudness by adjusting audio using a psychoacoustic model based on the equal loudness/
Fletcher‐Munson curves. Volume Modeler applies
different volume contours for different volume settings, maintaining the same perceived listening
experience as the reference level experience.
Volume Leveler resolves volume inconsistencies such as, those between input sources, or
broadcast stations. Volume Leveler continually measures the perceptual loudness of audio
content and dynamically applies multiband gain
modifications so that the perceived loudness of
all audio content remains consistent. The Volume
Leveler amount parameter adjusts the amount of
leveling applied by the Volume Leveler. Its range
is from 0 to 10, with 10 being more leveling and
0 being less leveling.
When Half mode is on, the Volume Modeler does
not apply volume contour gains for playback levels
higher than reference level; just the volume setting, as a flat spectrum gain, is applied.
Cinema Reference mode is an optional user controllable feature, which calibrates Dolby
Volume to work with content authored for cinema
level reproduction (i.e. DVD or Blu-ray discs).
Calibration Offset (–15 to +15 dB) provides the
ability to fine tune the calibration of a Dolby Volume product and compensate for things such as
speaker efficiency or actual listening position.
From the front panel of the Cinema Rhapsody
Mach 4 while in the Setup Mode navigate to the
PRO SETUP using the Mode knob and press the
knob. Turn the Mode knob to ENHANCEMENTS
and press the Mode knob. Turn the Mode knob
to DOLBY VOLUME and press the Mode knob.
Use the Mode knob to select features and the
Input knob to adjust them.
Page 35
Tone Settings & Loudness On/Off
The Cinema Rhapsody Mach 4 features a loudness contour filter and parametric tone control
(where in you can adjust Bass and Treble Levels
as well as set a Frequency points for both bass
and treble).
To turn Loudness on or off, press the button.
To set the Tone Controls using the PC program,
select the Tones tab and then either Group A or
B. Here speakers are toggled into or out of a
group. You can also raise or lower the frequency
points and levels for both bass and treble. There
are two speaker groups - Group A and Group B.
In each group, you can determine which speakers track that group (are affected by that group’s
bass and treble levels). Speakers can be in one
group or another, both groups or neither. There
are four Tone Presets that are saved by simply
Storing the preset while the audio levels are in
use. The preset not only stores levels and frequency points, but also which speakers are active in both Speaker Group A and B. If your front
speakers are one design while the surrounds are
another, you can place each in their own group.
If you are looking to EQ just the left and right
across two frequency points include them in both
groups while excluding all other speakers. If you
want to just correct the subwoofer, include it in
both groups while excluding all other speakers.
For Loudness, from the front panel of the Cinema
Rhapsody Mach 4 while in the Setup Mode turn
the Mode knob to navigate to VOL SET and then
press the Mode knob. Use the Mode knob to
navigate to LOUDNESS and the Input knob to
turn it ON or OFF.
For Tones, from the front panel of the Cinema
Rhapsody Mach 4 while in the Setup Mode turn
the Mode knob to navigate to TONE SET and then
press the Mode knob. Turning the Mode knob
will first scroll through channels. To engage the
channel into or out of the current speaker GROUP
(A or B), press the Mode knob (the channel will
show or disappear). To change Treble, Bass, or
their Frequency, turn the Mode knob to the desired
feature and adjust by turning the Input knob. To
Store or Recall a preset, turn the Mode knob to
that feature and then turn the Input knob to select
the desired preset number. Press the Input knob
to store or recall the desired Tone Preset.
Page 36
Parametric EQ (PEQ) Setup
The Cinema Rhapsody Mach 4 features a multiband parametric equalizer (PEQ) that provides
you with tools to dramatically correct acoustical
imperfections. Typically, best results are achieved
using acoustical measurement systems. The
PEQ is a separate PC program to the Cinema
Rhapsody Mach 4 PC program. ADA suggests
running one or the other but not both at the same
time for optimal results. You can also set and
adjust the PEQ from the front of the Cinema
Rhapsody Mach 4.
Each of the seven main channels features a 12band equalizer. Each band allows you to set a
center frequency point, Q level and +/- gain level
per speaker channel. You can have all seven main
channels track each other. The subwoofer channel features an 8-band equalizer with independent
center frequency, Q and level per band.
There are four PEQ presets that store all parameters. You can also reset center frequency, Q and
levels individually with the touch of one button.
Lastly, the PEQ can be turned on and off permitting you to A/B your results. Like other Cinema
Rhapsody Mach 4 setup features, you can store
your PEQ settings to a file on your PC.
To set and adjust the PEQ from the front panel of
the Cinema Rhapsody Mach 4, while in the Setup
Mode navigate the cursor to PEQ using the Mode
knob and press the knob.
Pressing the Mode knob toggles its behavior
between selecting bands to adjust or selecting
channels to adjust.
While on the desired frequency band, turning the
Input knob raises or lowers the Gain with the letter
G showing you the numeric level.
While on a band, pressing the Input knob toggles
the control to Frequency Center Point and Q settings. Here turning the Mode knob advances the
frequency through 10000th’s, 1000th’s, 100th’s,
10s’, and 1’s. Turning the Input knob adjusts
that numerics value. Turning the Mode knob to
Q permits the Input knob to adjust the Q setting.
Press the Input knob to exit this feature.
While on a Preset number (R = Recall, S = Store),
press the Mode knob to recall or store.
Page 37
HDMI Down Mix
The Cinema Rhapsody Mach 4 featured a HDMI
Equalizer in the units with HDMI 1.3.
For all units featuring HDMI 1.4, this feature is
no longer functional although the menu options
still display on both the front panel and PC software.
Making adjustments here does not provide any
functionality.
The only feature that is still is functional is the
HDMI Down Mix feature. Here the Cinema
Rhapsody Mach 4 is capable of passing 2-channel audio over the HDMI cable to the TV in the
event you would like to have the TV’s speakers
provide sound. Like all functions, this feature can
be incorporated into a remote control or touchscreen system. In the PC program, this feature
is a simple On or Off button press.
From the front panel of the Cinema Rhapsody
Mach 4 while in the Setup Mode navigate to the
PRO SETUP and press the Mode button. Turn
the Mode knob to navigate to the HDMI and press
the Mode Knob.
Ignore the Input, Input EQ, Output and Output EQ
features and navigate directly to DNMX OUTPUT
using the Mode knob. Turn the input knob to turn
the Down Mix option ON or OFF.
Page 38
Solo Test
The Cinema Rhapsody Mach 4 features a Solo
Test that allows you to turn off speakers while leaving others playing. The affect could be described
as unplugging speakers during a performance.
The obvious difference is that the Cinema Rhapsody Mach 4 does this safely and quickly.
You can use this feature to determine if you have
a blown speaker driver or if your speakers are
out of phase.
It is also a terrific way to demonstrate the benefits
of multi-channel music providing you have the
proper source material. A particular ADA favorite
is the DTS version of the Eagles Hell Freezes Over
CD or DVD (must be the DTS version). There is
a bonus 17th track on either disc that is a special
recording of Seven Bridges Road. Mixed in DTS
5.1, each of the five band members is mixed on
their own speaker channel. When playing the
song through the entire speaker array, the sound
is natural and welcoming. We encourage playing
the cut with the audience seated during the first
half of the song and then encouraging them to get
up an move around during the second half, noting that while the sound field flexes as they move
around the room it does not come apart. Then we
replay the song but this time with Solo Test ready.
Now we can engage just one speaker at a time
revealing the vocals of that one artist. By the end
of the demonstration, it is becomes obvious that
this song is mixing live - in the room itself.
From the PC program, select the Solo button on
the right side of the window and a new window will
open up revealing the Solo buttons. Red buttons
indicate input channels, bold letters indicate Solo
channels, and non-bold letters are channels that
are muted. The PC program lets you quickly turn
speaker channels on and off, even in pairs.
From the front panel of the Cinema Rhapsody
Mach 4 while in the Setup mode screen navigate
to PRO SETUP and press the Mode knob. Then
turn the Mode knob to SOLO and press the Mode
knob.
The cursor will be flashing on L or Left channel.
Turn the Mode knob to select between channels
or the SOLO OFF function.
Page 39
Saving (& Loading) Input Configuration & PROM Files
The Cinema Rhapsody Mach 4 allows you to save
the configuration of your inputs to your PC. This
preserves the Input Lables, the connectivity of the
jacks, the default modes and the input presets.
By storing input configurations to your PC, you
can recall them in the event that there is ever a
problem with the Cinema Rhapsody Mach 4. Alternately, since many home theater utilize similar
components, recalling a previously saved project
may give you a head start on a different project.
To Save the files setup (or recall a previously
saved setup), select the Default side tab and the
Cinema Rhapsody Mach 4 top tab.
After all custom input configurations are done,
press the Save File button. A Save As window
will open. Here you can select to save the file in
an alternate folder as well as label the file.
When you are done, select Save. The file will be
saved as the “.C43” file extension.
While the Input Configuration is saved as a .C43
file - containing input labels, AV jack links, defalut
modes and input presets, the PROM file contains
all the other aspects of the Cinema Rhapsody
Mach 4. To numerous to mention, these features
also should be preserved in a PC file (.C4P extension) as they can be recalled in the event of
a problem. Alternately, they too can provide you
a head start when configuring systems similar to
each other.
ADA strongly recommends saving both files to
your PC.
To save the PROM file, while on the Defaults side
tab, select the Defaults top tab. Then press the
PROM Configuration button. Again, a Save As
window will appear in which you can navigate to
a folder of your choosing. You can also name the
file which will be assigned the .C4P suffix.
Use this same procedure to recall previously
saved PROM files.
Page 40
Recalling Factory & Storing/Recalling Installer Defaults
The Cinema Rhapsody Mach 4 features both a
Factory Default as well as an Installer Default.
The Factory Default can be recalled in the event
you wish to begin the process of setting up the
Cinema Rhapsody Mach 4 from a clean start.
Note that recalling the Factory Default does not
reset the Installer Default, providing one was
saved first.
To recall the Factory Default is available only in
the PC program. Simply press the Factory Default
Recall button. The Cinema Rhapsody Mach 4 will
reset and power down and then up. The factory
default does not reset input configurations or the
PEQ.
When you are done with your custom input configuration and setup, ADA strongly suggests saving your setup on the Installer Default. You can
provide the Installer Default Recall button on a
touchscreen or remote control so that in the event
the system was tampered with inadvertently, your
customer can reset the unit to the way you left the
system. To store the Installer Default from the PC
program, press the Installer Default Store button
(also saving PEQ and input configurations).
To recall the Installer Default in the PC program,
simply press the Installer Default Recall button.
The Cinema Rhapsody Mach 4 will reset and
power down and then up.
Page 41
ADA Bus Address, IR Receiver & Display Blanking
The Cinema Rhapsody Mach 4 features 9 potential ADA Bus Addresses such that a system with
several Cinema Rhapsody Mach 4s can have
each one on its own unique control address. The
ADA Bus address can be changed from either the
PC program or the setup menu of the Cinema
Rhapsody Mach 4. Changing the Address takes
place in real time - there is no loading of the
new address. The most typical address for the
Cinema Rhapsody Mach 4 is ADA Bus Address
0. A Factory Default reset will reset the unit to
this address.
To change the address of the Cinema Rhapsody
Mach 4, set the address button up or down.
From the front panel of the Cinema Rhapsody
Mach 4 while in the Setup Mode navigate to PRO
SETUP using the Mode knob and press the knob.
Turn the Mode knob to ADA Bus and press the
Mode Knob. While on BUS ADDRESS, turning
the Input knob changes the address.
The following are only set on the Cinema Rhapsody Mach 4.
IR Receiver On & Off
You can activate or deactivate the front panel IR
receiver on the Cinema Rhapsody Mach 4. Generally, the receiver is deactivated so it does not
interfere when these components are integrated
into a control system. To turn the IR receiver On
(or Off), turn the Mode knob to IRR and the turn
the Input knob to set it ON or OFF.
Display Blanking
In the event you want the front panel display on the
Cinema Rhapsody Mach 4 to turn off (blank out),
you can set the blanking function between 0 and
60 seconds. Turn the Mode knob to BLANKING
and the turn the input knob to set the blanking
time. Turning any knob will illuminate the Cinema
Rhapsody Mach 4 for the time set.
Page 42
TEQ Tracking
The Cinema Rhapsody Mach 4 is designed to
operate in conjunction with ADA’s TEQ series
of Trinnov based room optimization equalizers.
Because the TEQ sits in line between the Cinema
Rhapsody Mach 4 and the power amplifiers and
subwoofers, the goal in this portion of the setup is
to have the TEQ become the device that controls
Master Volume.
The Cinema Rhapsody Mach 4 enables you to
engage TEQ Master Volume Control (TEQ ON).
When this feature is engaged, the volume level
being produced by the Cinema Rhapsody Mach
4 is 0 dB and is fixed. The front panel volume
knob will then actually raise and lower volume
levels in the TEQ as well as read back the volume
information of the TEQ.
You can slightly adjust the Fixed Volume Level
between 0 dB and -5 dB in 1/2 dB steps.
ADA strongly recommends engaging the TEQ
function when combining the Cinema Rhapsody
Mach 4 with the TEQ.
This feature can only be engaged and adjusted
from the PC program.
Page 43
View HEX Commands & Feedback
The Cinema Rhapsody Mach 4 is controllable via
HEX commands and also provides feedback in
HEX that can be translated to ASCII. For each and
every function described in this manual, there is a
matching HEX command. This includes update
requests (feedback updates) which in addition to
an Update All command, include update requests
specific to a function or section of functions thus
keeping the incoming data stream shorter.
While commands are seven bytes in length with
the first and last byte the FF clear buffer bytes,
the second byte (03) refers the component type
and the third byte (typically 00) is the unit address.
The remaining three bytes change depending on
the function command.
The PC program features a View Command check
box which displays the HEX command. Double
clicking on the command opens a Copy Command Packet’s window in which permits you to
copy and place the HEX command directly into
a control system.
Feedback is a 16 byte string with the first byte 0F
and the last byte F0 (clear buffer). For filtering
purposes, the 14th byte is the unit type (03) and
the fifteenth byte the unit address (typically 00).
Bytes 2-13 are is the 12-character text feedback
in HEX. Both the PC program and the front panel
display translate this HEX feedback to ASCII.
The PC program features a View Feedback check
box which opens a window that displays this
feedback in ascending order. To the left is the 16
byte HEX string and to the left in parenthesis is
the ASCII translation of bytes 2-13 (the feedback
in English).
Page 44
HEX Codes for System Integration
Comments/Notes
All Commands below use 00 for the Unit Address number. When the unit address is changed, Byte
number 6 (the Checksum Byte) increments by one step in Hex. For example, using the Discrete On
Command on with the unit address changed to 01; the Checksum Byte changes to 26. The various
commands below have been grouped together based on common function. On Off, Input Selection
and Volume are together; Direct Mode and Mode related are together, etc. Some commands require
settings that can only be made in the PC program. Sending the command without first defining the
settings in the PC program will result in nothing happening at all or improper functioning of the unit.
Command Name
Discrete On/UnMute
Power Off
Mute
Volume Up 1/2 dB
Volume Down 1/2 dB
Volume Up 1 dB
Volume Down 1dB
Volume Up 1/2 dB
Volume Down 1/2 dB
Volume Up 1 dB
Volume Down 1dB
Input 1
Input 2
Input 3
Input 4
Input 5
Input 6
Input 7
Input 8 Input 9
Input 10 Input 11
Input 12
Input 13
Input 14
Input 15
Input 16
Input 17
Input 18 Input 19
Input 20 Optical 1
Optical 2
Digital 1
Digital 2
Digital 3
Digital 4
Digital 5
Digital 6
Analog 1
Analog 2
Analog 3
Analog 4
HDMI 1
HDMI 2
HDMI 3
HDMI 4
HDMI 5
HDMI 6
HDMI 7
HDMI 8
Hex Command
FF, 03, 00, 01, 21, 25, FF
FF, 03, 00, 01, 08, 0C, FF
FF, 03, 00, 01, 22, 26, FF
FF, 03, 00, 01, 37, 3B, FF
FF, 03, 00, 01, 38, 3C, FF
FF, 03, 00, 01, 5A, 5E, FF
FF, 03, 00, 01, 5B, 5F, FF
FF, 03, 00, 01, 27, 2B, FF
FF, 03, 00, 01, 28, 2C, FF
FF, 03, 00, 01, 29, 2D, FF
FF, 03, 00, 01, 2A, 2E, FF
FF, 03, 00, 10, 70, 83, FF
FF, 03, 00, 10, 71, 84, FF
FF, 03, 00, 10, 72, 85, FF
FF, 03, 00, 10, 73, 86, FF
FF, 03, 00, 10, 74, 87, FF
FF, 03, 00, 10, 75, 88, FF
FF, 03, 00, 10, 76, 89, FF
FF, 03, 00, 10, 77, 8A, FF
FF, 03, 00, 10, 78, 8B, FF
FF, 03, 00, 10, 79, 8C, FF
FF, 03, 00, 10, 7A, 8D, FF
FF, 03, 00, 10, 7B, 8E, FF
FF, 03, 00, 10, 7C, 8F, FF
FF, 03, 00, 10, 7D, 90, FF
FF, 03, 00, 10, 7E, 91, FF
FF, 03, 00, 10, 7F, 92, FF
FF, 03, 00, 10, 80, 93, FF
FF, 03, 00, 10, 81, 94, FF
FF, 03, 00, 10, 82, 95, FF
FF, 03, 00, 10, 83, 96, FF
FF, 03,00, 10, 70,83, FF
FF, 03,00, 10, 71,84, FF
FF, 03,00, 10, 72,85, FF
FF, 03,00, 10, 73,86, FF
FF, 03,00, 10, 74,87, FF
FF, 03,00, 10, 75,88, FF
FF, 03,00, 10, 76,89, FF
FF, 03,00, 10, 77,8A, FF
FF, 03,00, 10, 78,8B, FF
FF, 03,00, 10, 79,8C, FF
FF, 03,00, 10, 7A,8D, FF
FF, 03, 00, 10, 7B, 8E, FF
FF, 03, 00, 10, 7C, 8F, FF
FF, 03, 00, 10, 7D, 90, FF
FF, 03, 00, 10, 7E, 91, FF
FF, 03, 00, 10, 7F, 92, FF
FF, 03,00, 10, 80,93, FF
FF, 03,00, 10, 81,94, FF
FF, 03,00, 10, 82,95, FF
FF, 03,00, 10, 83,96, FF
On/Off, Volume and Input Related Commands
Turns System On to Default Souce or Last Used (set in software) or Unmutes
Turns System Off
Mutes Audio
Raises Volume 1/2 dB at a time
Lowers Volume 1/2 dB at a time
Raises Volume 1 dB at a time
Lowers Volume 1 dB at a time
Optimized for 1200 Baud/Feedback Delayed-Raises Volume 1/2 dB at a time
Optimized for 1200 Baud/Feedback Delayed-Lowers Volume 1/2 dB at a time
Optimized for 1200 Baud/Feedback Delayed-Raises Volume 1 dB at a time
Optimized for 1200 Baud/Feedback Delayed-Lowers Volume 1 dB at a time
Selects Input 1 (if unit is Off then this command will power the unit on and select source)
Selects Input 2 (if unit is Off then this command will power the unit on and select source)
Selects Input 3 (if unit is Off then this command will power the unit on and select source)
Selects Input 4 (if unit is Off then this command will power the unit on and select source)
Selects Input 5 (if unit is Off then this command will power the unit on and select source)
Selects Input 6 (if unit is Off then this command will power the unit on and select source)
Selects Input 7 (if unit is Off then this command will power the unit on and select source)
Selects Input 8 (if unit is Off then this command will power the unit on and select source)
Selects Input 9 (if unit is Off then this command will power the unit on and select source)
Selects Input 10 (if unit is Off then this command will power the unit on and select source)
Selects Input 11 (if unit is Off then this command will power the unit on and select source)
Selects Input 12 (if unit is Off then this command will power the unit on and select source)
Selects Input 13 (if unit is Off then this command will power the unit on and select source)
Selects Input 14 (if unit is Off then this command will power the unit on and select source)
Selects Input 15 (if unit is Off then this command will power the unit on and select source)
Selects Input 16 (if unit is Off then this command will power the unit on and select source)
Selects Input 17 (if unit is Off then this command will power the unit on and select source)
Selects Input 18 (if unit is Off then this command will power the unit on and select source)
Selects Input 19 (if unit is Off then this command will power the unit on and select source)
Selects Input 20 (if unit is Off then this command will power the unit on and select source)
From the Input/Record Tab (on the Theater tab) of the PCOS Selects Input 1
From the Input/Record Tab (on the Theater tab) of the PCOS Selects Input 2
From the Input/Record Tab (on the Theater tab) of the PCOS Selects Input 3
From the Input/Record Tab (on the Theater tab) of the PCOS Selects Input 4
From the Input/Record Tab (on the Theater tab) of the PCOS Selects Input 5
From the Input/Record Tab (on the Theater tab) of the PCOS Selects Input 6
From the Input/Record Tab (on the Theater tab) of the PCOS Selects Input 7
From the Input/Record Tab (on the Theater tab) of the PCOS Selects Input 8
From the Input/Record Tab (on the Theater tab) of the PCOS Selects Input 9
From the Input/Record Tab (on the Theater tab) of the PCOS Selects Input 10
From the Input/Record Tab (on the Theater tab) of the PCOS Selects Input 11
From the Input/Record Tab (on the Theater tab) of the PCOS Selects Input 12
From the Input/Record Tab (on the Theater tab) of the PCOS Selects Input 13
From the Input/Record Tab (on the Theater tab) of the PCOS Selects Input 14
From the Input/Record Tab (on the Theater tab) of the PCOS Selects Input 15
From the Input/Record Tab (on the Theater tab) of the PCOS Selects Input 16
From the Input/Record Tab (on the Theater tab) of the PCOS Selects Input 17
From the Input/Record Tab (on the Theater tab) of the PCOS Selects Input 18
From the Input/Record Tab (on the Theater tab) of the PCOS Selects Input 19
From the Input/Record Tab (on the Theater tab) of the PCOS Selects Input 20
Page 45
Command Name
Hex Command
Volume Recall 1
FF, 03, 00, 01, 89, 8D, FF
Volume Recall 2
FF, 03, 00, 01, 8A, 8E, FF
Volume Recall 3
FF, 03, 00, 01, 8B, 8F, FF
Volume Recall 4
FF, 03, 00, 01, 8C, 90, FF
Volume Store 1
FF, 03, 00, 01, 8D, 91, FF
Volume Store 2
FF, 03, 00, 01, 8E, 92, FF
Volume Store 3
FF, 03, 00, 01, 8F, 93, FF
Volume Store 4
FF, 03, 00, 01, 90, 94, FF
Volume Limiter Up
FF, 03, 00, 10, D8, DC, FF
Volume Limiter Down FF, 03, 00, 01, D9, DD, FF
Turn On Volume Preset Up FF, 03, 00, 01, DA, DE, FF
Turn On Volume Preset Dn FF, 03, 00, 01, DB, DF, FF
Final Input Up
FF, 03, 00, 01, DD, D1, FF
Final Input Down
FF, 03, 00, 01, DE, D2, FF
Turn On Input Up
FF, 03, 00, 10, E0, F3, FF
Turn On Input Down
FF, 03, 00, 10, E1, F4, FF
Direct Volume Control FF, 03, 00, 11, 01, FF
Direct Volume Control FF, 03, 00, 12, 01, FF
Command Name
Hex Command
HDMI 2-Ch Downmix On
FF, 03, 00, 15, 21, 39, FF
HDMI 2-Ch Downmix Off
FF, 03, 00, 15, 20, 38, FF
HDMI Input Equalizer 1
FF, 03, 00, 15, 70, 88, FF
HDMI Input Equalizer 2
FF, 03, 00, 15, 71, 89, FF
HDMI Input Equalizer 3
FF, 03, 00, 15, 72, 8A, FF
HDMI Input Equalizer 4
FF, 03, 00, 15, 73, 8B, FF
HDMI Input Equalizer 5
FF, 03, 00, 15, 74, 8C, FF
HDMI Input Equalizer 6
FF, 03, 00, 15, 75, 8D, FF
HDMI Input Equalizer 7
FF, 03, 00, 15, 76, 8E, FF
HDMI Input Equalizer 8
FF, 03, 00, 15, 77, 8F, FF
TMDS 1
FF, 03, 00, 15, 78, 90, FF
TMDS 2
FF, 03, 00, 15, 79, 91, FF
Comm And 11
FF, 03, 00, 15, 56, 6E, FF
Command Name
Hex Command
Cinema
FF, 03, 00, 14, 00, 17, FF
Club
FF, 03, 00, 14, 01, 18, FF
Hall
FF, 03, 00, 14, 02, 19, FF
Arena
FF, 03, 00, 14, 03, 1A, FF
Cathedral
FF, 03, 00, 14, 04, 1B, FF
Quad Reverb
FF, 03, 00, 14, 05, 1C, FF
Recall Defaults FF, 03, 00, 15, E0, E8, FF
Command Name
Hex Command
Center None
FF, 03, 00, 01, 51, 55, FF
Center Small
FF, 03, 00, 01, 52, 56, FF
Center Large FF, 03, 00, 01, 53, 57, FF
Center Crossover Freq Up FF, 03, 00, 15, 03, 1B, FF
Center Crossover Freq Down FF, 03, 00, 15, 04, 1C, FF
Front Small
FF, 03, 00, 01, 4F, 53, FF
Front Large
FF, 03, 00, 01, 50, 54, FF
Front Crossover Freq Up
FF, 03, 00, 15, 01, 19, FF
Front Crossover Freq Down FF, 03, 00, 15, 02, 1A, FF
Subwoofer No (Off)
FF, 03, 00, 01, 57, 5B, FF
Subwoofer Yes (On)
FF, 03, 00, 01, 58, 5C, FF
Sub Crossover Freq Up
FF, 03, 00, 15, 01, 19, FF
Sub Crossover Freq Down FF, 03, 00, 15, 02, 1A, FF
Surrounds None
FF, 03, 00, 01, 54, 58, FF
Surrounds Small
FF, 03, 00, 01, 55, 59, FF
Surrounds Large
FF, 03, 00, 01, 56, 6A, FF
Surround Crossover Freq Up FF, 03, 00, 15, 05, 1D, FF
Surround Crossover Freq Dn FF, 03, 00, 15, 06, 1E, FF
Back None
FF, 03, 00, 01, 6D, 71, FF
Back 1 Speaker-Auto Size FF, 03, 00, 01, 6E, 72, FF
Back 2 Speakers-Auto Size FF, 03, 00, 01, 6F, 73, FF
Back 1 Small FF, 03, 00, 01, 72, 76, FF
Page 46
On/Off, Volume and Input Related Commands
Recalls Volume level 1 as stored
Recalls Volume level 2 as stored
Recalls Volume level 3 as stored
Recalls Volume level 4 as stored
Stores Volume level for Recall 1
Stores Volume level for Recall 2
Stores Volume level for Recall 3
Stores Volume level for Recall 4
Increases the maximum master volume setting (up to + 27.5 dB-out of box default)
Decreases the maximum allowable master volume setting
Increments through turn on Volume options: Vol Recall Presets 1 through 4 or Last Used
Decrements through turn on Volume options: Vol Recall Presets 1 through 4 or Last Used
Increments through inputs and removes inputs from front display not being used.
Decrements through inputs and add inputs back to the front display that are being used
Increments through the inputs to choose the unit to power on to the specific input chosen
Decrements through the inputs to choose the input the unit powers on via Volume. knob.
Will take unit directly to the specific volume 01 = -63.5 dB through B7 = +27.5 dB
As above. Please note that hex value 00 = Volume Mute! Both commands must be sent
New HDMI Specific Related Functions
Sets HDMI Audio Output to 2-Channel Downmix for Direct Connection to a TV Monitor
Sets HDMI Audio Output back to Default
Optimizes HDMI Input Signal for long cable runs: HDMI Input 1
Optimizes HDMI Input Signal for long cable runs: HDMI Input 2
Optimizes HDMI Input Signal for long cable runs: HDMI Input 3
Optimizes HDMI Input Signal for long cable runs: HDMI Input 4
Optimizes HDMI Input Signal for long cable runs: HDMI Input 5
Optimizes HDMI Input Signal for long cable runs: HDMI Input 6
Optimizes HDMI Input Signal for long cable runs: HDMI Input 7
Optimizes HDMI Input Signal for long cable runs: HDMI Input 8
Optimizes HDMI Output Signal for long cable runs: HDMI Output 1
Optimizes HDMI Output Signal for long cable runs: HDMI Output 2
Unknown
Reverb Settings for Cinema, Club, Hall, Arena, Cathedral, Quad Rev Modes
Selects Cinema Mode to Adjust Reverb Settings (for both 2-Channel and Multi-Channel)
Selects Club Mode to Adjust Reverb Settings (for both 2-Channel and Multi-Channel)
Selects Hall Mode to Adjust Reverb Settings (for both 2-Channel and Multi-Channel)
Selects Arena Mode to Adjust Reverb Settings (for both 2-Channel and Multi-Channel)
Selects Cathedral Mode to Adjust Reverb Settings (for both 2-Channel & Multi-Channel)
Selects Quad Reverb Mode to Adjust Reverb Settings (for 2-Channel & Multi-Channel)
Recalls Default Reverb Settings for any of the Selected Modes Above
Speaker Size, Noise/Levels/Balance, Delays and Tone setting Commands
Turns Center Speaker Off
Sets Center Speaker to Small
Sets Center Speaker to Large
Adjusts Center Crossover Frequency Up
Adjusts Center Crossover Frequency Down
Sets Front Left and Right Speakers to Small
Sets Front Left and Right Speakers to Large
Adjusts Front Crossover Frequency Up
Adjusts Front Crossover Frequency Down
Turns Subwoofer Off
Turns Subwoofer On
Adjusts Subwoofer Crossover Frequency Up
Adjusts Subwoofer Crossover Frequency Down
Turns the Left and Right Surround Speakers Off
Sets the Left and Right Surround Speakers to Small
Sets the Left and Right Surround Speakers to Large
Adjusts Surround Crossover Frequency Up
Adjusts Surround Crossover Frequency Down
Turns the Left and Right Back Surround Speakers Off
Turns on only the Left Back Surround speaker; sets size to the same as Surround L/R
Turns on both the Left & Right Back Surround speakers; sets Size same as Surround L/R
Turns on only the Left Back Surround speaker and sets to Small
Back 1 Large
FF, 03, 00, 01, 70, 74, FF
Back 2 Small FF, 03, 00, 01, 73, 77, FF
Back 2 Large
FF, 03, 00, 01, 71, 75, FF
Back Crossover Freq Up
FF, 03, 00, 15, 07, 1F, FF
Back Crossover Freq Dn
FF, 03, 00, 15, 08, 20, FF
Track Crossover Freq Up
FF, 03, 00, 01, 7D, 81, FF
Track Crossover Freq Dn
FF, 03, 00, 01, 7E, 82, FF
Boundary Gain On
FF, 03, 00, 01, 4D, 51, FF
Boundary Gain Off
FF, 03, 00, 01, 4C, 50, FF
Back Speakers: > 12"
FF, 03, 00, 01, 85, 89, FF
Back Speakers: 12-48"
FF, 03, 00, 01, 86, 8A, FF
Back Speakers: < 48"
FF, 03, 00, 01, 87, 8B, FF
LFE Attenuation Enable
FF, 03, 00, 01, CA, CE, FF
LFE Attenuation Disable
FF, 03, 00, 01, CB, CF, FF
LFE Attenuation Up
FF, 03, 00, 01, E0, E4, FF
LFE Attenuation Down
FF, 03, 00, 01, E1, E5, FF
Speaker Recall 1
FF, 03, 00, 13, 86, 9C, FF
Speaker Recall 2
FF, 03, 00, 13, 87, 9D, FF
Speaker Recall 3
FF, 03, 00, 13, 88, 9E, FF
Speaker Recall 4
FF, 03, 00, 13, 89, 9E, FF
Speaker Store 1
FF, 03, 00, 13, 8A, A0, FF
Speaker Store 2
FF, 03, 00, 13, 8B, A1, FF
Speaker Store 3
FF, 03, 00, 13, 8C, A2, FF
Speaker Store 4
FF, 03, 00, 13, 8D, A3, FF
Noise Sequence
FF, 03, 00, 01, 2E, 32, FF
Noise Advance
FF, 03, 00, 01, 2F, 33, FF
Noise Left
FF, 03, 00, 01, 30, 34, FF
Noise Right
FF, 03, 00, 01, 31, 35, FF
Noise Left Surround
FF, 03, 00, 01, 32, 36, FF
Noise Right Surround
FF, 03, 00, 01, 33, 37, FF
Noise Center FF, 03, 00, 01, 34, 38, FF
Noise Surround Back Left FF, 03, 00, 01, 35, 39, FF
Noise Surround Back Right FF, 03, 00, 01, 36, 3A, FF
Noise Sub
FF, 03, 00, 01, 59, 5D, FF
Noise Test Off
FF, 03, 00, 01, 21, 25, FF
Subwoofer Manager Noise FF, 03, 00, 01, C9, CD, FF
Increase Limiter Ceiling
FF, 03, 00, 01, CC, D0, FF
Decrease Limiter Ceiling FF, 03, 00, 01, CD, D1, FF
Center Speaker Level Up
FF, 03, 00, 01, 3B, 3F, FF
Center Speaker Level Down FF, 03, 00, 01, 3C, 40, FF
Left Speaker Level Up
FF, 03, 00, 01, 39, 3D, FF
Left Speaker Level Down
FF, 03, 00, 01, 3A, 3E, FF
Right Speaker Level Up
FF, 03, 00, 01, 3D, 41, FF
Right Speaker Level Down FF, 03, 00, 01, 3E, 42, FF
Front Speaker Levels Up
FF, 03, 00, 13, 76, 8C, FF
Front Speaker Levels Down FF, 03, 00, 13, 77, 8D, FF
Subwoofer Level Up
FF, 03, 00, 13, 43, 47, FF
Subwoofer Level Down
FF, 03, 00, 13, 44, 48, FF
Left Surr. Speaker Level Up FF, 03, 00, 01, 3F, 43, FF
Left Surr. Speaker Level Up FF, 03, 00, 01, 40, 44, FF
Right Surr. Speaker Level Up FF, 03, 00, 01, 41, 45, FF
Right Surr. Speaker Level Dn FF, 03, 00, 01, 42, 46, FF
Surround Speaker Levels Up FF, 03, 00, 13, 78, 8E, FF
Surround Speaker Levels Dn FF, 03, 00, 13, 79, 8F, FF
Surr. Back Left Level Up
FF, 03, 00, 01, 45, 49, FF
Surr. Back Left Level Dn
FF, 03, 00, 01, 46, 4A, FF
Surr. Back Right Level Up FF, 03, 00, 01, 47, 4B, FF
Surr. Back Right Level Dn FF, 03, 00, 01, 48, 4C, FF
Surround Back Levels Up FF, 03, 00, 13, 7A, 90, FF
Surround Back Levels Up FF, 03, 00, 13, 7B, 91 FF
Solo Center
FF, 03, 00, 01, 99, 9D, FF
Solo Left
FF, 03, 00, 01, 9B, 9F, FF
Solo Right
FF, 03, 00, 01, 9C, A0, FF
Solo Left and Right
FF, 03, 00, 10, 2B, 3E, FF
Solo Subwoofer
FF, 03, 00, 01, 9A, 9E, FF
Solo Left Surround
FF, 03, 00, 01, 9D, A1, FF
Solo Right Surround
FF, 03, 00, 01, 9E, A2, FF
Turns on only the Left Back Surround speaker and sets to Large
Turns on both the Left and Right Back Surround speakers and sets to Small
Turns on both the Left and Right Back Surround speakers and sets to Large
Adjusts Back Crossover Frequency Up
Adjusts Back Crossover Frequency Down
Adjusts Crossover Frequency Tracking Up
Adjusts Crossover Frequency Tracking Down
Turns on Boundary Gain (for Surround Back speakers)
Turns off Boundary Gain (for Surround Back speakers)
When Boundary Gain is on Adjusts BG for distance between Surround Back speakers
When Boundary Gain is on Adjusts BG for distance between Surround Back speakers
When Boundary Gain is on Adjusts BG for distance between Surround Back speakers
Turns LFE Attenuation On for DTS Only
Turns LFE Attenuation Off for DTS Only
Increments LFE Attenuation when enabled for DTS Only
Decrements LFE Attenuation when enabled for DTS Only
Recalls Speaker Size Setting 1-only valid w/Advanced Speaker Option is selected by PC
Recalls Speaker Size Setting 2-only valid w/Advanced Speaker Option is selected by PC
Recalls Speaker Size Setting 3-only valid w/Advanced Speaker Option is selected by PC
Recalls Speaker Size Setting 4-only valid w/Advanced Speaker Option is selected by PC
Stores Speaker Size Setting 1-only valid w/Advanced Speaker Option is selected by PC
Stores Speaker Size Setting 1-only valid w/Advanced Speaker Option is selected by PC
Stores Speaker Size Setting 1-only valid w/Advanced Speaker Option is selected by PC
Stores Speaker Size Setting 1-only valid w/Advanced Speaker Option is selected by PC
Starts Noise Generator Sequence (from Left though Sub-in order as noted below)
When choosing any of the direct noise options below, moves to the next speaker
Generates noise for the Left speaker only
Generates noise for the Right speaker only
Generates noise for the Left Surround speaker only
Generates noise for the Right Surround speaker only
Generates noise for the Center speaker only
Generates noise for the Surround Back Left speaker only
Generates noise for the Surround Back Right speaker only
Generates noise for the Subwoofer only
Same command as line 13, Turns off the noise generator mode when in this mode
Turns on noise for the Subwoofer the adjust Limiter Ceiling
Increases the limiter ceiling for the Subwoofer (in dB) against the master volume
Decreases the limiter ceiling for the Subwoofer (in dB) against the master volume
Adjusts Center Speaker Level Up-Above Master Volume Level for unit (in dB)
Adjusts Center Speaker Level Down-Below Master Volume Level for unit (in dB)
Adjusts Left Speaker Level Up-Above Master Volume Level for unit (in dB)
Adjusts Left Speaker Level Down-Below Master Volume Level for unit (in dB)
Adjusts Right Speaker Level Up-Above Master Volume Level for unit (in dB)
Adjusts Right Speaker Level Down-Below Master Volume Level for unit (in dB)
Adjusts Left and Right Speaker Levels Up-Above Master Volume Level for unit (in dB)
Adjusts Left and Right Speaker Levels Down-Below Master Volume Level for unit (in dB)
Adjusts Subwoofer Speaker Level Up
Adjusts Subwoofer Speaker Level Down
Adjusts Left Surround Speaker Level Up-Above Master Volume Level for unit (in dB)
Adjusts Left Surround Speaker Level Down-Below Master Volume Level for unit (in dB)
Adjusts Right Surround Speaker Level Up-Above Master Volume Level for unit (in dB)
Adjusts Right Surround Speaker Level Down-Below Master Volume Level for unit (in dB)
Adjusts Left & Right Surround Speaker Levels Up-Above Master Vol. Level for unit (dB)
Adjusts Left & Right Surrond Speaker Levels Down-Below Master Vol. Level for unit (dB)
Adjusts Left Surround Back Speaker Level Up-Above Master Volume Level for unit (dB)
Adjusts Left Surround Back Speaker Level Down-Below Master Volume Level for unit (dB)
Adjusts Right Surround Back Speaker Level Up-Above Master Volume Level for unit (dB)
Adjusts Right Surround Back Speaker Level Down-Below Master Volume Level for unit (dB)
Adjusts Left and Right Surround Back Speaker Levels Up-Above Master Vol. Level (dB)
Adjusts Left & Right Surround Back Speaker Levels Down-Below Master Vol. Level (dB)
When playing audio plays audio only from the Center speaker
When playing audio plays audio only from the Left speaker
When playing audio plays audio only from the Right speaker
When playing audio plays audio only from the Left and Right speakers
When playing audio plays audio only from the Subwoofer
When playing audio plays audio only from the Left Surround speaker
When playing audio plays audio only from the Right Surround speaker
Page 47
Solo Left and Right Surround FF, 03, 00, 01, 9F, A3, FF
Solo Surround Back Left
FF, 03, 00, 01, A0, A4, FF
Solo Surround Back Right FF, 03, 00, 01, A1, A5, FF
Solo Surr.Back Left and RightFF, 03, 00, 10, 2C, 3F, FF
Solo All Surrounds
FF, 03, 00, 10, 2D, 40, FF
Solo Test Off
FF, 03, 00, 01, 21, 25, FF
Balance Recall 1
FF, 03, 00, 01, 91, 95, FF
Balance Recall 2
FF, 03, 00, 01, 92, 96, FF
Balance Recall 3
FF, 03, 00, 01, 93, 97, FF
Balance Recall 4
FF, 03, 00, 01, 94, 98, FF
Balance Store 1
FF, 03, 00, 01, 95, 99, FF
Balance Store 2
FF, 03, 00, 01, 96, 9A, FF
Balance Store 3
FF, 03, 00, 01, 97, 9B, FF
Balance Store 4
FF, 03, 00, 01, 98, 9C, FF
Center Delay Up
FF, 03, 00, 01, 5F, 63, FF
Center Delay Down
FF, 03, 00, 01, 60, 64, FF
Left Delay Up
FF, 03, 00, 01, 5D, 61, FF
Left Delay Down
FF, 03, 00, 01, 5E, 62, FF
Right Delay Up
FF, 03, 00, 01, 61, 65, FF
Right Delay Down
FF, 03, 00, 01, 62, 66, FF
Subwoofer Delay Up
FF, 03, 00, 01, 67, 6B, FF
Subwoofer Delay Down
FF, 03, 00, 01, 68, 6C, FF
Left Surround Delay Up
FF, 03, 00, 01, 63, 67, FF
Left Surround Delay Down FF, 03, 00, 01, 64, 68, FF
Right Surround Delay Up
FF, 03, 00, 01, 65, 69, FF
Right Surround Delay Down FF, 03, 00, 01, 66, 6A, FF
Left Back Surround Delay Up FF, 03, 00, 01, 69, 6D, FF
Left Back Surr. Delay Down FF, 03, 00, 01, 6A, 6E, FF
Right Back Surr.Delay Up FF, 03, 00, 01, 6B, 6F, FF
Right Back Surr. Delay Down FF, 03, 00, 01, 6C, 70, FF
Tone Group A-Left FF, 03, 00, 01, A3, A7, FF
Tone Group A-Right
FF, 03, 00, 01, A4, A8, FF
Tone Group A-Left Surr.
FF, 03, 00, 01, A5, A9, FF
Tone Group A-Right Surr.
FF, 03, 00, 01, A6, AA, FF
Tone Group A-Center
FF, 03, 00, 01, A7, AB, FF
Tone Group A-Subwoofer
FF, 03, 00, 01, A8, AC, FF
Tone Group A-Back Left FF, 03, 00, 01, A9, AD, FF
Tone Group A-Back Right
FF, 03, 00, 01, AA, AE, FF
Treble Freq Up Tone Group A FF, 03, 00, 01, AB, AF, FF
Treble Freq Dn Tone Group A FF, 03, 00, 01, AC, B0, FF
Treble Level Up Tone Group AFF, 03, 00, 01, AD, B1, FF
Treble Level Dn Tone Group AFF, 03, 00, 01, AE, B2, FF
Bass Freq Up Tone Group A FF, 03, 00, 01, AF, B3, FF
Bass Freq Dn Tone Group A FF, 03, 00, 01, B0, B4, FF
Bass Level Up Tone Group A FF, 03, 00, 01, B1, B5, FF
Bass Level Dn Tone Group A FF, 03, 00, 01, B2, B6, FF
Tone Group B-Left FF, 03, 00, 01, B4, B8, FF
Tone Group B-Right
FF, 03, 00, 01, B5, B9, FF
Tone Group B-Left Surr.
FF, 03, 00, 01, B6, BA, FF
Tone Group B-Right Surr.
FF, 03, 00, 01, B7, BB, FF
Tone Group B-Center
FF, 03, 00, 01, B8, BC, FF
Tone Group B-Subwoofer
FF, 03, 00, 01, B9, BD, FF
Tone Group B-Back Left FF, 03, 00, 01, BA, BE, FF
Tone Group B-Back Right FF, 03, 00, 01, BB, BF, FF
Treble Freq Up Tone Group BFF, 03, 00, 01, BC, C0, FF
Treble Freq Dn Tone Group BFF, 03, 00, 01, BD, C1, FF
Treble Level Up Tone Grp B FF, 03, 00, 01, BE, C2, FF
Treble Level Dn Tone Grp B FF, 03, 00, 01, BF, C3, FF
Bass Freq Up Tone Group B FF, 03, 00, 01, C0, C4, FF
Bass Freq Dn Tone Group B FF, 03, 00, 01, C1, C5, FF
Bass Level Up Tone Group B FF, 03, 00, 01, C2, C6, FF
Bass Level Dn Tone Group B FF, 03, 00, 01, C3, C7, FF
Tones Recall 1
FF, 03, 00, 01, D0, D4, FF
Tones Recall 2
FF, 03, 00, 01, D1, D5, FF
Tones Recall 3
FF, 03, 00, 01, D2, D6, FF
Tones Recall 4
FF, 03, 00, 01, D3, D7, FF
Tones Store 1
FF, 03, 00, 01, D4, D8, FF
Page 48
When playing audio plays audio only from the Left and Right Surround speakers
When playing audio plays audio only from the Surround Back Left speaker
When playing audio plays audio only from the Surround Back Right speaker
When playing audio plays audio only from the Surround Back Left and Right speakers
When playing audio plays audio only from all fo the Surround Speakers
Same command as line 13, Turns Off the Solo Test mode when in this mode.
Recalls Balance settings 1 as stored
Recalls Balance settings 2 as stored
Recalls Balance settings 3 as stored
Recalls Balance settings 4 as stored
Stores Balance settings for Recall 1
Stores Balance settings for Recall 2
Stores Balance settings for Recall 3
Stores Balance settings for Recall 4
Increases the Delay time for the Center speaker (in feet)
Decreases the Delay time for the Center speaker (in feet)
Increases the Delay time for the Left speaker (in feet)
Decreases the Delay time for the Left speaker (in feet)
Increases the Delay time for the Right speaker (in feet)
Decreases the Delay time for the Right speaker (in feet)
Increases the Delay time for the Subwoofer (in feet)
Decreases the Delay time for the Subwoofer speaker (in feet)
Increases the Delay time for the Left Surround speaker (in feet)
Decreases the Delay time for the Left Surround speaker (in feet)
Increases the Delay time for the Right Surround speaker (in feet)
Decreases the Delay time for the Right Surround speaker (in feet)
Increases the Delay time for the Left Back Surround speaker (in feet)
Decreases the Delay time for the Left Back Surround speaker (in feet)
Increases the Delay time for the Right Back Surround speaker (in feet)
Decreases the Delay time for the Right Back Surround speaker (in feet)
Include or Exclude Left Speaker in Tone Group A-Toggle Command
Include or Exclude Right Speaker in Tone Group A-Toggle Command
Include or Exclude Left Surround Speaker in Tone Group A-Toggle Command
Include or Exclude Right Surround Speaker in Tone Group A-Toggle Command
Include or Exclude Center Speaker in Tone Group A-Toggle Command
Include or Exclude Subwoofer in Tone Group A-Toggle Command
Include or Exclude Back Left Surround Speaker in Tone Group A-Toggle Command
Include or Exclude Back Right Surround Speaker in Tone Group A-Toggle Command
Adjusts Treble Frequency for Tone Group A Up (in kHz)
Adjusts Treble Frequency for Tone Group A Down (in kHz)
Adjusts Treble Level for frequency set above in Tone Group A Up (in dB)
Adjusts Treble Level for frequency set above in Tone Group A Down (in dB)
Adjusts Bass Frequency for Tone Group A Up (in Hz)
Adjusts Bass Frequency for Tone Group A Down (in Hz)
Adjusts Bass Level for frequency set above in Tone Group A Up (in dB)
Adjusts Bass Level for frequency set above in Tone Group A Down (in dB)
Include or Exclude Left Speaker in Tone Group A-Toggle Command
Include or Exclude Right Speaker in Tone Group A-Toggle Command
Include or Exclude Left Surround Speaker in Tone Group A-Toggle Command
Include or Exclude Right Surround Speaker in Tone Group A-Toggle Command
Include or Exclude Center Speaker in Tone Group A-Toggle Command
Include or Exclude Subwoofer in Tone Group A-Toggle Command
Include or Exclude Back Left Surround Speaker in Tone Group A-Toggle Command
Include or Exclude Back Right Surround Speaker in Tone Group A-Toggle Command
Adjusts Treble Frequency for Tone Group B Up (in kHz)
Adjusts Treble Frequency for Tone Group B Down (in kHz)
Adjusts Treble Level for frequency set above in Tone Group B Up (in dB)
Adjusts Treble Level for frequency set above in Tone Group B Down (in dB)
Adjusts Bass Frequency for Tone Group B Up (in Hz)
Adjusts Bass Frequency for Tone Group B Down (in Hz)
Adjusts Bass Level for frequency set above in Tone Group B Up (in dB)
Adjusts Bass Level for frequency set above in Tone Group B Down (in dB)
Recalls Tones settings 1 as stored (both Tone Groups A & B)
Recalls Tones settings 2 as stored (both Tone Groups A & B)
Recalls Tones settings 3 as stored (both Tone Groups A & B)
Recalls Tones settings 4 as stored (both Tone Groups A & B)
Stores Tones settings for Recall 1 (both Tone Groups A & B)
Tones Store 2
FF, 03, 00, 01, D5, D9, FF
Tones Store 3
FF, 03, 00, 01, D6, DA, FF
Tones Store 4
FF, 03, 00, 01, D7, DB, FF
Command Name
Hex Command
Mode Scroll Up
FF, 03, 00, 10, 2E, 41, FF
Scroll Down
FF, 03, 00, 10, 2F, 42, FF
THX
FF, 03, 00, 10, 6B, 7E, FF
User Mode
FF, 03, 00, 10, 6C, 7F, FF
Stereo
FF, 03, 00, 10, 6D, 80, FF
Mono
FF, 03, 00, 10, 6E, 81, FF
Direct 5.1
FF, 03, 00, 13, 70, 86, FF
Direct 7.1
FF, 03, 00, 13, 71, 87, FF
Direct 2.0
FF, 03, 00, 10, 65, 78, FF
Stereo
FF, 03, 00, 10, 48, 5B, FF
Mono
FF, 03, 00, 10, 49, 5C, FF
DTS Neo:6 3-Channel FF, 03, 00, 13, 50, 66, FF
DTS Neo:6 Phantom FF, 03, 00, 13, 51, 67, FF
DTS Neo:6 5-Channel FF, 03, 00, 13, 52, 68, FF
DTS Neo:6 Movie FF, 03, 00, 10, 4A, 5D, FF
DTS Neo:6 Movie +THX
FF, 03, 00, 10, 4B, 5E, FF
DTS Neo:6 Music
FF, 03, 00, 13, 53, 69, FF
Dolby Pro Logic 3-Channel FF, 03, 00, 10, 63, 76, FF
Dolby Pro Logic Phantom FF, 03, 00, 10, 64, 77, FF
Dolby Pro Logic FF, 03, 00, 10, 4C, 5F, FF
Dolby Pro Logic + THX
FF, 03, 00, 10, 4D, 60, FF
Dolby Pro Logic II Matrix
FF, 03, 00, 10, 50, 63, FF
Mode)
Dolby Pro Logic II Game
FF, 03, 00, 13, 54, 6A, FF
Dolby Pro Logic II Music
FF, 03, 00, 10, 52, 65, FF
Dolby Pro Logic II Movie
FF, 03, 00, 10, 4E, 61, FF
Dolby Pro Logic II Movie/THXFF, 03, 00, 10, 4F, 62, FF
Dolby Pro Logic II Custom 1 FF, 03, 00, 10, 53, 66, FF
Dolby Pro Logic II Cust 1/THXFF, 03, 00, 10, 54, 67, FF
Dolby Pro Logic II Custom 2 FF, 03, 00, 10, 55, 68, FF
Dolby Pro Logic II Cust 2/THXFF, 03, 00, 10, 56, 69, FF
Dolby Pro Logic II Custom 3 FF, 03, 00, 10, 57, 6A, FF
Dolby Pro Logic II Cust 3/THX FF, 03, 00, 10, 58, 6B, FF
AGL Enhanced FF, 03, 00, 10, 51, 64, FF
Quad Bypass
FF, 03, 00, 10, 59, 6C, FF
Stereo Enhance
FF, 03, 00, 10, 5A, 6D, FF
Mono Enhance
FF, 03, 00, 10, 5B, 6E, FF
Stereo 5
FF, 03, 00, 10, 5C, 6F, FF
Mono 5 FF, 03, 00, 10, 5D, 70, FF
Cinema
FF, 03, 00, 14, 00, 17, FF
Club
FF, 03, 00, 14, 01, 18, FF
Hall
FF, 03, 00, 14, 02, 19, FF
Arena
FF, 03, 00, 14, 03, 1A, FF
Cathedral
FF, 03, 00, 14, 04, 1B, FF
Quad Reverb
FF, 03, 00, 14, 05, 1C, FF
Direct 7.1 FF, 03, 00, 13, 2D, 43, FF
Downmix Stereo
FF, 03, 00, 10, 30, 43, FF
Downmix Mono
FF, 03, 00, 10, 31, 44, FF
Downmix 3 Channel
FF, 03, 00, 10, 39, 4C, FF
Downmix Phantom
FF, 03, 00, 10, 3A, 4D, FF
Discrete Cinema
FF, 03, 00, 10, 33, 46, FF
Discrete Cinema/THX
FF, 03, 00, 10, 34, 47, FF
Discrete Cinema EX/ES
FF, 03, 00, 10, 35, 48, FF
Discrete Cinema EX/ES/THX FF, 03, 00, 10, 36, 49, FF
DTS Neo:6 Movie
FF, 03, 00, 13, 27, 3D, FF
DTS Neo:6 Movie + THX
FF, 03, 00, 13, 29, 3F, FF
DTS Neo:6 Music
FF, 03, 00, 13, 2B, 41, FF
Dolby Pro Logic IIx Movie FF, 03, 00, 13, 28, 3E, FF
Dolby Pro Logic IIx Movie/THX FF, 03, 00, 13, 2A, 40, FF
Dolby Pro Logic IIx Music
FF, 03, 00, 13, 2C, 42, FF
THX Ultra 2 Movie
FF, 03, 00, 10, 37, 4A, FF
THX Ultra 2 Games
FF, 03, 00, 10, 40, 53, FF
Stores Tones settings for Recall 2 (both Tone Groups A & B)
Stores Tones settings for Recall 3 (both Tone Groups A & B)
Stores Tones settings for Recall 4 (both Tone Groups A & B)
Direct Mode Selection and all Mode Related Commands
Increments through all available modes in current playback mode (2 Ch. or Multi-Ch. Mode)
Decrements through all available modes in current playback mode (2 Ch. or Multi-Ch. Mode)
If THX is not selected & the current mode has +THX option, turns on THX/Changes mode
Goes directly to specific mode for current playback mode as determined in PC Set-Up
Goes directly to Stereo Mode (2 Channel Only)
Goes directly to Mono Mode (2 Channel Only)
Goes directly to 5.1 Bypass Mode (direct via RCA inputs on back of unit)
Goes directly to 7.1 Bypass Mode (direct via RCA inputs on back of unit)
Direct Mode Selection-No Subwoofer (2 Channel Only Mode)
Direct Mode Selection-Sub only if Left/Right Speakers are Small (2 Channel Only Mode)
Direct Mode Selection-Center Channel Only (2 Channel Only Mode)
Direct Mode Selection-Left, Center Right Only (2-Channel Mode)
Direct Mode Selection-No Center Channel (2-Channel Mode)
Direct Mode Selection-No Surround Back Channels (2-Channel Mode)
Direct Mode Selection-Optimized for Movies (2-Channel Mode)
Direct Mode Selection-Optimized for Movies; THX Enhancements added (2-Ch. Mode)
Direct Mode Selection-Optimized for Music (2-Channel Mode)
Direct Mode Selection-Left, Center Right Only (2-Channel Mode)
Direct Mode Selection-No Center Channel (2-Channel Mode)
Direct Mode Selection-The "original" Dolby Processing Mode (2-Channel Mode)
Direct Mode Selection-The "original" Dolby Processing Mode with THX (2-Channel Mode)
Direct Mode Selection-the new standard Dolby mode Pro Logic II Mode (2-Channel
Direct Mode Selection-Optimized for Games (2-Channel Mode)
Direct Mode Selection-Optimized for Music (2-Channel Mode)
Direct Mode Selection-Optimized for Movies (2-Channel Mode)
Direct Mode Selection-Optimized for Movies; THX Enhancements added (2-Ch. Mode)
Direct Mode Selection-with Custom settings from PC Set-up (2-Channel Mode)
Direct Mode Selection-with Custom settings from PC Set-up and THX (2-Channel Mode)
Direct Mode Selection-with Custom settings from PC Set-up (2-Channel Mode)
Direct Mode Selection-with Custom settings from PC Set-up and THX (2-Channel Mode)
Direct Mode Selection-with Custom settings from PC Set-up (2-Channel Mode)
Direct Mode Selection-with Custom settings from PC Set-up and THX (2-Channel Mode)
Direct Mode Selection-Custom AGL Designed ADA mode (2-Channel Mode)
Direct Mode Selection-Custom AGL Designed ADA mode (2-Channel Mode)
Direct Mode Selection-with settings adjustable in PC Set-Up (2-Channel Mode)
Direct Mode Selection-with settings adjustable in PC Set-Up (2-Channel Mode)
Direct Mode Selection (2-Channel Mode)
Direct Mode Selection (2-Channel Mode)
Direct Mode Selection (2-Channel Mode - New for 7.1 HD)
Direct Mode Selection (2-Channel Mode - New for 7.1 HD)
Direct Mode Selection (2-Channel Mode - New for 7.1 HD)
Direct Mode Selection (2-Channel Mode - New for 7.1 HD)
Direct Mode Selection (2-Channel Mode - New for 7.1 HD)
Direct Mode Selection (2-Channel Mode - New for 7.1 HD)
Direct Mode Selection-via Multi Channel Analog RCA inputs (no processing)
Direct Mode Selection-Left and Right channels Only (Multi-Channel Mode)
Direct Mode Selection-Center channel Only (Multi-Channel Mode)
Direct Mode Selection-Left, Right and Center channels only (Multi-Channel Mode)
Direct Mode Selection-No Center Channel (Multi-Channel Mode)
Direct Mode Selection-Plays DVD Default (Dolby/DTS) Mode (Multi-Channel Mode)
Direct Mode Selection-Plays DVD Default (Dolby/DTS) Mode with THX (Multi-Ch. Mode)
Direct Mode Selection-Plays DVD Default (Dolby/DTS) Mode w/EXorES (Multi-Ch. Mode)
Direct Mode Selection-Plays DVD Default (Dolby/DTS) Mode w/ESorES+THX (M-Ch. Mode)
Direct Mode Selection-Optimized for Movies (Multi-Channel Mode)
Direct Mode Selection-Optimized for Movies with THX (Multi-Channel Mode)
Direct Mode Selection-Optimized for Music (Multi-Channel Mode)
Direct Mode Selection-Optimized for Movies (Multi-Channel Mode)
Direct Mode Selection-Optimized for Movies with THX (Multi-Channel Mode)
Direct Mode Selection-Optimized for Music (Multi-Channel Mode)
Direct Mode Selection-THX Ultra Mode Optimized for Movies (Multi-Channel Mode)
Direct Mode Selection-THX Ultra Mode Optimized for Games (Multi-Channel Mode)
Page 49
THX Ultra 2 Music
FF, 03, 00, 10, 38, 4B, FF
Downmix Cinema
FF, 03, 00, 14, 06, 1D, FF
Downmix Club
FF, 03, 00, 14, 07, 1E, FF
Downmix Hall
FF, 03, 00, 14, 08, 1F, FF
Downmix Arena
FF, 03, 00, 14, 09, 20, FF
Downmix Cathedral
FF, 03, 00, 14, 0A, 21, FF
Downmix Quad Reverb
FF, 03, 00, 14, 0B, 22, FF
Stereo Enhance Attn Up
FF, 03, 00, 01, E2, E6, FF
Stereo Enhance Attn Down FF, 03, 00, 01, E3, E7, FF
Stereo Enhance Delay Up FF, 03, 00, 01, E4, E8, FF
Stereo Enhance Delay Down FF, 03, 00, 01, E5, E9, FF
Mono Enhance Attn Up
FF, 03, 00, 01, E6, EA, FF
Mono Enhance Attn Down FF, 03, 00, 01, E7, EB, FF
Mono Enhance Delay Up
FF, 03, 00, 01, E8, EC, FF
Mono Enhance Delay Down FF, 03, 00, 01, E9, ED, FF
Dynamic Range @ Max
FF, 03, 00, 01, 49, 4D, FF
Dynamic Range @ Mid
FF, 03, 00, 01, 4A, 4E, FF
Dynamic Range @ Min
FF, 03, 00, 01, 4B, 4F, FF
Center Width Up FF, 03, 00, 01, F0, F4, FF
Center Width Down
FF, 03, 00, 01, F1, F5, FF
Panorama On
FF, 03, 00, 01, EE, F2, FF
Panorama Off
FF, 03, 00, 01, EF, F3, FF
Dimension Control Up
FF, 03, 00, 01, EC, F0, FF
Dimension Control Down
FF, 03, 00, 01, ED, F1,FF
Surround All Pass
FF, 03, 00, 01, F4, F8, FF
Surround LPF @ 7kHz
FF, 03, 00, 01, F5, F9, FF
Surround HPF + Shelf FF, 03, 00, 01, F6, FA, FF
Surround Delay On
FF, 03, 00, 01, FC, 00, FF
Surround Delay Off
FF, 03, 00, 01, FD, 01, FF
RS Polarity Inverse On
FF, 03, 00, 01, F7, FB, FF
RS Polarity Inverse Off
FF, 03, 00, 01, F8, FC, FF
Matrix Coef 0
FF, 03, 00, 01, F9, FD, FF
Matrix Coef 1
FF, 03, 00, 01, FA, FD,FF
Matrix Coef 2
FF, 03, 00, 01, FB, FD, FF
Auto Balance On
FF, 03, 00, 01, F2, F6, FF
Auto Balance Off
FF, 03, 00, 01, F3, F7, FF
Re-Equalization On
FF, 03, 00, 01, 77, 7B, FF
Re-Equalization Off
FF, 03, 00, 01, 78, 7C, FF
Decorrelation On
FF, 03, 00, 01, 7B, 7F, FF
Decorrelation Off
FF, 03, 00, 01, 7C, 80, FF
Timbre Match On
FF, 03, 00, 01, 79, 7D, FF
Timbre Match Off
FF, 03, 00, 01, 7A, 7E, FF
Command Name
Hex Command
Send Address
FF, 03, 07, 82, 00, 8C, FF
Update All Settings
FF, 03, 00, 00, 0D, 10, FF
Update Turn on Preset/Max FF, 03, 00, 01, DC, E0, FF
Update Input FF, 03, 00, 10, 84, 97 FF
Update Record FF, 03, 00, 10, A4, B7 FF
Update Volume Master
FF, 03, 00, 01, 7F, 83, FF
Update Vol/Mst/Fmt/Mode FF, 03, 00, 01, 81, 85, FF
Update Fmt/Mode/Dyn Rng FF, 03, 00, 01, 80, 84, FF
Update Re-Eq/Tim/Decorr FF, 03, 00, 01, 76, 7A, FF
Update Pro-Logic II Informtn FF, 03, 00, 01, EB, EF, FF
Update Tone Group A FF, 03, 00, 01, A2, A6, FF
Update Tone Groups B
FF, 03, 00, 01, B3, B7, FF
Update Speaker Size FF, 03, 00, 01, 88, 84, FF
Update Balance
FF, 03, 00, 01, 82, 86, FF
Update Delays
FF, 03, 00, 01, 83, 87, FF
Update ASA
FF, 03, 00, 01, 4E, 52, FF
Version Request FF, 03, 00, 00, 0E, 11, FF
Installer Default Store
FF, 03, 00, 13, 81, 97, FF
Installer Default Recall
FF, 03, 00, 13, 80, 96, FF
Factory Default Recall
FF, 03, 00, 10, FC, 0F, FF
Page 50
Direct Mode Selection-THX Ultra Mode Optimized for Music (Multi-Channel Mode)
Direct Mode Selection (Multi-Channel Mode - New for 7.1 HD)
Direct Mode Selection (Multi-Channel Mode - New for 7.1 HD)
Direct Mode Selection (Multi-Channel Mode - New for 7.1 HD)
Direct Mode Selection (Multi-Channel Mode - New for 7.1 HD)
Direct Mode Selection (Multi-Channel Mode - New for 7.1 HD)
Direct Mode Selection (Multi-Channel Mode - New for 7.1 HD)
Increments Gain for Stereo Enhance Mode
Decrements Gain for Stereo Enhance Mode
Increments Delay for Stereo Enhance Mode
Decrements Delay for Stereo Enhance Mode
Increments Gain for Mono Enhance Mode
Decrements Gain for Mono Enhance Mode
Increments Delay for Mono Enhance Mode
Decrements Delay for Mono Enhance Mode
Sets Dynamic Range at Maximum for non THX modes only
Sets Dynamic Range at the Middle for non THX modes only
Sets Dynamic Range at Minimum for non THX modes only
Increments Center channel width for Pro Logic II Music and Custom Modes Only
Decrements Center channel width for Pro Logic II Music and Custom Modes Only
Turns on Panorama enhancement for Pro Logic II Music and Custom Modes Only
Turns off Panorama enhancement for Pro Logic II Music and Custom Modes Only
Increments Dimension Control for Pro Logic II Music and Custom Modes Only
Decrements Dimension Control for Pro Logic II Music and Custom Modes Only
Sets Frequency Pass Filter for Surrounds for Pro Logic II Music and Custom Modes Only
Sets Frequency Pass Filter for Surrounds for Pro Logic II Music and Custom Modes Only
Sets Frequency Pass Filter for Surrounds for Pro Logic II Music and Custom Modes Only
Turns on surround delay for Pro Logic II Music and Custom Modes Only
Turns off surround delay for Pro Logic II Music and Custom Modes Only
Turns on RS Polarity Inverse for Pro Logic II Music and Custom Modes Only
Turns off RS Polarity Inverse for Pro Logic II Music and Custom Modes Only
Sets Matrix Coefficient at 0 for Pro Logic II Music and Custom Modes Only
Sets Matrix Coefficient at 1 for Pro Logic II Music and Custom Modes Only
Sets Matrix Coefficient at 2 for Pro Logic II Music and Custom Modes Only
Turns on Auto Balance for Pro Logic II Music and Custom Modes Only
Turns off Auto Balance for Pro Logic II Music and Custom Modes Only
Turns Re-Equalization On (for Non THX Modes Only)
Turns Re-Equalization Off (for Non THX Modes Only)
Turns Decorrelation On (for Non THX Modes Only)
Turns Decorrelation Off (for Non THX Modes Only)
Turns Timbre Match On (for Non THX Modes Only)
Turns Timbre Match Off (for Non THX Modes Only)
System and Specific Information Update Commands
Sends the selected unit address from the PCOS Program to the unit
Requests an update of all possible settings in the unit
Requests an update of the current Turn On Input Pre-set and Maximum Volume setting
Requests an update of the currently selected input
Requests an update of the currently selected record input
Requests an update of current master volume setting (in dB)
Requests an update of the current master volume, decoding format and playback mode
Requests an update of the current decoding format, playback mode & dynamic range setting
Requests an update of the current Re-EQ, Timbre Match and Decorrelation settings
Requests an update of all Pro Logic II information (only if in Pro Logic II mode)
Requests an update of all current Tone Group A Settings
Requests an update of all current Tone Group B Settings
Requests an update of all current Speaker size settings
Requests an update of all current speaker balance settings
Requests an update of all current speaker delay settings
Requests an update of all current Boundary Gain settings
Requests an update of all current revs for the unit and chips
Stores all changes/set-ups/settings as the Installer Default
Recalls all changes/set-ups/settings as stored above as the Installer Default
Returns all settings/set-ups to the ADA out of box default recalls
PEQ
PEQ
PEQ
PEQ
PEQ
PEQ
PEQ
PEQ
PEQ
PEQ
PEQ
Dolby Volume
Dolby Volume Dolby Volume Dolby Volume Dolby Volume Dolby Volume Dolby Volume Dolby Volume Dolby Volume Dolby Volume Dolby Volume Dolby Volume Dolby Volume Dolby Volume Dolby Volume Dolby Volume Dolby Volume Dolby Volume Dolby Volume Dolby Volume Dolby Volume Dolby Volume Dolby Volume Dolby Volume Dolby Volume Dolby Volume Dolby Volume Dolby Volume Dolby Volume Dolby Volume Dolby Volume Dolby Volume Dolby Volume Dolby Volume Dolby Volume Dolby Volume Dolby Volume Dolby Volume Dolby Volume Dolby Volume Dolby Volume Dolby Volume TEQ ON Sequence
TEQ
TEQ
TEQ
TEQ
TEQ
TEQ
TEQ
TEQ
TEQ
TEQ
TEQ
TEQ
TEQ
FF, 03, 00, 15, 40, 58, FF Turns on the Parametric Equalizer Function
FF, 03, 00, 15, 41, 59, FF Turns off the Parametric Equalizer Function
FF, 03, 00, 15, 43, 5B, FF Requests the current status of the Parametric Equalizer Function
FF, 03, 00, 15, 4C, 64, FF Stores the current PEQ Setting as Preset 1
FF, 03, 00, 15, 48, 60, FF Recalls the current PEQ Setting for Preset 1
FF, 03, 00, 15, 4D, 65, FF Stores the current PEQ Setting as Preset 2
FF, 03, 00, 15, 49, 61, FF Recalls the current PEQ Setting for Preset 2
FF, 03, 00, 15, 4E, 66, FF Stores the current PEQ Setting as Preset 3
FF, 03, 00, 15, 4A, 62, FF Recalls the current PEQ Setting for Preset 3
FF, 03, 00, 15, 4F, 67, FF Stores the current PEQ Setting as Preset 4
FF, 03, 00, 15, 4B, 63, FF Recalls the current PEQ Setting for Preset 4
FF 03 00 19 10 2C FF Updates Cgain Level
FF 03 00 19 11 2D FF decrement cgain cinema
FF 03 00 19 12 2E FF increment cgain cinema
FF 03 00 19 20 3C FF get cgain Music
FF 03 00 19 21 3D FF decrement cgain Music
FF 03 00 19 22 3E FF increment cgain Music
FF 03 00 20 01 24 FF
enable Dolby volume
FF 03 00 20 02 25 FF disable Dolby volume
FF 03 00 20 03 26 FF enable Dolby modeler
FF 03 00 20 04 27 FF disable Dolby modeler
FF 03 00 20 05 28 FF enable Dolby half mode
FF 03 00 20 06 29 FF disable Dolby half mode
FF 03 00 20 07 2A FF enable Dolby cinema reference mode
FF 03 00 20 08 2B FF disable Dolby cinema reference mode
FF 03 00 20 10 33 FF
increment Dolby Calibration level
FF 03 00 20 11 34 FF decrement Dolby Calibration level
FF 03 00 20 12 35 FF increment Dolby Leveler
FF 03 00 20 13 36 FF decrement Dolby Leveler
FF 03 00 20 20 43 FF
Store Dolby Volume Preset 1
FF 03 00 20 21 44 FF
Store Dolby Volume Preset 2
FF 03 00 20 22 45 FF
Store Dolby Volume Preset 3
FF 03 00 20 23 46 FF
Store Dolby Volume Preset 4
FF 03 00 20 30 53 FF Recall Dolby Volume Preset 1
FF 03 00 20 31 54 FF Recall Dolby Volume Preset 2
FF 03 00 20 32 55 FF
Recall Dolby Volume Preset 3
FF 03 00 20 33 56 FF Recall Dolby Volume Preset 4
FF 03 00 20 40 63 FF Dolby Leveler Off
FF 03 00 20 41 64 FF Dolby Leveler Low
FF 03 00 20 42 65 FF Dolby Leveler Med
FF 03 00 20 43 66 FF Dolby Leveler High
FF 03 00 20 80 A3 FF Dolby Volume Update
FF 03 00 20 df 02 FF Set Dolby Leveler to 0
FF 03 00 20 e0 03 FF Set Dolby Leveler to 1
FF 03 00 20 e1 04 FF Set Dolby Leveler to 2
FF 03 00 20 e2 05 FF Set Dolby Leveler to 3
FF 03 00 20 e3 06 FF Set Dolby Leveler to 4
FF 03 00 20 e4 07 FF Set Dolby Leveler to 5
FF 03 00 20 e5 08 FF Set Dolby Leveler to 6
FF 03 00 20 e6 09 FF Set Dolby Leveler to 7
FF 03 00 20 e7 0A FF Set Dolby Leveler to 8
FF 03 00 20 e8 0B FF Set Dolby Leveler to 9
FF 03 00 20 e9 0C FF Set Dolby Leveler to 10
FF 03 00 21 0B 2F FF , FF 03 00 21 63 87 FF , FF 03 00 21 02 26 FF , FF 03 00 21 3d 61 FF FF 03 00 22 30 55 FF
TEQ Volume 0.0dB
FF 03 00 22 31 56 FF
TEQ Volume -0.5dB
FF 03 00 22 32 57 FF
TEQ Volume -1.0dB
FF 03 00 22 33 58 FF
TEQ Volume -1.5dB
FF 03 00 22 34 59 FF
TEQ Volume -2.0dB
FF 03 00 22 35 5A FF
TEQ Volume -2.5dB
FF 03 00 22 36 5B FF
TEQ Volume -3.0dB
FF 03 00 22 37 5C FF
TEQ Volume -3.5dB
FF 03 00 22 38 5D FF
TEQ Volume -4.0dB
FF 03 00 22 39 5E FF
TEQ Volume -4.5dB
FF 03 00 22 3A 5F FF
TEQ Volume -5.0dB
FF 03 00 22 3E 63 FF
TEQ Off
FF 03 00 22 3F 64 FF
TEQ Update
Page 51