1
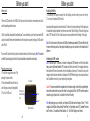
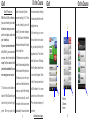
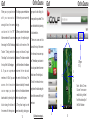
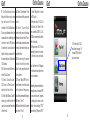
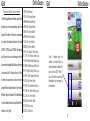
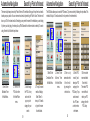
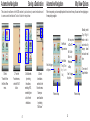
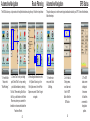
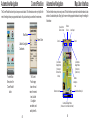
Welcome
Congratulations on your purchase of the EXPRESSO AG50s. From freeway to fairway to family,
the Expresso AG50S has something for everybody in your household. This manual was created to quickly
guide you through the many functionalities of your device and to assist you with the initial setup thereof.
Please take a few minutes to read through the manual, after which you may begin using your AG50s and
enjoying its many features.
Also, please visit us on the web at www.expressogps.com to register your device and for support help.
Thank you for choosing Expresso. Toll free phone # 1-866-691-1350
*Note: Outside of North America, please check www.expressogps.com for a tollfree support phone
number or email [email protected].
All rights reserved. Except as expressly provided herein, no part of this manual may be reproduced,
copied, transmitted, disseminated, downloaded, or stored in any storage medium, for any purpose
without the express prior written consent of Expresso Satellite Navigation, INC.
Information in this document is subject to change without notice. Expresso reserves the right
to change or improve its products and to make changes in the content without obligation to notify
any person or organization of such changes or improvements. Visit www.expressogps.com for current
updates and supplemental information concerning the use and operations of this and other Expresso
Satellite Navigation, INC. products.
November 2011
i
Trademarks
Trademarks
All brands and trademarks mentioned in this document are possibly registered by third parties and
GPS is based on satellites that orbit the Earth and are constantly transmitting their position. The GPS
receiver uses this data and calculates its own geographical position based on the information transmitted
by the various satellites. For a precise positioning it is necessary to obtain the data from at least three
satellites. With the data from four or more satellites the altitude above sea level can also be ascertained.
The determination has an accuracy of approximately three yards. Once the navigation device
has determined your position, it can be used as a starting point for route calculation. The map data on your
navigation device includes the geographical coordinates of all digitally recorded Points Of Interest (POIs),
streets, and places. This enables the device to calculate a route between a starting point and a destination.
The calcualtion of the current position and its representation on the map takes place once every second, so
your current position is always shown on the map. If GPS reception is impaired, navigation is interrupted,
but the navigation software remains active. As soon as GPS reception is restored, the navigation system
calculates any change of position which has occured in the meantime, and navigation continues.
are subject to the current legislation and to the rights of their respective owners without reservation.
All mentioned names of products, societies, or brands may be registered trademarks of their respective
owners. Every right that is not explicitly accorded is reserved.
The absence of the explicit labeling of registered trademarks used in this manual does not imply that the
brand is not subject to the rights of a third party.
Microsoft Windows and Excel are trademarks of the Microsoft Corporation.
Navevo is a registered trademark of Navevo, INC.
NAVTEQ is a registered trademark of NAVTEQ.
iGolf is a registered trademark of L1 Technologies INC.
Mobile HD is a registered trademark of Expresso Satellite Navigation INC.
3X tech is a registered trademark of Expresso Satellite Navigation INC.
Caution! The United States government operates the Global Positioning System (GPS) and is solely
responsible for its accuracy and maintenance. Changes by the United States government may
affect the accuracy and performance of all GPS equipment, including your personal navigation
device.
Caution! Ordinance or laws may restrict use of certain abilities of your navigation device on public or
private land.
Tech Express is a registered trademark of Expresso Satellite Navigation INC.
ii
iii
Safety Information
Safety Information
Please read the following notices and safety information carefully before starting to use your navigation system.
energy. Keep the device at least four inches from a pacemaker to avoid radio waves.
Caution! In an aircraft, turn off your mobile device whenever instructed to do so by airline staff.
Caution! When installing the Expresso AG50s, ensure that it does not represent a risk in the event of an
accident.
Caution! Do not run cables directly next to safety-relevant devices and power supplies.
Caution! After installation, check all safety-related equipment in the car.
Caution! Connect the car charger cable to cigarette lighters with an operating voltage of 12V only.
Caution! Do not attach the Expresso AG50s in a location that would interfere with airbag deployment
Caution! To prevent accidents, do not operate the navigation system while driving.
Caution! Do not look at the display unless it is absolutely safe to do so.
Caution! Traffic regulations have priority over any instructions from the navigation system.
Caution! Follow the instructions of the navigation system only when road conditions and traffic regulations
allow you to safely do so! The navigation system will guide you to your destination even if you deviate from
the calculated route.
Caution! Check that the cradle is secured and adjusted properly before each use of the navigation device.
Caution! Protect the device from moisture. The device is water resistant NOT waterproof, and is not
protected against water damage.
Caution! Unplug the navigation device’s power supply when you park the vehicle. The navigation device
requires power in standby mode, and can drain the vehicles battery.
Caution! Do not open the navigation device’s casing under any circumstances.
Caution! Do not expose the navigation device to extreme heat or cold. This may damage the device or
impair its function.
Caution! Use only the provided chargers or one that has been approved by the manufacturer.
Caution! Connect the charger to a suitable power supply. Voltage requirements are provided on the device
case and/or the packaging.
Caution! Turn off your device in any location where posted notices instruct you to do so. These locations
include hospitals or health care facilities that may be using equipment that is sensitive to external RF
iv
Note:
Note:
Note:
Note:
Note:
Note:
Ensure that there are no kinks in the cable and that it will not be damaged by any sharp objects.
Clean the navigation device using a moist cloth only.
Do not unplug by pulling on the cable. Doing so could damage the cable!
Create a backup of the data contained on the internal memory of the device.
The memory card must remain inserted in the device during operation of the navigation system.
Use SD-memory cards only! Ensure that memory card contacts are clean and undamaged.
Multimedia disclaimer
Multimedia should not and cannot be activated during navigation mode. Do not use multimedia functions
while operating a vehicle.
Avoiding theft
To avoid theft, remove the Expresso AG50s and mount from sight when not in use. If using with a windshield
mount, remove the residue left on the windshield by the suction cup.
v
Legal Notices
Before you start
NOTICE TO DRIVERS IN CALIFORNIA AND MINNESOTA
Caution! Please be sure to read, understand, and follow the safety information in “Safety Information” on
page iv.
State law prohibits drivers in California and Minnesota from using mounts on their windshields while
Charging the battery
When purchased, the rechargeable battery might not be fully charged. We recommend that you fully charge
the battery before using the device for the first time.
operating motor vehicles. EXPRESSO SATELLITE NAVIGATION INC does not take any responsibility for
any fines, penalties, or damages that may be incurred as a result of disregarding this notice. (See California
Vehicle Code Section 26708(a); Minnesota Statutes 2005, Section 169.71)
GPS
Underwriters Laboratories Inc. (“UL”) has not tested the performance or reliability of the Global Positioning
System (“GPS”) hardware, operating software, or other aspects of this product. UL has only tested
for fire, shock, or casualty hazards as outlined in UL’s Standard(s) for Safety (UL 60950-1, cUL 991).
UL Certification does not cover the performance or reliability of the GPS hardware and GPS operating
software. UL MAKES NO REPRESENTATIONS, WARRANTIES, OR CERTIFICATIONS WHATSOEVER
REGARDING THE PERFORMANCE OR RELIABILITY OF ANY GPS RELATED FUNCTIONS OF THIS
PRODUCT.
vi
To charge the battery, do one of the following:
-Connect the USB cable to the device and your computer (Note: The device will stop charging if the
computer enters sleep mode or powers down).
-Connect the 12 volt car charger cable to the device and into your cigarette lighter socket.
The Battery Status icon indicates the battery charge.
-The green highlight indicates the strength of the charge left in your
device.
-If no green highlights are seen, your battery is dead and needs to
be recharged.
-If all levels are highlighted in green (as shown), then your battery is
fully charged.
Note: It takes approximately 6 hours to charge the device when the battery is dead. A fully charged battery
provides up to 7-10 hours of GPS use, and much more in some Media functions.
vii
Memory cards
Before you start
Before you start
-There are 2 SD card slots in the AG50s. Slot A has can be used to store an extra memory card, and is
used for updating automotive maps.
-Slot B is specifically designated for multimedia use. To use multimedia, you will need to use another SD
card (not included). Please see multimedia section for instructions on properly setting up the SD card for
use in Slot B.
To insert an SD card in either slot, press the card into the device until it locks into place. (Note: The contacts
on the SD card should go into the slot first, and should face in toward the circuit board).
Removing a memory card
1. Switch the navigation device off by
pressing the power button.
2. Press the desired SD card into the slot,
and it will pop out enough to be grabbed.
3. Pull out the SD card.
Top of device
Pull back cover
to reveal SD card
slots.
Slot A
Slot B
Dual SD card slots
viii
Acquiring Satellites
1. Go outdoors to an open area away from tall buildings and trees where you can see the sky.
2. Turn on your Expresso AG50s device.
Acquiring satellite signals can take a few minutes. To check on the status and strength of the signal, open
the automotive navigation software, from the main menu select “Tools & Settings,” then scroll through and
select “GPS” from the list. There it will show you how many satellites and the strength of the signal.
Note: Due to the location of the antenna, the AG50s will perform approximately 30% more efficiently with
the screen in the open position. Once signal is obtained you may use your device in the closed position if
preferred.
Initializing the GPS receiver
Note: It can take up to 10 minutes to initialize the integrated GPS receiver for the first time. Each
time you turn on the device thereafter, GPS reception starts within one minute. If the navigation device has
been switched off for more than a week, the next initialization can take up to 10 minutes. As soon as the
navigation device has been switched on, initialization of the GPS Receiver begins. As soon as data from at
least 3 satellites is received, you are ready to begin navigation.
Caution! If you have connected the navigation device to the power supply via the vehicle’s cigarette lighter,
remove the connector befor you leave the vehicle for a long period of time. The GPS receiver requires a
constant supply of power and it could drain the vehicle’s battery.
Note: Depending upon your continent, your Expresso AG50s will come with maps of either 1. The 48
contiguous United States, Alaska, Hawaii, Puerto Rico, the Virgin Islands, and all 13 Canadian Provinces
and Territories, 2. Australia and New Zealand, or 3. The United Kingdom and Ireland.
ix
Table of Contents
Getting Started.....................................................1-6 Using Automotive Navigation
(continued)
Device Overview..................................................1
Entering a Destination.........................................38
Mounting Options.................................................2
Search by Point of Interest (POI)........................39
Main Menu...........................................................4
Saving a Destination...........................................41
Tools & Settings...................................................5
Map View Options...............................................42
Resetting the AG50s............................................6
Route Planning....................................................43
GPS Status..........................................................44
iGolf.....................................................................7-34
Current Position...................................................45
On the Course.................................................9-18
Map User Interface..............................................46
Play Golf Now..................................................9
Tools & Settings...................................................47
iGolf Features.................................................11
Troubleshooting Guide (Automotive)...................48
Hazard Abbreviations.....................................17
On the web....................................................19-24 Multimedia Features.........................................51-55
Join iGolf.com................................................19
Overview..............................................................51
Syncing with iGolf..........................................21
Music Player........................................................52
Premium Option.............................................23
Video Player........................................................53
Troubleshooting Guide (iGolf)........................25-33
Photo Viewer.......................................................54
Customer Service and Tech Support Contact.....34
Troubleshooting Guide (Media)...........................55
Using Automotive Navigation..........................35-50 Appendix................................................................56
Main Menu..........................................................37
Software Specifications & Liscensing..................56
x
xi
Getting Started: Device Overview
Screen Release
Button
Stability Wing
Front
Left Side
Stability Wing
Release Button
Right Side
Power
Button
USB
Input
Volume
Controls
Head
Phone
Jack
Speakers
Fully Extended
Front View
Stability Wing
Release Button
Stability Wing
Built-in
Antenna
USB Input
Head Phone
Jack
Right
Speaker
Reset Button
USB Input
Head Phone
Jack
Stability
Wing
Stability Wing
Right Speaker
1
The AG50s’ cup holder mode (Figure 2) works
great in golf carts and in some motor vehicles.
The dash mount function (Figure 1) allows you to
set the device directly onto your cars dash, leaving
your field of view open. The AG50s has 4 rubber
foot grips that keep the device from sliding.
Note: You may use a stylus, pencil eraser, or golf tee to touch the
screen. It even works while wearing gloves. If using said objects, be
careful not to scratch the screen.
Note: Included in the box is a dash-mount pad that allows for greater
stability.
Fully Extended
Side View
Built-in
Antenna
Getting Started: Mounting Options
Expresso’s AG50s has 4 different mounting functions. The below mounting options are legal in all 50 states,
because they do not obstruct your field of view. In dash mount mode and cup holder mode you acquire
satellites faster on initial start up.
Cup holder
Stability
Wings
Top of Device
Dual SD card slots
Slot A and Slot B
Note: Slot A is for storage of and
extra SD card only. Media files are
read from Slot B.
Figure 1
Figure 2
2
12 oz. can
Back
Getting Started: Mounting Options
Getting Started: Main Menu
1.
An optional windshield mount is available for
purchase at www.expressogps.com.
The media player stand allows you to easily watch
videos on table tops or on airplane trays.
Caution: In some states, an improperly mounted windshield mount
is considered illegal.
Caution: Multimedia cannot be activated during navigation mode.
Movies should never be viewed by the driver while operating any
vehicle.
2.
1.
3.
4.
5.
6.
7.
8.
9.
3.
Landscape Mode
(Closed Position)
4.
7.
1. Clock
2. Battery Status (See page vii)
3. Select to access iGolf Rangefinder
4. Select to access Automotive Navigation
5. Select to access Photo Viewer
6. Select to access Video Player
7. Select to access Music Player
8. Select to access Settings Menu
9. Select to access Tools Menu
3
2.
Portrait Mode
(Open Postition)
Note: You cannot access Photo Viewer, Video Player,
Settings Menu, or Tools Menu while in Portrait Mode.
4
Getting Started: Tools & Settings
Screen Brightness adjusts how bright or dim the screen is
on your AG50s.
Screen Calibration helps improve the accuracy of the
touch screen by calibrating it. It is recommended that
you calibrate your screen at least twice per year.
Getting Started: Resetting the AG50s
Occasionally, it may be necessary to reset (reboot) your device. In fact, in the times that you may be
experiencing trouble with your device, a reset is the first troubleshooting step recommended. It is quick
and easy to do, simply follow the process as outlined below:
Selection Tone allows you to mute the tone that plays
when you select buttons on your AG50s.
Exit to Main Menu.
Set Date allows you to set the date.
Set time allows you to set the time and toggle Daylight
Savings on or off.
Set time allows you to set the time and toggle Daylight
Savings on or off.
Reset Button
To reset the AG50s, Flip the screen up into the open position. Open
the cupholder stability wing on the inside of the device, and locate
the reset button that lies beneath it. It is a small pinhole with the word
“Reset” next to it. In order to access the reset button, you will need
something to push it with. A paperclip with a small enough diameter
to fit the pinhole works perfectly. A toothpick will also work; however, if
you use a toothpick, be careful not to push so hard as to break it inside
the pinhole. When you push the reset button, you will feel it click. Once
you feel it click, hold it in for a couple of seconds. This will power the
device down and reset the module to zero. At this point, you can power
the device back on.
Exit to Main Menu.
5
6
®
w w w . i g o l f . c o m
H o m e t o t h e world’s largest G P S e n a b l e d
g o l f c o u r s e database, iGolf ’s software is loaded
with tools and f e a t u r e s t o a s s i s t
7
with improving
your game.
y o u
On the Course
iGolf
P la y G ol f N ow
The AG50s is preloaded
with GPS data for over
18,000 golf courses,
and is ready to use
immediately on any
mapped golf course.
1. Proceed outside, away from
t a l l buildings an d tree s fo r a
clear view of GPS satellites.
2. With the device powered on,
select iGolf from the main
menu. For better reception,
flip the screen up into the
open position. Once signal
is acquired, you may close
the screen.
3. Check for GPS signal. In the
upper right-hand corner of the
screen, find the “T” shaped
icon. 2 or more green bars
with the “T” icon indicates
good s ignal.
4. Once the signal has been
confirmed, select “Play Golf.”
The AG50s will then search
for courses based upon your
position, and the courses
nearest to your location will
b e d i s p l a y e d a u t o m a t i c a l l y.
5. Select your course from the
l i s t . Yo u m a y s c r o l l t h r o u g h
the list for more results
by sliding your finger across
the screen from the bottom to
the top.
6 . S e l e c t y o u r Te e b o x .
7. The AG50s will show you
9
the first hole of the course
by default. If you are doing
a shotgun start, you can
manually switch holes by
sliding your finger across the
golf green. Slide from
right-to-left to advance to
the next hole, or slide from
left-to-right to return to
the previous hole. If Auto
Advance is enabled, the
AG50s will automatically
advance to the next hole
when you arrive at the
teeboxes. Auto Advance
can be turned on or off
from the main iGolf menu by
selecting “Settings” then
selecting “Device Settings.”
On the Course
iGolf
7.
3.
2.
4.
Slide your finger across the
green to change holes. Rightto-left for next hole. Left-to-right
for the previous hole.
10
On the Course
iGolf
iGolf Features
With the iGolf software,
you can track your shot
distances, keep your score,
and track your putts and
yo ur h an d i ca p.
If you are a premium member
with iGolf, you can also
access the interactive
maps for the courses that
you have downloaded. You can
even map your own course!
1. To track your shot distance,
button, it sets point A (where
to the score screen by selecting
you are standing) to “0.” Once
the button along the bottom with
you are standing by your ball
the golf green icon.
(point B), the number showing in
3. After entering your score
the “Shot Distance” field reflects
the distance from point A to point
B in a straight line.
2. To keep score on your device,
select the button along the bottom
of the screen with the pencil icon.
This allows you to enter your
score for each individual hole as
2.
for the last hole on the course,
save your data by utilizing the
navigational icons. First, select
the blue “back” arrow. This brings
1.
up the Play Menu. Select the red
“x” icon to exit the game. Select
the red “x” icon once more to exit
well as your putts. After entering
the iGolf software. Your score
your score and putts, you will
is saved into a folder named
button directly below the golf
be returned to the score screen
“SP” on the internal memory of
green. When you press this
automatically. You can also return
11
the device.
locate the “Shot Distance” target
On the Course
iGolf
(Continued on next page)...
2.
3.
3.
Return to
Distances
Screen
12
3.
On the Course
iGolf
When you sync your device
This brings up an overhead view
finger upon it and sliding it to
with your account at
of the hole you are currently
the new position you desire. This
w w w. i g o l f . c o m , t h e s c o r e s
play ing.
allows for detailed shot planning
contained in the “SP”
5. When you have the interactive
and club selection.
folder are cleared. You can view
map open, the yellow target
them using the “iGolf Handicap
defaults to the center of the
7. There are zoom controls
Tr a c k e r. ” S i m p l y s e l e c t t h e
fairway and shows 2 equal
“Handicap” button located at
distances. The distance notated
the top of the iGolf webpage.
by the first red line is the distance
4. If you are a premium
between the tee box and
member with iGolf, you can
the center of the fairway. The
access the interactive
distance notated by the second
course maps you have
red line is the distance between
downloaded by selecting the
the tee box and the green.
button along the bottom of
6. The yellow target can be
the screen with the map icon.
moved around by placing your
13
On the Course
iGolf
7.
located at the top of the screen
in the interactive course map
view. These allow you to zoom in
3. (Pages
11-13)
and out as you desire for a more
optimal view of the hole layout.
5.
&
6.
5.
8. To exit the interactive view,
simply select the button along the
bottom of the screen with the golf
green icon.
(Continued on next page)...
8.
4.
14
Note: Select Demo
Course from course
results list to get a feel
for the functionality of
the iGolf software
On the Course
iGolf
9. The iGolf software has a
feature that allows you to map
your own course if it is not
included in the iGolf database.
To do so you will need to be at the
course and have satellite signal
in order to record GPS points
for each hole. It would also be
helpful to keep a scorecard for
the course with you. Follow steps
10-23 below.
10. From the main iGolf menu,
select “Map Course.”
11 . S e l e c t “ C r e a t e C o u r s e . ”
12. Select a “New Course”
nu m ber slot from th e list.
13. In the “Spell State or Country”
screen, type in the first letter of
your state or province then select
it from the list.
14. Select “Course Name,” then
enter the name of the course and
save it.
15. Select “Course Data”
and enter the par and handicap
information for each hole. This is
where having a scorecard comes
in handy. Save each hole as you
complete them.
16. After entering the course
dat a f or t he las t hole, s ele c t
“Save” on the page that lists the
hole numbers.
17. Select “Map GPS Points.”
You will need to be at the course
for this portion of the process.
You will also need satellite signal.
18. Select “Hole 1.”
19. Stand at the front of the green
and select “Front.”
15
On the Course
iGolf
20. Select “Register” to record
the GPS point.
21. Repeat steps 19 & 20 for
the “Center” and “Back” of the
green, as well as CSTM 1, 2, & 3.
(CSTM are custom points which
refer to hazards).
22. Repeat steps 18-21 for all
remaining holes on the course.
23. Be sure to save your data.
9. Follow steps 10-23
as outlined on page 15
to map GPS points for
your own course.
That’s all there is to it!. Mapping
an entire course may take a few
hours to complete.
Alternately, premium members at
www.igolf.com can request GPS
for courses that aren’t mapped
by pulling up the course on the
website, then selecting “GPS,”
then selecting “Request GPS.”
16
On the Course
iGolf
H a z a r d
A b b r e v i a t i o n s
1. EOF- End of Fairway
2. LFB- Left Fairway Bunker
3. MFB- Middle Fairway Bunker
4. RFB- Right Fairway Bunker
5. RGB- Front Green Bunker
6. RGB- Right Green Bunker
7. LGB- Left Green Bunker
8. BGB- Back Green Bunker
9. LFW- Left Fairway Water Layup
10. LFWC- Left Fairway Water Carry
11. MFW- Middle Fairway Water Layup
12. MFWC- Middle Fairway Water Carry
13. RFW- Right Fairway Water Layup
14. RFWC- Right Fairway Water Carry
15. RGW- Right Green Water
16. FGWC- Front Green Water Carry
17. FGW- Front Green Water Layup
18. LGW- Left Green Water
19. BGW- Back Green Water
20. CRK- Creek Layup
21. CRKC- Creek Carry
The iGolf application will show up to three
hazards at a time, depending upon the
layout of the hole. If there are no hazards
on a hole, the hazard callouts will read
CSTM1, CSTM2, and CSTM3, indicating
that those slots are custom points that
have interchangable definitions that are
customized to fit that particular hole.
If there are hazards on a hole, there are
many different abbreviations that reflect
different types of hazards. The definitions
for these abbreviations are outlined in the
se c ti o n to t he r ight.
17
On the Course
iGolf
These 3 windows show the
distances to hazards. When no
hazard information is available, the
boxes will read CSTM. Page 17
has a full list of the various hazard
abbreviations that may appear in
these windows.
18
On the Web
iGolf
Join iGolf.com
This will be your username
located by flipping the screen into
Within 45 days of using
when logging in.
the “Open” position and finding
the iGolf application for the
4. Create a password. This can
the barcode sticker containing the
first time, you must register
be anything you want it to be,
the device for free at iGolf.com.
as long as it is easy for you to
full serial #.
A premium membership option
remember. You will also need to
is also available, providing
confirm your password.
access to interactive course
5. Select your brand. In this case
maps with distance to any point
it will be Expresso.
on the hole for detailed shot
6. Select your product. In this
planning.
case it will be the AG50s.
7. Membership field will set
On the Web
iGolf
9. Select the “Join Now” button.
10. You will be given the option to
upgrade. If you know you would
4.
like the premium membership,
you can upgrade immediately.
5.
Otherwise, select “No Thanks” to
6.
sign up for the free membership.
1. Go to www.igolf.com
automatically to “Register.”
You can always upgrade later if
2. Select “Join Now” to begin the
8. Enter your product I.D. This
you choose to do so.
registration process.
will be the serial # on your device
11. Complete the information
3. E nter you r ema il ad dre s s .
beginning AG50S. It can be
19
fields and select “Save.”
2.
3.
7.
8.
9.
20
On the Web
iGolf
Syncing with iGolf
computer using the USB cable
available updates to the iGolf
Yo u w i l l n e e d t o s y n c y o u r
provided with your accessories.
software, or to sync any scores to
device with iGolf.com. Doing
3. Make sure your device is
the handicap tracker.
so will eliminate the 45 day
powered on.
countdown to register with
4. Select the “Sync Device” button
*Note: The iGolf website uses
iGolf. This will also update the
on the left hand portion of your
a Javascript application in order
preloaded courses and sync
profile page.
to sync information between the
saved scores to ensure that
5. On the initial sync of the device
website and the device. You will
all GPS data on your device is
you will receive a large course
need to have a current version of
updated.
update, indicated by a status bar
Java installed on your computer.
and message reading “Updating
Java is available for download
1. Once logged into iGolf.com,
courses. Do not Disconnect. This
a t w w w. j a v a . c o m . F o r m o r e
select the “My Profile” link to
may take several minutes.”
information, please see item 1c.
navigate to your profile page.
6. It is advisable to sync your
on page 26 (iGolf troubleshooting
2. Connect your device to your
device often to receive any
21
guide).
On the Web
iGolf
4.
22
On the Web
iGolf
Premium Option
iGolf offers a premium
membership that allows
users to download interactive
course maps for the courses
of their choosing. The
12-month membership is
$34.99 (may be subject to
change), and includes 50
GPS credits, each of which
is good for downloading the
interactive map for 1 course.
iGolf premium maps do not
expire, and course maps can
be re-downloaded.
downloading interactive
4. Find your course on the list of
course maps is quick and easy.
results and click one time on
Start by l o g g i n g i n t o y o u r
the name.
for golf course gps files” box.
Repeat steps 2-5 for any
1. If you have opted for
the premium membership,
Type in the name of a course
additional courses you wish to
in the bar and select “Search.”
23
download.
account at
www.igolf.com. Make sure that
your device is connected to your
5. Select the large green
“Download GPS & Scorecard”
computer with the provided USB
button. This will download the
cable and it is powered on.
interactive map for the selected
2. At the top of the page,
golf course directly onto the
select the link that is titled
internal memory of your device.
“ G PS Cour s es . ”
3. In the bottom right-hand
portion of the page you will
see a search bar in the “Search
On the Web
iGolf
2.
3.
That’s all there is to it!
5.
24
iGolf
Troubleshooting Guide
Cause(s) & Solution(s)
Issue
1. Trouble syncing with iGolf. Please refer to
answers 1a.-1d. in Cause(s) & Solution(s) section.
1a. Computer may not be recognizing the device.
Make sure the device is connected to the computer
with the provided USB cable. Make sure the device
is powered on.
*Note: if the provided solutions do not resolve the
problem, contact either iGolf at 858-880-0267 or
Expresso Satellite Navigation at 1-866-691-1350.
In Europe or Australia, visit www.expressogps.com
or email [email protected].
Windows Users: On your computer, go to your
start menu, then select either “Computer” or “My
Computer” depending on your version of Windows.
Next, under “Devices with Removable Storage,”
there should be a “Removable Disk” listed. If it is not
there, try plugging in to a different USB port on your
computer. If it is there, double click on it to open
it and view the files within. You should see 4
folders (Fairway, Flag, SP, & Tree). If you see this,
move on to answer 1b.
Mac Users: Open Finder and check for removable
disk under Places.
25
iGolf
Troubleshooting Guide
1b. Your web browser may not be compatible
with the iGolf website. i G o l f r e c o m m e n d s u s i n g
Firefox, which can be downloaded for free
at www.mozilla.com. Keep in mind that you can
have more than one web browser installed on your
computer.
Java on the list and remove any older versions.
Keep only the most recent version. As noted
in answer 1b., if you are using Internet Explorer
and still having problems syncing your device, try
installing Mozilla Firefox.
1d. For Mac users: The minimum version of Java
required for syncing with iGolf is 1.6.0_10 (Java
6 Update 10). Apple develops their own version
of Java, so it must be downloaded through them.
This version of Java is only supported by OS X 10.6
or newer. For more information regarding Java for
Macs, visit http://support.apple.com.
1c. Java may not be installed or may be out of
date. iGolf’s website utilizes Java, so it is essential
that your version of Java is up to date. You can
download Java at www.java.com. After installing
Java, it may be necassary to restart your web
browser and/or computer. Occasionally, old versions
of Java may remain installed on your computer after
updating. These older versions of Java may conflict
with the most recent version, so if you still cannot
sync after installing Java, check for older versions.
You can do so by going to your start menu, and
then selecting “Control Panel.” Find the “Uninstall
a Program” link (Windows 7). Windows XP may
list it as Add/Remove Programs. From there, find
26
iGolf
Troubleshooting Guide
Issue
Cause(s) & Solution(s)
2. Trouble acquiring satellite signal in iGolf.
2a. You may have selected “Play Golf” before having
establilshed signal. This would result in seeing a
warning message that states “Not enough satellites
to find local courses.” Wait for signal to improve or
perform a manual search. If this is the case, back
out to the main iGolf Menu. Check for GPS signal.
In the upper right-hand corner of the screen, find
the “T” shaped icon. 2 or more green bars with the
“T” icon indicates good signal. Once signal
is confirmed, select play golf and a list of
local courses will come up.
Please refer to answers 2a.-2c. in Cause(s) &
Solution(s) section.
*Note: When trying to acquire satellite signal,
it is advisable to have the screen flipped up
into the open position. In the open position, the
antenna will be located at the top of the device, and
will be completely un-obscured, thus performing
approximately 30% more efficiently.
*Note: if the provided solutions do not resolve
the problem, please contact Expresso Satellite
Navigation at 1-866-691-1350. In Europe or
Australia, visit www.expressogps.com or email
[email protected].
27
2b. If you are unable to acquire signal in
iGolf within a couple minutes, the “Navipath”
file on the internal memory may need resetting.
(The Navipath file controls switching between
automotive navigation and golf GPS modes).
To do this, exit the iGolf application and open
the automotive navigation application. Once
iGolf
Troubleshooting Guide
open, you will want to confirm your satellite
connection there. To do so, follow these steps:
2c. If you still have trouble acquiring signal, try
performing a hard reset on the device. You can
do this by flipping the screen up into the open
position. On the inside of the device you will find
a cup holder stability wing. Open the wing, and
find the reset button below it. The reset button
is a small pinhole, so you will need something
to access it. A paperclip works very will for this.
Push in on the reset button. You will feel it click.
Once it clicks, hold it in for 2-3 seconds. This
will power the device down and set the module
to “0.” Once the reset is complete, try the
process from the beginning, making sure you
have signal BEFORE selecting ‘Play Golf.”
-Accept the safety instructions on the intro
screen.
-From the Main Menu, select “Tools & Settings.”
-Scroll down through the pages and select
“GPS.”
-Check your Satellite number and your HDOP
number. A good signal will be indicated by 3 or
more satellites and an HDOP number below 5.0
(the lower the number, the better).
-Once you have confirmed you have signal in the
automotive application, exit out to the main menu
and open iGolf. You should see green bars with
the “T” icon within 30 seconds.
28
iGolf
Troubleshooting Guide
Issue
Cause(s) & Solution(s)
3. Distance callouts on the screen show “999.”
Please refer to answers 3a. & 3b. in Cause(s) &
Solution(s) section.
3a. The AG50s gives the distances to the
green and custom points based upon your
GPS position. If you are 999 yards/meters
or more away from the hole your device is
set to, it will show 999.
3b. If you are playing the hole and the device
is showing 999, there may be an issue with some
mapping coordinates. This usally occurs if a golf
course has made changes to their layout. In these
instances, please report the issue to iGolf at
858-880-0267. If you prefer, you may report the issue
to Expresso Satellite Navigation at 866-691-1350,
and we will work with iGolf to resolve the problem. In
Europe or Australia, visit www.expressogps.com or
email [email protected].
iGolf
Troubleshooting Guide
Issue
Cause(s) & Solution(s)
4. Distance callouts on the screen suddenly go
blank. Please refer to answer 4. in Cause(s) &
Solution(s) section.
4. This occurs when satellite signal is interrupted.
If you are using the device in the closed position,
be sure not to cover the latch area with your hand,
as doing so will block the antenna and interfere with
signal. Keeping the device in your pocket may also
block signal. If you ride in a golf cart when playing, it
is advisable to use the device in the open position at
all times, utilizing the cup holder mount method.
*Note: if the provided solutions do not resolve
the problem, contact Expresso Satellite Navigation
at 866-691-1350. In Europe or Australia,
v i s i t w w w. e x p r e s s o g p s . c o m o r e m a i l
[email protected].
5. Other inaccuracies. Please refer to answer 5.
in Cause(s) and Solution(s) section.
5. Occasionally, mapping coordinates may be off
due to a restructuring of a course or some other
cause. If you notice inaccurate distances for any
hole on any course, please report the issue to iGolf
at 858-880-0267. If you prefer, you may report the
issue to Expresso Satellite Navigation at
866-691-1350, and we will work with iGolf to
resolve the problem. In Europe or Australia,
v i s i t w w w. e x p r e s s o g p s . c o m o r e m a i l
[email protected].
*Note: It is also possible in scenario 3b.
that the wrong course was initially selected.
Make sure the correct course and hole are
s elec t ed f ir s t .
29
30
iGolf
Troubleshooting Guide
Cause(s) & Solution(s)
Issue
6. Trouble finding a course in iGolf. Please refer to
answers 6a.-6d. in Cause(s) and Solution(s) section.
6a. The course may not be mapped by iGolf. Search
for the course at www.igolf.com to verify whether or
not that course is in the GPS database.
*Note: if the provided solutions do not resolve the
problem, contact either iGolf at 858-880-0267 or
Expresso Satellite Navigation at 866-691-0267.
In Europe or Australia, visit www.expressogps.com
or email [email protected].
6b. If the course is in the GPS database, it may
be farther down on the list. Scroll through the list by
sliding your finger up the screen.
6c. If you still can’t locate your course, try performing
a manual search to see if you can pull it up.
6d. If the course is not in the GPS database,
you have the option to map the course manually
using the “Map Course” feature in the application.
Premium members with iGolf have the additional
option of requesting GPS for unmapped courses.
31
iGolf
Troubleshooting Guide
Cause(s) & Solution(s)
Issue
7. Error Messages:
7 a . Tr y i n g t o a c c e s s i G o l f o n y o u r d e v i c e
w h i l e y o u a r e c o n n e c t e d t o t h e c o m p u t e r.
I f y o u a r e c o n n e c t e d t o t h e c o m p u t e r, y o u
will not be able to access the iGolf software,
if you try to, or if you accidentally touch the
iGolf button while connected, this error message
will occur every time. When connected to the
computer, it is best to set the device aside where
you won’t accidentally touch it, or power it off
when charging.
“The Navigation File Does Not Exist”
Please refer to answers 7a.-7c. in Cause(s) &
Solution(s) section.
“Fatal Application Error”
Please refer to answers 7b. & 7c. in Cause(s)
& Solution(s) section.
7b. If you see this message occur while
disconnected, try performing a hard reset
as detailed in Cause(s) and Solution(s)
a n sw e r 2 c.
*Note: if the provided solutions do not resolve
the problem, please contact Expresso
Satellite Navigation at 866-691-1350.
In Europe or Australia, visit www.expressogps.com
or email [email protected].
7c. If you still see this message occur, check
the internal memory of the device to make sure that
the Navipath file has not been deleted. Do so by
going to your start menu, select “Computer” or “My
Computer” and find your “Removable Disk.”
32
iGolf
Troubleshooting Guide
Cause(s) & Solution(s)
Issue
8. Device does not automatically advance
between holes. Please refer to answer 8a.-8c. in
the Cause(s) and Solution(s) section.
8a. Auto Advance is set to “Off.” From the main
iGolf menu, select “Settings.” Next, select “Device
Settings.” From there, find Auto Advance. If it is
turned off, set it to “On.”
*Note: if the provided solutions do not resolve the
problem, contact either iGolf at 858-880-0267 or
Expresso Satellite Navigation at 866-691-1350.
In Europe or Australia, visit www.expressogps.com
or email [email protected].
8b. You are starting on a hole other than the first.
The AG50s will show you the first hole of the
course by default. If you are doing a shotgun
start, you can manually switch holes by sliding
your finger across the golf green. Slide from
right-to-left to advance to the next hole, or slide from
left-to-right to return to the previous hole.
8c. In some instances,if a green and another fairway
are close to each other, you may need to manually
advance to the next hole. This may also occasionally
be necessary depending on the location of the cart
path. (See page 10).
33
iGolf
Customer Service & Tech Support
Expresso Satellite Navigation, Inc.
iGolf Customer Support
Toll-Free Line:
1-866-691-1350 Ext. 2007
Phone:
1-858-880-0267
Email:
[email protected]
Email:
From your profile page at www.igolf.com,
select “Member Support” then select
“Member Email Support”
Address:
824 Lincolnway, 3rd Floor
La Porte, IN 46350
Hours of operation:
M-F 9:00AM-6:00PM
Central Standard Time
Hours of operation:
M-F 9:00AM-5:00PM
Pacific Standard Time
34
Featuring the latest NAVTEQ maps, the automotive
navigation software has been designed to provide all
the features expected from a modern navigation
system while still maintaining an easy to use
interface, appealing aesthetics and a wide range of
added value services that can meet the demands of any
cu sto m e r.
™
35
Automotive Navigation
Main Menu
Automotive Navigation
Entering a Destination
This section covers the basics of the Automotive Navigation software. To open the Automotive
Navigation software, select the Automotive Navigation button from the main menu (page 4, item 4).
1. Show map shows the drive map
of your immediate vicinity when GPS
is acquired. This option is great for
finding local POIs.
2. Route planning allows
for detailed route planning
with a beginning point, and
ending point, and any stops
in-between.
4. Enter a destination to
begin navigation. See next
page for more detail.
5. View an interactive
overhead 2D image of your
local map. Zoom in and out
and jump to POIs.
3. Tools & Settings allows you to
select Route Type, Route Options,
Map/Drive Options, Voice Options,
as well as select Language, Select
POIs to show on the map, Check
GPS status, and more.
6. View your location by
road name, city name,
and latitude/longitude
coordinates. Also
contains useful phone
numbers such as AAA.
7. Exit to Main Menu
37
4. Select from a list of your
favorite locations for quick,
easy navigation. Add or remove
favorites by selecting the “Edit”
button from the favorites page.
1. Select from a list
of recent locations for
quick, easy navigation.
5. Enter an address manually. Enter
a city or zip code (make sure you
have the correct state selected,
item 6. this page). Enter a street
and address number, or select a
POI near the city or street of your
designation. POI searches will list
up to 74 of the nearest results.
2. View an interactive
overhead 2D image of your
local map. Zoom in and out
and jump to POIs.
3. Select a Point of Interest for
quick, easy navigation. A list of
nearby results will show when
connected to satellites, or you
will be able to enter a POI by
name for a statewide search
(make note of the state that is
selected, item 6., this page)
6. Selecting your State, Province,
or Territory is very important.
*Note: This selection will affect
POI searches and city/zip code
results.
38
Automotive Navigation
Search by Point of Interest
There are multiple ways to search by Point of Interest. This method will bring up the top three local results
based upon your position. You can view more local results by selecting the “More” button. The device will
show up to 74 of the closest results. Alternately,you may enter the name of the destination you are looking
for (when you start typing, the device pulls up POIs Statewide for whichever state is selected). To search
using this method, follow the steps below.
1. Select “Enter
Destination” from
the Main Menu.
3. Scroll through
the POI Library
and select the
appropriate
category for your
search.
2. Select the
POI button from
the Select Place
menu.
39
4. The top 3 nearest
results will display.
Select “More” to
view up to 74 results
or type in the name
of a destination.
Automotive Navigation
Search by Point of Interest
The AG50s also allows you to search for POIs near a City or near a street by following the steps below. This
method will list up to 74 results closest to the city center or the street selected.
1. Select “Enter
Destination” from
the Main Menu.
2. Select “Enter
Address” from
the Select Place
menu.
3. Enter a city
name and select
it from the list
by pressing the
selection bar.
40
4. Select “POI
near city” and
select your POI
category in the
POI Library. If you
want to search
for a POI near
a street, enter a
street name.
5. Enter a street
name and select
it from the list.
Then select “POI
near street” and
select your POI
category from the
POI Library.
Automotive Navigation
Saving a Destination
T h e aut omo tive so ftware on t he AG 50s m ak es it quic k an d e a s y t o s a v e d e s t i n a t i o n s a n d
t o a ccess saved de stin atio ns . To do s o f ollow t he s t eps b e l o w.
Automotive Navigation
Map View Options
When in map mode, you have multiple options of how to view the map. You can view these by tapping on
the map during navigation.
Set map view
to 2D or 3D
View Route
Map overview
1. Select
“Favorites” from
the Select Place
menu.
2. From the
Favorites menu,
select the “Edit”
button.
3. Add favorites
by entering
the address,
selecting a POI,
or selecting from
a list of recent
destinations.
41
4. Saved
destinations
are listed in the
Favorites menu.
Name your
saved locations
by selecting
“Edit Name.”
View Route
Text (Turn
by turn
list)
View 2nd page
of options.
Manually select
Day/Night
mode or set to
automatically
change based
on location and
time
Set Guide
Mode to
Pedestrian
or Map
Overview of
Map Interface
View 1st page
of options.
Return to Map
Return to Map
42
Automotive Navigation
Route Planning
The AG50s allows you to plan routes with multiple destinations along the way. Follow the steps below.
1. From the Main
Menu, select
“Route Planning.”
2. Select “Start” to set your starting
point. Select “End” to set your ending
point. Add destinations by selecting
“Add Via.” When selecting Start, End, or
Add Via, you will be taken to the Select
Place menu, where you can enter the
destination or choose a destination from
Favorites or Recent.
43
3. After adding all destinations, select
the “Options” button to go to the
Plan Options menu. From the Plan
Options menu, select “Drive” to begin
navigation.
Automotive Navigation
GPS Status
This option allows you to view the current signal and location status of your GPS. To view this information,
follow these steps.
1. From the main
menu, select Tools
& Settings.
2. In the Tools &
Settings menu,
scroll down and
find the “GPS”
Button. Select the
GPS button.
44
3. The GPS
status screen
is displayed.
A minumum
of 3 satellites
are needed to
triangulate a
position.
Automotive Navigation
Current Position
The Current Position function lets you know your exact location. This information can be very helpful in the
event of needing to know your approximate location. It is quick and easy to access from the main menu.
Speed Limit on
Class 1 & 2 roads
Road Name
Nearest Town
Latitude & Longitude
Coordinates
From the Main
Menu, select the
“Current Position”
button.
The Current
Position page
shows the road
name, the nearest
town, Latitude
& Longitude
coordinates, and
useful phone #’s.
45
Automotive Navigation
Map User Interface
The User Interface in map view is easy to read. The User Interface is preset with certain information but also
contains 3 customizable points. Simply tap the screen in the appropriate window to change the settings for
that window.
Direction
of Travel
Actual Speed
Zoom Out
Zoom In
Customizable
Display Window
(Shown set to
Estimated Time
of Arrival)
Customizable
Display Window
(Shown set to
System Clock)
Distance
remaining on
route
Distance to next turn
12
Customizable Display Window
(Shown set to “Current Road to Next Road”)
46
Satellite Status/Battery Life
Automotive Navigation
Tools & Settings
The Tools & Settings menu allows you to set and adjust your navigation preferences and more. Here is
a brief overview of the options. Use the green arrows to navigate through the menus. Select the Back Arrow
button from any Tools & Settings screen to return to the main menu.
Opt for or against toll
roads from this screen.
Select preferred units
of measurement. Select
whether highways should
be called out by name
or number in instances
where both apply.
47
Set navigational voice
preferences. TTS (Text
To Speech) is the
optimum setting, as it will
pronounce street names.
Cause(s) & Solution(s)
Issue
1. Trouble acquiring satellite signal. Please refer
to answers 1a. & 1b. in the Cause(s) & Solution(s)
section.
1 a . It can take up to 10 minutes to initialize the
integrated GPS receiver for the first time. Each time
you turn on the device thereafter, GPS reception
starts within one minute. If the navigation device has
been switched off for more than a week, the next
initialization can also take up to 10 minutes.
*Note: if the provided solutions do not resolve
the problem, please contact Expresso Satellite
Navigation.
(TTS)
Select your preferred
route type from this
screen.
Troubleshooting Guide
Automotive Navigation
Select “GPS” to check
satellite signal. Select
“POI” to set which types
of POIs should appear
on the navigation map.
Select “Favorites” to save
destinations.
1b. When trying to acquire satellite signal, it is
advisable to have the screen flipped up into the open
position. In the open position, the antenna will be
located at the top of the device, and will be completely
un-obscured, thus performing approximately 30%
more efficiently.
2. Sometimes you may need to re-calibrate the
2. Trouble selecting keys or buttons on the touch
screen. Please refer to answer 2. in the Cause(s) & screen. To do so, select the tools icon from the main
menu and select “Screen Calibration.” Make sure the
Solution(s) section.
device is sitting on a flat, level surface, and follow the
prompts on the screen.
48
Automotive Navigation
Troubleshooting Guide
Cause(s) & Solution(s)
Issue
3. Error Messages:
3a. Perform a hard
detailed on page 6.
“The Navigation File Does Not Exist”
“Fatal Application Error”
Please refer to answers 3a. & 3b. in the Cause(s) &
Solution(s) section.
*Note: if the provided solutions do not resolve
the problem, please contact Expresso
Satellite Navigation at 866-691-1350.
In Europe or Australia, visit www.expressogps.com
or email [email protected].
49
reset
Automotive Navigation
Troubleshooting Guide
Cause(s) & Solution(s)
Issue
(reboot) as
4. How do I update my NAVTEQ maps for the
automotive navigation?
3b. If you still see this message occur, check
the internal memory of the device to make sure that
the Navipath file has not been deleted. Do so by
going to your start menu, select “Computer” or “My
Computer” and find your “Removable Disk.”
Please refer to answer 4. in the Cause(s) &
Solution(s) section.
4. Please contact Expresso Satellite
Navigation at 866-691-1350 to check to
see if your version is up to date.
Expresso will also email registered
customers with details for obtaining map
updates when they are available, so
Please make sure to register your device
at the following webpage:
For any other questions or further information
contact Expresso Satellite Navigation at
866-691-1350 or em ail
[email protected].
w w w. e x p r e s s o g p s . c o m / r e g i s t r a t i o n . h t m l
50
Multimedia Features
Overview
2GB-32GB SD card needed for Music,
Video, and Photos. SD card is not included.
Multimedia Features
To access the multimedia features,
from the AG50s main menu, select one
of the 3 media buttons (Photos, Video,
or Music). *Note: Photos and Video are
not available in portrait mode.
Supported File Types:
Music: WMA, MP3, AAC, AC3, and WAV
Music User
Interface Portrait
View
Music User Interface
Landscape View
SD cards must be set up correctly in order for
it to recognize the multimedia files correctly.
Here is how to set up the SD card:
-Insert the SD card into the SD card slot on
your computer.
-Open up the SD card by going to the start
menu on your computer, select “Computer”
or “My Computer,” and find the SD card
under “Devices with Removable Storage.”
-Create 3 folders on the SD card and name
them My Music, My Video, and My Photos as
shown below.
-Copy and paste supported media files into
the corresponding folder.
Music Player
Song Library
Scroll Up
Song Library
Play Music
Toggle
Pause
On/Off
Current
Selection
Toggle
Shuffle
On/Off
Scroll Down
Photos: BMP, JPG, and JPEG
52
Scroll Up
Toggle
Shuffle
On/Off
Toggle
Pause
On/Off
Exit to Main
Menu
Video: AVI, WMV, MPEG, MPG, FLV, ASF, 3GP, and MP4
51
Current
Selection
Play Music
Scroll Down
Exit to Main
Menu
Multimedia Features
Scroll
Up
Video Player
Video Library
Multimedia Features
Photo Viewer
Photo Viewer
Video Viewer
Play Video
Current Selection
Exit to Main
Menu
Scroll
Down
Previous Photo
Rewind
Play
Video
Return
to Video
Library
53
Next Photo
Fast Forward
Pause
Video
Return to
Main Menu
View Photo
Slide Show
54
Troubleshooting Guide
Multimedia Features
Issue
Cause(s) & Solution(s)
1. Trouble viewing pictures, video or playing music
Please refer to answers 1a.-1c. in the Cause(s) &
Solution(s) section.
1a. Make sure that the SD card with the media files
you are trying to play is inserted into Slot B.
1b. Make sure that the media folders on the SD
card are named correctly as follows: My Music, My
Video, and My Photos. (See Page 47)
*Note: if the provided solutions do not resolve
the problem, please contact Expresso Satellite
Navigation.
1c. Make sure that the files you are trying to view
are a format supported by the AG50s media player.
(See page 47 for a list of supported file types)
Appendix
Software
Software Specifications & Liscensing
Powered by iGolf version 3.0
Mobile Navigator version 2.1
-Includes text-to-speech guidance (speaks street names), Preloaded Points of Interest, and lane/turn assist
NAVTEQ version 01.01.11
-Depending on your continent, the AG50s includes maps for either 1. The USA & Canada including Hawaii,
A l a s k a , & P u e r t o R i co , 2 . Au str a l i a n & N e w Ze a l a n d , o r 3 . Th e U n i te d Ki n g d o m
Software License Agreement
By using the Expresso AG50s, you agree to be bound by the terms and conditions of the following software
license agreement. Please read this agreement carefully.
2. Trouble selecting keys or buttons on the touch
screen. Please refer to answer 2. in the Cause(s) &
Solution(s) section.
2. Sometimes you may need to re-calibrate the
screen. To do so, select the tools icon from the main
menu and select “Screen Calibration.” Make sure
the device is sitting on a flat, level surface, and follow the prompts on the screen.
55
Expresso Satellite Navigation, INC. grants you a limited license to use the software embedded in this device (the “software”) in binary executable
form in the normal operation of the product. Title, ownership rights, and intellectual property rights in and to the software remain in Expresso
Satellite Navigation, INC. You acknowledge that the software is the property of Expresso Satellite Navigation, INC. and is protected under the
United States of America copyright laws and international treaties. You further acknowledge that the structure organization, and code of the
software are valuable trade secrets of Expresso Satellite Navigation, INC. You agree not to decompile disassemble, modify, reverse assemble,
reverse engineer, or reduce to human readable form the software or any part thereof or create any derivative works based on the software. You
agree not to export or re-export the software to any country in violation of the export control laws of the United States of America.
56
57