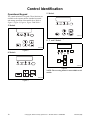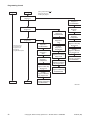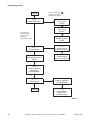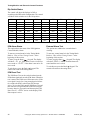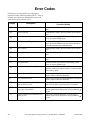
1
OPL Electronic Control Refer to Page 4 for Model Identification Keep These Instructions for Future Reference. (If this machine changes ownership, this manual must accompany machine.) www.comlaundry.com Part No. 70444901ENR5 August 2012 Programming Tumble Dryer Table of Contents Introduction......................................................................................... Model Identification ............................................................................. Nameplate Location.............................................................................. 4 4 7 Preliminary Information.................................................................... About the Control ................................................................................. DIP Switch Configuration................................................................ Power Failure Recovery................................................................... Communications .............................................................................. Audit Information ........................................................................... Restore to Factory Defaults ............................................................ Entering Program Mode................................................................... 8 8 8 8 8 8 9 9 Control Identification......................................................................... Operational Keypad .............................................................................. Operation Modes .................................................................................. General Modes of Operation............................................................ Power-up Mode................................................................................ Idle Mode ......................................................................................... Run Mode......................................................................................... Rapid Advance Mode ...................................................................... Pause Mode ...................................................................................... Error Mode....................................................................................... Communication Mode ..................................................................... Cool Down Mode............................................................................. End of Cycle Mode .......................................................................... Extended Tumble Mode................................................................... Reversing Mode (reversing models only)........................................ Entering Diagnostic Mode From Idle Mode .................................... Displaying Temperature Mode ........................................................ 10 10 12 12 12 12 12 13 13 14 14 14 14 14 14 14 14 Machine Cycle Definition and Operation......................................... Machine Cycle Operation ..................................................................... Time Dry Cycle................................................................................ Auto-Dry Cycle................................................................................ Moisture Dry Cycle (if equipped).................................................... Rotation Sensor Equipped Machines.................................................... To Start a Cycle .................................................................................... 15 15 15 15 15 15 15 Entering the Manual Mode................................................................ 16 How to Enter the Manual Mode ........................................................... 16 Programming Control ........................................................................ What Can Be Programmed? ................................................................. How to Program a Cycle....................................................................... Programmable Options Available......................................................... 18 18 18 18 Collecting Audit Information ............................................................ How to Enter Audit Feature ............................................................. How to Read Audit Data.................................................................. How to Exit Audit Feature ............................................................... 28 28 28 28 © Copyright 2012, Alliance Laundry Systems LLC All rights reserved. No part of the contents of this book may be reproduced or transmitted in any form or by any means without the expressed written consent of the publisher. 70444901 (EN) © Copyright, Alliance Laundry Systems LLC – DO NOT COPY or TRANSMIT 1 Manual Reset....................................................................................... 29 How to Enter Manual Reset ............................................................. 29 Custom Save ........................................................................................ 30 How to Enter Custom Save.............................................................. 30 Testing Machine and Electronic Control Functions........................ How to Enter Testing Feature .......................................................... How to Start Tests............................................................................ How to Exit Testing Feature ............................................................ Diagnostic Test Descriptions................................................................ Control Software Version Number Test .......................................... Loading Door Test ........................................................................... Lint Door Test.................................................................................. Heater Interlock Test........................................................................ Dip Switch Status............................................................................. ICM Alarm Status ............................................................................ ICM Reset Test ................................................................................ External Alarm Test ......................................................................... Tumble Dryer On Temperature Test................................................ Thermistor Temperature Test .......................................................... Machine Configuration Display #2 Test.......................................... Machine Configuration Display #3 Test.......................................... Airflow Switch Test ......................................................................... Fan Motor Test................................................................................. Damper Motor Test.......................................................................... Reverse Motor Test.......................................................................... Rotation Sensor Test ........................................................................ Moisture Sensor Test (Shorted Test Jumper)................................... Moisture Sensor Test (Resistance Test Jumper) .............................. Production Test Cycle........................................................................... To Enter Production Test Cycle....................................................... To Exit Production Test Cycle......................................................... 31 31 31 31 33 33 33 33 33 34 34 34 34 35 35 35 36 36 36 36 36 37 37 37 38 38 38 Machine Errors................................................................................... PDA Communications Error................................................................. Open Thermistor Error ......................................................................... Shorted Thermistor Error...................................................................... Stove and Cabinet Limit Errors ............................................................ Auto Ignition Retry (Gas Models Only)............................................... Air Flow Switch Errors......................................................................... Airflow Switch Sensed Closed While Not In Run Mode ................ Airflow Switch Does Not Close After Cycle Started ...................... Airflow Switch Bounces During A Running Cycle......................... Rotation Sensor Error ........................................................................... Fan Motor Contactor Error ................................................................... Fan Motor Centrifugal Switch Error..................................................... DIP Switch/Harness Index Mismatch Error ......................................... Moisture Sensor Error........................................................................... 39 39 39 39 39 40 40 40 40 40 40 41 41 41 41 Error Codes......................................................................................... 42 Communications Mode ...................................................................... 44 2 © Copyright, Alliance Laundry Systems LLC – DO NOT COPY or TRANSMIT 70444901 (EN) Infra-red Communications.................................................................... 44 How to Begin Communications with An External Device .............. 44 Cycle Charts ........................................................................................ 45 70444901 (EN) © Copyright, Alliance Laundry Systems LLC – DO NOT COPY or TRANSMIT 3 Introduction Model Identification Gas 25 Pound 30 Pound 30 Pound Stacked 35 Pound Steam/Thermal Oil CHD25G2-CA025L DR25G2-BU025N CHD25G2-CA025N HA025L CHD25G2-CT025L HA025N CHD25G2-CT025N HT025L CHD25G2-CU025L HT025N CHD25G2-CU025N HU025L DR25G2-BA025L HU025N DR25G2-BA025N IPD25G2-IT025L DR25G2-BT025L IPD25G2-IT025N DR25G2-BT025N SA025L DR25G2-BU025L SA025N CHD30G2-CA030L DR30G2-BU030N CHD30G2-CA030N SA030L CHD30G2-CT030L SA030N CHD30G2-CT030N HA030L CHD30G2-CU030L HA030N CHD30G2-CU030N HT030D DR30G2-BA030L HT030L DR30G2-BA030N HT030N DR30G2-BT030D HU030L DR30G2-BT030L HU030N DR30G2-BT030N IPD30G2-IT030L DR30G2-BU030L IPD30G2-IT030N CHD30STG2-CAT30L DRST30G2-BTT30N CHD30STG2-CAT30N DRST30G2-BUT30L CHD30STG2-CTT30L DRST30G2-BUT30N CHD30STG2-CTT30N HAT30L CHD30STG2-CUT30L HAT30N CHD30STG2-CUT30N HTT30D DR335 HTT30L DRST30G2-BAT30L HTT30N DRST30G2-BAT30N IPD30STG2-ITT30L DRST30G2-BTT30D IPD30STG2-ITT30N DRST30G2-BTT30L HUT30L CHD35G2-CA035L DR35G2-BU035N CHD35G2-CA035N HA035L CHD35G2-CT035L HA035N CHD35G2-CT035N HT035L CHD35G2-CU035L HT035N CHD35G2-CU035N HU035L DR35G2-BA035L HU035N DR35G2-BA035N IPD35G2-IT035L DR35G2-BT035L IPD35G2-IT035N DR35G2-BT035N SA035L DR35G2-BU035L SA035N ST025L ST025N SU025L SU025N UA025L UA025N UT025L UT025N UU025L UU025N Electric CHD25S2-CT025S CHD25S2-CU025S DR25S2-BT025S DR25S2-BU025S HT025S HU025S IPD25S2-IT025S ST025S SU025S UT025S UU025S ST030D CHD30S2-CT030S ST030L CHD30S2-CU030S ST030N DR30S2-BT030S SU030L DR30S2-BU030S SU030N HT030S UA030L HU030S UA030N IPD30S2-IT030S UT030L ST030S UT030N SU030S UU030L UT030S UU030N UU030S CHD25E2-CT025E CHD25E2-CU025E DR25E2-BT025E DR25E2-BU025E HT025E HU025E IPD25E2-IT025E ST025E SU025E UT025E UU025E CHD30E2-CT030E CHD30E2-CU030E DR30E2-BT030E DR30E2-BU030E HT030E HU030E IPD30E2-IT030E ST030E SU030E UT030E UU030E HUT30N SAT30L SAT30N STT30D STT30L STT30N SUT30L SUT30N CHD30STS2-CTT30S CHD30STS2-CUT30S DRST30S2-BTT30S DRST30S2-BUT30S HTT30S HUT30S IPD30STS2-ITT30S STT30S SUT30S CHD30STE2-CTT30E CHD30STE2-CUT30E DRST30E2-BTT30E DRST30E2-BUT30E HTT30E HUT30E IPD30STE2-ITT30E STT30E SUT30E ST035L ST035N SU035L SU035N UA035L UA035N UT035L UT035N UU035L UU035N CHD35S2-CT035S CHD35S2-CU035S DR35S2-BT035S DR35S2-BU035S HT035S HU035S IPD35S2-IT035S ST035S SU035S UT035S UU035S CHD35E2-CT035E CHD35E2-CU035E DR35E2-BT035E DR35E2-BU035E HT035E HU035E IPD35E2-IT035E ST035E SU035E UT035E UU035E Models continued on next page. 4 © Copyright, Alliance Laundry Systems LLC – DO NOT COPY or TRANSMIT 70444901 (EN) Introduction (Continued) Gas CTT45L CTT45N DR445G2-BAT45L DR445G2-BAT45N DR445G2-BTT45D DR445G2-BTT45L 45 Pound DR445G2-BTT45N Stacked DR445G2-BUT45L DR445G2-BUT45N DRST45G2-BAT45L DRST45G2-BAT45N DRST45G2-BTT45D DRST45G2-BTT45L CA050L CA050N CT050L CT050N CU050L CU050N DR50G2-BA050L 50 DR50G2-BA050N Pound DR50G2-BT050D DR50G2-BT050L DR50G2-BT050N DR50G2-BU050L DR50G2-BU050N DR55G2-BA050L DR55G2-BA050N CA055L CA055N CT055L CT055N CU055L CU055N 55 DR55SG2-BA055L Pound DR55SG2-BA055N DR55SG2-BT055D DR55SG2-BT055L DR55SG2-BT055N DR55SG2-BU055L DR55SG2-BU055N DRST45G2-BTT45N DRST45G2-BUT45L DRST45G2-BUT45N HAT45L HAT45N HTT45D HTT45L HTT45N HUT45L HUT45N IPD45STG2-ITT45L IPD45STG2-ITT45N SAT45L DR55G2-BT050D DR55G2-BT050L DR55G2-BT050N DR55G2-BU050L DR55G2-BU050N HA050L HA050N HT050D HT050L HT050N HU050L HU050N IPD50G2-IT050L IPD50G2-IT050N SA050L SAT45N STT45D STT45L STT45N SUT45L SUT45N HA055L HA055N HT055D HT055L HT055N HU055L HU055N IPD55G2-IT055L IPD55G2-IT055N SA055L SA055N ST055D ST055L ST055N HU055L HU055N SU055L SU055N UA055L UA055N UT055L UT055N UU055L UU055N SA050N ST050D ST050L ST050N SU050L SU050N UA050L UA050N UT050L UT050N UU050L UU050N Steam/Thermal Oil Electric Not Applicable Not Applicable CT050S CT050T CU050S CU050T DR50S2-BT050S DR50S2-BT050T DR50S2-BU050S DR50S2-BU050T DR55S2-BT050S DR55S2-BT050T DR55S2-BU050S DR55S2-BU050T HT050S HT050T HU050S HU050T IPD50S2-IT050S IPD50S2-IT050T ST050S ST050T SU050S SU050T UT050S UT050T UU050S UU050T Not Applicable CT050E CU050E DR50E2-BT050E DR50E2-BU050E DR55E2-BT050E DR55E2-BU050E HT050E HU050E IPD50E2-IT050E ST050E SU050E UT050E UU050E CT055E CU055E DR55SE2-BT055E DR55SE2-BU055E HT055E HU055E IPD55E2-IT055E ST055E SU055E UT055E UU055E Models continued on next page. 70444901 (EN) © Copyright, Alliance Laundry Systems LLC – DO NOT COPY or TRANSMIT 5 Introduction (Continued) Gas DR80G2-BT075L CA075L DR80G2-BT075N CA075N DR80G2-BU075L CT075L DR80G2-BU075N CT075N HA075L CU075L HA075N CU075N HT075D DR75G2-BA075L DR75G2-BA075N HT075L 75 Pound DR75G2-BT075D HT075N HU075L DR75G2-BT075L HU075N DR75G2-BT075N IPD75G2-IT075L DR75G2-BU075L DR75G2-BU075N IPD75G2-IT075N SA075L DR80G2-BA075L DR80G2-BA075N SA075N ST075D DR80G2-BT075D DR120G2-BU120N CA120L HA120L CA120N HA120N CT120L HT120L CT120N HT120N CU120L 120 CU120N HU120L Pound DR120G2-BA120L HU120N DR120G2-BA120N IPD120G2-IT120L DR120G2-BT120L IPD120G2-IT120N DR120G2-BT120N SA120L DR120G2-BU120L SA120N DR170G2-BU170N CA170L HA170L CA170N HA170N CT170L HT170L CT170N HT170N CU170L 170 CU170N HU170L Pound DR170G2-BA170L HU170N DR170G2-BA170N IPD170G2-IT170L DR170G2-BT170L IPD170G2-IT170N DR170G2-BT170N SA170L DR170G2-BU170L SA170N DR200G2-BU200N CA200L HA200L CA200N HA200N CT200L HT200L CT200N HT200N CU200L 200 CU200N HU200L Pound DR200G2-BA200L HU200N DR200G2-BA200N IT200L DR200G2-BT200L IT200N DR200G2-BT200N SA200L DR200G2-BU200L SA200N ST075L ST075N STF75L STF75N SU075L SU075N UA075L UA075N UT075L UT075N UTF75L UTF75N UU075L UU075N ST120L ST120N SU120L SU120N UA120L UA120N UT120L UT120N UU120L UU120N ST170L ST170N SU170L SU170N UA170L UA170N UT170L UT170N UU170L UU170N ST200L ST200N SU200L SU200N UA200L UA200N UT200L UT200N UU200L UU200N Steam/Thermal Oil IPD75S2-IT075S CT075S IPD75S2-IT075T CT075T ST075S CU075S ST075T CU075T DR75S2-BT075S SU075S DR75S2-BT075T SU075T DR75S2-BU075S UT075S DR75S2-BU075T UT075T DR80S2-BT075S UU075S DR80S2-BT075T UU075T DR80S2-BU075S DR80S2-BU075T HT075S HT075T HU075S HU075T HU120T CT120S IPD120S2-IT120S CT120T IPD120S2-IT120T CU120S ST120S CU120T DR120S2-BT120S ST120T DR120S2-BT120T SU120S DR120S2-BU120S SU120T DR120S2-BU120T UT120S UT120T HT120S UU120S HT120T UU120T HU120S HU170T CT170S IPD170S2-IT170S CT170T IPD170S2-IT170T CU170S ST170S CU170T DR170S2-BT170S ST170T DR170S2-BT170T SU170S DR170S2-BU170S SU170T DR170S2-BU170T UT170S UT170T HT170S UU170S HT170T UU170T HU170S HU200T CT200S IT200S CT200T IT200T CU200S ST200S CU200T DR200S2-BT200S ST200T DR200S2-BT200T SU200S DR200S2-BU200S SU200T DR200S2-BU200T UT200S UT200T HT200S UU200S HT200T UU200T HU200S Electric CT075E CU075E DR75E2-BT075E DR75E2-BU075E DR80E2-BT075E DR80E2-BU075E HT075E HU075E IPD75E2-IT075E ST075E SU075E UT075E UU075E CT120E CU120E DR120E2-BT120E DR120E2-BU120E HT120E HU120E IT120E ST120E SU120E UT120E UU120E Not Applicable Not Applicable Control suffixes listed on next page. 6 © Copyright, Alliance Laundry Systems LLC – DO NOT COPY or TRANSMIT 70444901 (EN) Introduction Includes models with the following control suffixes: EO – OPL electronic RE – reversing OPL electronic Nameplate Location The nameplate is located on the back of the machine and is programmed in the control. 70444901 (EN) © Copyright, Alliance Laundry Systems LLC – DO NOT COPY or TRANSMIT 7 Preliminary Information About the Control Communications This control is an advanced, programmable computer that lets the owner control most machine features by pressing a sequence of keypads. The control has the ability to communicate with a PDA and a laptop with an IrDA device running the control software. Devices such as PDAs and laptops that are IrDA capable (able to transmit information to machine) that have been tested and approved for use with the software can be used as a tool for managing the machine. The control allows the owner to program custom cycles, run diagnostic cycles, and retrieve audit and error information. Tumble Dryers shipped from the factory have default cycles and other settings built in. The owner can change the default cycle or any cycle. IMPORTANT: It is extremely important that the tumble dryer has a positive ground and that all mechanical and electrical connections are made before applying power to or operating the tumble dryer. Audit Information The control collects and stores audit information, which can be accessed with a PDA or PC. Refer to the following list for some of the available audit information. Refer to PC and PDA Application User Instructions. • End of Cycle to Loading Door Open Time DIP Switch Configuration • End of Cycle to Start of Next Cycle Time Make sure DIP switches are configured properly for the machine. Refer to Figure 1 below. • Total Number of Machine Cycles • Total Number of Operating Minutes • Power Failure Audit Data The PDA or PC can receive audit and program data from the control, and send programming data and diagnostic commands to the control. Refer to PC and PDA Application User Instructions for additional information. Some of the above listed audit data is available manually. Refer to Collecting Audit Information section. TMB1445R Figure 1 Power Failure Recovery If a cycle is in progress when the power fails, and if the power outage lasts three or more seconds, the cycle is lost and cannot be resumed when power recovers. If the power outage lasts less than three seconds, the control will resume the cycle when the power recovers. 8 © Copyright, Alliance Laundry Systems LLC – DO NOT COPY or TRANSMIT 70444901 (EN) Preliminary Information Restore to Factory Defaults When the user resets to factory default, the control resets all of the default values. The control also resets Machine Cycles #1 through #30. The control will also reset the following to factory-defaults: Entering Program Mode 1. Press and hold Stop ( ), then Back ( ), then Up ( ) to enter the programming options. Default Global Settings Ignition Retries = 3 Temperature Units = Fahrenheit (°F) High (H) Temperature = 190 (°F) Medium (M) Temperature = 160 (°F) Low (L) Temperature = 140 (°F) Very Low (VL) Temperature = 120 (°F) Cool Down Temperature = 100 (°F) Cool Down Time = 2 minutes Rapid Advance = Disabled Multi-Segment Cycles = Disabled Daylight Saving = Enabled Key Pad Audio = Enabled End of Cycle Audio = Enabled (5 seconds) End of Cycle External Signal = Enabled (5 seconds) Clean Lint Screen Reminder = Off Display Limit Errors = Disabled Manual Diagnostics = Enabled *Manual Programming = Enabled **Reverse Cylinder Rotate Time = 120 (seconds) **Reverse Cylinder Stop Time = 6 (seconds) **Advanced Reversing = Disabled ***Advanced Options for Moisture Dry = Disabled ***Display Moisture Sensor Error = Disabled *If manual programming is disabled, programming changes to the control can only be made with an external communication device. Refer to PC and PDA Application User Instructions. **Only available on units equipped with reversing feature. ***Only available on units equipped with moisture sensing feature. Refer to Factory Defaults, Menu section for information on Restoring Factory Defaults. 70444901 (EN) © Copyright, Alliance Laundry Systems LLC – DO NOT COPY or TRANSMIT 9 Control Identification Operational Keypad U Models The control includes five keypads. These functions are available to the operator and are intended to control and manage operation of the tumble dryer. Refer to Figure 2, Figure 3, Figure 4, Figure 5 and Table 1. S Models PROGRAM REVERSING ENERGY SAVER HEATING STOP START BACK PROGRAM REVERSING ENERGY SAVER HEATING TMB1371R Figure 4 B, C, and I Models STOP START BACK TMB1345R Figure 2 ECO H Models PROGRAM REVERSING ENERGY SAVER HEATING TMB1375R Figure 5 NOTE: The reversing feature is not available on all models. STOP START BACK TMB1346R Figure 3 10 © Copyright, Alliance Laundry Systems LLC – DO NOT COPY or TRANSMIT 70444901 (EN) Control Identification Keypad Description UP ARROW Press to scroll through menu options and edit parameter values. DOWN ARROW Press to scroll through menu options and edit parameter values. BACK ARROW Press to go to the list of parameters without saving the value when adjusting the value of a programming parameter. Also, press to go to the previous menu when the control displays a parameter, return to Idle Mode when the control displays the main menu or clear an error message from the display. STOP Press to pause a cycle while in Run Mode or abort a cycle if the control is in Pause Mode. START Press to start the selected cycle, select an option when in the menu or save a value when editing a parameter. Status Indicator LED Description PROGRAM LED will light up if the control is in Manual Programming Mode or if a cycle is being modified. REVERSING LED will light up when cylinder is reversing. ENERGY SAVER LED will light up when a Moisture Dry or Auto Dry cycle is running. HEATING LED will light up when the machine is in the heat portion of the cycle. Table 1 70444901 (EN) © Copyright, Alliance Laundry Systems LLC – DO NOT COPY or TRANSMIT 11 Control Identification Operation Modes Run Mode General Modes of Operation The Control enters Run Mode during a cycle. Loading and lint doors are closed during Run Mode. In each mode of operation, the user may press keypads or communicate with the control to change the displayed menu. Power-up Mode The control enters this mode at power-up. When power is applied to the tumble dryer, the control becomes active and will display its software version as “” (“HH” is the version number) for one second. If the control was not powered down during a running cycle, it will enter the Idle Mode. After the control completes operation in the Power-up Mode it will enter Idle Mode. Idle Mode The control is ready for operation in Idle Mode. Control can display different menus depending on user input (keypad press, opening or closing the loading door, or PDA communication). If there is no user input for 10 minutes, display will turn off. While in Run Mode, any programmed value can be changed for the currently running cycle. Press the Up ( ) or Down ( ) keypads to scroll through the displays. Press the Back ( ) keypad to select a parameter and press Up ( ) or Down ( ) to change the value. Once the cycle is complete, the control will go back to the original programmed parameters. Refer to the Tables below for each cycle type’s displays. Press Stop ( ) keypad to stop cycle and enter Pause Mode. Control enters Pause Mode if loading or lint door opens. Press Start ( ) to Rapid Advance. Time Dry Cycle Display 6 Digit Display Description Display 1 “” Cycle Time Remaining in Minutes and Seconds (HH) Display 2 “” or “” Cycle Number (HH) and Segment Number (Y) or Cycle Number (HH) and Segment Cooldown Press the up arrow ( ) to increment the cycle number. Press the down arrow ( ) to decrease the cycle number. If the Start ( ) keypad is pressed and either the loading door or lint door is open the control will show “” for five seconds or until door is closed. Display 3 “” or “” Actual Temperature Display 4 “” or “” Programmed Temperature If the control is in Idle Mode, Cycle Menu is displayed, loading and lint door closed, and the Start ( ) keypad is pressed, control will enter Run Mode. Display 5 “” Custom Save Mode Display While in Idle Mode the control will display the active cycles. Anytime the control returns to Idle Mode after a cycle has been run, the control will display the last run cycle (except the first time the control is powered up it will show the first cycle). 12 © Copyright, Alliance Laundry Systems LLC – DO NOT COPY or TRANSMIT 70444901 (EN) Control Identification Rapid Advance Mode Moisture Dry Cycle Display Display 1 6 Digit Display “ ” Description Actual Moisture Level If the Rapid Advance Option is enabled, the user can advance a running machine cycle by pressing the Start ( ) keypad. In a Time Dry cycle, pressing the Start ( ) keypad will decrease the remaining time by one minute. Pressing and holding the Start ( ) keypad will decrease the remaining time by four minutes per second until the end of the cycle. Display 2 “” or “” Cycle Number (HH) and Segment Number (Y) or Cycle Number (HH) and Segment Cooldown Display 3 “” or “” Actual Temperature Display 4 “” or “” Programmed Temperature In the Cool Down segment, pressing the Start ( keypad will decrease the remaining time by one minute. Display 5 “” Programmed Moisture Level Display 6 “” Custom Save Mode Display When the cycle is completed, the audit counter, Total Rapid Advance Cycles, is incremented rather than the Total Machine Cycles audit counter. If the Rapid Advance Option is disabled preventing a manual Rapid Advance, the user may still execute a Rapid Advance using the PDA or PC. Refer to PC and PDA Application User Instructions for additional information on using a PDA or PC to Rapid Advance a cycle. Auto Dry Cycle Display 6 Digit Display Display 1 “ Elapsed Time in Minutes and Seconds (HH) Display 2 “ ” or “ ” Cycle Number (HH) and Segment Number (Y) or Cycle Number (HH) and Segment Cooldown Display 3 “ ” or “ ” Actual Temperature Display 4 “ ” or “ ” Programmed Temperature Display 5 “ ” Description Programmed Target Level In the Auto-Dry and Moisture Dry cycles, pressing the Start ( ) keypad will advance the cycle to the next enabled segment. Note that Auto-Dry cycles only have one programmable segment. ) Pause Mode If Stop ( ) keypad is pressed or the loading or lint door is opened while in Run Mode, control enters Pause Mode. If the door was opened to enter Pause Mode, the control will show “” until the door is closed or Pause Mode is exited. If the door is closed, the control will show “” for one second followed by “” for one second as well as flash the Start ( ) keypad LED one second on/one second off. If the Stop ( ) keypad was pressed to enter Pause Mode and the loading door is closed, the control will show “” until Pause Mode is exited. Any time “” is shown on the control, the Start ( ) keypad LED will flash one second on/one second off to prompt the user to restart the cycle. 70444901 (EN) © Copyright, Alliance Laundry Systems LLC – DO NOT COPY or TRANSMIT 13 Control Identification Error Mode Entering Diagnostic Mode From Idle Mode This mode will be entered to display all fatal machine errors. When entered from the Idle Mode, the control will be running a test selected by the user via keypad presses or communication with a device. Communication Mode This mode is entered whenever the control is communicating with a PDA. Refer to PC and PDA Application User Instructions. Cool Down Mode The control enters the Cool Down Mode after the heat segment of the cycle is completed. The control turns the heater off and for steam heated units turns the damper motor on. The cool down segment will end once the cool down temperature has been reached or the programmed cool down time expires, which ever happens first. Displaying Temperature Mode The temperature can be displayed during an active cycle by pressing the up arrow ( ) or down arrow ( ) to scroll through the menu. Select A:(Temp Value) to see the actual or current temperature. Select P:(Temp Value) to see the programmed temperature. End of Cycle Mode The control enters End of Cycle Mode after the cool down segment is finished. The display will toggle between “” and “” for one second each until End of Cycle Mode is exited. If the door has not been opened or a keypad has not been pressed after two minutes, the machine will enter Extended Tumble Mode. This mode is exited when the door is opened or Stop ( ) keypad is pressed. The control will then return to Idle Mode. Extended Tumble Mode The Extended Tumble Mode has two portions. The Anti-Wrinkle Tumble is entered two minutes after the cycle has ended if the door is not opened. The cylinder will tumble for 30 seconds every two minutes for up to one hour. If the door hasn’t been opened and no keys have been pressed one hour after the Anti-Wrinkle Tumble has ended, the control increments the Anti-Wrinkle Time Exceeded audit counter and enters the Delayed Tumble. The cylinder will tumble for two minutes every 60 minutes for up to 18 hours. Reversing Mode (reversing models only) Models equipped with the reversing feature will rotate in the forward direction, pause, rotate in the reverse direction and then pause for programmable times and segments of the cycle. Factory default rotate time is 120 seconds and reversing stop time is 6 seconds for all cycles with reversing enabled. 14 © Copyright, Alliance Laundry Systems LLC – DO NOT COPY or TRANSMIT 70444901 (EN) Machine Cycle Definition and Operation There are 30 machine cycles that can be selected and run. Machine cycles can be modified or made “unavailable” by manually editing them in Modify Cycle Menu or by using the PDA to download a modified machine cycle into the control. Machine cycles cannot be deleted, but can be made “unavailable” so that they are not visible from the Cycle Menu. New machine cycles cannot be created, but existing machine cycles that have been edited to be “unavailable” may be re-edited to be available again. Rotation Sensor Equipped Machines Machine Cycle Operation To Start a Cycle When a cycle is run, the control runs the cycle segment by segment in a sequence. First the control examines the Cycle Type chosen to determine if it is a Time Dry, Auto-Dry or Moisture Dry (if equipped) cycle type. Then the first segment is examined to see if it is programmed to “” or “”. If the segment is programmed to “”, control skips to the next segment. On machines equipped with a rotation sensor, the control monitors the rotation sensor to verify the cylinder is rotating. The control calculates the cylinder’s RPM. If the RPM drops to zero while the cylinder is supposed to be rotating, the control will advance to the Cool Down segment of the cycle and an error message will be displayed. 1. Press the Up ( ) or Down ( ) keypad to change cycles. 2. Press Start ( ) to start selected cycle. NOTE: If door is not closed when the Start ( keypad is pressed, display will show “”. ) At the start of some machine cycles, the control displays a Total Remaining Cycle time. This time is taken from the machine cycles as they are programmed. The Total Remaining Cycle Time begins to count down as soon as the cycle is started. Time Dry Cycle In this type of cycle, the control will regulate the temperature and time duration as programmed for the cycle chosen. Auto-Dry Cycle If this type of cycle is selected, the control determines the cycle time based on the temperature and dryness level programmed for the cycle chosen. Moisture Dry Cycle (if equipped) In this type of cycle, the control checks the programmed material type, programmed target moisture content, programmed temperature and the data received from the moisture sensing system to achieve the desired results. 70444901 (EN) © Copyright, Alliance Laundry Systems LLC – DO NOT COPY or TRANSMIT 15 Entering the Manual Mode For programming, testing, and retrieving information from the control, it is often necessary to enter the Manual Mode by following the steps below. For an overview of entering the Manual Mode, refer to the flowchart on the following page. How to Enter the Manual Mode 1. Control must be in Idle Mode. 2. Press and hold the Stop ( ) keypad, then press and hold the Back ( ) keypad, then press the Up ( ) keypad. 3. The display will show “”. 4. Press the Up ( ) or the Down ( ) keypad to scroll through the options until the desired option appears in the display. 5. Press the Start ( displayed mode. ) keypad to enter the 6. To exit, press the Back ( ) keypad. The control will revert back to Idle Mode. 16 Manual Programming can only be turned on or off with an external device. Refer to the appropriate instruction manual. Diagnostics can be turned on and off using an external device by manual programming. By default, Manual Programming is turned “”. The manual features available in each group are as follows (the menu displayed on the display in this mode is in parentheses). Manual Programming () Manual Read Audit () Manual Reset () Diagnostic Tests () If a manual parameter is turned off or unavailable (ex: trying to enter diagnostics while a cycle is running), the display will change from the selected feature to “”, an audio signal will sound for one second and the features in the parameter cannot be entered. The display will then return to the selected feature. © Copyright, Alliance Laundry Systems LLC – DO NOT COPY or TRANSMIT 70444901 (EN) Entering the Manual Mode To enter a programming option, press the Start ( keypad. To exit, press the Back () keypad. Manual Mode: Enter by pressing Stop ( ), then Back (), then Up () keypads Press the Up () or the Down () keypad to scroll through the Manual Mode options. “Prog” Manual Programming “Audit” Manual Read Audit 70444901 (EN) / ) Press the Start ( / ) keypad to enter Manual Programming. Refer to Manual Programming flowchart. “CyCLE” Total machine cycles Press the Start ( / ) keypad to read audit. Press the Start ( / ) keypad. “totHrS” Total Run Hours Press the Start ( / ) keypad to read audit. Press the Up () or the Down () keypad to scroll through the Audit options. “HEAtHr” Total Heat Hours Press the Start ( / ) keypad to read audit. “rA CyC” Total Rapid Advance Cycles Press the Start ( / ) keypad to read audit. “Ab CyC” Total Aborted Cycles Press the Start ( / ) keypad to read audit. “AntiCt” Total Time Anti-wrinkle Exceeded Press the Start ( / ) keypad to read audit. “End2OP” Average Time From End of Cycle to Door Open Press the Start ( / ) keypad to read audit. “End2St” Average Time From End of Cycle to Run Mode Press the Start ( / ) keypad to read audit. “rESEt” Manual Reset Press the Start ( / ) keypad to reset control. “diAg” Diagnostic Tests Press the Start ( / ) keypad to enter Diagnostic Tests. Refer to Diagnostic Tests flowchart. © Copyright, Alliance Laundry Systems LLC – DO NOT COPY or TRANSMIT TMB1372R TMB1372R 17 Programming Control What Can Be Programmed? How to Program a Cycle This feature allows the owner to program cycle parameters and other features by using the keypads. The control must have the Manual Programming Mode enabled, which is the factory default. This mode can only be turned OFF and ON by using an external device. Refer to this section when programming the control. For an overview of the programming organization, refer to the flowcharts on the following pages. For more advanced users, a quick reference list of the options available through the programming mode is located on this page. 1. Press the Up ( ) or Down ( ) keypad to scroll through the option list. 2. Press Start ( ) to select an option to program. 3. Press the Up ( ) or Down ( ) keypad to change the value of that option. 4. Press Start ( ) to save the change. NOTE: Press the Back ( ) keypad to leave the option without saving any change. 5. After pressing Start ( next option in the list. ), control will go to the 6. Press Back ( ) keypad to go to Idle Mode. NOTE: The codes in the Option Display column of the Programmable Options List are what will show in the display when that option is selected. Programmable Options Available Option Number 1 a 1 2 Option Display “” “” “” “” Default Value Description Cycle Programming Cycle HH (HH represents cycles 1-30) Cycle HH Enable Disable Cycle HH Type - 3 “” Cycle HH Material Type - 4 “” 5 “” Cycle HH Time Past Target (minutes) Segment 1 - 6 “” Segment 2 - Value Range on/oFF tinE (Time Dry), Auto (Auto Dry), moist (Moisture Dry) 0 (Cotton), 1 (Blend), 2 (Bedding), 3 (Delicate), 4 (Synthetic), 5 (Wool) 0-15 CHHS11 (Segment 1 Enable/Disable), CHHS12 (Segment 1 Time), CHHS13 (Segment 1 Temperature), CHHS14 (Segment 1 Auto Dry Target Level), CHHS15 (Segment 1 Moisture Dry Target Moisture), CHHS16 (Segment 1 Reversing Enable/ Disable) CHHS21 (Segment 2 Enable/Disable), CHHS22 (Segment 2 Time), CHHS23 (Segment 2 Temperature), CHHS24 (Segment 2 Auto Dry Target Level), CHHS25 (Segment 2 Moisture Dry Target Moisture), CHHS26 (Segment 2 Reversing Enable/ Disable) (Continued) (Continued) 18 © Copyright, Alliance Laundry Systems LLC – DO NOT COPY or TRANSMIT 70444901 (EN) Programming Control Option Option Number Display 7 “” Segment 3 - 8 “” Segment 4 - 9 “” Segment 5 - 10 “” Cool Down - 11 “” Reversing - a b “” “ ” “ ” “” “ ” “ ” “ ” “” “ ” “ ” Global Cool Down Cool Down Temperature Cool Down Time (minutes) Global Reversing Parameters Rotate Time (seconds) Stop Time (seconds) Advanced Reversing Global Temperatures Global Very Low Temperature Global Low Temperature 100°F/38°C 2 7 (120) 0 (6) 0 120°F/49°C 140°F/60°C c “ ” Global Medium Temperature 160°F/71°C 2 a b 3 a b c 4 Default Value Description Value Range CHHS31 (Segment 3 Enable/Disable), CHHS32 (Segment 3 Time), CHHS33 (Segment 3 Temperature), CHHS34 (Segment 3 Auto Dry Target Level), CHHS35 (Segment 3 Moisture Dry Target Moisture), CHHS36 (Segment 3 Reversing Enable/ Disable) CHHS41 (Segment 4 Enable/Disable), CHHS42 (Segment 4 Time), CHHS43 (Segment 4 Temperature), CHHS44 (Segment 4 Auto Dry Target Level), CHHS45 (Segment 4 Moisture Dry Target Moisture), CHHS46 (Segment 4 Reversing Enable/ Disable) CHHS51 (Segment 5 Enable/Disable), CHHS52 (Segment 5 Time), CHHS53 (Segment 5 Temperature), CHHS54 (Segment 5 Auto Dry Target Level), CHHS55 (Segment 5 Moisture Dry Target Moisture), CHHS56 (Segment 5 Reversing Enable/ Disable) CHHCd1 (Cool Down Temperature), CHHCd2 (Cool Down Time), CHHCd3 (Cool Down Segment Reversing Enable/Disable) CHH r1 (Cycle Reversing Enable/Disable), CHH r2 (Cycle Reversing Rotate Time), CHH r3 (Cycle Reversing Stop Time) 70°-110°F/21°-43°C 1-15 3-9 (30-540 seconds) 0-4 (6-10 seconds) 0 (oFF), 1 (on) 100°-120°F/38°-49°C 120°-140°F/49°-60°C (50, 75, 120, 170, 200 Pound Models), 105°-145°F/41°-63°C (25, 30, T30 Pound Models), 125°-155°F/52°68°C (35, T45, 55 Pound Models) 140°-160°F/60°-71°C (50, 75, 120, 170, 200 Pound Models), 135°-160°F/57°-71°C (25, 30, T30 Pound Models), 145°-165°F/63°74°C (35, T45, 55 Pound Models) (Continued) (Continued) 70444901 (EN) © Copyright, Alliance Laundry Systems LLC – DO NOT COPY or TRANSMIT 19 Programming Control Option Option Number Display d “ ” 5 a b c 6 a b 7 8 9 a b 10 11 12 13 a b c d e f g 14 15 20 “” “ ” “ ” “ ” “” “ ” “ ” “” “” “” “” “ ” “ ” “” “” “” “ ” “ ” “ ” “ ” “ ” “ ” “ ” “” “” Default Value Range Value Global High Temperature 190°F/88°C 160°-190°F/71°-88°C (35, T45, 55, 50, 75, 120, 170, 200 Pound Models), 155°-190°F/ 68°-88°C (25, 30, T30 Pound Models) Global Audio Signal End of Cycle 1 0 (oFF), 1 (on) End of Cycle Duration (seconds) 5 1-120 Keypad Feedback 1 0 (oFF), 1 (on) External Signal External Signal End of Cycle 1 0 (oFF), 1 (on) External Signal End Of Cycle Duration 5 1-120 (seconds) Multi-Segment Cycles 0 1 (Enable), 0 (Disable) Advanced Moisture Dry Options 0 1 (Enable), 0 (Disable) Error Displays Display Limit Errors 0 1 (Enable), 0 (Disable) Display Moisture Sensor Error 1 1 (Enable), 0 (Disable) Temperature 0 0 (Fahrenheit), 1 (Celsius) Auto Ignite Retry 3 0-255 Clean Lint Reminder 0 0 (off)-255 Real Time Clock Minutes 0-59 Hours 0-23 Day 1-7 Date 1-31 Month 1-12 Year 0-99 Daylight Saving 1 1 (Enable), 0 (Disable) Manual Rapid Advance 0 1 (Enable), 0 (Disable) Manual Diagnostics 1 1 (Enable), 0 (Disable) Description © Copyright, Alliance Laundry Systems LLC – DO NOT COPY or TRANSMIT 70444901 (EN) Programming Control “Prog” Manual Programming To enter a programming option, press the Start ( keypad. To exit, press the Back () keypad. Press the Start ( / ) keypad “CyCLE-” Cycle Programming “CyCXX” Cycle to be programmed / ) “CXXEn” Cycle HH Enable Disable “On” Enable “oFF” Disable “CXXtyP” Cycle HH Type “tinE” Time Dry “Auto” Auto Dry Press the Up () or the Down () keypad to scroll through the programmable options. “noist” Moisture Dry “CXXnt” Cycle HH Material Type “0” Cotton “CXXtPt” Cycle HH Time Past Target “1” Blend “2” Bedding “3” Delicate “4” Synthetic continued continued “5” Wool TMB1437R TMB1437R 70444901 (EN) © Copyright, Alliance Laundry Systems LLC – DO NOT COPY or TRANSMIT 21 Programming Control continued continued To enter a programming option, press the Start ( keypad. To exit, press the Back () keypad. / ) “CXXS1-” Segment 1 “CXXS11” Segment 1 Enable/Disable “CXXS2-” Segment 2 “CXXS21” Segment 2 Enable/Disable “CXXS3-” Segment 3 “CXXS31” Segment 3 Enable/Disable Press the Up () or the Down () keypad to scroll through the programmable options. “CXXS32” Segment 3 Time “CXXS33” Segment 3 Temperature “CXXS34” Segment 3 Auto Dry Target Level “CXXS35” Segment 3 Moisture Dry Target Level continued continued “CXXS22” Segment 2 Time “CXXS23” Segment 2 Temperature “CXXS24” Segment 2 Auto Dry Target Level “CXXS25” Segment 2 Moisture Dry Target Level “CXXS12” Segment 1 Time “CXXS13” Segment 1 Temperature “CXXS14” Segment 1 Auto Dry Target Level “CXXS15” Segment 1 Moisture Dry Target Level “CXXS16” Segment 1 Reversing Enable/Disable “CXXS26” Segment 2 Reversing Enable/Disable “CXXS36” Segment 3 Reversing Enable/Disable TMB1373R-bTMB1373R-b 22 © Copyright, Alliance Laundry Systems LLC – DO NOT COPY or TRANSMIT 70444901 (EN) Programming Control continued continued To enter a programming option, press the Start ( keypad. To exit, press the Back () keypad. / ) “CXXS4-” Segment 4 “CXXS41” Segment 4 Enable/Disable “CXXS5-” Segment 5 “CXXS51” Segment 5 Enable/Disable “CXXS52” Segment 5 Time Press the Up () or the Down () keypad to scroll through the programmable options. “CXXS53” Segment 5 Temperature “CXXS54” Segment 5 Auto Dry Target Level “CXXS55” Segment 5 Moisture Dry Target Level “CXXS42” Segment 4 Time “CXXS43” Segment 4 Temperature “CXXS44” Segment 4 Auto Dry Target Level “CXXS45” Segment 4 Moisture Dry Target Level “CXXS46” Segment 4 Reversing Enable/Disable “CXXS56” Segment 5 Reversing Enable/Disable continued continued TMB1373R-c TMB1373R-c 70444901 (EN) © Copyright, Alliance Laundry Systems LLC – DO NOT COPY or TRANSMIT 23 Programming Control continued To enter a programming option, press the Start ( keypad. To exit, press the Back () keypad. / ) continued “CXXCd-” Cool Down “CXXCd1” Cool Down Temperature Press the Up () or the Down () keypad to scroll through the programmable options. “CXXCd2” Cool Down Time “CXXCd3” Cool Down Segment Reversing Enable/Disable “CXXr-” Reversing “CXX r1” Cycle Reversing Enable/Disable “Cd-” Global Cool Down “Cd 1” Cool Down Temperature continued “Cd 2” Cool Down Time “CXX r2” Cycle Reversing Rotate Time “CXX r3” Cycle Reversing Stop Time TMB1373R-d TMB1373R-d 24 © Copyright, Alliance Laundry Systems LLC – DO NOT COPY or TRANSMIT 70444901 (EN) Programming Control continued “rEv-” Global Reversing Parameters Press the Up () or the Down () keypad to scroll through the programmable options. To enter a programming option, press the Start ( keypad. To exit, press the Back () keypad. / ) “rEv 1” Rotate Time “rEv 2” Stop Time “rEv 3” Advanced Reversing (On/off) “tEnp-” Global Temperatures “tEnp 1” Global Very Low Temperature “tEnp 2” Global Low Temperature “tEnp 3” Global Medium Temperature “tEnp 4” Global High Temperature continued 70444901 (EN) © Copyright, Alliance Laundry Systems LLC – DO NOT COPY or TRANSMIT TMB1373R-e TMB1373R-e 25 Programming Control continued “Audio-” Global Audio Signal Press the Up () or the Down () keypad to scroll through the programmable options. “ESig-” External Signal “nuLSEg” Multi-Segment Cycles (on/off) To enter a programming option, press the Start ( keypad. To exit, press the BACK () keypad. / ) “Aud 1” End of Cycle (On/off) “Aud 2” End of Cycle Duration “Aud 3” Keypad Feedback (On/off) “ESig 1” External Signal End of Cycle (on/off) “ESig 2” External Signal End of Cycle Duration “ndryOP” Advanced Moisture Dry Options (Enable/Disable) “Error-” Error Displays “EdiSPL” Display Limit Errors (Enable/Disable) continued “noist” Display Moisture Sensor Error (Enable/Disable) TMB1373R-f TMB1373R-f 26 © Copyright, Alliance Laundry Systems LLC – DO NOT COPY or TRANSMIT 70444901 (EN) Programming Control continued To enter a programming option, press the Start ( keypad. To exit, press the BACK () keypad. / ) “t FC” Temperature “AIg” Auto Ignite Retry Press the Up () or the Down () keypad to scroll through the programmable options. “Lint” Clean Lint Reminder “rtC-” Real Time Clock “rtC 1” Minutes “rtC 2” Hours “rtC 3” Day “rtC 4” Date “rAPdEn” Manual Rapid Advance (on/off) “diAgEn” Manual Diagnostics (on/off) “rtC 5” Month “rtC 6” Year “rtC 7” Daylight Savings (on/off) TMB1373R-g TMB1373R-g 70444901 (EN) © Copyright, Alliance Laundry Systems LLC – DO NOT COPY or TRANSMIT 27 Collecting Audit Information This feature allows the owner to retrieve audit information stored in the tumble dryer by pressing a sequence of pads on the control. For an explanation of the audit options available, refer to the Audit Options List on this page. How to Enter Audit Feature 1. Control must be in Manual Mode to start. Refer to Entering the Manual Mode. 2. Press the Up ( ) or the Down ( ) keypad until “” appears. 3. Press the Start ( appear. ) keypad. “” will 2. Once the desired option appears in the display, press the Start ( ) keypad once to start the audit count. 3. Press the Start ( ) keypad again. The control will go to the next audit option in the Audit Options List. 4. To select other audit options, repeat steps 1 – 3. How to Exit Audit Feature Press the Back ( ) keypad until the control returns to Idle Mode. If the procedure did not work, the control will return to the Idle Mode. How to Read Audit Data 1. Use the Up ( ) or the Down ( ) keypad to scroll through various options until the desired option is shown in the display. Refer to the Audit Options List, Table 2, for an explanation of the audit options available. Audit Options List Display Description Total # of Machine Cycles Total # of Run Hours Total # of Heat Hours Total # of Rapid Advance Cycles Total # of Aborted Cycles Total # of Times Anti-Wrinkle Exceeded Average Time from End of Cycle to Door Open (Last 25 Cycles) Average Time from End of Cycle to Run Mode (Last 25 Cycles) Table 2 28 © Copyright, Alliance Laundry Systems LLC – DO NOT COPY or TRANSMIT 70444901 (EN) Manual Reset This feature allows the owner to reset the tumble dryer control’s programming data to the factory default settings by pressing a sequence of pads on the control. For an explanation of the Factory Default Settings, refer to Default Tumble Dryer Settings. How to Enter Manual Reset 1. Control must be in Manual Mode to start. Refer to Entering the Manual Mode. 2. Press the Up ( ) or the Down ( ) keypad until “” appears. 3. Press the Start ( ) keypad. The control will be blank until the programming is complete. Once the program has been reset, the control will revert back to the Manual Mode, displaying “”. 70444901 (EN) © Copyright, Alliance Laundry Systems LLC – DO NOT COPY or TRANSMIT 29 Custom Save This feature allows the owner to save a current cycle. For time dry cycles, the custom save will reprogram the cycle time to the time that has elapsed in the current cycle. For moisture dry cycles, the custom save feature will save the current moisture level as the target moisture level for the current cycle. How to Enter Custom Save 1. While a cycle is running, press the Back ( ) and Start ( ) keypads. 2. Display will change to “” and Start keypad will flash. 3. Press the Start ( 30 ) keypad. © Copyright, Alliance Laundry Systems LLC – DO NOT COPY or TRANSMIT 70444901 (EN) Testing Machine and Electronic Control Functions 3. Press the Start ( ) keypad. Display will change to “” indicating the control software version number test. 4. Press the Up ( ) or the Down ( ) keypad to scroll through the diagnostic test options. This feature allows the owner to run diagnostic tests on various tumble dryer operations without servicing the tumble dryer. The tests that are available are shown in Table 3. For an overview of the manual diagnostic test feature, refer to the flowchart on the following page. How to Enter Testing Feature 1. Enter Manual Mode. Refer to Entering the Manual Mode. 2. Press the Up ( ) or the Down ( ) keypad until “” appears. How to Start Tests To start a diagnostic test, refer to the quick reference chart below (Table 3). Press the Start ( ) keypad when the desired test is displayed. For detailed information on each test, read the appropriate description. How to Exit Testing Feature Press the Back ( ) keypad. The display will return to Idle Mode. Diagnostic (Testing) Mode - Quick Reference Chart Display Diagnostic Mode “” Control Software Version “” Loading Door Status “” Lint Door Status “” Heater Interlock Test “” Fan Motor Contactor Status ( represents input status, open “” or closed “” “” Fan Motor Centrifugal Switch Status ( represents input status, open “” or closed “” “ ” Cabinet High Limit Thermostat Status ( represents input status, open “” or closed “” “ ” Stove High Limit Thermostat 1 Status ( represents input status, open “” or closed “” “ ” Stove High Limit Thermostat 2 Status ( represents input status, open “” or closed “” “” DIP Switch Status “” ICM Alarm Status “” ICM Reset Test “” External Alarm Test “” Dryer On Temperature Test “” Thermistor Temperature Test “” Machine Config #2 Display “” Machine Config #3 Display “” Airflow Switch Test “” Fan Motor Test “” Damper Motor Test* “” Reverse Motor Test* “” Rotation Sensor Test* “ ” Moisture Sensor Test (Shorted test jumper)* “ ” Moisture Sensor Test (Resistance test jumper)* * = Tests only shown if enabled by the DIP switch configuration. Table 3 70444901 (EN) © Copyright, Alliance Laundry Systems LLC – DO NOT COPY or TRANSMIT 31 Testing Machine and Electronic Control Functions “diAg” Diagnostic Tests “dSoft” Control Software Version Number Test Press the Start ( / ) keypad. Press the Up () or the Down () keypad to scroll through the Diagnostic Test options. To enter a diagnostic test, press the Start ( / ) keypad. To exit, press the Back () keypad. “ddoor” Loading Door Status “dLint” Lint Door Status “dHEAt” Heater Interlock Test “ddiP” DIP Switch Status “FCOnXX” Fan Motor Contactor Status “diCnAL” ICM Alarm Status “Cab XX” Cabinet High Limit Thermostat Status “diCnrS” ICM Reset Test “SL XX” Stove High Limit Thermostat 1 Status “dEALrn” External Alarm Test “SL2 XX” Stove High Limit Thermostat 2 Status “ddryon” Dryer On Temperature Test “dtHEr” Thermistor Temperature Test “dConF2” Machine Config #2 Display “dConF3” Machine Config #3 Display “dAFS” Airflow Switch Test “dFAn” Fan Motor Test “ddAnPr” Damper Motor Test “drEuSE” Reverse Motor Test “drotAt” Rotation Sensor Test “drnC 1” Moisture Sensor Test (Shorted) “drnC 2” Moisture Sensor Test (Resistance) 32 © Copyright, Alliance Laundry Systems LLC – DO NOT COPY or TRANSMIT TMB1374R TMB1374R 70444901 (EN) Testing Machine and Electronic Control Functions Diagnostic Test Descriptions Heater Interlock Test Control Software Version Number Test While this test is running, the control will show the status of the following inputs for two seconds each. The control will continue scrolling through the input status displays until the test is aborted. This option displays the control software version number. To start test, control must be in the Testing Mode. Refer to “How to Enter Testing Feature” at the beginning of this section. To enter, press the Start ( ) keypad. The display will show “” where “” is the software version number. To exit the Software Version Number Test, press the Back ( ) keypad. The control will return to the testing mode. Loading Door Test To start test, the control must be in the Testing Mode. Refer to “How to Enter Testing Feature” at the beginning of this section. To enter, press Start ( ). Refer to five sections below for more details on individual statuses. NOTE: These switches are tested in sequence. If one switch is sensed open, the rest will be open as well. For example, if the fan motor contactor switch is open, all of the switches will be open. This option tests the loading door switch. To start test, control must be in the Testing Mode. Refer to “How to Enter Testing Feature” at the beginning of this section. To exit the test, press the Back ( ) keypad. The control will return to the testing mode. To enter, press the Start ( ) keypad. The display will show “” when the loading door switch is open and “” when the loading door switch is closed. The display will show “” if the switch is sensed open and “” if the switch is sensed closed. The loading door switch has to be closed or open for at least one second for the control to register the switch as closed or open. To exit the Loading Door Test, press the Back ( ) keypad. The control will return to the testing mode. Lint Door Test This option tests the lint door switch. To start test, control must be in the Testing Mode. Refer to “How to Enter Testing Feature” at the beginning of this section. To enter, press the Start ( ) keypad. The display will show “” when the lint door switch is open and “” when the lint door switch is closed. The lint door switch has to be closed or open for at least one second for the control to register the switch as closed or open. Fan Motor Contactor Switch Fan Motor Centrifugal Switch The display will show “” if the switch is sensed open and “” if the switch is sensed closed. Cabinet High Limit Thermostat The display will show “ ” if sensed open for at least 1.5 seconds and “ ” if sensed closed for at least one second. Stove High Limit Thermostat 1 The display will show “ ” if sensed open for at least 1.5 seconds and “ ” if sensed closed for at least one second. Stove High Limit Thermostat 2 The display will show “ ” if sensed open for at least 1.5 seconds and “ ” if sensed closed for at least one second. NOTE: Loading door must be closed while testing lint door. To exit the Lint Door Test, press the Back ( ) keypad. The control will return to the testing mode. 70444901 (EN) © Copyright, Alliance Laundry Systems LLC – DO NOT COPY or TRANSMIT 33 Testing Machine and Electronic Control Functions Dip Switch Status The control will show the displays in Table 4 according to the DIP switch configuration. The control will show which switches are in the ON position. DS8 OFF OFF OFF OFF OFF OFF OFF OFF ON DS7 OFF OFF OFF OFF OFF OFF OFF ON OFF DS6 OFF OFF OFF OFF OFF OFF ON OFF OFF DS5 OFF OFF OFF OFF OFF ON OFF OFF OFF DS4 OFF OFF OFF OFF ON OFF OFF OFF OFF DS3 OFF OFF OFF ON OFF OFF OFF OFF OFF DS2 OFF OFF ON OFF OFF OFF OFF OFF OFF DS1 OFF ON OFF OFF OFF OFF OFF OFF OFF Display Table 4 ICM Alarm Status External Alarm Test This option shows the status of the ICM (Ignition Control Module) Alarm. This option tests whether the external alarm is working. To start test, control must be in the Testing Mode. Refer to “How to Enter Testing Feature” at the beginning of this section. To start test, control must be in the Testing Mode. Refer to “How to Enter Testing Feature” at the beginning of this section. To enter, press the Start ( ) keypad. The display will show “ ” if the alarm is active for at least one second or “” if the alarm is not active for one second. To enter, press the Start ( ) keypad. The display will show “” and the external alarm will sound until the test is exited. To exit the test, press the Back ( ) keypad. The control will return to the testing mode. To exit this test, press the Back ( ) keypad. The control will return to the testing mode. ICM Reset Test The ICM Reset Test can be used to both activate the ICM alarm signal and reset the ICM alarm. When this test is started, the ICM reset will become active. If the reset signal is active for a long enough period of time (4 seconds) the ICM Lockout input will become active. To reset the ICM, stop the ICM Reset Test and then start the test again until the ICM Lockout input becomes inactive (4 seconds) and then stop the ICM Reset Test. If “” shows on the display, ICM Reset output is active. 34 © Copyright, Alliance Laundry Systems LLC – DO NOT COPY or TRANSMIT 70444901 (EN) Testing Machine and Electronic Control Functions Tumble Dryer On Temperature Test Machine Configuration Display #2 Test This option tests the temperature inside the cylinder while running a cycle. This option shows the machine configuration values for the machine type. To start test, control must be in the Testing Mode. Refer to “How to Enter Testing Feature” at the beginning of this section. To start test, control must be in the Testing Mode. Refer to “How to Enter Testing Feature” at the beginning of this section. To enter, press the Start ( ) keypad. The display will show “ ” (Fahrenheit) or “ ” (Celsius). Use the Up ( ) or the Down ( ) keypad to select desired temperature. Press the Start ( ) keypad to begin cycle. While the test is running the control will display the temperature estimated in the cylinder (“ ” or “ ”). Once the cylinder temperature stabilizes at the target temperature, the heater is turned off and there is a two minute cool down period. During cool down, the control will display the time remaining as “ ”. To enter, press the Start ( ) keypad. The display will show “ ”, with “” the number corresponding to the machine capacity. Refer to Table 5. NOTE: This test does not increment the Total # of Cycles audit counter. To exit the test, press the Back ( ) keypad. The control will return to the testing mode. Thermistor Temperature Test Value Description 2 25, 30 Pound Tumble Dryer 4 30, 45 Pound Stack Tumble Dryer 5 35, 55 Pound Tumble Dryer 12 50, 75, F75, 120, 170, 200 Pound Tumble Dryer Table 5 To exit Machine Configuration Display #2 Test, press the Back ( ) keypad. The control will return to the testing mode. This option displays the temperature sensed at the thermistor in 5°F (3°C) increments. To start test, control must be in the Testing Mode. Refer to “How to Enter Testing Feature” at the beginning of this section. To enter, press the Start ( ) keypad. The display will show “ ” or “ ”. The “” will show Fahrenheit, the “” will show Celsius and the “” will show degrees. If control senses a shorted thermistor, the display will show “ ”. If the control senses an open thermistor, the display will show “ ”. To exit this test, press the Back ( ) keypad. The control will return to the testing mode. 70444901 (EN) © Copyright, Alliance Laundry Systems LLC – DO NOT COPY or TRANSMIT 35 Testing Machine and Electronic Control Functions Machine Configuration Display #3 Test Fan Motor Test This option shows the machine configuration values for the machine capacity. This option shows the fan motor running. To start test, control must be in the Testing Mode. Refer to “How to Enter Testing Feature” at the beginning of this section. To enter, press the Start ( ) keypad. The display will show “ ”, with “” representing the machine capacity. Refer to Table 6. To exit Machine Configuration Display #3 Test, press the Back ( ) keypad. The control will return to the testing mode. Value Description To enter, press the Start ( ) keypad. The display will show “ ” to indicate the fan motor is going to run. The test must run for at least six seconds before it can be exited and off for six seconds before the test can be run again. NOTE: This test does not count towards the total machine run time operation. To exit Fan Motor Test, press the Back ( ) keypad. The control will return to the testing mode. 0 Tumble Dryer 17 25 Pound Tumble Dryer 18 30 Pound Tumble Dryer 19 30 Pound Stack Tumble Dryer 20 30 Pound Stack Tumble Dryer – Lower Pocket 21 30 Pound Stack Tumble Dryer – Upper Pocket 22 35 Pound Tumble Dryer 23 45 Pound Stack Tumble Dryer 24 45 Pound Stack Tumble Dryer – Lower Pocket 25 45 Pound Stack Tumble Dryer – Upper Pocket 26 50 Pound Tumble Dryer 27 55 Pound Tumble Dryer 28 75, F75 Pound Tumble Dryer 29 120 Pound Tumble Dryer 30 170 Pound Tumble Dryer To exit Damper Motor Test, press the Back ( ) keypad. The control will return to the testing mode. 31 200 Pound Tumble Dryer Reverse Motor Test Table 6 Airflow Switch Test This option shows the current state of the airflow switch. To start test, control must be in the Testing Mode. Refer to “How to Enter Testing Feature” at the beginning of this section. To enter, press the Start ( ) keypad. The display will show “ ” or “ ”, with “ ” being open and “ ” being closed. Switch has to be closed for at least one second or open for at least one second for a valid change. To exit Airflow Switch Test, press the Back ( ) keypad. The control will return to the testing mode. 36 To start test, control must be in the Testing Mode. Refer to “How to Enter Testing Feature” at the beginning of this section. Damper Motor Test This option shows the damper motor running. To start test, control must be in the Testing Mode. Refer to “How to Enter Testing Feature” at the beginning of this section. To enter, press the Start ( ) keypad. The display will show “” to indicate the damper motor is going to run. The test must run for at least six seconds before it can be exited and off for six seconds before the test can be run again. NOTE: This test does not count towards the total machine run time operation. This option shows the reverse motor running. To start test, control must be in the Testing Mode. Refer to “How to Enter Testing Feature” at the beginning of this section. To enter, press the Start ( ) keypad. The display will show “” to indicate the reverse motor is going to run. The test must run for at least six seconds before it can be exited and off for six seconds before the test can be run again. NOTE: This test does not count towards the total machine run time operation. To exit Reverse Motor Test, press the Back ( ) keypad. The control will return to the testing mode. © Copyright, Alliance Laundry Systems LLC – DO NOT COPY or TRANSMIT 70444901 (EN) Testing Machine and Electronic Control Functions Rotation Sensor Test This option shows the RPM of the tumble dryer cylinder. To start test, control must be in the Testing Mode. Refer to “How to Enter Testing Feature” at the beginning of this section. To enter, press the Start keypad. The display will show “”. The display is updated every ten seconds. The test must run for at least six seconds before it can be exited and off for six seconds before the test can be run again. NOTE: This test does not count towards the total machine run time operation. To exit Rotation Sensor Test, press the Back ( ) keypad. The control will return to the testing mode. Moisture Sensor Test (Shorted Test Jumper) This step is skipped if the control is not configured for Moisture Sensing. When entering this test, the control will show “ ” while flashing the Start LED one second on/one second off, allowing the user to short the cylinder to the baffle (orange jumper). When the Start key is pressed, this test step energizes the Fan Motor Contactor and Forward Motor Contactor and ”. The moisture sensor the control will show “ test is 30 seconds. During this 30 second period, the control is continually monitoring the moisture sensor input for the expected short circuit. If an intermittent signal or high resistance is sensed before the 30 seconds expire, the test is terminated and the control will show “ ”, indicating that the test has failed. At this time the user has the option to press the Back ( ) keypad to return and run the test again. If the control ran the whole test reading the expected moisture sensor level and without an intermittent signal or high resistance, “ ” will be shown. If either the loading or lint doors are opened during the test, the control will reset the test step and allow it to be run again. When the test is complete and result is displayed, the control sounds a 5 second audio signal. Press a key to advance to the next test step. If the Up ( ) or Down ( ) keypad is pressed while the test is in progress the control will toggle between displays ”, “ ” and “”. If the display is “ left on “ ” or “” for 5 seconds the control will revert to showing “ ” 70444901 (EN) Moisture Sensor Test (Resistance Test Jumper) This step is skipped if the control is not configured for Moisture Sensing. When entering this test, the control will show “ ” while flashing the Start key LED one second on/one second off, allowing the user to place the 510k Ohm resistor between the cylinder and the baffle (black jumper) which simulates an expected moisture sensor level. When the Start keypad is pressed, this step energizes the Fan Motor Contactor and Forward Motor Contactor and the control will ”. The moisture sensor test is 30 show “ seconds. During this 30 second period, the control is continually monitoring the moisture sensor input for the expected moisture sensor level. If an intermittent signal or unexpected resistance is sensed before the time expires, the test is terminated and the control will show “ ”, indicating that the test has failed. At this time, the user has the option to press the Back ( ) keypad to return and run the test again. If the control ran the test reading the expected moisture sensor level and without an inttermittent signal or unexpected resistance, “ ” will be shown. If either the loading or lint doors are opened during the test, the control will reset the test step and allow it to be run again. When the test is complete and result is displayed, the control sounds a 5 second audio signal. Press a key to advance to the next test step. If the Up ( ) or Down ( ) keypad is pressed while the test is in progress the control will toggle between ”, “ ” and “”. If the display is “ left on “ ” or “” for 5 seconds the control will revert to showing “ ”. © Copyright, Alliance Laundry Systems LLC – DO NOT COPY or TRANSMIT 37 Testing Machine and Electronic Control Functions Production Test Cycle 4. The control will advance through the sequence of test steps whenever any keypad is pressed, with the exception of the Keypad Test. Refer to Table 7 for all tests in the Production Test Cycle. To Enter Production Test Cycle 1. Be certain control is in Idle Mode. To Exit Production Test Cycle 2. While pressing and holding the Down ( ) keypad with one hand, press the Back ( ) keypad with the other hand. 3. When the control enters the Production Test Cycle, it will first display “ ” with the “” showing the software version of the control. The test will be exited when the time reaches “” on the control in the 10 Minute Test Cycle. Otherwise, the control must be powered down to end the test. Production Test Cycle Quick Reference Table Display Comments Software Version is the software version number. “ ” Control Type 2, 3, 4, 5 or 6, depending on brand. “ Keypad Test When a key is pressed, the control will display the number assigned to the keypad. As each keypad is pressed, the control will display the number assigned to it in the last digit of the display until the next key is pressed (example, if Key 1 is pressed the control will show “ ”). When all keypads have been pressed, the control will advance to next step after a one second delay. “” or “” Loading Door Test The control will display the status of the loading door: “” if door is open or “” if door is closed. “” or “” Lint Door Test The control will display the status of the lint door: “” if door is open or “” if door is closed. Loading door must be closed. All LEDs and display segments will light Show Entire Display Mode The audio signal is turned off. Control will stay in this mode until any key is pressed. “ “ ” Test Mode ” ” Machine Configuration #2 Display is the configuration byte value. The control will remain in this mode until any key is pressed. – DIP Switch Configuration The control will show the sum of all switches in the position. The control will remain in this mode until any key is pressed. Thermistor Temperature Test The temperature will be displayed in either Fahrenheit or Celsius, depending on machine’s configuration (refer to Programming Control). If control senses a shorted thermistor, SH will be displayed. If control senses an open thermistor, OP will be displayed. – Moisture Sensor 1 Test (Shorted) Refer to Diagnostic Test Descriptions. Test step lasts for 15 seconds. – Moisture Sensor 2 Test (Resistance) Refer to Diagnostic Test Descriptions. Test step lasts for 15 seconds. 10 Minute Test Cycle Determines if tumble dryer can function in a cycle for 10 minutes. Start pad will flash one second on and one second off. The Start pad can be used to decrease time remaining. If Start pad is not pressed within 4.25 minutes, the control will return to Idle Mode. Degrees in 5°F (3°C) increments, “ ”, “ ” “ ” NOTE: If power to the control is turned off before 10 Minute Test Cycle has ended, the cycle will be cleared from control. Table 7 38 © Copyright, Alliance Laundry Systems LLC – DO NOT COPY or TRANSMIT 70444901 (EN) Machine Errors PDA Communications Error Shorted Thermistor Error These errors may occur during communications. When an error occurs, the display indicates the error message on the control for a few seconds. When a PDA communication error occurs, the audit counter Total Bad IR Communications is incremented, the hour, date, and year of the event are saved, and the error code is saved. An active machine cycle is not affected when there is an error during PDA communications. Any time the control senses a temperature greater than 210 + 4°F (99°C + 16°C) during an active cycle, the control will enter the Cool Down portion of the cycle, display this error message, and turn on the audio signal. The control will continue to display the error message until any of the keypads are pressed, the Cool Down portion of the cycle has ended, and the temperature reading is less than 210°F (99°C). Press any keypad to stop audio signal. Once all three occur, the control will return to the Idle Mode. Open Thermistor Error Any time the control senses a temperature less than 0°F (-18°C) after the first three minutes of an active cycle, the control will go to Cool Down, display this error message, and then turn on the audio signal. The control will continue to display the error message until any of the keypads are pressed, the Cool Down portion of the cycle has ended, and the temperature reading is greater than 0°F (-18°C). Press any keypad to stop audio signal. Once all three occur, the control will return to the Idle Mode. Stove and Cabinet Limit Errors There are up to two Stove Limit thermostats and one Cabinet Limit thermostat on the machine. While the heat relay is on, if the stove temperature or cabinet temperature reaches the high temperature for the particular limit thermostat, the heater will turn off automatically and the control will continue the cycle with no heat until the limit thermostat resets. Once the control reaches the End of Cycle the control will display the appropriate error message, if programmed to do so, and sound the audio signal. The control will continue displaying the error message until the control returns to Idle mode. NOTE: On some models the stove and cabinet limit thermostats need to be manually reset. The remainder of the cycle will be run with no heat. On these models, the thermostat(s) must be reset prior to cycling power or the control will return back to Error Mode. 70444901 (EN) © Copyright, Alliance Laundry Systems LLC – DO NOT COPY or TRANSMIT 39 Machine Errors Auto Ignition Retry (Gas Models Only) Airflow Switch Does Not Close After Cycle Started If the Ignition Control Module (ICM) fails to ignite the gas valve the ICM will send an ICM Lockout Alarm to the control. When the control receives the ICM Lockout Alarm it will increment the ICM Lockout Alarm audit counter. If the airflow switch does not close within 5 seconds of the start/re-start of a cycle, the control will go to the Cool Down portion of the cycle, display an error message and sound the audio alarm. Once the Cool Down portion of the cycle ends, the control will continue to display the error message until the power is cycled to the machine or the Back ( ) keypad is pressed. If the ICM needs to be manually reset, when the control receives the ICM Lockout Alarm it will display the Cycle Stopped Menu with text prompting the user to press the Start ( ) keypad to reset the ICM. The user can continue to reset the ICM until there are no more programmable retry attempts (factory default is 3) or the gas ignites. On machines equipped with an ICM that does not need to be manually reset, when the control receives the ICM Lockout Alarm it will turn the heat relay off for twenty (20) seconds and then turn it back on to try and ignite the gas. The control will continue to try and ignite the gas until there are no more programmable retry attempts (factory default is 3) or the gas ignites. If the ICM fails to ignite the gas on the last attempt the control will start the Cool Down portion of the cycle, display the heat error message and sound the audio signal. When the Cool Down portion of the cycle ends the control will continue to display the error message until power is cycled to the machine or a user presses the Back ( ) keypad. Air Flow Switch Errors The control will flag an Airflow Switch Error under several conditions. Airflow Switch Errors will be processed differently depending upon what state the machine was in when the error was detected. Airflow Switch Bounces During A Running Cycle If the airflow switch is open for at least one second, the heat will be turned off and will remain off until the switch is observed closed for at least 5 seconds (it is flagged as an airflow switch bounce). If there are 5 airflow switch bounces within 5 minutes the control will go to the Cool Down portion of the cycle, display an error message and sound the audio signal. When the Cool Down portion of the cycle ends, the control will continue displaying the error message until power is cycled or a user presses the Back ( ) keypad. Rotation Sensor Error If the machine is equipped with a rotation sensor, the control will constantly monitor the input and calculate the cylinder’s rpm. If the rpm drops to zero while the cylinder is supposed to be spinning, the control will go to the Cool Down portion of the cycle. The control will display an error message and sound the audio signal. Once the Cool Down portion ends, the control will continue to display the error message until power is cycled to the machine. Airflow Switch Sensed Closed While Not In Run Mode If an airflow switch is sensed closed 30 seconds after entering Idle Mode, Pause Mode or End of Cycle Mode, the control will display an error message until power is cycled or the error clears. The cycle will not start and all user inputs will be ignored. If the error does clear, the control will go back to its previous mode of operation. 40 © Copyright, Alliance Laundry Systems LLC – DO NOT COPY or TRANSMIT 70444901 (EN) Machine Errors Fan Motor Contactor Error If the control attempts to turn on the heater relay and the control does not sense that the Fan Motor Contactor is closed, the control will go to the Cool Down portion of the cycle, display an error message and turn on the audio signal. Once the Cool Down portion of the cycle ends, the control will continue displaying the error message until power is cycled or the Back ( ) keypad is pressed. Fan Motor Centrifugal Switch Error If the control attempts to turn on the fan motor and the fan motor contactor is sensed closed but the Fan Motor Centrifugal Switch fails to close, the control will go into the Cool Down portion of the cycle, display an error message and turn on the audio signal. Once the Cool Down portion of the cycle ends, the control will continue displaying the error message until power is cycled or the Back ( ) keypad is pressed. 70444901 (EN) DIP Switch/Harness Index Mismatch Error On power up the control reads the Temperature Index Harness value and compares that with the value of switch 1, switch 2 and switch 3 on the DIP switch configuration. If the result is an invalid setup the control will not enter Idle mode and instead enter Error Mode. The control will ignore all user inputs and display an error message. The machine must be powered down and the correct temperature index harness must be installed and/or the DIP switch configuration must be corrected. Moisture Sensor Error When in Idle Mode, the control will begin to monitor the moisture sensor input. If the moisture sensor circuitry detects a load present signal read consistently (every second) for a ten minute period without user input, the control will declare a load sensed. If at any time during this sensing period, user input is detected or the control determines that there is no load present, it resets the load detected counter. After this ten minute period with a consistent load sensed, the control queues the “is dryer empty” (display “”, “”, “” each for two seconds) prompting the user to answer whether the machine is currently empty, pressing the Up ( ) or Down ( ) keypads will toggle between yes and no. If the operator selects “no” (display “”), the control returns to the Idle Mode display. If the operator selects “yes” (display “”) the control will increment the Moisture Sensor Error counter and record the error in the queue of the last eight machine errors and display the Moisture Sensor Error (display “”), pressing the Back ( ) keypad will clear the error. The “is dryer empty” prompt will only appear once a day unless machine power is cycled. © Copyright, Alliance Laundry Systems LLC – DO NOT COPY or TRANSMIT 41 Error Codes Following is a list of possible error codes for an electronic control. Errors beginning with “” refer to external device Infra-red communication errors. All other errors refer to machine errors. Display Cause/ Corrective Action Description Transmission Failure Communication failure. Re-aim external device and try again. Device Time-out Communication failure. Re-aim external device and try again. Invalid Command Code Incorrect machine type. Before downloading, ensure data is for current machine type. Invalid or Out-of-Range Data Incorrect machine type. Before downloading, ensure data is for current machine type and values entered are within the minimum and maximum limits. CRC-16 Error Communication failure. Re-aim external device and try again. Framing Error Communication error. Re-aim external device and try again. Time-out Exceeded Communication error. Re-aim external device and try again. Encryption Error Incorrect machine type. Before downloading, ensure data is for current machine type. Invalid Wake-up or Infra-red Disabled Communication failure or infra-red is disabled. Manually enable infra-red on control or re-aim external device and try again. Shorted Thermistor Error Remove any lint build-up around thermistor. If problem persists, replace control or thermistor. Open Thermistor Error Remove any lint build-up around thermistor. If problem persists, replace control or thermistor. Airflow Switch Error (Switch Fails to Open At End of Cycle) Inspect lint screen and ductwork. Once error is cleared, control will go back to previous mode of operation. Airflow Switch Error (Switch Does Not Close After Cycle Starts) Inspect lint screen and ductwork. Cycle power to machine (power down, then power up) or push Back ( ) keypad. Airflow Switch Error (Switch Bounces During Cycle) Inspect lint screen and ductwork. Cycle power to machine (power down, then power up) or push Back ( ) keypad. Table 8 (continued) 42 © Copyright, Alliance Laundry Systems LLC – DO NOT COPY or TRANSMIT 70444901 (EN) Error Codes Table 8 (continued) Display Cause/ Corrective Action Description Machine Did Not Reach Expected Temperature Check heating connections, cycle power to machine. Stove Limit 1 Error Remove any lint build-up around thermostat. If problem persists, replace control or thermostat. Stove Limit 2 Error Remove any lint build-up around thermostat. If problem persists, replace control or thermostat. Cabinet Limit Error Remove any lint build-up around thermostat. If problem persists, replace control or thermostat. ICM Lockout Alarm Active Check that gas is turned on and that ignition cable is connected securely. If problem persists, replace control. Rotation Sensor Error Check for broken or worn belts. Make sure machine is not over loaded and check if rotation sensor is working. If problem persists, replace rotation sensor or control. DIP Switch Configuration Size Mismatch Check temperature index harness and dipswitch settings. Error If problem persists, replace temperature index harness or control. Fan Motor Contactor Error Check signal to control. If problem persists, replace fan motor or control. Fan Motor Centrifugal Switch Error Check signal to control. If problem persists, replace fan motor or control. Moisture Sensor Error Push Back ( ) keypad to clear the error. Table 8 70444901 (EN) © Copyright, Alliance Laundry Systems LLC – DO NOT COPY or TRANSMIT 43 Communications Mode Infra-red Communications The Infra-red Communications feature allows the control to communicate with an external device. The control can be programmed and have its data read without using the keypad. It may also be used to start and stop various diagnostic tests. How to Begin Communications with An External Device The control will go blank and the display will show ” until the communication is complete. The “ display will return to the previous mode. If an error occurs that terminates communication, the display will show the appropriate error code. NOTE: The Infra-red Communications option must be turned on. 44 © Copyright, Alliance Laundry Systems LLC – DO NOT COPY or TRANSMIT 70444901 (EN) Cycle Charts Cycle No Cycle Name 1 Towels 2 Sheets Blend 3 Cycle Type Moisture Moisture Moisture Moisture Moisture Moisture Moisture Moisture Moisture Moisture Moisture Moisture Moisture Moisture Time Dry Time Dry Time Dry Time Dry Time Dry Time Dry Time Dry Time Dry Time Dry Time Dry Time Dry Time Dry Time Dry Time Dry Time Dry Time Dry Material Type Cotton Bedding Bedding Bedding Bedding Bedding Bedding Synthetic Blend Synthetic Blend Cotton Synthetic Cotton n/a n/a n/a n/a n/a n/a n/a n/a n/a n/a n/a n/a n/a n/a n/a n/a Reversing OFF ON ON ON ON ON ON OFF OFF OFF OFF OFF OFF OFF OFF OFF OFF OFF OFF OFF OFF OFF OFF OFF OFF OFF OFF OFF OFF OFF Temperature 190°F/88°C 160°F/71°C 190°F/88°C 160°F/71°C 190°F/88°C 190°F/88°C 160°F/71°C 140°F/60°C 160°F/71°C 140°F/60°C 160°F/71°C 190°F/88°C 140°F/60°C 190°F/88°C 190°F/88°C 160°F/71°C 140°F/60°C n/a 190°F/88°C 160°F/71°C 140°F/60°C n/a 190°F/88°C 160°F/71°C 140°F/60°C n/a 190°F/88°C 160°F/71°C 140°F/60°C n/a Target Moisture or Time 1% 5% 5% 20% 20% 5% 5% 3% 3% 20% 20% 20% 5% 5% 30 minutes 30 minutes 30 minutes 30 minutes 15 minutes 15 minutes 15 minutes 15 minutes 10 minutes 10 minutes 10 minutes 10 minutes 5 minutes 5 minutes 5 minutes 5 minutes Sheets Cotton Sheets Blend Iron 5 Sheets Cotton Iron 6 Duvet Cotton 7 Duvet Blend 8 Napkins Synthetic 9 Napkins Blend 10 Napkins Synthetic Iron 11 Napkins Blend Iron 12 Napkins Cotton Iron 13 Uniform Perm Press 14 Uniform Cotton 15 30 Min High 16 30 Min Med 17 30 Min Low 18 30 Min No Heat 19 15 Min High 20 15 Min Med 21 15 Min Low 22 15 Min No Heat 23 10 Min High 24 10 Min Med 25 10 Min Low 26 10 Min No Heat 27 5 Min High 28 5 Min Med 29 5 Min Low 30 5 Min No Heat n/a = not applicable - All cycles include a 2 minute, 100°F (38°C) cool down. - All cycles with reversing on rotate for 120 seconds and pause for 6 seconds. - Cool down and reversing settings can be changed from what is pre-programmed from the factory. - If machine does not have the moisture sensing option, the moisture sensing cycles in the table above are automatically changed to Auto-Dry cycle type with Dryness Level 0 (zero). 4 70444901 (EN) © Copyright, Alliance Laundry Systems LLC – DO NOT COPY or TRANSMIT 45