1
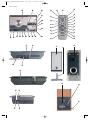
KH2267_68_Mikroanlage_EN.qxd
31.03.2006
13:31 Uhr
Seite 1
UK
Kompernaß GmbH · Burgstraße 21 · D-44867 Bochum
www.kompernass.com
ID no.: KH2267/2268-09/05-V2
KH2267_68_Mikroanlage_EN.qxd
31.03.2006
13:31 Uhr
Seite 2
Micro-system KH 2267 / 2268
Operating instructions
KH2267_68_Mikroanlage_EN.qxd
31.03.2006
13:31 Uhr
Seite 3
KH2267_68_Mikroanlage_EN.qxd
31.03.2006
13:31 Uhr
Seite 4
KH 2267 / 2268
q
e
w
r
3^
3&
1*
1(
2)
3%
2!
t
y
u
3$
2@
2#
3#
2$
3@
2%
3!
2^
3)
k
h
j
g
f
d
s
a
o
2&
i
2*
2(
3*
3(
4$
4@
4!
4#
4)
4%
4^
4(
4&
5)
4*
5@
5!
KH2267_68_Mikroanlage_EN.qxd
31.03.2006
13:31 Uhr
Seite 5
KH2267_68_Mikroanlage_EN.qxd
31.03.2006
13:31 Uhr
Seite 6
KH2267_68_Mikroanlage_EN.qxd
31.03.2006
13:31 Uhr
Seite 3
KH 2267 / 2268
Micro-system SilverCrest KH 2267 / 2268
Page
1. Proper use
4
2. Package contents
4
3. Technical Data
4
4. Safety Instructions
4
5. Wall mounting
5
6. Setting up
5
7. Operating elements
5
8. Inserting batteries into the remote control
5
9. Handling batteries
5
10. Connecting
6
11. Fold out the display for horizontal operation.
6
12. Switching on and off
6
13. Selecting the appliance/sound source.
6
14. Adjusting the volume
6
15. Adjusting the sound
7
16. Using headphones
7
17. Setting the clock
7
18. Setting the alarm function (timer)
7
19. Activating the sleep function (Sleep)
8
20. Radio operation / Selecting a band (USW/MW)
8
21. Operating the radio
8
22. CD functions
8
23. MP3 functions
9
24. USB and memory card functions
11
25. Cleaning and care
11
26. Disposal
11
27. Importer
11
Warranty Card
13
Read the operating instructions carefully before using the appliance for the first time and preserve this booklet for later
reference. Hand over the manual to anyone, whom you pass on the appliance to.
-3-
KH2267_68_Mikroanlage_EN.qxd
31.03.2006
13:31 Uhr
Seite 4
KH 2267 / 2268
Micro-system SilverCrest KH 2267/2268
4. Safety Instructions
1. Proper use
• Do not allow children to handle electrical appliances when
unsupervised - because they often underestimate the
danger.
• In order to avoid unintentional switching on, disconnect
the power cord after each use and before cleaning.
• Check the appliance and all the parts for visible damages.
The safety concept can work only if the appliance is in an
immaculate condition.
The micro-system is solely intended for playing music CDs,
MP3-CDs, MP3s from MS, SD and MMC cards and for listening
to radio prorams.
The micso-system is not intended for use in commercial or
industrial environments.
No guarantee will be granted for damage resulting from
improper use!
Explosion Hazard!
• Do not throw batteries into a fire. Do not recharge the
batteries.
2. Package contents
1
1
2
2
1
1
1
Danger of electric shock!
• Connect the appliance to a wall socket with a mains voltage
of 230 V ~ /50 Hz.
• Do not uise the appliance with a damaged connecting cable
or power plug.
• Get customer service to repair or replace connecting cables
and/or appliances that are not functioning properly or have
been damaged.
• Never immerse the appliance in water. Only wipe it with a
slightly damp cloth.
• Do not expose the appliance to the rain and never use it in
a humid or wet environment.
• Make sure that the power cord does not become wet
during operation.
• Do not open or repair the appliance casing yourself. In such
an event, safety is not guaranteed and the warranty shall
become void.
Micro-system
Subwoofer
Loudspeakers
Loudspeaker legs
Remote control
Medium wave antenna
Operating manual
3. Technical Data
Micro-system
Max. Rated output:
Frequency range radio:
5 watts RMS at 8 ohm per channel
MW (AM):
530 – 1600 KHz
UKW (FM) :
87.5 - 108 MHZ
CD drive
Frequency range (6 dB):
Signal-to-noise distance:
Flutter:
Channel separation:
60 - 15000 Hz
40 dB
1%
35 dB
Subwoofer
Mains voltage:
Power consumption:
Rated output:
230 V~, 50 Hz
85 Watt
15 watts RMS at 4 ohm
Fire hazard!
• Do not use the appliance near hot surfaces.
• Do not keep the appliance in places that are exposed to
direct sunlight, otherwise it may overheat and become
damaged.
• Do not leave the appliance unattended when in use.
• Never cover the ventilation slots of the appliance while it is
on.
Danger of injuries
• Keep children away from the connecting cable and the appliance.
Children frequently underestimate the danger from electrical
appliances.
• Make sure to find a safe place for the appliance.
• Do not operate the appliance if it has sustained a fall or is
damaged. Get the appliance checked and repaired by
experts, if necessary.
• Keep batteries away from children. Children can put
batteries into their mouths and swallow them.
Danger of injury to the eyes!
• Never look directly into the open CD compartment. The
invisible laser beam could damage your eyes.
-4-
KH2267_68_Mikroanlage_EN.qxd
31.03.2006
13:31 Uhr
Seite 5
KH 2267 / 2268
2$
2%
2^
2&
2*
2(
3)
3!
3@
3#
3$
3%
3^
3&
3*
3(
4)
4!
4@
4#
4$
4%
4^
4&
4*
4(
5)
5!
5@
5. Wall mounting
You can mount the micro-system and the loudspeakers to a
wall.
Only mount the appliance and the loudspeakers to a solid
wall.
➩ Drill the screwholes for the micro-system into the wall with
a horizontal spacing of 19 cm.
➩ Drill the screwholes for the loudpeakers above one another
into the wall with a vertical spacing of 13.5 cm.
So that the screws can grip properly into the mounts on
the back of the micro-system, the screw heads must jut
out of the wall approx. 3 mm.
➩ Screw two screws into the wall.
➩ Hang the micro-system onto the screws by the two mounts.
6. Setting up
➩ Take the micro-system and the acessories out of the packaging.
➩ Remove all transport securing means and adhesive
tape/films.
➩ Set up the micro-system so that the flap of the CD
compartment q can fully open.
➩ Place one loudspeaker 4@ each on a loudspeaker leg 4#.
➩ Place the subwoofer and the loudspeakerrs on an even
Play/pause button
Forward button
Stop button
Program selection button + (ALBUM PRESET +)
Stereo/Mono changeover (ST./MONO)
Find button (FIND)
Program selection button - (ALBUM PRESET –)
Reverse button
Programming button (PROG/MEM)
Random generator (RAND)
Timer button (TIMER)
Sleep function (SLEEP)
Reducing the volume
Switching the loudspeakers to mute (MUTE)
Connection memory card
Connection medium wave antenna
USB connection
Control cable to the subwoofer
Loudspeakers
Loudspeaker legs
Volume control (VOLUME) subwoofer
Headphone connection
Connection control cable
Power switch
Power cord
Left-hand loudspeaker connection (Speaker OUT L)
Left-hand connection audio appliance (AUX IN L)
Right-hand connection audio appliance (AUX IN R)
Right-hand loudspeaker connection (Speaker OUT R)
horizontal surface.
➩ Position one loudspeaker on the right-hand side of the
8. Inserting batteries into the remote control
micro-system.
➩ Position one loudspeaker on the left-hand side of the
micro-system.
For the remote control you need two bateries type micro
AAA / 1.5 V
7. Operating elements
➩ Open the battery compartment at the back of the remote
q
w
e
r
t
y
u
i
o
a
s
d
f
g
h
j
k
l
;
2)
2!
2@
2#
➩ Insert two batteries into the battery compartment making
control.
CD compartment
Sensor for the remote control
Display
Sound selection button (X-BASS/EQ)
Repeat button (REPEAT)
Programming button (MEM)
Timer button (TIMER)
Band selection button (TUNER/BAND)
Media selection button (FUNCTION)
Open/close CD compartment (OPEN/CLOSE)
Volume control (VOLUME)
Play/pause button
Stop button
Forward button
Reverse button
Standby light
ON/OFF switch (POWER)
Increase volume
ON/OFF button
Sound selection button (EQ)
Band selection button (BAND)
Function button (FUNCTION)
Repeat button (REPEAT)
sure to observe the polarity indicated in the battery
compartment.
➩ Carefully close the battery compartment lid until it clicks
into place.
9. Handling batteries
Leaky batteries can damage the remote control.
➩ If you intend not to use the remote control for a longer
period of time, please remove the batteries.
➩ Always replace both batteries and use batteries of the
same type.
➩ In case the batteries are leaky, wear protective gloves
and clean the battery compartment with a dry cloth.
-5-
KH2267_68_Mikroanlage_EN.qxd
31.03.2006
13:31 Uhr
Seite 6
KH 2267 / 2268
10. Connecting
12. Switching on and off
Loudspeakers
Both loudspeaker leads have a cinch plug at each end.
Switching on
➩ Switch the power switch 4& on the back of the subwoofer into ON (I) position.
The micro-system is in standby mode and the standby light
j lights up red.
➩ Connect the cinch plug of the right-hand loudspeaker to
the right-hand loudspeaker connection 5@.
➩ Connect the cinch plug of the left-hand loudspeaker to
the left-hand loudspeaker connection 4(.
Switching off
➩ Switch the power switch 4& on the back of the subwoofer to
OFF (0) position.
Additional audio appliance
You can connect other audio appliances such as e. g. a
mini-disc player or a TV to the micro-system.
Play mode
➩ In standby mode, please press the ON/OFF switch k on the
➩ Connect the cinch plug (right-hand channel) of the audio
micro-system.
appliance to the right-hand connection for the audio
appliance 5!.
➩ Connect the cinch plug (left-hand channel) of the audio
appliance to the left-hand connection for the audio
appliance 5).
13. Selecting the appliance/sound source.
You can choose between the following sound sources:
• CD
• AUX
• CARD-USB
• Tuner (radio)
Subwoofer
➩ Connect the control cable 4! of the micro-system to the
connection of the control cable 4^ on the subwoofer.
Connect and align the medium wave antenna
For the medium wave (MW) radio reception you must coonect
an additional antenna to the micro-system.
➩ Press the FUNCTION button o or 2@, until the desired
➩ Take the supplied antenna out of the packaging.
➩ Unwind the connecting cable from the antenna.
➩ Erect the ring until you hear it click into place in the
14. Adjusting the volume
sound source apears on the display.
You can adjust the volume via the remote control and the
micro-system.
antenna base.
➩ Push the antenna plug into the connection of the
medium wave antenna 3(.
Remote control
➩ To increase the volume press the button INCREASE
VOLUME l.
➩ Press the button until the desired volume is reached.
➩ To reduce the volume press the button REDUCE VOLUME 3^.
➩ Press the button until the desired volume is reached.
The set volume will appear e on the display
There is a AM antenna for the radio reception of the
USW transmitter on the micro-system.
➩ Carefully roll out the dipole antenna fully, so that the
micro-system has a good reception.
➩ If the reception is insufficient, change the position of
the dipole antenna.
Micro-system
➩ To increase the volume turn the volume control s clockwise.
➩ To reduce the volume, turn the volume control s anticlockwise.
The set volume will appear e on the display
Micro-system
➩ Connect the power plug of the power cord 4* to a
230 V ~ /50 Hz wall socket.
11. Fold out the display for horizontal operation.
Subwoofer
➩ To increase the volume, turn the volume control 4$
towards MAX.
➩ To reduce the volume, turn the volume control 4$
towards MIN.
You can fold out the display to be able to read it more easily.
➩ If you wish to fold out the display, please press at the top
of the display e.
The display will fold out.
Switching the loudspeakers to mute (Mute)
➩ To switch the micro-system to mute, presss the button
➩ If you wish to fold the display in again, please press the
SWITCH LOUDSPEAKER TO MUTE 3&.
display e down.
The display will engages into the housing again.
The volume flashes on the display.
➩ To continue listening press the button SWITCH
LOUD-SPEAKER TO MUTE 3& once again.
-6-
KH2267_68_Mikroanlage_EN.qxd
31.03.2006
13:31 Uhr
Seite 7
KH 2267 / 2268
15. Adjusting the sound
18. Setting the alarm function (timer)
You can adapt the sound quality to the respective type of
music by means of the sound setting. You can choose
between the following settings:
• Pop
• Jazz
• Pass
• Classic
• Rock
You can program your micro-system to wake you up. For this
purpose you can set the desired waking time, the sound source
and the volume. The micro-system will then switch on and off
according to the set time. You can be woken up by the radio
or to the sound of a CD.
➩ If you wish to be woken by a CD, please insert the desired
CD into the CD compartment q.
➩ If you wish to be woken by the radio, please select a radio
station by means of the BAND SELECTION BUTTON i
resp. 2!.
➩ Press the SOUND SELECTION button 2) or r, until the
desired sound appears on the display e.
If you adjust the sound setting while playing, the sound will
change immediately.
Setting the switch-on time
➩ Press the TIMER button u resp. 3$
.
The hour indication for the switch-on time flashes on the display.
16. Using headphones
➩ To set the hours for the switch-on time press the button
You can connect stereo heaphones to the micro-system with a
3.5 mm jack plug. The headphone socket 4% is situated on
the front of the micro-system. When you have connected the
headphones, the loudspeakers are disconnected and you will
hear the sound via the headphones only.
➩ To store the setting press the TIMER u resp. 3$ button
g resp. 2% or
h resp. 3!.
again.
The minute indication for the switch-on time flashes on the
display
➩ To set the minutes press the button
➩ Push the jack plug on the headphones into the headphone
h
g resp. 2% or
resp. 3!.
socket 4%.
Setting the switch-off time
➩ To enter the hours for the switch-off time press the TIMER
u resp. 3$ button.
The hours indication flashes on the display.
17. Setting the clock
You can only adjust the clock in standby mode.
➩ Press the PROGRAMMING BUTTON y or 3@ and keep it
pressed for approx. three seconds.
➩ In order to adjust the 24-hour or 12-hour mode, please
press the button
g resp. 2% or
h resp. 3!.
➩ To adjust the hours press the button
g resp. 2% or
resp.
.
h
3!
➩ To store the setting press the TIMER u resp. 3$ button
again.
The minute display for the switch-off time flashes on the display.
➩ To set the minutes press the buttons
g resp. 2% or
resp.
.
h
3!
➩ To store the setting press the PROGRAMMING BUTTON y
or 3@
The hours indication flashes on the display.
Setting the sound source
➩ Press the TIMER u resp. 3$ button.
The sound source indication flashes on the display.
➩ To set the hours press the buttons
g resp. 2% or
resp.
.
h
3!
➩ To store the setting press the PROGRAMMING BUTTON y
or 3@.
➩ Select the desired sound source by pressing buttons
g resp. 2% or
The minute indication will flash on the display.
➩ To set the minutes press the buttons
g resp. 2% or
resp.
.
h
3!
➩ Press the PROGRAMMING BUTTON again y or 3@.
The time is set and active.
h resp.3! .
Adjusting the volume
➩ Press the TIMER u resp. 3$ button.
The volume indication flashes on the display.
➩ Select the desired volume using buttons
g resp. 2% or
h resp. 3! .
Storing the settings
➩ Press the TIMER u resp. 3$ button.
The alarm function settings will be shown on the display one
after another. A clock symbol indicates that the alarm
function is active.
-7-
KH2267_68_Mikroanlage_EN.qxd
31.03.2006
13:31 Uhr
Seite 8
KH 2267 / 2268
➩ If you wish to activate/deactivate the alarm function,
➩ To store the station, press the PROGRAMMING BUTTON y
briefly press the TIMER u resp. 3$ button.
or 3@.
The display for the program location flashes.
After each switching on the alarm settings are shown on the
display.
➩ Select the desired program location with PROGRAM
SELECTION BUTTON + 2& or PROGRAM SELECTION
BUTTON - 3) .
➩ To confirm the program location, press the PROGRAMMING
BUTTON y or 3@.
The station is now stored in the selected program location.
19. Activating the sleep function (Sleep)
You can detemine a time after which the micro-system will
switch off. You can select a switch-off time between 10 and
90 minutes.
Selecting stored stations
You can select the stored stations during radio operation.
➩ Press PROGRAM SELECTION BUTTON + 2& or PROGRAM
SELECTION BUTTON – 3).
➩ Press until the program location appears on the display.
➩ Switch on the micro-system.
➩ Press the SLEEP FUNCTION button 3%, until you have set
the switch-off time.
The switch-off time is indicated on the display. Each time the
button is pressed the switch-off time is reduced by ten
minutes.
22. CD functions
Inserting a CD
➩ To open the CD compartment, press the button OPEN/CLOSE
CD-COMPARTMENT a.
The flap of the CD compartment folds upwards.
20. Radio operation / Selecting a band (USW/MW)
You can receive USW and MW stations with the micro-system.
➩ To select the radio station press the BAND SELECTION
BUTTON i resp. 2!.
➩ In order to change over between the radio stations, press
the BAND SELECTION BUTTON i resp. 2! again.
➩ If the USW reception is impaired, switch over to MONO by
means of the STEREO/MONO CHANGEOVER 2* function.
➩ Insert the CD into the CD compartment with the printed
side facing up.
➩ Press the CD down slightly until it is firmly positioned.
➩ To close the CD compartment, press hte button OPEN/CLOSE
CD-COMPARTMENT a again.
➩ Select the button FUNCTION SELECTION o resp. 2@ the
CD function.
The data (number of titles and total playing time) are shown
on the CD display.
21. Operating the radio
Automatic search function
➩ Switch on the tuner of the micro-system.
➩ Press button
g resp. 2% or
h resp. 3! again and
keep it pressed for a moment.
The search function begins and stops automatically when a
frequency with sufficient reception has been found.
➩ To re-start the search function press the button
g
resp. 2% or
h resp. 3! again and keep it pressed for a
moment.
➩ To stop the search function press the button
g resp.
or
resp.
again.
2%
h
3!
Removing the CD
➩ To open the CD compartment, press the button OPEN/CLOSE
CD-COMPARTMENT a on the micro-system.
➩ Remove the CD.
Starting the play function
d resp. 2$.
➩ Press button
Stopping the play function
➩ Press button f resp. 2^.
Manual search
With the manual search function you can carry out a fine
adjustment function of the stations e. g. if reception is difficult.
➩ Switch on the tuner of the micro-system.
➩ To increase the reception frequency briefly press the
button
g resp. 2%.
➩ To reduce the reception frequency briefly press the button
h resp. 3!.
Interrupting/continuing the play function
➩ While playing, press button
d resp. 2$.
➩ To coninue the play function press button
resp. 2$ again.
Next/previous title
➩ To move on to the next title on the CD, press button
g resp. 2%.
➩ To play the previous title of a CD,
breifly press button
h resp. 3! twice.
Storing the stations (memory)
You can store stations in up to 40 program locations
(30 x USW and 10 x MW).
➩ Set the desired station.
d
-8-
KH2267_68_Mikroanlage_EN.qxd
31.03.2006
13:31 Uhr
Seite 9
KH 2267 / 2268
23. MP3 functions
Title forward/reverse
➩ Press button
g resp. 2% or
h resp. 3! while
playing.
➩ Keep this button pressed until the desired point in the title
has been reached.
Playing MP3 titles
➩ Place a CD with MP3s into the CD compartment q.
➩ Using the FUNCTION SELECTION button o rsep. 2@ select
CD.
The number of contained albums, number of titles and MP3
appears on the display.
Repeat function (REPEAT)
By means of the repeat function you can repeat individual
titles or all the titles of a CD (only after stopping the play
function).
➩ To repeat individual titles, press the REPEAT BUTTON t
resp. 2# while playing.
REPEAT is shown on the display
➩ To start the play function of the CD press button
d
resp. 2$.
➩ To fade in additional MP3 information
(ID3 tag) press the FIND BUTTON and keep it pressed 2( for
two seconds.
➩ To repeat all titles of a CD, press the REPEAT BUTTON t
resp. 2# while playing.
REPEAT ALL will appear on the display.
➩ To select an album, press PROGRAM SELECTION BUTTON +
➩ To stop the repeat function of individual titles, press the
➩ Start the play function of the entire album by means of
REPEAT BUTTON t resp. 2# again.
REPEAT will disapear from the display.
➩ Or select a title by pressing button
If the CD contains several albums, please proceed as follows:
2&
or PROGRAM SELECTION BUTTON -
button
3).
d resp. 2$.
g resp. 2% or
resp.
.
h
3!
➩ Start the play function by means of button
d
resp. 2$.
Playing titles in random order (RANDOM)
➩ Press the button RANDOM GENERATOR 3# on the remote
control.
The titles on the CD will be played in random order.
Stopping the play function
f resp. 2^.
➩ Press button
Programming the order of titles
You can program an order in which the titles of a CD are to
be played. This is only possible when the play function has
been stopped
➩ Press the PROGRAMMING BUTTON y or 3@.
On the display program location1 of the title is shown that is
to be played first. 64 program locations are available for this
purpose.
Next/previous title
➩ To play the next MP3 title on the CD, press button
g
resp. 2%.
➩ To play the previous MP3 titles on the CD, press button
h resp. 3! twice in succession.
Title forward/reverse
You can play certain points within an MP3 title
➩ Press button
g resp. 2% or
h resp. 3! while
playing.
➩ Keep this button pressed until the desired point in the title
has been reached.
➩ Using button
g resp. 2% or
h resp. 3! select the
desired title for the program location.
➩ To store the setting please press the PROGRAMMING
BUTTON y or 3@.
➩To program further titles repeat the described steps.
Search functions
In search mode you can search for titles or albums on your
MP3 CD according to file names. You can have the search
done by the first letter (A–Z) or by numbers (0–9). If there is
no file name beginning with "A", the display will show
"A-NONE”.
➩ Insert a CD with MP3s into the CD compartment.
➩ Using the FUNCTION SELECTION button o resp. 2@ select
CD.
➩ To start searching mode, press the FIND BUTTON on the remote control once 2(.
This programming will remain stored until you remove the
CD from the CD compartment, switch to other function or
switch off the micro-system.
Starting the programmed titles order
➩ Press the PROGRAMMING BUTTON y or 3@.
Memory and the first programmed titles appear on the
display.
➩ Start the play function by pressing button
d
resp. 2$.
A magnifying glass smbol appears on the display and the first
name with the letter "A" will be displayed. If there is no file
name beginning with "A", the display will show "A-NONE”.
➩ Press button
g resp. 2% or
h resp. 3! until the
desired first letter or number appears on the display.
➩ To play the title press button
d resp. 2$.
-9-
KH2267_68_Mikroanlage_EN.qxd
31.03.2006
13:31 Uhr
Seite 10
KH 2267 / 2268
➩ If several file names begin with "A", press button
g
resp. 2% for two seconds.
The magnifying glass symbol in the remote control stops
flashing. The letter A starts flashing.
➩ Press button
g resp. 2% again.
The other file names beginning with A will be shown on the
display.
➩ To start the album search function, press the FIND
BUTTON 2( twice.
A magnifying glass symbol and Album appear on the display.
All album names beginning with A will be shown.
➩ Press button
g resp. 2% or
h resp. 3! until the
desired album or number appears on the display.
➩ To play the album press button
d resp. 2$.
➩ To display the existing titles of the desired album, press
button
g resp. 2% for two seconds.
The album display will go out and the first title will be
shown.
➩ Press button
g resp. 2% or
h resp. 3! until the
desired title is shown on the display.
➩ To play the title press button
d resp. 2$.
Displaying file information
You can have the file name, name of the artist and the album
title belonging to the title shown on the display.
➩ Start an MP3 title.
➩ Press the FIND BUTTON 2( while playing and keep it pressed for two seconds.
The album, the titles and the artist are shown on the display.
Starting the programmed titles order
➩ Press the PROGRAMMING BUTTON y or 3@.
Memory and the first programmed titles appear on the
display.
➩ Start the play function by pressing button
Checking the programmed titles order
➩ Start the play function by pressing button
d
resp. 2$.
➩ Press the PROGRAMMING BUTTON y or 3@.
Upon each press a stored title in ascending order of the
program locations will appear on the display.
MP3 repeat function (Repeat)
By means of the repeat function you can repeatedly play
individual titles from an MP3 CD or all titles of an MP3 CD.
➩ To repeat a title press the REPEAT BUTTON t resp. 2#
while that title is playing.
REPEAT is shown on the display
➩ To repeat all titles of an MP3 CD press the REPEAT
BUTTON t resp. 2# twice during playing.
REPEAT ALL will appear on the display.
➩ To repeat all titles of an MP3 CD, press the REPEAT
BUTTON t resp. 2# three times in succession during
playing.
REPEAT ALBUM is shown on the display.
➩ To terminate the repeat function press the REPEAT
BUTTON t resp. 2# four times during playing.
➩ To call up the overall title display again, press the FIND
BUTTON 2( again for two seconds.
Programming the MP3 title order
You can program the order in which the titles on an MP3 CD
are to be played. 64 program locations are available for this
purpose. This is only possible when the play function has
been stopped
➩ Press the PROGRAMMING BUTTON y or 3@.
The number of albums and the program location 1 of the
title that is to be played first is displayed.
➩ Using button
g resp. 2% or
h resp. 3! select the
desired album for the program location.
➩ To store the setting press the PROGRAMMING BUTTON y
or 3@ again.
The title display for program location 1 flashes on the display.
➩ Using button
g resp. 2% or
h resp. 3! select the
desired title for the program location.
➩ To store the setting press the PROGRAMMING BUTTON
y or 3@ again.
➩ To program further titles repeat the described steps.
This programming will remain stored until you remove the
MP3 CD from the CD compartment, switch to other function
or switsch off the micro-system.
d
resp. 2$.
- 10 -
KH2267_68_Mikroanlage_EN.qxd
31.03.2006
13:31 Uhr
Seite 11
KH 2267 / 2268
24. USB and memory card functions
26. Disposal
Due to the numerous anmount of available storage media,
no guarantee can be given for the compatibility with all
current and future storage media.
Playing MP3 from USB stick or memory card
You can play MP3 titles from USB sticks, MS, SD or MMC
memory cards.
➩ Insert the USB stick into the USB connection 4) of the
micro-system,
➩ or insert an MS-, SD- or MMC memory card into the
memory card connection 3*.
➩ Using the FUNCTION SELECTION button o resp. 2@ select
the function CARD-USB.
➩ Press button f resp. 2^.
The number of contained albums, number of titles and MP3
appears on the display.
➩ To start the play function press button
d resp. 2$.
Searching for an album
➩ Press the FIND BUTTON 2(.
A magnifying glass symbol appears on the display e and the
numbers and names of the albums are displayed.
Micro-system, subwoofer and loudspeakers
• Have the micro-system or parts of it disposed of by a
professional disposal company of by your communal disposal facility.
• Never dispose of the micro-system with the normal household refuse.
• Observe the currently valid regulations In case of doubt,
please
contact your waste disposal centre.
Batteries
• Never dispose of the micro-system with the normal household refuse.
• Batteries can contain toxic substances, which may damage
the environment. Therefore dispose of the batteries in
accordance with legal regulations. Never dispose of
batteries in the normal household refuse
➩ Using button
g resp. 2% or
h resp. 3! select the
desired album.
➩ To start the play function press button
d resp. 2$.
➩ To call up the overall title display press the FIND
BUTTON 2( for two seconds
The album, the titles and the artist are shown on the display.
27. Importer
Kompernaß GmbH
Burgstraße 21
D-44867 Bochum
www.kompernass.com
➩ Operate as described in the chapter "MP3 functions”.
25. Cleaning and care
Danger of life-threatening electric shock:
• Never open the appliance housing. No operating elements
are located inside the device.
• Never immerse the appliance components into water or
other liquids!
• Do not allow any liquids to penetrate the housing.
Cleaning the casing:
Clean the housing surface with a slightly damp cloth
➩ First pull the plug out of the socket.
- 11 -
KH2267_68_Mikroanlage_EN.qxd
31.03.2006
13:31 Uhr
Seite 12
KH 2267 / 2268
- 12 -
KH2267_68_Mikroanlage_EN.qxd
31.03.2006
13:31 Uhr
Seite 13
Fill in this section and submit it with the appliance!
Warranty
Micro-system KH2267 / 2268
In order to ensure free repair, please contact the
service hotline. Keep your cash receipt ready for this
purpose.
www.mysilvercrest.de
Please write the sender's address clearly:
Last name
First name
Street
Pincode/Place
Country
Telephone
Date/Signature
Error description:
✄
Kompernaß Service United Kingdom
Tel.: 08707/876177