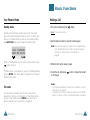
1
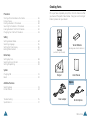
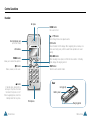
Digital Cordless
Keyphone
DECT-8000
USER’S MANUAL
ELECTRONICS
World Wide Web
www.samcom.com.au
Code No.: LSP
Rev.1.0
Table of Contents
Checking Parts .............................................................................. 3
Control Locations ......................................................................... 4
LCD Window Icon Descriptions ................................................... 6
Connecting Power Adapter .......................................................... 7
Installing Batteries ....................................................................... 8
Charging the Handset ................................................................ 10
Using the Handset Carrying Clip ................................................ 11
Using the Ear-microphone (option) ............................................ 12
Turning the Handset On/Off ....................................................... 13
Registering Handset ................................................................... 14
Your Phone’s Mode .................................................................... 16
Basic Functions
Making a Call ............................................................................. 17
Receiving a Call .......................................................................... 19
Out of Range Indication ............................................................. 20
Battery Level Indicator ............................................................... 20
Adjusting Voice Volume ............................................................. 21
Selecting Ring Type .................................................................... 21
Adjusting Ring Volume ............................................................... 22
Last Number Redial .................................................................... 23
Fuzzy Dialing ............................................................................... 24
Putting a Call on Hold ................................................................ 25
Transferring a Call ...................................................................... 26
Setting Up a Conference ............................................................ 27
Key Lock ..................................................................................... 28
Registered Recall ....................................................................... 29
Menus
Menu Navigation ....................................................................... 30
Menu Map .................................................................................. 32
Call Log
Call Log ....................................................................................... 33
1
Checking Parts
Phonebook
Storing a Phone Number with a Name ..................................... 36
Using a Pause ............................................................................. 39
Dialing a Number in Phonebook ............................................... 40
Searching for Numbers in Phonebook ....................................... 41
Erasing Numbers from the Phonebook ...................................... 42
Changing Your Internal Phonebook ............................................ 43
Once you have unpacked your phone, check to make sure that
you have all the parts shown below. If any piece is missing or
broken, please call your dealer.
Setting
Setting Handset Name ............................................................... 44
Selecting Language .................................................................... 45
Setting Call Time Display ........................................................... 46
Editing Prefix Number ................................................................ 47
Two AA Batteries
Handset
(Rechargeable Ni-MH batteries)
(with Belt clip attached)
Bell & Beep
Setting Key Tone ........................................................................ 48
Selecting Ring or Vibrator .......................................................... 49
Setting Unique Ring ................................................................... 50
System
Changing PIN .............................................................................. 51
Reset .......................................................................................... 52
Charger
User’s Manual
Option
Additional Features
Selecting Base ........................................................................... 53
Do Not Disturb ........................................................................... 54
Troubleshooting .......................................................................... 55
Specifications ............................................................................. 57
2
Power adapter
Ear-microphone
BEFORE USING
3
Control Locations
Handset
Ear piece
HOLD button
Puts a call on hold.
" or ❷ button
Scrolls through menus. Also adjusts volume.
Ear-microphone jack
C/R button
(at the left side)
Clears characters from the display. When navigating menus, backs up one
menu level. During a call, performs a switch-hook operation such as call
waiting.
LCD window
MENU button
OK/LNR button
MENU
HOLD
Allows you to access menu options.
OK
LNR
C/R
button
Makes, answers, or ends a call.
TRSF
1
2 ABC
3 DEF
4 GHI
5 JKL
6 MNO
7 PQRS
8 TUV
9WXYZ
0
button
Transfers a call to another station.
Rear
Battery cover
Microphone
BEFORE USING
TRSF button
Carrying clip
In Standby mode, press briefly to
lock keys on the phone. Press and
hold to turn the phone on or off.
When navigating menus, returns to
Standby mode from any menu.
4
When nativating menu options, confirms the menu selection. In Standby
mode, displays the outgoing calls list.
Charging points
BEFORE USING
5
LCD Window Icon Descriptions
1234 SAMSUNG
08/25 FRI 10:12A
This area displays in-use
information such as the other
party’s number, the call timer,
menus, etc. In Standby mode,
it displays the handset name,
the current time and date.
Connecting Power Adapter
1. Connect the modular end of the power adapter to the power
jack of the charger, then the other end to a standard AC wall
outlet.
Signal strength icon
This icon is always displayed when your phone
is on, and shows the current signal strength. More lines
indicate more signal strength.
Line icon
This icon indicates that line is engaged.
Message icon
This icon indicates that you have message(s)
waiting. The message(s) can be a voicemail notification,
page, or unanswered caller’s number.
2. Route the cord through the recessed channel as shown.
Vibrate icon
This icon indicates that an incoming call will
vibrate the phone rather than ring it.
DND icon
This icon indicates that DND function is enabled.
Voice volume icon
This icon indicates the current voice volume level.
The more bars you see, the louder the volume is.
Battery status icon
This icon is always displayed when your phone is
on, and shows the level of your battery charge. The more
bars you see, the greater the charge.
6
BEFORE USING
BEFORE USING
7
Installing Batteries
The two AA size rechargeable Ni-MH batteries come with
your phone. Install the batteries before using your phone.
1. Slide the battery cover in the direction of the arrow, then take
it out.
2. Remove old batteries if any, then insert new batteries observing
correct polarity ( + , - ). Reversing the orientation may
damage the handset.
8
BEFORE USING
3. To replace the battery cover, slide the cover up until it snaps
shut.
Notes:
• The batteries need to be replaced if they do not recover their
full storage capacity after recharging.
• When replacing batteries, always use good quality Ni-MH
rechargeable AA size batteries. For details, see ‘Specifications’
on page 56. Never use other batteries or conventional alkaline
batteries.
BEFORE USING
9
Charging the Handset
Using the Handset Carrying Clip
Before initial operation, you should fully charge the handset
for more than 10 hours.
The supplied handset carrying clip allows you to conveniently
carry the handset with you. It clips easily to your belt, waist
band, or shirt pocket.
To charge the handset, simply place it on the charger.
Result: When charging starts, the handset automatically turns on
and the Charge lamp on the charger turns on.
If you want to remove the carrying clip:
Insert a phillips screw driver along the edge of one of its arms,
and twist to release. Then lift it off.
If you want to attach the carrying clip:
Attach the carrying clip to the back of the handset. Make sure that
the carrying clip locks into place.
Charge
The lamp turns on
while charging.
10
BEFORE USING
BEFORE USING
11
Using the Ear-microphone (option)
Turning the Handset On/Off
With the ear-microphone, you can talk without using your
hands.
When you place the handset in the charger to charge it, the
handset automatically turns on. To turn the handset on or off
in Standby mode, follow these steps:
Connect the ear-microphone to the jack at the top left side of the
phone.
Result: The ear-microphone operates in the same way as the
phone’s speaker and microphone.
1. To turn on the handset when the display is off, press
button.
Result: At first time your turn the phone on, the LCD window
displays UNREGISTERED. You must register the
handset to a base. See page 14.
Once the phone is registered, the phone switches to
Standby mode and the display shows the handset
number and SAMSUNG when you turn the phone on.
If you change the handset name (see page 44), the
display shows the customized handset name in
Standby mode. The phone is now ready for use.
Speaker
Button
2. To turn the handset off, press and hold
three seconds until the display turns off.
Microphone
Clip
Allows you to hold the
ear-microphone to your
clothes, for example.
button for about
Note: Nothing will appear in the LCD window when battery
power is very low. You should fully charge the handset
before operation.
The button on the ear-microphone allows you to answer or
end a call without pressing a button on the phone. If you
receive a second call, press the button to end the first call and
answer the second call. If you press the button in Standby
mode, you can scroll through the redial list, and press and
hold for more than one second to dial the number.
12
BEFORE USING
BEFORE USING
13
Registering Handset
Register this handset to the base you will use. You can
register this handset up to four different bases.
6. Press OK button.
Result: The LCD window displays the ID of the base unit.
Note: To register a handset to a base, the handset must be
within range of the base and the base should be set to the
Registration mode by your system administrator.
7. Press OK button.
Result: The LCD window displays Enter AC.
To register a handset:
1. Press MENU to display main menu items.
8. Enter 9234, the Authentication Code, which is preset at factory.
2. Press ❷ (or ") button repeatedly to choose 5:System, then
press OK button.
9. Press OK button.
3. Enter the PIN code, then press OK button.
Note: PIN is preset to 0000 at factory. You can change the
PIN. For details, see page 51.
4. Press ❷ button to choose 2: Register, then press OK button.
5. Press ❷ (or ") button repeatedly to choose the base number
you want to specify for the base.
Result : When the registration is properly completed, the LCD
window displays the handset number and
SAMSUNG.
Note: If you have registered the handset to several bases, and
the base number you select at step 5 is already used for
another base, OVERWRITE warning appears. If you
press OK button, the old information is cleared and the
base number will be newly used for your newly selected
base. To keep old information, press and hold C/R
button to cancel the setting, then start over again with a
different base number.
Note: If check symbol appears at the right side of the base
number, it indicates that the base number is already
registered on your handset.
14
BEFORE USING
BEFORE USING
15
Basic Functions
Your Phone’s Mode
Making a Call
Standby mode
1. Pick up the handset and press
Standby is the most basic state of your phone. The phone
goes into Standby mode soon after you turn it on. When your
phone is in Standby mode, you will see the handset number
and SAMSUNG unless you change the handset name.
1234 SAMSUNG
08/25 FRI 10:12A
button.
Result: You hear a dial tone.
2. Dial the desired number by using the number keypad.
Note: You can store telephone numbers into one-digit memory
cells (01~30) and dial the numbers using the assigned
memory cell number. Refer to ‘Phonebook’ on
page 36.
While in Standby mode, you can enter a phone number, press
button to dial it.
3. When the other person answers, speak.
The Main menu is accessed when you are in Standby mode by
pressing MENU. See “Menu Map” on page 32 for a listing of
the Main menu items.
4. To end the call, either press
on the charger.
Talk mode
You can place and answer calls only when your phone is
powered on. During a call, the phone is in Talk mode. While
you are in Talk mode, pressing MENU gives you a list of
options referred to as “In-use menu” on page 30.
16
BEFORE USING
button or replace the handset
Notes:
• The LCD window displays the call time. For details, see ‘Call
Time Display’ on page 46.
• To make a call to the last number you dialed, use the ‘Redial‘
feature. For details, refer to ‘Last Number Redial’ on page 23.
BASIC FUNCTIONS
17
Receiving a Call
You can enter the desired phone number in Standby mode,
and then dial the number. This way of dialing allows you to
make corrections to the number before dialing. Follow these
steps:
1. Enter a telephone number. Check the number in the LCD
window.
Call to
9876
When sombody calls you, the phone rings and the
the display blinks.
Caller’s number
Call from
1234567
Blinks
If the caller can be identified, the caller’s phone number is
displayed. If the caller cannot be identified, only the icon
blinks.
1. To answer the call, press
Notes:
• If you make a mistake while entering a number, press C/R
button to clear the last digit and correct the number.
• If you press and hold C/R button for more than one second,
all digits you have entered are cleared and the phone returns
to the Standby mode.
2. When the number appears correctly, press
button.
button. Or
If the handset is on the charger, simply lift it up. You do not
need to press
button.
Adams
1234567
Caller’s name
Call time
00:05
Result: You are connected and the icon is steadily on. The
LCD window displays the call time. If the caller name
is currently stored in your internal phonebook, the
caller name displays.
2. You can speak. To end the call, either press
replace the handset on the charger.
Note:
18
BASIC FUNCTIONS
icon on
button or
button does not work for 3 seconds to prevent the
phone from being disengaged, right after you lift the
phone from the charger to receive the call.
BASIC FUNCTIONS
19
Out of Range Indication
Adjusting Voice Volume
If the handset is too far from the registered base, the handset
cannot properly engage the telephone line, and the
icon at
the left bottom of the LCD window blinks and the signal
strength indication bars next to the
icon disappear.
During calls, " or ❷ button affects the ear piece volume.
You can adjust the volume from level 1 to 3. The voice volume
is displayed as bars on the bottom line of the LCD window.
The more bars you see, the louder the volume is.
This icon blinks
when the handset
is out of range.
Adams
1234567
RANGE OUT
08/25 FRI 10:30A
If you move out of range during a call, the telephone line
might be disconnected and the handset returns to Standby
mode. Check if the
icon blinks in the LCD window. If so,
move the handset closer to the charger.
Battery Level Indicator
Flat
When the battery is weak and a few minutes of talk time
remain, you will hear a warning tone and the
icon blinks.
When the battery becomes too weak for the phone to operate,
the handset will automatically turn off. Place the handset on
the charger to charge the handset batteries.
20
BASIC FUNCTIONS
00:05
Selecting Ring Type
You can define your own ringing sound. Six ring types are
available.
1. Press MENU to display main menu items.
The
icon is continuously displayed at the right bottom of
the LCD window. The
icon shows the level of your battery. The more bars you see, the more power you have left.
1234 SAMSUNGFull
08/25 FRI 10:30A
Ear piece volume indicator
2. Press ❷!(or " ) button repeatedly to choose 4: Bell&Beep,
then press OK button.
3. Press ❷!button to choose 2: RingType, then press OK button.
4. Press ❷!(or " ) button repeatedly to choose the ring type
you want.
Result: Each time you press ❷ or " button, the handset
sounds the ring you have chosen.
5. Press OK button to save the setting, then press
to return
to Standby mode.
BASIC FUNCTIONS 21
Adjusting Ring Volume
Last Number Redial
1. Press MENU to display main menu items.
Your phone allows you to call the most recently dialed numbers again. The phone stores the last 10 numbers you called.
2. Press ❷!(or " ) button repeatedly to choose 4: Bell&Beep,
then press OK button.
To view and dial the numbers:
1. Press LNR button in Standby mode.
3. Press ❷!(or " ) button repeatedly to choose 3: RingVol,
then press OK button.
Result: The current ring level is displayed.
2. If you want to scroll through the memory, press ❷or "
button until you find the desired number you want to call.
4. Press ❷!(or " ) button repeatedly to choose the volume
level you want.
Result: You can adjust the volume from level 1 to 3. The higher,
the louder. You can also turn the ringer OFF. Each time
you press " or ❷ button, the handset sounds its
selected loudness.
5. Press OK button to save the setting, then press
to Standby mode.
to return
Note: Setting “OFF” turns the ringer off. When a call comes
in, only the icon on the window blinks.
22
BASIC FUNCTIONS
Result: The LCD window displays the last number you dialed.
3. Press
button to dial the number.
Notes:
• If there is no number dialed, Empty is displayed.
• Each time you dial a new number, the oldest number stored
in the redial memory is automatically erased, and the redial
memory is updated.
• You can modify the number displayed before pressing
button by using C/R button.
• If you press LNR button, followed by
button, the
phone dials the last number immediately.
• To erase all numbers in Redial memory, reset the handset. If
you reset the handset, all numbers stored in Redial memory
are erased. See page 52.
BASIC FUNCTIONS
23
Fuzzy Dialing
This dialing option allows you to enter the first digit of someone’s phone number, then have your phone remember the rest
of the number, and dial it for you.
To use this dialing option, the number you want to call must
be already stored in the internal phonebook, incoming or outgoing call logs, and the fuzzy dial option must be enabled
using the Setting menu.
To place a call using fuzzy dial feature:
1. In Standby mode, press the first digit of the desired phone
number.
Result: The phone searches for the phone number beginning
with the specified number from the internal Phonebook
or Call logs, then displays the first number.
2. Press ❷or "!button to scroll through the numbers beginning
with the number you entered.
To enable fuzzy dial feature:
1. Press MENU to display main menu items.
2. Press ❷!(or " ) button repeatedly to choose 3: Setting,
then press OK button.
3. Press ❷!(or " ) button repeatedly to choose 4: FuzzyDial,
then press OK button.
3. Press
button to dial the number displayed.
Or press C/R button to exit this fuzzy dial mode.
Putting a Call on Hold
You can place a current call on hold whenever you want.
Result: The current setting is displayed.
To place a call, press HOLD button during a call.
4. Press ❷!(or " ) button repeatedly to choose ON or OFF.
To enable this feature, select ON.
5. Press OK button to save the setting, then press
to Standby mode.
24
BASIC FUNCTIONS
to return
Result: The display shows On Hold.
To retrieve the call placed on hold, press HOLD button again.
Result: You can continue conversing with the other party.
BASIC FUNCTIONS
25
Transferring a Call
Setting Up a Conference
This feature allows you to transfer a call to another intercom
station. Any outside or intercom call may be transferred,
regardless of whether you initiated the call or the call rang in
to you.
You may confer with up to five parties over the phone in any
combination of outside lines and intercom stations in any
order.
When you transfer a call, you may wait on the line until the
transferred station answers, or you may hang up when you
hear the ringback tone. The connection between the caller
and the person to whom the call is being transferred is completed when you hang up.
To setup a conference:
1. With intercom or outside call in progress, press TRSF button.
1. Make a call to the first party.
2. When she (or he) is connected, press MENU button, and select
Conference from the in-use menu options.
Result: The LCD window displays Make next Call.
Result: The call is automatically put on hold. The LCD window
displays Transfer to.
3. Make another call to another party.
2. Dial the extension number that you want to transfer the call.
4. When the party answers you, repeat steps 2 and 3 until all parties are added.
3. Replace the handset.
Or, wait on the line and speak with the station about the call
transfer, then replace the handset.
5. To begin conference, press MENU twice.
Result: The LCD window displays the parties who joined the
conference.
Note: If the transferred station is busy, press TRSF button
again. You will be reconnected to the original call.
26
BASIC FUNCTIONS
BASIC FUNCTIONS
27
Key Lock
If you turn this feature on, all buttons except for
will be locked and not operate at all.
Registered Recall
button
When a call comes in, you can answer calls by using
button. But when you finish the call, the phone returns to the
lock mode. This feature is useful to avoid accidental key
pressing.
1. To turn the feature on, press
button briefly until KEY
LOCK displays in the LCD window.
The C/R button is used in conjunction with special services
such as ‘Call waiting’ which may be offered by your telephone company. You can place a new call directly after a
call or transfer a call to another extension under PABX,
using this feature.
To send a flash, simply press C/R button while the line is
engaged.
Result: The display shows F.
2. To turn the feature off, press
button briefly until KEY
LOCK disappears in the LCD window.
Notes:
• If a power failure occurs, the ‘Key Lock’ feature is automatically canceled.
• Do not hold
button for more than three seconds, or the
handset will turn off.
28
BASIC FUNCTIONS
BASIC FUNCTIONS
29
Menus
You phone includes both a Main menu and an In-use menu:
• Main menu – The main menu in Standby mode contains
seven primary options, all of which contains sub menus (see
“Menu Map” on page 32.
• In-use menu – The In-use menu options are available in Talk
mode. You can choose from:
1:Msg wait (see page 33)
2:DND (see page 54)
3:Conference Call (see page 27)
To access a menu option using the option number:
1. To display menu items, press MENU button.
2. Press the associated number key to select the desired option
(You do not have to scroll through the list or display an option
in order to select it.).
To return to Standby mode from any menu:
Menu Navigation
There are two ways to set a menu option on your phone:
• You can scan all menu options avaiable, then select the option
you want.
• If you know the number of the option you want to select, you
can just use the number to quickly access the menu option.
If you press C/R button from any menu (not in number or text
input mode), the phone backs up one menu level.
Pressing
button will return you to Standby mode from any
menu. Also, the phone will automatically return to Standby mode
from any menu if you do not touch a button for about ??? seconds.
To access a menu option using the scroll buttons:
1. To display menu items, press MENU button.
2. To scan menu options, press ❷!or " button repeatedly.
3. To select a desired option, press OK button when the number
of the option you want blinks.
4. Repeat as necessary.
30
MENUS
MENUS
31
Menu Map
Call Log
The following illustation shows the menu structure available and
indicates:
• Number assigned to each option
• Brief description and the page on which you can find details of
each feature.
1. Call Log (see page 35.)
2. Phonebook
1: Search (see page 41.)
2: Edit (see page 36.)
3. Setting
1: HS Name
2: Language
3: CallTime
4: FuzzyDial
5: PrefixEdit
4. Bell&Beep
5. System
1: KeyTone (see page 48.)
2: RingType (see page 21.)
3: RingVol (see page 22.)
4: Alert Type (see page 49.)
5: UniRing (see page 50.)
1: PinChange (see page 51.)
2: Register (see page 14.)
3: FuncClear (see page 52.)
6. Select Base (see page 53.)
7. DND (see page 54.)
32
MENUS
(see page 44.)
(see page 45.)
(see page 46.)
(see page 24.)
(see page 47.)
Call Log
You phone receives three kinds of messages: voicemail notification (VMN) messages, page messages, and unanswered caller’s
phone numbers (if the caller can be identified). When your phone
receives a message, the LCD window displays the number of the
received messages and
icon remains on the screen until you
read the caller’s numbers or delete the page or VMN messages
waited on your station after you listen or read them.
Received Msg: 03
1234 SAMSUNG
08/25 FRI 10:30A
Number of the
received messages
Message icon
Your phone stores up to 10 messages in the phone’s call log.
To review messages:
1. Press MENU to display the main menu items.
2. Press OK button to access 1: Call Log menu.
Result: The LCD window shows the last message, and the
date and time when the call was received if the information has been transmitted from the network. If
there is no message received, Calllog data is empty
is displayed.
CALL LOG
33
3. Scroll through the memory and choose the message you want
to listen, or read by using " or ❷!button.
Result: For caller’s number, the caller’s number (and name if
stored in your internal phonebook) displays.
For page message, <<MSG>> displays at the top line
of the display.
To Erase a Number Received
You can erase external or intercom station number stored in your
call logs. The
icon remains on the screen unless you delete
the page message.
1. When the call log data you want to erase displays, press OK
button.
For voicemail, the voicemail access number displays.
2. Press " or ❷!button to choose 2: Delete from the options.
4. When a phone number displays, pressing
number.
button dials the
Note: The last message is stored in the memory cell ’0’.
When a new call is received, the previous message is
shifted to the next cell ‘1’, allowing the new message
to be stored in this position. The oldest message is
automatically erased.
3. Press OK button to confirm the deletion.
Result: You hear a confirmation beep and the phone returns to
the Standby mode.
To Save a Number into Phonebook
1. When you are viewing a phone number stored in the call log,
press OK button.
2. Press OK button to access 1: Save to Pb option.
3. Enter name, and specify the memory cell. For details, see page
36.
34
CALL LOG
CALL LOG
35
Phonebook
The internal Phonebook allows you to store frequently used
phone numbers and their associated names in your personal
directory so that you can easily make a call without having to
remember or enter the phone number. You can store up to 30
numbers.
Storing a Phone Number with a Name
1. Press MENU to display main menu items.
2. Press ❷!button to choose 2: Phonebook, then press OK
button.
5. Enter the name (up to 12 digits) for the number, then press OK
button. Refer to “Entering a Name” on the following page.
6. The first available cell to save the number appears. If you want
to find another memory cell, press "!or ❷ button, or enter
the desired cell number.
7. Press OK button to save the setting.
Note: If you select the memory cell under which a number has
already been stored, you are asked to replace the cell
with the newly entered number. If you are, press OK
button. If not, press C/R button.
3. Press ❷!button to choose 2: Edit, then press OK button.
4. Enter the desired number (up to 24 digits), then press
OK button.
Note: If you make a mistake while entering a number at this
step or name at the next step, use C/R button to correct
the mistake. Each time you press the button, the last
digit is cleared. To clear all digits, press and hold the
C/R button. Then enter the correct number.
36
PHONEBOOK
PHONEBOOK
37
Entering a Name
1. Press the key labeled with the required letter:
2. Select the other letters in the same way. The cursor moves to
the right when you press a different button.
• Once for the first letter
• Twice for the selected letter
• And so on
Note: When entering the same letter twice (or a different letter on the same button), just wait for a few seconds for
the cursor to move automatically, and then select the
next letter. You can move the cursor to the right by using
the ❷!button. To delete letters, use the C/R button.
List of characters are shown below:
Key
0
1
Characters in the order displayed
0 ,
:
Space 1 !
;
‘
“ /
? & @
= – + (
)
< >
$ ¥ §
2
A B C a b c 2 Ä Å Æ Ç à ä å æ
3
D E F d e f
3 É ∆ Φ è é
4
G H I
4 Θ Ψ ì
5
J K L j
6
M N m n o 6 Ñ Ö ñ ø ò ö
7
P Q R S p q r
8
T U V t
9
W X Y Z w x y z 9 Ω
38
PHONEBOOK
g h i
k l
5 Λ
Using a Pause
A pause is useful when you access an interactive voice
response system, such as an automated banking system.
A pause delays for about 3 seconds.
If you want to insert a dialing pause between numbers when you
store a number in memory, press and hold OK button until –
appears at the pause entry.
s 7 Π Σ Ξ ß
u v 8 Ü ù ü
PHONEBOOK
39
Dialing a Number in Phonebook
Searching for Numbers in Phonebook
Once you have stored phone numbers in the internal
Phonebook, you can dial them easily whenever you want.
If you do not remember which telephone numbers have been
stored in the various memory cells, you can scan through the
memory until you find the one you are looking for.
One-touch dialing
Memory cells from 01 through 09 are special one-touch memory cells. You can dial the phone numbers stored in the cells
from 01 through 09 simply by pressing one button.
In Standby mode, press and hold the second digit of the memory
cell containing the number to be dialed.
1. Press MENU to display main menu items.
2. Press ❷ button to choose 2: Phonebook, then press OK
button.
3. Press OK button to access 1: Search menu.
For example: Memory cell number 09
Press 9 and hold. The number stored is displayed, then dialed.
Two-touch dialing
In Standby mode, press the first digit briefly, then hold down the
second digit of the memory cell.
For example: Memory cell number 23
Press 2 briefly and hold down 3. The number stored is displayed, then dialed.
4. Enter the memory cell number, then press OK button.
Result: The display shows the phone number stored under the
selected cell.
Note: If you press OK button without entering a cell number,
the display shows the first cell containing phone number.
5. Press ❷ (or ") button to scroll through the stored entries.
6. You can place a call by pressing
number you want to call.
40
PHONEBOOK
button when you find the
PHONEBOOK
41
Erasing Numbers from the Phonebook
Changing Your Internal Phonebook
To erase an entry in the internal Phonebook:
1. Find the Phonebook entry that you want to change. Refer to
“Searching for Numbers in Memory” on page 41.
1. Find the Phonebook entry that you want to erase. Refer to
“Searching for Numbers in Memory” on page 41.
2. Press OK button to display Phonebook option menus.
2. Press OK button to display Phonebook option menus.
3. Press OK button to access 1: Modify option.
3. Press ❷ button to choose 2: Delete, then press OK button.
Result: Your phone will prompt you for confirmation.
4. Press OK button to confirm, or press C/R button to cancel the
deletion.
Result: You will hear a confirmation beep and the phone returns
to Standby mode.
4. Change the number or name as described on page 36 steps 4
and 5.
Result: You will hear a confirmation beep.
5. To exit, press
.
To erase all numbers in the internal Phonebook:
If you reset the phone, all numbers stored in the internal
Phonebook are erased. Refer to “Reset” on page 52.
42
PHONEBOOK
PHONEBOOK
43
Setting
Many different features of your phone can be customized to
suit your preferences. All of these features are accessed via
Setting menu.
Setting Handset Name
Selecting Language
This option allows you to set your handset name. The handset
name displays in Standby mode.
You can select a display language. 3 different languages are
available. This feature is preset to English at factory.
1. Press MENU to display main menu items.
1. Press MENU to display main menu items.
2. Press ❷ (or #) button repeatedly to choose 3: Setting,
then press OK button.
2. Press ❷ (or #) button repeatedly to choose 3: Setting,
then press OK button.
3. Press OK button to access 1: HS Name option.
3. Press ❷ button to choose 2: Language, then press OK
button.
Result: The cursor is blinking. If you have already registered a
handset name, the name is displayed.
4. Enter your personal handset name by pressing the alphanumeric keys on the number keypad, then press OK button.
Result: A maximum of 16 digits can be entered. For details on
entering a name, see page 38. If necessary, use C/R
button to erase the current greeting message.
Result: The current setting displays.
4. Press ❷ (or #) button repeatedly to choose the desired
language.
5. Press OK button to save the setting.
Result: A long confirmation beep sounds.
5. To return to Standby mode, press
.
6. To return to Standby mode, press
button.
Note: If you want to restore the greeting message to the
default setting, erase the user-defined message.
44
SETTING
SETTING
45
Setting Call Time Display
Editing Prefix Number
If you turn the feature on, the handset automatically times the
duration of calls. The handset displays the call duration both
during your call and also for a few seconds after your call is
completed. The feature is preset to ON.
Prefix number option allows you to add digits such as outside
line access number ‘9’ to an external phone number currently
stored in your Call logs. When you dial the external phone
number stored in Call logs, the prefix number is automatically
dialed before the phone number.
1. Press MENU to display main menu items.
The prefix number is preset to ‘9’ at factory.
2. Press ❷ (or #) button repeatedly to choose 3: Setting,
then press OK button.
To change the prefix number:
3. Press ❷ (or #) button repeatedly to choose 3: CallTime,
then press OK button.
1. Press MENU to display main menu items.
2. Press ❷ (or #) button repeatedly to choose 3: Setting,
then press OK button.
Result: The display shows the current setting.
4. Press ❷ (or #) button to choose ON or OFF. Select ON to
turn this feataure on.
5. Press OK button to save the setting.
6. To return to Standby mode, press
3. Press ❷ (or #) button repeatedly to choose 5: PrefixEdit,
then press OK button.
Result: The display shows the current setting.
4. Enter the desired prefix number.
.
Note: You enter up to 4 digits.
5. Press OK button to save the setting. Then press
to Standby mode.
46
SETTING
to return
SETTING
47
Bell & Beep
You can use the Bell&Beep menu to customize various
sound settings.
Setting Key Tone
Selecting Ring or Vibrator
You can set your handset not to sound the key tone each time
you press a key.
This option allows you to indicate how you are to be alerted
any incoming calls. The following options are available:
1. Press MENU to display main menu items.
• RING: The phone rings using the ring tone selected via the
Ring Type menu option.
• VIBRATOR: The phone vibrates but does not ring.
• RING + VIBRAT: The phone rings first, then vibrates.
2. Press ❷ (or #) button repeatedly to choose 4: Bell&Beep,
then press OK button.
3. Press OK button to access 1: KeyTone option.
2. Press ❷ (or #) button repeatedly to choose 4: Bell&Beep,
then press OK button.
Result: The display shows the current setting.
4. Press ❷ (or #) button repeatedly to scroll through the key
tone options.
Result: You can choose from:
• TYPE 1 – Standard key tone.
• TYPE 2 – Two-frequency tone.
• OFF – The key tone does not sound.
5. Press OK button to save the setting. Then press
to Standby mode.
48
BELL & BEEP
1. Press MENU to display main menu items.
3. Press ❷ (or #) button repeatedly to choose 4: AlertType,
then press OK button.
4. Press ❷ (or #) button to scroll through the alert types.
to return
5. When the desired alert type displays, press OK button to save
the setting.
6. To return to Standby mode, press
.
BELL & BEEP
49
Setting Unique Ring
System
This option allows you to designate a unique ring to signal an
incoming call from a specified call number. You can use this
feature only when the caller’s service network transmits the
caller’s information.
You can specify 2 callers and select a unique ring tone for
each caller from 6 different tones.
PIN (Personal Identification Number) is required to access
System menu.
Changing PIN
The PIN is required when you register handset to a base unit
and use System menu. The PIN is preset to ‘0000’ at factory.
1. Press MENU to display main menu items.
To change the PIN code:
2. Press ❷ (or #) button repeatedly to choose 4: Bell&Beep,
then press OK button.
1. Press MENU to display main menu items.
3. Press ❷ (or #) button repeatedly to choose 5: UniRing,
then press OK button.
2. Press ❷ (or #) button repeatedly to choose 5: System,
then press OK button.
4. Press ❷ (or #) button to choose the ring address you want,
then press OK button.
5. Enter the phone number you want to designate, then press OK
button.
6. Press ❷ (or #) button to scan through the ring types available, then press OK button to save the setting.
7. To return to Standby mode, press
50
BELL & BEEP
.
3. Enter the current PIN code to access the System menu, then
press OK button.
Result: The LCD window dose not display the PIN code you
entered in order to maintain secrecy.
Note: If you enter a wrong PIN code, your phone returns to
Standby mode.
4. Press OK button to access 1: PinChange option.
SYSTEM
51
Additional Features
Selecting Base
5. Enter the new PIN code again to confirm the number, then
press OK button.
Note: If you change the PIN code and then forget it, enter the
default PIN “0000.”
6. To return to Standby mode, press
Note: To use the handset with more than one base unit, you
must registered the handset at each base unit. See page
14.
button.
To select a base unit:
Reset
1. Press MENU to display main menu items.
If you reset the handset, all the user-selectable features
return to the manufacturer’s default status.
2. Press ❷ (or #) button repeatedly to choose 6: Select
Base, then press OK button.
1. Press MENU to display main menu items.
2. Press ❷ (or #) button repeatedly to choose 5: System,
then press OK button.
3. Enter the PIN code to access the System menu, then press OK
button.
4. Press ❷ (or #) button repeatedly to choose 3: FuncClear,
then press OK button.
5. Press OK button to confirm the selection. Then press
return to Standby mode.
52
SYSTEM
Your handset can be used with up to four base units. This
menu option allows you to select the base you want to use.
to
3. Press ❷ (or #) button repeatedly to scroll through the available bases.
Result: If you choose Best Base, when you are moving around
and lose contact with the base unit, the handset will
automatically find the first available base unit.
4. Press OK button to save the setting. Then press
to Standby mode.
to return
ADDITIONAL FEATURES
53
Do Not Disturb
Troubleshooting
When you do not want to be disturbed with any incoming
calls, this feature allows you to block incoming calls temporarily. You can still make and receive calls. You can set up
this feature in Standby mode or Talk mode.
Symptom
• Check that the power adapter is properly connected.
• Check that the handset is properly
registered on the base.
To activate (or cancel) this feature:
No operation
1. Press MENU in Standby mode or in Talk mode.
3. Press ❷ (or #) to choose ON. To cancel this feature, choose
OFF.
4. Press OK button to save the settings. Then press
return to Standby mode.
54
ADDITIONAL FEATURES
DND icon
• Check that the handset batteries are
installed properly.
No dial tone
• Check that the handset is properly
registered on the base.
• Check that the handset is within
range of the base unit.
to
Result: With this feature on, the LCD window displays Do Not
Disturb to remind you of the mode and
icon
appears.
• Check that the handset is within
range of the base unit.
• Check that the handset is fully
charged.
2. Press ❷ (or #) repeatedly to choose 7: DND in Standby
mode (or 2: DND in Talk mode), then press OK button.
Do Not Disturb
1234 SAMSUNG
08/25 FRI 10:30A
Check
• Check that the power adapter is properly connected.
Warning beep
occurs when
making a call.
The handset
seems to have
very short battery life.
• Check that the handset is not too far
from the base.
• Check that the handset batteries are
not in low status.
• Clean the charging points.
• Consistently short battery life may
indicate that replacement of the batteries is necessary.
ADDITIONAL FEATURES
55
Specifications
Frequency Range
Channels
120 Duplex channels
Carrier Power
≤ 250 mW (24 dBm)
Modulation
Frequency Stability
GFSK
≤ ± 50 kHz
Operation Time
Ni-MH: Standby mode: 130 hours
Talk mode: 12 hours
Charging time
10 hours
Ambient temperature
Humidity
Weight
Normal : 15 oC ~ 35 oC
Extreme: -10 oC ~ 40 oC
5 % ~ 90 %
Handset: 100 g with carrying clip
Charger: 92 g
Dimensions
Handset: 120 x 45 x 22 mm (HWD)
Charger: 118 x 118 x 53 mm (HWD)
Power Supply
Handset Input: Ni-MH: 2.4 V, 550 mA
Charger Input: DC 9 V, 150 mA
Compliance
56
1.88~1.90 GHz
ADDITIONAL FEATURES
CTR 06
CTR 10
CTR 22
EMC
NET4 (PSTN)