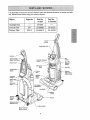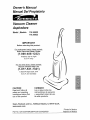
1
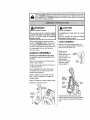
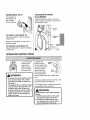
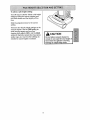
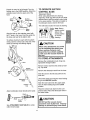
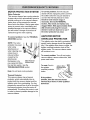
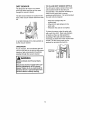
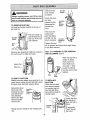
Owner's Manual
Manual Del Propietario
Vacuum Cleaner
Aspiradora
Model,
Modelo
116.36922
116.36923
IMPORTANT
Before returning this productFor reptacement,,parts,
please
contact:
Sears Parts and Repair Center
(1-800-488-1222)
Anytime, day or night
(U..SoA.only)
For an_e,
please contact:
Vacuum Cleaner Help Line
(1-877-531-7321)
7:30am-4:00pm EST, M-F
(UoSA.. and Canada)
CAUTION:
Read and follow all
safety and operating
instructions before first
use of this product.
CUIDADO:
Lea y sigue todas las
instrucciones
de peraci6n
y seguridad antes del uso
de este producto.
Sears, Roebuck and Co., Hoffman
www.sears,com
Estates, IL 60179 U.S.A.
Part No. COIZCSN40UOO-KCO1ZCSNZOUO
Printed in Mexico
lmpreso en Mexico
Before Using Your New
Vacuum Cleaner
..........................
Kenmore Vacuum
Cleaner Warranty
.... 3
Important Safety Instructions .........
Parts and Features .................
4
5
Assembly
Instructions
Operating Instructions
Cord Release
..............
.................
............................
Releasing the Handle ......................
Touch Control .........................
Vacuuming Tips ........................
Performance/Safety Features ..........
2
Vacuum
Cleaner
t2
13-14
Care ...............
t5
Vacuum Cleaner Storage ................
t5
Cleaning Exterior and Attachments ........ 15
Dust Bin Cleaning ...................
16
Primary Filter Removal and Cleaning
17-18
Exhaust Filter Replacement .................
t8
Light Bulb Replacement ................
19
Agitator Cleaning ...................
20
Clog Removal .........................
20
6-7
7
7
8
8
Gentle Sweep Function ....................
8
Pile Height Selection and Setting .........
9
Attachments .......................
10-I 1
Attachment Use Table .................
12
Troubleshooting
Requesting
Please read this guide It will help you assemble
cleaner in the safest and most effective way.
..........................
Assistance
Or Service
and operate your new Kenmore
2!
back page
vacuum
For more information about vacuum cleaner care and operation, call your nearest Sears store,
You will need the complete model and serial numbers when requesting information, Your vacuum cleaner's model and serial numbers are located on the Model and Serial Number Plate,
Use the space below to record the model number and serial number
vacuum cleaner.
of your new Kenmore
Model No,
Serial No,
Date of Purchase
Keep this book and your sales check (receipt)
in a safe place for future reference,
2
One Year Limited
When assembled,
Warranty
operated
and maintained
according
to all instructions
supplied
with
the product, if this vacuum cleaner fails due to a defect in material or workmanship
within
one year from the date of purchase, return it to any Sears store, Sears Parts & Repair
Center or other Kenmore outlet for free repair.
If this vacuum
applies
cleaner
is used for other than private family purposes,
this warranty
for only 90 days from the date of purchase°
This warranty
pay for:
1. Expendable
covers
only defects
in material
and workmanship.
items that can wear out from normal
filters, belts, light bulbs, and bags.
2. A service technician to instruct the user in correct
maintenance..
3o A service technician
4.. Damage
to clean or maintain
to or failure of this product
Sears
will NOT
use, including but not limited to
product assembly,
operation
or
this product..
if it is not assembled,
operated
or maintained
according to all instructions supplied with the product.
Damage to or failure of this product resulting from accident, abuse, misuse or use for
other than its intended purpose°
6.. Damage to or failure of this product caused by the use of detergents,
cleaners,
chemicals or utensils other than those recommended
in all instructions supplied with
5.
the product.
7. Damage to or failure of parts or systems
made to this product
Disclaimer
Customer's
resulting
from unauthorized
of implied warranties;
limitation of remedies
sole and exclusive remedy under this limited warranty
modifications
shall be product
repair
as provided herein. Implied warranties, including warranties of merchantability
or fitness
for a particular purpose, are limited to one year or the shortest period allowed by taw..
Sears shall not be liable for incidental or consequential
damages. Some states and
provinces do not allow the exclusion or limitation of incidental or consequential
damages,
or limitations on the duration of implied warranties of merchantability
or fitness, so these
exclusions
or limitations
may not apply to you.
This warranty
Canad&
applies
only while this vacuum
cleaner
is used in the United
This warranty
gives you specific legal rights, and you may also have other rights which
vary from state to state.
Sears, Roebuck and Co., Hoffman Estates, IL 60179
Sears Canada Inc.,Toronto,
Ontario, Canada M5B 2B8
States and
ILWARNING:
Your safety is important to us, To reduce the risk
of fire, electrical shock, injury to persons or
damage when using your vacuum cleaner, follow
basic safety precautions including the following:
Read all instructions =n this manual before
assembling or using your vacuum cleaner.
Use your vacuum
cleaner
only as
described in tHs manual. Use only with
Sears recommended attachments.
Disconnect e_ectrical supply before servic_
mg or cleaning out the brush area, Failure
to do so could result m electrical shock or
the brush suddenly starting.
Do not leave vacuum cleaner when
plugged [n. Unplug from outlet when not in
use and before performing malntenance,
To reduce the risk of electrical shock - Do
not use outdoors or on wet surfaces.
Do not allow to be used as a toy. Close
attention _s necessary when used by or
near children.
Do not use with a damaged cord or plug. If
vacuum cleaner is not working as it should,
has been dropped, damaged, left outdoors,
or dropped in water, return it to a Sears
Service Center.
Do not putl or carry by cord, use cord as a
handle, close a door on cord, or pull cord
around sharp edges or corners. Do not run
vacuum cleaner over cord. Keep cord away
from heated surfaces.
Do not unplug by pulling on cord. To
unplug, grasp the plug, not the cord.
Do not handle plug or vacuum c_eaner with
wet hands.
Do not put any objecls into opemngs.
Do not use with any opening b_ocked; keep
free of dust, Iint, hair, and anything that may
reduce air flow.
Keep ham loose clothing, fingers, and eli
)arts of body away from openings and
moving parts,
Turn off all controls before unplugging.
Use extra care when cleaning on stairs.
Do not put on chairs, tables, etc. Keep on
]our.
Do not use vacuum cleaner to pick up
flammable or combustible liquids (gasoline,
cleaning fluid, perfumes, etc.), or use m
areas where they may be present. The
fumes from these substances can create a
fire hazard or explosion,
Do not pick up anything that is burning or
smoking, such as cigarettes, matches, or
hot ashes.
Do not use vacuum cleaner without dust
bin andtor fitters in place.
Always clean the dust bin after vacuuming
carpet cleaners or freshener, powders, and
fine dust. These products clog the filters,
reduce allow and can cause damage to
lhe vacuum cleaner. Failure to clean the
dust bin could cause permanent damage to
the vacuum cleaner.
Do not use the vacuum cleaner to p_ck up
sharp hard objects, small toys, pros, paper
ctips, etc. They may damage the vacuum
cleaner or dust bin.
Unplug before connecting Handi-mate Jro®
You are responsible for making sure that
your vacuum cieaner is not used by anyone
unabie to eperate it properly,
SAVE THESE INSTRUCTIONS
Proper assembly and safe use of your vacuum cleaner are your responsibilifies. Your vacuum cteaner is intended for Household use. Read this Owner's Manual carefully for
important use and safety reformation. This guide contains safety statements under warning and caution symbots.
It is important to know your vacuum cleaner's parts and features to assure its proper and safe
use. Review these before using your vacuum cleaner.
Object
Style No.
Part No.
in USA
Headlight Bulb
....
20-5248
.....
Exhaust Filter
EF-I
20_86889
20-40324
20-82912
20-40335
Primary
Filter
DCF_2
Part No.
in Canada
Touch
Contro!
D_t
Sensor
Upper Cord Hook
Dust Bin
Release
Handle
' Bh_
Brush
Filter Cover
(Filter Inside)
Carrying
Handle
UpperHose
Hook
Extension
L Furniture
Guard
Release
Pedal
Nozzle
Extension Hose
Release Lever
Wand Holder
Motor Protector
(Behind Hose)
= ==
=HH=HH
,,,,,,,,,,,,,,,,,,,,,,,,,,
Please pay special attention to these hazard alert boxes, and follow any instructions
_b
and personal
given_
WARNING
injury.
statements
CAUTION
alert
statements
you to such
alert
dangers
you toas
such
fire,dangers
electric shock,
as personal
burns
injury andfor property damage.
Before assembling the vacuum cleaner,
check the PACKING LIST on the cover of
the separate REPAIR PARTS LIST. Use
this list to verify that you have received atl
the components of your new Kenmore
vacuum cleaner.
HANDLE ASSEMBLY
Remove the combination brush from
the handle to expose the handle mounting holeo
Remove the handle screw from the body
of the vacuum cleaner..
Position the handle assembly as shown in
the illustration below
CORD ASSEMBLY
Make sure the quick release upper cord
hook is in the upright position Remove the
wire tie from the power cord
Make sure the
power cord is
placed into the locking notch on the
body as shown This
helps keep the
power cord out from
under the vacuum
cleaner agitator
Power
c°r'
!_ I
1
When installingthe handle, firmly press
the handle onto the body. Secure with
handle screw provided
Begin to tighten the screw with your fingers.r It may be necessary to adjust the
handle slightly
Using a screwdriver, tighten handle screw.
_._F
Cord
Reinstall combination brush,
_<"
Plug
Electrical
Connection
Assembly
Hand/e
Screw
Wrap the power cord around the quick
release cord hook and the carrying handle.
Lock the powercord plug onto the power
cord.
HANDI-MATE
TELESCOPIC
JR.®
WAND
PLACEMENT
For operation of
Handi-Mate Jr®
see separate
Owner's Manual,,
Place the telescopic wand in the wand
holder Place the crevice tool in the top of
the telescopic wand_
Too/
TO INSERT HANDI-MATE JR _
Place Handi-Mate Jr,® into the storage
compartment
Rotate the Handi-Mate Jr ® back until it
snaps into place
TO REMOVE HANDI-MATE JR. _
Rotate Handi-Mate Jr ®out of the storage
compartment
OPERATING
INSTRUCTIONS
1. Turn the quick
release upper
cord hook to
either side and
down to release
the power cord
WARNING
• To reduce the risk of electric shock,
this vacuum cleaner has a polarized plug (one blade is wider than
the other)_
• The plug will fit in a polarized outlet
only one way° If the plug does not
fit fully in the outlet, reverse the
plugoIf it still does not fit, contact a
qualified technician to install the
proper outlet. Do not change the
plug in any way.
i= HHHH
2. Detach the
power cord plug
Notch
from the power cord
and pull the cord off
the quick release
upper cord hook°
Power
Be sure the power
cord is still locked
into the locking notch of the upper cord
hook,,
3. Plug the polarized power cord into a 120
Volt outlet located near the floor,
4. To replace cord, turn upper cord hook to
the up position, then wrap cord,,
WARNING
Personal Injury and Product Damage
Hazard
• DO NOT place hands or feet under
the vacuum cleaner at any time.
• DO NOT use outlets above counters. Damage from cord to items in
surrounding area could occur,
Release the handle by pressing down on
the handle release pedal with your foot and
pulling back and down on the handle with
your hand.
\
Note: The agitator does not rotate when the
vacuum cleaner is in the upright position.
OFF - Turns OFF the vacuum cleaner
(suction) motor.
CARPET - Turns ON the vacuum cleaner
motor to HIGH suction level and the agitator motor to HIGH speed level for cleaning
of most carpets and rugs.
GENTLE
motor to
tor motor
cleaning
___O;;RPET
- Turns ON the vacuum cleaner
HIGH suction level and the agitato LOW speed level for gentle
of most delicate carpets.
MOTOR
Touch
Control
Button
FLOOR -Turns ON the vacuum cleaner
motor to HIGH suction level and turns OFF
CARPET
the agitator
floors.
GENTLE
FLOOR
motor for cleaning
Your Kenmore
Vacuum
cleaner
OFF
of bare
features
two (2) speed, direct drive agitator
a
,
for
Do not use the CARPET setting (high
speed) for cleaning berber style carpet.
The high agitator speed could damage
the carpet or cause excessive carpet
wear.
Touch Control
,Setting
Carpet (1)
Gentle (2)
Floor (3)
Agitator
Speed
............
High
Low
Off
Bare
Floor
Vacuum Cleaner
(Suction)
Motor
OFF
HIGH
HIGH
HIGH
.....
Agitator
Motor
OFF
HIGH
LOW
OFF
Use the GENTLE setting (low speed)
ONLYfor berber or delicate pile carpeting. The agitator may slow down or stop
2,
cleaning a variety of floor surfaces, Please
review the table below before using your
vacuum cleaner.
FUNCTION
on thick carpeting, area rugs or throw
rugs. If agitator stops and does not
restart, See page 12, AGITATOR
MOTOR OVERLOAD PROTECTOR of
the owners manual.
34
Commercial
or Low Pile
The FLOOR setting may be used for alt
indoor bare floors including wood, tile,
linoleum, slate etc,
Berber
or Delicate
Plush
Toselect a pile height setting:
Turn off vacuum cleaner, Select a pile height
setting by tilting the vacuum cleaner back
until front wheels are lifted slightly off the
floor,,
Slide the adjustment lever to the correct
setting_
There are four (4) pile height settings on the
vacuum cleaner_ Use the LOW setting for
most low-pile carpets and bare floor
cleaning (with agitator OFF), and the HIGH
setting for high-pile carpets like shag carpet,
scatter rugs, etco Use the other settings as
needed for carpet heights in between,
CAUTION
Do not allow vacuum cleaner to
remain in one spot for any length of
time when the agitator is turning.
Damage to carpet may occur°
............
i
TELESCOPIC WAND WITH
SUCTION CONTROL
SLIDE
1, Remove the lower end of the extension
hose from the wand holder by grasping
the hose collar, twisting, and pulting
straight up
2o Remove the telescopic wand from the
wand holder
Combination
Brush
Carrying
3,.Remove the crevice tool from its storage
position in the wand. Turn the locking ring
to the UNLOCK position
_
Handle "_
f _
Extension
Wand
Hose
i
•
I
Extension Hose
Release Lever
TO USE ATTACHMENTS
Remove the lower end of the extension
hose from the wand holder by grasping the
hose collar, twisting, and pulling straight up
Rotate the extension hose release lever
down if maximum reach is needed.
Wand
Note: The motor protector may open when
using attachments or when cleaning new
carpet, due to reduced airflow caused by the
attachments themselves or caused by new
carpet lint filling the dust bin quickly. See
the TROUBLESHOOTING section..
1. Hose
Collar
--
, WARNING
Electrical
Hazard_
Shock And
Personal
Injury
Disconnect electrical supply before servicing or cleaning the vacuum cleaner.
Failure to do so could result in electrical
shock or personal injury from vacuum
cleaner suddenly starting,
10
Wand
Holder
TO OPERATE
Extend the wand to its full length_ Turn the
locking ring to the LOCK position° Attach the
extension wand onto the open end of the
hose_
SUCTION
CONTROL SLIDE
Telescopic Wand
When using attachments for cleaning
draperies, small rugs with low pile and other
delicate items, twist the suction control slide
to the open position. This slide is located on
the telescopic wand, close to the hose
Suction
This will reduce suction for ease of cleaning..
Suction Note: Return
Upper
Wand
Control
Slide
Align the tabs on the extension wand with
the "J" slots in the hose. Push the wand into
the hose and twist to the right to lock.
To achieve maximum reach with the attachments, add the crevice tool to the end of the
wand by inserting and twisting slightly.
suction control
slide to the
closed position
for normal
cleaning
CAUTION
When using attachments, be careful
not to overextend the stretch hose
when reaching.Trying to reach
beyond the hose stretch capability
could cause the vacuum cleaner to
tip over.
TO STORE ATTACHMENTS
Remove the combination brush, Snap into
appropriate storage location.
Remove crevice tool from the wand by twisting Lay aside
Suction
Control
Remove the telescopic wand from the hose.
Raised
Tab
Twist the wand to the left and pull from the
hose end
Unlock the wand by turning the wand locking
ring to the UNLOCK position
Wand
Slide the lower wand into the upper wand..
Turn the wand locking ring to the LOCK
position.
Tool
Place the crevice tool down into the compressed wandr Place the telescopic wand in
the wand holder
Attach combination brush directly to the wand.
B,-,,sh--,
Coob,no,,on
CAUTION
Brush2cJ' 12
DO NOT pull the vacuum cleaner
around the room by the hose° Property
damage or personal injury could result°
See ATTACHMENT USE TABLE for combination brush usage.
11
CLEANING
ATTACHMENT
CREVIcE'TooL
9
COMBINATION
BRUSH
Handi-Mate
Between
Cushions*
Furniture*
AREA
Stairs
Drapes*
4
4
4
v"
4
4
4
Jr.®
*Always clean attachments before using on fabriCS.r
Cleaner
i
i iii
Personal Injury Hazard
Use care if vacuum cleaner is placed on
position.
stairs. If it falls, personal injury or property damage could result.
Agitator
stops rotating,, Use the crevice tool, combination brush or Handi-Mate Jr.®.
Vacuum
iiiiiii
Applicable
WARNING
zle along a baseboard.
in full upright
t( =
i iiiiiii
Carpet edges
Guide either side or the front of the noz-
Stairs
Set handle
Wails
For best cleaning results, keep the airflow
passage clear,,
Tipping
When using the attachments
keep the
extension hose release lever in the locked
Unplug the vacuum cleaner from the outlet
before checking,
position when possible° This helps to keep
the vacuum cleaner from tipping over
when stretching the hose_ If additional
hose is needed then unlock the release
lever and pull out additional hose. Use
caution not to tip over vacuum cleaner,.
12
MOTOR PROTECTION SYSTEM
To correct problem: Turn the vacuum
cleaner off and unplug the power cord from
the outlet to allow the vacuum cleaner to
Motor Protector
This vacuum cleaner has a motor protector
by-pass valve which automatically
opens to
provide cooling air to the vacuum cleaner
cool and the thermal protector to reset.
Check for and remove clogs, if
necessary,
See CLOG REMOVAL
motor when a clog prevents the normal
flow of air to the motor, tf the by-pass valve
section,
clogged
opens to prevent motor overheating
and
possible damage to the vacuum cleaner,
you will notice a change of sound as air
rushes through
(30) minutes and plug the vacuum
cleaner in and turn back on to see if
the motor
the valve opening.
To correct problem:
SHOOTING
section.,
OVERLOAD
when cleaning new
carpet, due to
reduced airflow
press reset button°
Motor Protector
(Behind Hose)
the dust bin quickly,, See the
TROUBLESHOOTING
section_
To reset: Push in
the agitator
overload protector
button,
Do not block motor protector°
protector,
PROTECTOR
To correct problem: Turn off and unplug
vacuum cleaner, remove obstruction, then
caused by the
attachments
Thermal
Protector
This vacuum cleaner
has reset.
The agitator motor has built-in protection
against motor damage should the agitator
jam,, If the agitator slows down or stops, the
agitator overload protector shuts off the
agitator motor,, The vacuum cleaner motor
will continue to run,,
protector may open
when using
attachments
or
Note:
protector
AGITATOR MOTOR
See the TROUBLE-
NOTE: The motor
themselves
or by
new carpet lint filling
Also check and replace any
filters, Wait approximately
thirty
has a thermal
which automatically
Agitator
OveHoad
Button
Motor
Reset
If the problem
trips to
persists, have the vacuum cleaner
serviced
by a Sears or other qualified
technician.
protect both the vacuum cleaner and the
agitator motor from overheating, if a clog
prevents the normal flow of air to the motor,
the thermal protector turns the motor off
automatically, This allows the motor to cool
in order to prevent possible damage to the
vacuum cleaner,
13
DIRT SENSOR
The electronic dirt sensor is a feature
which will detect particles as they pass
through the vacuum cleaner,,
The dirt sensor indicator is located on the
front of the vacuum cleaner above the dust
bin.
Dirt_
Sensor
A red light indicates dirt is being picked up
by the vacuum cleaner.
TO CLEAN DIRT SENSOR OPTICS
The dirt sensor optics consist of two optic
cells located inside the dust bin port.,
Occasionally, it may become necessary to
clean the two optic cells to assure
maximum performance.. It is recommended
the optic cells be cleaned:
• When the red light stays on
continuously.
, When dirt or dust adheres to the
optic cells.
, Whenever the dust bin is emptie&
To clean the sensor, wipe the optic cells
with a soft, dry cloth.. Never use cleaners
or liquids as they can help speed the
recoating of the optic celis and make it
necessary to clean them much sooner than
normal. The dirt sensor area can be
reached by removing the dust bin.
OPERATION
As you vacuum, the red indicator light will
come on and stay on as Iong as the sensor
detects a high concentration of particles
passing through the vacuum cleaner.
i
i
i iii,
ii1,1,ii
Optic
iiiii
kWARNING
Electrical Shock And Personal Injury
Hazard
Disconnect electrical supply before performing maintenance to the vacuum
cleaner. Failure to do so could result in
electrical shock or personal injury from
vacuum cleaner suddenly starting.
nn n innn,ul
14
Cells
VACUUM CLEANER
CARE
AJways follow alt safety precautions when
performing maintenance to the vacuum
cleaner.
WARNING
Electrical Shock And Personal Injury
Hazard
Disconnect electrical supply before
servicing
or clean+ng the vacuum
cleaner. Failure to do so could result in
electrical shock or personal injury from
vacuum cleaner suddenly starting,
Gather the cord and wrap it loosely around
the upper and lower cord hooks. Lock power
cord plug onto the power cord.
- IbWARNING
Electrical Shock And Personal Injury
Hazard
Store the vacuum
cleaner _n a dry,
indoor area, on
the floor with the
handle locked in
the upright potation+
Wrapping the cord too tightly puts
stress on the cord and can cause
cord damage. A damaged cord is an
electrical shock hazard and could
cause personal injury or damage.
Unplug cord from wall outlet. DO NOT drip
water on vacuum cleaner+
CAUTION
Do not use attachments if they are
wet. Attachments used in dirty areas,
such as under a refrigerator, should
not be used on other surfaces until
they are washed, They could ieave
marks.
Clean extenor umng a clean, soft cloth that
has been dipped in a solution of mild liquid
detergent and water, then wrung dry. Wipe
dry after clean+ng.
To reduce static etectricity and dust buildup, wipe outer surface of vacuum cleaner
and attachments.
Wash attachments in warm soapy water,
nnse and air dry. Do not clean in dishwasher.
15
,1111 ii
i, iiiiiiii
Hold dust bin
over a trash
container.
iii
WARNING
Always
unplug
power
cord
from
trical outlet before performing
vice on vacuum cleaner.
.........................
Handle -_
elec-
Press the dust
bin door
release button
downward to
release the
door.
any ser-
i
TO REMOVE DUST BIN
Lift dust bin handle located
the dust bin
Dust Bin
at the top of
Dust Bin -1
Door
Release
Button
The door will
swing open
and the debris
will fall into the
trash container.
Pull the handle up
and lift dust bin up
and out of the vacuum cleaner,.
Shake
Dust _
Dust Bin
Emptying
Door
the dust
bin to release and debris
in the filter element.
Bin
Note:
Remove any clogs that might be located in
the suction port or filter port area.
See PRIMARY
AND CLEANING
that might hang
FILTER
REMOVAL
section..
After the dust bin is
empty of debris,
firmly close the
door., Make sure
Suet_
you hear a "click"
sound to indicate
that the door is fully
latched°
Door
TO EMPTY DUST BIN
Before removing debris from dust bin it is a
good idea to move the dust bin filter cleaning lever back and forth several times.
Moving the lever
back and forth
loosens the dust
and debris that
has attached
itself to the filter
element inside
the dust bin,
TO REPLACE
DUST BIN
Place dust bin back
into vacuum cleaner
by inserting the bottom first and tilting
back with the dust bin
handle raised.
Dust BM--_.
Filter
"_
Cleaning
Lever
Lower the dust
bin handle to
lock dust bin in
)lace.
Handle
Rotate
tion.
dust bin handle to the vertical
Door
Latch
posi-
16
noticeable
"click" should
be heard.
Remove primary
filter by turning
it counterclock-
IbWARNING
Electrical
Hazard
Shock And Personal
Injury
wise and pulling
out (See arrows
on bottom of fil-
Unplug power cord from electrical outlet. Do not operate the vacuum cleaner
without the primary or exhaust filters. Be
sure the filters are properly installed to
prevent motor failure and or electrical
shock°
Allow the filter to dry for 24 hours
before putting it back into the vacuum
cleaner°
and clean
when dirty,.
TO REMOVE
PRIMARY
When cleaning the filter no longer
restores vacuum cleaner's suction to full
FILTER
Remove the dust bin assembly as outlined
in the DUST BIN CLEANING section.
power you need to replace the filter.
Note: See PARTS AND
for the filter number_
Make sure dust bin is free of debris before
removing lid and filter.. Rotate dust bin lid
assembly counterclockwise
as indicated on
the lid and lift off.
TO REPLACE
For Emptying
FEATURES
PRIMARY
FILTER
To replace filter, insert it over cleaning
cams as far as it will go. Make sure rubber
seal at top of filter is flush against filter supporter, turn filter clockwise to secure into
Turn This Direction
To Open
Cam
ter),, Rinse with
water only as
needed, do not
use any detergent or soap,,
PRIMARY FILTER
Check primary filter frequently
Dust Bin
Lid
Closed
place° Filter will click and snap when it is
secured into place.
(For Use)
Note: Under normal use and care, your filter can be expected to last up to 5 years.
Rubber
Cams
Open
(For Emptying)
Supporter
While holding dust bin lid over a trash container grasp primary filter, rotate counterclockwise and lift off,
Dust Bin
Lid
Clean primary filter by gently tapping over a
trash container_ Tap on several sides to
ensure best cleaning.
Re-assemble dust bin lid to dust bin, Insert
into vacuum cleaner and secure with dust
bin handle.
17
TO REPLACE
DUST BIN LID
Rotate
Replace dust bin lid assembly by placing
back on dust bin with marks on the lid
aligned
as shown
Emptying)
under Open
downward
Closed
(For
Insert dust bin
into vacuum
cleaner_
Turn This Direction
For Use
while pressing
so marks align as shown above
(For Use).
on the back of the dust bin.
To Close
clockwise
Open
(For Emptying)
Lower the dust
bin handle to
lock dust bin in
Handle
place.
A noticeable
"click" should be heard,
Closed
(For Use)
The HEPA exhaust filter must be replaced
when dirty_ It should be replaced regularly
The foam seal
of the filter
placed
the vacuum
depending
body.
on use conditions.
The filter CANNOT
be washed
lose its dust trapping
Note:
See PARTS AND
for the exhaust
Remove
against
should
be
cleaner
as it will
Seal Against
Vacuum Cleaner
Body
ability.
Exhaust
Filter
FEATURES
filter number,.
exhaust
filter cover by pressing
the release tab on the cover and rotating
out from vacuum cleaner.
Filter
Remove
the filter
Exhaust
Filter
Cover
Replace the exhaust filter cover by placing
bottom tabs in slots and rotating in until
cartridge
from cover.,
cover snaps
Place new filter cartridge into cover making
sure that airflow arrow on side of cartridge
points into cover,,
18
into place,,
4, Remove the light
bulb by pulling
straight ouL
,WARNING
Electrical
Hazard
Shock Or Personal
Injury
Disconnect
electrical supply before
performing
maintenance
to the
vacuum cleaner. Failure to do so
could result in electrical shock or
personal injury from the vacuum
cleaner suddenly starting.
5. To replace the
light bulb carefully
insert fully into
sloto
j i HIIII ii1!
TO REMOVE LIGHT BULB
1. Disconnect
outlet.
power
cord from electrical
2. Press handle release
pedal and lay
vacuum cleaner back,.
F/at
Screwdriver
Stots_
Headlight
Lens
Note: See PARTS AND
bulb number.,
i
ii
FEATURES
for
i1,11
IAC*OT,O.
| Do not plug in or turn on until the vacu-
3. Pry light
lens out at
slots as shown
on both sides,,
Rotate lens up
and lift off.
lure
cleaner is completely
6. To replace light
lens, place tab at
front of lens into
slot,. Rotate lens
down and firmly
snap into place.
IbCAUTION
Do not use a bulb rated over 9W (13V)0
During extended use, heat from the
bulb could overheat surrounding plastic parts_
19
reassembled.
To maintain efficient cleaning, the agitator
must be kept free of carpet fiber, string, or
hair build-up After every 7 to 10 uses,
unplug and turn vacuum cleaner over and
check agitator for fiber and hair build-up,
Use scissors to remove any build-up entangled around the agitator.
Always follow all safety precautions when performing maintenance to the vacuum cleaner.
Plug in the vacuum cleaner and turn it on.
Stretch the extension hose to maximum
length and then allow the hose to return to its
natural length..
|WARNING
Electrical
Hazard
Shock
Or Personal
Injury
Original
Hose
Storage
Position
Disconnect
electrical
supply before
performing maintenance
to the
vacuum cleaner. Failure to do so
could result in electrical shock or
personal injury from the vacuum
cleaner suddenly starting.
Hose
If the vacuum cleaner does not seem to have
adequate suction, first check if the dust bin is
full or if a filter is clogged. See DUST BIN
CLEANING and FILTER REPLACEMENT.
Collar
Re-insert the hose into the opening on the
body from which it was removed. Press firmly
to assure connection. Rotate hose release
lever clockwise to the locked position.
If the dust bin and filter areas are free of
clogs, check the extension hose_ Rotate the
extension hose release lever counterclockwise to release extension hose.
If the dust bin and filter areas and the hose
areas are free of clogs, disconnect the nozzle hose from the wand holder and check the
nozzle for clogging..
IbWARNING
_"'_._._-_Ho/der
Personal Injury Hazard
DO NOT place hands or feet underneath
the vacuum cleaner at any time.
..
Release
Lever
Clean the agitator according to the instructions in the AGITATOR CLEANING section.
_,
_ Nozzte
Hose
Remove the lower end of the extension
Return the vacuum cleaner to the upright
position before plugging into an electrical
outlet.
hose
from the wand holder by grasping the hose
collar, twisting, and pulling straight up.
20
Review this table to find do-it-yourself
solutions
needed, other than maintenance described
Sears or other qualified service agent,
for minor performance
in this Owner's
problems° Any service
Manual, should be performed
I
by a
..............................................
Vacuum cleaner
won't run_
1.
Unplugged
at wail outlet
1_ Plug in firmly, select the desired set-
ting on the touch controi.
2o Tripped circuit breaker/blown
at household
service
fuse
2. Reset circuit breaker or replace fuse,,
panel
3. Thermaf protector tripped
3. Allow vacuum cleaner to cool, then
4. Defective wall outlet
4.
reset thermal
protector
Check with a good apptianceliamp,
have properly serviced
Handle screw not tight
Poor job of dirt
pick-upo
5,. Tighten screw
1. Full or clogged dust bin
1,. Empty dust bin,
2. Wrong pile height setting.
3o Worn agitator
2,, Adjust setting
3o Take to your nearest Sears
Service Center:
4,, Clogged nozzle
4.
5.
6.
5. Check for clogs,,
Clogged hose
Hole in hose
7. Hose not inserted
8,. Motor protection
fully
system acfivated
Check CLOG REMOVAL
6.
Take to your nearest Sears
Service Center
7.
Insert hose fully,
Check for clogs,
8.
(change of sound)
9. Dirty filters
9. Change filters
Vacuum Cleaner picks up
moveable rugs or
pushes too hard°
1. Wrong pile height setting
1,r Adjust setting,
Light won't work.
1. Burned out lightbulb
1. Change light bulb.
Agitator does not turn.
1. Handle in full upright position,
1. Move handle from upright position
2. Agitator Overload tripped
3. Thermal protectortripped.
2. Reset Agitator Overload.
3. Allow vacuum cleaner to cool, then
reset thermal protector,
i.
1. Check ATTACHMENTS for fuzz, lint,
pet hair or other debris.
2. Check CLOG REMOVAL and dean
hose.
Airflow restricted
with attachment use.
Sound changes,,
Attachment use restricts air f!ow
2. New carpet fuzz dogged air path
Difficulty adjusting pile
height setting
1,, Vacuum cleaner not in properupright
position.
t.
Dirt Sensor, will not work
1o Dirtyoplic ceils
I_ Clean optic ce!is
21
Place vacuum cleaner in the locked
upright position, tilt the vacuum cleaner back slightly and adjust pile height.